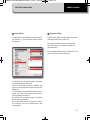
1
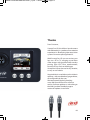
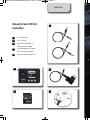
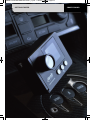
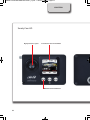
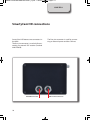
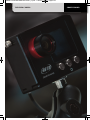
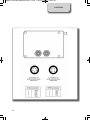
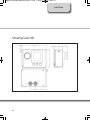
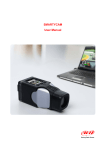
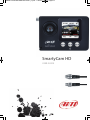
SMARTYCAM HD MANUALE ENG _Layout 1 24/07/13 20.40 Pagina 2
SmartyCam HD
USER GUIDE
SMARTYCAM HD MANUALE ENG _Layout 1 24/07/13 20.40 Pagina 3
SmartyCam HD
02
04
GETTING STARTED
12
THE VIDEO CAMERA
26
THE CONfIGURATION SOfTWARE
34
THE TRACK MANAGER
44
TECHNICAL DRAWINGS
SMARTYCAM HD MANUALE ENG _Layout 1 24/07/13 20.40 Pagina 4
Thanks
Dear Customer,
SmartyCam HD, the AiM on board camera
with data overlay, is a product of our extensive
experience in developing data acquisition
systems for motorsport applications.
With SmartyCam HD you can review your
laps on a PC or TV, merging crystal clear
video images with graphical data overlays
coming from GPS, from accelerometer,
from the ECU or from an AiM logger.
SmartyCam HD can be used in any situation,
on any sort of vehicle.
Acquired data is overlaid on to the video in
real time, with a multitude of gauge choices,
all configurable by the user.
We recommend regularly checking
www.AIM-Sportline.com for software
and/or firmware updates or subscribing to
the AIM-Sportline faceBook page to
receive all updates in real time.
03
SMARTYCAM HD MANUALE ENG _Layout 1 24/07/13 20.40 Pagina 5
ChApTer 1
What is SmartyCam hD?
SmartyCam HD is a video recorder
developed for motorsports environments. SmartyCam HD
automatically overlays graphical
indications of the vehicle data to an
HD video.
Its components have been specifically designed to meet the
demands of the extremes of
motorsports environments:
specialty lenses, CMOS sensor, reliability under vibrations, connectivity
to the vehicle data, and capability
to start and stop video recording
automatically are among the
features customized for our sport.
Which data does it show?
Data shown in overlay come from
your vehicle ECU, from the internal
accelerometers, from GPS and from
datalogger analog/digital inputs.
It is also possible to display the map
of the track and personal images
(i.e. logos).
04
Is it possible to configure the graphical overlays?
You can choose from a wide library
of graphical overlays and set the
position of each of them.
End of scales and measure units can
also be easily defined using the
SmartyManager software included
in the kit.
To which AiM systems can
SmartyCam hD be connected?
It is possible to connect SmartyCam
HD, through CAN network, to all the
AiM Loggers, that is to say, to MXL,
EVO, MyChron, SoloDL and ECU
Bridge.
Does it work in a stand alone
mode?
Yes, SmartyCam HD has an internal
battery and can work also without
being connected to the AiM CAN
network.
Of course, in this case, only lateral
acceleration coming from Smarty-
SMARTYCAM HD MANUALE ENG _Layout 1 24/07/13 20.40 Pagina 6
GeTTING STArTeD
Cam HD’s internal sensor can be
shown in overlay.
If a GPS receiver is connected,
SmartyCam HD can show also the
position on the track, speed and lap
times.
Is it possible to connect more
SmartyCam hD cameras on the
same CAN network?
Yes, every SmartyCam HD has its
own configuration and automatically retrieves the data it needs
from the network, without interfering with the others.
Is it possible to synchronize video
and data recorded by the loggers?
Yes. Using the new RaceStudio3,
ready in the second half of 2013, it
will be possible to automatically
synchronize video and data, and
show them on the same dedicated
view.
SMArTYCAM hD
Which video format does
SmartyCam hD generate?
SmartyCam HD generates .mov files
with H264 compression.
You can choose from three different
compression levels (low, medium,
high) and two different frame rates
(25 and 30 frames per second).
Does SmartyCam hD start and
stop automatically?
Yes. SmartyCam HD offers different
logics for starting and stopping
video recording.
Acceleration or speed can be used
for triggering when to start and to
stop the activities.
You can choose your preference
using the on-board Menu or
through SmartyManager software.
RaceStudio2 enables you to manually synchronize data and video.
05
SMARTYCAM HD MANUALE ENG _Layout 1 24/07/13 20.40 Pagina 7
ChApTer 1
SmartyCam HD kit
includes:
1
- SmartyCam HD
2
- SD Card 4GB
3
- External CAN Cable or
3
External power cable
4
- 110/220v Battery Charger
with AC power adapter
5
06
- Software RaceStudio2 CD
1
4
2
5
SMARTYCAM HD MANUALE ENG _Layout 1 24/07/13 20.40 Pagina 8
GeTTING STArTeD
SMArTYCAM hD
07
SMARTYCAM HD MANUALE ENG _Layout 1 24/07/13 20.41 Pagina 9
ChApTer 1
SmartyCam HD
high performance optics
Front mount color TFT viewfinder
Multifunctional pushbuttons
08
SMARTYCAM HD MANUALE ENG _Layout 1 24/07/13 20.41 Pagina 10
GeTTING STArTeD
Aluminum Body
GpS05B Connection
CAN - power Connection
SMArTYCAM hD
Watertight door latch design
SD and USB capable
09
SMARTYCAM HD MANUALE ENG _Layout 1 24/07/13 20.41 Pagina 11
ChApTer 1
SmartyCam HD connections
SmartyCam HD features two connectors in
the back.
The four-pin connector is used only for connecting an external GPS receiver (module
AiM GPS05B).
GpS05B Connection
10
The five-pin connector is used for connecting an external power and the CAN net.
CAN - power Connection
SMARTYCAM HD MANUALE ENG _Layout 1 24/07/13 20.41 Pagina 12
SMArTYCAM hD
GeTTING STArTeD
GPS05B
GPS05B
11
SMARTYCAM HD MANUALE ENG _Layout 1 24/07/13 20.41 Pagina 13
ChApTer 2
Power On/Off
Battery Level
SmartyCam hD NOT connected to an
external power source.
SmartyCam HD has an internal Lithium ion
battery, which provides 1.5 hours of life, so
SmartyCam HD may be used with or without external power.
The level of the battery is always shown on
the display.
After using SmartyCam HD without
external power, please do not forget to
charge the internal battery, using the
battery charger included in the kit.
In order to turn it on push the center
pushbutton.(1)
1
12
SMARTYCAM HD MANUALE ENG _Layout 1 24/07/13 20.41 Pagina 14
The VIDeO CAMerA
SMArTYCAM hD
In order to turn it off push the center pushbutton. SmartyCam HD can be set to
automatically turn itself Off after a period
of no activity (from five minutes to two
hours). In order to configure this feature,
select:
MeNU>>SeTTINGS>> AUTO pOWerOFF
and set the desired value
When the battery is too low, a warning
message appears for a few seconds on the
video.
The video file itself is closed and the
camera automatically shuts down.
13
SMARTYCAM HD MANUALE ENG _Layout 1 24/07/13 20.41 Pagina 15
ChApTer 2
SD card insert and removal
The housing is under the lateral door (close
carefully after insertion).
A microswitch detects when you open the
door, and the video file is automatically
closed in less than one second, allowing for
safe removal of the SD card.
Recording Support
SmartyCam HD kit includes a 4 GB SD card
and can support up to 128 GB.
14
SMARTYCAM HD MANUALE ENG _Layout 1 24/07/13 20.41 Pagina 16
SMArTYCAM hD
The VIDeO CAMerA
SmartyCam HD buttons and display
SmartyCam HD is managed using the
three buttons located under the display:
1, 2 and 3 in the image.
1
2
3
The functions of each button are shown
on the LCD screen display, immediately
above each button.
All SmartyCam HD pages are made up of
three parts:
• The “Battery and Memory Status” field is
always displayed at the top of the page;
• Specific info is displayed in the middle of
the page;
• The functions of the buttons are
displayed on the lower part the page.
15
SMARTYCAM HD MANUALE ENG _Layout 1 24/07/13 20.41 Pagina 17
ChApTer 2
SmartyCam HD battery charge
SmartyCam HD is supplied with
a 1040mAh 3.7 Volt internal rechargeable
lithium battery.
It can be charged using either the cable
connected to the five-pin connector or the
USB battery charger inserted into the USB
port, as shown in the following image:
When the battery is fully charged, the LED
is GREEN
The battery charge status is shown on the
display.
When the battery is charging by USB cable,
an internal LED becomes RED
16
SMARTYCAM HD MANUALE ENG _Layout 1 24/07/13 20.41 Pagina 18
The VIDeO CAMerA
SMArTYCAM hD
SmartyCam HD On/Off
SmartyCam HD can be switched on in two
ways:
SmartyCam HD can be switched off in the
following ways:
• Pressing the center (“2”) button
• Pressing the center (“2”) button any time
the “Off” option is available
• Connecting the external power cable to
SmartyCam HD.
As soon as the camera detects the 12V
power on pin three of the five-pin connector (see scheme at page 44) it switches on.
• Pressing the center (“2”) button for ten
seconds.
This force-shutdown option is to be used
ONLY in case the camera locks up.
• Automatic switch-off: if idle for a fixed
amount of time (no button pushed, no acceleration/speed detected), SmartyCam HD
will switch off automatically.
This time period can be set by selecting
MeNU>>SeTTINGS>>AUTO pOWerOFF
Available options are: 15 min, 30 min, one
hour, and two hours.
2
17
SMARTYCAM HD MANUALE ENG _Layout 1 24/07/13 20.41 Pagina 19
ChApTer 2
SmartyCam HD
connected to an external power source
In case SmartyCam HD is connected to an
external 12V power or to the AiM CAN Network, it works in a fully automatic way: it
turns itself ON and Off when the external
power drops down.
The internal battery is charged during the
activity.
Start/Stop recording
There are three ways for starting and stopping video recording:
n Manually
push the pushbutton REC to start recording
and the pushbutton STOP to stop recording.
n Depending upon the acceleration
SmartyCam HD has an internal, three-axis
accelerometer that controls the start/stop
recording.
It is possible to define three different
thresholds: Low, Medium and High.
These thresholds may be configured by
selecting
MeNU>>SeTTINGS>>AUTO STArT reC
18
SMARTYCAM HD MANUALE ENG _Layout 1 24/07/13 20.41 Pagina 20
The VIDeO CAMerA
SMArTYCAM hD
The video file is closed when the acceleration remains under a threshold for a period
of time.
This time period may be configured by
selecting
MeNU>>SeTTINGS>>AUTO STOp reC
After having installed your SmartyCam HD
on the vehicle, the accelerometers must be
calibrated by selecting
MeNU>>SeTTINGS>>ACCeL CALIBr
Then click “CALIBr”
19
SMARTYCAM HD MANUALE ENG _Layout 1 24/07/13 20.41 Pagina 21
ChApTer 2
n When SmartyCam hD is connected to
an AiM CAN Network and the logger
starts recording:
SmartyCam HD starts and stop recording in
tandem with the logger, in dependence
upon the logic implemented in the logger.
All AiM loggers begin recording at speeds
higher than 10 km/h or rpm higher than a
500 rpm threshold.
To disable the automatic start/stop video
recording from accelerometers or/and from
the logger signal, select
MeNU>>SeTTINGS>>AUTO STArT reC
>>DISABLe
20
SMARTYCAM HD MANUALE ENG _Layout 1 24/07/13 20.41 Pagina 22
The VIDeO CAMerA
SMArTYCAM hD
21
SMARTYCAM HD MANUALE ENG _Layout 1 24/07/13 20.41 Pagina 23
ChApTer 2
Video recording
Video recording can start and stop manually or automatically. Please, ensure that
the SD is properly inserted into the slot and
that the door is properly closed.
Note that the system stops recording as
soon as you open the door. On the other
side if you forget to close the door when
the recording starts, it tries to record
anyway.
n Manual recording
At power on, if the SD card is inserted and
the door closed, SmartyCam HD display will
show this page:
To start recording, press “reC”:
SmartyCam HD will show this page:
To stop recording, press “STOp”:
SmartyCam HD will switch to “Online
Status”
22
SMARTYCAM HD MANUALE ENG _Layout 1 24/07/13 20.41 Pagina 24
SMArTYCAM hD
The VIDeO CAMerA
n Automatic recording
• In slave mode (SmartyCam HD connected to an AiM logger).
The logger transmits a ‘Start Recording’ signal to SmartyCam HD as soon as it starts
recording the data.
• In stand alone mode (SmartyCam HD not
connected to any AiM logger).
SmartyCam HD can start and stop the
video recording automatically, depending
upon the accelerations it detects.
To enable the Automatic Start/Stop mode,
select:
MeNU>>SeTTINGS>>AUTO STArT reC
This generally happens when it detects rpm
or a speed higher than 10 km/h.
The logger transmits a ‘Stop Recording’
signal when it stops recording data.
This generally happens when the speed
goes under 10 km/h, or when RPM turn
Off.
And select the acceleration threshold value
at which recording starts. You have three
possibilities:
Low acceleration (0.2 G)
Medium (0.4 G)
High (0.8 G).
• After receiving the ‘Stop Recording’ signal,
SmartyCam HD continues recording for a
period from five seconds to five minutes.
To configure this setting, select:
• When SmartyCam HD does not detect acceleration, it will stop recording after the
delay (from five seconds to five minutes)
set by selecting:
MeNU>>SeTTINGS>>AUTO STOp reC
MeNU>>SeTTINGS>>AUTO STOp reC
23
SMARTYCAM HD MANUALE ENG _Layout 1 24/07/13 20.41 Pagina 25
ChApTer 2
SmartyCam HD menu
Pressing “MeNU” shows the following menus:
n GpS STATUS
Shows the level of the GPS satellites signals.
It is useful when SmartyCam is not connected to any AiM Dash.
n SeTTINGS
for setting the configuration parameters.
n TrACkS VIDeO FILe
Shows the video files recorded inside the
SD Card
Pressing “SeTTINGS” shows the following options:
24
n AUTO pOWerOFF
Enables/disables automatic power-off of
the camera after a fixed period of inactivity
n LANGUAGe
Chooses the desired language.
n TIMe SeTTINGS
Chooses the time and date format, the time
zone and enables or disables daylight savings time. Default setting is Greenwich
Time.
SMARTYCAM HD MANUALE ENG _Layout 1 24/07/13 20.41 Pagina 26
SMArTYCAM hD
The VIDeO CAMerA
n CONF LOAD
Allows configuration files to be loaded from
the SD. You have to select from:
• Overlay
• Tracks
• Parameters
n INFO
Shows information about the camera and
its software
n VIDeO SeT
Sets some Video options:
Video quality: High, Medium, Low
frame rate :25, 30, 15
Open/closed roof mode
(choosing the spot light settings)
n FLIp OVer
Reverses the video image (i.e. when the camera is affixed to a roll-bar).
n ACCeL CALIBr
Calibrates the 3D accelerometer: samples
acceleration and tunes SmartyCam frame.
n AUTO STArT reC
Enables automatic recording.
n AUTO STOp reC
Enables automatic stop of recording.
25
SMARTYCAM HD MANUALE ENG _Layout 1 24/07/13 20.41 Pagina 27
ChApTer 3
SmartyCam HD configuration SmartyManager2
software
SmartyManager 2 software lets you
configure your SmartyCam HD. You can:
• Create/modify/delete overlay
configurations.
• Transmit track maps.
• Download new firmware releases from
our site www.Aim-Sportline.com and
upgrade SmartyCam HD.
26
• Download movies from SmartyCam to
your PC.
• View SmartyCam HD movies.
This software is provided on a CD included
in the SmartyCam HD or can be downloaded from www.Aim-Sportline.com,
“Download” area.
SMARTYCAM HD MANUALE ENG _Layout 1 24/07/13 20.41 Pagina 28
The CONFIGUrATION SOFTWAre
SMArTYCAM hD
When you run SmartyManager2, a first
page appears, divided in two sides.
In the left side, you can create different
folders, in order to better organize your
configurations.
Simply push the [+] pushbutton in order to
create a new one.
When you connect a SmartyCam HD, or
insert an SD card in your PC, they both
appear in the left side of your screen.
In the right side of the screen you can see
all the configurations of the selected folder.
Please, click on the desired one for editing it.
In the upper left position of the screen you
can see a pushbutton that lets you swap
between different features:
CONfIGURATIONS/TRACKS/ONLINE/
MOVIES/PREfERENCES
27
SMARTYCAM HD MANUALE ENG _Layout 1 24/07/13 20.41 Pagina 29
ChApTer 3
Create a new configuration
In the CONFIGUrATIONS page push
“NeW”, or click on the [+] pushbutton.
Right of the preview panel available graphic objects are grouped in “Sets” ;
double click on the desired object to select
it or drag and drop it in the preview area
fill in the layer of the loaded object that appears down on the left of the software window.
When the panel shows the desired configuration, push “SAVE and CLOSE” for saving
the configuration.
28
for transmitting the new configuration to
your SmartyCam HD, go back to the “Configurations Page” and drag and drop it to
the camera.
You can also use a snapshot of the image
of SmartyCam HD, in order to better understand how the graphical controls fit in
the image.
Please, start the “ONLINE” feature and
push “SnapShot”: the image will be immediately saved in the list of possible background images
SMARTYCAM HD MANUALE ENG _Layout 1 24/07/13 20.41 Pagina 30
The CONFIGUrATION SOFTWAre
SMArTYCAM hD
Insert track map
As shown here below, in addition to “Set” layers others are available to manage the
Map and the logos to be inserted in the
configuration.
After having selected the Track map object,
you can resize and move it. The track shape
will fit this area
Please, NOTE: with this feature, you ONLY
define the space where the track map will
be shown. You have then to transmit the
tracks information to your SmartyCam HD,
using the Track Manager feature, as explained in the next chapter.
29
SMARTYCAM HD MANUALE ENG _Layout 1 24/07/13 20.41 Pagina 31
ChApTer 3
Insert a logo
“Logos” button, located at the top of the
Overlay Toolbox, lets you add, modify and
delete custom logos and images from
SmartyManager2 and thereby from
SmartyCam HD overlay.
Supported image formats are: .png, .jpg
.bmp and .tga but “.Png” format is the only
compatible with transparency effect.
30
Pressing “Logos”, you can choose the logo
to show as overlay.
for adding a new logo push the proper pushbutton.
SMARTYCAM HD MANUALE ENG _Layout 1 24/07/13 20.41 Pagina 32
SMArTYCAM hD
The CONFIGUrATION SOFTWAre
Modify or delete an existing configuration
for modifying or deleting an existing configuration, select the desired configuration
to be modified and double click on it:
then, proceed like in the creation of the
configuration.
Transmit a configuration to SmartyCam HD
You can transmit a configuration to
Smartycam HD in two different ways:
n Connect SmartyCam hD to the pC:
n Use SD card:
• Select the desired data overlay clicking on
it and simply drag and drop on the
SmartyCam HD Icon in the left side of the
display.
• Insert the SD card into your PC.
An Icon will appear on the left side of the
display.
• SmartyCam will automatically select that
configuration.
• Drag and drop the desired data overlay to
the SD Card Icon.
• Insert the SD card into your SmartyCam.
• Go to “Settings / Conf. load” option and
select “Smarty Conf” following the requests.
In case you connect your SmartyCam HD to
an AiM logger, you need to configure the
logger using AiM Race Studio2 software.
31
SMARTYCAM HD MANUALE ENG _Layout 1 24/07/13 20.41 Pagina 33
ChApTer 3
On line view
If you select the SmartyCam HD Icon on the
left side of your screen, the online view will
appear on the right side of your screen.
32
SMARTYCAM HD MANUALE ENG _Layout 1 24/07/13 20.41 Pagina 34
SMArTYCAM hD
The CONFIGUrATION SOFTWAre
Viewing SmartyCam HD videos
Videos recorded on SmartyCam HD are in
.mov format with H.264 codec.
To view the videos on your PC remove SD
from SmartyCam HD, place it in the PC
reader and manage it as an USB
peripheral.
You will find your videos in the “Video” folder and can view them, after having copied
them to your PC, using Smarty Manager2
or any video player you wish.
33
SMARTYCAM HD MANUALE ENG _Layout 1 24/07/13 20.41 Pagina 35
ChApTer 4
Track Manager
feature
Using Track Manager, you can update, modify, transmit and receive to and from SmartyCam HD the coordinates of finish line and
split points of all the tracks where you are
going to run.
1
8
When opening the software, if there is no
system connected to your PC via USB cable,
you will see the screen shown.
As you can see, the screen is divided into
two parts. On the left you see the track list,
arranged by country of origin.
If available, you will see the track layout and
the type of vehicle that usually race on the
track: car, motorcycle or kart.
On the right side of the screen, you will find
a big picture of the track.
1
Track management command
2
Selection window for dynamic filters
3
Track type: car, bike, karts
4
Track data manager
5
Track shape, with starting line
and split points position
6
Small track shape
7
Track selection
8
Open/Close Country track data
34
7
SMARTYCAM HD MANUALE ENG _Layout 1 24/07/13 20.41 Pagina 36
The TrACk MANAGer
2
3
4
SMArTYCAM hD
5
6
35
SMARTYCAM HD MANUALE ENG _Layout 1 24/07/13 20.41 Pagina 37
ChApTer 4
Filters in track data base management
In order to see only tracks you need, you
can filter the list of tracks in different ways.
The filters can be static (1) (i.e. recorded and
used every time you use Track Manager), or
dynamic (2) (i.e. not saved when quitting
the program.
1
36
2
SMARTYCAM HD MANUALE ENG _Layout 1 24/07/13 21.01 Pagina 38
SMArTYCAM hD
The TrACk MANAGer
n Static Filters
n Dynamic Filters
A static filter is activated by pressing the filter button [1]. The window shown below
will appear.
The dynamic filters are activated in the box
at the top left of the screen [2]:
The dynamic filters allow you to further
filter the tracks by combining different
characteristics.
for example, filtering using "Spain kart," will
show only kart circuits in Spain.
It will allow you to select nations, the type
of vehicle and type of circuit.
The lists show only countries, vehicles and
types of circuit present at least once in the
database.
for example, if the database does not include any track in Germany, this country
will not appear in the list.
By default, all countries, types of vehicle
and tracks are enabled.
If you are interested in only the car tracks,
for example, you must disable karts and
motorcycles.
37
SMARTYCAM HD MANUALE ENG _Layout 1 24/07/13 21.01 Pagina 39
ChApTer 4
How to add a new track to the PC database
The official AiM track Database is continuously expanding.
To update your PC database, you can import the new tracks by selecting
OpTIONS / IMpOrT TrACkS FrOM AIM
WeBSITe
To add a new track
1)) Press the “New” button
1
2) Enter the name of the track.
2
3) Enter the required information:
Country, Type of circuit (Closed, Oval or
Open) (asphalt, dirt, ice, water).
finally, using the icon buttons, set the type
of vehicle that usually run on the circuit:
Cars, Motorcycles or karts.
If you have already run a test on the track
and have downloaded data, you can associate the shape of the track, pressing the
“Load Shape” button.
38
3
SMARTYCAM HD MANUALE ENG _Layout 1 24/07/13 21.01 Pagina 40
SMArTYCAM hD
The TrACk MANAGer
You can now select the file “Gpk”, containing the GPS map of your track session.
Select the proper file, carefully checking
name, date and time of the files.
The shape of the track will appear, split in
different laps of the test. It is possible to
scroll through the different laps, to zoom,
to rotate the drawing.
After having selected the desired lap, push
“OK” to save the image of that lap.
That image will be used as a reference
shape for the future.
finish line coordinates are automatically
calculated but can be modified as desired
in one of the following ways:
Define the coordinate by hand (1) Position
the cursor on the desired point of the track
and click the pushbutton “Cursor Pos” (2)
In case of a point-to-point track, it is necessary to define the coordinates of the starting and finish line.
Push “OK” for saving the configuration.
1
2
39
SMARTYCAM HD MANUALE ENG _Layout 1 24/07/13 21.01 Pagina 41
ChApTer 4
How to modify track data in the PC database
Click the icon aside. The window containing
the track data will open..
40
SMARTYCAM HD MANUALE ENG _Layout 1 24/07/13 21.01 Pagina 42
The TrACk MANAGer
SMArTYCAM hD
How to read, write and delete tracks information
in Smartycam HD
Connect your system to your PC using the
USB cable.
The Track Manager screen will display two
lists: the tracks in your PC will be shown on
the left, and the tracks in SmartyCam HD
will be shown on the right.
41
SMARTYCAM HD MANUALE ENG _Layout 1 24/07/13 21.01 Pagina 43
ChApTer 4
n To transmit track information to
SmartyCam hD
n To read track information from
SmartyCam hD
Select tracks to be submitted by clicking on
the checkbox or on the name of the track.
Select tracks to be submitted by clicking on
the checkbox or on the name of the track
1
2
n Drag in the right panel or press the
button ►.
Tracks’ information are updated in
SmartyCam panel.
42
n Drag in the left panel or press the
◄ button.
Tracks’ information are updated in the
PC list.
SMARTYCAM HD MANUALE ENG _Layout 1 24/07/13 21.01 Pagina 44
The TrACk MANAGer
SMArTYCAM hD
n To erase a track’s information
from SmartyCam hD
Select the track to be erased in the right
panel and press "Delete Sel".
43
SMARTYCAM HD MANUALE ENG _Layout 1 24/07/13 21.01 Pagina 45
ChApTer 5
44
SMARTYCAM HD MANUALE ENG _Layout 1 24/07/13 21.02 Pagina 46
TeChNICAL DrAWINGS
SMArTYCAM hD
SmartyCam HD
Part Numbers
X94ShD002S0
SmartyCam HD with 2m CAN cable and 67°
standard lens
X94ShD004S0
SmartyCam HD with 4m CAN cable and 67°
standard lens
X94ShD001S0
SmartyCam HD with external power cable
and 67° standard lens
X94ShD002W0
SmartyCam HD with 2m CAN cable and 84°
wide lens
X94ShD004W0
SmartyCam HD with 4m CAN cable and 84°
wide lens
X94ShD001W0
SmartyCam HD with external power cable
and 84° wide lens
45
SMARTYCAM HD MANUALE ENG _Layout 1 24/07/13 21.02 Pagina 47
ChApTer 5
SmartyCam HD
46
SMARTYCAM HD MANUALE ENG _Layout 1 24/07/13 21.02 Pagina 48
TeChNICAL DrAWINGS
n Video format H.264 1280x700 pixel
@ 30 fps
n Accelerometer: three-axial ±5G
n Internal battery: 1.040 mAh
3.7 Volt lithium – rechargeable
n Battery charge: 700 mAh max 12V
n Battery life: three hours with
acquisition
n Temperature working range:
-20°C/+60°C
n Display size: 128*160 pixel
n Memory: 4 GB
(up to 128 Gigabytes supported)
n Memory consumption:
1 hour recording = about 4 GB HQ
n Aluminum body
n Dimensions: 87x63x48 mm
n Weight: 250g battery included
n Waterproof IP67
SMArTYCAM hD
Our web site aim-sportline.com is constantly
updated.
Please, constantly check it and download
the last versions of the firmware of your
products.
47
SMARTYCAM HD MANUALE ENG _Layout 1 24/07/13 20.40 Pagina 1
AiM Srl.
Via Cavalcanti, 8
20063 Cernusco S/N (MI)
Italia
Tel. (+39) 02.9290571
Made in Italy
www.aim-sportline.com