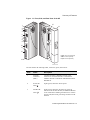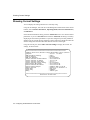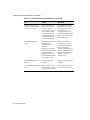
1
RoamAbout Access Point
User’s Guide
9032848-02
Notice
Notice
Cabletron Systems reserves the right to make changes in specifications and other information contained in this
document without prior notice. The reader should in all cases consult Cabletron Systems to determine whether
any such changes have been made.
The hardware, firmware, or software described in this manual is subject to change without notice.
IN NO EVENT SHALL CABLETRON SYSTEMS BE LIABLE FOR ANY INCIDENTAL, INDIRECT,
SPECIAL, OR CONSEQUENTIAL DAMAGES WHATSOEVER (INCLUDING BUT NOT LIMITED TO
LOST PROFITS) ARISING OUT OF OR RELATED TO THIS MANUAL OR THE INFORMATION
CONTAINED IN IT, EVEN IF CABLETRON SYSTEMS HAS BEEN ADVISED OF, KNOWN, OR
SHOULD HAVE KNOWN, THE POSSIBILITY OF SUCH DAMAGES.
© August 1999 by Cabletron Systems, Inc.
All Rights Reserved. Printed in the United States of America.
Cabletron Systems, Inc.
35 Industrial Way
Rochester, NH 03867
Order Number: 9032848-02
Cabletron, Cabletron Systems, clearVISN, DEChub, MultiSwitch, NetRider, RoamAbout, the RoamAbout
logo, and ThinWire are trademarks or registered trademarks of Cabletron Systems, Inc.
PC Card is a trademark of PCMCIA.
Microsoft, Windows, Windows 95, Windows 98, and Windows NT are either trademarks or registered
trademarks of Microsoft Corporation.
All other trademarks and registered trademarks are the property of their respective holders.
Web Site: http://www.cabletron.com/wireless
i
Notice
FCC Notice
This device complies with Part 15 of the FCC rules. Operation is subject to the following two
conditions: (1) this device may not cause harmful interference, and (2) this device must accept any
interference received, including interference that may cause undesired operation.
NOTE: This equipment has been tested and found to comply with the limits for a Class A digital
device, pursuant to Part 15 of the FCC rules. These limits are designed to provide reasonable
protection against harmful interference when the equipment is operated in a commercial
environment. This equipment uses, generates, and can radiate radio frequency energy and if not
installed in accordance with this user’s guide, may cause harmful interference to radio
communications. Operation of this equipment in a residential area may cause interference in which
case the user will be required to correct the interference at his own expense.
WARNING: Changes or modifications made to this device which are not expressly approved by
the party responsible for compliance could void the user’s authority to operate the equipment.
VCCI Notice
This is a Class A product based on the standard of the Voluntary Control Council for Interference
by Information Technology Equipment (VCCI). If this equipment is used in a domestic
environment, radio disturbance may arise. When such trouble occurs, the user may be required to
take corrective actions.
Industry Canada Notice
This digital apparatus does not exceed the Class A limits for radio noise emissions from digital
apparatus set out in the Radio Interference Regulations of the Canadian Department of
Communications.
Le présent appareil numérique n'émet pas de bruits radioélectriques dépassant les limites
applicables aux appareils numériques de la class A prescrites dans le Règlement sur le brouillage
radioélectrique édicté par le ministère des Communications du Canada.
ii
Notice
Taiwanese Notice — Class A Computing Device:
CE Notice — Class A Computing Device:
Warning!
This is a Class A product. In a domestic environment, this product may cause radio interference, in
which case the user may be required to take adequate measures.
Achtung!
Dieses ist ein Gerät der Funkstörgrenzwertklasse A. In Wohnbereichen können bei Betrieb dieses
Gerätes Rundfunkstörungen auftreten, in welchen Fällen der Benutzer für entsprechende
Gegenmaßnahmen verantwortlich ist.
Avertissement!
Cet appareil est un appareil de Classe A. Dans un environnement résidentiel cet appareil peut
provoquer des brouillages radioélectriques. Dans ce cas, il peut être demandé à l'utilisateur de
prendre les mesures appropriées.
iii
Notice
Declaration of Conformity
Addendum
Application of Council Directive(s):
Manufacturer’s Name:
Manufacturer’s Address:
European Representative Name:
European Representative Address:
Conformance to Directive(s)/Product Standards:
Equipment Type/Environment:
89/336/EEC
73/23/EEC
Cabletron Systems, Inc.
35 Industrial Way
PO Box 5005
Rochester, NH 03867
Mr. J. Solari
Cabletron Systems Limited
Nexus House, Newbury Business Park
London Road, Newbury
Berkshire RG13 2PZ, England
EC Directive 89/336/EEC
EC Directive 73/23/EEC
EN 55022
EN 50082-1
EN 60950
Networking Equipment, for use in a
Commercial or Light Industrial
Environment.
We the undersigned, hereby declare, under our sole responsibility, that the equipment
packaged with this notice conforms to the above directives.
Manufacturer
Legal Representative in Europe
Mr. Ronald Fotino
____________________________________________________
Mr. J. Solari
____________________________________
Full Name
Full Name
Principal
Compliance Engineer
____________________________________________________
Title
Managing
Director - E.M.E.A.
____________________________________
Title
Rochester, NH, USA
____________________________________________________
Newbury, Berkshire, England
____________________________________
Location
Location
iv
Notice
Getting Help
For additional support related to this device or document, contact Cabletron Systems using one of
the following methods:
World Wide Web
http://www.cabletron.com
http://www.cabletron.com/wireless
Phone
(603) 332-9400
Internet mail
[email protected]
To send comments or suggestions concerning this document, contact the
Cabletron Systems Technical Writing Department via the following
email address: [email protected]
Make sure to include the document Part Number in the email message.
Before calling Cabletron Systems, have the following information ready:
•
Your Cabletron Systems service contract number
•
A description of the problem
•
A description of any action(s) already taken to resolve the problem
•
The serial and revision numbers of all involved Cabletron Systems products in the network
•
A description of your network environment (layout, cable type, etc.)
•
Network load and frame size at the time of trouble (if known)
•
The device history (i.e., have you returned the device before, is this a recurring problem, etc.)
•
Any previous Return Material Authorization (RMA) numbers
v
Contents
Preface
Intended Audience . . . . . . . . . . . . . . . . . . . . . . . . . . . . . . . . . . . . . . . . . . . . . . . . . . . . . . . . . . . . . . xi
Terminology . . . . . . . . . . . . . . . . . . . . . . . . . . . . . . . . . . . . . . . . . . . . . . . . . . . . . . . . . . . . . . . . . . .xii
Associated Documents . . . . . . . . . . . . . . . . . . . . . . . . . . . . . . . . . . . . . . . . . . . . . . . . . . . . . . . . . . xiii
1 Introducing RoamAbout Access Point
Summary of Features . . . . . . . . . . . . . . . . . . . . . . . . . . . . . . . . . . . . . . . . . . . . . . . . . . . . . . . . . . . 1-2
AP to Wireless Clients Configuration . . . . . . . . . . . . . . . . . . . . . . . . . . . . . . . . . . . . . . . . . . . . . . 1-6
AP to AP Configuration . . . . . . . . . . . . . . . . . . . . . . . . . . . . . . . . . . . . . . . . . . . . . . . . . . . . . . . . . 1-7
Bridging Services . . . . . . . . . . . . . . . . . . . . . . . . . . . . . . . . . . . . . . . . . . . . . . . . . . . . . . . . . . . . . . 1-8
Configuration Tools . . . . . . . . . . . . . . . . . . . . . . . . . . . . . . . . . . . . . . . . . . . . . . . . . . . . . . . . . . . . 1-9
Console Port . . . . . . . . . . . . . . . . . . . . . . . . . . . . . . . . . . . . . . . . . . . . . . . . . . . . . . . . . . . . . . 1-9
RoamAbout Access Point Manager . . . . . . . . . . . . . . . . . . . . . . . . . . . . . . . . . . . . . . . . . . . . 1-9
Other Management Tools . . . . . . . . . . . . . . . . . . . . . . . . . . . . . . . . . . . . . . . . . . . . . . . . . . . 1-10
Optional Antennas . . . . . . . . . . . . . . . . . . . . . . . . . . . . . . . . . . . . . . . . . . . . . . . . . . . . . . . . . . . . 1-11
Range Extender Antenna . . . . . . . . . . . . . . . . . . . . . . . . . . . . . . . . . . . . . . . . . . . . . . . . . . . 1-11
Outdoor Antenna Kit . . . . . . . . . . . . . . . . . . . . . . . . . . . . . . . . . . . . . . . . . . . . . . . . . . . . . . 1-12
2 Preparing for Installation
Unpacking and Checking the Contents of the Shipment . . . . . . . . . . . . . . . . . . . . . . . . . . . . . . . . 2-1
Selecting the Location . . . . . . . . . . . . . . . . . . . . . . . . . . . . . . . . . . . . . . . . . . . . . . . . . . . . . . . . . . 2-2
Reviewing the Site Requirements . . . . . . . . . . . . . . . . . . . . . . . . . . . . . . . . . . . . . . . . . . . . . . . . . 2-4
Hardware Requirements . . . . . . . . . . . . . . . . . . . . . . . . . . . . . . . . . . . . . . . . . . . . . . . . . . . . . 2-4
Electrical and Environmental Requirements . . . . . . . . . . . . . . . . . . . . . . . . . . . . . . . . . . . . . 2-5
Cabling Requirements. . . . . . . . . . . . . . . . . . . . . . . . . . . . . . . . . . . . . . . . . . . . . . . . . . . . . . . 2-7
vii
Table of Contents
3 Installing the RoamAbout Access Point
Installing the PC Card . . . . . . . . . . . . . . . . . . . . . . . . . . . . . . . . . . . . . . . . . . . . . . . . . . . . . . . . . . 3-2
Installing the AP into a MultiSwitch 900 or DEChub 90 . . . . . . . . . . . . . . . . . . . . . . . . . . . . . . . 3-3
Removing the Back Cover . . . . . . . . . . . . . . . . . . . . . . . . . . . . . . . . . . . . . . . . . . . . . . . . . . . 3-3
Seating the AP in the MultiSwitch 900 or DEChub 90 . . . . . . . . . . . . . . . . . . . . . . . . . . . . . 3-4
Installing the AP . . . . . . . . . . . . . . . . . . . . . . . . . . . . . . . . . . . . . . . . . . . . . . . . . . . . . . . . . . . . . . 3-5
Verifying the Operation of the RoamAbout Access Point . . . . . . . . . . . . . . . . . . . . . . . . . . . . . 3-10
Connecting a Device to the Console Port . . . . . . . . . . . . . . . . . . . . . . . . . . . . . . . . . . . . . . . . . . 3-12
Console Port Signaling Standards . . . . . . . . . . . . . . . . . . . . . . . . . . . . . . . . . . . . . . . . . . . . 3-12
Connecting to the Console Port . . . . . . . . . . . . . . . . . . . . . . . . . . . . . . . . . . . . . . . . . . . . . . 3-12
Installing the RoamAbout Access Point Manager . . . . . . . . . . . . . . . . . . . . . . . . . . . . . . . . . . . 3-15
Setting the AP Parameters. . . . . . . . . . . . . . . . . . . . . . . . . . . . . . . . . . . . . . . . . . . . . . . . . . . . . . 3-16
Verifying Wireless Communication . . . . . . . . . . . . . . . . . . . . . . . . . . . . . . . . . . . . . . . . . . . . . . 3-16
4 Configuring the RoamAbout Access Point
Starting a Configuration Tool . . . . . . . . . . . . . . . . . . . . . . . . . . . . . . . . . . . . . . . . . . . . . . . . . . . . 4-2
RoamAbout Access Point Manager . . . . . . . . . . . . . . . . . . . . . . . . . . . . . . . . . . . . . . . . . . . . 4-2
Console Port Device. . . . . . . . . . . . . . . . . . . . . . . . . . . . . . . . . . . . . . . . . . . . . . . . . . . . . . . . 4-3
Showing Current Settings . . . . . . . . . . . . . . . . . . . . . . . . . . . . . . . . . . . . . . . . . . . . . . . . . . . . . . . 4-4
Wireless Parameters . . . . . . . . . . . . . . . . . . . . . . . . . . . . . . . . . . . . . . . . . . . . . . . . . . . . . . . . . . . 4-6
Channel . . . . . . . . . . . . . . . . . . . . . . . . . . . . . . . . . . . . . . . . . . . . . . . . . . . . . . . . . . . . . . . . . 4-6
Wireless Network Name . . . . . . . . . . . . . . . . . . . . . . . . . . . . . . . . . . . . . . . . . . . . . . . . . . . . 4-6
Station Name . . . . . . . . . . . . . . . . . . . . . . . . . . . . . . . . . . . . . . . . . . . . . . . . . . . . . . . . . . . . . 4-7
AP Density . . . . . . . . . . . . . . . . . . . . . . . . . . . . . . . . . . . . . . . . . . . . . . . . . . . . . . . . . . . . . . . 4-7
Transmit (Tx) Rate. . . . . . . . . . . . . . . . . . . . . . . . . . . . . . . . . . . . . . . . . . . . . . . . . . . . . . . . . 4-7
RTS Threshold . . . . . . . . . . . . . . . . . . . . . . . . . . . . . . . . . . . . . . . . . . . . . . . . . . . . . . . . . . . . 4-8
IEEE Power Management (DTIM Period). . . . . . . . . . . . . . . . . . . . . . . . . . . . . . . . . . . . . . . 4-9
Secure Access . . . . . . . . . . . . . . . . . . . . . . . . . . . . . . . . . . . . . . . . . . . . . . . . . . . . . . . . . . . . 4-9
Setting Bridge Mode . . . . . . . . . . . . . . . . . . . . . . . . . . . . . . . . . . . . . . . . . . . . . . . . . . . . . . . . . . 4-10
Setting Default Rate Limiting (Multicast Traffic) . . . . . . . . . . . . . . . . . . . . . . . . . . . . . . . . . . . 4-10
Setting Encryption. . . . . . . . . . . . . . . . . . . . . . . . . . . . . . . . . . . . . . . . . . . . . . . . . . . . . . . . . . . . 4-11
Setting RMON Values . . . . . . . . . . . . . . . . . . . . . . . . . . . . . . . . . . . . . . . . . . . . . . . . . . . . . . . . 4-12
Checking the Configuration on Multiple APs. . . . . . . . . . . . . . . . . . . . . . . . . . . . . . . . . . . . . . . 4-13
Resetting the RoamAbout Access Point . . . . . . . . . . . . . . . . . . . . . . . . . . . . . . . . . . . . . . . . . . . 4-14
Configuring the AP for LAN-to-LAN . . . . . . . . . . . . . . . . . . . . . . . . . . . . . . . . . . . . . . . . . . . . 4-15
Configuring the AP for SNMP Management . . . . . . . . . . . . . . . . . . . . . . . . . . . . . . . . . . . . . . . 4-16
Set In-Band Interface Addresses . . . . . . . . . . . . . . . . . . . . . . . . . . . . . . . . . . . . . . . . . . . . . 4-16
Set SNMP Read/Write Community . . . . . . . . . . . . . . . . . . . . . . . . . . . . . . . . . . . . . . . . . . . 4-18
Set SNMP Trap Addresses. . . . . . . . . . . . . . . . . . . . . . . . . . . . . . . . . . . . . . . . . . . . . . . . . . 4-19
Upgrading the RoamAbout Access Point . . . . . . . . . . . . . . . . . . . . . . . . . . . . . . . . . . . . . . . . . . 4-20
viii
Table of Contents
5 Problem Solving
Using the LEDs to Determine the Problem . . . . . . . . . . . . . . . . . . . . . . . . . . . . . . . . . . . . . . . . . . 5-2
Reset Button . . . . . . . . . . . . . . . . . . . . . . . . . . . . . . . . . . . . . . . . . . . . . . . . . . . . . . . . . . . . . . . . . . 5-7
Setting Upline Dump . . . . . . . . . . . . . . . . . . . . . . . . . . . . . . . . . . . . . . . . . . . . . . . . . . . . . . . . . . . 5-7
Showing Counters . . . . . . . . . . . . . . . . . . . . . . . . . . . . . . . . . . . . . . . . . . . . . . . . . . . . . . . . . . . . . 5-8
Displaying Error Logs . . . . . . . . . . . . . . . . . . . . . . . . . . . . . . . . . . . . . . . . . . . . . . . . . . . . . . . . . 5-10
Removing the AP from the MultiSwitch 900 or DEChub 90 . . . . . . . . . . . . . . . . . . . . . . . . . . . 5-11
A Connector, Cable, and Adapter Pin Assignments
Figures
Front, Side, and Rear View of the AP . . . . . . . . . . . . . . . . . . . . . . . . . . . . . . . . . . . . . . . . . . . . . . 1-3
Roaming . . . . . . . . . . . . . . . . . . . . . . . . . . . . . . . . . . . . . . . . . . . . . . . . . . . . . . . . . . . . . . . . . . . . 1-6
Building-to-Building Configuration . . . . . . . . . . . . . . . . . . . . . . . . . . . . . . . . . . . . . . . . . . . . . . . 1-7
Range Extender Antenna . . . . . . . . . . . . . . . . . . . . . . . . . . . . . . . . . . . . . . . . . . . . . . . . . . . . . . 1-12
Mounting the AP in a Central Location . . . . . . . . . . . . . . . . . . . . . . . . . . . . . . . . . . . . . . . . . . . . 2-3
Normal LED Pattern . . . . . . . . . . . . . . . . . . . . . . . . . . . . . . . . . . . . . . . . . . . . . . . . . . . . . . . . . . 3-11
Console Port Cabling . . . . . . . . . . . . . . . . . . . . . . . . . . . . . . . . . . . . . . . . . . . . . . . . . . . . . . . . . 3-14
10BaseT (8-pin MJ) Connector Pin Assignments . . . . . . . . . . . . . . . . . . . . . . . . . . . . . . . . . . . . .A-1
Console Port (DB-9) Connector Pin Assignments . . . . . . . . . . . . . . . . . . . . . . . . . . . . . . . . . . . .A-2
BN24H Cable Pin Assignments (Used with Console Port) . . . . . . . . . . . . . . . . . . . . . . . . . . . . .A-2
BC16E Cable Pin Assignments (Used with Console Port) . . . . . . . . . . . . . . . . . . . . . . . . . . . . . .A-2
H8571-J Adapter Pin Assignments (Used with Console Port) . . . . . . . . . . . . . . . . . . . . . . . . . . .A-3
H8575-A Adapter Pin Assignments (Used with Console Port) . . . . . . . . . . . . . . . . . . . . . . . . . .A-3
Tables
AP Physical Specifications . . . . . . . . . . . . . . . . . . . . . . . . . . . . . . . . . . . . . . . . . . . . . . . . . . . . . . 2-4
Environmental Specifications . . . . . . . . . . . . . . . . . . . . . . . . . . . . . . . . . . . . . . . . . . . . . . . . . . . . 2-5
Electrical Specifications . . . . . . . . . . . . . . . . . . . . . . . . . . . . . . . . . . . . . . . . . . . . . . . . . . . . . . . . 2-6
AP Power Supply Specifications . . . . . . . . . . . . . . . . . . . . . . . . . . . . . . . . . . . . . . . . . . . . . . . . . 2-6
AP Acoustical Specifications . . . . . . . . . . . . . . . . . . . . . . . . . . . . . . . . . . . . . . . . . . . . . . . . . . . . 2-6
Console Port Cabling . . . . . . . . . . . . . . . . . . . . . . . . . . . . . . . . . . . . . . . . . . . . . . . . . . . . . . . . . 3-13
LED Summary Table . . . . . . . . . . . . . . . . . . . . . . . . . . . . . . . . . . . . . . . . . . . . . . . . . . . . . . . . . . 5-2
LED Problem Solving Summary . . . . . . . . . . . . . . . . . . . . . . . . . . . . . . . . . . . . . . . . . . . . . . . . . 5-3
Normal Operating Mode LED Patterns . . . . . . . . . . . . . . . . . . . . . . . . . . . . . . . . . . . . . . . . . . . . 5-5
Diagnostics LED Patterns . . . . . . . . . . . . . . . . . . . . . . . . . . . . . . . . . . . . . . . . . . . . . . . . . . . . . . . 5-5
Network Loading/Upline Dumping LED Patterns . . . . . . . . . . . . . . . . . . . . . . . . . . . . . . . . . . . . 5-6
ix
Preface
The RoamAbout™ Access Point is a 2-port bridge that connects a wired Ethernet
(ThinWire™ or 10BaseT) local area network (LAN) and a wireless LAN.
This manual describes how to install and configure the RoamAbout Access Point. It
also describes how to troubleshoot problems that may arise during installation or
operation.
Intended Audience
This manual is intended for the device installer and network manager. This manual
assumes that you have a working knowledge of local area networking and bridging
functions.
xi
Terminology
Terminology
The following terms are used throughout this manual. You should be familiar with
these terms before you continue.
xii
Term
Definition
RoamAbout Access Point
A 2-port bridge that connects a wireless LAN to a
wired Ethernet LAN. Referred to as AP.
RoamAbout PC Card™
A PC Card that installs in a RoamAbout Access
Point or wireless client to provide wireless
connectivity in a LAN environment.
PCMCIA
The Personal Computer Memory Card
International Association (PCMCIA) is the
standards body for the type of PC card used with
the AP.
RoamAbout Access Point
Manager
Software used to manage and configure one or
more APs. The software is installed on a Windows
computer that connects to the AP via a wired LAN
or wireless LAN.
Range Extender Antenna
An indoor antenna that extends the coverage area
of the AP.
LAN-to-LAN Wireless
Bridge
An AP mode that allows two APs to communicate,
effectively connecting two wired LANs through a
wireless link.
wireless LAN
A collection of end-user systems connected
together using a medium such as radio frequency
or infrared technology. The RoamAbout products
use radio frequencies
wireless client
A computer such as a PC, laptop, or notebook, that
uses the PC card for wireless LAN connectivity. A
wireless client is also referred to as a station.
Associated Documents
Associated Documents
The following table lists each component, with its associated document, that can be
used with your RoamAbout Access Point.
Component
Document
PC Card
RoamAbout IEEE DS/PC Card and ISA
Adapter Card User’s Guide
RoamAbout Access Point
Manager
Online Help
RoamAbout Building-toBuilding
RoamAbout 802.11 Outdoor Antenna
Installation Guide
xiii
Chapter 1
Introducing RoamAbout Access Point
This chapter provides an overview of the RoamAbout Access Point (AP) and its
operation.
The AP is a 2-port bridge. One port connects the AP to an Ethernet LAN through a
10BaseT or ThinWire cable (or through a MultiSwitch 900 or DEChub 90 Ethernet
backplane). The other port connects the AP to the wireless network through a
RoamAbout PC Card.
The wireless network can consist of multiple wireless clients and multiple APs. A
client can be a laptop or notebook computer or desktop PC. Typically, a single AP is
used to enable several wireless clients to connect to a wired Ethernet LAN.
The AP fully supports wireless clients equipped with any 802.11-Compliant Direct
Sequence (DS) PC Card.
You can also configure the AP to communicate with another AP in a LAN-to-LAN
configuration. This allows you to connect two Ethernet LANs (usually in separate
buildings) through a wireless link.
The AP is shown in Figure 1-1.
Introducing RoamAbout Access Point 1-1
Summary of Features
Summary of Features
The AP includes the following features:
•
Supports any 802.11 Direct Sequence (DS) compliant radio in a wireless client1.
•
Supports ThinWire (10base2) and 10BaseT Ethernet LANs.
•
Ideally, an AP can support up to 250 users. However, this number can be
significantly reduced by various factors, such as obstructions in the coverage area
and the amount of network utilization by each client.
•
Can be configured to communicate with another RoamAbout Access Point in a
LAN-to-LAN configuration2.
•
Supports 802.11 Wired Equivalent Privacy (WEP)3 and Secure Access Mode.
•
Allows wireless clients to roam from one Access Point to another in the same
wireless LAN without losing connectivity.
•
Can be standalone or mountable in a MultiSwitch 900 or DEChub 90.
•
Can be managed via its local console port or remotely by the RoamAbout Access
Point Manager software, clearVISN system, or Network Management Station
(NMS).
•
Supports RMON Groups 1, 2, 3, and 9 (Statistics, History, Alarms, and Events).
•
Can be upgraded via a downline-load using BOOTP and TFTP.
•
Supports IEEE power management.
•
Contains an 8000 node forwarding address database.
•
Redundancy through 802.1D Spanning Tree.
•
Supports protocol filtering.
•
Supports source and destination address filtering.
•
Contains various user-selectable parameters.
1. As of V3.0, the AP no longer supports the legacy, non-802.11 PC Cards. If you require the AP to support the earlier versions of the RoamAbout DS or Frequency Hopping (FH) cards, use AP firmware V2.4, which is included in the AP Manager
diskettes.
2. Requires the AP firmware to be V3.4 or later.
3. Requires the AP firmware to be V4.0 or later.
1-2 Introducing RoamAbout Access Point
Summary of Features
Figure 1-1: Front, Side, and Rear View of the AP
15
1
14
Acc
5
6
7
8
9
Poin
t
1
16
Ro amAbout
2
3
4
ess
1
2
17
10
11
12
Height: 27.31 cm (10.75 in)
Width: 3.18 cm (1.25 in)
Depth: 13.3 cm (5.25 in)
13
18
LKG-8679-931-02
The AP contains the following LEDs, connectors, ports, and controls:
Item
Name
Description
1
Network
Connector
(BNC)
Connects the AP to a ThinWire network. This
connector is not used if the AP is connected to a
10BaseT network or installed in a MultiSwitch 900 or
DEChub 90.
Power OK
Lights (green) when the AP has power.
2
LED
3
Module OK
LED
Lights (green) when the AP passes its power-up
self-test. If the AP fails the test, the Module OK LED
is off. If this LED is flashing, the Ethernet or wireless
port (or both) has a fault, preventing connection to the
network.
Introducing RoamAbout Access Point 1-3
Summary of Features
Item
Name
Description
4
Wired LAN
Activity
Indicates the status of the wired Ethernet segment. The
LED lights (green) when packets are:
LED
• Received on the Ethernet port and forwarded to the
wireless port.
• Addressed to or generated by the AP using the
Ethernet port.
Packets received and filtered are not shown. Data
traffic forwarded to the Ethernet port is not shown.
The average brightness of the LED indicates the level
of activity on the Ethernet port. If the LED is flashing
together with the Bridge State LED (6), the Ethernet
port has a fault that prevents the AP from establishing
a connection to the network.
5
10BaseT
Ethernet
Connector
Connects the AP to a 10BaseT network. This
connector is not used if the AP is connected to a
ThinWire network or installed in a MultiSwitch 900 or
DEChub 90.
6
Bridge State
Lights (green) when the AP is forwarding packets.
LED
7
Access Point
Saturated
LED
8
Wireless LAN
Activity
LED
1-4 Introducing RoamAbout Access Point
Lights (yellow) when the AP is saturated. Saturation
occurs when the AP cannot forward packets from the
Ethernet to the wireless side due to the lower
throughput of the wireless network. The degree of
LED brightness indicates the level of saturation. The
LED dims (and eventually extinguishes) as the
network congestion is processed.
Indicates the status of the wireless Ethernet segment.
The LED lights (green) when packets are:
• Received on the wireless port and forwarded to the
Ethernet port.
• Addressed to or generated by the AP using the
wireless port.
Packets received and filtered are not shown. Data
traffic forwarded to the wireless port is not shown. The
average brightness of the LED indicates the level of
activity on the wireless port. If the LED is flashing
together with the Bridge State LED (6), the wireless
port has a fault that prevents the AP from establishing
a connection to the network.
Summary of Features
Item
Name
Description
9
PC Card
Present
Lights (green) when the PC Card is correctly installed
at power-up.
LED
10
Local Console
Port
Used to configure the AP.
11
PC Card Slot
Used for the PC Card.
12
Ethernet
Hardware
Address
Unique physical address of the AP.
13
Reset Button
Forces a downline load of the AP’s firmware from a
load host and resets the AP to its factory default
settings.
14
Back Cover
Present on standalone APs only. Covers the backplane
connector and mounting assembly.
15
Locking Tab
Locks the AP into a MultiSwitch 900 or DEChub 90.
16
48-Pin
Backplane
Connector
Provides network and power connections to the AP
when installed in a MultiSwitch 900 or DEChub 90.
17
Power Supply
Connector
Receives +5 Vdc from the AP’s standalone power
supply. Not used when the AP is installed in a
MultiSwitch 900 or DEChub 90.
18
Mounting Tab
Secures the AP to the MultiSwitch 900 or DEChub 90
backplane.
Introducing RoamAbout Access Point 1-5
AP to Wireless Clients Configuration
AP to Wireless Clients Configuration
The AP enables wireless clients to move from the coverage area of one AP into the
coverage area of another AP while maintaining LAN connectivity. This capability is
called roaming. Figure 1-2 illustrates a wireless client roaming from one AP coverage
area to another. Each coverage area is called a cell, where a cell is a single AP and its
wireless clients within a network of multiple APs.
Figure 1-2: Roaming
Coverage
Areas
Cell 1
PC
(Ap1)
PC
(Ap1)
Cell 2
PC
(Ap2)
PC
(Ap2)
Ro a mAbout
AP1
1
2
Ro a mAbout
1
2
PC
(Ap1)
PC
(Ap1)
Wireless
Client
AP2
PC
(Ap2)
PC
(Ap1)
LKG-8892-931-01
In Figure 1-2, Cell 1 and Cell 2 share overlapping areas of coverage. As a wireless
client moves from Cell 2 to Cell 1, the necessary network information is passed from
AP2 to AP1.
When a wireless client (such as the laptop computer in Figure 1-2) approaches the
boundary of a coverage area, the wireless client searches for a new AP that provides a
better quality signal, resulting in more reliable data throughput.
1-6 Introducing RoamAbout Access Point
AP to AP Configuration
AP to AP Configuration
You can connect two separate LANs over a wireless link by configuring two
RoamAbout Access Points to communicate with each other. This is called a
LAN-to-LAN connection.
Figure 1-3 shows two APs in different buildings using an outdoor antenna to connect
the LANs in those buildings.
Figure 1-3: Building-to-Building Configuration
R o a mAbout
R o a mAbout
1
1
2
2
2844-01-03
You can also configure APs to connect two LANs in the same building.
Contact your Cabletron sales representative or visit the RoamAbout web site for more
information about the optional outdoor antenna kits.
Introducing RoamAbout Access Point 1-7
Bridging Services
Bridging Services
The AP provides the following bridging services:
•
Store-and-forward capability
The AP receives, checks, and transmits frames to other LANs, enabling the
configuration of extended LANs.
•
Frame filtering based on address
Using the address database and the source and destination addresses from
incoming frames, the AP isolates the traffic that should not be allowed on other
LANs. This action reduces the total data traffic on an extended LAN by not
forwarding the packets that have local destination addresses or packets that are not
allowed to be forwarded. This increases bandwidth efficiency.
•
Data Link layer relay
The AP operates at the Data Link layer of the Open System Interconnection (OSI)
model. Operation at this layer makes the AP transparent to the protocols that use
the LAN connectivity service. This protocol transparency is a key factor in the
extended LAN service.
•
Dynamic address learning
The forwarding and translating process module automatically adds new source
addresses to the address database while the AP is operating. This reverse learning
of the address and port association allows automatic network configuration
without prior downline loading of configuration data to the AP. Note that the
address learning is protocol and management entity independent.
How long an address remains in the database is determined by an Aging Timer
that measures how much time has elapsed since data was last addressed to or from
a particular node. If the timer lapses without any traffic, the node’s address is
removed from the database.
•
LAN-to-LAN Bridge mode
LAN-to-LAN mode is used to configure the AP to communicate with another AP.
In LAN-to-LAN mode, the AP learns addresses from both the wireless network
and the wired Ethernet LAN. The AP filters packets based on their destination
address and forwards all packets with unknown addresses. The default Aging
Timer interval is 2 minutes.
•
Workgroup Bridge mode
Workgroup Bridge mode (the default mode) is used to configure the AP to
communicate with wireless clients. In Workgroup Bridge mode, the AP learns
addresses only from the wireless side of the network. The AP only forwards
packets to multicast addresses, broadcast addresses, and known addresses on the
wireless LAN. The default Aging Timer interval is 32 minutes.
1-8 Introducing RoamAbout Access Point
Configuration Tools
Configuration Tools
You can configure the AP using these tools:
•
RoamAbout Access Point Console Port
•
RoamAbout Access Point Manager
•
clearVISN and Network Management Stations (NMS)
Console Port
The AP has a local console port that enables you to configure and manage the AP using
a console port device (a terminal or personal computer running terminal emulation
software). The device needs to be directly connected to the AP console port.
RoamAbout Access Point Manager
The RoamAbout Access Point Manager is included in the RoamAbout Access Point
kit. You install the AP Manager on a Windows 95, Windows 98, or Windows NT
system.
The AP Manager can be used as a setup/configuration tool for new APs and as a
management tool to assist the ongoing management and support of RoamAbout
wireless LANs. The AP Manager can manage multiple APs simultaneously.
The AP Manager has the following features:
•
Ability to manage multiple APs remotely, including changing parameters on
multiple APs in a wireless network with a single command.
•
Ability to view AP parameters, such as AP statistics, AP firmware version
number, MAC addresses, amount of memory, and card type.
•
Integrity checking for many wireless parameter changes. This warns the user if a
common wireless network management mistake is about to be made, or if the
operation requested is unusual and usually not recommended.
•
Integrity checking of an existing wireless network configuration for consistent
settings and common management errors.
•
Improved wireless network performance through easy packet filtering and
recommended filter settings.
•
Integrated with a BootP/TFTP application for simple AP firmware upgrades, also
called flash upgrades.
•
Support for 802.11 radio technology as well as the earlier versions of the
RoamAbout Direct Sequence (DS) and Frequency Hopping (FH) products.
Introducing RoamAbout Access Point 1-9
Configuration Tools
Other Management Tools
The AP supports the Simple Network Management Protocol (SNMP) through any
standard Network Management Station (NMS) that supports SNMP. The SNMP
management capability enables you to manage standard SNMP MIB characteristics,
such as protocol filtering and address filtering.
To manage the AP with an NMS system, you must configure the AP with a valid IP
address, as described in “Configuring the AP for SNMP Management” on page 4-16.
The management systems use MIB objects to manage the AP. The AP supports the
following MIB objects:
•
MIB II (RFC–1213)
•
IETF Bridge MIB (RFC–1493)
•
Ethernet MIB (RFC–1398)
•
DEC ELAN Vendor MIB
•
HUB PCOM MIB
•
RoamAbout Access Point MIB
•
RMON MIB (RFC-1757)
•
802.11 MIB
For details on the management features of each MIB, consult your NMS
documentation.
The Cabletron clearVISN system also supports the AP.
NOTE
The AP Manager and console port do not support RMON. To set RMON
parameters and the multicast limiting rate value, you need an NMS system or
clearVISN.
1-10 Introducing RoamAbout Access Point
Optional Antennas
Optional Antennas
When the AP is configured to support wireless clients, you may need the Range
Extender antenna to improve signal quality when the PC Card in the AP is shielded.
In a LAN-to-LAN configuration, you may need to install outdoor antennas, especially
when the APs are located in separate buildings.
Range Extender Antenna
The RoamAbout PC Card in the AP has two integrated antennas that perform best in
an open environment with as few obstacles as possible. Use the Range Extender
Antenna (Figure 1-4) to ensure optimal transmission and reception quality for
situations where the integrated antennas are shielded, such as:
•
The PC Card is close to metal surfaces.
•
The AP is installed in a hidden location, e.g. under a desk or inside a cabinet.
•
Objects shield the PC Card.
You can connect the Range Extender antenna to the PC Card by inserting the connector
into the socket on the extended side of the PC card. To protect the socket from dust, it
is shielded with a cap. Remove this cap before you connect the antenna.
The Range Extender antenna has a mounting bracket and a base for vertical positioning
that allows you to place the antenna on top of a table or filing cabinet, or hang it on the
wall or ceiling.
NOTE
Many computer monitors support a degauss option. The electromagnetic
discharge that may occur when degaussing the monitor may cause damage to the
antenna. To avoid damage, do not place the Range Extender Antenna on top of, or
too close to, a monitor.
Introducing RoamAbout Access Point 1-11
Optional Antennas
Figure 1-4: Range Extender Antenna
Outdoor Antenna Kit
The RoamAbout outdoor antenna kit allows you to connect multiple buildings or
LANs via a wireless outdoor point-to-point link. The kit provides a selection of
high-gain, low-noise antennas and components.
Refer to the RoamAbout 802.11 Outdoor Antenna Installation Guide or the
RoamAbout web site for more information.
1-12 Introducing RoamAbout Access Point
Chapter 2
Preparing for Installation
Before installing the AP, you must complete the following tasks:
•
Unpack the AP and check the contents of the shipment.
•
Select the location to install the AP.
•
Review the site requirements.
Unpacking and Checking the Contents of the Shipment
Unpack and check the shipment for damage or missing parts. The shipment includes:
•
RoamAbout Access Point
•
Power supply
•
RoamAbout Access Point Manager software on diskettes.
Optionally, you could also have these kits:
•
RoamAbout PC Cards for wireless clients
•
Range Extender Antenna
•
Outdoor antenna kit (building-to-building)
If any item is damaged or missing, immediately notify the delivery agent and your
sales representative.
Preparing for Installation 2-1
Selecting the Location
Selecting the Location
If the AP is not installed in a MultiSwitch 900 or DEChub 90, you can mount the AP
on a wall, ceiling, or cubicle partition.
Depending on your configuration, choose the location to install the AP based on the
following guidelines.
For an AP to wireless client configuration:
•
The size of the coverage area (in open air) is determined by the type of PC Card
in the AP and wireless client(s). The RoamAbout PC Card has an effective range
of up to a 550-ft. radius area (in an open environment). If using a card other than
the RoamAbout PC Card in wireless clients, refer to that card’s documentation for
information about allowable distances.
•
Centrally locate the AP within the group of wireless clients to have all wireless
clients within the AP’s coverage area. If permanent obstructions prevent you from
centrally mounting the AP, mount it as high as possible. Figure 2-1 shows an
example of a centrally located, standalone AP.
•
Minimize obstructions, such as walls (especially those made of steel reinforced
concrete or masonry), between the AP and its wireless clients. Obstructions can
reduce the effective range of the radio transmissions from the PC Cards.
•
If it is necessary to install the AP in an obstructed location, use the optional range
extender antenna, as described in “Optional Antennas” on page 1-11.
•
If using multiple APs in the same wireless network, make sure that they have
overlapping coverage areas. You many need to adjust the placement of the APs
after the initial installation to obtain the best signal quality and coverage.
For a LAN-to-LAN configuration:
•
If using an outdoor antenna, make sure that the AP and the outdoor antenna use
the same grounding system, as described in the RoamAbout 802.11 Outdoor
Antenna Installation Guide.
•
If not using an antenna, the APs should be within 500 feet of each other; less if
there are obstructions.
2-2 Preparing for Installation
Selecting the Location
Figure 2-1: Mounting the AP in a Central Location
R o amAbout
1
2
LKG-8805-931-01
Preparing for Installation 2-3
Reviewing the Site Requirements
Reviewing the Site Requirements
Review the following to ensure that all site preparation tasks were completed.
Hardware Requirements
•
Ensure that the Ethernet LAN is in place and operable.
•
If you are installing the AP in a standalone configuration, locate the Ethernet
interface device (for example, a ThinWire segment, DECconnect faceplate, or
other appropriate network device) to which to connect the AP. Otherwise, if you
are installing the AP in a MultiSwitch 900 or DEChub 90, ensure that the device
is installed and operable.
•
If you are installing the AP in a standalone configuration, ensure that an
appropriate ac power source is within 1.6 m (5.5 ft) of the AP.
•
Ensure that a PC to install the RoamAbout Access Point Management software or
a console port device (a terminal or PC with terminal emulation software) is
available at the site for configuring the AP.
•
Ensure that PC Cards are obtained for each wireless client.
•
Ensure that the location can accommodate the physical size of the AP, as
described in the following table.
Table 2-1: AP Physical Specifications
Parameter
Value
Width
3.18 cm (1.25 in)
Height
27.31 cm (10.75 in)
Depth
13.34 cm (5.25 in)
Weight
0.68 kg (1.5 lb)
2-4 Preparing for Installation
Reviewing the Site Requirements
Electrical and Environmental Requirements
Ensure that the environmental and electrical requirements are within the ranges
described in the following tables.
Table 2-2: Environmental Specifications
Parameter
Description
Operating Environment
Temperature1
5°C to 50°C (41°F to 122°F)
Maximum rate of change
20°C/h (36°F/h)
Relative humidity
10% to 95% (noncondensing)
Wet-bulb temperature
32°C (90°F)
Altitude
Sea level to 2.4 km (8000 ft)
Air flow
Convection cooled
Nonoperating Environment
Temperature
–40°C to 66°C (–40°F to 151°F)
Relative humidity
Up to 95% (noncondensing)
Altitude
Up to 4.9 km (16,000 ft)
Certifications
CE, CSA, FCC, TÜV, UL, VCCI
1. For sites above 4900 m (16,000 ft), decrease the operating temperature specification by
1.8°C for each 1000 m or 3.2°F for each 3200 ft.
Preparing for Installation 2-5
Reviewing the Site Requirements
Table 2-3: Electrical Specifications
Voltage
Current (Amperes)
Power (Watts)
+5.0 V
1.2 A
6.0 W
Table 2-4: AP Power Supply Specifications
Parameter
Value
Input voltage
100 Vac to 240 Vac
Current at 120 V
0.25 A
Frequency
50 Hz to 60 Hz
Power consumption
16 W
Output voltage
5.1 Vdc
Output current (maximum)
1.8 A
Table 2-5: AP Acoustical Specifications
Acoustics — Declared values per ISO 9296 and ISO 7779
Product
RoamAbout Access Point
Sound Power Level L
WAd , B
Sound Pressure Level
L pAm , dBA
(bystander positions)
Idle/Operate
Idle/Operate
No acoustic noise
No acoustic noise
Schallemissionswerte — Werteangaben nach ISO 9296 und
ISO 7779/DIN EN27779
Produkt
RoamAbout Access Point
2-6 Preparing for Installation
Schalleistungspegel
L WAd , B
Schalldruckpegel L
pAm , dBA
(Zuschauerpositionen)
Leerlauf/Betrieb
Leerlauf/Betrieb
keine meßbaren
Schallemissionen
keine meßbaren
Schallemissionen
Reviewing the Site Requirements
Cabling Requirements
For a standalone configuration only: Ensure that you have the appropriate types and
lengths of cable for connecting the AP to the wired Ethernet. For a 10BaseT
connection, use a BN26K cable. For a ThinWire connection, you need a BC16M cable,
T-connector (H8223-00), and 50-ohm terminator (H8225-00).
If you are using the console port:
•
For standalone and DEChub 90 configurations: Ensure that you have two 9-pin
DECconnect adapters (H8571-J) and an MMJ DECconnect BC16E cable for
connecting the console port device to the AP.
•
For MultiSwitch 900 configurations: Ensure that you have a 9-pin DECconnect
adapter (H8571-J) and an MMJ DECconnect BN24H cable for connecting the
console port device to the MultiSwitch 900. If your local console port device is a
PC running terminal emulation software, you can use a 9-pin, D-Sub
(PC-compatible) serial (null modem) cable.
Refer to Table 3-1 on page 3-13 for a list of console port cable part numbers.
NOTE
Refer to Appendix A for connector, cable and adapter pinout information.
Preparing for Installation 2-7
Chapter 3
Installing the RoamAbout Access Point
This chapter provides a step-by-step procedure to install the RoamAbout Access Point.
Before installing the AP, ensure that all the procedures in Chapter 2 are completed.
Installing the AP involves the following tasks:
•
Installing the PC Card into the AP
•
Installing the AP in a standalone configuration, or in a MultiSwitch 900 or
DEChub 90
•
Verifying the operation of the AP
•
Connecting a device to the console port (if not using the AP Manager)
•
Installing the RoamAbout Access Point Manager
•
Setting the AP parameters
•
Verifying wireless communication
Installing the RoamAbout Access Point 3-1
Installing the PC Card
Installing the PC Card
To install the PC Card, do the following:
Step
Action
1
With the logo on the PC Card facing the same direction as the AP’s BNC
connector, partially insert the card into the PC Card slot.
Acc
ess
Poin
t
BNC
Connector
Ro amAbout
1
2
PC Card
Logo
2
2844_01_04
Gently push the card into the slot until it is firmly seated. You will sense
a slight resistance as you insert the card. When properly inserted, the
card protrudes approximately 1-1/2 inches from the AP.
3-2 Installing the RoamAbout Access Point
Installing the AP into a MultiSwitch 900 or DEChub 90
Installing the AP into a MultiSwitch 900 or DEChub 90
This section describes how to install the AP in a MultiSwitch 900 or DEChub 90.
Removing the Back Cover
If there is a cover on the back of the AP, you must remove it before inserting the AP
into the backplane. Perform the following steps to remove the back cover:
Step
Action
1
Lift up the latch on the back cover by inserting a flat-blade screwdriver
into the top mounting hole.
LKG-6722-921-01
2
With the latch up, pull the top of the back cover away, pivoting at the
bottom of the AP.
Installing the RoamAbout Access Point 3-3
Installing the AP into a MultiSwitch 900 or DEChub 90
Seating the AP in the MultiSwitch 900 or DEChub 90
You can install the AP in the MultiSwitch 900 or DEChub 90 without turning off
power. Seating the AP initiates the power-up sequence. However, when installing the
AP into a DEChub 90, connect the console port device to the console port before
applying power to the AP.
Perform the following steps to install the AP in the MultiSwitch 900 or DEChub 90.
Step
Action
1
Place the AP’s mounting tab into the first mounting slot on the
MultiSwitch 900 or DEChub 90.
2
Pivot the AP on the mounting tab and align the connectors.
3
Firmly push the AP onto the backplane connectors until the release lever
clicks.
4
Press down on the release lever to ensure that it is locked.
Release Lever
Clicks when
Module is
Seated.
Hub Manager
Status Display
MultiSwitch 900
VNswitch
900GV
VNswitch
900GV
DEChub 90
VNswitch
900GV
Mounting Tab
LKG-9453-941-01
5
Perform the appropriate steps in “Installing the AP” on page 3-5.
3-4 Installing the RoamAbout Access Point
Installing the AP
Installing the AP
Perform the following procedure to install the AP as a standalone module. Also, you
may need to perform steps 4 and 5 after installing the AP in a DECHub 90 or
MultiSwitch 900.
Step
Action
1
Place the AP in the previously defined location. Site requirements are
defined in Chapter 2.
2
Connect the AP to the wired network using either the 10BaseT or
ThinWire connector, as follows:
To Connect to ThinWire Network –– Connect a ThinWire cable,
T-connector, and terminator to the BNC connector on the AP. Note that
instead of a terminator, the other side of the T-connector can be cabled
to another device in the LAN.
T-Connector
50-ohm
Terminator
Acc
ess
Poin
t
Ro amAbout
1
2
LKG-8685-931-01
Installing the RoamAbout Access Point 3-5
Installing the AP
Step
Action
To connect to a 10BaseT Network –– Connect the 10BaseT cable to
the 10BaseT Ethernet connector.
Acc
ess
Poin
t
Ro amAbout
1
2
LKG-8686-931-01
3
Connect the other end of the ThinWire cable or 10BaseT cable to an
active Ethernet outlet, such as a DECconnect faceplate or other
appropriate network device.
3-6 Installing the RoamAbout Access Point
Installing the AP
Step
Action
4
To configure the AP, you need the RoamAbout Access Point Manager
(see “Installing the RoamAbout Access Point Manager” on page 3-15)
or a console device.
To use a console device, connect a 9-pin serial cable to the AP’s 9-pin,
D-Sub, PC-compatible serial port.
Note: The pinouts for the AP’s local console connector are listed in
Appendix A.
Acc
ess
Poin
t
Ro amAbout
1
2
LKG-8804-931-01
Installing the RoamAbout Access Point 3-7
Installing the AP
Step
Action
5
If using an antenna (outdoor or range extender antenna), install the
antenna cable to the PC Card. The following figure shows the optional
range extender antenna.
Acc
ess
Poin
t
Ro amAbout
Range
Extender
Antenna
(Optional)
1
2
2848-01-02
3-8 Installing the RoamAbout Access Point
Installing the AP
Step
Action
6
Connect the AP’s power supply cable to the power connector on the
back panel of the AP.
If using an outdoor antenna, make sure that the AP and the outdoor
antenna use the same grounding system, as described in the RoamAbout
802.11 Outdoor Antenna Installation Guide.
7
Connect the power supply to an AC outlet to turn on the AP.
LKG-8673-931-01
8
Go to “Verifying the Operation of the RoamAbout Access Point” on
page 3-10.
Installing the RoamAbout Access Point 3-9
Verifying the Operation of the RoamAbout Access Point
Verifying the Operation of the RoamAbout Access Point
The AP runs a series of self-tests on power-up and reports status using its LEDs.
When power-up begins, the following occurs:
Stage
Description
1
The firmware begins running diagnostics, initializes minimal hardware,
then sequentially turns LEDs 2 through 6 on and off.
2
After LED 6 turns on and then turns off, the firmware completes its
diagnostics and hardware initialization. During this portion of the
diagnostics and hardware initialization, LEDs 2 through 7 flash on and
then off.
3
The diagnostics then checks to see if the PC Card is properly inserted in
the AP. If a card is present, the PC Card Present LED lights.
The diagnostics take approximately 10 seconds to complete after power-up. Upon
successful completion of the diagnostics, the LED pattern shown in Figure 3-1 is
displayed.
If the AP fails to display the proper LED pattern, verify that you have correctly
installed the AP. If the AP still fails to display the LED pattern, refer to Chapter 5.
3-10 Installing the RoamAbout Access Point
Verifying the Operation of the RoamAbout Access Point
Figure 3-1: Normal LED Pattern
Access Point
1
2
3
R o amAbout
4
5
6
7
1
2
LKG-10067-931-01
Item
LED Name
Operational State
1
Power OK
On = power is okay
2
Module OK
On = self-test passed
3
Wired LAN Activity
Blinking = network connection
4
Bridge State
On = lights after 30 seconds indicating
that the AP is forwarding packets
5
AP Saturated
Off
6
Wireless LAN Activity
Blinking
7
PC Card Present
On = PC Card is installed
Installing the RoamAbout Access Point 3-11
Connecting a Device to the Console Port
Connecting a Device to the Console Port
The console port on the AP allows you to access and set AP parameters. If the AP is
installed on the MultiSwitch 900, you need to connect the device to the hub’s console
port.
You do not need to use the console port if you plan to manage the AP with the AP
Manager.
Console Port Signaling Standards
Signals from the MultiSwitch 900 console port and from the standalone console port
conform to the EIA-232D signaling standard at 9600 baud only. To the user, the port
appears as a data terminal equipment (DTE) device.
Connecting to the Console Port
The console port on the AP standalone unit or the MultiSwitch 900 can be connected
to a console port device (a terminal or personal computer) by using the cables and
adapters listed in Table 3-1 and shown in Figure 3-2. Refer to Appendix A for the
console port connector, cable and adapter pinouts.
NOTE
When installing the AP into a DEChub 90, you must connect the console port
device to the console port before applying power to the AP.
To connect a device to the AP console port, do the following:
•
Ensure that the transmit and receive baud rates on the console port device are set
to 9600 baud only.
•
Connect the console port device to the console port connector on either the AP
front-panel serial port or the MultiSwitch 900 console port.
3-12 Installing the RoamAbout Access Point
Connecting a Device to the Console Port
Table 3-1: Console Port Cabling
Connecting
to a...
If the console
port device is
a...
Then use
this cable...
With these
adapters...
Standalone AP or
DEChub 90
PC with a 9-pin
D-Sub
communications port
and terminal
emulation
BC16E-xx1 or
any std. PC
compatible
9-pin serial
cable.
H8571-J (qty = 2)2
Terminal with a
25-pin D-Sub
connector
BC16E-xx1
H8575-A,
Terminal with a
6-pin MMJ
connector
BC16E-xx1
H8571-J2
PC with a 9-pin
D-Sub
communications port
and terminal
emulation
BN24H-xx1
H8571-J2
Terminal with a
25-pin D-Sub
connector
BN24H-xx1
H8575-A
Terminal with a
6-pin MMJ
connector
BN24H-xx1
H8575-A
MultiSwitch 900
H8571-J2
1. xx indicates cable length in meters.
2. The AP requires an H8571-J also.
Installing the RoamAbout Access Point 3-13
Connecting a Device to the Console Port
Figure 3-2: Console Port Cabling
3
3
1
int
ss Po
Acce
2
R oa mAbout
H8571-J
H8571-J
1
2
H8575-A
BN24H
H8575-A
BC16E
Item
Description
1
MultiSwitch 900 console port
2
AP console port
3
Console port device
3-14 Installing the RoamAbout Access Point
Installing the RoamAbout Access Point Manager
Installing the RoamAbout Access Point Manager
Before installing the RoamAbout Access Point Manager, first select a computer that
meets these requirements:
•
Operating system is Windows 95, Windows 98 and Windows NT V4.0 or later.
•
The computer is connected to the AP’s wired or wireless LAN. However, a
computer connected on the wireless LAN can not upgrade the firmware on its
associated AP.
To install the RoamAbout Access Point Manager, insert the floppy disk (disk 1 of 2)
in the PC and run A:SETUP (this can be done from the Windows Explorer, DOS
prompt or the Run option from the Start button). Follow the Setup instructions.
If you have a previous version of the AP Manager, install the AP Manager on the same
computer. The setup process automatically upgrades the existing software and keeps
your existing configuration files.
You can access the AP Manager through the MultiChassis Manager (MCM)
component (V6.2 or later) of the clearVISN system. Simply right click on the device
and select the RoamAbout Configurator menu item. However, the AP Manager default
directory has changed from an earlier default setting. Therefore, you may need to
change the \Program Files\clearVIS\hubwatch\hubwatch.ini file as follows:
Find these lines:
[Applications]
RoamAbout Configurator=c:\roamabt\config\config.exe $I $C
Change them to:
[Applications]
RoamAbout Configurator=c:\Program Files\RoamAbout\Manager\Rmabt_APManager.exe $I $C
NOTE
To manage an AP with the AP Manager, you must assign the AP an IP address.
You can use the AP Manager to load the IP address, as described in “Configuring
the AP for SNMP Management” on page 4-16.
Installing the RoamAbout Access Point 3-15
Setting the AP Parameters
Setting the AP Parameters
The AP is shipped with the following default values:
•
IP Address: 0.0.0.0
•
IEEE Power Management enabled
•
Secure Access enabled
•
Encryption disabled
•
Workgroup bridge mode
•
Station name: RoamAbout AP
•
Wireless Network Name: RoamAbout Default Network Name
•
AP Density: Low
•
RTS Threshold: 2347 (this value equals an OFF state)
•
Transmit Rate: Auto Rate Select
•
Limit multicast traffic to 100Kb/sec
Refer to Chapter 4 to change these and other parameters. Also refer to “Configuring
the AP for SNMP Management” on page 4-16 for instructions to specify the AP’s
SNMP management parameters.
To configure the AP for LAN-to-LAN, refer to “Configuring the AP for
LAN-to-LAN” on page 4-15.
Verifying Wireless Communication
To verify that the AP can communicate with its wireless clients or another AP, use the
AP Manager Point-to-Point diagnostic test as follows. To use this test, the AP firmware
must be V3.4 or later and the AP Manager must be V3.4 or later.
1) Select the AP in the Managed List field.
2) Click Integrity in the menu bar.
3) Select Point-to-Point Diagnostics. For more information, press F1 on the
keyboard for the online help topic.
You can also use the RoamAbout Client Utility to test the communications path from
a wireless client to the AP. The client utility is described in the RoamAbout IEEE
DS/PC Card and ISA Adapter Card User’s Guide.
3-16 Installing the RoamAbout Access Point
Chapter 4
Configuring the RoamAbout Access Point
This chapter describes how to configure the AP parameters.
Depending on the configuration of your wireless network, you may need to change the
default settings of various parameters.
Refer to “Configuring the AP for SNMP Management” on page 4-16 to have the AP
managed by an SNMP Manager.
Configuring the RoamAbout Access Point 4-1
Starting a Configuration Tool
Starting a Configuration Tool
To modify AP parameters after installing the AP, you need to use the RoamAbout
Access Point Manager or a device connected to the console port. The following
sections describe how to start each tool.
RoamAbout Access Point Manager
If you have installed the RoamAbout Access Point Manager on a computer, go to that
computer, click the Start button on the Windows desktop, and select:
Programs→RoamAbout→ RoamAbout Access Point Manager
The program starts with the following screen.
To manage APs from the AP Manager, you need to add the APs by selecting the
Setup/Add New Access Point button. First, you are prompted to add a new AP with
or without an IP address. If the AP has an IP address, select NO; otherwise, select YES
and fill in the required information.
When you first establish communications with the AP, you are prompted for some
general information and then prompted for your wireless parameters. It is highly
recommended that you change the Wireless Network Name from the default, as
described in “Wireless Parameters” on page 4-6.
4-2 Configuring the RoamAbout Access Point
Starting a Configuration Tool
You can add all your APs within a wireless domain (defined by the same Wireless
Network Name) so that they show up in one Managed List for future changes. Before
you exit the AP Manager, make sure to save your Managed List file (you will be
prompted). If you are managing APs in multiple domains (different Wireless Network
Names) you should save these APs in a separate file.
Press F1 on your keyboard while in any AP Manager window for information about
the parameters in that window.
Console Port Device
If using a device connected to the AP console port, you need to access the RoamAbout
Access Point Installation Menu to modify the AP parameters. Perform the following:
Step
Action
1
Press Return a few times on the console port device until a menu
appears.
If the AP is connected to a DEChub 90 or is a standalone unit, the
RoamAbout Access Point Installation Menu appears.
Note: If the AP is installed in a DEChub 90, the AP must be powered off
before connecting a cable to the console port.
2
If the AP is connected to the MultiSwitch 900 console port, choose Start
Redirect Mode in the MultiSwitch Installation Menu. Afterwards, enter
the AP slot number as shown in the following example.
Enter selection: 9
================================================
Enter the slot number for redirection (1-8): [n]
setup redirected to 3: RoamAbout Access Point
The initial installation menu allows you to display and modify the Access Point
parameters. Use the Module-Specific Options menu item to display and modify the
wireless networking parameters.
To prevent other users from accessing the console port menu, choose Enable/Disable
Console Password from the menu and enable it. Then change the default SNMP
community string as described in “Configuring the AP for SNMP Management” on
page 4-16. Afterwards, the console port will require users to enter the community
string before displaying the menu.
Configuring the RoamAbout Access Point 4-3
Showing Current Settings
Showing Current Settings
You can display the settings that the AP is currently using.
Using the AP Manager, select the AP in the Managed List field and click the various
buttons, such as Wireless Parameters, Operating Modes, IP Network Parameters,
and Hardware.
In the Wireless Parameters dialog, click the Advanced button to view all the wireless
parameters. If you see a Normal button instead of Advanced, the dialog is currently
displaying all the wireless parameters. If you have changed any wireless parameters
and have not yet reset the AP, the operating (current) settings are displayed on the left
and the settings that will take affect after the next reset are on the right.
Using the console port, choose Show Current Settings to display the current AP
settings, as shown below.
=================================================================
RoamAbout Access Point,Wireless-to-Wired Bridge:HW=V1.0,RO=V1.4,SW=V4.n
SysUpTime
: 00:26:37
98 resets
SNMP Read/Write Community
: public
Console Password
: Disabled
SNMP Trap Addresses
: Not Configured
In-Band Interface Hardware Address
: 08-00-2B-A3-89-61
In-Band Interface IP Address
: 16.20.40.156
In-Band Interface Subnet Mask
: 255.0.0.0
In-Band Interface Default Gateway
: Not Configured
Wired Ethernet MAC Address
: 08-00-2B-A3-89-61
Wireless Ethernet MAC Address
: 00-60-6D-92-00-FB
Wireless Network Adapter
: RoamAbout IEEE 2.4 GHz DS
Adapter Revisions
: Hardware 2.000 Firmware 3.01
Bridge Mode
: Work Group
Upline Dump
: DISABLED
Memory
: 4194304 bytes
===================================================================
Press Return for Main Menu ...
4-4 Configuring the RoamAbout Access Point
Showing Current Settings
To display the current wireless settings, choose Module-Specific Options then select
Show Wireless Configuration. If you have changed a wireless parameter and have
not yet reset the AP, the new setting is NOT reflected in this display. The following
example shows the dialog associated with this option.
============================================================
RoamAbout Access Point Wireless Configuration
Current
Current
Current
Current
Current
Current
Current
Current
Station Name
: RoamAbout AP
Wireless Network Name : RoamAbout Default Network Name
Secure Access
: Enabled
Channel
: 2.4220 GHz (802.11-3)
AP Density
: Low
RTS Threshold
: 2347
Transmit Rate
: Auto Rate Select
DTIM Period
: 001
Press Return for Main Menu ...
Configuring the RoamAbout Access Point 4-5
Wireless Parameters
Wireless Parameters
The wireless parameters affect how the AP communicates with wireless clients or
another AP.
To modify any wireless parameter using the AP Manager, select the AP in the
Managed List field and click the Wireless Parameters button. To see all the wireless
parameters, click the Advanced button.
To modify any wireless parameter using the console port, choose Module-Specific
Options then choose Set Wireless Configuration. To not change a value while in its
screen, press Return to go back to the previous menu.
The following sections describe the various wireless parameters.
NOTE
To implement a change to one or more wireless parameters, you need to reset the
AP, as described in “Resetting the RoamAbout Access Point” on page 4-14.
Channel
The channel sets the center frequency of the AP. In a LAN-to-LAN configuration, the
APs need to be set to the same channel. In a wireless client configuration with multiple
APs, adjacent APs should be set to different channels that are at least 5 channels apart.
For example, in a configuration with 3 APs, set the channels to 1, 6, and 11. Note that
some countries only support a limited number of channels. The AP does not allow you
to set channels outside your country’s band.
Wireless clients with RoamAbout PC Cards automatically switch to the AP’s channel
when roaming between APs in a wireless network.
Wireless Network Name
The Wireless Network Name is the network name for your AP. All APs on the same
LAN must be set with the same Wireless Network Name.
If the AP is configured to communicate with wireless clients and the Secure Access
parameter is enabled, each client must be configured with the same Wireless Network
Name. If Secure Access is not enabled, clients can be configured with the AP’s
wireless network name, ANY (all uppercase), or keep the Wireless Network Name
field blank.
4-6 Configuring the RoamAbout Access Point
Wireless Parameters
Station Name
The Station Name is displayed when clients run the Client Utility. Select a name that
will help identify the location of the AP.
AP Density
The AP Density changes the sensitivity of the roaming client. When APs are placed
close together, you can change the AP Density to Medium or High to force clients to
roam sooner to a closer AP. The default value is Low. Clients should be set to the same
value as the AP.
Transmit (Tx) Rate
The transmit rate identifies the preferred data transmission speed of the AP. The actual
data transmission speed is subject to the type of PC Cards at both ends of the wireless
link and the communications quality of the link.
By default, the PC Card automatically switches to a lower rate when data transmissions
fail more than once. Transmissions at lower rates are usually more reliable.
Transmissions at higher rates do not cover the same distances as the lower data rates.
Shortly after completing the transmission, the PC Card returns to transmitting data at
the selected rate. This is called the auto-rate select feature.
Use a lower rate in networks where range is more important than speed, or network
response times are affected by numerous retransmissions. For example, set the
transmit rate to a low rate when the communications quality is low due to a low signal
level. Setting the transmit rate to a lower rate prevents the PC Card from slowing
network response times by transmitting data unsuccessfully at a higher rate then
retransmitting at a lower rate.
Use a fixed rate when performance slows down as a result of many retransmissions,
even though the devices show an excellent radio connection. This situation can occur
when, for example, microwave ovens interfere with communication. A fixed rate
prevents the PC Card from slowing network response time by retransmitting at a
slower rate. In this environment, transmitting at 1 Mbit/s is not more useful than
transmitting at 2 Mbit/s.
The transmit rate you select does not affect the receive rate. For example, you can set
the transmit rate to 1 Mbit/s and still receive 2 Mbit/s data.
Configuring the RoamAbout Access Point 4-7
Wireless Parameters
RTS Threshold
RTS Threshold, also known as medium reservation, specifies the packet size, where
messages larger than the specified size must use the RTS/CTS (Request to Send/Clear
to Send) protocol. The default value, 2347, effectively turns off the RTS Threshold.
In a wireless network, only one wireless device transmits at a time. Each device can
sense transmissions from other devices in its network that use the same frequency. This
behavior is referred to as the Carrier Sense Multiple Access/Collision Avoidance
protocol (CSMA/CA).
The RTS Threshold is useful when collisions frequently occur at the AP. This can be
caused when the AP and another device transmit data to each other simultaneously. By
lowering the RTS Threshold on the AP:
•
When a message is shorter than the RTS Threshold, the AP transmits data when it
senses that the medium is free. The RTS/CTS protocol is not used.
•
When the message exceeds the threshold, the AP sends an RTS to the client (or
AP in a LAN-to-LAN configuration). The AP waits until the device responds with
a CTS message.
Lowering the RTS Threshold imposes additional network overhead that could
negatively affect the throughput performance. Therefore, you should only lower the
RTS Threshold when the wireless network experiences frame collisions and lost
messages.
Medium Reservation on the client is useful for resolving a hidden station problem,
where two or more clients cannot sense each other’s transmissions, causing frame
collisions and lost messages. This problem can occur with clients located at opposite
ends of the AP coverage area. If you have a hidden station problem, move the clients
or AP so that the devices can sense each other’s transmissions, if possible. Otherwise,
set Medium Reservation on the RoamAbout client to the Hidden Stations setting. For
a hidden station problem, change Medium Reservation on the client, not the AP.
4-8 Configuring the RoamAbout Access Point
Wireless Parameters
IEEE Power Management (DTIM Period)
Power Management can extend battery life of clients by allowing the client to sleep for
short periods of time while the AP buffers messages for the client.
You may need to balance wireless performance versus battery-life. Power
Management can impose a more active use of the wireless medium, which might lead
to more frequent transmission delays, experienced as slower network response times
during file transfers.
With slower response times, the client may spend more time in operational mode
resulting in less effective power management. In such cases, disabling power
management on the client might result in better throughput performance.
RoamAbout PC Cards with Station Firmware lower than V2.00, do NOT support
Power Management. Enabling Power Management for such cards can cause
unpredictable computer behavior and a loss of the network connection. To check the
Station Firmware version, run the RoamAbout Client Utility, choose Diagnose Card
then choose the tab Version Info. If the secondary firmware version is less than V2.0,
check the RoamAbout web site for available upgrades.
The AP supports IEEE Power Management. The DTIM (Delivery Traffic Indication
Message) interval value sets the buffering time. For example, the default value of 1
corresponds to 100ms of sleep time. It is highly recommended that you do not change
this value.
Secure Access
When Secure Access is enabled, the AP denies access to wireless clients that do not
use the correct Wireless Network Name. When Secure Access is disabled, the AP
allows access to wireless clients that use ANY (all uppercase) as the Wireless Network
Name or have a blank Wireless Network Name.
Configuring the RoamAbout Access Point 4-9
Setting Bridge Mode
Setting Bridge Mode
The options are:
•
Workgroup Mode configures the AP to communicate with wireless clients. This
is the default setting.
•
LAN-to-LAN Mode configures the AP to communicate with another AP. The AP
to AP configuration connects two LANs.
To configure an AP for LAN-to-LAN mode, you may need to change other parameters.
For the complete procedure, refer to “Configuring the AP for LAN-to-LAN” on page
4-15.
The bridge mode setting is available by clicking the Wireless Parameters button in
the AP Manager then clicking the Advanced button. In the console port menu, select
Module-Specific Options.
NOTE
To implement this change, you need to reset the AP as described in “Resetting the
RoamAbout Access Point” on page 4-14.
Setting Default Rate Limiting (Multicast Traffic)
By default, the AP is configured to limit multicast traffic to 100Kb/sec (5%).
You can enable or disable this parameter from the AP Manager or console port.
Disabling this parameter could cause multicast traffic to use more network bandwidth.
Should a broadcast storm occur when this parameter is disabled, the multicast traffic
could cause a serious degradation of network performance.
You can change the value of the multicast traffic limit from a Network Management
Station (NMS).
The Default Rate Limiting setting is available by clicking the Operating Modes
button in the AP Manager, or selecting the Module-Specific Options in the console
port menu.
4-10 Configuring the RoamAbout Access Point
Setting Encryption
Setting Encryption
The Wired Equivalent Privacy (WEP) feature uses a specific key to encrypt all data
transmitted from the Access Point. However, it uses one of 4 keys to decode received
encrypted data. A wireless client without the correct encryption keys cannot receive
and decipher encrypted data from the Access Point. You can configure the AP to
communicate with clients that use WEP and clients that do not.
One version of the RoamAbout PC Card in the AP supports the 802.11 standard 40-bit
encryption only. Another version supports both 40-bit and 128-bit encryption. The
standard 40-bit encryption uses a 5 character key (or 10 hexadecimal digits). The
128-bit encryption uses a 13 character key (or 26 hexadecimal digits).
NOTE
A hexadecimal digit key must start with 0x, which is not counted in the number of
digits. For example, 0xABCDEF0123 is a valid 40-bit encryption hexadecimal
key (10 hex digits).
There are 4 positions, Key 1, Key 2, Key 3, and Key 4. The position of each key is
important, since the clients must enter the same key in the same position to
communicate with the AP.
In the AP Manager, the Encryption setting is available by clicking the Encryption
button. When you open the Encryption window, press F1 on your keyboard for specific
information on each field.
In the console port menu, select the Module-Specific Options. If you enable
Encryption, you must also enter at least one key and choose a transmit key.
If you wish to prevent any SNMP Manager, including the AP Manager, from changing
the Encryption parameters, select Set Exclude WEP SNMP from the Encryption
menu in the console port and enable it.
NOTE
If you enable/disable Encryption or allow/disallow nonencrypted clients to
communicate with the AP, you need to reset the AP as described in “Resetting the
RoamAbout Access Point” on page 4-14. You do not need to reset the AP to add,
delete, or modify keys.
Configuring the RoamAbout Access Point 4-11
Setting RMON Values
Setting RMON Values
The AP supports four of the nine Remote Network Monitoring MIB (RMON) groups:
Statistics, History, Alarm, and Event. However, the settings for these groups can only
be accessed with an NMS system. The console port and AP Manager can not change
or view the RMON group settings.
•
Statistics - The Statistics group contains statistics measured by the probe for the
Wired LAN and the Wireless LAN interfaces.
•
History - The History group records periodic statistical samples from a network
and stores them for later retrieval.
•
Alarm - The Alarm group periodically takes statistical samples from variables in
the probe and compares them to previously configured thresholds. If the
monitored variable crosses a threshold, an event is generated.
•
Event - The Event group controls the generation and notification of events from
this device.
When the AP is initialized, two statistics groups are generated: one for the Wired
interface and one for the Wireless interface. Also, two History groups are generated for
each interface: one with a short term polling period of thirty seconds and one with a
long term polling period of thirty minutes.
The AP has the following limits for the RMON MIB because of memory limitations:
•
A maximum of six Statistics groups.
•
A maximum of four History groups, each group allowing a maximum of fifty (50)
“buckets”, i.e., samples.
•
A maximum of ten Alarm groups.
•
A maximum of ten Event groups.
With an NMS system, you can reconfigure each group. For example, you could assign
80 buckets each to the long and short term History groups assigned to the Wired
interface, and 20 buckets each to the long and short term History groups assigned to
the Wireless interface. This example does not exceed the maximum of 200 buckets.
4-12 Configuring the RoamAbout Access Point
Checking the Configuration on Multiple APs
Checking the Configuration on Multiple APs
You can use the AP Manager to check the integrity of your APs’ configuration. This
will insure that all your APs (within a domain) are configured correctly. You can select
to check the Wireless, Mode or Firmware integrity. Before running an integrity test,
click the Select All button under the list of APs to ensure that all the APs are checked.
Wireless IDs - Checks that all APs are configured with the same Wireless Network
Name, different station name, same AP density setting, and the same RTS Threshold.
Modes - Checks that all APs are configured with the same operating modes, such as
rate limiting, upline dump, and bridge mode.
Firmware Revisions - Verifies that all APs have the same version of the firmware.
Configuring the RoamAbout Access Point 4-13
Resetting the RoamAbout Access Point
Resetting the RoamAbout Access Point
There are two ways to reset the AP:
•
Reset with Current Settings
This option reboots the AP but leaves the AP’s configured NVRAM parameters
at their current settings.
If you change any wireless configuration parameter (Wireless Network Name,
Channel, Station Name, etc.), you must select this option to reset the AP.
From the AP Manager, select Reset/Reload then select Reset with Current
Settings.
From a device attached to the console port, select Reset with Current Settings
from the Installation Menu.
Allow approximately 1 minute for the AP to reset and complete its self-test.
•
Reset with Factory Defaults
This option reboots the AP, causing the AP’s configured NVRAM parameters to
be initialized to factory default values.
This action deletes all configuration settings and replaces them with factory
default values. All configuration settings will be lost, including the IP address.
From the AP Manager, select the AP from the Managed List field, click the
Reset/Reload button, then click the Reset with Factory Defaults button.
From a device attached to the console port, select Reset with Factory Defaults
from the Installation Menu.
Allow approximately 1 minute for the AP to reset and complete its self-test.
4-14 Configuring the RoamAbout Access Point
Configuring the AP for LAN-to-LAN
Configuring the AP for LAN-to-LAN
To configure two APs to communicate with each other in a LAN-to-LAN
configuration, perform the following tasks:
1) Get the wireless MAC address of the remote AP.
You can see the wireless address via the AP Manager or console device, as
described in “Showing Current Settings” on page 4-4. The wireless MAC address
is NOT the same as the wired MAC address printed on the front of the AP.
2) Set the Bridge Mode to LAN-to-LAN, as described in “Setting Bridge Mode” on
page 4-10.
3) Make sure that the APs use the same channel. To change the AP channel, see
“Wireless Parameters” on page 4-6.
4) Set the Transmit (TX) Rate to Auto Select, which is the default setting. See
“Wireless Parameters” on page 4-6 to change the Transmit Rate.
5) Perform this procedure on the other AP.
The following AP parameters are not used in this mode:
•
Wireless Network Name
•
Secure Access
•
AP Density
•
Power Management (DTIM Period)
Configuring the RoamAbout Access Point 4-15
Configuring the AP for SNMP Management
Configuring the AP for SNMP Management
To enable SNMP management for the AP, use the AP Manager or console port to
perform the following tasks:
•
Set the in-band interface IP address of the AP.
•
Set the in-band interface default gateway address.
•
Optionally set the SNMP read/write community name (default is “public”).
•
Optionally add SNMP trap addresses.
Set In-Band Interface Addresses
To perform SNMP management on the AP, you must assign it an IP address, along
with a subnet mask and default gateway. If there is a BootP/TFTP server on the
network configured with the MAC address of the AP, the AP will get an IP address
from it.
To enter the AP’s IP address, subnet mask and default gateway using the AP
Manager:
1) Click the Setup/Add New Access Point button.
2) In the popup dialog, select Yes to load a new IP address.
3) Enter the AP’s MAC address, IP address, subnet mask, and default gateway.
4) Click OK to reset the AP. Allow approximately 1 minute for the AP to reset and
complete its self-test, then click OK.
To modify an existing AP’s subnet mask and default gateway using the AP
Manager:
1) Select the AP in the Managed List field.
2) Click the IP Network Parameters button.
3) Enter the subnet mask and default gateway.
4-16 Configuring the RoamAbout Access Point
Configuring the AP for SNMP Management
To change or delete the Access Point’s current IP address using the AP Manager:
1) Select the Access Point in the managed list.
2) Click the IP Network Parameters button.
3) Set the Address State to Volatile then click OK.
4) In the main AP Manager window, click the Reset/Reload button. Then click Reset
with Current Settings. This will set the IP address back to 0.0.0.0. The Access
Point is no longer manageable by the AP Manager.
5) Use the Setup/Add New Access Point button to give the Access Point a new IP
address and add it back to the list of managed Access Points.
To enter the AP’s IP address, subnet mask, and default gateway using the console
port:
1) At the RoamAbout Installation Menu, choose Set In-Band Interface IP Address.
2) Enter the IP address, subnet mask, and default gateway. You do not need to reset
the AP.
Configuring the RoamAbout Access Point 4-17
Configuring the AP for SNMP Management
Set SNMP Read/Write Community
To perform SNMP management on the AP, you must assign it a community name. The
format for a community name is a string consisting of 4 to 31 printable ASCII
characters. This community name can be used by SNMP managers for read/write
access control. The default community name is public.
NOTE
If you use an SNMP read/write community name other than public, you can also
prevent other users from accessing the console port menu. To require users to
enter the community string before displaying the menu, choose Enable/Disable
Console Password from the console port menu and enable it.
To enter a community name for the AP using the AP Manager:
1) Select the AP in the Managed List field.
2) Click on the Options menu and select Community Strings.
3) Enter the community name (4 to 31 printable ASCII characters) in the dialog box
and click OK. The change is sent to the AP. The AP Manager also changes its
internal community string to match the AP.
If the AP has a community name, the AP Manager and any other SNMP Manager must
have the correct community name associated with the AP; otherwise, the tool will be
unable to make any changes to the AP.
To enter a community name for the AP using the console port:
1) At the RoamAbout Installation Menu, choose Set SNMP Read/Write
Community.
2) Enter the community name (4 to 31 printable ASCII characters).
4-18 Configuring the RoamAbout Access Point
Configuring the AP for SNMP Management
Set SNMP Trap Addresses
To have the AP send SNMP traps, you need to enter the IP address of the device where
the trap is to be sent. A trap is a defined event or condition detected by the RoamAbout
Access Point SNMP agent.
To enter an SNMP trap address using the console port:
1) At the RoamAbout Installation Menu, choose Add SNMP Trap Addresses.
2) Enter the SNMP trap address.
Note: To not change the existing value, press Return to go back to the previous
menu.
To delete an existing trap address using the console port:
1) At the RoamAbout Installation Menu, choose Delete SNMP Trap Addresses.
2) Enter the existing SNMP trap address that you wish to delete.
Note: To not change the existing value, press Return to go back to the previous
menu.
Configuring the RoamAbout Access Point 4-19
Upgrading the RoamAbout Access Point
Upgrading the RoamAbout Access Point
The AP internal firmware, also called embedded software, can be easily upgraded.
This firmware is stored in an area called flash memory. You should regularly check the
RoamAbout web site (listed in the front of this guide) for the latest information
concerning new firmware releases, new features, and bug fixes.
Typically, all your parameter settings are retained after the upgrade.
To load the AP with an upgraded version of the firmware, you should copy the .bin file
from the web site to the same directory as the AP Manager or BootP/TFTP server. As
part of the upgrade, you will be asked for the location of the .bin file.
You can only upgrade one AP at a time.
The AP Manager includes a BootP/TFTP loader, called NetRider Loader, that will
upgrade the AP. If you are not using the AP Manager, you need to configure a
BootP/TFTP server.
When you start the upgrade, the AP immediately stops its operation. The firmware in
the AP’s memory is then upgraded with an image downline-loaded from the
BootP/TFTP server.
To upgrade the AP using the AP Manager:
1) Select the AP in the Managed List field.
2) Click the Reset/Reload button.
3) Click the Upgrade Flash Software button. You will see an indication of the flash
load on the NetRider Loader screen. After this happens, the AP processes the new
firmware and is unavailable for approximately one minute. The easiest way to
know this has completed is to look for normal flashing of the front panel lights or
try to communicate with the AP using the AP Manager.
To upgrade the AP using the console port:
1) Make sure that you have properly configured a BootP/TFTP server.
2) At the RoamAbout Installation Menu, choose Module-Specific Options.
3) In the next menu, choose Upgrade Flash. You will be asked to confirm the
upgrade.
4-20 Configuring the RoamAbout Access Point
Chapter 5
Problem Solving
This chapter contains problem solving information for the AP. Refer to the appropriate
section for information about solving specific problems.
Problem Solving 5-1
Using the LEDs to Determine the Problem
Using the LEDs to Determine the Problem
The LEDs on the AP show status and help you diagnose problems. After the AP is
powered up and completes its power-up self-test procedure, the LEDs indicate whether
the AP is functioning properly.
When the power-up self-test diagnostics detect a failure in the AP or you suspect a
failure, rerun the self-test to verify that the failure can be repeated. Run the self-test by
unplugging the ac power cord and plugging it back in.
Table 5-1 summarizes the AP LEDs.
Table 5-1: LED Summary Table
LED
No.
LED
Color
LED
Signal
LED On Status
Normal
1
Green
Power OK
Power is on.
On
2
Green
Module OK
Firmware is running OK.
On
3
Green
Wired LAN
Activity
Indicates activity on wired
LAN.
Blinking
4
Green
Bridge State
Indicates AP is forwarding.
On
5
Yellow
AP
Saturated
Indicates that packets are
being lost due to congestion,
or an error condition exists
(see Table 5-2).
Off
6
Green
Wireless
LAN
Activity
Indicates activity on
wireless LAN.
Blinking
7
Green
PC Card
Present
PC Card is present in the AP.
On
State
LEDs that blink do so in one of two modes:
•
Normal mode – At a variable (random) rate with varied intensity to indicate the
activity level during normal operation.
•
Error mode – At a constant (steady) rate and intensity to indicate an error.
5-2 Problem Solving
Using the LEDs to Determine the Problem
Table 5-2 describes possible AP problems and recommended corrective actions.
Table 5-2: LED Problem Solving Summary
If...
Then...
Do This...
Power OK LED (1) is off.
AP does not have
power.
Verify that the outlet has
power.
Check the power
connection to the AP.
Replace the power supply
(if a standalone
configuration).
Return the AP (contact
your sales representative).
Module OK LED (2) is
off.
Either the AP is
performing hardware
diagnostics, the
Ethernet connection is
bad, or the AP hardware
is defective.
Verify the Ethernet
connection. If the LED
still fails to light, return
the AP (contact your sales
representative).
Module OK LED (2) is
blinking in Error mode
(constant rate and
intensity), and is blinking
in unison with the AP
Saturated LED and in
unison with either the
Wired LAN or Wireless
LAN activity LED.
The AP is not connected
to either the wired LAN
or wireless LAN.
Check to see which
network activity LED the
Module OK LED is
blinking in unison with,
and verify the appropriate
connection.
Wired LAN Activity LED
(3) is blinking with a short
on once per second.
AP is not connected to
the wired network, or
there is no activity on
the wired LAN.
Verify that the AP is
physically connected to
the network.
AP Saturated LED (5) is
blinking in Normal mode.
AP is dropping packets
due to excessive traffic.
Examine your
configuration to
determine if there are one
or more users transmitting
excessive amounts of
data.
AP Saturated LED (5) is
blinking in Error mode.
This indicates an error
condition exists.
See Module OK LED
description.
Problem Solving 5-3
Using the LEDs to Determine the Problem
Table 5-2: LED Problem Solving Summary (Continued)
If...
Then...
Do This...
Wireless LAN Activity
LED (6) is blinking a short
on once per second.
There is no activity on
the wireless LAN. If
you know there is
activity on the wireless
LAN, then this status
indicates that the PC
Card has an incorrect
wireless parameter or is
not operating properly.
Reconfigure the wireless
parameters. Ensure that
the AP and all wireless
clients in the AP’s
coverage area have the
same wireless parameters.
Self-test in progress or a
spanning tree
reconfiguration is
underway.
Wait until self-test or
reconfiguration ends.
Bridge State LED (4)
is off.
Otherwise, this status
may indicate that there
is a redundant AP
handling the network
traffic and that this AP
is in Standby mode.
Verify that the PC Card is
installed properly.
If the AP is in Standby
mode, verify your
network configuration to
determine whether there is
another AP configured to
operate in the same
coverage area.
Bridge State LED (4) is
blinking.
Downline load is in
progress.
Wait for downline load to
complete.
PC Card Present LED (7)
is off.
There is no PC Card
installed in the slot, or it
is not properly inserted.
Turn off power and insert
the PC Card into the AP.
5-4 Problem Solving
Using the LEDs to Determine the Problem
Table 5-3, Table 5-4, and Table 5-5 list common conditions and the corresponding
states of the LED indicators.
Table 5-3: Normal Operating Mode LED Patterns
LEDs1
1
2
3
4
5
6
7
Meaning of LED Pattern
Normal operating mode.
AP is okay but waiting for Spanning Tree.
AP is okay but occasionally saturated.
PC Card is defective.
Ethernet problem after power-up.
1.
=on,
=off,
=steady blinking,
=random blinking
Table 5-4: Diagnostics LED Patterns
LEDs1
1
2
3
4
5
6
7
Meaning of LED Pattern
No power. (No power at the outlet or a failed
power supply.)
PC Card not inserted properly.
Diagnostics are running.
Ethernet connection broken.
Failure while initializing/testing the
memory.
1.
=on,
=off,
=steady blinking,
=random blinking,
=any state
Problem Solving 5-5
Using the LEDs to Determine the Problem
Table 5-5: Network Loading/Upline Dumping LED Patterns
LEDs1
1
2
3
4
5
6
7
Meaning of LED Pattern
Waiting for downline load from load host
Downline loading image from load host
Firmware error detected while downline
loading image from load host
TFTP file not found
Waiting for retry of TFTP load
Upgrading Flash
Flash upgrade successful
Invalid (wrong) load image
Unsuccessful Flash upgrade
Invalid load image: corrupted image
Invalid load image: image too large
TFTP error
Firmware error or number of retries
exceeded
Hardware error
1.
=on,
5-6 Problem Solving
=off,
=steady blinking,
=random blinking,
=any state
Reset Button
Reset Button
You can force a downline load of the AP’s firmware from a load host and reset to
factory parameters by pressing the Reset button on the front panel of the AP during a
power-up cycle. When you press the Reset button as the AP is powering up, the LEDs
cycle through three times to indicate that the AP recognized the reset request. If the
LEDs do not function properly after resetting the AP to its factory settings, remove the
AP and contact your sales representative.
Setting Upline Dump
This parameter allows you to specify whether the AP’s memory is upline dumped in
the event the AP crashes.
When upline dump mode is enabled, the AP’s memory is dumped to any local
BootP/TFTP load host that is configured with the AP’s address. Upline dump mode is
disabled by default.
Depending on the dump host, you may need to create a writable file to accept the dump.
The file name should be apxxxxxx.dmp, where xxxxxxx is the last 6 digits of the AP’s
wired MAC address, which is printed on the front cover of the AP.
The Upline Dump setting is available by clicking the Operating Modes button in the
AP Manager, or selecting the Module-Specific Options in the console port menu.
Problem Solving 5-7
Showing Counters
Showing Counters
You can display the values of all the counters maintained by the AP. This information
can help you to monitor the performance of your wireless network or better understand
a problem. Typically, this information is used by RoamAbout support personnel to
help you diagnose a problem.
To show a subset of the counters using the AP Manager:
1) Select the AP in the Managed List field.
2) Click the Statistics button.
To show all the counters using the console port:
1) At the RoamAbout Installation Menu, choose Module-Specific Options.
2) In the next menu, choose Show Counters.
5-8 Problem Solving
Showing Counters
The following example shows the dialogs associated with Show Counters.
Device uptime:
0 00:30:08
ETHERNET Port 0
Individually addressed bytes sent:
0
Multicast bytes sent:
111446
Individually addressed bytes received:
0
Multicast bytes received:
0
Individually addressed frames sent:
0
Multicast frames sent:
1850
Individually addressed frames received:
0
Multicast frames received:
0
Frames deferred:
0
Single collision:
0
Multiple collisions:
0
Excessive collisions:
0
Carrier check failed:
0
Transmit Frame too long:
0
Remote failure to defer:
0
Block check error:
0
Frame error:
0
Receive Frame too long:
0
Data Overrun:
0
System buffer unavailable:
0
Collision detect check fail:
0
Press RETURN to continue
WIRELESS Port 1
0
109406
0
0
0
1820
0
0
0
0
0
0
0
0
0
0
0
0
0
0
0
Wireless PC card counters
Individually addressed frames sent:
0
Multicast frames sent:
156
Fragments sent:
1665
Individually addressed bytes sent:
0
Multicast bytes sent:
10380
Deferred transmissions:
126
Single retry frames sent:
0
Multiple retry frames sent:
0
Transmit retry limit exceeded frames:
0
Transmit frames discarded:
0
Individually addressed frames received:
0
Multicast frames received:
3
Fragments received:
3
Individually addressed bytes received:
0
Multicast bytes received:
162
Receive FCS errors:
220
Receive buffer not available:
0
Wrong station address on transmit:
0
Receive WEP errors:
0
Receive message in message fragments:
0
Receive message in bad msg fragments:
0
Receive WEP ICV errors:
0
Receive WEP excluded:
0
Press Return for Main Menu ...
Problem Solving 5-9
Displaying Error Logs
Displaying Error Logs
The AP can display error logs used by support personnel when analyzing system faults.
Up to four error log dumps can be stored, and the most recent dump is displayed first.
There are two types of error logs. One for AP settings and one for wireless settings.
AP Settings
To display the AP settings error logs using the console port, choose Dump Error Log
from the RoamAbout Installation Menu.
This error log displays various information, including current reset count and
PCMCIA Card present/not present.
Wireless Settings
To display the wireless settings error logs using the console port:
1) At the RoamAbout Installation Menu, choose Module-Specific Options.
2) In the next menu, select Dump Error Log.
The following example shows the dialog associated with this option.
RoamAbout Access Point
================================================================
Product Specific ERROR LOG
================================================================
Entry
Entry
Error
Error
Number
Type
Code
Data
= 58
= OTHER EXCEPTIONS
= FC000200 Vector offset = 0512
=
0:0001E8C8
4:0000EEAC
1:00000000
5:00050400
2:20100700
6:0001CBAC
3:C3360200
7:01001596
Dump another Log entry [Y]/N ?
To see the same information in the AP Manager, select the AP in the Managed List
field and click the Hardware and Troubleshooting buttons.
5-10 Problem Solving
Removing the AP from the MultiSwitch 900 or DEChub 90
Removing the AP from the MultiSwitch 900 or DEChub 90
Follow this procedure if it becomes necessary to remove the AP:
Step
Action
1
Lift the release lever located on the top of the MultiSwitch 900 slot or
the DEChub 90 slot.
2
Pivot the AP back on its bottom mounting tab, and disengage the AP
from the backplane.
Hub Manager
Status Display
MultiSwitch 900
Lift Release Lever
VNswitch
900GV
VNswitch
900GV
DEChub 90
VNswitch
900GV
Mounting Tab
LKG-9454-941-01
Problem Solving 5-11
Appendix A
Connector, Cable, and Adapter
Pin Assignments
The following figures illustrate the connector, adapter, and cable pin assignments for
the RoamAbout Access Point.
Figure A-1: 10BaseT (8-pin MJ) Connector Pin Assignments
Pin Assignment
1
Receive (RX+)
Pin
1
8
2
Receive (RX-)
3
Transmit (TX+)
4
No connect
5
No connect
6
Transmit (TX-)
8-pin MJ connector
7
No connect
8
No connect
LKG-8895-93-01
Connector, Cable, and Adapter Pin Assignments A-1
Figure A-2: Console Port (DB-9) Connector Pin Assignments
Pin
1
2
3
4
5
6
7
8
9
Assignment
Data Carrier Detect (DCD)
Receive Data (RXD)
Transmit Data (TXD)
Data Terminal Ready (DTR)
Ground
Data Set Ready (DSR)
Request to Send (RTS)
Clear to Send (CTS)
No connect
1
6
5
9
LKG-8996-931-01
Figure A-3: BN24H Cable Pin Assignments (Used with Console Port)
8 MMP
WH/GR 1
GR/WH 2
WH/OR 3
4
5
OR/WH 6
WH/BR 7
BR/WH 8
6 MMP
1
2
3
4
5
6
LKG-4716-91-01
Figure A-4: BC16E Cable Pin Assignments (Used with Console Port)
6 MMP
1
2
3
4
5
6
6 MMP
1
2
3
4
5
6
LKG-4718-911-01
A-2 Connector, Cable, and Adapter Pin Assignments
Figure A-5: H8571-J Adapter Pin Assignments (Used with Console Port)
9 D-Sub(F)
1
2
3
4
5
6
7
8
20
6 MMJ
1
2
3
4
5
6
DCD
SD
RD
DTR
GRD
DSR
RTS
CTS
RI
LKG-5342-911-01
Figure A-6: H8575-A Adapter Pin Assignments (Used with Console Port)
25 D-Sub(F)
6 MMJ
DTR
TX+
TX RXRX +
DSR
1
2
3
4
5
6
1
2
3
4
5
6
7
8
20
LKG-8793-931-01
Connector, Cable, and Adapter Pin Assignments A-3