1
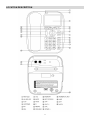
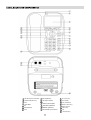
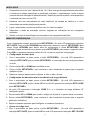
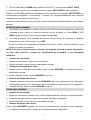
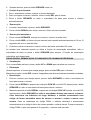
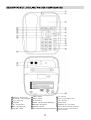
GUIA DEL USUARIO
DTC-360
INTRODUCCIÓN
Gracias por adquirir nuestro nuevo teléfono con función de identificación de llamadas. En este
manual encontrará información que le ayudará a familiarizarse con el teléfono. Para obtener un
rendimiento óptimo del teléfono, le recomendamos que lea este manual de instrucciones
atentamente antes de utilizar el teléfono por primera vez.
INSTRUCCIONES DE SEGURIDAD
Cuando utilice este teléfono, asegúrese de tomar siempre las precauciones de seguridad básicas
que se describen a continuación para evitar el riesgo de incendios, descargas eléctricas y daños
a las personas.
1. Lea atentamente y cumpla todas las advertencias e instrucciones.
2. Desenchufe el teléfono de la toma de línea de la pared antes de limpiarlo. No utilice productos
de limpieza líquidos ni aerosoles. Límpielo con un trapo húmedo.
3. No coloque el teléfono encima de superficies inestables ya que podría caer y sufrir daños
irreparables.
4. No introduzca objetos extraños de ningún tipo dentro del dispositivo a través de las ranuras de
la cubierta ya que podrían tocar puntos de voltaje peligrosos o cortocircuitar componentes, lo
que podría ocasionar un incendio o una descarga eléctrica. No derrame líquidos de ningún
tipo encima del teléfono.
5. No mueva ni desconecte el teléfono durante tormentas con aparato eléctrico ya que existe el
riesgo de sufrir una descarga eléctrica.
6. Si el teléfono presenta problemas, envíelo al servicio de asistencia técnica. No intente
repararlo usted mismo.
7. Siempre use baterías nuevas del tipo y tamaño especificados. Quite las baterías viejas o
descargadas y deseche de acuerdo con sus regulaciones locales.
CARACTERÍSTICAS
¾ FSK/DTMF/ compatible con detección automática
¾ Pantalla LCD de 12 dígitos con reloj y termómetro
¾ Memorias para 55 números entrantes, 18 números salientes y 55 números VIP
¾ 1 tecla de llamada directa y 12 memorias indirectas
¾ 8 tipos de tonos de llamada para seleccionar
¾ 3 tipos de melodías de espera para seleccionar
¾ Función de no molestar
¾ Función de transferencia de llamadas
¾ Función de prellamada y edición
¾ Función de rellamada y rellamada automática
¾ Función de bloqueo de 3 posiciones
¾ 5 niveles de contraste para la pantalla LCD
2
¾ Función calculadora
¾ Configuración del código PABX
¾ Compatibilidad con el modo de marcación por tonos o pulsos
¾ 3 niveles de volumen para el modo de manos libres
¾ 4 niveles de selección del volumen del timbre
¾ Función Baby Call
¾ Función de retroiluminación de la pantalla LCD
¾ Tecnología a prueba de descargas eléctricas
¾ Función de marcación y escucha en modo de manos libres
¾ Indicador LED de uso y nueva llamada
3
1 LED NUEVA LLAMADA
8 MUTE
15 ARRIBA
2 LED EN USO
9 PAUSA
16 NÚM. SALIENTE
3 LCD
10 TRANSFERENCIA LLAMADAS
17 CALCULADORA
4 VIP
11 RELLAMADA
18 ABAJO
5 MEMORIA M1
12 MANOS LIBRES
19 TECLADO NUMERICO
6 ELIMINAR
13 MEMORIA
20 LINEA
7 VOLUMEN
14 CONFIGURAR/CONFIRMAR
21 EXT
22 BLOQUEO
INSTALACIÓN
1. El dispositivo funciona con 3 pilas de tamaño AA de 1,5 V. Abra la cubierta del compartimiento
para pilas e introduzca las pilas según la polaridad indicada y, a continuación, cierre la cubierta
(se recomienda utilizar pilas alcalinas). Después de introducir las pilas, debería aparecer la hora
en la pantalla LCD del teléfono.
2. Introduzca un extremo del cable telefónico en la toma de línea de la base del teléfono y el otro
extremo en la toma telefónica de la pared.
3. Conecte el auricular y la base con un cable en espiral.
4. Seleccione el modo de marcación correcto según las indicaciones de su compañía telefónica.
5. Solicite el servicio de identificación de llamadas a su compañía telefónica.
MENÚ DE CONFIGURACIÓN
Con el auricular colgado, presione el botón SET/STORE/÷ /STORE/÷ para acceder al menú, la
pantalla mostrará SET 1 DATE. Pulse UP/- o DOWN/+ para seleccionar el submenú y presione
SET/STORE/÷ para entrar en la opción. Presione UP/- o DOWN/+ para cambiar la configuración
la valor deseado y presione el botón SET/STORE/÷ para pasar al siguiente menú. Si pulsa DEL o
ningún botón durante 10 segundos saldrá del modo de configuración.
¾ Configuración de la fecha y la hora
1. Con el auricular colgado, pulse el botón SET/STORE/÷ , la pantalla mostrará SET1 DATE.
Presione SET/STORE/÷ y el valor del año parpadeará.
2. Pulse el botón UP o DOWN para modificar el año.
3. Pulse el botón SET/STORE/÷
para confirmar el valor introducido y pasar al siguiente
parámetro de mes.
4. Repita los mismos pasos para configurar el mes, la fecha y la hora.
NOTA: Cuando conecte la unidad por primera vez la pantalla LCD mostrará automáticamente la
fecha para que sea configurada.
¾ Configuración del código de área local y el código de larga distancia
1. Tras configurar la fecha y la hora, pulse el botón SET/STORE/÷ . En la pantalla LCD
aparecerá SET 2 CODE, pulse SET y la pantalla mostrará CODE 0----- y el código de larga
distancia "0" parpadeará.
2. Pulse el botón UP o DOWN para cambiar el código del 0 al 9 o para dejarlo en blanco.
3. Pulse el botón SET/STORE/÷
para confirmar el valor introducido y pasar al siguiente
parámetro de código.
4. Repita los pasos anteriores para configurar el resto de códigos.
¾ Configuración del código PABX
1. Tras configurar el código de área local, pulse el botón SET/STORE/÷ . En la pantalla LCD
aparecerá SET 3 PCODE, pulse SET y la pantalla mostrará PCODE ----- y el campo "-"
parpadea.
5
2. Pulse el botón UP o DOWN para configurar el código PABX del 0 al 9 o para dejarlo en
blanco.
3. Si decide dejarlo en blanco "-", no se configurará ningún código PABX.
4. Pulse el botón SET/STORE/÷ para confirmar la selección y salir.
¾ Configuración del tiempo FLASH
1. Con el auricular colgado, pulse SET/STORE/÷ y pulse UP hasta que aparezca en la pantalla
SET4 FLASH.
2. Puse el botón SET/STORE/÷ y en la pantalla LCD aparecerá FLASH 4 110.
3. Pulse el botón UP o DOWN para ajustar el tiempo FLASH, puede seleccionar entre 1000ms,
600ms, 300ms o 100ms.
4. Pulse el botón SET/STORE/÷ para confirmar la selección y salir
¾ Ajuste del contraste de la pantalla LCD
1. Con el auricular colgado, pulse SET/STORE/÷ y pulse UP hasta que aparezca en la pantalla
SET5 LCD. Pulse SET/STORE/÷ la pantalla mostrará LCD3
2. Pulse el botón UP o DOWN para ajustar el contraste de la pantalla LCD. Se pueden
seleccionar hasta un total de 5 niveles.
3. Pulse el botón SET/STORE/÷ para confirmar la selección y salir.
Con el auricular colgado, pulse el botón R para acceder directamente al parámetro de
contraste de la pantalla LCD y, a continuación, pulse el botón R varias veces para ajustar
el contraste de la pantalla LCD.
¾ Configuración de la alarma
1. Con el auricular colgado, pulse el botón SET/STORE/÷ pulse UP hasta que aparezca en la
pantalla SET6 ALERT y en la pantalla LCD aparecerá 1 00-00 OFF y el numero 1 parpadea.
Pulse el botón UP o DOWN para seleccionar el numero de alarma 1,2 o3. Pulse
SET/STORE/÷ para editar la hora de la alarma.
2. Pulse el botón UP o DOWN para ajustar la hora de la alarma, y pulse SET/STORE/÷ para
confirmar cada dígito.
3. Después de configurar la hora, OFF parpadea, pulse UP o DOWN para activar la alarma ON.
4. Pulse el botón SET/STORE/÷ para confirmar.
5. Repita los pasos anteriores para configurar las 2 alarmas adicionales.
NOTA: Cuando se alcance la hora de la alarma el teléfono emitirá le pitido durante 1 minuto.
Pulse cualquier tecla para parar la alarma. La función de alarma solo está disponible cuando el
teléfono está conectado a la línea telefónica.
¾ Configuración de la función anti llamadas externas
1. Con el auricular colgado, pulse el botón SET/STORE/÷ pulse UP hasta que aparezca en la
pantalla SET7 PPP y en la pantalla LCD aparecerá PPP OFF y el texto OFF parpadea. Pulse
el botón UP o DOWN para seleccionar ON.
6
2. Pulse el botón SET/STORE/÷ para confirmar. En la pantalla aparece el icono
.
NOTA: Cuando esta función esta activada ON, no permite realizar llamadas desde teléfonos
conectados a la misma línea, dará una señal di-di al descolgar el resto de teléfonos. Si conecta
varios teléfonos a la misma línea seleccione OFF si desea realizar llamadas desde todos ellos.
¾ Configuración de la función baby call
1. Con el auricular colgado, pulse el botón SET/STORE/÷ pulse UP hasta que aparezca en la
pantalla SET8 BABY y en la pantalla LCD aparecerá BABY OFF y el texto OFF parpadea.
Pulse el botón UP o DOWN para seleccionar ON/OFF.
2. Cuando seleccione BABY ON, pulse SET/STORE/÷, la pantalla LCD mostrará INPUT CODE
3. Introduzca el número baby-call usando el teclado numérico.
Cuando la función Baby call está activada, al descolgar el auricular o presiona cualquier tecla
(excepto SET/STORE/÷), se marcará el número guardado como Baby call automáticamente.
¾ Configuración del código de extensión para transferencia de llamadas.
1. Con el auricular colgado, pulse el botón SET/STORE/÷ pulse UP hasta que aparezca en la
pantalla SET9 ECODE, pulse el botón SET/STORE/÷
y en la pantalla LCD aparecerá
ECODE -- .
2. El primer “-“ parpadeará para introducir el primer dígito del código de extensión.
3. Pulse el botón UP o DOWN para seleccionar un número 0-9, pulse el botón SET/STORE/÷
para confirmar. Seleccione el segundo dígito de la misma manera.
RECEPCIÓN DE UNA LLAMADA
1. Al recibir una llamada, el teléfono suena y la pantalla LCD muestra el número de secuencia
de la llamada, la fecha, la hora, el número de teléfono entrante y el icono NEW. El LED NEW
parpadea si hay una llamada sin contestar.
2. Si vuelve a recibir una llamada del mismo número y la llamada anterior no se ha visualizado,
la pantalla LCD muestra el icono REP.
Cuando la memoria de llamadas entrantes está llena, el último número entrante sustituye al
más antiguo de la memoria, excepto los números VIP.
NOTA: Para que el teléfono muestre el número entrante y otra información en la pantalla,
debe solicitar el servicio de identificación de llamadas a su compañía telefónica.
¾ Desde el auricular
1. Descuelgue el auricular y hable con la otra persona.
2. Cuando haya terminado, vuelva a colocar el auricular en la base.
¾ Uso del altavoz
1. Cuando esté hablando por el auricular, pulse el botón SPEAKER y vuelva a colocar el
auricular en la base.
2. Cuando haya terminado, pulse el botón SPEAKER otra vez.
7
¾ Desde el altavoz
1. Cuando suene el teléfono, pulse el botón SPEAKER y hable con la persona que llama. Para
que la otra persona le pueda oír claramente, hable a una distancia máxima de 32 cm del
altavoz.
2. Cuando haya terminado, pulse el botón SPEAKER otra vez.
REALIZAR UNA LLAMADA
¾ Desde el auricular
1. Descuelgue el auricular, cuando oiga la señal de línea, marque el número que desee.
2. El teléfono empezará a medir el tiempo de la conversación al cabo de 6 segundos.
3. Cuando haya terminado, vuelva a colocar el auricular en la base.
¾ Desde el altavoz
1. Pulse el botón SPEAKER, cuando oiga la señal de línea, marque el número que desee.
2. El teléfono empezará a medir el tiempo de la conversación al cabo de 6 segundos.
3. Cuando haya terminado, pulse el botón SPEAKER otra vez.
¾ Función de prellamada
1. Con el auricular en la base, marque el número que desee.
2. Si se equivoca de número, utilice el botón DEL para modificarlo.
3. Pulse el botón SPEAKER o descuelgue el auricular y el número se marcará
automáticamente.
¾
Rellamada
1. Descuelgue el auricular o pulse el botón SPEAKER.
2. Pulse el botón REDIAL para volver a llamar al último número marcado.
¾
Rellamada automática
1. Pulse el botón SPEAKER, marque un número y si oye una señal de comunicar
2. Pulse el botón ARD y el último número marcado se volverá a marcar automáticamente cada
9 o 10 segundos hasta que se oiga la señal de línea.
3. El teléfono volverá a marcar el mismo número automáticamente 32 veces.
Al recibir una llamada mientras usa la función de rellamada automática, descuelgue el auricular o
pulse el botón SPEAKER para responder. La función de rellamada automática se desactivará.
VISUALIZACIÓN, RELLAMADA Y BORRADO DE NÚMEROS ENTRANTES
¾ Visualización
Con el auricular colgado, pulse el botón UP o DOWN para desplazarse y visualizar los números.
La pantalla LCD muestra END cuando ha visualizado todos los números.
Mientras revisa los números puede presionar la tecla VIP/P/DND para establecer números VIP
que no serán borrados de la memoria. Se mostrará un icono “VIP” en la pantalla.
8
¾ Borrado
Cuando aparezca el número que desea borrar, pulse el botón DEL para borrarlo. Si se trata de un
número VIP, debe pulsar primero VIP/P/DND para cancelar el atributo VIP antes de borrarlo.
Mantenga pulsado el botón DEL durante 3 segundos para borrar todos los números entrantes
(incluidos los números VIP).
¾ Rellamada
1. Vaya al número al que desea llamar, pulse el botón SPEAKER o descuelgue el auricular y el
número se marcará.
2. Pulse el botón REDIAL y en la pantalla LCD aparecerá PICK UP, pulse el botón SPEAKER o
descuelgue el auricular y el número se marcará.
3. Mantenga pulsado el botón REDIAL hasta que PICK UP parpadee y, a continuación, pulse el
botón SPEAKER o descuelgue el auricular y el número se marcará. Si se establece el código
de larga distancia, el teléfono añadirá este código delante del número automáticamente y, a
continuación, volverá a marcarlo. Si se establece el código PABX, el teléfono detectará y
añadirá el código delante del número automáticamente cuando vuelva a marcar el número.
Primero marcará el código PABX y, tras una pausa de 2 segundos, marcará el número.
VISUALIZACIÓN, RELLAMADA Y BORRADO DE NÚMEROS SALIENTES
¾ Visualización
Con el auricular colgado, pulse el botón OUT y, a continuación, vuelva a pulsar el botón OUT para
visualizar los números salientes uno por uno.
¾ Rellamada
1. Con el auricular colgado, pulse el botón OUT para visualizar el número que desee y, a
continuación, pulse el botón SPEAKER o descuelgue el auricular y el número se marcará.
2. Pulse el botón REDIAL y en la pantalla LCD aparecerá PICK UP, pulse el botón SPEAKER o
descuelgue el auricular y el número se marcará.
¾ Borrado
1. Con el auricular colgado, pulse el botón OUT para desplazarse hasta el número que desea
borrar.
2. Pulse el botón DEL para borrarlo.
3. Mantenga pulsado el botón DEL durante 3 segundos. De esta manera, se borrarán todos los
números.
FUNCIONAMIENTO DE LA MEMORIA DIRECTA ( 1 PULSACIÓN)
¾ Almacenamiento de un número en la memoria de una pulsación
1. Marque el número que desee o busque el número entrante o saliente que desee almacenar.
2. Pulse el botón SET/STORE/÷.
3. Pulse el botón M1.
¾ Realización de una llamada desde la memoria de una pulsación
9
Con el auricular colgado o descolgado, pulse el botón M1 para marcar el número almacenado.
FUNCIONAMIENTO DE LA MEMORIA INDIRECTA (2 PULSACIONES)
¾ Almacenamiento de un número en la memoria de dos pulsaciones
1. Marque el número que desee o busque el número entrante o saliente que desee almacenar.
2. Pulse el botón SET/STORE/÷..
3. Pulse un dígito del 0 al 9, *, #).
¾ Realización de una llamada desde la memoria de dos pulsaciones
Con el auricular descolgado o en modo de manos libres, pulse el botón MEMORY y un dígito (0-9,
*, #) y el número correspondiente se marcará.
FUNCIÓN MUTE
Cuando el teléfono recibe una llamada y suena pero no quiera contestar la llamada, puede pulsar
el botón MUTE para silenciar el timbre del teléfono.
CONFIGURACIÓN DEL TONO DE LLAMADA
Existen 8 tipos de tonos de llamada para seleccionar:
1.
Con el auricular colgado, pulse el botón HOLD y en la pantalla LCD aparecerá ring 02 db8.
2.
Pulse HOLD o UP/DOWN para seleccionar el tono que desee o para desactivarlo.
3.
Pulse DEL para confirmar la selección y salir.
NOTA: Cuando desactive el tono, pasará a modo de "no molestar". Cuando el teléfono se
encuentre en este modo, no sonará cuando reciba una llamada entrante.
CONFIGURACIÓN DEL VOLUMEN DEL TIMBRE Y MANOS LIBRES
Con el auricular colgado pulse la tecla VOL varias veces para escoger el volumen de la llamada,
hay 4 niveles para el volumen del timbre, pulse DEL para confirmar.
En modo de manos libres, pulse el botón VOL varias veces para ajustar el volumen de manos
libres. La pantalla mostrará un total de 3 niveles de volumen.
FUNCIÓN NO MOLESTAR
1. Con el auricular colgado, pulse el botón VIP/P/DND, la pantalla LCD muestra DND 08-00.
2. Pulse UP o DOWN para ajustar la duración de la función no molestar.
3. Pulse el botón VIP/P/DND, el teléfono entra en modo no molestar y la pantalla LCD muestra la
cuenta atrás.
Cuando la función no molestar está activada, el teléfono tan solo mostrará le número entrante
durante 6 segundos sin sonar ningún timbre para las llamadas normales, para los números VIP si
que se emitirá el timbre normal.
Cuando se acabe la cuenta atrás el teléfono pasará a modo normal, también puede desconectar
la función no molestar pulsando de nuevo el botón VIP/P/DND, la pantalla mostrará DND OFF.
R TRANSFERENCIA DE LLAMADAS
Para transferir una llamada en curso a otro número de teléfono, marque la tecla R y a
10
continuación marque el número de destino. Espere tono y coloque el auricular en la base para
finalizar la transferencia de la llamada.
También puede transferir llamadas entre teléfonos conectados a la misma línea. Deberá a signar
a cada uno un código ECODE, cuando reciba una llamada puede descolgar cualquiera de los
teléfonos conectados a la línea y transferir la llamada a otro terminal pulsando el botón
SET/STORE/÷ y a continuación el código ECODE del otro terminal.
MELODÍA DE ESPERA
¾ Selección de melodía de espera
Existen 3 tipos de melodía de espera para seleccionar.
1. Con el auricular descolgado o en modo de manos libres, pulse el botón HOLD.
2. Pulse el botón OUT para seleccionar la melodía de espera que desee. Se reproducirá la
melodía que ha seleccionado.
3. Pulse el botón UP o DOWN para seleccionar uno de los 4 niveles de volumen de la melodía
de espera.
4. Pulse el botón HOLD para salir.
¾ Cuando hable por el auricular, pulse el botón HOLD para activar el modo de espera e
iniciar la reproducción de la melodía de espera.
1. Pulse el botón HOLD para desactivar el modo de espera y continuar hablando por el auricular.
2. Si cuelga el auricular, accederá al modo de espera en manos libres.
¾ Cuando hable en modo de manos libres, pulse el botón HOLD para activar el modo de
espera e iniciar la reproducción de la melodía de espera.
1. Descuelgue el auricular para hablar por el auricular.
2. Pulse el botón SPEAKER para salir del modo de espera y hablar en modo de manos libres.
FUNCIÓN DE RETROILUMINACIÓN DE LA PANTALLA LCD
La luz de la pantalla se enciende al recibir una llamada entrante, marcar un número, pulsar
cualquier botón o en modo de melodía de espera. Se apagará si el teléfono se deja en reposo
durante 6 segundos.
NOTA: Si las pilas no están cargadas, la pantalla LCD no se iluminará.
FUNCIÓN DE PAUSA
Si marca un número desde una centralita PABX, pulse el número PABX (normalmente "0" o "9"),
el botón VIP/P/DND y el número al que desea llamar. Cuando vuelva a llamar, no tendrá que
volver a marcar el número PABX ni el botón VIP/P/DND; sólo tendrá que pulsar el botón REDIAL.
BLOQUEO
Gire la llave hasta la posición de color amarillo para bloquear todos los números, excepto los
números de emergencia.
Gire la llave hasta la posición verde para bloquear todos los números que empiecen por "0".
Gire la llave hasta la posición de color rojo para poder marcar todos los números.
11
FUNCIÓN CALCULADORA
Con el auricular colgado, presione el botón CAL, la pantalla mostrará “0”, está en modo
calculadora, puede realizar las siguientes operaciones: + (UP/+), - (DOWN/-), x (OUT/x) y ÷ , la
tecla #/= muestra los resultados.
SOLUCIÓN DE PROBLEMAS
-
No hay sonido
Compruebe que el auricular esté conectado al teléfono y que la línea no esté cortada.
-
Sólo se pueden recibir llamadas
Compruebe que el modo de marcación por tonos o pulsos esté configurado correctamente.
Compruebe si el dispositivo está bloqueado. Si lo está, utilice la llave para desbloquearlo.
-
Las pilas se han oxidado o derramado
Elimine el óxido o limpie el derrame.
-
Se oye ruido
Compruebe si hay un cortocircuito. Si es necesario, cambie el circuito.
Compruebe si el conector está húmedo u oxidado. Si lo está, cambie el conector.
-
Suena una vez pero se desconecta al recibir una llamada. La función de marcación sigue
estando disponible.
Compruebe si el conector se encuentra en un entorno húmedo.
Compruebe si se utilizan demasiados alargos a la vez o si el alargo no se encuentra en buen
estado. Cambie el alargo defectuoso.
-
La pantalla LCD está oscura
Compruebe que el contraste de la pantalla LCD esté configurado correctamente y que las
pilas no se hayan agotado. Ajuste el contraste de la pantalla LCD. Si la pantalla sigue
estando oscura, sustituya las pilas.
-
No suena
Compruebe si el timbre está desactivado. Si lo está, actívelo.
-
La mayoría de funciones fallan
Compruebe que las pilas estén suficientemente cargadas. Si es necesario, cambie las pilas.
Si las pilas están bien, extráigalas y desconecte todos los cables. Vuelva a colocar las pilas y
conectar los cables al cabo de 10 minutos.
NOTA: Debido al desarrollo constante de nuestros productos, todas las funciones y
especificaciones están sujetas a cambios sin previo aviso.
12
DECLARACIÓN DE CONFORMIDAD
Por medio de la presente Flamagas SA declara que el modelo DTC-360 cumple los requisitos y
objetivos de protección básicos de:
•
La Directiva 1999/5/CE de la CE sobre ER+ETT
Para ver la declaración de
www.electronicaflamagas.com
conformidad
completa
del
equipo
visite
la
página:
GARANTIA
Este aparato tiene una garantía de 2 años desde la fecha de adquisición contra todo fallo de
fabricación. Esta garantía no cubre las pilas.
El incumplimiento de las instrucciones o precauciones de uso contenidas en este manual
implican la pérdida automática de la garantía.
Para que esta garantía tenga validez, es necesario presentar el ticket o factura de compra
original.
Importador exclusivo Flamagas S.A., www.electronicaflamagas.com
13
USER GUIDE
DTC-360
14
INTRODUCTION
Thank you for your purchasing our newest Caller ID phone. This manual is designed to familiarize
you with this phone. To get maximum use from your new phone, we suggest that you read this
Instruction Manual carefully before operating it.
SAFETY INSTRUCTION
When using your telephone equipment, the following basic safety precautions should always be
followed to reduce the risk of fire, electric shock and injury to persons:
1. Read and understand all instructions
2. Follow all warnings and instructions.
3. Unplug the product from the wall outlet before cleaning. Do not use liquid cleaners or aerosol
cleaners. Use damp cloth for cleaning.
4. If you will not use the phone for more than 30 days, remove the batteries because they may
leak and damage the phone.
5. Do not place this product on an unstable cart, stand or table. The product may fall, causing
serious damage to the product.
6. Do not overload wall outlets and extension cords as this can result in the risk of fire or electric
shock.
7. Never push objects of any kind into this product through cabinet slots as they may touch
dangerous voltage points or short out parts that could result in a risk of fire or electric shock.
Never spill liquid of any kind on the product.
8. Avoid using this phone during an electrical storm, move or disconnect the phone, there may
be a remote risk of electronic shock from lightning and thunder.
FEATURES
¾ FSK/DTMF compatible with auto-detection
¾ 12-digit LCD display with round clock and thermometer
¾ Dynamic storage: 55 incoming calls (16 digits), 18 outgoing calls (8 digits) and 55 VIP calls
¾ 1 one-touch memories and 12 two-touch memories
¾ 8 normal ringing tones selectable
¾ 3 groups normal alarm clock
¾ 2-digit PABX code setting
¾ 5-digit local area code set and auto-filter the local area code
¾ Pre-dial and edit function with 32-digit maximum
¾ Hold with music
¾ Mute function
¾ DND (Do Not Disturb) function
15
¾ Intercom and Transfer call function between parallel phones
¾ 4 steps ringing volume adjustment
¾ 3 steps hands-free volume adjustment
¾ 3-step lock function
¾ Redial and auto-redial function
¾ Calculator function
¾ Baby call function
¾ LCD backlight function
¾ 5 levels of LCD contrast adjustable
¾ Thunder-proof and anti-dialing from parallel phones function
¾ Hands-free dialing and speaking function
¾ In use and new call LED indicator
16
LOCATION DESCRIPTION
17
GETTING STARTED
1. The unit requires 3×1.5V AA batteries. Open the battery compartment cover and insert the
batteries in the right polarity, then close the cover (Proposal using alkali battery). There should
be time display on the liquid crystal screen after the batteries are inserted.
2. Insert one end of the line cord to the line jack of the base and the other end to the wall outlet of
exchange.
3. Connect the handset and the base with coiled line.
4. Setting the dialing mode to correct mode according to the directions from your local telecom.
5. Apply for the caller ID service from your local telecom office.
SETTING MENU
At on-hook state, press SET/STORE/÷ key into the setting menu, LCD will display SET 1 DATE.
Use UP/- or DOWN/+ key to select the submenu and press SET/STORE/÷ key to enter. At
setting course, press UP/- or DOWN/+ key to change setting items and press SET/STORE/÷ key
to confirm. After finishing one submenu, press SET/STORE/÷ key to enter next. Press DEL key or
no operation within 10s, it will exit setting mode.
The detail item settings are as follow:
¾ Setting date and time
1. At on-hook state, press SET/STORE/÷ key, LCD displays SET 1 DATE
2. Press SET/STORE/÷ key, the last two digits of year flash.
3. Press UP/- or DOWN/+ key to edit the year. Press SET/STORE/÷ key to confirm and enter
month setting, use the same method to set the month, day, hour and minute.
Note: LCD will automatically display the corresponding week of the day.
When the unit is powered on initially, LCD will be reminded to set the date first. Use above
methods to set it, and then press SET/STORE/÷ key to come back to standby state.
¾ Setting local area code
1. At on-hook state, press SET/STORE/÷ key and UP/- key, LCD will display SET 2 CODE
2. Press SET/STORE/÷ key again, LCD displays CODE ----- or the preset local area code.
3. Press UP/- or DOWN/+ key to set the first digit of local area code from 0 to 9.
4. Press SET/STORE/÷ key to confirm and enter the second digit setting. Use the same method
to set the last 4 digits. If the local area code has only 4 digits, the last digit can be left as “-”.
Note: After setting the local area code, the phone can auto-filter local area code, and only display
the last digits of an incoming call number.
¾ Setting PABX code
1. At on-hook state, press SET/STORE/÷ key and UP/- key twice, LCD displays SET 3
PCODE.
2. Press SET/STORE/÷ to confirm, LCD displays PCODE - - or the preset PABX code.
3. The first “-” flashes to indicate to set the first code.
18
4. Press UP/- or DOWN/+ key to set the first code, press SET/STORE/÷ key to confirm. Set the
second code by same way. If PABX code has one digit only, set the second digit to “-”.
¾ Setting Flash time
1. At on-hook state, press SET/STORE/÷ key and UP/- key three times, LCD displays SET 4
FLASH
2. Press SET/STORE/÷ key again, LCD displays FLASH 4 110
3. Press UP/- or DOWN/+ key to edit the Flash time to 110, 300, 600 or 1000ms.
4. Press SET/STORE/÷ to confirm.
¾ Setting the LCD contrast
1. At on-hook state, press SET/STORE/÷ key and UP/- key four times, LCD displays SET 5
LCD. Press SET/STORE/÷ key again, LCD displays LCD 3
2. Press UP/- or DOWN/+ key to adjust the LCD contrast, total 5 levels can be selected.
3. Press SET/STORE/÷ key to confirm.
Note: Alternatively in on-hook state, press R key continually to adjust the LCD contrast to the
comfortable level, press DEL key to save and quit.
¾ Setting normal alarm clock
1. At on-hook state, press SET/STORE/÷ key and UP/- key five times, LCD displays SET 6
ALERT
2. Press SET/STORE/÷ key, LCD displays 1 00-00 OFF and the number “1” flashes, press UP/
- or DOWN/+ key to select the group number from 1~3. Press SET/STORE/÷ key to go into
the alarm time setting.
3. Use the UP/- or DOWN/+ to adjust the alarm time, and press SET/STORE/÷ key to confirm
every digit.
4. After setting alarm time, the OFF flashes; press the UP/- or DOWN/+ key to select ON.
5. Press SET/STORE/÷ key to confirm.
6. Set the rest 2 groups normal alarm clock by the same way.
Note: After time runs up to the set alarm time, the phone will send out “DI, DI” sound for 1 minute.
Press any key to stop alarming and return to on-hook state.
The alarm clock is available only when the phone is connected to telephone line.
¾ Setting anti-dialing from parallel phones
1. At on-hook state, press SET/STORE/÷ key and UP/- key six times, LCD displays SET 7 PPP
2. Press SET/STORE/÷ key to confirm, LCD displays PPP OFF
3. Press UP/- or DOWN/+ key to select ON.
4. Press SET/STORE/÷ key to confirm, LCD displays a
icon.
Note: After setting it to ON, it will not allow making and receiving calls from parallel phones,
otherwise it will send out “di-du” tone. So please set it as OFF if you connect any extension to the
phone, otherwise the extension phone cannot work properly.
19
¾ Setting baby-call function
1. At on-hook state, press SET/STORE/÷ key and UP/- key seven times, LCD displays SET 8
BABY.
2. Press SET/STORE/÷ key again, LCD displays BABY OFF or BABY ON
3. Press UP/- or DOWN/+ key to select ON or OFF.
4. When select BABY ON, press SET/STORE/÷ key to confirm, LCD displays INPUT CODE
5. Input the baby-call number using numeric keys.
6. Press SET/STORE/÷ key to confirm.
After you set baby-call function at ON, pick up handset or press any key (except the
SET/STORE/÷ key), the baby-call number will be dialed out automatically.
Note: If the lock is at the position of forbidding all, the baby-call function is not effective.
¾ Set extension code for transferring calls
1. At on-hook state, press SET/STORE/÷ key and UP/- key eight times, LCD displays SET 9
ECODE
2. Press SET/STORE/÷ key again, LCD displays ECODE --.
3. The first “-” flashes to indicate to set the first digit extension code.
4. Press UP/- or DOWN/+ key to select it from 0~9, press SET/STORE/÷ key to confirm. Set
the second digit by same way. Both digits extension code are required, otherwise it is not
available.
Note: Please refer the section “INTERCOM AND TRANSFER CALL FUNCTION” to perform
intercom calls and transfer incoming calls with the help of the extension code.
¾ OPERATIONS DESCRIPTION
CALLER ID MESSAGE
1. When a call comes in, the telephone rings, and LCD displays the seq. number of the call, the
date, time, incoming number and NEW icon. The current date and time will be updated by the
FSK Caller ID signal while the year setting remains unchanged. DTMF Caller ID signal will not
change the date and time setting as it only contains the caller’s number.
2. If the number has come twice and has not been checked, LCD displays REP icon.
3. If the caller has subscribed the private service, LCD displays ---P---; when the message is
wrong, LCD displays ---E---; when the caller has not got the Caller ID service, LCD displays
---o--4. When incoming memory is full, the last incoming number is always replacing the oldest
number except VIP numbers.
5. If there are missed calls haven’t been reviewed, the NEW LED can flicker to indicate, and will
not stop until you reviewed all missed calls.
20
RECEIVING A CALL
¾ From handset
1. Pick up the handset and talk to the other party.
2. When finished, return the handset to the base.
¾ Switching to speakerphone
1. When using the handset, press
2. When finished, press
key and return the handset to the base.
key again.
¾ From speakerphone
key and talk to the caller. For the other party to hear your
1. When the telephone rings, press
voice clearly, speak into the speaker from a distance of 32cm or less.
2. When finished, press
key again.
Note: Generally telecom transmits the incoming message between the first ring and the second
ring. So please answer calls after the second ring.
MAKING A CALL
¾ From handset
1. Pick up the handset.
2. When you hear the dial tone, dial the desired number.
3. The phone will start to time the conversation after 6 seconds.
4. When finished, return the handset to the base.
¾ From Speakerphone
1. Press
key. When you hear the dialing tone, dial the desired number.
2. The phone will start to time the conversation after 6 seconds.
3. When finished, press
key again.
¾ Pre-dialing function
1. At on-hook state, dial the number using numerical key, if a mistake use DEL key to edit.
2. Press REDIAL key, the pre-dialed number will be auto-dialed out.
a) Redial function
1. Pick up the handset or press
key,
2. Press REDIAL key, the last dialed number will be dialed again.
b) Auto-redial function
1. Press
key, dial a number, if you hear an engaged tone.
2. Press REDIAL key and the dialed number will be redialed automatically at every 6 seconds
until the line is through.
3. The phone will redial the same number automatically maximum for 15 times.
When there is an incoming call while using auto-redial, pick up the handset or press
answer the call. The auto redial function will be terminated.
21
key to
REVIEWING, CALLING BACK AND DELETING INCOMING CALL
¾ Reviewing Incoming Call
1. In on-hook or off-hook state, press UP/- key, LCD displays the first incoming call number.
2. Press UP/- or DOWN/+ key continually to review the incoming numbers one by one. LCD
displays ---END--- after all records are checked.
3. Press and hold UP/- or DOWN/+ key for 3 seconds, you can quickly check incoming calls.
Note: When reviewed the desired incoming number, press VIP/P/DND key to set the number as
VIP number to avoid being deleted inadvertently. There will be a “VIP” icon displayed on LCD.
¾ Calling Back Incoming Call
When reviewed the desired incoming number, press REDIAL key to dial out it. Or press fleetly
REDIAL key twice, the number will be dialed out ahead with “0”.
If PABX code has been set, it will add the PABX code and a pause time ahead the incoming
number.
¾ Deleting Incoming Call
1. Review the desired incoming number except VIP numbers (If need delete VIP number, press
VIP/P/DND key to cancel VIP attribute first).
2. Press DEL key to delete it, then LCD displays the next number.
3. Press DEL key for 3 seconds, all the incoming numbers will be deleted including VIP numbers.
REVIEWING, CALLING BACK AND DELETING OUTGOING CALL
The phone can record outgoing calls with their sequence and conversation time. You may review,
call back and delete outgoing calls.
¾ Reviewing Outgoing Call
1. In on-hook or off-hook state, press OUT/× key, LCD displays the last dialed number.
2. Press OUT/× key continuously to review the outgoing calls one by one. LCD displays
---END--- after all numbers are reviewed.
3. Press OUT/× key for 3 seconds, you can quickly check outgoing calls.
¾ Dialing out Outgoing Call
1. In on-hook or off-hook state, press OUT/× key to check the desired number.
2. Press REDIAL key, the number will be dialed out automatically.
¾ Deleting Outgoing Call
1. Press OUT/× key to check the number you want to delete.
2. Press DEL key to delete it, and LCD displays the next number.
3. Or press DEL key for 3 seconds, all the outgoing calls will be deleted.
ONE TOUCH MEMORY OPERATION
¾ Store number into one-touch memory
1. In on-hook state, pre-dial the desired number or review an incoming/ outgoing number you
want to store.
22
2. Press SET/STORE/÷ key.
3. Press M1 key.
¾ Make a call from one-touch memory
In on-hook or off-hook state, press M1 key, the stored number will be dialed out directly.
TWO TOUCH MEMORY OPERATION
¾ Store number into two-touch memory
1. In on-hook state, pre-dial the desired number or review an incoming/ outgoing number you
want to store.
2. Press SET/STORE/÷ key. Press one of numeric keys (0-9, *, #)
¾ Make a call from two-touch memory
In on-hook or off-hook state, press MEMORY key + numeric keys (0-9, *, #) key, the stored
number will be dialed out directly.
MUTE FUNCTION
When the phone has received a call and is ringing but you wouldn’t like answer the call, then you
can press MUTE key to mute the ringing tone. The phone stops ringing.
SETTING RINGING TONE
1. In on-hook state, press HOLD key, LCD displays RING 01.
2. Press HOLD key continually to select your favorite music as the ringing tone, there are total 8
normal ringing tones for you selection.
3. Press DEL key to save and quit.
Note: RING OFF means no ringing tone for any incoming call and only the NEW LED will flicker
to remind there are missed calls. If you wouldn't like to be disturbed by incoming calls at some
time, you can set the phone to RING OFF, or let it in DND mode according to the section “DO NOT
DISTURB FUNCTION”.
DO NOT DISTURB FUNCTION
1. At on-hook state, press VIP/P/DND key, LCD displays DND 08-00
2. Press UP/- or DOWN/+ key to adjust DND time from 1~24 hours
3. Press VIP/P/DND key, the phone enters DND mode, and LCD starts to count down by minute
from the set time.
Once DND function is activated, the phone should only show the caller’s numbers for 6 seconds
but no ringing tone for normal incoming calls. But for VIP number, it will ring as usual.
Note: After the DND time is counted down to 00-00, the phone will quit DND mode automatically.
Or during DND time counting down, press VIP/P/DND key to quit directly. In this case, LCD
displays “DND OFF” for 6 seconds and then comes back to standby state.
23
INTERCOM AND TRANSFER CALL FUNCTION
¾ Notes before using
1. The parallel phone must be the same model as this unit.
2. When DND function is activated, or anti-dialing is ON or there are no batteries loaded, the two
functions are void.
3. Set the extension code from the menu “SET 9 ECODE” for this unit first.
4. Advise you to parallel with only one similar phone for the better to use your phone.
¾ Intercom call
1. At on-hook state, connect several similar telephones in parallel, and set ECODE for each one.
2. At off-hook state, press SET/STORE/÷ key and input the extension code set in the parallel
phone.
3.
When the telephone in parallel is ringing normal tone, this unit can hear a back tone from
telephone line to indicate the successful calling.
4. Press
key or pick up the handset of the parallel one to answer the calling and perform an
intercom conversation. If the parallel one hasn’t answer the call after it rings 8 times, the intercom
call will be cancelled automatically.
¾ Transfer incoming call
1. At on-hook state, connect several similar telephones in parallel, and set ECODE for each one.
When a call is incoming, you can use anyone of them to communicate.
2.
If need to transfer to another telephone in parallel, press SET/STORE/÷ firstly at off-hook
state, then input another one’s ECODE to transfer calling.
3. When the telephone in parallel is ringing, this unit can hear a back tone from telephone line.
Meanwhile, the parallel telephone can receive the call and this unit can hung-up or not.
4. Press
key or pick up the handset of the parallel one to answer the incoming call transferred
from the telephone line. If haven’t answer the call after eight times ringing, the incoming call will be
cut off automatically and stop ringing.
Note: If the parallel phone doesn’t get a back tone after dialing extension code, this means the
intercom or transferred call fails, maybe this unit is being DND mode or there are no batteries
loaded. If continuous “di-du” tone is heard on the parallel phone then, this means this unit has turn
on the anti-dialing function.
HOLD ON MUSIC
When talking over handset, press HOLD key to enter the hold mode and the hold music is
sent out. In hold mode
1. Press HOLD key to release hold mode and continue to talk over handset.
2. Or hang up handset, it enters hands-free hold mode.
When talking at hands-free mode, press HOLD key to enter the hold mode and the hold
music is sent out. In hold mode
24
3. Pick up handset to talk over handset.
4. Or press
or HOLD key to quit hold mode and talk at hands-free mode.
LCD BACKLIGHT FUNCTION
The backlight will light on when receiving an incoming call, dialing, pressing any key or in music
hold mode, etc. It will fade off if the telephone is left idle for 6 seconds.
Note: If batteries are not loaded, there will be no LCD backlight.
ADJUST RINGING VOLUME AND HANDSFREE VOLUME
In on-hook state, press VOL key more one times to select the ringing volume, total 4 levels, press
DEL key to save and quit.
In handsfree state, press VOL key more one times to adjust the handsfree speaker volume, total
3 levels.
PAUSE FUNCTION
If dial a number from PABX extension, press PABX number (normally “0” or “9”) + VIP/P/DND key
+ desired number. When redial, need not dial PABX number and VIP/P/DND key, just press
REDIAL/ARD key.
LOCK FUNCTION
Turn the key to yellow point of LOCK, all numbers except 110, 112, 119, 120, 122 and 999 will be
locked.
Turn the key to green point, number led by “0” will be locked.
Turn the key to red point to unlock, all numbers will be allowed to dial.
CALCULATOR FUNCTION
In on/off-hook state, press CAL key, LCD displays 0, the unit is in the calculator state. The unit is available
for “+. -. ×. ÷”. #/= key is used as “=”, the */.key is used as “.”, OUT/× and SET/STORE/÷ are used as
× and ÷ respectively, DOWN/+ key and UP/- key are used as positive and negative signs respectively.
Eg.1 (10+26) ÷2
1. In on/off-hook state, press CAL key 2. Press (1, 0, +, 2, 6), ÷, 2, #/= keys
2. After calculated, press R key to quit.
Eg.2 0.5×0.6-1
1 In on/off-hook state, press CAL key
2 Press 0, */., 5, ×, 0, */., 6, -, 1, #/= keys
3 After calculated, press R key to quit.
NOTES
Please unplug telephone line and power (if any) when install or replace batteries.
25
TROUBLE SHOOTING
? No receiving
+ Check if the handset is on the phone or line is broken.
? Receive only
+ Check if the phone is locked (Use the key to unlock it).
? Battery rust or leak
+ Replace the batteries.
? Noise
+ Check if the circuit is broken (Change the circuit).
+ Check if the connector is moist or rust (Change the connector).
? When receive a call, it rings once then disconnect. Dialing function is available
+ Check if the connector of telephone line is in a moist environment.
Check if too many extensions are used together or the quality of extension is not good enough
(Change the bad extension)
? LCD becomes dim
+ Check if LCD contrast is properly set or battery is in low-battery state. (Adjust LCD contrast, if
the LCD is still dim, replace the battery)
? Most of the functions failed
+ Check if the battery is too low (Change the battery), if the battery is in normal state(Unplug the
telephone line first, remove the batteries, and reinstall them after 10 minutes).
NOTE: Due to continuous product development, all features and specifications are subject to
change without prior notice.
DECLARATION OF CONFORMITY
Flamagas, S.A. declares telephone DTC-360 complies with the essential protective
requirements and objectives of:
• EC RE TTE Directive 99/5/EC
To check the entirely declaration of conformity of this model, visit www.electronicaflamagas.com.
WARRANTY
This device has 2 years warranty from the buying date against all manufactured defective
problems. Batteries are not related to this warranty.
The non-fulfilment of the instructions or cautions use in this manual implies automatically a
cancellation of the warranty.
It is necessary to show the buying invoice to validate this warranty.
Exclusive importer Flamagas S.A., www.electronicaflamagas.com
26
MANUAL DO UTILIZADOR
DTC-360
27
1 LED NEW (Nova chamada)
8 MUTE (Silêncio)
15 UP/- (Para cima)
2 LED IN USE (Em uso)
9 HOLD (Em espera)
16 OUT/x (Saída)
3 LCD
10 R
17 CAL (Calculadora)
11 REDIAL (Remarcação)
18 DOWN/+ (Para baixo)
5 M1
12 SPEAKER (Altifalante)
19 Teclado numérico
6 DEL (Eliminar)
13 MEMORY (Memória)
20 LINE (Linha)
4
7
VIP/P/DND
VOL
14 SET/STORE/÷ (Def./Armaz.)
21 EXT
22 LOCK (Bloqueio)
INSTALAÇÃO
1. O dispositivo funciona com 3 pilhas AA de 1,5 V. Abra a tampa do compartimento para pilhas
e introduza as pilhas respeitando a polaridade indicada e, seguidamente, feche a tampa
(recomenda-se a utilização de pilhas alcalinas). Depois de colocar as pilhas, deverá aparecer
a indicação de hora no ecrã LCD.
2. Introduza uma das extremidades do cabo telefónico na tomada do telefone e a outra
extremidade na tomada telefónica da parede.
3. Ligue o auscultador e a base do telefone com um cabo em espiral.
4. Seleccione o modo de marcação correcto, segundo as indicações da sua companhia
telefónica.
5. Solicite o serviço de identificação de chamadas à sua companhia telefónica.
MENU DE CONFIGURAÇÃO
Com o auscultador na base, prima o botão SET/STORE/÷ . No ecrã LCD aparecerá a indicação
SET1 DATE. Prima o botão UP/DOWN para selecionar o submenu e prima SET/STORE/÷ para
entrar. Prima UP/DOWN para alterar itens de configuração e prima SET/STORE/÷ para
confirmar. Depois de terminar um submenu prima SET/STORE/÷ para passar o seguinte menu.
Prima DEL ou nenhuma operação dentro de 10s, vai sair do modo de configuração.
¾ Configuração de data e hora
1. Com o auscultador na base, prima o botão SET/STORE/÷ . No ecrã LCD aparecerá a
indicação SET1 DATE, prima o botão SET/STORE/÷ e a indicação de ano começará a piscar
no ecrã.
2. Prima o botão UP ou DOWN para modificar o ano.
3. Prima o botão SET/STORE/÷ para confirmar o valor introduzido e passar para o seguinte
parâmetro (mês).
4. Repita os mesmos passos para configurar o mês, a data e a hora.
¾ Configuração do indicativo local e do indicativo de longa distância
1. Com o auscultador na base, prima o botão SET/STORE/÷ . No ecrã LCD aparecerá a
indicação SET1 DATE, prima o botão UP No ecrã LCD aparecerá a indicação SET2 CODE
prima SET/STORE/÷.
2. No ecrã LCD aparecerá a indicação CODE 0----- e o indicativo de longa distância "0"
começará a piscar.
3. Prima o botão UP ou DOWN para mudar o código (de 0 para 9) ou para o deixar em branco.
4. Prima o botão SET/STORE/÷ para confirmar o valor introduzido e passar para o seguinte
parâmetro (indicativo).
5. Repita os passos anteriores para configurar os restantes indicativos.
¾ Ajuste do código local
1. Com o auscultador na base, prima o botão SET/STORE/÷ . No ecrã LCD aparecerá a
indicação SET1 DATE, prima o botão UP No ecrã LCD aparecerá a indicação SET3 PCODE
31
prima SET/STORE/÷.
2. No ecrã LCD aparecerá a indicação PCODE –
3. Prima o botão UP ou DOWN para mudar o código e prima SET/STORE/÷ para confirmar.
¾ Ajuste do tempo FLASH
1. Com o auscultador na base, prima o botão SET/STORE/÷ . No ecrã LCD aparecerá a
indicação SET1 DATE, prima o botão UP No ecrã LCD aparecerá a indicação SET4 FLASH
prima SET/STORE/÷.
2. O ecrã mostrará a indicação FLASH 4 110.
3. Prima o botão UP ou DOWN para mudar a 300,600 ou 100 ms
¾ Ajuste do contraste do ecrã LCD
1. Com o auscultador na base, prima o botão SET/STORE/÷ . No ecrã LCD aparecerá a
indicação SET1 DATE, prima o botão UP No ecrã LCD aparecerá a indicação SET5 LCD
prima SET/STORE/÷.
2. O ecrã mostrará a indicação LCD 08.
3. Prima o botão UP ou DOWN para modificar o contraste do ecrã LCD. Pode selecionar de
entre um total de 5 níveis.
4. Prima o botão SET/STORE/÷ para confirmar a selecção e sair.
Com o auscultador na base, prima o botão R para aceder diretamente ao parâmetro de
contraste do ecrã LCD e, seguidamente, prima o botão R várias vezes para ajustar o
contraste do ecrã LCD.
¾ Configuração dos alarmes
Com o auscultador na base, prima o botão SET/STORE/÷. No ecrã LCD aparecerá a indicação
SET1 DATE, prima o botão UP No ecrã LCD aparecerá a indicação SET6 ALERT e prima
SET/STORE/÷.
1.
Uma vez e no ecrã LCD aparecerá a indicação 1 00-00 OFF e a indicação "1" começará a
piscar.
2. Prima o botão UP ou DOWN para configurar a alarma 1-3. Prima SET/STORE/÷ e acceda ao
parâmetro de configuração da hora e dos minutos.
3. Prima SET/STORE/÷ para confirmar e aceder ao seguinte parâmetro de grupo de alarme.
4. Repita os passos anteriores para configurar mais alarmes.
NOTA: Os três primeiros grupos de alarme repetem-se periodicamente todos os dias, enquanto
os dois últimos grupos só se activam uma vez.
¾ Função baby Call
1. Com o auscultador na base, prima o botão SET/STORE/÷ . No ecrã LCD aparecerá a
indicação SET1 DATE, prima o botão UP No ecrã LCD aparecerá a indicação SET8 BABY
prima SET/STORE/÷.
2. O ecrã mostrará a indicação BABY ON/OFF.
32
3. Prima o botão UP ou DOWN para modificar ON ou OFF o ecrã mostrará INPUT CODE.
4. Introduza um número com o teclado numérico e prima SET/STORE/÷ para confirmar.
Quando a função Babycall estiver activada, ao premir qualquer tecla excepto SET/STORE/÷ ou
simplesmente desligando o auscultador, o número de emergência/Babycall será marcado
repetidamente um máximo de 32 vezes.
Quando a função Babycall estiver activada, é possível atender chamadas retirando o auscultador
da base.
RECEBER UMA CHAMADA
1. Ao receber uma chamada, o telefone toca e o ecrã LCD mostra em sequência o número da
chamada, a data, a hora, o número de telefone que faz a ligação e o ícone NEW. O LED
NEW ficará a piscar se houver uma chamada não atendida.
2. Se voltar a receber uma chamada do mesmo número antes de visualizar a chamada
precedente, o ecrã LCD mostra o ícone REP.
Quando a memória de chamadas recebidas estiver cheia, o último número substitui o mais
antigo que conste na memória.
NOTA: Para que o telefone mostre o número de chamada recebida e outras informações
no ecrã, deve solicitar o serviço de identificação de chamadas à sua companhia
telefónica.
¾ Através do auscultador
1. Levante o auscultador e fale com a outra pessoa.
2. Quando terminar, volte a colocar o auscultador na base.
¾ Utilização da função mãos-livres
1. Quando estiver a falar pelo auscultador, prima o botão SPEAKER e coloque novamente o
auscultador na base.
2. Quando terminar, prima o botão SPEAKER outra vez.
¾ Através da função mãos-livres
1. Quando o telefone tocar, prima o botão SPEAKER e fale com a pessoa que liga. Para que a
outra pessoa possa ouvi-lo claramente, fale a uma distância máxima de 32 cm do aparelho.
2. Quando terminar, prima o botão SPEAKER outra vez.
FAZER UMA CHAMADA
¾ Através do auscultador
1. Levante o auscultador; quando ouvir o sinal de linha telefónica, marque o número desejado.
2. O telefone começa a medir o tempo de chamada passados 6 segundos.
3. Quando terminar, volte a colocar o auscultador na base.
¾ Através da função mãos-livres
Prima o botão SPEAKER; quando ouvir o sinal de linha telefónica, marque o número desejado.
1. O telefone começa a medir o tempo de chamada passados 6 segundos.
33
2. Quando terminar, prima o botão SPEAKER outra vez.
¾ Função de pré-chamada
1. Com o auscultador na base, marque o número desejado.
2. Caso se engane a marcar o número, utilize o botão DEL para o alterar.
3. Prima o botão SPEAKER ou retire o auscultador da base para marcar o número
automaticamente.
¾
Remarcação
1. Levante o auscultador e prima o botão SPEAKER.
2. Prima o botão REDIAL para voltar a marcar o último número marcado.
¾
Remarcação automática
1. Prima o botão SPEAKER, marque um número e ouvirá o sinal de linha
2. Prima o botão ARD e o último número marcado será repetido automaticamente de 10 em 10
segundos até ouvir o sinal de linha.
3. O telefone marca novamente o mesmo número de forma automática 32 vezes.
Ao receber uma chamada quando se utiliza a função de remarcação automática, retire o
auscultador da base ou prima o botão SPEAKER para atender. A função de remarcação
automática será desactivada.
VISUALIZAÇÃO, REMARCAÇÃO E ELIMINAÇÃO DE CHAMADAS RECEBIDAS
¾ Visualização
Com o auscultador na base, prima o botão UP ou DOWN para visualizar os números.
¾ Eliminação
Quando aparecer o número que deseja apagar, prima o botão DEL para o eliminar.
Mantenha premido o botão DEL durante 3 segundos para eliminar todas as chamadas recebidas.
¾ Remarcação
1. Procure o número que deseja marcar, prima o botão SPEAKER ou retire o auscultador da
base para marcar o número.
2. Prima o botão REDIAL e aparecerá a indicação PICK UP no ecrã LCD; depois prima o botão
SPEAKER ou retire o auscultador da base para marcar o número.
3. Mantenha premido o botão REDIAL e aparecerá a indicação PICK UP a piscar no ecrã LCD;
depois prima o botão SPEAKER ou retire o auscultador da base para marcar o número.
Caso seleccione um indicativo de longa distância, o telefone acrescentará esse
código de forma automática antes do número a marcar e voltará a marcar esse
número. Caso se estabeleça um código PABX, o telefone detectará e acrescentará
automaticamente o código à frente do número quando o voltar a marcar. Primeiro marcará o
código PABX e, após uma pausa de 2 segundos, o número será marcado.
34
LED DE CHAMADA NOVA OU CHAMADA NÃO ATENDIDA
O LED NEW começa a piscar quando é recebida uma chamada nova; caso exista uma chamada
não atendida por reconhecer, o LED começa a piscar a intervalos de 4 segundos.
VISUALIZAÇÃO, REMARCAÇÃO E ELIMINAÇÃO DE CHAMADAS RECEBIDAS
¾ Visualização
Com o auscultador na base, prima o botão OUT e, seguidamente, prima novamente o botão OUT
para visualizar os números de chamadas efectuadas um a um.
¾ Remarcação
1. Com o auscultador na base, prima o botão OUT para visualizar o número desejado e prima
depois o botão SPEAKER ou retire o auscultador da base para marcar o número
automaticamente.
2. Prima o botão REDIAL e aparecerá a indicação PICK UP no ecrã LCD; prima depois o botão
SPEAKER ou retire o auscultador da base para marcar o número.
¾ Eliminação
1. Com o auscultador na base, prima o botão OUT para seleccionar o número que deseja
eliminar.
2. Prima o botão DEL para eliminar o número.
3. Mantenha premido o botão DEL durante 3 segundos. Deste modo, serão eliminados todos os
números.
R (TRANSFERÊNCIA DE CHAMADAS)
Para transferir uma chamada activa para outro número de telefone, prima a tecla R e depois
marque o número de destino. Aguarde pelo sinal de linha e coloque o auricular na base para
finalizar a transferência da chamada.
CONFIGURAÇÃO DO TOQUE E DO VOLUME DE CHAMADA
Existem 8 tipos de toques de chamada:
1.
Com o auscultador na base, prima o botão HOLD e no ecrã LCD aparecerá a indicação ring
02 db8.
2.
Prima HOLD para seleccionar o toque desejado ou para o desactivar.
3.
Prima o botão UP ou DOWN para seleccionar o volume de toque.
4.
Prima o botão DEL para confirmar a selecção e sair.
Com o auscultador na base, prima o botão VOL para ajustar o volume de mãos-livres. O ecrã
mostrará os 4 níveis de volume disponíveis.
REGULAÇÃO DO VOLUME EM MODO MÃOS-LIVRES
Em modo de mãos-livres, prima o botão VOL para ajustar o volume de mãos-livres. O ecrã
mostrará os 3 níveis de volume disponíveis.
MELODIA DE ESPERA
¾ Ao falar pelo auscultador, prima o botão HOLD para activar o modo de espera e iniciar
35
a reprodução da melodia de espera.
1. Prima o botão HOLD para desactivar o modo de espera e continuar a falar pelo auscultador.
2. Se coloca o auscultador na base, o telefone entra em modo de espera em mãos-livres.
¾ Ao falar em modo mãos-livres, prima o botão HOLD para activar o modo de espera e
iniciar a reprodução da melodia de espera.
1. Retire o auscultador da base para falar pelo auscultador.
2.
Prima o botão SPEAKER para sair do modo de espera e falar em modo mãos-livres.
FUNCIONAMENTO DA MEMÓRIA DIRECTA (1 TOQUE)
¾ Guardar um número na memória de um toque
1. Marque o número que deseja ou procure o número de chamada recebida ou efectuada que
deseja armazenar.
2. Prima o botão STORE.
3. Prima o botão M1.
¾ Efectuar uma chamada a partir da memória de um toque
Com o auscultador na base ou fora da base, prima o botão M1 para marcar o número
armazenado.
FUNCIONAMENTO DA MEMÓRIA INDIRECTA (2 TOQUES)
¾ Guardar um número na memória de dois toques
1. Marque o número que deseja ou procure o número de chamada recebida ou efectuada que
deseja armazenar.
2. Prima o botão STORE.
3. Prima um dígito de 0 a 9, *, #
¾ Efectuar uma chamada a partir da memória de dois toques
Com o auscultador fora da base ou em modo de mãos livres, prima o botão MEMORY e um dígito
de 0 a 9, *, #; será marcado o número correspondente.
FUNÇÃO DE ILUMINAÇÃO DO ECRÃ LCD
A luz do ecrã acende-se ao receber uma chamada, marcar um número, premir qualquer botão ou
em modo de melodia de espera. O ecrã apaga-se após 6 segundos se o telefone ficar em
repouso.
NOTA: Se as pilhas não estão carregadas, o ecrã LCD não se iluminará.
FUNÇÃO DE PAUSA
Ao marcar um número através de uma central telefónica PABX, prima o número PABX
(normalmente "0" ou "9"), o botão VIP/P/DND e marque o número pretendido. Quando quiser
ligar novamente, não terá de voltar a marcar o número PABX nem premir o botão VIP/P/DND;
basta premir o botão REDIAL.
36
BLOQUEIO
Gire a chave até ficar na posição de cor amarela para bloquear todos os números, excepto os
números de emergência.
Gire a chave até ficar na posição de cor verde para bloquear todos os números que comecem por
"0".
Gire a chave até ficar na posição de cor vermelha para desbloquear todos os números.
FUNÇÃO CALCULADORA
Com o auscultador na base, prima o botão CAL e o ecrã mostrará a indicação “0”; o telefone fica
em modo calculadora e permite realizar as seguintes operações: + (UP/+), - (DOWN/-), x (OUT/x)
y ÷ , a tecla #/= mostra os resultados.
RESOLUÇÃO DE PROBLEMAS
-
Não há som
Verifique se o auricular está ligado ao telefone e que a linha não está cortada.
-
Só permite receber chamadas
Verifique se o modo de marcação por tons ou impulsos está correctamente configurado.
Verifique se o dispositivo está bloqueado. Se estiver, utilize a chave para o desbloquear.
-
As pilhas estão oxidadas ou o líquido no interior derramou-se.
Elimine o óxido ou limpe o líquido derramado.
-
Ouve-se ruído
Verifique se existe um curto-circuito. Se for necessário, mude o circuito.
Verifique se o conector está húmido ou oxidado. Se estiver, mude o conector.
-
Toca uma vez mas desliga-se ao receber uma chamada. A função de marcação continua
disponível.
Verifique se o conector se encontra num ambiente húmido.
Certifique-se de que não está a utilizar demasiadas extensões eléctricas ou se a que está a
usar se encontra em bom estado. Substitua a extensão eléctrica defeituosa.
-
O ecrã LCD está escuro
Verifique se o contraste do ecrã LCD está configurado correctamente e que as pilhas têm
carga. Ajuste o contraste do ecrã LCD. Se o ecrã continuar escuro, substitua as pilhas.
-
Não toca
Verifique se o toque está desativado. Se estiver, deverá activá-lo.
-
A maior parte das funções dão erro
Verifique se as pilhas têm carga suficiente. Se for necessário, mude as pilhas.
Se as pilhas têm carga, retire-as e desligue todos os cabos. Coloque novamente as pilhas e
volte a ligar os cabos passados 10 minutos.
NOTA: Devido ao constante desenvolvimento dos nossos produtos, todas as funções e
especificações indicadas neste manual estão sujeitas a alterações sem prévio aviso.
37
DECLARAÇÃO DE CONFORMIDADE
Por meio da presente, a Flamagas SA declara que o produto DTC-360 cumpre os requisitos e
objetivos de proteção básicos da:
•
Directiva 99/5/EC de Aparelhos de Telecomunicações
Para ver a declaração de conformidade completa visite a página: www.electronicaflamagas.com
Garantia
Este aparelho tem uma garantia de 2 anos contra problemas de fabrico, a partir da data de
aquisição. Esta garantia não cobre as pilhas.
O não cumprimento das instruções ou avisos deste manual implica a anulação automática da
garantia.
Para que esta garantia seja válida, é necessário apresentar o recibo ou factura de compra
original.
Importador exclusivo Flamagas S.A., www.electronicaflamagas.com
38
MANUEL DE L’UTILISATEUR
DTC-360
39
INTRODUCTION
Nous vous remercions pour avoir acquis notre nouveau téléphone avec fonction identification d’appels. Sur ce
manuel vous trouverez l’information qui vous aidera à vous familiariser avec le téléphone. Pour un rendement optimal
du téléphone, nous vous recommandons de bien lire les instructions avant d’utiliser le téléphone pour la première
fois.
INSTRUCTIONS DE SÉCURITÉ
Lorsque vous utiliserez le téléphone, rassurez-vous de prendre les précautions de sécurité essentielles indiquées
ci-dessous afin d’éviter un risque d’incendies, de décharges électriques ou dommages aux personnes.
1. Lisez attentivement et suivez tous les avertissements et consignes.
2. Débranchez le téléphone de la prise de courant du mur avant de le nettoyer. Ne pas utiliser des produits de
nettoyage liquides ni aérosols. Le nettoyer avec un drap humide.
3. Ne pas placer le téléphone sur une superficie instable car il pourrait tomber ou subir des dommages irréparables.
4. Ne pas introduire des objets étrangers d’aucun type dans le dispositif à travers les rainures du couvercle car vous
pourriez toucher des points de voltage dangereux ou courcircuiterles composantes et provoquer un incendie ou une
décharge électrique. Ne pas versez des liquides d’aucun type sur le téléphone.
5. Ne pas bouger ni déconnecter le téléphone lors d’une tempête car vous risquez de souffrir une décharge
électrique.
6. Si le téléphone présente des problèmes, envoyez le téléphone au service d’assistance technique. N’essayez pas
de le réparer vous mêmes.
7. Utilisez toujours des batteries neuves du type et taille spécifiées. Retirez les batteries épuisées ou déchargées,
recyclez les batteries selon les régulations locales.
CARACTERISTIQUES
¾
FSK/DTMF/ compatible avec détection automatique
¾
Ecran LCD de 16 digits avec calendrier
¾
Mémoires avec 99 numéros entrants et 18 numéros sortants
¾
1 touche d’appel direct et 10 mémoires indirectes
¾
16 sonneries différentes d’appel pour sélectionner
¾
3 mélodies différentes d’attente pour sélectionner
¾
Fonction ne pas déranger
¾
Fonction transfert d’appels
¾
Fonction d’appel codé par connexion automatique de l’écouteur
¾
Fonction pré-appel et édition
¾
Fonction de rappel et rappel automatique
¾
Fonction de verrouillage de 3 positions et 5 alarmes
¾
16 niveaux de contraste pour l’écran LCD
¾
Fonction calculatrice
¾
Configuration du code PABX
40
¾
Compatible avec le mode de marquage par tons ou pulsations
¾
4 niveaux de volume pour le mode mains libres
¾
8 niveaux de sélection du volume de la sonnerie
¾
Fonction Baby Call
¾
Fonction retroillumination de l’écran LCD
¾
Technologie contre décharges électriques
¾
Fonction de marquage et écoute en mode mains libres
¾
Indicateur LED d’utilisation et nouvel appel
41
1
1 NEW LED = Nouveau LED
8 MUTE = Silence
2 IN USE LED = LED en utilisation 9 HOLD = Attente
15 UP = Augmenter
16 OUT = OUT (visualisation numéro)
3 LCD = Ecran LCD
10 R = R (transfert)
17 CAL = Calculatrice
4 VIP/P/DND
11 REDIAL = REDIAL (Rappel Marquage)
M1 = M1 (mémoire 1)
12 SPEAKER = Haut-parleur
18 DOWN =Baisser
5
19 NUMERICAL KEY = Clé numérique
6
DEL = DEL(Supprimer)
13 MEMORY = Mémoire
20 LINE = LINE (Connexion ligne téléphonique)
7
VOLUME =Volume
14 SET/STORE =SET/STORE (Fixer/Stocker) 21 EXT=EXT (connexion courant électrique)
22 LOCK = Verrouiller
INSTALLATION
1.
L’appareil fonctionne avec 3 piles format AA de 1,5 V. Ouvrez le couvercle du compartiment des piles et
introduisez les piles selon la polarité indiquée, à continuation, fermez le couvercle (il est recommandé d’utiliser des
piles alcalines). Après avoir introduit les piles, sur l’écran LCD s’affichera l’heure.
2.
Introduisez une extrémité du câble téléphonique dans la prise de ligne de la base du téléphone et l’autre
extrémité dans la prise téléphonique du mur.
3.
Connectez l’écouter et la base avec un câble spiral.
4.
Sélectionnez le mode de marquage correcte selon les consignes de votre opérateur téléphonique
5.
Sollicitez le service indentification d’appels à votre opérateur téléphonique.
MENU CONFIGURATION
Avec l’écouteur raccroché, appuyez la touche SET/STORE/÷ . Sur l’écran LCD s’affichera SET1 DATE. Appuyez
sur la touche UP ou DOWN pour sélectionner le sous-menu et appuyez sur SET/STORE/÷ pour
entrer. Appuyez sur UP / - ou DOWN / + pour modifier les éléments de réglage et appuyez sur
SET/STORE/÷ touche pour confirmer.
Après avoir terminé un sous-menu, appuyez sur
SET/STORE/÷ clé pour entrer dans la prochaine. Appuyer sur la touche DEL ou aucune opération
dans les 10s, il va quitter le mode réglage.
¾
1.
Configuration de la date et l’heure
Avec l’écouteur raccroché, appuyez la touche SET/STORE/÷ . Sur l’écran LCD s’affichera SET1 DATE,
appuyez la touche SET/STORE/÷ et la valeur année clignotera.
2.
Appuyez sur la touche UP ou DOWN pour modifier l’année.
3.
Appuyez sur la touche SET/STORE/÷ pour confirmer la valeur introduite et passer au suivant paramètre le mois.
4.
Répétez les mêmes pas pour configurer le mois la date et l’heure.
¾
1.
Configuation du code de zone locale et le code de longue distance
Avec l’écouteur raccroché, appuyez la touche SET/STORE/÷ . Sur l’écran LCD s’affichera SET1 DATE,
appuyez la touche UP, Sur l’écran LCD s’affichera SET2 CODE e appuyez la touche SET/STORE/÷. Sur l’écran
LCD s’affichera CODE 0-----et le code de longue distance "0" clignotera.
2.
Appuyez sur la touche UP ou DOWN pour changer le code du 0-9 ou pour le laisser en blanc.
3.
Appuyez la touche SET/STORE/÷ pour confirmer la valeur introduite et passer au paramètre du code suivant.
4.
Répétez les pas antérieurs pour configurer le reste des codes.
¾
Régler le PABX code
1. Avec l’écouteur raccroché, appuyez la touche SET/STORE/÷ . Sur l’écran LCD s’affichera SET1 DATE,
appuyez la touche UP, sur l’écran LCD s’affichera SET3 PCODE.
2. Appuyez sur la touche SET/STORE/÷ et sur l’écran LCD s’affichera PCODE
3. Appuyez sur la touche UP ou DOWN pour changer le code du 0-9. Appuyez la touche SET/STORE/÷ pour
confirmer
43
¾
1.
Régler le temps de FLASH
Avec l’écouteur raccroché, appuyez la touche SET/STORE/÷ . Sur l’écran LCD s’affichera SET1 DATE,
appuyez la touche UP, sur l’écran LCD s’affichera SET4 FLASH.
2. Appuyez sur UP ou DOWN pour modifier le temps de flash à 110, 300, 600 ou 1000 ms.
3.
Appuyez sur SET/STORE/÷ pour confirmer.
¾
Régler le contraste de l’écran LCD
1.
Avec l’écouteur raccroché, appuyez la touche SET/STORE/÷ . Sur l’écran LCD s’affichera SET1 DATE,
appuyez la touche UP, sur l’écran LCD s’affichera SET5 LCD.
2.
Appuyez sur la touche UP ou DOWN pour régler le contraste de l’écran LCD. Vous pouvez choisir jusqu’à un
total de 5 niveaux.
3.
Appuyez sur la touche SET/STORE/÷ pour confirmer la sélection et sortir.
Avec l’écouteur raccroché, appuyez sur la touche R pour accéder directement au
paramètre du contraste de l’écran LCD et, à continuation appuyez sur la touche R
plusieurs fois pour régler le contraste de l’écran LCD.
¾
Configuration de l’alarme
1.
Avec l’écouteur raccroché, appuyez la touche SET/STORE/÷ . Sur l’écran LCD s’affichera SET1 DATE,
appuyez la touche UP, sur l’écran LCD s’affichera SET6 ALERT.
2.
Appuyez sur la touche SET/STORE/÷ et sur l’écran LCD s’affichera 1 00-00 OFF et "1" clignotera. Appuyez sur
la touche UP ou DOWN pour sélectionner 1-3. Appuyez sur la touche SET/STORE/÷ pour configurer l’heure de
l’alarme et appuyez sur SET/STORE/÷ pour confirmer et accéder au paramètre de configuration des minutes.
3.
OFF« « »clignotera, appuyez sur la touche UP ou DOWN pour configurer OFF/ON. Appuyez sur SET/STORE/÷
pour confirmer.
4.
Répétez les pas antérieurs pour configurer des alarmes supplémentaires
¾
Fonction Babycall
1.
Avec l’écouteur raccroché, appuyez la touche SET/STORE/÷ . Sur l’écran LCD s’affichera SET1 DATE,
appuyez la touche UP, sur l’écran LCD s’affichera SET8 BABY.
2.
Appuyez sur la touche SET/STORE/÷ et sur l’écran LCD s’affichera BABY OFF / BABY ON
3.
Appuyez sur la touche UP ou DOWN pour changer ON ou OFF.
4.
Sélectionner BABY ON, l’écran affichera INPUT CODE, introduisez un numéro en utilisant le clavier numérique
et appuyez sur SET/STORE/÷ pour confirmer.
Lorsque la fonction Babycall est activée appuyez sur n’importe quelle touche sauf SET/STORE ou décrochez
l’écouteur, le numéro Babycall se composera automatiquement.
RECEPTION DE L’APPEL
1.
Lorsque vous recevez un appel, le téléphone sonne et l’écran LCD affiche le numéro de la séquence, la date,
l’heure, le numéro de téléphone entrant et l’icône NEW. Le LEDNEW clignote s’il y a un appel sans répondre.
2. Si vous recevez un appel avec le même numéro de téléphone et l’appel antérieur n’a pas été
44
visualisé, sur l’écran LCD s’affiche l’icône REP.
Quand la mémoire d’appels entrants est pleine, le dernier numéro entrant remplace le plus
ancien de la mémoire.
NOTE : Pour que le téléphone puisse afficher le numéro entrant et une autre
information sur l’écran, vous devez solliciter le service d’identification d’appels à votre
opérateur téléphonique.
¾
Depuis l’écouteur
1.
Décrochez l’écouteur et parlez avec une autre personne.
2.
Une fois l’appel terminé, replacez l’écouteur sur la base.
¾
Utilisation du haut-parleur
1.
Lorsque vous parlez à travers l’écouteur, appuyez la touche SPEAKER et placez l’écouteur sur la base.
2.
Une fois terminé la conversation, appuyez à nouveau sur la touche SPEAKER.
¾
1.
Depuis le haut-parleur
Lorsque le téléphone sonne, appuyez sur la touche SPEAKER et parlez avec la personne qui vous appelle. Afin
que l’autre personne puisse vous entendre clairement, parlez à une distance du haut-parleur de 32 cm maximum.
2.
Une fois terminé la conversation, appuyez à nouveau sur la touche SPEAKER.
FAIRE UN APPEL
¾
Depuis l’écouteur
1.
Décrocher l’écouteur, après entendre le signal de ligne, composez le numéro souhaité.
2.
Le téléphone commencera à compter la durée de la conversation au bout de 6 secondes.
3.
Une fois terminé la conversation, replacez l’écouteur sur la base.
¾
Depuis le haut-parleur
1.
Appuyez sur la touche SPEAKER, après entendre le signal de ligne, composez le numéro souhaité.
2.
Le téléphone commencera à compter la durée de la conversation au bout de 6 secondes.
3.
Une fois terminé la conversation, appuyez à nouveau sur la touche SPEAKER.
¾
Fonction rappel
1. Avec l’écouteur sur la base, composez le numéro souhaité.
2. Si par erreur vous vous trompez en composant le numéro, utilisez la touche DELpour rectifier.
3. Appuyez sur la touche SPEAKER ou décrochez l’écouteur et le numéro se composera automatiquement.
¾
Rappel
1. Décrochez l’écouteur ou appuyez sur la touche SPEAKER.
2. Appuyez sur la touche REDIAL pour rappeler au dernier numéro composé.
¾
Rappel automatique
1. Appuyez sur la touche SPEAKER, composez le numéro et vous écouterez le signal de communication
2. Appuyez sur la touche ARD et le dernier numéro se composera automatiquement toutes les 9 ou 10 secondes
jusqu’à écouter le signal de ligne.
3. Le téléphone composera à nouveau le même numéro automatiquement jusqu’à 32 fois.
45
Lorsque vous recevez un appel pendant que vous utilisez la fonction de rappel automatique, décrochez
l’écouteur ou appuyez sur la touche SPEAKER pour répondre. La fonction de rappel automatique se
désactivera.
VISUALISATION, RAPPEL ETSUPPRESSION NUMÉROS ENTRANTS
¾
Visualisation
Avec l’écouteur raccroché, appuyez sur la touche UP ou DOWN pour vous déplacer et pour visualiser les numéros.
¾
Suppression
Lorsque vous visualisez le numéro que vous souhaitez supprimer, appuyez sur la touche DEL pour le supprimer.
Maintenez appuyez la touche DEL pendant 3 secondes pour effacer tous les numéros entrants..
¾
Rappel
1. Choisissez le numéro auquel vous souhaitez appeler, appuyez sur la touche SPEAKER ou décrochez l’écouteur
et le numéro se composera.
2. Appuyez sur la touche REDIALet sur l’écran LCD s’affichera PICK UP, appuyez sur la touche SPEAKER ou
décrochez l’écouteur et le numéro se composera.
3. Maintenez appuyé la touche REDIALjusqu’à ce que PICK UP clignote, à continuation appuyez sur la touche
SPEAKER ou décrochez l’écouteur et le numéro se composera. Si le code longue distance s’établit, le téléphone
ajoutera ce code devant le numéro automatiquement et, à continuation le numéro se recomposera.Si le code
PABX s´établit, le téléphone détectera et ajoutera le code devant le numéro automatiquement lorsque vous
recomposerez le numéro. Dans un premier temps il composera le code PABX et après une pause de 2 secondes,
il composera le numéro.
LED DE NOUVEL APPEL OU APPEL RATE
Le LED NEW clignote lorsque vous recevez un nouvel appel, lorsque vous ratez un appel le LED clignote à des
intervalles de 4 secondes.
VISUALISATION, RAPPEL ET SUPPRESSION DES NUMÉROS
¾
Visualisation
Avec l’écouteur raccroché, appuyez sur la touche OUT et à continuation, appuyez à nouveau sur la touche OUT pour
visualiser les numéros sortants un par un.
¾
Rappel
1. Avec l’écouteur raccroché, appuyez sur la touche OUT pour visualiser le numéro souhaité et à continuation
appuyez la touche SPEAKER ou décrochez l’écouteur et le numéro se composera.
2. Appuyez sur la touche REDIAL et sur l’écran LCD s’affichera PICK UP, appuyez sur la touche SPEAKER ou
décrochez l’écouteur et le numéro se composera.
¾
Suppression
1. Avec l’écouteur raccroché, appuyez sur la touche OUT pour vous déplacer jusqu’au numéro que vous souhaitez
supprimer.
2. Appuyez sur la touche DEL pour le supprimer
3. Maintenez appuyé la touche DEL pendant 3 secondes. Ceci supprimera tous les numéros.
46
R TRANSFERT D’APPELS
Pour transférer un appel en cours à un autre numéro de téléphone, marquez la touche R et à continuation composez
le numéro de destination. Attendez recevoir le ton et placez l’écouteur sur la base pour terminer le transfert de
l’appel.
CONFIGURATION DU TON DE L’APPEL
Il existe 8 sonneries différentes d’appels au choix :
1. Avec l’écouteur raccroché, appuyez sur la touche HOLD et sur l’écran LCD s’affichera ring 02 db8.
2. Appuyez sur HOLD pour sélectionner la sonnerie que vous souhaitez ou pour la désactiver.
3. Appuyez sur DEL pour confirmer la sélection et sortir.
CONFIGURATION VOLUME DE LA SONNERIE
Il existe 4 volume d’appels au choix :
1.
Avec l’écouteur raccroché, appuyez sur la touche VOL pour sélectionner la sonnerie que vous souhaitez
2.
Appuyez sur DEL pour confirmer la sélection et sortir.
RÉGLAGE DU VOLUME EN MODE MAINS LIBRES
En mode mains libres, appuyez sur la touche VOL pour régler le volume mains libres. L’écran affichera au total 3
niveaux de volume.
MELODIE D’ATTENTE
¾
Lorsque vous parlerez avec l’écouteur, appuyez sur la touche HOLD pour activer le mode d’attente et
initier la reproduction de la mélodie d’attente.
1. Appuyez sur la touche HOLD pour désactiver le mode d’attente et continuer de parler à travers l’écouteur.
2. Si vous raccrochez l’écouteur, vous accéderez au mode d’attente mains libres.
¾
Lorsque vous parlerez en mode mains libres, appuyez sur la touche HOLD pour activer le mode en
attente et initier la reproduction de la mélodie d’attente.
1. Décrochez l’écouteur pour parler à travers l’écouteur.
2. Appuyez sur la touche SPEAKER pour sortir du mode attente et parler en mode mains libres.
FONCTIONNEMENT DE LA MEMOIRE DIRECTE (1 PULSATION)
¾
Stockage d’un numéro dans la mémoire d’une pulsation
1.
Composez le numéro entrant ou sortant que vous souhaitez stocker.
2.
Appuyezsur la touche SET/STORE/÷ .
3.
Appuyez sur la touche M1.
¾
Réalisation d’un appel depuis la mémoire de pulsation
Avec l’écouteur raccroché ou décroché, appuyez sur la touche M1 pour composer le numéro stocké.
FONCTIONNEMENT DE LA MEMOIRE INDIRECTE (2 PULSATIONS)
¾
Stockage d’un numéro dans la mémoire de 2 pulsations
1.
Composez le numéro souhaité ou cherchez le numéro entrant ou sortant que vous souhaitez stocker.
2.
Appuyez sur la touche SET/STORE/÷ .
3.
Appuyez sur un digit du 0 au 9, *, #
47
¾
Réalisation d’un appel depuis la mémoire de 2 pulsations
Avec l’écouteur décroché ou en mode mains libres, appuyez sur la touche MEMORY et un digit du 0 au 9, *, #et le
numéro correspondant se composera.
FONCTION DE RETROILLUMINATION DE L’ECRAN LCD
La lumière de l’écran s’allume lorsqu’on reçoit un appel entrant, on compose un numéro, on appui
sur une touche quelconque ou on active le mode attente. Elle s’éteindra si vous laissez le
téléphone reposer pendant 6 secondes.
NOTE: Si les piles ne sont pas chargées, l’écran LCD ne s’illumine pas.
FONCTION DE PAUSE
Si vous composez un numéro depuis la centrale PABX, appuyez le numéro PABX (normalement "0" o "9"), et la
touche ALARMet le numéro auquel vous souhaitez appeler. Quand vous rappellerez, vous ne devrez pas composer
le numéro PABX ni appuyer sur la touche ALARM; vous ne devrez qu’appuyer sur la touche REDIAL.
VERROUILLAGE
Tournez la clé jusqu’à la position en couleur jaune pour verrouiller tous les numéros, sauf les numéros d’urgence.
Tournez la clé jusqu’à la position en couleur vert pour verrouiller tous les numéros qui commencent par "0".
Tournez la clé jusqu’à la positon en couleur rouge pour composer tous les numéros.
FONCTION CALCULATRICE
Avec l’écouteur raccroché, appuyez sur la touche CAL, l’écran affichera “0”, il est en mode calculatrice, vous pouvez
réaliser les opérations suivantes :: + (UP/+), - (DOWN/-), x (OUT/x) y ÷ , la touche #/= affiche les résultats.
SOLUTIONS DE PROBLEMES
-
Pas de son
Vérifiez que l’écouteur est connectez au téléphone et que la ligne n’a pas été coupé.
-
Vous ne pouvez que recevoir des appels
Vérifiez que le mode de marquage par tons ou parpulsations a été configuré correctement.
Vérifiez si le dispositif est verrouillé. S’il est verrouillé, utilisez la clé pour le déverrouiller
-
Les piles se sont abîmées (oxydées)
Nettoyez et éliminez l’oxydedes piles
-
On entend du bruit
Vérifiez s’il y a un courcircuit. Si besoin changez le circuit.
Vérifiez si le connecteur est humide ou oxydé. Si oui, changez le connecteur.
-
Il sonne une fois mais il se déconnecte lorsqu’on reçoit un appel. La fonction de marquage
est toujours disponible
Vérifiez que le connecteur ne se trouve pas dans un environnement humide.
Vérifiez qu’il n’y ait pas trop de câbles de rallonge et qu’ils soient en bon état. Changez les câbles en mauvais
état.
-
L’écran LDC est noir
Vérifiez que le contraste de l’écran LCD est configuré correctement et que les piles ne se sont pas épuisées.
48
Réglez le contraste de l’écran LCD. Si l’écran continue en noir, remplacez les piles.
-
Ne sonne pas
Vérifiezque la sonnerie a été désactivée. Si elle est désactivée, activez-la.
-
La plupart des fonctions ne marchent plus
Vérifiez que les piles ont été suffisamment chargées. Si besoin, changez les piles.
Si les piles sont en bon état, retirez les piles et déconnectez tous les câbles. Replacez les piles et connectez les
câbles après 10 minutes.
NOTE:Pour cause du développement constant de nos produits, toutes les fonctions et spécifications sont sujettes
aux changements sans préavis.
DECLARATION DE CONFORMITÉ
Par la présente Flamagas SA déclare que le modèle DTC-360 accomplit les exigences et objectifs de protection
essentiels de:
•
Le Directive 1999/5/CE du CE sobre ER+ETT
Pour obtenir une copie complète
site :www.electronicaflamagas.com
de
la
déclaration
de
conformité,
visitez
le
Garantie
L’appareil a une garantie de 2 ans à compter à partir de la date d’achat contre tout défaut de
fabrication. Les piles sont exclues de la garantie. L’inaccomplissement des instructions et
précautions d’utilisation indiquées sur ce manuel impliquent la perte automatique de la garantie.
Pour que cette garantie soit valable, il est nécessaire de présenter la facture ou le ticket d’achat
original
Importateur exclusifFlamagas S.A., www.electronicaflamagas.com
49