1
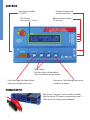
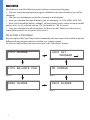
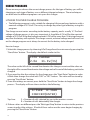
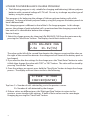
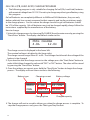
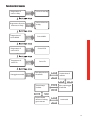
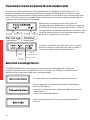
Power Charger 5 balance charger Manual Manuale Mode d’emploi warranty We guarantee this product to be free of manufacturing or assembly defects for a period of one year from time of purchase. This does not affect your statutory rights. This warranty is not valid for any damage or subsequent damage arising as a result of a misuse, modification or for damage or consequential damage arising as a result of failure to observe the procedures outlined in this manual. Operation of this product is carried out entirely at the risk of the operator. Please note that, whilst every effort is made to ensure the accuracy of instructions and material included with this product, mistakes can occur and neither Amerang Limited nor it’s distributors will be held liable for any loss or damage arising from the use of this product or for any loss or damage arising from omissions or inaccuraccies in the associated instructions or materials included with this product. We reserve the right to modify the design of this product, contents and manuals without prior notification. II introduction Thank you for purchasing the Power Charger 5 balance charger. This product is a rapid charger that has a high performance microprocessor and specialised operating software. The balance charge function helps to keep your LiPo battery pack in optimum condition and also control them safely. Please read this entire operating manual completely and attentively before using this product. specifications Operating voltage range:11.0 - 18.0V Circuit power: max. 50W Charge current range: 0.1 - 5.0A Current drain for balancing Li-Po: 200mAh/cell NiCd/NiMh battery cell count:1-14 cells Li-ion/Polymer cell count:1-5 cells Gel cell battery voltage: 2V, 6V, 12V Weight: 280g Dimensions:130 x 80 x 23mm Special features Cell balancer and charger in 1 Power Charger 5 has an individual-cell-voltage balancer built in so it does not need a separate balancer when charging Lipo batteries. Maximum safety Delta-peak sensitivity: The automatic charge termination program works on the principle of the Delta-peak voltage detection. Capacity limit: The charging capacity is calculated by a multiple of the charging current and time. If the charging capacity exceeds the limit the process will be terminated automatically when you set the maximum value. Charge time limit: You can also set a maximum charge time to prevent any possible over charge. Input power monitor: This function monitors the input voltage from your battery supply and will automatically stop the charge program if your battery falls below the required level. High-power and high-performance circuit The Power Charger 5 balancer charger has a maximum output power of 50w. As a result it can charge up to 14 cells of Nicd/NiMh and 5 series of Li-poly batteries with maximum current of 5.0A controls Input power cable Output charge lead 11-18V DC 4mm banana plug LCD Screen Balance Lead sockets 16 Characters, 2 Lines JST-XH ports Alter values See the status of individual cells in balance charge mode Scroll through the Main Menu Stop any charge processes Resume or Start charge processes Confirm an action power supply The Power Charger 5 comes with crocodile clips for direct DC battery connection and 1118V socket for mains power adapter. Warning and safety notes These warnings and safety notes are particularly important. Please follow the instructions for maximum safety; otherwise the charger and the battery can be damaged or at worst it can cause a fire. Never leave the charger unsupervised when it is connected to a power supply. If any malfunction is observed immediately terminate the process and refer to the operation manual. Keep the unit away from dust, damp, rain, heat, direct sunshine and vibration. Do not drop it. The circuit of the unit is designed to be powered by an 11-18V power source or with AC Power source supplied with First Hobby. This unit and the battery to charge or discharge should be set up on a heat-resistant, noninflammable and non-conductive surface. Never place them on a car seat, carpet or similar surface. Never use this charger inside a car, van or any other motor vehicle. Keep all inflammable volatile materials well away from the chargers operating area. Never charge batteries fitted inside models, always remove them before charging. Make sure you know the specifications of the battery to be charged or discharged to ensure it meets the requirements of this charger. If the program is set up incorrectly the battery and charger may be damaged. To avoid short-circuits between the charge lead always connect the charge cable to the charger first, then connect the battery. Reverse the sequence when disconnecting. Do not connect more than one battery pack to this charger at any one time. Do not attempt to charge or discharge the following types of battery. A battery pack which consists of different types of cell (including different manufacturers) A battery that is already fully charged or just slightly discharged. Non-rechargeable batteries (Explosion hazard). Batteries that require a different charge technique from NiCd, NiMh, Li-Poly or Gel cell (Pb, Lead acid). A faulty or damaged battery. A battery fitted with an integral charge circuit or a protection circuit. Batteries installed in a device or which are electrically linked to other components. Batteries that are not expressly stated by the manufacturer to be suitable for main menu Please bear in mind the following points before commencing charging: Did you select the appropriate program suitable for the type of battery you will be charging? Did you set up adequate current for charging or discharging? Have you checked the type of battery you are charging, i.e. Li-Po, NiMh, NiCd, Gel? Have you checked the battery voltage? Lithium battery packs can be wired in parallel and in series, i.e. a 2 cell pack can be 3.7V (in parallel) or 7.4V (in series). Have you checked that all connections are firm and safe? Make sure there are no intermittent contacts at any point in the circuit. sELECTING A PROGRAM By pressing the “Batt Type/Stop” button repeatedly the main menu will scroll through the different charge program options and the user settings option. To select an option from the main menu press the “Start/Enter” button. LiPo CHARGE Page 8 LiPo BALANCE CHG Page 10 NIMH CHARGE Page 12 USER SET PROGRAM Page 7 Pb CHARGE Page 14 NICd CHARGE Page 13 USEr set program option - main menu As default this charger will be set to typical user settings when it is connected to a 12V battery for the first time. This settings menu can be accessed by selecting User Set Program from the main menu by pressing the “Start/Enter” button. Scroll through the different options in the User Set Program menu by pressing the “INC” or “DEC” buttons. If you need to alter the settings for an option press the “Start/Enter” button to make it blink then change the value with “DEC” or “INC” button. The value will be stored by pressing “Start/Enter” button. To exit from the User Set Program menu press the “Batt type/Stop” button. USER SET PROGRAM Select USER SET PROGRAM from the main menu by pressing the “Start/Enter” button Start Enter TEMP CUT OFF ON 20C NOT AVAILABLE ON THIS MODEL INC DEC SAFETY TIMER ON 10min The safety timer automatically begins running when the charge process starts. This function is to prevent over charge of the battery if it proves to be faulty, or if the termination circuit does not detect a peak. The timer limit should not be set lower than the time needed to allow a full charge of the battery. INC DEC CAPACITY CUT OFF ON 500mAh This function sets the maximum charge capacity that will be supplied to the battery during charge. If the delta peak voltage is not detected or the safety timer has not cut off the charge process this function automatically stops the charge process at the selected capacity value. INC DEC KEY BEEP BUZZER ON ON INC DEC INPUT POWER LOW CUT OFF 10.7V If the KEY BEEP function is switched on a beep will sound every time a button is pressed to confirm your action. If the BUZZER function is switched on a beep or melody will sound to alert you of changes in the charge process, including errors. These functions can be switched On or Off independantly. This function monitors the voltage of the input batttery used to power this charger. If the voltage of the input drops below the value you have set the charge process will be terminated to protect the input battery. INC DEC INC DEC Batt type Stop BACK LIGHT 64% Adjusts the brightness of the LCD screen on the charger. Charge Programs Please ensure you choose the correct charge process for the type of battery you will be charging as each type of battery uses a different charge technique. These techniques are built into the different programs set up on this charger. Lithium polymer charge program The following program is only suitable for charging Lithium-polymer batteries with a nominal voltage of 3.7V/cell. Do not try to charge any other type of battery using this program. The charge current varies according to the battery capacity, and is usually 1C. The final voltage of charge process is also very important; it should be 4.2V/cell for the nominal voltage of 3.7V/cell. If the final voltage exceeds 4.2V/cell by more than 1% during charge at any time the battery will explode. The charge current, nominal voltage and cell count set on the charge program must always be correct for the battery to be charged. How to charge: 1. Select this charge process by choosing LiPo Charge from the main menu by pressing the “Start/Enter” button. The display should look similar to this: LiPo CHARGE 2.0A 11.1V(3S) The value on the left of the second line denotes the charge current and the value on the right of the second line denotes the voltage and cell count of the battery pack to be charged. 2. If you need to alter the settings for the charge press the “Start/Enter” button to make it blink then change the value with “DEC” or “INC” button. The value will be stored by pressing “Start/Enter” button. 3. Once the settings are correct press hold the “Start/Enter” button to begin the charge process. The display will now show similar to the following: S:3SER R:3SER CONFIRM(ENTER) Top Line: S = Number of cells selected by you in the previous screen. R = Number of cells detected by the charger. 4. If these values are different press the “Batt type/Stop” button to return to the previous screen to adjust the settings. If both of these values are the same begin charging by pressing the “Start/Enter” button. 5. Once you have started the charge process the following information will display: Number of cells Li3S CHG Charging current 1.2A 022:43 Charging time Battery voltage 12.59V 00682 Charged capacity 6. The charger will emit a sound to inform you when the charge process is complete. To stop the charge process early press the “Batt type/Stop” button. Lithium polymer BALANCE charge program The following program is only suitable for charging and balancing Lithium-polymer batteries with a nominal voltage of 3.7V/cell. Do not try to charge any other type of battery using this program. This program is for balancing the voltage of Lithium-polymer battery cells while charging. To charge a lithium-polymer battery using this program the battery needs to have a balance lead. This charge program is different to that of the Li-Po charge program. In this charge process the voltage of each individual cell is monitored and the charging current fed into each cell is controlled to balance the voltages. How to charge: 1. Select this charge process by choosing LiPo BALANCE CHG from the main menu by pressing the “Start/Enter” button. The display should look similar to this: LiPo BALANCE CHG 2.0A 11.1V(3S) The value on the left of the second line denotes the charge current and the value on the right of the second line denotes the voltage and cell count of the battery pack to be charged. 2. If you need to alter the settings for the charge press the “Start/Enter” button to make it blink then change the value with “DEC” or “INC” button. The value will be stored by pressing “Start/Enter” button. 3. Once the settings are correct press hold the “Start/Enter” button to begin the charge process. The display will now show similar to the following: S:3SER R:3SER CONFIRM(ENTER) Top Line: S = Number of cells selected by you in the previous screen. R = Number of cells detected by the charger. 4. If these values are different press the “Batt type/Stop” button to return to the previous screen to adjust the settings. If both of these values are the same begin charging by pressing the “Start/Enter” button. 5. Once you have started the charge process the following information will display: Number of cells Charging current BL3S CHG 1.2A 022:43 Charging Battery voltage 12.59V 00682 Charged capacity 6. The charger will emit a sound to inform you when the charge process is complete. To stop the charge process early press the “Batt type/Stop” button. VIEWING THE VOLTAGE OF INDIVIDUAL CELLS This charge process allows you to monitor the voltage of individual cells whilst charging. To use this function press the “INC” or “DEC” buttons during the charge process. Cell 1 4.17V 0.4A Charge Current Cell 2 4.17V 0.00V Cell 4 Cell 3 4.19V 0.00V Cell 5 nimh charge program The following program is only suitable for charging NiMh (Nickel-Metal-Hydride) batteries associated with R/C model applications. Do not try to charge any other type of battery using this program. This program simply charges the battery using the current you set, the charge current ranges from 0.1 to 5A. How to charge: 1. Select this charge process by choosing NiMh CHARGE from the main menu by pressing the “Start/Enter” button. The display should look similar to this: NiMH CHARGE CURRENT 2.0V 2. If you need to alter the charge current press the “Start/Enter” button to make it blink then change the value with “DEC” or “INC” button. The value will be stored by pressing the “Start/Enter” button. 3. Once the settings are correct press hold the “Start/Enter” button to begin the charge process. The display will now show similar to the following: Battery type NiMH CHG Charging current 2.0A 022:45 Charging time Battery voltage 7.42V 00890 Charged capacity 4. The charger will emit a sound to inform you when the charge process is complete. To stop the charge process early press the “Batt type/Stop” button. 10 nICD charge program The following program is only suitable for charging NiCd (Nickel-Cadmium) batteries associated with R/C model applications. Do not try to charge any other type of battery using this program. This program simply charges the battery using the current you set, the charge current ranges from 0.1 to 5A. How to charge: 1. Select this charge process by choosing NiCd CHARGE from the main menu by pressing the “Start/Enter” button. The display should look similar to this: NiCd CHARGE CURRENT 2.0A 2. If you need to alter the charge current press the “Start/Enter” button to make it blink then change the value with “DEC” or “INC” button. The value will be stored by pressing the “Start/Enter” button. 3. Once the settings are correct press hold the “Start/Enter” button to begin the charge process. The display will now show similar to the following: Battery type NiCd CHG Charging current 2.0A 022:45 Charging time Battery voltage 7.42V 00890 Charged capacity 4. The charger will emit a sound to inform you when the charge process is complete. To stop the charge process early press the “Batt type/Stop” button. 11 Gel cell (pb, lead acid) charge program The following program is only suitable for charging Gel cell (Pb, Lead-Acid) batteries with nominal voltage from 2V-12V. Do not try to charge any other type of battery using this program. Gel cell batteries are completely different to NiMh and NiCd batteries, they can only deliver relatively low current compared to their capacity and similar restrictions apply to the charge process. For this reason the charge current for gel cell batteries should be 1/10 of the capacity. Gel cell batteries must not be charged rapidly, always follow the instructions supplied by the manufacturer of the battery. How to charge: 1. Select this charge process by choosing Pb CHARGE from the main menu by pressing the “Start/Enter” button. The display should look similar to this: Pb6s CHARGE 4.0A 12.0V The charge current is displayed in the lower left. The nominal voltage is displyed in the lower right. The charge current ranges from 0.1 to 5A. The voltage should match the voltage of the battery to be charged. 2. If you need to alter the charge current or the voltage press the “Start/Enter” button to make it blink then change the value with “DEC” or “INC” button. The value will be stored by pressing the “Start/Enter” button. 3. Once the settings are correct press hold the “Start/Enter” button to begin the charge process. The display will now show similar to the following: Battery type Pb6s CHG Charging current 4.0A 022:45 Charging time Battery voltage 12.59V 00682 Charged capacity 4. The charger will emit a sound to inform you when the charge process is complete. To stop the charge process early press the “Batt type/Stop” button. 12 warnings and error messages This charger incorporates a variety of functions for protection, these monitor the system to verify processes and the state of the electronics. In case of an error the screen will display the cause of error and emit and audiable sound. error messages REVERSED POLARITY CONNECTION BREAK SHORT ERR IN VOLTAGE ERR VOL SELECT ERR BREAKDOWN BATTERY CHECK LOW VOLTAGE BATTERY CHECK OVER VOLTAGE BATTERY VOL ERR The output is connected to a battery with incorrect polarity This will be displayed if the unit detects a break in the circuit between the battery and output or if the battery is voluntarily disconnected during the charge process. There was a short cicuit at OUTPUT. The voltage of the input power supply is below the minimum of 12V The voltage of the lithium battery pack to be charged has been selected incorrectly. The charger has malfunctioned for some reason. Seek professional advice. The processor detects that the battery has dropped below the minimum voltage during the charge process. The processor detects that the battery has risen above the maximum voltage during the charge process The voltage of one of the cells in a Li-poly battery pack has risen above the maximum voltage. 13 Importer distributor : Amerang Limited Commerce Way, Lancing, West Sussex, BN15 8TA, ENGLAND www.Amerang-Group.com 14 15 POWER CHARGER 5 Manuale Vi ringraziamo per aver acquistato il nostro POWER CHARGER 5. Avete scelto un caricabatteria computerizzato dotato di microprocessore ad alta prestazione e software operazionale specifico. Grazie all’utilizzo di POWER CHARGER 5, la vostra batteria darà sempre la massima prestazione e sarà sempre controllata. Prima dell’utilizzo, si prega di leggere attentamente le istruzioni contenute nel seguente manuale per essere a conoscenza di tutte le informazioni necessarie per il corretto funzionamento. Conservare il manuale in un luogo sicuro in caso di passaggio ad un altro proprietario. 16 Caratteristiche generali: Caricabatteria con bilanciatore interno per batterie Li-Po Il POWER CHARGER 5 ha al suo interno un bilanciatore che opera su ogni singola cella e questo permette di poter caricare e bilanciare batterie Li-Po senza dover utilizzare bilanciatori separati. Massima sicurezza Sistema Delta Peak: il programma automatico di fine carica lavora in base al principio della rilevazione di voltaggio picco Delta. Limite di capacità: la capacità di ricarica è sempre calcolata in base ai multipli della corrente e del tempo di ricarica. Se la capacità di ricarica è superiore ai limiti previsti, il processo di ricarica sarà automaticamente terminato al raggiungimento del valore massimo. Limite tempo di carica: potete anche limitare il tempo massimo di carica per evitare possibili errori. Dysplay per controllo tensione: per proteggere la batteria della macchina da eventuali danni, la tensione viene sempre monitorata. Nel caso in cui scenda al di sotto del valore limite minimo consentito, il processo terminerà automaticamente. Alta potenza e grande prestazione Il POWER CHARGER 5 può lavorare utilizzando in uscita massimo 50W. Può caricare fino a 14 celle Nicd/NiMH , pacchi batteria Li-Po fino a 5 celle e batterie Piombo(Pb), con corrente di carica fino a 5A 17 Cavo d’entrata (DC 11-18V) Schermo LCD (16chrx22linee)) Uscita per la ricarica ( banana 4mm femmina) Entrata per conettore bilanciamento JST-XH DEC(-)/INC(+) Per selezionare un sottoprogramma Per variare il valore TIPO BATTERIA/STOP per selezionare il programma principale Stop per fermare l’operazione power supply 18 START/ENTER per iniziare o confermare l’operazione ▲ Avvertenze e note relative alla sicurezza Non lasciare mai il caricabatteria incustodito se connesso alla corrente. Nel caso in cui si noti un qualsiasi malfunzionamento, fermare subito il processo e fare riferimento al manuale d’istruzioni. Tenere lontano da polvere, vapore, pioggia, calore, fonti dirette di calore e vibrazioni. Non farlo cadere. Il circuito dell’unità funziona solamente a 12 V CC. L’unità e la batteria da ricaricare devono essere posizionate su di una superficie resistente al calore, non infiammabile e non conduttiva. Non posizionarlo mai sul sedile della macchina, sui tappeti o oggetti simili. Tenere lontano dall’area di lavoro i materiali volatili infiammabili. Leggere attentamente le istruzioni relative alla batteria da ricaricare. Se non si segue le sequenza delle operazioni, la batteria non si caricherà correttamente. Invertire la sequenza per disconnettere la batteria. Per evitare cortocircuiti, collegare sempre prima il cavo all’unità. Invertire la sequenza per disconnettere. Non collegare più di un pacco batteria alla volta. Non cercare di caricare o scaricare i seguenti tipi di batteria: --pacco batteria costituito da diversi tipi di elementi (costruite da diversi fornitori) -- la batteria è già completamente carica oppure è leggermente scarica. --batterie non ricaricabili (pericolo di esplosione). --batterie che richiedono una tecnica di ricarica diversa rispetto a Nicd, NIMH, Li-Poly o Pb. --batterie difettose o danneggiate --batterie con circuito di ricarica integrale o circuito di protezione 19 --batterie installate su di un dispositivo o connesse elettricamente ad altri componenti --batterie non espressamente definite dal costruttore o definite non compatibili con il caricabatteria. Ricordate di controllare i seguenti punti prima di iniziare l’operazione di ricarica. --avete selezionato il programma giusto a seconda del tipo di batteria? --avete selezionato la corrente adeguata per caricare o scaricare la batteria? --il pacco batteria al litio può contenere sia circuiti paralleli che circuiti in serie. Dovete controllare attentamente il pacco batteria prima di avviare l’operazione di ricarica. --le connessioni sono sicure e stabili oppure vi sono contatti intermittenti in qualche punto del circuito? Questi avvertimenti e note di sicurezza sono particolarmente importanti. Si prega di seguire le istruzioni per ottenere il massimo livello di sicurezza; diversamente, il caricabatterie e la batteria potrebbero subire dei danni, causando anche il rischio d’incendio o ferite. 20 Funzioni del menu Programma di carica Li-Poly Programma di carica bilanciata Li-Poly Carica Li-Ion Poly Carica bilanciata Li-Poly Programma di carica NIMH Carica NIMH Programma di carica NICd Carica NICd Programma di carica Pb Settaggio manuale Carica Pb Max temperatura di utilizzo Limite timer di utilizzo Suono beep/ cicalino Max amperaggio di utilizzo Impostazione minima di voltaggio in entrata Luminosità 21 Set up parametri iniziali Il POWER CHARGER 5 ha impostazioni di base che possono essere variate dall’utente una volta connesso ad una batteria o alimentatore da 12V. Lo schermo visualizza le seguenti informazioni in sequenza e l’utente può variare il valore del parametro su ogni schermo. Quando si desidera variare il valore nel programma, premere start/enter, questo inizierà a lampeggiare, ora si può modificare il valore con il tasto DEC o INC. Il valore sarà salvato premendo una sola volta il tasto start/enter. Funzioni menu Caratteristica opzionale che utilizza una sonda di temperatura a contatto con la superficie della batteria, l’arresto della temperatura può essere on o off. Se è selezionato su on, determinare la temperatura massima che il caricatore deve raggiungere durante la carica. Una volta raggiunta questa temperatura durante la carica, il processo sarà interrotto. Quando si inizia un processo di carica, il timer generale di sicurezza, automaticamente inizia a funzionare. Questo è programmato per evitare una carica eccessiva della batteria nel caso in cui questa risulti difettosa oppure se il circuito interno non riesce a determinare la carica totale della batteria. Il valore per il timer di sicurezza deve permettere una carica completa della batteria. Questo programma determina la capacità(ampere) di carica massima che la batteria dovrebbe raggiungere durante la fase di carica. Se non entra in funzione il sistema delta peak, questa caratteristica bloccherà in automatico il processo in base al valore selezionato. Il beep avviene ogni volta che vengono premuti i pulsanti. Il beep o la melodia che si sente durante il funzionamento, servono per avvertire delle possibili variazioni. Questi suoni possono essere on o off. Questo programma controlla il voltaggio della batteria in entrata. Se il voltaggio scende al di sotto del valore , l’operazione cessa per proteggere la batteria. Si può regolare la luminosità dello schermo LCD del caricatore. 22 Programma per batteria litio polimero Questi programmi sono adatti solamente per caricare e scaricare batterie litio-polimero con un voltaggio nominale pari a 3.7V/elemento. Queste batterie adottano diverse tecniche di carica con un medio voltaggio costante (VC) e corrente costante (CC). La corrente di carica varia a seconda della capacità della batteria e di solito è pari a C/2 (la metà della capacità rispetto alla corrente di carica).Il voltaggio finale del processo di carica è molto importante; dovrebbe essere pari a 4.2V/ elemento per il voltaggio nominale di 3.7V/elemento. Se il voltaggio finale supera l’1% durante la carica per qualsiasi ragione, la batteria esploderà. La corrente di carica e il voltaggio nominale settati devono sempre essere corretti a seconda del tipo di batteria da ricaricare. Quando si desidera modificare i parametri del programma, premere start/enter che inizierà a lampeggiare, successivamente variare il valore con DEC o INC. Il valore sarà salvato premendo di nuovo una sola volta start/enter. Il valore sulla sinistra della seconda linea determina una corrente di ricarica e il valore sulla destra della seconda linea determina il voltaggio del pacco batteria. Dopo aver settato la corrente e il voltaggio, tenere premuto il tasto start/enter per più di tre secondi per iniziare il processo (Corrente di ricarica: 0.1---5.0A, Voltaggio: 1--- 5 serie). Batteria Li-Lon/poly Questo mostra il numero di elementi prestabiliti e il processore. “R” mostra il numero di elementi trovati dal caricatore e “S” rappresenta il numero di elementi selezionati da Voi nella schermata precedente. Se entrambe i numeri coincidono, potete iniziare la carica premendo start/enter. Se ciò non accade, premere il pulsante batt type stop per tornare alla schermata precedente. Successivamente controllare il numero di elementi del pacco batteria. Il display mostra la situazione corrente durante il processo di carica. Per fermare la carica premere il pulsante batt type stop una sola volta. Numero di elementi Tempo di carica Voltaggio batteria Corrente di carica 23 Carica delle batterie Li-Poly in modalità bilanciamento Utilizzato per bilanciare il voltaggio delle batterie al litio del pacco batterie da ricaricare. Per fare questo, il pacco batteria da ricaricare deve avere il connettore per bilanciamento(il 90% dei pacchi batteria lo possiede). Collegarlo all’ingresso sulla parte destra del caricatore e di seguito collegare il + e – (rosso e nero) all’uscita del caricabatteria. Il pacco batteria sarà caricato a seconda dei valori precedentemente impostati. Il processore interno del caricatore monitorerà il voltaggio di ogni cella del pacco batteria e controllerà l’alimentazione presente in ogni cella per normalizzare il voltaggio. Il valore sulla sinistra della seconda linea determina la corrente(ampere) di carica e il valore sulla destra della seconda linea determina il voltaggio del pacco batteria(tra parentesi il numero di celle). Dopo aver settato la corrente e il voltaggio, tenere premuto il tasto start/enter per più di tre secondi per iniziare il processo (Corrente di carica: 0.1---5.0A, Tensione: 3,7V--- 18,5V in serie). Batteria Li-Lon/poly Questo mostra il numero di elementi prestabiliti e il processore. “R” mostra il numero di elementi trovati dal caricatore e “S” rappresenta il numero di elementi selezionati da Voi nella schermata precedente. Se entrambe i numeri coincidono, potete iniziare la carica premendo start/enter. Se ciò non accade, premere il pulsante batt type stop per tornare alla schermata precedente. Successivamente controllare il numero di elementi del pacco batteria. Il display mostra la situazione corrente durante il processo di carica. Per fermare la carica premere il pulsante batt type stop una sola volta. Numero di elementi Tempo di ricarica Corrente di ricarica 24 Voltaggio batteria Capacità ricaricata Richiesta del voltaggio dei singoli elementi E’ possibile monitorare il voltaggio corrente di ogni singola cella, premendo il tasto DEC/INC durante il processo. La prima riga del display mostra il voltaggio dell’elemento 1, elemento 2 ed elemento 3. Sulla parte sinistra della seconda riga si visualizza la corrente di carica. Quella successiva mostra il voltaggio dell’elemento 4 ed elemento 5. Programma di carica per batterie NiMH/NiCd Questi programmi servono per ricaricare le batterie NiMH (Nickel-Metal-Hydride) o NiCd (Nicdel Cadmium) solitamente utilizzate per le applicazione dei modelli R/C. Per variare la corrente di carica, premere il tasto start/enter in modo tale che lampeggi, poi variare il valore utilizzando il tasto DEC o INC. Il valore sarà salvato premendo una sola volta il tasto start/ enter. Per iniziare il processo di ricarica, tenere premuto start/enter per più di 3 secondi. Questo programma ricarica semplicemente la batteria utilizzando la corrente da voi selezionata e può essere regolata da 0.1 a 5.0A. Questa schermata mostra lo stato della ricarica. Per arrestare il processo, premere il tasto batt type stop una volta. Il suono che si udirà indica la fine del processo. Tipo batteria Tempo di ricarica Corrente di ricarica Voltaggio batteria Capacità ricaricata 25 Programma di ricarica per batterie Pb (lead-sulphuric acid) Si utilizza per ricaricare le batterie Pb (al piombo) con un voltaggio nominale da 2 a 12V. Le batterie al piombo sono completamente diverse rispetto alle batterie NiCd o NiMH. Possono emettere una corrente inferiore rispetto alla loro capacità. La corrente di carica ottima sarà quindi pari a 1/10 della capacità. Le batterie Pb non devono essere ricaricate in maniera rapida. Seguire sempre le istruzioni fornite dal costruttore. Selezionare la corrente di carica sulla sinistra e il voltaggio nominale della batteria sulla destra. La gamma di corrente di carica può essere regolata da 0.1 a 5.0A e il voltaggio deve corrispondere alla batteria che deve essere ricaricata. Iniziare il processo di ricarica tenendo premuto per più di 3 secondi il tasto start/enter. Il display visualizza lo stato della carica. Per arrestare il processo, premere il tasto batt type stop una volta. Il suono che si udirà indica la fine del processo. Tempo di ricarica Corrente di ricarica Capacità (amperer)ricaricata Voltaggio batteria Avvertenze e messaggi d’errore Il POWER CHARGER 5 ha anche funzioni di protezione e monitoraggio del sistema per verificare le funzioni e lo stato dell’elettronica. In caso di errori, il display visualizza la causa dell’errore e lo strumento emetterà un suono percepibile. L’uscita è connessa alla batteria con una polarità errata Questo segnalerà un eventuale interruzione della connessione tra la batteria e l’uscita o una disconnessione volontaria della carica durante l’operazione di carica o di scarica della batteria. Determina la presenza di un corto circuito nel terminale d’uscita. 26 Il voltaggio in entrata è più basso del limite. Il voltaggio del pacco batteria al litio è stato selezionato erroneamente. Controllare il voltaggio del pacco batteria. Vi è un malfunzionamento nell’unità per qualche ragione. Il processore rileva una differenza di voltaggio(basso) durante la ricarica. Il processore rileva una differenza di voltaggio(alto) durante la ricarica. Il voltaggio di un elemento nel pacco batteria Li-Poly è andato oltre i limiti. Caratteristiche: Voltaggio: 10.0 ~ 18.0 Volt Potenza: max. 50W Corrente di ricarica: 0.1 ~ 5.0A Corrente di scarica per bilanciamento Li-Po: 200mAh/elemento Tipo batterie NiCd/NiMH: 1 ~ 14 elementi Li-Lon/polymer: 1-5 in serie Voltaggio batteria Pb: 6V ~ 12V Peso: 280g Dimensioni: 130*80*23mm Garanzia e Servizio La garanzia del prodotto vale 2 anni (24 mesi) dalla data di acquisto. La garanzia si applica solo su materiale difettoso al momento dell’acquisto dell’apparecchio. Durante questo periodo ripareremo o sostituiremo senza costi aggiuntivi qualsiasi prodotto con difetti dovuti a cause esterne. Al momento dell’acquisto emetteremo come prova dell’acquisto fattura. Questa garanzia non copre i danni dovuti ad usura, sovraccarico, utilizzo non previsto o utilizzo di accessori non compatibili. La ditta SABATTINICARS non risponde di danni a persone o cose, causate da un utilizzo errato del caricabatteria POWER CHARGE 5. 27 Importato e distribuito da: SABATTINICARS s.r.l. Via Cicogna 129 40068 - San Lazzaro di Savena (BO) www.sabattinicars.com 28 29 POWER CHARGER 5 Mode d’emploi Chargeur équilibreur pour accus Lithium Polymère Nous vous remercions d’avoir fait l’acquisition de Power charger 5. Vous possédez dorénavant un chargeur rapide qui est informatisé grâce à un puissant microprocesseur et à un logiciel spécialement développé pour gérer la charge des accus.Ce chargeur maintient et optimise dans les meilleures conditions qui soient la durée de vie de vos batteries. Merci de lire complètement et attentivement ce mode d’emploi car il contient de nombreuses informations utiles et importantes. Si vous possédez un autre chargeur Power charger 5,conservez toujours ce mode d’emploi ou donnez-le à un autre utilisateur qui ne le possède pas. 30 Caractéristiques : Equilibeur pour batteries Li-Po intégré Le Power charger 5 intègre un équilibreur d’élément Li-Po.De ce fait, il n’est pas nécessaire d’utiliser un équilibreur séparé lorsque vous chargez votre batterie Li-Po. Sécurité maximale Sensibilité du Delta-peak : Le programme automatique d’arrêt de charge fonctionne grâce au principe de la détection de tension (delta-peak). Limite de capacité : La charge maximale est toujours calculée à la fois en fonction du temps et du courant de charge. Au cas où la charge dépasserait la limite de capacité de la batterie, le processus de charge se coupera automatiquement lorsque la valeur maximale est déterminée. Temps limite de charge : vous pouvez prérégler un temps de charge maximal afin d’éviter d’endommager la batterie. Surveillance de la tension d’entrée : Dans le cas où vous utilisez une batterie de voiture comme alimentation et afin de la protéger, sa tension est toujours surveillée. En effet, si son voltage chute en dessous d’une certaine valeur, la charge se coupera automatiquement. Haute puissance et performance du circuit Le Power charger 5 utilise un circuit qui permet dedélivrer une puissance de sortie de 50W. Par conséquent il peut charger jusqu’à 14 éléments en Ni-Cd ou Ni-MH et 5 éléments Li-Po avec un courant maximal de 5.0A. 31 Prises de charge. (Prises bananes 4mm). Alimentation d’entrée (11-18V DC) Ecran LCD (16 caractères / 2 lignes) TYPE DE BATTERIE / ARRET Pour sélectionner le menu principal. Pour arrêter la charge. 32 DESCENDRE / MONTER Pour sélectionner les différents programmes. Pour modifier les valeurs. Balance Lead sockets JST-XH ports DEMARRER/ENTRER Pour démarrer ou reprendre la charge. Avertissement et remarques de sécurité Ne laissez jamais sans surveillance le chargeur lorsque celui-ci est alimenté. Si vous observez des dysfonctionnements lors de la charge, veuillez consulter le mode d’emploi. Conservez le power charger5 à l’abri de la poussière, de l’humidité, de la pluie, de la chaleur (ne le mettez pas directement sous le soleil) et des vibrations. Le chargeur B5 a été conçu pour fonctionner uniquement en 12V. Le chargeur et la batterie à charger doivent être disposés sur une surface qui doit résister à la chaleur, qui soit non inflammable et non conducteur d’électricité. Ne placez jamais le chargeur et la batterie sur un siège de voiture,sur un tapis ou une surface constituée d’une matière similaire. Gardez à distance du chargeur et de la batterie à charger tous les matériaux susceptibles d’être inflammables.Assurez-vous de comprendre les instructions de charge propres à la batterie et que le chargeur soit programmé en fonction de ses instructions. Assurez-vous de comprendre les instructions de charge propres à la batterie et que le chargeur soit programmé en fonction de ses instructions. Si le chargeur est programmé de façon incorrecte,débranchez immédiatement la batterie. Pour éviter les courts-circuits entre les prises de charge, branchez toujours en premier la batterie au chargeur.Faites l’inverse lorsque vous éteignez le chargeur. Ne branchez pas plus d’une batterie à la fois. Ne tentez pas de charger ou de décharger les types de batteries suivantes : - Des batteries contenant des éléments différents (et également de fabricants différents). - Des batteries entièrement chargées ou à peinedéchargées. - Des batteries non rechargeables (risque d’explosion). - Des batteries qui exigent un processus de charge différent (Ni-Cd, Ni-MH, Li-Po ou auplomb). - Des batteries abîmées ou endommagées. - Des batteries munies d’un circuit électronique de charge ou d’un circuit de protection. - Des batteries installées dans un modèle réduit ou qui sont électriquement liées à d’autres éléments. - Des batteries qui ne sont pas compatibles avec le courant de charge du chargeur (voire les recommandations du fabriquant de batteries). Veuillez vérifier les points suivants avant de commencer à charger. - Avez-vous sélectionné le programme de charge adapté à votre type de batterie ? - Avez-vous sélectionné le courant de charge ou de décharge adapté à votre batterie? - Les batteries au lithium peuvent être composées de circuits en parallèle et/ou en série. Vous devez vérifier attentivement la composition de votre batterie avant de commencer à la charger. - Toutes les connectiques sont-elles sécurisées et fixées fermement afin d’éviter tout courcircuit. ? Tous ces avertissements et ces conseils sont très importants. Veuillez suivre ces instructions pour un maximum de sécurité autrement le chargeur et la batterie pourraient être endommagés. Cela pourrait également vous blesser et provoquer un incendie. 33 Organigramme de la programmation Programme de charge Li-Po Programme de charge/équilibrage Li-Po Charge les batteries Li-Po/Li-Ion Charge/équilibre les batteries Li-Po Programme de charge Ni-MH Charge les batteries Ni-MH Programme de charge Ni-Cd Charge les batteries Ni-Cd Programme de charge plomb Réglages de l’utilisateur 34 Charge les batteries au plomb Coupure par la température Limite de la minuterie Son (Bip ou Buzzer) Coupure par la capacité Coupure par basse tension d’entrée Luminosité de l’écran Réglage des paramètres initiaux Le Power charger 5 fonctionnera avec les valeurs par défaut lorsqu’il sera branché pour la première fois à l’alimentation 12V.L’écran affichera les informations suivantes dans l’ordre de la séquence indiquée et l’utilisateur peut modifier la valeur des paramètres à chaque écran. Lorsque vous désirez modifier la valeur des paramètres dans le programme,appuyez sur le bouton Start Enter pour faire clignoter la valeur puis changez la valeur avec les touches DEC ou INC. La valeur sera sauvegardée en pressant de nouveau la touche Start/Enter. Vous informe sur le mode du chargeur. Une sonde optionnelle se dispose sur la surface de la batterie et la charge peut-être coupée automatiquement par la température. Lorsque cette option est activée, vous devrez préciser la température maximale à laquelle le chargeur devra couper la charge. Une fois que la batterie aura atteint cette valeur, la charge s’arrêtera automatiquement. Lorsque la charge débute, la minuterie se mettra en route simultanément. La minuterie permettra d’éviter à la batterie d’être trop chargée si celle-ci est défectueuse ou si le circuit delta peak ne détecte pas la capacité maximale de la batterie. Vous devrez régler la minuterie de façon à ce que la batterie soit chargée complètement. Cette fonction vous permet d’indiquer la capacité maximale de la batterie. Si le circuit delta peak ne détecte pas la fin de charge ou si la minuterie ne coupe pas la charge, alors cette fonction vous permettra de mettre un terme à la charge en sélectionnant la capacité de votre batterie. Pour confirmer votre action, un bip sera émis à chaque fois que vous presserez les touches. Le bip ou la mélodie sera émis plusieurs fois pendant le réglage de la programmation pour vous alerter de la modification des modes. Les sons peuvent être activées ou désactivées. Ce programme surveille la tension de la batterie d’alimentation. Si cette tension descend en dessous d’une certaine valeur, vous pouvez programmer le chargeur pour qu’il se coupe afin de protéger la batterie d’alimentation. Vous pouvez modifier la luminosité de l’écran LCD du chargeur. 35 Programme de charge des batteries Lithium Les programmes inclus dans le chargeur sont uniquement destinés à la charge et décharge des batteries Lithium-Polymère avec une tension nominale de 3,7V par élément. Ces batteries nécessitent une technique de charge avec une tension et un courant constants. Le courant de charge varie en fonction de la capacité de la batterie et est généralement égal à la moitié de la capacité de la batterie. La tension finale de la charge est très importante ; elle doit être égale à 4,2V par élément lorsque la capacité de chaque élément est de 3,7V. Si la tension excède plus d’un pourcent pendant la charge alors la batterie risque d’exploser. Le courant de charge et la tension nominale doivent être correctement déterminés dans le programme afin que la batterie soit chargée efficacement. Lorsque vous désirez modifier une valeur dans le programme, pressez le bouton « Start/Enter » afin de faire clignoter la valeur puis changez-la avec les touches DEC et INC . La valeur sera enregistrée en appuyant de nouveau sur la touche « Start/Enter ». La valeur située sur la deuxième ligne sur le côté gauche correspond au courant de charge. La valeur située sur la deuxième ligne sur le côté droit correspond à la tension de la batterie. Après avoir déterminé le courant et la tension, appuyez sur la touche Start/Enter pendant au moins trois secondes afin de commencer la charge. (Courant de charge : 0,1---5.0A, Tension : 1---5 éléments). Charge des batteries Li-Ion/Li-Po Cet affichage indique le nombre d’éléments à charger détectés par le microprocesseur. La lettre “R” montre le nombre d’éléments trouvés par le chargeur et la lettre “S” montre le nombre d’éléments que vous avez sélectionnés précédemment. Si les deux chiffres sont identiques, vous pouvez débuter la charge en pressant la touche Start/Enter. Si ce n’est pas le cas, appuyez sur la touche Batt type stop pour retourner à l’écran précédant. Faites attention à bien vérifier le nombre d’éléments de labatterie à charger. Pendant la charge, l’écran fournit des informations en temps réel. Pour arrêter la charge, appuyez de nouveau sur la touche Batt type stop . Nombre d’éléments 36 Temps de charge Courant de charge Tension de la batterie Capacité chargée Charge équilibrée de batterie Li-Po Ce chargeur est capable d’équilibrer tout en chargeant les tensions des batteries Lithium. Pour réaliser cela, la batterie à charger doit posséder une prise d’équilibrage. Branchez la prise d’équilibrage sur le connecteur situé sur le côté droit du chargeur. Vous n’avez pas besoin de brancher la batterie au chargeur avec les prises bananes. Lorsque le chargeur est configuré dans ce mode, le procédé de charge sera différent du mode normal. Le processeur interne surveillera la tension de chaque élément de la batterie et contrôlera le courant de charge nécessaire à chaque élément pour homogénéiser la tension. La valeur située sur la deuxième ligne sur le côté gauche correspond au courant de charge. La valeur située sur la deuxième ligne sur le côté droit correspond à la tension de la batterie. Après avoir déterminé le courant et la tension, appuyez sur la touche Start/Enter pendant au moins trois secondes afin de commencer la charge. (Courant de charge : 0,1---5,0A,Tension : 1---5 éléments). Charge des batteries Li-Ion/Li-Po Cette affichage indique le nombre d’éléments à charger détectés par le microprocesseur. La lettre “R” montre le nombre d’éléments trouvés par le chargeur et la lettre “S” montre le nombre d’éléments que vous avez sélectionnés précédemment. Si les deux chiffres sont identiques, vous pouvez débuter la charge en pressant la touche Start/Enter. Si ce n’est pas le cas, appuyez sur la touche Batt type stop pour retourner à l’écran précédant. Faites attention à bien vérifier le nombre d’éléments de la batterie à charger. Pendant la charge, l’écran fournit des informations en temps réel. Pour arrêter la charge, appuyez de nouveau sur la touche Batt type stop . Nombre d’éléments Temps de charge Courant de charge Tension de la batterie Capacité chargée 37 Surveiller la tension de chaque élément Vous pouvez surveiller en temps réel la tension de chaque élément en appuyant pendant la charge sur la touche DEC ou INC. La première ligne de l’écran indique les tensions des éléments No.1, No.2 et No.3. A gauche de la deuxième ligne, vous verrez indiqué le courant de charge.L’écran d’après indique les tensions des éléments No.4 et No.5. Programmes de charge des batteries Ni-MH/Ni-Cd Ces programmes sont conçus pour charger les batteries Ni-MH (Nickel-Metal-Hydride) ou NiCd (Nickel Cadmium) utilisées fréquemment en modélisme. Pour modifier le courant de charge, appuyez sur la touche Start/Enter pour faire clignoter la valeur puis modifiez-la en utilisant les touches DEC ou INC. La valeur sera enregistrée en appuyant de nouveau sur la touche Start/Enter. Pour débuter la charge, appuyez sur la touche Start/Enter pendant plus de 3 secondes. Ce programme charge les batteries en fonction du courant de charge que vous désirez. Le courant de charge peut varier de 0,1 à 5,0A. L’écran indique en temps réel le courant de charge. Pour arrêter la charge, appuyez de nouveau sur la touche Batt type stop. Un son sera émis pour vous signaler la fin de la charge. Type de batterie Temps de charge Courant de charge 38 Tension de la batterie Capacité chargée Programme de charge des batteries au plomb (acide) Ce programme permet de charger les batteries au plomb qui ont une tension comprise entre 2 et 12V. Les batteries au plomb sont complètement différentes des batteries Ni-Cd ou NiMH. Elles peuvent délivrer un courant inférieur à leur capacité et à contrario ce phénomène s’applique également pour la charge. De ce fait le courant de charge optimal doit être de 1/10ème de la capacité de la batterie. Les batteries au plomb ne doivent pas être chargées rapidement. Veuillez toujours suivre les instructions fournies par le fabriquant de la batterie. Modifiez le courant de charge sur la gauche de l’écran et la tension nominale sur la droite de l’écran. Le courant de charge doit être compris entre 0,1 et 5,0A et la tension doit correspondre à la batterie. Débutez la charge en appuyant sur la touche Start/Enter pendant au moins 3 secondes. L’écran indique en temps réel l’état de la charge. Pour forcer l’arrêt de la charge, appuyez de nouveau sur la touche Batt Type Stop . Un son sera émis pour vous signaler la fin de la charge. Temps de charge Courant de charge Capacité chargée Tension de la batterie 39 Avertissements et messages d’erreur Le Power charger 5 contient plusieurs fonctions différentes destinées à protéger et à surveiller l’état du système et de l’électronique. Dans le cas où des dysfonctionnements se produiraient, l’écran indiquera la cause de ce dysfonctionnement par un message d’explication accompagné d’un son. Le chargeur est branché à la batterie d’alimentation avec les polarités inversées. Ce message d’erreur s’affichera lorsque le chargeur détectera une interruption dans le branchement entre la batterie et le chargeur ou si la batterie à charger est débranchée. Il y a un court-circuit au niveau de la sortie du chargeur. La tension d’entrée est inférieure au minimum requis. La tension sélectionnée pour la batterie au lithium estinadaptée. Vérifiez la tension du la batterie. Un dysfonctionnement s’est produit au niveau du chargeur. Le processeur a détecté une différence de tension pendant la charge. Le processeur a détecté une différence de tension pendant la charge. La tension d’un des éléments de la batterie Li-Po a atteint sa limite. 40 Caractéristiques Tension de fonctionnement : 10,0~18,0 Volt Circuit d’alimentation : Max. 50W Courant de charge : 0,1~5,0A Courant d’équilibrage : 200mAh/élément Nombre d’éléments Ni-Cd/Ni-MH : 1~14 éléments Nombre d’éléments Li-Ion/Li-Po : 15 éléments Tension de batterie au plomb : 6V~12V Poids : 280g Dimensions : 130x80x23mm Garantie et service Ce produit est garanti sans défaut de matière ou de fabrication à la date de l’achat. Cette garantie ne couvre ni les dommages d’usage,ni les modifications. La garantie couvre exclusivement le produit lui-même et est limitée sa la valeur d’origine. Elle ne concerne pas les éléments endommagés par l’usage ou à la suite de modifications. Le fait pour le modéliste d’utiliser ce produit implique l’acceptation de sa responsabilité de tous dommages pouvant être causés par le produit tel qu’il aura été utilisé. Dans le cas où l’acheteur n’accepterait pas cette responsabilité, il peut rapporter le produit neuf et inutilisé dans son emballage d’origine à son détaillant pour en obtenir le remboursement. 41 Distibué en France par : Model Racing Car ZAC, 15bis Avenue De La Sablière 94370 Sucy En Brie Tel. : 01.49.62.09.60 Fax: 01.49.62.09.73 www.mrcmodelisme.com Made in China MRC-2007, Reproduction partielle ou totale interdite sans l’accord préalable de MRC. 42 WARNING: Failure to connect as shown in this diagram will damage this charger. This balance charging function is designed for JST-XH balance leads only. Do not try and fit any other type of balance lead directly into this chargers balance ports. (If you are not sure what type of lead you have then check with your local model shop before connecting to the balance ports on this charger) Adaptor leads are currently available to convert from JST-XH to JST-EHR. More balance leads will be available in the near future to suit other manufacturers balance leads. The main battery leads must be connected along with the balance lead connector as shown before charging your battery. WARNING: If using crock clips as shown in diagram 2 make sure they are unable to touch together! 43