1
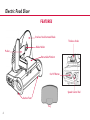
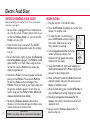
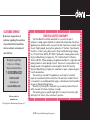
Electric Food Slicer
with 8 1/2“ blade
ile
t
a
c
rs
Ve lectri r
E lice
S
Model #14250
IMPORTANT!
Please keep these instructions and
your original box packaging.
www.deni.com
INSTRUCTIONS
FOR PROPER USE AND CARE
IMPORTANT SAFEGUARDS
When using this electrical appliance, safety precautions
should always be observed, including the following:
n
n
n
n
n
n
n
n
n
n
n
Read all of the instructions.
Do not leave appliance when plugged in. Always
unplug from outlet when not in use.
Do not use outdoors or on a wet surface.
Do not allow children near appliance. Close
supervision is necessary when used near children.
Use only as described in this manual.
Do not use with damaged cord or plug. If the
appliance is not working as it should, has been
dropped, damaged, left outdoors, or dropped into
water, return it to Keystone Manufacturing Company,
Inc. for proper service and replacement or repair.
Do not do the following: pull or carry by the cord,
use cord as a handle, close a door on cord, pull cord
around sharp edges or corners, let cord hang over
edge of counter, operate appliance over cord.
Keep cord away from heated surface.
To protect against risk of electrical shock, do not put
the motor in water or any other liquid.
Using attachments not recommended or sold by
Keystone Manufacturing Co., Inc. may cause hazards.
Blade is sharp! Handle carefully while cleaning.
n
n
n
n
n
n
n
n
n
Unplug from outlet when not in use, before putting
on or taking off parts and before cleaning.
Avoid contacting moving parts. Never slice food by
hand. Always use completely assembled slicer with
platform and pusher.
Do not use an extension cord with this unit.
However, if one is used, it must have a rating equal
to or exceeding the rating of this appliance.
Do not unplug by pulling on cord. To unplug, grasp
the plug, not the cord.
Do not handle plug or appliance with wet hands.
Keep hair, loose clothing, fingers, and all body parts
away from openings and moving parts.
Turn off before unplugging.
The Deni Electric Food Slicer has a polarized plug
(one blade is wider than the other). This plug will fit
in a polarized outlet only one way, as a safety
feature. Reverse the plug if the plug does not fully
fit in the outlet. Contact a qualified electrician if it
still does not fit. Do not attempt to defeat this
safety feature.
This unit is recommended for household, indoor use
only.
SAVE THESE INSTRUCTIONS
1
Electric Food Slicer
FEATURES
Stainless Steel Serrated Blade
Thickness Knob
Blade Holder
Pusher
Retractable Platform
On/Off Button
Speed Control Dial
Suction Feet
Tray
2
FUNCTIONS
Blade Holder
Locks blade in place and removes the
blade for easy cleaning
On/Off Button Press to operate unit
Platform
Pusher
Speed
Control Dial
Holds food to be sliced,
retracts for easy cleaning
Securely presses against food to keep
food in place while slicing & keeps
fingers away from blade
Never operate without Pusher!
8.5” Stainless Universal blade is precision ground for:
Steel Blade
Accurate slicing
Helps prevent shredding
Slices food to desired thickness
Quickly removes for cleaning
Suction Feet
Keeps unit secure while slicing
Thickness
Knob
Adjusts for professional uniform slicing
from wafer thin to 7/8” thick
Tray
Collects sliced food
Turn clockwise for high speed and
counterclockwise for low speed. You
may find it helpful to use a lower
setting for more fragile foods like
fresh bread. Higher speed for foods
like meat or cheese.
3
Electric Food Slicer
BEFORE OPERATING YOUR SLICER
Before operating your slicer for the first time, disassemble
and clean, (see page 5).
1. Be sure slicer is unplugged. Place assembled slicer
on a flat, dry surface. Position slicer in front of you
so that the Thickness Knob is on your left and the
Pusher is on your right.
2. Check that the slicer is turned off. The On/Off
Button should not be pushed inward. Do not plug
it in yet.
3. Be sure the blade is tightly in place. (See Removing
the Cutting Blade on page 5). The Platform should
glide smoothly on its track. When using the slicer
for the first time, the Platform may need a few
drops of vegetable oil.
4. Remove the Pusher. Cut food to proper size before
placing on the Platform. Place food on Platform.
Position the Pusher on the back edge of the
Platform. Place your hand so your fingers align with
the grooves inside the pusher. Do not allow any
food to hang over the Platform. Note: Meats and
cheeses slice better when chilled.
5. Position the Thickness Knob for desired slice
thickness. Turn the knob clockwise for thicker slices,
counter clockwise for thinner slices.
4
CAUTION!!!
Blade is very sharp and can cause severe lacerations!
BEGIN SLICING
1. Plug the cord into a 120 Volt AC outlet.
2. Press On/Off button completely to start the slicer,
release it to stop the slicer.
3. To make the slicer run continuously
press On/Off button and move slightly
to the right. Allow slicer to run for
thirty seconds to warm up.
4. Turn the Speed Control Dial to change
number of blade revolutions. Turn
clockwise for high speed and counter
clockwise for low speed.
5. Grasp the Pusher with right hand, keeping your
thumb protected behind the Pusher. Apply even
pressure for best slicing results.
6. Move the Pusher towards the Blade. Move back
and forth steadily and easily with even pressure.
Repeat for additional slices.
7. When finished slicing, press the On/Off button to
stop the Blade from turning. Unplug from outlet.
8. The slicer can operate continuously for 10
minutes, after which it should be turned off and
allowed to cool.
9. Always reset the Thickness Knob to the “0”
position after use.
CLEANING AND MAINTENANCE
Platform, Pusher, Tray
1. Unplug slicer from outlet.
2. Move the Thickness Knob to “0”.
3. Retract the platform.
4. Wash with a soft cloth or sponge with mild soap and
water. Rinse and dry.
DO NOT PUT ANY PART OF THE SLICER IN THE
DISHWASHER. NEVER USE STEEL WOOL OR
SCOURING POWDER ON ANY PART OF YOUR
SLICER. NEVER IMMERSE THE MOTOR IN WATER
OR OTHER LIQUIDS.
Removing the Cutting Blade
HANDLE THE BLADE WITH CARE. IT IS EXTREMELY
SHARP AND CAN CAUSE SEVERE LACERATIONS.
1. Move the Thickness Knob to “0”.
2. While facing the cutting blade, move the Platform
to the far left.
3. Remove the Blade by placing a nickel or quarter in
the Blade Holder. Turn the coin clockwise.
4. Carefully lift the blade off.
Note: You may see oil when you remove the blade. This is a safe,
non-toxic food grade oil. It is necessary for the gears to run
smoothly.
5. Wipe Blade with a damp cloth with warm soapy
water. Use a clean damp cloth to wipe clean.
DO NOT WASH BLADE IN DISHWASHER.
Replacing the Cutting Blades
HANDLE THE BLADE WITH CARE. IT IS EXTREMELY
SHARP AND CAN CAUSE SEVERE LACERATIONS.
1. Move the Thickness Knob to “0”.
2. Place the blade back on the unit. Align so the gears
are fully engaged.
3. Insert the Blade Holder and tighten securely by
turning counterclockwise with a nickel or quarter.
Always move the thickness to “0” after slicing
for safety.
Suction Feet
1. Clean with any grease removing cleaner, such as
alcohol.
All parts should be thoroughly dried before
assembling.
5
Electric Food Slicer
HELPFUL HINTS AND TIPS GUIDE
n
n
n
n
n
n
n
Do not slice anything that contains bones, large
seeds or other extremely hard materials.
Remove all wrapping material from food before
slicing.
Do not attempt to override the safety feature or to
slice without using both the Platform and the Pusher.
Remove thick rind on food before slicing.
6
n
n
n
n
Use the slicer to quickly cut cucumbers, potatoes,
zucchini, and onions.
n
To maintain the freshness of your sliced foods for
up to five times as long as traditional food storage
methods, it is recommended that you use one of
Deni’s vacuum sealers or vacuum packaging
systems. To order, or for more information,
call 1-800-DENI-VAC.
When slicing boneless roasts, remove from oven
and allow to cool for 15-20 minutes before slicing.
The meat will retain its natural juices and slice
without crumbling.
Cut the roast, if necessary, to fit on the platform.
Place foil underneath the platform table to catch
juices and crumbs for easy cleanup.
For rolled or tied roast, remove strings one at a time
as the strings become closer to the blade (make sure
the motor is off).
Cheese
To slice meats or fish wafer thin, chill before slicing.
Hot Roasts—Beef, Pork, Lamb, Turkey, Ham
n
n
Slice while well chilled.
Before serving, allow cheese to reach room
temperature. This will enhance the natural flavor.
Some process cheese may stick to blade. When
necessary, turn motor off and wipe blade with a
damp cloth. This moisture will help prevent the
blade from sticking.
Bulk Bacon
n
Chill thoroughly before slicing. Some types of
smoked bacon should have the rind removed.
Cold Cuts, Sandwiches
n
n
n
n
Cold cuts of meat will keep longer and will retain
flavor longer if sliced when needed.
For best results, chill first.
Remove any plastic or hard casing before slicing.
Use a constant, gentle pressure for uniform slices.
Breads, Cakes and Cookies
n
n
n
n
Fruits and Vegetables
n
n
n
n
n
For dainty sandwiches, slice bread about
1/4”
thick.
Fresh bread should be cooled before slicing.
Slice all types of party breads, pound cakes and fruit
cakes.
Especially effective with coarse textured breads and
cakes.
Slice potatoes for thick or thin chips.
Slice cabbage for slaw.
Slice carrots lengthwise in very thin strips. Soak in
ice water to curl.
Slice zucchini, eggplant and squash.
Peeled and cored pineapple can be easily sliced.
Fruit and Cheese Tray
n
Select large, firm fruit. Thinly slice cored apples
(peel on), oranges, cored pears and pineapple.
Arrange in the center of a platter with thinly sliced
swiss, American or any cheese you prefer around
the outside. Fruit is used instead of crackers.
7
CUSTOMER SERVICE
If you have any questions or
problems regarding the operation
of your Deni Electric Food Slicer,
call our customer service department toll free:
Monday through Friday
8:30 a.m. to 5:00 p.m.
(Eastern Standard Time)
1-800-DENI-822
1-800-336-4822
or email us at
[email protected]
Visit our website at
www.deni.com
ONE-YEAR LIMITED WARRANTY
Your Deni Electric Food Slicer warranted for one year from date of
purchase or receipt against all defects in material and workmanship. Should your
appliance prove defective within one year from date of purchase or receipt, return
the unit, freight prepaid, along with an explanation of the claim. If purchased in
the U.S.A. or other country, please send to: Keystone Manufacturing Company,
Inc., 33 Norris Street, Buffalo, NY 14207. If purchased in Canada, please send to:
Keystone Manufacturing Company, Inc., 151 Cushman Road, St. Catharines,
Ontario L2M 6T4. (Please package your appliance carefully in its original box and
packing material to avoid damage in transit. Keystone is not responsible for any
damage caused to the appliance in return shipment.) Under this warranty,
Keystone Manufacturing Company, Inc. undertakes to repair or replace any parts
found to be defective.
This warranty is only valid if the appliance is used solely for household
purposes in accordance with the instructions. This warranty is invalid if the unit
is connected to an unsuitable electrical supply, or dismantled or interfered with in
any way or damaged through misuse.
We ask that you kindly fill in the details on your warranty card and return it
within one week from date of purchase or receipt.
This warranty gives you specific legal rights. You may also have other rights
which vary from state to state or province to province.
Deni by Keystone Manufacturing Company, Inc.®
©2007 Keystone Manufacturing Company, Inc.