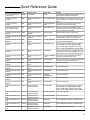
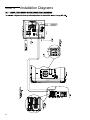
1
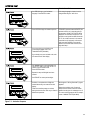
INSTALLATION
GUIDELINES
Air-cooled Generators
NOT INTENDED FOR USE IN CRITICAL LIFE SUPPORT
APPLICATIONS.
THIS MANUAL MUST BE USED IN CONJUNCTION
WITH THE APPROPRIATE OWNER’S MANUAL.
This manual should remain with the unit.
THIS PRODUCT CAN BE INSTALLED BY THE HOMEOWNER.
HOWEVER, IF YOU ARE UNCOMFORTABLE WITH THE SKILLS
OR TOOLS REQUIRED, HAVE A QUALIFIED ELECTRICIAN OR
CONTRACTOR PERFORM THE INSTALLATION.
DEADLY EXHAUST FUMES! OUTDOOR INSTALLATION ONLY!
Table of Contents
Frequently Asked Questions (FAQs) ....................................................................................................................................... 1
Section 1 — Safety Rules & General Information ................................................................................................................... 2
1.1 Introduction ............................................................................................................................................................ 2
1.2 Safety Rules........................................................................................................................................................... 3
1.3 General Rules ........................................................................................................................................................ 4
Section 2 — Unpacking/Inspection/Familiarization ................................................................................................................. 6
2.1 Required Tools ....................................................................................................................................................... 6
2.2 Unpacking .............................................................................................................................................................. 7
2.3 Parts Shipped Loose.............................................................................................................................................. 9
Section 3 — Site Selection and Preparation ......................................................................................................................... 10
3.1 Site Selection ....................................................................................................................................................... 10
3.2 Site Preparation ................................................................................................................................................... 12
Section 4 — Generator Placement ........................................................................................................................................ 14
4.1 Generator Placement ........................................................................................................................................... 14
Section 5 — Fuel Conversion/Gas Requirements/Connections ............................................................................................ 15
5.1 Fuel Conversion ................................................................................................................................................... 15
5.2 Fuel Requirements and Recommendations......................................................................................................... 15
5.3 Fuel Consumption ................................................................................................................................................ 16
5.4 Fuel Line Sizing ................................................................................................................................................... 16
5.5 Installing and Connecting Gas Lines ................................................................................................................... 17
Section 6 — Electrical Connections ...................................................................................................................................... 20
6.1 Generator Connections ........................................................................................................................................ 20
6.2 Control Wiring ...................................................................................................................................................... 20
6.3 Main AC Wiring .................................................................................................................................................... 21
6.4 Battery Requirements .......................................................................................................................................... 22
6.5 Battery Installation ............................................................................................................................................... 22
Section 7 — Control Panel/Activation/Start-up/Testing ......................................................................................................... 23
7.1 Control Panel Interface ........................................................................................................................................ 23
7.2 Generator Activation ............................................................................................................................................ 24
7.3 Before Initial Start-up ........................................................................................................................................... 24
7.4 Check Manual Transfer Switch Operation ........................................................................................................... 26
7.5 Electrical Checks ................................................................................................................................................. 26
7.6 Generator Tests Under Load ................................................................................................................................ 27
7.7 Checking Automatic Operation ............................................................................................................................ 27
7.8 Installation Summary ........................................................................................................................................... 28
Section 8 — Quick Reference Guide..................................................................................................................................... 29
Section 9 — Notes................................................................................................................................................................. 30
Section 10 — Installation Diagrams ...................................................................................................................................... 32
Q: Do I have to supply the generator with the 100% loaded BTU rated fuel supply and pipe size?
A: Yes, the generator needs the 100% loaded BTU fuel rating to start, run and handle loads. The fuel pipe must be sized
for 100% load, regardless of the load.
Q: Does the fuel regulator really need to be 10’ feet from the generator?
A: Yes, per Generac’s instruction to assure proper operation of the regulator and also to meet code.
Q: Can I use a fuel shut off valve that is not “Full Flow Rated”?
A: No, it must be a Full Flow Rated valve and must also match the required fuel pipe ID dimensions.
2.5 feet per each elbow, tee, etc. to the overall calculated distance
from the source to the generator.
Q: Can I leave the unit on the shipping pallet and install it?
A: No, it must be installed per local jurisdiction, code and the instructions as outlined by Generac.
Q: Can the generator be mounted indoors or in a structure?
A: No, it is designed, manufactured and sold for outdoor use only!
Q: Can I run the Main AC and Control Wires in the same conduit?
A: Yes, this wiring can be run in the same conduit if the appropriate rated wire and insulation is used and it meets code.
Q: Can the Transfer Switch be mounted outdoors?
A: Only if it’s a NEMA 3R rated transfer switch.
WARNING!
California Proposition 65
Engine exhaust and some of its constituents are known to the state of California to cause cancer,
birth defects, and other reproductive harm.
WARNING!
California Proposition 65
This product contains or emits chemicals known to the state of California to cause cancer,
birth defects, and other reproductive harm.
1
Section 1
Safety Rules & General Information
Thank you for purchasing this compact, high performance, air-cooled, engine-driven generator. It is designed to automatically supply electrical power
to operate critical loads during a utility power failure.
This unit is factory installed in an all-weather, metal enclosure that is intended exclusively for outdoor installation. This generator will operate using
either vapor withdrawn liquid propane (LP) or natural gas (NG).
NOTE:
When sized properly, this generator is suitable for supplying typical residential loads such as Induction Motors (sump pumps, refrigerators,
air conditioners, furnaces, etc.), Electronic Components (computer, monitor, TV, etc.), Lighting Loads and Microwaves.
If any portion of this manual is not understood, contact the nearest Dealer for starting, operating and servicing procedures.
personnel to special instructions about a particular operation that may be hazardous if performed incorrectly or carelessly. Observe them carefully.
INDICATES A HAZARDOUS SITUATION OR ACTION WHICH, IF NOT AVOIDED, WILL RESULT IN DEATH OR SERIOUS INJURY.
Indicates a hazardous situation or action which, if not avoided, could result in death or serious injury.
Indicates a hazardous situation or action which, if not avoided, could result in minor or moderate injury.
NOTE: Notes contain additional information important to a procedure and will be found within the regular text body of this manual.
These safety warnings cannot eliminate the hazards that they indicate. Common sense and strict compliance with the special instructions while
performing the action or service are essential to preventing accidents.
Four commonly used safety symbols accompany the DANGER, WARNING and CAUTION blocks. The type of information each indicates is as
This symbol points out important safety information that, if not followed, could endanger personal safety and/or property of
others.
This symbol points out potential explosion hazard.
This symbol points out potential fire hazard.
This symbol points out potential electrical shock hazard.
The operator is responsible for proper and safe use of the equipment. The manufacturer strongly recommends that if the operator is also the owner,
to read their Owner’s Manual and thoroughly understand all instructions before using this equipment. The manufacturer also strongly recommends
instructing other users to properly start and operate the unit. This prepares them if they need to operate the equipment in an emergency.
When the generator requires servicing or repairs, contact a Dealer for assistance. Service technicians are factory-trained and are capable of
handling all service needs. For assistance locating a dealer, call 1-888-436-3722.
When contacting a Dealer about parts and service, always supply the complete model number and serial number of the unit as given on its data decal,
which is located on the generator. See section “The Generator” for decal location.
Model No. ____________________ Serial No. _________________________
2
Save These Instructions – The manufacturer suggests that these rules for safe operation be copied and posted near the unit’s
installation site. Safety should be stressed to all operators and potential operators of this equipment.
Study these SAFETY RULES carefully before installing, operating or servicing this equipment. Become familiar with this Installation Manual and
caused by failing to follow simple and fundamental rules or precautions.
The manufacturer cannot anticipate every possible circumstance that might involve a hazard. The warnings in this manual and on tags and decals
recommend, ensure that it is safe for others. Also, make sure the procedure, work method or operating technique utilized does not render the
generator unsafe.
Despite the safe design of this generator, operating this equipment imprudently, neglecting its maintenance or being careless can
cause possible injury or death. Permit only responsible and capable persons to install, operate and maintain this equipment.
Potentially lethal voltages are generated by these machines. Ensure all steps are taken to render the machine safe before attempting to work on the generator.
Parts of the generator are rotating and/or hot during operation. Exercise care near running generators.
Installation must always comply with applicable codes, standards, laws and regulations.
A running generator gives off carbon monoxide, an odorless, colorless poison gas. Breathing in carbon monoxide can cause headaches, fatigue, dizziness, nausea, vomitting, confusion, fainting, siezures or death.
or installation technician who is familiar with applicable codes, standards and regulations. The operator also must comply with all such codes,
standards and regulations. Only an Authorized Service Dealer is allowed to perform warranty service on this unit.
cause unconsciousness or even death. Do NOT alter or add to the exhaust system or do anything that might render the system unsafe or in
noncompliance with applicable codes and standards.
Install a battery-operated carbon monoxide alarm indoors, according to manufacturer’s instructions/recommendations.
partial blockage of ventilation provisions, as this can seriously affect safe operation of the generator. The generator MUST be installed and
operated outdoors only.
Keep hands, feet, clothing, etc., away from drive belts, fans, and other moving or hot parts. Never remove any drive belt or fan guard while the
unit is operating.
When working on this equipment, remain alert at all times. Never work on the equipment when physically or mentally fatigued.
Inspect the generator regularly, and contact the nearest Dealer for parts needing repair or replacement.
Before performing any maintenance on the generator, disconnect its battery cables to prevent accidental start up. Disconnect the cable from the
Never use the generator or any of its parts as a step. Stepping on the unit can stress and break parts, and may result in dangerous operating
conditions from leaking exhaust gases, fuel leakage, oil leakage, etc.
3
All generators covered by this manual produce dangerous electrical voltages and can cause fatal electrical shock. Utility power delivers extremely
high and dangerous voltages to the transfer switch, as does the standby generator when it is in operation. Avoid contact with bare wires,
terminals, connections, etc., while the unit is running. Ensure all appropriate covers, guards and barriers are in place, secured and/or locked
before operating the generator. If work must be done around an operating unit, stand on an insulated, dry surface to reduce shock hazard.
Do not handle any kind of electrical device while standing in water, while barefoot, or while hands or feet are wet. DANGEROUS ELECTRICAL
SHOCK MAY RESULT.
The National Electrical Code (NEC) requires the frame and external electrically conductive parts of the generator to be connected to an approved
earth ground. Local electrical codes also may require proper grounding of the generator electrical system.
After installing this home standby electrical system, the generator may crank and start at any time without warning. When this occurs, load circuits
are transferred to the STANDBY (generator) power source. To prevent possible injury if such a start and transfer occur, always set the generator
to the OFF mode, remove the 7.5A fuse from the generator control panel, and disconnect the battery before working on equipment.
In case of accident caused by electric shock, immediately shut down the source of electrical power. If this is not possible, attempt to free the
victim from the live conductor. AVOID DIRECT CONTACT WITH THE VICTIM. Use a nonconducting implement, such as a dry rope or board, to
Never wear jewelry when working on this equipment. Jewelry can conduct electricity resulting in electric shock, or may get caught in moving
components causing injury.
and regulations. Adhere strictly to local, state and national electrical and building codes. Comply with regulations the Occupational Safety and
Health Administration (OSHA) has established. Also, ensure that the generator is installed in accordance with the manufacturer’s instructions
and recommendations. Following proper installation, do nothing that might alter a safe installation and render the unit in noncompliance with the
aforementioned codes, standards, laws and regulations.
Do not smoke around the generator. Wipe up any fuel or oil spills immediately. Ensure that no combustible materials are left in the generator
compartment, or on or near the generator, as FIRE or EXPLOSION may result. Keep the area surrounding the generator clean and free from
debris.
fuel-gas codes. Before placing the home standby electric system into service, fuel system lines must be properly purged and leak tested according
to applicable code. After installation, inspect the fuel system periodically for leaks. No leakage is permitted.
Follow all safety precautions in the Owner’s Manual, Installation Guidelines manual and other documents included with your equipment.
Refer to NFPA 70E for safety equipment required when working with a live system.
Never energize a new system without opening all disconnects and breakers.
Always consult your local code for additional requirements for the area in which the unit is being installed.
Improper installation can result in personal injury and damage to the generator. It may also result in the warranty being suspended
or voided. All the instructions listed below must be followed including location clearances and pipe sizes.
Contact the local inspector or City Hall to be aware of all federal, state and local codes that could impact the installation. Secure all required permits
before starting the job.
Carefully read and follow all of the procedures and safety precautions detailed in the installation guide. If any portion of the installation manual,
technical manual or other factory-supplied documents is not completely understood, contact a dealer for assistance.
Fully comply with all relevant NEC, NFPA and OSHA standards as well as all federal, state and local building and electric codes. As with any
generator, this unit must be installed in accordance with current NFPA 37 and NFPA 70 standards as well as any other federal, state, and local codes
for minimum distances from other structures.
4
operating appliances.
Local code enforcement may require that Arc Fault Circuit Interrupters (AFCIs) be incorporated into the transfer switch distribution panel. The
Transfer Switch provided with this generator has a distribution panel that will accept AFCIs (pre-wired transfer switches only).
Siemens Part No. Q115AF - 15A or Q120AF - 20A can be obtained from a local electrical wholesaler and will simply replace any of the single pole
circuit breakers supplied in the pre-wired transfer switch distribution panel.
Applicable national, state or local laws, codes and regulations pertaining to the installation of engine-generator power systems must be strictly
complied with. Always use the current acceptable version or edition of the applicable code or standard which applies to your jurisdiction. In the
absence of pertinent local laws and standards, the following published booklets may be used as a guide (these apply to localities which recognize
This list is not all-inclusive. Check with the Authority Having Local Jurisdiction (AHJ) for any local codes or standards which may be applicable to
The installation of this product must comply strictly with applicable codes, standards and regulations. This product can be installed by
the homeowner. However, if you are uncomfortable with the skills or tools required, have a qualified electrician or contractor perform the
installation.
PERFORM THE INSTALLATION IN ONLY 6 STEPS!
STEP 1 - Unpacking/Inspection/Familiarization
STEP 2 - Site Selection and Preparation
STEP 3 - Generator Placement
STEP 4 - Gas Requirements Connections/Fuel Conversion
5
STEP 5 - Electrical Connections
STEP 6 - Control Panel Activation/Start-up/Testing
If this generator is used to power electrical load circuits normally powered by a utility power source, it is required by code to install
a transfer switch. The transfer switch must effectively isolate the electrical system from the utility distribution system when the
generator is operating (NEC 700, 701 & 702). Failure to isolate an electrical system by such means will result in damage to the generator and also may result in injury or death to utility power workers due to backfeed of electrical energy
Having reviewed SAFETY/GENERAL INFORMATION
proceed to Step 1:
SECTION 2 - UNPACKING/INSPECTION/FAMILIARIZATION
Section 2
Unpacking/Inspection/Familiarization
NOTE: After unpacking, carefully inspect the contents for damage. It is advised to unpack and inspect the unit immediately upon delivery to
detect any damage that may have occured in transit. Any claims for shipping damage need to be filed as soon as possible with the freight
carrier. This is especially important if the generator will not be installed for a period of time.
This standby generator set is ready for installation with a factory supplied and pre-mounted base pad and has a weather protective enclosure that
is intended for outdoor installation only.
This UL listed standby generator set may be packaged with an automatic transfer switch with built-in load center. The combination transfer switch
and load center is pre-wired with a two foot and 30 foot conduit. The pre-wired switch is rated for indoor use only. Circuit breakers for emergency
circuit connections are included (if equipped).
This UL listed, 2-pole switch is rated at 50, 100 or 200 amps, Service Rated at 250 volts maximum. The 200 Amp transfer switch is for indoor/
outdoor use (if equipped).
under the consignor’s memo of loss or damage.
If a loss or damage is noted after delivery, separate the damaged materials and contact the carrier for claim procedures.
“Concealed damage” is understood to mean damage to the contents of a package that is not evident at the time of delivery, but is discovered later.
General SAE and Metric hand tools
– Wrenches
– Sockets
– Screwdrivers
Standard electrician’s hand tools
– Drill and bits for mounting and routing conduits
4mm Allen wrench (for access to customer connections)
3/16 Allen wrench (test port on fuel regulator)
Manometer (for fuel pressure checks)
Meter capable of measuring AC/DC Voltage and Frequency
6
1. With the box removed, you can see that this unit came with an automatic transfer switch. The transfer switch is an option and may not be
included.
2. Remove the wood frame and lift the transfer switch, if present, off the top of the generator.
Figure 2.1 — Crated Generator
3. Remove bolts and clamps. Exercise caution when removing the generator. Dragging it off the pallet WILL damage the base. The
generator must be lifted from the wooden pallet to remove.
LID
FRONT ACCESS
PANEL
6)13:)'6%8-2+'0%147
Figure 2.2 — Generator on Pallet
4. The lid will be locked. A set of keys is located behind the breaker door. Open the breaker door and cut the zip tie to remove the keys. Use the
keys to open the lid of the generator.
Figure 2.3 — Circuit Breaker Box and Keys (as shipped)
7
5. There are two locks securing the lid, one on each side. To properly open the lid, press down on the lid above the side lock and unlock the latch.
Repeat for the other side. If pressure is not applied from the top, the lid may appear stuck. NOTE: Always verify that the side locks are
unlocked before attempting to lift the lid.
6. Once the lid is open, remove the front access panel by lifting it up and out. Also remove the black panel over top of the customer connection
area.
7. Perform a visual inspection for any hidden freight damage.
Figure 2.4 — Inspecting for damage
–
–
–
–
Customer connection area (underneath and behind the control panel)
Fuel regulator
Battery compartment
Location of “Loose Shipped Parts”
CONNECTION AREA (UNDER CONTROL PANEL)
*9)06)+90%836
LOOSE PARTS
BATTERY COMPARTMENT
Figure 2.5 — Customer Connection Area/Loose Parts Location
8
REMOTE MONITOR COVER PLATE
8-17 kW MAIN AC/CONTROL WIRING CONDUIT HOLE w/CAP PLUG
20 kW MAIN AC/CONTROL WIRING CONDUIT HOLE w/CAP PLUG
FUEL
CONNECTION
HOLE
BASE FACIA (IF EQUIPPED)
Figure 2.6 — Generator Back View
Rubber Mounts (only for units that include fascia)
Flex Fuel Line
Battery Terminal Caps
Wire Shielding to separate AC from DC control wires
Main Line Circuit Breaker (MLCB) Terminal Caps
Wire Nuts (for pre-wired switches only)
Main Line Circuit Breaker (MLCB) Locking Mechanism
Install/Owner’s Manual (not shown) (CD if applicable)
Keys
*0)<*9)00-2)
X][VETTIHXSFEXXIV]GEFPISVEPXIVREXSVFSPX
RUBBER MOUNTS
BATTERY
TERMINAL
CAPS
WIRE SHIELDING
MLCB
TERMINAL CAPS
MLCB
LOCKING MECHANISM
WIRE NUTS
KEYS
Figure 2.7 — Loose Parts
With the UNPACKIN
I G/IN
I SPECTI
T ON/FAMI
N
ILIARIZATI
T ON
completed, proceed to Step 2:
SECTI
T ON
N 3 - SITE
E SELECTI
T ON
N and PREPA
E RA
R TI
T ON
9
Section 3
Site Selection and Preparation
2SSTIVEFPI[MRHS[WSVSTIRMRKWMRXLI[EPPTIVQMXXIH
[MXLMRJIIXJVSQER]TSMRXSJXLIKIRIVEXSV
MRGLIW
MRGLIW
8LIWIKYMHIPMRIWEVIFEWIHYTSRJMVI
XIWXMRKSJXLIKIRIVEXSVIRGPSWYVIERH
XLIQERYJEGXYVIVvWVIUYMVIQIRXJSVEMV
JPS[JSVTVSTIVSTIVEXMSR0SGEPGSHIW
QE]FIHMJJIVIRXERHQSVIVIWXVMGXMZI
XLER[LEXMWHIWGVMFIHLIVI
)\MWXMRK;EPP
MRGLIW
1MRMQYQ(MWXERGI
8STSJ+IRIVEXSV
MRGLIW
MRGLIW
MRGLIW
'PIEVERGIJVSQXLIIRHWERHJVSRXSJXLI
KIRIVEXSVQYWXFIMRGLIW8LMW[SYPH
MRGPYHIWLVYFWXVIIWERHER]OMRHSJ
ZIKIXEXMSR'PIEVERGIEXXLIXSTWLSYPH
FIEQMRMQYQSJMRGLIWJVSQER]
WXVYGXYVISZIVLERKSVTVSNIGXMSRWJVSQ
XLI[EPP8LIKIRIVEXSVWLSYPHRSXFI
TPEGIHYRHIVEHIGOSVSXLIVWXVYGXYVI
XLEXMWGPSWIHMRERH[SYPHPMQMXSV
GSRWXVEMREMVJPS[
x1MRMQYQ
x6IGSQQIRHIH
1MRMQYQ*VSQ)RHW
+IRIVEXSV
MRGLIW
1MRMQYQ
Figure 3.1 – Installation Guidelines
10
'PIEVERGIJVSQSTIVEFPI
[MRHS[WHSSVWER]
STIRMRKWMRXLI[EPP
WLVYFWSVZIKIXEXMSRSZIV
xMRLIMKLX
Install the generator set, in its protective enclosure, outdoors, where adequate cooling and ventilating air is always available (Figure 1.9). Consider
The installation of the generator must comply strictly with NFPA 37, NFPA 54, NFPA 58 and NFPA 70 standards.
Install the unit where air inlet and outlet openings will not become obstructed by leaves, grass, snow, etc. If prevailing winds will cause blowing or
drifting, consider using a windbreak to protect the unit.
Install the generator on high ground where water levels will not rise and endanger it. It should not operate in or be subjected to standing water.
NFPA 37 and NFPA 70 standards, as well as any other federal, state and local codes for minimum distances from other structures. DO NOT install
front, and a minimum of 18 inches of clearance at the back of the unit.
spray the enclosure, including any air inlet or outlet openings.
Install the unit where services will not be affected or obstructed, including concealed, underground or covered services such as electrical, fuel,
phone, air conditioning or irrigation. This could affect Warranty Coverage.
Where strong prevailing winds blow from one direction, face the generator air inlet openings to the prevailing winds.
Install the generator as close as possible to the fuel supply to reduce the length of piping. REMEMBER THAT LAWS OR CODES MAY
REGULATE THE DISTANCE AND LOCATION.
Install the generator as close as possible to the transfer switch. REMEMBER THAT LAWS OR CODES MAY REGULATE THE DISTANCE AND
LOCATION.
The generator must be installed on a level surface. The generator must be level within a 1/2 inch all around.
The generator is typically placed on pea gravel, crushed stone or a concrete pad. Check local codes to see what type is required. If a concrete
pad is required, all federal, state and local codes should be followed.
The National Fire Protection Association has a standard for the installation and use of stationary combustion engines. That standard is NFPA 37, its
requirements limit the spacing of an enclosed generator set from a structure or wall (Figure 1.10).
located at least 5 ft. from openings in walls and at least 5 ft. from structures having combustible walls. A minimum separation shall not be required
ignite combustible materials outside the enclosure.
Annex A — Explanatory Material
tests to assure that the enclosure will not ignite combustible materials outside the enclosure.
NOTE: Southwest Research Institute tesing approves 18 inch installation minimum from structure. Southwest Research is a nationally
recognized third party testing and listing agency.
at various distances. The enclosure is constructed of non-combustible materials, and the results and conclusions from the independent testing lab
personnel response.
11
Figure 3.2 — Southwest Research Institute Decal (located inside the generator, next to the generator’s data decal)
Based on this testing and the requirements of NFPA 37, Sec 4.1.4, the guidelines for installation of the generators listed above are
changed to 18 inches (457mm) from the back side of the generator to a stationary wall or building.
clearance, the area above the generator should be at least 4 feet with a minimum of 3 feet at the front and ends of the enclosure. This would include
manual for details.
Generator exhaust contains DEADLY carbon monoxide gas. This dangerous gas can cause unconsciousness or death. Do not place the unit near
windows, doors, fresh air intakes (furnaces, etc.) or any openings in the building or structure, including windows and doors of an attached garage.
If the generator is not set to the OFF mode, it can crank and start as soon as the battery cables are connected. If the utility power
supply is not turned off, sparking can occur at the battery posts and cause an explosion.
Locate the mounting area as close as possible to the transfer switch and fuel supply.
Leave adequate room around the area for service access (check local code), and place high enough to keep rising water from reaching the
generator.
Place the unit so air vents won’t become clogged with leaves, grass, snow or debris. Make sure exhaust fumes will not enter the building through
eaves, windows, ventilation fans or other air intakes (see the “Site Selection” section).
Select the type of base, gravel or concrete, as desired or as required by local laws or codes. Verify your local requirements before selecting.
Dig a rectangular area approximately 5 inches deep and about 6 inches longer and wider than the footprint of the generator. Cover with
required. The pad should be 4-5 inches thick and extend 6 inches beyond the outside of the generator in all directions.
NOTE: If a concrete pad is required, follow all applicable Federal, State or local codes.
12
Figure 3.3 — Compacted Gravel Site
Figure 3.4 — Concrete Pad Site
After completing your SITE SELECTION and PREPARATION,
time for Step 3:
SECTION 4 - GENERATOR PLACEMENT
13
Section 4
Generator Placement
With the Site Selection and Preparation performed, proceed with placement and installation of the generator itself.
All of the air-cooled generators come with a composite pad. The composite pad elevates the generator and helps prevent water from pooling around
the bottom of the generator (Figure 3.1). You can place the generator with a composite pad on 4 inches of pea gravel that is compacted or on a
concrete pad. Check local codes to see what type of site base is required. If a concrete pad is required, all federal, state and local codes should be
followed. Place the generator on its mounting pad and position correctly as per the dimensional information given in Section 2.
NOTE: Generator must be level within 1/2”.
Figure 4.1 — Composite pad
When mounting the generator to concrete, there are four mounting holes available for securing the generator, if codes require (two holes inside the
front of the generator compartment and two holes in the back). See Figure 3.2.
Figure 4.2 — Mounting Hole Location
14
After completing GENERATOR PLACEMENT, proceed to
Step 4:
SECTION 5 — FUEL CONVERSION/GAS REQUIREMENTS/
CONNECTIONS
Section 5
Fuel Conversion/Gas Requirements/
Connections
NOTE: The orange fuel conversion knob is located on the top of the fuel mixer on the V-twin engine and under the fuel mixer on the single
cylinder engine.
Turn the valve towards the marked fuel source arrow until it stops. If needed, use pliers to break free in correct direction of arrow. Fuel knob will
rotate 180° and slide into the mixer body when converting to LP.
*9)0/23&03'%8-3277,3;2*631+)2)6%836%-6&3<7-():-);
Figure 5.1 — Fuel Conversion Knob Location for Single and Twin Cylinder Generators
With LP gas, use only the vapor withdrawal system. This type of system uses the vapors formed above the liquid fuel in the storage tank.
dual fuel systems. The unit will run on natural gas or LP gas, but it has been factory set to run on natural gas. Should the primary fuel need to be
Recommended fuels should have a Btu content of at least 1,000 Btus per cubic foot for natural gas; or at least 2,520 Btus per cubic foot for LP gas.
Ask the fuel supplier for the Btu content of the fuel.
Required fuel pressure for
(5) inches to seven (7) inches water column (0.18 to 0.25 psi) for 14kW and below. Required fuel pressure for for liquid propane vapor is
ten (10) inches to twelve (12) inches of water column (0.36 to 0.43 psi). The primary regulator for the propane supply is NOT INCLUDED
with the generator.
15
NOTE: All pipe sizing, construction and layout must comply with NFPA 54 for natural gas applications and NFPA 58 for liquid propane
applications. Once the generator is installed, verify that the fuel pressure NEVER drops below it’s required fuel pressure rating. For further information regarding NFPA requirements refer to their website at www.nfpa.org.
installation. Local codes will mandate correct routing of gaseous fuel line piping around gardens, shrubs and other landscaping to prevent any
damage.
All installed gaseous fuel piping must be purged and leak tested prior to initial start-up in accordance with local codes, standards and regulations.
NOTE: Required fuel pressure in inches of water column: 15kW and above = 3.5” to 7”; 14kW and below = 5” to 7”
Unit
Nat. Gas
LP Vapor
1/2 Load
Full Load
1/2 Load
Full Load
7/8 kW
76.5
118.9
0.89/31.1
1.47/51.4
10/11 kW
102.4
160.3
1.23/42.9
2.08/72.7
13/13 kW
137.6
250.3
1.69/59.2
3.04/106.5
14/14 kW
173.9
275.2
1.91/66.8
3.17/111.0
15/15 kW
182.4
291.9
1.89/66.1
2.96/103.5
16/16 kW
190.5
307.9
1.96/68.7
3.30/115.4
16/17 kW
190.5
307.9
2.06/72.2
3.70/129.4
18/20 kW
201.8
303.4
2.14/75.0
3.99/139.5
Gaseous fuels such as natural gas and liquid propane (LP) gas are highly explosive. Even the slightest spark can ignite such fuels
and cause an explosion. No leakage of fuel is permitted. Natural gas, which is lighter than air, tends to collect in high areas. LP gas
is heavier than air and tends to settle in low areas.
NOTE: A minimum of one approved full flow manual shut-off valve must be installed in the gaseous fuel supply line. The valve must be
easily accessible. Local codes determine the proper location.
NOTE: The gas supply and pipe MUST be sized at 100% Load BTU rating.
First, determine what size pipe is required. Refer to NFPA 54 for NG or NFPA 58 for LP for further information.
–
–
Start by measuring the distance from the generator to the gas source. The generator should be plumbed directly from the source, not off the end
of an existing system.
When measuring the pipe length, add 2.5 feet for every angle or bend in the pipe and add that to the overall pipe distance.
16
NOTE: Pipe sizes are using a second stage regulator.
Gas pipe sizing is one of the most commonly made mistakes. A properly sized gas pipe is critical to the proper operation of the generator.
The generator inlet size has no bearing on the proper gas pipe size.
1. Both natural gas and LP Vapor are highly volatile substances, so strict adherence to all safety procedures, codes, standards and
regulations is essential.
Gas line connections should be made by a certified plumber familiar with local codes. Always use AGA-approved gas pipe and a quality
pipe sealant or joint compound.
Verify the capacity of the natural gas meter or the LP tank in regards to providing sufficient fuel for both the generator and other operating
appliances.
AGA approved gas pipe
Flexible fuel line
– Do not bend!!!
– Do not attach directly to generator
– Check all connections for leaks
Sediment trap near generator (if applicable or required by code)
17
2. Most applications will require an external manual full flow shutoff valve on the fuel line.
Figure 5.2 — Full Flow Shutoff Valve
3. When connecting the gas line to the generator, use the provided section of UL Listed or AGA-approved flexible fuel line in accordance with
local regulations. The purpose of the flexible fuel line is to ensure that vibration from the generator does not cause a gas leak at one of the
connection points, so it’s important that the line be installed with as few bends as possible. Configure the sediment trap (if applicable or
required by code) as illustrated.
SEDIMENT TRAP
Figure 5.3 — Sediment Trap
Figure 5.4 — Incorrect Routing of Flexible Hose
18
4. Never bend the flexible fuel line to avoid using an elbow. Bending the flexible line decreases its ability to absorb vibrations and defeats its
purpose, as well as constricts the actual fuel flow. See Figure 5.5.
5. Check for leaks by spraying all connection points with a soap solution made of dishwashing soap and water. You should not see the solution be
“blown away” or form “bubbles”. Next, check the gas pressure at the regulator in the generator by following these steps.
– Close gas supply valve.
– Remove the top gas pressure test port from the regulator (see Figure 5.6) and install the gas pressure tester (manometer).
– Open the gas supply valve and ensure that the pressure is within the specified values.
NOTE: See owner’s manual or spec sheet for proper fuel pressure specifications. If the gas pressure is not within specifications, contact
the local gas supplier.
4) Close gas valve when completed.
Top Gas Pressure
Test Port
Fuel Regulator
Gas Pressure
Manometer
Figure 5.5 — Checking Pressure with Manometer
+%71)8)6'%4%&0)3*
&)7846%'8-')74)'-*-)(&=8,)6)+90%836
1%29*%'896)6
463:-(-2+2%896%0+%7
%88,)6)59-6)(:3091)
1%29%07,98
3**:%0:)
86%4
14kW and Below =
5"-7" WC REGULATOR
15kW and Above =
3.5"-7" WC REGULATOR
2+&89!'9&-'*))8,396<
+%71%-2
47-
19
&)7846%'8-')74)'-*-)(&=8,)6)+90%836
1%29*%'896)6
46-1%6=6)+90%836
79440-)(&=-278%00-2+
'3286%'836
1%29%07,98
*9)046)7796)
3**:%0:)7
x;'
86%4
Figure 5.6 — Typical LP Vapor Installation
After completing GAS REQUIREMENTS/CONNECTIONS/FUEL
CONVERSION, it’s time for Step 5:
SECTION 6 — ELECTRICAL CONNECTIONS
Section 6
Electrical Connections
NOTE: Control wiring may be already wired on pre-wired generators. If not, wiring must be in accordance with local jurisdiction and codes.
NOTE: These wiring connections may be present on pre-wired models.
NOTE: This wiring can be run in the same conduit if the appropriate insulation rated wire is used.
NOTE: No wire insulation should be in the connection point, only bare wire.
20
Maximum Wire Length
Recommended Wire Size
1 - 460 feet (140m)
No. 18 AWG
461 - 730 feet (223m)
No. 16 AWG
731 - 1160 feet (354m)
No. 14 AWG
1161 - 1850 feet (565m)
No. 12 AWG
CONTROL PANEL CONNECTIONS
Terminal Numbering Decal
Wire Numbers
A
YELLOW #1 & #2
N1 & N2 - 240 VAC - Sensing for Utility Dropout and Pickup
B
WHITE #3
T1 - Fused 120VAC for Battery Charger (see NOTE)
C
BLACK #3
0 - DC (-) Common Ground Wire
D
RED #4
194 - DC (+) 12 VDC for Transfer Controls
E
WHITE #5
23 - Transfer Control Signal Wire
SPRING LOADED CONNECTION POINTS
A
B*
LARGE NEUTRAL LUG TORQUE SPEC
2/0 TO 14AWG 120 LB-IN
4-6 AWG 35 LB-IN, 8 AWG 25 LB-IN,
10-14 AWG 10 LB-IN
C
D
E
LARGE GROUND LUG TORQUE SPEC
2/0 TO 14AWG 120 LB-IN
Figure 6.1 — Control Wiring (found behind control board)
NOTE: Must be connected to keep battery charged whether unit is running or not.
Figure 6.2 — Main AC Wiring
NOTE: Main AC wiring must be in accordance with local jurisdiction and codes.
6. Strip the insulation off the wire ends. Do not remove excessive insulation.
7. Remove the two cap plugs located behind the breaker door and to the right of the Main Breaker.
8. Loosen the lugs of the Main Breaker through the access holes.
NOTE: There are 3 screws inside the top of the breaker panel (behind the breaker door). Removing these screws will allow the entire
breaker box to be carefully pulled out. When reinstalling, be certain that the tabs on the bottom lock into place.
21
NOTE: Torque all wiring lugs, bus bars and connection points to the proper torque specifications. Torque specifications for the Main Line
Circuit Breaker (MLCB) can be found on a decal located on the inside of the Main Line Circuit Breaker Door.
Group 26R, 12V, 525CCA (Minimum CCA)
1. Verify that the generator has been turned OFF.
2. Turn off utility power supply to the transfer switch.
3. Remove the 7.5A fuse from the generator control panel.
5. Connect the black battery cable (from frame ground) to the battery post indicated by a negative, NEG or (—).
6. Install the battery post covers (included).
NOTE:
Dielectric grease should be used on battery posts to aid in the prevention of corrosion.
NOTE:
Damage will result if battery connections are made in reverse.
Figure 6.3 – Battery Cable Connections
NOTE: In areas where temperatures regularly fall below 32° F (0° C), it is recommended that a pad type battery heater be installed to aid
in cold climate starting. This is available as a cold weather kit through an authorized service dealer.
22
With the ELECTRICAL CONNECTIONS completed,
Step 6:
SECTION 7 — CONTROL PANEL/ACTIVATION/
START-UP/TESTING
Section 7
Control Panel/Activation/Start-up/Testing
With the AUTO button pushed in, the engine may crank and start at any time without warning. Such automatic starting occurs
when utility power source voltage droops below a preset level or during the normal exercise cycle. To prevent possible injury that
might be caused by such sudden starts, always push the OFF button, remove the fuses, and disconnect the battery before working on or around the generator or transfer switch. Then, place a “DO NOT OPERATE” tag on the generator panel and on the transfer switch.
1. “OFF” Button – This button shuts down the engine and prevents automatic operation.
2. “MANUAL” Button – This button cranks and starts the engine. Transfer to standby power will not occur unless there is a utility failure.
3. “AUTO” Button – Selecting this button activates fully automatic system operation. It also allows the unit to automatically start and exercise the
engine every seven days with the setting of the exercise timer (see the Setting the Exercise Timer section).
Figure 7.1 – 8/11/13/14/15/16/17/20kW Generator Control Panel
23
Status message and the current date and time. The highest priority active Alarm and/or Warning will be automatically posted on this page as well,
clear an Alarm or Warning, press the OFF button and then press the ENTER key.
The display backlight is normally off. If the user presses any key, the backlight will come on automatically and remain on for 30 seconds after the
last key was pressed.
The “Main Menu” page will allow the user to navigate to all other pages or sub-menus by using the Up/Down and Enter keys. This page can
be accessed at any time with several presses of the Escape key. Each press of the Escape key takes you back to the previous menu until the
Owner’s Manual).)
When battery power is applied to the generator during the installation process, the controller will light up. However, the generator still needs to be
activated before it will automatically run in the event of a power outage.
Activating the generator is a simple, one-time process that is guided by the controller screen prompts. Once the product is activated, the
controller screen will not prompt you to activate again, even if you disconnect the generator battery.
After obtaining your activation code, please complete the following steps at the generator’s control panel in the Activation Chart.
initialized when the exercise time is entered.
The exercise settings can be changed at any time via the “EDIT” menu.
If the 12 volt battery is disconnected or the fuse removed, the installation wizard will operate upon power restoration. The only difference is the
display will only prompt the customer for the current Time and Date.
This generator is equipped with an exercise timer. Once it is set, the generator will start and exercise every seven days, on the day of the week and
generator output does not occur during the exercise cycle unless utility power is lost.
IF THE INSTALLER TESTS THE GENERATOR PRIOR TO INSTALLATION, PRESS THE “ENTER” BUTTON TO SKIP SETTING UP THE
EXERCISE TIMER
17 and 20kW units can run at 2,400 rpm while exercising. While providing the necessary periodic exercise operation, the lower rpm also reduces fuel
consumption, engine wear and noise.
NOTE: The exerciser will operate only when the generator is placed in the AUTO mode and will not work unless this procedure is performed. The current date/time will need to be reset every time the 12 volt battery is disconnected and then reconnected, and/or when the
fuse is removed.
NOTE: These units have been run and tested at the factory prior to being shipped and do not require any type of break-in.
Never operate the engine with the oil level below the “Add” mark on the dipstick. Doing this could damage the engine.
NOTE: This unit comes filled with 30 weight organic oil from the factory. Check the oil level and add the appropriate viscosity and amount
if necessary.
24
TROUBLESHOOTING
Use ARROW keys to scroll to desired
language. Press ENTER to select.
If the wrong language is chosen, it can be
changed later using the “edit” menu.
Press ENTER to begin the activation process.
If ESCAPE is pressed instead of ENTER, the
generator will only run in manual mode (for
test purposes) and NOT ACTIVATED will be
displayed. You will need to remove the 7.5A
generator control panel fuse AND disconnect
the T1, N1 and N2 connector in the external
connection box (if equipped); or disconnect
utility input (main breaker) to the transfer
switch for 3-5 seconds and reconnect, then
begin with Step 1.
0ERKYEKI
)RKPMWL
%GXMZEXIQI)28SV
)7'XSVYRMRQERYEP
8S%GXMZEXIKSXS
[[[EGXMZEXIKIRGSQ
If you do not have your activation code,
go to www.activategen.com or call
1-888-9ACTIVATE (922-8482).
If you already have your activation code, wait
3-5 seconds for the next display.
number of your Activation Code.
7IVMEP
4EWWGSHI<<<<<
Press ENTER to select.
Repeat this step until all digits have been
entered.
Use ESCAPE to correct previous digits.
7IPIGX,SYV
Activation is complete when all digits are
entered above and your screen shows this
display.
What happens if “Wrong Passcode Try Again”
appears?
Reenter the activation code. If a second
attempt is unsuccessful, check the number
Follow the controller prompts to continue
setting the time function. Refer to your Owner’s against the code given on activategen.com. If
it is correct and the generator will not accept it,
Manual with questions.
contact 1-888-9ACTIVATE (922-8482).
Figure 7.2 – Activation Sequence
25
Interconnect System Self Test Feature (follow the on-screen prompts)
Upon power up, this controller will go through a system self test which will check for the presence of utility voltage on the DC circuits. This is done to
prevent damage if the installer mistakenly connects AC utility power sense wires into the DC terminal block. If utility voltage is detected, the controller
will display a warning message and lock out the generator, preventing damage to the controller. Power to the controller must be removed to clear this
warning.
Utility voltage must be turned on and present at the N1 and N2 terminals inside the generator control panel for this test to be performed and pass.
7.3.2 Before starting, complete the following:
1. Ensure that the generator is OFF.
2. Set the generator’s main circuit breaker to the OFF (or OPEN) position.
3. Turn off all breakers that will be powered by the generator.
5. Check the fuel supply. Gaseous fuel lines must have been properly purged and leak tested in accordance with applicable fuel-gas codes. All fuel
shutoff valves in the fuel supply lines must be open.
During initial start up only, the generator may exceed the normal number of start attempts and experience an “overcrank” fault. This is due to
accumulated air in the fuel system during installation. Reset the control board by pushing the OFF button and ENTER key, and restart up to two more
times if necessary. If unit fails to start, contact a local dealer for assistance.
Refer to the “Manual Transfer Operation” section of the owner’s manual for procedures.
.
Do not attempt manual transfer switch operation until all power voltage supplies to the transfer switch have been positively turned
off. Failure to turn off all power voltage supplies will result in extremely hazardous and possibly fatal electrical shock.
1.
2.
3.
4.
Ensure that the generator is OFF.
Set the generator’s main circuit breaker to the OFF (or OPEN) position.
Turn OFF all circuit breakers/electrical loads that will be supplied by the generator.
Turn on the utility power supply to the transfer switch using the means provided (such as a utility main line circuit breaker).
The transfer switch is now electrically “hot.” Contact with “hot” parts will result in extremely hazardous and possibly fatal
electrical shock. Proceed with caution.
5. Use an accurate AC voltmeter to check utility power source voltage across transfer switch terminals N1 and N2. Nominal line-to-line voltage
should be 240 volts AC. If it’s not, verify AC output and wiring from utility source to N1 and N2 lugs at transfer switch.
6. Check utility power source voltage across terminals N1 and the transfer switch neutral lug; then across terminal N2 and neutral. Nominal line-toneutral voltage should be 120 volts AC. If it’s not, verify AC output and wiring from utility source to N1 and N2 lugs at transfer switch.
7. When certain that utility supply voltage is compatible with transfer switch and load circuit ratings, turn OFF the utility power supply to the transfer
switch.
8. On the generator panel, push the MANUAL button. The engine should crank and start.
(or CLOSED) position.
Proceed with caution! Generator power voltage is now supplied to the transfer switch. Contact with live transfer switch parts will
result in dangerous and possibly fatal electrical shock.
10. Connect an accurate AC voltmeter and a frequency meter across transfer switch terminal lugs E1 and E2. Voltage should be 238-242 at a
frequency of 59.5-60.5 Hertz. If it’s not, verify that the MLCB is closed and verify AC output and frequency (Hertz or Hz) at the MLCB. Also verify
wiring from generator to E1 and E2 lugs at transfer switch.
26
11. Connect the AC voltmeter test leads across terminal lugs E1 and neutral; then across E2 and neutral. In both cases, voltage reading should
be 119-121 volts AC. If it’s not, verify that the MLCB is closed and verify AC output between the E1 and E2 of the MLCB and Neutral at the
generator. Also, verify wiring from generator to E1, E2 ans Neutral lugs at transfer switch.
12. Set the generator’s main circuit breaker to its OFF (or OPEN) position.
13. Push the generator’s OFF button. The engine should shut down.
NOTE: It is important not to proceed until certain that generator AC voltage and frequency are correct and within the stated limits.
1. Ensure that the generator is OFF.
2. Turn OFF all breakers/electrical loads that will be powered by the generator.
3. Turn OFF the utility power supply to the transfer switch, using the means provided (such as a utility main line circuit breaker).
Do not attempt manual transfer switch operation until all power voltage supplies to the transfer switch have been positively turned
off. Failure to turn off all power voltage supplies will result in extremely hazardous and possibly fatal electrical shock.
4. Manually set the transfer switch to the STANDBY position, i.e., load terminals connected to the generator’s E1/E2 terminals. The transfer switch
operating lever should be down.
5. Push the generator’s MANUAL button. The engine should crank and start immediately.
6. Let the engine stabilize and warm up for a few minutes.
7. Set the generator’s main circuit breaker to its ON (or CLOSED) position. Loads are now powered by the standby generator.
8. Turn ON the circuit breaker/electrical loads that are powered by the generator one by one.
9. Connect a calibrated AC voltmeter and a frequency meter across terminal lugs E1 and E2. Voltage should be approximately 240 volts and
frequency should be 60 Hz. If the voltage and frequency are rapidly dropping as the loads are applied, the generator may be overloading or
there may be a fuel issue. Check amperage value of loads and/or fuel pressure.
10. Let the generator run at full rated load for 20-30 minutes. Listen for unusual noises, vibration or other indications of abnormal operation. Check
for oil leaks, evidence of overheating, etc.
11. Verify gas pressure while under full load.
12. When testing under load is complete, turn OFF electrical loads.
13. Set the generator’s main circuit breaker to the OFF (or OPEN) position.
14. Let the engine run at no-load for 2-5 minutes.
15. Push the generator’s OFF button. The engine should shut down.
1. Ensure that the generator is OFF.
2. Install front cover of the transfer switch.
3. Turn ON the utility power supply to the transfer switch, using the means provided (such as a utility main line circuit breaker).
NOTE: Transfer Switch will transfer back to utility position.
4. Set the generator’s main circuit breaker to its ON (or CLOSED) position.
5. Push the generator’s AUTO button. The system is now ready for automatic operation.
6. Turn OFF the utility power supply to the transfer switch.
With the generator ready for automatic operation, the engine should crank and start when the utility source power is turned OFF after a 10 second
system operate through its entire automatic sequence of operation.
With the generator running and loads powered by generator AC output, turn ON the utility power supply to the transfer switch. The following should
After approximately 15 seconds, the switch should transfer loads back to the utility power source.
Approximately one minute after re-transfer, the engine should shut down.
27
1. Ensure that the installation has been properly performed as outlined by the manufacturer and that it meets all applicable laws and codes.
3. Educate the end-user on the proper operation, maintenance and service call procedures.
Important! If the end user ever finds it necessary to turn the generator off during prolonged utility outages to conserve on fuel, educate
them on these simple, but important steps:
1. Turn OFF (or OPEN) the main Utility disconnect.
2. Turn OFF (or OPEN) the Main Line Circuit Breaker (MLCB) on the generator.
3. Turn the generator OFF.
1. Put the generator back into AUTO and allow to start and warm-up for a few minutes.
2. Turn ON (or CLOSE) the MLCB on the generator.
The system will now be operating in its automatic mode. The main utility disconnect can be turned ON (or CLOSED), but to shut the unit off, this
complete process must be repeated.
28
Section 8
Quick Reference Guide
Problem
LED
Things to Check
Active Alarm
Solution
Unit running in AUTO but no
power in house.
GREEN
Check MLCB.
NONE
Check MLCB if the MLCB is in the ON position. If it is in
the ON position contact the servicing dealer.
Unit shuts down during
operation.
RED
Check the LED’s/Screen for
alarms.
HIGH TEMPERATURE
Check ventilation around the generator, intake, exhaust
and rear of generator. If no obstruction contact serving
dealer.
Unit shuts down during
operation.
RED
Check the LED’s/Screen for
alarms.
OVERLOAD REMOVE
LOAD
Clear alarm and remove household loads from the
generator. Put back in AUTO and restart.
Unit was running and shuts
down, attempts to restart.
RED
check the LED’s/Screen for
alarms.
RPM SENSE LOSS
Clear alarm and remove household loads from the
generator. Put back in AUTO and restart. It may be a fuel
issue so contact the servicing dealer.
Unit will not start in AUTO with NONE
utility loss.
See if screen says unit not
activated.
NOT ACTIVATED
Refer to activation section in owners manual.
Unit will not start in AUTO with GREEN
utility loss.
Check screen for start delay
countdown.
None
If the start up delay is greater than expected, contact
servicing dealer to adjust from 2 to 1500 seconds.
Unit will not start in AUTO with RED
utility loss.
Check the LED’s/Screen for
alarms.
LOW OIL PRESSURE
Check Oil Level/Add Oil Per Owners Manual. If oil level
is correct contact servicing dealer.
Unit will not start in AUTO with RED
utility loss.
Check the LED’s/Screen for
alarms.
RPM SENSE LOSS
Clear alarm. Check the battery using the control panel
under the MAIN menu using the BATTERY MENU
option. If it states battery is GOOD contact servicing
dealer. If it states CHECK BATTERY replace the battery.
Unit will not start in AUTO with RED
utility loss.
Check the LED’s/Screen for
alarms.
OVERCRANK
Check fuel line shutoff valve is in the ON position. Clear
alarm. Attempt to start the unit in MANUAL. If it does not
start or starts and runs rough, contact servicing dealer.
Unit will not start in AUTO with RED
utility loss.
Check the LED’s/Screen for
alarms.
LOW VOLTS REMOVE
LOAD
Clear alarm and remove household loads from the
generator. Put back in AUTO and restart.
Unit will not start in AUTO with RED
utility loss.
Check the LED’s/Screen for
alarms.
FUSE PROBLEM
Check the 7.5amp fuse. If it is bad replace it with an ATO
7.5Amp fuse, if not contact servicing dealer.
Unit will not start in AUTO with RED
utility loss.
Check the LED’s/Screen for
alarms.
OVERSPEED
Contact servicing dealer.
Unit will not start in AUTO with RED
utility loss.
Check the LED’s/Screen for
alarms.
UNDERVOLTAGE
Contact servicing dealer.
Unit will not start in AUTO with RED
utility loss.
Check the LED’s/Screen for
alarms.
UNDERSPEED
Contact servicing dealer.
Unit will not start in AUTO with RED
utility loss.
Check the LED’s/Screen for
alarms.
STEPPER
OVERCURRENT
Contact servicing dealer.
Unit will not start in AUTO with RED
utility loss.
Check the LED’s/Screen for
alarms.
MISWIRE
Contact servicing dealer.
Unit will not start in AUTO with RED
utility loss.
Check the LED’s/Screen for
alarms.
OVERVOLTAGE
Contact servicing dealer.
Yellow LED illuminated in any
state.
YELLOW
Check the screen for
additional information.
LOW BATTERY
Clear alarm. Check the battery using the control panel
under the MAIN menu using the BATTERY MENU
option. If it states battery is GOOD contact servicing
dealer. If it states CHECK BATTERY replace the battery.
Yellow LED illuminated in any
state.
YELLOW
Check the screen for
additional information.
BATTERY PROBLEM
Contact servicing dealer.
Yellow LED illuminated in any
state.
YELLOW
Check the screen for
additional information.
CHARGER WARNING
Contact servicing dealer
Yellow LED illuminated in any
state.
YELLOW
Check the screen for
additional information.
SERVICE A
Perform SERVICE A maintenance, hit ENTER to clear.
Yellow LED illuminated in any
state.
YELLOW
Check the screen for
additional information.
SERVICE B
Perform SERVICE B maintenance, hit ENTER to clear.
Yellow LED illuminated in any
state.
YELLOW
Check the screen for
additional information.
Inspect Battery
Inspect Battery, hit ENTER to clear.
29
Section 9
30
Notes
31
Section 10
32
Installation Diagrams
33
Part No. 0J9944SPFR
Revision A (03/08/13)
Printed in U.S.A.