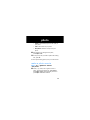
1
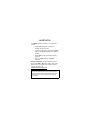
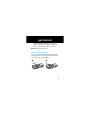
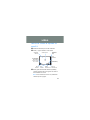
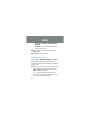
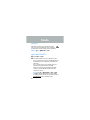
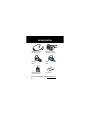
Quick Start Guide
24-01-2008
welcome
Your MOTO Z10 phone is easier to use, quicker, and
smarter!
• Create movies (page 24) on the go and
instantly upload to the Web.
• Capture key moments in high-definition videos
(page 21) and photos (page 26), and upload to
the Web.
• Watch videos on the high-definition display
(page 33).
• Edit your videos (page 23) and photos
(page 28).
For more information: To read instructions on your
phone press Options > Help within a feature, such as the
Home screen. For manuals, web tutorials, software
support, and more, visit
www.motorola.com/uk/support/z10
Note: Before using the phone for the first time,
review the Important Safety and Legal Information
guide included in the box. Periodically review this
information so you remember how to safely use
your phone.
1
Primary Camera
Lens
(on reverse)
Scroll up, down,
left, right or
press centre to
select.
Left Soft Key
Secondary
Camera
Lens
Bumper Bar
Right Soft Key
Clear Key
Menu Key
Volume Keys
Make & answer
calls.
Turn on & off, hang
up, exit menus.
Camera Key
Microphone
Media Gallery
Key
Battery Charging
Indicator
Tip: Press the Menu key 1 to open the main menu
and press again to return to the Home screen. Press
the navigation key up, down, left, right to scroll or
centre s to select.
2
contents
menu map . . . . . . . . . . . . . . . . . . . . . . . . . . . . . . . . . . . 5
getting started . . . . . . . . . . . . . . . . . . . . . . . . . . . . . . . 7
insert your SIM card . . . . . . . . . . . . . . . . . . . . . . . . . 7
memory card. . . . . . . . . . . . . . . . . . . . . . . . . . . . . . . 8
insert the battery. . . . . . . . . . . . . . . . . . . . . . . . . . . . 9
charge the battery. . . . . . . . . . . . . . . . . . . . . . . . . . 10
install Motorola PcSync . . . . . . . . . . . . . . . . . . . . . 11
turn phone on & off. . . . . . . . . . . . . . . . . . . . . . . . . 11
slider . . . . . . . . . . . . . . . . . . . . . . . . . . . . . . . . . . . . 12
make a call . . . . . . . . . . . . . . . . . . . . . . . . . . . . . . . 12
answer a call . . . . . . . . . . . . . . . . . . . . . . . . . . . . . . 12
end a call . . . . . . . . . . . . . . . . . . . . . . . . . . . . . . . . . 13
make a video call . . . . . . . . . . . . . . . . . . . . . . . . . . 13
store a phone number . . . . . . . . . . . . . . . . . . . . . . 13
call a stored phone number . . . . . . . . . . . . . . . . . . 14
your phone number . . . . . . . . . . . . . . . . . . . . . . . . 14
basic navigation . . . . . . . . . . . . . . . . . . . . . . . . . . . 15
home screen . . . . . . . . . . . . . . . . . . . . . . . . . . . . . . 16
personalise . . . . . . . . . . . . . . . . . . . . . . . . . . . . . . . . . 18
home screen . . . . . . . . . . . . . . . . . . . . . . . . . . . . . . 18
main menu appearance . . . . . . . . . . . . . . . . . . . . . 19
main menu organisation . . . . . . . . . . . . . . . . . . . . 19
3
messaging . . . . . . . . . . . . . . . . . . . . . . . . . . . . . . . . . . 20
send a text message. . . . . . . . . . . . . . . . . . . . . . . . 20
receive a message . . . . . . . . . . . . . . . . . . . . . . . . . 20
video . . . . . . . . . . . . . . . . . . . . . . . . . . . . . . . . . . . . . . 21
record a video & upload or send it. . . . . . . . . . . . . 21
edit a video . . . . . . . . . . . . . . . . . . . . . . . . . . . . . . . 23
create a movie . . . . . . . . . . . . . . . . . . . . . . . . . . . . 24
photo . . . . . . . . . . . . . . . . . . . . . . . . . . . . . . . . . . . . . . 26
take a photo & upload or send it . . . . . . . . . . . . . . 26
edit a photo . . . . . . . . . . . . . . . . . . . . . . . . . . . . . . . 28
make a photo movie. . . . . . . . . . . . . . . . . . . . . . . . 29
media player . . . . . . . . . . . . . . . . . . . . . . . . . . . . . . . . 31
play music . . . . . . . . . . . . . . . . . . . . . . . . . . . . . . . . 31
play videos . . . . . . . . . . . . . . . . . . . . . . . . . . . . . . . 33
ShoZu . . . . . . . . . . . . . . . . . . . . . . . . . . . . . . . . . . . . . 34
ShoZu . . . . . . . . . . . . . . . . . . . . . . . . . . . . . . . . . . . 34
activate ShoZu . . . . . . . . . . . . . . . . . . . . . . . . . . . . 34
share-it destinations . . . . . . . . . . . . . . . . . . . . . . . . 35
Bluetooth® wireless . . . . . . . . . . . . . . . . . . . . . . . . . . 36
Bluetooth® wireless . . . . . . . . . . . . . . . . . . . . . . . . 36
accessories . . . . . . . . . . . . . . . . . . . . . . . . . . . . . . . . . 38
4
menu map
menu map
main menu
E Messaging
•
•
•
•
A Contacts
D Agenda
q Web
B Recent calls
•
•
•
•
All
Dialled
Missed
Received
G
Control panel
• (see next page)
Õ
Tools
• Time & Alarm
• To Do
• Calculator
• Jotter
Ö
Ó
Media Studio
• Camera
• Camcorder
• Media Gallery
• Media Player
• Media Editor
• Voice
• ShoZu
Ô
Connectivity
• Bluetooth®
• Remote sync
• Connections
• USB Selector
K
SIM Card
• SIM Application
• SIM Toolkit
L
Ú
>
Ù
Games
Call voice mail
Create new message
Messages Inbox
Email Inbox
Voicemail
Instant Messaging
Mobiclip Player
File manager
(continued next page)
* optional features
5
main menu (continued)
G Control panel
This is the standard main
•
•
•
•
•
•
•
•
•
•
•
•
•
•
•
•
•
6
Themes
Install
Uninstall
Audio Routing
Camera Settings
Home Settings
Kill filter
Profiles
Rights Manager
Speed Dial
Text Input Settings
Call settings
Device
Security
Messaging Settings
Internet Settings
Network settings
menu layout. Your
phone’s menu may be
different.
To change your home
screen shortcuts and main
menu appearance, see
page 18.
Tip: Press Options
> View as list to change the
main menu to a list view.
get started
insert your SIM card
getting started
Caution: Don’t bend or scratch your SIM card. Keep it
away from static electricity, water, and dirt.
Your Subscriber Identity Module (SIM) card stores
your phone number and other information.
1
2
3
Note: To remove your SIM card press in the clip, then
slide your SIM card out.
7
get started
memory card
You can use a removable microSD or
microSDHC memory card with your phone to
store and retrieve multimedia objects (such as
photos and sounds). Some applications, such as Camera
and Camcorder, allow you to store photos or videos on
your phone or memory card. For more memory card
features, see your User’s Guide.
Note: If you download a copyrighted file and store it
on your memory card, you can use the file only while
your memory card is inserted in your phone. You
cannot send, copy, or change copyrighted files.
install or remove a memory card
1
Open the protective
cover.
2
To install the
memory card, make
sure the memory
card’s metal
contacts are facing
up, and slide the
memory card into the slot until you hear a click.
8
get started
To remove the memory card, push it in and
release. The memory card slides a little way out of
the slot. Pull the memory card out of the slot.
3
Replace the protective cover.
insert the battery
Note: Your battery is intentionally tight fitting to ensure
consistent connection. Your phone will automatically
turn on when you insert the battery.
1
2
9
get started
3
4
charge the battery
New batteries are not fully
charged. Before you use
your phone, install and
charge the battery as
described here. Some
batteries perform best after
several full charge and
discharge cycles. Open the
protective cover on your phone’s accessory connector
port, and plug the battery charger into your phone and
an electrical outlet. Your phone’s battery charging icon,
in the status bar, flashes while the battery is charging,
and stops flashing when the battery is fully charged.
10
get started
The battery charge indicator light on your phone
shows when the battery is charging.
install Motorola PcSync
While your battery is charging, why not install the
Motorola PcSync software provided on the Companion
CD. Simply insert the CD into your PC’s CD drive to get
started. The software allows you to connect your
phone to a PC and transfer files, synchronise contacts
and email, backup your phone, and much more.
For more details about the Companion CD, see your
User’s Guide.
turn phone on & off
Press and hold the end
key O for a few seconds,
or until the display turns
on or off. If prompted,
enter your SIM card PIN.
11
get started
Note: The first time you turn on your phone with a new
SIM you are given the option to copy contacts from
your SIM to your phone.
slider
To open your slider, push the bumper bar up. To close
your slider pull the bumper bar down.
make a call
Enter a phone number and press the call key N.
Tip: For the best microphone performance, have the
slider open during a call.
answer a call
When your phone rings and/or vibrates, open the
phone slider or press N to answer.
12
get started
end a call
To “hang up,” close the slider or press O.
make a video call
Enter a phone number and press Options > Video call to dial
the number. To end a video call press O.
store a phone number
You can store a phone number in your list of Contacts.
To store a phone number:
1
2
3
Enter a phone number in the Home screen.
4
Press Options > Save to store the contact.
Press Options > Store.
Enter a name and other details for the phone
number. To select a highlighted item, press the
centre key s.
Note: The number will be stored on your phone’s
memory.
13
get started
Tip: To learn more about storing phone numbers and
email addresses on your phone, see your User’s
Guide.
call a stored phone number
To call a number stored in your contact list:
Find it: 1 > A Contacts
1
Scroll to the contact.
Shortcut: In contacts, press keypad keys to enter
the first letters of an entry you want.
2
Press N to call the contact.
your phone number
To see your phone number from the home screen:
Find it: 1 > SIM > SIM Application > My Lines
14
get started
basic navigation
menu key
Press 1 at any time to go to
the main menu. Press 1
again to switch between the
main menu and the Home
screen.
Press O at any time to return
to the Home screen.
Tip: Press and hold 1 to display a list of your most
recently used applications.
tab scrolling
In some applications, such as Messaging, Contacts,
and Media Studio, you can press the navigation key S
left and right to scroll between tabs.
15
get started
home screen
The Home screen appears when you turn on the phone.
Service Provider
10/Aug/2007
12:00am
Call a contact
Send a message
Aug 10, 2007
Ring
Active profile: General
Ó Media
Options
00:00
Open
Camera
Note: Your Home screen might look different from the
one shown, depending on your service provider and
selected plug-ins.
16
get started
Your Home screen displays important status
information, such as messages and missed calls using
plug-ins. The following plug-ins can be selected:
• Calls - Select to view missed calls or call
a contact.
• Messages - Select to view or send messages.
• Emails - Select to view or send email.
• Agenda - Select to view agenda reminders.
• Profiles - Select to view current profile and
settings.
• Media Player - Select to play media and access
the Media Gallery.
For more Home screen Options see your User’s Guide.
17
personalise
home screen
personalise
You can change your Home screen settings.
Find it: 1 > G Control panel > Home Settings
changing plug-ins
You can change your plug-ins from the Plug-ins tab.
Find it: 1 > G Control panel > Home Settings > Plug-ins
> plug-in
changing wallpaper
Set a photo or picture as a wallpaper (background)
image in your Home screen.
Find it: 1 > G Control panel > Home Settings > Wallpaper
> Change > Choose
changing softkeys
You can change the function of your Home screen’s
right soft key.
Find it: 1 > G Control panel > Home Settings > Soft Keys
18
personalise
main menu appearance
To make your main menu appear either as a grid
or list:
Find it: 1 > Options > View as grid or View as list
main menu organisation
Personalise the main menu to suit your needs.
features
create new folder in main menu
From the main menu, press Options > New folder.
move feature to new folder
Scroll to the menu feature you want to move, press
Options > Move to folder.
delete folder
Move all menu features and sub-folders out of the
folder, scroll to the folder, press Options > Delete folder.
19
messaging
send a text message
messaging
Find it: 1 > E Messaging > Create new message > SMS
1
Select To to add a recipient. Enter the recipient’s
number or press Contacts and select a contact.
2
Scroll down to the text entry field and press
keypad keys to enter text on the page.
Note: Press # to switch modes (iTAP™ predictive
text h, Multi-tap standard entry i, Numeric n or
Symbol o). Press 0 to change capitalisation.
3
When you finish the message, press the Send key.
receive a message
When you receive a new message, your phone plays
an alert. Also, the display shows New message with a
message indicator, such as É, and the Home screen
messaging plug-in is updated. Press the View key to
open the message.
To learn more about sending and receiving messages
with your phone, see your User’s Guide.
20
video
record a video & upload or
send it
video
1
2
Press the camera key to see the viewfinder.
Press S right to switch to video mode.
Autofocus box
Right Soft
Key
Use Navigation
Key to select
zoom in, zoom
out, or mode
58:43
Mode
Indicator
3
Size
Indicator
Options
Back
Viewfinder
Window
Time
Available
Left Soft Key
Quality
Storage
Indicator Icon Indicator Icon
Gently press and hold the camera key halfway
until the autofocus box turns green. The video in
the viewfinder is in focus.
Note: If the autofocus box turns red, release the
camera key and try again.
21
video
4
Fully press the camera key to start recording the
video.
Tip: A red circle displays to show you are recording.
5
Press the camera key to stop recording the video.
Tip: To edit the video, press Options > Edit.
6
Press S:
• Up - Go to the Media Gallery.
• Down - Go to Send as menu.
• Left - Return to viewfinder.
• Right - Discard and return to viewfinder.
Note: You can also press the camera key again
to return to the viewfinder.
Tip: To set video recording and playback
options, see your User’s Guide.
22
video
7
Press Options > Send to YouTube or Send as to
upload the video to your online Web site or
to send in a message.
Note: Send to YouTube will be shown as Open ShoZu until
you set the destination for your video on the Web,
see page 34.
edit a video
Find it: 1 > Ó Media Studio > Media Editor > Edit video
1
Select the video you want to edit. The selected
video is displayed in pause mode.
2
Press Options and select and the editing function:
• Set - To set the start and end of your video.
• Add subtitle - Add subtitles to your video.
• Audio - Set audio for your video (Audio dubbing,
Live dubbing or Remove audio track).
• Grabbing frame - Grab one frame at a time.
• Preview - Preview your video.
• Reset - Reset video.
23
video
• Output settings - Set Resolution, Length, Default file name, or
Memory in use.
• New storyboard - Loads the storyboard editor with
the video being edited.
3
After making your changes to the video, press
Options > Save.
4
Press Play to watch your video.
create a movie
Find it: 1 > Ó Media Studio > Media Editor > Storyboard
A storyboard is a collection of media shown in a
sequence with a sound track, transitions and effects to
create a movie.
1
Press S up, down, left or right to scroll to media,
and press the centre key s to select it. Press
Options > Mark to select multiple media and press
Options > Done when finished.
Tip: The selected media and transitions with
intervals are at the bottom of the screen. Press S
left or right to scroll between items.
24
video
2
Press Options to open the storyboard menu and edit
your media:
• Edit - Cut, Audio dubbing, Live dubbing, Add subtitle,
or Remove audio track.
• Preview - Preview your storyboard.
• Insert - Insert media, Insert text clip, or Insert animate title.
• Transition - Select type of transition.
• Effect - Change the effect of your media.
• Narration - Insert audio clip or audio clip with mix.
• Duration - Set duration in seconds.
• Remove - Remove selection or Remove all.
• Move - Change the order of media.
• Output settings - Set Resolution, Length, Default file name,
or Memory in use.
3
When you have finished making your storyboard
press Options > Save.
4
Press Play to watch your storyboard.
25
photo
take a photo & upload or
send it
photo
Note: To take a photo with the primary camera (back),
your slider must be closed. To take a photo with your
secondary camera (front), the slider must be open.
Press the camera key to see the viewfinder.
Autofocus box
Use Navigation
Key to select
zoom in, zoom
out or mode
Mode
Indicator
26
Right Soft
Key
240
Size
Indicator
Back
Viewfinder
Window
Number of
pictures
available
Options
1
Left Soft Key
Quality
Storage
Indicator Icon Indicator Icon
photo
2
Gently press and hold the camera key halfway
until the autofocus box turns green. The photo in
the viewfinder is in focus.
Note: If the autofocus box turns red, release the
camera key and try again.
3
Fully press the camera key to take the photo.
Tip: To edit the photo press Options > Edit.
4
Press S:
• Up - Go to the Media Gallery.
• Down - Go to Send as menu.
• Left - Return to viewfinder.
• Right - Discard and return to viewfinder.
Tip: Press the camera key again to return to the
viewfinder.
To more camera options, see your User’s Guide.
27
photo
5
Press Options > Send to Flickr or Send as to upload
the photo to your online Web site or to send
in a message.
Note: Send to Flickr will be shown as Open ShoZu until
you set the destination for your photo on the Web,
see page 34.
edit a photo
Find it: 1 > Ó Media Studio > Media Editor > Edit image
1
2
Select the photo you want to edit.
Press S left and right to highlight an editing
function and s to perform the editing function:
• Rotate left - Rotates your photo 90 degrees
anti-clockwise.
• Rotate right - Rotates your photo 90 degrees
clockwise.
• Crop - Set the size to crop your photo.
• Brightness & Contrast - Set the brightness and
contrast.
28
photo
• Auto level - Automatically improves the quality of
your photo.
• Frames - Add a frame to your photo.
• Red-eye removal - Removes red-eye from your
photo.
3
After making your changes to the photo,
press Options > Save.
4
At the prompt “Do you want to replace the existing
file”, press Yes.
For more photo editing options, see your User’s Guide.
make a photo movie
Find it: 1 > Ó Media Studio > Media Editor
> Make photo movie
1
Press S up, down, left or right to scroll to a
photo, and press the centre key s to select it.
Press Options > Mark to select multiple photos and
press Options > Done when finished.
29
photo
Tip: The selected photos and transitions with
intervals are shown at the bottom of the screen.
Press S left or right to scroll between items.
2
Press Options to open the photo movie menu and
edit your photo:
• Effect - Change the effect of your photo.
• Preview - Preview your photo movie.
• Insert - Insert photos, Insert text clip, or Insert animate title.
• Transition - Select type of transition.
• Narration - Insert audio clip.
• Duration - Set duration in seconds.
• Remove - Remove selection or Remove all.
• Move - Change the order of photos.
• Output settings - Set Resolution, Length, Default file name,
or Memory in use.
3
After making your changes to the photos and
transitions press Options > Save.
4
Press Play to watch your photo movie.
30
media player
play music
media player
Your phone can play and store AAC, AAC+, Enhanced
AAC+, MP3, and WMA music files.
Note: Your phone may not play MP3 files that have a
bit rate higher than 320 kbps. If you try to download or
play one of these files, your phone might show you an
error or ask you to delete the file.
Find it: Press 1 > Ó Media Studio > Media Player
If no tracks or playlists are loaded, you are first taken to
the Media Gallery to select a song to play. From the
music tab, open one of the following:
tab
Playlists
Play and manage your playlists.
Artists
Select an artist to show or play their
songs.
Tracks
Select a track to show or play songs.
Albums
Select an album to show or play its
songs.
31
media player
Once the Media Player is displayed:
• Play or pause - Press the centre key s.
• Stop - Press S down.
• Play previous or next - Press S left or right.
• Change volume - Press the volume keys.
• Return to the Media Gallery - Press S up.
Your music will continue to play.
• Hide the player - Press 1 to go return to the
main menu. This lets you use other phone
features while playing music.
Note: The Media Player is used to play music or
videos. You cannot play both at the same time.
Tip: You can listen to music as you travel. Use
Bluetooth® A2DP enabled devices, such as stereo
headphones, for enhanced music quality and use
Bluetooth AVRCP enabled devices, such as car stereos,
to control playback. If you’re on a plane, use a wired
headset and flight mode to make your phone safe to
use.
32
media player
play videos
Find it: 1 > Ó Media Studio > Media Gallery > Video tab
In the Media Gallery, select the video you want to play.
When the Media Player is displayed:
• Play or pause - Press the centre key s.
• Stop - Press S down.
• Skip back or forward - Press S left or right.
• Change volume - Press the volume keys.
• Return to the Media Gallery - Press S up.
Note: The Media Player is used to play music or
videos. You cannot play both at the same time.
Tip: Want some help? Press Options > Help.
33
ShoZu
ShoZu
ShoZu
Use ShoZu to upload your photos and videos
from your phone to a Web site, such as Flickr or
YouTube (other online storage sites are available).
Find it: 1 > Ó Media Studio > ShoZu
activate ShoZu
1
2
Press Options > Activate.
You will be asked if you have a ShoZu account.
If you do not have an account, press No. ShoZu will
automatically create a temporary username and
password.
If you do have an account, press Yes, enter your
username and password, then press OK.
After your username and password have been
created or entered ShoZu activation will take
around one minute.
Note: Press 1 > Ó Media Studio > ShoZu > Options
> Settings to see your temporary account details.
To change your temporary account details, login at
www.ShoZu.com and go to MyAccounts.
34
ShoZu
share-it destinations
Find it: 1 > Ó Media Studio > ShoZu > Share-It
> Destinations > Options > Add New Destination
1
Scroll down the list of destinations and select your
primary destination.
2
Enter your destination account details.
Note: If you have chosen YouTube, after taking a
photo or video Options > Send to YouTube will be shown.
If you have chosen Flickr, after taking a photo
Options > Send to Flickr will be shown.
Tip: To automatically upload your photos and
videos select 1 > Ó Media Studio > ShoZu > Share-It
> All files > Options > Settings press left S > Share-It
> New images/New videos > Auto save.
35
Bluetooth® wireless
wireless
Bluetooth® wireless
Bluetooth®
You can make handsfree calls using an optional
Bluetooth headset or car kit.
Note: The use of wireless phones while driving may
cause distraction. Discontinue a call if you can’t
concentrate on driving. Additionally, the use of
wireless devices and their accessories may be
prohibited or restricted in certain areas. Always obey
the laws and regulations on the use of these products.
Before you try to connect your phone with a
handsfree or music device, make sure the device is on
and ready in pairing or bonding mode (see the user’s
guide for the device).
Find it: 1 > Ô Connectivity > Bluetooth
> Enabled audio devices tab > New device
1
Scroll to a device in the list and press the centre
key s.
2
If necessary, press the Yes or OK key to connect to
the device.
36
Bluetooth® wireless
3
If necessary, enter the device passkey (such as
0000) and press the OK key.
When your phone is connected, the Bluetooth
indicator O is highlighted in the status bar.
Shortcut: When your phone’s Bluetooth power is on,
your phone can automatically connect to a handsfree
device you have used before. Just turn on the device,
or move it near the phone. If the device doesn’t
connect, turn it off and back on. During a call, you can
press Options > Audio > Earpiece to connect to a handsfree
device you have used before.
37
accessories
accessories
Bluetooth® Stereo
Headphones S9
Bluetooth® Stereo
Headphones HT820
Bluetooth® Headset
H670
Bluetooth® Headset
H700
Bluetooth® Stereo
Controller S705
Car Charger
To see more accessories, visit www.hellomoto.com
38
www.hellomoto.com
Certain mobile phone features are dependent on the
capabilities and settings of your service provider’s
network. Additionally, certain features may not be
activated by your service provider, and/or the provider's
network settings may limit the feature’s functionality.
Always contact your service provider about feature
availability and functionality. All features, functionality, and
other product specifications, as well as the information
contained in this user's guide are based upon the latest
available information and are believed to be accurate at
the time of printing. Motorola reserves the right to change
or modify any information or specifications without notice
or obligation.
MOTOROLA and the Stylised M Logo are registered in the
US Patent & Trademark Office. All other product or service
names are the property of their respective owners. The
Bluetooth trademarks are owned by their proprietor and
used by Motorola, Inc. under license. Java and all other
Java-based marks are trademarks or registered
trademarks of Sun Microsystems, Inc. in the U.S. and
other countries. Microsoft, Windows and Windows Me are
registered trademarks of Microsoft Corporation; and
Windows XP is a trademark of Microsoft Corporation. UIQ
Technology and all UIQ Technology-based marks and
logos are trademarks of UIQ Technology AB.
© Motorola, Inc., 2007.
Caution: Changes or modifications made in the radio
phone, not expressly approved by Motorola, will void the
user’s authority to operate the equipment.
39
www.motorola.com
6803631F58