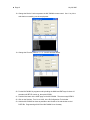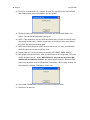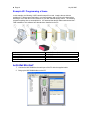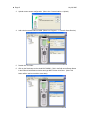
1
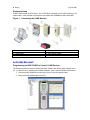
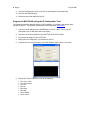
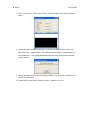
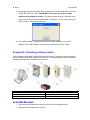
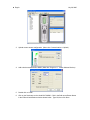
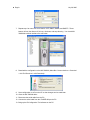
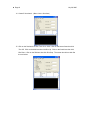
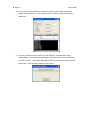
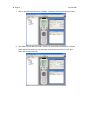
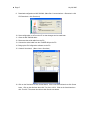
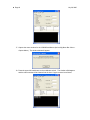
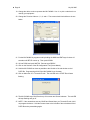
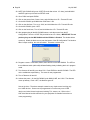
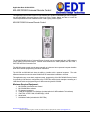
Application Note: A-05010975-A
MX-500/700/800 Universal Remote Control
This application note has been written to help installers gain a better understanding of how to integrate
the MX-500/700/800 Universal Remote Control by Home Theater Master and also to unveil the
unlimited possibilities that are available with the i-LiNE Lighting Control System.
MX-500/700/800 Universal Remote Control
The MX-500/700/800 family of Universal Remote Controls can be integrated with the i-LiNE system to
control lighting devices and scenes. Infrared communications are made possible with the i-LiNE iPoRT-IRs Infra Red Connection Port.
The MX-500 remote control must be setup manually as it does not have a personal computer interface.
Refer to the MX-500 programming manual for instructions.
The MX-700 and MX-800 both have the ability to interface with a personal computer. The main
difference between the two is that the MX-800 has RF transmission in addition to infra red.
This application note covers basic equipment setup, programming of the MX-700/800 Remote Control
for controlling i-LiNE devices, configuration of the i-PoRT-IRs, and two basic examples: controlling an iLiNE dimmer switch and programming an i-LiNE scene using the MX-700/800.
Minimum Required Equipment:
1.
2.
3.
4.
5.
6.
7.
MX-700/800 Universal Remote Control
MX-700/800 Editor software
PC (personal computer)
i-LiNE IR Configuration Tool Software (included with the i-LiNE Installation Tool software)
i-PoRT-IRs, i-PoRT-COM, i-PoWER-M(x), i-ON-D
Serial Cable
Null Modem Cable (included with i-PoRT-IRs)
Electronic Design Technology
707 North Green Street, Longview, TX 75601, Tel: (903) 753-4180, Fax: (903) 753-4811, E-mail: [email protected]
z Page 2
July 28, 2005
Equipment Setup
A basic i-LiNE network is shown below. The i-PoRT-IRs is connected to the i-PoRT-COM with a null
modem cable. In this example, the computer is connected to the i-PoWER-M1p with a serial cable.
Figure 1 – Connecting the i-LiNE Network
1. Personal computer
2. Serial Cable
3. i-PoWER-M1p
4. i-PoRT-IRs
5. Null Modem Cable
6. i-PoRT-COM
7. i-ON-D Dimmer Switch
8. i-ON-MB Multibutton Switch
LLe
ett’’ss G
Ge
ett S
Stta
arrtte
ed
d!!
Programming the MX-700/800 to Control i-LiNE Devices:
The following procedures assume that the MX Editor Software has already been installed on the
PC. For instructions on installing the MX Editor Software, refer to the MX-700/800 User Manual.
1. Connect the MX-700/800 to the serial port of the PC with the supplied cable.
2. Bring up the MX-700/800 editor on the PC.
z Page 3
July 28, 2005
3. Upload current remote configuration. (Menu bar: Communications > Upload).
4. Add a device named ILINE to MAIN. (Menu bar: Program > 1. Create & Name Devices)
5. Double click on ILINE.
6. Click on the first button on the virtual MX-700/800. Click in the field next to Button Name
in the “Edit and Label Buttons” window shown below. Type in a name (5 chars max),
then click Save.
7. Repeat step 6 for each MX-700/800 button that you wish to program.
8. Download the configuration to the MX-700/800. (Menu Bar: Communications > Download
> click Full Download > click Download).
z Page 4
July 28, 2005
9. Save the configuration to a file on the PC so that changes can be made later.
10. Close the MX-700/800 editor.
11. Disconnect the serial cable from the PC.
Program the MX-700/800 using the IR Configuration Tool:
The following procedures assume that the i-LiNE Installation Tool software has already been
installed on the PC. The software is available for free download at www.edt.biz.
1. Connect a serial cable from the i-PoWER-M(x) to the PC. (Note: The PC can be
connected to any i-LiNE device with a serial port).
2. Connect a null modem cable from the i-PoRT-IRs to the i-PoRT-COM.
3. Plug the power supply into the i-PoRT-IRs.
4. Bring up the IR Configuration Tool software on the PC.
5. Create a New Item for each button on the MX-700/800. (Menu: Item > New Item)
6. Change the Type of each item to one of the following:
•
•
•
•
•
•
•
•
Turn On to 100%
Turn On to Preset
Turn Off
Dim Up
Dim Down
Dim Stop
Scene Watch
Scene Learn
z Page 5
July 28, 2005
7. Click on the first item. Click on the IR Type. Type will change on the item list as shown
below.
8. Change the Macro Number if you know it. If you don’t know the macro number, click
Menu Bar: Other > Capture Macro. The window below will appear. Press the button on
the i-LiNE device.
The window will disappear and the macro number will be inserted
into the item list.
9. Change the device code to represent the MX-700/800. Use 11 or pick a code that is not
used by your equipment.
10. Change the Function Code to a unique number. Number 1,2,3,4, etc.
z Page 6
July 28, 2005
11. Put the MX-700/800 in program mode. Hold MAIN and ENT for about 10 seconds until
SETUP comes up. Then select LEARN.
12. Go to the first button on the MX-700/800 that you wish to program. Remote says
READY.
13. Hold the MX-700/800 as close as possible to the left side of the red window on the iPoRT-IRs. Programming will fail if the MX-700/800 is too far away.
14. Transmit the IR code for the first button to the MX-700/800 (Menu bar: IR > Transmit IR
code). The red LED on the i-PoRT-IRs will start flashing.
15. The MX-700/800 says GOOD at the top of its screen and Saved at the bottom of its
screen. The red LED will stop flashing and go off.
16. NOTE: If the remote does not say GOOD and Saved when you Transmit IR code, it did
not program the button. Hold the remote closer to the left side of the red window of the iPoRT-IRs and try transmitting again.
17. NOTE: MX-700/800 will go out of SETUP mode after a time. If it does, just hold MAIN
and ENT again to put it back into SETUP mode.
18. Repeat steps 12-17 to program the remaining buttons on the MX-700/800.
z Page 7
July 28, 2005
19. After programming all the buttons, write the macros from the IR Configuration Tool to the
i-PoRT-IRs. Menu: IR > Write. IMPORTANT: Do not push any keys on the MX700/800 until the IR Write is finished. The window below comes up. Watch the black
screen near the bottom of the IR Configuration Tool window. Once it stops scrolling, the
Write is finished. This takes a minute or so.
20. Test the MX-700/800. Reprogram buttons as necessary making sure to write the
changes to the i-PoRT-IRs after any changes are made (Menu bar: IR > Write).
Example #1: Controlling a Dimmer Switch
In this example, the following i-LiNE network setup will be used. The dimmer switch (device #7)
will be controlled with the MX-700/800 remote control. This example assumes that the MX Editor
Software has already been installed on the computer.
1. Computer
2. Serial Cable
3. i-PoWER-M1p
4. i-PoRT-IRs
5. Null Modem Cable
6. i-PoRT-COM
7. i-ON-D Dimmer Switch
8. i-ON-MB Multibutton Switch
LLe
ett’’ss G
Ge
ett S
Stta
arrtte
ed
d!!
1. Connect the MX-700/800 to the serial port of the PC with the supplied cable.
2. Bring up the MX-700/800 editor on the PC.
z Page 8
July 28, 2005
3. Upload current remote configuration. (Menu bar: Communications > Upload).
4. Add a device named ILINE to MAIN. (Menu bar: Program > 1. Create & Name Devices)
5. Double click on ILINE.
6. Click on the first button on the virtual MX-700/800. Click in the field next to Button Name
in the Edit and Label Buttons window shown below. Type ON, then click Save.
z Page 9
July 28, 2005
7. Repeat step 6 to name four more buttons: OFF, DMUP, DMDN, and DMSTP. These
buttons will turn the dimmer off, dim up, dim down, and stop dimming. Your virtual MX700/800 should look similar to the one below.
8. Download the configuration to the MX-700/800. (Menu Bar: Communications > Download
> click Full Download > click Download).
9. Save configuration to a file on the PC so that changes can be made later.
10. Close the MX-700/800 editor.
11. Disconnect the serial cable from the PC.
12. Connect the serial cable from the i-PoWER-M1p to the PC.
13. Bring up the IR Configuration Tool software on the PC.
z Page 10
July 28, 2005
14. Create 5 ‘New Items’. (Menu: Item > New Item)
15. Click on the first item then click Turn On to 100%. Click on the second item then click
Turn Off. Click on the third item then click Dim Up. Click on the fourth item then click
Dim Down. Click on the fifth item then click Dim Stop. The screen should now look like
the one below:
z Page 11
July 28, 2005
16. If you know the macro number for the dimmer switch, put that number in the Macro
Number field for each item. In the example setup, the macro number for the dimmer
switch is 06.
17. If you do not know the macro number, you can capture it; click Menu Bar: Other >
Capture Macro. The window below will appear. Press the button on the i-LiNE device
you wish to control.
The window will disappear and the macro number will be inserted
into the item. Copy the macro number to all five items.
z Page 12
July 28, 2005
18. Change the Device Code to represent the MX-700/800 remote control. Use 11 or pick a
code that is not used by your other equipment.
19. Change the Function Codes to 1, 2, 3, 4, and 5 as shown below:
20. Put the MX-700/800 in program mode by holding the MAIN and ENT keys for about 10
seconds until SETUP comes up, then push LEARN.
21. Push the first button in the ILINE page on the MX-700/800. The screen says READY.
22. Click on the first item, Turn On to 100%, in the IR Configuration Tool window.
23. Hold the MX-700/800 as close as possible to the left side of the red window on the iPoRT-IRs. Programming will fail if the MX-700/800 is too far away.
z Page 13
July 28, 2005
24. On the PC, click Menu bar: IR > Transmit IR code. The red LED on the i-PoRT-IRs will
start flashing as the code is transmitted to the MX-700/800.
25. The MX-700/800 says GOOD at the top of its screen and Saved at the bottom of its
screen. The red LED will stop flashing and go off.
26. NOTE: If the remote does not say GOOD and Saved when you click Transmit IR code, it
did not program the button. Hold the remote closer to the left side of the red window of
the i-PoRT-IRs and try transmitting again.
27. NOTE: MX-700/800 will go out of SETUP mode after a time. If it does, just hold MAIN
and ENT again to put it back into SETUP mode.
28. Repeat steps 21-27 for the remaining four buttons (OFF, DMUP, DMDN, DMSTP).
29. After programming all the buttons, write the macros from the IR Configuration Tool to the
i-PoRT-IRs (Menu bar: IR > Write). IMPORTANT: Do not push any keys on the MX700/800 until the IR Write is finished. The window below comes up. Watch the black
screen near the bottom of the IR Configuration Tool window. When it stops scrolling, the
write operation is finished. This takes a minute or so.
30. Test the MX-700/800 buttons; they will now control the dimmer switch.
31. Save the file for later use.
z Page 14
July 28, 2005
Example #2: Programming a Scene
In this example, the following i-LiNE network setup will be used. Imagine the two dimmer
switches 6 & 7 below control the lights in your home theater, and you wish to dim them before
watching a movie with the touch of a button on your MX-700/800 remote control. The following
procedure explains how to accomplish this. It is assumed that the MX Editor software and the iLiNE Installation Tool software have already been installed on the PC.
1. Computer
2. Serial Cable
3. i-PoWER-M1p
4. i-ON-MB Multibutton switch
5. i-PoRT-COM
6. i-ON-D Dimmer Switch #1
7. i-ON-D Dimmer Switch #2
8. i-PoRT-IRs
9. Null modem cable
LLe
ett’’ss G
Ge
ett S
Stta
arrtte
ed
d!!
1. Connect the MX-700/800 to the serial port of the PC with the supplied cable.
2. Bring up the MX-700/800 editor on the PC.
z Page 15
July 28, 2005
3. Upload current remote configuration. (Menu bar: Communications > Upload).
4. Add a device named PGM-I to MAIN. (Menu bar: Program > 1. Create & Name Devices)
5. Double click on PGM-I.
6. Click on the first button on the virtual MX-700/800. Click in the field next to Button Name
in the Edit and Label Buttons window and type WATCH then click Save. (Note: This
button will be used to record the scene later).
z Page 16
July 28, 2005
7. Click on another button and name it LEARN. This button will memorize the scene later.
8. Click MAIN, then double click ILINE. Click on an unused button and name it 1-ON (this
button will turn the scene on). Click another unused button and name it 1-OFF (this
button will turn the scene off).
z Page 17
July 28, 2005
9. Download configuration to MX-700/800. (Menu Bar: Communications > Download > click
Full Download > click Download).
10. Save configuration to a file on the PC so that changes can be made later.
11. Close the MX-700/800 editor.
12. Disconnect the serial cable from the PC.
13. Connect the serial cable from the i-PoWER-M1p to the PC.
14. Bring up the IR Configuration software on the PC.
15. Create 4 ‘New Items’. (Menu: Item > New Item)
16. Click on the first item then click Scene Watch. Click on the second item then click Scene
Learn. Click on the third item then click Turn On to 100%. Click on the fourth item then
click Turn Off. The screen should now look like the one below:
z Page 18
July 28, 2005
17. Capture the macro number for the i-ON-MB multibutton (device #4) (Menu Bar: Other >
Capture Macro). The window below will appear.
18. Press the upper left hand button on the multibutton switch. The window will disappear
and the macro number will be inserted into the item. Copy the macro into all items.
z Page 19
July 28, 2005
19. Change the device code to represent the MX-700/800. Use 11 or pick a code that is not
used by your equipment.
20. Change the Function Codes to 1, 2, 3, and 4. The screen should look similar to the one
below:
21. Put the MX-700/800 in program mode by holding the MAIN and ENT keys for about 10
seconds until SETUP comes up. Then push LEARN.
22. Go into PGM-I and push WATCH. Remote says READY.
23. Click on the first item of the IR Configuration Tool (Scene Watch).
24. Hold the MX-700/800 as close as possible to the left side of the red window on the iPoRT-IRs. Programming will fail if the MX-700/800 is too far away.
25. Click on Menu bar: IR > Transmit IR code. The red LED on the i-PoRT-IRs will start
flashing.
26. The MX-700/800 says GOOD at the top of its screen and Saved at bottom. The red LED
will stop flashing and go off.
27. NOTE: If the remote does not say GOOD and Saved when you Transmit IR code, it did
not program the button. Hold the remote closer to the left side of the red window of the iPoRT-IRs and try transmitting again.
z Page 20
July 28, 2005
28. NOTE: MX-700/800 will go out of SETUP mode after a time. If it does, just hold MAIN
and ENT again to put it back into SETUP mode.
29. Go to PGM-I and push LEARN.
30. Click on the second item, Scene Learn, and click Menu bar: IR > Transmit IR code.
31. On the MX-700/800, push MAIN then ILINE then 1-ON.
32. Click on the third item, Turn on to 100%, and click Menu bar: IR > Transmit IR code.
33. On the MX-700/800, push 1-OFF.
34. Click on the fourth item, Turn off, and click Menu bar: IR > Transmit IR code.
35. After programming all the MX-700/800 buttons, write the macros from the IR
Configuration Tool to the i-PoRT-IRs (click Menu bar: IR > Write). IMPORTANT: Do not
push any keys on the MX-700/800 until the IR Write is finished. The window below
comes up. Watch the black screen near the bottom of the IR Configuration Tool window.
When it stops scrolling, the write is finished. This takes a minute or so.
36. Program a scene. Push MAIN, PGM-I, then WATCH on the MX-700/800. The LED on
the multibutton switch (device #4) will start flashing slowly indicating that it is in program
mode.
37. Turn dimmers #1 and #2 up to about 50%. Push LEARN on the MX-700/800. The LED
on the multibutton stops flashing. The scene is now programmed.
38. Turn off dimmers #1 and #2.
39. Activate the scene. On the MX-700/800, push MAIN, ILINE, and 1-ON. The dimmers
come up halfway. Push 1-OFF, the dimmers goes off.
Note to the User: The above example created a very simple scene involving only
two i-LiNE devices. Scenes can be programmed to involve many more i-LiNE
devices and other infrared equipment including TVs, stereos, etc. Refer to the iLiNE User Manual and the manuals for your equipment for detailed instructions on
scene programming.