1
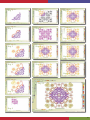
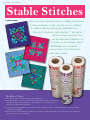
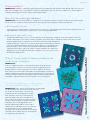
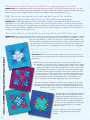
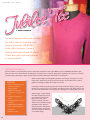
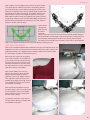
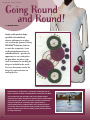
stitch r ecipe
NEEDLE PUNCH
Issue 25
$6.95
What’s
Inside
• Embroidered
Wallflowers
• Scattered Leaves
Vest
• The Happy Bag
• Stable Stitches
Page4
• Jubilee Tee
• Going Round and
Round
• Something Fishy
• Embroidery Special
Effects
• Southwest Stitches
Pillow
• The Eyes Have It!
• Spontaneous
Combustion
table of
contents
Embroidered Wallflowers
4With colorful fabrics and wonderful variegated threads, this beautiful quilt made
from a Benartex kit was only missing one thing…Embroidery! See how to create
designs that fit the pieces of the quilt using only one design and Embroidery
Software v5.
34
Scattered Leaves Vest
8This simple vest becomes fabulous when you start with a colorful fabric, add painted
accents, then a touch of embroidery, and finish with sparkling glitz.
The Happy Bag
11What makes this simple tote bag so spectacular? The large 12” x 12” design is
created by arranging several motifs into a “square” using the BERNINA Embroidery
Software and is easily stitched in one hooping using the Happy Voyager 12-needle
embroidery machine.
Stable Stitches
14One of the most important keys to creating professional-looking embroidery is
choosing the correct stabilizer. Find the answers to your stabilizer questions that
will yield the best embroidery results for your projects.
Jubilee Tee
18See what happens when you combine My Label 3D Fashion Pattern Software with
the multi-hooping feature of Version 5 BERNINA Embroidery Software. Create a
custom-embroidered one-of-a-kind T-shirt that adds style and panache to your
wardrobe.
Going Round and Round
20Simple needle-punched shapes sprinkled with embroidered elements add impact
to an otherwise non-descript garment. Utilizing BERNINA Embroidery Software to
create the composition – from needle punch placement lines to embroidered
details – provides the opportunity to assess and perfect the plan before you take
a single stitch.
Something Fishy
22This colorful little wallhanging is fun to make with bright fabrics, paper piecing
techniques and simple free-motion quilting.
Embroidery Special Effects
26Creating special effects with embroidery may be as easy as changing the needle
in your machine! See how using specialty needles such as Double needles, Wing
needles, and Triple needles can add texture, dimension, color variation, and depth
to a “plain Jane” embroidery design.
Southwest stitches pillow
29Combine machine-embroidered appliqué and a decorative stitch recipe for a
coordinated, custom look that has Southwest appeal.
The Eyes Have It!
32
Learn about about a forgotten BERNINA accessory: Eyelet Embroidery Set #82.
Spontaneous Combustion
34Try this great exercise in creativity and see how much fun it can be! More fun than
paper dolls, making these “flat dresses” can be addictive.
8
Managing Editor/Creative Director
Susan Beck
Contributing Editors
Jill Danklefsen
Jo Leichte
Through The Needle is published four
times a year by BERNINA of America, Inc.
for machine stitchers and embroiderers of
all types and all skill levels. No portion of
this publication may be reproduced in any
form without prior written permission of
the publisher.
Bernina of America, Inc.
3702 Prairie Lake Court
Aurora, IL 60504
Phone: 630-978-2500
Website: www.berninausa.com
E-mail: [email protected]
For subscription information, contact:
QRI Subscription Department, 3702 Prairie
Lake Ct, Aurora, IL 60504-6182
Printed in the U.S.A.
1
contributors
Nina McVeigh
During 14 years of owning her own store, Nina developed and taught her
original patterns and designs in BERNINA clubs and classes. An avid
quilter, heirloom sewer and lover of all kinds of embellishment, she is also
a collector of scissors, buttons and thread.
Susan Fears
Susan’s love of sewing began at a young age and she enjoys making
clothing, quilting and sewing for her home. As a garment sewer, she
utilizes the precision of Bernina machines and decorative features of
embroidery and software to bring designer details into her own work. As
a quilter, she creates traditional blocks with a contemporary flair and especially enjoys
incorporating embroidery into her quilt blocks and quilting in the hoop. She combines
her experience with computers and fashion design with BERNINA innovation as an
Educator for BERNINA of America.
11
Erika Mulvenna
Erika inherited a love of art from her mother, who encouraged her creativity
at a young age through sewing and painting. Eager to explore all aspects
of art, she earned a BA in General Studio Arts before continuing on to
complete a BFA majoring in Fiber Arts. Currently employed as an
Educator for BERNINA of America, Erika’s garments are playfully inspired
by her extensive collection of vintage and antique sewing patterns.
Dawn Andrew
An Educator for OESD. Dawn has taught classes in all areas of sewing
and embroidery. She has also been a manager for a sewing machine store
and served as a district home economist for a fabric retailer. With a BS in
Home Economics, Dawn is an expert seamstress and enjoys being creative
with embroidery software.
Debbi Lashbrook
A former teacher at the university level, Debbi also managed the BERNINA
Sewing Center in Plano, TX for five years before joining the Education staff
at BERNINA® of America. Her specialties include garment construction,
pattern drafting and fitting, and embroidery software.
22
Jennifer Gigas
Always looking for a creative outlet, Jennifer found sewing to be her
passion. From heirloom to embroidery to quilting, she’s yet to find a
technique she doesn’t like. Jennifer began her sewing career designing
custom children’s wear and teaching fine sewing techniques. As Director
of Education/Training for BERNINA of America, Inc, she combines serging, sewing, and
embroidery in updated versions of her favorite patterns.
Elva Mungai
Elva has used and loved BERNINA sewing machines since she bought
her first, an 830. The embroidery software has allowed her to combine
her computer and sewing knowledge in many creative ways and she enjoys
sharing that knowledge with dealers, their staff and consumers.
GAIL GARBER
Gail Garber has been a quiltmaker since 1980, and is now internationally
known as a teacher, lecturer, designer, and author. Her quilt and garment
patterns are published through her company, Gail Garber Designs.
Regular Contributors:
Jill Danklefsen
BERNINA® Product Support Specialist,
BERNINA® of America, Inc.
2
elinor peace bailey
Known around the world for her whimsical dolls, elinor says “being creative is a common experience for everyone. Don’t worry about content – the
process will take you somewhere and is valuable in and of itself.” Try her
creative exercise and you’ll see what she’s talking about!
from bernina
by susan beck
Many of us can remember when the only “equipment” in our sewing rooms was a sewing machine.
Then, along came sergers, rotary cutting supplies,
professional steam irons, presses, and embroidery
machines. All have made a difference in how easy
and fun it is to turn fabric and thread into clothing,
artwork, quilts, gifts, and anything else we want,
but none have made more of an impact that the
embroidery machine. It has taken the sewing world
to a whole new level of embellishment, personalization, and computerization. This issue of Through The
Needle is dedicated to all machine embroiderers,
whether you are experienced, new to the art, or just
thinking about trying it.
From basic and practical to beautiful and unusual, you’ll find projects, tips, and useful embroidery information in this issue. “Stable
Stitches” on page 14 is a great overview of OESD stabilizers
and is handy to keep as a reference for why
we use stabilizers and when we need each
type. If you like to mix machine embroidery
with other stitching techniques, try “Going
Round and Round” on page 20, a project that
incorporates embroidery with needle punching! “Embroidered Wallflowers” on page 4
offers fun ideas for using embroidery as part
of your quilt. “These articles inspire you to
want more, look for the BERNINA-sponsored
seminar, Embroidery T-n-T in your area – ask
your local dealer for details.
Even if you are not into machine
embroidery, there are fun projects
and creative ideas to try. The
“Something Fishy” wall hanging
on page 22 is a colorful little quilt
that’s fun to make with bright fabrics,
paper piecing and simple free-motion quilting techniques. Be
sure to try the creative exercise on page 34 by elinor peace
bailey. It’s very freeing and can definitely get you over a mid-winter artistic slump.
So whether you embroider by machine or sew more traditional projects using the sewing machine, we
hope you’ll find this issue of Through The Needle useful and inspiring.
Through The Needle would not be possible without the contributions of talented designers and authors. From the BERNINA Educators and staff to
freelance designers and teachers, we appreciate the work of these
fiber artists and strive to give credit where it is due. We apologize
for inadvertently omitting the name of the author/designer on one
of the articles in Issue #24. Nancy Kazlauckas designed the Painted
Hearts Table Topper and you can see more of her creative work at
www.threadcalligraphy.com.
By Nina McVeigh
Supplies
Making this beautiful quilt from Benartex was great fun. With
colorful fabrics and wonderful variegated threads, it was only
missing one thing…Embroidery! Playing with just one design
in BERNINA Version 5 Software, it was easy to create designs
that fit the pieces of the quilt.
Quilt Blocks
Construct the quilt blocks as instructed in the Benartex Kit,
following the directions below for appliquéing.
Appliqué along the edges of the shapes using the Open
Embroidery Foot #20/20C and the blanket stitch. Change
the stitch length to 3mm and the width to 3.1mm. Move the
needle position to far right and align the edge of the appliqué shape with the inner edge of the toe as shown.
4
• Wild Flower Kit from Benartex
• Paper-backed Fusible Web
• Various Variegated Threads
for appliqué
• Batting and Backing for the
quilt
• BERNINA Embroidery
Software V5
• Designer Accents Design
Collection from OESD
• Isacord Thread
-G
reens #5933 and #6141
for center design
-O
ther colors to coordinate
with appliqués fabrics
• #80 or #90 Topstitch Needle for
appliqué depending on Thread
• #50 Black cotton thread for
piecing and appliqué bobbin
• Bobbin Fill for Embroidery
Bobbin
• OESD Poly Mesh Stabilizer
• OESD 101 Spray Adhesive
I S S U E
Design Manipulation
25
New Design #2
One design from the OESD Designer
Accents Collection was used for all the
embroidery on the quilt. It was manipulated in the software to create three
different designs to fit various areas in
the appliqué pattern.
Open a new design, once again using
03-Art Nouveau 3. Ungroup the
design. Select portion of design
shown in magenta and delete.
New Design #1
Set the block aside while you go to
the computer to design the embroidery. Open Version 5 Software and in
Picture Mode, scan the center pattern
piece K (from the kit).
Return to
Design View
and select
the Open
Object tool.
Using a
series of
right clicks;
digitize the
lines of the
center pattern piece that are within the
hoop.
Go back to Picture View, select the
picture and delete; return to Design
View. Insert design 03-Art Nouveau 3
from the Designer Accents Collection.
With both designs selected, use the
Mirror-Merge Vertical tool to place a
mirrored design on the opposite end
of the pattern piece. Select entire
design; group. With design selected
go to sequence by color and click OK.
Save as “Center Design 1” and close.
Use the Mirror-Merge Vertical tool to
add a second image. Select All; use
the Mirror-Merge Horizontal tool to add
another design.
Ungroup the design. Select the flower
and a few dots on the end of the design; delete the selected portions.
Select remainder of the inserted design; right click on the design for the
Object Properties box. Select General
Tab. Change the size of the design to
width 2.17”, height 0.88”. Rotate 18
degrees. Select apply then OK. Move
the design to the right half of the lower
portion of the pattern piece.
With the design selected, choose
the Mirror-Merge Horizontal tool and
position a second image as shown.
5
t h r o u g h
the
n ee d l e
Turn the block 90 degrees and reposition in the hoop. Select “Center Design
1”. Stitch as before; repeat until all four
stems have a design at the end and
there is a design in the center of the
stem.
New Design #3
Select All, copy and paste. Rotate 90°.
Select one of the dots in the design
and copy and paste in the 4 places
where the design meets; top, bottom
and sides. You now have the design for
the very center of the block. Select and
group the entire design. Select Arrange
> Sequence by Color; click OK. Save
as “Block Center” and close.
Open the saved “Center Design 1”.
Insert design “Block Center”. With the
“Block Center” highlighted, select Object
Properties > General Tab and decrease
the size to 50%. Make sure the design
is centered within the digitized pattern
lines. Save as “Center Design 2”.
Back at the computer, open BERNINA
V5 Software. In Picture View, scan the
appliqué pattern piece D. In Design
View, digitize the entire pattern piece
D. Back in Picture View, delete the picture. Return to Design View and open
03-Art Nouveau 3 from the Designer
Accents Collection. Select the design
and ungroup.
Select
the
portion
of the
design
shown in
picture
and
move it
away from the original. Select the remaining portion of design and delete.
Select the portion of remaining design
Move into place under first design.
With the design still selected change
the thread color.
Select the portion of the design
shown. Copy and paste the design.
Drag the design over to the side.
With the design selected, use the
Mirror-Merge Horizontal tool to create
the other half of the design you will be
using. Select the entire design you
just created. Copy the design and
paste it three times. Place the three
copies in a stacked position above
the main design. Vertically mirror the
remaining design and position below
the main design. If desired, copy and
paste some of the dots and place
them as shown.
shown. Rotate 90° and move to the
right side of pattern piece. Use MirrorMerge Horizontal to place a design on
the left side of the flower.
Stitching Designs 1 and 2
Transfer the designs to the sewing machine. Center the appliquéd block in
the Large Oval Hoop. Select “Center
design 2”. Use the digitized pattern
line to help with placement. It may be
helpful to go to the sewing screen and
advance through color 1 so that you
can “tweak” the placement. You will
skip Color 1 when stitching; as it was
digitized only to help with placement.
When the design has finished sewing,
remove fabric from the hoop.
6
Select the remainder of the design,
right click for Object Properties >
General Tab. Rotate 118°. With the
design selected, choose Mirror-Merge
Horizontal to create a mirrored image.
Select entire design and group it.
Select Arrange > Sequence by Color
> OK. Save the design as “Petal
Design”.
Stitching Design 3
Transfer the design you just created
to the sewing machine. Center this
portion of the appliqué block in the
large oval hoop. Use the digitized
appliqué outline for exact placement
by advancing through the color and
periodically checking against the
outline of the appliqué. Do not stitch
this color.Use various thread colors
depending on the appliqué color.
t h r o u g h
the
n ee d l e
This simple vest becomes
spectacular when you
start with a colorful
fabric, add painted
accents, then a touch of
embroidery, and finish
with sparkling glitz.
By Susan Fears
8
I S S U E
25
Painting the Fabric
Follow the directions in Paintstiks on Fabric for applying paint.
Use the Grip-n-Grip sheet to keep the plate from shifting while
rubbing; spray 404 temporary adhesive on rubbing plate to
prevent fabric from shifting while painting. For a more even
application of paint with no streaking, color in one direction
rather than back and forth. Paint the pattern onto the fabric,
randomly mixing colors as desired. It is not necessary to let
one color dry before adding a second, although wiping off
the Paintstik may be necessary. Coloring on one plate with 2
colors OR using 2 different patterns with 2 different colors can
yield exciting combinations. Use scotch tape to remove any
paint “chunks” that fall onto the fabric; tape can also
Unpainted fabric
Painted fabric
be used to remove some paint strokes applied in error. Be
sure to let the paint dry and follow the recommended setting
instructions in the book.
Cutting the Fabric
Lay the fabric out in a single layer and lay pattern pieces
utilizing the best motifs. Note: The Peony and Poppy vest is an
asymmetrical pattern – be sure to read the pattern pieces –
some say “cut this side up.”
Supplies
• Shiva Paint Stiks in Iridescent Copper and
Iridescent Green
• Leaves Rubbing Plates by Canyon Creek
• 404 temporary adhesive
• Book: Paintstiks on Fabric by Shelly Stokes
• BERNINA Embroidery Software, Designer
Plus V5
• OESD Crafter’s Collection, Autumn Leaves
Embroidery Collection
• Edgestitch Foot #10/10C
• Button Sew-On Foot #18
• Isacord embroidery thread – colors used:
4033 & 2711
• Black bobbin thread, Mettler 60wt cotton
• Size 80 Organ needles
• OESD black MediumWeight Tear-Away
• 101 Quilt Basting Spray
• Mega Hoop
• Spray starch
• Fabric as desired (Rhapsodie Coloree for
Red Rooster Fabrics by Ricky Tims was
used for the sample shown)
•F
abric, notions
and thread as
directed by pattern
•A
ppliqué press
sheet
• EZGlitzer
• EZ Glitz
crystals, 3mm in
Jet AB,
Amethyst, Metallic Blue
• Optional, but
you’ll wish you
had them: Glitzer
stand and Glitz
tweezers
•P
attern: “Peony
and Poppy Vest”
by the Sewing
Workshop
9
th r o u g h
th e
n ee d l e
Creating the Embroidery
On the front facing pattern
piece, draw in the 5/8” seam
allowance and scan into
the Bernina Embroidery
Designer Plus software.
Use the Open Object tool to
trace the cutting line, seam
line and approximate roll
line where the facing will
drape at center front.
Using the Mega Hoop, hoop a single layer of black MediumWeight Tear-Away stabilizer. Stitch the placement line (the
cutting line) and remove the hoop from machine, but do not
remove fabric from hoop.
Use a light application of starch on the fabric prior to embroidery. Spray the stabilizer with temporary adhesive and lay the
fabric on the placement line. Reattach hoop to the machine
and stitch the basting line for the seam allowance – this will
further anchor the fabric to the stabilizer.
Stitch the designs.
These designs are
intended to be appliqués, however, they
can be stitched as
they are for finished
designs with more
of an outline quality. The 2 designs
were stitched with
the same 2 colors
with a different color
emphasis for each
design (one design
is predominately teal
with purple accents,
while the second
design is reversed).
Create a color stop between the cutting line and
the drawn seam allowance
line. Change the stitch
length to a 5mm basting
stitch for the seam allowance line.
From the Autumn Leaves design collection, insert designs
#905 and #913.
Scale down and rotate the designs, placing them close to the
seam line in a pleasing arrangement.
Delete the roll line. Be sure to delete the scanned image before saving and sending to the machine.
Embroidering the Design
Note: The embroidery is on the right front facing of the
vest and it is visible as the facing flips back when worn.
Adding Glitz
Select crystals that coordinate with the fabric, paint stick
designs and embroidery, and apply. Put an appliqué press
sheet underneath the fabric to be glitzed to prevent the glue
from bleeding through to the back and affixing the fabric to
your table surface. By using the appliqué press sheet, should
a heated crystal fall off the wand, it can easily be removed
from the press sheet, while it would be permanent on another
surface.
Assemble the vest according to the pattern directions. Use
Edgestitch Foot #10/10C for understitching and to close the
sides vents, eliminating all handwork. Use Button Sew-On Foot
#18 to attach the button and use a piece of the black tearaway stabilizer to support the buttonhole as it is sewn.
10
I S S U E
The
25
Bag
By Erika Mulvenna
What makes this simple tote bag so spectacular? First, the embroidery
– one large design made by arranging and combining several smaller
designs covers the entire surface of the front and is stitched again on
the back. And secondly, the bag is reversible with another great design
on the inside! The large 12” x 12” designs are created by arranging
several motifs into a “square” using the BERNINA Embroidery Software
and is easily stitched in one hooping using the Happy Voyager 12-needle
embroidery machine.
Happy Embroidery
Embroidery: Using the general guidelines on the following pages, create a combined
design of your choice using digitized motifs from your favorite collections. Save it on a
memory card and load it into the Happy Voyager machine or use a USB cable and the
Happy Link software that comes with the machine.
Layer one piece of PolyMesh Cut-Away and one piece of HeavyWeight Tear-Away stabilizer with the fabric to be hooped;use temporary spray adhesive to bond the layers together.
Hoop the layers, centering the design about 7½” from each end of the fabric. Embroider
the complete design on each end of the fabric. Note: Using the Happy machine, this design requires one hooping and about 3 hours of stitching time. It is possible to stitch using
other embroidery machines but will require multiple hoopings and more time.
Supplies:
• BERNINA Embroidery
software
• Happy embroidery machine
with large 12” x 12” hoop
• Heavyweight denim, twill, or
canvas, 2 piece 16” wide by
26 “ long each
• 2 pieces of the same fabric,
24” x 2” each for straps
• OESD PolyMesh Cut-Away
stabilizer
• OESD HeavyWeight
Tear-Away stabilizer
• 101 Quilt Basting Spray
• Assorted colors of Isacord
thread as desired for the
embroidery designs
• Thread for tote construction
Embroider the second piece of fabric being used for the lining.
11
Bag Construction
Body of the Bag: Cut the finished, embroidered pieces for the bag to 13” wide and 25 “ long,
making sure that the designs are centered at each end with about 2” extending at the top above
the design and 3” between the designs at the bottom.
Fold the bag in half, right sides together, with one design on each side and the fold at the bottom.
Sew side seams for front and back, using ½” seam allowances; press open.
Create the base of the bag by stitching “dog ears” at the corners: fold the corners into triangles
and stitch across them, about 2” down from the points. Trim about ¼” from the stitching lines,
cutting of the points.
Repeat the previous steps for the second piece of fabric.
Handles: Sew the 24” x 2” pieces together using a ½” seam allowance; turn to the right side
and topstitch along the edges using Edgestitch Foot #10/10C, adjusting the needle position
as needed. Baste the handles to one side of bag with about ½” of each end extending past the
raw edge of the bag.
Completing the Bag: Place one bag inside the other, right sides together, and stitch around the
opening with a ½” seam allowance, leaving one edge open between the handles for turning. The
handles will be secured in the seam.
Turn the bag to the right side and press. Topstitch along the edge of the bag, turning the edges
of the opening inward and stitching them closed.
Creating the Design
The 12” x 12” design stitched on the Happy bag is actually a collection of individual designs
arranged in a “square” format. The directions below offer general guidelines and a visual map for
creating your own design. Experiment and test as you arrange your selected designs. Resize and
rearrange as needed to get the combination and arrangement you desire.
General Guidelines
Open the BERNINA Embroidery Software V5; open the desired design (start near in or near the
center and build out to the edges).
Build the “corner” arrangement of
the design first, then mirror-merge
it to get four units. See Steps #1-6
below.
Next, add motifs at the top and
bottom and along the sides. See
Steps #7-13 below.
Finish with the motif in the center.
See Step #14 below.
12
Step 1
Step 7
Step 2
Step 8
Step 11
Step 12
Step 3
Step 9
Step 13
Step 4
Step 10
Step 14
Step 15
Step 5
Step 6
13
th r o u g h
th e
needl e
Stable Stitches
By Dawn Andrew
One of the most important keys to creating professionallooking embroidery is choosing the correct stabilizer.
A common question among most embroiderers is,
“How do I choose the right stabilizer?” but that is
only one of many questions that
can be asked about stabilizer. So
let’s have a conversation with an
OESD Educator to find the
answers that will yield the best
embroidery results.
The Rule of Three
Keep these three facts in mind for all of your embroidery projects:
1. You Need Stabilizer: The hoop holds the fabric and the stabilizer keeps the fabric from
moving, puckering, or stretching while it is being stitched. It is impossible to stitch
beautiful embroidery without stabilization.
2. Follow These General Guidelines: Use Cut-Away on knits, Tear-Away on wovens, and Wash-Away when you don’t want any
stabilizer left in the design.
3. Hoop Whenever Possible: Adhere the stabilizer to the fabric using 101 Quilt Basting Spray and hoop the layers, making them
smooth, but not stretched, in the hoop.
14
I S S UE
25
What is stabilizer?
OESD Educator: Stabilizer is a backing or topping that prevents puckering and stretching of the fabric during, and in the case of cutaway, after, embroidery. Some of you know from experience what happens when you don’t use a stabilizer. It can make a big mess,
resulting in puckering, loose stitches, and less than beautiful designs!
How do I choose the right stabilizer?
OESD Educator: There are many variables to consider when assessing which stabilizer is right for the project. Remember to always
do a test “sew-out” to help you make your final choice. Before you get to the testing point, start with two questions:
1. What
design have I chosen?
The design tells the weight of fabric it can be stitched on. For instance, if it is a design that has simple outlines and few stitches, use
a lightweight fabric. If the design has many stitches, use a mid- to heavyweight fabric.
2. What
type of fabric will I be using?
The fabric type will tell you to choose a cut-away, tear-away or wash-away type of stabilizer. A Cut-Away stabilizer is the most
versatile; stretch fabrics such as knits, sweaters, sweatshirts, Lycra, fleece, denim, and fabrics that are loosely woven should
always be stabilized with a cut-away because the stitches need to be stable during washing and wearing. You can also use a cut away on woven fabrics with designs that have lots
of stitches. A Tear-Away stabilizer is best for non-stretch fabrics such as quilting cottons,
poly/cotton fabrics, canvas, towels, vinyl and leather. A Wash-Away stabilizer washes
completely from the fabric, and can be used for cutwork, stand-alone lace and reverse
appliqué. Once you have determined the type of stabilizer to use, you can select one or
two within that category to test.
What if I test a couple of different stabilizers and
it still doesn’t look right?
OESD Educator:
Then you consider the question, “How many stitches does the design have?” If
it has many stitches and you have used only one layer of stabilizer, then it will
probably still pucker. Test with two layers of each of the stabilizers to narrow it
down. Also, be sure that the fabric and stabilizer are hooped together, and that the
stabilizer is adhered to the fabric with temporary spray adhesive. If using more than
one layer of stabilizer, adhere the layers together with the temporary spray adhesive.
That produces a good foundation, which then produces a successful project.
I stitched my design on a t-shirt using a
cut-away stabilizer. Why is it stiff ?
OESD Educator: This is another common question. If Heavyweight
Cut-Away stabilizer was used, it will cause the shirt to be
too stiff. It is for heavier fabrics or for items that
need to be stiff, such as inside pages of a fabric
book. The better choice for a t-shirt and for any
baby and children’s knit items is PolyMesh CutAway. It has an extra-soft feel, which doesn’t irritate
the skin, and still has plenty of strength to keep the
embroidery stitches looking good after lots of
washing and wearing. PolyMesh can be used in
multiple layers to hold higher stitch count embroideries. Another great choice is Fusible PolyMesh
Cut-Away, which can be pressed onto the wrong side
of the fabric with a medium warm iron, eliminating the
use of temporary spray adhesive.
15
I heard that I could use tear-away stabilizer for paper piecing, is that true?
OESD Educator: Yes, LightWeight Tear-Away can be used for paper piecing. Just cut the sheets to be paper size (8½” x 11”) and
place one at a time in the printer to print the piecing pattern. The Ultra Clean and Tear is a medium weight tear-away and can also be
used for paper piecing. Do a paper piecing test with each of the stabilizers before choosing which one to use.
Help! I stitched a monogram on a towel and the loops of the towel are
poking through the embroidery. How can I keep that from happening?
OESD Educator: Use AquaFilm Topping on top of the towel. AquaFilm Topping is a lightweight wash-away to be used on top of
napped fabrics such as corduroy, velvet, fleece, polar fleece, knits, towels, terry cloth, velour items, etc. Place it over the area to be
embroidered. After stitching, remove the stabilizer gently by holding the stitched area and tearing most of the topping away. The remainder can be washed, sprayed, or dabbed away with a towel or cotton swab. A damp towel can also be placed over the top of the
remainder of the stabilizer to gently steam it away.
What is the difference in BadgeMaster and AquaMesh, and which is the best?
OESD Educator: These are both wash-away products, but there are a few differences between BadgeMaster and AquaMesh. BadgeMaster is a starch-based product that will leave some stiffness behind after being rinsed out. In most cases, the stabilizer can be torn
away when the embroidery is complete, then any excess can be dissolved. AquaMesh will
rinse away (after excess stabilizer is trimmed), leaving no stiffness to the embroidery. Based
on the differences, it is not a matter of which is the best, but rather of which you prefer. For
example, if you prefer stiffer lace, use BadgeMaster; if you want softer lace, use AquaMesh.
What do I use if I am stitching on a garment that is
difficult to hoop?
OESD Educator: There are several specialty stabilizers that can be used. The specialties fit into the same three groups that I have already mentioned: Cut-Away, Tear-Away &
Wash-Away.
Available in both cut-away and tear-away versions, Hydro-Stick is a stabilizer with
starch-based glue on one side (the shiny side) that is water activated. Hoop the stabilizer with the shiny side up in the hoop. Lightly dampen a sponge or use a sponge
applicator and wipe the shiny side of the stabilizer. This activates the glue so the
fabric will adhere to the stabilizer. To remove the Hydro-Stick, dampen the edge
of the fabric with the sponge and wait 30 seconds, and then separate the stabilizer from the fabric. Continue until the fabric is completely released. Hydro-Stick
is great for collar points, socks, gloves, towels, caps, jeans, and bags with zippers.
Items using Hydro-Stick will be stiff until laundered. Once laundered, the starch
washes away and the item will soften making it great for t-shirts and sweaters.
Stabil-Stick, a paper-backed adhesive stabilizer, is also available in cut-away and
tear-away versions and is perfect for designs that require multiple hoopings. Hoop
the Stabil-Stick with the paper side up and use an Embroiderer’s Wand to score the
paper. Remove the paper to expose the adhesive and adhere the item to
the area.
AquaMesh Plus is a wash-away paper-backed
adhesive and works like Stabil-Stick. Hoop the
stabilizer with the paper side up and use the
Embroiderer’s Wand to score the paper. Remove
the paper to expose the adhesive and adhere
the item to the area. AquaMesh Plus washes away
with water and is wonderful for sheer, slippery
fabrics like chiffon.
Specialty Stabilizers Tip: Use a titanium needle;
it helps in cutting down the gumming up of the
needles.
16
I S S UE
25
OESD Stabilizers At-A-Glance
Cut-Away
• HeavyWeight Cut-Away – Good for most fabrics, this versatile stabilizer is especially good for sweatshirts, polar fleece and knit
fabrics. Also works well with dense designs on any fabric.
• X-tra HeavyWeight Cut-Away – Same as above; can be used when more stabilization is needed. Use one layer of X-tra
HeavyWeight instead of two layers of HeavyWeight.
• PolyMesh Cut-Away – This extra-soft stabilizer doesn’t irritate the skin and can be used on almost anything. Available in white,
beige, black, the beige is good for use with light-colored fabric to avoid shadows from the trimmed stabilizer.
Tear-Away
• Fusible PolyMesh Cut-Away – same as above but can be fused to the fabric to prevent stretching. This stabilizer remains on
the fabric to support the embroidery during washing and wearing.
• LightWeight Tear-Away – Use with lightweight fabrics such as quilting cottons and linen. Use more layers for dense designs or
where more stabilization is needed.
• MediumWeight Tear-Away – Only available in black for darker fabrics to prevent the stabilizer from showing through to the right
side of the fabric.
• Ultra Clean and Tear – This medium weight stabilizer is perfect for cotton quilting fabrics, and can also be printed for use in
foundation piecing. Easily tears away, remains soft and disintegrates with washing.
Wash-Away
• AquaFilm Topping – Used on top of fabrics with a nap or pile, such as terry cloth, velour, or velvet to keep the thread from
sinking into the fabric. Placed on top of fabric; does not need to be hooped.
• AquaFilm Backing – Used to stabilize fine fabrics such as batiste and projects where all traces of stabilizer need to be removed.
Several layers can be used for stitching stand-alone items such as lace.
• BadgeMaster – Three times the weight of AquaFilm, this stabilizer is good for stand-alone laces and for projects where all
stabilizer needs to be removed. Can be only partially rinsed for a stiff effect.
• AquaMesh – Can be used for many of the same applications as BadgeMaster, but rinses away easier and faster. Good for any
project in which only the thread should remain.
Specialty Stabilizers
• AquaMesh Plus – Same as AquaMesh but backed with a pressure-sensitive adhesive. Use it for items that cannot be hooped,
such as collars and cuffs; also good for sheer, slippery fabrics such as chiffon.
• Stabil-Stik Cut-Away – This cut-away stabilizer with a pressure-sensitive backing is good for large designs that require multiple
hoopings; also good for knits that can’t be hooped.
• Stabil-Stik Tear-Away – This tear-away stabilizer with a pressure-sensitive backing is good to use with stable fabric items that
cannot be hooped such as towels, bags, collars, cuffs, etc.
• Hydro-Stick Cut-Away – For knits such as t-shirts, sweatshirts, and golf shirts, the glue on this medium weight stabilizer is
repositionable as long as it is wet. Good for items that can’t be hooped
• Hydro-Stick Tear-Away (1.8 oz.) – For use with lightweight wovens such as quilting cottons and linen.
• Hydro-Stick Tear-Away (2.5oz.) – Great when extra stiffness is desired; perfect for patches, purses, heavy towels, caps, and hats.
17
th r o u g h
th e
needl e
By Debbi Lashbrook
See what happens when you combine
My Label software with the multi
feature of Version 5 BERNINA®
Embroidery Software. Create a
custom-embroidered one-of-a-kind
T-shirt that adds style and panache
to your wardrobe.
Creating the Design
Scan the neckline of the printed pattern piece from My Label software and save it as a BMP file. Open the BERNINA® Embroidery Software, then click on the Picture View tab and select the Load Picture tool. For ease in designing the embroidery, you may wish to rotate the
scanned image by selecting the object, opening Object Properties, selecting the General tab, and rotating 90°.
Select the Open Object tool and digitize a placement line along the cutting line of the neck
pattern piece. Place the line along only the center portion of the neckline curve to mark a
guideline for placing the design on the edge of the T-shirt.
Supplies
• Printed T-shirt pattern from
Insert design Jubilee 02 by selecting File/Insert Design. Rotate the design by clicking on the
My Label 3D Fashion
Rotate tool two times. Zoom in on the design and align the center of the design with the cenPattern Software
ter of the T-shirt neckline and a short distance from the edge of the stitching line of the neck.
• BERNINA® Embroidery
Software V5 - Designer Plus
Select Arrange > Pattern Stamp,
level
then select the Monogram Orna• Stretch knit yardage for
ment Symbol Set and choose
T-shirt
M004b. Place four pattern
• OESD Stabil-Stick Cut-Away
stamps as desired. Select the
stabilizer
stamps and use the Mirror Image
and Rotate tools to place the
• OESD PolyMesh stabilizer
stamps in position. After placing
• Isacord embroidery thread
the pattern stamps, change the
• EZ Glitzer™
color of the stamps to match that
• EZ Glitz™ crystals
of the Jubilee design.
18
I S S UE
25
elect a different color and digitize a placement line along the neckline
S
of the upper right front. Make sure you leave a small opening between
the two placement lines so that splitting the design will be easier. Insert
Jubilee 05. Decrease the size to 90% by opening Object Properties and
decreasing both the width and the length of the design. Add two more
pattern stamps to this part of the design and place them as desired.
Select these two pattern stamps and Jubilee 05 and combine them into
a single design using the Group tool. Select Mirror-Merge Horizontal tool
and place along the upper left front by clicking on the screen when the
design is in position. Save the design.
Switch to Multi
Hooping View.
Select the hoop
and rotate it
horizontally.
Add two more hoops and move the hoops so that the three neckline placement
lines fit separately in the three large oval hoops. Switch back to Design View and
save the design, selecting Export one file for every hooping when prompted,
then clicking on the Save All button. Note that you may need to use the Reshape
Object tool to separate the placement lines if you have difficulty in placing the hoops.
Stitching the Design
Place a layer of PolyMesh stabilizer behind Stabil-Stik Cut-Away in the embroidery hoop. The
PolyMesh is used next to the skin because of its softness. Remove the paper covering of the
Stabil-Stik and insert a 75/11 Ballpoint Organ Embroidery needle into the machine. Select
the center design and stitch the placement line (color 1).
Remove the hoop and smooth the neckline
of the T-shirt into position on the stabilizer as
shown. Return the hoop and finish stitching
the design. Next, remove the hoop from the
machine and carefully trim around the stabilizer, being careful not to remove the stitched
registration marks from the stabilizer.
Place another stabilizer set in the hoop
following the instructions above and select
design 2. Stitch the placement line and
registration marks on the stabilizer. Align the
T-shirt registration marks with those on the
stabilizer using straight pins through the back
of the stabilizer. Remove the pins and stitch
the remainder of the design.
Place the third set of stabilizer in the hoop
and select design 3. Stitch the placement line
and the registration marks on the stabilizer.
Align the stitched T-shirt as outlined above
and stitch the final design.
Complete the construction of the T-shirt following the pattern directions in the My Label
and embellish with EZ Glitz™!
19
Going Round
and Round!
th r o u g h
th e
needl e
By Jennifer Gigas
Simple needle-punched shapes
sprinkled with embroidered
elements add impact to an otherwise non-descript garment. Utilizing
BERNINA® Embroidery Software
to create the composition – from
needle punch placement lines to
embroidered details – provides the
opportunity to assess and perfect
the plan before you take a single
stitch. Instructions for stitching the
design are included in this article.
Visit www.berninausa.com for the
design files and instructions on
creating the files.
Needle felting or needle punch is a technique traditionally done by
hand, in which wool fibers are embedded into a wool base. The fibers
are “punched” into the base fabric with a set of barbed needles
mounted into a handle. The fibers are often formed into simple shapes
such as flower petals, leaves or geometric elements. The advent of
machine needle punch accessories opens opportunities for
experimenting with non-traditional fibers and completing projects
in a fraction of the time needed for hand-punched projects. Speed
project completion even further by adding needle-punched elements
to ready-made items.
20
I S S UE
25
Step 1:
Fuse Armo-Weft to the wrong side of the fabric, behind the area to be embellished. Print Felted Appliqué 1.art design template. Use
the paper template to determine the positioning of the design on the ready-made item. Chalk-mark the center point on the fabric.
Step 2:
Spray Ultra Clean and Tear with HR5, adhere to the wrong side of the fabric. Place a layer of AquaFilm Topping on top of the fabric;
hoop the project.
Step 3:
Stitch Felted Appliqué Design 1 .art.
• Color 1–large circle placement
• Color 2–ring placement and accent stitches
• Color 3–small accent circle placement
• Color 4–embroidered elements
The placement lines mark the position of the needlepunched appliqués. The color changes for groups of
placement lines serve as a reminder where like colors of
wool are used for the appliqué shapes.
Remove the project from the hoop; remove excess
stabilizer.
Step 4
Trace appliqué shapes from printed design template
onto tear-away stabilizer; use as patterns to cut shapes
from wool.
Attach the Needle Punch Accessory Set to the machine.
Tip: Shapes should be appliquéd in the same order the placement lines were sewn:
large circles, rings, small circles.
Position wool shape on the project; punch slowly in the center of the shape out
toward the edges; punch across the surface
of the appliqué. Repeat for each appliqué.
Once all the shapes are in place, punch from
the wrong side of the base fabric and once
again from the front to fully imbed the wool.
Step 5
Print Felted Appliqué 2.art design template.Use the template to
determine the positioning of the design on the ready-made item.
Mark the center point on the fabric. Adhere a layer of AquaMesh
Plus to the wrong side of the fabric. Place a layer of AquaFilm
Topping on top of the fabric; hoop the project. Embroider. Remove
the project from the hoop. Rinse to remove the stabilizer. Press well
from the wrong side once the fabric is completely dry.
Supply List
• Embroidery compatible sewing
machine
• Felted Appliqué.art design files 1
and 2 (available for FREE download from www.berninausa.com)
• Weeks Dye Works Hand Dyed
Wool – small amounts of three
coordinating colors
• Isacord Embroidery thread
• OESD Stabilizers:
- Ultra Clean and Tear
- OESD AquaMesh Plus
- AquaFilm Topping
•1
01 Quilt Basting Spray
• Organ Needles for embroidery
(size appropriate for project fabric)
• Needle Punch Accessory Set
Note: The Needle Punch Accessory Set is for use with selected
CB hook machines only.
• HTC Armo Weft fusible interfacing
• Ready-made item for embellishing
21
Something Fishy
by Gail Garber
Supplies
• 1 yard background
fabric
• 1 yard wavy stripe for
inner border and bias
binding
• ¾ yard total assorted
bright tones for fish
• 2 /3 yard backing
•3
2” x 26” batting
•1
01 Quilt Basting
Spray
22
This colorful little wallhanging is fun to make with bright fabrics, paper piecing
techniques and simple free-motion quilting. Finished size: 30” x 24”
Cutting
Cut outer borders first (see right) and set aside. Tip: When using directional fabric, be sure to note
which direction the pattern follows before cutting. For instance, I used a watery background print
for my quilt. Therefore, on the upper and lower borders, I aligned the water flow with the long part
of the strip. On the side borders, the water flows across them, or horizontally across the pattern. In
this pattern all upper/lower strips have a lengthwise flow and all side strips have a horizontal flow.
Likewise, all triangles are also directional. The cutting instructions below provide enough triangles to
place so that they are also directional in the finished quilt. However, it is necessary to check placement before stitching each background triangle.
Background fabric
• Cut two strips 2” x 24½” for upper and lower outer borders
• Cut four strips 2” x 18½” for the side borders
• Cut four strips 2” x 9½” for upper and lower fishy blocks
• Cut four strips 2” x 9½” for side fishy blocks
• Cut 2 strips 3½” x 9½” for upper and lower fishy blocks.
• Cut four 2” squares for upper and lower corners
• Cut twelve 5” squares. Cut on the diagonal to use in the
background of the fishy blocks.
• Cut four 7” x 2” strips for fishy tail inset
Wavy Stripe
• Cut two strips 2” x 30½” for upper and lower inner border
• Cut two strips 2” x 18½” for side inner border
• Cut four 2” squares for upper and lower outer border
• Cut a bias strip 2¼” x 115” for binding
For each Fishy Body
Note: Use different fabrics for each fishy. You will need four
sets.
• One square 3” x 3” (Piece #1)
• One rectangle 1½” x 3” (Piece #2)
• One rectangle 2” x 3½” (Piece #3)
• Four rectangles 1½” x 4” (Pieces #4-7)
• One rectangle 2½” x 4” (Piece #8)
• One rectangle 2½” x 5½” (Piece #9)
• Cut two upper fins
• Cut two lower fins
• Use the background triangles already cut
For each Fishy Tail
• Four rectangles 2” x 5½” (pieces #2-5)
• Use the background triangles already cut
• Use the tail inset already cut
Making the Fishy Blocks
Stitch the upper and lower fins with right sides together using a
¼” seam allowance. Leave
the straight end unstitched.
Turn fins right side out; press
and edgestitch along the
seamed edges. Set these
aside.
6½” x 6½”
Stitch the tail blocks to the body blocks for four complete fish.
Fold the fishy fins in place, but do not tack them down until the
blocks have been stitched together (the top fin extends above
the top of the block).
After piecing is complete, add the eye and mouth to each fish.
I used black polka dot (½”) on white fabric for my fishy eyeballs; I cut a white border around the dot and hand appliquéd
it to the fish as indicated on the pattern. I also hand embroidered around each eye, using one strand of black embroidery
floss and the outline stitch. Add eyebrows, eyelashes, and a
big smile, too.
Quilt
Assembly
Something
Fishy
30" x 24"
Piece four body blocks and
four tail blocks using the
paper piecing technique
described on the following
page or your favorite technique. When piecing the
Fishy body, insert the upper
and lower fin pieces before
stitching the final background triangles in place.
Trim the finished blocks as
shown in the photos.
3½” x 6½”
Designed by Gail Garber
23
The fishies are offset in this quilt so they are not aligned.
Thus, the background rectangles are not the same sizes on
every block. Refer to the assembly chart for the placement
of the background rectangles. Once these are stitched to the
fishy blocks, the size will be 10½” x 9½”. Note: Carefully pin
the upper fins out of the way when stitching the background
rectangles.
Stitch the four fishy blocks together. Stitch the three side borders together and add them to the sides of the center. Stitch
the upper and lower inner borders (wavy stripe) to the center.
For the outermost upper and lower borders, stitch a 2” square
of stripe to each end of the 24½” rectangle. Add the remaining
2” squares of background fabric to the outermost edge. Stitch
the upper and lower borders in place.
Make a sandwich of the
pieced top, the batting,
and backing, bonding them
together with quilt basting
spray.
Upper Fin
Free-motion quilt the layers
– moving side toCut
side –8
creating large wavy shapes
resembling water. Note: The
BERNINA Stitch Regulator helps you create even, consistent
stitches even if you have never free-motion stitched before.
Learn quickly without hours of practice!
Bind the edges of the quilt using the binding method of your
choice.
Gail Garber
Paper Piecing
Almost any straight stitch or allpurpose foot will work for paper
piecing, but the best choice is Clear
Foot #34/34C. The markings on the
foot and the visibility the clear sole
offers makes it easier to see the pattern lines as you stitch.
6
Photocopy or trace the pattern on the following page
onto OESD Ultra Clean and Tear stabilizer.
Place the printed pattern face down.
Position and pin a roughly cut piece of fabric over section
#1, right side up. Note: You will place fabric on the unprinted side and stitch from the printed side of the stabilizer.
Position a piece of fabric over section #2, right side down.
Turn the paper over and stitch on the line between sections 1 and 2. Trim seam allowances to 1/4”. Turn back to
the fabric side and finger press the fabric to the right side.
Continue this process in numerical order until all sections
are covered and the block is created. Trim seam allowances to 1/4”. Carefully tear the stabilizer away from the
back of the block.
3
5
1
2
4
Free-motion Quilting
7
Fishy Tail
24
I S S U E
25
Something fisht pattern
Upper Fin
Lower Fin Cut 8
Upper Fin
Cut 8
Lower Fin
Lower Fin
Cut 8
Cut 8
Cut 8
Something Fishy Block Pattern
Something Fishy Block
Something Fishy Block Pattern
3
3
5
1
1
5
w
Lo
4
t
en
em
ac
Pl
t
in
in
rF
pe
pe
Up
6
2
w
Lo
2
4
6
4
6
in
F
er
Pl
ac
Pl
11
12
12 Body
Fishy
t
en
in
em
t
F
er
ac
w
en
em
Lo
ac
Pl
8
t
en
em
Fishy Tail
Fishy Tail
7
3
1
8
in
F
er
12 7
4
5 7
3
1
2
2
5 7
3
1
2
4
9
rF
5 7
9
Up
Pl
ac
Up
em
pe
en
en
em
in
Pl
ac
9 13
rF
6
10
13
6
t
13
Fishy B
25
Embroidery
th r o u g h
th e
n ee d l e
By Elva Mungai
Supply List
• Embroidery Needles 75/11
• Wing Needle 100/16 or 120/19
• Twin Needles size 2.0-4.0/80
• Top Stitch Needle 100/16 or 110/18 sizes
• Triple Needle 3.0/80
• Darning Foot #9, Embroidery Foot #15, Freehand Embroidery Foot #24,
and/or Freehand Quilting Foot #29 (see sidebar on next page)
• Natural Fabrics, such as handkerchief linen, 100% cotton batiste or
organdy
• Embroidery Threads in desired colors
• OESD AquaMeshPlus, AquaMesh, or other water-soluble stabilizer
• Shirt Pattern for the tailored shirt from My Label 3D Fashion Pattern
Software, or such other patterns for a tailored shirt or a baby dress that
would be appropriate for the use of these designs
• Designer Plus V5 BERNINA Embroidery Software
Tip: If working with a
BERNINA model equipped
with a Security Program,
engage it to keep the
needle from swinging too
wide and hitting the presser
foot, possibly causing
needle breakage.
26
Creating special effects with machine embroidery is
as easy as changing the needle in your machine! Using
specialty needles such as double needles, wing needles,
and triple needles can add texture, dimension, color
variation, and depth to a “plain Jane” embroidery design.
general information
When using specialty needles, care must be taken to be sure that
the needles clear both the embroidery foot and the stitch plate.
For Double needles up to 4.0 mm or Wing, Topstitch and Triple
needles, the 5mm stitch plate will work well, but for a 6mm double
needle, use a 9mm stitch plate.
The embroidery presser foot must also be selected carefully so
that the needles will clear the foot when stitching. Darning Foot
#9, Freehand Embroidery Foot #24, Embroidery Foot #15, or
Freehand Quilting Foot #29 can be used for embroidery with these
specialty needles. When selecting the foot to use, check to be
sure the needle will clear the foot. Teardrop Embroidery Foot #26
does not have enough space for the larger needles to clear the
foot. Topstitch needles (size 100 or 110) will clear Foot #26.
Designs from the BERNINA Embroidery Software v5 can be edited
to allow for the use of a Wing, Double, or Topstitch needle. The satin
stitched lines of the Blue Swirls design used in the simple monogram for the blouse have been changed to a straight stitch outline
and then stitched with a Double needle to create a shadow effect.
The geometric design created with a straight stitch outline can be
stitched with a Wing needle or Topstitch needle after changing the
straight stitch to Pattern Outline stitch #701a, the Venetian hemstitch. This same stitch is used to apply lace for lace insertion work.
I S S U E
Double Needles
Double needles can be used to create a
shadow effect in an embroidery design;
bows and curved motifs lend themselves
to this type of design. The designs can be
digitized using a straight outline stitch or a
design can be edited so that it has a single
straight-stitch outline in it. When these
sections of the design are stitched using a
Double needle there will be two rows of parallel stitching connected on the underside
by just one bobbin thread. Using a darker
shade of thread in the bobbin and a lighter
shade of the same color in the needles will
create the effect of a shadow between the
two rows of stitching.
Wing Needles
A Wing needle or 100 or 110 Topstitch
needle will create a row of holes, entredeux
or replicate a fil tire’ when used with an appropriate stitch pattern. Only natural fabrics
will perform well using these techniques
because the threads of the fabric must be
displaced by the needle making several passes into the same space between
threads to create a hole. Stitches in Version
5 of the BERNINA Embroidery Software that
are especially nice to use with a Wing or
Topstitch needle are: #305 in the Crossstitch
folder; #711 and 724 in the Heirloom folder;
#10, blanket stitch.
Triple Needle Stitching
Triple
needles can
be used to
stitch a Pattern Outline
with three
different colors of thread
to give an
interesting dimensional effect. Pattern Run
Outlines in the Home Dec category, such as
stitch 402, are one example of stitches that
can be used for this technique.
A Triple needle, with each needle threaded
with a different color of thread, could be used
for the scalloped border with a Wing needle,
making the hemstitch on both sides of the
center design. This would be an appropriate
design to use of the cuff or collar of a shirt or
on center front of a baby dress as a substitute for Swiss embroidered trim.
Elva’s Elegant Monogram
Getting Started
• Click the New
icon or select
File > New
• Click the hoop
icon to turn on
the hoop. Right
click hoop icon
and select 255 x
145 oval hoop > OK
• Toggle on the grid. Right click on the grid
icon and select Snap to Grid > OK
• Select the Zoom Box tool. Right click to
zoom out so that you can see the entire
hoop.
Creating the Geometric Motif
• Select the Open Object tool, then click on
Outline > Pattern Run
• Open Object Properties > Outline Stitches
> Pattern Run; click Select
• Click the Drop Down arrow; select
NP005a for the category.
• Select 701a > OK > OK
• With the Open Object tool, draw a straight
line, starting at the top of the hoop, extending down for 9 grid squares; click.
• Continue to draw the line 2 squares to the
left; click.
• Move two squares up; click.
• Continue the line by moving 4 squares to
the right; click.
• Draw the line 5 squares down; click.
• Move 2 squares to the right; click.
• Continue the line with 2 squares up; click.
• Drag the line 3 squares to the left; click.
• Finish with a line 5 squares down; click.
Enter.
Naming and Saving the File
• Select File > Save As and select the folder
where you wish to save the file.
• Save the file as Heirloom 1; touch Esc.
Adding the Stitch Pattern
• Select the design.
25
• Right click and drag to clone a new design.
•C
lick Object Properties > Outline Stitch >
Pattern Run > Select.
•W
ith stitch pattern selected, navigate to the
Heirloom Category using the drop down
arrow. Select stitch 720. Apply.
•R
ight click and clone another copy of the
stitches.
• Select stitch 711 > Apply.
• Check the results of the new stitch.
• Close the file.
All of the stitches above can be used with a
Wing needle and embroidery. When stitching
the wing needle stitches, use a thread that
is close in color to the background fabric for
best visual results.
Creating the Swirled Vine
• Click the Open icon. Navigate to the folder
where the Heirloom1.art file is saved.
Open the file.
• Select File > Insert Design. Navigate to
the Ornaments folder in My Designs and
select Blue Swirls 2.art and open.
• With the Blue Swirls2.art design still
selected, right click twice on the Scale by
20% up/down icon to enlarge the design.
• Click on the Ungroup icon.
• From Color Film, select the lighter blue
color and delete the satin stitches.
• Using Color Film again, select the darker
blue swirls. Group.
• Move the darker blue swirls into position
overlapping the Heirloom1 stitches. These
stitches will be stitched using a 2.5mm or
3.0mm Double needle with a darker thread
in the bobbin to create a shadow effect.
• Save design as Heirloom2.art
• Add a one-letter monogram or a small
floral design of your choice to complete
the design.
Tip: For correct placement when stitching
the design, scan the pattern piece for the
left shirtfront or the left front of a purchased
shirt and use the Open Object tool to digitize a placement line.
Note: Specialty needles as discussed in
this article may be used with the aurora and
artista embroidery modules. They are not
intended to be used with the Bernette Deco
embroidery machines.
Presser Feet Choices
Most machine embroidery can be stitched using Teardrop Embroidery Foot #26 but when using specialty needles, other freemotion presser feet may be needed to accommodate the needles. Below are possible choices.
Darning
Foot #9
Embroidery
Foot #15
Freehand Embroidery
Foot #24
Freehand Quilting
Foot #29
27
I S S U E
Southwest Stitches Pillow
25
By Jill Danklefsen
Combine machine embroidered appliqués and a
decorative stitch recipe for a coordinated, custom look
that has Southwest appeal.
Embroidery Appliqué
1. Prepare base fabric for embroidery by fusing HTC Armo® Weft interfacing
2. Place one layer of OESD PolyMesh stabilizer on the back of the fabric
3. Place a second layer of stabilizer – Ultra Clean and Tear beneath the PolyMesh.
4. Hoop your fabric/stabilizer layers as one.
5. Load the design into your embroidery machine of choice.
6. F
ollow the step-by-step embroidery process as shown in the photos on the
following page. Note: The special thing about these designs is that the
appliqué process is part of the embroidery stitching, meaning
the fabric placement stitch as well as the tackdown stitch
are digitized as part of the design.
Appliqué Supplies:
• OESD Southwest Appliqués
Design Pack #12121 (Design
#FB094)
• 14½” x 14½” linen or linen/
cotton blend base fabric (fused
with HTC Armo® Weft fusible
interfacing, if desired) Note: The
interfacing adds more support for
the base fabric to hold embroidery and/or decorative stitches
• OESD PolyMesh Cut-Away
stabilizer
• OESD Ultra Clean and Tear
• Four fat quarters of coordinating fabrics; gilded Opulence by
Paula Nadelstern for Benartex
was used for appliqué background, borders, piping and
pillow backing
• Isacord thread in desired colors
– (#4122-aqua; #1172 beige;
#4250-lt. aqua; #0101 off-white
are shown )
• Machine Embroidery needle
Stitch Recipe Supplies:
• Open Embroidery Foot #20/20C
• Thread – choose the same or
coordinating Isacord thread
colors
• 80/12 Sharp needle
• OESD Lightweight Tear-Away –
cut into narrow strips – about 3”
wide to cover just the stitching
area
Pillow Supplies:
• Double Cord Foot
#60/60C
• 3/8”-1/2” wide cording
• Pillow form, 14” x 14”
29
th r o u g h
th e
n ee d l e
Step 2 – Lay fabric over stitched line
Step 1 – Stitch fabric placement line
Step 4 – Remove hoop from machine & trim appliqué fabric
Step 3 – Stitch the Tackdown stitches
Step 6 – Continue stitching . . .
Step 5 – Reattach hoop; continue stitching
Decorative Stitch Recipe
Decide where you would like the decorative stitch border to be, then
mark lines to indicate the placement. Note: I measured and marked
a line about 2” away from and parallel to each edge of the appliqué
motif. This was the placement line for the first row of stitching.
Step 7 – Complete applique stitching
30
To select a decorative stitch to coordinate with the motif, simply look
at the stitching within the design. The motif contained a satin stitch
triangle as well as a multi-motion straight stitch that resembled a
triple straight stitch. To make all of the elements blend, I selected
Triple Straight Stitch #6 and Home Decorating Stitch #406.
I S S U E
Note: The stitch numbers listed are artista numbers. If using
another current BERNINA machine, see the Stitch Conversion
Chart at www.berninausa.com > Sewing Studio > Basic Training > Stitch Conversion Chart.
Stitch Manipulation
The decorative stitches shown were stitched on a
machine that has a 9mm stitch width. To make Stitch
#406 look like the triangle satin stitch in the appliqué
motif, make the following adjustments:
25
Reduce the Motor Speed function to make it easier to control
the stitching when aligning it with
the triangle satin stitching.
Repeat stitching on all four sides
of the project, alternating thread
colors as desired.
Pillow Construction
Stitch Width – 5.0mm
Engaged Pattern Extend 2x - This stretched
the pattern to resemble the look in the
embroidery motif. Remember, Pattern Extend
doesn’t just make the pattern two times longer, it also
adds twice the number of stitches.
Machine Settings
If using a rotary hook machine, reduce the top tension to about
2.25; for an oscillating hook machine, thread the finger on the
bobbin case.
To make it easier to combine motifs, Engage
Right-Left Mirror Image for the first sewing pass.
The triangle motifs are sewn back-to-back using Open
Embroidery Foot #20C. This foot offers great visibility to
perfectly align the stitches!
Add a Border
Cut strips of cotton about 3”
wide. Piece the strips to all
four edges of the pillow front
using a basic straight stitch
and a ¼” seam allowance.
Piping
For piping with a heavier look than that created with Bulky Overlock Foot #12C, use Double Cord Foot #59/59C for 4mm-6mm
cords or Double Cord Foot #60/60C for 7mm-8mm cords.
No Corner “Make Your Life Easy” Piping
For an easy, unique corner treatment cut four pieces cording
and fabric strips, each one long enough for one edge.
Wrap the fabric around the cord and stitch next to the cord, using the selected foot and an adjusted needle position.
Before beginning to stitch, place a strip of lightweight tearaway stabilizer under the area to be stitched. Tip: You only
need to put stabilizer underneath the area being stitched. This
makes it easier to handle the fabric and to remove the stabilizer
when the stitching is complete.
Satin Stitching
Move the Needle Position all the way to the Left for the first row
of stitching. Begin by choosing one thread color – sew a row
of adjusted Stitch #406. Sew this color on all four sides of the
project.
Select a second thread color
– disengage Right-Left Mirror
Image and adjust the Needle
position so that the second row
of stitching will just meet at the
middle. Sew a second row of
stitching, being sure to “offset”
the stitch patterns by beginning
to sew at the middle of the first
row of stitching as shown in the
photo.
Apply the piping
pieces to each edge,
simply overlapping
at the corners. Note:
Adjust the needle
position again so that
no previous rows of
stitching will show.
A unique corner effect is
created when the pillow is
turned right side out.
Finishing the Pillow
Cut two pieces of fabric,
14½” x 11”. To create an
overlapped opening for the
back of the pillow, fold 1”
twice along one 14½” edge
of each piece; use a straight
stitch to topstitch hem in
place.
Straight Stitching
Change to Patchwork Foot #37.
Overlap the hemmed edges until the total size of the back is
14½” x 14½” (the back should match the front of the pillow).
Select Triple Straight Stitch #6; adjust the stitch length to
2.5mm (this will make the stitching look similar to that of the
appliqué motif).
Place front and back right sides together; stitch along all four
edges. Turn to the right side, press, and insert the pillow form.
31
Eyes
Have
It!
The
by Susan Beck
Tote by Susan Beck
Certainly not a new sewing technique, embroidered eyelets have been
stitched into garments for hundreds of years. First stitched by hand,
eyelets have long been easy to make using the sewing machine. The Eyelet Embroidery Set is a sometimes forgotten BERNINA accessory. Discover it again – or
maybe for the first time – you’ll love the results.
When we think of eyelets, we often think of sweet
little girls’ dresses with embroidered eyelets and
other motifs scattered across soft batiste. But in
reality you can use eyelets anywhere you want
an interesting effect such as in the wool and
felt purse shown here. The variegated thread
brings the orange fabric of the main fabric into
the solid green tab, blending the two fabrics
for a coordinated look.The beautiful pillow uses
eyelets as a practical way to add a ribbon border
around the embroidered focal point of the pillow.
If you’ve never made eyelets using Eyelet Embroidery Set #82, you’ll be pleasantly surprised
that something so beautiful and complex
looking is so easy to make. It’s a free-motion
technique, stitched with the feed dog covered
but it is one of the easiest free-motion techniques you’ll ever stitch. Even if you’ve never tried
it, you’ll be successful the first time!
32
The Eyelet Set has multiple parts, but once you really look at it you’ll find that
most of those pieces are used to punch a hole in the fabric so you can satin stitch
around the raw edges. There is a series of fabric and leather punches and awls to
create different sizes of holes in different types of fabric and leather (yes, they’re
easy to do in leather, too.) The actual working parts of the attachment are a plate
to cover the feed dog and hold the post that the eyelet is worked around, six
posts in six different sizes (only one is used at a time), and Eyelet Foot #92, specially designed to fit around the post. Clear instructions are included with the set
but below is an overview of the process and a few tips for making great eyelets.
making eyelets
1. Attach Eyelet Set to machine according to the directions included with it.
2. Make a hole in the fabric.
3. P
lace hole on the post; stitch around it with a narrow zigzag to stabilize
the opening.
4. S titch a second time with a wider zigzag stitch to create an embroidered
opening.
Eyelet Tips
1. Always do a sample using your project fabric.
2. S elect a post that is smaller than you want the finished eyelet. Make the hole in the fabric fit the post. As
you stitch, the hole will open up and become wider. Different fabrics “give” different amounts so the size of
the initial hole will vary depending on your fabric choice. (This is the reason for Tip #1 – don’t ignore it.)
3. S tabilize the fabric with fusible interfacing, tear-away stabilizer, or by placing it in an embroidery hoop for
stitching. You can use any or all of these methods, depending on what works best with your fabric.
4. G
o around the eyelet 3 or 4 times if you
want a heavier look or if you moved
the fabric too quickly and did not
cover the fabric well. You’ll love the
look and no one will know you didn’t
get it on the first time!
5. F or a “puffy” look, loosen the top tension to 3 or 4. The satin stitching will
“puff up”, making the hole in the center
of the eyelet smaller.
For more
instruction on
making eyelets,
go to
www.berninausa.com >
Online Classes.
You'll find an
eyelet class in the
Sewing Classes and
also in the
Quarterly Accessory
Society.
Pillow by Nina McVeigh
6. F or a “finished” look, try this: After completing the satin stitching, select straight
stitch, adjust your needle position to the
left, and sew a line of straight stitching
just outside the satin stitching.
33
t h r o u g h
th e
needl e
Spontaneous
Combustion…
Fanning the Flame of Creativity
By elinor peace bailey
The Creative Process
If we define creativity as the gathering of disparate elements and reordering them, all of human life is connected to the creative process. The thing that separates those who show clear evidence of their creativity and those who don’t is passion. I pay attention to the
ideas that occur to me and act on these ideas because I have passion that is sufficient for me to
be willing to fail. Self-consciousness great enough to stop me from performing has ceased to exist.
Number one, I have observed that there are few people willing to change their concern for their
own affairs to an interest in mine and number two, I make a lot of stuff and close examination of
any single thing is impossible.
So it seems to me that if you wish to explore the creative process, you have to be willing to fail,
because it is obvious that very few will care when you do, as they are busy picking themselves
up off the floor. Simply make a mark, which will lead to another. Put two things together and
then add a third. Put yourself in community
with others who “just do it” and gain
enough skill to do what you think.
Forget about being original,
there are billions of people
on this earth and it’s just
not possible. Forget
about what someone else
will think since they usually
won’t think anything and, play
with children; they have no
fear at all!
Try this great exercise in creativity and see
how much fun it can be!
Using the guidelines below, create your
own flat dress using any fabrics, trims, and
techniques you want! Make it as simple or
elaborate you determine the size
and you decide the mood
or “flavor” of the dress.
A great way to start the
creative juices flowing, this
experiment should be fast,
fun, and easy!
Rules to Follow (or NOT):
1. Do not take more than an hour to complete your dress.
2. Don’t overthink this process; just do it!
3. Use this exercise to try new techniques, express a
unique side of you, or to show the world who you
really are.
Loose Directions
Cut the dress from Fast to Fuse, a heavyweight interfacing that is fusible on both sides (or use Timtex and spray
adhesive). I just winged it, but if you feel a bit uncertain
about that kind of scissorwork, just start with the pattern
shown, enlarging or reducing it as you please.
Fuse a base fabric on the front of the dress; this fabric sets
the mood. Then, play with trims such as buttons, beads,
ribbon, lace, and tulle. Layer and add to the dress as you wish,
making it as simple or as elaborate as you please.
Once you’ve concluded you have done enough, back the dress with a fabric
that echoes the spirit of the dress. Turn under the raw edges and stitch it in
place by hand or machine. Add a ribbon hanger if you think you might need it.
Stitch Ideas to Get You Going!
…gathering, ruching, pleats, pintucks, buttons, eyelets, Double needle
work, piecing, quilting, bobbinplay, appliqué, topstitching, decorative
stitching, bias binding, piping, ruffles, couching, tucks, edgestitching,
trapunto, shirring, silk ribbon embroidery, smocking, shadow work, Triple
needle stitching, Wing needle stitching, heirloom sewing, thread painting,
satin stitching, monogramming, needle punching, passementerie,
buttonholes, lace insertion, fagoting, cutwork, drawn thread work,
beading, chenille stitching, sewing in circles, machine embroidery,
ouclé stitching, crazypatch, bartacks…
If you’re having trouble getting started, use
this dress as a jumping off point. Make it
smaller, larger, longer, shorter, with sleeves,
sleeveless, strapless, button-down, fitted,
flowing…you get the idea; just sew!
www.berninausa.com
www.berninabsr.com
www.berninaUSAblog.com
www.berninaMyLabel.com
BERNINA Blog
Take a look at BERNINA’s newest adventure on the World Wide
Web – a BLOG! Join Jo and Erika as they blog about their favorite
obsession – sewing! They’ll connect you to some of the best products, useful techniques, and most
creative stitchers around. And they may even share a few BERNINA secrets along the way.
www.berninaUSAblog.com
New designs from EmbroideryOnline.com
Check out new stock designs available for download from OESD and Great Notions. Save money on these packs
and get Free Designs by joining the SPREE Club. Look for the link on the BERNINA home page or go directly to
www.embroideryonline.com.
BERNINA Videos
See BERNINA Today videos featuring machine techniques presented by BERNINA Educator Nina McVeigh. Go to www.berninausa.com
and select BERNINA Videos or go to www.thequiltshow.com. These thirteen topics are posted with more to come!
1. Machine Needle Punch
2. BERNINA activa – Machines to Grow With
3. Quilting with the Embroidery Module
4. Free Motion Couching
5. Using a Walking Foot
6. Going in Circles
7. Free Motion Machine Beading
8. Corded Pintucks
9. Bias Binding by Machine
10. Echo Quilting
11. Decorative Stitching
12. ¼” No-Pins Curves
13. BERNINA Stitch Regulator
Knit Know How – Embroidery
Are you intimidated to embroider on knit fabrics? In this online class BERNINA Educator Susan Fears steps you
through the process of creating a T-shirt with beautiful embroidery on it. Learn about stabilizing, hooping and
much more!
36