1
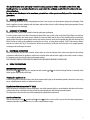
INSTRUCTIONS
ELECTRIC OIL FILLED RADIATOR
Proudly distributed by
De’Longhi Australia Pty Limited
De’Longhi New Zealand Limited
P.O. BOX 4540
25 Carbine Road
CASULA MALL NSW 2170
Mt Wellington
Customer Service Ph: 1800 126 659
Auckland, New Zealand
Fax: 1800 706932
P.O. Box 58-056 Botany
www.delonghi.co.au
MANUKAU 2163
e-mail: [email protected]
Customer Service Ph: 0508 200 300
Fax: 0508 200 301
www.delonghi.co.nz
e-mail:[email protected]
fig. 1
fig. 2
P
I
fig. 3
II
T
IHS
2
The Rapido heater is an extremely versatile heating appliance with 3 selectable power levels. The
Rapido also has one exclusive functions to ensure that the optimum comfort level is achieved in any
given situation.
In order to use this heater to its maximum potential we advise you to carefully read the instructions
given here.
1. GENERAL INSTRUCTIONS
Remove the appliance from its box and packaging and turn it over resting it on the protective polystyrene packaging. Check
that the appliance is intact, complete with the power cable and that it hasn't suffered damage during transportation. Do not
use the appliance if it is damaged.
2. ASSEMBLY OF THE BASE
Remove the castors, wheels and assemblies from the polystyrene packaging
Insert the castors into the pins of the feet and push them all the way in until a click can be heard (fig1) Make sure that they
are in tightly by pulling the wheels gently. Attach the castor assembly into the base of the control panel by inserting the
guiding ridges between the control panel and the first heating element; insert the two location lugs into their housings and
lock the castor assembly to the product by inserting the eye screws, screwing them in tightly. (fig1) Fit the two rear wheels
onto the rear wheel axle (fig 2). Check that the wheels can turn freely. Finally turn the heater over to its upright position,
ensuring you do not damage the wheels.
3. ELECTRICAL CONNECTION
Before inserting the plug into the electrical socket, make sure that the voltage of the socket corresponds to the voltage
requirement indicated on the appliance, and that the electrical socket and the mains supply to the socket is rated at 13amps.
It is important to ensure that the socket is adequately earthed.
THIS APPLIANCE COMPLIES WITH DIRECTIVE 2004/108/EEC ON RADIO INTERFERENCE SUPPRESSION.
4. USING THE FUNCTIONS
INSTANT HEATING SYSTEM
By pressing the I H S button (fig 3) in conjunction with switches l and ll, an exclusive heating function is activated which
warms up your room rapidly and silently.
Turning the appliance on
Insert the plug into the electrical socket; turn the thermostat until it stops at the maximum position; turn on the heater using
one or a combination of switches as indicated in the table.
Regulation of the thermostat “P” (fig3)
When the room has reached the desired temperature, turn the thermostat slowly in an anticlockwise direction until it arrives
at the position where a click can be heard (or until the warning light turns off) and not beyond this point.
The temperature selected in this way will be automatically regulated and maintained.
Anti-frost Function
With the thermostat in the position and the l and /or ll switches are pressed, this ensures that the room temperature is
maintained and does not fall below circa 5°C, whilst using minimum energy.
3
Depressed
Buttons
Activated
Functions
Modes of
Functioning
Press the I button for normal heating
at minimum power
In this mode, it is possible to activate the Anti-Frost
function.
Press the II button for normal heating at medium power
In this mode, it is possible to activate the Anti-Frost
function.
Press both the I and II buttons for
normal heating at the maximum
power available without the instant
heat system
In this mode, it is possible to activate the Anti-Frost
function.
Press the I, II and Instant Heating
System IHS buttons for Rapid heating
at maximum power.
In this mode, we do not suggest to activate the antifrost function.
Models with 24 hour timer (T - fig. 3)
To programme the timer;
- Check the time on your watch. If for example it is 10am, turn the number disc of the timer in a clockwise direction until
the number 10 on the disc lines up with the arrow head marker.
The timer is normally supplied with all the teeth pushed into the centre allowing continuous operation. To set the periods of time you would like the appliance to be off continue as follows;
- Each tooth corresponds to a period of 15 minutes of time. Push the teeth with your thumbnail to the outer rim of the
timer. At this point, the sectors that correspond to the periods to be on and off will be visible.
- The heater will now function automatically everyday, switching on and off according to your selection.
(Important; the plug must always be inserted into the electrical socket)
- To vary the programming times, simply return the teeth ot their original position and set new periods of functioning.
- If you desire to operate the heater without programming it, push all the teeth toward the centre (i.e. in the mode as
normally supplied)
- To completely turn off the heater turn of all the switches and remove the plug from the socket.
Models with “Tilt-switch”
- Some models are fitted with a tilt-switch which turns the appliance off if it should fall over. To restart the appliance,
simply place it upright again.
5. MAINTENANCE
Before carrying out any maintenance, remove the plug from the electrical socket and wait until the heater has cooled down.
The heater does not require special maintenance. Simply dust it off with a soft, dry cloth. Never use abrasive powders or solvents. If necessary, remove concentrated areas of dirt with a vacuum cleaner.
6. WARNINGS
-
Do not use this heater in the immediate surroundings of a bath, a shower or a swimming pool.
Never use the heater to dry laundry.
Never place the power cable on top of the heater while it is hot.
Only use the heater in an upright position.
The heater must be positioned at least 50cm from furniture or other objects.
If the supply cord is damaged, it must be replaced by the manufacturer or it’s service agent or a similary qualified person in order to avoid a hazard.
- On using the appliance for the first time, turn it on to the maximum power setting for at least 2 hours. This is to eliminate the 'new odour' which is released by the appliance. During this time ensure that the room is well ventilated.
- It is normal for the heater to make 'crackling' noises during the first time it is switched on (or in the case of infrequent
use)
- The heater must not be located directly below a socket-outlet.
- The body of the heater is filled with an exact quantity of oil. If reparations may be necessary which call for the opening
of the heater, they must be done only by the manufacturer or by an authorised service centre. In the unlikely event of oil
leakage, contact the manufacturer or by an authorised service centre.
- Do not use this appliance in rooms which have an area smaller than 4m2
- The appliance is not intended for use by persons (including children) with reduced physical, sensory or mental capabilities, or lack of experience and knowledge, unless they have been given supervision or instruction concerning use of the
appliance by a person responsible for their safety.
- Young children should be supervised to ensure that they do not play with the appliance.
- When scrapping the appliance, respect legislation on the disposal of oil.
- IMPORTANT: Never for any reason cover the appliance during operation as this could lead to dangerous overheating.
- The use of an extension lead is not recommended, as overheating of the extension lead may occur during the operation
of the heater.
The appliance is fitted with a safety device which will switch off it in case of accidental overheating. To reset, contact an
authorised service centre.
WARNING: In order to avoid overheating, never under any circumstances cover the appliances
during operation, as this would lead to dangerous overheating.
CAUTION: In order to avoid a hazard due to inadvertent resetting of the thermal cutout, this appliance must not be supplied
through an external switching device, such as a timer, or connected to a circuit that is regularly switched on and off by the
utility.
5
5786002700/11.10