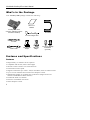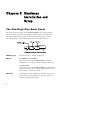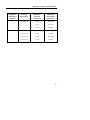
1
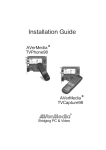
FCC NOTICE This device has been tested and found to comply with the limits for a Class B digital device, pursuant to Part 15 of the FCC Rules. These limits are designed to provide reasonable protection against harmful interference in a commercial, industrial or business environment. This equipment can generate, use and radiate radio frequency energy and, if not installed and used in accordance with the instruction, may cause harmful interference to radio communications. However, there is no guarantee that interference will not occur in a particular installation. If this equipment does cause harmful interference to radio or television reception, which can be determined by turning the equipment off and on, the user is encouraged to try to correct the interference by one or more of the following measures : • • • • Reorient or relocate the receiving antenna. Increase the separation between the equipment and receiver. Connect the equipment into an outlet on a circuit different from that to which the receiver is connected. Consult the dealer or an experienced radio/TV technician for help. This device complies with Part 15 of the FCC Rules. Operation is subject to the following two conditions: (1) this device may not cause harmful interference, and (2) this device must accept any interference received, including interference that may cause undesired operation. CAUTION ON MODIFICATIONS To comply with the limits for the Class B digital device, pursuant to Part 15 of the FCC Rules, this device must be installed in computer equipment certified to comply with the Class B limits. All cables used to connect the computer and peripherals must be shielded and grounded. Operation with non-certified computers or nonshielded cables may result in interference to radio or television reception. Any changes or modifications not expressly approved by the grantee of this device could void the user's authority to operate the equipment. CE NOTICE This is a Class B product. DISCLAIMER No warranty or representation, either expressed or implied, is made with respect to the contents of this documentation, its quality, performance, merchantability, or fitness for a particular purpose. Information presented in this documentation has been carefully checked for reliability; however, no responsibility is assumed for inaccuracies. The information contained in this documentation is subject to change without notice. In no event will AVerMedia be liable for direct, indirect, special, incidental, or consequential damages arising out of the use or inability to use this product or documentation, even if advised of the possibility of such damages. TRADEMARKS AVerMedia and AVerKey are registered trademarks of AVerMedia TECHNOLOGIES, Inc. IBM PC is a registered trademark of International Business Machines Corporation. Macintosh is a registered trademark of Apple Computer, Inc. Microsoft is a registered trademark and Windows is a trademark of Microsoft Corporation. All other products or corporate names mentioned in this documentation are for identification and explanation purposes only, and may be trademarks or registered trademarks of their respective owners. COPYRIGHT © 1998 by AVerMedia TECHNOLOGIES, Inc. All rights reserved. No part of this publication may be reproduced, transmitted, transcribed, stored in a retrieval system, or translated into any language in any form by any means without the written permission of AVerMedia TECHNOLOGIES, Inc. ENG 01 i Table of Contents Chapter 1 Introduction.................................................................................... 1 Product Highlights.................................................................................................1 What’s in the Package ...........................................................................................2 Features and Specifications ...................................................................................2 System Requirements ............................................................................................3 Chapter 2 Hardware Installation and Setup .................................................... 4 The AVerKey3 Plus Back Panel ...........................................................................4 Connecting to an IBM PC and VGA Monitor .......................................................5 Connecting to a Macintosh Computer and Display Monitor .................................5 Connecting to a SCART RGB Monitor.................................................................7 Connecting the TV ................................................................................................7 Chapter 3 Using the AVerKey3 Plus.............................................................. 8 Using the Remote Control .....................................................................................8 Touch Button Panel .............................................................................................11 The LED Panel ....................................................................................................11 Zoom Functions...................................................................................................12 Normal Zoom...............................................................................................12 AVerMedia Area Zoom...............................................................................13 Chapter 4 Troubleshooting ........................................................................... 14 Appendix Supported Display Modes............................................................ 16 ii Chapter 1 Introduction Thank you for purchasing the AVerKey3 Plus. We are certain you will find this product a useful video presentation tool that is highly suitable for your business and multimedia applications. To get you started, this chapter briefly describes what the AVerKey3 Plus has to offer and lists the system requirements needed in order to use this product. Product Highlights The AVerKey3 Plus is an external PC/MAC-to-TV scan converter. It can convert computer images into video format and display them on any TV monitor or large-screen LCD projector. True Plug & Play with no software drivers required, the AVerKey3 Plus is compatible with all computers, notebooks and operating systems. AVerKey3 Plus offers many exciting features to enhance your presentations : 1. Remote Control and Touch Button Control Panel The AVerKey3 Plus gives extra mobility to the presenter with its infrared remote control. You can move around the room and control your presentation with the remote. Just in case you misplace the remote control, you can still give your presentation. With a control panel located on the AVerKey3 Plus unit, you can directly access major functions. 2. Area Zoom This function divides your VGA screen into 9 separate sections and lets you easily zoom in or out on individual sections of interest. 3. Superior Image Quality With resolutions up to 1024 x 768, wider horizontal and vertical frequencies (24KHz ~ 65KHz and 50Hz ~ 100Hz respectively) and over 16 million colors, you're guaranteed to receive clear and professional images. 1 AVerMedia AVerKey3 Plus User's Manual What’s in the Package Your AVerKey3 Plus package includes the following : This User’s Manual AVerKey3 Plus Scan Converter & Remote Control (2 batteries included) VGA Cable AC Power Adapter Unit AV Cable S-Video Cable Mac Monitor Adapter Mac VGA Adapter 12” and 14” Dummy Terminators (for MAC) Features and Specifications Features • • • • • • • Plug and Play, no software drivers required Compatible with all PCs, MACs and Laptops Wireless remote control access to all functions Touch-button control panel Supports resolutions up to 1024 x 768 (PC and MAC) with 16.7 million colors Up to 7 levels of flicker-filter selection for sharpness control Simultaneous display on computer and TV monitors (Supports all VGA monitors and MultiScan MAC monitors) • Traditional Zoom (2x) and Pan • Exclusive AVerMedia Area Zoom • Zoom sharpness control 2 Chapter 1 Introduction • • • • • • • • Screen freeze/unfreeze Full-screen underscan/overscan (underscan up to 1024 x 768) Wide-range picture width and height adjustment Horizontal/vertical picture positioning Horizontal/vertical screen panning TV brightness control Supports Composite/S/RGB video output Auto-Save Specifications Input Signal: Output Signal: Power Supply: Dimensions: Weight: Compliance: VGA, RGB or MAC Horizontal frequency : 24KHz - 65KHz Vertical frequency : 50Hz - 100Hz Composite video, S-video, Computer monitor (PC or MAC) pass-thru output, SCART RGB video output 7.5VDC Power Adapter Base unit : 5.95" x 4.76" x 1.45" Remote control : 7.24" x 2.2" x 0.65" 0.77 lb. (349 grams) FCC Class B System Requirements To use the AVerKey3 Plus, you will need : • IBM PC or compatibles; • Any Macintosh supporting standard display modes : 512 x 384 at 24KHz ; 640 x 480 at 31KHz or 35KHz ; 832 x 624 at 48KHz ; up to 1024 x 768 at 60KHz (MAC systems without the monitor output require a Power-R or Apple adapter) NOTE: AVerKey3 Plus should in theory support any computer and display systems with a vertical display frequency range of 50Hz to 100Hz and a horizontal display frequency of 24KHz to 65KHz. However, due to different custom hardware configurations and the wide variety of connectors used on various systems, we cannot guarantee that AVerKey3 Plus will function properly. 3 Chapter 2 Hardware Installation and Setup The AVerKey3 Plus Back Panel The ports on the back panel of the AVerKey3 Plus are for connecting the converter to the system unit and graphics display monitor. The figure and descriptions below specify what device should go into each port. (Text describing each port are printed at the bottom side of the converter.) POWER (7.5V) : Plug the AC Power Adapter to this port. VGA IN For IBM PC or compatible : This port connects the AVerKey3 Plus to the IBM compatible PC’s VGA port via the supplied VGA Cable. : For Macintosh : This port connects the AVerKey3 Plus to the Macintosh computer's monitor port. Use the supplied VGA Cable and Mac VGA Adapter to connect. VGA OUT 4 : The computer monitor should be connected to this port. You need to use the supplied Mac Monitor Adapter to connect the Macintosh monitor. Chapter 2 Hardware Installation and Setup Connecting to an IBM PC and VGA Monitor 1. Connect the AVerKey3 Plus to the PC. Plug one end of the supplied VGA Cable to the AVerKey3 Plus “VGA IN” port and the other end to the PC’s VGA port. 2. Connect the VGA monitor to AVerKey3 Plus. Plug the VGA monitor cable to the AVerKey3 Plus “VGA OUT” port. 3. Plug the supplied AC Power Adapter into the AVerKey3 Plus “POWER” port. Connecting to a Macintosh Computer and Display Monitor 1. Use the supplied VGA Cable and the Mac VGA Adapter to connect AVerKey3 Plus to the Macintosh computer. • Plug one end of the VGA Cable to the AVerKey3 Plus “VGA IN” port. • Attach the Mac VGA Adapter to the other end of the VGA Cable. 5 AVerMedia AVerKey3 Plus User's Manual • Connect the VGA Cable with the attached Mac VGA Adapter to the monitor port on the back panel of your Macintosh computer. 2. Connect your Macintosh monitor to the AVerKey3 Plus. • Disconnect the monitor from the computer. • Then, attach the Mac Monitor Adapter to the monitor cable. • Connect the monitor cable with the attached Mac Monitor Adapter to the AVerKey3 Plus “VGA OUT” port. 3. If you do not intend to use a computer monitor with your Macintosh computer, you will need to connect a dummy terminator to the AVerKey3 Plus “VGA OUT” port. In general, a 14” terminator is used. A 12” terminator is only used with software that requires it. Terminators are used with Macintosh and laptops when no external monitor is used. 4. Plug the supplied AC Power Adapter into the AVerKey3 Plus “POWER” port. 6 Chapter 2 Hardware Installation and Setup Connecting to a SCART RGB Monitor If you are using a SCART RGB monitor, you can connect it to the SCART RGB port at the side panel of the AVerKey3 Plus using a SCART RGB Cable. (Refer to the setup diagram at the right.) Connecting the TV To display the computer screen on TV (or any video monitor), you will need to connect the TV to one of the ports at the AVerKey3 Plus side panel. If the TV set uses the composite video standard, connect the TV to the AVerKey3 Plus “VIDEO” port using the supplied AV Cable. If the TV set uses the Svideo standard, connect the TV to the AVerKey3 Plus “S-VHS” port using the supplied S-Video Cable. 7 Chapter 3 Using the AVerKey3 Plus This chapter will show you how to use the Remote Control Unit and Touch Button Control Panel of the AVerKey3 Plus. At the end of this chapter, you will find details on using the zoom functions of the AVerKey3 Plus. Using the Remote Control To use the remote control, first insert the batteries (2 size “AA” batteries are provided) into the battery compartment at the back of the remote. The Infrared Sensor is located at the front panel of the AVerKey3 Plus (see figure below). While using the remote, aim it at the infrared sensor. The figure and descriptions on the following pages show you how to use the remote control. 8 Chapter 3 Using the AVerKey3 Plus POWER : Switches the AVerKey3 Plus on/off. RESET : Restores the AVerKey3 Plus to original factory settings. AREA ZOOM : Provides quick selection of the screen area to magnify. The Area Zoom function divides the computer image on the TV into 9 parts and allows you to select the desired part to zoom. ZOOM : Press this button to zoom in or out of the computer image on TV. FREEZE : Press this button to freeze or unfreeze the computer image on TV. OVERSCAN : Toggles between Underscan and Overscan. Overscan displays the computer image on TV to the fullest. The image will be chopped off at the borders when displayed this way. When you switch to Underscan, the computer image will be completely displayed on TV. Note: Images will not be chopped off for resolutions up to 1024 x 768 in underscan mode. 9 AVerMedia AVerKey3 Plus User's Manual SHARPNESS : This button alternates up to 7 levels of sharpness. Press this button repeatedly until you find the level of sharpness you want. HEIGHT : Press on TV. to enlarge the height of the computer image Press on TV. to reduce the height of the computer image Press on TV. to enlarge the width of the computer image WIDTH : BRIGHTNESS : Press TV. to reduce the width of the computer image on Press to decrease the brightness level. Press to increase the brightness level. There are 4 brightness levels to choose from. PAN/POS : Toggles between PAN and POS modes. When you switch to PAN mode, pressing the Positioning & Movement Control buttons will allow you to move around the computer image on TV. When you switch to POS mode, pressing the Positioning & Movement Control buttons will allow you to change the position of the computer image on the TV. You can move the image left, right, up, or down. Positioning : and Movement Control 10 Use these buttons to PAN around the computer image on TV or adjust the POSition of the image. Chapter 3 Using the AVerKey3 Plus Touch Button Panel The figure and descriptions below show you how to use the Touch Button Panel on the hardware case. POWER : Switches the AVerKey3 Plus on/off. OVERSCAN : Toggles between Underscan and Overscan. (Refer to the section, Using the Remote Control, for more details on this function.) ZOOM : Press this button to zoom in or out of the computer image on TV. Positioning & : Movement Control Use these buttons to PAN around the computer image on TV or adjust the POSition of the image. The LED Panel Aside from the touch button panel, you will also find an LED Panel on the AVerKey3 Plus unit. The figure and descriptions below show what each LED indicator in this panel represents. 11 AVerMedia AVerKey3 Plus User's Manual FREEZE : This LED shows whether FREEZE or UNFREEZE is in operation. (FREEZE is a red LED in the NTSC version and a green LED in the PAL version.) If this LED is on, it means that the user has paused, that is, frozen the screen. ON : This (green) LED is the power on/off indicator. If this LED is on, it indicates that the AVerKey3 Plus has been powered on. READY : If this (red) LED is on, it indicates that the AVerKey3 Plus is ready for use. Zoom Functions The AVerKey3 Plus provides 2 types of zoom : Normal Zoom and AVerMedia Area Zoom. Normal Zoom Normal Zoom allows you to zoom in (200%) the computer screen on TV display. Simply press the ZOOM button on the remote control. You can move (pan) around freely to any part of the screen. Press the PAN/POS button to change to PAN mode. Then, press the Up, Down, 12 Chapter 3 Using the AVerKey3 Plus Left, and Right Arrows, which are the Positioning and Movement Control buttons, to move around the zoomed image. AVerMedia Area Zoom This function divides your screen into 9 parts and allows you to select the desired part to zoom through the available buttons on the remote control. The directional buttons on the remote corresponds to 9 parts of your screen : Directional Buttons on the Remote Control 9 Parts of the Screen Choose which part you want to zoom, and then press one of the 9 directional buttons on the remote that corresponds to that area. Example : To pan around the zoomed area, press the PAN/POS button to change to PAN mode. Then, press the Up, Down, Left, and Right Arrows, which are the Positioning and Movement Control buttons, to move around the zoomed area. 13 Chapter 4 Troubleshooting This chapter provides many useful tips on how to solve common problems while using the AVerKey3 Plus. There is no picture on my TV. 1. Check all the connectors again as shown in this manual. 2. Check your TV remote control on/off switch and channel setting. 3. Verify the setting of the Composite Input or S-VHS Input of your TV set. 4. If you are using a SCART connector, check the SCART input of your TV set. 5. If you are using a notebook, you may have to switch to external VGA mode. (Refer to your notebook’s manual.) 6. As specified by IBM, some systems may require that the monitor is present and connected when the system is powered up. 7. If you are using the AVerKey3 Plus on the Macintosh, you must have a Macintosh monitor or Dummy Terminators connected. When the signal runs through a VCR, there is no picture on the TV. 1. Check your TV/VCR input channel setting. 2. If your TV and VCR are connected to an AV Amplifier, please check the input/output selection. 14 Chapter 4 Troubleshooting I have set up the AVerKey3 Plus and checked all the connections as specified in the manual, but I can only get a picture on the VGA monitor, not on the TV screen. AVerKey3 Plus is in the “Ready” mode once power is connected. You need to switch AVerKey3 Plus “ON”, either from the remote control or from its touch button panel to display both VGA and VIDEO. The picture on my TV is distorted. 1. Before doing any adjustments, reset all the picture attributes to the factory default setting using the “Reset” button on the remote control. 2. Each VIDEO display device is slightly different from another. Use the Panning Control of AVerKey3 Plus to adjust the picture. 3. Use the Brightness and Sharpness picture attributes controls on the remote control to reduce the distortion. The picture on my TV is all messed up. 1. When using AVerKey3 Plus with the Macintosh, up to 1024 x 768 can be supported. 2. When using AVerKey3 Plus with IBM PC compatible computers, screen resolutions up to 1024 x 768 (horizontal frequency less than 65KHz) is supported. There is no image on both my Macintosh monitor and TV. When you turn on the Macintosh computer, it will first auto-detect the type of monitor you have. During auto-detection, there won't be any display on your Macintosh monitor. To avoid this problem, connect your Macintosh computer, monitor and all the necessary cables to the AVerKey3 Plus first before you power on your Macintosh computer. 15 Appendix Supported Display Modes The reference table below lists the various display resolutions which the AVerKey3 Plus can support. Computer / Operating System Display Resolution Maximum Vertical Frequency Maximum Horizontal Frequency IBM PC 720 X 400 60 Hz 31.5 KHz DOS/V 640 X 480 60 Hz 31.5 KHz 72 Hz 37.9 KHz 75 Hz 37.5 KHz 85 Hz 43.3 KHz 90 Hz 47.9 KHz 100 Hz 52.2 KHz 56 Hz 35.1 KHz 60 Hz 37.9 KHz 72 Hz 48.1 KHz 75 Hz 46.9 KHz 85 Hz 53.7 KHz 90 Hz 57.0 KHz 100Hz 62.5 KHz 800 X 600 16 Appendix Supported Display Modes Computer / Operating System Macintosh Display Resolution Maximum Vertical Frequency Maximum Horizontal Frequency 1024 X 768 60 Hz 48.4 KHz 70 Hz 56.5 KHz 75 Hz 60 KHz 512 X 384 60 Hz 24.5 KHz 640 X 480 67 Hz 35 KHz 832 X 624 75 Hz 49.7 KHz 1024 X 768 75 Hz 60 KHz 17 LIMITED WARRANTY AVerMedia Technologies, Inc. warrants this product to be free of defects resulting from faulty manufacture or components under the following terms : WARRANTY LENGTH Labor is warranted for (1) one year from the date of purchase. Parts are warranted for (1) one year from the date of purchase. Replacement products will be warranted for the remainder of the one year warranty period or (30) thirty days, whichever is longer. WHO IS PROTECTED This warranty is enforceable only by the first consumer purchaser. WHAT IS AND IS NOT COVERED Except as specified below, this warranty covers all defects resulting from faulty manufacturing of this product. The following are not covered by the warranty. 1. Any product on which the serial number has been defaced, modified, or removed. 2. Damage, deterioration, or malfunction resulting from : A. Accident, abuse, misuse, neglect, fire, water, lightning, or other acts of nature, commercial or industrial use, unauthorized product modification, or failure to follow instructions included with the product. B. Misapplication of service by someone other than the manufacturer’s representative. C. Any shipment damages. (Claims must be made with carrier.) D. Any other cause which does not relate to a product defect. 3. Cartons, cases, batteries, cabinets, tapes, or accessories used with product. 4. AVerMedia does not warrant that this product will meet your requirements; it is your responsibility to determine the suitability of this product for your purpose. WHAT WE WILL AND WILL NOT PAY FOR We will pay labor and material expenses for covered items. However, we will not pay for the following : 1. Removal or installation charges. 2. Shipping charges. 3. Any incidental charges. EXCLUSION OF DAMAGES THE MANUFACTURER’S SOLE OBLIGATION AND LIABILITY UNDER THIS WARRANTY IS LIMITED TO THE REPAIR OR REPLACEMENT OF A DEFECTIVE PRODUCT AT OUR OPTION. THE MANUFACTURER SHALL NOT, IN ANY EVENT, BE LIABLE TO THE PURCHASER OR ANY THIRD PARTY FOR ANY INCIDENTAL OR CONSEQUENTIAL DAMAGE (INCLUDING, BUT NOT LIMITED TO, DAMAGES RESULTING FROM INTERRUPTION OF SERVICE AND LOSS OF BUSINESS) OR LIABILITY IN TORT RELATING TO THIS PRODUCT OR RESULTING FROM ITS USE OR POSSESSION. LIMITATIONS OF IMPLIED WARRANTIES There are no other oral or written warranties, expressed or implied, including but not limited to those of merchantability or fitness for a particualr purpose. Any implied warranties are limited in duration to one year from the date of purchase. STATE LAW AND YOUR WARRANTY This warranty gives you specific legal rights, and you may also have other rights granted under state law. These rights vary from state to state. CONTACT INFORMATION www.aver.com