1
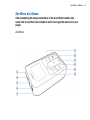
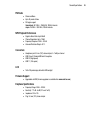
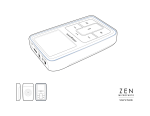
User’s Guide
Copyright © 2004 by Creative Technology Ltd. All rights reserved.
The Creative logo, and Creative MediaSource are trademarks or registered trademarks of Creative Technology
Ltd. in the United States and/or other countries. Microsoft, Windows, Windows Media, Outlook and the Windows
logo are registered trademarks of Microsoft Corporation. Intel and Pentium are registered trademarks of Intel
Corporation. All other products are trademarks or registered trademarks of their respective owners. All
specifications are subject to change without prior notice. Actual contents may differ slightly from those pictured.
Information in this document is subject to change without notice and does not represent a commitment on the part
of Creative Technology Ltd. No part of this manual may be reproduced or transmitted in any form or by any means,
electronic or mechanical, including photocopying and recording, for any purpose without the written permission of
Creative Technology Ltd. The software described in this document is furnished under a license agreement and
may be used or copied only in accordance with the terms of the license agreement. It is against the law to copy
the software on any other medium except as specifically allowed in the license agreement. The licensee may make
one copy of the software for backup purposes only.
The Software License Agreement can be found on the Installation CD.
Version 1.00 October 2004
Zen Micro at a Glance.................................................. 6
Zen Micro....................................................................... 6
Touch Pad ..................................................................... 9
Main Menu ................................................................... 12
Now Playing screen ..................................................... 13
Creative MediaSource Player/Organizer ..................... 14
Zen Media Explorer ..................................................... 14
Accessories................................................................
Earphones ...................................................................
Belt Clip .......................................................................
Pouch...........................................................................
Neckstrap.....................................................................
Remote Control............................................................
15
15
16
17
18
19
Importing Music into Creative MediaSource Player/
Organizer .................................................................... 21
Importing music from audio CDs ................................. 21
Shopping for music on the Internet.............................. 22
Transferring Music to Zen Micro ..............................
Transferring music tracks ............................................
Creating and transferring playlists ...............................
Synchronizing music with your computer ....................
24
24
26
26
Playing and Managing Music....................................
Turning Zen Micro on and off.......................................
Adjusting volume .........................................................
Locking Zen Micro .......................................................
Selecting and playing music tracks..............................
27
27
27
27
30
Searching for similar tracks .........................................
Selecting tracks with Zen Micro’s DJ ...........................
Managing the list of selected tracks.............................
Shuffling and repeating the list of selected tracks .......
Searching within a track...............................................
Using bookmarks .........................................................
Listening to the radio ...................................................
Deleting radio presets..................................................
Recording radio broadcasts.........................................
Recording with the built-in microphone........................
Playing recorded tracks ...............................................
Deleting tracks .............................................................
Viewing track information.............................................
Viewing player information...........................................
30
31
31
32
33
34
35
37
37
38
39
39
39
39
Using Zen Micro’s Organizer Features ....................
Synchronizing with Microsoft Outlook..........................
Viewing the calendar ...................................................
Viewing today’s tasks ..................................................
Viewing contacts..........................................................
41
41
41
42
42
Storing Data Files in Zen Micro ................................ 43
Using Zen Micro as a Removable Disk........................ 43
Changing the amount of memory space in Removable
Disk mode.................................................................... 47
Personalizing Zen Micro ...........................................
Adjusting Touch Pad settings ......................................
Setting the date and time.............................................
Setting the alarm..........................................................
49
49
49
50
Using Zen Micro’s equalizer (EQ)................................
Setting playback at a constant volume ........................
Labeling Zen Micro with your name.............................
Setting the backlight duration ......................................
Setting the display contrast..........................................
Setting the idle shutdown time.....................................
Enabling Sleep Timer ..................................................
Changing the menu language......................................
Resetting Zen Micro.....................................................
Adding and removing main menu items ......................
50
51
52
52
52
53
53
53
54
54
Frequently Asked Questions .................................... 55
Safety Advice ............................................................. 63
General Specifications .............................................. 64
Zen Micro at a Glance
Zen Micro at a Glance
After completing the setup instructions in the Quick Start booklet, take
some time to read this User’s Guide to learn how to get the most out of your
player.
Zen Micro
6
Zen Micro at a Glance
Next/Fast-Forward button
Press this button to go the next track.
Press and hold this button to move forward within a track.
Options button
Press this button to display the options available.
Touch Pad
Use the Touch Pad to scroll through and select menu items.
During playback, use the Touch Pad to adjust the volume.
For more information using the Touch Pad, see "Touch Pad" on page 9.
Menu/Back button
During playback, press this button to display the main menu.
When scrolling though menu items, press this button to return to the previous menu.
Play/Pause button
Starts, pauses and resumes playback.
Previous/Rewind button
Press this button to go the previous track.
Press and hold this button to move back within a track.
Power switch
Turns your player on and off.
7
Zen Micro at a Glance
Lock
Slide the Power switch to the Lock position to disable your player’s controls.
Headphone jack
Connect Zen Micro’s earphones to this jack.
USB 2.0 port
To charge Zen Micro’s battery, connect one end of Zen Micro’s Power Adapter to this
port, and the other end to a power outlet. Turn on the power outlet if necessary.
To transfer music and data files, connect one end of the supplied USB cable to this
port, and the other end of the USB cable to the your computer’s USB port.
Microphone
Make instant recordings with this built-in microphone.
8
Zen Micro at a Glance
Touch Pad
Move your finger up and down the
Touch Pad to scroll through menu
items.
9
Zen Micro at a Glance
To rapidly scroll though menu items,
hold down the top or bottom portion
of the Touch Pad with your finger.
10
Zen Micro at a Glance
To select a menu item, lightly tap
the Touch Pad.
11
Zen Micro at a Glance
Main Menu
Press the Menu/Back
button to view Zen Micro’s main menu. Move your finger up and
down the Touch Pad to scroll through menu items, and press the Menu/Back
button to
return to the previous menu or screen.
12
Zen Micro at a Glance
Now Playing screen
The Now Playing screen appears when you turn on Zen Micro, or when a song is playing.
When you see the Now Playing screen, move your finger up and down the Touch Pad to
adjust the volume. Status icons at the top right corner of the LCD indicate Zen Micro’s
current settings and battery status.
NOTE
When you see the Now Playing screen, lightly tap the Touch Pad to view the Selected
Music screen. The Selected Music screen shows you your list of selected music tracks.
13
Zen Micro at a Glance
Creative MediaSource Player/Organizer
Use Creative MediaSource™ Player/Organizer to import music into your computer and
transfer it to Zen Micro. Creative MediaSource Player/Organizer is your digital music
center for playing, creating, organizing and transferring digital music.
Creative MediaSource Player/Organizer is included with your player and is automatically
installed when you set up the Zen Micro software on your computer.
TIP
By default, Creative MediaSource Player/Organizer automatically starts when you
connect Zen Micro to your computer. You can disable this feature at any time. For more
information, refer to Creative MediaSource Player/Organizer’s online Help.
Zen Media Explorer
Zen Media Explorer offers you the ease of managing music tracks and data files in
Zen Micro, in a Windows Explorer environment.
Zen Media Explorer is included with your player and is automatically installed when you set
up the Zen Micro software on your computer.
NOTE
■
■
After Zen Media Explorer is installed, the Zen Media Explorer
Windows Explorer under My Computer.
icon appears in
When you connect your player to your computer, an icon representing Zen Micro
appears under the Zen Media Explorer icon. To start Zen Media Explorer, click the
icon that represents Zen Micro.
14
Accessories
Accessories
Zen Micro comes with some of the accessories described below.
Accessories that are not included with your player are available from your
Creative Labs dealer or at our online store at www.creative.com.
Earphones
Zen Micro’s earphones feature dynamic bass response and enhanced audio clarity.
WARNING!
For your safety and the safety of others, do not use your earphones while driving,
cycling or any other activity that requires your full attention.
15
Accessories
Belt Clip
Use the Zen Micro belt clip to fasten Zen Micro to your belt.
16
Accessories
Pouch
Zen Micro’s protective pouch keeps Zen Micro snug and safe.
17
Accessories
Neckstrap
With Zen Micro’s neckstrap, your music collection goes wherever you go.
NOTE
Zen Micro’s neckstrap is available separately in selected countries.
18
Accessories
Remote Control
Zen Micro’s optional remote control gives you easy access to basic playback functions.
To Zen Micro’s Headphone
NOTE
jack
Zen Micro’s remote control is available separately in selected countries.
19
Accessories
+
Volume Increase button
Press this button to increase the volume.
–
Volume Decrease button
Press this button to decrease the volume.
Play/Pause button
Starts, pauses and resumes playback.
Next/Fast-Forward button
Press this button to go the next track.
Press and hold this button to move forward within a track.
Previous/Rewind button
Press this button to go the previous track.
Press and hold this button to move back within a track.
Headphone jack
Connect Zen Micro’s earphones to this jack.
MODE button
Press this button to switch between the Now Playing and FM Radio modes.
Lock switch
Slide to the Lock position to disable the remote control.
20
Importing Music into Creative MediaSource Player/Organizer
Importing Music into Creative MediaSource Player/
Organizer
To listen to music on Zen Micro, first import music into Creative
MediaSource Player/Organizer, and then transfer this music to your player.
Music can be ripped from your CD collection, or downloaded from Internet
music sites.
Importing music from audio CDs
WARNING!
It may be illegal to encode MP3 or WMA files for trade or sale unless you have the
express or explicit permission of the copyright holder(s).
To get music tracks from your CDs, you will need a CD-ROM or DVD-ROM drive that can
extract digital audio data. Creative MediaSource Player/Organizer reads the audio
information on your CD and convert it to MP3 or WMA files using the bitrate you choose.
The standard bitrate of most MP3 files is 128 kbps, although some are set higher, at 160 or
192 kbps. The standard bitrate for WMA files is 64 Kbps. Using the standard bitrate will
ensure that your MP3 and WMA files retain much of their audio quality. Higher bitrates will
result in larger file sizes, but better audio quality.
The time needed to successfully extract audio from a CD depends on:
■
■
■
■
CD-ROM/DVD-ROM drive speed
defects, like scratches on the audio CD
error-checking features on the CD-ROM/DVD-ROM drive
bitrate selected for encoding
21
Importing Music into Creative MediaSource Player/Organizer
To rip an audio CD using Creative MediaSource Player/Organizer
1 Start Creative MediaSource Player/Organizer.
2 Insert an audio CD into your CD-ROM/DVD-ROM drive.
3 If Creative MediaSource Player/Organizer is in Player view, click the Player/Organizer
View button to switch to Organizer view.
4 In the Sources window, select [d:] Audio CD (replace d: with the drive letter of your
CD-ROM/DVD-ROM drive).
5 In the Task bar, click the Rip Now button.
TIP
If you have an Internet connection, you can set Creative MediaSource Player/
Organizer to automatically retrieve track information about the tracks being ripped,
instead of manually entering this information. For more information about this feature,
refer to Creative MediaSource Player/Organizer’s online Help.
Shopping for music on the Internet
If you have an Internet connection, you can use a search engine to locate sites where you
can purchase digital music content. Follow the instructions on these sites to download the
music tracks to your computer.
Once you have downloaded music tracks, you can import these tracks into Creative
MediaSource Player/Organizer using the Import Wizard.
To import music tracks into Creative MediaSource Player/Organizer
1 Start Creative MediaSource Player/Organizer.
2 If Creative MediaSource Player/Organizer is in Player view, click the Player/Organizer
View button to switch to Organizer view.
22
Importing Music into Creative MediaSource Player/Organizer
3 In the Task bar, click the Import button, and select Import Tracks.
The Import Wizard dialog box appears.
4 In the My Computer panel, locate the track or folder you want to import, and then click the
Add File or Add Folder button.
5 Click the Continue button and follow the instructions on the screen.
23
Transferring Music to Zen Micro
Transferring Music to Zen Micro
Music tracks that you transfer to Zen Micro must be MP3 or WMA files if you
want to play them back.
Transferring music tracks
1 Connect Zen Micro to your computer’s USB port with the supplied USB cable.
24
Transferring Music to Zen Micro
2 When your computer detects Zen Micro, Creative MediaSource Player/Organizer starts
automatically. Transfer your music tracks (MP3 or WMA files) to Zen Micro using the
drag-and-drop method.
3 When you have finished transferring music tracks, disconnect Zen Micro.
Wait till you see the inactive Docked screen before disconnecting Zen Micro. DO NOT
disconnect Zen Micro if you see the active Docked screen on the LCD. Transfer is still in
progress and disconnecting Zen Micro may damage the tracks being transferred.
Inactive Docked screen
TIP
Active Docked screen
You can also use Zen Media Explorer to transfer music tracks to Zen Micro. For more
information, refer to its online Help.
25
Transferring Music to Zen Micro
Creating and transferring playlists
With Creative MediaSource Player/Organizer, organizing music tracks into playlists (tracks
you have organized into lists) has never been easier. You can create as many playlists as
you like and transfer these to Zen Micro.
You can compile playlists using the drag-and-drop method, or automatically generate
playlists based on your preferences using the Smart Playlist feature.
TIP
■
■
For more information about using Creative MediaSource Player/Organizer, refer to
its online Help.
You can also directly create playlists on Zen Micro. For more information, see
"Managing the list of selected tracks" on page 31.
Synchronizing music with your computer
You can use Sync Manager to update and synchronize music in Zen Micro and your
computer.
1 Connect Zen Micro to your computer.
2 Start Sync Manager.
You can start Sync Manager in either Creative MediaSource Player/Organizer or Zen
Media Explorer.
3 Select My Computer and Zen Micro as the devices you want to synchronize, and then
click Sync Now.
4 Select the Audio check box, and then click the Next button.
5 Follow the instructions of the screen.
6 Click the Finish button.
26
Playing and Managing Music
Playing and Managing Music
After transferring music to Zen Micro, read on to learn how to get the most
out of your player.
Turning Zen Micro on and off
1 To turn on Zen Micro, slide the Power switch towards the Power
icon and hold it
there until the LCD lights up.
2 To turn off Zen Micro, slide the Power switch towards the Power
icon and hold it
there until Shutting down... appears.
Adjusting volume
In the Now Playing screen, move your finger up and down the Touch Pad to adjust the
volume.
To adjust the volume when browsing the menu, press the Options
Volume.
button and select
Locking Zen Micro
Locking Zen Micro disables all controls on Zen Micro. Lock Zen Micro when you want to
prevent buttons from being accidently pressed.
You can lock Zen Micro with your player’s Power switch. To lock the optional Zen Micro
remote control, use the Lock switch on the remote control.
27
Playing and Managing Music
To lock Zen Micro
Slide the Power switch towards the Lock
Playing screen.
icon. The Locked icon
appears on the Now
28
Playing and Managing Music
To lock the Zen Micro remote control
Slide the Lock switch towards the Lock
icon.
29
Playing and Managing Music
Selecting and playing music tracks
You can search for music tracks by album, artist, genre or title. If you have created playlists
(tracks you have organized into lists) on Zen Micro, or transferred playlists from Creative
MediaSource Player/Organizer, you can search for music tracks in playlists as well.
1 Press the Menu/Back
button.
The main menu appears.
2 Select Music Library and select a music category, such as Albums or Genres. Select All
Tracks if you want to search by track title.
3 Continue searching with the Touch Pad until you find what you want.
At any time, press the Options
button for more search and playback options.
4 To start playing a music track or a category of music tracks (like an album), scroll to the
item and press the Play/Pause
button.
The currently playing track appears on the Now Playing screen. Lightly tap the Touch Pad
when viewing the Now Playing screen to view the Selected Music screen. The Selected
Music screen shows you your list of selected music tracks.
5 To add music tracks to the list of selected tracks, select a music track, and then select Add
to Selected.
NOTE
For more information about creating playlists on Zen Micro, see "Managing the list of
selected tracks" on page 31.
Searching for similar tracks
During playback, you can search for another track that is similar to the currently playing
track. In the Now Playing screen, press the Options
button and select Lookup Artist to
start playing a similar track.
30
Playing and Managing Music
You can also select this option when viewing the Selected Music screen. Lightly tap the
Touch Pad when viewing the Now Playing screen to view the Selected Music screen. The
Selected Music screen shows you your list of selected music tracks.
Selecting tracks with Zen Micro’s DJ
Instead of selecting tracks yourself, you can let Zen Micro’s DJ pick out tracks for you.
1 Press the Menu/Back
button.
The main menu appears.
2 Select Music Library DJ.
3 Select Album of the Day to play an album of music tracks selected by Zen Micro’s DJ.
4 Select Random Play All to let Zen Micro’s DJ randomly play all tracks, including your
recorded tracks.
Managing the list of selected tracks
Tracks you have selected for playback can be viewed and managed in the Selected Music
screen.
1 Press the Menu/Back
button.
The main menu appears.
2 Select Now Playing.
3 Lightly tap the Touch Pad.
The Selected Music screen appears.
31
Playing and Managing Music
4 Press the Options
■
■
■
TIP
button and select one of the following playlist management options:
Remove... Remove Track
Removes the current track from the list.
Remove... Remove All
Clears the list.
Save As Playlist
Saves the list as a playlist. Name the playlist using the characters in the list box that appears,
and then select Ok.
These playlist management options are also available in the Now Playing screen.
Shuffling and repeating the list of selected tracks
You can shuffle or repeat your list of selected tracks by selecting a different play mode.
1 Press the Menu/Back
The main menu appears.
2 Select Play Mode.
button.
32
Playing and Managing Music
3 Select one of the following items in the Play Mode screen:
■
Normal
Plays your selected tracks in sequential order.
Repeat Track
■
Repeats the current track. When you select this play mode,
screen.
Repeat All
■
Repeats all selected tracks. When you select this play mode,
screen.
Shuffle
■
Plays all selected tracks in random order, once only. When you select this play mode,
appears on the Now Playing screen.
Shuffle Repeat
■
Plays and repeats all selected tracks, in random order. When you select this play mode,
appears on the Now Playing screen.
Track Once
■
appears on the Now Playing
appears on the Now Playing
Stops playing after the current track ends. When you select this play mode,
Now Playing screen.
TIP
To change the play mode during playback, press the Options
Play Mode.
appears on the
button and select
Searching within a track
You can search for a particular point within a track and start playing from there. For
example, if you want to start playback one minute into a music track, you can pinpoint or
seek to the one minute position and then play from there.
1 In the Now Playing screen, press the Options
button and select Seek To.
2 Move your finger up and down the Touch Pad to scroll to any point within the current track.
33
Playing and Managing Music
3 Lightly tap the Touch Pad to start playing from the selected position.
Using bookmarks
You can insert bookmarks during playback. A bookmark helps you mark a point within a
track, so you can return to it at a later time.
For example, if you are listening to your recording of an interview, insert a bookmark if you
need to stop halfway through. When you want to continue listening from where you left off,
go to this bookmark.
You can use up to 10 bookmarks at any one time.
To insert a bookmark
1 In the Now Playing screen, press the Options
button and select Set Bookmark.
Playback pauses and the Set Bookmark screen appears.
2 Select a bookmark number.
Your bookmark is assigned to the selected bookmark number. If all 10 bookmark numbers
have been assigned, you can replace an existing bookmark with the new one.
To go to a bookmark
1 Press the Menu/Back
button.
The main menu appears.
2 Select Music Library Bookmarks.
3 Select the bookmark that you want.
34
Playing and Managing Music
Listening to the radio
1 Press the Menu/Back
button.
The main menu appears.
2 Select FM Radio.
3 To automatically scan and save radio stations, press the Options
button and select
Autoscan.
The player scans for all radio stations with clear reception. At the end of the autoscan,
Zen Micro automatically saves all stations as presets and tunes in to the first preset.
4 Press the Next/Fast-Forward
button or Previous/Rewind
button to select a different
preset.
NOTE
■
■
Make sure your earphones are connected to your player when scanning for radio
stations. The earphone cable acts as an antenna for radio reception.
If you’re using the optional Zen Micro remote control, you can press the MODE
button to switch between the Now Playing and FM Radio screens.
35
Playing and Managing Music
5 To fine tune or manually scan for a radio station, press the Play/Pause
button to switch
to the manual tuning view.
Manual tuning view
Preset information disappears
in the manual tuning view.
6 Press the Next/Fast-Forward
button or Previous/Rewind
button to fine tune the
radio frequency.
7 Hold down the Next/Fast-Forward
button or Previous/Rewind
second to scan for the next available radio station.
8 To save a radio station as a preset, press the Options
and then select a preset number.
button for one
button, select Save As Preset,
36
Playing and Managing Music
Deleting radio presets
1 Press the Menu/Back
button.
The main menu appears.
2 Select FM Radio.
3 Press the Next/Fast-Forward
button or Previous/Rewind
button to select the preset
you want to delete.
4 Press the Options
button and select Delete Preset.
Recording radio broadcasts
1 While listening to a radio broadcast, press the Options
button and select Record
Radio to start recording.
2 While recording, you can press the Options
button and select one of the following
items:
■
■
■
Pause
Pauses the recording. You can also pause the recording by pressing the Play/Pause
button.
Split
Starts a new recording.
Stop
Stops and saves the recording.
3 The recorded track is named FM followed by the date and time of the recording (FM
YYYY-MM-DD HH:MM:SS). For example, if you record a track on March 15, 2004 at
2:57 pm, the track is named FM 2004-03-15 14:57:00.
37
Playing and Managing Music
4 To view and play back recorded tracks, see "Playing recorded tracks" on page 39.
NOTE
Make sure your earphones are connected to your player when recording radio
broadcasts. The earphone cable acts as an antenna for radio reception.
Recording with the built-in microphone
1 Press the Menu/Back
button.
The main menu appears.
2 Select Extras Microphone.
3 Press the Play/Pause
button to start recording.
TIP
For a clear recording, make sure you place Zen Micro as close as possible to what you
want to record.
4 While recording, you can press the Options
button and select one of the following
items:
■
■
■
Pause
Pauses the recording. You can also pause the recording by pressing the Play/Pause
button.
Split
Starts a new recording.
Stop
Stops and saves the recording.
5 The recorded track is named MIC followed by the date and time of the recording (MIC
YYYY-MM-DD HH:MM:SS). For example, if you record a track on March 15, 2004 at
2:57 pm, the track is named MIC 2004-03-15 14:57:00.
6 To preview your new recording, press the Options
delete it, select Delete Recording.
button and select Preview. To
38
Playing and Managing Music
To view and play back recorded tracks, see "Playing recorded tracks" on page 39.
Playing recorded tracks
1 Press the Menu/Back
button.
The main menu appears.
2 Select Music Library Recordings, and select the recording you want to play.
Deleting tracks
1 Press the Menu/Back
button.
The main menu appears.
2 Select Music Library.
3 Continue searching with the Touch Pad until you find the track or category of tracks that
you want to delete.
4 Press the Options
button and select Delete Playlist, Delete Album, Delete Artist,
Delete Genre or Delete Track.
For more song management tasks, connect your player to your computer and use
Creative MediaSource Player/Organizer.
Viewing track information
To view detailed information about a track, such as its duration, scroll to the track, press
the Options
button, and select View Details.
Viewing player information
You can view player information, such as memory space and the total number of tracks, in
the Information screen.
39
Playing and Managing Music
1 Press the Menu/Back
button.
The main menu appears.
2 Select System Information.
40
Using Zen Micro’s Organizer Features
Using Zen Micro’s Organizer Features
Zen Micro stores your contacts, calendar events and tasks from Microsoft
Outlook®. Read on to learn how to use these organizer features.
Synchronizing with Microsoft Outlook
1 Connect Zen Micro to your computer.
2 Start Sync Manager.
You can start Sync Manager from Zen Media Explorer or Creative Media Source Player/
Organizer.
3 Select the My Computer and Zen Micro as the devices you want to synchronize, and then
click Sync Now.
4 Select the information you want to import from Microsoft Outlook, and then click the Next
button.
5 Follow the instructions on the screen.
6 Click the Finish button.
TIP
You can also use Sync Manager to synchronize music tracks between Zen Micro and
your computer. For more information, see "Synchronizing music with your computer"
on page 26
Viewing the calendar
1 Press the Menu/Back
button.
The main menu appears.
2 Select Extras Organizer Calendar.
41
Using Zen Micro’s Organizer Features
3 Use the Next/Fast Forward
and Previous/Rewind
buttons to scroll between
months, and use the Touch Pad to scroll between the days in the selected month.
4 Lightly tap the Touch Pad to view the events and to-do list of the selected day.
Viewing today’s tasks
1 Press the Menu/Back
button.
The main menu appears.
2 Select Extras Organizer Tasks.
Viewing contacts
1 Press the Menu/Back
button.
The main menu appears.
2 Select Extras Organizer Contacts.
3 Select a name in your contact list to view details about the selected person.
42
Storing Data Files in Zen Micro
Storing Data Files in Zen Micro
You can use Zen Micro to store backup copies of your computer’s data files,
or use it to transfer files from one computer to another.
Use Zen Media Explorer if you need to transfer data files between Zen Micro and your
computer. Zen Media Explorer is automatically installed when you set up the Zen Micro
software on your computer. If you want to use Zen Micro to transfer files between different
computers, make sure you set up the Zen Micro software on these computers.
If you are using a shared computer in school or at the office, and installing Zen Media
Explorer is not possible, you can still transfer data files. However, you must enable
Zen Micro’s Removable Disk mode when you do this.
Using Zen Micro as a Removable Disk
1 Press the Menu/Back
button.
The main menu appears.
2 Select Extras Removable Disk.
When you select this menu item for the first time, you must select the the amount of
memory space you want to use for the Removable Disk mode.
3 When you see Removable Disk on Zen Micro’s LCD, you are ready to transfer data files
to and from any computer.
43
Storing Data Files in Zen Micro
4 Connect Zen Micro to your computer using the supplied USB cable.
44
Storing Data Files in Zen Micro
Zen Micro appears as a Removable Disk under My Computer in Windows Explorer.
5 Use the drag-and-drop method in Windows Explorer to copy files to and from Zen Micro.
6 When you have finished copying files, safely disconnect Zen Micro using the Windows
Eject or Safely Remove Hardware icon on the Taskbar. Follow these steps below to
safely disconnect your player:
CAUTION!
Only disconnect Zen Micro after the Do not Disconnect message disappears from the
LCD. If not, your player may not be able to function normally.
45
Storing Data Files in Zen Micro
To stop your player in Windows XP, Windows 2000 or Windows Me
Click the Safely Remove Hardware icon
on the Taskbar, click Safely remove USB
Mass Storage Device, and disconnect your player when you are prompted to do so.
To stop your player in Windows 98 SE
In Windows Explorer, right-click the Removable Disk icon, click the Eject option, and
disconnect your player when you are prompted to do so.
46
Storing Data Files in Zen Micro
7 To return to the Now Playing screen and continue listening to music on Zen Micro, press
the Menu/Back
button.
Remember to disconnect Zen Micro first. Zen Micro cannot return to the Now Playing
screen if the USB cable is still connected to it.
NOTE
■
■
Data files saved in the Recovery Mode memory space cannot be viewed or
managed with Zen Media Explorer.
Similarly, data files transferred to Zen Micro using Zen Media Explorer cannot be
viewed or managed in Recovery Mode.
Changing the amount of memory space in Removable Disk mode
You can change the amount of memory space in Removable Disk mode at anytime.
1 Press the Menu/Back
button.
The main menu appears.
2 Select Extras Removable Disk.
3 Press the Options
button, select Set Capacity, and select the capacity that you want.
Before you can decrease the amount of memory space, the existing data files stored in
Removable Disk mode must be able to fit into the decreased space.
NOTE
■
To delete all the data files in the Removable Disk memory space, press the Options
■
button and select Format.
Use Windows Explorer if you want to delete individual data files stored in
Removable Disk mode.
47
Storing Data Files in Zen Micro
4 Alternatively, connect Zen Micro to your computer and use Creative Removable Disk
Manager to increase or decrease the amount of memory space in Removable Disk mode.
TIP
■
■
Creative Removable Disk Manager is included with your player and is automatically
installed when you set up the Zen Micro software on your computer.
To start Creative Removable Disk Manager, click Start → Programs or All
Programs → Creative → Zen Micro → Creative Removable Disk Manager.
48
Personalizing Zen Micro
Personalizing Zen Micro
Zen Micro’s settings can be adjusted to suit your needs.
Adjusting Touch Pad settings
You can change the Touch Pad’s sensitivity, and to turn the Touch Pad’s clicking sound on
or off.
1 Press the Menu/Back
button.
The main menu appears.
2 Select System Player Settings Touch Pad.
3 To adjust the Touch Pad’s sensitivity, select Sensitivity and use the Touch Pad to scroll to
the setting that you want.
4 To turn the clicking sound on or off, select Clicker: On or Clicker: Off.
Setting the date and time
1 Press the Menu/Back
button.
The main menu appears.
2 Select Extras Date & Time. The current date and time are displayed.
3 Press the Options
button and select Set Time or Set Date to change the time or date
settings respectively.
4 You can adjust how the date and time are displayed by selecting Date Separator, Date
Format and Time Format.
49
Personalizing Zen Micro
Setting the alarm
1 Press the Menu/Back
button.
The main menu appears.
2 Select Extras Date & Time. The current date and time are displayed.
3 To adjust time, date and alarm settings, press the Options
button and select Set
Alarm.
Using Zen Micro’s equalizer (EQ)
EQ is Zen Micro’s collection of equalizer settings that enhance the sound of your music.
You can select equalizer settings to suit the genre or style of your music, or customize your
own setting.
1 Press the Menu/Back
button.
The main menu appears.
2 Select System Audio Settings EQ.
3 Select one of the EQ menu items.
When an EQ setting is selected,
appears on the Now Playing screen.
50
Personalizing Zen Micro
To create a customized equalizer setting
1 In the EQ screen, select Custom EQ.
Each slider on the Custom EQ screen represents successively higher frequencies that can
be adjusted.
■
■
■
■
■
80 controls bass frequency
250 adjusts the low mid-range frequency
1k adjusts the mid-range frequency
4k adjusts the upper mid-range frequency
13k adjusts the treble frequency.
2 Select a slider, and move your finger up and down the Touch Pad to move the control knob
up or down to vary the amount of boost or reduction in the selected frequency range.
3 Lightly tap the Touch Pad to confirm the setting for the selected slider.
4 Repeat steps 2 and 3 for the remaining sliders.
5 Select the check mark
to save and enable the Custom EQ settings.
Setting playback at a constant volume
You can limit the volume range of playback with Smart Volume. When enabled, Smart
Volume sets playback at a constant volume, so you do not have to continually adjust the
volume when you play back different tracks.
1 Press the Menu/Back
button.
The main menu appears.
2 Select System Audio Settings Smart Volume: On.
51
Personalizing Zen Micro
Labeling Zen Micro with your name
1 Press the Menu/Back
button.
The main menu appears.
2 Select System Player Settings Owner.
3 Spell out your name using the characters in the list box that appears, and then select Ok.
Setting the backlight duration
1 Press the Menu/Back
button.
The main menu appears.
2 Select System Player Settings Backlight Time.
3 Use the Touch Pad to scroll to the backlight duration that you want.
Setting the display contrast
1 Press the Menu/Back
button.
The main menu appears.
2 Select System Player Settings Contrast.
3 Use the Touch Pad to scroll to the contrast setting that you want.
52
Personalizing Zen Micro
Setting the idle shutdown time
You can specify how long Zen Micro remains inactive before it automatically shuts down.
This feature helps you conserve battery power.
1 Press the Menu/Back
button.
The main menu appears.
2 Select System Player Settings Idle Shutdown.
3 Use the Touch Pad to scroll to the timing that you want.
Enabling Sleep Timer
You can specify a fixed period of time before Zen Micro automatically turns off. When
enabled, Sleep Timer overrides the Idle Shutdown settings.
1 Press the Menu/Back
button.
The main menu appears.
2 Select System Player Settings Sleep Timer.
3 Use the Touch Pad to scroll to the timing that you want.
Changing the menu language
1 Press the Menu/Back
button.
The main menu appears.
2 Select System Language, and select the language that you want.
53
Personalizing Zen Micro
Resetting Zen Micro
You can reset Zen Micro to its original settings.
1 Press the Menu/Back
button.
The main menu appears.
2 Select System Reset Settings.
Adding and removing main menu items
You can personalize the main menu by adding and removing menu items. For example, if
you usually search for songs by album, you can add Albums to the main menu so you can
access the Albums screen more easily.
1 Press the Menu/Back
button.
The main menu appears.
2 Press the Options
button and select Configure Menu.
3 Select the check boxes to add menu items and clear the check boxes to remove these
menu items from the main menu.
4 To change the order of the menu items, press the Options
button and select Change
Order.
5 Use the Touch Pad to change the position of the the highlighted menu item.
6 To revert to the default menu settings, press the Options
Menu.
button and select Default
54
Frequently Asked Questions
Frequently Asked Questions
If the tips and advice in this chapter do not answer your question, refer to
the Creative Knowledge Base for more information. Creative's 24-hour
self-help Knowledge Base helps you resolve and troubleshoot technical
queries. Go to www.creative.com and select your region.
What are the minimum system requirements for setting up Zen Micro’s
software?
■
■
■
■
■
■
■
NOTE
Microsoft® Windows® XP, Windows 2000, Windows Millennium Edition (Me) or Windows 98
Second Edition (SE)
Intel® Pentium® II 350 MHz, AMD®-K6-2® 450 MHz or better processor (Pentium III 450 MHz or
higher recommended for MP3 encoding)
CD-ROM/DVD-ROM drive with digital audio extraction support
USB 1.1 (USB 2.0 port recommended for faster transfers)
64 MB RAM (128 MB recommended)
30 MB free hard disk space (more for audio content storage)
Internet connection for Internet content downloading and CDDB2™ support (any charges
incurred are the responsibility of the user)
The software applications on the Zen Micro CD may have higher requirements for
basic functionality. Refer to each application’s documentation for details.
Should I leave Zen Micro plugged into the Power Adapter?
No, you should not. After charging the battery or using Zen Micro, disconnect it from the
Power Adapter. Leaving it plugged in leads to heat buildup, which is not good for Zen Micro
or its battery.
55
Frequently Asked Questions
Can I jog with my Zen Micro?
You should not subject Zen Micro to continuous shocks, such as those that are likely to
occur while you jog or run.
Can I transfer DRM protected WMA files to my player?
Yes. To transfer DRM protected WMA files to Zen Micro, you can use Creative
MediaSource Player/Organizer or Zen Media Explorer.
Can I use the player for portable data storage?
Yes, you can. For more information, see "Storing Data Files in Zen Micro" on page 43.
If I damage or lose my Power Adapter, can I buy a similar, off-the-shelf
adapter?
No. An off-the-shelf adapter may not be compatible with Zen Micro, and may even damage
it. You should get a replacement Power Adapter from Creative at www.creative.com, or
your local Creative office/distributor.
56
Frequently Asked Questions
I have to recharge Zen Micro’s battery quite often. Is there anything I can do
to make it last longer?
Generally, any operation requiring Zen Micro to access the hard disk uses battery power.
Consequently, filling your player to capacity is not recommended. However, some
operations consume more battery power:
■
■
■
■
■
a long backlight timeout setting. A shorter timeout conserves battery power.
a high contrast setting. Position the player so that you can read the display without using a high
contrast setting.
fast-forwarding or rewinding.
turning the player on and off too many times.
prolonged use at high volumes.
57
Frequently Asked Questions
One of the following diagrams appears on the LCD. What does it mean?
Your computer is actively managing your player. Warning:
DO NOT disconnect your player while your computer is still
actively managing it.
Your computer is not actively managing your player. To use
your player, disconnect it from your computer.
You are upgrading your player’s firmware.
58
Frequently Asked Questions
The firmware upgrade is complete. Reset your player to
enable the new firmware to take effect.
There was an unexpected power loss during audio file
transfer. Use you player only after this library rebuilding is
completed.
There was an unexpected power loss while saving settings.
Reload the firmware, download a newer firmware version
or contact Customer Support Services.
59
Frequently Asked Questions
The firmware is corrupted. Reload the firmware, download
a newer firmware version or contact Customer Support
Services.
How do I reset Zen Micro?
You can solve most problems with Zen Micro by resetting it.
1 Turn off Zen Micro.
2 Slide open the battery cover.
3 Remove the battery and wait five seconds before reinserting the battery.
Zen Micro does not turn on or stops responding. What do I do?
■
■
■
Make sure the Power switch is not in the Lock
position.
If you’re using the optional Zen Micro remote control, make sure the remote control’s Lock
switch is not is the Lock
position.
Your battery may need to be recharged. Connect your player to the Zen Micro Power Adapter,
and then connect the Power Adapter to a power outlet. If necessary, turn on the power outlet.
60
Frequently Asked Questions
Do I need to defragment Zen Micro hard disk drive?
Zen Micro may occasionally operate at less than optimal performance for a number of
reasons, for example, if Music Library is rebuilt frequently when no changes are made to it.
Selecting CleanUp in Zen Micro’s Recovery Mode menu cleans, rebuilds and reorganizes
Music Library and restore it to optimal efficiency. Save a copy of Zen Micro’s content
before cleaning up your player.
To clean up Zen Micro’s hard disk drive
1 Turn off Zen Micro.
2 Slide open the battery cover.
3 Remove the battery.
4 Slide the Power switch towards the Power
icon and hold it there while you reinsert
the battery.
The Recovery Mode screen appears when Zen Micro turns on.
5 Four menu items are available in the Recovery Mode screen: CleanUp, Format All,
Reload Firmware and Reboot.
6 To clean up your player’s hard disk drive, select Cleanup.
7 When the clean up is complete, select Reboot. Your player restarts and starts rebuilding
Music Library.
CAUTION!
■
■
Selecting Format All clears Zen Micro’s memory and erases all hard disk content.
Save a copy of your player’s content before formatting your player.
Selecting Reload Firmware erases your player’s firmware. DO NOT Select the
Reload Firmware unless you have downloaded a newer firmware version for
Zen Micro, or have been advised to do so by the Creative Customer Services
center.
61
Frequently Asked Questions
My optional Zen Micro remote control is not working. What do I do?
■
■
Make sure the remote control’s Lock switch is not in the Lock position.
Make sure the remote control is properly connected to Zen Micro, and the earphones are
properly connected to the remote control.
What is PC Music Library?
PC Music Library is your collection of digital audio tracks in Creative MediaSource Player/
Organizer. In Creative MediaSource Player/Organizer, you can have more than one PC
Music Library. When sharing the same computer, multiple users can each have their own
music library, each with its own settings. However, only one music library can be active at
one time.
Can PC Music Library be automatically updated?
Yes. You can use Media Sniffer tool in Creative MediaSource Player/Organizer to monitor
or 'watch' folders in your computer. With Media Sniffer enabled, PC Music Library is
updated when tracks in monitored folders are added, deleted or moved. This helps to
prevent broken links in PC Music Library. For more information about using Creative
MediaSource Player/Organizer, refer to its online help.
Where can I get more information on Creative products?
Visit www.creative.com and select your region or country for updates and downloads
relating to all Creative products.
62
Safety Advice
Safety Advice
The following precautions apply to Zen Micro, its battery and its
accessories.
■
■
■
■
■
■
■
■
■
Store away from direct sunlight.
Do not expose to heat or fire.
Avoid using or storing in environments that exceed 45ºC (113ºF).
Keep away from excessive moisture.
Do not subject to excessive force or impact.
Do not modify or disassemble.
Avoid contact with metal objects.
Do not pierce or crush.
If there is leakage, an unusual odor, discoloration or deformation during use, remove the
battery and do not use it again. Clean your hands well before handling food or touching
sensitive areas of your body, for example, your eyes.
63
General Specifications
General Specifications
Size (WxHxD)
■
51 mm (2.0") x 84 mm (3.3") x 19 mm (0.7")
■
108 g (3.8 oz) with battery
■
5 GB
Weight
Capacity
Power Source
■
■
Battery: 1 x Rechargeable Lithium Ion battery
USB bus powered when connected to a power outlet or powered USB port on a computer
Battery Life
■
MP3 128 kbps: Up to 12 hours of continuous playback with a full battery charge
Playback Formats
■
■
■
MP3: Up to 320 kbps
WMA: Up to 320 kbps
WMA with Digital Rights Management (DRM) 9
Recording Formats
■
■
Voice (via built-in microphone): IMA ADPCM (16 kHz, Mono)
FM Radio: IMA ADPCM (22 kHz, Stereo)
64
General Specifications
FM Radio
■
■
■
Stereo and Mono
Up to 32 preset stations
FM region support
International: 87.5 MHz ~ 108.0 MHz, 100 kHz intervals
Japan: 76.0 MHz ~ 90.0 MHz, 100 kHz intervals
MP3 Playback Performance
■
■
■
■
Signal-to-Noise Ratio: Up to 98 dB
Channel Separation: Up to -70 dB
Frequency Response: 20 Hz ~ 20 kHz
Harmonic Distortion Output: <0.1%
Connectors
■
Headphone jack: 3.5 mm (1/8") stereo minijack, 5~7 mW per channel
USB 2.0 port: Standard USB mini-B receptacle
USB 2.0 (High speed)
USB 1.1 (Full speed)
■
160 x 104 pixel display with white LED backlight
■
■
■
LCD
Firmware Support
■
Upgradable via USB (firmware upgrades are available from www.creative.com)
Earphone Specifications
■
■
■
■
Frequency Range: 20 Hz ~ 20 KHz
Sensitivity: 111 dB ±5 dB (I/P Level:1 mW)
Impedance: 32 Ω ±15%
Plug: 3.5 mm (1/8") stereo minijack
65