1
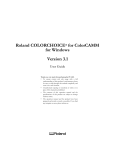
getting started
quick start guide
This Quick Start Guide is intended to take you through basic
setup of your Roland ColorCAMM PC -12. For more detailed
information or troubleshooting, please refer to the ColorCAMM
PC-12 User’s Manual that came with your machine.
1Attaching the Media Base
1. On the back of the machine are two holes for inserting the
tabs on the media base. There are also two screw holes for
securing the media base in place after attaching it. Remove
the screws that are now in the screw holes.
Holes for inserting the tabs
on the media base
with the
3 Connecting to the Computer
To connect the machine and the computer, you can use either a
parallel cable (IEEE 1284-compliant) or a USB cable. Be sure to
make the connection using only one or the other type of cable.
Connection Using a Parallel Cable (IEEE 1284-compliant)
The parallel cable is sold separately. Use a cable suited to the
configuration of the printer port on your computer.
Note
5
Installing
Ink-ribbon Cartridges
Install ink-ribbon cartridges with side B facing up. If an ink
cartridge is with side B facing down, the unit determines that the
ink cartridge is not installed or is upside down, and the [error]
light on the PC-12 flashes.
1.
If you’re using a new ink-ribbon cartridge,
remove the stopper.
Make the cable connections while the computer
and the machine are switched off.
5. As shown in the figure,
2.
Back of the machine
“B” Indication
Rear left of the machine
insert a pencil or the like into
Insert a pencil or side B of the ink-ribbon
the like and turn. cartridge and turn
clockwise to take up slack
in the ink ribbon.
Rating
label
Computer
Amphenol 36-pin
connector
Screw holes for securing the
media base in place
3.
2. With the roller side of the media base facing up, insert the
Printer port
tabs on the media base into the holes on the machine.
Switch off the power to the PC-12 and press the front-cover
eject button. When the internal lock is released, open the front
cover gently while supporting it with your hands.
Connection Using a USB Cable
Note
5. Arrange the ink cartridges so that side
4.
Make the cable connections while the computer
and the machine are switched off.
B faces up and grasp the ink cartridge at
the center using your thumb and index
finger.
Ink ribbon
3. Use the screws to secure the media base in place.
Rear left of the machine
USB connector (B type)
computer
USB port
2 Connecting the Power Cord
"B" indication
4 Switching the Power On and Off
5.
While grasping the ink-ribbon cartridge between your thumb
and index finger, insert the ink-ribbon
cartridge into the inkcartridge holder so
Latch (blue area)
that the left side of the
ink cartridge presses the latch (the
blue area that holds the ink
cartridge in place) Install the inkribbon cartridge by pressing it in from
above.
Gray tabs (two locations)
Switching On the Power
1. Press the [power] button on the PC-12. The PC-12
automatically performs initialization, and the [power] and
[ready] lights illuminate.
White tab
6. Make sure the ink-ribbon
cartridge is held securely by
the white tab, blue tab, and
two gray tabs on the inkribbon cartridge holder, and that
there is no slack in the
Blue tab
ribbon.
2. Start the computer
Power-cord
connector
Switching Off the Power
1. Shut down the computer.
2. Press the [power] button on the PC-12. All the lights go dark.
Power cord
For more information on the ink cartridges & their installation,
see the Installing Ink Cartridges section in the User Manual.
6 Installing a Blade
When you are using the PC-12 for the first time, or when you
are replacing the blade with a new one,
follow the steps below to install a blade
Blade holder
in the blade holder.
As shown in the figure at right, insert the blade
into the blade holder, pressing it in until it
Blade
clicks into place. When doing this,
press the blade down on a piece of
Blade tip
cardboard or the like.
Press the blade down on a piece
of cardboard or the like.
7Adjusting the Blade Tip
• The amount of blade extension is set at approximately 0.0078
in. (0.2 mm) when the unit is shipped from the factory. An amount
of blade extension that is the same as the thickness of the media
(not including the carrier paper) is optimal. For the included
media and genuine resin-use media (white or transparent vinyl
chloride), this is approximately 0.0078 in. (0.2 mm). When at
0.0078 in. (0.2 mm), the blade tip is just barely visible beyond the
blade holder.
• If the blade leaves clearly visible traces on the carrier paper, the
blade tip is extended too far.
Excessive blade extension may damage the blade protector and
make attractive cutting impossible, so readjust the amount of
blade extension.
Be sure to adjust the tip of the blade to match the thickness of the
media you're using.
As shown in the figure at right, turn the
dial on the blade
holder to extend
the blade tip by
an amount
equal to the
thickness of the
Blade tip
media you're
Media thickness
using.
Turn clockwise to extend
the blade.
Turn counterclockwise to
retract the blade.
The blade is extended by
0.0196 in. (0.5 mm) with
one full turn and by 0.0019 in.
(0.05 mm) when turned
by one tick of the scale.
quick start guide
continued
10
8 Installing the Blade Holder 9 Loading Roll Media
1. Switch off the power to the PC-12
1.
2. Press the front-cover eject
button, and after the
inside lock has been
released, catch the
front cover with
your hand and open
it gently.
Orient the roll media as shown in the figure, place it in the
media base, and bring it flush against the right stopper.
Stopper
Media guide
cartridge carriage. Turn the tool-carriage screw
counterclockwise to loosen it.
Perform demo printing to make sure printing can be
carried out correctly.
Bring flush against the right stopper
.
Front-cover eject
button
3. The tool carriage is located to the right of the ink-ribbon
Note
11Clean The Print Head
Printing Tests and
Cutting Tests
To prevent foreign particles from coming in contact
with the print head, we recommend cleaning most
media types with a lint-free cloth and denatured
alcohol. Simply apply alcohol to cloth and clean the area you
intend to print. Be sure to wipe in one direction to remove hard
particles.
!
Caution
• Demo printing uses resin-compatible media and resin CMYK
ink-ribbon cartridges.
You can’t use wax compatible media and wax ribbon cartridges.
• The required media size is 6 in. (152 mm) or more wide by 6 in.
(152 mm) or more in length.
• If the power is switched off while demo printing is in progress,
then the next time you switch on the power, the machine cuts off
the media and goes into data standby.
1. Make sure that resin-compatible media is loaded on the PC-12
and the resin CMYK ink-ribbon cartridges are installed. If the
PC-12 is turned on, press the [power] button to switch it off.
2. While holding down the [ready/insert] button, press and hold
the [power] button. The three lights illuminate.
3. Continue to hold down the [ready/insert] button and release
Tool carriage
just the [power] button. All the lights go dark.
Cutter guide
2. If the leading edge of the roll
4. Insert the blade holder into the hole in the carriage.
Blade holder
12Before Printing & Cutting
Before printing and cutting with the PC-12, you will need to
install the Roland ColorCAMM Driver CD and the
ColorChoice® software CD that are included with your
machine. Please refer to the Roland ColorChoice® for the
PC-12 User’s Manual for information on proper installation
and operation for your Mac or PC.
!
Caution
WINDOWS USERS: Do not install the ColorChoice
software until you have installed the Roland
ColorCAMM Driver.
4. Wait five seconds, the release the [ready/insert] button. The
media is not straight, use a
commercially available cutter
knife or the like to cut it straight.
As shown in the figure at right,
hold down the roll media with
your hand and cut the media
using the cutter knife, inserting the
blade of the cutter knife into the
knife-guide groove and letting the
groove guide the cutter knife.
three lights flash in sequence, then the [power] light flashes
and demo printing starts.
When demo printing ends normally, the PC-12 automatically
restarts, cuts off the media, and goes into data standby.
3. Insert the media in the machine’s feed unit. Insert the media
until it makes contact.
Technical Support
For the latest firmware, drivers, technical information, along with
tips and techniques for your Roland product go to
www.rolanddga.com/support.
For technical assistance, send an email to [email protected].
We’ll make every attempt to answer email support inquiries within
60 minutes during normal business hours
(Monday-Friday, 8:00 AM - 5:00 PM)
Output Results of the Printing Test
1. Four-color printing (cyan, magenta, yellow, and black)
2. Cutting of a rectangle around four-color printing
3. Printing-head dot drop-out test pattern
4. Printer information
Technical Support phone assistance 800-542-2307 x300.
Example of Output Results
For more information on installing or replacing the blade, please
see the Installing & Adjusting the Blade section in the user manual.
Note
Only the right-hand leading edge of the printhead needs to be
cleaned. The cleaning pen should be used after each print job.
Hard particles tend to solidify or harden to the print head if
head temperature cools down to ambient levels. See your
operating manual for detailed usage instructions.
Cyan
Magenta
Yellow
1, 2
Black
Insert until the collar of the blade holder lies flush
against the top of the hole.
4. Press the [ready/insert] button once. The machine feeds the
media to the position where printing can be performed.
Not OK
OK
5. Mount the included media cover on the machine’s media base.
5. Turn the tool-carriage screw clockwise to secure in place.
3
Media cover
4
Fit it into this space.
Mount so that this area fits into the
groove in the knife guide.
If there are any missing dots or other
evidence of a drop in printing quality,
clean the head.
For more information about head
cleaning, see 6-1 in the User’s Manual:
“Cleaning the Printing Heads.”
RDGA-QSG-PC12
01/20/02