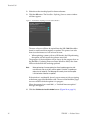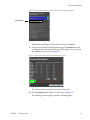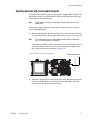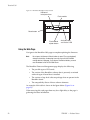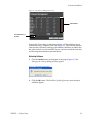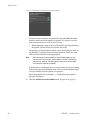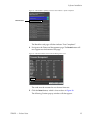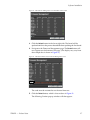
1
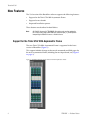
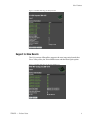
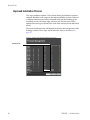
TRINIX
BROADLINX SOFTWARE
Release Notes
Software Version 3.3.0
071828317
SEPTEMBER 2011
CERTIFICATE
Certificate Number: 510040.001
The Quality System of:
Grass Valley USA, LLC and its Grass Valley Affiliates
Headquarters:
400 Providence Mine Road
Nevada City, CA 95945
United States
15655 SW Greystone Ct.
Beaverton, OR 97006
United States
Kapittelweg 10
4827 HG Breda
The Nederlands
2300 So. Decker Lake Blvd.
Salt Lake City, UT 84119
United States
Brunnenweg 9
D-64331 Weiterstadt
Germany
Including its implementation, meets the requirements of the standard:
ISO 9001:2008
Scope:
The design, manufacture and support of video and audio hardware and software products and related
systems.
This Certificate is valid until:
This Certificate is valid as of:
Certified for the first time:
June 14, 2012
December 23, 2010
June 14, 2000
H. Pierre Sallé
President
KEMA-Registered Quality
The method of operation for quality certification is defined in the KEMA General Terms And Conditions For
Quality And Environmental Management Systems Certifications. Integral publication of this certificate is allowed.
KEMA-Registered Quality, Inc.
4377 County Line Road
Chalfont, PA 18914
Ph: (215)997-4519
Fax: (215)997-3809
CRT 001 042108
Accredited By:
ANAB
TRINIX
BROADLINX SOFTWARE
Release Notes
Software Version 3.3.0
071828317
SEPTEMBER 2011
Contacting Grass Valley
International
France
United States/Canada
+800 8080 2020 or +33 1 48 25 20 20
24 x 7
Support Centers 24 x 7
Asia
+1 800 547 8949 or +1 530 478 4148
Hong Kong, Taiwan, Korea, Macau: +852 2531 3058 Indian Subcontinent: +91 22 24933476
Southeast Asia/Malaysia: +603 7805 3884 Southeast Asia/Singapore: +65 6379 1313
China: +861 0660 159 450 Japan: +81 3 5484 6868
Local Support
Australia and New Zealand: +61 1300 721 495
Central/South America: +55 11 5509 3443
Centers
(available
Middle East: +971 4 299 64 40 Near East and Africa: +800 8080 2020 or +33 1 48 25 20 20
during normal
Belarus, Russia, Tadzikistan, Ukraine, Uzbekistan: +7 095 2580924 225 Switzerland: +41 1 487 80 02
business hours)
S. Europe/Italy-Roma: +39 06 87 20 35 28 -Milan: +39 02 48 41 46 58 S. Europe/Spain: +34 91 512 03 50
Europe
Benelux/Belgium: +32 (0) 2 334 90 30 Benelux/Netherlands: +31 (0) 35 62 38 42 1 N. Europe: +45 45 96 88 70
Germany, Austria, Eastern Europe: +49 6150 104 444 UK, Ireland, Israel: +44 118 923 0499
Copyright © Grass Valley USA, LLC. All rights reserved.
This product may be covered by one or more U.S. and foreign patents.
Grass Valley Web Site
The www.grassvalley.com web site offers the following:
Online User Documentation — Current versions of product catalogs, brochures,
data sheets, ordering guides, planning guides, manuals, and release notes
in .pdf format can be downloaded.
FAQ Database — Solutions to problems and troubleshooting efforts can be
found by searching our Frequently Asked Questions (FAQ) database.
Software Downloads — Download software updates, drivers, and patches.
4
TRINIX — Release Notes
Contents
Broadlinx Release Notes . . . . . . . . . . . . . . . . . . . . . . . . . . . . . . . . . . . . . . . . . . . . . . . . .
7
Purpose . . . . . . . . . . . . . . . . . . . . . . . . . . . . . . . . . . . . . . . . . . . . . . . . . . . . . . . . . . . . . . . 7
Interoperability Requirements . . . . . . . . . . . . . . . . . . . . . . . . . . . . . . . . . . . . . . . . 7
New Features . . . . . . . . . . . . . . . . . . . . . . . . . . . . . . . . . . . . . . . . . . . . . . . . . . . . . . . . . . 8
Support for the Trinix 512x1024 Asymmetric Frame . . . . . . . . . . . . . . . . . . . . . . . 8
Support for New Boards. . . . . . . . . . . . . . . . . . . . . . . . . . . . . . . . . . . . . . . . . . . . . . . 9
Improved Installation Process . . . . . . . . . . . . . . . . . . . . . . . . . . . . . . . . . . . . . . . . . 10
Replacing Trinix Boards . . . . . . . . . . . . . . . . . . . . . . . . . . . . . . . . . . . . . . . . . . . . . . . . 11
Software Installation . . . . . . . . . . . . . . . . . . . . . . . . . . . . . . . . . . . . . . . . . . . . . . . . . . . 12
Introduction . . . . . . . . . . . . . . . . . . . . . . . . . . . . . . . . . . . . . . . . . . . . . . . . . . . . . . . . 12
Overview. . . . . . . . . . . . . . . . . . . . . . . . . . . . . . . . . . . . . . . . . . . . . . . . . . . . . . . . . 12
Caveats . . . . . . . . . . . . . . . . . . . . . . . . . . . . . . . . . . . . . . . . . . . . . . . . . . . . . . . . . . 13
Updating Compact Flash Cards . . . . . . . . . . . . . . . . . . . . . . . . . . . . . . . . . . . . . . . 13
Copying the Broadlinx Software to the CF Using a CF Reader . . . . . . . . . . . 14
Updating New Broadlinx Boards . . . . . . . . . . . . . . . . . . . . . . . . . . . . . . . . . . . . . . 14
Updating Systems with a Single Broadlinx Board . . . . . . . . . . . . . . . . . . . . . . . . 15
Using the Web Page. . . . . . . . . . . . . . . . . . . . . . . . . . . . . . . . . . . . . . . . . . . . . . . . 16
Updating Systems with Two Broadlinx Boards . . . . . . . . . . . . . . . . . . . . . . . . . . 21
Using the Web Page. . . . . . . . . . . . . . . . . . . . . . . . . . . . . . . . . . . . . . . . . . . . . . . . 22
Updating the Second Broadlinx Board . . . . . . . . . . . . . . . . . . . . . . . . . . . . . . . . 26
Licensing SNMP on Both Broadlinx Boards . . . . . . . . . . . . . . . . . . . . . . . . . . . . . 29
Formatting the Compact Flash Card with the FAT16 Format . . . . . . . . . . . . . . 31
Installation FAQ. . . . . . . . . . . . . . . . . . . . . . . . . . . . . . . . . . . . . . . . . . . . . . . . . . . . . 33
The installation process seems to have stopped . . . . . . . . . . . . . . . . . . . . . . . . 33
TRINIX — Release Notes
5
— Contents
6
TRINIX — Release Notes
Version
3.3.0
SEPTEMBER 2011
Broadlinx Release Notes
Purpose
This document provides information about the new features and the software installation instructions for the 3.3.0 software release of the Broadlinx
software.
Grass Valley strongly recommends that 256x512 Routing switcher owners
update to the 3.3.0 release.
Interoperability Requirements
•
Any Encore system that is newer than the 1.7.3 version.
•
Any Jupiter system.
•
The 2.0.13 version of NetConfig or newer.
Note
Do not use Broadlinx with either the Dynex DX-ESW8, 10/100M Fast Ethernet
Switch or the Zonet Model ZFS3124.
Related Documents
Trinix Planning and Installation Manual.
Upgrade Materials Supplied
Table 1. Broadlinx Version. 3.2
Quantity
TRINIX — Release Notes
Description
Part Number
1
Broadlinx 3.3.0 Software
N/A
1
Broadlinx 3.3.0 Release Notes
071828317
7
Version 3.3.0
New Features
The 3.3.0 version of the Broadlinx software supports the following features:
•
Support for the Trinix 512x1024 Asymmetric Frame
•
Support for new boards
•
Improved Installation process
These features are described in detail below.
Note
All 256x512 frames with TRX-DM256-3G matrix cards must be updated to
the 3.3.0 (or later) release of Broadlinx to avoid the input_in_frame equation
interpreting the 256x512 frame as a 128x128 frame.
Support for the Trinix 512x1024 Asymmetric Frame
The new Trinix 512x1024 Asymmetric Frame is supported in the latest
version of Broadlinx (Figure 1).
This support includes changes to the console commands and Web pages for
the new Asymmetrical frame, including the new Input board, see (Figure 2
on page 9).
Figure 1. Broadlinx Web Page for the Trinix 512x1024 Asymmetric Frame
8
TRINIX — Release Notes
New Features
Figure 2. Broadlinx Web Page for the Input board
Support for New Boards
The 3.3.0 version of Broadlinx supports the new innovative boards that
Grass Valley offers, the Trinix Multiviewer and the Fiber Optic option.
Figure 3. Broadlinx Web Page for the Trinix Multiviewer
TRINIX — Release Notes
9
Version 3.3.0
Improved Installation Process
The steps needed to update a Trinix frame during installation have been
reduced. Broadlinx now compares the micro-controller versions. If there is
a difference between the Active (installed) code and the Pending (to be
installed) version, the Status light will turn red. The firmware will be
updated for each type of board at the same time instead of each individual
board.
The actual installation time will depend on the size and configuration of the
Routing switcher. These steps are described in Software Installation on
page 12.
Figure 4. Changes to the Firmware Management Screen
Installed version
10
TRINIX — Release Notes
Replacing Trinix Boards
Replacing Trinix Boards
When replacing Trinix boards, you should keep in mind that there was a
change in the VIT timing. This change was made to accommodate the additional processing delay of 10.3 micro-seconds in the new 3G matrix cards.
The VIT signals generated from the NR and SR cards were advanced by
10.3 micro-seconds. All of the legacy matrix/output cards VIT timing will
be delayed by the same amount of time.
Grass Valley recommends that you use matched versions of boards (all
boards running Broadlinx version 3.X and newer) in your systems to meet
RP-168 switch points.
CAUTION Grass Valley strongly recommends that customers keep all software updated
to the latest released version. New boards are NOT guaranteed to be compatible with older versions of software. A system failure may occur if a new
board is received as a replacement part and then loaded with an older version
of software.
However, a “mismatched” system will operate but with a minor timing
offset. If you mix a Broadlinx 3.x version board in a system that is running
Broadlinx 2.x, when switched, signals will be outside of the SMPTE RP-168
specification. In other words, the switch will occur as much as 10.3 microseconds later (or early for 3.x NR/SR) for a path that passes through the
mismatched version board.
TRINIX — Release Notes
11
Version 3.3.0
Software Installation
CAUTION Installation of this upgrade will interrupt video signals passing through the
system. The length of this interruption will vary depending on system size
and specific procedures used. Users of this equipment should consult with
Grass Valley Technical Support personnel before proceeding.
Introduction
The Broadlinx firmware is installed and updated using Compact Flash
cards. If the programmed Compact Flash card is not available, you must
obtain the necessary files and then copy them to a blank Compact Flash
card. Ensure that the Compact Flash card is formatted to FAT16 rather than
FAT32 (this format will decrease the time it takes for Broadlinx to “boot” or
start up). The CF card must have a minimum of 128 MB of available
memory.
Overview
This section describes the Installation process. These steps are:
•
Updating Compact Flash cards
•
Updating systems with a single Broadlinx board
•
Updating systems with two Broadlinx boards
The difference between the update process for frames with one or two
Broadlinx boards is that you must:
1. Update the inactive Broadlinx board.
2. Activate the inactive Broadlinx board.
3. Update the now inactive Broadlinx card.
With the single board, you will only need to update one board.
12
TRINIX — Release Notes
Software Installation
Caveats
Before starting the Installation process, please read the following:
•
All frames with TRX-DM256-3G matrix cards MUST be updated to the
3.3.0 (or later) release of Broadlinx. For example, the 256x512, 512x512,
and the 512x1024.
•
Web tools such as NetConfig cannot be used to install versions prior to
the 3.2.0 version of Broadlinx. The 2.0.13 version of NetConfig or newer
must be used.
•
Protected paths are not monitored during firmware updates. If the
primary path fails during a firmware update, no fail-over switch will
occur.
•
Certain TRX-NXT-512x512 systems will require DIP switch changes to
operate properly with the 2.4 release (or newer) software. The S401-7
and S401-8 DIP switches on the DM-33501 and DM-33502 1.5G matrix
boards should be set to ON. If the stickers are not present, these switches
should be set to Off. The remaining six switches on S401 are always set
to Off.
•
For multiple Trinix 128 or 256 frame systems only, the dip switch “A”
setting on the frame with the Broadlinx board that is driving the Com
Bus should be set to Open. This setting should be set to Closed on all
other frames in the system. This step is required when using Protected
Paths. For single frame operation, the “A” switch must be set to the
Open position.
•
Certain steps of the following procedure will momentarily interrupt
switcher operations. These steps are preceded by a Caution statement.
Note
If the Installation process is taking 20% longer than the initial time shown in
Figure 8 on page 17, see The installation process seems to have stopped on
page 33.
•
For more information, contact Grass Valley’s Technical support; see page 4.
Updating Compact Flash Cards
Compact Flash (CF) Memory cards are used to update Broadlinx. These
cards are read from the NR-33000 (Broadlinx) board. You must use at least
a 128MB CF memory card.
TRINIX — Release Notes
13
Version 3.3.0
Copying the Broadlinx Software to the CF Using a CF Reader
This process assumes that a Compact Flash (CF) card reader has been connected to the workstation. If not, see the Installation instructions that came
with the CF card reader.
Note
Grass Valley recommends that you format your CF card to the FAT16 format.
For more information, see Formatting the Compact Flash Card with the FAT16
Format on page 31.
Follow these steps to update a CF with the latest version of Broadlinx:
1. Place the Broadlinx CD in the computer’s CD drive.
2. Open Windows Explorer using one of the following suggested options:
•
Press the Windows logo and E key combination.
•
Right click the Start button and then select the “Explore all users”
option.
•
Click the Start button, then All Programs, point to Accessories, and
then select Windows Explorer.
3. Navigate to the CD, select and then copy all of the Broadlinx files.
4. Navigate to the Compact Flash memory and then paste the files.
Note
If you use a CF card on which a previous version of Broadlinx has been saved,
you will need to overwrite the existing files. It is important that you do NOT
overwrite the ipconfig.txt file on the Compact flash.
The compact flash is now ready to update your system.
Updating New Broadlinx Boards
All Broadlinx boards (NR33000) have the Broadlinx 3.3.0 firmware preloaded. If your Trinix router is currently running a previous version of
Broadlinx, please contact Grass Valley's Technical Support department (+1
800 547 8949 or +1 530 478 4148).
The Broadlinx software that is currently running on your Trinix Routing
switcher must be updated to Broadlinx 3.0.1 (or newer) if you add ANY of
the following Trinix 3G boards:
14
•
TRX-HI-3G
•
TRX-HO-3G
•
TRX-DM128-3G
•
TRX-DM128R-3G
•
TRX-DM256-3G
TRINIX — Release Notes
Software Installation
You MUST do one of the following options when you are adding a new HD
board to a Trinix router that is running Broadlinx 2.4.2 or older:
Note
Selecting one of these options will insure that switches occur at the correct
timing position. See Replacing Trinix Boards on page 11.
•
Update the Trinix router to Broadlinx 3.0.1 or newer (most preferred).
•
Rollback the version of Broadlinx on the new HD board to the
version of Broadlinx that is currently running on your router (least
preferred). You must understand that some boards will be supported by older versions of Broadlinx.
CAUTION Grass Valley strongly recommends that customers keep all software updated
to the latest released version. New boards are NOT guaranteed to be compatible with older versions of software. A system failure may occur if a new
board is received as a replacement part and then loaded with an older version
of software.
Before Proceeding with the Installation process, see the Broadlinx Version
and Supported Trinix Boards section in the Trinix Installation manual. The
information in this section is intended to help you understand what would
be required to update from your current version to the latest version of software.
Updating Systems with a Single Broadlinx Board
This section describes the steps for updating existing Broadlinx boards. The
update process can be accomplished using the Broadlinx Web page to navigate to the Firmware Management screen to activate the FPGAs for the
boards. These steps are described below.
Note
Using Telnet or a Console session during an firmware update can cause the
update to fail.
Follow these steps to update all the boards within the frame (except an
active NR-33000 board):
1. Remove the Broadlinx board from the chassis and remove the existing
compact Flash card by pressing the Eject button (Figure 6 on page 16).
Note
For the Asymmetric frames, the NR-33000 (Broadlinx) board is turned sideways, so the Eject button is at the bottom.
For Encore controlled systems, the memory must be cleared by disconnecting the battery terminal, leave it un-connected for couple of minutes, and then reconnect the battery (Figure 5 on page 16).
TRINIX — Release Notes
15
Version 3.3.0
Figure 5. Battery location on the NR-33000.
Battery terminal location
071828316-BATTERY CONNECTION
2. Insert the Compact Flash card into the slot on the Broadlinx board and
then insert the Broadlinx board into the frame. Broadlinx will then
inventory the boards that are in the frame.
Figure 6. NR-33000 (Broadlinx board) Controls.
NR board
left ejector lever
Flash module
Reset button
Flash module
ejector button
Activate button
and "Active" LED
Using the Web Page
Navigate to the Broadlinx Firmware Management Web page to update the
firmware.
Note
16
Do not press the Browser's Refresh button (or press F5 on your keyboard)
during the installation. A redrawing issue may occur with the 512x1024
routing switcher's Web page. If you do press the Refresh button, you must
reset the bottom half of the 512x1024 frame.
TRINIX — Release Notes
Software Installation
The Broadlinx Firmware Management page displays the following:
•
The possible types of PC boards
•
The version of the Broadlinx software that is presently associated
with each type of board that is installed
•
The versions of top-level software packages that are present in the
Broadlinx board
•
The compatibility Status of these software elements.
An example of this table is shown in the figure below (Figure 7).
When accessing this web page there may be a slight delay as the page is
gathering the latest information.
Figure 7. The Firmware Management Screen
Older firmware
The installed version of
Broadlinx
Some of the Status lights, in the Status column, will be red following an
installation using a Compact Flash card (Figure 7). This indicates that the
software that is currently running in the module is different (or older) than
the software that was just installed. The new software should be activated
by following the instructions provided below.
Activating Software
1. Click the Activate button at the bottom of the page (Figure 7). The
Message from webpage dialog will then appear:
Figure 8. The Estimated Time Dialog
TRINIX — Release Notes
17
Version 3.3.0
2. Write down the time displayed for future reference.
3. Click the OK button. The Broadlinx: Updating firmware status window
will then appear:
Figure 9. The Broadlinx: Updating Firmware Status Window
The new software will then be copied from the NR-33000 (Broadlinx
board) to each board that requires an update. This process can take
from several minutes to a half an hour or more.
•
When updating systems with two NR boards, the NR performing
the update will not install the software onto itself.
The progress of the installation will be shown by the progress bars on
the Broadlinx: Updating Firmware Status Window and by the alarm
LEDs on the boards that are being updated.
Note
When performing a firmware update, the Overall update progress bar indicator will reach and stay at 99% until the update is finished. The update procedure has not locked up. The Web page will correctly show that the update
is finished when all boards are updated.
If the window is accidentally closed, you can return to it by navigating
to the home page of the Broadlinx card. The rest of the Broadlinx pages
are not available while the update is in progress.
When the progress bars reach 100%, a “finished firmware update”
message will appear.
4. Click the Click here to close this window button (Figure 10 on page 19).
18
TRINIX — Release Notes
Software Installation
Figure 10. The Broadlinx: Updating Firmware Status Window - Update Completed
Click this button
The Broadlinx web page will then indicate “Post Completed.”
5. Navigate to the Firmware Management page. The Restart button will
now appear near the bottom of the page. (The display may vary from
the example that is shown in Figure 11.)
Figure 11. The Restart Button on the Firmware Management Screen
The cards must be restarted to use the new firmware.
6. Click the Restart button, which is shown above in Figure 11.
The following Caution pop-up window will then appear:
TRINIX — Release Notes
19
Version 3.3.0
Figure 12. The Restart Caution Popup
CAUTION Clicking the OK button will cause a momentary interruption to video passing
through the Routing switcher. Clicking the Cancel button, while not advised,
will stop the restart process allowing you to restart the board during a scheduled service time. However, the new software will not be applied until the
boards are restarted.
7. Click the OK button.
The Post Complete window will then reappear.
8. Navigate to the Firmware Management page. All Status indicators
should be green.
Figure 13. The Firmware Management Screen All boards are up to date
20
TRINIX — Release Notes
Software Installation
Updating Systems with Two Broadlinx Boards
This section describes the steps for updating existing Broadlinx boards. The
Installation process uses the Broadlinx Firmware Management Web page.
These steps are described below.
Note
Using Telnet or a Console session during an firmware update can cause the
update to fail.
Follow these steps to update all the boards within the frame (except an
active NR-33000 board):
1. Remove the Broadlinx board from the chassis and remove the existing
compact Flash card by pressing the Eject button (Figure 15 on page 22).
Note
For the Asymmetric frames, the NR-33000 (Broadlinx) board is turned sideways, so the Eject button is at the bottom.
For Encore controlled systems, the memory must be cleared by disconnecting the battery terminal, leave it un-connected for couple of minutes, and then reconnect the battery (Figure 14).
Figure 14. Battery location on the NR-33000.
Battery terminal location
071828316-BATTERY CONNECTION
2. Insert the Compact Flash card into the slot on the Broadlinx board and
then insert the Broadlinx board into the frame. Broadlinx will then
inventory the boards that are in the frame.
TRINIX — Release Notes
21
Version 3.3.0
Figure 15. NR-33000 (Broadlinx board) Controls.
NR board
left ejector lever
Flash module
Reset button
Flash module
ejector button
Activate button
and "Active" LED
Using the Web Page
Navigate to the Broadlinx Web page to complete updating the firmware.
Note
Do not press the Browser's Refresh button (or press F5 on your keyboard)
during the installation. A redrawing issue may occur with the 512x1024
routing switcher's Web page. If you do press the Refresh button, you must
reset the bottom half of the 512x1024 frame.
The Broadlinx Firmware Management page displays the following:
•
The possible types of PC boards
•
The version of the Broadlinx software that is presently associated
with each type of board that is installed
•
The versions of top-level software packages that are present in the
Broadlinx board
•
The compatibility Status of these software elements.
An example of this table is shown in the figure below (Figure 16 on
page 23).
When accessing this web page there may be a slight delay as the page is
gathering the latest information.
22
TRINIX — Release Notes
Software Installation
Figure 16. The Firmware Management Screen
Older firmware
The installed version of
Broadlinx
Some of the Status lights, in the Status column, will be red following an
installation using a Compact Flash card (Figure 16). This indicates that the
software that is currently running in the module is different (or older) than
the software that was just installed. The new software should be activated
by following the instructions provided below.
Activating Software
1. Click the Activate button at the bottom of the page (Figure 16). The
Message from webpage dialog will then appear:
Figure 17. The Estimated Time Dialog
2. Click the OK button. The Broadlinx: Updating firmware status window
will then appear:
TRINIX — Release Notes
23
Version 3.3.0
Figure 18. The Broadlinx: Updating Firmware Status Window
The new software will then be copied from the NR-33000 (Broadlinx
board) to each board that requires an update. This process can take
from several minutes to a half an hour or more.
•
When updating systems with two NR boards, the NR performing
the update will not install the software onto itself.
The progress of the installation will be shown by the progress bars on
the Broadlinx: Updating Firmware Status Window and by the alarm
LEDs on the boards that are being updated.
Note
When performing a firmware update, the Overall update progress bar indicator will reach and stay at 99% until the update is finished. The update procedure has not locked up. The Web page will correctly show that the update
is finished when all boards are updated.
If the window is accidentally closed, you can return to it by navigating
to the home page of the Broadlinx card. The rest of the Broadlinx pages
are not available while the update is in progress.
When the progress bars reach 100%, a “finished firmware update”
message will appear.
3. Click the Click here to close this window button (Figure 10 on page 19).
24
TRINIX — Release Notes
Software Installation
Figure 19. The Broadlinx: Updating Firmware Status Window - Update Completed
Click this button
The Broadlinx web page will then indicate “Post Completed.”
4. Navigate to the Firmware Management page. The Restart button will
now appear near the bottom of the page.
Figure 20. The Restart Button on the Firmware Management Screen
The cards must be restarted to use the new firmware.
5. Click the Restart button, which is shown above in Figure 20.
The following Caution pop-up window will then appear:
TRINIX — Release Notes
25
Version 3.3.0
Figure 21. The Restart Caution Popup
CAUTION Clicking the OK button will cause a momentary interruption to video passing
through the Routing switcher. Clicking the Cancel button, while not advised,
will stop the restart process allowing you to restart the board during a scheduled service time. However, the new software will not be applied until the
boards are restarted.
6. Click the OK button.
The Post Complete window will then reappear.
Updating the Second Broadlinx Board
You will now need to update the second Broadlinx (NR-33000) board. You
are going to make the secondary Broadlinx board active and then update
the Primary board.
Follow theses steps to Update the second Broadlinx board:
1. Make the Secondary board active. There are many ways to do this step,
the following ways are suggested:
•
Enter “redundancyBoardActivate” at the Telnet prompt in a Telnet
session for the inactive board.
•
Press the Activation button on the Inactive board.The Activate button
is the button closest to the CF card
2. Navigate to the Firmware management page. All Status indicators
should be green but the now inactive broadlinx board.
26
TRINIX — Release Notes
Software Installation
Figure 22. The Firmware Management Screen Broadlinx Status is Red
3. Click the Activate button in the lower right side. The board will be
updated similar to the process described when updating the first board.
4. Navigate to the Firmware Management page. The Restart button will
now appear near the bottom of the page. (The display may vary from
the example that is shown in Figure 23.)
Figure 23. The Restart Button on the Firmware Management Screen
The cards must be restarted to use the new firmware.
5. Click the Restart button, which is shown above in Figure 23.
The following Caution pop-up window will then appear:
TRINIX — Release Notes
27
Version 3.3.0
Figure 24. The Restart Caution Popup
CAUTION Clicking the OK button will cause a momentary interruption to video passing
through the Routing switcher. Clicking the Cancel button, while not advised,
will stop the restart process allowing you to restart the board during a scheduled service time. However, the new software will not be applied until the
boards are restarted.
6. Click the OK button.
The Post Complete window will then reappear.
7. Navigate to the Firmware Management page. All Status indicators
should be green.
Figure 25. The Firmware Management Screen All boards are up to date
28
TRINIX — Release Notes
Software Installation
Licensing SNMP on Both Broadlinx Boards
SNMP is licensed for a frame type using the hardware Ethernet address
(MAC Address) of the Broadlinx or NR33000 processor. To license SNMP
use the Enter License Key option from the Configuration web page on both
boards with the specific key for each board.
An alternative to licensing both boards is to enable inter-board communications to save the license key from the active board that has been licensed
to the standby board. To license a newly added standby board either in the
primary or secondary slot type setSnmpCommunicationsEnable and
wait for the SNMP license set message then reboot the board.
The setSnmpCommunicationsEnable command will allow the SNMP
key to be saved from the active board to the inactive board. Inter-board
communications of the license key is verified with the
redundantConfigShow command.
Follow these steps to save the license key from the primary board:
1. Start a console or telnet connection to the standby Broadlinx board
2. Enter setSnmpCommunicationsEnable at the command prompt.
The SNMP license should now be saved to the secondary board.
3. Enter the redundantConfigShow command at the command prompt
to verify that the communications is active and that the SNMP license
key had been transferred.
4. Once the key is transferred the board should be rebooted.
TRINIX — Release Notes
29
Version 3.3.0
Figure 26. Example
The SNMP Keys status
Ensure that the SNMP key
and the master SNMP key
values are the same.
The value for the SNMP
keys shown in this
example are for the frame
type rather than the
encrypted key number
that was entered on the
Web page.
If zero is shown, no SNMP
key has been set.
30
TRINIX — Release Notes
Software Installation
Formatting the Compact Flash Card with the FAT16 Format
These steps describe the steps needed to reformat your Compact Flash (CF)
card to the FAT16 format, which will decrease the time it takes to ”boot” or
start up. The FAT16 format will check all the file entries in less time than the
FAT32 format.
When you format the CF, a warning will appear that indicates that the
format may not be compatible with older versions of Windows because of
the large allocation size. The data that will be stored on the CF is a small
enough amount that you do not need to be concerned about the file storage
inefficiency.
Follow these steps to format the CF card with the FAT16 format:
1. Select the Start menu.
2. Right click the My Computer icon and then select the Manage option
(Figure 27). The Computer Management dialog will then appear.
Figure 27. The Manage Option of the My Computer Menu
3. Select the Disk Management option under the Storage menu.
4. Right click the CF, when it appears, and then select the Format option
(Figure 28 on page 32).
TRINIX — Release Notes
31
Version 3.3.0
Figure 28. The Format Option
The Format dialog will then appear (Figure 29).
Figure 29. The Format Dialog
5. Enter a preferred name in the Volume label field.
6. Select FAT from the File system drop-down list.
7. Select Default from the Allocation unit size drop-down list.
8. Click the OK button. A popup will appear (Figure 30).
Figure 30. Format Warning
Click the OK button.
32
TRINIX — Release Notes
Software Installation
Installation FAQ
The installation process seems to have stopped
If no activity is being shown on the Progress bar, and the time has exceeded
the estimated time by 20%, check the LED on the door of the frame on
which the installation is being preformed.
•
If the LED is green, Restart Web browser.
•
If the LED is red, Open the door and see which board has a red LED.
Then start a Telnet session to check the alarm conditions on the board.
TRINIX — Release Notes
33
Version 3.3.0
34
TRINIX — Release Notes