1
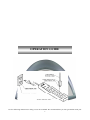
OWNER’S MANUAL CAUTION: Exercise of a strenuous nature, as is customarily done on this equipment, should not be undertaken without first consulting a physician. No specific health 0 equipment. claims are made or implied as they relate to the IMPORTANT: Read all instructions carefully before using this product. Retain this owner’s manual for future reference. IMPORTANT SAFETY PRECAUTIONS 1. Plug the power cord of the treadmill directly into a dedicated grounded circuit. This product must be grounded well. If there is a surge, grounding provides a path of least resistance for electric current to reduce the risk of electric shock. 2. Position the treadmill on a clear, level surface. Do not place the treadmill on thick carpet as it may interfere with proper ventilation. Also, do not place the treadmill near water or outdoors. 3. Position treadmill so that the wall plug is visible and accessible. 4. NEVER start the treadmill while you are standing on the walking belt. After turning the power on and adjusting the speed control, there may be a pause before the walking belt begins to move, ALWAYS stand on the foot rails on the sides of the frame until the belt is moving. 5. Wear appropriate clothing when exercising on the treadmill. Do not wear long, loose fitting clothing that could become caught in the treadmill. Always wear running or aerobic shoes with rubber soles. 6. Always unplug the power cord before removing the treadmill motor cover. 1 7. Keep small children away from the treadmill during operation. 8. Always hold the handrails when initially walking or running on the treadmill, until you are comfortable with the use of the treadmill. 9. If the user wants to stop the exercise or the should the treadmill suddenly increase in speed due to an electronics failure, please be sure to put your hands on the both uprights, and then step on the ride rail to avoid injury by the moving running belt. IMPORTANT SAFETY PRECAUTIONS 10. Always attach the safety cord to your clothing when using the treadmill. If the treadmill should suddenly increase in speed due to an electronics failure or the speed being inadvertently increased, the treadmill will come to a sudden stop when the cord is disengaged from the console. Please don’t leave the cord on the treadmill to avoid accidental useage. 11. When the treadmill is not being used, the power cord should be unplugged and the safety cord should be removed. 12. Before starting any exercise program, consult with your physician or health professional. He or she can help to establish the exercise frequency, intensity (target heart zone) and time appropriate to your particular age and physical condition. If you have any pain or tightness in your chest, an irregular heartbeat, shortness of breath, feel faint or have any discomfort while you exercise, STOP IMMEDIATELY! Consult your physician before continuing. 13. If you observe any damage or wear on the main plug or on any section of the main lead then please have these replaced immediately by a qualified electrician – do not attempt to change or repair these yourself. 14. The maximum user weight is limited 100kgs. 2 15. Please leave a 6ft X 3ft safety area behind the equipment. ASSEMBLY INSTRUCTIONS Please check following parts after you open the box. HARDWARE BAG CONTAINING: Parts # 1 4 5 9 85 75 76 77 78 Description MAIN FRAME LEFT UPRIGHT POST RIGHT UPRIGHT POST FIXED FRAME ASSEMBLY COMPUTER ASSEMBLY LEFT PLASTIC COVER(LEFT) LEFT PLASTIC COVER(RIGHT) RIGHT PLASTIC COVER(LEFT) RIGHT PLASTIC COVER(RIGHT) 3 Remarks Qty. 1 1 1 1 1 1 1 1 1 79 16 20 21 27 31 38 43 44 45 END CAP HEX BOLT HEX BOLT HEX BOLT SCREW SCREW FLAT WASHER ALLEN WRENCH ALLEN WRENCH WRENCH W/SCREW DRIVER M8*52 M8*20 M8*16 ST2.9*13 M6*10 Ø8 5mm 5mm S=13,14,15 6 1 8 1 6 4 10 1 1 1 ASSEMBLY STEPS STEP (1): 1) Take all the parts from the boxes, and put the main frame & base frame on to floor. STEP (2): 1). Fix the M8*20 bolt (20) with flat washer(38) on the main frame with the allen wrench(43) to connect the left upright post(4) onto the main frame. STEP (3): 4 1). Connect the wires on right upright post(5) into the wires on base frame (1) according the the direction of the connector. Then insert the right upright post(5) into main frame(1). Be careful with the assembly STEP (4): 1. Put the left plastic cover (right)(76) and right plastic cover (left)(77) into the fixed frame assembly (9), then insert them into the left and right upright post(4,5). 2. Use the allen wrench to connect the screw(16) with the flat washer (38). 3. Use the allen wrench to assemble screw (16) and flat washer(38), insert the fixed bar(9) into left upright post(4). STEP (5): 1.Connect the cables(98,101)of computer(85) onto the cables(99a) of left and right upright posts(4,5), ensure the connection is done correctly, then insert the computer(85) into the left and right upright posts(4,5). Be careful with the assembly to avoid damage to the connectors. For the correct way refer to the introduction sticker(107). 2.Use the screwdriver(45), fix the screw (31) onto the left and right upright posts(4,5). CAUTION: Please don’t tighten the screws and bolts if above assembly steps are not completed. Before turning on the power, be sure all the steps are completed. Please read the introduction of treadmill operation carefully before using. STEP (5): 5 1. Put the left plastic cover (left)(75) into left upright post(4). Then use the screw(27) to connect the left plastic cover (left,right)(75,76) with left upright post(4). 2. Put the right plastic cover (right)(78) into right upright post(5). Then use the screw(27) to connect the right plastic cover (left,right)(77,78) with right upright post(5). 3. Put the end cap into the holes of left,right plastic covers. FOLDING STEPS: 1.Lift up the machine and push it in the diretion of the arrowhead, make the adjustment pin (72) spring into the fixed hole. A 6 1.Push the machine towards the direction of the arrowhead with one hand hold on the indication A area. The other hand draw the adjustment pin towards the arrowhead direction then release the hand on the place A, the machine will lower down slowly. TECHNICAL PARAMETER ASSEMBLED SIZE(mm) 1800x735x1425 POWER SUPPLY FOLDABLE SIZE(mm) 900x735x1530 MAX OUTPUT 1290x430 INPUT CURRENT MACHINE N.W. 70.5KG SPEED RANGE 1.0-16km/h INCLINE DEGREE 0%-15% MAX WEIGHT 105KG RUNNING BOARD SIZE(mm) 3 LED DISPLAY SPEED DISTANCE TIME INCLINE PULSE CALORIES 7 ELECTRICAL SOURCE REQUIREMENT Improper connection of the equipment grounding connector can result in a risk of an electric shock. Check with a qualified electrician or service man if you are in doubt as to whether the product is properly grounded. Do not modify the plug provided with the product. If plug will does not fit into the outlet, have a proper outlet installed by a qualified electrician. This treadmill can be seriously damaged by sudden voltage changes in your home’s electrical power. Voltage spikes, surges, and noise interference can result from weather conditions or from other appliances being turned on or off. To reduce the possibility of treadmill damage, always use a dedicated surge protector (not included) with your treadmill. Surge protectors can be purchased at most hardware stores. The manufacturer recommends a single outlet surge protector with UL 1449 rating as a Transient Voltage Surge Suppressor (TVSS) with UL suppressed voltage rating of 400V or less and an electrical rating of 120VAC, 15 amps. This treadmill must be grounded to reduce the risk of electrical shock. Grounding provides a path of least resistance for electric current should the treadmill malfunction. This treadmill comes with an electrical cord with an equipment-grounding conductor and a grounding plug. Always plug the power cord into a surge protector, and plug the surge protector into an appropriate outlet that is properly installed and grounded in accordance with all local codes and ordinances. Do not connect other equipment to the surge protector or this could cause permanent damage to your treadmill. This product is for use on a nominal 120-volt circuit and has a grounding plug that looks like the plug illustrated in the drawing below. 8 OPERATION GUIDE Use the following instructions to help you use the treadmill. We recommend that you first get familiar with your 9 treadmill in the manual mode before you attempt any programmed workouts. CAUTION: 1. We recommend that you stay at a slow speed in the beginning and hold on to the handrails until you become comfortable. 2. Attach the magnet end of the safety pulling rope to the computer and attach the clip of safety pulling rope to your clothing. 3. To end your workout safely, press the STOP/CLEAR button or pull out the safety pulling rope, then the treadmill will stop immediately. 1.WINDOW DISPLAY: 1) Incline and Pulse are in the left window, incline degree range:0%-15%; Normally it only displays the incline, But it will display the pulse after user hold the sensor for 5 seconds, pulse data range: 40-200 times/min.( the datas only for reference, cannot as medical data). 2) Speed and Total Mileage are in the middle window, speed range: 1.0-16km/h. Display outer cycle has 0-16 Arabic numerals and 16 pcs indicator lights, also has 16 sections blue indicator lights match the current speed, each section for 1.0 kilometer. On the main window below have detail data to display current speed. Meanwhile, on the bottom of the main window there is an “ODOMETER” to display total mileage, the total mileage will not be lost under sudden power off. 3) Distance and Time are in the right window, the data switches every 5 seconds. Displays distance from 0.00 to 99.9, When the data reach 99.9 it stared again from 0.00; Counter setting then the data degressively to 0.00, when it reaches 0.00, the machine stop running; Display running time, the data from 0:00 to 99.59, when the time reaches 99.59 the machine will stop running; Counter setting then the data degressively to 0.00, when the data reach 0.00, the machine stops. REMARK: Window displays “End” when machine stoped. Please press”MODE” key to clear the data, or it will automaticly clear the data after 25 seconds. 2. BUTTONS INTRODUCTION: 1). “PROG”: Before running, press the button to select “0:00”“P1->P2->P3->P4->P5->P6->P7->P8->P9”(“0.00” is maual model, P1-P9 is computer program. 2). “MODE”: Before running, press the button to select “0:00”, “22:00” “1.5” (“0:00”is manual mode, “22:00” is time counter model, “1.5” is distance counter model). 3).“START/STOP”: press the button to start or stop under power connected and the magnet end of the safety pulling rope to the computer. If start under the manual model, then the machine begin from the speed (1.0km), incline is zero. 4). “SPEED+” “SPEED-”: Press the button to adjust the speed. The increment is 0.1km/time, continue pressing 10 for over 0.5 seconds and the rate of speed change will be increased or decreased. 5). “INCLINE+” “INCLINE-”: Press the button to adjust incline, its range is 1% per touch, keep pressing for over 0.5 seconds and the rate of change will be increased or decreased. 6). General mileage clear to zero: Press “SPEED+” and “SPEED-” at the same time under power off and turn on the power. 3.QUICK START: 1) After turning on the power, be sure to put the magnetic end of safety pulling rope on the computer. 2) Press the button “START/STOP”, the machine will start running within 3 seconds. 3) Users could select the “Time, Distance, Speed” according to their needs. 4.OPERATION WHILE RUNNING: 1). Press speed - button to lower running speed. 2). Press speed + button to increase running speed. 3). Press incline - button to decrease the incline 4). Press incline+ button to increae the incline 5). Press “STAR/STOP” button, the machine will slowdown until it comes to a stop 6). User holds the hand pulse for 8 seconds to display pulse data. 5. MANUAL MODEL: 1). Pressing “ START/STOP” button will start the machine at a speed of 1.0km/h and incline of 0%. Other windows start from 0. 2). Before running, press “MODE” to enter “DISTANCE” counter window. It will flash and display “1.5”. Press “SPEED-” to set training time, ranging from 8:00 to 99:00 3). On the time counter model: press “MODE” button into distance counter model, “DISTANCE” window displays “1.5” and flash, press “SPEED+”“SPEED-”button to adjust speed and incline; press “STOP” button, the machine stop running. 4). After setting, press “START/STOP”button, the machine start running in 3 seconds, press “INCLINE+” “INCLINE-” “SPEED+” “SPEED-” to adjust speed and incline; press “STOP” button, the machine stop running. 6. PROGRAMs: The machine has 9 built-in programs P1-P9, before running, press “PROG”button, the left window than displays “P1-P9”. After selecting one program the “TIME” window will flash, displaying the time 22:00, press “SPEED+” “SPEED- ” to set running time. After setting, press “START/STOP” button to start program. The programs have 16 sections, each section equals the set time divided by 16. Upon entering each new section, the system will beep and a change the incline and speed according to the program. You can press “ INCLINE+” “INCLINE-” “SPEED+” “SPEED-” to change incline and speed, but when the program enters into the next section, it will come back to the speed and incline data on this section. When the program is finished, the system will give beeping tone, followed by the the machine slowing down and displaying “END”. Press the “MODE” button for 2 seconds to clear the data, or automatically clear the data after 25 seconds. 7.PROGRAM INTRODUCTION: 11 P1—P9 CHART TIME INTERVAL P1 P2 P3 P4 P5 P6 P7 P8 P9 SPEED INCLINE SPEED INCLINE SPEED INCLINE SPEED INCLINE SPEED INCLINE SPEED INCLINE SPEED INCLINE SPEED INCLINE SPEED INCLINE 1 3 2 2 1 4 2 4 4 5 4 3 1 6 3 6 4 7 0 2 3 2 4 1 4 6 6 4 6 4 6 2 7 3 6 4 10 3 3 4 6 6 2 6 8 3 10 6 6 9 3 8 4 10 5 11 6 4 4 6 6 2 7 10 7 5 8 8 12 3 10 4 10 5 12 8 5 5 3 7 5 8 12 2 11 9 10 14 4 12 3 14 3 8 8 6 5 3 8 5 8 12 5 11 10 12 14 4 14 3 14 3 12 10 7 7 5 4 4 7 12 8 6 10 6 7 5 14 2 8 6 12 5 8 7 5 4 4 7 8 10 8 11 5 7 5 13 2 8 6 7 5 9 6 4 7 6 9 8 6 10 12 5 14 0 12 5 13 2 7 3 10 6 4 8 6 9 7 12 5 12 10 14 0 12 5 13 2 10 3 11 5 3 8 3 6 10 8 6 10 10 9 2 11 6 6 4 12 6 12 5 3 6 3 10 10 10 4 8 7 10 2 11 6 8 4 6 6 13 4 2 8 2 7 6 7 4 12 5 12 3 10 4 12 3 14 4 14 4 2 5 2 6 4 5 3 10 3 11 4 8 2 12 2 7 4 15 3 1 5 1 6 2 3 1 7 2 6 4 6 2 6 2 10 2 16 3 1 3 1 2 2 2 0 5 0 4 1 5 0 3 0 4 0 8. DATA DISPLAYING RANGE: Parameter Initialvalue Initialvalue Setting Range Displaying Range Time(Min:Sec) 0:00 22:00 8:00-99:00 0:00-99:59 Incline(%) 0 0 0-15 0-15 Speed(Kph) 1.0 1.0 1.0-16.0 1.0-16.0 Distance(K) 0.00 1.5 1.00-99.9 1.00-99.9 Pulse(BPM) P N/A N/A 40-200 9. POWER SAVING: This tread has a power saving function, it will stop the display automatically when there is no input data for 10 minutes. It will re-start when any key is pushed. 10. SOUND FUNCTION: After turning on the power, connect one end of audio wire to the MP3 interface , the other end insert to the MP3, then you can enjoy the music while running. 11. SAFETY CORD FUNCTION: Under any situation, pulling out the safety cord stops the machine from running. All windows will display “_ _”. Under this situation, the machine must be turned off and the safety cord replaced again to restart. 12. TURNOFF: 12 Turning off the machine with the on/off switch under any situation will not damage the machine. MAINTENANCE INSTRUCTIONS CLEANING General cleaning of the unit will greatly prolong the life of the treadmill. Keep the treadmill clean by dusting regularly. Be sure to clean the exposed part of the deck on either side of the walking belt and also the side rails. This reduces the build up of foreign material underneath the walking belt. The top of the belt may be cleaned with a wet, soapy cloth. Be careful to keep liquid away from inside the motorized treadmill frame or from underneath the belt. Warning:Always unplug the treadmill from the electrical outlet before removing the motor cover. At least once a year remove the motor cover and vacuum under the motor cover. WALKING BELT AND DECK LUBRICATION This treadmill is equipped with a pre-lubricated, low maintenance deck system. The belt/ deck friction may play a major role in the function and life of your treadmill, thus requiring periodic lubrication. We recommend a periodic inspection of the deck. We recommend lubrication of the deck according to the following timetable: Light user (less than 3 hours/ week) Medium user (3-5 hours/ week) Heavy user (more than 5 hours/ week) every two months monthly every two weeks We suggest you to purchase lubrication from local franchiser or contact to our company directly. 13 WALKING BELT CENTERING AND TENSION ADJUSTMENT The walking belt may occasionally need to be centered and tightened. 1. In order to protect your treadmill, prolong its usage period, we suggest you to shut off the power for 10 minutes after 2 hours of continuous use. 2.Do not make running belt overly loose, it may slip when running; Do not overtighten running belt it may reduce motor performance and abrade the roller and running belt. When properly tightened, the sides of belt can be raised approximate 50-75mm off the deck. - Put the treadmill on a clear, level surface. Run treadmill at approximately 6-8 km/h If the belt has drifted to the right, turn the right adjusting bolt 1/4 turn clockwise. Wait a moment for the belt to move. Repeat this step until the belt is centered. ( Picture A) A If the belt has drifted to the left, turn the left adjusting bolt 1/4 turn clockwise. Wait a moment for the belt to move. Repeat these steps until the belt is centered. ( Picture B) B After using for some time, the belt may get loose and need to adjustment. Pull off the safety cord and shut off the power. Turn the left/right adjusting bolt 1/4 turn clockwise . Check the tension of the belt and repeat the adjustment if needed. C 14 EXPLODED VIEW 15 # DESCRIPTION REMARKS QTY # DESCRIPTION REMARKS QTY 1 MAIN FRAME 1 56 BLUE CUSHION PAD 4 2 BASE FRAME 1 57 FLAT FOOT PAD 6 3 INCLINE FRAME LEFT UPRIGHT POST 1 58 COMPUTER UPPER COVER 1 4 1 59 COMPUTER BOTTOM COVER 1 5 RIGHT UPRIGHT POST 1 60 EVA WASHER 1 6 MOTOR BRACKET 1 61 RHOMBIC END CAP 2 7 COMPUTER ASSEMBLY 1 62 WHEEL TUBE END CAP 2 8 TUBE 1 63 WHEEL 2 9 FIXED FRAME ASSEMBLY 1 64 ADJUSTABLE WHEEL 2 10 FLAT WASHER 6 65 END CAP FOR PROTECTING WIRES 2 11 HEX BOLT M10*120 1 66 DRIVING BELT 1 12 HEX BOLT M10*45 3 67 CABLE CONNECTER 1 13 HEX BOLT M8*50 2 68 RUNNING BELT 1 14 HEX BOLT M8*65 1 69 FOAM 2 15 HEX BOLT M8*60 1 70 FOAM 1 16 HEX BOLT M8*52 1 71 MOTOR COVER 1 17 HEX BOLT M8*40 2 72 CAP FOR ADJUST AXEL 1 18 HEX BOLT M8*30 2 73 FIXED BLOCK 2 19 HEX BOLT M8*25 2 74 HEX BOLT M8*20 8 75 BOTTOM BOARD LEFT PLASTIC COVER(LEFT) 1 20 21 HEX BOLT M8*16 3 76 LEFT PLASTIC COVER(RIGHT) 1 1 8 1 22 HEX BOLT M8*20 4 77 RIGHT PLASTIC COVER(LEFT) 23 SCREW M6*32 8 78 RIGHT PLASTIC COVER(RIGHT) 1 6 24 SCREW M6*60 2 79 END CAP 25 SCREW M6*45 1 80 FRONT END CAP 2 26 SCREW ST4.2*13 4 81 INNER ENC CAP 2 27 SCREW ST2.9*13 6 82 HAND PULSE WITH INCLINE 1 28 SCREW ST2.2*6.5 6 83 HAND PULSE WITH SPEED 1 29 SCREW ST4.2*13 16 84 DECK END CAP 2 30 SCREW ST2.9*6.5 2 85 COMPUTER 1 31 SCREW M6*10 6 86 RUNNING BOARD 1 32 SCREW M5*8 6 87 1 33 SCREW M6*16 6 88 AC SINGLE WIRE AC SINGLE WIRE 34 SCREW M5*6 14 89 AC SINGLE WIRE 1 1 35 SCREW ST4.2*28 4 90 TRANSFORMER 1 36 LARGE WASHER φ9*φ26.7*2.4 2 91 LIGHT SENSOR 1 37 FLAT WASHER 10 6 92 DC MOTOR 1 38 FLAT WASHER 8 16 93 INCLINE MOTOR 1 39 FLAT WASHER 6 3 94 PROTECTER FOR OVER LOAD 1 40 FLAT WASHER 5 2 95 SWITCH 1 41 HEX NUT M10 2 96 STANDARD CABLE 1 42 SPRING WASHER 8 4 97 CONTROL BOARD 1 43 ALLEN WRENCH 5mm 1 98 COMPUTER WIRE (UPPER) 1 44 ALLEN WRENCH 5mm 1 99 COMPUTER WIRE (MIDDLE) 1 45 WRENCH W/SCREW DRIVER S=13,14,15 6 100 COMPUTER WIRE (BOTTOM) 1 46 WHEEL TURNING TUBE 4 101 HAND PULSE WIRE (UPPER) 2 47 INCLINE TURNING TUBE 2 102 HAND PULSE WITH INCLINE 1 48 FRONT ROLLER 1 103 HAND PULSE WITH SPEED 1 49 BACK ROLLER 1 104 50 COMPRESS SPRING 1 105 MAGNETIC CORE 1 51 KNOB BAR 1 106 MAGNETIC RING 1 52 CYLINDER 1 107 STICKER 2 53 LEFT SIDE RAIL 1 108 LIGHT POWER PART 1 54 RIGHT SIDE RAIL 1 109 SCREW W/CROSS HEAD M5*8 2 55 BLACK CUSHION PAD 4 110 FLAT WASHER 8 2 16 SAFETY PULL PIN 1 TROUBLESHOOTING GUIDE PROBLEM CAUSE CORRECTION 1. Treadmill will not start. 1. Not plugged in.. 1. Plug into three prong grounded outlet. 2. Safety cord not inserted 3. Treadmill circuit breaker tripped. 4. House circuit breaker tripped. 2. Insert safety cord. 3. Reset circuit breaker (see exploded view for location) 4. Reset circuit breaker. 2. Walking belt slips. 1. Walking belt not tight. 1. Adjust walking belt tension.( see maintenance instructions) 3. Walking belt is not in the center. 1. Walking belt tension not centered across the rear roller. 2. Center walking belt.(See Maintenance Instructions) 4. Walking belt speed seems slower than displayed speed. 1. Set in kilometers. 1. Change to miles per hour. 2. out of calibration. 2. Recalibrate electronics (professional operation only) 5.Treadmill squeaks when walked on. 1. Pivot points need lubrication. 1. Lubricate pivot points. 6. Heart rate not displayed 1. Transmitter not making good contact with skin. 1. Moisten skin contact area on the transmitter strap, or turn transmitter strap upside down. 2. Electromagnetic interference. 2. Turn off any television, microwave, or computer within 6 feet of treadmill. Customer Service 1-866-978-1999 [email protected] 17