1
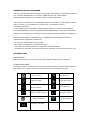
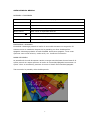
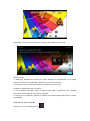
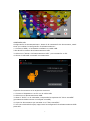
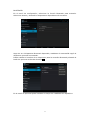
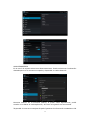
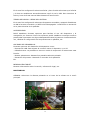
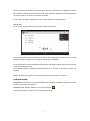
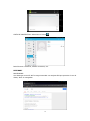
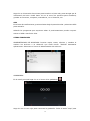
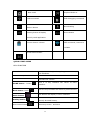
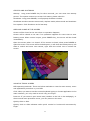
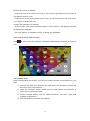
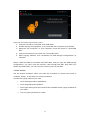
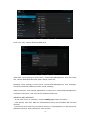
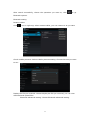
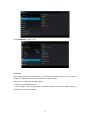
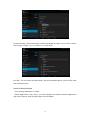
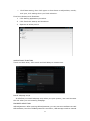
BTPC-1015QC-3G
TABLET PC 10,1”-QUAD
CORE-3G-GPS-HD-WIFI-BLUETOOTH-A 4.2
Manual de Instrucciones
1
CONTENIDO
Advertencias de seguridad
Introducción
- Preparación
- Iconos de estado
Guía de inicio rápido
- Botones y funciones
- Encendido y apagado
- Modo de espera
- Uso de la pantalla táctil
- Pantalla de inicio
- Ventana de aplicaciones
- Conexión USB
- Métodos de entrada
- Operatividad
Funcionamiento básico
- Gestión de SIM
- Wifi e Internet
- Bluetooth
- Conexión a Redes - 3G
- Modos de Sonido
- Almacenamiento
- Aplicaciones
- Cuentas y sincronización
- Servicios de localización
- Seguridad
- Copia de seguridad
- Fecha y hora
- Tiempo de inicio y cierre del sistema
- Accesibilidad
- Engineer
Multimedia
- Camera
- Radio FM
Comunicación
- Teléfono
- Mensaje de texto
- Lista de contactos
Internet
- Browser
Función GPS
Otras funciones
- Administrador de archivos
- Grabadora
Procedimientos de instalación
2
ADVERTENCIAS DE SEGURIDAD
Este manual contiene instrucciones de seguridad importantes e información para el
uso correcto del dispositivo. Por favor, asegúrese de leer este manual
detenidamente antes de su uso para evitar cualquier accidente.
- No coloque el dispositivo en ambientes calientes, húmedos o polvorientos, sobre
todo en verano, no lo guarde en el interior de un automóvil con las
ventanillas cerradas.
- Evite dejar caer el dispositivo, podría causar daños o un mal funcionamiento.
- No use el dispositivo mientras realiza otras actividades que requieran su atención.
- Asegúrese de utilizar los cargadores y los accesorios que acompañan al dispositivo.
Asegúrese de cargar el dispositivo con el adaptador suministrado cuando se
produzcan las siguientes situaciones:
- El icono de la batería se muestra bajo.
- El sistema se apaga sólo automáticamente.
- Las teclas de funcionamiento no responden adecuadamente.
- El dispositivo muestra en la esquina superior derecha el icono de batería en rojo.
INTRODUCCIÓN
PREPARACIÓN
Antes de proceder al primer uso, por favor cargue la batería por completo.
ICONOS DE ESTADO
Al recibir un aviso, se mostrará un icono en la barra superior. Deslice hacia abajo la
barra para ver el aviso. Una vez visto vuelva a cerrar la barra de avisos.
Nuevo e-mail
Modo avión
USB conectado
USB depuración
Botón VOLVER
Descargando
Ajustes y APK recientes
Estado de batería
Captura de pantalla
3
Menú principal
Wi-Fi conectado
GUÍA DE INICIO RÁPIDO
BOTONES Y FUNCIONES
Botón Encendido
Pulsación larga: Encender y apagar. Pulsación corta: modo espera.
Volume +
Subir volumen
Volume -
Bajar el volumen
Botón Home
Para volver al menú principal
Botón Volver
Para volver a la pantalla anterior
Botón Menú
Muestra el menú de aplicaciones.
Botón Ajustes
Para ver funciones y APK recientes
Captura de Pantalla
Toma una imagen de la pantalla actual
ENCENDIDO Y APAGADO
Encendido: Mantenga pulsado el botón de encendido durante tres segundos. El
sistema entra en estado de bloqueo de la pantalla, por favor desbloquéelo.
Apagado: Mantenga pulsado el botón POWER. Seleccione apagado. Tiene otras
opciones como modo silencio, modo avión, etc. Confirme la selección.
MODO DE ESPERA
La pantalla irá al modo de espera cuando no tenga actividad para ahorrar batería. Si
quiere ponerla en espera presione el botón de encendido/apagado brevemente. Si
quiere volver a encenderla, presione de nuevo el botón de encendido/apagado.
Tras encender la pantalla, debe desbloquearla.
4
USO DE LA PANTALLA TÁCTIL
Para seleccionar un icono de la pantalla pulse sobre él. El teclado se usa de la misma
manera, pulsando directamente en las teclas.
Puede pasar las pantallas horizontalmente, deslizando de izquierda a derecha o de
derecha a izquierda.
Cuando gire el dispositivo la pantalla girará.
PANTALLA DE INICIO
Mantenga pulsado en algún espacio en blanco para añadir elementos, cambiar el
fondo de pantalla, etc.
Página de inicio extendida: La página de inicio se puede extender más allá de la
amplitud de la pantalla para ofrecer más espacio, puede poner accesos directos y
widgets. Haga clic en un espacio en blanco en la página principal y luego deslice la
derecha o hacia la izquierda para extender a la derecha o a la izquierda de la
pantalla.
5
Agregando un icono encima de otro, podrá crear carpetas de iconos.
Borrar iconos:
1. Mantenga pulsado los iconos que quiera eliminar, a continuación, en la parte
superior derecha de la pantalla, aparecerá el icono de eliminar.
2. Arrastre el icono hasta ella hasta que cambie el color a rojo.
Cambiar el papel tapiz del escritorio:
1. En la página principal, pulse en algún lugar libre y aparecerá una ventana
emergente para cambiar el fondo de pantalla.
2. Haga clic en la galería o galería de fondos de escritorio para seleccionar el fondo
de pantalla.
VENTANA DE APLICACIONES
Presione el icono de aplicaciones
6
CONEXIÓN USB
Configuración de almacenamiento: Antes de la transmisión de documentos, usted
tiene que realizar la configuración de almacenamiento:
1. Conecte el MID y el ordenador mediante un cable USB.
2 Se abrirá la ventana de almacenamiento USB.
3. Seleccione “Activar el almacenamiento USB” y se conectará a su PC.
4. Ahora el USB está conectado correctamente.
Copia de documentos en la tarjeta de memoria:
1. Conecte el dispositivo a su PC con el cable USB.
2. Seleccione el almacenamiento USB.
3. Abra el "Mi PC" en el ordenador, compruebe las opciones de "disco extraíble"
(previamente debe insertar una tarjeta microSD)
4. Copie los documentos que necesita en el "disco extraíble".
5. Una vez terminada la copia, haga cierre la configuración de almacenamiento USB
para salir.
7
Aviso: Cuando se conecte la unidad con cable USB y use la función de
almacenamiento, no podrá ver la información de la tarjeta en la unidad. Sólo tras
desconectar el cable USB, puede ver la tarjeta de memoria en el dispositivo.
MÉTODOS DE ENTRADA
Para introducir texto, use el teclado de pantalla. Cuando necesite introducir algún
tipo de texto o números, aparecerá el teclado de pantalla. Elija el método de
tipificación que desee, seleccione el idioma, etc.
Widgets: En la interfaz de las aplicaciones, haga clic en widgets. Mantenga pulsado
cualquier widget para crear un acceso directo y podrá entrar en la aplicación a
través del acceso directo
Crear iconos de acceso directo de la aplicación en el escritorio: En la interfaz de la
aplicación o interfaz de widgets, mantenga pulsado cualquier icono para cambiar al
escritorio de forma automática, arrastrar y soltar el icono, se puede mover a
cualquier posición en el escritorio. Recuerde: Si en la posición de destino no hay
espacio, el widget no se añadirá en la pantalla principal.
FUNCIONAMIENTO BÁSICO
GESTIÓN DE SIM
Llamadas: Seleccione gestión de SIM y llamadas para configurar las opciones
8
Establezca la SIM por defecto para las llamadas, video llamadas, mensajes y
conexión de datos:
WIFI E INTERNET
Conexión a una red WIFI: En el menú de configuración, active WIFI y el dispositivo
buscará redes WIFI disponibles. Seleccione la red deseada, introduzca la contraseña
y haga clic en conectar.
9
Puede añadir una red WIFI:
Cada vez que exista una red WIFI a su alcance será notificado. Puede seleccionar
mantener activo o no la conexión WIFI durante el modo de espera.
10
BLUETOOTH
En el menú de configuración, seleccione la función Bluetooth para activarla.
Seleccione buscar y buscará los dispositivos disponibles más cercanos.
Haga clic en el dispositivo Bluetooth disponible, establezca la contraseña según el
dispositivo que está conectando.
Puede cambiar el nombre de su dispositivo para la conexión Bluetooth pulsando el
botón de opciones arriba ala derecha
:
En el menú de opciones podrá cambiar el tiempo de visibilidad del dispositivo:
11
En el menú de opciones podrá seleccionar ver el archivo recibido
CONEXIÓN A REDES – 3G
Seleccione en el administrador de SIM el uso de datos y actívelo para usar los datos
en esa tarjeta SIM.
Seleccione “Más…” para acceder a otras funciones:
MODOS DE SONIDO
Seleccione Perfiles de audio. Podrá elegir General, Silencio, Reunión o Exterior. El
modo General puede personalizarse pulsando en las opciones.
12
ALMACENAMIENTO
En el menú de ajustes seleccione Almacenamiento. Puede seleccionar la ubicación
deseada para ver la memoria ocupada y disponible en cada ubicación.
Memoria interna: En la memoria interna, al pulsar sobre Aplicaciones, podrá
acceder a los datos de cada aplicación, así como a la gestión de las mismas.
Tarjeta SD: Si inserta una tarjeta SD podrá gestionar la información instalada en ella
13
desde este menú.
APLICACIONES
En el menú de configuración seleccione Aplicaciones. Podrá ver las aplicaciones en
diversos menús como Descargadas, Almacenamiento USB, En ejecución o Todas.
Pulsando sobre cada aplicación podrá acceder al menú de cada aplicación.
CUENTAS Y SINCRONIZACIÓN
Una vez cargada correctamente la cuenta Gmail, acceda a Google en el menú de
configuración:
Seleccione la cuenta y en el menú de opciones seleccione sincronizar ahora.
SERVICIOS DE LOCALIZACIÓN
Seleccione en el menú de configuración, Servicios de localización (Acceso
ubicación).
14
Podrá seleccionar la forma de mostrar la ubicación.
SEGURIDAD
Bloqueo de pantalla: puede bloquear la pantalla para proteger la el inicio del sistema
con
iconos de desbloqueo o una contraseña. Puede elegir entre deslizar la pantalla
(sin seguridad), bloqueo facial, patr5ón de bloqueo, PIN o contraseña.
COPIA DE SEGURIDAD
Conéctese a una red Wifi o use la conexión de datos, acceda a su cuenta de Google,
seleccione copia de seguridad de mis datos en los servidores de Google.
En su dispositivo, seleccione Copia de seguridad y Copiar mis datos. Seleccione la
cuenta de Gmail que va a usar para copiar los datos.
Para restaurar el sistema a los datos de fábrica, seleccione Restablecer datos de
fábrica.
FECHA Y HORA
15
En el menú de configuración seleccione fecha y hora. Puede seleccionar que la fecha
y la hora se establezcan automáticamente según la red o GPS. Para introducir la
fecha y hora de forma manual debe desactivar esta función.
TIEMPO DE INICIO Y CIERRE DEL SISTEMA
En el menú de configuración seleccione Programar encendido y apagado. Establezca
en ON la hora de encendido y el OFF la hora de apagado. Y seleccione su activación
en la parte derecha de la pantalla.
ACCESIBILIDAD
Podrá establecer diversas opciones para facilitar el uso del dispositivo y la
navegación por Internet. Entre las opciones podrá establecer mensajes sonoros
para ayudar a personas con alguna discapacidad visual, ajustes en el sintetizador de
voz, cambiar la configuración de las pulsaciones en pantalla, etc.
OPCIONES DE DESARROLLO
Diversas opciones del desarrollo del dispositivo como:
- Depuración USB: Para ajustar la conexión entre el dispositivo y un PC
- Pantalla Activa: La pantalla no entra en modo de suspensión al seleccionar esta
función.
- Mostrar pulsaciones: Mostrará en pantalla cada sitio pulsado.
- Ubicación del puntero: Mostrará el recorrido de la pulsación
Etc.
INFORMACIÓN TABLET
Muestra información sobre la versión, información legal, etc.
MULTIMEDIA
CÁMARA: Seleccione la cámara pulsando en el icono de la cámara en el menú
principal.
16
Deslice la barra de la parte izquierda para ver las funciones de la cámara de fotos.
Para realizar una foto pulse el botón de la parte derecha. Para realizar una grabación
de vídeo pulse el icono de la cámara de vídeo.
En el botón de ajustes podrá encontrar otras opciones configurables.
RADIO FM
En el menú de aplicaciones seleccione “Transmisión FM”
Se mostrará la frecuencia actual en el centro de la pantalla. EL botón de la estrella
permite añadir la estación a la lista de emisoras guardadas.
En la parte inferior de la pantalla se encuentran los botones para pasar de frecuencia
y pausar la reproducción.
En la parte superior izquierda podrá desactivar la función y acceder al menú de
ajustes.
NOTA: Necesita introducir unos auriculares para que hagan de antena.
COMUNICACIÓN
TELÉFONO: Seleccione el icono del teléfono para realizar llamadas. Para el uso como
teléfono use unos auriculares.
MENSAJES DE TEXTO: Pulse el icono de mensajes
Accederá al menú de edición de mensajes de texto:
17
LISTA DE CONTACTOS: Seleccione el icono
Podrá buscar contactos, añadir contactos, etc.
INTERNET
NAVEGADOR
Una obtenga conexión Wifi o tenga insertada una tarjeta SIM que permita el uso de
datos, abra el navegador:
18
Haga clic en la barra de direcciones para introducir el sitio web, para navegar por la
información del sitio. Podrá hacer clic en el menú de opciones para actualizar,
guardar en favoritos, compartir, marcadores, ver el historial, etc.
GPS
En la barra de notificaciones, presione hacia abajo la parte derecha y seleccione GPS
para activarlo.
Además los programas que requieren saber el posicionamiento pueden requerir
activar el GPS a través de ellos.
OTRAS FUNCIONES
ADMINISTRADOR DE ARCHIVOS: Permite copiar, cortar, eliminar y cambiar el
nombre los archivos o la ubicación que estos tienen. También desinstalar
aplicaciones. Seleccione el icono de Administrador de archivos:
GRABADORA
En el menú principal haga clic en el icono de la grabadora
Haga clic en el icono rojo para comenzar la grabación. Pulse el botón “stop” para
19
parar y el botón “play” para reproducir la grabación.
PROCEDIMIENTOS DE INSTALACIÓN
Para instalar software externamente, debe asegurarse que contiene la extensión
APK. Debe instalar este archivo dentro del dispositivo.
“Las especificaciones pueden cambiar sin previo aviso”
IMPORTADO
I.R.P., S.L.
AVDA. SANTA CLARA DE CUBA 5
SEVILLA, SPAIN
DECLARACIÓN DE CONFORMIDAD
I.R.P., S.L. declara bajo su responsabilidad que el aparato indicado cumple los
requisitos de las siguientes directivas:
DIRECTIVAS EMC
EN60950-1:2006/A11:2009/A1:2010
EN 62311: 2088
EN 301 489-1 V1.9.2:2011-09
EN 301 489-17 V2.1.1:2009-05
EN 300 328 V1.7.1: 2006-10
ETSI EN 301 489-1 V1.9.2(2011-09)
ETSI EN 301 489-17 V2.1.1(2009-05)
Descripción del aparato:
Modelo BRIGMTON BTPC-1015QC-3G
Dispositivo de conexión a internet
Importador: I.R.P., S.L.
Dirección: Avda. Santa Clara de Cuba 5, 41007, Sevilla.
20
BTPC-1015QC-3G
TABLET PC 10,1”-QUAD
CORE-3G-GPS-HD-WIFI-BLUETOOTH-A 4.2
Instruction Manual
21
CONTENT
Safety Instruction
Introduction
- Preparation
- Status Icons
Quick Start Guide
- Keys Function
- Start-up and Shutdown
- Open and Close the Screen
- Usage of Touch Screen
- Main Interface
- Visit Application Procedures
- USB Connection
- Words Input
- Application Technique
Basic Setting
- SIM Card Management
- Wireless and Internet
- Bluetooth
- Mobile Networks
- Contextual Model
- Storage
- Application
- Account and Sync
- Location Service
- Security Setting
- Backup and Reset
- Date and Time
- Fixed-time Start-up and Shutdown.
- Assistance Function
- Engineer Selection
Multi-Media
- Camera
- FM Radio
Communication Function
- Phone
- Text Message
- Contact List
Internet
- Browser
GPS Function
Other Application Procedures
- File Manager
- Recorder
22
Installation of Procedures
SAFETY INSTRUCTION
Before the operation of the MID, please read this chapter and teach your kids about
these information. For further details, please refer to the safety instructions and
announcement.
- Never use the MID when driving car, in order to ensure safe driving.
- In the medical area, please abide by related rules and regulations. Please shut
down the MID when it is near to the medical area.
- To avoid the wireless signal to interrupt the plane- controlled signal, please shut
down the MID or using airplane mode when you are boarding a flight,
- To avoid electronic equipment failure, please shut down the MID in the vicinage of
high-accuracy electronic equipments.
- Please don’t disassemble the MID and accessories. Only authorized agent has
access to service the MID.
- Please keep the MID far away from magnetic equipments, the radiation of MID
may erase the data stored in the magnetic equipments.
- Never use the MID in the vicinage of high temperature, inflammable gas (gas
station).
- Protect the MID and accessories from kids reach scope, and avoid the kids to use
the MID without parents’ supervision.
- Please comply with related rules and regulations, and respect others’ privacy and
legal rights while using the MID.
- Please strictly adhere to related instructions in the manual when using USB cable
to ensure the safety of the MID or PC.
- Never use the MID in bathroom or other humid environment, and
INTRODUCTION
PREPARATION
Battery Charging: If this navigator is first used, please use AV adaptor to fully
charge it.
Apply the power adptor to charge for MID.
STATUS ICONS
When some remind message appears in your reminder window, please click column
and slip the screen to open the reminder list. Choose the menu you need, and
confirm the information. Then you can close the reminder window through clicking
the column to slide up. Please refer to below status icons:
23
New email
Airplane Mode on
USB connected
USB debugging connected
Return button
Downloading
Setting button & Display
Home button
recently-used application
Current electric volume.
WIFI connected, internet is
available
Screen Shoot button
QUICK START GUIDE
KEYS FUNCTION
Power button
Short press to sleep/wake up, long press to startup
and shutdown.
Volume +(up)
Increase the volume
Volume -(down)
Decrease the volume
Click it in any interface will return to main
HOME button (home)
Back button(back)
Menu button
interface.
click it in any interface will return to previous menu
This button will display in menu interface.
Can set the system and other menus &display
Setting button
recently browsed history
Shot screen button
Shoot any screen
24
and save
STARTUP AND SHUTDOWN
Startup:
Long press POWER key for three seconds, you can enter into startup
picture. The system enters into screen lock status, please unlock it.
Shutdown: Long press POWER, it will popoup shutdown window.
Shutdowm window contains mute mode, airplane mode,reboot mode and shutdown
four options. Click Shutdown is the last step.
OPEN AND CLOSE OF THE SCREEN
Screen will be closed on its own when no operation happens.
Screen will be closed on its own if no operation happens for some time to save
battery power When screen is open, press POWER key, the screen will be closed
immediately.
Open the screen when it is closed: If the screen is closed, short press POWER to
open the screen. The screen will be locked open it, it will show the below picture, left
slide to unlock and enter into camera, right slide the unlock icon to unlock the
screen.
USAGE OF TOUCH SCREEN
MID operating methods: There are below methods to view the main screen, menu
and application procedure in your MID.
Click: When you want to use the screen keyboard typing or choose application in the
main interface, you only need to touch it by your finger.
Press on: If you want to open some item( textbox or the link in the webpage), or
shortcut and main procedure move, you can press on this item.
Quickly slide or slide
Quickly slide or slide indicates make quick vertical or horizoncial movement by
finger.
25
Pull: Before you pull, you need to hold the it with strenghth until you pull it into the
position you want.
Rotate: For most pictures, you only need to retate the MID sidewise to change the
screen direction from horizoncial to vertical. For instance, when you are typing wods,
and watching movies.
HOME PAGE
Main interface as below picture, long press the blank and it will popup windows to
set wallpaper, folder, widgets, and shortcut.
The extended home page: The home page can be extended beyond the wideness of
screen to provide more space, which you can put new-added shortcuts and widgets.
Click the blank space in home page then slide right or left to extend to the right or
left of the screen. In the home page, there are two extended pictures.
26
Remove the icons in desktop
- Long press the icons need to be remove, then on the right above of the screen, it
will appear remove icons.
- Drag the icon to the above of the remove icon, till the icon become red, then move
your finger to delete the icon.
Change the wallpaper of desktop
- In home page, long press any blank space in main screen, it will popup a window
to change the wallpaper.
- Click the gallery or wallpaper gallery to select the wallpaper.
VISIT APPLICATION PROCEDURES
Click
to enter into main interface, choose the application procedure you want to
visit.
USB CONNECTION
Before transmitting documents, you have to conduct storage configuration for your
MID:
1. Connect the MID and computer by USB cable, the reminder column will
show the remind information.
2. Open the reminder board; please view the MID status and reminder to
learn how to open the board.
3. In the reminder board, click the “USB Connected”, then click “open USB
storage configuration”.
4. Now the USB is connected successfully.
27
Copy the document into memory card
1. Connect the MID to computer with USB cable.
2. As MID storage configuration, it is connected with computer successfully.
3. Open the “My computer” in your computer, check the items in “removable
disc”.
4. Copy the documents you need into “removable disc”.
5. After copying finishes, click “shutdown the USB storage configuration” to
uninstall.
Notice: When the MID is connected with USB cable, and you open the USB storage
configuration, you can’t view the memory card through the MID. Only after you
detach the USB cable, you can view the memory card in the MID.
TYPING WORDS
Use the screen keyboard: When you start the procedure or choose the words or
numbers edition, it will show the screen keyboard.
Choose the typing method you want
1. Click Setting pocedure application.
2. Click Language and Keyboard.
3. In the text setting area will reveal all the installed words-typing methods in
your MID.
4. Tick the typing method you want.
28
1
switch the capital and small letter
2
switch the mode of words input
3
click to insert the space
4
click input to execute
5
delete the character in the left of cursor, click and hold to
delete all the characters in the left og the cursor.
OPERATION TECHNIQUE
Enter widgets interface: In the application interface,click widgets on the above of
screen, or slide the screen, it will swtich into widgets interface. Long press any
widget to create its shortcut, then you can enter into the application through the
shortcut icon.
Create application shortcut icons in the desktop: In the application interface or
widgets interface, long press any icon to switch into desktop automatically, drag
and hold the icon, you can move to any position in the desktop.
Remind: If the target position has no space, the widget won’t be add in the main
screen.
BASIC SETTING
SIM MANAGEMENT
Voice call: Click settings in main menu, choose SIM Management:
29
Click voice call, choose defaulted SIM card.
Video Call: Click settings in main menu, choose SIM Management, and click video
call, choose defaulted SIM card when makes video call.
Message: Click settings in main menu, choose SIM Management, click message,
choose the defaulted SIM card when sends message.
Data Connection: Click setting application in main menu, choose SIM management,
click data connection, and choose the defaulted SIM card.
WIRELESS AND INTERNET
- In the main menu or interface, choose setting application procedure.
- Click WLAN, open wifi, MID will automatically search the available Wifi wireless
internet.
- Choose the Wi-Fi internet you want to connect, if it has password, it will popup the
password window, enter password, click connect.
30
Add Network: Click
icon in right top
- Input network SSID, the wireless network name, click save.
- Click user name already saved, click connect to use network.
31
Network Notice: If you open Network Notice, when WIFI signal appears, the right
bottom will remind you available WLAN network.
Keep WI-FI on during sleep: Click
icon in right top of, select advanced.
Click Keep WI-FI on during sleep:
BLUETOOTH
- Click setting application in main menu interface
- Click bluetooth and open it.
- If somebody open bluetooth in your surroudings, click search device in right above,
then MID will automatically search the bluetooth device nearby.
- Click the available Bluetooth device, it will popup request window, enter into
related password, and match the device to connect.
32
After match successfully, choose the operation you want to, click
to go
Bluetooth options.
Bluetooth setting
Rename tablet
Click
icon in right top, select rename tablet, you can rename it as you want
Check visibility timeout: Select visibility timeout setting. Choose the time you want
to set:
Display the file you received: Choose display the file you received, you can view
download and upload files.
Bluetooth advanced setting: Choose Bluetooth advanced setting.
33
- File transmission: Open file transmission service. Connect Bluetooth FTP and
customer device to visit and operate the file.
- Bluetooth distance induction device: Open Bluetooth distance induction device,
when two Bluetooth devices distance is quite far or connection is cut off, the
Bluetooth will remind you with sound.
MOBILE NETWORKS
Network Operator: Click network operator, choose SIM card you need to connect,
system will search available GSM and WCDMA network:
CONTEXTUAL MODEL
- Open settings, click contextual model:
34
Click standard to enter into:
STORAGE
Open setting function, click memory, click preferred install location, you can choose
isntall new application to choose preferred install location.
Check SD card and MID storage space.
- Enter into setting application.
- Click storage, check storage space: System storage is the spcae MID leave for
system file, it can’t be viewed.
35
Internal storage: Internal storage is MID local NAND storage, if you need to check
the storage content, you can check it in main menu.
SD card: You can check storage space, SD card available space, unmount SD card
and erease SD card
APPLICATION PROGRAM
- Click setting application in Apps.
- Select application, after enter, you can manage and delete installed application
and check system used storage space and left space.
36
- View internal storage used space and left space.
View the working device, used space and available space.
37
ACCOUNT AND SYNC
After successfully load, it will open the sync function.
LOCATION SERVICE
Click setting, select location service.
38
SAFETY SETTING
Set locked screen: Lock the touch screen by unlock icon or password to protect your
MID.
Note: After setting screen locked, you should enter the passcode each time when
you startup or screen is locked
Set unlocked picture
- Click setting application in main interface.
- Click safe.
- Click locked the screen.
- Choose picture in text setting area.
Click next following the remind message.
- The unlocked pattern board pop up, there are nine touch spots, connect 4 points
from vertical, horizontal or diagonal direction. As picture, move your finger from the
screen when finish. The system will record yous new unlock pattern.
- Click continue.
- When you see the reminder, enter the unlock pattern, then click confirm.
39
Set unlock PIN code
1.
Click setting application in main interface.
2.
Click safe.
3.
Click screen locked.
4.
Choose PIN in text setting area.
5.
Enter new PIN code(numbers) and click continue.
6.
Ener new PIN code again and click confirm.
Set unlock password
1. Click setting application in main interface.
2. Click safe.
3. Click screen locked.
4. Set password in text seting area.
5. Set new password(letters and numbers) and then click
continue.
6. Enter the password again and the click confirm.
Unknown source
1.
In main interface, click setting.
2.
Click safety.
3.
Click unknown source
40
BACKUP AND RESET
Connect WIFI and login your google account, choose backup my data, system will
backup your data into google server.
If you need to recovery factory reset, please click reset, if you need to formulate
NAND, please click reset tablet.
DATE AND TIME
According to the preset, system will voluntorily apply the date, zone, and time
provided by internet. Manual set date, time and zone
1. Click Setting application procedure.
2. Slide down the screen, then click date and time.
3. Turn off “auto setting of date and time”.
4. Turn off “auto setting zone’.
5. Click Zone Selecting, then choose the zone lists. Slide down the list to view
more zones.
41
6. Click Date setting, then click upper or down buton to adjust date, month,
and year, click setting when you finish selection.
Fixed-time Startup and Shutdown
1.
Click Setting application procedure
2.
Click fixed-tine startup and shutdown.
3.
Operate as below picture
ASSISSTANCE FUNCTION
Touch and hold delay: Click touch and hold delay to increae time.
Install webpage script
It will allow you install webpage scrip when you open system,, but it will increase
the risk when you are browsing webpage.
ENGINEER SELECTION
USB adjustment: After opening USB adjustment, you can use some software to read
MID software, but when USB adjustment is turned on, USB storage needs to manual
42
adjust.
Keep awaken state: If you open keep awaken state, it wll never auto sleep when
your MID is charging.
Pointer Location: If you open pointer location, it will display touch vertical and
horizontal direction.
Show touches: If you open display touch screen operation, it will display touch
opeation on the screen. It is suggested to use with same direction as pointer
location.
Show screen update: If you open screen refresh, it will display related area when
the area is refreshing.
About Tablet: Check MID state
- Check Setting application.
- Click about tablet, check state message, model, Android version, version No and
so on.
- Click state message, check battery state, battery volumne, SIM state, IMEI
number, IP address.
MULTI-MEDIA
CAMERA: IN THE MAIN INTERFACE OR DESKTOP, CLICK CAMERA APPLICATION
PROCEDURE,
ENTER INTO CAMERA
Operation of camera: Switch camera: choose Menu key, click switch front/back
camera:
FM RADIO
CLICK ON FM RADIO ICON IN THE MAIN INTERFACE OR DESKTOP TO ENTER INTO
FM RADIO INTERFACE:
43
Save channels: Click
button in the main interface to save the channel, and the
channel will be saved in channels list.
Note: You need to insert earphone as antenna when using FM radio, if no antenna,
your MID can’t search any frequency band.
COMMUNICATION FUNCTION
PHONE: Click Phone application procedure
44
TEXT MESSAGE: Enter into main menu, choose message application procedure.
Click “Edit new message”
CONTACT LIST
Click Contact list
in the main interface, enter into the contact:
INTERNET
BROWSER: In case of Wi-Fi or mobile internet is connected well (Please refer to
Chapter 4.1 for wireless and internet setting), click IE browser
main menu or desktop to enter the IE interface:
45
in the
Click address bar to input the website, click start, enter into related webpage, then
you can browse the website information and you can click the menu you can
refresh ,save to bookmarks, share page, bookmarks, history and setting the
webpage.
OTHER APPLICATION PROCEDURES
FILE MANAGER: File manager will copy, cut, delete, rename the documents or the
folder in the TF card, it also will share the files, install apk etc.
In the main menu or desktop, click the document manager icon
DOCUMENTS MANAGER.
to enter into
RECORDER
In the main interface or desktop, click recorder icon to enter into record interface,
click record key start red button to start record. Click Stop key stop to stop recording.
Click Play key to play the recorded sound. The system will auto remind you to use or
abandon this record, please choose it manually. Play the record: choose the video
player to play the recorded sound, choose the recorded sound in the source
manager, and click it to play.
46
INSTALLATION OF PROCEDURES
Install the third party application procedure
- Click “file manager” application procedure; choose the application procedure you
need to install.
- Hold the application procedure you need to install.
- It popup install, click install apk.
- Finish the installation as guide, it will operate.
Note: The third party procedure searched from internet to use on the system are all
suffixed with .apk.
“Features can change without notice”
Imported: I.R.P., S.L.
Avda. Santa Clara de Cuba 5
41007 Sevilla
Spain
DECLARATION OF CONFORMITY
I.R.P., SL declare under our responsibility that the equipment meets the
requirements indicated in the following directives:
EMC DIRECTIVES
DIRECTIVAS EMC
EN60950-1:2006/A11:2009/A1:2010
EN 62311: 2088
47
EN 301 489-1 V1.9.2:2011-09
EN 301 489-17 V2.1.1:2009-05
EN 300 328 V1.7.1: 2006-10
ETSI EN 301 489-1 V1.9.2(2011-09)
ETSI EN 301 489-17 V2.1.1(2009-05)
Description of apparatus:
BRIGMTON Model BTPC-1015-QC-3G
Mobile Internet Device
Importer: I.R.P., SL
Address: Avenida Santa Clara de Cuba 5, 41007, Sevilla.
48