1
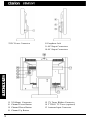
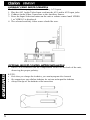
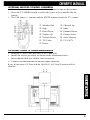
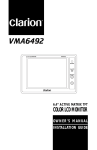
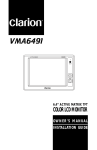
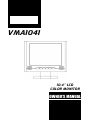
VMA1041
10.4” LCD
COLOR MONITOR
OWNER’S MANUAL
INTRODUCTION
The Clarion VMA1041 is a full-featured 10.4" LCD Color Display Monitor. It
can be used as:
• A stand-alone TV when used with the optional TV Tuner, TTX001
• A monitor integrated into a mobile multimedia system using the auxiliary
A/V inputs
• A PC monitor with the VGAinput
ABOUT THE MANUAL AND WARRANTY
To start enjoying your new Clarion VMA1041, please read the instructions
listed in this manual. Keep all instructions for future reference. Please fill out
and send in the enclosed warranty card to protect your purchase and aid in
warranty service. Also, save your original sales receipt as proof of
purchase.
* If using the VMA1041 with the optional TV Tuner, please refer to the owner’s manual
for the TTX001.
TABLE OF CONTENTS
Precautions • • • • • • • • • • • • • • • • • • • • • • • • • • • • • • • • • • • • •1
Package Contents • • • • • • • • • • • • • • • • • • • • • • • • • • • • • • • • •2
Button Locations • • • • • • • • • • • • • • • • • • • • • • • • • • • • • • • • •2
Installation and Wiring • • • • • • • • • • • • • • • • • • • • • • • • • • • • •4
Picture Adjustment • • • • • • • • • • • • • • • • • • • • • • • • • • • • • • • •4
Auxiliary Video Inputs • • • • • • • • • • • • • • • • • • • • • • • • • • • • • •5
Optional Remote Control Battery Installation • • • • • • • • • • • • • • •5
Optional Remote Control Operation • • • • • • • • • • • • • • • • • • • • •6
Optional TTX001 TV Tuner Installation • • • • • • • • • • • • • • • • • • •6
TV Tuning • • • • • • • • • • • • • • • • • • • • • • • • • • • • • • • • • • • • • •7
Care and Maintenance • • • • • • • • • • • • • • • • • • • • • • • • • • • • • •7
Troubleshooting • • • • • • • • • • • • • • • • • • • • • • • • • • • • • • • • • •7
Product Specs • • • • • • • • • • • • • • • • • • • • • • • • • • • • • • • • • • •8
Notes • • • • • • • • • • • • • • • • • • • • • • • • • • • • • • • • • • • • • • • • •9
PRECAUTIONS
• This set is for use in 12V, negative ground vehicles. Be sure to consult your
store of purchase before installing it on 24V vehicles.
• Do not operate the set in ways other than described in this guide. Doing so
may damage it.
• SAFETY FIRST! For rear seat use only. Do not install on dashboard or
anywhere else that would permit monitor to be viewed by the driver.
Monitor must not be located in the motor vehicle at any point forward of the
back of the front seats. Monitor must never be used in any manner that will
distract driver or interfere with driver’s safe operation of the motor vehicle.
• Be careful not to run down the car battery while using the set with the car
stopped.
1
• For safety, install the set in a position at which the driver cannot see it.
• Do not disassemble or modify the set. Doing so may damage it and voids
your warranty.
• Keep drinks and drops from umbrellas away from the set. Water may damage the internal circuitry.
• Do not let the set become hot. If temperature in the car is high or the set
has been exposed to direct sunlight and is hot, lower the temperature before
using it. (The liquid crystal panel will work properly within a temperature
range of 30 – 113 degrees F.)
• In extremely cold temperatures, the movement of the picture may be slow
and the picture may be dark, but this is not a malfunction. The set will work
normally once the temperature increases.
• Small black and shiny dots inside the liquid crystal panel are normal for liquid crystal products.
PACKAGE CONTENTS
The Clarion VMA1041 comes with the following items:
• Ribbon Cable for connection to the TTX001 TV Tuner
• A/V RCA Cable
• Power Cord
• Table Top Stand
BUTTON LOCATIONS
1 Volume Down Button
2 Volume Up Button
3 Picture Adjustment Button
4 Mode Selection Button
5 Power Button
6 IR Remote Sensor
2
3
7 DC Power Connector
8 Earphone Jack
9 AV2 Input Connectors
0 AV1 Input Connectors
q
w
e
r
t TV Tuner Ribbon Connector
y TTX001 TV Tuner (optional)
u Antenna Input Connector
VGAInput Connector
Channel Preset Button
Channel Down Button
Channel Up Button
INSTALLATION AND WIRING
Before You Begin:
1. This monitor is exclusively for use in cars with a 12V negative ground
power supply.
2. Read these instructions carefully.
3. Be sure to disconnect the battery’s negative terminal before starting. This is
to prevent short circuits during installation.
NOTE: The VMA1041 cannot be used by itself. It should be connected to a device
such as a Clarion TTX001 TV Tuner or a source such as a video cassette player.
Wiring
1. Be sure to turn the power off before wiring.
2. Be very careful where you route the wires. Keep them well away from the
engine, exhaust pipe, etc. Heat may damage the wires.
3. If the fuse should blow, check to see if the wiring is correct.
4. Fasten the ground lead (black) securely to a clean chassis ground. If the
unit is insufficiently grounded, it may not operate or there may be noise.
Power
1. Connect the output of the DC-Adapter on the DC-Input port.
2. Connect one end of the power cord to DC-Adapter socket and connect the
other end of the cord to the power supply.
3. Connect the PC-VGA cable to the VGA port for computer application.
4. Connect A/V cables to AV1 and AV2 port for auxiliary video application.
PICTURE ADJUSTMENT
To adjust from the unit:
1. Press the Picture Adjustment button until the desired adjustment appears on
the screen. The picture control symbols will appear on the screen in the
following order: CONTRAST BRIGHT TINT COLOR H-CENTER VCENTER
2. Press the Volume +/- buttons to adjust the selected function.
To adjust from the remote control:
1. Press the Picture Select button on the remote control until the desired
adjustment appears on the screen. The picture control symbol will appear
on the screen in the following order: CONTRAST BRIGHT TINT
COLOR H-CENTER V-CENTER
2. Press the Channel +/- button to adjust the selected function.
To adjust the viewing angle:
1. Gently hold both sides of the cabinet and tilt the monitor up or down to
achieve the desired viewing angle.
2. The recommended viewing is +30 degrees to –10 degrees vertical and +45
degrees to –45 degrees horizontal.
4
AUXILIAR Y VIDEO INPUTS OPERATION
The VMA1041 is equipped with two auxiliary A/V Inputs.
1. Plug the AV1 Audio/Video Input cord into the AV1 and/or AV2 input jacks.
2. Connect Audio/Video Connectors to the Auxiliary Source.
3. Press the Input Selection button on the unit or remote control until VIDEO
1 or VIDEO 2 is displayed.
4. The selected auxiliary video source should be seen.
OPTIONAL REMOTE CONTROL BATTERY INSTALLATION
• Insert 2 AAA batteries into the compartment located on the back of the unit,
observing the proper polarity.
NOTES:
• Each time you change the batteries, you must reprogram the channels.
• We suggest you use alkaline batteries; do not use rechargeable batteries.
• Always change all the batteries at the same time.
5
OPTIONAL REMOTE CONTROL OPERATION
• To use the remote control, press the Power button to turn on the remote.
• Press the TV/VIDEO button to select the source to be controlled by the
remote.
• The VOL(ume) +/- buttons and the MUTE button control the TV volume.
1
2
3
4
5
6
7
Number Pad
Skip
Erase/Write
8 Channel Up
9 Mute
Volume Down
0 Channel Down
q Picture Select
w Auto Memory
TV/Video
e TV/CATV
Volume Up
Power
OPTIONAL TTX001 TV TUNER INSTALLATION
Slide the TTX001 onto the back of the VMA1041.
Install the screws provided, as shown in the illustration below.
Insert ribbon cable into ribbon cable connector.
Connect external antenna to antenna input connector.
•
•
•
•
Note: When using a TV Tuner with the VMA1041, AV1 Input Connector will be
disabled.
6
TV TUNING
If using the TTX001 with the VMA1041, follow these directions to control the
TV functions:
1. Be sure TV is chosen as the source to be controlled.
2. Press the Auto Memory button on the remote control to scan available
channels.
3. For station adjustments, press the Channel Up and Down buttons on the
remote control.
CARE AND MAINTENANCE
Cleaning the cabinet:
• Use a soft, dry cloth and gently wipe off the dirt. For tough dirt, apply
some neutral detergent diluted in water to a soft cloth, wipe off the dirt
gently, then wipe again with a dry cloth.
• Do not use liquid cleaners on any surfaces as they may damage the cabinet
or cause the paint to peel. Also leaving rubber or plastic products in
contact with the cabinet for long periods of time may cause stains.
Cleaning the LCD panel:
• The LCD panel tends to collect dust, so wipe it off occasionally with a soft
and dry cloth.
• The surface is easily scratched; do not rub it with hard objects.
TROUBLESHOOTING
Before assuming malfunction of the unit, check the following:
Problem:
Power does not switch on.
Solution:
• The wiring is incomplete – See the Installation section of the manual and
connect properly.
Problem:
Optional remote control unit does not work.
Solution:
• The batteries in the remote control may be inserted incorrectly or the
batteries are dead – Check batteries and replace if necessary.
• The remote distance may be too far – Distance must be less than 2 meters.
• The direction of the remote may be improper – Point the remote control
unit directly to the remote sensor.
7
Problem:
Picture does not appear.
Solution:
• The TV Tuner is not set to TV mode (when using the TTX001) – Set the
function to TV mode.
• The TV Tuner is set to VTR mode (when using the TTX001) – In the VTR
mode, no picture appears if no video signal is being input to the VIDEO IN
terminal of the tuner.
Problem:
Picture has shadow or shadows.
Solution:
• Signal condition is poor – This may be due to signals reflected off
mountains or buildings. Check again in a different place or direction.
Problem:
Screen is dark.
Solution:
• The brightness control is not set properly – Adjust the brightness setting.
• Usage conditions are poor – This may happen if the temperature in the
vehicle is below 30 degrees F or above 113 degrees F. Check again when
the temperature is between 30 – 113 degrees F.
Problem:
Colors are pale or hue is poor.
Solution:
• The picture adjustment is not adjusted properly – Adjust the picture.
Problem:
Stripes or spots are on the picture.
Solution:
• Interference signals – This may be caused by interference from other
vehicles, trains, high voltage lines, neon lights, etc. Check again in another
place.
PRODUCT SPECS
Type:
Size:
Pixels:
Power Source Voltage:
Power Consumption:
Operation Temperature:
Color TFT active matrix LCD Display
10.4" (actual panel size)
800x600 screen resolution
DC 11-15V
1.5Amax. (1.5Aor less)
30 - 113 degrees F
8
NOTES
9
NOTES
10
661 W. Redondo Beach Blvd.
Gardena, CA 90247
1-800-GO-CLARION
www.clarion-usa.com
VMA1041-10 Rev.1 (05/00)