1
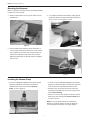
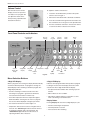
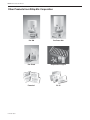
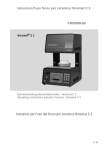
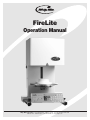
FireLite
Operation Manual
Whip Mix Corporation • 361 Farmington Ave. • P.O. Box 17183 • Louisville, KY 40217-0183 USA
502-637-1451 • 800-626-5651 • Fax 502-634-4512 • www.whipmix.com
FireLite Furnace Operations Manual
Table of Contents
Chapter Three — Entering and
Editing Programs Specifications.........................................................................2
Accessories ...........................................................................3
To Enter and Edit a Program................................................12
Chapter One — Getting Started Changing a Program While it is Running..............................12
Before Unpacking...................................................................3
Available Program Parameters.............................................12
Unpacking..............................................................................3
Lifting and Carrying................................................................3
Chapter Four — Running a Program
Furnace Requirements...........................................................4
To Start a Program...............................................................13
Mounting the Keyboard .........................................................5
Skipping a Program Step.....................................................13
Installing the Vacuum Pump...................................................5
Volume Control.......................................................................6
Chapter Five — Maintenance Front Panel Controls and Indicators.......................................6
Cleaning Your Furnace.........................................................13
Menu Selection Buttons.........................................................6
Replacing the Muffle.............................................................13
Changing Units of Measurement
Between English and Metric ..................................................7
If More Help is Needed.........................................................14
Night Mode.............................................................................8
Replacement Parts
Idle Temperature Operation....................................................8
Parts List..............................................................................15
Chapter Two — Special Function Input FireLite Accessory
Customize Program Finish Tune............................................9
High Efficiency Vacuum Pump.............................................14
Fast Cool with Vacuum.........................................................10
Conversion Table
Adjusting Calibrations for Low-Fusing and
High-Fusing Porcelains........................................................10
Fahrenheit to Celsius............................................................15
Adjust High-Fusing Porcelain Calibration.............................10
Other Products from Whip Mix........................16
Adjust Low-Fusing Porcelain Calibration..............................10
Displaying Muffle Hours.......................................................11
Displaying Software Version.................................................11
Error Messages....................................................................11
Specifications
Power: 110 VAC +/- 10% 50/60 Hz
Minimum and Maximum Values
Power Consumption:
Furnace and Pump: 1,400 W Max
Minimum entry temperature = 65° C/149° F
Maximum entry temperature = 650° C/1,202° F
Outputs: Pump Accessory Power: 85–245 VAC,
50/60 Hz, 300 W Max
Maximum entry time = 60 minutes
Dimensions: 131/2" wide x 131/2" deep x 201/2" high
Minimum heat-rate = 1° C/minute
Temperature: 1,200° C / 2,190° F Max
Maximum heat-rate = 100° C/minute/181° F
Weight: 50 lbs.
Maximum final temperature = 1,200° C/2,192° F
Muffle Chamber: 33/4" diameter x 21/2" high
Maximum vacuum = 76 cm/30 inches of Mercury
Fuse ratings and characteristics:
115 Volt units: Type 326, 12 amp Slo Blo ceramic fuse,
3AB style. 230 Volt units: Type 218- T, 6.3 amp Slo Blo
ceramic fuse, 5 x 20 mm style.
Maximum idle temperature = 650° C/1,202° F
2
FireLite Furnace Operations Manual
Accessories
The following accessories will be found with your FireLite
furnace. If you are missing any of these please call Whip Mix
at (800) 626-5651.
Cooling Tray
Operator’s Manual
Firing Tray
Dry-Erase Program Log Magnets*
Power Cord
*Only use dry-erase marker
Chapter One — Getting Started
You are undoubtedly eager to unpack, set up, and begin using your new furnace. Getting started will be much easier if you
carefully review the information in this chapter and follow the steps as outlined.
Before Unpacking
• When you unpack your furnace, be sure to save the
carton and packing materials. These can be used
again if there is a need to ship or return equipment.
• Be sure to read and save the printed shipping
material packed with your furnace — it contains
valuable information.
• DO NOT turn on the power to your furnace until
you are instructed to do so.
Before the power is disconnected, use the front panel up
arrow button to raise the platform to its full up position, then
disconnect the power and wait at least one hour to allow
the oven table and other surfaces to cool to room ambient
temperature.
If you are relocating the oven inside the current facility or
have used a protective glove to remove the firing tray from
the table, continue below.
Remember to disconnect both the mains power cord and the
pump accessory power cord and also remove the vacuum
tubing from the vacuum inlet at the rear of the oven.
Unpacking
• If the packing materials and/or the furnace appear
to be damaged, call your dealer before continuing.
• Remove the furnace from the carton and place it on
a flat surface.
• Look up into the muffle area and locate the orange
shipping bar and wingnuts. Remove the wingnuts
and push the two bolts and attached brackets out
of the orange bar. Finally, remove the orange bar
by sliding it out the side. Keep these parts in case
there is a need to ship the furnace.
The oven weighs approximately 50 pounds (25 kg). A fourwheeled platform cart is recommended if the new location is
more than a few feet away. Position the oven with the Mains
Power Switch closest to the front edge of the work surface.
Feel underneath the table and the table lift arm to ensure
the surfaces are cool to the touch. Slide your right arm just
underneath the table lift arm as close to the chassis as
possible. Use your left hand to grasp the overhang of the
chassis back just above the vacuum inlet. Raise the oven two
inches, keeping it over the work surface until your back and
arms confirm that you are able to control the oven without
injuring yourself. Step back from the work surface and pivot
slowly until you are headed in the desired direction. Reverse
the above sequence to place the oven in the new location.
Refer to page 5 to reconnect the power and
vacuum ports.
Lifting and Carrying
Never attempt to lift or carry the oven
within one hour of disconnecting the
power after it has been in use.
If you are preparing to ship the unit in its carton to a location
outside your current facility, allow the furnace to cool with the
platform down and, once it is cool to the touch, remove the
white ceramic fiber firing tray from the table and pack it in the
accessory box. Damage to the oven will result from shipment
of the oven with the firing tray inside the muffle. Push the
up button to run the table to the muffle. Install the orange
aluminum shipping bar underneath the table by reversing
the above instructions.
The oven should never be placed on a
flammable work surface. Never place
the oven in a location with overhead
shelving or cabinets that could interfere
with the ventilation slots in the top of
the muffle hood.
3
FireLite Furnace Operations Manual
Furnace Requirements
• The furnace requires 120 VAC and 12 amps of current.
A special heavy-duty power cord has been supplied with
your furnace.
• Turn on the furnace using the power switch located on
the left side of the furnace. The display will light up and
the furnace will perform a series of internal self-tests.
During these self-tests you will hear the pump turn on
and off.
DO NOT OPERATE ON ANY OTHER POWER CORD.
DO NOT OPERATE WITH AN EXTENSION CORD.
OPERATING THIS FURNACE ON A CIRCUIT WITH
OTHER FURNACES OR ELECTRICAL APPLIANCES
THAT REQUIRE SIGNIFICANT POWER MAY CAUSE A
CIRCUIT BREAKER TO TRIP. Install the heavy-duty
safety grounded power cord and plug the
furnace into a grounded outlet.
• The lift will lower. Place the firing tray on the center of
the lift table.
caution: Never open the interior of
the chassis before first removing
the AC electrical power cord.
There are deadly voltages inside.
• Position the furnace so the front is facing you. Be sure
to have at least eight inches on all sides of the furnace to
allow sufficient air flow to keep the furnace cool. Do not
place anything flammable near the furnace.
If you experience a power outage while firing, the firing table
can be raised or lowered manually.
• Minimum ambient room temperature 60° F (15.5° C).
Maximum ambient room temperature 80° F (26.6° C).
Minimum relative humidity 45%. Maximum relative
humidity 60%.
1. Open the back cover by removing the screws on the left
side with an Allen wrench as seen in Figure 1.
2. With pliers, turn the metal rod located to the right of the
shaft as seen in Figure 2.
• The mains power On/Off switch is located on the left
side of the chassis. It is a rocker-type switch with a “1”
and a “0” symbol embossed on it. When the “1” side is
depressed, the mains power will be applied to the oven.
When the “0” side is depressed, the mains power will be
removed from the oven. Never position the oven in such
an orientation where the operator has to lean over the
top of the oven to reach the mains power switch.
The triangular black and yellow sticker on
the front center edge of the muffle hood is a
warning that the metallic surface can become
hot to the touch. Never place your hand on this
surface or lean on the top of the hood when
the unit is in operation.
Figure 1
Figure 2
use of this oven in any manner not
proscribed in this manual may render operator
safety features ineffective.
Intended Use
The FireLite furnace is intended for the firing of dental porcelain materials only.
If the furnace is not used in a manner specified by Whip Mix Corporation, the protection provided by the product
may be impaired.
4
FireLite Furnace Operations Manual
Mounting the Keyboard
When you unpack your FireLite furnace, the keyboard will be
located in the accessory box.
3. To complete the keyboard installation, simply plug the
keyboard cable into the back of the keyboard until you
hear a click as seen in Figures 4 and 5.
1. Remove keyboard from accessory box and loosen the
thumbscrews.
Figure 3
Figure 4
2. Flip the keyboard around to the proper orientation as
seen in Figure 3. One lock-washer goes on the outside
of the brackets on each side and one lock-washer sits
between the keyboard and the inside of the bracket.
Adjust the keyboard to the desired position and tighten
the set screw.
Figure 5
Installing the Vacuum Pump
• If you have a Whip Mix supplied vacuum pump, simply
attach the pump power cord into the international
standard outlet on the furnace marked Vacuum
Pump, as seen in Figure 6.
• If you do not have a Whip Mix supplied vacuum pump,
plug the vacuum pump’s power cord into the outlet end
of the short power cord supplied with the furnace.
• Attach the other end of this short power cord to the
international standard outlet on the rear of the furnace
marked Vacuum Pump.
• Attach a 1/4 inch vacuum rated hose from the vacuum
pump to the brass fitting marked Vacuum Pump at the
rear of the furnace.
Note: The vacuum pump will only run continuously.
Whenever a program requires vacuum, the pump will
run continuously until vacuum is no longer required.
Figure 6
5
FireLite Furnace Operations Manual
Volume Control
To adjust the volume of the furnace:
After the self-test, the furnace
will play a tune to let you know
it is ready to run a program. You
can adjust the volume of the
tune by turning a potentiometer
located in the furnace.
1. Locate the small white button just above the power
switch as seen in Figure 7.
2. Remove the white button with a flat-head screwdriver.
3. Insert the screwdriver through the hole and make sure
the screwdriver sits on the groove of the potentiometer.
4. Turn the screwdriver clockwise to increase the volume
or counter-clockwise to decrease the volume.
Figure 7
Front Panel Controls and Indicators
Program Status
LED Graph
Vacuum
Status LED
Graph
4-Digit LED
Display
Time Remaining
2-Digit LED
Temperature Display
Display
Vacuum
Level
Figure 8
Start
Program
Special
Functions
Program
Select
Table
Up/Skip
Night
Mode
Program
Edit
10-Key
Pad
Enter
Last
Table
Down/Abort
Menu Selection Buttons
4-Digit LED Display
2-Digit LED Display
When a program is not running, the display will automatically
show the muffle temperature. If a program is running, the
default display is time remaining to finish the program. The
4-digit display indicates:
Indicates active program number. Except when a program
is calling for vacuum, then the display shows the current
vacuum level. The 2-digit window will also display:
• the Special Function number when entering a special
function.
• the time remaining in minutes/seconds. If the time
remaining for a program is greater than 99 minutes,
59 seconds the time will be in minutes only.
• Er to indicate an error condition.
• Fr or Dr to indicate frequency or duration of a tone
when customizing a user-defined tone.
• the muffle temperature when the temperature light is
illuminated. When entering the rate rise for a program,
the rate rise will be displayed as degrees per minute.
Display Button
Pressing Display will cause the four-digit display to cycle:
• the vacuum level when the vacuum light is on.
• from time remaining to temperature.
• temperature and vacuum in Celsius or English units of
measure. The °F/Inches light indicates that the furnace
is operating in English units of measurement. The
°C/Centimeters light indicates that the furnace is
operating in Metric units of measure.
• from temperature to vacuum.
• from vacuum to time remaining.
6
FireLite Furnace Operations Manual
After approximately one minute, the display will revert from
the item being displayed to the time remaining if a program
is running or to muffle temperature if the furnace is in
idle mode.
Program Edit Button
Program and Vacuum Status LED Graphs
• Pressing Program Edit while a program is running will
allow you to make temporary changes to the program
currently running. After the changed program has run,
the program will revert to its original values. Changing
programs is covered in detail in Chapter Three —
Entering and Editing Programs.
• Pressing Program Edit allows you to edit a program.
Editing programs is covered in detail in Chapter Two —
Special Functions Input.
• Indicates the item being entered while entering a
program.
• Indicates the status of a program while running.
Start Program Button
Pressing this button will start the selected program number
displayed in the 2-digit display.
Up/Skip Button
• While in idle mode, press the /Skip once and the lift
moves upward. Press again and the lift stops moving.
Special Function Button
• While the lift is moving down, press the /Skip and the
lift will begin moving up.
Press Special Function to perform furnace setup.
Special functions are covered in detail in Chapter Four —
Running a Program.
• While a program is running, press the /Skip and the
program will skip to the next step. For example, pressing
the /Skip button during the soak time will advance
the program to the rise rate. Pressing /Skip again will
advance to the final temperature.
Keypad
The keypad is used to enter numeric data.
Enter Button
Down/Abort Button
Press the Enter button to:
• While in idle mode, press the /Abort once and the
lift moves downward. Press again and the lift will
stop moving.
• store the input data.
• proceed to the next item when entering input information.
• clear an error message on the display.
• While the lift is moving up, press the /Abort and the
lift will begin moving down.
Program Select Button
Used to select a program to run. Valid program numbers
are from 1 through 50.
• While a program is running, pressing the /Abort will
cause the program to abort and the lift to move to its
lower position.
• Press the Program Select button.
• Press the /Abort while changing a program or while
entering a special function and the program entry or
special function will abort without changing the previous
contents of the program or special function.
• Input the desired program number you wish to run. The
program number will be displayed in the 2-digit display.
• Press the Start Program button to start the program
shown in the 2-digit display.
• While in any mode, press the /Abort and the furnace
will return to idle mode.
Note: Program number 0 is a special program. DO NOT run
or use program number 0 to edit or store your program.
Changing Units of Measure Between
English and Metric
The furnace can be changed from Metric to English units
of measure or from English to Metric units while in idle
mode. Programmed values are automatically converted.
Follow these steps to convert from English
to Metric:
Follow these steps to convert from Metric
to English:
2.Press 1 on the keypad.
1. Press the Special Function button.
3. Press the Enter button.
1. Press the Special Function button.
2.Press 2 on the keypad.
3. Press the Enter button.
7
FireLite Furnace Operations Manual
Night Mode
• Pressing Night Mode while the furnace is idling will
cause the furnace to enter night mode immediately.
Placing the furnace in night mode keeps the muffle idling at
a low temperature, preventing a buildup of moisture during
the night. This special function password allows the user to
set the night mode temperature of the furnace.
Important — Before firing porcelain for the first time, it is
best to rid the muffle of all moisture. The easiest way to
do this is to use the Night Mode for several hours.
The furnace comes from the factory with the night mode
temperature set to 150° C. The furnace will remain at this
temperature when night mode is in operation.
• Pressing the Night Mode button while a program is
running will cause the furnace to enter the night mode
after the program has finished running.
Idle Temperature Operation
Setting the Idle temperature:
The furnace will be in the idle mode of operation after any
of the other modes are completed or whenever the /Abort
button has been pushed to abort an operation. The furnace
comes from the factory with the idle temperature set to
0° C. The furnace will idle at idle temperature whenever
a program is aborted or finished.
1. Press the Special Function button.
2.Press 22 on the keypad.
3. Press the Enter button.
4. Input the desired idle temperature using the keypad.
5. Press the Enter button.
8
FireLite Furnace Operations Manual
Chapter Two — Special Function Input
The FireLite furnace has several special functions that allow the furnace operation to be customized to your needs.
Customize Program Finish Tune
The FireLite furnace has an unique feature to allow you
to customize the tune that plays indicating a program is
finished. This allows you to distinguish one furnace from
another when a program is finished. FireLite allows you
to program four tunes to play one after another. You need
to enter the frequency and the duration for each tune. The
furnace will play back all the tones right after they have
been entered. You can reprogram the tones as many
times as you want.
11. The two-digit display will show Dr to indicate the
duration of the second tune. Use the keypad to
enter the duration of the second tune.
12. Press the Enter button.
13. The two-digit display will display Fr to indicate the
frequency of the third tune. Use the keypad to enter
the frequency of the third tune.
14. Press the Enter button.
Setting Program Tunes:
15. The two-digit display will show Dr to indicate the
duration of the third tune. Use the keypad to enter
the duration of the third tune.
16. Press the Enter button.
17. The two-digit display will display Fr to indicate the
frequency of the fourth tune. Use the keypad to
enter the frequency of the fourth tune.
18. Press the Enter button.
19. The two-digit display will show Dr to indicate the
duration of the fourth tune. Use the keypad to enter
the duration of the fourth tune.
20. Press the Enter button.
21. The furnace will play the customized tune once.
After that, the four-digit display will show the
temperature of the furnace and the two-digit
display will show the program number.
1. Press the Special Function button.
2.Press 55 on the keypad.
3. Press the Enter button.
4. Use the keypad to enter the frequency of the
first tune. The four-digit display will show a default
number and the two digit display will show Fr.
This indicates the frequency of the first tune. The
larger the number the lower the pitch. The lower the
number, the higher the pitch. The acceptable range
is from 0 to 1,000 however, the recommended
range of values are between 400 and 1,000.
5. Press the Enter button.
6. The four-digit display will show a default number and
the two-digit display will show Dr. This indicates the
duration of the first tune.
7. Use the keypad to enter the duration of the
first tune. Generally 500 represents one-second
duration. The higher the value, the longer the
duration. The acceptable range is from 1 to
1,000 however, the recommended range of
values are between 400 to 1,000.
8. Press the Enter button.
9. The two-digit display will show Fr to indicate the
frequency of the second tune. Use the keypad to
enter the frequency of the second tune.
Note: Entering 0 as frequency would represent a silent or
pause between note segments for the specified duration.
Note: The recommended range of duration of the tone is
from 400 to 1,000 and the recommended range of frequency
is from 400 to 1,000. The higher the number of duration,
the longer the length of the tone. The higher the number of
frequency, the lower the pitch of the tone.
10. Press the Enter button.
9
FireLite Furnace Operations Manual
Fast Cool with Vacuum
The FireLite comes from the factory with a Fast Cool
Vacuum feature. This feature automatically turns on the
vacuum pump between programs to cool the muffle to the
entry temperature of the new program.
3. Press the Enter button.
4.Press 0 (zero) to change the display from YES to NO
5. Press the Enter button.
To use this feature:
To reactivate this feature:
1. Press the Start Program button.
1. Press the Special Function button.
2.Press 82 on the keypad.
Note: If the final temperature of the last program is higher
than the start temperature of the new program, the vacuum
pump will automatically come on.
3. Press the Enter button.
4. Press any number key between 1 and 9 to change the
four-digit display from NO to YES.
To deactivate this feature:
5. Press the Enter button.
1. Press the Special Function button.
2.Press 82 on the keypad.
Adjusting Calibrations for Low-Fusing
and High-Fusing Porcelains
The FireLite calibration can be adjusted for normal highfusing porcelains and for the new low-fusing porcelains.
These adjustments do not affect each other, so both
adjustments can be used if you fire both types of porcelain.
The adjustments can range from 0° C/32°F to 50° C/90° F.
All porcelain furnaces fire slightly differently. Even porcelain
furnaces from the same manufacturer can fire porcelains at
slightly different temperatures. The FireLite addresses this
problem by allowing you to customize the calibration. This
feature can be used to adjust your furnace to fire porcelains
at manufacturers’ recommendations, or to adjust multiple
furnaces to fire identically.
Adjust High-Fusing Porcelain Calibration
(800° C/1,470° F or above)
Overfires:
Underfires:
1. Press the Special Function button.
1. Press the Special Function button.
2.Press 18 on the keypad.
2.Press 19 on the keypad.
3. Press the Enter button.
3. Press the Enter button.
4. Enter the number of degrees to adjust the
calibration downward.
4. Enter the number of degrees to adjust the
calibration upward.
5. Press the Enter button.
5. Press the Enter button.
Adjust Low-Fusing Porcelain Calibration
(800° C/1,470° F or below)
Overfires:
Underfires:
1. Press the Special Function button.
1. Press the Special Function button.
2.Press 16 on the keypad.
2.Press 17 on the keypad.
3. Press the Enter button.
3. Press the Enter button.
4. Enter the number of degrees to adjust the
calibration downward.
4. Enter the number of degrees to adjust the
calibration upward.
5. Press the Enter button.
5. Press the Enter button.
10
FireLite Furnace Operations Manual
Displaying Muffle Hours
2.Press 90 on the keypad.
To see the number of hours the muffle has been over 605° C:
3. Press the Enter button.
1. Press the Special Function button.
Displaying Software Version
3. Press the Enter button.
To display the version of the software running in your furnace:
1. Press the Special Function button.
2.Press 9 on the keypad.
Error Messages
Er 7 — Setup Error — The computer has detected a
problem with the special functions setup values. Check
all special functions as described in Chapter Four —
Special Functions.
The FireLite furnace contains several self-checks and error
detection circuits. The following error messages may occur:
Er 1 and Er 9 — No Vacuum Error — The program called
for a vacuum and after two minutes the vacuum didn’t reach
an acceptable level. Clean the lift platform and the O-Ring
seal. Check all vacuum connections of the pump and the
furnace. Try the program again.
Er 8 — Maximum Temperature Error — The furnace has
run away to a temperature beyond the maximum allowed.
Turn the power off and allow the furnace to cool. This
error may indicate a bad thermocouple. Test the furnace
by running a program. If it fails again, contact Whip Mix
Corporation for instructions.
Er 2 — Thermocouple Error — The electronics have
detected an open circuit in the thermocouple. Replace the
thermocouple to correct this condition.
Er 12 — Bottom Lift Fail Error — The computer has
detected an error with the bottom lift mechanism. The lift
hasn’t pushed the bottom limit switch after the allowed time.
Contact Whip Mix Corporation for calibration instructions.
Er 3 — Temperature Calibration Error — The computer
has detected a problem with the temperature calibration.
Contact Whip Mix Corporation for calibration instructions.
Er 4 — Lift Calibration Error —The computer has
detected a problem with the lift calibration. Contact Whip Mix
Corporation for calibration instructions.
Er 13 — Top Lift Fail Error — The computer has detected
an error with the top lift mechanism. The lift hasn’t pushed
the top limit switch after the allowed time. Contact Whip Mix
Corporation for calibration instructions.
Er 5 — Vacuum Calibration Error — The computer has
detected a problem with the vacuum calibration. Contact
Whip Mix Corporation for calibration instructions.
Er 14 — Wrong Thermocouple Error — This error only
appears when performing auto-calibration. Contact Whip Mix
Corporation for calibration instructions.
Er 6 — Program Memory Error — The computer has
detected a problem with the memory that stores your
programs. Check all your programs and correct any that have
changed.
11
FireLite Furnace Operations Manual
Chapter Three — Entering and Editing Programs
Programs can be entered or changed while in the idle mode. Changes to a program currently running can also be made for the
remaining stages of the cycle. The procedure for entering and editing a program is the same.
Note: Pressing the /Abort button at any time while
entering or editing a program will abort the procedure and
the original program will not be changed.
To Enter/Edit a Program
3. Press the Last button to scroll backwards through
the program to verify or make changes.
1. Press the Program Edit button, press Enter button.
The LED light on the left will blink showing the program
stage to be set. Use the keypad to enter the program
parameters.
Note: Pressing the Last button at the Start Temp (Entry
Temp) while editing a program will set the temperature
to zero.
2. By pressing the Enter key, you will move to the next
parameter in the program.
Changing a Program While it is Running
4. Repeat this step for each of the remaining steps.
1. While a program is running, press the Program Edit
button. The program number will be displayed in the
two-digit display. The four-digit display will be blank.
5. After the last value has been entered, the furnace will
continue running the program with the new values.
When the program has finished running, it will revert
back to the original values.
2. Press the Enter button.
3. The light for the start temperature will flash. Use the numeric keypad to enter the new values and press Enter
to continue.
Available Program Parameters
Start Temp — The recommended range is 0° to 650° C
(0° to 1,202° F).
vacuum off, press the Zero (0) button on the keypad. To add
vacuum to a program, press any number 1–9 on the keypad.
Pre Dry — The lift will be raised in five evenly spaced steps
during the programmed entry time. The time is entered in
minutes:seconds. The acceptable range is from 0 to 60
minutes and seconds.
Start Time — If vacuum is desired during the heat soak, you
can enter a value from 0 (when the soak time starts) to end
the time of the heat soak.
Start Temperature — Enter the temperature at which the
vacuum will turn on. The recommended range is from Start
Temp to Final Temp.
Soak Time — This is a preliminary low temperature soak.
The acceptable range is from 0 to 60 minutes. The time is
entered in minutes:seconds.
Release Temp — If vacuum is used in a program, it is
necessary to enter a temperature at which the vacuum
pump will turn off. The recommended range is from the
programmed entry temperature to the final temperature
of the program.
Heat Rate — The recommended range is 0° to 100° C
(2° to 181° F) per minute.
Final Temp — The recommended range is the programmed
below start temperature to 117° C (2,192° F).
Note: Vac Release Temp (Vac Start Temp).
Hold Time — The recommended range is from 0
to 60 minutes and seconds. The time is entered in
minutes:seconds.
Release Time — If a program has a hold time, it is possible
to hold vacuum during the hold time. If vacuum is not desired
during the hold time, enter a value of zero (0).
Cool Time — This is the time it takes to lower the lift from the
upper position to the lower position. The lift will be lowered
in five evenly spaced steps during the programmed cool
time. The acceptable range is from 0 to 60 minutes. Time is
entered in minutes:seconds.
After the last value has been entered, the program is stored
in permanent memory.
Note: If an invalid entry is made while entering the
parameters of a program, the furnace will play an error
tune and set the display to zero (0).
Vacuum Level — The furnace can only run continuous
vacuum. All programs are pre-set with vacuum on. To turn
12
FireLite Furnace Operations Manual
Chapter Four — Running a Program
To Start a Program:
The display will stop flashing and be ready for the next
input by pressing the Enter button.
1. Press the Program Select button.
The “program finished” tune can be customized to distinguish
one furnace from another. See Chapter Two — Special
Functions for details.
2. Use numeric keypad to enter the desired program
number.
3. Press the Start Program button to begin the new
program.
Loading Your Work Into the Furnace:
To run the program currently on the two-digit display, simply
press the Start Program button.
Press the down arrow key
to lower the work platform.
Place your work on the firing tray, Press Start Program key,
and it will raise automatically under program control.
When a program is finished, the four-digit display and the
Program Finish LED will flash and the furnace will play a
tune to let you know the program is finished. The furnace will
automatically cool down to idle temperature at this time.
Skipping a Program Step
caution: Never open the interior of
the chassis before first removing
the AC electrical power cord.
There are deadly voltages inside.
Manually override a program step and skip to the next step
by pressing the /Skip button.
Chapter Five — Maintenance
Cleaning Your Furnace
Your new furnace has been painted with an epoxy-based paint
and may be cleaned by using a soft cloth and mild kitchen
cleaners such as Fantastic® or Formula 409®. The front panel
should be cleaned with a window cleaner such as Windex®.
CAUTION: THE GASSES PRODUCED WHEN HEAT
TREATING REFRACTORY MODELS WILL DAMAGE THE
TRANSPARENCY and structure OF THE QUARTZ
TUBES IN THE MUFFLE CHAMBER AND MAY CAUSE
VACUUM LEAKAGE. TO HELP EXTEND THE LIFE OF THE
MUFFLE, IT IS NECESSARY TO PREHEAT REFRACTORY
MODELS IN ABURNOUT FURNACE TO PREVENT THE
GASSES FROM DAMAGING THE QUARTZ GLASS IN THE
MUFFLE CHAMBER.
Never clean the display window with a dry cloth or tissue.
Always moisten the cleaning cloth with a cleaner such
as Windex®.
Note: If hazardous material is spilled on or inside the
furnace, contact Whip Mix Technical Support if there is any
doubt as how to safely remove the material.
Replacing the Muffle
4. Inspect the O-ring for damage and replace if required.
Clean the O-ring area and the sealing area of the new
muffle with a mild cleaning solution such as Windex®.
Lower the new muffle into the vacuum chamber with
the thermocouple and the heating element connectors.
These are keyed so it is not possible to plug them in
incorrectly.
The FireLite furnace contains a muffle module designed for
simple service and replacement. The muffle module contains
the heating chamber and the thermocouple.
The replacement procedure is as follows:
1. Turn the power switch located at the rear of the furnace
to the off position. Remove the power cord from the wall
socket to prevent any chance of a shock hazard. Allow
the furnace to cool.
5. Repeat step 3 in reverse order, reinstalling the muffle
screws and connectors.
6. Install the muffle cover by lowering it over the upright
column and aligning the screw holes. Install the six
Phillips-head screws that attach the muffle cover to the
upright column.
2. Remove the six Phillips-head screws holding the muffle
cover to the two upright brackets. Remove the muffle
cover by lifting it straight up until it clears the upright
brackets.
7. Plug the power cord back into the wall socket and turn
the power on. Observe that the temperature begins to
rise and stabilize at the entry temperature of the current
program.
3. Remove the thermocouple connector from the column
by squeezing the two tabs and pulling away from the
column. Remove the heating element connector from
the bracket by squeezing the two tabs and pulling away
from the bracket. Remove the four large Phillips-head
screws on the top of the muffle. Grasp the handle on the
top of the muffle and lift vertically to remove the muffle
from the vacuum chamber.
8. Fire a chip of porcelain to test the firing temperature of
the new muffle. Adjust the calibration as described in
Chapter Two — Adjust Furnace Calibration to Match
Your Porcelain.
13
FireLite Furnace Operations Manual
If More Help is Needed
We hope you have many years of trouble-free service from
your furnace. If you do have problems with the furnace, or
if you have questions about the furnace not covered in
the manual, contact your dealer or Whip Mix at:
Be prepared to provide the following information:
1. Your name
2. Your lab’s name and address
3. Your lab’s phone number
Phone:800-626-5651
Fax:502-634-4512
E-Mail:[email protected]
Or visit our web site at www. whipmix.com
4. Your lab’s fax number
5. Furnace model and serial number (serial number
can be found on the rear of the furnace)
6. Your question/problem
When you call, it would be helpful if you are near the furnace.
The technician will probably ask you to run tests and report
the results, or read the display while the test is running.
Replacement Parts
FireLite Accessory
Part NumberDescription
96034
Muffle, 115 Volt
96312Thermocouple
96286
Drive Motor
96287
Lift Cable
96288
Vacuum Valve Assembly
96070
Vacuum Valve Plunger
96289
Power Supply PCB
96290
Logic PCB
96025Table
96291
Limit Switch Assembly
High Efficiency Vacuum Pump
96293Overlay
96294
Power Switch Assembly
96295
Speaker Assembly
96296
Vacuum Hose Assembly
96015
Alumina Firing Tray
96297
Cooling Shelf
96016
Fuse, 12 amp (115 Volt units only)
96017
Fuse, 6.3 amp (230 Volt units only)
96004
115 Volt Power Cord
96060
Pump & Heater SSR, 10 amp
96011
Rubber Feet
96302
Dry-Erase Program Log Magnet
IT11236
Operation Manual
Manufactured and serviced at:
Whip Mix Corporation
P.O. Box 17183
Louisville, KY 40217-0183
14
FireLite Furnace Operations Manual
Fahrenheit to Celsius
° F
° C
Celsius to Fahrenheit
° F
° C
100
110
120
130
140
150
160
170
180
190
200
210
220
230
240
250
260
270
280
290
300
310
320
330
340
350
360
370
380
390
400
410
420
430
440
450
460
470
480
490
500
510
520
530
540
550
560
570
580
590
600
610
620
38 630332 1,160627 1,690 921
43 640338 1,170632 1,700 927
49 650343 1,180638 1,710 932
54 660349 1,190643 1,720 938
60 670354 1,200649 1,730 943
66 680360 1,210654 1,740 949
71 690366 1,220660 1,750 954
77 700371 1,230666 1,760 960
82 710377 1,240671 1,770 966
88 720382 1,250677 1,780 971
93 730388 1,260682 1,790 977
99 743393 1,270688 1,800 982
104 750399 1,280693 1,810 988
110 760404 1,290699 1,820 993
116 770410 1,300704 1,830 999
121 780416 1,310710 1,840
1,004
127 790421 1,320716 1,850
1,010
132 800427 1,330721 1,860
1,016
138 810432 1,340727 1,870
1,021
143 820438 1,350732 1,880
1,027
149 830443 1,360738 1,890
1,032
154 840449 1,370743 1,900
1,038
160 850454 1,380749 1,910
1,043
166 860460 1,390754 1,920
1,049
171 870466 1,400760 1,930
1,054
177 880471 1,410766 1,940
1,060
182 890477 1,420771 1,950
1,066
188 900482 1,430777 1,960
1,071
193 910488 1,440782 1,970
1,077
199 920493 1,450788 1,980
1,082
204 930499 1,460793 1,990
1,088
210 940504 1,470799 2,000
1,093
216 950510 1,480804 2,010
1,099
221 960516 1,490810 2,020
1,104
227 970521 1,500816 2,030
1,110
232 980527 1,510821 2,040
1,116
238 990532 1,520827 2,050
1,121
2431,000538 1,530832 2,060
1,127
2491,010543 1,540838 2,070
1,132
2541,020549 1,550843 2,080
1,138
2601,030554 1,560849 2,090
1,143
2661,040560 1,570854 2,100
1,149
2711,050566 1,580860 2,110
1,154
2771,060571 1,590866 2,120
1,160
2821,070577 1,600871 2,130
1,166
2881,080582 1,610877 2,140
1,171
2931,090588 1,620882 2,150
1,177
2991,100593 1,630888 2,160
1,182
3041,110599 1,640893 2,170
1,188
3101,120604 1,650899 2,180
1,193
3161,130610 1,660904 2,190
1,199
3211,140616 1,670910 2,200
1,204
3271,150621 1,680916 2,210
1,210
° F
° C
° F
°C
° C
° F
35 95
40 104
45 113
50 122
55 131
60 140
65 149
70 158
75 167
80 176
85 185
90 194
95 203
100 212
105 221
110 230
115 239
120 248
125 257
130 266
135 275
140 284
145 293
150 302
155 311
160 320
165 329
170 338
175 347
180 356
185 365
190 374
195 383
200 392
205 401
210 410
215 419
220 428
225 437
230 446
235 455
240 464
245 473
250 482
255 491
260 500
265 509
270 518
275 527
280 536
285 545
290 554
295 563
15
° C
° F
° C
° F
° C
° F
° C
°F
300 572 5651,049 8301,526 1,095 2,003
305 581 5701,058 8351,535 1,100 2,012
310 590 5751,067 8401,544 1,105 2,021
315 599 5801,076 8451,553 1,110 2,030
320 608 5851,085 8501,562 1,115 2,039
325 617 5901,094 8551,571 1,120 2,048
330 626 5951,103 8601,580 1,125 2,057
335 635 6001,112 8651,589 1,130 2,066
340 644 6051,121 8701,598 1,135 2,075
345 653 6101,130 8751,607 1,140 2,084
350 662 6151,139 8801,616 1,145 2,093
355 671 6201,148 8851,625 1,150 2,102
360 680 6251,157 8901,634 1,155 2,111
365 689 6301,166 8951,643 1,160 2,120
370 698 6351,175 9001,652 1,165 2,129
375 707 6401,184 9051,661 1,170 2,138
380 716 6451,193 9101,670 1,175 2,147
385 725 6501,202 9151,679 1,180 2,156
390 734 6551,211 9201,688 1,185 2,165
395 743 6601,220 9251,697 1,190 2,174
400 752 6651,229 9301,706 1,195 2,183
405 761 6701,238 9351,715 1,200 2,192
410 770 6751,247 9401,724 1,205 2,201
415 779 6801,256 9451,733 1,210 2,210
420 788 6851,265 9501,742 1,215 2,219
425 797 6901,274 9551,751 1,220 2,228
430 806 6951,283 9601,760 1,225 2,237
435 815 7001,292 9651,769 1,230 2,246
440 824 7051,301 9701,778 1,235 2,255
445 833 7101,310 9751,787 1,240 2,264
450 842 7151,319 9801,796 1,245 2,273
455 851 7201,328 9851,805 1,250 2,282
460 860 7251,337 9901,814 1,255 2,291
465 869 7301,346 9951,823 1,260 2,300
470 878 7351,355 1,0001,832 1,265 2,309
475 887 7401,364 1,0051,841 1,270 2,318
480 896 7451,373 1,0101,850 1,275 2,327
485 905 7501,382 1,0151,859 1,280 2,336
490 914 7551,391 1,0201,868 1,285 2,345
495 923 7601,400 1,0251,877 1,290 2,354
500 932 7651,409 1,0301,886 1,295 2,363
505 941 7701,418 1,0351,895 1,300 2,372
510 950 7751,427 1,0401,904 1,305 2,381
515 959 7801,436 1,0451,913 1,310 2,390
520 968 7851,445 1,0501,922 1,315 2,399
525 977 7901,454 1,0551,931 1,320 2,408
530 986 7951,463 1,0601,940 1,325 2,417
535 995 8001,472 1,0651,949 1,330 2,426
5401,004 8051,4811,0701,9581,3352,435
5451,013 8101,4901,0751,9671,3402,444
5501,022 8151,4991,0801,9761,3452,453
5551,031 8201,5081,0851,9851,3502,462
5601,040 8251,5171,0901,9941,3552,471
FireLite Furnace Operations Manual
Other Products from Whip Mix Corporation
IT 11236 08/11
Pro 200
Pro Press 200
Pro Check
Disposable Plungers
Formula 1
PC 15