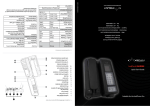
1
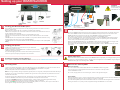
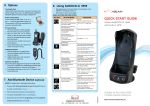
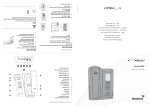
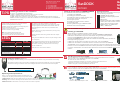
Beam Communications Pty Ltd
8 Anzed Court, Mulgrave
Victoria, Australia, 3170
SatDOCK
T: +61 3 8851 0400
F: +61 3 9560 9055
E: [email protected]
W: www.beamcommunications.com
To confirm your SatDOCK is working properly:
1. Make a call from the handset in the cradle and confirm operation.
2. Make a call to the handset and confirm operation.
3. NOTE: The HFI controls operation (turning On and Off) of the 9505A handset. Please ensure the
9505A is off before applying key accessories. The HFI will then automatically power on the 9505A and
SatDOCK after 6 seconds.
Installation guidelines:
Routing Cables:
> Always protect equipment from dirt and moisture
> Ensure mounting surfaces are strong
> Allow for cooling space & driver/passenger leg room
> Ensure all wires are secure
> Always use the supplied mounting hardware.
> Ensure removal is easy (as above)
Use wiring troughs when available, to simplify cable
installation and to provide maximum protection for cables.
If wiring troughs are not available, route cables under the
carpet alongside the drive shaft hump and follow these
guidelines:
Note: Only qualified people should install
communication equipment. For vehicle air bag
information contact the vehicle manufacturer.
LEDs
State
Charge LED Mute LED
(Off)
Handset is fully charged
(Solid)
Handset is charging
*
(Solid)
Charging Error
(Solid)
(Flashing - Slow)
Handset absent
(Solid)
Mute Mode
(Flashing - Slow)
Privacy Mode
Incompatible handset /
(Flashing - Fast)
Connection Error
(Off)
Normal Handsfree Mode
> Route cables so they are protected from pinching, sharp
edges, and crushing
> Where possible, avoid routing cables above the catalytic
converter
USRQSG003202
TiPS
Checking performance after installation:
Quick
Start
Guide
RST980
Thank you for purchasing the BEAM SatDOCK
Package Contents
This QuickStart Guide lists the installation steps:
Before commencing installation ensure your package
has the following components:
1 x SatDOCK Docking Station
1 x Hands Free Interface (HFI) module
1 x Speaker
1 x Microphone
1 x Interface Cable (from HFI to SatDOCK)
1 x 3-wire power cable harness & 2 Fuses
1 x “Iridium Antenna Guide” (printed)
1 x RAM bracket / 2 x M4 Screws
1 x SMA / TNC Adapter
1. Installing your SatDOCK
2. Installing your Interface box (HFI)
3. Installing the antenna cable & interface cable
4. Install your directional microphone
5. Install your speaker
6 .Installing your external Iridium Antenna
7. Connecting power
8. Docking & Undocking your 9505A handset
9. Mute Function & Privacy Mode
!
1
> Use grommets wherever a cable must pass through a hole
in a metal panel
> In a vehicle equipped with electronically controlled anti-skid
brakes (ABS), route all cables on the opposite side of the
vehicle from the braking modulator box to minimize any
possible interference.
Note: The SatDOCK will only work with a 9505A handset. Do not use the older 9505 handset.
Installing your SatDOCK
When selecting an installation location, please consider:
> Each mounting surface is strong enough to support the SatDOCK or RAM bracket
> Mount the handset within easy reach of the driver during normal vehicle operation.
> Ensure that the SatDOCK is within reach of the interface unit (HFI).
> Position the SatDOCK and cables as to not interfere with vehicle operation, the driver or
Passenger seating/leg space.
> Allow room to easily dock and undock the handset into / from the SatDOCK.
> Allow room for interface and antenna cables to connect to the base of the SatDOCK
The SatDOCK can be mounted directly to a flat surface by means of the bolting holes at the rear, or to a RAM
bracket. To connect the RAM bracket, bolt one of the pivot bases to a convenient place in your vehicle as per
the above considerations, then bolt the other pivot base to the back of the SatDOCK using the 2 supplied M4
screws :
> Keep all in-line connectors accessible.
Back of SatDOCK
Pivot base
Pivot base bolted on
Finished result
*Eg. Unsafe ambient temperature for charging
Intelligent Handset (Optional):
2
This Intelligent Handset enables you to make private phone calls without using the hands-free functionality.
The Intelligent handset is easily connected to the RJ45 socket located on the HFI. The unit must be powered
off before connecting. An extension cable to the Intelligent handset can be sourced and used if required.
More info @ www.beamcommunications.com
3
Installing your Interface box (HFI)
The best location for mounting the HFI Adapter Box is under the dashboard or front seat within
reaching distance of the 9505A handset when in the SatDOCK.
To install the box, follow these steps:
1. Using the Hands Free Interface as a template, mark the screw hole locations.
2. Remove the bracket, and drill holes at the marked locations.
3. Mount using the six screws provided with the fuse kit.
HFI
Connecting the Antenna Cable & Interface Cable
In your package you should have received a TNC to SMA adapter for the antenna cable. Firmly fasten this onto the
antenna cable, and screw onto the SMA connector on the rear of the SatDOCK.
Plug the interface cable onto the back of the SatDOCK and fasten both thumb screws to keep it secure.
Optimising Iridium performance
Iridium is a line-of-sight Satellite network, conditions that can
compromise the quality of the service you may receive include:
1. Obstructions: Provide the best satellite view for your antenna by removing all obstructions where possible
2. Cabling: Use the shortest cable length and the fewest number of connectors on all Iridium certified antenna cable runs
3. RF Interference: Install antenna as far away from other transmitters as possible.
1. Connect TNC/SMA adapter to cable
2. Fix antenna cable to SatDOCK
3. Connect interface cable
Setting up your BEAM SatDOCK
HFI Side 1
HFI Side 2
!
io
Rad e
t
Mu
al
ern
Ext enna
t
n
A
ory
ess
Acc fuse
1A
n
Hor rt
Ale
itive
Pos fuse
3A
+
4
5
Installing your Directional Microphone
The hands-free directional microphone must be properly positioned in the vehicle to ensure
optimum performance.
When selecting a location for the microphone, consider these guidelines:
> Mount the microphone near the centre of the vehicle, either on the driver-side sun visor or
on the head-liner above the driver.
> Do not position the microphone where it may be blocked by the visor.
> Position the microphone so that it faces the user of the mobile when the user is seated
normally.
> Do NOT position the microphone near a window or in any location where road noise or any
ambient background noise may be high (above 85 dB SPL).
> Do NOT position the microphone where it will be affected by the output of the speaker (see
below).
Iridium
9505A
Handheld
8
Installing your Speaker
1. Mount the speaker to the transmission hump or underneath
dashboard on passenger side.
2. Mount speaker so it faces AWAY from microphone - this can cause
“feedback” through the system.
3. To avoid damaging the cable, route the cable carefully to ensure that
it does not get crimped by any heavy objects or enclosures.
6
Installing your External Iridium Antenna
7
Connecting Power
See the specific “Iridium Antenna Installation Guide” manual or visit us @ www.beamcommunications.com
1. Ensure the power and Interface cable to the HFI will reach from the SatDOCK unit to the point at which vehicle
power is being sourced. DO NOT connect to the HFI until after the installation is complete.
2. Route the power cable from the HFI to the connection point.
Note: To limit ground loops and high impedance ground paths, run the green/red-stripe and black wires directly to
the battery, or as close to the battery as possible. Use a grommet or other protection to prevent wear on metal
surfaces for these wires.
3. Prepare the fuse block. Remove all fuses, and tape them to their respective holders, before making any
connection. DO NOT insert fuses until you have completed and inspected all connections.
4. Connect the BLACK Ground wire to negative battery / vehicle chassis (if negatively grounded chassis).
5. Connect the RED +Battery wire to the vehicle + Battery (+12V) via a 3A fuse.
Connect the GREEN Accessory wire to the vehicle accessory power, via a 1A fuse. (This may be connected to
Vehicle Ignition voltage if Accessory power is unavailable).
CAUTION:
DO NOT connect power
to the battery until the
installation is complete.
-
?
ELECTRICAL LEGEND
RED = +12v (B+)
Black = GND (B-)
Green = Accessory Power (Acc)
Docking & Undocking your 9505A handset
To dock the 9505A handset, firstly ensure you remove the rotating antenna from the handset. Place the
base of the 9505A handset into the seat of the SatDOCK ensuring that the pins on the bottom of the
9505A handset line up with that on the seat of the SatDOCK cradle as illustrated below.
Push down on the handset to seat the handset base firmly in the SatDOCK cradle.
To clip the handset into place, press and hold the button on top of the 9505A handset whilst pushing it
back into the SatDOCK until it clips into place. Release the button on top. Gently pull on the handset to
confirm that it is docked correctly and won’t come loose.
When removing 9505A Handset from the SatDOCK cradle, reverse the above steps, ensuring you hold
down the button on top of the handset before trying to remove it from the SatDOCK.
The handset can now be powered on for normal mobile operation - refer to 9505A manual for further
information.
Stage 1
Stage 2
!
Antenna Operation
9
Mute Function & Privacy Mode
Stage 3
Stage 4
Stage 5
Please note that earlier firmware versions of the 9505A handset may display a message prompting the user to rotate
the antenna. To toggle between enabling / disabling this message when in the SatDOCK, using the keypad on your
9505A handset, type in the following code : *#92#
Mute Functionality
To mute all audio to the handset whilst docked to the SatDOCK cradle, simply press
the mute button once. A red light will illuminate on the mute button to visually confirm
that the SatDOCK is muted.
Muted
To un-mute, simply press the mute button again, and the mute light will extinguish.
Privacy Mode
Unmuted
Privacy mode allows a user to utlise a Privacy Handset or earpiece plugged into the side of the 9505A in the 2.5mm
jack and subsequently does not use the external microphone or speaker.
To enable Privacy Mode, press and hold the Mute button for 1.5 seconds. The red light on the mute button will start
flashing to indicate it is in privacy mode, as opposed to being solid Red when in mute mode.