1
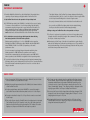
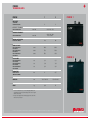
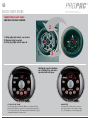
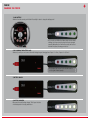
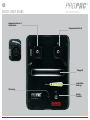
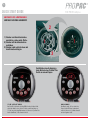
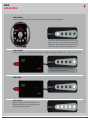
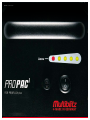
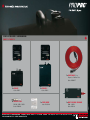
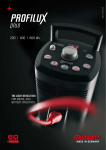
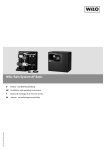
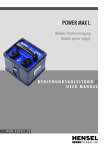
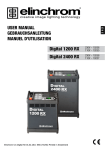
+ FOR PROFILUX plus Quick Start Guide. EN D 1 EN Quick Start Guide FOR PROFILUX plus Lamp Head Socket I / Charger connection Lamp Head Socket II Handle Battery Level Indicator Fuse Holder Power On-Off 2 + PROPAC Important Information! 1. Read the Multiblitz Profilux Plus „Quick Start Guide“ thoroughly before operating a Propac battery pack together with a Profilux Plus unit. 2. Only Profilux Plus units are to be operated on a Propac battery back. 3. A 150 W halogen tube (Code: PACHAL) is included in the scope of supply. To ensure a correct rendition of color for the modeling light, we highly recommend using this halogen tube in your Profilux Plus unit when it is being operated on a Propac battery pack.During battery operation with halogen tube PACHAL, the supplied pyrex-dome (Code: PLUSKLA) must be attached to the internal reflector of the Profilux Plus unit used. 4. It is absolutely necessary to exchange the halogen tube when switching from battery operation to 220–240 V mains operation. attery operation with Propac-1 or -2 to 220-240 V mains operation: B Exchange the 100 V–130 V halogen tube PACHAL with the 220–240 V tubes PROHAL, LUHAL 2 or LUHAL 3, depending on the units´ performance class. - T he digital display of the Profilux Plus changes between indicating the selected output and „LO“ (for „Low“), the very left of the four green LEDs on the Propac starts blinking and an acoustic signal sounds. - Now, only a few more flashes can be fired before the unit switches off. - A soon as the red LED of the battery level indicator starts blinking, the Propac should be turned off and recharged promptly. 6. During recharge, no Profilux Plus units can be operated on a Propac. 7. If a Propac is only used occasionally or not in use for longer time period, it always should be stored fully charged. We recommend to fully charge the Propac at least every 3 months. 8. When turning off the Propac it should not be switched on again directly, wait until the battery level indicator has entirely gone out. If you switch on directly after switching off, the deep discharge protection will stay active and the two lamp sockets remain locked. It is not necessary to exchange halogen tubes when switching from battery operation to 100-130 V mains operation and vice versa, because the recommended tube for battery operation and 100-130 V mains operation (Code: PACHAL) is designated for both operating modes. 5. T o protect the batteries (deep discharge protection) against permanent deep discharges, which can be unfavourable for the Propac, the connected Profilux Plus units units will automatically switch off as soon as a critical state of charge is reached: FOR PROFILUX plus Quick Start 1. P lace the supplied 150 W halogen tube (Code: PACHAL) into the Profilux Plus unit that will be operated on the Propac. 2. Attach the supplied pyrex-dome (Code: PLUSKLA) to the internal reflector of the Profilux Plus unit. 3. Use the supplied lamp cable (Code: PACNET) to connect the ready to use Profilux Plus unit with either lamp head socket I or II of the Propac. 4. Proceed as described in steps 1 to 3 if you like to connect a second unit to the Propac. 5. T urn on the Propac using its “On-Off” switch, the battery level is displayed. The Profilux Plus unit is in “stand-by” mode, the „I-0“ button glows red. Switch on the Profilux Plus unit by pressing the “I-0” button, the button lights up red, Propac and Profilux Plus are ready for operation. 6. T he Propac can be recharged using the supplied multi-voltage charger (Code: PACLA). Plug the charger into a wall outlet (you might need the separately available travel plug adapter TRAPLUG, depending on the country you are in). Connect the charger to lamp head socket I of the Propac, marked with “Charge”. The charging activity is displayed via the very right green LED of the Propacs´ battery level indicator. 7. A s soon as the Propac is fully charged the multi-voltage chargers´ LED changes its´color from red to green. Charging time for Propac 1 = 4 hrs. Charging time for Propac 2 = 4,5 hrs. 8. R echarging the Propacs for ten hrs will result in a 25% gain of flash capacity. After ten hours of charging, the Propac and the multi-voltage charger will automatically switch off. 3 EN Quick Start Guide FOR PROFILUX plus PROPAC FAQ Is there an external hot swappable battery available for the Propac? No, we think that much capacity does not need an extra battery. Can I operate my Profilux Plus unit(s) on a Propac while charging? No, the lamp sockets are being switched off during charging. Can I operate other flash units than a Profilux Plus on my Propac? DO NOT, you will damage the other flash unit and the Propac. Can I use the modeling light on my Profilux Plus when it is being operated on a Propac? Yes you can, the modeling lights´ „Auto Off“ function on your Profilux Plus will help you spare battery power. Is it necessary to exchange the 220-240 V modelling lamps PROHAL, LUHAL 2 or LUHAL 3 (included in the Profilux Plus´ scope of supply for 220-240 V mains operation) for the 100-130 V modelling lamp PACHAL (included in the Propacs´ scope of supply) when I switch from 220-240 V mains operation to battery operation? Technically it is not necessary for the modeling lamp will not take any damage. Practically we advise to change the modelling lamp in order to assure a correct rendition of colour. Be sure to also apply pyrex dome PLUSKLA when using the 100-130 V modelling lamp. Is it necessary to exchange the 100-130 V modelling lamp PACHAL (included in the Propacs´ scope of supply) for the 220-240 V modelling lamps PROHAL, LUHAL 2 or LUHAL 3 (included in the Profilux Plus´ scope of supply for 220-240 V mains operation) when I switch from battery operation to 220-240 V mains operation? Yes, this is absolutely necessary, otherwise you will damage the 100-130 V modelling lamp. What about when switching from 100-130 V mains operation to battery operation and vice versa? Modeling lamp PACHAL, included in the Profilux Plus´ scope of supply for 100-130 V mains operation and also included in the Propacs´ scope of supply for battery operation, is designated for 100-130 V mains operation and battery operation and therefore must not be exchanged. Be sure to also apply pyrex dome PLUSKLA when using the 100-130 V modelling lamp. 4 Why must I apply pyrex dome PLUSKLA when using 150 W/100-130 V modelling lamp PACHAL? 100-130 V bulbs with b15 socket do not have a built-in fuse, this is why the pyrex dome has to be applied to the flash unit. 220-240 V bulbs with b15 socket have a built-in fuse. How does the Propac indicates that its´ battery is nearly empty? See „1) Low Battery“ on page 7. Can I keep my Propac in a hard-/or soft case when I ´am working with it, or does it get too warm and might damage the case or other equipment? Yes, you can keep the Propac in its´ case, the Propac battery packs only get warm to the touch during operation. How many flashes can I fire before the Propac cuts-out due to overheating? The Propacs do not cut-out at all because it has not to be monitored by a thermal cut-out circuit. You can fire its´ whole capacity of flashes from one load. Why does the battery level indication displays a different state of charge when a connected Profilux Plus unit recycles. In doing so the Propac indicates the stronger load that acts on the batteries during the recycling process of the flash unit. Should I always store my Propac fully charged? See page 3 under point 7. Can I leave my Propac recharging overnight? Yes you can. After 4 hrs, 4,5 hrs respectively, the Propacs will deliver the flash count stated in the specifications. Recharging the Propacs for ten hrs will result in a 25% gain of flash capacity. After ten hours of charging, the Propac and the multi-voltage charger will automatically switch off. + PROPAC Technical Data PROPAC 1 2 2 2 PROPAC 1 LAMP SOCKETS (splash proof) for Profilux Plus units Obtainable performances with 1 Profilux Plus unit max. Ws Obtainable performances: with 2 Profilux Plus unit max. Ws Modeling light operation: mit “Auto-Off” Funktion* Number of Flashes: with 1 x Profilux Plus 200 at full output** with 1 x Profilux Plus 400 at full output** with 1 x Profilux Plus 600 at full output** Recycling time: with 1 and 2 Profilux Plus 200 at full output with 1 and 2 Profilux Plus 400 at full output with 1 and 2 Profilux Plus 600 at full output Recharge time at 110 V / 230 V: 200 / 400 / 600 400 / 600 / 800 1000 / 1200 Yes Yes count 1400 3200 count 700 1600 count 350 800 sec 0,9 0,9 sec 1,8 1,8 sec 3,2 3,2 PROPAC 2 hrs 4 4,5 (when fully discharged) Dimensions: mm 166 x 219 x 210 166 x 219 x 296 Weight: kg 8,8 12 *If a unit isn´t fired for 15 sec., the modeling light switches off automatically in order to preserve battery power. It turns on again after the unit is fired. **Propac fully charged, without modeling-light, flash count halves with two units connected. Tolerances of specifications and components conforming to DIN and IEC standards. Specifications are subject to change without notice. 5 EN Quick Start Guide FOR PROFILUX plus Connection of lamp cable and multi-voltage charger. 2 1) Align plug and socket, see arrows. 2) Connect plug to socket. 3) Turn plug right until it snaps in. 1 1 3 Additional visual indications on a Profilux Plus unit when operated with a Propac. 15 sec auto-off” mode The modeling-Llght on-off button/100% on-off button will blink when the unit switches to “auto-off” mode after not being fired for 15 sec. Also refer to the „Profilux Plus Quicks Start Guide“, page 2, „Important Information“ under point 4. 6 Low Battery The display will indicate “LO” as soon as a the Propac reaches a critical state of charge. See „1) Low Battery“ on the following page. + PROPAC Charging the Propac 1) Low Battery: Switch off and disconnect your Profilux Plus unit(s) in order to charge the battery pack.* *A soon as the red LED of the battery level indicator starts blinking, the Propac should be turned off and recharged promptly. Otherwise, the Profilux Plus unit(s) will cut-out automatically (deep discharge protection). 2) Re-charging the battery pack: Switch off your Propac and connect the multi-voltage charger. Ccharging time: Propac 1 = 4 hrs, Propac 2 = 4,5 hrs** ** R e-charging the Propacs for ten hrs will result in a 25% gain of flash capacity. 3) Battery charged 4) Battery charged: Disconnect the multi-voltage charger. The Propac indicates a full battery after it is being switched on. 7 D Quick Start Guide FOR PROFILUX plus Lampenanschluss I / Ladebuchse Lampenanschluss II Tragegriff LadestatusAnzeige Sicherung An-Aus Schalter 8 + PROPAC Wichtige hinweise! 1. L esen sie unbedingt den Punkt „Wichtige Hinweise“ im Multiblitz „Profilux Plus Quick Start Guide“ sorgfältig durch, bevor sie ein Propac Akku zusammen mit einem Profilux Plus Gerät betreiben. - D as Display am Profilux Plus wechselt zwischen der Anzeige der eingestellten Blende und der Anzeige „LO“ (für „Low“). Die letzte der vier vorhandenen grünen LEDs am Propac blinkt und ein akustisches Signal ertönt. 2. Es dürfen ausschließlich Profilux Plus Geräte an einem Propac Akku betrieben werden. - J etzt können nur noch einige Blitze abgegeben werden, bevor das Gerät abschaltet. 3. Im Lieferumfang des Propac ist eine 150 W Halogenröhre (Code: PACHAL) für den Akkubetrieb enthalten. Um eine korrekte Farbwiedergabe des EinstellLichts zu garantieren muss diese Halogenröhre für den Akkubetrieb in das verwendete Profilux Plus Gerät eingesetzt werden. Zusätzlich muss dann das im Lieferumfang enthaltende Pyrex-Schutzglas (Code: PLUSKLA) am Innen reflektor angebracht werden. - S obald nur noch die rote LED der Ladestatus-Anzeige am Propac leuchtet, sollte das Propac ausgeschaltet und umgehend wieder aufgeladen werden. 4. Es ist unbedingt notwendig beim Wechseln vom Akkubetrieb in den 220 - 240 V Netzbetrieb die Halogenröhre auszutauschen. Akkubetrieb mit Propac-1 oder -2 auf 220 - 240 V Netzbetrieb: Wechseln vom Akkubetrieb der Halogenröhre PACHAL auf PROHAL, LUHAL 2 oder LUHAL 3, je nach Leistungsklasse des Geräts. B eim Wechseln vom Akkubetrieb mit Propac-1 oder -2 auf 100-130 V Netzbetrieb und umgekehrt ist kein Austauschen der Halogenröhren not wendig da die hier genutzte Halogenröhre (Code: PACHAL) für beide Betriebsarten vorgesehen ist. 5.Eine Tiefentladung kann auf Dauer nachteilig für die Akkus sein, um das Propac davor zu schützen, werden die angeschlossenen Profilux Plus Geräte beim Erreichen eines kritischen Ladestandes der Akkus automatisch abgeschaltet. 6. Während des Ladevorganges können keine Profilux Plus Geräte an einem Propac betrieben werden. 7. E in Propac sollte, wenn es über einen längeren Zeitraum unbenutzt gelagert wird, voll aufgeladen gelagert werden. Bei seltener Nutzung empfehlen wir das Propac min. alle 3 Monate einmal voll aufzuladen. 8. N ach dem Ausschalten sollte das Propac nicht sofort wieder eingeschaltet werden, da sonst der Tiefentladeschutz der Akkus anspricht und die 2 Blitz anschlüsse nicht freigegeben werden. Deshalb vor dem erneuten Einschalten warten, bis die Ladestatus-Anzeige nach dem Ausschalten vollkommen erloschen ist. FOR PROFILUX plus Quick Start 1. Setzen sie, die mitgelieferte 150 W Halogenröhre (Code: PACHAL) in das Profilux Gerät ein, das am Akku betrieben werden soll. 2. Befestigen sie mit Hilfe der Klemmbügel im Innenreflektor des Profilux Plus Geräts das mitgelieferte Pyrex-Schutzglas (Code: PLUSKLA) über der Blitzund Halogenröhre. 3. Verbinden sie das anschlussbereite Profilux Plus Gerät mit dem Lampen kabel (Code: PACNET) über die Lampenanschlüsse I oder II mit dem Propac. 4. Gehen sie nach den Punkten 1-3 vor, wenn sie ein zweites Profilux Plus Gerät an einem Propac anschließen möchten. 5. Das Propac über den Schalter „An/Aus“ einschalten, der „Ladestatus“ des Propac wird angezeigt. Das/Die Profilux Plus Gerät/e ist/sind jetzt im „Stand-by“ Modus, der Schalter „I-0“ glimmt rot. 6. Ü ber den Lampenanschluss I kann das Propac mit Hilfe des MultivoltageLadegeräts (Code: PACLA) aufgeladen werden. Hierfür muss das Ladegerät mit dem Netzstecker in eine Steckdose eingesteckt werden und das Ladekabel des Lagdegerätes muss mit dem/der Lampenanschluss I / „Charge“Buchse des Propac verbunden werden. Die Ladeaktivität wird über die Ladestatus-Anzeige am Propac angezeigt. 7. S obald das Propac aufgeladen ist, wechselt die Farbe der LED des Lade geräts von rot nach grün. (Ladedauer für Propac 1 = 4 Std., Ladedauer für Propac 2 = 4,5 Std.) 8. Z ehnstündiges Aufladen des Propacs resultiert in einem Gewinn von 25% mehr Blitzkapazität. Nach zehn Stunden Ladezeit, schalten das Multi-Voltage Ladegerät und das Propac automatisch ab. Das/Die Profilux Plus Gerät/e über den Schalter „I-0“ einschalten. Propac und Profilux Plus Gerät/e sind betriebsbereit. 9 D Quick Start Guide FOR PROFILUX plus PROPAC FAQ Ist eine separate Schnellwechselbatterie für das Propac erhältlich? Nein, wir glauben dass bei so viel Kapazität keine extra Batterie nötig ist. Kann ich mein(e) Profilux Plus Gerät(e) an meinem Propac betreiben während dieser lädt? Nein, während des Ladevorgangs werden die Lampenanschlüsse abgeschaltet. Darf ich andere Blitzgeräte als das Profilux Plus an meinem Propac betreiben? 100-130 V Röhren mit b15 Sockel verfügen nicht über eine eingebaute Sicherung, deshalb muss das Pyrex-Schutzglas benutzt werden. 220-240 V Röhren mit b15 Sockel verfügen über eine eingebaute Sicherung. Wie erkenne ich, dass das Propac wieder aufgeladen werden muss? Siehe „1) Akku schwach“ auf Seite 13. Nein, nur Profilux Plus Geräte von Multiblitz dürfen an einem Propac Akku betrieben werden. Schließen Sie keine anderen Geräte am Akku an. Kann ich meinen Propac im Transportkoffer belassen wenn ich damit arbeite, oder wird es zu warm und könnte eventuell den Koffer oder anderes Equipment beschädigen? Kann ich auch im Batteriebetrieb mit Einstell-Licht arbeiten? Sie können das Propac bedenkenlos im Koffer lassen, das Propac wird im Betrieb nur handwarm. Ja, die in das Profilux Plus eingebaute „Auto Off“ Funktion für das EinstellLicht hilft ihnen dabei Akkuenergie zu sparen. Ist es notwendig die 220-240 V Halogenröhre (PROHAL, LUHAL 2 oder LUHAL 3, im Lieferumfang eines Profilux Plus für 220-240 V Länder enthalten) gegen eine 100-130 V Halogenröhre (PACHAL, im Lieferumfang des Propac enthalten) auszutauschen, wenn ich vom 220-240 V Netzbetrieb in den Batteriebetrieb wechsle? Aus technischen Gründen ist das austauschen der Röhren nicht notwendig, da die Röhre nicht beschädigt werden würde. Um jedoch eine korrekte Farb wiedergabe zu garantieren, empfehlen wir die Röhren für den praktischen Gebrauch auszutauschen. Benutzen sie außerdem das Pyrex-Schutzglas PLUSKLA wenn sie mit der 100-130 V Halogenröhre PACHAL arbeiten. Ist es notwendig die 100-130 V Halogenröhre (PACHAL, im Lieferumfang des Propac enthalten) gegen eine 220-240 V Halogenröhre (PROHAL, LUHAL 2 oder LUHAL 3, im Lieferumfang eines Profilux Plus für 220-240 V Länder enthalten) auszutauschen, wenn ich vom Batteriebetrieb in den Netzbetrieb mit 220-240 V wechsle? Ja, dies ist absolut notwendig, da sonst die 100-130 V Halogenröhre beschädigt würde. Was wenn man von 100-130 V Netzbetrieb in den Batteriebetrieb wechselt und umgekehrt? Die Halogenröhre PACHAL (im Lieferumfang eines Profilux Plus für die Nutz ung in 100-130 V Ländern, und im Lieferumfang des Propac enthalten) ist für beide Betriebsarten vorgesehen. Benutzen sie das Pyrex-Schutzglas PLUSKLA wenn sie mit der 100-130 V Halogenröhre PACHAL arbeiten. 10 Warum muss ich das Pyrex-Schutzglas PLUSKLA benutzen wenn ich mit der 150 W/100-130 V Halogenröhre PACHAL arbeite? Wieviele Blitze kann ich auslösen bevor das Propac wegen Überhitzung abschalten muss? Ein Propac schaltet nie wegen Überhitzung ab da es nicht von einer ThermoSchaltung überwacht werden muss. Sie können die gesamte Kapazität an Blitzen abfeuern ohne das, das Propac „pausieren“ muss. Warum zeigt die Ladestaus-Anzeige des Propac einen anderen Ladezustand an sobald ein angeschlossenes Profilux Plus Gerät nachlädt? So zeigt das Propac die höhere Last an die während des Nachladens des Blitzgeräts anliegt. Sollte ich mein Propac imm er voll aufgeladen lagern? Siehe Seite 9, Punkt 7. Kann ich mein Propac über Nacht bedenkenlos aufladen? Ja. Nach 4, bzw. 4,5 Std. Ladezeit liefert ein Propac die Blitzanzahl die in den technischen Daten angegeben ist. Wenn ein Propac 10 Std. geladen wird verfügt es über 25% mehr Kapazität, was die Blitzanzahl noch einmal deutlich erhöht. Nach 10 Std. Ladezeit schalten das Multi-Voltage Ladegerät und das Propac automatisch ab. + PROPAC Technische Daten PROPAC 1 2 2 2 PROPAC 1 Anschlüsse für Profilux Plus Geräte (spritzwassergeschützt) Mögliche Leistungen mit 1 PROFILUX Gerät max. Ws Mögliche Leistungen mit Kombinationen aus 2 Profilux Plus Geräten max. Ws Halogenlichtbetrieb: mit “Auto-Off” Funktion* Blitze: mit 1 x Profilux Plus 200 bei voller Leistung** mit 1 x Profilux Plus 400 bei voller Leistung** mit 1 x Profilux Plus 600 bei voller Leistung** Blitzfolge: mit 1 oder 2 Profilux Plus 200 bei voller Leistung Mit 1 oder 2 Profilux Plus 400 bei voller Leistung Mit 1 oder 2 Profilux Plus 600 bei voller Leistung 200 / 400 / 600 400 / 600 / 800 1000 / 1200 Ja Ja Anzahl 1400 3200 Anzahl 700 1600 Anzahl 350 800 Sek 0,9 0,9 Sek 1,8 1,8 Sek 3,2 3,2 PROPAC 2 AUFLADEZEIT NACH VOLLER ENTLADUNG BEI 110 V / 230 V: Std 4 4,5 Abmessungen: mm 166 x 219 x 210 166 x 219 x 296 Gewicht: kg 8,8 12 *Wenn die Geräte bei eingeschaltetem Einstell-Licht innerhalb von 15 sek. Nicht abgeblitz werden, schaltet sich das Einstell-Licht automatisch ab um Akku-Energie zu sparen. Durch einmaliges ausslösen des Blitzes wir das Einstell-Licht wieder aktiv. **Bei voller Ladung des Akkus, ohne Einstell-Licht, Blitzanzahl halbiert sich mit zwei angeschlossenen Geräten. Toleranzen der technischen Daten für Meßwerte und Bauelemente nach DIN- und IEC Norm. Technische Änderungen vorbehalten. 11 D Quick Start Guide FOR PROFILUX plus Anschluss des Lampenkabels und Multi-Voltage Ladegeräts 2 1) Stecker und Anschlussbuchse ausrichten, siehe weiße Pfeile. 2) Stecker mit Anschlussbuchse verbinden. 3) Stecker nach rechts drehen und zum Einrasten bringen. 1 1 3 Zusätzliche visuelle Anzeigen beim Betrieb eines Profilux Plus Geräts an einem Propac. 15 Sek. „Auto-off“ Modus Der Einstell-Licht An-Aus Schalter/100% An-Aus Schalter blinkt sobald das Gerät in den „Auto-off“ Modus schaltet nachdem es 15 Sek. lang nicht abgeblitzt worden ist. Siehe auch „Profilux Plus Quick Start Guide“, Seite 6 unter Punkt 4. 12 Akku schwach Das Display zeigt „LO“ an sobald der Propac einen kritischen Ladezustand erreicht. Siehe auch „1) Akku schwach“ auf der folgenden Seite. + PROPAC laden des Propac 1) Akku schwach: Schalten sie ihr Profilux Plus Gerät aus und trennen sie es vom Propac um den Propac wieder aufzuladen.* * Sobald die rote LED der Ladestatus-Anzeige am Propac zu blinken beginnt sollte das Propac ausgeschaltet und umgehend wieder aufgeladen werden. Andernfalls werden die angeschlossenen Profilux Plus Geräte automatisch abgeschaltet (Tiefentladungsschutz). 2) Akku aufladen: Schalten sie das Propac aus und verbinden sie das Multi-Voltage Ladegerät mit dem Propac. Ladedauer: Propac 1 = 4 Std., Propac 2 = 4,5 Std. ** 1 0 stündiges Aufladen des Propac führt zu einer Erhöhung der Blitzkapazität um 25%. 3) Akku geladen 4) Akku geladen: Das Propac zeigt eine volle Batterie an nachdem sie das Multi-Voltage Ladegerät vom Propac getrennt haben und das Propac wieder eingeschaltet wird. 13 images by: stefan Ditner 14 + Shooting Setup: Profilux Plus 600 // Reflector COMWEW // Propac 1 15 + VISIT US online: www.multiblitz.de + SCOPE OF DELIVERY / LIEFERUMFANG packit 1 / packit 2 1x L AMP CABLE, 5 m Propac to Profilux Plus Code: PACNET 1x P ROPAC 2 Code: PAC 1 Code: PAC 2 1x HALOGEN TUBE 1x P YREX DOME 150 W / 100 - 130 V Code: PACHAL Code: PLUSKLA 1x M ulti-Voltage CHARGER 100 - 260 V Code: PACLA MULTIBLITZ Dr. Ing. D. A. Mannesmann GMBH | Ferdinand - Porsche - StrASSE 19 | D-51149 KÖLN | GERMANY | Fon: +49 (0) 2203 - 93 96 10 | Fax: +49 (0) 2203 - 93 96 49 e-mail: [email protected] | internet: www.multiblitz.de 16 D/engl 10.09 1x PROPAC