1
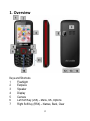
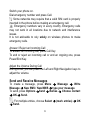
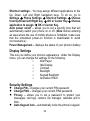
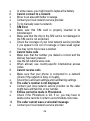
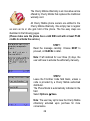
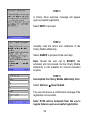
Cherry Mobile D11 Mini User Guide 1 Preface Please read the following guidelines before using your new Cherry Mobile D11 Mini Phone. Utmost compliance is highly recommended for your safety. Non-compliance may pose danger to you and your mobile phone, and may be illegal. Cherry Mobile reserves the right to modify technical specifications without prior notice. Some content in this manual, i.e. software, images, accessories and more, may vary from that in the actual device. Please refer to unit for accuracy. This guide aims to help you get started on your new Cherry Mobile phone. Aside from the last two parts of this guide i.e. Section 6 - Important Safety Precautions and Section 7 Troubleshooting, you may find the following icons periodically present to help you make better use of your phone. - indicates sequence of processes - presents additional notes on a topic or alternative options for a feature - shows further cautionary measures 2 1. Overview Keys and Shortcuts 1 Flashlight 2 Earpiece 3 Speaker 4 Display 5 Camera 6 Left Soft Key (LSK) – Menu, OK, Options 7 Right Soft Key (RSK) – Names, Back, Clear 3 8 9 10 11 12 13 14 Call Key – Call history, connect to a call Power / End Key – Power On/Off, End, Clear Navigation Keys Left – File Manager Right – User Profile Up – Audio Player Down – Calendar Center – Main Menu; OK key Keypad 1 – special characters (.,-?!’@:#$/_1) 2 – abc2 3 – def3 4 – ghi4 5 – jkl5 6 – mno6 7 – pqrs7 8 – tuv8 9 – wxyz9 0 – 0 [space] * – symbols tab # – shortcut for Silent mode; change input mode (messaging) Charger slot Headset/USB jack Microphone 4 2. Getting Started Switch your Mobile Phone ON / OFF To switch your mobile phone ON, press and hold the Power Key until an animation appears on the display screen. Make sure the battery is correctly inserted and charged. To switch it OFF, press and hold the Power Key until the phone shuts down. Install / Remove the SIM Card, Memory Card and Battery Install / Remove the SIM Card and Battery Make sure to switch off the device and disconnect from charger before installing and removing the SIM card and battery. To install / remove the SIM card and battery, perform the following: 1. Slide open the phone’s back cover and pull out the battery. 2. Open the latch of the SIM card slot and carefully insert the SIM card into place, making sure that the card’s gold plate is facing down and in proper alignment with the phone’s metal contacts. 3. Carefully return the battery into its slot and put the cover back on. Install / Remove the Memory Card The Memory Card is a handy mobile storage device that expands the phone’s storage capacity. To install / remove the memory card, perform the following: 1. Press and hold the Power Key to shut off the mobile phone. 5 2. 3. 4. Slide open the phone’s back cover. Carefully pull out the battery from its slot. Open the memory card slot latch and carefully place the Memory Card into it, making sure that the card’s gold plate is facing down and in proper alignment with the phone’s metal contacts. To remove, carefully take out the card out of the slot and close the latch. 5. Insert the battery into its slot and place the cover back on. : It is vital that you restart your phone for it to identify with the newly inserted memory card. : As the memory card intended for Cherry Mobile D11 Mini is small, it is advisable to keep it out of children’s reach. Charge the Battery 1. 2. Plug the charger into the electrical outlet. Connect the end of the charger connector into the mobile phone’s USB / charging slot. 3. The battery indicator icon will flash until charging is finished. 4. When charging is complete, i.e. the battery charging icon stops flashing, disconnect the phone from the charger. 5. Do not forget to unplug the charger from the electrical outlet. : You can use the phone while charging, but the charging time will increase. When you are charging the handset in its Power Off state, a charging indicator will appear on the screen. Phone Security The mobile phone and the SIM card support several passwords in order to prevent the SIM card and phone from being misused. 6 When you are prompted to enter any of the codes mentioned below, just type in the correct code and then confirm by pressing the OK key. To access the phone’s settings for these codes, go to Menu Settings Security Settings PIN / PIN2. SIM Security Local network service providers furnish each SIM card with a unique set of codes including the PIN, PIN2 and PUK. If the PIN is incorrectly entered for three successive attempts, the SIM card will be locked. To unlock the SIM card, you need to input the PUK or the Personal Unlocking Key. For assistance and further details regarding PIN, PUK and SIM Lock, please contact your local network service provider. Basic Troubleshooting for locked SIM card: -Enter the correct PUK. You will then be prompted to enter a new PIN. -Type in the new PIN and press OK. -Re-type the new PIN and press OK. PUK The PUK code (Personal Unlocking Key) is required to change a blocked PIN. This code usually comes with the SIM card upon purchase. Otherwise, contact your local service provider. If you enter the wrong PUK code for 10 consecutive times, the SIM card becomes invalid. Lock / Unlock your Phone Depending on the screen lock settings, your phone will automatically lock when left untouched after a period of time. To unlock, lightly press the LSK followed by the star (asterisk) key. 7 Go to Menu Settings Security Settings Lock screen by end-key to manually lock the keypad by pressing the End key during idle mode. You may choose from the keypad lock modes: normal or password mode. To change the screen auto-lock time, go to Menu Settings Security Settings Auto-keypad lock choose desired time. 3. Basic Functions Make and Answer a Call To make a call, type the number you wish to contact and press the Call Key. Affix the appropriate codes to avoid inconvenience. To call a contact whose details are saved in your Phonebook, press Names scroll up/down to select contact Call Key. To dial a phone number listed in your recent call logs, press the Call Key to view all call log entries. Use the navigation keys to select a number and press Call Key to connect. Format for international calls: (+) (Country Code) (complete phone number) then press call key. : Press the (*) key twice to type "+" and then type the country code, the area code and the telephone number. Then press the telephone icon to connect. Dial an Emergency Call This phone operates using radio signals, wireless and landline networks, but cannot guarantee connection in all conditions. To make an emergency call: 8 Switch your phone on. Dial emergency number and press Call. : Some networks may require that a valid SIM card is properly inserted in the phone before making an emergency call. : Emergency numbers vary in every country. Emergency calls may not work in all locations due to network and interference issues. It is not advisable to rely solely on wireless phones to make emergency calls. Answer / Reject an Incoming Call To answer an incoming call, press Call Key To end or reject an incoming call or end an ongoing one, press Power/End Key. Adjust the Volume During Call During a call, you can press the Left and Right Navigation keys to adjust the volume. Send and Receive Messages To create a message, press Menu Message Write Message New SMS / New MMS type your message. To send, press Options Send Names Choose contact OK Send. : For multiple entries, choose Select (mark entries) OK Send. 9 To manually enter a number, press Options Send (enter phone number) OK Send. To view a message, press Menu Message Inbox (choose message from list) press Center Key. Listen to Music To listen to music, go to Menu Multimedia Audio Player. Take note of the following to utlilize this feature: Center Key – plays / stops a track Left Navigation Key – plays the previous track Right Navigation Key – plays the next track Up and Down key – adjusts volume LSK – displays further options (Music List, Music Mark, Play Mode and Exit) RSK – lets you go back to the menu Listen to FM Radio To listen to the radio, go to Menu Multimedia FM Radio. Tap the ( ) to play/stop the FM radio. Tap the ( ) to search channels. To automatically search and save radio channels, press Options Auto Search Yes. : An earphone, to act as antenna, must be connected for the radio to work. To listen to the radio, go to Menu Multimedia FM Radio. Tap the ( ) to play/stop the FM radio. Tap the ( ) to search channels. 10 To automatically search and save radio channels, press Options Auto Search Yes. : An earphone, to act as antenna, must be connected for the radio to work. 4. Main Menu MESSAGES Write Message – please refer to “Send and Receive Messages” on page 9. Inbox – lists all received messages. The Inbox stores messages from both your SIM cards. There is, however, a limit to its capacity. When the Inbox becomes full, you must delete some of the messages in order to continue receiving new ones. Its options include: Reply – to reply to a message by SMS or MMS. Delete – to delete selected message. Call – to call the sender of the message. Lock – to keep the message from being erased or moved Mark – to reply to multiple text messages. You can also use this to mark messages you wish to delete in the future. Sort – to sort messages by time, contacts, subject and type. Delete same number – to delete messages of the same number. Outbox – stores unsuccessfully sent messages. There is a separate outbox messages list for SIM. Drafts – allows you to store and view saved messages. Select Options to edit/delete or send saved messages from SIM. Sent – stores all your sent messages. You may opt not to save messages that you save by pressing Menu Messaging 11 SMS Settings Save Sent Message Off. Options include: Templates - provides you with pre-typed message options that you can use and edit for quick SMS messaging. messages function. Voice mail server – contact your network service provider for more information on voice mail server. Message capacity - The phone memory can hold up to 50 messages on top of your SIM cards’ capacity. Settings include: SMS - SIM1/SIM2 Message Settings: You can change the SMS settings, such as SIM message center, message validity and status report. You can also opt to save sent messages and choose preferred storage for incoming messages. PHONEBOOK This menu shows an alphabetical listing of saved contacts in your phone and SIM card/s. The Phonebook can hold as much as 500 contacts on top of your SIM card’s capacity. Press Options to access the following: New, Search, Write Message, Call, Delete, Mark, Copy, Move, Add to Blacklist. Other options include: Speed Dial settings, Caller Id, Memory Status and Single Line Display. USER PROFILES This menu lets you customize your phone’s settings to suit your activities, lifestyle and environment. The mobile phone is equipped with multiple user profiles that you can customize tones 12 for incoming calls, messages. The Cherry Mobile D11 Mini is equipped with five (5) pre-set profile options: General, Silent, Meeting, Indoor and Earphone. To access these, go to Menu Profiles. Press Options to Activate, Customize or Rename. CALL CENTER The Call Center menu displays details of calls made and received in your phone. It contains your missed, dialed and received calls, as well their call duration, call history, and call settings. It tracks call records in SIM. To access this, go to, Menu → Call Center. It also lists call timers, call costs and GPRS and text message counters. To perform actions on a listed call, press the Options key and choose from the following: View Call Send Message Add to Blacklist Edit before call Delete : Alternatively, from the Home Screen, press the Call Key to access the call history. Call Settings – displays the following options: Network Selection – allows you to select network manually of automatically. Call Divert – lets you forward a call to your phone to another number. For details, contact your service provider. Call Barred – allows you to restrict a contact or number from calling you. For details, contact your service provider. Call Waiting – allows you to answer a waiting call during an active call. With this activated, you will be notified of incoming calls even you have a call in progress. The first call will be put on hold when 13 you opt to answer a waiting call. Hide ID (Network Service) – allows you to select whether your identification will be Hidden, Displayed or Displayed by Network (default set). Select Line–This function allows you to switch from one line to the other. Flight Mode – also known as the “Airplane Mode,” it is advisable when riding aircrafts. This function, when turned ON, disables all wireless connection to any network. However, with the flight mode, you can make use other functions of your device such as playing music, watching videos and capturing images and videos. Other Settings include the following: 50 secs warning - allows you to keep track of or limit your calls’ duration by setting mini-alarms that alert you during a call. Answer/Reject mode – allows you to mechanically reject any incoming call and send an auto-reply message to the caller instead. It also lets you enable/disable the ‘any-key answer,’ where any key may be pressed to answer an incoming call. Auto redial – with this switched on, your phone will automatically redial the number you are calling, should there be any failure in connection. MULTIMEDIA Camera This mobile phone is equipped with a standard digital camera that lets you take photos whenever and wherever you like. Saved photos are stored in the phone’s memory or in a memory card (if available). With the screen on camera mode, press the LSK to customize details: 14 Gallery – to skip to the image viewer interface Settings - sets specifications relative to color, exposure, etc. Storage – lets you choose where to save the captured images Press the left/right navigation keys to adjust the camera’s parameters such as image size, mode, brightness, contrast, white balance, delay (timer), effects and exposure bias. To capture an image, press the Center Key. After taking the photo, press the “Back” key to return to the camera’s viewfinder state, or press the LSK for other options. Video Recorder To record a video, go to Multimedia Video Recorder. Saved video clips are stored in the phone’s memory or in a memory card (if available). With the screen on video recorder mode, press the LSK to customize details: Video Directory – to skip to the image viewer interface Settings - sets specifications relative to banding, audio, image type, etc. Storage – lets you choose where to save the captured images Press the left/right navigation keys to adjust the camera’s parameters such as image size, brightness, contrast and effects. To start recording a video, press the Center Key. Press the center key as well to stop recording. Video Player This lets you play video files saved in your memory card or phone memory. Take note of the following to utlilize this feature: Center Key – plays / stops a video Left Navigation Key – plays the previous video Right Navigation Key – plays the next video 15 Up and Down key – adjusts volume LSK – displays further options (Music List, Music Mark, Play Mode and Exit) RSK – lets you go back to the menu Note: The Video Player plays clips in .avi and .mp4 format. Audio Player – Please refer to “Listen to Music” on page 10. Recorder Record sound and other audio files on your phone by going to Multimedia → Recorder. To start recording, press Options Start Recording You may press options again to view the playlist and settings. FM Radio – Please refer to “Listen to FM Radio” on page 10. File Manager The File Manager menu helps you organize your files in folders without having to use a computer. You can explore your storage device and view its capacity, such as the total used space and free space, etc., on your phone. TOOLS Alarm This mobile phone is geared with an alarm function that you can set at your chosen time/s. To create an alarm, go to Extras →Alarm Edit a pre-set alarm. You may set your preferred specifics i.e. on/off, time, period, ring and reminding mode. Once an alarm is configured, an icon will appear on the screen. Tap Edit to modify specifics. Calendar 16 The Calendar application shows the current date/month and lets you organize your schedule by allowing you to add, edit, delete and view events. You may also add appointments and notes as reminders. Press the LSK to view the following Options: Add new schedule – lets you create a new event and add an alarm to it. View schedule – lets you view previously stored events. All schedules – lets you view all events made on your phone. Clear today’s tasks – lets you erase all scheduled events and appointments for the day Clear all – delete all events Go to date – allow you to jump into a specific date by entering a specific year, month and day. Bluetooth You may establish wireless connection with other compatible devices with the Bluetooth technology. The Bluetooth may be used to send and receive different kinds of files. With the Bluetooth technology and you may establish wireless connection with a compatible PC to enhance communication. To access this go to Menu Settings Connectivity Bluetooth. Its options include: Open/Close Bluetooth – allows you to switch your Bluetooth connectivity on or off Visibility – shows/hides the visibility of the phone’s Bluetooth Paired Device – lets you view all Bluetooth devices that you can connect to Shared folder settings – allows you to let other devices view your phone’s folders and their content. My Bluetooth name – allows you to rename your Bluetooth device Bluetooth file storage – lets you choose where to store received 17 files via Bluetooth Help – displays information regarding Bluetooth settings Calculator This mobile phone is equipped a calculator to facilitate simple computations using the 4 basic functions. Enter the numbers using the keypad and choose the desired operation by pressing the navigation keys. Tap Back to delete the entered numbers and the Center key to get the output. Flashlight The Cherry Mobile D11 Mini is made with a built-in flashlight. Press and hold the “0” key to turn the flashlight on or off. SERVICES The Services menu contains the Internet Service sub-menu and the SIM ToolKit (STK) Internet Service (WAP) This function allows you to browse the Internet on your phone, however, GPRS charges may be applied by your service provider. Please consult your network service provider regarding rates and specific settings. This menu has two sub-options: the Internet Service and the Surf & Download. To access Internet Service, go to Services Internet Services. SIM ToolKit (STK) The features of your STK are specified by your service provider. If 18 your SIM card supports the STK feature, you will see the STK menu. You may contact your network service provider for more information regarding the STK. CHERRY ZONE To access, go to Menu Cherryzone. GPRS connection charges may apply. It also allows you to have access to : Boxman (Game) Cherry Shop Cherry Mobile eWarranty – please refer to page 28 for more information regarding the eWarranty. 5. Settings Dual-SIM Settings Since your phone can work with two SIM cards at a time, this option lets you choose which SIM to activate at a given time, or to simultaneously activate both SIM cards. To do this, go to Menu Settings Dual SIM Settings. Phone Settings This menu (Settings Phone Settings choose from options) lets you configure the following according to your preferences: Time and date - allows you to set your phone’s time and date according to zone and format. Select Language – lets you select your phone’s display language. 19 Shortcut settings - You may assign different applications to the Up, Down, Left and Right navigation keys. To do so, go to Settings Phone Settings Shortcut Settings Choose from Up/Down/Left/Right key OK or Center Key Choose application to assign OK or Center Key. Auto power on/off – allows you to set a specific time that will automatically switch your phone on or off. (Note: Before entering an area where the use of mobile phones is forbidden, make sure that the scheduled power-on function is deactivated to avoid inconvenience.) Power Management – displays the status of your phone’s battery. Display Settings This lets you define your phone’s appearance. Under the Display menu, you can change the settings for the following: o Wall Paper o Idle Display o Contrast o Backlight o Keypad Backlight o Animation Effect Security Settings Change PIN – changes your current PIN password. Change PIN2 – Changes your current PIN2 password. Privacy – allows you to set a password to protect your messages, call logs, camera, file manager, calendar and U Disk. Auto Keypad lock – automatically locks the phone’s keypad. 20 Lock screen by end key – locks the screen by pressing the “end” key. Power on password – prompts you to enter password upon turning on the unit. Keypad Lock – allows you to activate/deactivate your phone’s keypad lock, as well as change the password. Restore Factory Settings This will erase all data from your phone’s internal storage, including your Google account, system and application data and settings, and downloaded applications. It also clears music files, pictures and other user data, plus all data on your SD memory card. To do this, go to Settings Restore Factory Settings Input Privacy Password OK : The phone’s default Privacy Password is 0000. This action is not reversible. 6. Important Safety Precautions This mobile phone meets quality standards set by national authorities and complies with safety requirements on harmless human exposure to radio waves. Kindly read the following guidelines before using your wireless phone. Utmost compliance with these precautions is highly recommended for your safety. Non-compliance may pose danger to you and your mobile phone, and may be illegal. 21 General Precautions Use only authorized accessories and batteries by the manufacturer. The use of incompatible batteries and accessories may cause battery leaks, overheating, rupture or fire. This may also nullify your warranty. Do not put the battery, phone and charger in a highpressure container or microwave, as this may result in circuit damage or fire. Do not use the mobile phone near flammable and explosive materials. Doing such may cause explosion or fire. Do not store the phone in areas with high temperature as this can cause extensive damage to the handset. Keep the phone out of children’s reach. Do not use your phone while driving. Keep your hands free when operating a moving a vehicle and observe road safety rules and traffic regulations to avoid unfortunate incidents. If you are with a pacemaker, make sure to use your phone at least 20 centimeters away from the medical device as it may interfere with its function. Consult your physician for more information. Phone DO turn off your mobile phone inside aircrafts, hospitals and other locations where its use is restricted. Use of handsets in prohibited areas is dangerous as it may cause interference in the operation of electrical and medical equipment. DO keep your mobile phone away from moisture. Contact 22 with water or any liquid may cause the phone to malfunction and overheat. DON’T disassemble or remodel your phone as this may cause permanent and irreparable damage. This may also void your mobile phone’s warranty. DON’T use sharp or pointed objects in pressing you phone’s keys as this can cause damage. DON’T use your handset if you notice any damage (e.g. broken antenna) as this may cause injury to the user. Battery Each Cherry Mobile handset is equipped with a rechargeable battery. Use only authorized Cherry Mobile batteries and accessories. For better performance and longer battery life, initial charging of at least four (4) hours is recommended when using the mobile phone for the first time. The optimum performance of a new battery is achieved only after two or three complete charge and discharge cycles. Overcharging, however, may affect battery life. Do not use a damaged battery or charger. If battery life becomes noticeably shorter than usual, it is recommended to replace it with a new one. While charging, keep the mobile phone out of children’s reach. Store the battery in a cool and dry place away from direct sunlight, dust and water. Avoid exposing batteries to extreme temperature (below 10°C (14°F) or above 45°C (113°F)). Unplug the charger from the electrical outlet when not in use. 23 Avoid using the charger in a wet environment. If the charger comes in contact with water or any form of liquid, immediately unplug it from the outlet to reduce the risk of overheating, charger malfunction, electric shock or fire. Be careful with the disposal of spent batteries. Avoid throwing them in a fire, as this may cause explosion. It is recommended to abide by local environmental laws and guidelines on proper waste disposal. Do not short-circuit the batteries (i.e. when metal objects such as coins, are directly connected to the metal side of the battery) as this will damage your phone. It is advisable to handle spare batteries with extra care. Cleaning and Maintenance The handset, battery and charger are not water-resistant and should always be kept dry. Avoid using them in excessively moist areas. Use a soft, dry cloth to clean the handset, battery and charger. Do not use alcohol, thinner, benzene or other solvents to clean the handset. Avoid charging the mobile phone through a dirty outlet as this causes poor electrical contact and results in power lost and charging failure. 7. Troubleshooting Below is a list of common problems that may occur when using your mobile phone. Before running to a Cherry Service Center, you may want to troubleshoot the issues first in order to save time 24 and energy. For better performance, it is recommended to always fully charge your battery. : Avoid storing too much data in the phone as this may affect its performance. 1. 2. 3. 4. 5. Phone does not switch on Press and hold the end key until image appears on the display. Check the battery charge level. Remove and insert the battery, and switch your phone on again. Phone does not respond for several minutes Press and hold the end key. Remove and insert the battery, and switch your phone on again. The phone switches off by itself Check if the keypad is locked when left unused. Check the battery charge level. Check if the “Auto Power Off” feature has been turned on. The battery won’t charge Make sure the battery is not fully drained. Make sure that the battery is inserted correctly. Use only Cherry Mobile approved batteries and chargers. Double check if the charger connector is properly connected to the mobile phone or not. : The charger can be connected only after the battery is inserted. Standby time is too short Standby time has something to do with the system settings of your local network service provider. Switch your phone off in a weak signal area. 25 6. 7. 8. 9. 10. 11. 12. In some cases, you might need to replace the battery. Cannot connect to a network Move to an area with better coverage. Contact your local network service provider. Try to manually select a network. SIM Error Make sure that SIM card is properly inserted in its intended spot. Make sure that the chip in the SIM card is not damaged or the SIM card is not scratched. Check the coverage of your local network service provider if you appear to be out of coverage or have weak signal. You may opt to move near a window. Cannot make calls Make sure that the number you dialed is correct and the dial key has been pressed. Use the full national area code. When abroad, use country-specific international access codes Cannot receive calls Make sure that your phone is connected to a network (Check if the network is busy or invalid). Check the Call Divert settings and Call Barring settings. The caller’s number is not displayed Contact your local network service provider as the caller might have withheld his or her number. Entries cannot be made in Phonebook. Check if the Phonebook is full. If so, you may have to delete some records in order to accommodate new ones. The caller cannot leave a voicemail message Contact your local network service provider 26 13. 14. Make sure that the voice mail number you have saved is correct. If the network is busy, try again after a few minutes. Messages cannot be sent/received You may have to delete some old or saved messages, as the message capacity of the phone is limited. Contact your local network service provider and verify your service center number. PIN is entered incorrectly three times Enter the PUK code (PIN Unlock Code). This code usually comes with the SIM card upon purchase. Otherwise, contact your local service provider. Thank you for using Cherry Mobile D11 Mini. For further questions and concerns, please do not hesitate to contact us or your local Cherry Mobile Service Center. For information about our Cherry Mobile Service Center contact details, please visit our website at www.cherrymobile.com.ph. 27 The Cherry Mobile eWarranty is an innovative service offered by Cherry Mobile that replaces the traditional warranty card. All Cherry Mobile phone owners are entitled to the Cherry Mobile eWarranty. One simply has to register as soon as he or she gets hold of the phone. The five easy steps are illustrated in the following pages. (Please make sure the phone has a valid SIM card with at least P5.00 credits to activate the service.) STEP 1 Read the message carefully. Choose NEXT to proceed, or CANCEL to defer. Note: If left deferred for over three (3) days, the user will have to activate the eWarranty manually. STEP 2 Leave the Frontliner Code field blank, unless a code is provided by a Cherry Mobile authorized distributor. The Phone Model is automatically indicated in the field Select Options Save. Note: The user may opt to have the Cherry Mobile eWarranty activated upon purchase for more convenience. 28 STEP 3 A Cherry Zone welcome message will appear upon successful registration Select NEXT to proceed. STEP 4 Carefully read the terms and conditions of the Cherry Mobile eWarranty. Select AGREE to proceed to the next step. Note: Should the user opt to REJECT, the activation will not proceed, but the Cherry Mobile eWarranty is still available for manual activation anytime. STEP 5 Accomplish the Cherry Mobile eWarranty form. Select Options Save/ Submit. The user will receive a confirmation message if the registration is successful. Note: P2.50 will be deducted from the user’s regular balance upon successful registration. 29