1
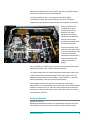
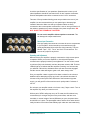
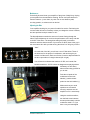
Owners Manual and Set-up Guide
Genesis Integrated 60-Watt Valve Amplifier
Version 1.2
December 2005
Copyright Genesis Advanced Technologies
OWNERS MANUAL AND SET-UP GUIDE
Genesis Integrated 60-Watt Valve Amplifier
Contents
Set-up and Safety Information ........................................................................ 3
Unpacking and Setting Up .......................................................................... 3
Safety Information ....................................................................................... 3
About Your Amplifier....................................................................................... 5
Introduction.................................................................................................. 5
Design and Construction............................................................................. 5
Set-up and Operation ..................................................................................... 6
Speaker Connections.................................................................................. 6
Source Input Connection............................................................................. 7
Operating and Adjustment .......................................................................... 7
Controls ....................................................................................................... 8
Power Switch........................................................................................... 8
Volume Control........................................................................................ 8
Selector Switch........................................................................................ 8
Maintenance................................................................................................ 9
Adjusting the Bias ....................................................................................... 9
Replacing Tubes ....................................................................................... 10
Specifications................................................................................................ 11
A Message from Genesis
The Genesis Integrated 60-Watt Valve (or vacuum tube) Amplifier is a
limited-edition product that was created as proof of concept that a welldesigned, well-executed, value-priced amplifier will be able to drive any
Genesis loudspeaker with ease and authority.
The transparency, detail retrieval, dynamics, and wide frequency extension
of Genesis loudspeakers place great demands on the quality of
amplification. Because of our emphasis on absolute fidelity™ above all else,
the speakers do represent a difficult, but not impossible load for an amplifier
to drive. The I60 was created as a partner to a pair of Genesis loudspeakers,
and as a result, it has the quality of amplifiers costing much more.
Please write the serial number and
The I60, together with a pair of Genesis loudspeakers, will give your entire
music collection a whole new life. In a well set-up system, it is capable of
transporting the musical performance into your room. The hiss and hum
normally associated with vacuum tubes are completely absent, while
retaining the richness and rightness of the best of this genre of amplifiers.
purchase details of your Genesis
I60 Integrated Valve Amplifier here
for future reference.
Serial No.: ___________________
Bought at: ___________________
____________________________
Date: _______________________
While developing a value-priced product, quality has not been scaled down.
Hand-selected, precisely matched components are used throughout:
custom-made military-spec paper-in-oil capacitors with aluminum cans are
selectively used; tantalum-film resistors are used on a hand-built discrete
resistor potentiometer as a volume control. The output transformers and
power transformer are laboriously hand wound to precise specifications
tailored to the circuit and tubes used. Point-to-point wiring using solid-core
silver wire is used in the entire signal path. This reduces the resistance,
capacitance and inductance normally associated with ordinary printed circuit
boards. Each and every unit is first burned-in on the test bench, and then run
in for over 100 hours before final test and packaging.
Address: ____________________
Very little feedback is used – just enough to make the amplifier
unconditionally stable. Not the excessive amount usually employed to make
amplifiers measure better at the expense of musicality. The result of all this
obsessive attention to detail is a fabulously musical amplifier capable of
driving almost any loudspeaker in the world.
____________________________
Before using this unit, please take the time to carefully review the safety
instructions and operating information contained in this Owner’s Manual and
Set-up Guide. Becoming familiar with your new amplifier and the correct
operating procedures will help assure you of safe usage, reliable operation,
and maximum musical enjoyment.
Tel: ________________________
I60 Owner’s Manual Ver 1.2
2
Set-up and Safety Information
Now that you have your new amplifier, we realize that you can't wait to hook
it up and start playing! However, please read this set-up guide and safety
information before you proceed.
Unpacking and Setting Up
Your amplifier is heavy, and its vacuum tubes are delicate and dissipate a
great amount of heat. It is important that this product is never used near
water or sources or water. Avoid bathrooms, washbowls, kitchen sinks,
swimming pools, etc. Damp basements should also be avoided.
Get the help of a friend, because these amplifiers are HEAVY. Carefully
remove the amplifier package from the carton and unwrap it. Place it on a
solid, level surface with adequate ventilation. It should not be placed in a
built-in installation or rack unless adequate proper ventilation is provided. Do
not place your amplifier in a closed bookcase or cabinet. Never obstruct the
top part of the amplifier with any objects that could result in the valves
overheating.
The amplifier should not be subject to vibration of any sort. Do not place
them directly in front of, or on top of your loudspeakers. As valve amplifiers
can be microphonic, vibration of the tubes will distort the signal.
Next, carefully remove the tube cage by carefully lifting it vertically upwards.
Remove the protective foam around the individual vacuum tubes, and
replace the tube cage. This protects the tubes from damage, and also
protects inquisitive fingers from the hot tubes!
Before you plug the power cord in, please make sure that you have the
model with the proper voltage for the country you are in. Taiwan, Japan
and North America will require the 115V version. Most European countries
and other Asian countries will require the 230V version. We have found that
a single voltage power transformer sounds better, and hence the amplifier is
designed for a single-voltage only.
Safety Information
1.
Never try to disassemble the amplifier as you may be exposed
to dangerous voltages. Vacuum tube amplifiers operate at
hundreds of volts. Even after turning the amplifier off and
unplugging it from the wall socket, it will retain a lethal electrical
charge for some time.
2.
Do not attempt to modify the amplifier. The device has been
tested and adjusted for optimal operation and should give you
I60 Owner’s Manual Ver 1.2
3
years of trouble-free service. Please see Adjusting the Bias and
Replacing Tubes (pages 9 and 10) for special instructions.
3.
Vacuum tubes dissipate a large amount of heat and will result in
very high temperatures:
a. Do not touch the tubes with bare hands during, and
immediately after operation. It could cause severe burns.
b. The I60 features a removable “tube cage”. However, we
recommend that for the sake of safety, you operate the unit
with the tube cage left in place.
c. Do not leave the device within the reach of children.
d. Vacuum tubes are made of glass, and hot tubes will shatter
if a single drop of water lands on it! Care must be taken so
that objects do not fall into, and liquids are not spilled into
the unit.
e. Do not expose the tubes to moisture.
f. Do not attempt to clean the device with a wet cloth, or any
solvents or cleaning solutions.
4.
The vacuum tube amplifiers are fragile instruments. Do not
subject the unit to excessive shock, smoke, dust, or mechanical
vibration.
5.
Do not move the amplifier while the tubes are still hot. Allow the
amplifier to cool down first before attempting to relocate the
amplifier or to change the tubes.
6.
Do not connect or disconnect the loudspeakers from the
amplifier while it is playing. Turn the amplifier off, and wait a
couple of minutes before making any connections. Before
turning the amplifier on, it should be properly connected.
7.
Do not run the amplifier without the appropriate
loudspeakers connected to it.
8.
This device should be operated at a maximum of 5A current. Do
not replace the internal fuse with one rated higher than 5A.
I60 Owner’s Manual Ver 1.2
4
About Your Amplifier
Introduction
The Genesis Integrated 60-Watt Stereo Valve Amplifier uses proprietary
technology, high quality components, and state-of-the-art vacuum tube
topology to deliver sonic performance rivaling other amplifiers costing much
more. The design objectives of this product are to:
1. Deliver musically accurate amplification,
2. Provide a vacuum tube amplifier that would approach the reliability
and ease of use of solid state amplifiers, and
3. Provide an affordable vacuum tube amplifier that would be able to
drive the Genesis family of loudspeakers.
A valve amplifier matched with an appropriate loudspeaker can produce a
sound that we can only call magic. The hard, brittle, and edgy presentation
of many transistor amplifiers is contrasted with the rich, lush and silky sound
of the tube amplifier. Often, tube amplifiers offer much better imaging and
sound stage presentation compared to an equivalently priced solid-state
amplifier. It is more musical, and the performance seems almost alive.
A properly designed and built tube amplifier, such as the Genesis I60, is
capable of reproducing midrange and treble with crystal clear definition – the
sound can only be described as smooth and silky, and musically accurate
with the right timbre and harmonics.
As for the bass, the I60 is designed to maintain tight control over the bass,
and deliver the powerful punch and dynamics at the low end with the solidity
and weight of transistor amplifiers.
Design and Construction
The I60 is an integrated amplifier with four high-quality selectable inputs and
a discrete resistor ladder potentiometer as a volume control. It uses a single
12AX7 per channel as the main voltage gain stage, with 6SN7’s as the driver
stage. No ordinary 6SN7’s for the I60 – military spec 6N8P are selected for
their reliability and durability, and then hand-picked for linearity and low
noise. Two sets of matched-pair KT88 power output valves are used to
deliver a very conservative 60 watts RMS per channel.
While the I60 is developed as a value-priced product, quality has not been
scaled down. Extensive listening tests were done throughout the design
process, and expensive components were used where they were
appropriate. Custom-made military-spec paper-in-oil capacitors with
aluminum cans are selectively used; a hand-built discrete resistor stepped
I60 Owner’s Manual Ver 1.2
5
attenuator is employed as a volume control; low-noise gold plated militaryspec ceramic tube sockets are used throughout.
Very little feedback is used – just enough to make the amplifier
unconditionally stable. Not the excessive amount that is sometimes
employed to make amplifiers measure better at the expense of musicality.
During construction, all
components are handselected and precisely
matched. The output
transformers and power
transformer are laboriously
hand wound to precise
specifications tailored to the
circuit and tubes used.
Point-to-point wiring using
solid-core silver wire is used
in the entire signal path. This
reduces the resistance,
capacitance and inductance
normally associated with
ordinary printed circuit
boards.
The only PCBs you see in the “guts” above are the boards associated with
biasing of the power tubes, and the soft-start electronics.
The output transformers are custom designed and hand-wound with a core
of grain-oriented silicon steel specifically for the output tubes used. Two
output taps are provided on the secondary – 4ohm and 8ohm – with the 4
Ohm tap specifically tuned using Genesis loudspeakers.
Each amplifier is extensively inspected and tested at every stage of
manufacturing. It is also allowed to burn-in before the valves are biased and
calibrated, and then run-in for 100 hours before finally being electronically
tested prior to packing for shipment. Hence, it should come to you ready to
use straight out of the box.
Set-up and Operation
Speaker Connections
Matching the impedance between your speakers and the I60 is one of the
most important sonic factors in your enjoyment of this amplifier. Please
I60 Owner’s Manual Ver 1.2
6
check the specifications of your speakers. Speakers with 6 ohms up to 8
ohms impedance should be connected to the “8 ohm” speaker connectors.
Genesis loudspeakers should be connected to the “4 ohm” connectors.
Two sets of 5-way insulated binding posts are provided on the rear of your
amplifier, but we recommend that you use spade lugs or banana plugs
instead of bare wire. Make sure that your speaker cables are firmly
connected to the correct speaker connections. Loose or wrong connection of
the cables or speakers may cause damage to the power output tubes. DO
NOT SHORT THE TERMINALS TOGETHER.
Do not run the amplifier without speakers connected. This
will damage the output transformers.
Source Input Connection
Use high quality interconnects to connect the source components
to your amplifier. All the internal input connections are high
quality with shielded silver solid core wiring internally. They are
labeled “Tape”, “CD”, “Tuner” and “Aux” for convenience. You
can use any input for any device.
Operating and Adjustment
Make sure that your amplifier is properly connected to a high-current power
receptacle. Before you turn the amplifier on, check that the speaker
connections are properly hooked up and tightened. Turn the volume control
to minimum (fully anti-clockwise), and turn the power switch to ON. The blue
LED will light up to indicate that the amplifier is working. In a few seconds,
you will hear a faint click to indicate that the soft-start circuit has engaged
and the vacuum tubes will begin to glow a soft, warm orange color.
Give your amplifier a warm-up period of at least a minute for the valves to
stabilize before attempting to play any music. It should take less than 10
minutes to fully warm up the tubes. Because of the fast warm-up power
supply, you will get 95% of the maximum sonic quality within 5 minutes of
turn-on.
Do not leave your amplifier turned on 24 hours a day 7 days a week. Turn on
the amplifier only when you intend to use it.
While a pair of KT88’s will pump out up to 75 watts, the I60 is biased very
conservatively for a longer lifecycle on the power tubes, and also more
musicality. In normal usage of around 500hours per year, the power tubes
should last 6 to 8 years. The preamplifier tubes, and the driver tubes should
easily last twice to three times that. Military-spec tubes are used extensively
I60 Owner’s Manual Ver 1.2
7
for their reliability and durability. Hence, your vacuum tube amplifier should
give you years of trouble free service and magical musical moments.
Controls
Power Switch
Turn the switch clockwise to turn the amplifier on. The blue power indicator
will light up, and the tubes will begin to warm up. A soft start circuit is
incorporated for extended tube life and to prevent a turn-on thump at the
speakers.
Within a few seconds, you will hear a couple of soft clicks, and the valves will
begin to glow a beautiful soft orange color. Do not turn on the amplifier
without speakers connected. Also, turn on the source components before
turning on your amplifier. Otherwise, some components might produce turnon “thumps” which could be harmful to your amplifier, your loudspeakers or
your ears.
Turn the switch counter clockwise to turn the amplifier off. About 30 seconds
after turning the unit off, the tubes will lose the soft orange glow. The valves
will still be hot and could burn your fingers if you touch them. Leave the
amplifier turned off for at least 30 minutes before cleaning or touching the
tubes.
It is normal for a vacuum tube amplifier to run quite warm. If used for
prolonged periods, the chassis will be hot to the touch. If you are using the
included tube cage, that cage will also be hot.
Keep young children away from vacuum tube amplifiers. The hot valves
could burn their fingers.
Volume Control
This knob is used to adjust the output volume. Turn the knob clockwise to
increase the sound level, and counter-clockwise to decrease the sound
level. When turning the unit on or off, it is recommended that the volume be
turned to minimum (fully counter-clockwise).
The volume control is a precision discrete resistor stepped attenuator.
Hence, do not attempt to set the volume between clicks!
Selector Switch
Use this knob to select the input source to be listened to. There are four
selection positions. While they are labeled Tape, CD, Aux, and Tuner, they
can be used for any line-level source. There is no quality difference between
CD, Tape, Aux, and Tuner inputs. They all have shielded high resolution
solid-silver cabling.
I60 Owner’s Manual Ver 1.2
8
Maintenance
Periodically dust and clean your amplifier of the grime of daily living. Unplug
your amplifier from the wall before cleaning. Do not use liquid cleaners or
aerosol cleaners – just a clean, dry cloth. Do not use abrasive pads,
scouring powder, or solvents such as alcohol.
Adjusting the Bias
Your amplifier should give you years of trouble-free service. Re-biasing the
vacuum tubes will not be necessary unless you change the valves. However,
we have provided a simple means to do it.
The bias adjustment controls the amount of current flowing through the
tubes. Proper adjustment is crucial to the performance of the amp, and also
to the life of the tubes. The wrong bias setting will result in excessive
distortion and also shorten the life of your tubes. Do NOT listen to the guy in
the corner store who tells you that running the tubes “hot” will give you more
“slam”.
On each side of the I60, you will see a set of 5 little holes. Three of
the holes are for the probe of a multimeter, and two that give you
access to a little screw. Each set of holes is used to adjust the bias for
the two output tubes of a single channel (left or right).
You will need a multimeter that reads to 2V DC, and a small, flatbladed screwdriver. 2V DC is about as dangerous as playing with an
AA battery so don’t worry
about electrocuting yourself as
you do this.
Poke the red probe of the
multimeter into the hole
labeled (+) and the black
probe into the hole labeled (-).
Make sure that your usual
speakers are connected
securely, and then turn the
amplifier on if it is not already.
Using the small screwdriver,
turn the little screw between
the two probes slowly until the
multimeter reads 2 V. If you
have a very accurate digital
I60 Owner’s Manual Ver 1.2
9
voltmeter (like the RadioShack pictured) don’t worry if you can’t get to
exactly 2.00V. Plus or minus 0.05V is more than accurate enough!
Once you have adjusted the bias of one tube, move the red probe to the
other hole labeled (+) to adjust the bias of the other tube before moving to
the other side of the amplifier to adjust the bias of the other channel.
Replacing Tubes
When replacement parts are required, make sure that the service technician
uses parts that are as specified, or have the same characteristics as the
original part. Unauthorized substitutions may result in fire, electric shock, or
other hazards.
The only valves that may need replacement are the power output valves –
these should be replaced with matched pairs of KT88’s. As the I60 has
individual bias controls for each tube, matched pairs need not be used.
However, if matched pairs are used, the matches should be placed on both
the left output pair, and the right output pair.
When you replace the power output valves, you will have to rebias the
amplifier as described above. In normal usage of approximately 500 hours
per year, the power output valves will last you 6 to 8 years.
The vacuum valves used on the I60 are high quality, reliable, low gas valves.
It is highly recommended that you replace these valves with equivalent
valves from reliable, quality suppliers.
I60 Owner’s Manual Ver 1.2
10
Specifications
• Vacuum Tubes:
KT88 x 4, 12AX7 x 2
6N8P x 4 (or 6SN7 equivalent)
• Rated Power Output:
60w + 60w RMS
• Frequency Response:
20Hz ~ 30kHz, <1% T.H.D.
• Input Impedance:
250k Ohms
• Output Impedance:
4 Ohms or 8 Ohms
• Preamp Input Sensitivity:
380mV
• Signal to Noise Ratio:
>90 dB
• Dimensions
H 185mm x W 480mm x D 380mm
H 7 ¼” x W 17” x D 15”
• Weight
60 lbs (27 Kgs)
I60 Owner’s Manual Ver 1.2
11