1
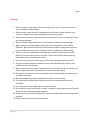
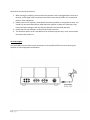
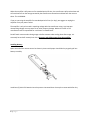
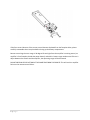
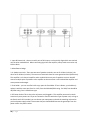
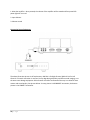
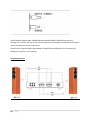
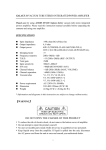
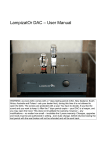
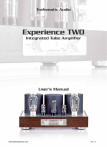
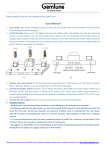
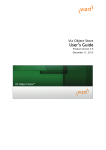
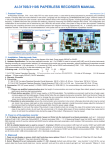
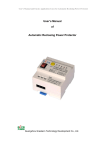
Psvane TC5 Integrated KT120 Tube Amplifier User Manual (English) Exclusively available at www.GrantFidelity.com All copy rights reserved by Psvane Audio & Grant Fidelity 1|P ag e page I Warnings: 1. Before using your amp, please check the voltage of the amp - it must be the same as your local power supply voltage. 2. When you don't use the amp for extended period of time or you will be away from home for extended time, please unplug the amp from wall socket. 3. Please place the amp at a place with plenty of ventilation. Do not use anything to cover the amp during usage. 4. When moving the amp, please use care and handle it carefully to avoid damage. 5. When the amp is moved between places with drastic temperature and humidity difference, please allow sufficient time for the amp to adjust to temperature and not having condensation on the amp. The amp must be completely dry before usage. 6. There is no user serviceable parts inside the amp - unless for cleaning broken tube glasses, do not open the bottom of the amp. Please use all caution when touching inside of the amp to avoid electrical shock. 7. Do not put any liquid around the amp in case of water damage or electrical shock. 8. All repair should be done by certified technician with qualified skills and care. User modification will void warranty. 9. When cleaning the amp, please unplug the amp from the wall first. Use a soft clean dry cloth to wipe the outside of the amp. Do not use any corrosive liquid. 10. Be careful not to drop any small metal objects into the amp through the tube socket or ventilation openings. 11. The amp should be placed horizontally and all 4 feet on even surface. 12. The amp should be placed with 20cm distance from surrounding walls for good ventilation. 13. Do not place any inflammable objects on top of the amp. 14. Do not place the amp under direct sunshine - exposure to high temperature will age the electronics parts causing potential problems. 15. Please only use the amp with high quality 3 prone grounded power cord meeting safety standard. 16. Please contact your seller for warranty terms. 2|P ag e Page II Introduction Thank you for purchasing Psvane TC5 integrated KT120 tube amp. In order to fully enjoy your new purchase, please read the manual in its entirety and keep it in a safe place for future reference. Open Package When receiving delivery, please check if the package has signs of rough handling and damage. If so, please document them with camera and ask delivery driver to document the damages on his/her delivery note. The package contain the following items: 1 TC5 amplifier 1 spare fuse for the amp voltage (packed with the power cord) 1 IEC standard power cord 1 User manual from factory 1 remote control Features 3|P ag e Tube output, hand wired point-to-point circuit High quality custom made wide frequency range EI output transformer High quality custom made wide frequency range EI power transformer Preamp stage with 4 x 6SN7 (6N8P) and 1 x 6N9P vacuum tube Power amp stage with 4 x KT120 vacuum tube for push pull amplification Japanese ALPS volume control Easy to install / remove metal tube protection cage Operational Instructions & Cautions: 1. When moving the amplifier, please make sure that power cord is unplugged from the unit and the wall, and all signal cables are disconnected. Do not move the amp when it is connected to power or other equipment. 2. Before power on the amplifier, please double check that all cables are connected correctly. You should only connect and disconnect cables when the amplifier is power off. Otherwise it may cause permanent damage to the unit and such damage is not covered by warranty. 3. Please keep this User Manual in a safe place for future reference. 4. The illustrative picture in this User Manual is for illustration purpose only. It may not be shown the same as the actual unit. AC Power Supply: You should ONLY connect power supply and power on the amplifier AFTER correctly connecting the amplifier to source equipment and speakers. 4|P ag e You should leave at least 20cm space above and around all sides of the amplifier. This is to allow sufficient ventilation so that the amplifier will not be overheated by heat produced from the vacuum tubes. If the amplifier is left overheated with poor ventilation for extended time, lifespan of all electronics parts in the amplifier will be shortened significantly, resulting in the amplifier premature failure. This type of failure will not be covered by manufacturer warranty. 5|P ag e When the amplifier is left power on for extended period of time, the transformers will produce heat and will touch warm from the heat generated by the transformers themselves and heat form the vacuum tubes. This is NORMAL. If you are not using the amplifier for extended period of time (i.e. days), we suggest to unplug the amplifier from your power socket. The amplifier is only to be used in matching voltage with the transformer rating. Any improper mismatching voltage use may cause fire or other property damage. Neither the seller or the manufacturer will be responsible for such losses or related losses. Do NOT touch vacuum tubes during usage or before vacuum tubes cooling down after usage. It is extremely hot and will instantly burn skin. Keep pets and children away from the amplifier. Installing Battery: Open one end of the remote control as shown in picture with proper sized Allen key to gently pull out battery assembly. Install two (2) AAA 1.5V batteries into the space as instructed then close up the remote with Allen key. 6|P ag e If the front control buttons of the remote control become displaced from the faceplate holes, please carefully reassemble them into place before closing up the battery compartment. Remote control signal sensor range is 30 degree left and right from the amplifier's receiving sensor (on amplifier's front faceplate, beside the power button) and within 6 meter range unobstructed. If there is object between the remote and the amplifier, the operating range will be shortened. DO NOT PRESS MULTIPLE BUTTONS AT THE SAME TIME FROM THE REMOTE. This will result in amplifier failure or the remote control failure. 7|P ag e Front Faceplate: 8|P ag e 1. Power On/Off button: Press in, Power On. Press out, Power Off. Do NOT power on / off the amplifier repetitively. You need to leave at least 5 minutes after power off the amplifier, before turning it on again. Otherwise the amplifier / vacuum tubes may be permanently damaged. Vacuum tubes need about 3-5 minutes to heat up and start functioning properly. You may notice the amplifier sound turns up by itself a little bit when it is just power on - this is due to tube warm up and it is normal. Tube amp typically sounds better after 15-30 minutes warm up for critical audiophile listening. 2. Power indicator LED: When turning on the amplifier, the LED light will stay red for about 30 seconds. Once warm up, the LED light will turn green. When the amplifier is muted, the LED light will turn red. 3. Remote control Sensor 4. Bias meter - when idle, the meter is pointed to the far left. When checking bias of each tube (using the bias checking switch on the top plate, hold it towards the tube to be checked and do not release), the bias meter needle should stay roughly in the middle. If the needle is too far left or far right, you need to use a flathead screw driver to adjust bias of that particular tube until needle returns to the middle. If the needle cannot be adjusted back to the middle, it's time to change the tube. 5. Volume control: Left to turn volume down, right to turn volume up. Always leave volume to lowest when you turn on the amp, then gradually bring up the volume. 6. Input selector: the selector knob can be turned perpetually to either direction. The LED light will indicate which input is selected and you will hear a soft click sound when an input is selected. Rear Panel: 9|P ag e 1. Input RCA terminals - there are total 3 pairs of RCA inputs, each vertically aligned with one marked red, the other marked black. When connecting signal into the amplifier, always make sure red to red, black to black. 2. Manufacturer badge 3. 4. Speaker terminals - There are two sets of speaker terminals, one set for 4 Ohm (red color), the other set for 8 Ohm (red color). The two sets of terminals share the same ground terminal (black color). This amplifier is a 2-channel amplifier and it can ONLY drive one pair of speakers at a time. Do NOT connect multiple pairs of speakers to the amplifier at the same time. It will overload the amplifier and cause permanent damages. 5. Fuse holder - you can use a flat knife to pry open the fuse holder. If fuse is blown, you should only replace it with the same spec fuse. For 115V, fuse should be 8A/250V rating. For 230V, fuse should be 4A/250V rating. Fuse is slow blown type. 6. IEC Power Socket: This is where the AC power cord plugged in. This amplifier comes with a North American 3-prone power cord. If you are located in countries with other type of power cord, as long as the female end is IEC standard, you can choose your own power cord with the matching male end to your local power supply socket. Please note that you should NEVER remove the ground pin from the power cord or the power socket. 10 | P a g e Vacuum tubes: A1, A2, A4 and A5: (these are the 4 tube sockets in the middle of the amplifier, not including the very center one) for 6N8P or 6SN7 vacuum tubes. A3: This is the very center tube socket in middle of the amplifier. For 6N9P vacuum tube. V1, V2, V3 and V4: These are the four tube sockets on the far left and far right of the amplifier. For KT120 vacuum tubes. The small hole beside each KT120 tube is for bias adjustment - you will see a small screw in each hole. The switch between the two KT120 tubes is for checking bias. You will need to use finger to hold the switch towards the KT120 tube that you intend to check bias for, and look at the bias meter on the front panel without releasing the switch. If the bias meter needle is pointed too far left or too far right, use a small screw driver to adjust from the bias hole SLOWLY until you see the bias meter needle is pointed to the middle. If you cannot return the needle to the middle, it is time to change that particular KT120 tube. We suggest you check your tube bias daily when the amp is under 30 days old. It's normal to see bias drifting when the amp and tubes are both new. Check your tube bias weekly from 2nd month to 6th month and adjust bias if necessary. Check your tube bias monthly after 6th month. Routine maintenance of tube bias will extend your tube lifespan and allow your tube amplifier to operate in optimal condition for best possible sound. 11 | P a g e Please note that all tubes have been installed at factory before packaging and the amplifier has been optimized to each tube. You do not need to reinstall tubes if not necessary. When first time unpacking the amplifier, you may gently press down each tube to make sure they are all sitting in each socket securely and not displaced during shipping. If you have to replace a tube from shipping damage, please handle carefully and use the guide pin of the tube to install it correctly. Always use a pure cotton cloth to handle tubes without leaving finger print on the tube glass. Finger print oil will cause tube glass to overheat locally and may result in tube premature failure. If you have pets or small children at home, we suggest you leave the tube cage on to avoid accidental damage to tubes. Remote control: 12 | P a g e 1. Mute the amplifier - when pressed, the volume of the amplifier will be muted and front panel LED power light will turn red. 2. Input Selector 3. Volume control Connecting Source Equipment The above illustrative picture is self explanatory. Red RCA is for Right Channel, Black RCA is for Left Channel. If channel connection is reversed, it may degrade signal quality and affect sound imaging, or to the worst case damage equipment. RCA connector should be connected all the way in to allow for best contact and sound quality. See picture below - the top picture is INCORRRECT connection, the bottom picture is the CORRECT connection. 13 | P a g e DO NOT BUNDLE SIGNAL CABLE, POWER CORD AND SPEAKER CABLE TOGETHER with a twist tie. Although this may make your set up look neat and organized, it will degrade sound quality and introduce noise and interference to your audio system. DO NOT PLUG / UNPLUG SIGNAL CABLE WHEN THE AMPLIFIER IS POWER ON. This will permanently damage your amplifier or your speakers. Connecting Speakers: 14 | P a g e The TC5 amplifier is suitable for using with speakers with impedance between 4 Ohm and 8 Ohm. If you have a 6 Ohm speaker, you may try either 4 Ohm or 8 Ohm and choose which one is best suited to your listening preference. Please make sure to connect Left Speaker to the Left Speaker terminal at the back of the amplifier. Same to the Right speaker. When connecting speaker cables, make sure red to red, black to black. Reversing channel or reversing phase (red to black, or black to red) will result in improper sound imaging. The TC5 amplifier speaker terminal can take either banana type or spade type speaker cables. You can ONLY connect one speaker to each terminal at a time - otherwise you will overload the amplifier and cause permanent damage to the amplifier. Do NOT twist the speaker cable once the terminal has been tightened. Otherwise it may damage the connection inside the amplifier. Same for the connection at the speaker end - twisting the speaker cable after terminal is tightened will damage the connection inside the speaker. You should always only tighten or un-tighten the terminal to adjust speaker cables. DO NOT HAVE TWO SPEAKERS CONNECTED TO ONE TERMINAL AT THE SAME TIME Do NOT ever leave the amp on when adjusting speaker cables. It may accidentally short the circuit of the amplifier and cause permanent damage to the amplifier. Always turn OFF the amplifier when switching speakers or adjusting speaker cables. If your speaker cables are directional (good quality speaker cable should be directional), make sure the direction is from the amplifier to the speakers. DO NOT EVER LET THE SPEAKER CABLE POSITIVE (RED +) END TOUCH THE NEGATIVE (BLACK -) END. THIS WILL PERMENTLY DAMAGE YOUR AMPLIFIER. General Trouble Shooting: 1. Power LED does not turn on, no sound: - check incoming power supply, check power cord connection, check fuse. 15 | P a g e 2. Power LED light ON, but no sound: - check sound equipment signal is on, check input selector at correct selection, check speaker connection, check amplifier volume control 3. Excessive noise: - check source signal is grounded properly or if contact is good. If necessary, change to a different source signal and change signal cable. Clean the input RCA terminal with proper electronics cleaning spray to remove oxidization. If noise changes when adjusting volume control, use proper electronics cleaning spray to clean the volume control to remove oxidization. 4. Sound imaging is poor: - check speaker connection to make sure channel and phase is not reversed. Specifications: Input impedance: 100 kohm Input voltage: <=450mV Output power: 2 x85W Power consumption: 200 Watts Output impedance: 4 ohm and 8 ohm Frequency Response Range: 20 Hz to 20kHz THD: <=1.2% S/N Ratio: 88 dB Power supply: AC115V 50/60Hz +/-10% or 230V 50/60Hz by modification Fuse: 250V 8A slow blown for 115V or 250V 4A slow blown for 230V Net size: 16 1/8" W x 13 1/8" D x 8 1/4"H Net weight: 23kg / 51 lbs Vacuum tubes: 4 x KT120, 4 x 6SN7(6N8P), 1 x 6N9P Operating temperature: 0-40 Celsius Operating humidity: 20-80% Storage temperature: -20 to 70 Celsius Storage humidity: 20-90% (note: manufacturer reserves the right to continuously improve on product quality. Above specification and function of the product might be changed at any time without notice) Manufacturer Warranty: Manufacturer of this product provides 90 days warranty to vacuum tubes and one year parts warranty against any defective electronics parts inside the amplifier. Manufacturer labor warranty will only be provided if the buyer bears the cost of shipping the product to and from manufacturer at his / her own cost. Such costs include all related freight charges and customs charges. 16 | P a g e If the product has been modified by the buyer or other party, the manufacturer warranty will be voided. Please keep your purchase record - your warranty can only be honoured if your amplifier is purchased from a manufacturer authorized reseller and you must have written proof of such purchase by way of original purchase receipt (ie. payment receipt). Manufacturer warranty is only valid to the original owner and it is not transferrable. Improper usage by the owner causing damages to the amplifier or its accessories / vacuum tubes will not be covered by manufacturer's warranty. Thank you for purchase our product and we hope you will enjoy it for many years to come. Manufacturer: Changsha Hengyang Electronics Ltd. - aka Psvane Audio www.psvane.com 17 | P a g e