1
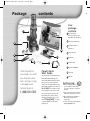
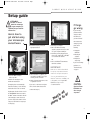
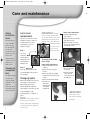
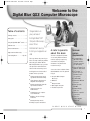
1318 Parent Guide Final
03/12/2002
04:05 PM
Page 1
Welcome to the
Digital Blue QX3 Computer Microscope
™
Table of contents
Package contents . . . . . . . . . . . . . .2
™
Congratulations on
your purchase of
the Digital Blue QX3
Computer Microscope,
one of Prime
Entertainment new toys
that let your imagination run
wild!
™
Setup guide . . . . . . . . . . . . . . . . . . .3
Using the Digital Blue QX3™ controls . .4
Software notes . . . . . . . . . . . . . . . . .5
Care and maintenance . . . . . . . . . . .6
Support and troubleshooting . . . . . . .7
Your Activity Book . . . . . . . . . .flip side
™
These toys harness the power of your
PC to encourage creative play activities
directed by your children. With the
QX3™ Computer Microscope, your kids
can explore their environments and
share their discoveries with you and
their friends. Some of the benefits of
the QX3™ microscope include:
A note to parents
about this book
Minimum
system
requirements:
This book is designed in flip format.
You can easily find the information
needed to properly set up the toy.
Your children can quickly find
information to help them achieve
results when using it.
Your section is here, behind the Parent
Quick Start Guide cover. This guide will
help you:
■
A computer that is
USB enabled (Most
computers manufactured after June 1998
are USB enabled.)
■
Microsoft® Windows® 98,
98SE, Me, 2000 and XP
■
Intel® Pentium® or
Celeron™ processor
200 MHz or faster
(or equivalent)
■
Turning everyday objects into big
opportunities for fun and learning.
■
Set up the QX3™ Computer
Microscope.
■
32 MB of RAM
■
Using software to alter images in
imaginative and wacky ways.
■
Maintain it.
■
■
Minimum 175 MB hard
disk space
Creating an audiovisual show with
special effects and music.
Change the bulbs.
■
Order supplies and parts.
■
■
Troubleshoot problems.
Quad speed (4x)
CD-ROM
■
800x600 display,
16-bit color
■
■
Using a microscope in a
handheld mode.
■
Viewing images on a computer
screen with friends.
■
Windows® compatible
sound device
■
Building a collection of images
and movies.
■
■
Creating time-lapse movies.
Video and
sound compatible
with DirectX®
■
Printing out posters and stickers.
P A R E N T
Q U I C K
S T A R T
G U I D E
1
1318 Parent Guide Final
03/12/2002
04:05 PM
Page 2
Package
contents
Your
package
contains
1
1
QX3™ Computer
Microscope (microscope
with USB cable and stand)
2
Sample jars with lids (2)
3
Containment dishes
with lids (2)
4
Plastic tweezers
5
Eyedropper
6
Prepared slide
7
Software (CD-ROM)
8
This guide
9
Slide clipd
2
8
3
4
7
5
6
9
Check the contents of
your package. You should
have all the items shown
here. If anything is missing
or damaged, contact
Technical Support at:
1-(888) 800-0502
2
Parent Quick
Start Guide
You should share the information in this
Parent Quick Start Guide with your
whole family. While the QX3™ Computer
Microscope is easy to install and a
snap to use, the initial hardware setup
and software installation must be done
by an adult. Your children should
be encouraged to keep the toy clean,
but only an adult should change the
bulbs. Make sure everyone understands the information in the section
titled “Playing Safely” on page 5
to prevent damage or injury when
using this toy.
Getting help
■
Click on the Help button to
use the software’s Audio Help.
The cursor changes to a question
mark (?).
■
Pause over items and you will hear
their names and how to use them.
■
More detailed help is available in
Online Help through the F1
function key.
■
You can also get help at the website:
www.PlayDigitalBlue.com
1318 Parent Guide Final
03/12/2002
04:05 PM
Page 3
P A R E N T
Q U I C K
S T A R T
G U I D E
Setup guide
STOP!!! Do not
attach the microscope
to your computer! It is
important that you install the
software first.
If things
go wrong
Here’s how to
get started using
your microscope
and software.
2
■
Follow the steps by clicking the
appropriate buttons.
4
■
Restart your computer.
■
Once the Windows® desktop
appears, plug the microscope cable
into your computer’s USB port.
■
Now that you have plugged in your
microscope, double click on the QX3™
icon to launch the software.
Or,
■
1
■
Insert the QX3™ Computer
Microscope CD.
■
Wait for the autoplay to start.
■
Click the Install button.
(If Autoplay does not automatically
launch the installer, go to the desktop
and double-click on the icon named
My Computer. Double-click the icon for
the CD-ROM/DVD drive that contains
the QX3™ software. Sometimes this will
cause Autoplay to start. If it doesn’t,
open the setup folder, double-click on
setup.exe, and follow the setup steps
on this page.)
3
■
When installation is complete, you
can register your QX3™ microscope
online if you have a modem.
■
Adults, follow the instructions on the
e-registration screens.
(If you can’t or don’t want to register
online, click the Cancel button and
continue with step 4.)
Go to the Windows Start menu to
launch the software.
If you have any
problems with the
setup procedure,
first make sure
you have followed
these instructions
exactly. If you did,
please do the
following:
■
Unplug the
USB cable.
■
Restart your
computer.
■
Repeat the
setup steps.
®
IMPORTANT:
Make sure to check the Read Me file
for any tips or important information
written since this guide was printed.
To access the Read Me from your
Windows® Start menu, click Start, point
to Programs, point to Digital Blue
QX3 Microscope and then
click QX3 Read Me.
all t!
s
at’ to i
h
T
is
e
r
the
If you are still having
problems, see
“Troubleshooting”
on page 7.
CAUTION:
Upper and lower
illumination surfaces can get
very warm.
3
1318 Parent Guide Final
03/12/2002
04:05 PM
Page 4
Using the Digital Blue QX3 controls
™
4
Capture button
Magnification ring
1
2
3
Focus knob
Remember the
QX3 ™ microscope
can be used in
handheld mode,
but you need to
have a clear view
of the monitor to
see what is being
examined.
Arrange your
play area with
this in mind.
6
Checking
out the QX3
controls
Focus
™
Once the software is running,
you can use the controls on
the microscope to focus,
change magnification level,
and capture pictures or
movies (in handheld mode).
Look at the computer screen and
adjust the focus knob until the image is
clear. Focusing may take a little
practice. On some computers, there
can be a delay between knob
movement and screen image
adjustment. Try making small changes
and waiting for the screen to catch up.
Capturing
pictures and
movies in
handheld mode
Sample platform
Setup
suggestion
4
5
USB cable
Base stand
™
™
The QX3 Computer
Microscope consists of
a base stand and a
detachable microscope.
There are two light sources:
one in the sample platform
and another in the
microscope. The base also
has focus knobs, while
the microscope has a
magnification ring and
capture button.
In handheld mode, click the Capture
button to take a picture. Click and
hold the button to capture a movie.
For more information on how to use
the microscope in handheld mode,
press F1 for Online Help.
Changing
magnification
Choose the level by rotating the
magnification ring on the microscope
until the desired magnification level
label faces you. You will hear a click
when the lens is properly aligned.
The levels correspond roughly to 10x,
60x and 200X*. In this guide, we refer
to magnification as low, medium,
or high.
NOTE:
In
handheld mode,
focus by slowly
moving the
microscope closer
to or farther away
from the object
being examined.
You can get a good idea of the focal
range with the microscope on the base
stand and watching the upper and
lower limits of the focus adjustment.
*These magnification levels are approximate and
have been measured using a 15 in. (38 cm.)
monitor. Actual magnification will vary according to
the size of your monitor.
1318 Parent Guide Final
03/12/2002
04:05 PM
Page 5
P A R E N T
Q U I C K
S T A R T
G U I D E
Software notes
Now that setup is complete
and you are familiar with
the QX3 microscope,
use Your Activity Book
for an overview of the
QX3 software.
™
™
More information about software
operation is in the Online Help files.
Audio Help is also available to help
your children learn to:
■
Capture magnified pictures and
movies of interesting things they
find and collect.
■
Use paint tools and special effects
to modify pictures and movies.
■
Print stickers and posters.
■
Make slide shows to share with
family and friends.
Uninstalling the
QX3 software
™
To uninstall your QX3™ software from the
Windows® Start menu, click Start, point
to Programs, point to Digital Blue QX3
Microscope and then click Uninstall
QX3 Microscope.
To reinstall the software, see the
section “Setup Guide” on page 3,
or press F1 for Online Help.
Lighting
The QX3 lights are controlled by the
software. The microscope lights turn
on automatically when you enter Live
View. They turn off when you go to
Main, where they are not needed.
™
Lighting controls
You control the lights in Live View with
the Lighting Controls on the screen.
Click the top bulb to use top lighting.
Click the bottom bulb to shine light up
through the sample platform.
Moving the slider up makes your
sample look brighter. Moving it down
makes your sample less bright.
Experiment to find what works best
with your samples.
When you remove the microscope
from the base, the top light comes
on automatically.
Using the right light
Use the bottom light to shine light up
through transparent and very thin
samples (e.g., feathers, slices of
vegetables, onion skin).
The light in the detachable microscope
illuminates objects that are too large
or heavy to be placed on the
microscope’s sample platform.
You can also use the microscope
on the stand to view small solid
objects and living specimens with
top lighting.
You can put a bug or a slug in the
containment dish to look at, take
magnified snapshots, or make
short movies.
Remember
this—
■
If disk space is
limited, urge your
children to delete
unwanted captures when they
finish playing.
■
Alt-F4 is a function of Microsoft®
Windows® that
will quit an
application. Also
Alt-Tab will cycle
through open
applications.
Remind your
children to avoid
these keystrokes
when using the
QX3™ software.
Adding extra lighting
Ordinary household light works fine
with the QX3™ microscope. You may
want to place a high-intensity desk
lamp near the microscope to add to
top lighting when using medium or
high magnification.
Playing safely
We encourage you to participate
in play activity with this and other
toys unless your children play
responsibly when unsupervised.
The QX3™ Computer Microscope,
if misused, could result in injury or
damage. Here are some suggestions
for safe operation of the QX3™
Computer Microscope.
■
When setting up the play area, make
sure your child can easily view the
monitor while placing specimens on
the sample platform.
■
Demonstrate the safe reach of the
USB cable.
■
Encourage responsible use and care
of the equipment.
■
Be especially careful when using
liquids around electrical equipment.
WARNING:
If you use an
additional light
with your
microscope,
do not use a
lamp with a
halogen or
other high heat
bulb that could
cause burns if
accidently
touched.
5
1318 Parent Guide Final
03/12/2002
04:05 PM
Page 6
Care and maintenance
Caring
for the lens
cover
The protective lens
cover on the QX3™
microscope may
become dirty with
use. Use only
canned air to clean
it. Never use a lens
brush or other
rubbing method to
clean the lens cover.
Avoid the use of
liquid cleaners!
Cleaning the
sample platform
The sample platform
should be wiped
clean with a damp
cloth after use. The
stand and
microscope should
also be wiped clean
whenever required.
Lens cover
replacement
If the lens cover becomes severely
smudged, scratched, or stained, it
should be replaced. To order a
replacement lens cover, see
“Support” on page 7.
Step 1
The cover is
replaced by
removing the two
Phillips head screws
and discarding the
damaged cover.
Step 2
Secure the replacement cover with
the retained Phillips head screws. Do
not over-tighten.
Changing bulbs
Bulbs used in the QX3™ microscope are
a special type not found in stores.
Replacement bulbs other than
authorized Digital Blue bulbs may
cause damage to your microscope and
void your warranty! To order
replacement bulbs, see “Support” on
page 7.
NOTE: A bulb should be replaced
6
whenever there is a noticeable
decrease in light output. Adequate light
is needed to get the best capture with
the microscope.
IMPORTANT: The bulbs
become hot when operating. Make
sure the bulb has fully cooled to room
temperature before replacing. Do not
touch the surface of the replacement
bulb with your fingers.
Use a cloth or cotton
glove to prevent
damage to the bulb.
Lower bulb replacement
1. Unplug the USB cable from
your computer.
2. Remove the microscope from the
base and set it aside.
3. Remove the bulb cover on the
bottom of the sample platform by
loosening two screws.
To change bulbs, follow
these steps:
Upper bulb replacement
1. Unplug the USB cable from your
computer.
2. Remove the microscope from
the base.
3. Remove the single screw holding
the bulb retainer in the microscope
housing.
4. Remove and discard
the old bulb.
5. Insert the new bulb,
replace the bulb
cover and re-attach
the USB cable.
4. Remove and discard the old bulb.
5. Insert the new
bulb, replace
the bulb retainer
and re-attach
the USB cable.
IMPORTANT:
All procedures on this
page must be performed
by an adult.
1318 Parent Guide Final
03/12/2002
04:05 PM
Page 7
P A R E N T
Q U I C K
S T A R T
G U I D E
Support and troubleshooting
Support
Replacement parts
and supplies
Order the following replacement parts
directly from Prime Entertainment:
Light bulb (top or bottom)
Lens Cover
Containment Dish and Lid
Contact Technical Support:
1-(888) 800-0502
Alternative sources
Check your phone directory to locate
specialty items to use with your QX3™
Computer Microscope. Look under:
Variety Pack, 3274™. If you need
more information, contact Avery®
at 1-800-462-8379 or check their
web site at http://www.avery.com
Troubleshooting
Check Online Help and the “Read Me”
file for important changes and
information developed since this guide
was printed. You can also check our
web site for the latest information.
System Information Utility
The QX3™ Computer Microscope
includes a system information utility to
assist in solving any problems you may
be having with your microscope. If you
need to contact technical support, you
may be asked to run this program from
the Windows Start Menu to produce a
report.
■
Bait shops—meal worms, red
wrigglers, maggots
■
Craft stores—ribbons, fibers, dried
plants, beads, sequins
■
Pet shops—brine shrimp, tubifex,
bloodworms, daphnia
Universal Serial Bus (USB)
problems
■
Hobby shops—prepared slides,
collection jars, eyedroppers
■
Museum shops—prepared slides,
bugs in amber
■
Nurseries—special soils, sands, live
bugs, mosses, rocks and gravel,
plants not found at home
■
Public aquariums—prepared slides,
crystals, fossils
■
Office supply stores—specialty
papers, stickers
If your microscope shows up in the
device manager as disabled or nonfunctioning, you can check our support
web site for up-to-date information on
USB problems and solutions. If you
don’t find a solution there, call Technical
Support. You may be asked to run the
system information utility to isolate and
solve the problem.
Sluggish performance
Stickers and
specialty papers
We recommend you use Avery®
Round Stickers, 3113. These are
available as part of Avery® Personal
Creations™ White Removable Stickers
If you have trouble focusing or other
operations seem excessively slow, set
your screen color depth to 24- or 16-bit
color (if available). This decreases
theprocessing load. You should also
Alt-Tab to other open applications
and close them.
Hard disk space
The software indicates when hard drive
space is low and prevents new
samples from being created until more
space is available. The minimum
amount of free disk space needed is
20 Megabytes.
Visual orientation confusion
In handheld mode, moving the QX3™
microscope toward you has the same
effect as pushing a slide on the sample
platform away from you. Likewise,
moving to the right in handheld mode
is the same as moving a slide on the
sample platform to the left. Press F1 for
Online Help for additional information.
Special effects
The time it takes to apply a special
effect depends upon the complexity
of the sample being altered, the effect
chosen, and your computer model.
The faster the computer the more
quickly an effect will render. Movies
are processed one frame at a time.
Applying a complex effect to a long
movie can take considerable time.
For this reason, you are given the
opportunity to cancel effects applied
to movies. Cancelling an effect leaves
your original sample untouched.
7
1318 Parent Guide Final
03/12/2002
04:05 PM
Page 8
P A R E N T
Troubleshooting,
continued
Sound
We recommend using speakers that
connect directly to the ports on your
sound card. Although USB speakers
work with the Digital Blue QX3™
software, under heavy CPU load we
have found quality problems, resulting
in choppy playback.
Import/export problems
Import supports the following formats:
■
BMP (1-bit, 2-bit, 4-bit, 8-bit, 24-bit,
and 32-bit color depths).
■
JPEG (color and grey scale).
■
Photo CD.
BMP (24-bit), JPEG (color).
■
AVI.
Message
Solution
Your microscope is not plugged in. Please
connect the microscope.
Connect the microscope, see page 3.
Your computer can’t find all the necessary
software components. Please reinstall
QX3 software.
Reinstall the QX3™ software (see page 3)
or go to Add/Remove Programs in your
Computer's control panels, select the
QX3™ Microscope from the menu of
programs and click Add/Remove. Select
the "repair" option and click "next."
There is not enough room on your computer
to get started. Please make more room on
your hard drive.
Delete items from the sample collection,
run the Windows® maintenance utilities,
and/or delete other unused files
and applications.
Your computer stopped paying attention.
Please exit and restart the QX3™ Software.
Click OK to exit the software. Restart the
QX3™ software. If error repeats, reboot
your computer.
You are out of memory. Please exit other
applications to free up more memory.
Alt-tab to other open applications and
exit them.
Error messages
You may encounter error messages
using the QX3™ software. These
errors will appear either in the Live
View screen or in a standard dialog
box. If errors are recurring, you can
check our support web site for up-todate information on problems and
solutions. If you don't find a solution
there, contact Technical Support (see
page 7).
8
S T A R T
Error messages appearing in a
standard dialog box contain a number
to identify the specific cause to
technical support. These messages
also include a suggested resolution.
The following table lists the most
common of these messages and
additional suggested solutions.
Export supports the following formats:
■
Q U I C K
G U I D E