1
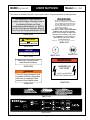
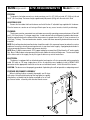
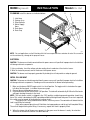
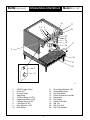
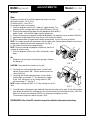
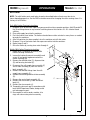
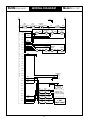
BUNNEspress
®
ES•1AF
DISCONTINUED VERSION
The information in this manual
is no longer current.
G
LE
SI
N
CL
2
OPERATING & SERVICE MANUAL
Designs, materials, weights, specifications, and dimensions for equipment or replacement parts are subject to
change without notice.
BUNN-O-MATIC CORPORATION
POST OFFICE BOX 3227
SPRINGFIELD, ILLINOIS 62708-3227
PHONE: (217) 529-6601 FAX: (217) 529-6644
26691.0000C 6/97 ©1995 Bunn-O-Matic Corporation
BUNN Espress®
WARRANTY
Model ES•1AF
User notices......................................................................................................................... 3
Site Requirements ............................................................................................................... 4
Installation ........................................................................................................................... 5
Operating Controls............................................................................................................... 6
Adjustments ........................................................................................................................ 7
Operation ............................................................................................................................. 8
Brewing tips ...................................................................................................................... 10
Alarms ............................................................................................................................... 11
Wiring Diagram ................................................................................................................. 12
INTRODUCTION
This compact, easy-to-operate equipment produces consistently fine espresso and related beverages with
the push of a button. The brewer is selectable to deliver one of eight different programmed amounts of
beverage. All of the critical functions of the brewer are electronically controlled.
WARRANTY
Bunn-O-Matic Corp. (“Bunn”) warrants the equipment manufactured by it to be commercially free from defects in
material and workmanship existing at the time of manufacture and appearing within one year from the date of
installation. This warranty does not apply to any equipment, component or part that was not manufactured by Bunn
or that, in Bunn’s judgement, has been affected by misuse, neglect, alteration, improper installation or operation,
improper maintenance or repair, damage or casualty.
THE FOREGOING WARRANTY IS EXCLUSIVE AND IS IN LIEU OF ANY OTHER WARRANTY, WRITTEN OR ORAL,
EXPRESS OR IMPLIED, INCLUDING, BUT NOT LIMITED TO, ANY IMPLIED WARRANTY OF EITHER MERCHANTABILITY OR FITNESS FOR A PARTICULAR PURPOSE. The agents, dealers or employees of Bunn are not authorized to make
modifications to this warranty or to make additional warranties that are binding on Bunn. Accordingly, statements by
such individuals, whether oral or written, do not constitute warranties and should not be relied upon.
The Buyer shall give Bunn prompt notice of any claim to be made under this warranty by telephone at (217) 5296601 or by writing to Post Office Box 3227, Springfield, Illinois, 62708-3227. If requested by Bunn, the Buyer shall ship
the defective equipment prepaid to an authorized Bunn service location. If Bunn determines, in its sole discretion, that
the equipment does not conform to the warranty, Bunn shall repair the equipment with no charge for parts during the
one year warranty period and no charge for labor by a Bunn Authorized Service Representative during the one year
warranty period. If Bunn determines that repair is not feasible, Bunn shall, at its sole option, replace the equipment or
refund the purchase price for the equipment.
THE BUYER’S REMEDY AGAINST BUNN FOR THE BREACH OF ANY OBLIGATION ARISING OUT OF THE SALE OF
THIS EQUIPMENT, WHETHER DERIVED FROM WARRANTY OR OTHERWISE, SHALL BE LIMITED, AS SPECIFIED
HEREIN, TO REPAIR OR, AT BUNN’S SOLE OPTION, REPLACEMENT OR REFUND.Bunn shall not be liable for any other
damage or loss, including, but not limited to, lost profits, lost sales, loss of use of equipment, claims of Buyer’s
customers, cost of capital, cost of down time, cost of substitute equipment, facilities or services, or any other special,
incidental or consequential damages.
2
BUNN Espress®
USER NOTICES
Model ES•1AF
The notices on this brewer should be kept in good condition. Replace unreadable or damaged labels.
WARNING
This equipment is to be installed to
comply with the Basic Plumbing Code of
the Building Officials and Code
Administrators International, Inc. (BOCA)
and the Food Service Sanitation Manual
of the Food and Drug Administration (FDA).
• DO NOT OVERLOAD CIRCUIT.
• ALWAYS ELECTRICALLY GROUND
THE CHASSIS OR ADAPTOR PLUG.
• DO NOT DEFORM PLUG OR CORD.
• FOLLOW NATIONAL AND LOCAL
ELECTRICAL CODES.
• KEEP COMBUSTIBLES AWAY.
FAILURE TO COMPLY RISKS EQUIPMENT
DAMAGE, FIRE OR SHOCK HAZARD.
READ THE ENTIRE OPERATING
MANUAL INCLUDING THE LIMIT
OF WARRANTY AND LIABILITY
BEFORE BUYING OR USING
THIS PRODUCT
00656.0000
CAUTION
00986.0000C 3/94 © 1994 Bunn-O-Matic Corporation
HOT
Liquid-Steam-Surfaces
00986.0002
24246.0000
F
SM
26602.0000
26602.0001
NOTICE
160 psig max operating pressure
24247.0000
Must wet o-ring with clean
water before installing.
WARNING
26625.0000
HAZARDOUS
VOLTAGE
!
WARNING
UNPLUG BREWER
BEFORE REMOVING!
The milk supply hose and milk
container must be refrigerated
after use in compliance with
state and local health codes.
12652.0000
26868.0000
1. Place a pod in the filter holder.
2. Lock the filter holder into the group head.
3. Place an empty cup below the dispensing nozzles.
4. Press your drink selection.
5. Carefully remove the cup after the flow has stopped.
1. Place an empty cup below the dispensing nozzle.
2. Press the button indicating your selection.
3. Press any button to stop the cycle.
1. For complete instructions, see the operators manual.
When CLEAN FROTHER light flashes, rinse the frother as follows:
2. Place the end of the milk supply tube in a container of clean hot water.
3. Press the "CLEAN FROTHER" button.
4. Carefully remove the cup & discard contents after flow has stopped.
5. Disassemble and thoroughly clean the milk frother according to local
sanitation codes, at least every four (4) hours.
226601.0000
25551.0001
3
(Revised January 1996)
BUNN Espress®
SITE REQUIREMENTS
Model ES•1AF
PHYSICAL
The brewer is for indoor use only on a sturdy counter or cart. It is 16” (40.5 cm) wide, 20” (50.8 cm) tall and
19.25” (48.9 cm) deep. The brewer weighs approximately 88 pounds (40 kg) with the water tank filled.
ADJUSTABLE LEGS
Remove the four rubber feet from the brewer and install the four 4” adjustable legs supplied with the brewer.
Place the brewer on a counter or cart having sufficient space for easy access to water, electricity and drainage.
PLUMBING
The brewer must be connected to a cold water source with operating pressure between 20 and 90
psi (1.5-6.5 bar) from a .5” or larger supply line. Install a shutoff valve in the water line before the brewer.
Install a regulator before the brewer when the pressure is greater than 90 psi (6.3 bar) to reduce it to
45-60 psi ( 3-4 bar). The enclosed water strainer, water inlet hose assembly and drain hose must be
installed.
NOTE-Only softened or demineralized water should be used in this espresso brewer to reduce the service
problems caused by naturally occurring elements in your local water supply. A polyphosphate feeder is
not recommended because it does not remove minerals.
NOTE-Bunn-O-Matic recommends .375” copper tubing for no more than 25 feet from the .5” water supply
line. Bunn-O-Matic does not recommend the use of a saddle valve to install the brewer. The size and shape
of the hole made in the supply line by this type of device may restrict water flow.
ELECTRICAL
The brewer is equipped with an attached cordset and requires a 2-wire, grounded mating receptacle
rated 120 volts ac, 20 amp, single phase, 60 hz. An electrician must properly install a NEMA 5-20R
connector to the appropriate electrical service on an individual branch circuit to install this brewer.
CAUTION- The brewer must be properly grounded. A plumbing line will not provide an adequate ground.
FROTHER DISCONNECT ASSEMBLY
When installing frother assembly thoroughly wet O-rings
with water. Using the slide bracket on the front panel as a guide,
slide frother assembly into the frother manifold as far as it will
go. Secure frother assembly with attached thumb screw.
an
cle
ith
gw
-rin in
to
we fore
st be
Mu ater
N
w
IO
UT
CA T
s
face
HO -Sur
team
id-S
Liqu
P911
4
BUNN Espress®
INSTALLATION
Model ES•1AF
PLUMBING Install the brewer as indicated below:
5
3
1. Inlet Hose
2. Strainer Assy.
3. Filter/Softener
4. Water Supply
Hose
5. Drain Hose
6. Drain Cup
BOM
90 psig Straine
BUN
max r
operat
N
ing
pressu
re
FLOW
L
E
G
0,5
1
SIN
0
0
4
8
1,5
CL
2
2
2,5
12
16
bar
s:
ow
foll water.
l. r as
hot
nua
ma frotheclean
d.
rs
ppe
rato e the er of
sto local
ope , rins tain
has to
the hes con
ing
see flas in a
r flow ord
ns, light tube
afte r acc
ts
ctio
tru THER ply ton. ten frothe
sup
ins
te FRO milk " but d conmilk rs.
ER car the
ple AN
com CLE of the TH & dis an (4) hou
FRO
For en end
y cle r
Wh the
EAN the cupghl ry fou
"CL
rou eve
ce
Pla ss the remove tho st
2.
lea
Pre efully ble and at
3.
es,
Car em cod
ass
4.
Dis itation
5.
san
4
1 2
1.
g noz
sin .
ion
pen
dis ect
the r sel
ow you le.
bel
cup icatingthe cyc
p
sto
zle.
pty ind
em
an button to
ce
ton
Pla ss the but
1.
Pre ss any
2.
Pre
3.
.
zles
d.
hea noz
.
d.
der up sing
ppe
r holthe gro pen
sto
dis
filte
has
into the
the
in der ow
flow
hol bel .
a pod r cup ion r the
filte
ce
ect afte
Pla k the empty k sel cup
1.
Loc an r drin the
2.
ce
Pla ss youremove
3.
Pre efully
4.
Car
5.
66
1
P907
NOTE: For cart applications, unit will function with inlet hose suspended into a container of water. Be sure not to
run the container dry, damage to the pump will occur.
ELECTRICAL
CAUTION- The brewer must be disconnected from the power source until specified. Improper electrical installation
will damage electronic components.
1. Using a voltmeter, check the voltage and color coding of each conductor at the electrical source.
2. When Instructed to proceed, connect the brewer to the power source.
CAUTION- The brewer must be properly grounded. A plumbing line will not provide an adequate ground.
INITIAL FILL AND HEAT
CAUTION- The brewer must be disconnected from the power source until specified. Improper electrical installation
will damage electronic components. Plumbing must be connected to the brewer before proceeding.
1. Make sure the brewer ON/OFF toggle switch is in the off position. The toggle switch is located on the upper
left side of the front panel, just above the pressure gauge
2. Connect brewer to the power source.
3. Place the brewer ON/OFF switch in the “ON” position. The tank will automatically fill. When full the heater
will begin heating the water in the tank.
NOTE: The tank heater switch is shipped in the “ON” position, and during normal operation should stay
there. This switch is located on the DBC control board behind the right hand side panel. If service is required
this switch may be turned off to disable the heating circuit.
During initial fill, using a bottled water source, a fault may occur. The controller will detect that the
tank is not filling fast enough.
If this occurs power down the unit. Reinitiate start-up procedures and the unit will complete filling.
The unit will begin heating after filling. If necessary, repeat until tank is properly filled.
4. When the steam side of the pressure gauge is in the green area the brewer is ready for selection
of one of the four drinks and the size drink desired..
5
BUNN Espress®
OPERATING CONTROLS
Model ES•1AF
10
44 5
11
6
13
78
12
9
12
14
15
L
E
G
0,5
8
1
1,5
CL
2
16
2
2,5
12
16
17
SIN
0
0
4
bar
2
s:
low ter.
fol
as t wa
al.
nu ther an ho
.
s ma fro cle
ed
tor the of
pp al
era se iner
s stoto loc
op , rin
ha
the shes a conta
w
flo rding
see
er
co
s, ht fla e in
aft r ac
on
cti R lig tub
tru HE pply tton. ntentsfrothe
co lk
e ins OT su bu
mi urs.
let N FR milk R" card
HE
the
mp EA the
OT & dis an (4) ho
r co CL of
cle r
Fo hen end N FR cup
W the
EA the ughly fou
ery
"CL e
ce
ov thoro st ev
Pla the
2. ess y rem and lea
at
Pr
3. refullemble des,
Ca
4. sass on co
Di
5. nitati
sa
1.
e.
zzl
no
ing
ns n.
pe
dis lectio
the se
low your .
cle
p be g
cu icatin cy
pty ind p the
em n
sto
an butto n to
ce
tto
Pla the
1. ess y bu
an
Pr
2. ess
Pr
3.
.
. zzles
ad
r.
.
p he ing no
ed
lde ou
pp
ho gr pens
er
s sto
filt o the dis
ha
the r int the
w
flo
d in holde below
a po er cup tion. er the
filt
ce
pty seleccup aft
Pla
1. ck the em ink
the
an dr
Lo
2.
ce ur ove
Pla yo
3. ess y rem
Pr
4. refull
Ca
5.
19
20
ON
1
OFF
0
0
0,5
1
4
8
118
1,5
CL
2
3
2
2,5
12
16
bar
P908
1.
2.
3.
4.
5.
6.
7.
8.
9.
10.
ON/OFF Toggle Switch
Power LED
Pressure Gauge
Stop Button
Tall/Short Button & LEDS
Cappuccino Button & LED
Espresso Button & LED
Latte Button & LED
Special Button & LED
Froth Button
11.
12.
13.
14.
15.
16.
17.
18.
19.
20.
6
Clean Frother Button & LED
Steamed Milk Button
Hot Water Button
Frother Disconnect Assembly
Group Head
Filter Holder
Syphon Tube, Milk
Cup Tray
Drip Tray Grate
Drip Tray Wireform
BUNN Espress®
ADJUSTMENTS
Model ES•1AF
INFUSION
Water
The brewer is factory set to yield these approximate amounts of water:
Short Coffee Volume - 1.5 oz (44 cc)
Tall Coffee Volume - 1.8 oz (53 cc)
To change the factory set amounts:
1. Place the program switch in the “Program” (right) position. The
P912
program switch is located behind the switch/LED panel. See Fig. 1
FIG. 1
2. Place the desired quantity of pods into the appropriate filter holder (1
pod or 2 pod). Lock the filter holder into the group head.
3. Place a measuring vessel beneath the filter holder dripout. The amounts may be set from 0 to 500 cc.
4. Hold button of desired drink for three flashes, then release the button.
5. When enough coffee is dispensed hit button to stop coffee. This hit also starts milk flow.
NOTE- To change steamed milk temperature adjust needle valve. Rotate counterclockwise to increase
temperature, clockwise to decrease temperature. See Fig. 2
6. Hit button the third time to complete drink.
NOTE- Three hits of button will program a milk drink, two hits of
a button for espresso only.
7. Place the program switch in the “RUN” left position, when
done.
4
F
2
C
L
8
10
4
2
L
8
SM
C
10
Air
1. Remove the three screws securing the top cover. Remove
the top cover.
P913
FIG. 2
CAUTION- The inside of this machine is very hot.
C
F
2
4
8
10
4
10
2
SM
C
8
L
L
2. To change the steamed milk adjustment, turn the knob
closest to you marked “SM”. A lower number means less
steam. See Fig. 3
3. To change the frothed milk adjustment, turn the knob
farthest from you marked “F”. The adjustment is added
to the “SM” adjustment, so any change made to “SM”
will also change “F”. See Fig. 3
NOTE- Factory settings are SM-1; F-5. These settings are for 2%
milk.
FIG. 3
P909
3. The milk frother is designed to pull cold milk from counter height at the most. If milk will be pulled
from below the counter, the metering jet at the end of the tube must be drilled out with a .125” drill.
Make sure all burrs are removed. DO NOT use connector to lengthen the hose.
The maximum height this frother will pull is 24.0”
PREINFUSION- Refer to the DBC instruction manual for additional adjustments and settings.
7
BUNN Espress®
OPERATION
Model ES•1AF
BREWING
1. Place a pod in the filter holder.
2. Lock the filter holder into the group head. Make sure it is tight.
3. Place an empty cup in position. The factory settings are for an 8 oz cup.
NOTE- Install the cup tray, as shown in the operating controls illustration (Page 6). This can be used when
brewing into shorter cups, or swung out of the way when using taller cups. The height may be adjusted
by moving the slide up or down, as desired.
4. If brewing a milk based drink, place the milk supply hose in milk.
5. Press the button indicating your selection.
NOTE- If you press the wrong selection, or want to stop brewing at any time, simply press the “STOP”
button or any button on the panel.
6. Carefully remove the cup after the flow has stopped.
WARNING - The milk supply hose and milk container must be refrigerated after use in compliance with
state and local Health Codes.
7. Disconnect the milk supply hose from the frother assembly.
8. Place the milk supply hose into a separate storage container or secure it to the milk container being
careful not to allow contamination by contact with other foods or the refrigeration storage compartment.
DISPENSING HOT WATER OR FROTHED/STEAMED MILK
1. Place an empty cup in position.
2. Press the button indicating your selection.
3. Press any button to stop the cycle.
CLEANING
General
1. The use of a damp cloth rinsed in any mild, non-abrasive, liquid detergent is recommended for
cleaning all surfaces on Bunn-O-Matic equipment.
2. Clean the gasket that seals the filter & group head, located under the group head. Ground coffee buildup on this gasket will result in a bad seal of the filter holder, and will leak brewed coffee onto the outside
of the filter holder when brewing. This is why it is important to wipe excess coffee off of the rim of
the filter prior to insertion of the group head.
3. Clean the drip tray components nightly. Remove the grate, wireform, drip tray and drain hose. Clean
drain cup thoroughly. Wash the grate, wireform and drip tray thoroughly. Run clean water through the
drain hose. Reinstall drain hose, drip tray, wireform and grate.
Filter Cup
1. Place the pressure test cup into the filter holder.
2. Put a teaspoon of any granular espresso cleaner or automatic dish washing detergent into the filter
cup.
3. Lock the filter holder into the group head, as if you were brewing coffee.
4. Press the expresso brew button and repeat for four cycles.
5. Remove the filter holder from the group head.
6. Rinse the group head thoroughly by repeating step 4 a few times without a filter holder installed.
7. Remove the cup filter and filter support wire from the filter holder.
8. Use a damp cloth rinsed in any mild non-abrasive liquid detergent to wipe the inside and outside
surfaces of the cup filter, filter support wire and the filter holder.
9. Rinse all parts in hot water and reassemble. Insure your hands are clean before reassembling the filter
holder.
10. Repeat steps 2 through 9 with the double cup filter.
(Revised January 1996)
8
BUNN Espress®
Model ES•1AF
OPERATION
Milk Frother
NOTE- The milk frother parts need to be cleaned as described below at least every four to six
hours depending upon use. See the DBC instruction manual for changing the clean warning alarm. It is
factory set at 25 drinks.
Daily Milk Frother Cleaning Instructions
1. Dispense 10 oz. of hot water from the espresso machine into a separate container. Add 1/2 packet Of
Kay-5 sanitizing cleaner or any brand of sanitizing cleaner that contains 3%-5% chlorine based
sanitizer.
2. Place milk supply hose into the container.
3. Push the frother clean button. The frother clean button must be actuated as many times as needed
to empty the container.
4. After the container has been emptied, rinse the container out with hot water.
5. Dispense 10 oz. of hot water from the espresso machine into the container.
6. Repeat steps 2 and 3.
7. Rinse the frother by running clear water through it.
Nightly Milk Frother Cleaning Instructions
1. Follow items 1 through 6 of the Daily Milk
Frother Cleaning Instructions.
2. Loosen the frother disconnect assembly thumb
screw (A) and gently tug downward on the
frother assembly (B).
3. Remove the deflector tube (C), dispense tube
(D) and focusing laminator (E).
4. Disconnect the milk supply hose assembly (F)
and air tube assembly (G) from the venturi
body assembly (H).
5. Remove the two end fittings from the milk
supply hose assembly (F).
6. Remove the end fitting from the air tube assembly
(G).
7. Remove the venturi body assembly (H).
8. Remove the steam tube (I) from the venturi
body (H).
9. Remove the steam nozzle (J).
10. Thoroughly clean each part in accordance with
local Health Department Codes, being careful
not to damage any part.
11. Reassemble in reverse order, moisten all orings with clean water prior to assembly.
I
J
G
n
clea
ith g.
g w allin
o-rin inst
et re
t w befo
Musater
w
N
IO
UT
CA T
HO -Sur
Liqu
id-S
face
s
team
milk
NINGand ted
WARhose gera
ly refri with
pp
e s.
su be
ilk ust plianccode
e m r m m th
Th aine in co heal
l
nt
co r use loca
d
aftee an
stat
!
F
H
E
D
A
B
C
P910
9
(Revised June 1997)
BUNN Espress®
BREWING TIPS
Model ES•1AF
GENERAL
Good espresso is identified by its taste, aroma, and the manner in which it is served. All of these elements can
be improved-upon to serve your customers a better product.
BEAN SELECTION
The selection of a blend of coffee is a matter of personal choice. A blend with a high proportion of Central and/
or South American beans results in a beverage with a soft and agreeable flavor. A blend with a high proportion of
African, Arabian, or Indonesian beans results in a beverage with a stronger flavor.
BEAN STORAGE
Roasted beans begin to lose their flavor and aroma shortly after roasting. It is not advisable to keep large
quantities of coffee beans. Roasted beans should always be stored in an airtight container in a cool, dry place to
retain these qualities for as long as possible.
GRIND
Make sure the grinder is functioning properly and delivering the correct grind. Place a small amount of ground
coffee in the palm of your hand and spread it out. The particles should be small and for the most part, uniform in
size. There should be almost no large grains. If the grind doesn’t look right, try adjusting the grinder. The true test
of the grind, though, is when you brew.
GROUND COFFEE STORAGE
Do not store quantities of ground espresso coffee, even overnight. The use of freshly ground espresso coffee
is always advisable for better flavor, extraction and aroma.
ACCESSORIES & TOOLS
Keep a supply of serving cups warming on top of the brewer, even when not a busy time. This assures the
customer a hot cup of espresso each time. The cups will draw heat from the beverage if they are too thick. Mediumsized cups improve the presentation of the served beverage by allowing a slight amount of turbulence in the cup
as the espresso falls from the filter holder. The crema can then rise easily to the surface.
Store all mixing tools, ie: spoons, etc. in hot water so they will not draw the heat from the beverage.
CLEANLINESS
Keep all items used in the preparation of espresso and related beverages clean. It improves the presentation
of the product served and it’s just a good sanitary practice.
10
BUNN Espress®
ALARMS
Model ES•1AF
PROBLEMS
When a fault occurs the following will happen:
Fault 1 will appear on DBC screen.
Power light will flash once every three seconds. This means a flowmeter error. Water is not
flowing thru the flowmeter
Fault 2 will appear on DBC screen.
Power light will flash two flashes every three seconds. This means a refill error. The tank is
not refilling with water fast enough.
11
WIRING DIAGRAM
BUNN Espress®
Model ES•1AF
L1
N
GRN
BLK
LIMIT
T'STAT
BLK
LIMIT
T'STAT
PRESSURE
SWITCH
BLK
BLK
1785W
BLK
K-N.O.
WHI
HOT WATER
D
I
G
I
T
A
L
B
R
E
W
E
R
C
O
N
T
R
O
L
C
I
R
C
U
I
T
B
O
A
R
D
J2-1
J2-3
RED
PUMP WHI
WHI
WHI
TANK HEATER
WHI
BREW
AIR
WHI WHI
SOL
SOL
PRIMARY
STEAM
SECONDARY
STEAM
SOL
SOL
SOL
WHI
J2-5
J2-7
J2-9
J2-11
J2-13
J2-15
BLK
WHI/YEL
WHI/RED
ORA
BLU
WHI/BLU
VIO
WHI/ORA
K
WHI WHI
REFILL
WHI WHI
SOL
WHI
J3-1
WHI
GRN
PNK
J3-3
J3-5
J3-7
J3-9
J3-11
J3-13
J3-15
J3-17
J3-19
J3-21
J3-23
FLOW METER
OUT
+
GRN
-
BLK
RED
GRY
J3-25
J3-27
TANK LEVEL
SENSING
J3-29
P1
J3-31
J3-33
J3-35
J3-37
J3-39
VIO
ORA
BLU
YEL
WHI
YEL
P1
YEL
P2
BLU
P2
BLU
P3
WHI
P3
WHI
P4
ORA
P4
ORA
P5
BLK
P5
BLK
P6
RED
P6
RED
26564.0000B 11/95 © 1995 BUNN-O-MATIC CORPORATION
12
CONTROL PANEL,
PROGRAM SWITCH,
& DISPLAY INTERFACE
120 VOLTS AC
2 WIRE
SINGLE PHASE