1
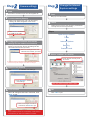
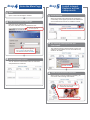
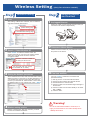
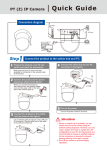
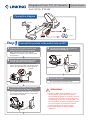
Megapixel Pan/Tilt IP Camera
Quick Guide
ALC-9751/9751W
Connection diagram
ɓ!
Power
Ȣ
ɓ!
HUB
ɓ!
ɓ!
Step
1
Speaker
Alarm
Connect the product to the switch hub and PC.
Prepare the product, your PC and
switch hub ready for connection.
Make sure that your PC has a LAN port
available for connection to the network cable
of the product.
2
MIC
4
Connect the switch hub to your PC
(as shown in the figure).
ɓ!
IP Cam
ɓ!
HUB
Connect the product to the power
source (as shown in the figure).
When you connect the product to the power
source, the camera rotates once and the green
LED on the right side of the camera lights up.
ɓ
power
ɓ!
PC
5 Turn on the power.
ɓ!
3
Automatic rotation
Connect the product to the switch
hub (as shown in the figure).
Use a network cable and plug it in the LAN port
of the product. Plug the other end of the cable
in the LAN port of the hub.
ɓ!
HUB
Turn on the power of the PC and hub.
Attention
1. Where no switch hub is available, you can
search and set up the camera using the
network peering approach. However, you may
need a jumper and need to change the LAN
configuration on your PC for this purpose. It is
recommended to request a qualified engineer
for the connection or execute the network
peering referring to the user's manual.
2. Don't tilt the camera to avoid disrupting
operations.
Step
1
Camera settings
Change the Internet
Explorer settings
Start
Execute the IP Finder.exe file from the supplied CD.
1
2
Step
1
Start
Bring Up Your IE browser
Find the camera (Search)
Search for the product from your LAN. The factory
IP setting 192.168.0.20 appears on the screen.
2 Check
Make sure that Level II, the commonly used default
security level, is set for the security.
ɓ!
Steps
Click Search to find the
IP CAM on the LAN.
Ļ
Open the IE browser
ʔ
Tools
ʔ
!Internet Options
ʔ
Security
!ʔ
Custom Level
3 Changing the IP address and related
settings for the network environment
When you find the camera, click it and the settings
appear on the right side. Change the settings for the
new network environment you need.
ɓ!
Enter the settings for the new
network environment you need.
Ļ
3 Select “medium” for security
ɓ!
Check that the security level
is Level II.
§ You must enter new settings in the IP, Netmask and Gateway
fields and keep the settings in other fields unchanged.
4
Submit data (Submit)
Click “Submit” to validate new settings.
ɓ!
Click Submit to validate
new settings.
Ļ
Note: This product supports IE 6.0 or above.
4 OK
5 Confirmation
When all changes have been confirmed, click
“Exit” to quit.
ɓ
When all changes have been
confirmed, click Exit to quit.
Ļ
Note:
If this software cannot run successfully, check that it is
not blocked by an anti-virus software or firewall.
Click “OK” to quit.
Step
1
Enter the Main Page
Install Internet
Explorer ad-hoc
components
Start
Open a new Internet Explorer window.
1
2
Step
1
Install ActiveX
When the username and password are confirmed, a
control setup screen pops up under the IE address bar.
Click “Install ActiveX Control” to install the controls.
Enter the IP address and login
Enter the new IP address and
key in the username “root” and password “root”.
Ļ
ɓ
Enter the IP address that
you have just set.
ɓ!
2
Ļ
ɓ!
When the login screen appears,
key in root in the User Name
and Password fields. Click OK
Click Install ActiveX Control
The security warning screen aps.
Click Install.
The ActiveX Control is named ActiveX Control. This
software is well certified. You can use it without any
doubts on its validity.
3 Enter the control screen
You can enter the control screen when the username
and password are confirmed.
ɓ!
Click Install
3 Camera operation and interface
When ActiveX Control is installed successfully, you
can see the camera image and interface.
Ļ
ɓ!
Select the HTTP mode if you
cannot see the image.
ɓ!
Control the camera direction.
Wireless Setting
Step
1
Wireless Setting
(Only for wireless model)
Step
Relocate camera
and final test
Start
CMOS PT IP CAM
ɓ!
ɓ!
1
Unplugged Ethernet
Unplug the cable on both camera and AP so that you
can start to use wireless independently.
Ļ
After setting of Ethernet IP address, click on Network
and select Wireless setting page.
Click Setting page
Click Wireless setting page
Ļ
2
2
Search / Select Wireless AP
Relocate & Mount Device
Please mount the camera to your preferred location
and power on the device.
Press “scan” to make the camera search the
wireless Aps that you can use in the nearby. Please
make sure your WLAN AP is shown and with
encryption enable.
Please confirm the SSID of
AP that you want to use.
ɓ!
Ļ
Ļ
ɓYou can click scan icon to see
all reachable AP in nearby.
3 Setting the Network parameters
1
Select infrastructure mode, auto and enter SSID. Select
WEP encryption to be 64 bits or 128 bits depending on
your wireless AP. Enter the exact same KEY that you
used for your wireless AP. Select DHCP or enter static
IP address based on your network plan. Click “ Save”.
Ļ
3 Final test and Run
ĻĻ
Ļ
You may “Test” if it has been connected and
operated smoothly.
1). Set up your PC on the same WLAN subnet.
2). Use IP Finder to identify the network camera.
3). Use IE Browser to view the video
4). Check to make sure the wireless signal strength is
at least 50%
5). Check to make sure the Video Quality is set lower
than 1.5Mbps
6). View the video.
Ļ
Warning!
4 Wireless setting confirm
Refresh / Reload page. After few seconds, you shall
see the new wireless IP address.
Due to the bandwidth limitation of WLAN, it is
highly recommended to set Video Quality below
1.5Mbps and below.