1
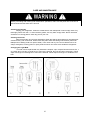
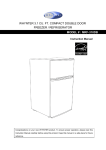
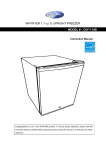
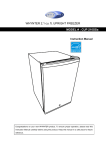
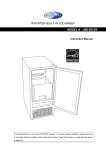
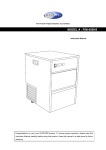
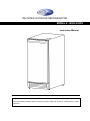
WHYNTER OUTDOOR REFRIGERATOR MODEL # : BOR-325FS Instruction Manual Congratulations on your new WHYNTER product. To ensure proper operation, please read this Instruction Manual carefully before using this product. Keep this manual in a safe place for future reference. TABLE OF CONTENTS PARTS AND FEATURES 3 SAFETY PRECAUTIONS 4-5 5 ENERGY-SAVING TIPS INSTALLATION 5-8 ELECTRICAL REQUIREMENTS 8 OPERATION INSTRUCTIONS 9 CARE AND MAINTENANCE 10 TROUBLESHOOTING 11 WARRANTY INFORMATION 12 2 PARTS AND FEATURES SPECIFICATIONS: 1. 2. 3. 4. 5. 6. 7. Light Fan Shelves Door Light Switch Vent Leveling Legs Description of product Model Voltage/Frequency Amperage Built-in Outdoor refrigerator BOR-325FS AC 115V~60Hz 2.0A Color Stainless Cabinet; Stainless Door Refrigerant High/Low side pressure R134a, 1.94 oz. 190 / 90 psig Compartment Temperature Range 35 - 50ºF Ambient Temperature Range 25 - 100ºF Dimensions (Height x Width x Depth 33.5” x 14.6” x 24.4” Weight 69 pounds 3 WARNING TO REDUCE THE RISK OF FIRE, ELECTRICAL SHOCK, OR INJURY WHEN USING YOUR OUTDOOR REFRIGERATOR, FOLLOW THESE BASIC PRECAUTIONS: All repairs, disassembly and modifications should be performed only by qualified technicians. Attempting to perform this yourself could result in fire, malfunction or injury. Never splash water directly onto the product or wash it with water without unplugging, as a short circuit could result. In a rainy environment, a water-proof covering is recommended. Never put flammable or volatile substances into the unit as explosion and fire could result. Do not damage, modify, excessively bend, strain, twist or bundle the power cord. Also, placing heavy objects on the power cord or binding it could damage the cord, possibly resulting in electrical shock or fire. Use a dedicated wall outlet. Do not use an extension cord or multiple-outlet adaptor as this could result in electrical shock, overheating and fire. Never use flammable spray cans or leave flammable substances near the unit. Sparks from electrical switches could result in explosion or fire. If a combustible gas is present near the appliance, turn off the source of the gas, then open the windows and doors to allow the gas to dissipate. To avoid an explosion, do not pull the plug or switch off the unit. The electrical socket must have good grounding. The ground wire cannot be connected with a gas pipe, heating pipe, water pipe, telephone line or lightning rod. It cannot be replaced with the neutral wire of single-phase power. In addition to the ground wire, an electrical leakage circuit breaker is also required. If installation in a damp location is unavoidable, have an electrician install a ground fault circuit interrupter (GFCI) electrical outlet. If no GFCI is installed, electrical shock could result. Never climb onto the unit. The unit could tip over or fall and cause material damage or personal injury. Disconnect the power cord plug from the wall outlet before moving the unit and make sure that the power cord is not damaged during transport. A damaged power cord could result in electrical shock and/or fire. Never unplug the unit by pulling on the power cord. Always grip the plug firmly and pull straight out from the outlet. Pulling the cord could cause wire breakage, possibly resulting in overheating and fire. Repair or replace any cord that is frayed. Do not use a cord that shows cracks or abrasions along its length. SAFETY PRECAUTIONS Read all of the instructions before using this appliance. When using this appliance, always exercise basic safety precautions, including the following: This unit must be properly installed in accordance with the installation instructions before it is used. See grounding instructions in the Installation section. This model can either be built-in or free-standing. Built-in units vent at the bottom front and airflow at the front of this vent must be unimpeded. Install the unit in a location where the floor is sturdy enough to support the load of the unit. If the floor is not sturdy enough or installation is incorrectly performed, the unit could tip over and cause personal injury. If the unit is placed on a stand, the front surface must be 3” or more back from the edge of the stand in order to avoid accidental tipping of the appliance during normal usage. In a rainy or snowy environment, a water-proof covering is recommended. Never place heavy objects or items containing water on top of the unit. Objects could fall and cause injury and spilled water could cause the deterioration of the insulation of electrical components and result in electrical shock. Disconnect the unit if it is behaving abnormally, and do not reconnect until the situation is corrected. 4 Pull out the plug before doing any maintenance on the unit to avoid electric shock. Never pull out plug when hands are wet! This unit is not intended for the storage of medicines or chemical reagents. Keep packing materials away from children. Condenser water from evaporator drains into a hole in the floor of the storage compartment and is channeled into a drain pan located at the back of the unit on the compressor. Heat transferred from the compressor evaporates any water that has collected in the pan. Be sure the drain hole in the floor of the unit is clear and unobstructed. During long absences, remove the unit’s contents, unplug the unit, clean it and leave the door open slightly to avoid possible formation of condensation, mold or odors. Use a cover to protect the unit and prolong its lifespan. Leave disassembly and disposal of the unit to qualified experts. Risk of child entrapment. Before discarding your old refrigerator: • take off the doors • leave the shelves in place so that children may not easily climb inside. ENERGY-SAVING TIPS Do not place the unit next to a heating vent, a range or in direct sunlight. Keep the door closed as much as possible, especially in hot, humid weather. Cover foods to reduce moisture buildup inside the appliance. INSTALLATION Installation Types This refrigerator has been designed for free-standing, recessed, or built-in installation. In every case, there must be adequate ventilation and access for service. Never install or operate the unit in an enclosed area, such as a closed cabinet. Free-standing installation: A free-standing installation will allow you to install the refrigerator in any place you desire. You must follow the stated instructions for a – Electrical requirements b – Location requirements of the refrigerator Built-in installation: If this method of installation is chosen, it will still be necessary to allow adequate ventilation space around the unit (make sure there is at least some ventilation room for the back of the unit). The following additional items must be observed. Remove packaging materials and Cleaning IMPORTANT: Do not remove any permanent instruction labels or the data label on your refrigerator. Remove the exterior and interior packaging. Use a soft dry cloth to wipe down the outside of the refrigerator thoroughly. Use a clean cloth dampened with lukewarm water to wipe down the inside of the refrigerator. Air must circulate freely in front of the refrigerator. Avoid placing the appliance 5 near any source of heat or moisture, or in direct sunlight. Direct sunlight may affect the finish and, nearby heat sources will cause higher electrical consumption. Install the outdoor refrigerator in a well-ventilated area where the ambient temperature is above 25°F and below 100°F This Outdoor Refrigerator is designed to be either free-standing or built-in. It has motorized fans at the back of the unit that direct compressor-generated heat away from the compressor and through the front of the unit, keeping the front vents unobstructed. If the unit is built-in, allow minimum clearances of 1/4” at the sides, 1/2” at the back and 1” at the top. Location Requirements INSTALLATION CLEARANCES: (Unit shown in an enclosed setup) Note: The temperature range for this cooler is optimized for outdoor beverage storage. Perishable food items may require a different storage environment 6 Reversing the Door Swing Tools needed: Flathead screwdriver, Phillips screwdriver IMPORTANT: Before you begin, unplug the refrigerator or disconnect power. To remove door from hinges: 1. Remove the top hinge cover and bottom louver. 2. Using a Phillips screwdriver, remove the screws, then remove top hinge mat and top hinge. Keep the parts together and set them aside. 3. Lift the door off the bottom hinge and set it aside. 4. Using a Phillips screwdriver, remove the magnet and door switch baffle, then place them on the opposite side at the top of the door. To replace door on hinges: 1. Using a flat screwdriver, remove the plug buttons from the screw holes opposite the door hinges. Set aside. 2. Remove the bottom hinge and place it on the opposite side at the bottom of the door. 3. Position the door on the bottom hinge. 4. Align the door on the bottom hinge and replace the top hinge and top hinge mat. 5. Replace top hinge cover and bottom louver. 6. Push the plug buttons into the spare screw holes on the top of the cabinet. 7 Leveling the Refrigerator It is important for the refrigerator to be leveled in order to work properly. It can be raised or lowered by turning the four feet on the bottom of the machine. We recommend using a carpenter’s level to check the machine. 1. Place a carpenter’s level on top of the product to see if the refrigerator is level from front to back and side to side. 2. Adjust the height of the feet as follows: • Turn the leveling feet to the right to lower that side of the refrigerator • Turn the leveling feet to the left to raise that side of the refrigerator ELECTRICAL REQUIREMENTS Electrical Shock Hazard For your personal safety, this appliance must be properly grounded. In the event of an electrical short circuit, grounding reduces the risk of shock by providing an escape wire for the electric current. This appliance is equipped with a cord having a grounding wire with a grounding plug. The plug must be inserted into an outlet that is properly grounded and installed. The ground wire cannot be connected to a gas pipe, heating pipe, water pipe, telephone line or lightning rod. It cannot be replaced with the neutral wire of single-phase power. In addition to the ground wire, an electrical leakage circuit breaker is also required. Consult a qualified electrician if you do not completely understand these grounding instructions. DO NOT UNDER ANY CIRCUMSTANCES CUT OR REMOVE THE THIRD (GROUND) PRONG FROM THE POWER CORD. If installation in a damp location is unavoidable, have an electrician install a ground fault circuit interrupter (GFCI) electrical outlet. If no GFCI is installed, electrical shock could result. Before you move your refrigerator into its final location, it is important to make sure you have the proper electrical connection: A standard electrical supply (115V, 60Hz, 15A), properly grounded in accordance with the National Electrical Code and local codes and ordinances, is required. It is recommended that a separate circuit, serving only your refrigerator, be provided. Use receptacles that cannot be turned off by a switch or pull chain. The fuse (or circuit breaker) size should be 15 amps. Do Not Use an Extension Cord Avoid the use of an extension cord because of potential safety hazards under certain conditions. 8 OPERATION INSTRUCTIONS IMPORTANT: Do not plug in the refrigerator for 24 hours after unit is set in place. Failure to do so may result in the unit working improperly. This refrigerator has a rotary temperature control knob (thermostat) inside the unit which is marked with the settings OFF-COLD-COLDEST in order of increasing coldness. In addition, this model employs a heater inside the cabinet and is designed for outdoor use. Note: To prevent excessive strain on the compressor, do not leave the unit at the COLDEST setting for more than an hour at a time. Turning on the Unit The refrigerator turns on automatically when it is plugged in. When the air temperature is below 40°F, follow this procedure to stop the compressor: 1. Turn the temperature control knob (thermostat) to the COLD setting. 2. Continuing turning the control knob counter-clockwise to the OFF setting. The compressor will stop working and the heater will turn on automatically to maintain the temperature at a suitable level. If the ambient temperature is above 40ºF, turn the thermostat to the range between COLD and COLDEST to cool foods. If the ambient temperature is below 30°F, do not use the unit to store anything. If you unplug the refrigerator or the power is cut off accidentally, allow 8 minutes before restarting it or plugging it back in. It will not operate properly in less than 8 minutes. Temperature Setting Initially set the thermostat to the midpoint between the COLD and COLDEST settings. The compressor will run continuously for a few hours until the temperature inside the appliance becomes stable. After this, the compressor runs normally (i.e., turns on and off periodically). When the unit is operated for the first time, it is suggested that you not put food inside until the compressor is running normally. Adjusting the thermostat clockwise will make the compressor run for a longer time with a shorter compressor stop time, and the temperature inside the appliance will become colder. The setting should be regulated according to ambient conditions and the desired temperature. The compressor will run for a while after each regulation before reaching a steady temperature. Note: Cold air falls and warmer air rises, and there will be a small temperature variation from the bottom of the unit to the top. The temperature at the bottom of the unit will always be slightly colder. Operating the Internal Light This appliance has an internal light to make it easier for you to see the foods you have stored. When the door is open, the light will be on and when it is closed, the light will be off. Shelving The wire racks in your refrigerator are chrome-plated so they will not rust. The unit has 3 adjustable chrome-plated flat wire shelves and a wire basket to hold cans and bottles of beverages such as beer, water and soft drinks. These racks are removable and reversible. To take out a rack, remove any cans or bottles from the rack and pull it out until it stops. Then lift up the front of the rack and remove it from the unit. Normal Sounds Your new refrigerator may make sounds that are not familiar to you. Hard surfaces like the floor, walls can make the sounds seem louder than they actually are. The following describes the kinds of sounds that might be new to you and what may be making them. • Ratting noises may come from the flow of the refrigerant or the water line, items stored on top of the refrigerator can also make noises. • The high efficiency compressor may make a pulsating or high-pitched sound. • Water running from the evaporator to the water bin may make a splashing sound. • You may hear air being forced over the condenser by the condenser fan. 9 CARE AND MAINTENANCE Before proceeding with cleaning and maintenance operations, make sure the power line of the unit is disconnected and the water line is shut off. Cleaning the Outside Unplug your refrigerator. Clean the outside with a cloth dampened in warm soapy water. Dry thoroughly with a soft cloth. To clean the door gasket, use only warm soapy water. Never use harsh cleansers or scouring pads to clean any part of your unit. Cleaning the Inside Remove all foods, plus shelves and basket. Wash the shelves and basket in a mild detergent solution and dry with a soft cloth. Wash inside with plain water and baking soda solution (about two tablespoons of baking soda to a quart of water). Then rinse and dry. Do not use cleansers such as soaps, detergents, scouring power or spray cleaners which can cause odors inside the refrigerator. Changing the Light Bulb The bulb can be replaced with any standard U-shaped, 2-pin compact fluorescent bulb of 5, 7 or 9 watts. Don’t use any unusual force to remove the old bulb. No tools should be necessary. Follow steps A through D in the diagram to remove the old bulb. Follow steps E through H to install the new bulb. 10 TROUBLESHOOTING Many common refrigerator problems are easily resolved. Try the troubleshooting suggestions below to see if the problems can be resolved before having to contact the service department. PROBLEM The appliance does not operate. The appliance is not cold enough. POSSIBLE CAUSE There is a power failure. The appliance is not plugged in. A house fuse has blown or the circuit breaker is tripped. The set temperature too high. The appliance is placed too close to a heat source. The door is opened too often. The door is not closed completely. The door gasket does not seal properly. The front bottom grille does not have sufficient ventilation. The appliance turns on and off frequently. The appliance makes too much noise. The door does not close properly. The ambient (room) temperature is too low or high. A large amount of contents has been added to the appliance. The door is opened too often. The door is not closed completely. The door gasket does not seal properly. The noise may come from the flow of the refrigerant/ Contraction and expansion of the inside walls may cause popping and crackling noises. The appliance is not level. The appliance is not level. The door was reversed and not properly installed. The shelves are out of position. 11 SOLUTIONS Ensure the appliance is plugged in and the power outlet has power. Replace the broken fuse or reset the breaker. Adjust the set temperature Keep the appliance away from sunshine or other heat sources. Close the door tightly and do not open the door too frequently or for a long period of time. Ensure the door gasket is not loose. The front bottom grille must be completely unobstructed. Decrease or increase the ambient (room) temperature. To minimize internal temperature fluctuation, do not add large amount of contents at once. Close the door tightly and do not open the door too frequently or for a long period of time. Ensure the door gasket is not loose. It is normal that as each cooling cycle ends, you may hear gurgling sounds caused by the flow of refrigerant in the appliance. Some popping or cracking noises are normal. They are caused by expansion and contraction of the inside walls due to temperature changes. Make sure the cooler is on a hard and level surface. Do not place the appliance on carpet. Make sure the cooler is on a hard and level surface. Avoid placing the appliance on a carpeted or soft surface. Correctly install the shelves. ONE YEAR LIMITED WARRANTY This WHYNTER Outdoor Refrigerator is warranted, to the original owner within the 48 continental states, for one year from the date of purchase against defects in material and workmanship under normal use and service. Should your Outdoor Refrigerator prove defective within one year from the date of purchase, return the defective part or unit, freight prepaid (within two months of purchase; after two months to one year, customer will be responsible for freight cost to Whynter’s service department), along with an explanation of the claim to Whynter LLC. Please package the Outdoor Refrigerator carefully in its original packaging material to avoid damage in transit. Please retain the original box and packaging material. Under this warranty, Whynter will repair or replace any parts found defective. This warranty is not transferable. After the expiration of the warranty, the cost of labor and parts will be the responsibility of the original owner of the unit. THIS WARRANTY DOES NOT COVER: Acts of God, such as fire, flood, hurricanes, earthquakes and tornadoes. Damage, accidental or otherwise, to the Outdoor Refrigerator while in the possession of a consumer not caused by a defect in material or workmanship; Damage caused by consumer misuse, tampering, or failure to follow the care and special handling provisions in the instructions. Damage to the finish of the case, or other appearance parts caused by wear. Damage caused by repairs or alterations to the product by anyone other than authorized by the manufacturer. Freight and Insurance cost for the warranty service. DISCLAIMER OF IMPLIED WARRANTIES; LIMITATION OF REMEDIES CUSTOMER'S SOLE AND EXCLUSIVE REMEDY UNDER THIS LIMITED WARRANTY SHALL BE PRODUCT REPAIR OR REPLACEMENT AS PROVIDED HEREIN. CLAIMS BASED ON IMPLIED WARRANTIES, INCLUDING WARRANTIES OF MERCHANTABILITY OR FITNESS FOR A PARTICULAR PURPOSE, ARE LIMITED TO ONE YEAR OR THE SHORTEST PERIOD ALLOWED BY LAW, BUT NOT LESS THAN ONE YEAR. WHYNTER SHALL NOT BE LIABLE FOR CONSEQUENTIAL OR INCIDENTAL DAMAGES SUCH AS PROPERTY DAMAGE AND INCIDENTAL EXPENSES RESULTING FROM ANY BREACH OF THIS WRITTEN LIMITED WARRANTY OR ANY IMPLIED WARRANTY. SOME STATES AND PROVINCES DO NOT ALLOW THE EXCLUSION OR LIMITATION OF INCIDENTAL OR CONSE- QUENTIAL DAMAGES, OR LIMITATIONS ON THE DURATION OF IMPLIED WARRANTIES, SO THESE LIMITATIONS OR EXCLUSIONS MAY NOT APPLY TO YOU. THIS WRITTEN WARRANTY GIVES YOU SPECIFIC LEGAL RIGHTS. YOU MAY ALSO HAVE OTHER RIGHTS THAT VARY FROM STATE TO STATE. To obtain service or information, contact Whynter via email at [email protected] or call 866-WHYNTER. Product contents and specifications may change without notice. Copyright © 2013 Whynter LLC www.Whynter.com 12