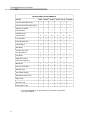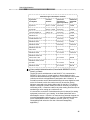
1
The 8400-Series Voice Terminals Instructions for Installation, Switch Administration, and Programming the Options (for the 8403, 8410, 8411, and 8434DX Voice Terminals) (Instructions and Information for the Installer, System Manager, and Provisioning Personnel) AT&T 555-015-725 COMCODE 107537094 Issue 2 , January 1996 bbbbb b bbbbbbbbbbbbbbbbbbbbbbbbbbbbbbbbbbbbbbbbbbb IMPORTANT SAFETY WARNINGS When this product is located in a separate building from the telephone communications system, a line current protector MUST be installed at the entry/exit points of ALL buildings through which the line passes. However, note that there is a difference between 4-wire and 2-wire installations. The following are the ONLY acceptable devices for use in a 4-wire installation: (note that two protectors are needed at each installation point) AT&T 4-type protectors ITW LINX LP-type protectors For 2-wire installations, the following is recommended: (only one protector is needed at each installation point) AT&T 4-type protectors ITW LINX LP-type protectors However, if the above two protectors are not used, the following is acceptable in a 2-wire installation: AT&T 3BIC (Carbon block) or AT&T 3BEW (gas tube) protectors NOTE: The 3BIC and 3BEW protectors can be used ONLY for 2-wire installations. They CANNOT be used for 4-wire installations. bbbbbbbbbbbbbbbbbbbbbbbbbbbbbbbbbbbbbbbbbbbbbbbbbbbbbbbbbbbbbbbbbbbbbbbbbbbbbbbb c CAUTION: This voice terminal is NOT for residential use. It is for business c c systems applications ONLY. Use in a residential environment could result in c c c c an electrical short circuit when the telephone wiring is set up to provide other c c applications, for example, for appliance control or power transformers. The c c AC power used in these applications may create a safety hazard by placing a c c direct short circuit across the telephone wiring. c c bbbbbbbbbbbbbbbbbbbbbbbbbbbbbbbbbbbbbbbbbbbbbbbbbbbbbbbbbbbbbbbbbbbbbbbbbbbbbbbb c i bbbbb b bbbbbbbbbbbbbbbbbbbbbbbbbbbbbbbbbbbbbbbbbbb DO NOT DISCARD THE BLANK DESIGNATION CARD The voice terminal is shipped with a blank button designation card in place under the transparent cover. Do not discard this button designation card. Instead, place the preprinted designation card over the blank button designation card which comes with the voice terminal. This blank designation card can then be used as a substitute if, in the future, there are changes in features, telephone numbers, or extension assignments on the voice terminal. ENVIRONMENTAL INFORMATION In accordance with international environmental standards, parts of this AT&T voice terminal have been manufactured with recyclable plastic resins. These telephone parts have been marked >ABS< so they can be easily identified at recycling or waste recovery facilities when appropriate. The paper used in this documentation is also recyclable. The ``CE´´ Mark The ‘‘CE’’ mark affixed to this equipment means that it conforms to the European Union Electromagnetic Compatibility Directive (89/336/EEC). RESPONSIBILITY FOR THE SYSTEM’S SECURITY The system manager for each PBX system is responsible for the system’s security. AT&T does not warrant that this product is immune from or will prevent unauthorized use of common-carrier telecommunication services or facilities accessed through or connected to it. AT&T will not be responsible for any charges that result from such unauthorized use. Product administration to prevent unauthorized use is the responsibility of the system manager, and he or she should read all documents provided with this product to fully understand the features available that may reduce the risk of incurring unauthorized charges. WARRANTY All terms and conditions specified in the owner’s agreement with AT&T apply. HEARING AID COMPATIBILITY This voice terminal is compatible with inductively coupled hearing aids as required by the Federal Communications Commission (FCC). TRADEMARKS DEFINITY and QUORUM are registered trademarks of AT&T. IBM and PS/2 are registered trademarks of International Business Machines Corporation. PassageWay is a trademark of AT&T. ii bbbbb b bbbbbbbbbbbbbbbbbbbbbbbbbbbbbbbbbbbbbbbbbbb CONTENTS The 8400-Series Voice Terminals 1 Checklist of Parts (with PECs and Comcodes) 3 The 8403 Voice Terminal Package 3 The 8410 and 8411 Voice Terminal Packages 4 The 8434DX Voice Terminal Packages 6 Auxiliary Power Supplies for the 8400-Series Voice Terminals 8 Installing Your Voice Terminal 9 Wiring Information 9 General Notes on Wiring and Installation 12 The 2-Wire/4-Wire Line Adapter 12 Auxiliary Power 13 Distance Limitations 13 Desktop Installation Adjusting the 8410D Voice Terminal Desktop Stand 14 19 Wall Installation 21 Attaching Adjunct Equipment 26 Connecting a Personal Computer and an Analog Adjunct to the 8411 Voice Terminal Connecting the 8411 to a Personal Computer for PassageWay Applications Connecting an Analog Adjunct to the 8411 Voice Terminal PassageWay and Analog Adjunct Status Indications on the 8411 28 28 30 30 Labeling the Designation Card 33 For the 8403 Voice Terminal 33 For the 8410 and 8411 Voice Terminals 34 For the 8434DX Voice Terminal 34 How to Label the Blank Designation Card 35 Switch Administration 37 Programming the Terminal’s Transmission and Softkey Parameters 37 Circuit Packs Used for the 8400-Series Sets 39 iii bbbbb b bbbbbbbbbbbbbbbbbbbbbbbbbbbbbbbbbbbbbbbbbbb A Note on Bulk Administration and on LABELMASTER 39 Administering the 8403 Voice Terminal 40 Administering the 8410 and 8411 Voice Terminals Administering Softkey Features on the 8410D and 8411D The Default Softkey Features on the 8410D and 8411D Alternate Softkey Features on the 8410D and 8411D Button Numbering for 8410 and 8411 Voice Terminal Administration 43 47 49 51 53 Administering the 8434DX Voice Terminal Administering Softkey Features on the 8434DX The Default Softkey Features on the 8434DX Alternate Softkey Features on the 8434DX Button Numbering for 8434DX Voice Terminal Administration 56 58 59 61 63 The Test Feature and the Diagnostics Feature 67 The Test Feature (For ALL 8400-Series Voice Terminals) 67 The Diagnostics Feature (Used ONLY with the 8411 Voice Terminal) 68 Programming the Options A Shortcut in Programming the Options (for Display Sets) 69 70 Enabling/Disabling the Speakerphone or Speaker (or Changing to a Listen-Only Speaker) 71 Enabling/Disabling the Mute Function 72 Selecting Ringing Preference (for a Second Incoming Call) 73 Enabling/Disabling the Status Lights for the PassageWay Connection (For the 8411 Voice Terminal Only) 74 Enabling/Disabling the Status Lights for the Analog (Tip/Ring) Adjunct Interface (For the 8411 Voice Terminal Only) 75 Selecting Whether the I1-Channel or the I2-Channel Will Be Used for the Analog Adjunct (For the 8411 Only) 76 Setting the Audio Volume Control (on the 8411) 77 Setting the Display for 1- or 2-Lines (for the 8434DX only) 79 Viewing Information on Terminal Options and Parameters 80 Other 8400-Series Voice Terminals Documentation iv 81 bbbbb b bbbbbbbbbbbbbbbbbbbbbbbbbbbbbbbbbbbbbbbbbbb The 8400-Series Voice Terminals bbbbbbbbbbbbbbbbbbbbbbbbbbbbbbbbbbbb There are six different types of 8400-Series voice terminals: the 8403, 8410B and 8410D, 8411B and 8411D, and 8434DX. The following table lists the voice terminals and shows the features you can use with each of them. 1 bbbbb The 8400-Series Voice Terminals b bbbbbbbbbbbbbbbbbbbbbbbbbbbbbbbbbbbbbbbbbbb bbbbbbbbbbbbbbbbbbbbbbbbbbbbbbbbbbbbbbbbbbbbbbbbbbbbbbbbbbbbbbbbbbbbbbbbbbbbbbbbbbbbbbbbbbb c c THE 8400-SERIES VOICE TERMINALS cbbbbbbbbbbbbbbbbbbbbbbbbbbbbbbbbbbbbbbbbbbbbbbbbbbbbbbbbbbbbbbbbbbbbbbbbbbbbbbbbbbbbbbbbbbb c c c c c c c c c c Feature c 8403 c 8410B c 8410D c 8411B c 8411D c 8434DX c bbbbbbbbbbbbbbbbbbbbbbbbbbbbbbbbbbbbbbbbbbbbbbbbbbbbbbbbbbbbbbbbbbbbbbbbbbbbbbbbbbbbbbbbbbb c c c c c c c c c Liquid Crystal Display (LCD) c √ √ c c c c c c bbbbbbbbbbbbbbbbbbbbbbbbbbbbbbbbbbbbbbbbbbbbbbbbbbbbbbbbbbbbbbbbbbbbbbbbbbbbbbbbbbbbbbbbbbb c c c c c c c c c Vacuum Fluorescent Display (VFD) c c c c c c c √ bbbbbbbbbbbbbbbbbbbbbbbbbbbbbbbbbbbbbbbbbbbbbbbbbbbbbbbbbbbbbbbbbbbbbbbbbbbbbbbbbbbbbbbbbbb c c c c c c c c c c c c c c c c Softkeys and Display c c c c c c c c √ √ √ c Control Buttons c c c c c c bbbbbbbbbbbbbbbbbbbbbbbbbbbbbbbbbbbbbbbbbbbbbbbbbbbbbbbbbbbbbbbbbbbbbbbbbbbbbbbbbbbbbbbbbbbc c c c c c c c c c Call appearance/ c c c c c c c c Feature buttons c c c c c c c 3 10 10 10 10 34 c bbbbbbbbbbbbbbbbbbbbbbbbbbbbbbbbbbbbbbbbbbbbbbbbbbbbbbbbbbbbbbbbbbbbbbbbbbbbbbbbbbbbbbbbbbb c c c c c c c c c c c c c c c 1-way Speaker √ √* √* √* √* √* cbbbbbbbbbbbbbbbbbbbbbbbbbbbbbbbbbbbbbbbbbbbbbbbbbbbbbbbbbbbbbbbbbbbbbbbbbbbbbbbbbbbbbbbbbbb c c c c c c c c c c c c c c c √ √ √ √ √ c 2-way Speakerphone c c c c c c c bbbbbbbbbbbbbbbbbbbbbbbbbbbbbbbbbbbbbbbbbbbbbbbbbbbbbbbbbbbbbbbbbbbbbbbbbbbbbbbbbbbbbbbbbbb c c c c c c c c c Feature Button c √ c c c c c c cbbbbbbbbbbbbbbbbbbbbbbbbbbbbbbbbbbbbbbbbbbbbbbbbbbbbbbbbbbbbbbbbbbbbbbbbbbbbbbbbbbbbbbbbbbb c c c c c c c c Shift Button c c c c c c c √ √ √ √ √ cbbbbbbbbbbbbbbbbbbbbbbbbbbbbbbbbbbbbbbbbbbbbbbbbbbbbbbbbbbbbbbbbbbbbbbbbbbbbbbbbbbbbbbbbbbb c c c c c c c c c c c c c c c c Transfer, Hold, Conf, c c c c c c c √ √ √ √ √ √ c and, Drop Buttons c c c c c c c bbbbbbbbbbbbbbbbbbbbbbbbbbbbbbbbbbbbbbbbbbbbbbbbbbbbbbbbbbbbbbbbbbbbbbbbbbbbbbbbbbbbbbbbbbb c c c c c c c c c Test Button c √ √ √ √ √ √ c c c c c c bbbbbbbbbbbbbbbbbbbbbbbbbbbbbbbbbbbbbbbbbbbbbbbbbbbbbbbbbbbbbbbbbbbbbbbbbbbbbbbbbbbbbbbbbbb c c c c c c c c c Diagnostics Feature c c c c c c c c c c c c c c c √ √ c (used with Test Button) c c c c bbbbbbbbbbbbbbbbbbbbbbbbbbbbbbbbbbbbbbbbbbbbbbbbbbbbbbbbbbbbbbbbbbbbbbbbbbbbbbbbbbbbbbbbbbb c c c c c c c c c c c Mute Button √ √ √ √ √ √ cbbbbbbbbbbbbbbbbbbbbbbbbbbbbbbbbbbbbbbbbbbbbbbbbbbbbbbbbbbbbbbbbbbbbbbbbbbbbbbbbbbbbbbbbbbb c c c c c c c c c c c c c c c c Volume Control Button c √ √ √ √ √ √ c c c c c c bbbbbbbbbbbbbbbbbbbbbbbbbbbbbbbbbbbbbbbbbbbbbbbbbbbbbbbbbbbbbbbbbbbbbbbbbbbbbbbbbbbbbbbbbbb c c c c c c c c c Message Light c c c c c c c √ √ √ √ √ √ cbbbbbbbbbbbbbbbbbbbbbbbbbbbbbbbbbbbbbbbbbbbbbbbbbbbbbbbbbbbbbbbbbbbbbbbbbbbbbbbbbbbbbbbbbbb c c c c c c c c c c c c c c c Personalized Ringing √ √ √ √ √ √ cbbbbbbbbbbbbbbbbbbbbbbbbbbbbbbbbbbbbbbbbbbbbbbbbbbbbbbbbbbbbbbbbbbbbbbbbbbbbbbbbbbbbbbbbbbb c c c c c c c c c c c c c c c Kickstand (on back of set) √ √ cbbbbbbbbbbbbbbbbbbbbbbbbbbbbbbbbbbbbbbbbbbbbbbbbbbbbbbbbbbbbbbbbbbbbbbbbbbbbbbbbbbbbbbbbbbb c c c c c c c c c c c c c c c c Adjunct Jack √ √ √ √ √ √ c c c c c c c bbbbbbbbbbbbbbbbbbbbbbbbbbbbbbbbbbbbbbbbbbbbbbbbbbbbbbbbbbbbbbbbbbbbbbbbbbbbbbbbbbbbbbbbbbb c c c c c c c c c EIA-232-D Jack c c c c c c c √ √ cbbbbbbbbbbbbbbbbbbbbbbbbbbbbbbbbbbbbbbbbbbbbbbbbbbbbbbbbbbbbbbbbbbbbbbbbbbbbbbbbbbbbbbbbbbb c c c c c c c c c c c c c c c Analog Adjunct Jack √ √ c bbbbbbbbbbbbbbbbbbbbbbbbbbbbbbbbbbbbbbbbbbbbbbbbbbbbbbbbbbbbbbbbbbbbbbbbbbbbbbbbbbbbbbbbbbb c c c c c c c * The 2-way speakerphone can be optioned as a 1-way (listen-only) speaker, (or it can be disabled). 2 bbbbb The 8400-Series Voice Terminals b bbbbbbbbbbbbbbbbbbbbbbbbbbbbbbbbbbbbbbbbbbb Checklist of Parts (with PECs and Comcodes) bbbbbbbbbbbbbbbbbbbbbbbbbbbbbbbbbbbb b bbbbbb The 8403 Voice Terminal Package The 8403 voice terminal package includes the following items. Comcodes and Price Element Codes (PECs) are included so you can order additional equipment. 8403 (8403D01A) Voice Terminal Black 8403 Set PEC: 3233-03B(A) * Comcode: 106705106 White 8403 Set PEC: 3233-03W(A) * Comcode: 106705114 * NOTE: For ordering domestic voice terminals with English labels, use the attribute CTR15. For ordering voice terminals with international icons, use the attribute CTR98. K2S6 Handset Comcode: Black=107180549; White=107181471 Handset Cord (9-foot) Comcode: Black=105635429; White=105701809 Designation Card Cover PEC: 32306(A) Comcode: 846506780 Line Cord, D8W 8-conductor, 7-foot Comcode: 103786778 3 bbbbb Checklist of Parts (with PECs and Comcodes) b bbbbbbbbbbbbbbbbbbbbbbbbbbbbbbbbbbbbbbbbbbb The voice terminal comes with a deskstand and blank button designation card. The following quantities of 8403 button designation cards can be ordered: 8403 Button Designation Cards Tractor Feed For 25 Sets, 5 Sheets PEC: 32307(A) Comcode: 847167962 Tractor Feed, For 100 Sets, 20 Sheets PEC: 32308(A) Comcode: 847167970 b bbbbbb The 8410 and 8411 Voice Terminal Packages The 8410 and 8411 voice terminal packages are almost exactly the same except for the voice terminal. Also, the 8411 is shipped with an MSP-1 power supply; a power supply does NOT come with the 8410. Note that there are two types of 8410 and 8411 sets: the 8410B and the 8411B do NOT have displays; the 8410D and the 8411D have displays. The following items are included in these packages. Comcodes and PECs are included for ordering additional equipment. 8410B (8410D02A) Voice Terminal without display Black 8410B Set PEC: 3234-04B(A) * Comcode: 106790454 White 8410B Set PEC: 3234-04W(A) * Comcode: 106790462 8410D (8410D01A) Voice Terminal with display Black 8410D Set PEC: 3235-05B(A) * Comcode: 106705122 White 8410D Set PEC: 3235-05W(A) * Comcode: 106705130 8411B (8411D02A) Voice Terminal without display Black 8411B Set PEC: 3234-TRB(A) * with power supply PEC: 3234-PTB(A) * Comcode for black set: 107526535 White 8411B Set PEC: 3234-TRW(A) * with power supply PEC: 3234-PTW(A) * Comcode for white set: 107526543 4 bbbbb Checklist of Parts (with PECs and Comcodes) b bbbbbbbbbbbbbbbbbbbbbbbbbbbbbbbbbbbbbbbbbbb 8411D (8411D01A) Voice Terminal with display Black 8411D Set PEC: 3235-TRB(A) * with power supply PEC: 3235-PTB(A) * Comcode for black set: 107526501 White 8411D Set PEC: 3235-TRW(A) * with power supply PEC: 3235-PTW(A) * Comcode for white set: 107526519 * NOTE: For ordering domestic voice terminals with English labels, use the attribute CTR15. For ordering voice terminals with international icons, use the attribute CTR98. K2S6 Handset Comcode: Black=107180549; White=107181471 Handset Cord (9-foot) Comcode: Black=105635429; White=105701809 Designation Card Cover PEC: 32309(A) Comcode: 846320216 Line Cord, D8W 8-conductor, 7-foot Comcode: 103786778 The voice terminals come with a deskstand and blank button designation card. The following quantities of 8410 button designation cards can be ordered: NOTE: The 8410 voice terminal uses a different button designation card than the 8411. Both types of cards are listed below. 8410 Button Designation Cards Tractor Feed For 25 Sets, 3 Sheets (12 cards per sheet) PEC: 32310(A) Comcode: 847161817 Tractor Feed For 100 Sets, 9 Sheets (12 Cards per Sheet) PEC: 32311(A) Comcode: 847161916 Laser Printer Forms (8 1/2"x11") 67 Sheets (six cards per sheet) PEC: 32312(A) Comcode: 847065497 5 bbbbb Checklist of Parts (with PECs and Comcodes) b bbbbbbbbbbbbbbbbbbbbbbbbbbbbbbbbbbbbbbbbbbb The following quantities of 8411 button designation card (and telephone number card which fits under the handset) can be ordered: 8411 Button Designation Cards Package of six 8 1/2’’ by 11’’ cards, 67 sheets PEC: 31170 Comcode: 847065467 Package of tractor feed nine 8’’ by 17’’ cards, 34 sheets, to be used by LabelMaster PEC: 31170 Comcode: 846819530 The following PassageWayTM package contains PassageWay software, documentation, and cables for PassageWay connectivity: (This package can be ordered from the Customer Information Center at 1-800-432-6600.) PassageWay connection software, documentation, and cables PEC: 8302-800 Comcode: not yet assigned at time of printing PassageWay documentation can be ordered separately — PassageWay Solution User’s Guide for DEFINITY Communications System . (This document can be ordered from the Publications Fulfillment Center at 1-800-457-1235.) Comcode: 107149148 PFC Ordering Number: 560-201-102 b bbbbbb The 8434DX Voice Terminal Package The 8434DX voice terminal package includes the following items. Comcodes and PECs are included for ordering additional equipment. NOTE: The 8434DX voice terminal has two separate designation cards: on the left there is a 10-button ‘‘small’’ designation card, and on the right there is a 24-button ‘‘large’’ designation card. 8434DX (8434D02A) Voice Terminal Black 8434DX Set PEC: 3236-06B(A) * Comcode: 107239436 White 8434DX Set PEC: 3236-06W(A) * Comcode: 107239444 * NOTE: For ordering domestic voice terminals with English labels, use the attribute CTR15. For ordering voice terminals with international icons, use the attribute CTR98. 6 bbbbb Checklist of Parts (with PECs and Comcodes) b bbbbbbbbbbbbbbbbbbbbbbbbbbbbbbbbbbbbbbbbbbb K2S6 Handset Comcode: Black=107180549; White=107181471 Handset Cord (9-foot) Comcode: Black=105635429; White=105701809 Small Designation Card Cover PEC: 32309(A) Comcode: 846320216 Large Designation Card Cover PEC: 32314(A) Comcode: 847037553 Line Cord, D8W 8-conductor, 7-foot Comcode: 103786778 The 8434DX voice terminal comes with a deskstand and blank small and large designation card. The following quantities of 8434DX button designation cards can be ordered: Small 8434DX Button Designation Cards (for 10 buttons on left of terminal) Tractor Feed For 25 Sets, 3 Sheets (12 cards per sheet) PEC: 32310(A) Comcode: 847161817 Tractor Feed For 100 Sets, 9 Sheets (12 Cards per Sheet) PEC: 32311(A) Comcode: 847161916 Large 8434DX Button Designation Cards (for 24 buttons on right of terminal) Tractor Feed For 25 Sets, 13 Sheets (two cards per sheet) PEC: 32315(A) Comcode: 847141504 Tractor Feed For 100 Sets, 50 Sheets (two cards per sheet) PEC: 32316(A) Comcode: 847168747 7 bbbbb Checklist of Parts (with PECs and Comcodes) b bbbbbbbbbbbbbbbbbbbbbbbbbbbbbbbbbbbbbbbbbbb b bbbbbb Auxiliary Power Supplies for the 8400-Series Voice Terminals The following power supplies can be used with the 8400-Series voice terminals: Stand-alone MSP-1 (PEC: 2404-010; Comcode: 406743419) 1145A Bulk Power Supply (PEC: 2404-011; Comcode: 106448939) Battery for the 1145A (2.5 amp per hour battery) (Comcode: 106448921) 1145B1 Bulk Power Supply (PEC: 2404-010) Battery for the 1146B1 (2 amp battery = PEC: 24700; or 5 amp battery = PEC: 24701) KS-22911 L2 (replaced by the MSP-1 Power Supply) NOTE: This type of power supply cannot be used with the 8411 voice terminal. NOTE: The MSP-1 and the 1145B are global power supplies. It is recommended that the 1145A and the 1145B Bulk Power Supplies be used as auxiliary power for the 8411D and 8434DX voice terminals. These power supplies provide battery back-up, and therefore when power outages occur, the voice terminal display will continue to operate. 8 bbbbb b bbbbbbbbbbbbbbbbbbbbbbbbbbbbbbbbbbbbbbbbbbb Installing Your Voice Terminal bbbbbbbbbbbbbbbbbbbbbbbbbbbbbbbbbbbb b bbbbbb Wiring Information The 8400-Series voice terminals work in both 4-wire and 2-wire DCP configurations. Figure 1 shows an enlargement of a voice terminal 8-pin ‘‘LINE’’ jack. The table and figure below describe the pins on this jack and shows the 8-pin modular jack connections. 9 bbbbb Installing Your Voice Terminal b bbbbbbbbbbbbbbbbbbbbbbbbbbbbbbbbbbbbbbbbbbb bbbbbbbbbbbbbbbbbbbbb 12345678 bbbbbbbbbbbbbbbbbbbbbbbbbbbbbbbb Figure 1. A Voice Terminal Line Jack bbbbbbbbbbbbbbbbbbbbbbbbbbbbbbbbbbbbbbbbbbbbbbbbb c c LINE INTERFACE cbbbbbbbbbbbbbbbbbbbbbbbbbbbbbbbbbbbbbbbbbbbbbbbbbc c c PIN c PAIR c NAME c DESCRIPTION c c c b c c bbbbbbbbbbbbbbbbbbbbbbbbbbbbbbbbbbbbbbbbbbbbbbbb c c c c 1 c 2 OD1 4-Wire Output b c c c c c bbbbbbbbbbbbbbbbbbbbbbbbbbbbbbbbbbbbbbbbbbbbbbbb c OD2 c 4-Wire Output c c 2 c 2 b c c c c c bbbbbbbbbbbbbbbbbbbbbbbbbbbbbbbbbbbbbbbbbbbbbbbb c ID1 c 4-Wire Input c c 3 c 3 b c c c c c bbbbbbbbbbbbbbbbbbbbbbbbbbbbbbbbbbbbbbbbbbbbbbbb c U-T c 2-Wire (Tip) c c 4 c 1 b c c c c c bbbbbbbbbbbbbbbbbbbbbbbbbbbbbbbbbbbbbbbbbbbbbbbb c U-R c 2-Wire (Ring) c c 5 c 1 b c c c c c bbbbbbbbbbbbbbbbbbbbbbbbbbbbbbbbbbbbbbbbbbbbbbbb c ID2 c 4-Wire Input c c 6 c 3 b c c c c c bbbbbbbbbbbbbbbbbbbbbbbbbbbbbbbbbbbbbbbbbbbbbbbb c P1- c Adjunct Power –48V c c 7 c 4 b c c c c c bbbbbbbbbbbbbbbbbbbbbbbbbbbbbbbbbbbbbbbbbbbbbbbb c P2+ c Adjunct Power Common c c 8 c 4 c c c c cbbbbbbbbbbbbbbbbbbbbbbbbbbbbbbbbbbbbbbbbbbbbbbbbb 10 bbbbb Installing Your Voice Terminal b bbbbbbbbbbbbbbbbbbbbbbbbbbbbbbbbbbbbbbbbbbb bbbbbbbbbbbbbbbbbbbbbbbbbbbbbbbbbbbbbbbbbbbbbbbbbbbbbbbbbbbbbbbbbbbbb c c c c c c c c c FAILURE TO FOLLOW THESE INSTRUCTIONS CAN CAUSE c c DAMAGE TO THE TERMINAL OR CAUSE THE ASSOCIATED c c c PBX CIRCUIT PACK TO REMOVE POWER TO THE TERMINAL. c c c c IN EITHER CASE THE TERMINAL WILL NOT FUNCTION c CORRECTLY. c c c c The design of this product allows it to operate on either 2-wire or c c c 4-wire DCP circuits. In order for the terminal to function properly in c c c c either 2-wire or 4-wire installations, there must be NO c c INTERCONNECTIONS between the wire pairs used for 2-wire and c 4-wire operation. Bridging or paralleling of these pairs can result c c c in damage to the terminal or can cause the PBX circuit pack to c c remove power to the terminal. c c c c c c REMOVE ALL CONNECTIONS BETWEEN PAIRS BEFORE c c CONNECTING THE TERMINAL. c c c c For 2-wire operation, if you need to plug the voice terminal into c c a 4-pin or 6-pin wall jack, instead of a standard 8-pin modular c c c jack, refer to the ‘‘Line Interface’’ table below Figure 1 to c c c insure that the wires from the 4-pin or 6-pin wall jack are connected c c to the correct pins on the terminal ‘‘LINE’’ jack. c c c c 4-WIRE installations MUST ONLY have PBX connections on pair 2 c c c c and pair 3 and, if necessary, auxiliary power must be connected c c to pair 4. c c c c 2-WIRE installations MUST ONLY have PBX connections on pair 1 c c and, if necessary, auxiliary power must be connected to pair 4. c c c c c c This applies to all 8400 series voice terminals, the CALLMASTER III, c c and the 302B1 Attendant Console. c c c c bbbbbbbbbbbbbbbbbbbbbbbbbbbbbbbbbbbbbbbbbbbbbbbbbbbbbbbbbbbbbbbbbbbbb INSTALLATION WARNING 11 bbbbb Installing Your Voice Terminal b bbbbbbbbbbbbbbbbbbbbbbbbbbbbbbbbbbbbbbbbbbb b bbbbbb General Notes on Wiring and Installation Regardless of which configuration is in use, ALL wiring between the PBX and the terminal MUST consist of twisted-pairs, including the modular line cord. The line cord must be a D8W, which consists of four twisted-pairs, or an AT&T approved equivalent. Twisted-pair wiring is used to make lines less sensitive to crosstalk. Therefore, failure to use twisted pair wiring may result in less-than-optimum performance of the terminal and may also contribute to problems with the line. An 8-wire modular cord MUST be used for all 4-wire and any 2-wire installations requiring auxiliary power. You do NOT need to change any settings on the voice terminal for 2-wire or 4-wire installations. The voice terminal is able to detect whether it is in a 2-wire or a 4-wire configuration. b bbbbbb The 2-Wire/4-Wire Line Adapter The 2-wire/4-wire line adapter (PEC: 32302; Comcode: 407124114 for a single adapter; PEC: 32303 for a package of 25 adapters) is available to accommodate situations in which customers need to upgrade from an analog-type RJ11C jack to an 8-wire RJ45X-type jack. This adapter eliminates the need to remove RJ11C jacks which are presently being used and install new RJ45X jacks in their place. Please read the CAUTION statement directly below before beginning the installation. If all connections are correct, plug the adapter into the RJ11C jack to provide the proper wiring translation to the 8400-Series terminals. NOTE: This adapter works ONLY when using an 8400-Series terminal on a 2-wire 16-port (TN2181) digital line circuit card. It will NOT work if you are connecting an 8400-Series terminal to a 4-wire, 4-port, or 4-wire, 8-port DCP line circuit card (such as the TN754B, TN754, TN413, SN270B, or SN270). CAUTION: In previous installation of the premises line jacks, customers may have wired the jack connections as bridged or in parallel. These jacks must be rewired, at customer expense, in order for the 8400-Series terminals to function properly in either 2-wire or 4-wire installations. There must be NO INTERCONNECTIONS between the wire pairs used for 2-wire and 4-wire operations. Bridging or paralleling of these pairs can result in damage to 12 bbbbb Installing Your Voice Terminal b bbbbbbbbbbbbbbbbbbbbbbbbbbbbbbbbbbbbbbbbbbb the terminal or can cause the PBX line circuit card to remove power to the terminal. All interconnections between these pairs MUST BE REMOVED BEFORE the 8400-Series terminals are connected to the jack. b bbbbbb Auxiliary Power In both a 4-wire or 2-wire configuration, most of the 8400-Series voice terminals are phantom powered from the PBX. However, you will need auxiliary power in the following instances: If you are using an 8411 or 8434DX voice terminal NOTE: You must use auxiliary power with these sets. If you have an 801A Expansion Module connected to an 8434DX voice terminal (This expansion module can ONLY be used with the 8434DX connected to a DEFINITY G3V3.3 or later switch.) NOTE: If an 8434DX voice terminal with attached adjunct equipment is connected to an expansion module, it should be locally powered by an MSP-1. If this configuration is closet powered by an 1145A, two ports must be used. A KS-22911 L2 cannot be used in this situation. If there is attached adjunct equipment, such as an S201A Speakerphone, to any of the 8400-Series voice terminals For a list of possible auxiliary power supplies, see ‘‘Auxiliary Power Supplies for the 8400-Series Voice Terminals’’ earlier in this manual. b bbbbbb Distance Limitations In 4-wire operation, the voice terminal must be within 5,000 feet of the PBX using 22-gauge or 24-gauge wire, and within 4,000 feet of the PBX using 26-gauge wire. In 2-wire operation, the voice terminal must be within 5,500 feet (1676.4 meters) of the PBX using 22-gauge wire, within 3,500 feet (1066.8 meters) of the PBX using 24-gauge wire, and within 2,200 feet (670.56 meters) of the PBX using 26-gauge wire. 13 bbbbb Installing Your Voice Terminal b bbbbbbbbbbbbbbbbbbbbbbbbbbbbbbbbbbbbbbbbbbb b bbbbbb Desktop Installation The following instructions are for a desktop installation. If you are mounting the voice terminal on the wall, proceed to the next section, ‘‘Wall Installation.’’ 1. Turn the voice terminal face down on a flat surface. Then, use the following figures for installation. Figure 2 shows the bottom of the 8403 voice terminal. You can use this diagram for installing the 8403 or the 8410. However, note that the location of the routing channels on the 8410 differs slightly from the 8403. Also, the Handset jack on the 8410 is in a different location. Figure 3 shows the bottom of the 8411 voice terminal. NOTE: The rear of the 8411 set includes two jacks: the Analog Adjunct jack, for connecting answering machines, fax machines, PC or laptop data/fax modem cards, data sets or modems, audio teleconferencing equipment, and TTY machines commonly used by hearing impaired, and the RS-232-D Jack for connecting the voice terminal to a COM port on an IBM- compatible personal computer on which you can load PassageWay Solution software. For instructions on connecting hardware to these jacks, see ‘‘Connecting a Personal Computer and an Analog Adjunct to the 8411 Voice Terminal’’ which appears later in this manual. Figure 4 shows the bottom of the 8434DX voice terminal. This diagram can be used for installing the 8434DX. According to the 8400-Series model you are using, refer to these three figures for the location of the jacks referred to in the following steps. NOTE: If you are installing an 8410D voice terminal, refer to ‘‘Adjusting the 8410D Voice Terminal Desktop Stand’’ for choosing whether the desktop stand should be in the high or low position. On the 8411, decide whether you want the kickstand in the up or the down position. 2. For all voice terminals, snap one end of the line cord into the ‘‘LINE’’ jack and the adjunct cord (if applicable) into the Adjunct jack on the bottom of on all sets except the voice terminal. (The Adjunct jack is labeled the 8411, on which the jack is labeled ‘‘ADJUNCT.’’) For more information on installing adjuncts, refer to the section ‘‘Attaching Adjunct Equipment.’’ Important: If you are routing the cords on the 8410D voice terminal and the desktop stand is in the high position, you may need to place the cords through the long, rectangular opening that surrounds the jacks 14 bbbbb Installing Your Voice Terminal b bbbbbbbbbbbbbbbbbbbbbbbbbbbbbbbbbbbbbbbbbbb and plug the cords into the jacks BEFORE you insert the desktop stand onto the back of the voice terminal. NOTE: If you are routing cords on the 8411, lift the kickstand and place the cords under the kickstand. 3. For all sets, thread the line cord (and adjunct cord, if applicable) through the routing channel leading to the top of the desktop stand, as shown in Figure 2, Figure 3, or Figure 4, according to the type of terminal you are using. Make sure that each cord is placed securely under the square tabs in the routing channel. 4. If you are using an 8434DX with an attached 801A Expansion Module, plug the D6AP-87 cord, shipped with the expansion module, into the Expansion Module jack on the 8434DX (labeled ‘‘EX MOD’’) and then plug the free end of the cord into the jack on the expansion module. The cord should be threaded through the routing channels on the voice terminal. See Figure 4. For more detailed instructions on installing the expansion module to the 8434DX, use the instructions titled ‘‘801A Expansion Module Instruction Manual,’’ shipped with the expansion module. Important: An 801A Expansion Module can be used ONLY with an 8434DX voice terminal connected to a DEFINITY G3V3.3 or later switch. 5. For all voice terminals, snap one end of the coiled cord into the Handset ). On an 8403, thread the cord into the jack (this jack is labeled channel leading to the side edge of the voice terminal; the handset cord will then lead off the side of the voice terminal. WARNING: Do not insert the handset cord into the Adjunct jack. It may cause equipment damage. 15 bbbbb Installing Your Voice Terminal b bbbbbbbbbbbbbbbbbbbbbbbbbbbbbbbbbbbbbbbbbbb bbbbbbbbbbbbbbbbbbbbb Routing channel for line cord and adjunct cord Desktop stand AT&T Line jack MADE IN U.S.A. LINE Adjunct jack Location of handset jack on the 8410 ADJUNCT LISTED 91B0 R TELEPHONE EQUIPMENT R AT&T Handset jack MADE IN U.S.A. Handset cord routing channel bbbbbbbbbbbbbbbbbbbbbbbbbbbbbbbb Figure 2. Line, Adjunct, & Handset Cord Routing for Desktop Installation on the 8403 and 8410 Voice Terminals 16 bbbbb Installing Your Voice Terminal b bbbbbbbbbbbbbbbbbbbbbbbbbbbbbbbbbbbbbbbbbbb bbbbbbbbbbbbbbbbbbbbb Kickstand Routing channel for line cord and adjunct cord Line jack Handset jack Adjunct jack bbbbbbbbbbbbbbbbbbbbbbbbbbbbbbbb Figure 3. Line, Adjunct, and Handset Cord Routing for Desktop Installation on the 8411 Voice Terminal 17 bbbbb Installing Your Voice Terminal b bbbbbbbbbbbbbbbbbbbbbbbbbbbbbbbbbbbbbbbbbbb bbbbbbbbbbbbbbbbbbbbb Routing channel EX MOD Handset jack LINE LISTED 91B0 AT&T Adjunct jack R MADE IN U.S.A. TELEPHONE EQUIPMENT R ! USE ONLY WITH COMMUNICATION CIRCUIT POWER SOURCE Line Expansion module jack jack bbbbbbbbbbbbbbbbbbbbbbbbbbbbbbbb Figure 4. Line, Adjunct, Handset, & Expansion Module Cord Routing on the 8434DX Voice Terminals 6. Turn the voice terminal right side up, with the front facing you. 7. Snap the free end of the handset cord into the handset and place the handset in the cradle. 8. Snap the free end of the line cord into the modular wall jack. Notes: If you are installing an 8411 or 8434DX, connect the voice terminal line cord to the PHONE jack on the MSP-1 power supply and then connect a cord from the LINE jack on the MSP-1 to the wall jack. You can use a 2-wire/4-wire adapter to upgrade an analog-type RJ11C jack to an 8-wire RJ45X-type jack. For more information, see ‘‘The 2-Wire/4-Wire Line Adapter’’ earlier in this manual. Refer to the section, ‘‘Attaching Adjunct Equipment’’ later in this manual, for information about connecting any 8400-Series voice terminal to the wall jack when an adjunct is used. 18 bbbbb Installing Your Voice Terminal b bbbbbbbbbbbbbbbbbbbbbbbbbbbbbbbbbbbbbbbbbbb Refer to the sections, ‘‘Connecting a Personal Computer and an Analog Adjunct to the 8411 Voice Terminal,’’ later in this manual, for information about connecting a personal computer to an 8411 voice terminal for use with the AT&T PassageWay Solution software or connecting the 8411 voice terminal with analog equipment such as an answering machine, fax machine, or modem. 9. Lift the handset and listen for dial tone. If there is no dial tone, check all wire connections to make sure they are secure. Also, perform a self-test to see if the terminal is receiving power from the switch. (See ‘‘Using the Test Feature and the Diagnostics Feature’’ later in this manual.) bbbbbbbbbbbbbbb Adjusting the 8410D Voice Terminal Desktop Stand To ensure better display visibility on the 8410D set, the accompanying desktop stand can be installed in a high or low position. (When each of these voice terminals is shipped from the factory, the stand is in the low position.) Figure 5 shows you the set of tabs to use for each position. Check which position allows the user the best viewing angle of the display, and then use the following short procedure for installing the desktop stand in the selected position. To reinstall the desktop stand on the 8410D voice terminal for the low or the high position (See Figure 5.) 1. Place the lower desktop stand tab in the appropriate voice terminal tab slot. 2. Slowly lower the desktop stand until the top tab fits into the appropriate tab slot at the top of the voice terminal. You may need to press inward on the top of the desktop stand (see Figure 5) in order for the tab to fit into the slot. NOTE: As noted before, if you choose to install the desktop stand in the high position, you may need to pass the cords through the long, rectangular opening that surrounds the jacks and then plug the cords into the jacks BEFORE you place the stand on the back of the voice terminal. 19 bbbbb Installing Your Voice Terminal b bbbbbbbbbbbbbbbbbbbbbbbbbbbbbbbbbbbbbbbbbbb bbbbbbbbbbbbbbbbbbbbb Use these 2 tab slots for the high position Use these 2 tab slots for the low position Press inward Tab Tab Slots Slot bbbbbbbbbbbbbbbbbbbbbbbbbbbbbbbb Figure 5. Adjusting the 8410D Desktop Stand 20 bbbbb Installing Your Voice Terminal b bbbbbbbbbbbbbbbbbbbbbbbbbbbbbbbbbbbbbbbbbbb b bbbbbb Wall Installation Only the 8403 and 8410 voice terminals can be wall-mounted. The 8411 and 8434DX voice terminals CANNOT be wall-mounted. Use the following directions for wall-mounting the 8403 and 8410 voice terminals. NOTE: For wall-mounting these voice terminals, you need a 1-foot D8W line cord (not supplied with the voice terminal; Comcode: 103786760). 1. Make sure the 8-conductor wall mount plate is in place. 2. Press down on the handset retainer hook located under the handset and slide it toward the top of the voice terminal. See Figure 6. 3. Rotate the hook and slide it back into its slot so the bottom part now sticks out from the top. Snap the hook firmly into place. See Figure 6. 21 bbbbb Installing Your Voice Terminal b bbbbbbbbbbbbbbbbbbbbbbbbbbbbbbbbbbbbbbbbbbb bbbbbbbbbbbbbbbbbbbbb a. Handset retainer in place c. Rotate handset retainer 180 degrees. b. Press to release and then remove handset retainer. d. Replace handset retainer. 180° bbbbbbbbbbbbbbbbbbbbbbbbbbbbbbbb Figure 6. Reversing the Handset Hook 4. Place the voice terminal face down on a flat surface. 5. Remove the desktop stand which is attached to the base of the voice terminal by tabs on the top and bottom of the stand. See Figure 7. Press inward on the top of the stand until you can lift the top of the stand out of the tab slot on the voice terminal. Lift the bottom of the stand out of the lower tab slot. 22 bbbbb Installing Your Voice Terminal b bbbbbbbbbbbbbbbbbbbbbbbbbbbbbbbbbbbbbbbbbbb bbbbbbbbbbbbbbbbbbbbb Desktop stand Desk mount tab slot bbbbbbbbbbbbbbbbbbbbbbbbbbbbbbbb Figure 7. Removing the Desktop Stand 6. Snap the 1-foot line cord into the ‘‘LINE’’ jack in the back of the voice terminal. 7. Pass the 1-foot line cord through the channel, as shown in Figure 8. (Figure 8 shows the 8403 voice terminal.) Coil any remaining part of the cord and place it in one of the recesses on the back of the voice terminal. 23 bbbbb Installing Your Voice Terminal b bbbbbbbbbbbbbbbbbbbbbbbbbbbbbbbbbbbbbbbbbbb bbbbbbbbbbbbbbbbbbbbb Line cord routing channel for wall mount Line jack Handset jack Handset cord routing channel bbbbbbbbbbbbbbbbbbbbbbbbbbbbbbbb Figure 8. Line Cord Routing for Wall Mount 8. Snap one end of the coiled cord into the Handset jack (labeled ), as shown in Figure 8. On the 8403, thread the cord into the channel leading to the side edge of the voice terminal; the handset cord will then lead off the side of the voice terminal. WARNING: Do not insert the handset cord into the Adjunct jack. It may cause equipment damage. 9. Snap the free end of the 1-foot line cord into the wall jack. 10. Place the base of the voice terminal on the wall-jack mounting studs, and pull downward until it is secure, as shown in Figure 9. 24 bbbbb Installing Your Voice Terminal b bbbbbbbbbbbbbbbbbbbbbbbbbbbbbbbbbbbbbbbbbbb bbbbbbbbbbbbbbbbbbbbb bbbbbbbbbbbbbbbbbbbbbbbbbbbbbbbb Figure 9. Placing the Voice Terminal onto the Wall Jack Mounting Studs 11. Snap the free end of the handset cord into the handset and place the handset in the cradle. NOTE: The handset hook you repositioned will hold the handset in place. Lift the handset and listen for dial tone. If there is no dial tone, check all wire connections to make sure they are secure. Also, perform a self-test to see if the terminal is receiving power from the switch. (See ‘‘Using the Test Feature and the Diagnostics Feature’’ later in this manual.) 25 bbbbb Installing Your Voice Terminal b bbbbbbbbbbbbbbbbbbbbbbbbbbbbbbbbbbbbbbbbbbb b bbbbbb Attaching Adjunct Equipment If you are installing a speakerphone (models AT&T S101A, S201A, or QUORUM CS201A), a headset adapter (model AT&T 500A), or other adjunct that may be offered, follow these steps to connect the adjunct equipment to your voice terminal. NOTE: On the rear of the 8411 voice terminal, there are two jacks: the Analog Adjunct Jack for connecting analog equipment such as answering machines, fax machines, data sets or modems, or audio teleconferencing equipment, and a RS-232-D Jack for connecting the 8411 to an IBM-compatible personal computer for use with PassageWay software. For directions on connecting equipment to these jacks, see ‘‘Connecting a Personal Computer and an Analog Adjunct to the 8411 Voice Terminal’’ which appears later in this manual. The adjunct requires auxiliary power from either a local, individual power supply or a closet supply serving multiple phones. Refer to the adjunct’s installation documentation for its power requirements. 1. Place the voice terminal face down on a flat surface. 2. Snap the adjunct cord into the Adjunct jack (labeled , on all sets except the 8411, on which it is labeled ‘‘ADJUNCT’’) until you hear a click. See Figure 2 for the location of the Adjunct jack on the 8403 and 8410 voice terminals. See Figure 3 for the location of the Adjunct jack on the 8411 voice terminal. See Figure 4 for the location of the jack on the 8434DX voice terminal. 3. Refer to the ‘‘Desktop Installation’’ section for instructions on routing the adjunct cord through the channel. 4. Connect the free end of the adjunct cord to your speakerphone, headset adapter, or other adjunct. 5. Then, do one of the following: If auxiliary adjunct power is provided by a bulk closet supply, connect the line cord from the voice terminal to the wall jack. If a local, individual auxiliary power supply is being used, refer to Figure 10 for information about how to connect the telephone to the wall jack. NOTE: If the voice terminal is being used with the 4-wire 7400B Plus or 2-wire 8400B Plus data module, the telephone line cord connects to the Phone jack on the data module instead of to the wall jack. The Line connector on the data module is then connected to the wall jack or power supply. Refer to the 7400B Plus Data Module User’s Guide or the 8400B Plus Data Module User’s Guide for further information on using these data modules. 26 bbbbb Installing Your Voice Terminal b bbbbbbbbbbbbbbbbbbbbbbbbbbbbbbbbbbbbbbbbbbb bbbbbbbbbbbbbbbbbbbbb 84xx Terminal KS-22911 power supply D6AP Wall jack Line 400B2 ADJ D8W D8AC 84xx Terminal Ex Mod (8434DX) Wall jack D8W Line Line cord Line D6AP Expansion Module ADJ D8AC Other Phone Adjunct Adjunct MSP-1 power supply = Cord connections bbbbbbbbbbbbbbbbbbbbbbbbbbbbbbbb = Jack Figure 10. Connections for All Telephones with Adjuncts Using an Individual Power Supply 27 bbbbb Installing Your Voice Terminal b bbbbbbbbbbbbbbbbbbbbbbbbbbbbbbbbbbbbbbbbbbb b bbbbbb Connecting a Personal Computer and an Analog Adjunct to the 8411 Voice Terminal The rear of the 8411 voice terminal has two jacks (see Figure 11 and the explanations below the figure): bbbbbbbbbbbbbbbbbbbbb Analog Adjunct jack RS-232-D jack bbbbbbbbbbbbbbbbbbbbbbbbbbbbbbbb Figure 11. The Jacks on the Rear of the 8411 Voice Terminal The Analog Adjunct jack — for connecting answering machines, fax machines, PC or laptop data/fax modem cards, data sets or modems, audio teleconferencing equipment, and TTY machines commonly used by the hearing impaired. The RS-232-D Jack — for connecting the voice terminal to a COM port on an IBM- compatible personal computer on which you can load PassageWay Solution software. bbbbbbbbbbbbbbb Connecting the 8411 to a Personal Computer for PassageWay Applications The RS-232-D jack on your 8411 voice terminal provides you with a direct interface between an IBM-compatible personal computer and your DEFINITY switch. This connection with the PC allows you to access AT&T PassageWay Solution applications. To use the PassageWay software, you must have the following components: An IBM-PC compatible or PS/2 -compatible PC with the following hardware: — 28 An 80286 or higher processor (an 80386 or higher model number is recommended) bbbbb Installing Your Voice Terminal b bbbbbbbbbbbbbbbbbbbbbbbbbbbbbbbbbbbbbbbbbbb — An available serial port — A minimum of 2 MB of RAM (4 MB is recommended) — A 3.5-inch, 1.44 MB, high-density drive. (If you do not have a 3.5-inch drive, you can order PassageWay Solution on a 5.25-inch diskette.) — A hard disk with 2 MB of space available — A VGA monitor — A Windows-compatible pointing device (a mouse or trackball is recommended) Microsoft Windows 3.1 or later release running in standard or enhanced mode Your 8411 voice terminal must be connected to a DEFINITY Generic 1, Generic 2, or Generic 3, or System 75 or System 85. Important: In order for PassageWay to operate, your 8411 must have auxiliary power, either locally using a MSP-1 or remotely using an 1145B1 closet supply. Also, before you set up your PassageWay connection, you must know which COM port number (that is, COM1, COM2, COM3, or COM4) to which you are connecting your 8411 voice terminal. To connect your 8411 to the PassageWay PC: 1. Make sure that the PC is turned off. 2. Unplug the line cord from the modular wall jack or the MSP-1 power supply, if the line cord is already connected. 3. Connect one end of the 25-pin cord to the EIA jack on the rear of the 8411 voice terminal. 4. Connect the other end of the cord to the serial (COM) port on the PC. NOTE: You may need a 25-pin to 9-pin adapter in order to make this connection. 5. Connect, or reconnect, the line cord from the ‘‘LINE’’ jack on the voice terminal to the modular wall jack or to the MSP-1 power supply. 6. Turn on your PC. For information about installing and setting up the PassageWay software, see the section titled Installing and Setting Up PassageWay Solution in the PassageWayTM Solution User’s Guide For DEFINITY Communications System , 560-201-102. 29 bbbbb Installing Your Voice Terminal b bbbbbbbbbbbbbbbbbbbbbbbbbbbbbbbbbbbbbbbbbbb bbbbbbbbbbbbbbb Connecting an Analog Adjunct to the 8411 Voice Terminal Through the Analog Adjunct RJ11C jack on the rear of the set, the 8411 voice terminal provides connection with Analog Adjuncts such as answering machines, fax machines, PC or laptop data/fax modem cards, data sets or modems, audio teleconferencing equipment, and TTY machines commonly used by the hearing impaired. On System 75, System 85, and DEFINITY G1 and G2 switches and DEFINITY G3 systems prior to G3V4, Issue 3, the analog equipment shares the telephone line (or I1-Channel) with the voice terminal. Therefore, while the telephone is being used, you cannot use the Analog Adjunct at the same time, or vice versa. Beginning with DEFINITY G3V4, Issue 3, the 8411 and Analog Adjunct can use separate telephone lines (the I1-Channel and I2-Channel) and thus the voice terminal and the Analog Adjunct can be used simultaneously. To connect an Analog Adjunct to the 8411 1. Connect the line cord of the Analog Adjunct to the Analog Adjunct jack on the rear of the 8411 voice terminal. WARNING: Do NOT connect the Analog Adjunct to the wall jack. It will cause equipment damage. NOTE: At the DEFINITY G3V4, Issue 3, switch, the 8411 voice terminal must be optioned to use the appropriate DCP I-channel (either the I1-Channel or the I2-Channel). For administration of the 8411 with DEFINITY G3V4, Issue 3, and later switches, see ‘‘Administering the 8410 and 8411 Voice Terminal’’ later in this manual. bbbbbbbbbbbbbbb PassageWay and Analog Adjunct Status Indications on the 8411 The system manager may choose to administer Button #9 on the 8411 voice terminal, the next-to-last button in the second column, so that the lights next to these buttons show the status of the PassageWay connection (the PC can be connected to the RS-232-D jack on the rear of the 8411). Button #10, the last button in the second column, can be administered to monitor the status of the Analog Adjunct (this adjunct equipment can be connected to the Analog Adjunct jack on the rear of the 8411). See Figure 12 for the location of Buttons #9 and #10. 30 bbbbb Installing Your Voice Terminal b bbbbbbbbbbbbbbbbbbbbbbbbbbbbbbbbbbbbbbbbbbb NOTE: When the status indication feature is optioned, Button #9 is always used to monitor the PassageWay connection, and Button #10 is always used to monitor the Analog Adjunct. No other buttons on the 8411 can be used for these purposes. If these two buttons are not used for PassageWay and an Analog Adjunct, they can be used for switch features. bbbbbbbbbbbbbbbbbbbbb These lights are used for PassageWay status 1 6 2 7 3 8 4 9 5 10 These lights are used for Analog Adjunct status bbbbbbbbbbbbbbbbbbbbbbbbbbbbbbbb Figure 12. The location of Buttons #9 and #10 on the 8411 PassageWay Status Indications The 8411 provides the following status indications, next to Button #9 for the PassageWay connection: bbbbbbbbbbbbbbbbbbbbbbbbbbbbbbbbbbbbbbbbbbbbbbbbbbbbbbbb c c c c PassageWay Status c Green light c Red light c cbbbbbbbbbbbbbbbbbbbbbbbbbbbbbbbbbbbbbbbbbbbbbbbbbbbbbbbb bbbbbbbbbbbbbbbbbbbbbbbbbbbbbbbbbbbbbbbbbbbbbbbbbbbbbbbb c c c c c AT Command Mode c c c Off On cbbbbbbbbbbbbbbbbbbbbbbbbbbbbbbbbbbbbbbbbbbbbbbbbbbbbbbbb c c c c c c c PassageWay Mode On Off cbbbbbbbbbbbbbbbbbbbbbbbbbbbbbbbbbbbbbbbbbbbbbbbbbbbbbbbbb c c c bbbbbbbbbbbbbbbbbbbbbbbbbbbbbbbbbbbbbbbbbbbbbbbbbbbbbbb c c c c Flash* Flash c DCP Looparound c c c bc bbbbbbbbbbbbbbbbbbbbbbbbbbbbbbbbbbbbbbbbbbbbbbbbbbbbbbb c c c c Switch Link Down c c c Wink† Wink cbbbbbbbbbbbbbbbbbbbbbbbbbbbbbbbbbbbbbbbbbbbbbbbbbbbbbbbb c c c c c c c EIA Out-of-Sync Flash Off cbbbbbbbbbbbbbbbbbbbbbbbbbbbbbbbbbbbbbbbbbbbbbbbbbbbbbbbbb c c c bbbbbbbbbbbbbbbbbbbbbbbbbbbbbbbbbbbbbbbbbbbbbbbbbbbbbbb c c c c c Program Mode c c c On Flash cbbbbbbbbbbbbbbbbbbbbbbbbbbbbbbbbbbbbbbbbbbbbbbbbbbbbbbbb c c c * A Flash is a repeating pattern of 500 ms ON and 500 ms OFF. † A Wink is a repeating pattern of 750 ms ON and 250 ms OFF. 31 bbbbb Installing Your Voice Terminal b bbbbbbbbbbbbbbbbbbbbbbbbbbbbbbbbbbbbbbbbbbb Analog Adjunct Status Indications The 8411 uses the GREEN and the RED lights next to Button #10 to provide the following status indications for the Analog Adjunct connection. bbbbbbbbbbbbbbbbbbbbbbbbbbbbbbbbbbbbbbbbbbbbbbbbbbbbbbbbbbbbbbbbbbbbbbbbbbbbbbbbbbbb c c c c Analog Adjunct Status Green Light Red Light cbbbbbbbbbbbbbbbbbbbbbbbbbbbbbbbbbbbbbbbbbbbbbbbbbbbbbbbbbbbbbbbbbbbbbbbbbbbbbbbbbbbb c c c c c c c c The Analog Adjunct is off-hook c c c On cbbbbbbbbbbbbbbbbbbbbbbbbbbbbbbbbbbbbbbbbbbbbbbbbbbbbbbbbbbbbbbbbbbbbbbbbbbbbbbbbbbbb c c c c The Analog Adjunct is on-hook and idle c c c Off cbbbbbbbbbbbbbbbbbbbbbbbbbbbbbbbbbbbbbbbbbbbbbbbbbbbbbbbbbbbbbbbbbbbbbbbbbbbbbbbbbbbb c c c c c c c Flash c The voice terminal is sending a c c c c ringing signal to the Analog Adjunct c c c cbbbbbbbbbbbbbbbbbbbbbbbbbbbbbbbbbbbbbbbbbbbbbbbbbbbbbbbbbbbbbbbbbbbbbbbbbbbbbbbbbbbb c c c c c c c The Analog Adjunct is using the telephone line On c c c c bbbbbbbbbbbbbbbbbbbbbbbbbbbbbbbbbbbbbbbbbbbbbbbbbbbbbbbbbbbbbbbbbbbbbbbbbbbbbbbbbbbb c c c c c The 8411 voice terminal is using the telephone line c c c Off c c c c c (that is, the Analog Adjunct is NOT using c c c c the I-Channel) c c c cc bbbbbbbbbbbbbbbbbbbbbbbbbbbbbbbbbbbbbbbbbbbbbbbbbbbbbbbbbbbbbbbbbbbbbbbbbbbbbbbbbbbb cc cc cc NOTE: The flash indication has priority over the on-hook and off-hook indications listed immediately above. NOTE: When the 8411 is programmed for the Analog Adjunct to use a separate telephone line (that is, the I2-Channel), the red light is always on. 32 bbbbb b bbbbbbbbbbbbbbbbbbbbbbbbbbbbbbbbbbbbbbbbbbb Labeling the Designation Card bbbbbbbbbbbbbbbbbbbbbbbbbbbbbbbbbbbb The designation card is a removable card placed behind a transparent protective cover on which the user can type or print call appearance or feature assignments. In most cases, the voice terminal’s designation card is filled out before the user begins to use the set. Do not discard the blank button designation card. Instead, if there is a preprinted designation card, place it over the blank button designation card which comes with the voice terminal. The blank designation card can then be used as a substitute if, in the future, there are changes in features, telephone numbers, or extension assignments on the voice terminal. b bbbbbb The following information describes the designation card(s) for each voice terminal and explains how the cards are to be filled out, if necessary, and reinstalled under the plastic cover. For the 8403 Voice Terminal The designation card for the 8403 voice terminal consists of two sections: The Feature Directory section — Provides a convenient quick reference bbbbbbb Feature list for 12 features. (These features can be accessed by pressing cbbbbbbbc and then entering the number assigned to the feature, 1 through 9, or 0, or the character ∗ or #.) The system manager or user can print the name of the feature next to F1 through F9, F∗, F0 and F#. The Call Appearance section — Sections a, b, and c are provided for noting the telephone number or extension of your voice terminal. To label the card, use the instructions under ‘‘How to Label the Blank Designation Card’’ later in this section. 33 bbbbb Labeling the Designation Card b bbbbbbbbbbbbbbbbbbbbbbbbbbbbbbbbbbbbbbbbbbb b bbbbbb For the 8410 and 8411 Voice Terminals The Call Appearance/Feature Button Designation Card on the 8410 and 8411 voice terminals contains 10 spaces labeled a through j for specifying the telephone number, extension, or feature assigned to each button. To label the card, use the instructions under ‘‘How to Label the Blank Designation Card’’ on the next page. Notes: On the 8411, you may also label the telephone number card and place it under the telephone number card cover located beneath the handset. b bbbbbb Also, if the Analog Adjunct connected to the 8411 uses the I2-Channel, the telephone number of the Analog Adjunct should be written or typed on the button label next to Button #10 (labeled j). For the 8434DX Voice Terminal There are two Call Appearance/Feature Button Designation Cards on the 8434DX voice terminals: The smaller card contains two columns with five buttons in each column: the first column is labeled a through e; the second column is labeled f through j. The larger card also contains two columns with 12 buttons in each column. The button labels on this larger card are blank; that is, they are NOT prelabeled with letters like the smaller card. The four columns on either the 8434DX voice terminal, totaling 34 button spaces, can be used for specifying the telephone number, extension, or feature assigned to each button. To label the card, use the instructions under ‘‘How to Label the Blank Designation Card’’ on the next page. 34 bbbbb Labeling the Designation Card b bbbbbbbbbbbbbbbbbbbbbbbbbbbbbbbbbbbbbbbbbbb b bbbbbb How to Label the Blank Designation Card To label the designation card, do the following: NOTE: Be sure to print the voice terminal’s full telephone number, including the area code, on the first call appearance button. 1. The transparent cover is attached to the frame of the voice terminal by tabs on the top and bottom of the cover. To remove the cover, pull the top tab forward and lift the bottom of the transparent cover from the voice terminal. 2. Remove the card. 3. Print or type the desired labels on the blank designation card. On the 8403, print or type the assigned features on your Feature Directory next to the appropriate number or character, and print or type the voice terminal user’s extension in Sections a, b, and c. On the 8410, 8411, or 8434DX, print or type the voice terminal user’s extension on the call appearance buttons and the assigned features on the feature buttons. 4. Once you have placed the designation card(s) on the voice terminal, you can replace the transparent cover by inserting the tabs at the bottom and then pressing the top down until it clicks. 35 bbbbb Labeling the Designation Card b bbbbbbbbbbbbbbbbbbbbbbbbbbbbbbbbbbbbbbbbbbb 36 bbbbb b bbbbbbbbbbbbbbbbbbbbbbbbbbbbbbbbbbbbbbbbbbb Switch Administration bbbbbbbbbbbbbbbbbbbbbbbbbbbbbbbbbbbb b bbbbbb Programming the Terminal´s Transmission and Softkey Parameters The following applies to 8400-Series voice terminals installed in a DEFINITY G3V3 (or later) system: The 8400-Series voice terminals have programmable voice and Touch Tone transmission parameters that must be set to the correct values in order for the terminals to operate within the required limits of the installation. For installations within the United States (or other sites that use the U.S. transmission limits), no further action is required by the system manager since the terminals and the switch will default automatically to the proper limits (assuming the terminals have not been previously programmed with other transmission parameters). For installations using a non-U.S. transmission plan, the terminals must be programmed with the correct parameters before being placed into service. The ‘‘change terminal-parameters’’ command should be used to select the desired transmission parameters. Then, as each terminal is administered and installed, it will automatically be programmed with the selected parameters. A replacement terminal that has not been pre-programmed with the proper transmission parameters should not be placed into service until it has been programmed with the administered transmission parameters. This can be accomplished by doing one of the following: From the system maintenance console, enter the command ‘‘busyout station’’ followed by ‘‘release station.’’ 37 bbbbb Switch Administration b bbbbbbbbbbbbbbbbbbbbbbbbbbbbbbbbbbbbbbbbbbb Dial the ‘‘Refresh Terminal Parameters’’ feature access code from the terminal (or from another terminal that is already in service, specifying the desired terminal to be programmed). The system indicates a successful program operation by turning on the first three green call appearance lights on the programmed set. On new DEFINITY G3V3 (or later) systems, the terminals will automatically be programmed with the administered transmission parameters shortly after system initialization. The program status of a terminal can be determined by using the ‘‘status station’’ command and noting the contents of the ‘‘download status’’ field. The ‘‘busyout station’’ and/or ‘‘release station’’ commands can be used to force the administered transmission parameters (and softkey features for the 8410D, 8411D, and 8434DX) to be sent to the terminal immediately. A terminal that has not been programmed with the proper parameters may experience incorrect volume levels while on a call, incorrect Touch Tone levels while placing a call, or incorrect softkey labels. If incorrect parameters are suspected, use the ‘‘busyout station’’ and/or ‘‘release station’’ commands to force the currently administered parameters to be sent to the terminal. The ‘‘status station’’ command should then be used to verify that the ‘‘download status’’ field indicates the parameters were successfully downloaded. All 8400-Series terminals are checked each day by the switch (during scheduled maintenance) to ensure they are operating with the currently-administered transmission parameters. If the switch detects an incorrectly-programmed terminal, it will automatically send the correct parameters to the terminal. Note that softkey labels are not checked by the switch and will not be automatically corrected. Use the ‘‘busyout station’’ and/or ‘‘release station’’ commands to manually correct the softkey labels on a particular terminal. 38 bbbbb Switch Administration b bbbbbbbbbbbbbbbbbbbbbbbbbbbbbbbbbbbbbbbbbbb b bbbbbb Circuit Packs Used for the 8400-Series Sets The following circuit packs can be used with all of the 8400-Series sets. bbbbbbbbbbbbbbbbbbbbbbbbbbbbbbbbbbbbbbbbbbbbbbbbbbbbbbbbbbbbbbbbbbbbb c c c c Circuit Pack 2/4-Wire Will support these switches c cbbbbbbbbbbbbbbbbbbbbbbbbbbbbbbbbbbbbbbbbbbbbbbbbbbbbbbbbbbbbbbbbbbbbb c c c c c c TN2181 - 16-port 2-wire cbbbbbbbbbbbbbbbbbbbbbbbbbbbbbbbbbbbbbbbbbbbbbbbbbbbbbbbbbbbbbbbbbbbbb c c G3V2, G3V3 or later c c c c c c TN754b - 8-port c c All switches except System 85 c 4-wire cbbbbbbbbbbbbbbbbbbbbbbbbbbbbbbbbbbbbbbbbbbbbbbbbbbbbbbbbbbbbbbbbbbbbb c c c c TN754* - 8-port c c All switches except System 85 c 4-wire cbbbbbbbbbbbbbbbbbbbbbbbbbbbbbbbbbbbbbbbbbbbbbbbbbbbbbbbbbbbbbbbbbbbbb c c c c c c c TN413 8-port 4-wire International System 75 cbbbbbbbbbbbbbbbbbbbbbbbbbbbbbbbbbbbbbbbbbbbbbbbbbbbbbbbbbbbbbbbbbbbbb c c c c c c c c SN 270 or c c c c SN 270B - 4-port c c System 85 R2V2 - R2V4 c 4-wire c bbbbbbbbbbbbbbbbbbbbbbbbbbbbbbbbbbbbbbbbbbbbbbbbbbbbbbbbbbbbbbbbbbbbb c c c * G3V3 will support the 8403, 8410, and 8434DX voice terminals in the Native Mode with the TN754 V11 or later packs. G3V3 with TN754 V10 and earlier packs must alias these terminals as 7400-Series terminals. b bbbbbb A Note on Bulk Administration and on LABELMASTER All the 8400-Series voice terminals can be used with LABELMASTER, Issue 3.1 and later. The sets can be bulk-administered with the following (all allow aliased support only): G3MA (used with G1, G3, G3V2, G3V3, and GD’91) SATPC (used with System 75 and International System 75) MGR IV (used with G2.1 and G2.2) CSM, MAAP (used with System 85) 39 bbbbb Switch Administration b bbbbbbbbbbbbbbbbbbbbbbbbbbbbbbbbbbbbbbbbbbb b bbbbbb Administering the 8403 Voice Terminal Use the following table for administering the 8403 voice terminal: bbbbbbbbbbbbbbbbbbbbbbbbbbbbbbbbbbbbbbbbbbbbbbbbbbbbbbbbbbbbbbbbbbbbbbbbb c c Administering the 8403 Voice Terminal cbbbbbbbbbbbbbbbbbbbbbbbbbbbbbbbbbbbbbbbbbbbbbbbbbbbbbbbbbbbbbbbbbbbbbbbbb c c c c c c c If you have c and this c (which can c administer c c this System c c Release c support this c the 8403 c c c c type of operation) c as a cbbbbbbbbbbbbbbbbbbbbbbbbbbbbbbbbbbbbbbbbbbbbbbbbbbbbbbbbbbbbbbbbbbbbbbbbb c c c c c c c c c System 75 R1V1 — R1V3 4-wire only 7405 cbbbbbbbbbbbbbbbbbbbbbbbbbbbbbbbbbbbbbbbbbbbbbbbbbbbbbbbbbbbbbbbbbbbbbbbbb c c c c c c c c c R2V2 — R2V4 c 4-wire only 7405 c System 85 c c c bc bbbbbbbbbbbbbbbbbbbbbbbbbbbbbbbbbbbbbbbbbbbbbbbbbbbbbbbbbbbbbbbbbbbbbbbb c c c c c Internat’l System 75 c IR1V4, etc. c c 4-wire only c 7405 cbbbbbbbbbbbbbbbbbbbbbbbbbbbbbbbbbbbbbbbbbbbbbbbbbbbbbbbbbbbbbbbbbbbbbbbbb c c c c c DEFINITY G1 c c c 4-wire only c 7405 cbbbbbbbbbbbbbbbbbbbbbbbbbbbbbbbbbbbbbbbbbbbbbbbbbbbbbbbbbbbbbbbbbbbbbbbbb c c c c c c c c 4-wire only c 7405 Global DEFINITY ’91 cbbbbbbbbbbbbbbbbbbbbbbbbbbbbbbbbbbbbbbbbbbbbbbbbbbbbbbbbbbbbbbbbbbbbbbbbb c c c c c c c c c c DEFINITY G2V1 c c c 4-wire only c 7405 bbbbbbbbbbbbbbbbbbbbbbbbbbbbbbbbbbbbbbbbbbbbbbbbbbbbbbbbbbbbbbbbbbbbbbbbb c c c c c cbbbbbbbbbbbbbbbbbbbbbbbbbbbbbbbbbbbbbbbbbbbbbbbbbbbbbbbbbbbbbbbbbbbbbbbbb c DEFINITY G2V2 c c 4-wire only c 7405 c c c c c c DEFINITY G3i, G3r, c c c c c G3s, G3vs c c c 4-wire only c 7405 bc bbbbbbbbbbbbbbbbbbbbbbbbbbbbbbbbbbbbbbbbbbbbbbbbbbbbbbbbbbbbbbbbbbbbbbbb c c c c c c c c 2- or 4-wire c 7405 DEFINITY G3V2 cbbbbbbbbbbbbbbbbbbbbbbbbbbbbbbbbbbbbbbbbbbbbbbbbbbbbbbbbbbbbbbbbbbbbbbbbb c c c c c c c c c c DEFINITY G3V3 c c c c c or later c cc cc 2- or 4-wire cc 8403 cbbbbbbbbbbbbbbbbbbbbbbbbbbbbbbbbbbbbbbbbbbbbbbbbbbbbbbbbbbbbbbbbbbbbbbbbb c Figure 13 shows the button numbering schemes for administering the 8403 voice terminal to a System 75 or DEFINITY Generic 1 or Generic 3. Figure 14 shows the button numbering scheme for administering the 8403 voice terminal to a System 85 or DEFINITY Generic 2. NOTE: On the voice terminals in the diagrams, both numbers and letters are printed on the dial pad keys. However, on some voice terminals only numbers appear on these keys. NOTE: The 8403 can be administered as itself ONLY IF it is connected to a DEFINITY G3V3 (or later) switch. 40 bbbbb Switch Administration b bbbbbbbbbbbbbbbbbbbbbbbbbbbbbbbbbbbbbbbbbbb bbbbbbbbbbbbbbbbbbbbb If administered as a 7405D, F1 through F7 are administered as “BUTTON ASSIGNMENTS” 4 through 10. F8, F9, F , F0, and F# are * administered as "FEATURE BUTTON ASSIGNMENTS" 1 through 5. If administered as itself, administer F1 through F9, F , * F0 and F# as "FEATURE BUTTON ASSIGNMENTS" 1 through 12. 8403 F F F F F F 4 5 6 7 8 9 1 2 3 4 5 6 1 Call appearance buttons a, b, and c are administered as call appearance “BUTTON ASSIGNMENTS” 1, 2, and 3. F F F F F F 2 7 8 9 * 0 # 10 1 2 3 4 5 3 Message bbbbbbbbbbbbbbbbbbbbbbbbbbbbbbbb Figure 13. Button Numbering Scheme for Administering the 8403 Voice Terminal Connected to System 75 or DEFINITY Generic 1 or Generic 3 41 bbbbb Switch Administration b bbbbbbbbbbbbbbbbbbbbbbbbbbbbbbbbbbbbbbbbbbb bbbbbbbbbbbbbbbbbbbbb If administered as a 7405D, F1 through F7 are administered as “BUTTON ASSIGNMENTS” 6 through 12. F8, F9, F , F0, and F# are * administered as "FEATURE BUTTON ASSIGNMENTS" 13 through 17. If administered as itself, administer F1 through F9, F * F0, and F# as "FEATURE BUTTON ASSIGNMENTS" 1 through 12. 8403 F F F F F F 6 7 8 9 10 11 1 2 3 4 5 6 3 Call appearance buttons a, b, and c are administered as call appearance “BUTTON ASSIGNMENTS” 3, 4, and 5. F F F F F F 4 7 8 9 * 0 # 12 13 14 15 16 17 5 Message bbbbbbbbbbbbbbbbbbbbbbbbbbbbbbbb Figure 14. Button Numbering Scheme for Administering the 8403 Voice Terminal Connected to System 85 or DEFINITY Generic 2 42 bbbbb Switch Administration b bbbbbbbbbbbbbbbbbbbbbbbbbbbbbbbbbbbbbbbbbbb b bbbbbb Administering the 8410 and 8411 Voice Terminals There are two types of 8410 and 8411 voice terminals: the 8410B and the 8411B are basic sets without a display. The 8410D and the 8411D have displays. Use the following tables for administering the 8410B, 8410D, 8411B, and 8411D voice terminals (BE SURE to use the administration table for the voice terminal you are using): bbbbbbbbbbbbbbbbbbbbbbbbbbbbbbbbbbbbbbbbbbbbbbbbbbbbbbbbbbbbbbbbbbbbbbbbb c c Administering the 8410B Voice Terminal cbbbbbbbbbbbbbbbbbbbbbbbbbbbbbbbbbbbbbbbbbbbbbbbbbbbbbbbbbbbbbbbbbbbbbbbbb c c c c c c c If you have c and this c (which can c administer c c this System c Release c support this c the 8410B c c c c c type of operation) c as a cbbbbbbbbbbbbbbbbbbbbbbbbbbbbbbbbbbbbbbbbbbbbbbbbbbbbbbbbbbbbbbbbbbbbbbbbb c c c c c c c c c System 75 R1V1 — R1V3 4-wire only 7403D cbbbbbbbbbbbbbbbbbbbbbbbbbbbbbbbbbbbbbbbbbbbbbbbbbbbbbbbbbbbbbbbbbbbbbbbbb c c c c c c c c c c System 85 c c R2V2 — R2V4 c 4-wire only c 7403D bc bbbbbbbbbbbbbbbbbbbbbbbbbbbbbbbbbbbbbbbbbbbbbbbbbbbbbbbbbbbbbbbbbbbbbbbb c c c c c Internat’l System 75 c IR1V4, etc. c c 4-wire only c 7403D bc bbbbbbbbbbbbbbbbbbbbbbbbbbbbbbbbbbbbbbbbbbbbbbbbbbbbbbbbbbbbbbbbbbbbbbbb c c c c c DEFINITY G1 c c c 4-wire only c 7403D cbbbbbbbbbbbbbbbbbbbbbbbbbbbbbbbbbbbbbbbbbbbbbbbbbbbbbbbbbbbbbbbbbbbbbbbbb c c c c c c c c c Global DEFINITY ’91 4-wire only 7410D cbbbbbbbbbbbbbbbbbbbbbbbbbbbbbbbbbbbbbbbbbbbbbbbbbbbbbbbbbbbbbbbbbbbbbbbbb c c c c c c c c c 4-wire only 7410D c DEFINITY G2V1 c c c bbbbbbbbbbbbbbbbbbbbbbbbbbbbbbbbbbbbbbbbbbbbbbbbbbbbbbbbbbbbbbbbbbbbbbbbbc c c c c c c DEFINITY G2V2 c c 4-wire only c 7410 Plus c cbbbbbbbbbbbbbbbbbbbbbbbbbbbbbbbbbbbbbbbbbbbbbbbbbbbbbbbbbbbbbbbbbbbbbbbbb c c c c c DEFINITY G3i, G3r, c c c c c c c c 4-wire only c 7410D G3s, G3vs cbbbbbbbbbbbbbbbbbbbbbbbbbbbbbbbbbbbbbbbbbbbbbbbbbbbbbbbbbbbbbbbbbbbbbbbbb c c c c c c c c c DEFINITY G3V2 cbbbbbbbbbbbbbbbbbbbbbbbbbbbbbbbbbbbbbbbbbbbbbbbbbbbbbbbbbbbbbbbbbbbbbbbbb c c 2- or 4-wire c 7410 Plus c c c c c c c DEFINITY G3V3 c c c c c or later c c c 2- or 4-wire c 8410B cbbbbbbbbbbbbbbbbbbbbbbbbbbbbbbbbbbbbbbbbbbbbbbbbbbbbbbbbbbbbbbbbbbbbbbbbb c c c c NOTE: The 8410B can be administered as itself ONLY IF it is connected to a DEFINITY G3V3 (or later) switch. 43 bbbbb Switch Administration b bbbbbbbbbbbbbbbbbbbbbbbbbbbbbbbbbbbbbbbbbbb bbbbbbbbbbbbbbbbbbbbbbbbbbbbbbbbbbbbbbbbbbbbbbbbbbbbbbbbbbbbbbbbbbbbbbbbb c c Administering the 8410D Voice Terminal cbbbbbbbbbbbbbbbbbbbbbbbbbbbbbbbbbbbbbbbbbbbbbbbbbbbbbbbbbbbbbbbbbbbbbbbbb c c c c c c c If you have c and this c (which can c administer c c this System c Release c support this c the 8410D c c c c c type of operation) c as a cbbbbbbbbbbbbbbbbbbbbbbbbbbbbbbbbbbbbbbbbbbbbbbbbbbbbbbbbbbbbbbbbbbbbbbbbb c c c c c System 75 c R1V1 — R1V3 c 4-wire only c 7405D+D c bc bbbbbbbbbbbbbbbbbbbbbbbbbbbbbbbbbbbbbbbbbbbbbbbbbbbbbbbbbbbbbbbbbbbbbbbb c c c c c System 85 c R2V2 — R2V4 c 4-wire only c 7405D+D c cbbbbbbbbbbbbbbbbbbbbbbbbbbbbbbbbbbbbbbbbbbbbbbbbbbbbbbbbbbbbbbbbbbbbbbbbb c c c c c Internat’l System 75 c IR1V4, etc. c 4-wire only c 7405D+D c bc bbbbbbbbbbbbbbbbbbbbbbbbbbbbbbbbbbbbbbbbbbbbbbbbbbbbbbbbbbbbbbbbbbbbbbbb c c c c c DEFINITY G1 c R1V4 c 4-wire only c 7405D+D c cbbbbbbbbbbbbbbbbbbbbbbbbbbbbbbbbbbbbbbbbbbbbbbbbbbbbbbbbbbbbbbbbbbbbbbbbb c c c c c Global DEFINITY ’91 c c 4-wire only c 7405D+D c bc bbbbbbbbbbbbbbbbbbbbbbbbbbbbbbbbbbbbbbbbbbbbbbbbbbbbbbbbbbbbbbbbbbbbbbbb c c c c c DEFINITY G2V1 c c 4-wire only c 7405D+D c bc bbbbbbbbbbbbbbbbbbbbbbbbbbbbbbbbbbbbbbbbbbbbbbbbbbbbbbbbbbbbbbbbbbbbbbbb c c c c c DEFINITY G2V2 c c 4-wire only c 7405D+D c bc bbbbbbbbbbbbbbbbbbbbbbbbbbbbbbbbbbbbbbbbbbbbbbbbbbbbbbbbbbbbbbbbbbbbbbbb c c c c c DEFINITY G3i, G3r, c c c c c G3s, G3vs c c 4-wire only c 7405D+D c cbbbbbbbbbbbbbbbbbbbbbbbbbbbbbbbbbbbbbbbbbbbbbbbbbbbbbbbbbbbbbbbbbbbbbbbbb c c c c c DEFINITY G3V2 c c 2- or 4-wire c 7405D+D c cbbbbbbbbbbbbbbbbbbbbbbbbbbbbbbbbbbbbbbbbbbbbbbbbbbbbbbbbbbbbbbbbbbbbbbbbb c c c c c DEFINITY G3V3 c c c c c c c c 2- or 4-wire c 8410D or later cbbbbbbbbbbbbbbbbbbbbbbbbbbbbbbbbbbbbbbbbbbbbbbbbbbbbbbbbbbbbbbbbbbbbbbbbb c c c c NOTE: As noted in the above table, an 8410D aliased as a 7405 voice terminal must be administered as a 7405+D, that is, with Display Module. On the administration page, type a ‘‘y’’ (for Yes) on the blank next to ‘‘Display?’’ NOTE: The 8410D can be administered as itself ONLY IF it is connected to a DEFINITY G3V3 (or later) switch. 44 bbbbb Switch Administration b bbbbbbbbbbbbbbbbbbbbbbbbbbbbbbbbbbbbbbbbbbb bbbbbbbbbbbbbbbbbbbbbbbbbbbbbbbbbbbbbbbbbbbbbbbbbbbbbbbbbbbbbbbbbbbbbbbbbbbbb c c Administering the 8411B Voice Terminal cbbbbbbbbbbbbbbbbbbbbbbbbbbbbbbbbbbbbbbbbbbbbbbbbbbbbbbbbbbbbbbbbbbbbbbbbbbbbb c c c c c c c If you have c and this c (which can c administer c c this System c Release c support this c the 8411B c c c c c type of operation) c as a cbbbbbbbbbbbbbbbbbbbbbbbbbbbbbbbbbbbbbbbbbbbbbbbbbbbbbbbbbbbbbbbbbbbbbbbbbbbbb c c c c c c c c c System 75 R1V1 — R1V3 4-wire only 7403D cbbbbbbbbbbbbbbbbbbbbbbbbbbbbbbbbbbbbbbbbbbbbbbbbbbbbbbbbbbbbbbbbbbbbbbbbbbbbb c c c c c c c c c c System 85 c c R2V2 — R2V4 c 4-wire only c 7403D bc bbbbbbbbbbbbbbbbbbbbbbbbbbbbbbbbbbbbbbbbbbbbbbbbbbbbbbbbbbbbbbbbbbbbbbbbbbbb c c c c c Internat’l System 75 c c IR1V4, etc. c 4-wire only c 7403D cbbbbbbbbbbbbbbbbbbbbbbbbbbbbbbbbbbbbbbbbbbbbbbbbbbbbbbbbbbbbbbbbbbbbbbbbbbbbb c c c c c DEFINITY G1 c c c 4-wire only c 7403D cbbbbbbbbbbbbbbbbbbbbbbbbbbbbbbbbbbbbbbbbbbbbbbbbbbbbbbbbbbbbbbbbbbbbbbbbbbbbb c c c c c c c c 4-wire only c 7410D Global DEFINITY ’91 cbbbbbbbbbbbbbbbbbbbbbbbbbbbbbbbbbbbbbbbbbbbbbbbbbbbbbbbbbbbbbbbbbbbbbbbbbbbbb c c c c c c c c c c DEFINITY G2V1 c c c 4-wire only c 7410D bbbbbbbbbbbbbbbbbbbbbbbbbbbbbbbbbbbbbbbbbbbbbbbbbbbbbbbbbbbbbbbbbbbbbbbbbbbbb c c c c c c DEFINITY G2V2 c c 4-wire only c 7410 Plus c bc bbbbbbbbbbbbbbbbbbbbbbbbbbbbbbbbbbbbbbbbbbbbbbbbbbbbbbbbbbbbbbbbbbbbbbbbbbbbc c c c c DEFINITY G3i, G3r, c c c c c c c c c G3s, G3vs 4-wire only 7410D cbbbbbbbbbbbbbbbbbbbbbbbbbbbbbbbbbbbbbbbbbbbbbbbbbbbbbbbbbbbbbbbbbbbbbbbbbbbbb c c c c c c c c c c DEFINITY G3V2 c c 2- or 4-wire c 7410 Plus c bbbbbbbbbbbbbbbbbbbbbbbbbbbbbbbbbbbbbbbbbbbbbbbbbbbbbbbbbbbbbbbbbbbbbbbbbbbbb c c c c c c DEFINITY G3V3 and c c c c c G3V4, Issue 1 & 2 c c c 2- or 4-wire c 8410B cbbbbbbbbbbbbbbbbbbbbbbbbbbbbbbbbbbbbbbbbbbbbbbbbbbbbbbbbbbbbbbbbbbbbbbbbbbbbb c c c c c c c c c c DEFINITY G3V4, Issue 3 c c c c c and later c c c 2- or 4-wire c 8411B bc bbbbbbbbbbbbbbbbbbbbbbbbbbbbbbbbbbbbbbbbbbbbbbbbbbbbbbbbbbbbbbbbbbbbbbbbbbbb c c c c c DEFINITY G3V5 c c c 2- or 4-wire c 8411B cbbbbbbbbbbbbbbbbbbbbbbbbbbbbbbbbbbbbbbbbbbbbbbbbbbbbbbbbbbbbbbbbbbbbbbbbbbbbb c c c c Notes on 8411 Administration (if used with DEFINITY G3V4, Issue 3, or later): The 8411B can be administered as itself ONLY IF it is connected to a DEFINITY G3V4, Issue 3, (or later) switch. In Native Mode the voice terminal is administered through a digital line circuit card with a line number (with the usual three call appearances) assigned to the I1-Channel. A second line number can be administered through the same digital line card on the I2-Channel, but this line number can only be used for Analog Adjuncts connected to the Analog Adjunct jack on the 8411. This Analog Adjunct is assigned a private number, but can be used only for placing or terminating a call. It cannot be used for any other analog functions such as transferring a call or setting up a conference call. If a second line on the 8411 is administered on the I2 channel (for analog equipment) on the 8411, type ‘‘analog’’ in the Data Option field on the administration screen. If the 8411 is connected to a personal computer for use with PassageWay software, type a ‘‘y’’ in the PassageWay field also on the administration screen. (However, DO NOT enter a ‘‘y’’ in the PassageWay field unless the user has a licensed PassageWay application.) 45 bbbbb Switch Administration b bbbbbbbbbbbbbbbbbbbbbbbbbbbbbbbbbbbbbbbbbbb bbbbbbbbbbbbbbbbbbbbbbbbbbbbbbbbbbbbbbbbbbbbbbbbbbbbbbbbbbbbbbbbbbbbbbbbbbbbb c c Administering the 8411D Voice Terminal cbbbbbbbbbbbbbbbbbbbbbbbbbbbbbbbbbbbbbbbbbbbbbbbbbbbbbbbbbbbbbbbbbbbbbbbbbbbbb c c c c c c c If you have c and this c (which can c administer c c this System c Release c support this c the 8411D c c c c c type of operation) c as a cbbbbbbbbbbbbbbbbbbbbbbbbbbbbbbbbbbbbbbbbbbbbbbbbbbbbbbbbbbbbbbbbbbbbbbbbbbbbb c c c c c System 75 c R1V1 — R1V3 c 4-wire only c 7405D+D c bc bbbbbbbbbbbbbbbbbbbbbbbbbbbbbbbbbbbbbbbbbbbbbbbbbbbbbbbbbbbbbbbbbbbbbbbbbbbb c c c c c System 85 c R2V2 — R2V4 c 4-wire only c 7405D+D c cbbbbbbbbbbbbbbbbbbbbbbbbbbbbbbbbbbbbbbbbbbbbbbbbbbbbbbbbbbbbbbbbbbbbbbbbbbbbb c c c c c Internat’l System 75 c IR1V4, etc. c 4-wire only c 7405D+D c bc bbbbbbbbbbbbbbbbbbbbbbbbbbbbbbbbbbbbbbbbbbbbbbbbbbbbbbbbbbbbbbbbbbbbbbbbbbbb c c c c c DEFINITY G1 c R1V4 c 4-wire only c 7405D+D c cbbbbbbbbbbbbbbbbbbbbbbbbbbbbbbbbbbbbbbbbbbbbbbbbbbbbbbbbbbbbbbbbbbbbbbbbbbbbb c c c c c Global DEFINITY ’91 c c 4-wire only c 7405D+D c bc bbbbbbbbbbbbbbbbbbbbbbbbbbbbbbbbbbbbbbbbbbbbbbbbbbbbbbbbbbbbbbbbbbbbbbbbbbbb c c c c c DEFINITY G2V1 c c 4-wire only c 7405D+D c bc bbbbbbbbbbbbbbbbbbbbbbbbbbbbbbbbbbbbbbbbbbbbbbbbbbbbbbbbbbbbbbbbbbbbbbbbbbbb c c c c c DEFINITY G2V2 c c 4-wire only c 7405D+D c bc bbbbbbbbbbbbbbbbbbbbbbbbbbbbbbbbbbbbbbbbbbbbbbbbbbbbbbbbbbbbbbbbbbbbbbbbbbbb c c c c c DEFINITY G3i, G3r, c c c c c G3s, G3vs c c 4-wire only c 7405D+D c cbbbbbbbbbbbbbbbbbbbbbbbbbbbbbbbbbbbbbbbbbbbbbbbbbbbbbbbbbbbbbbbbbbbbbbbbbbbbb c c c c c DEFINITY G3V2 c c 2- or 4-wire c 7405D+D c cbbbbbbbbbbbbbbbbbbbbbbbbbbbbbbbbbbbbbbbbbbbbbbbbbbbbbbbbbbbbbbbbbbbbbbbbbbbbb c c c c c DEFINITY G3V3 and c c c c c c c c 2- or 4-wire c 8410D G3V4, Issue 1 & 2 cbbbbbbbbbbbbbbbbbbbbbbbbbbbbbbbbbbbbbbbbbbbbbbbbbbbbbbbbbbbbbbbbbbbbbbbbbbbbb c c c c c c c c c c DEFINITY G3V4, Issue 3 c c c c and later cbbbbbbbbbbbbbbbbbbbbbbbbbbbbbbbbbbbbbbbbbbbbbbbbbbbbbbbbbbbbbbbbbbbbbbbbbbbbb c c c 2- or 4-wire c 8411D c c c c c DEFINITY G3V5 2- or 4-wire 8411D ccbbbbbbbbbbbbbbbbbbbbbbbbbbbbbbbbbbbbbbbbbbbbbbbbbbbbbbbbbbbbbbbbbbbbbbbbbbbbb c c c cc NOTE: As noted in the above table, an 8411D aliased as a 7405 voice terminal must be administered as a 7405+D, that is, with Display Module. On the administration page, type a ‘‘y’’ (for Yes) on the blank next to ‘‘Display?’’ Notes on 8411 Administration (if used with DEFINITY G3V4, Issue 3, or later): The 8411D can be administered as itself ONLY IF it is connected to a DEFINITY G3V4, Issue 3 (or later) switch. In Native Mode the voice terminal is administered through a digital line circuit card with a line number (with the usual three call appearances) assigned to the I1-Channel. A second line number can be administered through the same digital line card on the I2-Channel, but this line number can only be used for Analog Adjuncts connected to the Analog Adjunct jack on the 8411. This Analog Adjunct is assigned a private number, but can be used only for placing or terminating a call. It cannot be used for any other analog functions such as transferring a call or setting up a conference call. If a second line on the 8411 is administered on the I2 channel (for analog equipment) on the 8411, type ‘‘analog’’ in the Data Option field on the administration screen. If the 8411 is connected to a personal computer for use with PassageWay software, type a ‘‘y’’ in the PassageWay field also 46 bbbbb Switch Administration b bbbbbbbbbbbbbbbbbbbbbbbbbbbbbbbbbbbbbbbbbbb on the administration screen. (However, DO NOT enter a ‘‘y’’ in the PassageWay field unless the user has a licensed PassageWay application.) bbbbbbbbbbbbbbb Administering Softkey Features on the 8410D and 8411D On the 8410D and 8411D, up to 12 features can be administered with the softkeys. (There are three feature option screens with up to four available features listed on the second line of each screen.) When the voice terminal is shipped from the factory, there are 12 softkey features already assigned to the feature option screens; their feature abbreviations appear on the second line of the display, such as the following: bbbbbbbbbbbbbbbbbbbbbbbbbbbbb c c c LWC CnLWC AutCB Timer c c c cbbbbbbbbbbbbbbbbbbbbbbbbbbbbbc If this feature option screen appears on a user’s voice terminal display, the user would press the softkey below LWC in order to activate the Leave Word Calling feature or press the softkey below AutCB to use the Automatic Callback feature. When the feature is activated, an arrow ( ) appears above the feature abbreviation. For a list of the default softkey features, see ‘‘The Default Softkey Features on the 8410D and 8411D’’ later in this section. Other softkey features that can be administered on the 8410D and 8411D voice terminals are listed in ‘‘Alternate Softkey Features on the 8410D and 8411D.’’ b bbbbbbbbbbbbbbbbbbbbbbbbbbbbbbbbbbbbbbbbbbbbbbbbbbbbbbbbbbbbbbbbbb c Alternate softkey features (to replace default softkey features), international c c transmission levels and parameters, and A/Mu Law companding can be c c c administered and supported ONLY on a terminal connected to a G3V3 or later. c c c c c CAUTION: It is not recommended nor will it be supported for anyone to c c administer alternate softkey features, international transmission levels and c c parameters, and A/Mu Law companding on a terminal from a G3V3 switch and c c subsequently connect this same terminal to an earlier switch release, such as a c c c DEFINITY G3V2, G2, G1, or a System 75 or System 85. Any problems in the c c c functionality or in readministration of this terminal will be the responsibility of c customer, not AT&T. ccbthe bbbbbbbbbbbbbbbbbbbbbbbbbbbbbbbbbbbbbbbbbbbbbbbbbbbbbbbbbbbbbbbbbb cc 47 bbbbb Switch Administration b bbbbbbbbbbbbbbbbbbbbbbbbbbbbbbbbbbbbbbbbbbb NOTE: With G3V3 and later switches, the system can download BLANK softkey labels for positions where there are no features administered. The 12 softkey features on the 8410D and 8411D should be administered in the following manner: If the 8410D is connected to a DEFINITY G3V3 (or later) switch, or if the 8411D is connected to a DEFINITY G3V3 or G3V4, Issue 1 or 2, administer either of the voice terminals as an 8410D. An 8411D voice terminal connected to a DEFINITY G3V4, Issue 3 (or later) can be administered as itself. In any of these cases (that is, if the voice terminal is connected to a G3V3 or later), the system manager may choose to leave the default softkey features in place (see ‘‘The Default Softkey Features on the 8410D and 8411D’’ on the next page) OR select features from the list of alternative softkey features (see ‘‘Alternate Softkey Features on the 8410D and 8411D’’). Administer the softkey features on ‘‘SOFTKEY BUTTON ASSIGNMENTS’’ Buttons #1 through 12. If the 8410D or 8411D is connected to a System 75, DEFINITY G1, or DEFINITY G3V2 (or earlier), administer the voice terminal as a 7405D + Display Module. Only the default softkey features can be used. (See ‘‘The Default Softkey Features on the 8410D and 8411D’’ on the next page.) Administer the 12 softkey features on ‘‘FEATURE BUTTON ASSIGNMENTS’’ Buttons #2 through 13. (The Normal feature should be administered on Button #1 on this administration screen.) For example, on the default feature option screen on the previous page, the Leave Word Calling (LWC) feature would be administered on ‘‘FEATURE BUTTON ASSIGNMENTS’’ Button #2; the Automatic Callback (AutCB) feature would be administered on Feature Button #4. If the 8410D or 8411D is connected to a System 85 or DEFINITY G2, administer the voice terminal as a 7405D + Display Module. Only the default softkey features can be used. (See ‘‘The Default Softkey Features on the 8410D and 8411D’’ on the next page.) Administer the 12 softkey features on ‘‘FEATURE BUTTON ASSIGNMENTS’’ Buttons #14 through 25. (The Normal feature should be administered on Button #13 on this administration screen.) For example, for the features on the first default feature option screen shown on the previous page, the Leave Word Calling feature should be administered on ‘‘FEATURE BUTTON ASSIGNMENTS’’ Button #14. The Automatic Callback feature should be administered on Feature Button #16. 48 bbbbb Switch Administration b bbbbbbbbbbbbbbbbbbbbbbbbbbbbbbbbbbbbbbbbbbb bbbbbbbbbbbbbbb The Default Softkey Features on the 8410D and 8411D Below is a list of the 12 default softkey features assigned to the 8410D and 8411D voice terminals and the order in which they appear. bbbbbbbbbbbbbbbbbbbbbbbbbbbbbbbbbbbbbbbbbbbbbbbbbbbbbbbbbbbbbbbbbbbbbbbbbbbbbbbbbbbbbbbbbb c c Default Softkey Features on the 8410D and 8411D cbbbbbbbbbbbbbbbbbbbbbbbbbbbbbbbbbbbbbbbbbbbbbbbbbbbbbbbbbbbbbbbbbbbbbbbbbbbbbbbbbbbbbbbbbb c c c c c ABBREVIATION c c FEATURE and DESCRIPTION cbbbbbbbbbbbbbbbbbbbbbbbbbbbbbbbbbbbbbbbbbbbbbbbbbbbbbbbbbbbbbbbbbbbbbbbbbbbbbbbbbbbbbbbbbb c c c c c First Screen c c c c LWC c Leave Word Calling – Leave a message for another extension to call c c c c you back c c c cbbbbbbbbbbbbbbbbbbbbbbbbbbbbbbbbbbbbbbbbbbbbbbbbbbbbbbbbbbbbbbbbbbbbbbbbbbbbbbbbbbbbbbbbbb c c c c Cancel Leave Word Calling – Cancel a Leave Word Calling message c CnLWC c c c bbbbbbbbbbbbbbbbbbbbbbbbbbbbbbbbbbbbbbbbbbbbbbbbbbbbbbbbbbbbbbbbbbbbbbbbbbbbbbbbbbbbbbbbbb c c c c c AutCB c Automatic Callback – Sends you a 3-burst ring indicating that a c c c previously busy number is now available c c c b bbbbbbbbbbbbbbbbbbbbbbbbbbbbbbbbbbbbbbbbbbbbbbbbbbbbbbbbbbbbbbbbbbbbbbbbbbbbbbbbbbbbbbbbb c c c c c Timer c Timer – Measure elapsed time, such as time spent on a call cb c bbbbbbbbbbbbbbbbbbbbbbbbbbbbbbbbbbbbbbbbbbbbbbbbbbbbbbbbbbbbbbbbbbbbbbbbbbbbbbbbbbbbbbbbbb bbbbbbbbbbbbbbbbbbbbbbbbbbbbbbbbbbbbbbbbbbbbbbbbbbbbbbbbbbbbbbbbbbbbbbbbbbbbbbbbbbbbbbbbb c c c c Second Screen c c c c c 1 c CFrwd c c Call Forward – Temporarily forward your calls to another extension or c c c c outside number cbbbbbbbbbbbbbbbbbbbbbbbbbbbbbbbbbbbbbbbbbbbbbbbbbbbbbbbbbbbbbbbbbbbbbbbbbbbbbbbbbbbbbbbbbb c c c c c 2 c c CPark c Call Park – Put a call on hold for retrieval at another telephone cbbbbbbbbbbbbbbbbbbbbbbbbbbbbbbbbbbbbbbbbbbbbbbbbbbbbbbbbbbbbbbbbbbbbbbbbbbbbbbbbbbbbbbbbbb c c c c c Time/Date – Shows you the date and time TmDay c c c b bbbbbbbbbbbbbbbbbbbbbbbbbbbbbbbbbbbbbbbbbbbbbbbbbbbbbbbbbbbbbbbbbbbbbbbbbbbbbbbbbbbbbbbbb c c c c c PCall c Priority Calling – Call an extension with a distinctive 3-burst ring c c c to indicate your call needs immediate attention c c cbbbbbbbbbbbbbbbbbbbbbbbbbbbbbbbbbbbbbbbbbbbbbbbbbbbbbbbbbbbbbbbbbbbbbbbbbbbbbbbbbbbbbbbbbb cc c 1 This feature is named Call Forward-Follow Me on DEFINITY G2 or System 85 switches. 2 On DEFINITY G2 and System 85, there is no Call Park feature that can be assigned to a feature button. In order to have the Call Park function on a softkey or hard button, administer the button as an Abbreviated Dial button and program the Call Park trunk group access code onto it. This button can then be labeled ‘‘Call Park.’’ In addition, on a DEFINITY G2 or System 85, the Recall feature must be administered on a standard feature button. 49 bbbbb Switch Administration b bbbbbbbbbbbbbbbbbbbbbbbbbbbbbbbbbbbbbbbbbbb bbbbbbbbbbbbbbbbbbbbbbbbbbbbbbbbbbbbbbbbbbbbbbbbbbbbbbbbbbbbbbbbbbbbbbbbbbbbbbbbbbbbbbbbbb c c Default Softkey Features on the 8410D and 8411D (continued) c cbbbbbbbbbbbbbbbbbbbbbbbbbbbbbbbbbbbbbbbbbbbbbbbbbbbbbbbbbbbbbbbbbbbbbbbbbbbbbbbbbbbbbbbbbb c c c c c ABBREVIATION c FEATURE and DESCRIPTION c cbbbbbbbbbbbbbbbbbbbbbbbbbbbbbbbbbbbbbbbbbbbbbbbbbbbbbbbbbbbbbbbbbbbbbbbbbbbbbbbbbbbbbbbbbb c c c c Third Screen c c c c Prog c Abbreviated Dialing (AD) Program – Program a telephone number, c c c c c c extension, or feature access code on an AD button c c cbbbbbbbbbbbbbbbbbbbbbbbbbbbbbbbbbbbbbbbbbbbbbbbbbbbbbbbbbbbbbbbbbbbbbbbbbbbbbbbbbbbbbbbbbb c c c c Pause AD Special Function Pause – Places a 1.5 second pause between c c c c numbers on an AD button, such as between an access code and a c c c c c telephone number c c c b bbbbbbbbbbbbbbbbbbbbbbbbbbbbbbbbbbbbbbbbbbbbbbbbbbbbbbbbbbbbbbbbbbbbbbbbbbbbbbbbbbbbbbbbb c c c c c Mark c AD Special Function Mark – Numbers included after a Mark are c c c dialed in Touch-Tone signal form c c c b bbbbbbbbbbbbbbbbbbbbbbbbbbbbbbbbbbbbbbbbbbbbbbbbbbbbbbbbbbbbbbbbbbbbbbbbbbbbbbbbbbbbbbbbb c c c c c c AD Special Function Wait – Numbers included after a Wait are Wait 3 c c c delayed 5 to 25 seconds until dial tone is received from the switch c c c c c cbbbbbbbbbbbbbbbbbbbbbbbbbbbbbbbbbbbbbbbbbbbbbbbbbbbbbbbbbbbbbbbbbbbbbbbbbbbbbbbbbbbbbbbbbb 3 50 When administering the Wait feature, use ‘‘-w’’; when administering the Stop feature, use ‘‘-W.’’ bbbbb Switch Administration b bbbbbbbbbbbbbbbbbbbbbbbbbbbbbbbbbbbbbbbbbbb bbbbbbbbbbbbbbb Alternate Softkey Features on the 8410D and 8411D On 8410D and 8411D voice terminals connected to a DEFINITY G3V3 (or later), the system manager can choose to keep all, some, or none of the above default softkey features on each individual voice terminal display. The following table lists the alternate softkey features, those features that can be substituted for the default softkey features listed above. NOTE: Alternate softkey features can be administered ONLY on terminals connected to a DEFINITY G3V3 (or later) switch. bbbbbbbbbbbbbbbbbbbbbbbbbbbbbbbbbbbbbbbbbbbbbbbbbbbbbbbbbbbbbbbbbbbbbbbbbbbbbbbbbbbbbbbbbb c c Alternate Softkey Features on the 8410D and 8411D cbbbbbbbbbbbbbbbbbbbbbbbbbbbbbbbbbbbbbbbbbbbbbbbbbbbbbbbbbbbbbbbbbbbbbbbbbbbbbbbbbbbbbbbbbb c c c c c ABBREVIATION c c FEATURE and DESCRIPTION cbbbbbbbbbbbbbbbbbbbbbbbbbbbbbbbbbbbbbbbbbbbbbbbbbbbbbbbbbbbbbbbbbbbbbbbbbbbbbbbbbbbbbbbbbb c c c c c AD c c c Abbreviated Dialing buttons (can be multiple AD buttons, but they c c c are labeled AD rather than the button’s destination, such as a c c c telephone number or person’s name) c c c cbbbbbbbbbbbbbbbbbbbbbbbbbbbbbbbbbbbbbbbbbbbbbbbbbbbbbbbbbbbbbbbbbbbbbbbbbbbbbbbbbbbbbbbbbb c c c c c c c Cnslt c Consult – After answering a coverage call, you can discuss c c c the call with the person for whom the call was intended c c c b bbbbbbbbbbbbbbbbbbbbbbbbbbbbbbbbbbbbbbbbbbbbbbbbbbbbbbbbbbbbbbbbbbbbbbbbbbbbbbbbbbbbbbbbb c c c c Count c ACD Stroke Count (can be up to 10 buttons) – Allows an ACD agent c c c c to record the number of times a particular customer-related event c c c c occurs, such as the number of questions about a particular sale item c c cbbbbbbbbbbbbbbbbbbbbbbbbbbbbbbbbbbbbbbbbbbbbbbbbbbbbbbbbbbbbbbbbbbbbbbbbbbbbbbbbbbbbbbbbbb c c c c Call Pickup – Lets you answer a call at your voice terminal for another c CPkUp c c c c c extension in the same pickup group c cbbbbbbbbbbbbbbbbbbbbbbbbbbbbbbbbbbbbbbbbbbbbbbbbbbbbbbbbbbbbbbbbbbbbbbbbbbbbbbbbbbbbbbbbbb c c c c c 1 Dir c c c Directory – Searches for the extension of another user in the c c c same location cbbbbbbbbbbbbbbbbbbbbbbbbbbbbbbbbbbbbbbbbbbbbbbbbbbbbbbbbbbbbbbbbbbbbbbbbbbbbbbbbbbbbbbbbbb c c c c c c c Excl c Manual Exclusion – Keeps other users with whom you share a c c c bridged call appearance from listening in on an existing call c c c bbbbbbbbbbbbbbbbbbbbbbbbbbbbbbbbbbbbbbbbbbbbbbbbbbbbbbbbbbbbbbbbbbbbbbbbbbbbbbbbbbbbbbbbbb c c c c HFAns 2 c Internal (Hands-Free) Auto Answer – Answers on the speakerphone c c c c whenever an internal call comes in to your voice terminal c c c cbbbbbbbbbbbbbbbbbbbbbbbbbbbbbbbbbbbbbbbbbbbbbbbbbbbbbbbbbbbbbbbbbbbbbbbbbbbbbbbbbbbbbbbbbb c c bbbbbbbbbb 1 Call Display standard feature button should be administered, if access to A cbbbbbbbbbbc bbbbbbbbbb Display System Directory is provided. It is also desirable for a cbNext bbbbbbbbbc standard feature button to be administered. This feature is NOT available on DEFINITY G2 or System 85. 2 This feature is available only on a DEFINITY G3V2 (or later) switch. 51 bbbbb Switch Administration b bbbbbbbbbbbbbbbbbbbbbbbbbbbbbbbbbbbbbbbbbbb bbbbbbbbbbbbbbbbbbbbbbbbbbbbbbbbbbbbbbbbbbbbbbbbbbbbbbbbbbbbbbbbbbbbbbbbbbbbbbbbbbbbbbbbbb c c Alternate Softkey Features on the 8410D and 8411D (continued) cbbbbbbbbbbbbbbbbbbbbbbbbbbbbbbbbbbbbbbbbbbbbbbbbbbbbbbbbbbbbbbbbbbbbbbbbbbbbbbbbbbbbbbbbbb c c c c c ABBREVIATION c c FEATURE and DESCRIPTION cbbbbbbbbbbbbbbbbbbbbbbbbbbbbbbbbbbbbbbbbbbbbbbbbbbbbbbbbbbbbbbbbbbbbbbbbbbbbbbbbbbbbbbbbbb c c c c IAuto c Automatic Intercom – Automatically dials the number of a c c c predetermined partner c c c bc bbbbbbbbbbbbbbbbbbbbbbbbbbbbbbbbbbbbbbbbbbbbbbbbbbbbbbbbbbbbbbbbbbbbbbbbbbbbbbbbbbbbbbbbbc c c c IDial c Dial Intercom – Automatically dials the number of a member of a c c c predetermined group of users (for this feature, you need to know c c c c c the member’s 2- or 3-digit code) c c bc bbbbbbbbbbbbbbbbbbbbbbbbbbbbbbbbbbbbbbbbbbbbbbbbbbbbbbbbbbbbbbbbbbbbbbbbbbbbbbbbbbbbbbbbb c c c c Inspt c c c Inspect –Shows you call-related information for an active call bc bbbbbbbbbbbbbbbbbbbbbbbbbbbbbbbbbbbbbbbbbbbbbbbbbbbbbbbbbbbbbbbbbbbbbbbbbbbbbbbbbbbbbbbbb c c c c c Last Number Dialed – Automatically redials the last extension or Last c c c c c outside number you dialed c c bc bbbbbbbbbbbbbbbbbbbbbbbbbbbbbbbbbbbbbbbbbbbbbbbbbbbbbbbbbbbbbbbbbbbbbbbbbbbbbbbbbbbbbbbbb c c c c RngOf Ringer Off – Turns the ringer off on your voice terminal (however, c c c c c you will hear a half-ring whenever a call comes in to your voice c c c c terminal) c c c b bbbbbbbbbbbbbbbbbbbbbbbbbbbbbbbbbbbbbbbbbbbbbbbbbbbbbbbbbbbbbbbbbbbbbbbbbbbbbbbbbbbbbbbbb c c c c c SAC c Send All Calls – Temporarily sends all your calls to the extension of c c c a person designated by the system manager c c c b bbbbbbbbbbbbbbbbbbbbbbbbbbbbbbbbbbbbbbbbbbbbbbbbbbbbbbbbbbbbbbbbbbbbbbbbbbbbbbbbbbbbbbbbb c c c c c c AD Special Function –Insert one of the AD Special Functions SFunc c c c (such as Pause, Mark, or Wait) by pressing a dial pad key that c c c c c c corresponds with that function cbbbbbbbbbbbbbbbbbbbbbbbbbbbbbbbbbbbbbbbbbbbbbbbbbbbbbbbbbbbbbbbbbbbbbbbbbbbbbbbbbbbbbbbbbb c c c c c c c Spres c AD Special Function Suppress — Suppress numbers on an c c c AD button, such as numbers needed for a password so they c c c c c are dialed but not shown on the screen c cbbbbbbbbbbbbbbbbbbbbbbbbbbbbbbbbbbbbbbbbbbbbbbbbbbbbbbbbbbbbbbbbbbbbbbbbbbbbbbbbbbbbbbbbbb c c c c 3 c ACD View Statistics – Logged-in ACD agents can view their own Stats c c c c c ACD measurements c cbbbbbbbbbbbbbbbbbbbbbbbbbbbbbbbbbbbbbbbbbbbbbbbbbbbbbbbbbbbbbbbbbbbbbbbbbbbbbbbbbbbbbbbbbb c c c c c AD Indefinite Wait or Stop – A Stop or Indefinite Wait is included 4 Stop c c c c c in an AD number, so that all action is stopped until a dial tone c c c c is received from the switch c c c cbbbbbbbbbbbbbbbbbbbbbbbbbbbbbbbbbbbbbbbbbbbbbbbbbbbbbbbbbbbbbbbbbbbbbbbbbbbbbbbbbbbbbbbbbb c c c c c View Stored Number — Allows you to check the number stored on View 5 c c c an AD button or in an AD list c c c cbbbbbbbbbbbbbbbbbbbbbbbbbbbbbbbbbbbbbbbbbbbbbbbbbbbbbbbbbbbbbbbbbbbbbbbbbbbbbbbbbbbbbbbbbb c c 52 3 This feature can be used ONLY on a DEFINITY G3V3 or later. Also, note that after you press the softkey under the VuStats feature ( Stats), the statistics information will remain on the display for only approximately five seconds before it is overwritten by the softkey menu. In order to continuously display the statistical information, you should administer this feature on one of the call appearance/feature buttons instead of administering it as a softkey feature. 4 When administering the Wait feature, use ‘‘-w’’; when administering the Stop feature, use ‘‘-W.’’ 5 This feature CANNOT be administered on a DEFINITY G2 or System 85. bbbbb Switch Administration b bbbbbbbbbbbbbbbbbbbbbbbbbbbbbbbbbbbbbbbbbbb bbbbbbbbbbbbbbb Button Numbering for 8410 and 8411D Voice Terminal Administration Use the following diagrams for administering the 8410 and 8411 voice terminals. Figure 15 shows the button numbering scheme for administering the 8410 or 8411 voice terminal to a System 75 or DEFINITY Generic 1 or Generic 3. (The drawing shows the 8410D; however, the button numbering for the 8411 is the same). Figure 16 shows the button numbering scheme for administering the 8410 or 8411 voice terminals to a System 85 or DEFINITY Generic 2 (again, the figure shows the 8410D). NOTE: On the voice terminals in the diagrams, both numbers and letters are printed on the dial pad keys. However, on some voice terminals only numbers appear on these keys. Although Figures 15 and 16 show the 8410D, the button numbering scheme for administering the 8411 is the same. 53 bbbbb Switch Administration b bbbbbbbbbbbbbbbbbbbbbbbbbbbbbbbbbbbbbbbbbbb bbbbbbbbbbbbbbbbbbbbb If the 8410D or 8411D is administered as a 7405D, administer the 12 softkey features on “FEATURE BUTTON ASSIGNMENTS” 2 through 13; administer the Normal feature on Button #1. If the 8410D or 8411D is administered as itself, administer the 12 softkey features on “SOFTKEY BUTTON ASSIGNMENTS” 1 through 12. The 10 call appearance/feature buttons are administered as “BUTTON ASSIGNMENTS” 1 through 10. 8410D 1 6 2 7 3 8 4 9 5 10 Message bbbbbbbbbbbbbbbbbbbbbbbbbbbbbbbb Figure 15. Button Numbering Scheme for Administering the 8410 and 8411 Voice Terminals Connected to System 75 or DEFINITY Generic 1 or Generic 3 54 bbbbb Switch Administration b bbbbbbbbbbbbbbbbbbbbbbbbbbbbbbbbbbbbbbbbbbb bbbbbbbbbbbbbbbbbbbbb If the 8410D or 8411D is administered as a 7405D, administer the 12 softkey features on “FEATURE BUTTON ASSIGNMENTS” 14 through 25; administer the Normal feature on Button #13. If the 8410D or 8411D is administered as itself, administer the 12 softkey features on “SOFTKEY BUTTON ASSIGNMENTS” 1 through 12. The 10 call appearance/feature buttons are administered as “BUTTON ASSIGNMENTS” 3 through 12. 8410D 3 8 4 9 5 10 6 11 7 12 Message bbbbbbbbbbbbbbbbbbbbbbbbbbbbbbbb Figure 16. Button Numbering Scheme for Administering the 8410 and 8411 Voice Terminals Connected to System 85 or DEFINITY Generic 2 55 bbbbb Switch Administration b bbbbbbbbbbbbbbbbbbbbbbbbbbbbbbbbbbbbbbbbbbb b bbbbbb Administering the 8434DX Voice Terminal Use the following table to administer the 8434DX voice terminal: NOTE: The voice terminal can be administered so it can access the softkey features OR it can be administered so that it has access to more coverage buttons. bbbbbbbbbbbbbbbbbbbbbbbbbbbbbbbbbbbbbbbbbbbbbbbbbbbbbbbbbbbbbbbbbbbb c c Administering the 8434DX Voice Terminal cbbbbbbbbbbbbbbbbbbbbbbbbbbbbbbbbbbbbbbbbbbbbbbbbbbbbbbbbbbbbbbbbbbbb c c c c c c c If you have c and this c (which can c administer c c this System c Release c support this c the 8434DX c c c c c type of c as a c c c c c operation) cbbbbbbbbbbbbbbbbbbbbbbbbbbbbbbbbbbbbbbbbbbbbbbbbbbbbbbbbbbbbbbbbbbbb c c c c c c c c c c System 75 c R1V1 — R1V3 c 4-wire only c 7405D+D+F c bc bbbbbbbbbbbbbbbbbbbbbbbbbbbbbbbbbbbbbbbbbbbbbbbbbbbbbbbbbbbbbbbbbbb c c c c c System 85 c R2V2 — R2V4 c 4-wire only c 7405D+D+F c bc bbbbbbbbbbbbbbbbbbbbbbbbbbbbbbbbbbbbbbbbbbbbbbbbbbbbbbbbbbbbbbbbbbb c c c c c Internat’l System 75 c IR1V4, etc. c 4-wire only c 7405D+D+F c cbbbbbbbbbbbbbbbbbbbbbbbbbbbbbbbbbbbbbbbbbbbbbbbbbbbbbbbbbbbbbbbbbbbb c c c c c c c c c DEFINITY G1 4-wire only 7405D+D+F c cbbbbbbbbbbbbbbbbbbbbbbbbbbbbbbbbbbbbbbbbbbbbbbbbbbbbbbbbbbbbbbbbbbbb c c c c c c c c c Global DEFINITY ’91 c c 4-wire only c 7405D+D+F c c c c c or 7434+D c cbbbbbbbbbbbbbbbbbbbbbbbbbbbbbbbbbbbbbbbbbbbbbbbbbbbbbbbbbbbbbbbbbbbb c c c c c DEFINITY G2V1 c c 4-wire only c 7405D+D+F c c c c c c or 7434+D c cbbbbbbbbbbbbbbbbbbbbbbbbbbbbbbbbbbbbbbbbbbbbbbbbbbbbbbbbbbbbbbbbbbbb c c c c c c c c c DEFINITY G2V2 c c 4-wire only c 7405D+D+F c c c c c or 7434+D c bc bbbbbbbbbbbbbbbbbbbbbbbbbbbbbbbbbbbbbbbbbbbbbbbbbbbbbbbbbbbbbbbbbbb c c c c c DEFINITY G3i, G3r, c c 4-wire only c 7405D+D+F c c G3s, G3vs c c c or 7434+D c cbbbbbbbbbbbbbbbbbbbbbbbbbbbbbbbbbbbbbbbbbbbbbbbbbbbbbbbbbbbbbbbbbbbb c c c c c c c c c 2- or 4-wire 7405D+D+F c c DEFINITY G3V2 c c c c c c c c or 7444 bc bbbbbbbbbbbbbbbbbbbbbbbbbbbbbbbbbbbbbbbbbbbbbbbbbbbbbbbbbbbbbbbbbbb c c c c c DEFINITY G3V3 c c c c c c c c c or later 2- or 4-wire 8434D cbbbbbbbbbbbbbbbbbbbbbbbbbbbbbbbbbbbbbbbbbbbbbbbbbbbbbbbbbbbbbbbbbbbb c c c c Key to Abbreviations: +D = with Display Module +F = with Feature Key Module 56 bbbbb Switch Administration b bbbbbbbbbbbbbbbbbbbbbbbbbbbbbbbbbbbbbbbbbbb CAVEATS: The 8434DX may be aliased as a 7405+D+F to support features on all systems. However, in this case, while all the call appearance/feature buttons AND the softkey features will be functional, there can be a maximum of only 10 call appearances. On the 7405, the Display Module is a 1-line display, and thus the 1-line display option should be selected. On some systems, the 8434DX can be aliased as a 7434+D or a 7444 to support coverage. In this case, there can be up to 34 call appearances (including bridged call appearances), but the 15 softkey features will NOT be functional because the Feature Key Module is not allowed with the 7434 or 7444. On the 7434, the Display Module is a 1-line display, and thus the 1-line display option should be selected. If the set is administered as a 7444, it can be optioned for a 2-line display. Important: An 801A Expansion Module can be used with an 8434DX voice terminal connected to a DEFINITY G3V3.3 or later switch. For switch administration procedures for an 8434DX voice terminal with an expansion module connected to it, see the 801A Expansion Module Instruction Manual shipped with the expansion module. NOTE: The 8434DX can be administered as an 8434D ONLY IF it is connected to a DEFINITY G3V3 (or later) switch. b bbbbbbbbbbbbbbbbbbbbbbbbbbbbbbbbbbbbbbbbbbbbbbbbbbbbbbbbbbbbbbbbbb c Alternate softkey features (to replace the default softkey features), international c c transmission levels and parameters, and A/Mu Law companding can be c c c administered and supported ONLY on a terminal connected to a G3V3 or later. c c c c c CAUTION: It is not recommended nor will it be supported for anyone to c c administer alternate softkey features, international transmission levels and c c parameters, and A/Mu Law companding on a terminal from a G3V3 switch and c c subsequently connect this same terminal to an earlier switch release, such as a c c c DEFINITY G3V2, G2, G1, or a System 75 or System 85. Any problems in the c c c functionality or in readministration of this terminal will be the responsibility of c customer, not AT&T. ccbthe cc bbbbbbbbbbbbbbbbbbbbbbbbbbbbbbbbbbbbbbbbbbbbbbbbbbbbbbbbbbbbbbbbbb 57 bbbbb Switch Administration b bbbbbbbbbbbbbbbbbbbbbbbbbbbbbbbbbbbbbbbbbbb bbbbbbbbbbbbbbb Administering Softkey Features on the 8434DX On the 8434DX, up to 15 softkey features can be administered on the three feature option screens (five features on each screen). When the voice terminal is shipped from the factory, there are 15 features already assigned to the feature option screens; their feature abbreviations appear on the second line of the display, such as the following: bbbbbbbbbbbbbbbbbbbbbbbbbbbbbbbbbbbbbbb c c c LWC CnLWC Cnslt AutCB Timer c cbbbbbbbbbbbbbbbbbbbbbbbbbbbbbbbbbbbbbbbc If this feature option screen appears on a user’s voice terminal display, the user would press the softkey below LWC in order to activate the Leave Word Calling feature or press the softkey below AutCB to use the Automatic Callback feature. When the feature is activated, an arrow ( ) appears above the feature abbreviation. NOTE: With G3V3 and later switches, the system can download BLANK softkey labels for positions where there are no features administered. The 15 softkey features on the 8434DX should be administered in the following manner: If the 8434DX is connected to a DEFINITY G3V3 switch, administer the voice terminal as an 8434. In any of these cases (that is, the voice terminal is connected to a G3V3 switch or later), the system manager may choose to leave the default softkey features in place (see ‘‘The Default Softkey Features on the 8434DX’’ on the next page) OR select features from the list of alternative softkey features (see ‘‘Alternate Softkey Features on the 8434DX’’). Administer the softkey features on ‘‘SOFTKEY BUTTON ASSIGNMENTS’’ Buttons #1 through 15. If the 8434DX is connected to a System 75, System 85, DEFINITY G1, DEFINITY G2, or DEFINITY G3V2 (or earlier), and you want to use the softkey features, administer the voice terminal as a 7405D + Display Module and Feature Key Module. (If you administer the voice terminal as a 7434 or a 7444, you cannot use the softkey features.) Only the default softkey features can be used. Administer the 15 softkey features on ‘‘FEATURE MODULE BUTTON ASSIGNMENTS’’ Buttons #1 through 15. (The Normal feature should be administered on Button #1 on the ‘‘DISPLAY BUTTON ASSIGNMENTS’’ screen.) sp .5 For example, for the features on the default feature option screen on the previous page, the Leave Word Calling feature would be administered on ‘‘FEATURE MODULE BUTTON ASSIGNMENTS’’ Button #1; the Automatic Callback feature would be administered on Button #4. 58 bbbbb Switch Administration b bbbbbbbbbbbbbbbbbbbbbbbbbbbbbbbbbbbbbbbbbbb bbbbbbbbbbbbbbb The Default Softkey Features on the 8434DX Below is a list of the 15 default softkey features assigned to the 8434DX and the order they appear in. (For a description of these features, see ‘‘Administering Softkey Features on the 8410D and 8411D’’ earlier in this manual.) b bbbbbbbbbbbbbbbbbbbbbbbbbbbbbbbbbbbbbbbbbbbbbbbbbbbbbbbbbbbbb c c Default Softkey Features on the 8434DX bc bbbbbbbbbbbbbbbbbbbbbbbbbbbbbbbbbbbbbbbbbbbbbbbbbbbbbbbbbbbbbc c c c c c ABBREVIATION FEATURE c bc bbbbbbbbbbbbbbbbbbbbbbbbbbbbbbbbbbbbbbbbbbbbbbbbbbbbbbbbbbbbbc c c First Screen c c c c c c LWC c Leave Word Calling c bc bbbbbbbbbbbbbbbbbbbbbbbbbbbbbbbbbbbbbbbbbbbbbbbbbbbbbbbbbbbbbc c c c c Cancel Leave Word Calling CnLWC c bc bbbbbbbbbbbbbbbbbbbbbbbbbbbbbbbbbbbbbbbbbbbbbbbbbbbbbbbbbbbbb c c c c c Cnslt c c Consult b bbbbbbbbbbbbbbbbbbbbbbbbbbbbbbbbbbbbbbbbbbbbbbbbbbbbbbbbbbbbb c c c c AutCB c c Automatic Callback cb bbbbbbbbbbbbbbbbbbbbbbbbbbbbbbbbbbbbbbbbbbbbbbbbbbbbbbbbbbbbb c c c c c Timer Timer cb bbbbbbbbbbbbbbbbbbbbbbbbbbbbbbbbbbbbbbbbbbbbbbbbbbbbbbbbbbbbb c c b bbbbbbbbbbbbbbbbbbbbbbbbbbbbbbbbbbbbbbbbbbbbbbbbbbbbbbbbbbbbb c c c c Second Screen c c c c c 1 Call Forward c CFrwd c c bc bbbbbbbbbbbbbbbbbbbbbbbbbbbbbbbbbbbbbbbbbbbbbbbbbbbbbbbbbbbbb c c c CPark 2 c c Call Park bc bbbbbbbbbbbbbbbbbbbbbbbbbbbbbbbbbbbbbbbbbbbbbbbbbbbbbbbbbbbbb c c c c c Manual Exclusion Excl c bc bbbbbbbbbbbbbbbbbbbbbbbbbbbbbbbbbbbbbbbbbbbbbbbbbbbbbbbbbbbbb c c c c c TmDay c c Time/Date bc bbbbbbbbbbbbbbbbbbbbbbbbbbbbbbbbbbbbbbbbbbbbbbbbbbbbbbbbbbbbb c c c PCall c c Priority Calling cb bbbbbbbbbbbbbbbbbbbbbbbbbbbbbbbbbbbbbbbbbbbbbbbbbbbbbbbbbbbbb c c 1 This feature is named Call Forward-Follow Me on DEFINITY G2 or System 85 switches. 2 On DEFINITY G2 and System 85, there is no Call Park feature that can be assigned to a feature button. In order to have the Call Park function on a softkey or hard button, administer the button as an Abbreviated Dial button and program the Call Park trunk group access code onto it. This button can then be labeled ‘‘Call Park.’’ In addition, on a DEFINITY G2 or System 85, the Recall feature must be administered on a standard feature button. 59 bbbbb Switch Administration b bbbbbbbbbbbbbbbbbbbbbbbbbbbbbbbbbbbbbbbbbbb bbbbbbbbbbbbbbbbbbbbbbbbbbbbbbbbbbbbbbbbbbbbbbbbbbbbbbbbbbbbbbbbb c c Default Softkey Features on the 8434DX (cont.) c cbbbbbbbbbbbbbbbbbbbbbbbbbbbbbbbbbbbbbbbbbbbbbbbbbbbbbbbbbbbbbbbbb c c c c c ABBREVIATION FEATURE c bbbbbbbbbbbbbbbbbbbbbbbbbbbbbbbbbbbbbbbbbbbbbbbbbbbbbbbbbbbbbbbbb c c c c c Third Screen c c c c c c Prog c AD Program c cbbbbbbbbbbbbbbbbbbbbbbbbbbbbbbbbbbbbbbbbbbbbbbbbbbbbbbbbbbbbbbbbb c c c c AD Special Function Pause Pause c cbbbbbbbbbbbbbbbbbbbbbbbbbbbbbbbbbbbbbbbbbbbbbbbbbbbbbbbbbbbbbbbbb c c c c AD Special Function Suppress c c Spres c c cbbbbbbbbbbbbbbbbbbbbbbbbbbbbbbbbbbbbbbbbbbbbbbbbbbbbbbbbbbbbbbbbb c c c Mark c AD Special Function Mark c cbbbbbbbbbbbbbbbbbbbbbbbbbbbbbbbbbbbbbbbbbbbbbbbbbbbbbbbbbbbbbbbbb c c c c 3 AD Special Function Wait Wait c cbbbbbbbbbbbbbbbbbbbbbbbbbbbbbbbbbbbbbbbbbbbbbbbbbbbbbbbbbbbbbbbbb c c c 3 60 When administering the Wait feature, use ‘‘-w’’; when administering the Stop feature, use ‘‘-W.’’ bbbbb Switch Administration b bbbbbbbbbbbbbbbbbbbbbbbbbbbbbbbbbbbbbbbbbbb bbbbbbbbbbbbbbb Alternate Softkey Features on the 8434DX If the 8434DX is connected to a DEFINITY G3V3 (or later) switch, the system manager can choose to keep all, some, or none of the above default softkey features on each individual voice terminal display. The following table lists the alternate softkey features, those features that can be substituted for the default softkey features listed above. (For a description of these features, see ‘‘Administering Softkey Features on the 8410D and 8411D’’ earlier in this manual.) NOTE: Alternate softkey features can be administered ONLY on terminals connected to a DEFINITY G3V3 (or later) switch. bbbbbbbbbbbbbbbbbbbbbbbbbbbbbbbbbbbbbbbbbbbbbbbbbbbbbbbbbbbbbbbbbbbbbbb c c Alternate Softkey Features for the 8434DX bc bbbbbbbbbbbbbbbbbbbbbbbbbbbbbbbbbbbbbbbbbbbbbbbbbbbbbbbbbbbbbbbbbbbbbbc c c c c Abbreviation c Feature c bc bbbbbbbbbbbbbbbbbbbbbbbbbbbbbbbbbbbbbbbbbbbbbbbbbbbbbbbbbbbbbbbbbbbbbb c c c AD c c Abbreviated Dialing buttons (can be multiple buttons) c bc bbbbbbbbbbbbbbbbbbbbbbbbbbbbbbbbbbbbbbbbbbbbbbbbbbbbbbbbbbbbbbbbbbbbbb c c c c ACD Stroke Count (can be up to 10 buttons) c Count c c bc bbbbbbbbbbbbbbbbbbbbbbbbbbbbbbbbbbbbbbbbbbbbbbbbbbbbbbbbbbbbbbbbbbbbbb c c c CPkUp c c Call Pickup bc bbbbbbbbbbbbbbbbbbbbbbbbbbbbbbbbbbbbbbbbbbbbbbbbbbbbbbbbbbbbbbbbbbbbbb c c c c 1 c Directory Dir c bc bbbbbbbbbbbbbbbbbbbbbbbbbbbbbbbbbbbbbbbbbbbbbbbbbbbbbbbbbbbbbbbbbbbbbb c c c c 2 c HFAns c c Internal (Hands-Free) Auto Answer bc bbbbbbbbbbbbbbbbbbbbbbbbbbbbbbbbbbbbbbbbbbbbbbbbbbbbbbbbbbbbbbbbbbbbbb c c c IAuto c c Automatic Intercom c bc bbbbbbbbbbbbbbbbbbbbbbbbbbbbbbbbbbbbbbbbbbbbbbbbbbbbbbbbbbbbbbbbbbbbbb c c c c Dial Intercom IDial c c c bc bbbbbbbbbbbbbbbbbbbbbbbbbbbbbbbbbbbbbbbbbbbbbbbbbbbbbbbbbbbbbbbbbbbbbb c c c Inspt c c Inspect bc bbbbbbbbbbbbbbbbbbbbbbbbbbbbbbbbbbbbbbbbbbbbbbbbbbbbbbbbbbbbbbbbbbbbbb c c c c c Last Number Dialed Last cbbbbbbbbbbbbbbbbbbbbbbbbbbbbbbbbbbbbbbbbbbbbbbbbbbbbbbbbbbbbbbbbbbbbbbb c c c c c c RngOf c Ringer Off c bc bbbbbbbbbbbbbbbbbbbbbbbbbbbbbbbbbbbbbbbbbbbbbbbbbbbbbbbbbbbbbbbbbbbbbbc c c SAC c c Send All Calls cbbbbbbbbbbbbbbbbbbbbbbbbbbbbbbbbbbbbbbbbbbbbbbbbbbbbbbbbbbbbbbbbbbbbbbb c c 1 2 bbbbbbbbbb Call Display standard feature button should be administered, if access to A cbbbbbbbbbbc bbbbbbbbbb Display the System Directory is provided. It is also desirable for a cbNext bbbbbbbbbc standard feature button to be administered. This feature is available only with the DEFINITY G3V2 (or later) switch. 61 bbbbb Switch Administration b bbbbbbbbbbbbbbbbbbbbbbbbbbbbbbbbbbbbbbbbbbb bbbbbbbbbbbbbbbbbbbbbbbbbbbbbbbbbbbbbbbbbbbbbbbbbbbbbbbbbbbbbbbbb c c Alternate Softkey Features for the 8434DX (cont.) bc bbbbbbbbbbbbbbbbbbbbbbbbbbbbbbbbbbbbbbbbbbbbbbbbbbbbbbbbbbbbbbbbc c c c c c Abbreviation Feature c bc bbbbbbbbbbbbbbbbbbbbbbbbbbbbbbbbbbbbbbbbbbbbbbbbbbbbbbbbbbbbbbbbc c c c SFunc c Abbreviated Dialed Special Function c bc bbbbbbbbbbbbbbbbbbbbbbbbbbbbbbbbbbbbbbbbbbbbbbbbbbbbbbbbbbbbbbbb c c c 3 c ACD View Statistics Stats c cbbbbbbbbbbbbbbbbbbbbbbbbbbbbbbbbbbbbbbbbbbbbbbbbbbbbbbbbbbbbbbbbb c c c c c c Stop 4 Abbreviation Dialing Indefinite Wait c c cbbbbbbbbbbbbbbbbbbbbbbbbbbbbbbbbbbbbbbbbbbbbbbbbbbbbbbbbbbbbbbbbb c c c View 5 c Stored Number c c cbbbbbbbbbbbbbbbbbbbbbbbbbbbbbbbbbbbbbbbbbbbbbbbbbbbbbbbbbbbbbbbbb 3 4 5 62 This feature can be used ONLY on a DEFINITY G3V3 or later. Also, note that after you press the softkey under the VuStats feature ( Stats), the statistics information will remain on the display for only approximately five seconds before it is overwritten by the softkey menu. In order to continuously display the statistical information, you should administer this feature on one of the call appearance/feature buttons instead of administering it as a softkey feature. When administering the Wait feature, use ‘‘-w’’; when administering the Stop feature, use ‘‘-W.’’ This feature CANNOT be administered on a DEFINITY G2 or System 85 switch. bbbbb Switch Administration b bbbbbbbbbbbbbbbbbbbbbbbbbbbbbbbbbbbbbbbbbbb bbbbbbbbbbbbbbb Button Numbering for 8434DX Voice Terminal Administration Use the following diagrams for administering the 8434DX voice terminal. Figure 17 shows the button numbering scheme for administering the 8434DX voice terminal to a System 75 or DEFINITY Generic 1 or Generic 3. Figure 18 shows the button numbering scheme for administering the 8434DX voice terminal to a System 85 or DEFINITY Generic 2. NOTE: On the voice terminals in the diagrams, both numbers and letters are printed on the dial pad keys. However, on some voice terminals only numbers appear on these keys. 63 bbbbb Switch Administration b bbbbbbbbbbbbbbbbbbbbbbbbbbbbbbbbbbbbbbbbbbb bbbbbbbbbbbbbbbbbbbbb If administered as a 7405D, administer the 15 softkey features as "FEATURE MODULE BUTTON ASSIGNMENTS" 2 through 16. Administer the Normal feature on Button #1 on the "DISPLAY BUTTON ASSIGNMENTS" screen. If administered as itself, administer the 15 softkey features on "SOFTKEY BUTTON ASSIGNMENTS" 1 through 15. 8434DX Menu Exit Prev Next 1 6 1 13 2 7 2 14 3 8 3 15 4 9 4 16 5 10 5 17 6 18 7 19 8 20 9 21 Message The 10 call appearance/feature buttons in the left 2 columns are administered as "BUTTON ASSIGNMENTS" 1 through 10. 10 22 11 23 12 24 The 24 call appearance/feature buttons in the right 2 columns are administered as "FEATURE BUTTON ASSIGNMENTS" 1 through 24. (On the 7434 or 7444, these buttons are labeled "BUTTON ASSIGNMENTS" and numbered 11 through 34). bbbbbbbbbbbbbbbbbbbbbbbbbbbbbbbb Figure 17. Button Numbering Scheme for Administering the 8434DX Voice Terminal Connected to System 75 or DEFINITY Generic 1 or Generic 3 64 bbbbb Switch Administration b bbbbbbbbbbbbbbbbbbbbbbbbbbbbbbbbbbbbbbbbbbb bbbbbbbbbbbbbbbbbbbbb If administered as a 7405D, administer the 15 softkey features as "FEATURE MODULE BUTTON ASSIGNMENTS" 2 through 16. Administer the Normal feature on Button #1 on the "DISPLAY BUTTON ASSIGNMENTS" screen. If administered as itself, administer the 15 softkey features on "SOFTKEY BUTTON ASSIGNMENTS" 1 through 15. 8434DX Menu Exit Prev Next 3 8 13 25 4 9 14 26 5 10 15 27 6 11 16 28 7 12 17 29 The 10 call appearance/feature buttons in the left 2 columns are administered as "BUTTON ASSIGNMENTS" 3 through 12. 18 30 19 31 20 32 21 33 22 34 23 35 24 36 The 24 call appearance/feature buttons in the right 2 columns are administered as "FEATURE BUTTON ASSIGNMENTS" 13 through 36. bbbbbbbbbbbbbbbbbbbbbbbbbbbbbbbb Figure 18. Button Numbering Scheme for Administering the 8434DX Voice Terminal Connected to System 85 or DEFINITY Generic 2 65 bbbbb b bbbbbbbbbbbbbbbbbbbbbbbbbbbbbbbbbbbbbbbbbbb 66 bbbbb b bbbbbbbbbbbbbbbbbbbbbbbbbbbbbbbbbbbbbbbbbbb The Test Feature and the Diagnostics Feature bbbbbbbbbbbbbbbbbbbbbbbbbbbbbbbbbbbb b bbbbbb The Test Feature (For ALL 8400-Series Voice Terminals) When an 8400-Series voice terminal bbbbb is initially powered up, the green light (or Test flashes if the voice terminal is not (or not yet) red light on the 8411) next to cbbbbbc able to communicate with the PBX or with the auxiliary power supply, whichever is appropriate. The light changes to steady when the PBX link is operational. After a short period of time, the light turns off in order to conserve power. NOTE: bbbbb Test does not come on, the voice terminal is not If the light next to cbbbbbc receiving power from the PBX or from the auxiliary power supply. To test the lights and the display on your voice terminal bbbbb Test . 1. While on-hook, press and hold down cbbbbbc bbbbb Test goes on. Light next to cbbbbbc NOTE: bbbbb Test flashes rather than goes on steadily, If the light next to cbbbbbc it means that the voice terminal is not able to communicate with the PBX or with the auxiliary power supply. The button lights on your voice terminal go on (and, if the terminal has a display, all the display segments fill in): — On the 8403, all the lights go on together — On the 8410 and 8411, the lights go on in two groups, and the display, if there is one, fills in all the segments 67 bbbbb The Test Feature and the Diagnostics Feature b bbbbbbbbbbbbbbbbbbbbbbbbbbbbbbbbbbbbbbbbbbb — On the 8434DX, the lights go on in four groups, and the display fills in all the segments bbbbb Test to end test. 2. Release cbbbbbc Lights return to pretest state. bbbbb Test goes off. Light next to cbbbbbc NOTE: You can test the tone ringer on your voice terminal by pressing either side of the Volume control button when the handset is on-hook and the speaker is not in use. b bbbbbb The Diagnostics Feature (Used ONLY with the 8411 Voice Terminal) On the 8411 voice terminal, the user can use the Diagnostics feature to monitor the status of the PassageWay connection and the Analog Adjunct. Use the following procedure. bbbbb Shift 1. Press cbbbbbc bbbbb Shift goes on steadily. The red light next to cbbbbbc bbbbb Test 2. Press cbbbbbc bbbbb bbbbb Test flutters Shift goes off and the light next to cbbbbbc The light next to cbbbbbc intermittently. The red and green lights go on next to Buttons #9 and #10 to indicate the status of these fwo functions. (If administered, Button #9 is always used to monitor the status of the PassageWay connection. Button #10 is always used to monitor the Analog Adjunct.) For more information about the meaning of these diagnostics lights, see ‘‘PassageWay and Analog Adjunct Status Indications on the 8411’’ earlier in this manual. NOTE: If you press any voice terminal buttons or if you receive or place a call during the diagnostics test, the test is terminated and the voice terminal returns to Normal Mode. 68 bbbbb b bbbbbbbbbbbbbbbbbbbbbbbbbbbbbbbbbbbbbbbbbbb Programming the Options bbbbbbbbbbbbbbbbbbbbbbbbbbbbbbbbbbbb Depending on the needs of the telecommunications administrator and individual users at an installation site, a service technician may be called upon to change the following settings for the 8400-Series voice terminal: Enable or disable the speakerphone or listen-only speaker (the default for the 8403 is the 1-way listen-only speaker enabled; the default for the 8410, 8411, and 8434DX voice terminals is full 2-way speakerphone enabled) Enable or disable the Mute function (the default is Mute enabled) Select a ringing preference for an incoming call when you are busy on another call (the default is Continuous Ringing) Enable or disable status lights on the 8411 for the PassageWay interface (the default setting is Status Lights disabled) Enable or disable status lights on the 8411 for the Analog (Tip/Ring) Adjunct connected to the Analog Adjunct jack (the default setting is Status Lights disabled) Select whether the I-1 Channel or the I-2 Channel on the 8411 voice terminal will be used for the Analog Adjunct transmission Set the audio volume control levels for the speakerphone and handset on the 8411 voice terminal (the default is retention of the current volume setting for both speakerphone and handset until the user changes the settings). Set the display for one or two lines (this option is available only on the 8434DX voice terminal; the default setting is a 2-line display) 69 bbbbb Programming the Options b bbbbbbbbbbbbbbbbbbbbbbbbbbbbbbbbbbbbbbbbbbb NOTE: On all 8410D, 8411D, and 8434DX voice terminal displays, you can view information on options and parameters already set for that particular terminal. For procedures, see ‘‘Viewing Information on Terminal Options and Parameters’’ at the end of this section of the manual. In order to ‘‘hide’’ these features for security purposes, are bbbbb bbbbbbb four button presses Shift Feature (on the 8403) or cbbbbbc necessary to enter Programming Mode: Press bcbbbbb bbbbbbc (on the 8410, 8411, and 8434DX) followed by cbMute bbbbc and then enter the specified 2-digit code on the dial pad. If an error is made during the programming sequence, the terminal will exit the Programming Mode without providing any error indication or affecting the operation of the terminal. CAUTION: Be sure the voice terminal is on-hook, the ringer is off, and the display (if the set has one) is in Normal Mode. If a headset adapter is connected to the set, make sure this is also in the on-hook state. You can do that either by pressing an appropriate button on the headset adapter or by unplugging the headset from the headset adapter. If a call should come in while programming the options, the alerter will sound, but the terminal will remain in Programming Mode unless the call is answered. If the call is answered, the Programming Mode is exited without saving any changes in progress. bbbbbbbbbbbbbbb A Shortcut in Programming the Options (for Display Sets) If you have a voice terminal equipped with a display, the display screen shows the option being programmed and you may use the following keys to program the options. bbb The cbbbc ∗ toggles the option setting (such as between ‘‘enabled’’ and ‘‘disabled’’) or shows you the next setting on the display. bbb # stores the option setting shown and exits Programming Mode. The cbbbc 70 bbbbb Programming the Options b bbbbbbbbbbbbbbbbbbbbbbbbbbbbbbbbbbbbbbbbbbb b bbbbbb Enabling/Disabling the Speakerphone or Speaker (or Changing to a Listen-Only Speaker) NOTE: The 8403 is equipped with a 1-way, listen-only speaker that can be enabled or disabled; this voice terminal CANNOT be optioned for a 2-way speakerphone. To enable or disable the 2-way speakerphone or the listen-only speaker, or to change the 2-way speakerphone to a 1-way, listen-only speaker bbbbb bbbbbbb Shift . Feature or cbbbbbc 1. While on-hook, press cbbbbbbbc bbbbb bbbbbbb Shift goes on. Feature or cbbbbbc The light next to cbbbbbbbc b bbbb 2. Press cbMute bbbbc . bbbbb bbbbbbb Shift goes off. Feature or cbbbbbc The light next to cbbbbbbbc 3. Enter the 2-digit code, ‘‘77’’ (‘‘SP’’). bbbbbbbb Speaker flutters. The red light next to cbbbbbbbbc If the voice terminal has a display, the current setting ( ENABLE SPEAKERPHONE or ENABLE ONE-WAY SPEAKER or DISABLE SPEAKER) is shown on the display, if there is one. 4. Press one of the following to change the current setting: Press ‘‘1’’ to enable the 2-way speakerphone (This setting cannot be used with the 8403) Press ‘‘2’’ to enable the 1-way speaker Press ‘‘3’’ to disable the 1-way speaker or the 2-way speakerphone or bbb if the voice terminalbbb has a display, you may choose to press cbbbc ∗ to change # to save the desired option and then exit the setting. Press cbbbc programming. After pressing ‘‘1,’’ ‘‘2,’’ or ‘‘3’’ or pressing ‘‘#’’, one of the following voice terminal responses occurs: If the voice terminal saves your selection, the first three green call appearance lights go on and, if you have a display, a confirmation message is displayed. If the voice terminal cannot save this selection, the first three red call appearance lights go on and, if you have a display, an error message is displayed. In this case, the selected option will be in effect until power is removed from the set. If this happens, try repeating the process. If the option still cannot be saved, the terminal may be faulty. 71 bbbbb Programming the Options b bbbbbbbbbbbbbbbbbbbbbbbbbbbbbbbbbbbbbbbbbbb b bbbbbb Enabling/Disabling the Mute Function To enable or disable the Mute function bbbbb bbbbbbb Shift . Feature or cbbbbbc 1. While on-hook, press cbbbbbbbc bbbbb bbbbbbb Shift goes on. Feature or cbbbbbc The light next to cbbbbbbbc b bbbb 2. Press cbMute bbbbc . bbbbb bbbbbbb Shift goes off. Feature or cbbbbbc The light next to cbbbbbbbc 3. Enter the 2-digit code, ‘‘68’’ (‘‘MU’’). b bbbb The red light next to cbMute bbbbc flutters. The current setting (ENABLE MUTE BUTTON or DISABLE MUTE BUTTON) is shown on the display, if there is one. 4. Press either ‘‘1’’ or ‘‘2’’ to change the setting: Press ‘‘1’’ to enable the Mute function Press ‘‘2’’ to disable the Mute function or bbb ifbbb the voice terminal has a display, press cbbbc ∗ to change the setting. Press # to save the desired option and then exit programming. cbbbc After pressing ‘‘1’’ or ‘‘2’’ or pressing ‘‘#’’, one of the following voice terminal responses occurs: If the voice terminal saves your selection, the first three green call appearance lights go on and, if you have a display, a confirmation message is displayed. If the voice terminal cannot save this selection, the first three red call appearance lights go on and, if you have a display, an error message is displayed. In this case, the selected option will be in effect until power is removed from the set. If this happens, try repeating the process. If the option still cannot be saved, the terminal may be faulty. 72 bbbbb Programming the Options b bbbbbbbbbbbbbbbbbbbbbbbbbbbbbbbbbbbbbbbbbbb b bbbbbb Selecting Ringing Preference (for a second incoming call) You can select one of the following types of rings for an incoming call while you are busy on another call. No Ring One Ring Continuous Ringing To select ringing preference (No Ring, One Ring, or Continuous Ringing) bbbbb bbbbbbb Shift . Feature or cbbbbbc 1. While on-hook, press cbbbbbbbc bbbbb bbbbbbb Shift goes on. Feature or cbbbbbc The light next to cbbbbbbbc b bbbb 2. Press cbMute bbbbc . bbbbb bbbbbbb Shift goes off. Feature or cbbbbbc The light next to cbbbbbbbc 3. Enter the 2-digit code, ‘‘74’’ (‘‘RG’’). bbbbb bbbbbbb Shift flutters. Feature or cbbbbbc The light next to cbbbbbbbc The current setting (NO RING, ONE RING, or CONTINUOUS RING) is shown on the display, if there is one. 4. Press one of the following options: Press ‘‘0’’ for No Ring Press ‘‘1’’ for One Ring Press ‘‘2’’ for Continuous Ringing or bbb if the voice terminal has a display, press ∗ to move to the next setting bbb cbbbc # to save the desired option and shown on the display screen. Press cbbbc then exit programming. After pressing ‘‘0,’’ ‘‘1,’’ or ‘‘2’’ or pressing ‘‘#’’, one of the following voice terminal responses occurs: If the voice terminal saves your selection, the first three green call appearance lights go on and, if you have a display, a confirmation message is displayed. If the voice terminal cannot save this selection, the first three red call appearance lights go on and, if you have a display, an error message is displayed. In this case, the selected option will be in effect until power is removed from the set. If this happens, try repeating the process. If the option still cannot be saved, the terminal may be faulty. 73 bbbbb Programming the Options b bbbbbbbbbbbbbbbbbbbbbbbbbbbbbbbbbbbbbbbbbbb b bbbbbb Enabling/Disabling the Status Lights for the PassageWay Connection (For the 8411 Voice Terminal Only) If a PC for the PassageWay Solution has been connected to the RS-232-D jack on the rear of the 8411, the user can use Button #9 (the next-to-last button in the second column) to see the status of the PassageWay connection. For a list of PassageWay indications, see ‘‘PassageWay and Analog Adjunct Status Indications on the 8411’’ earlier in this manual. To enable or disable the status lights for the PassageWay connection bbbbb Shift . 1. While on-hook, press cbbbbbc bbbbb Shift goes on. The light next to cbbbbbc b bbbb 2. Press cbMute bbbbc . bbbbb Shift goes off. The light next to cbbbbbc 3. Enter the 2-digit code, ‘‘79’’ (‘‘PW’’). The red and green lights next to Button #9 flutter. The current setting (ENABLE PWY STATUS LAMPS or DISABLE PWY STATUS LAMPS) is shown on the display, if there is one. 4. Press either ‘‘1’’ or ‘‘2’’ to change the setting: Press ‘‘1’’ to enable the status lights for the PassageWay connection (next to Button #9) Press ‘‘2’’ to disable the status lights for the PassageWay connection or bbb ifbbb the voice terminal has a display, press cbbbc ∗ to change the setting. Press # to save the desired option and then exit programming. cbbbc After pressing ‘‘1’’ or ‘‘2’’ or pressing ‘‘#’’, the red and green lights stop fluttering and one of the following voice terminal responses occurs: If the voice terminal saves your selection, the first three green call appearance lights go on and, if you have a display, a confirmation message is displayed. If the voice terminal cannot save this selection, the first three red call appearance lights go on and, if you have a display, an error message is displayed. In this case, the selected option will be in effect until power is removed from the set. If this happens, try repeating the process. If the option still cannot be saved, the terminal may be faulty. 74 bbbbb Programming the Options b bbbbbbbbbbbbbbbbbbbbbbbbbbbbbbbbbbbbbbbbbbb b bbbbbb Enabling/Disabling the Status Lights for the Analog (Tip/Ring) Adjunct Interface (For the 8411 Voice Terminal Only) If an Analog Adjunct has been connected to the Analog Adjunct jack on the rear of the 8411 voice terminal, the user can use the lights next to Button #10 (the last button in the second column) to see the status of the Analog Adjunct connection. These indications show: Status of the ringing signal being sent from the voice terminal to the Analog Adjunct) (on OR off) Switchhook status of the Analog Adjunct (off-hook OR on-hook and idle) Status of the I-Channel (used by the Analog Adjunct OR by the 8411 voice terminal) For a more detailed list of Analog Adjunct (Tip/Ring) status light indications, see ‘‘PassageWay and Analog Adjunct Status Indications on the 8411’’ earlier in this manual. To enable or disable the status lights for the Analog Adjunct interface bbbbb Shift . 1. While on-hook, press cbbbbbc bbbbb Shift goes on. The light next to cbbbbbc b bbbb 2. Press cbMute bbbbc . bbbbb Shift goes off. The light next to cbbbbbc 3. Enter the 2-digit code, ‘‘25’’ (‘‘AL’’). The red and green lights next to Button #10 flutter. The current setting (ENABLE T/R STATUS LAMPS or DISABLE T/R STATUS LAMPS) is shown on the display, if there is one. 4. Press either ‘‘1’’ or ‘‘2’’ to change the setting: Press ‘‘1’’ to enable the status lights for the Analog (Tip/Ring) Adjunct connected to the Analog Adjunct jack Press ‘‘2’’ to disable status lights for Analog Adjunct connection (so the button is thus used in the normal way, that is, for call appearance or feature indications) or bbb ifbbb the voice terminal has a display, press cbbbc ∗ to change the setting. Press # to save the desired option and then exit programming. cbbbc After pressing ‘‘1’’ or ‘‘2’’ or pressing ‘‘#’’, the red and green lights stop fluttering and one of the following voice terminal responses occurs: 75 bbbbb Programming the Options b bbbbbbbbbbbbbbbbbbbbbbbbbbbbbbbbbbbbbbbbbbb If the voice terminal saves your selection, the first three green call appearance lights go on and, if you have a display, a confirmation message is displayed. If the voice terminal cannot save this selection, the first three red call appearance lights go on and, if you have a display, an error message is displayed. In this case, the selected option will be in effect until power is removed from the set. If this happens, try repeating the process. If the option still cannot be saved, the terminal may be faulty. b bbbbbb Selecting Whether the I1-Channel or the I2-Channel Will Be Used for the Analog Adjunct (For the 8411 Only) If the 8411 is connected to a DEFINITY G4, Issue 3 (or later) switch, the Analog (Tip/Ring) Adjunct and voice terminal can handle calls simultaneously over the I1-Channel or the I2-Channel. The system manager can administer the voice terminal to select which of the two channels the Analog (Tip/Ring) Adjunct will use. To select which channel (the I1-Channel or the I2-Channel) the Analog (T/R) Adjunct will use bbbbb Shift . 1. While on-hook, press cbbbbbc bbbbb Shift goes on. The light next to cbbbbbc b bbbb 2. Press cbMute bbbbc . bbbbb Shift goes off. The light next to cbbbbbc 3. Enter the 2-digit code, ‘‘42’’ (‘‘IC’’). bbbbb Shift flutters. The red light next to cbbbbbc The current setting (either T/R ON I1 CHANNEL or T/R ON I2 CHANNEL) is shown on the display, if there is one. 4. Press either ‘‘1’’ or ‘‘2’’ to change the setting: Press ‘‘1’’ to select the I1-Channel for Analog Adjunct transmission Press ‘‘2’’ to select the I2-Channel for Analog Adjunct transmission or bbb ifbbb the voice terminal has a display, press cbbbc ∗ to change the setting. Press # to save the desired option and then exit programming. cbbbc bbbbb Shift After pressing ‘‘1’’ or ‘‘2’’ or pressing ‘‘#’’, the light next to cbbbbbc goes off and one of the following voice terminal responses occurs: If the voice terminal saves your selection, the first three 76 bbbbb Programming the Options b bbbbbbbbbbbbbbbbbbbbbbbbbbbbbbbbbbbbbbbbbbb green call appearance lights go on and, if you have a display, a confirmation message is displayed. If the voice terminal cannot save this selection, the first three red call appearance lights go on and, if you have a display, an error message is displayed. In this case, the selected option will be in effect until power is removed from the set. If this happens, try repeating the process. If the option still cannot be saved, the terminal may be faulty. b bbbbbb Setting the Audio Volume Control (on the 8411) The 8411 sets will support a set of audio volume control features for the handset and speakerphone. The speakerphone and handset volume remains at its current setting until the user changes it (that is, the volume level does NOT revert back to its mid-range volume after each call) (this is the default setting) The speakerphone and handset volume reverts back to its mid-range level after each call The handset volume is fixed at a mid-range volume setting, and the speakerphone volume remains at its current setting until the user changes it (that is, the speakerphone volume does NOT automatically revert back to its mid-range level after each call) The handset volume level is fixed at a mid-range volume setting, and the speakerphone volume reverts back to its mid-range level after each call To set the audio volume control for the handset and the speakerphone bbbbb Shift . 1. While on-hook, press cbbbbbc bbbbb Shift goes on. The light next to cbbbbbc b bbbb 2. Press cbMute bbbbc . bbbbb Shift goes off. The light next to cbbbbbc 3. Enter the 2-digit code, ‘‘48’’ (‘‘HV’’). bbbbb Shift flutters. The red light next to cbbbbbc If the voice terminal has a display, the current setting ( RETAIN SP, RETAIN HS or RESET SP, RESET HS or RETAIN SP, FIXED HS or RESET SP, FIXED HS) is shown on the display, if there is one. 4. Press one of the following to change the current setting: Press ‘‘1’’ to RETAIN the HANDSET AND SPEAKERPHONE volume at its current volume level (that is, the volume level does NOT automatically revert back to the mid-range level after each call) 77 bbbbb Programming the Options b bbbbbbbbbbbbbbbbbbbbbbbbbbbbbbbbbbbbbbbbbbb Press ‘‘2’’ to RESET the HANDSET AND SPEAKERPHONE volume to its mid-range volume level after each call Press ‘‘3’’ to FIX the HANDSET volume at a mid-range level, and RETAIN the SPEAKERPHONE at its current level (does NOT revert back to mid-range level after each call) Press ‘‘4’’ to FIX the HANDSET volume at a mid-range level, and RESET the SPEAKERPHONE volume level to a mid-range level after each call or bbb if the voice terminalbbb has a display, you may choose to press cbbbc ∗ to change # to save the desired option and then exit the setting. Press cbbbc programming. After bbbbbpressing ‘‘1,’’ ‘‘2,’’ ‘‘3,’’ or ‘‘4,’’ or pressing ‘‘#’’, the light next to Shift goes off and one of the following voice terminal responses cbbbbbc occurs: If the voice terminal saves your selection, the first three green call appearance lights go on and, if you have a display, a confirmation message is displayed. If the voice terminal cannot save this selection, the first three red call appearance lights go on and, if you have a display, an error message is displayed. In this case, the selected option will be in effect until power is removed from the set. If this happens, try repeating the process. If the option still cannot be saved, the terminal may be faulty. 78 bbbbb Programming the Options b bbbbbbbbbbbbbbbbbbbbbbbbbbbbbbbbbbbbbbbbbbb b bbbbbb Setting the Display for 1- or 2-Lines (for the 8434DX only) To change the display to 1 or 2 lines (on the 8434DX only) bbbbb Shift . 1. While on-hook, press cbbbbbc bbbbb Shift goes on. The light next to cbbbbbc b bbbb 2. Press cbMute bbbbc . bbbbb Shift goes off. The light next to cbbbbbc 3. Enter the 2-digit code, ‘‘35’’ (‘‘DL’’). The current setting (1-LINE DISPLAY or 2-LINE DISPLAY) is shown on the display. 4. Press either ‘‘1’’ or ‘‘2’’ to change the setting: Press ‘‘1’’ to select a 1-line display Press ‘‘2’’ to select a 2-line display or bbb bbb # to save the desired option and press cbbbc ∗ to change the setting. Press cbbbc then exit programming. After pressing ‘‘1’’ or ‘‘2’’ or pressing ‘‘#’’, one of the following voice terminal responses occurs: If the voice terminal saves your selection, the first three green call appearance lights go on and, if you have a display, a confirmation message is displayed. If the voice terminal cannot save this selection, the first three red call appearance lights go on and, if you have a display, an error message is displayed. In this case, the selected option will be in effect until power is removed from the set. If this happens, try repeating the process. If the option still cannot be saved, the terminal may be faulty. 79 bbbbb Programming the Options b bbbbbbbbbbbbbbbbbbbbbbbbbbbbbbbbbbbbbbbbbbb b bbbbbb Viewing Information on Terminal Options and Parameters You can use the 8410D, 8411D, and 8434DX display screen to view options and parameters that have been set at a particular voice terminal. NOTE: In order for you to view this information, the set must be on-hook and idle, and it must equipped with a display. To view voice terminal options and parameters for a specific set bbbbb Shift . 1. While on-hook at that voice terminal, press cbbbbbc bbbbb Shift goes on. The light next to cbbbbbc b bbbb 2. Press cbMute bbbbc . bbbbb Shift goes off. The light next to cbbbbbc 3. Enter ‘‘00’’ OR ‘‘11’’ OR ‘‘##’’ according to the type of information you wish to view. Press ‘‘00’’ to view what Speakerphone, Mute, Handset Expander, and Ringer Preference options are set. Press ‘‘11’’ to view the Compander, Display Font (Domestic or International), and DLI settings. Also shown is information about the Primary and Adjunct levels selected (either ROM if the defaults are operating or the checksum bytes of the parameter message that set the levels). Press ‘‘##’’ to check the software version currently installed in the terminal and whether the terminal is operating in 4-wire or 2-wire mode. The information is displayed on the screen for approximately five seconds and then disappears. 4. To view more information on terminal options and parameters, repeat Steps 1 through 3. 80 bbbbb b bbbbbbbbbbbbbbbbbbbbbbbbbbbbbbbbbbbbbbbbbbb Other 8400-Series Voice Terminals Documentation bbbbbbbbbbbbbbbbbbbbbbbbbbbbbbbbbbbb The following documentation provides instructions for using both the fixed and the switch features. These documents can be ordered from the AT&T GBCS Publications Fulfillment Center. Write: AT&T GBCS Publications Fulfillment Center P.O. Box 4100 Crawfordsville, IN 47933 Call: 1 800 457-1235 Outside US: 1 317 361-5353 When ordering any of these documents, be sure to specify the title and the ‘‘555’’ ordering number. DEFINITY Communications System Generic 1 and Generic 3 and System 75 8403 Voice Terminal User’s Guide, 555-230-761 DEFINITY Communications System Generic 1 and Generic 3 and System 75 8403 Voice Terminal Quick Reference Guide, 555-230-762 DEFINITY Communications System Generic 2 and System 85 8403 Voice Terminal User’s Guide, 555-104-761 DEFINITY Communications System Generic 2 and System 85 8403 Voice Terminal Quick Reference Guide, 555-104-762 DEFINITY Communications System Generic 1 and Generic 3 and System 75 8410 Voice Terminal User’s Guide, 555-230-763 DEFINITY Communications System Generic 1 and Generic 3 and System 75 8410 Voice Terminal Quick Reference Guide, 555-230-764 81 bbbbb Other 8400-Series Voice Terminals Documentation b bbbbbbbbbbbbbbbbbbbbbbbbbbbbbbbbbbbbbbbbbbb DEFINITY Communications System Generic 2 and System 85 8410 Voice Terminal User’s Guide, 555-104-763 DEFINITY Communications System Generic 2 and System 85 8410 Voice Terminal Quick Reference Guide, 555-104-764 DEFINITY Communications System Generic 1 and Generic 3 and System 75 8411 Voice Terminal User’s Guide, 555-230-872 DEFINITY Communications System Generic 1 and Generic 3 and System 75 8411 Voice Terminal Quick Reference Guide, 555-230-873 DEFINITY Communications System Generic 2 and System 85 8411 Voice Terminal User’s Guide, 555-104-769 DEFINITY Communications System Generic 2 and System 85 8411 Voice Terminal Quick Reference Guide, 555-104-770 DEFINITY Communications System Generic 1 and Generic 3 and System 75 8434DX Voice Terminal User’s Guide, 555-230-856 DEFINITY Communications System Generic 1 and Generic 3 and System 75 8434DX Voice Terminal Quick Reference Guide, 555-230-857 DEFINITY Communications System Generic 2 and System 85 8434DX Voice Terminal User’s Guide, 555-104-767 DEFINITY Communications System Generic 2 and System 85 8434DX Voice Terminal Quick Reference Guide, 555-104-768 801A Expansion Module Instruction Manual, 555-015-136 PassageWayTM Solution User’s Guide For DEFINITY Communications System, 560-201-102. 82