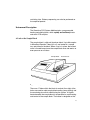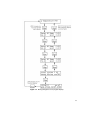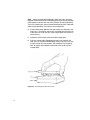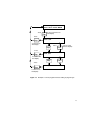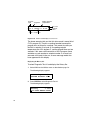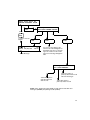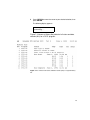
1
GeneAmp® PCR System 9600 User’s Manual © Copyright 2001, Applied Biosystems. All rights reserved. For Research Use Only. Not for use in diagnostic procedures. Notice AUTHORIZED THERMAL CYCLER NOTICE This GeneAmp PCR System 9600 is an Authorized Thermal Cycler. Its purchase price includes the up-front fee component of a license under the patents of the Polymerase Chain Reaction (PCR) process, which are owned by Roche Molecular Systems, Inc. and F. Hoffmann-La Roche Ltd., to practice the PCR process for internal research and development using this instrument. The running royalty component of that license may be purchased from Applied Biosystems or obtained by purchasing Authorized Reagents. This instrument is also an Authorized Thermal Cycler for use with applications licenses available from Applied Biosystems. Its use with Authorized Reagents also provides a limited PCR license in accordance with the label rights accompanying such reagents. Purchase of this product does not itself convey to the purchaser a complete license or right to perform the PCR process. Further information on purchasing licenses to practice the PCR process may be obtained by contacting the Director of Licensing at Applied Biosystems, 850 Lincoln Centre Drive, Foster City, California 94404. The information contained in this document is subject to change without notice. APPLIED BIOSYSTEMS MAKES NO WARRANTY OF ANY KIND WITH REGARD TO THIS MATERIAL, INCLUDING, BUT NOT LIMITED TO, THE IMPLIED WARRANTIES OF MERCHANTABILITY AND FITNESS FOR A PARTICULAR PURPOSE. APPLIED BIOSYSTEMS SHALL NOT BE LIABLE FOR ERRORS CONTAINED HEREIN OR FOR INCIDENTAL CONSEQUENTIAL DAMAGES IN CONNECTION WITH THE FURNISHING, PERFORMANCE, OR USE OF THIS MATERIAL. Release Information Manual Part No. Manual Version Date 0993-8660 E 04/2001 Trademarks Applied Biosystems and MicroAmp are registered trademarks of Applera Corporation or its subsidiaries in the U.S. and certain other countries. Epson is a trademark of Seiko Epson Corporation. AmpliTaq, AmpliType, GeneAmplimer, AmpliWax, EnviroAmp, and Twelve Paq AmpliTaq are registered trademarks of Roche Molecular Systems, Inc. GeneAmp is a registered trademark of Roche Molecular Systems, Inc. Registered trademarks, etc. used in this document, even when not specifically marked as such, are protected by law. Safety and Regulatory Information S Conventions Used in This Manual ! WARNING ! A warning indicates an operation that could cause personal injury if precautions are not followed. CAUTION A caution indicates an operation that could cause instrument damage if precautions are not followed. Note Notes emphasize significant information in a procedure or description. S-1 Symbols and Conventions Used on the Instrument There are three different types of warning symbols that appear on the instrument. This symbol indicates an operation (or condition on the instrument) that could cause personal injury or instrument damage if precautions are not followed. This can be any type of hazard. When you see this symbol, refer to the safety pages in the manual for further information. AVERTISSEMENT. Consulter les documents d'accompagnement. If there is a hazard of heat or electric shock, the following warning symbols will appear on the instrument: This symbol indicates the danger of burns, if precautions are not followed, due to the presence of heat in this area of the instrument. There may also be hot surfaces that can be easily touched. AVERTISSEMENT. Surface chaude. This symbol indicates the danger of electric shock, if precautions are not followed, due to the presence of high voltage. AVERTISSEMENT. Risque de choc électrique. S-2 Additional graphic symbols used on the instrument are the following: Indicates alternating current. Indicates the primary protective grounding terminal. Indicates the off position of the main power switch. Indicates the on position of the main power switch. S-3 Warnings on the Instrument The following sections present the warning labels affixed to the instrument. 100, 120, and 220/230 Volt Models The following warning labels are affixed to the front, the left side and the back of the instrument as shown in the figures on the following pages for all three voltage models (100, 120, and 220/230). Front of Instrument ! WARNING ! Hot Surface. Use care when working around this area to avoid being burned by hot components. ! AVERTISSEMENT ! Surface chaude. ! WARNING ! To reduce the chance of electrical shock do not remove covers that require tool access. No user serviceable parts are inside. Refer servicing to Applied Biosystems qualified service personnel. ! AVERTISSEMENT ! Pour réduire le risque de chocs électriques, ne pas ouvrir les couvercies si un outil est nécessaire. Ne contient aucune pièce pouvant être réparée par l'utilisateur. Confier le dépannage au personnel qualifié de Applied Biosystems. Left Side of Instrument ! WARNING ! For protection against fire hazard, replace only with same type and rating of fuse. ! AVERTISSEMENT ! Afin d'assurer la protection contre les risques d'incendie, remplacer uniquement par un fusible de même type et de même courant nominal. S-4 Back of Instrument ! WARNING ! Grounding circuit continuity is vital for safe operation of equipment. Never operate equipment with grounding conductor disconnected. ! AVERTISSEMENT ! Risque de choc électrique. Pour un fonctionnement sans danger. Ne jamais utiliser l'équipment si le fil de terre n'est pas raccordé. ! WARNING ! To avoid electrical shock, disconnect power cord before servicing. ! AVERTISSEMENT ! Pour éviter les chocs électriques, débrancher le cordon d'alimentation avant le dépannage. CAUTIONThis unit contains protective circuitry. Contact Applied Biosystems Service before performing any AC line tests. ! AVERTISSEMENT ! Cet appareil contient des circuits de protection. Vérifier auprès de Applied Biosystems avant d' effectuer des essais de secteur. S-5 ! WARNING ! Hot Surface. Use care when working around this area to avoid being burned by hot components. ! AVERTISSEMENT ! Surface chaude. ! WARNING ! To reduce the chance of electrical shock do not remove covers that require tool access. No user serviceable parts are inside. Refer servicing to Applied Biosystems qualified service personnel. ! AVERTISSEMENT ! Pour réduire le risque de chocs électriques, ne pas ouvrir les couvercies si un outil est nécessaire. Ne contient aucune pièce pouvant être réparée par l'utilisateur. Confier le dépannage au personnel qualifié de Applied Biosystems. S-6 ! WARNING ! For protection against fire hazard, replace only with same type and rating of fuse. ! AVERTISSEMENT ! Afin d'assurer la protection contre les risques d'incendie, remplacer uniquement par un fusible de même type et de même courant nominal. LEFT SIDE S-7 ! WARNING ! Grounding circuit continuity is vital for safe operation of equipment. Never operate equipment with grounding conductor disconnected. ! AVERTISSEMENT ! Risque de choc électrique. Pour un fonctionnement sans danger. Ne jamais utiliser l'équipment si le fil de terre n'est pas raccordé. ! WARNING ! To avoid electrical shock, disconnect power cord before servicing. ! AVERTISSEMENT ! Pour éviter les chocs électriques, débrancher le cordon d'alimentation avant le dépannage. CAUTIONThis unit contains protective circuitry. Contact Applied Biosystems service before performing any AC line tests. ! AVERTISSEMENT ! Cet appareil contient des circuits de protection. Vérifier auprès de Applied Biosystems avant d' effectuer des essais de secteur. BACK VIEW S-8 Electrical Safety Testing CAUTION Routine safety testing of analytical instruments (e.g., high potential voltage testing) may be required by various safety agencies. Testing should only be carried out by qualified personnel after seeking advice from the Applied Biosystems Service Department. Internal AC line surge suppressors may need to be disconnected before a test is performed. On completion of the tests, it is essential to reconnect the surge components. Electromagnetic Compatibility (EMC) United States (FCC) This product is classified as a digital device used exclusively as industrial, commercial, or medical test equipment. It is exempt from the technical standards specified in Part 15 of the FCC Rules and Regulations, based on Section 15.103 (c). S-9 Operating Precautions This manual contains important information regarding potential hazards that may arise during the operation of the instrument. It is essential that this information is read and thoroughly understood by all potential users of the instrument. This section describes precautions that must be observed in order to assure safe operation. If used otherwise, the protections provided by the instrument can be impaired. Sample Block Cover CAUTION To protect your samples and to guarantee the best temperature uniformity, keep the sample block cover closed at all times, except when you are loading samples. CAUTION To avoid damaging the sample block or heated cover, make sure you turn the cover knob completely counterclockwise before you try to move the heated cover either forward or backward. The cover knob must be turned completely counterclockwise to lift the heated plate from the sample block. ! WARNING ! During routine operation, do not lift the heated cover. This will expose the surface of the sample block, which may be hotter than 100 degrees Celsius. See Chapter 7 for cleaning instructions. S-10 Instrument Cover CAUTION This unit contains protective circuitry. Contact Applied Biosystems before performing any AC line tests. ! WARNING ! To reduce the chance of electrical shock, do not remove covers that require tool access. There are no user-serviceable components inside the instrument. Refer servicing to Applied Biosystems qualified service personnel. Temperature, Humidity, and Environment CAUTION This instrument is designed for indoor use. CAUTION Do not operate in a Cold Room or a refrigerated area. The PCR 9600 operates most efficiently under the following conditions: ♦ ambient temperature is 15 to 30°C (59 to 86°F), ♦ ambient relative humidity is 20 to 80% (without condensation), ♦ altitude is in the range 0 to 2000 meters. CAUTION This instrument is not designed for operation in an explosive environment. Installation Category This instrument is able to withstand transient overvoltage according to Installation Category II as defined in IEC 1010-1, CSA 1010.1 and UL 3101–1. S-11 Pollution Degree This equipment will operate safely in environments that contain nonconductive foreign matter up to Pollution Degree 2 in IEC 1010–1, CSA 1010.1 and UL 3101–1. Storage Conditions The PCR 9600 may be stored under the following conditions: ♦ ambient temperature is –20 to + 60°C (–4 to 140°F), ♦ ambient relative humidity is 20 to 80%, without condensation, ♦ altitude is in the range 0 to 12,000 meters. Electrical Warnings ! WARNING ! Connect the instrument to an AC line power outlet that has a protective ground connection. To ensure satisfactory and safe operation of the instrument, it is essential that the protective ground conductor (the green /yellow lead) of the line power cord is connected to true electrical ground. Any interruption of the protective ground conductor, inside or outside the instrument, or disconnection of the protective ground terminal may impair the protection provided by the instrument. ! WARNING ! Do not operate the instrument with any covers or parts removed. ! WARNING ! Use only fuses with the required current rating and of the specified type for replacement. S-12 Fuses and Power Interruption If power to the instrument fails or is turned off while the instrument is running, turn the instrument off and wait five minutes before restarting. If you do not wait, or if the power is restored quickly after a power failure, a fuse may blow. This does not mean that there is anything wrong with the instrument. It is caused by the refrigeration motor stalling because it is unable to start until the pressure bleeds away, which takes about five minutes. S-13 Technical Support Contacting You can contact Applied Biosystems for technical support by telephone Technical Support or fax, by e-mail, or through the Internet. You can order Applied Biosystems user documents, MSDSs, certificates of analysis, and other related documents 24 hours a day. In addition, you can download documents in PDF format from the Applied Biosystems Web site (please see the section “To Obtain Documents on Demand” following the telephone information below). To Contact Contact technical support by e-mail for help in the following product Technical Support areas: by E-Mail Product Area E-mail address Genetic Analysis (DNA Sequencing) [email protected] Sequence Detection Systems and PCR [email protected] Protein Sequencing, Peptide and DNA Synthesis [email protected] Biochromatography, PerSeptive DNA, PNA and Peptide Synthesis systems, CytoFluor®, FMAT™, Voyager™, and Mariner™ Mass Spectrometers [email protected] LC/MS (Applied Biosystems/MDS Sciex) [email protected] or [email protected] Chemiluminescence (Tropix) [email protected] Hours for In the United States and Canada, technical support is available at the Telephone following times: Technical Support S-14 Product Hours Chemiluminescence 8:30 a.m. to 5:30 p.m. Eastern Time Framingham support 8:00 a.m. to 6:00 p.m. Eastern Time All Other Products 5:30 a.m. to 5:00 p.m. Pacific Time To Contact Technical Support by Telephone or Fax In North America To contact Applied Biosystems Technical Support, use the telephone or fax numbers given below. (To open a service call for other support needs, or in case of an emergency, dial 1-800-831-6844 and press 1.) Product or Product Area Telephone Dial... Fax Dial... ABI PRISM® 3700 DNA Analyzer 1-800-831-6844, then press 8 1-650-638-5981 DNA Synthesis 1-800-831-6844, then press 21 1-650-638-5981 Fluorescent DNA Sequencing 1-800-831-6844, then press 22 1-650-638-5981 Fluorescent Fragment Analysis (includes GeneScan® applications) 1-800-831-6844, then press 23 1-650-638-5981 Integrated Thermal Cyclers (ABI PRISM ® 877 and Catalyst 800 instruments) 1-800-831-6844, then press 24 1-650-638-5981 ABI PRISM ® 3100 Genetic Analyzer 1-800-831-6844, then press 26 1-650-638-5981 BioInformatics (includes BioLIMS®, BioMerge™, and SQL GT™ applications) 1-800-831-6844, then press 25 1-505-982-7690 Peptide Synthesis (433 and 43X Systems) 1-800-831-6844, then press 31 1-650-638-5981 Protein Sequencing (Procise Protein Sequencing Systems) 1-800-831-6844, then press 32 1-650-638-5981 PCR and Sequence Detection 1-800-762-4001, then press 1 for 1-240-453-4613 PCR, 2 for the 7700 or 5700, 6 for the 6700 or dial 1-800-8316844, then press 5 S-15 Product or Product Area Telephone Dial... Fax Dial... Voyager MALDI-TOF Biospectrometry and Mariner ESI-TOF Mass Spectrometry Workstations 1-800-899-5858, then press 13 1-508-383-7855 Biochromatography (BioCAD Workstations and Poros Perfusion Chromatography Products) 1-800-899-5858, then press 14 1-508-383-7855 Expedite Nucleic acid Synthesis Systems 1-800-899-5858, then press 15 1-508-383-7855 Peptide Synthesis (Pioneer and 9050 Plus Peptide Synthesizers) 1-800-899-5858, then press 15 1-508-383-7855 PNA Custom and Synthesis 1-800-899-5858, then press 15 1-508-383-7855 FMAT 8100 HTS System and Cytofluor 4000 Fluorescence Plate Reader 1-800-899-5858, then press 16 1-508-383-7855 Chemiluminescence (Tropix) 1-800-542-2369 1-781-275-8581 Applied Biosystems/MDS Sciex 1-800-952-4716 (U.S. only), or 1-781-271-0045 1-650-638-6223 Outside North America Telephone Dial... Region Fax Dial... Africa and the Middle East S-16 Africa (English Speaking) and West Asia (Fairlands, South Africa) 27 11 478 0411 27 11 478 0349 South Africa (Johannesburg) 27 11 478 0411 27 11 478 0349 Middle Eastern Countries and North Africa (Monza, Italia) 39 (0)39 8389 481 39 (0)39 8389 493 Telephone Dial... Region Fax Dial... Eastern Asia, China, Oceania Australia (Scoresby, Victoria) 61 3 9730 8600 61 3 9730 8799 China (Beijing) 86 10 64106608 86 10 64106617 Hong Kong 852 2756 6928 852 2756 6968 Korea (Seoul) 82 2 593 6470/6471 82 2 593 6472 Malaysia (Petaling Jaya) 60 3 758 8268 60 3 754 9043 Singapore 65 896 2168 65 896 2147 Taiwan (Taipei Hsien) 886 2 2358 2838 886 2 2358 2839 Thailand (Bangkok) 66 2 719 6405 66 2 319 9788 Austria (Wien) 43 (0)1 867 35 75 0 43 (0)1 867 35 75 11 Belgium 32 (0)2 712 5555 32 (0)2 712 5516 Czech Republic and Slovakia (Praha) 420 2 61 222 164 420 2 61 222 168 Denmark (Naerum) 45 45 58 60 00 45 45 58 60 01 Finland (Espoo) 358 (0)9 251 24 250 358 (0)9 251 24 243 France (Paris) 33 (0)1 69 59 85 85 33 (0)1 69 59 85 00 Germany (Weiterstadt) 49 (0) 6150 101 0 49 (0) 6150 101 101 Hungary (Budapest) 36 (0)1 270 8398 36 (0)1 270 8288 Italy (Milano) 39 (0)39 83891 39 (0)39 838 9492 Norway (Oslo) 47 23 12 06 05 47 23 12 05 75 Poland, Lithuania, Latvia, and Estonia (Warszawa) 48 (22) 866 40 10 48 (22) 866 40 20 Portugal (Lisboa) 351 (0)22 605 33 14 351 (0)22 605 33 15 Russia (Moskva) 7 095 935 8888 7 095 564 8787 South East Europe (Zagreb, Croatia) 385 1 34 91 927 385 1 34 91 840 Spain (Tres Cantos) 34 (0)91 806 1210 34 (0)91 806 1206 Sweden (Stockholm) 46 (0)8 619 4400 46 (0)8 619 4401 Switzerland (Rotkreuz) 41 (0)41 799 7777 41 (0)41 790 0676 The Netherlands (Nieuwerkerk a/d IJssel) 31 (0)180 331400 31 (0)180 331409 Europe S-17 Telephone Dial... Fax Dial... United Kingdom (Warrington, Cheshire) 44 (0)1925 825650 44 (0)1925 282502 All other countries not listed (Warrington, UK) 44 (0)1925 282481 44 (0)1925 282509 Region Japan Japan (Hacchobori, ChuoKu, Tokyo) 81 3 5566 6230 81 3 5566 6507 Latin America Del.A. Obregon, Mexico To Reach Technical Support Through the Internet 305-670-4350 305-670-4349 We strongly encourage you to visit our Web site for answers to frequently asked questions and for more information about our products. You can also order technical documents or an index of available documents and have them faxed or e-mailed to you through our site. The Applied Biosystems Web site address is http://www.appliedbiosystems.com/techsupp To submit technical questions from North America or Europe: Step Action 1 Access the Applied Biosystems Technical Support Web site. 2 Under the Troubleshooting heading, click Support Request Forms, then select the relevant support region for the product area of interest. 3 Enter the requested information and your question in the displayed form, then click Ask Us RIGHT NOW (blue button with yellow text). 4 Enter the required information in the next form (if you have not already done so), then click Ask Us RIGHT NOW. You will receive an e-mail reply to your question from one of our technical experts within 24 to 48 hours. S-18 To Obtain Free, 24-hour access to Applied Biosystems technical documents, Documents on including MSDSs, is available by fax or e-mail or by download from our Demand Web site. To order documents... Then... by index number a. Access the Applied Biosystems Technical Support Web site at http://www.appliedbiosystems.com/techsupp b. Click the Index link for the document type you want, then find the document you want and record the index number. c. Use the index number when requesting documents following the procedures below. by phone for fax delivery a. From the U.S. or Canada, call 1-800-487-6809, or from outside the U.S. and Canada, call 1-858-7120317. b. Follow the voice instructions to order the documents you want. Note through the Internet for fax or e-mail delivery There is a limit of five documents per request. a. Access the Applied Biosystems Technical Support Web site at http://www.appliedbiosystems.com/techsupp b. Under Resource Libraries, click the type of document you want. c. Enter or select the requested information in the displayed form, then click Search. d. In the displayed search results, select a check box for the method of delivery for each document that matches your criteria, then click Deliver Selected Documents Now (or click the PDF icon for the document to download it immediately). e. Fill in the information form (if you have not previously done so), then click Deliver Selected Documents Now to submit your order. Note There is a limit of five documents per request for fax delivery but no limit on the number of documents you can order for e-mail delivery. S-19 Users Manual Summary If You Have Used the Applied Biosystems DNA Thermal Cycler or DNA Thermal Cycler 480 Describes the differences between the GeneAmp PCR System 9600 and the DNA Thermal Cycler/DNA Thermal Cycler 480. Preface Describes how to use this manual. Chapter 1. Introducing the GeneAmp PCR System 9600 Describes instrument operation, the hardware, and the software. Chapter 2. Installation Describes how to install the instrument and connect it to a printer Chapter 3. Tutorial: Customizing a PCR CYCL Program Includes step-by-step instructions for customizing a CYCL program and starting a trial run. Chapter 4. Software Basics Gives you an overview of the GeneAmp PCR System 9600 software and describes programs and methods. Chapter 5. Setting Up PCR Programs and Methods Describes how to customize the HOLD, CYCL, and AUTO programs and how to create PCR methods. Chapter 6. Running PCR Samples Describes how to load samples and start a run. Describes the run-time keys and displays. Chapter 7. Utilities Describes how to obtain a history of the run, configure the instrument, run diagnostics, and update the file directory. Chapter 8. Maintenance Describes periodic maintenance procedures. Chapter 9. Troubleshooting Describes how to solve common problems and what to do in case of instrument power loss. Chapter 10. Specifications Lists and describes instrument specifications. If You Have Used the Applied Biosystems DNA Thermal Cycler or DNA Thermal Cycler 480 You will find that the GeneAmp PCR System 9600 is in many ways similar in operation to the DNA Thermal Cycler and DNA Thermal Cycler 480, but there are several important differences. These differences affect the following areas: ♦ sample block ♦ sample tubes ♦ PCR files and programs ♦ function keys ♦ file storage ♦ operation ♦ setting hold times Sample Block CAUTION Do not use mineral oil or glycerine in the sample block of the GeneAmp PCR System 9600. The GeneAmp PCR System 9600 is designed for oil-free operation. The MicroAmp Reaction Tubes fit tightly in the wells and a heated cover exerts an even pressure on all tubes. Mineral oil is not used on the sample surface because the heated cover eliminates condensation in the tubes. Sample Tubes The GeneAmp PCR System 9600 uses 0.2-mL MicroAmp Reaction Tubes or 0.2-mL MicroAmp Reaction Tubes with Caps, with a 96-position MicroAmp Tray/Retainer. The GeneAmp PCR System 9600 can also use Thin-Walled GeneAmp Reaction Tubes. Use of these 0.5-mL tubes requires a Thin-Walled GeneAmp Tray, which holds 480 tubes. See Chapter 5 for details. 2 Comparing Files and Programs In the GeneAmp PCR System 9600 software, PCR files are referred to as programs. The following table lists the differences between DNA Thermal Cycler PCR files and GeneAmp PCR System 9600 PCR programs. Function File on the DNA Thermal Cycler Program on the GeneAmp PCR System 9600 PCR INCUBATIONS SOAK (File #1): An incubation file. HOLD: Set the hold time to the FOREVER option for an indefinite soak. TIME DELAY (File #2): An incubation file. HOLD: Set the hold time to a pre-defined time. THERMO-CYCLE (File #3): Use the default value (0:01) for the fastest possible ramp time. CYCL: Program ramp times and hold times as desired for each setpoint. STEP-CYCLE (File #4): You cannot program ramp times; target temperatures are reached as quickly as possible. CYCL: Use the default value (0:00) for the fastest possible ramp time. AUTO-SEGMENT EXTENSION THERMO-CYCLE or STEP-CYCLE with auto-segment extension AUTO: This program can automatically increase or decrease the setpoint hold time and setpoint temperature in successive cycles. METHODS Link each file to another file using the “link to stored file #” parameter within each file. METH: Use this program to link together a series of programs. PCR CYCLING 3 Function Keys 4 To do this: On the DNA Thermal Cycler On the GeneAmp PCR System 9600 Begin a run Press START from the first display in the file. Select RUN on the main menu, enter the program number, then press ENTER. Access a file Press FILE, press the numeric key(s) corresponding to the desired file number, then press ENTER. Select EDIT on the main menu, enter the desired program number, then press ENTER. Access the File Directory Press FILE. Then press ENTER. Select UTIL on the main menu. Access the Configuration and Diagnostic files. Press FILE. Then press YES. Select UTIL on the main menu. Move the cursor to the next display or parameter. Press STEP. Press STEP. Move the cursor to the previous display or parameter. Press HELP. Press BACK. Toggle between two run-time displays. Press HELP. Press MORE. Move the cursor to the next selection. Press NO. Press OPTION. Exit a file. Press STOP. Press STOP. Pause a run. Press STOP. Press PAUSE. Abort a run. Press STOP twice. Press STOP twice. File Storage With the GeneAmp PCR System 9600, you can store up to 150 programs. (A method is assigned a program number and is considered an individual program.) The Thermal Cycler stores up to 93 user files. Operation On the DNA Thermal Cycler, the run-time display counts down the number of cycles. On the GeneAmp PCR System 9600, the run-time display counts up the number of cycles. To pause a run on the DNA Thermal Cycler, press the STOP key once. On the GeneAmp PCR System 9600, use the PAUSE key to pause a run, or you can specify an automatic pause in your CYCL or AUTO program. On the DNA Thermal Cycler, an auto-tuning diagnostic test checks instrument operation. With the DNA Thermal Cycler 480 and the GeneAmp PCR System 9600, no auto-tuning is necessary. The accuracy of the block temperature can be verified using the Temperature Verification Kit (Applied Biosystems Part No. N801-0434 for the DNA Thermal Cycler, Part No. N801-0435 for the GeneAmp PCR System 9600). When the DNA Thermal Cycler is in an idle state, you cannot control the block temperature; the temperature drifts to ambient. On the GeneAmp PCR System 9600, block temperature is controlled in the idle state. This parameter is called the idle state setpoint and you can program it by selecting UTIL on the Main menu, then selecting CONFIG. The default value is 25 degrees C. When the block is at this temperature, the Heating light on the control panel flashes. When a run has been completed on the DNA Thermal Cycler, “SHUT-OFF” appears on the display. When a run has been completed on the GeneAmp PCR System 9600, “DONE” appears on the display. 5 Setting Hold Times on the GeneAmp PCR System 9600 These general guidelines are based upon differences in how the instruments operate to heat and cool samples. The hold times that you specify in your PCR CYCL and AUTO programs for the GeneAmp PCR System 9600 will be shorter than those you used for your Step-Cycle or Thermo-Cycle files on the DNA Thermal Cycler. This is because the Thermal Cycler starts counting the hold time when the block reaches a temperature one degree before the target temperature, while the GeneAmp PCR System 9600 starts counting the hold time when the samples reach a temperature one degree before the target temperature. As shown in Figure 1, since the block reaches the target temperature before the samples, the programmed hold time on the Thermal Cycler must include enough time for the samples to reach the target temperature. A hold time of one minute or greater is required on the DNA Thermal Cycler for the samples to reach the target temperature. On the GeneAmp PCR System 9600, hold times of less than one minute are often used. 6 Graphic Figure 1 Heating ramps on the DNA Thermal Cycler 480 and GeneAmp PCR System 9600. 7 Tables 1 and 2 show some guidelines for converting hold times for the DNA Thermal Cycler or DNA Thermal Cycler 480 to hold times for the GeneAmp PCR System 9600. The table you use will depend on whether you are using an up ramp (the temperature is higher than that used in the previous segment) or a down ramp (the temperature is lower). ♦ If you are using an up ramp, you will base the new hold time on the change in temperature required to reach the next target temperature. See Table 1. ♦ If you are using a down ramp, you will base the new hold time on the starting temperature of the ramp and the change in temperature required to reach the next target temperature. See Table 2. For up ramps, determine the change in temperature required to reach the next target temperature, then round off this value to the closest value given below. Then subtract the number of seconds indicated from the hold time used for the DNA Thermal Cycler. The result is the hold time to use for the GeneAmp PCR System 9600. The typically recommended hold time is 10 to 15 seconds for denaturation. Table 1. After Up Ramps: Converting Hold Times Greater than One Minute (DNA Thermal Cycler to GeneAmp PCR System 9600) 8 If your change in temperature (°C) is: Subtract this time from your Thermal Cycler hold time: 10 ° 38 sec. 15 ° 45 sec. 20 ° 49 sec. 30 ° 54 sec. 40 ° 55 sec. 50 ° 57 sec. 60 ° 57 sec. Note If methods developed on the GeneAmp PCR System 9600 are to be used on the DNA Thermal Cycler, you can use Table 1 to convert the hold times from GeneAmp PCR System 9600 to DNA Thermal Cycler. Simply add the indicated times instead of subtracting them. For down ramps, determine the change in temperature required to reach the next target temperature, then round off this value to the closest value given below. Then, based on the starting temperature of the ramp, determine the number of seconds to subtract from the DNA Thermal Cycler hold time to arrive at the new hold time. The typically recommended hold time is 10 to 15 seconds for annealing. Table 2. After Down Ramps: Converting Hold Times Greater than One Minute (DNA Thermal Cycler to GeneAmp PCR System 9600) If your change in temperature (°C) is: Subtract this time from the DNA Thermal Cycler hold time if the starting temperature of the ramp is: 35-55 ° 56-75 ° 76-95 ° 10 ° 39 sec. 39 sec. 40 sec. 15 ° 45 sec. 47 sec. 48 sec. 20 ° 49 sec. 52 sec. 53 sec. 30 ° 56 sec. 59 sec. 40 ° 57 sec. 62 sec. 50 ° 62 sec. 60 ° 60 sec. Note If methods developed on the GeneAmp PCR System 9600 are to be used on the DNA Thermal Cycler, you can use Table 2 to convert the hold times from GeneAmp PCR System 9600 to DNA Thermal Cycler by adding the indicated times instead of subtracting them. 9 Contents Preface: 1 Using the Manual . . . . . . . . . . . . . . . . . . . . . . . . . . . . . . . . . . . . . . P-1 Using the Manual . . . . . . . . . . . . . . . . . . . . . . . . . . . . . . . . . . . . . . P-1 Conventions . . . . . . . . . . . . . . . . . . . . . . . . . . . . . . . . . . . . . . . . . . P-3 Software Conventions . . . . . . . . . . . . . . . . . . . . . . . . . . . . . . . . P-3 Notes and Warnings. . . . . . . . . . . . . . . . . . . . . . . . . . . . . . . . . P-4 Chapter 1. Introducing the GeneAmp® PCR System 9600 . . . . . . . . . . . . . . 1-1 Introduction . . . . . . . . . . . . . . . . . . . . . . . . . . . . . . . . . . . . . . . . . . . 1-1 Principles of Operation . . . . . . . . . . . . . . . . . . . . . . . . . . . . . . . . . . 1-2 Instrument Description . . . . . . . . . . . . . . . . . . . . . . . . . . . . . . . . . . . 1-3 A Look at the Sample Block . . . . . . . . . . . . . . . . . . . . . . . . . . . 1-3 A Look at the Control Panel . . . . . . . . . . . . . . . . . . . . . . . . . . . 1-4 Instrument Features . . . . . . . . . . . . . . . . . . . . . . . . . . . . . . . . . . 1-5 The GeneAmp PCR System 9600 Software . . . . . . . . . . . . . . . 1-5 Chapter 2. Installing the GeneAmp PCR System 9600 . . . . . . . . . . . . . . . . . 2-1 Introduction . . . . . . . . . . . . . . . . . . . . . . . . . . . . . . . . . . . . . . . . . . . 2-1 Unpacking . . . . . . . . . . . . . . . . . . . . . . . . . . . . . . . . . . . . . . . . . . . . 2-2 Parts Supplied . . . . . . . . . . . . . . . . . . . . . . . . . . . . . . . . . . . . . . . . . 2-2 Supplies, Accessories, and Replacement Parts . . . . . . . . . . . . . . . 2-3 Power Requirements . . . . . . . . . . . . . . . . . . . . . . . . . . . . . . . . . . . 2-4 Proper Location . . . . . . . . . . . . . . . . . . . . . . . . . . . . . . . . . . . . . . . . 2-5 Temperature, Humidity, and Environment . . . . . . . . . . . . . . . . . 2-5 Setting Up the Printer . . . . . . . . . . . . . . . . . . . . . . . . . . . . . . . . . . . 2-6 Installing the 115-VAC Printer . . . . . . . . . . . . . . . . . . . . . . . . . . 2-6 Installing the 230-VAC Printer . . . . . . . . . . . . . . . . . . . . . . . . . 2-10 Configuring the Printer . . . . . . . . . . . . . . . . . . . . . . . . . . . . . . . 2-12 Configuring the GeneAmp PCR System 9600 . . . . . . . . . . . . . . . 2-14 Summary of Configuration Parameters . . . . . . . . . . . . . . . . . . 2-15 Heater and Chiller Tests . . . . . . . . . . . . . . . . . . . . . . . . . . . . . . . . 2-19 Heater Test . . . . . . . . . . . . . . . . . . . . . . . . . . . . . . . . . . . . . . . 2-19 Chiller Test . . . . . . . . . . . . . . . . . . . . . . . . . . . . . . . . . . . . . . . . 2-21 Chapter 3. Tutorial: Customizing a PCR CYCL Program . . . . . . . . . . . . . 3-1 Introduction . . . . . . . . . . . . . . . . . . . . . . . . . . . . . . . . . . . . . . . . . . . 3-1 Before You Start . . . . . . . . . . . . . . . . . . . . . . . . . . . . . . . . . . . . . . . 3-2 What is a CYCL Program? . . . . . . . . . . . . . . . . . . . . . . . . . . . . . . . 3-3 Starting Up the Instrument . . . . . . . . . . . . . . . . . . . . . . . . . . . . . . . 3-5 Getting to the CYCL Program . . . . . . . . . . . . . . . . . . . . . . . . . . . . . 3-6 A Look at the CYCL Program . . . . . . . . . . . . . . . . . . . . . . . . . . . . . 3-9 Customizing the CYCL Program . . . . . . . . . . . . . . . . . . . . . . . . . . 3-14 Defining the Number of Setpoints . . . . . . . . . . . . . . . . . . . . . . 3-14 Defining Values for Setpoint # 1. . . . . . . . . . . . . . . . . . . . . . . . 3-15 Defining Values for Setpoint #2 . . . . . . . . . . . . . . . . . . . . . . . . 3-17 Defining Values for Setpoint #3 . . . . . . . . . . . . . . . . . . . . . . . . 3-17 Specifying the Number of Cycles . . . . . . . . . . . . . . . . . . . . . . . 3-18 Storing Your CYCL Program . . . . . . . . . . . . . . . . . . . . . . . . . . . . . 3-20 Starting a Trial Run . . . . . . . . . . . . . . . . . . . . . . . . . . . . . . . . . . . . 3-22 Loading a Tray (without samples) . . . . . . . . . . . . . . . . . . . . . . 3-22 Running the Program . . . . . . . . . . . . . . . . . . . . . . . . . . . . . . . . 3-24 The Next Step . . . . . . . . . . . . . . . . . . . . . . . . . . . . . . . . . . . . . . . . 3-27 ii Chapter 4. Software Basics . . . . . . . . . . . . . . . . . . . . . . . . . . . . . . . . . . . . . . . 4-1 Introduction . . . . . . . . . . . . . . . . . . . . . . . . . . . . . . . . . . . . . . . . . . . 4-1 Reviewing Keypad Basics . . . . . . . . . . . . . . . . . . . . . . . . . . . . . . . . 4-2 Use of the Keys . . . . . . . . . . . . . . . . . . . . . . . . . . . . . . . . . . . . . 4-3 A Close Look at the Main Menu . . . . . . . . . . . . . . . . . . . . . . . . . . . 4-4 Selecting a Function. . . . . . . . . . . . . . . . . . . . . . . . . . . . . . . . . . 4-5 An Overview of PCR Programs and Methods . . . . . . . . . . . . . . . . . 4-6 Linking Programs in a PCR Method . . . . . . . . . . . . . . . . . . . . . 4-6 Storing Programs and Methods . . . . . . . . . . . . . . . . . . . . . . . . . 4-7 The HOLD Program . . . . . . . . . . . . . . . . . . . . . . . . . . . . . . . . . . . . 4-8 CYCL: The Cycle Program . . . . . . . . . . . . . . . . . . . . . . . . . . . . . . 4-10 The AUTO Program . . . . . . . . . . . . . . . . . . . . . . . . . . . . . . . . . . . 4-12 PCR Methods . . . . . . . . . . . . . . . . . . . . . . . . . . . . . . . . . . . . . . . . 4-14 Chapter 5. Setting Up PCR Programs and Methods . . . . . . . . . . . . . . . . . . . 5-1 Introduction . . . . . . . . . . . . . . . . . . . . . . . . . . . . . . . . . . . . . . . . . . . 5-1 Setting Hold Times on the GeneAmp® PCR System 9600 . . . . . . . 5-2 Editing Keys . . . . . . . . . . . . . . . . . . . . . . . . . . . . . . . . . . . . . . . . . . 5-8 Creating and Editing Programs . . . . . . . . . . . . . . . . . . . . . . . . . . . . 5-9 Creating a Program . . . . . . . . . . . . . . . . . . . . . . . . . . . . . . . . . 5-10 Storing the Program . . . . . . . . . . . . . . . . . . . . . . . . . . . . . . . . . 5-11 Editing a Program. . . . . . . . . . . . . . . . . . . . . . . . . . . . . . . . . . . 5-13 Printing a Program . . . . . . . . . . . . . . . . . . . . . . . . . . . . . . . . . . 5-16 Creating and Editing Methods . . . . . . . . . . . . . . . . . . . . . . . . . . . . 5-17 Creating a Method . . . . . . . . . . . . . . . . . . . . . . . . . . . . . . . . . . 5-18 Storing the Method . . . . . . . . . . . . . . . . . . . . . . . . . . . . . . . . . . 5-21 Editing a Method . . . . . . . . . . . . . . . . . . . . . . . . . . . . . . . . . . . 5-23 Printing a Method . . . . . . . . . . . . . . . . . . . . . . . . . . . . . . . . . . 5-25 iii Software Shortcuts . . . . . . . . . . . . . . . . . . . . . . . . . . . . . . . . . . . . 5-28 Using the STOP Key . . . . . . . . . . . . . . . . . . . . . . . . . . . . . . . . 5-28 Recalling Programs: A Shortcut . . . . . . . . . . . . . . . . . . . . . . . . 5-30 The HOLD Program . . . . . . . . . . . . . . . . . . . . . . . . . . . . . . . . . . . 5-31 The Displays in a HOLD Program . . . . . . . . . . . . . . . . . . . . . . 5-31 Description of HOLD Program Displays . . . . . . . . . . . . . . 5-32 CYCL: The Cycle Program . . . . . . . . . . . . . . . . . . . . . . . . . . . . . . 5-33 The Displays in a CYCL Program . . . . . . . . . . . . . . . . . . . . . . 5-33 Description of CYCL Program Displays . . . . . . . . . . . . . . 5-34 The AUTO Program . . . . . . . . . . . . . . . . . . . . . . . . . . . . . . . . . . . 5-39 The Displays in an AUTO Program . . . . . . . . . . . . . . . . . . . . . 5-39 Description of AUTO Program Displays . . . . . . . . . . . . . . 5-40 Chapter 6. Running PCR Samples . . . . . . . . . . . . . . . . . . . . . . . . . . . . . . . . . 6-1 Introduction . . . . . . . . . . . . . . . . . . . . . . . . . . . . . . . . . . . . . . . . . . . 6-1 Loading Samples . . . . . . . . . . . . . . . . . . . . . . . . . . . . . . . . . . . . . . 6-2 Using the 96-Position Sample Tray with MicroAmp Reaction Tubes . . . . . . . . . . . . . . . . . . . . . . . . . . . . . . . . . . . . . . . . . . . . 6-2 Placing the Sample Tray in the Block . . . . . . . . . . . . . . . . . . . . . . . 6-5 Using the Cap-Installing Tool . . . . . . . . . . . . . . . . . . . . . . . . . . . . . 6-8 Removing the Sample Tray from the Block . . . . . . . . . . . . . . . . . . . 6-8 Removing Samples from the Tray . . . . . . . . . . . . . . . . . . . . . . . . . . 6-9 Specifying a Program or Method . . . . . . . . . . . . . . . . . . . . . . . . . . 6-10 Create a new program or method . . . . . . . . . . . . . . . . . . . . . . 6-10 Edit an existing program or method . . . . . . . . . . . . . . . . . . . . 6-10 Recall a stored program or method . . . . . . . . . . . . . . . . . . . . . 6-10 Starting the Run . . . . . . . . . . . . . . . . . . . . . . . . . . . . . . . . . . . . . . 6-11 Run Keys . . . . . . . . . . . . . . . . . . . . . . . . . . . . . . . . . . . . . . . . . 6-11 Running a Stored Program . . . . . . . . . . . . . . . . . . . . . . . . . . . 6-12 iv Indicator Lights . . . . . . . . . . . . . . . . . . . . . . . . . . . . . . . . . . . . . 6-16 Run-Time Displays . . . . . . . . . . . . . . . . . . . . . . . . . . . . . . . . . . . . 6-17 CYCL and AUTO Program Run-Time Displays . . . . . . . . . . . . 6-17 HOLD Program Run-Time Display . . . . . . . . . . . . . . . . . . . . . . 6-19 Pausing a Run . . . . . . . . . . . . . . . . . . . . . . . . . . . . . . . . . . . . . . . . 6-20 Stopping a Run . . . . . . . . . . . . . . . . . . . . . . . . . . . . . . . . . . . . . . . 6-20 Reviewing the History of the Run . . . . . . . . . . . . . . . . . . . . . . . . . 6-22 Chapter 7. Utilities . . . . . . . . . . . . . . . . . . . . . . . . . . . . . . . . . . . . . . . . . . . . . . 7-1 Introduction . . . . . . . . . . . . . . . . . . . . . . . . . . . . . . . . . . . . . . . . . . . 7-1 Getting to the Utilities Menu . . . . . . . . . . . . . . . . . . . . . . . . . . . . . . 7-2 Selecting a Utilities Function . . . . . . . . . . . . . . . . . . . . . . . . . . . . . . 7-3 The Directory Function (DIR) . . . . . . . . . . . . . . . . . . . . . . . . . . . . . 7-4 Listing Programs by their Program Number (PROG) . . . . . . . . 7-4 Listing Programs by their Program Type (TYPE) . . . . . . . . . . . . 7-7 Listing Programs by their User Number (USER) . . . . . . . . . . . 7-10 Printing a Directory of Your Programs (PRINT) . . . . . . . . . . . . 7-13 The Configuration Function (CONFIG) . . . . . . . . . . . . . . . . . . . . . 7-16 Editing the Configuration Parameters . . . . . . . . . . . . . . . . . . . 7-16 Setting the Time and Date . . . . . . . . . . . . . . . . . . . . . . . . . . . . 7-18 Turning the Run-Time Printer Mode and Run-Time Beeper On or Off. . . . . . . . . . . . . . . . . . . . . . . . . . . . . . . . . . . . . . . . . . 7-20 Changing the Pause Time-Out Limit . . . . . . . . . . . . . . . . . . . . 7-22 Changing the Allowed Setpoint Error . . . . . . . . . . . . . . . . . . . . 7-23 Entering an Idle State Setpoint Value . . . . . . . . . . . . . . . . . . . 7-25 Changing the Temperature Interval for the Setpoint Clock . . . 7-26 Changing the Sample Tube Type. . . . . . . . . . . . . . . . . . . . . . . 7-28 Setting Sample Tube Time Constants . . . . . . . . . . . . . . . . . . . 7-30 MICRO Time Constant . . . . . . . . . . . . . . . . . . . . . . . . . . . 7-30 v THIN Time Constant . . . . . . . . . . . . . . . . . . . . . . . . . . . . . 7-32 Printing the Configuration Parameters . . . . . . . . . . . . . . . . . . 7-34 The Diagnostic Function (DIAG) . . . . . . . . . . . . . . . . . . . . . . . . . . 7-35 Selecting the Diagnostic Tests . . . . . . . . . . . . . . . . . . . . . . . . . 7-36 Reviewing the History file . . . . . . . . . . . . . . . . . . . . . . . . . . . . . 7-38 About The History File . . . . . . . . . . . . . . . . . . . . . . . . . . . . 7-38 Status Records in a History File . . . . . . . . . . . . . . . . . . . . 7-39 Data Records in a History File . . . . . . . . . . . . . . . . . . . . . . 7-42 Displaying the History file . . . . . . . . . . . . . . . . . . . . . . . . . 7-44 Printing the History file . . . . . . . . . . . . . . . . . . . . . . . . . . . 7-48 Running the Heater Test . . . . . . . . . . . . . . . . . . . . . . . . . . . . . 7-50 Running the Chiller Test. . . . . . . . . . . . . . . . . . . . . . . . . . . . . . 7-52 Running the System Performance Test . . . . . . . . . . . . . . . . . . 7-54 Running the Verify Calibration Test . . . . . . . . . . . . . . . . . . . . . 7-56 The Delete Function (DEL) . . . . . . . . . . . . . . . . . . . . . . . . . . . . . . 7-57 Deleting Programs by Program Number . . . . . . . . . . . . . . . . . 7-57 Deleting Programs by User Number . . . . . . . . . . . . . . . . . . . . 7-59 Deleting All Unprotected Programs . . . . . . . . . . . . . . . . . . . . . 7-61 Chapter 8. Maintenance . . . . . . . . . . . . . . . . . . . . . . . . . . . . . . . . . . . . . . . . . . 8-1 Introduction . . . . . . . . . . . . . . . . . . . . . . . . . . . . . . . . . . . . . . . . . . . 8-1 Cleaning the Sample Wells . . . . . . . . . . . . . . . . . . . . . . . . . . . . . . . 8-2 Cleaning the Heated Cover . . . . . . . . . . . . . . . . . . . . . . . . . . . . . . . 8-3 Temperature Calibration Verification Test . . . . . . . . . . . . . . . . . . . . 8-4 Equipment Required . . . . . . . . . . . . . . . . . . . . . . . . . . . . . . . . . 8-4 Verifying the Temperature Calibration . . . . . . . . . . . . . . . . . . . 8-4 Test Results . . . . . . . . . . . . . . . . . . . . . . . . . . . . . . . . . . . . . . . 8-10 Temperature Uniformity Test . . . . . . . . . . . . . . . . . . . . . . . . . . . . 8-13 Equipment Required . . . . . . . . . . . . . . . . . . . . . . . . . . . . . . . . 8-13 vi Testing the Temperature Uniformity . . . . . . . . . . . . . . . . . . . . 8-13 Test Results . . . . . . . . . . . . . . . . . . . . . . . . . . . . . . . . . . . . . . 8-17 Changing External Fuses . . . . . . . . . . . . . . . . . . . . . . . . . . . . . . . 8-18 Chapter 9. Troubleshooting . . . . . . . . . . . . . . . . . . . . . . . . . . . . . . . . . . . . . . . 9-1 Introduction . . . . . . . . . . . . . . . . . . . . . . . . . . . . . . . . . . . . . . . . . . . 9-1 Troubleshooting . . . . . . . . . . . . . . . . . . . . . . . . . . . . . . . . . . . . . . . . 9-1 If the Instrument Turns Off . . . . . . . . . . . . . . . . . . . . . . . . . . . . . . . 9-5 Chapter 10. Specifications . . . . . . . . . . . . . . . . . . . . . . . . . . . . . . . . . . . . . . . . 10-1 Dimensions . . . . . . . . . . . . . . . . . . . . . . . . . . . . . . . . . . . . . . . . . . 10-1 Sample Compartment . . . . . . . . . . . . . . . . . . . . . . . . . . . . . . . . . . 10-1 Sample Tubes . . . . . . . . . . . . . . . . . . . . . . . . . . . . . . . . . . . . . 10-1 Power Requirements . . . . . . . . . . . . . . . . . . . . . . . . . . . . . . . . . . . 10-2 Control Panel . . . . . . . . . . . . . . . . . . . . . . . . . . . . . . . . . . . . . . . . . 10-2 Display . . . . . . . . . . . . . . . . . . . . . . . . . . . . . . . . . . . . . . . . . . . 10-2 Keypad . . . . . . . . . . . . . . . . . . . . . . . . . . . . . . . . . . . . . . . . . . 10-2 Indicator Lights . . . . . . . . . . . . . . . . . . . . . . . . . . . . . . . . . . . . 10-2 Sample Temperature Range . . . . . . . . . . . . . . . . . . . . . . . . . . . . . 10-3 Sample Temperature Accuracy . . . . . . . . . . . . . . . . . . . . . . . . . . . 10-3 Displayed Sample Temperature. . . . . . . . . . . . . . . . . . . . . . . . . . . 10-3 Sample Block Temperature Uniformity . . . . . . . . . . . . . . . . . . . . . 10-3 Sample Temperature Overshoot . . . . . . . . . . . . . . . . . . . . . . . . . . 10-3 Ramp Time Repeatability . . . . . . . . . . . . . . . . . . . . . . . . . . . . . . . . 10-4 Sample Heating and Cooling Rate . . . . . . . . . . . . . . . . . . . . . . . . . 10-4 Printer Interface . . . . . . . . . . . . . . . . . . . . . . . . . . . . . . . . . . . . . . . 10-5 Temperature Calibration . . . . . . . . . . . . . . . . . . . . . . . . . . . . . . . . 10-5 Index vii 11 Illustrations Figure 1-1 The GeneAmp PCR System 9600. . . . . . . . . . . . . . . . . . . . . . . . . . 1-1 Figure 1-2 Sample block and heated cover. . . . . . . . . . . . . . . . . . . . . . . . . . . . 1-3 Figure 1-3 The control panel. . . . . . . . . . . . . . . . . . . . . . . . . . . . . . . . . . . . . . . 1-4 Figure 2-1 DIP switch Settings on the Epson C82302 serial interface card. . . 2-8 Figure 2-2 Side panel of the GeneAmp PCR System 9600 and rear panel of the printer showing DIP switch settings and cable connections. . . . . . . . . . . . . . . . . . . . . . . . . . . . . . . . . . . . . . . . . . . 2-9 Figure 3-1 A common CYCL program. . . . . . . . . . . . . . . . . . . . . . . . . . . . . . . . 3-3 Figure 3-2 Setting temperature and time values for Setpoint #1. . . . . . . . . . . . 3-4 Figure 3-3 Location of power switch. . . . . . . . . . . . . . . . . . . . . . . . . . . . . . . . . 3-5 Figure 3-4 Moving through the CYCL program displays. . . . . . . . . . . . . . . . . 3-13 Figure 3-5 Sliding the heated cover forward for a trial run. . . . . . . . . . . . . . . 3-23 Figure 4-1 Keypad. . . . . . . . . . . . . . . . . . . . . . . . . . . . . . . . . . . . . . . . . . . . . . . 4-2 Figure 4-2 Access to the major functions of the software. . . . . . . . . . . . . . . . . 4-5 Figure 4-3 HOLD, CYCL, AUTO, and METH programs . . . . . . . . . . . . . . . . . . 4-7 Figure 4-4 A HOLD program held for an indefinite time. . . . . . . . . . . . . . . . . . 4-9 Figure 4-5 A HOLD program held for a specific time interval. . . . . . . . . . . . . . 4-9 Figure 4-6 A common CYCL program . . . . . . . . . . . . . . . . . . . . . . . . . . . . . . 4-11 Figure 4-7 An AUTO program used to increase hold time. . . . . . . . . . . . . . . 4-13 Figure 4-8 An example of a PCR method. . . . . . . . . . . . . . . . . . . . . . . . . . . . 4-14 Figure 5-1 Heating ramps on the DNA Thermal Cycler 480 and GeneAmp PCR System 9600 . . . . . . . . . . . . . . . . . . . . . . . . . . . . . 5-3 ix Figure 5-2 Sample conversion of hold times for up ramps (DNA Thermal Cycler to GeneAmp PCR System 9600) . . . . . . . . . . . . . . 5-5 Figure 5-3 Sample conversion of hold times for down ramps (DNA Thermal Cycler to GeneAmp PCR System 9600) . . . . . . . . . . . . . . . . . . . . . 5-7 Figure 5-4 Editing Keys . . . . . . . . . . . . . . . . . . . . . . . . . . . . . . . . . . . . . . . . . . 5-8 Figure 5-5 Example of a printout for a CYCL program. . . . . . . . . . . . . . . . . . 5-16 Figure 5-6 Example of a method printout using METHOD. . . . . . . . . . . . . . . 5-26 Figure 5-7 Example of a method printout using PROGRAM DATA. . . . . . . . 5-27 Figure 5-8 The series of displays in a HOLD program. . . . . . . . . . . . . . . . . . 5-31 Figure 5-9 The main displays in a three-temperature CYCL program. . . . . . . 5-33 Figure 5-10 The main displays in a three-temperature AUTO program. . . . . . 5-39 Figure 6-1 Setting up the 96-position sample tray. . . . . . . . . . . . . . . . . . . . . . . 6-3 Figure 6-2 Securing the retainer on the tray. . . . . . . . . . . . . . . . . . . . . . . . . . . 6-4 Figure 6-3 Placing the sample tray in the block. . . . . . . . . . . . . . . . . . . . . . . . . 6-5 Figure 6-4 Sliding the heated cover forward. . . . . . . . . . . . . . . . . . . . . . . . . . . 6-6 Figure 6-5 Turning the cover knob. . . . . . . . . . . . . . . . . . . . . . . . . . . . . . . . . . 6-7 Figure 6-6 Removing samples from the tray. . . . . . . . . . . . . . . . . . . . . . . . . . . 6-9 Figure 6-7 Run-Time Keys . . . . . . . . . . . . . . . . . . . . . . . . . . . . . . . . . . . . . . . 6-11 Figure 6-8 An example printout of a CYCL program using the SETPOINT option. . . . . . . . . . . . . . . . . . . . . . . . . . . . . . . . . . . . . 6-15 Figure 6-9 Run-time displays for a CYCL program. . . . . . . . . . . . . . . . . . . . . 6-17 Figure 6-10 Using the MORE key. . . . . . . . . . . . . . . . . . . . . . . . . . . . . . . . . . . 6-18 Figure 6-11 More run-time information in a CYCL program. . . . . . . . . . . . . . . 6-18 Figure 6-12 Run-time displays for a HOLD program. . . . . . . . . . . . . . . . . . . . . 6-19 Figure 6-13 Example history file printout of a CYCL program. . . . . . . . . . . . . . 6-22 Figure 7-1 The Utilities functions. . . . . . . . . . . . . . . . . . . . . . . . . . . . . . . . . . . . 7-3 Figure 7-2 Example of a list of programs listed according to program number. 7-6 Figure 7-3 Example of a list of programs listed according to program type. . . 7-9 x Figure 7-4 Example of a list of programs listed according to user number. . . 7-12 Figure 7-5 The PRINT selection of the Directory function. . . . . . . . . . . . . . . . 7-15 Figure 7-6 The Configuration function. . . . . . . . . . . . . . . . . . . . . . . . . . . . . . . 7-17 Figure 7-7 Diagram of a 1-degree C temperature interval. . . . . . . . . . . . . . . . 7-26 Figure 7-8 Initial displays for the five diagnostic tests. . . . . . . . . . . . . . . . . . . 7-37 Figure 7-9 A typical status record display. . . . . . . . . . . . . . . . . . . . . . . . . . . . 7-41 Figure 7-10 A data record display of a CYCL run. . . . . . . . . . . . . . . . . . . . . . . 7-44 Figure 7-11 Viewing (ALL) the records in a History file for a two-temperature CYCL program. . . . . . . . . . . . . . . . . . . . . . . . . . . . . . . . . . . 7-46 Figure 7-12 Viewing the status (STAT) records, data records with error messages (ERROR), and printing records (PRINT). . . . . . . . . . . 7-47 Figure 7-13 Printout of all status and data records (ALL) of a typical History file. . . . . . . . . . . . . . . . . . . . . . . . . . . . . . . . . . . . . . . . . . . 7-49 Figure 8-1 Location of sample wells E1 and D1. . . . . . . . . . . . . . . . . . . . . . . . 8-5 Figure 8-2 Placing the probe assembly into the sample wells. . . . . . . . . . . . . . 8-6 Figure 8-3 Temperature measurements in the temperature calibration verification test. . . . . . . . . . . . . . . . . . . . . . . . . . . . . . . . . . . . . . . . . 8-9 Figure 8-4 GeneAmp PCR System 9600 Calibration Label. . . . . . . . . . . . . . 8-10 Figure 8-5 The probe assembly in sample wells A1 and A2. . . . . . . . . . . . . . 8-14 Figure 8-6 Measurements in the temperature uniformity test. . . . . . . . . . . . . 8-15 Figure 8-7 Location of wells used in uniformity test. . . . . . . . . . . . . . . . . . . . . 8-16 Figure 8-8 Removing the fuses. . . . . . . . . . . . . . . . . . . . . . . . . . . . . . . . . . . . 8-18 Figure 10-1 Sample temperature overshoot after ramping up. . . . . . . . . . . . . . 10-4 xi Preface: Using the Manual P The GeneAmp PCR System 9600 is a highly sophisticated, yet easy-to-use temperature cycling instrument designed specifically to automate the PCR technique. Using the Manual The main function of this manual is to give you all the information needed to operate the GeneAmp PCR System 9600 in as productive a way as possible, utilizing all of the instrument's features. Note The unpacking and setup procedures for the GeneAmp PCR System 9600 are included in Chapter 2 of this manual. If your instrument has not been installed by an Applied Biosystems Service Representative, you should first refer to the instructions given in Chapter 2. For a summary of the instrument's main features and how to use them, refer to the Quick Reference Guide, Applied Biosystems Part. No. 0993-8690. We recommend that you follow this approach to learn about the GeneAmp PCR System 9600: P-2 1 Read this chapter to learn about the conventions used in the manual. 2 Read Chapter 1 to familiarize yourself with the instrument hardware and software. 3 If you are installing the instrument yourself, use this chapter as a guide. 4 Use the tutorial in Chapter 3 to learn the basic operation of the system in about 30 minutes. 5 When you have completed the tutorial, go through Chapters 4 and 5 to learn more about the software and setting up PCR programs and methods. 6 When you are ready to run your own samples, refer to Chapter 6 to learn how to load a sample tray and run a PCR program. 7 Select other chapters according to your needs: ♦ Chapter 7 describes the Utilities functions. These instrument functions let you display or print programs, configure the instrument to your needs, review a history of the run, perform instrument diagnostics, and maintain your directory of programs. ♦ Chapter 8 contains maintenance procedures. ♦ Chapter 9 explains how to solve some basic instrument problems and when to call service. ♦ Chapter 10 lists and describes instrument specifications. Conventions The following conventions are used in this manual. Software Conventions ♦ The instrument display is pictured as follows. This display shows the main menu. Select Option 9600 RUN-CREATE-EDIT-UTIL ♦ In displays where the current temperature of the samples is indicated, the temperature is shown in the manual as xx.xC, as in the display below. CYCL# 26 PAUSE 10:00 xx.xC ♦ Messages seen on the display and referred to in the text are enclosed in quotation marks. For example: “Pause during run?” ♦ Keys are printed in all capital letters and in bold type. For example: OPTION ♦ The names of the different types of programs stored in the software are often referred to by their abbreviations on the screen display: HOLD, CYCL, and AUTO. P-3 Notes and Warnings The following conventions are used in this manual: ! WARNING ! A warning indicates an operation that could cause personal injury if precautions are not followed. CAUTION A caution indicates an operation that could cause instrument damage if precautions are not followed. Note Notes emphasize significant information in a procedure or description. P-4 1 Introducing the GeneAmp® PCR System 9600 1 Introduction This chapter describes the principles of instrument operation, the hardware, and the software. Figure 1-1 The GeneAmp PCR System 9600. Principles of Operation The GeneAmp PCR System 9600 automates the Polymerase Chain Reaction (PCR) technique for amplifying DNA. The Polymerase Chain Reaction (PCR) technique is conceptually a very simple method for amplifying nucleic acids. It mimics the natural DNA replication process in that the number of DNA molecules generated by the Polymerase Chain Reaction doubles after each cycle. In the PCR technique, the typical cycle consists of three steps: ♦ Denaturing the template DNA by heating it to a high temperature (94 degrees C to 95 degrees C), thereby producing two single strands of DNA. ♦ Annealing of the target-specific primers to the two separated DNA strands by cooling the reaction mixture to a lower temperature (37 degrees C to 65 degrees C). ♦ Extending the annealed primers with a DNA polymerase by warming the reaction mixture to an intermediate temperature (72 degrees C). The anneal and extend steps can be combined into a single setpoint, called two-temperature PCR. The original DNA segment can be either a small, discrete molecule whose sequence is already known or a part of a much larger molecule in a complex mixture, such as a chromosome fragment. The product of the reaction will be discrete double-stranded DNA molecules whose termini will be determined by the set of primers used. Because the copy number of the target DNA doubles after each cycle, amplification through 25 cycles would theoretically yield a 33 million fold increase of specific product. The PCR method readily lends itself to research applications. Cloning of the amplified sequence can be facilitated by extending the 5' end of the primers with short sequences harboring 1-2 restriction sites. Dideoxy sequencing can also be performed on the amplified product. Instrument Description The GeneAmp PCR System 9600 contains a programmable heating and cooling block, which rapidly and uniformly heats and cools PCR samples. A Look at the Sample Block The sample block is a 96-well aluminum block. Up to 96 samples in MicroAmp Reaction Tubes (0.2 mL) are loaded in a sample tray and placed in the block. When a tray is in place, the heated cover is moved forward over the sample block area and exerts an even pressure on all tubes. Sample Block Figure 1-2 Heated Cover Sample block and heated cover. There are 17 holes within the block for coolant flow: eight of the holes are used for rapid sample block cooling (ramp cooling) and the remaining nine are for cold-biasing the system. A Kapton heater beneath the sample block is responsible for rapid heating and control of the sample block. The heater is designed so that 1-3 the power density at the edges is greater than that at the center to compensate for losses that may occur at the edges. A Look at the Control Panel The instrument control panel consists of a 40-character blue fluorescent display; three indicator lights that show you when the sample block is heating, cooling, or hot; and the keypad. The keypad includes standard numeric keys and eight function keys used for creating, storing, editing, or running PCR cycles. Figure 1-3 1-4 The control panel. Instrument Features Features of the GeneAmp PCR System 9600 include: ♦ reproducibility of cycle times ♦ uniformity of PCR yields for samples ♦ sample tray accommodating up to 96 samples in an 8 x 12 format ♦ thin-walled MicroAmp Reaction Tubes allowing efficient heat transfer and improving equilibration times ♦ high speed of heating and cooling so that more samples can be run in a fixed amount of time, increasing productivity ♦ heated cover assuring that tubes fit tightly in the wells ♦ oil-free operation The GeneAmp PCR System 9600 Software PCR time and temperature profiles are stored by the GeneAmp PCR System 9600 in programs. A program is a set of instructions that specify how the instrument should heat and cool your samples in a PCR cycle. There are three types of programs stored in instrument memory, abbreviated as the HOLD, CYCL, and AUTO programs. Each program contains a thermal profile in which values can be entered to fit your specific temperature control application. Programs can be linked together in a PCR method to accommodate complete amplification experiments. 1-5 The software lets you: 1-6 ♦ create, store, and modify your own customized time and temperature programs and protect these programs with a user number, if desired ♦ link several programs together to create and store a PCR method ♦ automatically increment or decrement the setpoint time and/or temperature a fixed amount every cycle ♦ view the current status of your PCR cycle on one of two runtime displays ♦ review comprehensive run-time information in a history of the run ♦ run software diagnostics to help you solve common problems ♦ configure the instrument for use with an optional printer Installing the GeneAmp PCR System 9600 2 2 I Introduction This chapter describes how to install the GeneAmp PCR System 9600. If your instrument has already been installed by an Applied Biosystems Service Representative, disregard these instructions. The following sections are included in this chapter: ♦ Parts Supplied ♦ Power Requirements ♦ Proper Location ♦ Operating Precautions ♦ Printer Setup and Configuration (optional) ♦ Heater and Chiller Tests ♦ Configuring the System Unpacking Inspect the GeneAmp PCR System 9600, and all other parts supplied, for any damage that may have occurred during shipment. If there has been any damage during transit, notify the carrier and Applied Biosystems immediately. Save the shipping container and all packing materials in case it becomes necessary to reship the instrument. Do not attempt to lift or move the instrument without the assistance of others. Safety training for proper lifting techniques is recommended. ! WARNING ! Improper lifting can cause painful and sometimes permanent back injury. Use proper lifting techniques when lifting or moving the instrument. Parts Supplied The following parts are supplied with the GeneAmp PCR System 9600: 2-2 Item Part No. Quantity PCR System Starter Kit (Consumable items for instrument operations.) N801-0538 1 Line Cord (Domestic 120V) N801-6033 1 Line Cord (Continental Europe 0999-1401 220V - 230V) 1 Line Cord (Japan 100V) 0999-1420 1 15-Amp slow-blow Fuse (system fuse for 100-120V units) 0998-1756 2 8-Amp slow-blow Fuse (system 0998-1643 fuse for 220-230V units) 2 Item Part No. Quantity 230-220V Conversion Kit (shipped with 230V unit) N801-0110 1 100V 50Hz to 60Hz Conversion N801-0111 Kit (shipped with 100V unit) 1 PCR System 9600 Video (Domestic and Japan) N801-0661 1 PCR System 9600 Video (Europe) N801-0660 1 Users Manual 0993-8660 1 Quick Reference Guide 0993-8690 1 Brochures 0993-8813 1 Supplies, Accessories, and Replacement Parts For Sales Assistance and Information: 1-800-345-5224. For Technical Assistance: 1-800-762-4001. Supplies, accessories, and replacement parts can be ordered directly from Applied Biosystems using the eight-digit part numbers provided in this manual. Applied Biosystems catalog service offers a full selection of high quality instrumentation, reagents and consumables through the Biotechnology Catalog. To place an order: If you are located within the U.S., call toll free 1-800-327-3002, Monday - Friday, 8 a.m. to 8 p.m. EST. Your order will be shipped promptly, usually within 24 hours. If you are located outside of the U.S., call your local Applied Biosystems sales office. 2-3 Power Requirements CAUTION Before the power is turned on for the first time at installation, be sure that the unit has been upright for at least four hours at normal indoor temperatures (15 degrees C to 30 degrees C). The GeneAmp PCR System 9600 operates on one of the following input voltages: Part No. Voltage (volts) Freq. (Hz) Maximum Operating Current (amps) N801-0001 120 60 10 850 N801-0002 230/240 50 5 850 220* 50 5 850 100 50 12 850 100 60** 12 850 N801-0003 Power (watts) * For 220-volt operation with instrument Part No. N801-0002, a conversion kit is required and included (Applied Biosystems Part No. N801-0110). ** For 60-Hertz operation with instrument Part No. N801-0003, a conversion kit is required and included (Applied Biosystems Part No. N801-0111). 120 VAC and 100 VAC units are supplied with a three-terminal plug. One of the terminals is an earth ground. To protect yourself against shock hazards, the electrical outlet must be a properly wired three-terminal outlet conforming to National Electric Code. Do not use an adapter to a two-terminal outlet. 2-4 All 230VAC instruments are wired for single-ended line service. 230VAC instruments installed in locations that have double-ended line service or locations that have unpolarized power receptacles (as in Germany) must be rewired using the instructions provided with the 230V to 220V Conversion Kit, Applied Biosystems Part No. N801-0110. The 220/230 VAC units are supplied with a power cord that has a Continental European style plug (also known as Schuko or CEE 7/7). If you need a power cord with a different style plug, call an Applied Biosystems Service Representative. Proper Location Place the GeneAmp PCR System 9600 on a solid (to prevent vibration), stable, level surface that allows free air flow, especially around the sides and back. Temperature, Humidity, and Environment Observe the following precautions when locating the instrument in your laboratory: ♦ Do not place the unit in a location subject to wide temperature fluctuation, such as direct sunlight, air drafts, or heat-generating equipment. ♦ Avoid placing the unit in an excessively damp area. ♦ Do not place the instrument in a Cold Room, i.e., a refrigerated room. ♦ The GeneAmp PCR System 9600 operates most efficiently when the ambient temperature is 15 to 30 degrees C (59 to 86 degrees Fahrenheit) and the ambient relative humidity is 20 to 80%. ♦ Do not operate in an environment where there is an oil mist. 2-5 Setting Up the Printer The GeneAmp PCR System 9600 can be used with an optional Epson LX-810 printer or other Epson-compatible printers with a serial (RS-232C) interface board. The printer is shipped with an Epson C82302 serial adapter card when ordered as part of Printer Kits (N801-0313 for 115VAC operation or N801-0314 for 230VAC operation). The card must be installed in the printer as instructed in pages 5-38 to 5-51 of the Epson LX-810 Instruction Manual (as explained below). Before installing the card, set the DIP switches on the Epson C82302 card as described below. The procedure for installing the printer is different for line voltages of 115 volts and 230 volts. Follow the procedure given below for the line voltage you are using, then configure the printer as described on page 2-12. Installing the 115-VAC Printer The Printer Kit for the 115 VAC GeneAmp PCR System 9600 (Part No. N801-0313) contains a printer (Part No. 0942-1015), with both a serial adapter card and a printer cable (Part No. N801-0421). 2-6 1 Set the DIP switches on the Epson C82302 serial adapter card as shown in Figure 2-1. 2 Install the serial adapter card in the printer as described in pages 5-38 to 5-51 of the Epson LX-810 User's Manual. When using this manual, pay special attention to "Removing the Upper Case" on page 5-38 and "Installing the Board" starting on page 5-44. (Note the figure on page 5-45.) Once the board has been installed, pay special attention to "Attaching the Upper Case " on page 5-49 of the Epson LX-810 User's Manual. 3 Set the DIP switches SW1 and SW2 on the right side panel of the printer to the positions shown in Figure 2-2. 4 Connect one end of the cable (Applied Biosystems Part No. N801-0421) to the 25-pin (D shell) RS-232C connector on the side panel of the GeneAmp PCR System 9600. Connect the other end of the cable to the connector on the serial adapter card you just installed. Note When you are printing, the printer ON LINE/OFF LINE button must be in the ON LINE position. See page 3-3 of the Epson LX-810 User's manual. When setting the DIP switches on the serial interface cards, remember that the “ON” setting is the same as the “CLOSED” setting, and the “OFF” setting is the same as the “OPEN” setting. The correct DIP switch settings on the Epson C82302 serial adapter card are: SW1 SW2 1: OFF 1: ON 2: OFF 2: ON 3: OFF 3: OFF 4: OFF 4: OFF 5: OFF 5: OFF 6: ON 6: OFF 7: OFF 7: OFF 8: OFF 8: OFF 2-7 Figure 2-1 2-8 DIP switch Settings on the Epson C82302 serial interface card. RS-232 Communications Parameters for users who do not have an LX-810: 9600 Baud No Parity 8 data bits 1 stop bit GeneAmp PCR System 9600 Instrument Power Cord Connection Printer Dip Switch settings Fuse Holders Serial Port ON Cable N801-0421 ON/OFF Switch Epson LX-810 Printer Rear Panel 1 SW1 8 1 SW2 4 Epson LX-810 Printer Right Side Panel Note: When installing the serial interface card in the Epson LX-810, see pages 5-38 to 5-51 in the Epson LX-810 Users Manual. Figure 2-2 Side panel of the GeneAmp PCR System 9600 and rear panel of the printer showing DIP switch settings and cable connections. 2-9 Installing the 230-VAC Printer The Printer Kit for the 230-VAC GeneAmp PCR System 9600 (Part No. N801-0314) contains a printer (Part No. 0942-1015), with a serial adapter card. It also includes a printer cable (N801-0421) and a 230-volt adapter (Part No. 0942-1002). To set up and install the printer, proceed as follows: 2-10 1 Set the DIP switches on the Epson C82302 serial adapter card as shown in Figure 2-1. 2 Install the serial adapter card in the printer as described in pages 5-38 to 5-51 of the Epson LX-810 User's Manual. When using this manual, pay special attention to "Removing the Upper Case" on page 5-38 and "Installing the Board" starting on page 5-44. (Note the figure on page 5-45.) Once the board has been installed, pay special attention to "Attaching the Upper Case " on page 5-49 of the Epson LX-810 User's Manual. 3 Set the DIP switches SW1 and SW2 on the right side panel of the printer to the positions shown in Figure 2-2. 4 Connect a local plug to the primary line cord of the adapter (0942-1002), as described in the adapter instruction sheet (0993-8359), and connect the local plug to the connector 230-VAC line power outlet. 5 Plug the secondary line cord into the printer line cord receptacle located on the printer rear panel. 6 Connect one end of the printer cable (Applied Biosystems Part No. N801-0421) to the serial port on the side panel of the GeneAmp PCR System 9600 and connect the other end to the serial adapter card you just installed. Note When you are printing, the printer ON LINE/OFF LINE button must be in the ON LINE position. See page 3-3 of the Epson LX-810 User's manual. After you have installed and connected the printer, you must configure the GeneAmp PCR System 9600 for the printer as described on the following pages. 2-11 Configuring the Printer 1 Turn on the power switch located on the lower left side of the instrument. A beeper sounds and all three indicator lights flash. Two displays appear briefly. Finally, the instrument main menu appears: Select Option 9600 RUN-CREATE-EDIT-UTIL The cursor appears under the "R" in RUN. 2 Press the OPTION key three times. The cursor moves under UTIL. Select Option 9600 RUN-CREATE-EDIT-UTIL 3 Press ENTER. The utilities menu is displayed: Select function DIR-CONFIG-DIAG-DEL 4 2-12 Press the OPTION key once to move the cursor under CONFIG, then press ENTER to select configuration. The following display appears: Time Date HH:MM MM/DD/YY This display is used to set the time and date. 5 To set the time, press the appropriate numeric keys for hours and minutes (HH:MM), then press ENTER. The software will place the colon for you. Press ENTER after making each entry. 6 To set the date, press the appropriate numeric keys for month, day and year (MM/DD/YY), then press ENTER. The software will separate the numbers for you. 7 Press STEP. The following display appears: Runtime printer Runtime beeper OFF ON This display lets you turn the run-time printer mode and the run-time beeper on or off. When the run-time printer mode is on, you can print run-time data. When the run-time beeper is on, a beeper will sound at the end of each setpoint in a run. 8 Press the OPTION key to toggle the OFF on the top line of the display to ON, then press ENTER. The instrument is now configured for a printer. 9 If you don't want to hear a beeper sound at the end of each setpoint, press the OPTION key to toggle the ON on the bottom line of the display to OFF, then press ENTER. 10 Press STOP to return to the Utilities menu. Press STOP again to return to the main menu. 2-13 Configuring the GeneAmp PCR System 9600 The final procedure in installing the GeneAmp PCR System 9600 is checking the instrument configuration. The configuration parameters include: ♦ time and date ♦ run-time printer mode (on or off) ♦ run-time beeper (on or off) ♦ pause time-out limit ♦ allowed setpoint error ♦ idle state setpoint ♦ temperature interval that triggers the clock start ♦ sample tube time constants Access the configuration parameters as follows: 1 The Utilities menu (shown below) should be displayed. If not, access the main menu, and select UTIL. Select function DIR-CONFIG-DIAG-DEL 2 Press OPTION to move the cursor to CONFIG, then press ENTER. The first configuration display is shown. Refer to the following pages for instructions on editing configuration parameters. For more detailed instructions, see Chapter 7, “Utilities.”. 2-14 Summary of Configuration Parameters Configuration EDIT-PRINT This display lets you edit or print the configuration parameters. Press ENTER to select EDIT. The first configuration screen, used to set the time and date, is displayed. Time Date HH:MM MM/DD/YY Set the time in hours and minutes (HH:MM), and the date in month, day, and year (MM/DD/YY). Press STEP to move to the next display. Runtime printer OFF Runtime beeper ON To configure the instrument for use with a printer, press the OPTION key to change OFF to ON, then press ENTER. To turn the run-time beeper off, press the OPTION key to change ON to OFF, then press ENTER. Press STEP to move to the next display. Or, press BACK to move to the previous display. Pause time out limit xx:xx Set the maximum amount of time that a program can pause before it is aborted. (This pertains only to the keypad pause.) The default value is 10 minutes. Press STEP to move to the next display. Or, press BACK to move to the previous display. Allowed setpt error x.xC Set the number of degrees the actual sample temperature may vary before the reading is noted in the History file as an error. The default value is 2.0 degrees C. Press STEP to move to the next display. Or, press BACK to move to the previous display. 2-15 Idle state setpoint 25C Set the temperature at which the block will be maintained when a program is not running. As factory set, the instrument will heat to 25 degrees C while idling and the heating indicator will flash. The default idling temperature may be changed to a new value. For operator safety, this value should be close to room temperature. Press STEP to move to the next display. Or, press BACK to move to the previous display. Start clock within x.xC of setpoint Enter the temperature interval before the setpoint temperature is reached at which the setpoint clock will start. The default value is 1.0 degree C. We highly recommend that you use the default value for this parameter. See Chapter 7 for details. Press STEP to move to the next display. Or, press BACK to move to the previous display. Special tube? NO This display lets you specify a special type of sample tube when you start a run if you are not using MicroAmp Reaction Tubes or Thin-Walled GeneAmp Reaction Tubes. The default condition of this parameter is no special tube type, as indicated on the display by “NO.” See Chapter 7 for details. If you accept the default condition, you will be able to select one of two sample tube types when you start a run (MicroAmp Reaction Tubes or Thin-Walled GeneAmp Reaction Tubes). See Chapter 6 for more information. 2-16 a. To change the default condition, press the OPTION key. “NO” will change to “YES” on the display and you will be able to select a different tube type when you start a run (see Chapter 6 for more information). b. Press ENTER. The following display appears: Rxn vol=100uL T= 9.5 Rxn vol= 50uL T= 7.0 This display lets you change the sample tube time constant. There are two default values for sample tube time constants on this display: one for sample tubes with a reaction volume of 100 µL, and one for sample tubes with a reaction volume of 50 µL. There is a time constant default value for sample tubes with a reaction volume of 20 µL that appears on a separate display. Press STEP to view this display: Rxn vol= 20uL T= 5.0 c. To change any of these time constant values, press the appropriate numeric keys, then press ENTER. To move the cursor from one time constant value to the next, or to move from the first display to the second, press STEP. Press BACK to move to the previous display. Or, press STOP to return to the first configuration display. From here, you can return to the main menu by pressing STOP twice. 2-17 There are two additional configurable parameters that let you change the time constants for MicroAmp Reaction Tubes and Thin Walled GeneAmp Reaction Tubes. We recommend that you only change these values if instructed to do so by future documentation. For more information, see pages 7-28 to 7-33. 2-18 Heater and Chiller Tests After you have configured the GeneAmp PCR System 9600, perform the heater and chiller tests as described in the following sections to verify that the instrument is operating correctly. Heater Test The heater test verifies that the sample block heaters and electronics are operating correctly. At the conclusion of the test, the display indicates whether the test was successful or not. The test takes approximately three minutes to run. CAUTION Before you begin this test, make sure you place an empty MicroAmp Tray (MicroAmp Tray/Retainer Set, Part No. N801-0530) on the sample block, then slide the heated cover forward and turn the cover knob clockwise until the white mark on the knob lines up with the white mark on the cover. 1 Access the main menu (shown below). (This display appears a few seconds after you turn on the instrument. At any other time, you can get to the main menu by pressing the STOP key until this display appears.) Select Option 9600 RUN-CREATE-EDIT-UTIL 2 Press the OPTION key three times to move the cursor under UTIL, then press ENTER. The Utilities menu is displayed: Select function DIR-CONFIG-DIAG-DEL 2-19 3 Press the OPTION key twice to move the cursor under DIAG and press ENTER. A display referring to the first diagnostic test appears: Enter Diag test # 1 REVIEW HISTORY FILE 4 Change the "1" to a "2" by pressing 2. Then press ENTER. The following display appears and the test begins: Enter Diag test # 2 HEATER TEST If “Heater Test Passed” appears on the display as shown below, proceed to the chiller test. If “Heater Test Failed” appears on the display, notify an Applied Biosystems Service Engineer. Heater Test Passed 5 Press STOP to go to the next test (Test #3). Next, you will run the chiller test, which is accessible from the first diagnostic display. 2-20 Chiller Test The chiller test verifies that the refrigeration system is operating correctly. CAUTION Before you begin this test, make sure you place an empty MicroAmp Tray (MicroAmp Tray/Retainer Set, Part No. N801-0530) on the sample block, then slide the heated cover forward and turn the cover knob clockwise until the white mark on the knob lines up with the white mark on the cover. 1 The following display should appear. If not, follow Steps 1 through 3 in the heater test procedure on page 2-19. Enter Diag test # 1 REVIEW HISTORY FILE 2 To access the chiller test, press 3 and press ENTER. The following display appears and the test begins: Enter Diag test # 3 CHILLER TEST The test takes from 3 to 12 minutes to complete. If “Chiller Test Passed” appears on the display as shown below, the refrigeration system is operating correctly. If “Chiller Test Failed” appears on the display, notify an Applied Biosystems Service Engineer. Chiller Test Passed 3 Press STOP to exit the test. The next test (Test #4) will appear on the display. Press STOP again to return to the Utilities menu. 2-21 Tutorial: Customizing a PCR CYCL Program 3 3 Introduction This tutorial explains how to set up a time and temperature profile for PCR. To do this, you will customize the CYCL (Cycle) program stored in instrument memory. Follow the instructions in this tutorial step by step and you will learn how to: ♦ start the instrument and get to the CYCL program ♦ use the keypad to view all the displays in the CYCL program ♦ customize the CYCL program by entering your own times and temperatures for a PCR profile ♦ start a trial run By working through this tutorial, you’ll become familiar with the basic operation of the system in about 30 minutes. You’ll see how quick and easy it is to enter times and temperatures for a PCR profile and start a run. Before You Start Before you start this tutorial: 3-2 1 The system should be properly installed either by an Applied Biosystems service representative or according to the supplied instructions in Chapter 2, Installation, in this manual. 2 Read Chapter 1 in this manual. 3 Unwrap one of the MicroAmp Trays supplied with the instrument. What is a CYCL Program? A CYCL program is a set of instructions in which you specify how the instrument should heat and cool your samples in a PCR cycle. The CYCL program is stored in the instrument software. You view the CYCL program by scrolling through a series of displays on the front panel screen. By entering the times and temperatures for your PCR application, you can easily customize the program to your needs. The CYCL program is a common type of PCR thermal profile. Typically, it consists of two or three setpoints or incubation temperatures (see Figure 3-1). The first setpoint is used for template denaturation or melting. The second setpoint is used for primer annealing, and the third setpoint is used for primer extension. Each cycle may be repeated up to 99 times. Figure 3-1 A common CYCL program. 3-3 For each setpoint, you specify a target temperature, a ramp time, and a hold time (see Figure 3-1). The ramp time is the time it takes to change from one temperature to another. The hold time is the length of the samples will be held at the specified temperature. With the GeneAmp PCR System 9600, the hold time begins when the samples, not the block, reach the target temperature. Figure 3-2 Setting temperature and time values for Setpoint #1. The display in Figure 3-2 shows the default values for Setpoint #1. Defaults are commonly used times, temperatures, and other values. For example, the default ramp time is 0:00 minutes. This causes the sample to heat or cool to the target temperature as fast as possible. You can change the default times and temperatures as necessary to customize the program. You will see that the CYCL program is similar to a form, which you can fill out with your thermal cycling instructions. 3-4 Starting Up the Instrument Press the power switch (see Figure 1-3) to the ON position. Figure 3-3 Location of power switch. A beeper sounds, and all three indicator lights on the control panel flash. The screen lights up and a series of displays appear. 3-5 Getting to the CYCL Program 1 After you start the instrument, the main menu (shown below) appears on the screen. Select Option 9600 RUN-CREATE-EDIT-UTIL Think of the main menu as your “home base.” It gives you access to the major functions of the instrument. You can easily get to the main menu from any of the other displays by pressing the STOP key one or two times. Note If you press the wrong key in the steps that follow, press STOP one or two times to return to the main menu and start again. 2 Look for the cursor on the main menu. The cursor is the short line that appears under the “R” in RUN. Select Option 9600 RUN-CREATE-EDIT-UTIL Cursor 1 The cursor marks the current selection on the display. 3-6 3 To select an option on the main menu, you use the OPTION key. To learn how the OPTION key works, follow these steps: a. Press the OPTION key to move the cursor from one selection to the next: b. When the cursor reaches the last selection (UTIL), press OPTION to move the cursor to the first selection again: The OPTION key is used the same way on many different displays. 3-7 4 To create a program, you need to select the CREATE option. Press the OPTION key once to move the cursor under CREATE: Select Option 9600 RUN-CREATE-EDIT-UTIL Cursor 5 Press ENTER The next display appears: You have now learned how to make a menu selection. Using the OPTION key, you mark your selection, then you press ENTER to accept it. You’ll do this again in the next step. Create program HOLD-CYCL-AUTO-METH 6 Press the OPTION key to move the cursor under CYCL. This option allows you to create a CYCL program. Then press ENTER to accept this selection. The first display in the CYCL program appears: 3 Temperature PCR 3-8 A Look at the CYCL Program In the following steps, you will look at the main displays in the CYCL program. In each display, you will see the default parameters (e.g., times and temperatures) that make up a common PCR cycle. Using the STEP key, you will quickly step through all the displays and accept the default values. Keep in mind, however, that default values can be changed, which you will do later on in this tutorial. 1 The first screen in the CYCL program should still be on your display: 3 Temperature PCR Cursor This display sets the number of setpoints or incubation temperatures in one cycle. The cursor marks the default value, 3, which specifies three-temperature PCR cycling. 2 Press STEP. This accepts the default value of three set-points and moves you to the next display: Setpt #1 Ramp 0:00 94.0C Hold 0:30 This display sets the ramp time, temperature, and hold time for Setpoint 1 — typically used for template denaturation. The temperature of the first PCR setpoint is 94 degrees C and is held for 30 seconds. 3-9 3 Press STEP to accept all of the default values and move to the next display. The display for Setpoint #2 appears: Setpt #2 Ramp 0:00 55.0C Hold 0:30 This display sets the ramp time, temperature, and hold time for Setpoint #2 — used for primer annealing. For a three-temperature cycle, the second PCR setpoint is commonly 55 degrees C and is held for 30 seconds. 4 Press STEP to accept the default ramp time, temperature, and hold time for Setpoint #2. The display for Setpoint #3 appears: Setpt #3 Ramp 0:00 72.0C Hold 0:30 This display sets the ramp time, temperature, and hold time for Setpoint #3 — used for primer extension. For a three-temperature cycle, the third PCR setpoint is commonly 72 degrees C and is held for 30 seconds. 5 3-10 Press STEP to accept the default ramp time, temperature, and hold time for Setpoint #3. The following display appears: Total cycles = 25 Pause during run? NO 6 Press the BACK key to review the display for Setpoint #3. The illustration below shows you how the BACK key works. Setpt #3 Ramp 0:00 72.0C Hold 0:30 Press Back To display the previous screen Total cycles = 25 Pause during run? No 7 Now, press STEP to move forward again to the next display: Total cycles = 25 Pause during run? NO “Total cycles” specifies the number of times the three-temperature cycle will be repeated. The prompt that reads “Pause during run?” is used to automatically interrupt a run in the first or successive cycles. This lets you add reagents or add or remove samples, then continue the run. 3-11 8 Press STEP to accept the default values in the display. The following display appears: CYCL#??? xx.xC RUN-STORE-PRINT-HOME This is the last display in the program. From here, you have the option of running, storing, or printing the program, or reviewing it again. In the next procedure, you will go through the program again to customize it with new PCR parameters. 9 Press STEP to return to the first display: 3 Temperature PCR You have now viewed the main displays in the standard CYCL program and the default parameters for a common PCR profile. Figure 3-4 on the next page summarizes how to use the keypad to move through a program. 3-12 Figure 3-4 Moving through the CYCL program displays. 3-13 Customizing the CYCL Program In the steps below, you will customize the CYCL program by changing some of the default parameters. Although we suggest some new temperatures and times to use, you may want to choose values relating to a current PCR application in your lab. Defining the Number of Setpoints 1 The first display in the CYCL program (shown below) should appear on your display. If it does not, press STOP one or two times to return to the main menu. Then refer to “Getting to the CYCL Program” on page 3-6. 3 Temperature PCR 2 In this display, you specify the number of setpoints to be used in the program. (For example, if you wanted to perform two-temperature PCR, you would press 2.) For this tutorial, you will set up a threetemperature PCR program, so just press ENTER to accept the default value of 3. The display for Setpoint #1 appears. Setpt #1 Ramp 0:00 94.0C Hold 0:30 3-14 Defining Values for Setpoint # 1 Setpt #1 Ramp 0:00 94.0C Hold 0:30 In the following steps, you will change some of the default values for Setpoint #1. 1 Look for the cursor on the display. It appears under the ramp time. The default time of 0:00 is most commonly used. This causes the sample to be heated or cooled to the target temperature as fast as possible. 2 For this example, we will not change the default ramp time. Press ENTER to accept 0:00 minutes. The cursor moves to the temperature entry. Setpt #1 Ramp 0:00 Hold 0:30 94.0C 3 Change the temperature to 96.5 degrees C. Press 9, then 6, then 5. If you make a mistake, press CE (Clear Entry) to erase the value, then start again. When the value is correct, press ENTER. Note that the temperature is set to the nearest tenth of a degree. To enter a whole number such as 94 degrees C, you must specify 94.0 (press 9, then 4, then 0). 3-15 The cursor moves to the hold time: Setpt #1 Ramp 0:00 96.0C Hold 0:30 4 Sometimes, you may want to change an entry after you have pressed ENTER. To move back to the previous entry, you press the BACK key. The cursor is now at the hold time. Press BACK to move the cursor back to the temperature: Setpt $1 Ramp 0:00 94.0C Hold 0:30 Press Back To move the cursor back to the previous parameter 5 Now press ENTER to move the cursor forward again to the hold time. 6 For this example, we will not change the default hold time. Press ENTER to accept 0:30 seconds for the hold time. The display for Setpoint #2 appears Setpt #2 Ramp 0:00 55.0C Hold 0:30 3-16 Defining Values for Setpoint #2 Setpt #2 Ramp 0:00 55.0C Hold 0:30 1 Use the default ramp time by pressing ENTER 2 Enter 52.5 degrees C for the temperature by pressing 5, then 2, then 5. Then press ENTER. 3 We will not change the hold time, Press STEP to skip over this entry, The display for Setpoint #3 appears. Defining Values for Setpoint #3 Setpt #3 Ramp 0:00 72.0C Hold 0:30 1 Use the default ramp time by pressing ENTER. 2 Enter 74.5 degrees C for the temperature. Press ENTER. 3 We will not change the hold time, Press STEP to skip over this entry and move to the next display: Total cycles = 25 Pause during run? NO 3-17 Specifying the Number of Cycles Total cycles = 25 Pause during run? NO The first entry in the above display specifies the number of times the cycle will be repeated. 1 Enter 30 cycles: press 3 then press 0. When the entry is correct, press ENTER. The cursor moves to the entry, “Pause during run?” This allows you to pause a run to add a reagent to your sample solutions, for example. 2 The OPTION key is also used to change a NO selection to a YES and vice versa. The illustration below shows how this function of the OPTION key works. Total cycles = 25 Pause during run? NO Press Option Total cycles = 25 Pause during run?YES To change NO to YES and vice versa a. Press the OPTION key once The YES option appears in place of NO. b. 3-18 For this example, no pause will be specified. Press OPTION again to display NO, then press ENTER to accept this selection and proceed. The next display (the last display in the program) is: Program Type CYCL Program Number not yet assigned O CYCL#??? xx.xC RUN-STORE-PRINT-HOME O “CYCL” in this display means that the type of program you have set up is a CYCL program. “#???” means that the program doesn’t have a program number yet since it hasn’t been stored. Store the program following the procedure on the next page. This will allow you to run the program you have customized at any time in the future without needing to set it up again. 3-19 Storing Your CYCL Program 1 The following display should appear on your screen: CYCL#??? xx.xC RUN-STORE-PRINT-HOME 2 Press the OPTION key to move the cursor beneath STORE, then press ENTER. The following display appears: Store Enter program # x At the cursor, x is the next available program number. If this is the first program stored on the instrument, x would be a “1” on the display. 3 Press ENTER to store the program under the displayed number. The following display appears: Store Protect program? NO 4 3-20 This display gives you the option of protecting the program under a user identification number. More details on this option are given in the next chapter. For this example, choose NO and press ENTER. The following display appears: Prog# x OK to store? YES 5 Press ENTER to store the program The following display appears: Program Type CYCL Assigned Program Number (1) O CYCL# 1 xx.xC RUN-STORE-PRINT-HOME On this display, CYCL is the type of program you have set up. The number of the program appears on the display following the program type. Your program is stored with the parameters you have entered. From this display, you could print the program parameters if a printer is available. Or, by selecting HOME to return to the main menu, you could create or edit other programs, or link together a series of programs in a PCR method. Our next step will be to use the stored program for a trial run (without loading any samples). 6 Press OPTION to move the cursor to HOME, then press ENTER. The main menu appears: Select Option 9600 RUN-CREATE-EDIT-UTIL 3-21 Starting a Trial Run In the following steps, you will learn how to load a tray and run the program you just stored, then stop it after a few moments. You will not be loading any samples in the tray for this exercise, but will be able to see how a run is initiated. Loading a Tray (without samples) Load an empty tray in the sample block by following these steps. 3-22 1 Turn the cover knob fully counterclockwise (see Figure 3-5). This should be done whenever you move the heated cover to ensure that the heated plate underneath is filly raised. 2 Slide the heated cover away from you. 3 Locate an empty sample tray and orient it so that the cutout in the lower rim is on the left side. Place the tray in the sample block. 4 Move the heated cover forward to cover the sample compartment to safeguard against burns. No samples are loaded in the tray so leave the cover knob fully counterclockwise. This keeps the plate raised above the tray since no samples will be heated. Figure 3-5 Sliding the heated cover forward for a trial run. 3-23 Running the Program 1 Look at the display. The main menu (shown below) should be displayed. If not press the STOP key one or two times. Select Option 9600 RUN-CREATE-EDIT-UTIL 2 With the cursor beneath RUN, press ENTER. The following display appears: Run Enter program # _ 3 Press the key for the number of the program you created and stored earlier in this tutorial. (If it was the first program stored on the system, press 1.) Then press the ENTER key. The following display appears: Select tube MICRO Reaction vol? 100uL 4 This display lets you define the type of sample tube you are using and the reaction volume of that tube. Press ENTER to accept the default values displayed. Note If the printer has been enabled (using the Utilities function), a display that reads “Select print mode” appears. Select OFF and press ENTER since a printer is not used in this example. 3-24 5 Before the run starts, a display will appear that reminds you to close and tighten the heated cover, When the run starts, you will see a run-time display that is continuously updated for the program being run. During ramp segments, you will see the following display: Setpoint temperature Current sample temperature O Ramp to 96.5C xx.xC 0:30 Cycle 1 Time remaining in current ramp or hold segment Current cycle # During hold segments, you will see the following display: Setpoint temperature Current sample temperature O Ramp to 96.5C xx.xC 0:22 Cycle 1 Time remaining in current ramp or hold segment Current cycle # These two run-time displays alternately appear during ramps and holds in the run. 6 Press the MORE key to display more information about the run. A second run-time display appears: 3-25 Current setpoint number Total cycles in program O Setpt #1 Tot Cyc 30 Hrs left 0.7 Prog 1 Estimated time left in program Current program # 7 Press MORE again to return you to the first run-time display. The illustration below shows you how the MORE key works. O Ramp to 96.5C xx.xC 0:30 Cycle 1 Press More Setpt #1 Tot Cyc 30 Hrs left 0.7 Prog 1 8 To move between the two run-time displays After a few moments, press the STOP key to abort the run. The following display appears: CYCL# 1 xx.xC Abort program? YES 9 Press the ENTER key to stop the program. A display similar to the one shown below appears: 3-26 CYCL# 1 Abort xx.xC RUN-STORE-PRINT-HOME 10 You can now return to the main menu. Press the OPTION key to move the cursor to HOME, then press ENTER. Select Option 9600 RUN-CREATE-EDIT-UTIL The Next Step In this tutorial, you have learned how to set up a threetemperature PCR CYCL program. You may now want to try creating a CYCL program to perform two-temperature PCR. Start by selecting CREATE on the main menu, Then, select CYCL for the type of program you want to create. Enter 2 in the first display in the program for two-temperature PCR, then customize the rest of the program as you like. In Chapter 4, you will find a summary of the keypad functions and more information about the software and the main menu. Chapter 5 explains how to customize any of the three PCR programs available — HOLD, CYCL, and AUTO — and how to link programs together to create a method. In Chapter 6, you will find information on loading and running your PCR samples. 3-27 Software Basics 4 4 Introduction This chapter presents an overview of the GeneAmp® PCR System 9600 software and describes the HOLD, CYCL, and, AUTO programs and PCR methods. Included are the following main sections: ♦ Reviewing Keypad Basics ♦ A Close Look at the Main Menu ♦ An Overview of PCR Programs and Methods ♦ The HOLD Program ♦ CYCL: The Cycle Program ♦ The AUTO Program ♦ PCR Methods Reviewing Keypad Basics If you haven’t already done so, go through the Tutorial in Chapter 3 to learn how to use the keys. The following section summarizes the functions of the keys. On the left side of the keypad are function keys used to select the thermal cycling parameters and run programs. The right side of the keypad is used to specify numeric values, for example, time and temperatures for an analysis, or the number of cycles. After you type a numeric value, you press the ENTER key. Figure 4-1 4-2 Keypad. Use of the Keys There are two types of keys: run-time keys and editing keys. Runtime keys are used while running samples, for example, to start and stop an analysis. Editing keys are used to move through the different displays and select program options. The ENTER key is also considered an editing key. After you select an item by marking it with the cursor, pressing ENTER accepts your selection. 4-3 A Close Look at the Main Menu Select Option 9600 RUN-CREATE-EDIT-UTIL The main menu (shown above) appears a few seconds after the instrument is first turned on. If the instrument is already on and the main menu is not shown, you can always access the main menu by pressing the STOP key until it is displayed. Note If the display on your screen has the following options: “RUNSTORE-PRINT-HOME,” you can select HOME to get to the main menu. (Press the OPTION key to move the cursor under HOME, then press ENTER.) The functions on the main menu are described below. 4-4 Function When to select... RUN Select this option to start PCR thermal cycling on samples using any of the PCR programs that you have stored. CREATE Select this option to create a new PCR program. EDIT Select this option to make changes to any of the PCR programs you have stored. UTIL Select the UTIL (Utilities) option to see a history of the run, review a list of your stored programs, configure the GeneAmp PCR System 9600, run diagnostics, or delete programs. The Utilities functions are described in Chapter 7. Selecting a Function 1 Press OPTION to move the cursor from one option to the next. When the cursor reaches UTIL, pressing OPTION again will move it back to RUN. 2 When the cursor is at the desired selection, press ENTER. You will then see the first display for the option you selected. For example, when you select RUN or EDIT, you will be asked to enter the number of a program. When you select CREATE, you then select the type of program you want to use. For UTIL, you are asked to select a Utilities function, for example, a directory or listing of your programs. Figure 4-2 Access to the major functions of the software. 4-5 An Overview of PCR Programs and Methods A program is a set of instructions in which you specify how the instrument should heat and cool your samples for PCR. Three types of programs are stored in the instrument software HOLD, CYCL, and AUTO. You can view each program by scrolling through a series of displays on the front panel screen. Each program contains default parameters, which you can change as necessary to customize the program. Think of a program as similar to a form, which you can fill out with your thermal cycling instructions. The three types of programs are described below. ♦ A HOLD program consists of a single temperature held for a specific time interval or for an extended (e.g., overnight) period. ♦ A CYCL (Cycle) program comprises a repeated pattern of temperature ramp and hold segments for PCR cycling. ♦ In an AUTO program, a more versatile form of CYCL program, the setpoint time, and/or temperature can be automatically incremented or decremented a fixed amount every cycle. Linking Programs in a PCR Method You may also create a Method, which links together up to 17 programs. For example, a method could include a HOLD file used for pre-PCR incubation, followed by a three-temperature CYCL program, followed by a final HOLD program for post-PCR incubation. 4-6 Figure 4-3 HOLD, CYCL, AUTO, and METH programs Storing Programs and Methods By storing the programs and methods you can easily access and run them later. Up to 150 programs be stored on the GeneAmp PCR System 9600. A program can be a method (a series of linked programs) or an individual program. Both methods and programs are assigned program numbers. 4-7 The HOLD Program During a HOLD program the temperature of the sample block (and the sample) is held at one temperature for either a fixed time interval or an indefinite period. Figures 4-4 and 4-5 show the two common types of HOLD programs. A HOLD program would normally be used before or after running a CYCL program. For example a high temperature (e.g., 94 degrees C) HOLD might be used before cycling and a low temperature (e.g., 4 degrees C) HOLD might be used after cycling. The clock starts when the sample temperature is within one degree C of the target temperature. 4-8 Figure 4-4 A HOLD program held for an indefinite time. Figure 4-5 A HOLD program held for a specific time interval. 4-9 CYCL: The Cycle Program A CYCL program contains the thermal ramp and hold segment patterns for PCR cycling. It contains up to nine setpoints. Each setpoint comprises a ramp segment and a hold segment for the specific target temperature. The pattern can be repeated up to 99 times. A complete cycle for a common profile requires about three or four minutes. Typically, there are two or three setpoints in a CYCL program. The first setpoint is commonly used for DNA denaturation or melting. For example, the setpoint temperature can be set to 94 degrees C for about 10 to 20 seconds, when double strands of DNA are separated into single strands. The second setpoint is commonly used for primer annealing. For example, the setpoint temperature can be lowered to between 45 and 55 degrees C for typically not less than 15 seconds, when a unique pair of primers bind or anneal to the start and end points of the target sequence. For the third setpoint, the primers are extended. For example, DNA can be polymerized at approximately 72 degrees C for a time interval of typically not less than 15 seconds. 4-10 Figure 4-6 A common CYCL program 4-11 The AUTO Program An AUTO program allows the user to automatically increment or decrement the setpoint times and temperatures a fixed amount every cycle. By increasing the extension time with each cycle, it may be possible to increase product yield with a fixed amount of enzyme. The enzyme is not initially limiting, but eventually, if more enzyme is not added, longer times may be needed to continue with exponential increases in product. An AUTO program may also be desirable when it is found that the melting temperature of DNA is increasing as the DNA becomes more concentrated. In this instance, an AUTO program would be used to incrementally increase the denaturation temperature over a series of cycles. Another use of an AUTO program is to incrementally increase the annealing temperature over the first several cycles for greater specificity of primer binding. After the first several cycles (usually, two to five), the annealing temperature is kept constant. 4-12 Figure 4-7 An AUTO program used to increase hold time. 4-13 PCR Methods PCR methods are used to automatically link together up to 17 programs for a specific PCR application. To create a method, you use the METH program. An example of a method is shown in Figure 4-8. This method starts with a HOLD file used for pre-PCR denaturation (e.g., 94.0 degrees C for five minutes). This is followed by a CYCL program for three-temperature PCR. A final HOLD program concludes the run, for post-PCR storage overnight (at 4.0 degrees C, for example). Figure 4-8 4-14 An example of a PCR method. Setting Up PCR Programs and Methods 5 5 Introduction This chapter describes how to use the HOLD, CYCL, and AUTO programs to create your own PCR programs. You will learn how to store, access, edit, and print these programs. This chapter also describes how to setup a PCR method, in which you specify a sequence of programs for a run. For example, pre-PCR incubations, PCR cycling, and post-PCR incubations can be linked together in a single method. You will also learn how to store, edit, and print the methods you create. At the end of this chapter, you will find information on the displays found in the HOLD, CYCL, and AUTO programs. Setting Hold Times on the GeneAmp® PCR System 9600 If you have used the DNA Thermal Cycler or DNA Thermal Cycler 480, read the following information on setting hold times. These general guidelines are based upon differences in how the instruments heat and cool samples. The hold times that you specify in your PCR Cycle and Auto programs for the GeneAmp PCR System 9600 will be shorter than those you used for your Step-Cycle or Thermo-Cycle files on the DNA Thermal Cycler. This is because the DNA Thermal Cycler starts counting the hold time when the block reaches a temperature one degree before the target temperature, while the GeneAmp PCR System 9600 starts counting the hold time when the samples reach a temperature one degree before the target temperature. As shown in Figure 5-1, since the block reaches the target temperature before the samples, the programmed hold time on the DNA Thermal Cycler must include enough time for the samples to reach the target temperature. A hold time of one minute or greater is required on the DNA Thermal Cycler for the samples to reach the target temperature. On the GeneAmp PCR System 9600, hold times of less than one minute are generally used. 5-2 Figure 5-1 Heating ramps on the DNA Thermal Cycler 480 and GeneAmp PCR System 9600 5-3 Tables 5-1 and 5-2 show guidelines on how to convert hold times for the DNA Thermal Cycler or DNA Thermal Cycler 480 to hold times for the GeneAmp PCR System 9600. The table you use will depend on whether you are using an up ramp (the temperature is higher than in the previous segment) or a down ramp (the temperature is lower). ♦ If you are using an up ramp, you will base the new hold time on the change in temperature required to reach the next target temperature. See Table 5-1. ♦ If you are using a down ramp, you will base the new hold time on the starting temperature of the ramp and the change in temperature required to reach the next target temperature. See Table 5-2. For up ramps, determine the change in temperature required to reach the next target temperature and round this off to the closest value given below. Then subtract the number of seconds indicated from the hold time used for the DNA Thermal Cycler. This will give you the hold time to use for the GeneAmp PCR System 9600. The typically recommended hold time is 10 to 15 seconds for denaturation. Table 5-1 After Up Ramps: Converting Hold Times Greater than One Minute (DNA Thermal Cycler to GeneAmp PCR System 9600) 5-4 ∆Temp. (°C) Seconds to Subtract from DNA Thermal Cycler Hold Times (> 1 min.) 10° 38 sec. 15° 45 sec. 20° 49 sec. 30° 54 sec. 40° 55 sec. 50° 57 sec. 60° 57 sec. Figure 5-2 shows an example of converted hold times. In this example, the temperature was increased by 17 degrees C, This value was rounded to 15 degrees C. According to Table 5-1, we should subtract 45 seconds from the hold time on the DNA Thermal Cycler, giving us a new hold time of 35 seconds. Figure 5-2 Sample conversion of hold times for up ramps (DNA Thermal Cycler to GeneAmp PCR System 9600) Note If methods developed on the GeneAmp PCR System 9600 will be used on the DNA Thermal Cycler, you can also use Table 5-1 to convert the hold times. Simply add the indicated times instead of subtracting them. 5-5 Table 5-2 After Down Ramps: Converting Hold Times Greater than One Minute (DNA Thermal Cycler to GeneAmp PCR System 9600) For down ramps, determine the change in temperature required to reach the next target temperature, then round off this value to the closest value given below. Then, based on the starting temperature of the ramp, determine the number of seconds to subtract from the DNA Thermal Cycler hold time to arrive at the new hold time. The typically recommended hold time is 10 to 15 seconds for annealing. Seconds to Subtract from DNA Thermal Cycler Hold Times (> 1 min.) ∆Temp. Starting Temperature of Ramp (°C) (°C) 35-55° 56-75° 76-95° 10° 39 sec. 39 sec. 40 sec. 15° 45 sec. 47 sec. 48 sec. 20° 49 sec. 52 sec. 53 sec. 30° 56 sec. 59 sec. 40° 57 sec. 62 sec. 50° 62 sec. 60° 60 sec. Figure 5-3 shows an example of converted hold times 5-6 In the example below, the temperature was decreased by 22 degrees C. This value was rounded to 20 degrees C. According to Table 5-2, with a starting temperature of 94 degrees C, we should subtract 53 seconds from the hold time on the DNA Thermal Cycler, giving us a new hold time of 27 seconds. Figure 5-3 Sample conversion of hold times for down ramps (DNA Thermal Cycler to GeneAmp PCR System 9600) Note If methods developed on the GeneAmp PCR System 9600 will be used on the DNA Thermal Cycler, you can also use Table 5-2 to convert the hold times. Simply add the indicated times instead of subtracting them. 5-7 Editing Keys To create, view, or edit programs and methods, you will use the following keys. Figure 5-4 Editing Keys The function of each key is described below. 5-8 BACK Moves the cursor to the previous parameter or display. STEP Moves the cursor to the next parameter or display OPTION Moves the cursor to your selection. Changes a YES response to a NO and vice versa. STOP Returns you to the last display in a program when pressed once. When pressed twice, returns you to the main menu. CE Clear Entry: Clears the numeric entry marked by the cursor. ENTER Accepts the selection marked by the cursor. Creating and Editing Programs The main steps involved in creating and editing programs are summarized below. These steps are explained in detail in the following pages. 1 Start at the main menu. 2 Choose one of the following: a. Select CREATE on the main menu if you want to create a new program. b. On the next display, choose the type of program — HOLD, CYCL, or AUTO — you want to create. OR a. Select EDIT on the main menu if you want to view or edit a program you have already stored (and assigned a program number). 3 View the displays in the program and make any changes to the thermal cycling parameters. 4 In the last display in the program, you can choose to: RUN Allows you to run a program that you have customized and stored immediately. If you do not store the program first, you will have to recreate it if you want to use it later. STORE Allows you to save the program you have customized before running it. Once you have stored a program, it may be run at any time. PRINT Select this option to print the program you have customized. HOME Select this option to display the main menu. 5-9 Creating a Program 1 Access the main menu. Select Option 9600 RUN-CREATE-EDIT-UTIL 2 Press the OPTION key to select CREATE, then press ENTER. The following display appears Create a program HOLD-CYCL-AUTO-METH 3 Press the OPTION key to select the type of program — HOLD, CYCL, or AUTO — you want to create, then press ENTER. (The METH option is used to create a method. See page 5-18.) 4 Specify the thermal cycling parameters for the program. The displays in each program are described in the tables at the end of this chapter. The last display to appear allows you to run, store, or print the program. For example, this display appears at the end of a CYCL program: Program Type: CYCL Program Number (not yet assigned) CYCL#??? xx.xC RUN-STORE-PRINT-HOME 5 5-10 In most cases, you will want to store the program and assign it a number so that it can be run at any time. Use the following procedure to store the program. Storing the Program 1 Press the OPTION key to move the cursor beneath STORE, then press ENTER. The following display appears: Store Enter program # x The number “x” is the next available number. If this is the first file being stored, “x” would be a “1” on the display. Up to 150 programs can be stored. 2 Press ENTER to store the method under the displayed number. OR To use a different number, type the number (1-150), then press ENTER. The following display appears: Store Protect program? NO 3 The above display gives you the option of protecting the file under a user identification number. By doing so, the file cannot be overwritten or deleted unless the user number is entered. Select YES or NO by pressing the OPTION key, then press ENTER. 5-11 If you select YES, the following display will appear: Store Enter user # In this display, you can specify any number from 1 to 9999 for your user identification number. Make a note of the number you choose for later use. Type the number, then press ENTER. The following display appears: Prog # x User #xxxx OK to store? YES Note If you see a display that reads, “Prog #x: OK to (overwrite?,” you typed a number (in Step 2) that has already been used. Press OPTION key to select YES or NO. YES stores the new file and erases (overwrites) the old one. NO cancels the action and lets you choose a new number (see the beginning of this procedure). 4 5-12 Press ENTER to store the program, Editing a Program When you want to view a program you have stored or make changes to it, you use the Edit function. You can also modify an existing program to create a new one. This can save you time when you need to change only certain program parameters. To edit a program: 1 Access the main menu. Select Option 9600 RUN-CREATE-EDIT-UTIL 2 Press the OPTION key to select EDIT, then press ENTER. You obtain the following display: Edit Enter program # 3 Type the number of the program you wish to edit, then press ENTER. The first display for the program or method appears. For example, if you are editing a CYCL program, you will see the display that reads “3 temperature PCR.” 5-13 Note If you enter a number for a program that does not exist, you will see a message that reads “Program not found.” The next display allows you to choose the program number you want to edit again. 4 Edit the program as necessary. The displays in each program are described in the tables at the end of this chapter. Press ENTER after you make a numeric entry. Press STEP to advance to the next display. Press BACK to return to a previous parameter or display. 5 The last display gives you the option of storing the program. Press the OPTION key to select STORE, then press ENTER. The following display appears: Store Enter Program # x The next available number (x) appears at the cursor 6 To store the program, you have two options. You can create a new copy of the program and save the old one (see Step 6a). Or, you can replace the original program with the new version (see Step 6b). a. Press ENTER to store the program under the next available number (the one that appears in the display). This will create a new program. The original program that you edited will still be available under its original number. Once you press ENTER, the next display will ask you if you want to protect the program. If you choose to do so, you will be asked to enter a user identification number. 5-14 b. Type the original number for the program, then press ENTER. This allows you to replace the original program with the new edited version. The subsequent display will ask “OK to overwrite?” Select YES and the original program will be over-written by the new edited version. If the original program was protected, you will need to enter the user identification number that was specified when the program was first created before you can overwrite it. The following display will appear: Prog x is protected Enter user # _ Type the correct user number, then press ENTER. The next display will ask “OK to overwrite?” Select YES and the original program will be overwritten by the new edited version. 5-15 Printing a Program If the instrument is configured for a printer, you can obtain a printout of the parameters in a program. For more information on configuring a printer, see Chapter 7, “Utilities.” 1 You can print any program when the last display in the program is on the screen. The last display for the Cycle program is shown below. (To quickly get to this display while you are in a program, press STOP.) CYCL#??? xx.xC RUN-STORE-PRINT-HOME 2 Press the OPTION key twice to select PRINT, then press ENTER. The program is printed. AB GeneAmp PCR System 9600 Ver 2 June 1, 1992 CYCL Progr- #??? — Program Parameters 3 Temperature PCR SetPt #1 94.0C Ramp Hold 0:00 0:30 SetPt #2 55.0C Ramp Hold 0:00 0:30 SetPT #3 72.0C Ramp Hold 0:00 0:30 Total cycles = 25 Pause during run? NO Figure 5-5 5-16 Example of a printout for a CYCL program. 10:52 am Creating and Editing Methods The main steps involved in creating and editing methods are summarized below. These steps are explained in more detail on the following pages. 1 Start at the main menu. 2 Choose one of the following: a. On the main menu, select CREATE if you want to create a new method. b. Then select METH on the next display. OR a. Select EDIT on the main menu if you want to view or edit a method you have already stored (and assigned a number). 3 Link together a series of programs. 4 In the next display, you can choose to: RUN Allows you to run the method immediately. If you do not store the method first, you will have to recreate it if you want to use it later. STORE Allows you to save the method before running it. Once you have stored a method, it may be run at any time. PRINT Select this option to print the list of linked programs, or the program parameters for each program. HOME Select this option to display the main menu. 5-17 Creating a Method A method is a series of up to 17 programs linked together. For example, you can link a HOLD program to a CYCL program and conclude your experiment with another HOLD program. To create a method: 1 Access the main menu. Select Option 9600 RUN-CREATE-EDIT-UTIL 2 Press the OPTION key to select CREATE, then press ENTER. You obtain the following display: Create program HOLD-CYCL-AUTO-METH 3 Press the OPTION key to select METH, then press ENTER. The following display appears: Link progs: _- 4 - Type the program numbers of the programs you want linked. After you type each number, press ENTER. For example, to link programs 1, 3, and 5, your display would look like this: Link progs: 15- - - 5-18 3- Note If you enter a program number for a program that does not exist, you will see a message that reads “Program not found.” The next display allows you to choose the program number you want to edit again. A program can appear more than one time in a method. Also, the same program can be used in more than one method. 5 Press STEP to move to the next display. If you are linking seven or more programs in a method, the following display appears. - - - - - This display lets you link up to ten additional programs in the method. Note You cannot link a method. 6 Type the program numbers of the programs you want linked. After you type each number, press ENTER. 7 Press STEP to move to the next display. Meth#??? 25.6C RUN-STORE-PRINT-HOME This display allows you to run, store, or print the method. In most cases, you will want to store the method so that it can be run at any time. Instructions for storing a method are given on page 5-21. 5-19 8 Program Type: (Method) The last display to appear when you are creating a method allows you to run, store, or print the method: Program Number (not yet assigned) METH#??? xx.xC RUN-STORE-PRINT-HOME 9 5-20 In most cases, you will want to store the method and assign it a number so that it can be run at any time. Use the following procedure to store the method. Storing the Method 1 Press the OPTION key to move the cursor beneath STORE, then press ENTER. The following display appears: Store Enter program # x X is the next available number. If this is the first file being stored, x would be a “1” on the display. 2 Press ENTER to store the method under the displayed number. OR To use a different number, type the number (1-150) then press ENTER. The following display appears: Store Protect program? NO 3 The above display gives you the option of protecting the file under a user identification number. By doing so, the file cannot be overwritten or deleted unless the user number is entered. Select YES or NO by pressing the OPTION key, then press ENTER. If you select YES, the following display will appear. 5-21 Store Enter user # In this display, you can specify any number from 1 to 9999 for your user identification number. Make a note of the number you choose for later use. Type the number, then press ENTER. The following display appears: Prog # x User #xxxx OK to store? YES Note If you see a display that reads, “Prog #x: OK to overwrite?; you typed a number (in Step 2) that has already been used. Press OPTION key to select YES or NO. YES stores the new file and erases (overwrites) the old one. NO cancels the action and lets you choose a new number (see the beginning of this procedure). 4 5-22 Press ENTER to store the method Editing a Method When you want to view a stored method or change it so it includes a different sequence of linked programs, you use the Edit function. To edit a method: 1 Access the main menu. Select Option 9600 RUN-CREATE-EDIT-UTIL 2 Press the OPTION key to select EDIT, then press ENTER. You obtain the following display: Edit Enter program # 3 _ Type the number of the method you wish to edit, then press ENTER. The following display appears. Link progs: _- 4 - If desired, edit the sequence of linked programs. 5-23 Note If you enter a program number for a program that does not exist, you will see a message that reads “Program not found.” The next display allows you to choose the program number you want to edit again. 5 The last display gives you the option of storing the file. Press the OPTION key to select STORE, then press ENTER. The following display appears: Store Enter program # x The next available number (x) appears at the cursor. 6 To store the method, you have two options. You can create a new copy of the method and save the old one (see Step 6a). Or, you can replace the original method with the new version (see Step 6b). a. Press ENTER to store the method under the next available number (the one that appears in the display). This will create a new method. The original method that you edited will still be available under its original number. Once you press ENTER, the next display will ask you if you want to protect the program. If you choose to do so, you will be asked to enter a user identification number. b. 5-24 Type the original number for the method, then press ENTER. This allows you to replace the original method with the new edited version. The subsequent display will ask “OK to overwrite?” Select YES and the original method will be overwritten by the new edited version. If the original method was protected, you will need to enter the user identification number that was specified when the method was first created before you can overwrite the method. The following display will appear: Prog x is protected Enter user # Type the correct user number, then press ENTER. The next display will ask “OK to overwrite?” Select YES and the original method will be overwritten by the new edited version. Printing a Method If the instrument is configured for a printer, you can obtain two kinds of printouts for a method. For more information on configuring a printer, see Chapter 7, “Utilities.” 1 You can print a method when the following display is shown. METH#??? xx.xC RUN-STORE-PRINT-HOME 2 Press the OPTION key twice to select PRINT, then press ENTER. The following display is shown: Select option METHOD-PROGRAM DATA 5-25 3 AB GeneAmp Select METHOD to print out a list of the linked program numbers specified in the method (see Figure 5-6). Or, select PROGRAM DATA to print out the complete program parameters for each program linked in the method. PCR System 9600 Ver 2 June 1, 1992 10:55 am METH Program #??? HOLD Program #l CYCL Program #2 HOLD Program #3 Figure 5-6 Example of a method printout using METHOD. If you selected the PROGRAM DATA option, you will obtain printouts for each program that is specified in the method. Figure 5-7 shows an example of a printout using the PROGRAM DATA option. 5-26 AB GeneAmp PCR System 9600 Ver 2 June 1, 1992 10:59 am METH Program #??? HOLD Program #1 - Program Parameters Hold at 95.0C Hold for 5:00 Beep while Hold? NO CYCL Program #2 – Program Parameters 3 Temperature PCR SetPt #l 94.0C Ramp Hold 0:00 0:30 SetPt #2 55.0C Ramp Hold 0:00 0:30 SetPt #3 72.0C Ramp Hold 0:00 0:30 Total cycles = 25 Pause during run? NO HOLD Program #3 - Program Parameters Hold at 4.0C Hold FOREVER Beep while Hold? NO Figure 5-7 Example of a method printout using PROGRAM DATA. 5-27 Software Shortcuts Below are some hints to getting around quickly in the software while you are creating or editing programs. Using the STOP Key While you are creating or editing a program, you may want to start over, or use another function of the instrument. You can easily do this by using the STOP key. 1 With any of the program displays shown, press STOP. The following display appears: Program Type: (CYCL) Program Number (not yet assigned) CYCL#??? xx.xC RUN-STORE-PRINT-HOME Returns you to the main menu 2 Press the OPTION key to move the cursor under HOME, then press ENTER. The following display appears: Prog ??? not stored! Continue? YES 3 If you do not wish to store any changes you have made to the program, press ENTER to accept the YES response This returns you to the main menu. If you change your mind and do not want to leave the program, press OPTION to change YES to NO, then press ENTER. This returns you to the display shown in Step 1 above. Then press STEP to display the beginning of the program. 5-28 A shortcut to the above procedure is: 1 With any of the program displays shown, press STOP. The following display appears: CYCL#??? xx.xC RUN-STORE-PRINT-HOME 2 Instead of selecting HOME on this display, you can immediately return to the main menu by pressing STOP again. However, any changes you have made to a program will be lost. 5-29 Recalling Programs: A Shortcut Once you have finished editing or running a program, you can quickly recall another program without needing to return to the main menu. 1 Once you have stored a program, your display will look like this (CYCL program shown): Program Type: Program Number (26) CYCL# 26 xx.xC RUN-STORE-PRINT-HOME 2 Although the cursor appears under RUN, at this point, you can enter any program number. The program number you enter will appear on the top line. Then press ENTER. Note If the program type you entered is different from (the type previously listed, this will be indicated on the display. For example, if you entered the number of a Hold program in the above display, “HOLD” would appear before the program number. 3 Once you enter the new program number, you can: ♦ run, store, or print the program OR ♦ 5-30 view or edit it. Press STEP to get to the beginning of the program. The HOLD Program During a HOLD program, the temperature of the sample block (and the sample) is held at one temperature for either a fixed time interval or an indefinite period. These two basic types of programs are shown in Figures 4-4 and 4-5. The Displays in a HOLD Program Figure 5-8 shows the main displays that make up a HOLD program. These displays are described on the following pages. Figure 5-8 The series of displays in a HOLD program. 5-31 5 Description of HOLD Program Displays Hold at 4.0C Hold FOREVER- 10:00 This display allows you to set the temperature at which the sample will be held and the length of time this temperature will be maintained. Press ENTER to accept the default temperature (4 degrees C), or select a different temperature. Enter the temperature in a decimal form, but do not type the decimal point. For example, to specify 82.0 degrees C, press 8 2 0. Then press ENTER. For the hold time, press ENTER to accept the default value of 10:00 minutes or use the numeric keys to change to the hold time, then press ENTER. For an infinite soak, press the OPTION key. The cursor moves to FOREVER and the default time changes to 0:00 minutes. You can accept this value by pressing ENTER, or use the numeric keys to change the value, then press ENTER. Remember that the hold time clock starts within one degree C of the target temperature. Beep While Hold? NO HOLD#??? xx.xC RUN-STORE-PRINT-HOME 5-32 You can specify whether or not you want a beeper to sound during the hold segment. Press the OPTION key to change NO on the display to YES and vice versa. When the desired response is displayed, press ENTER. The last display in the program indicates the program type, followed by “???,” which means that the program has not yet been stored and assigned a number. It also displays the calculated sample temperature. In the second line of the display, the options allow you to run, store, or print the program, or return to the main menu. CYCL: The Cycle Program A CYCL program contains the thermal ramp and hold segment patterns for PCR cycling. It contains up to nine setpoints. Each setpoint comprises a ramp segment and a hold segment for the specific target temperature. The pattern can be repeated up to 99 times. Typically there are two or three setpoints in a CYCL program. A complete cycle typically requires less than two to four minutes. The Displays in a CYCL Program Figure 5-9 shows the main displays that make up a CYCL program. Figure 5-9 The main displays in a three-temperature CYCL program. 5-33 Description of CYCL Program Displays 3 Temperature PCR Defines the number of incubation temperatures or setpoints used in the PCR cycle. A typical PCR cycle consists of three (3) setpoints; therefore, #3 is the default value. Press ENTER to accept the default, or type a different number (1-9), then press ENTER. Setpt #1 Ramp 0:00 94.0C Hold 0:30 Setpoint #1 in a typical cycle program is used for DNA denaturation or melting. This display sets the following values for the first setpoint (Setpt #1): ♦ Setpoint temperature. The default value is 94.0 degrees C. ♦ Ramp time: the time taken to change from one temperature to another. The default value (0 minutes, 0 seconds) causes the sample to heat or cool to the first setpoint as fast as possible. ♦ Hold time: the length of time the samples will be maintained at the specified temperature. The default value is 30 seconds. Note If you previously used the DNA Thermal Cycler, note that you will be using shorter hold times for the GeneAmp PCR System 9600. Refer to page 5-2 for more information. 5-34 You can accept any of the default values for Setpoint #1 by pressing the ENTER key, or you can change the values using the following steps: Setpt #2 Ramp 0:00 55.0C Hold 0:30 1 For the ramp time, use the numeric keys to specify the time (in minutes and seconds). For example, to specify a ramp time of one minute, press 1 0 0, then press ENTER. 2 For the setpoint temperature, enter the temperature in decimal form. You do not type a decimal point. For example, to specify 96.0 degrees C, press 9 6 0, then press ENTER. 3 Specify the hold time in minutes and seconds, then press ENTER. For example, to specify fifteen seconds, press 1 5, then press ENTER. Setpoint #2 in a typical cycle program is used for primer annealing. This display sets the ramp time, target temperature, and hold time for the second setpoint (Setpt #2). For a three-temperature PCR, the default temperature is 55 degrees C. For a twotemperature PCR, the default is 68 degrees C. The other default values are shown in the display to the left. You can accept any of the default values for Setpoint #2 by pressing the ENTER key, or you can change the values using the same procedure as that for Setpoint #1 (see above). 5-35 Setpt #3 Ramp 0:00 72.0C Hold 0:30 Setpoint #3 in a typical cycle program is used for primer extension. This display sets the ramp time, target temperature, and hold time for the third setpoint (Setpt #3). The default values are shown in the display to the left. You can accept any of the default values for Setpoint #3 by pressing the ENTER key, or you can change the values using the same procedure as that for Setpoint #1 (see above). Setpt #n Ramp 0:00 72.0C Hold 0:30 Total cycles = 25 Pause during run? NO A display will appear for each setpoint up until the total number of setpoints specified in the first program display. The default temperature for setpoints in CYCL programs with more than four setpoints is 0.0 degrees. A CYCL program call have up to nine setpoints. Specifies the number of times the complete cycle will be repeated. Type the number of cycles (1-99), then press ENTER. This display also allows you to program a pause after a setpoint and cycle that you will specify in subsequent displays. A pause would be required, for example, to add a reagent. A pause may also be used to add or remove sample tubes during a run. Press the OPTION key to change the NO response (default) to a YES and vice versa. When the desired response is displayed, press ENTER. 5-36 Pause after setpt #1 Beep while pause?YES The display appears only if you specified a pause in the previous display. ln this display, you define the setpoint after which you want to pause the run. Type the number of the desired setpoint, then press ENTER. During the pause, you specify whether or not you want a beeper to sound. Press the OPTION key to change the YES (default) to a NO and vice versa. When the desired response is displayed, press ENTER. 1st pause at cyc 1 Pause every 25 cyc’s This display only appears if you specified a pause during the run. In this display, you specify the number of the cycle in which you want the run to pause. The default value (1) indicates that the instrument will pause during the first cycle (after the specified setpoint). Press the number of the desired cycle, then press ENTER. Next, you specify how often the pause should occur. The default value will be the same value as the total cycles in the program. This indicates that the instrument will pause only once during the run. To pause more frequently, change the default. For example, to pause every cycle, you would press 1. To pause every other cycle, press 2. After you specify the number, press ENTER. Pause time 10:00 This display only appears if you specified a pause during the run. In this display, you specify how long the instrument should pause. Specify the pause time in minutes and seconds, then press ENTER. 5-37 CYCL #??? xx.xC RUN-STORE-PRINT-HOME 5-38 The last display in the program indicates the program type, followed by “???,” which means that the program has not yet been stored and assigned a number. It also displays the calculated sample temperature. The options in this display allow you to run, store, or print the program, or return to the main menu. The AUTO Program An AUTO program allows the user to automatically increment or decrement the setpoint times and temperatures a fixed amount every cycle. The Displays in an AUTO Program Figure 5-10 The main displays in a three-temperature AUTO program. 5-39 Description of AUTO Program Displays 3 Temperature PCR Defines the number of incubation temperatures or setpoints used in the PCR cycle. A typical PCR cycle consists of three (3) setpoints; therefore, 3 is the default value. Type the number of setpoints you wish in your DNA amplification experiment (1-9), then press ENTER. Setpt #1 Hold for 94.0C 0:30 This display sets the following values for the first setpoint (Setpt #1): ♦ Setpoint temperature. The default value is 94.0 degrees C. ♦ Hold time: the length of time the samples will be maintained at the specified temperature. The default value is 30 seconds. Note If you previously used the DNA Thermal Cycler, note that you will be using shorter hold times for the GeneAmp PCR System 9600. Refer to page 5-2 for more information. You can accept any of the default values for Setpoint #1 by pressing the ENTER key, or you can change the values using the following steps. 5-40 Setpt #1 94.0C Change time/temp? NO 1 For the setpoint temperature, enter the temperature in decimal form. You do not type a decimal point. For example, to specify 89.0 degrees C, press 8 9 0, then press ENTER. 2 Specify the hold time in minutes and seconds, then press ENTER. For example, to specify one minute and five seconds, press 1 0 5, then press ENTER. This display allows you to incrementally increase or decrease the hold time or temperature of the first setpoint in successive cycles. Press the OPTION key to change the NO response (default) to a YES and vice versa 94.0C Delta ↑ 0.0C Delta ↑ 0:00 This display appears if you have elected to change the time and temperature by selecting the YES response in the previous display. In this display, you specify the values by which the setpoint temperature and hold time will be increased or decreased in successive cycles. Use the following steps to enter these values. 1 Press the OPTION key to change the down arrow before the temperature value to an up arrow and vice versa. This indicates whether you want a decrease or increase in the temperature. 2 Press ENTER to move the cursor to the temperature entry. Choose one of the following. 5-41 ♦ Enter the temperature increment in decimal form, except you do not type a decimal point. For example, to specify a two-degree increment, press 2, then 0. Then press ENTER. OR ♦ Press ENTER to accept the default (0.0) temperature. This will not change the specified temperature of Setpoint #1 in successive cycles. The cursor moves to the hold time increment. Setpt #2 Hold for 55.0C 0:30 Setpt #2 55.0C Change time/temp? NO 3 Press the OPTION key to change the arrow direction, indicating whether you want an increase or decrease in the hold time, then press ENTER. 4 Enter the time by which the hold time will increase or decrease, or accept the default increment (0:00), which indicates that the hold time will not change. Use the numeric keys to enter the time, then press ENTER. These two displays are used to set the temperature and hold time for the second setpoint (Setpt #2) and change the time and temperature values in successive cycles, if desired. For a threetemperature PCR, the default temperature is 55 degrees C. For a two-temperature PCR, the default is 68 degrees C. To change these displays, use the same procedure as described for Setpoint #1. 5-42 Setpt #3 72.0C Hold for 0:30 Setpt #3 72.0C Change time/temp? NO Setpt #n 0.0C Hold for 0:30 Total cycles = 25 Pause during run? NO These two displays are used to set the temperature and hold time for the third setpoint (Setpt #3) and change the time and temperature values in successive cycles, if desired. To change these displays, use the same procedure as described for Setpoint #1. A display will appear for each setpoint up until the total number of setpoints specified in the first program display. For each setpoint, you will be asked whether you want to change the time or temperature values in successive cycles. Specifies the number of times the complete cycle will be repeated. Type the number of cycles (1-99), then press ENTER. This display also allows you to program a pause after a setpoint and cycle that you will specify in subsequent displays. A pause would be required, for example, to add a reagent. A pause may also be used to add or remove sample tubes during a run. Press the OPTION key to change the NO response (default) to a YES and vice versa. When the desired response is displayed, press ENTER. 5-43 Pause after setpt #1 Beep while pause?YES The display appears only if you specified a pause in the previous display. In this display, you define the setpoint after which you want to pause the run. Type the number of the desired setpoint, then press ENTER. During the pause, you specify whether or not you want a beeper to sound. Press the OPTION key to change the YES (default) to a NO and vice versa. When the de-sired response is displayed, press ENTER. 1st pause at cyc 1 Pause every 25 cyc’s This display only appears if you specified a pause during the run. In this display, you specify the number of the cycle in which you want the run to pause. The default value (1) indicates that the instrument will pause during the first cycle (after the specified setpoint). Press the number of the desired cycle, then press ENTER. Next, you specify how often the pause should occur. The default value will be the same value as the total cycles in the program. This indicates that the instrument will pause only once during the run. To pause more frequently, change the default. For example, to pause every cycle, you would press 1. To pause every other cycle, press 2. After you specify the number, press ENTER. Pause time 10:00 5-44 This display only appears if you specified a pause during the run. In this display, you specify how long the instrument should pause. Specify the pause time in minutes and seconds, then press ENTER. AUTO# ??? xx.xC RUN-STORE-PRINT-HOME The last display in the program indicates the program type, followed by “???,” which means that the program has not yet been stored and assigned a number. It also displays the calculated sample temperature. The options in this display allow you to run, store, or print the program, or return to the main menu. 5-45 Running PCR Samples6 6 Introduction To run samples, turn on the instrument and follow these procedures, which are explained in this chapter. ♦ Loading Samples in the Tray ♦ Placing the Sample Tray in the Block ♦ Removing the Sample Tray from the Block ♦ Removing Samples from the Tray ♦ Specifying a Program or Method ♦ Starting a Run Note After you turn on the instrument, wait 10 minutes before you run your samples. ! WARNING ! Never run the instrument without a sample tray in place. You will crush the sample tubes and may lose your sample. MicroAmp Reaction Tubes have thin and fragile walls. To avoid damaging one of these sample tubes, do not pinch the conical bottom and always handle the tube at the top. Loading Samples The GeneAmp PCR System 9600 uses a 96-position sample tray (MicroAmp Tray) and retainer (MicroAmp Retainer) for 0.2-mL MicroAmp Reaction Tubes. Using the 96-Position Sample Tray with MicroAmp Reaction Tubes To load the 96-position MicroAmp Tray, follow the steps below (refer to Figure 6-1). CAUTION The GeneAmp PCR System 9600 is designed for oil-free operation. It does not use mineral oil or glycerine in the sample block. The MicroAmp Reaction Tubes fit tightly in the wells and a heated cover exerts an even pressure on all tubes. No mineral oil is used on the sample surface because the heated cover eliminates condensation on the tubes. 1 Place the MicroAmp Base on a flat surface such as a table. Do not place the base in the sample block. 2 Place the MicroAmp Tray onto the base so that the well numbered A1 is located at the upper left corner of the tray. The cutout in the outside rim of the tray will then be located on the left side of the tray. This orients the tray for the proper fit into the sample block. 3 Place MicroAmp Reaction Tubes in the tray. Note that the wells in the tray are labeled left to right from 1 through 12 and A through H from back to front. Note The above procedure is most useful if you are loading a dozen or more samples. If you are only loading a few samples, use the sample tray base as a working tray in which to load your sample tubes, then transfer your tubes to a sample tray already loaded in the instrument. Do not use the MicroAmp Retainer if you want to remove a single tube without removing the caps from all the tubes. The caps will not fit through the retainer. 6-2 Figure 6-1 Setting up the 96-position sample tray. 6-3 Note When using MicroAmp Reaction Tubes with Caps, place the required number of tubes into a MicroAmp Base, then fill each tube with PCR reagents and close the caps firmly. Position an empty MicroAmp Tray in the sample block, then place the MicroAmp Reaction Tubes with Caps into the MicroAmp Tray sitting in the sample block. 4 Place the MicroAmp Retainer over the sample tray and tubes (see Figure 6-1). The retainer and the tray are keyed so the retainer can fit only one way. If you use only a few sample tubes, the retainer is not necessary. 5 Pipette the PCR reaction mixture into the sample tubes. 6 Cap your sample tubes. Depending on how many samples you load, you can use individual MicroAmp Caps or you can cut a strip of caps to cover one row of tubes. See “Using the Cap-Installing Tool” on page 6-8 for additional instructions on how to cap your sample tubes. Figure 6-2 6-4 Securing the retainer on the tray. Placing the Sample Tray in the Block 1 Lift the sample tray and retainer assembly from the sample tray base and place it in the sample block. Make certain that the notch in the sample tray is at the left of the block. The receptacle in the tray labeled A1 will then be in the upper left-hand corner of the block. Once the tray is placed in the block, be sure that the rim of the tray engages with the channel around the block. Figure 6-3 Placing the sample tray in the block. CAUTION Do not place the MicroAmp Base in the sample block. 6-5 2 Make certain that the cover knob is completely counterclockwise, which fully raises the platen, before you attempt to slide the heated cover forward. Then slide the cover forward. Figure 6-4 6-6 Sliding the heated cover forward. 3 Turn the cover knob clockwise until the white mark on the knob lines up with the white mark on the cover (indicating the full clockwise position). This lowers the platen onto the tray. Figure 6-5 Turning the cover knob. 6-7 Using the Cap-Installing Tool Use the MicroAmp Cap-Installing Tool, supplied with your instrument, to cap a single sample tube or a row of sample tubes as described in the following procedure. 1 Place individual sample tubes or a row of tubes in the sample tray (you don't have to use a retainer). 2 Manually press the cap(s) onto the tube(s) so that the caps are not sitting loosely on the tubes. 3 Use the roller end of the tool to press a row of caps into a row of sample tubes. Using moderate force, roll the tool along a single row of caps, pressing the caps into the tubes. The roller end of the tool works best with single rows of eight or 12 caps. 4 Use the other end of the tool to press a single cap into a sample tube. Using moderate force, press the cap down into the tube. 5 Verify that all the caps are firmly seated in the sample tubes. If necessary, use the tool again. Removing the Sample Tray from the Block The following procedure describes how to remove the sample tray from the instrument: 6-8 1 Make sure the sample block is not hot (the “Hot” indicator light is not on). 2 Turn the cover knob completely counterclockwise, then slide the heated cover back. 3 Grasp the sample tray/retainer assembly firmly with both hands and gently rock it back and forth until the tubes are free. Removing Samples from the Tray The following procedure describes how to remove the sample tubes from the tray: 1 Place the sample tray back on the base and remove the sample caps. 2 Remove the tray from the base. 3 Grasp one end of the tray with one hand, and with your other hand, press in the front and back tabs on the retainer (see Figure 6-6). Then push up and remove the retainer. 4 Remove the sample tubes. Figure 6-6 Removing samples from the tray. 6-9 Specifying a Program or Method To specify the time and temperature pattern you want to use to run PCR samples, you can create a new program or method, edit an existing one, or recall one you have previously stored. Create a new program or method Select the CREATE option on the main menu and choose a type of program: HOLD, CYCL, or AUTO. Modify the parameters in the program displays by referring to the description of each program in Chapter 4. You can then immediately run the program, or store it, then run it at any time. Or, select CREATE on the main menu, then choose the method option (METH) to link together a series of programs. You can then immediately run the method, or store it, then run it at any time. Edit an existing program or method Select the EDIT option on the main menu to modify one of the programs or methods that you have stored. Once you have edited the file, you can immediately run it, or store it for later use, then run it at any time. Recall a stored program or method Select the RUN option on the main menu to run a program or method that you have already set up and stored. 6-10 Starting the Run Run Keys The following keys are used to start a run or are used during the run. Figure 6-7 Run-Time Keys The function of each key is described below. RUN Starts or restarts a sample run. MORE Displays more information about run-time parameters. PAUSE Interrupts a run so you can add a reagent to your samples, or add or remove samples. STOP Aborts a run. 6-11 Running a Stored Program To run a program that you have previously stored: 1 Access the main menu. Select Option 9600 RUN-CREATE-EDIT-UTIL CAUTION Before you start a run, make sure the “Start clock within x.xC of setpoint” parameter in the Configuration function is set correctly. To do this, select “UTIL” on the main menu, then select “CONFIG” on the Utilities menu. Press ENTER, then press the STEP key five times to view the “Start clock...” parameter. See Chapter 7 for complete instructions. 2 With the cursor positioned under RUN, press ENTER. The following display appears: Run Enter program # 3 Select the desired program by pressing the appropriate numeric keys, then ENTER. The following display appears: Select tube Reaction vol? MICRO 100uL This display lets you select the type of sample tube you are using and enter the reaction volume for that tube. The default tube type is the MicroAmp Reaction Tube, as indicated on the display by “MICRO.” The default reaction volume is 100 µL. 6-12 4 If the “Special Tube?” parameter in the Configuration function (see Chapter 7) has been set to “NO,” pressing the OPTION key will change the tube type to Thin-Walled GeneAmp Reaction Tubes. On the display, “MICRO” changes to “THIN.” Note Instructions for the use of sample tubes other than MicroAmp Reaction Tubes will be included in separate documentation. 5 If the “Special Tube?” parameter in the Configuration function (see Chapter 7) has been set to “YES,” pressing the OPTION key twice will change the displayed tube type to “OTHER.” Select this option if you are using tubes other than MicroAmp Reaction or Thin-Walled GeneAmp Reaction Tubes. 6 To change the reaction volume, press the appropriate numeric keys. CAUTION Do not press ENTER until the displayed tube type and the displayed reaction volume are both set correctly. Note The next time you run this program, the tube type and reaction volume you selected will be used as defaults. For methods, the tube type and reaction volume you select before you run the method will be used for every program in that method. 6-13 ♦ If you have a printer and it has been enabled (using the Configuration function), the following display appears: Select print mode OFF-CYCLE-SETPOINT This display lets you select the type of printout you want: 7 OFF: Disables data output to the printer for this run. CYCLE: Prints a message that reads “Complete” after each cycle. SETPOINT Prints actual and programmed time and temperature data for each ramp and hold segment during cycling. See Figure 6-8 for an example Setpoint printout of a Cycle program. Press the OPTION key to choose one of these print options. When the cursor is under your desired option, press ENTER. The following display appears: Close and tighten the sample cover Make sure the heated cover is closed and tightened down. After a few seconds, the run starts. 6-14 Figure 6-8 option. An example printout of a CYCL program using the SETPOINT ! WARNING ! During a sample run, keep the heated cover pulled forward and tightened down at all times. This will guard against burns and guarantee the best temperature uniformity. 6-15 Indicator Lights The three indicator lights on the control panel of the instrument indicate the operating status, as described below. ♦ Heating, when lit, indicates that the heater is active. When flashing, it indicates that the system is controlling the sample temperature. ♦ Cooling, when lit or flashing, indicates that ramp cooling is active. Note Both of the above lights will be lit simultaneously when the sample is being held at a subambient temperature. ♦ Hot, when lit, indicates that the sample temperature is at least 50 degrees C. The next section describes the displays that appear on the screen during a run. 6-16 Run-Time Displays During a run, you will see a run-time display that is continuously updated for the program being run. CYCL and AUTO Program Run-Time Displays The run-time displays for a CYCL program and an AUTO program are the same. If you are in a ramp segment, the display will show “Ramp to. . .” If you are in a hold segment, the display will show “Hold at. . .” These displays are shown in Figure 6-9. Setpoint temperature Current sample temperature Ramp to 94.0C xx.xC 0:00 Cycle 1 Current cycle # (counts up cycles during a run) Time remaining Setpoint temperature Current sample temperature Hold at 94.0C xx.xC 0:12 Cycle 1 Current cycle # (counts up cycles during a run) Time remaining Figure 6-9 Run-time displays for a CYCL program. Once a CYCL or AUTO run has started, press the MORE key to view a second run-time display (see Figure 6-10). This run-time display includes further information about the run. 6-17 Ramp to 94.0C xx.xC 0:30 Cycle 1 Press More Setpt #1 Tot Cyc 30 Hrs left 0.5 Prog 1 To move between the two run-time displays Figure 6-10 Using the MORE key. The parameters in the second run-time display are explained in Figure 6-11. Current setpoint Total cycles in program Setpt #1 Tot Cyc 25 Hrs left 1.2 Prog 26 Estimated time left in program Program # Figure 6-11 More run-time information in a CYCL program. Press MORE again to return you to the first run-time display. The MORE key toggles between the two run-time displays. 6-18 HOLD Program Run-Time Display Figure 6-12 shows the run-time displays for a HOLD program. Use the MORE key to view the second run-time display. Press the MORE key again to return to the first run-time display. Programmed target temperature Current sample temperature Hold at 95.0C xx.xC 4:30 Prog 1 Time remaining Current program # Press More To move between the two run-time displays Hrs left 0.2 Prog Time remaining 1 Current program # Figure 6-12 Run-time displays for a HOLD program. 6-19 Pausing a Run Once a run has started, you can manually pause a run, in order to add a reagent to your samples, for example, using the PAUSE key. Note that the instrument will automatically pause if you select the Pause option in a CYCL or AUTO program. ! WARNING ! Be careful not to touch the sample block or the bottom of the heated cover during a pause. These areas may be hotter than 100 degrees C. 1 Press the PAUSE key. The instrument beeps and a display similar to the one shown below appears. CYCL# 26 PAUSE 10:00 xx.xC This display occurs in a CYCL program. 2 Press RUN to resume the run (from where you left off). 1 To abort a run at any time, press the STOP key. Stopping a Run The following appears on the second line of the display: Abort program? 2 If you want to abort the run, press ENTER to accept the “YES” selection. OR 6-20 YES Press the STOP key again. The run is aborted and a display similar to the one shown below appears: CYCL# 26 Abort xx.xC RUN-STORE-PRINT-HOME This display occurs in a CYCL program. 3 If you change your mind and do not want to abort the run, press the OPTION key to change “YES” to “NO,” then press ENTER. OR Press the RUN key. The run resumes. 4 To run the program from the beginning, select the RUN option. 6-21 Reviewing the History of the Run Once a run has been completed (or aborted), you can obtain a record of the run called a History file. If you want to view the current History file for a run, you must view it before you start the next run, since each time a new run begins, the previous History file is erased. A History file can contain status records or data records. Status records list the status messages received during the run, such as “Method Complete” or various error messages. Data Records contain records of target temperatures, ramp and hold times, and other run data. To obtain a History file, use Diagnostic Test #1. To access this diagnostic test, select UTIL on the main menu, then select DIAG to use the diagnostic tests. Refer to Chapter 7, “Utilities,” for instructions on how to use the diagnostic tests. Figure 6-13 Example history file printout of a CYCL program. 6-22 Utilities 7 7 Introduction This chapter explains the Utilities functions. The Utilities functions let you: ♦ display or print programs by their number, their type, or their user number (see page 7-4) ♦ configure and set default values for general instrument operating parameters (see page 7-16) ♦ review the history of the most recent instrument run and perform heater, chiller, system performance, and calibration verification tests to check instrument integrity (see page 7-35) ♦ delete individual programs by program number or user number, or delete all programs (see page 7-57) Getting to the Utilities Menu To get the Utilities menu: 1 Get to the Main menu. Press the STOP key once or twice until the Main menu appears: Select Option 9600 RUN-CREATE-EDIT-UTIL 2 Press the OPTION key three times to move the cursor to UTIL, then press ENTER. The Utilities menu appears: Select function DIR-CONFIG-DIAG-DEL The functions available from the Utilities menu are: 7-2 ♦ DIR Select this function to display or print a listing of your programs by program number, type, or user number. ♦ CONFIG Select this function to configure and set default values for general instrument operating parameters. ♦ DIAG Select this function to review the most recent instrument run and to perform diagnostic tests to verify instrument integrity. ♦ DEL Select this function to delete individual programs as identified by program number and user number, or delete all programs. Selecting a Utilities Function To select one of the Utilities functions: 1 Press OPTION to move the cursor from one function to the next. When the cursor reaches DEL, press OPTION to move the cursor back to DIR. 2 When the cursor is under your desired selection, press ENTER. You will then see the first display for the function you selected. Figure 7-1 shows the first displays for the Utilities functions. Select function DIR-CONFIG-DIAG-DEL Delete PROGRAM-USER-ALL Directory PROG-TYPE-USER-PRINT The Directory function lets you display or print programs by their program number, their type, or their user number. The Delete function lets you delete individual programs by their program number and user number, or delete all programs. Enter Diag Test #1 REVIEW History file Configuration EDIT-PRINT The Configuration function lets you configure and set default values for general instrument operating parameters. Figure 7-1 The Diagnostic function lets you review recent instrument runs and perform heater, chiller, system performance, and calibration verification tests. The Utilities functions. 7-3 The Directory Function (DIR) The Directory function lets you display or print programs according to: ♦ program number ♦ type, or ♦ user identification number Once you view a directory, you can return to Utilities menu or the Main menu using the STOP key. Listing Programs by their Program Number (PROG) The PROG selection lets you list your programs by their program number on a series of displays, starting with the first program number that you enter. To list your programs by their program number: 1 Select DIR on the Utilities menu as described on page 7-3. The Directory display appears: Directory PROG-TYPE-USER-PRINT 2 Press ENTER to select PROG. The first display that you see prompts you to enter a program number. Directory Enter program # 7-4 1 3 Press the numeric keys that correspond to the program number of the program you want to list first, then press ENTER. In our example, the default is shown. Each of the next displays will list a program by its program number and type, beginning with Program #1. 4 Press STEP to view the next display. In our example, Program #1 is a Hold program: HOLD #1 5 Press STEP to view the next display, which will list Program #2. In our example, Program #2 is a CYCL program: CYCL #2 6 Press BACK to view the previous program in the list. 7 When you reach the last display in the list, press STOP to return to the first Directory display. Figure 7-2 on the next page shows an example of a complete list of programs. 7-5 Directory Enter program # Press Step 1 to move forward to the next display Press HOLD #1 Stop to return to the first display Press Step Back to move to the previous display Press CYCL #2 Stop to return to the first display Step Back Press Stop AUTO #3 to return to the first display Figure 7-2 7-6 Example of a list of programs listed according to program number. Listing Programs by their Program Type (TYPE) The TYPE selection lets you list all your programs of a specific program type (HOLD, CYCL, or AUTO) in numerical order. To list your programs by their program type: 1 Select DIR on the Utilities menu as described on page 7-3. The Directory display appears: Directory PROG-TYPE-USER-PRINT 2 Press OPTION to move the cursor to TYPE, then press ENTER. The following display appears: Directory HOLD-CYCL-AUTO-METH 3 Press OPTION to move the cursor to the program type for which you want to obtain a listing, then press ENTER. For example, to see a listing of all your HOLD programs, press ENTER when the cursor is under the HOLD selection. You will see a series of displays that list all your HOLD programs, beginning with the first HOLD program. 7-7 For example, if your first HOLD program is HOLD #14, the following display appears: HOLD #14 4 Press STEP to view the next display in your program listing. In our example, the next HOLD program is HOLD #26: HOLD #26 5 Press BACK each time you want to view the previous program in the list. 6 You can press STOP at any time to return to the display in which you selected the program type. Figure 7-3 on the next page shows an example of a list of programs grouped by program type. 7-8 Directory HOLD-CYCL-AUTO-METH Press to move forward to the Step next display Press HOLD #14 Stop to return to the first display Press Step Back to move to the previous display Press HOLD #26 Stop to return to the first display Step Back Press HOLD #31 Stop to return to the first display Figure 7-3 Example of a list of programs listed according to program type. 7-9 Listing Programs by their User Number (USER) The USER selection lets you list all programs that have been stored under a previously specified user number. (While storing a program, you have the option of protecting the program by entering a user identification number.) This type of directory will also list the program type and program number. To list your programs by their user number: 1 Select DIR on the Utilities menu as described on page 7-3. The Directory display appears: Directory PROG-TYPE-USER-PRINT 2 Press OPTION twice to move the cursor to USER, then press ENTER. The first display that you see prompts you to enter a user number: Directory Enter user #7777 3 Type the user number of the programs you want to list, then press ENTER. In our example, we entered user #7777. Each of the next displays will list a program stored under user #7777. 7-10 4 Press STEP to view the next display. In our example, CYCL program #6 is listed: CYCL #6 5 User#7777 Press STEP to view the next display, which will list the next program stored under user #7777. In our example, HOLD program #5 is listed: HOLD #5 User#7777 6 Press BACK to view the previous program in the list. 7 You can press STOP at any time to return to the display in which you entered the user number. Figure 7-4 on the next page shows an example of a complete list of programs grouped by user number. 7-11 Directory Enter user #7777 Press to move forward to the Step next display Press HOLD #16 Stop User#7777 to return to the first display Press Step Back to move to the previous display Press HOLD #25 Stop User#7777 to return to the first display Step Back Press Stop AUTO #4 User#7777 to return to the first display Figure 7-4 7-12 Example of a list of programs listed according to user number. Printing a Directory of Your Programs (PRINT) The PRINT selection of the Directory function lets you print a directory of your programs organized by program number (PROG), program type (TYPE), or user number (USER). To print a directory: 1 Select DIR on the Utilities menu as described on page 7-3. The Directory display appears: Directory PROG-TYPE-USER-PRINT 2 Press OPTION three times to move the cursor to PRINT, then press ENTER. The following display appears: Directory Print PROG-TYPE-USER 3 Press the OPTION key to move the cursor to the kind of directory you want to print (Program #, Program Type, or User #), then press ENTER. One of the following displays appear, prompting you to enter a program #, select a program type, or enter a user #: 7-13 Directory Print Enter program # ♦ If the above display is shown, type the program # of the first program in the directory you want to print, then press ENTER. All your programs will be printed, beginning with the program # you entered. Directory Print HOLD-CYCL-AUTO-METH ♦ If the above display is shown, press the OPTION key to move the cursor to the program type of which you want to print a directory, then press ENTER. For example, if you select HOLD, all your HOLD programs will be printed. Directory Print Enter User # _ ♦ If the above display is shown, type the user # of the programs for which you want to print a directory, then press ENTER. All your programs stored with that user # will be printed. 4 As your directory is printed, the following display appears: Directory Print printing... 5 7-14 When printing is complete, the first Print display appears. Press STOP to the return to the Directory display. Figure 7-5 shows all the displays in the PRINT selection of the Directory function. Figure 7-5 The PRINT selection of the Directory function. 7-15 The Configuration Function (CONFIG) The Configuration function lets you customize the instrument by editing the configuration parameters. These parameters include: ♦ time and date ♦ run-time printer mode (on or off) ♦ run-time beeper (on or off) ♦ pause time-out limit ♦ allowed setpoint error ♦ idle state setpoint ♦ temperature interval that triggers the clock start ♦ sample tube time constants Editing the Configuration Parameters There are eleven configuration parameters that you can edit. These parameters appear on nine different displays. To move forward through the displays, press STEP. To move backward through the displays, press BACK. Press STOP at any time to return you to the first Configuration display. Press STOP again to return to the Utilities menu. Figure 7-6 on the next page shows the displays for the Configuration function. The sections that follow explain how to edit the individual configuration parameters. 7-16 Configuration EDIT-PRINT Press Enter Time Date to display the first configuration parameter HH:MM MM/DD/YY Step Runtime printer Runtime beeper OFF ON moves you forward to the next display Pause time-out limit xx:xx Allowed setpt error x.xC Back moves you to the previous display or parameter Idle state setpoint 25C Start clock within x.xC of setpoint Stop returns you to the “Configuration” display Special tube? NO Set MICRO tube time constants? NO Set THIN tube time constants? NO Figure 7-6 The Configuration function. 7-17 Setting the Time and Date The Configuration function lets you set the time in hours and minutes and the date in months, days, and years. To set the time and date: 1 Select CONFIG on the Utilities menu as described on page 7-3. The following display appears: Configuration EDIT-PRINT 2 Press ENTER. The following display appears: Time Date HH:MM MM/DD/YY The cursor appears under the entry field for hours (HH on the display shown above). 3 To set the time, press the appropriate numeric keys for the hours and minutes and press ENTER. The display will automatically place a colon to separate the hours from the minutes. The cursor will move to the entry field for months (MM on the display shown above). 7-18 4 To set the date, type in the appropriate numbers for the month, day, and year and press ENTER. The display will automatically separate the month, day, and year. 5 Press STEP to display the next configuration parameter or press STOP to return to the first Configuration display. 7-19 Turning the Run-Time Printer Mode and Run-Time Beeper On or Off The Configuration function lets you turn the run-time printer mode on or off and the run-time beeper on or off. These parameters appear together on one display. If you have a printer, setting the run-time printer mode to ON lets you print run-time data. When the run-time beeper is on, a beeper will sound at the end of each segment in a run. To turn these parameters on or off: 1 Select CONFIG on the Utilities menu as described on page 7-3. The following display appears: Configuration EDIT-PRINT 2 Press ENTER, then press STEP. The following display appears: Runtime printer Runtime beeper 3 7-20 OFF ON The default condition of the run-time printer mode is off. To turn the run-time printer mode on, press OPTION (OFF changes to ON), then press ENTER. 4 The default condition of the run-time beeper is on. To turn the beeper off, press OPTION (ON changes to OFF), then press ENTER. 5 Press STEP to display the next configuration parameter or press BACK to display the previous configuration parameter. Press STOP to return to the first Configuration display. 7-21 Changing the Pause Time-Out Limit The pause time-out limit is the maximum amount of time a program can pause before it automatically aborts; it applies only to the keypad pause. The default value is 10 minutes. This means that if you do not restart a run within 10 minutes after you pause it, the run is aborted. The Configuration function lets you change the pause time-out limit. To change the pause time-out limit: 1 Select CONFIG on the Utilities menu as described on page 7-3. The following display appears: Configuration EDIT-PRINT 2 Press ENTER, then press STEP twice. The following display appears: Pause time-out limit 10:00 The default value of ten minutes and zero seconds (10:00) appears on this display. The acceptable range for the pause time-out limit is 0 to 99:59 minutes. 3 To change the pause time-out limit, press the appropriate numeric keys, then press ENTER. The display will automatically place the colon for you. Note For practical purposes, the pause time-out should be at least one minute. 4 7-22 Press STEP to display the next configuration parameter or press BACK to display the previous configuration parameter. Press STOP to return to the first Configuration display. Changing the Allowed Setpoint Error The allowed setpoint error is the number of degrees the actual sample temperature may vary from the setpoint before the reading is recorded in the history file as an error. The default value is 2.0 degrees C. The Configuration function lets you change the allowed setpoint error value. To change the allowed setpoint error value: 1 Select CONFIG on the Utilities menu as described on page 7-3. The following display appears: Configuration EDIT-PRINT 2 Press ENTER, then press STEP three times. The following display appears: Allowed setpt error 2.0C The default value of 2.0 degrees C appears on this display. 3 To change the allowed setpoint error, press the appropriate numeric keys, then press ENTER. The display will automatically place the decimal point for you. 7-23 4 7-24 Press STEP to display the next configuration parameter or press BACK to display the previous configuration parameter. Press STOP to return to the first Configuration display. Entering an Idle State Setpoint Value The idle state setpoint is the temperature of the block when a program is not running (the idling temperature). The Configuration function lets you change the idle state setpoint value. The default value for the idle state setpoint is 25 degrees C. The instrument will automatically heat or cool to this temperature while idling and the Heating light on the control panel will flash. To edit this configuration parameter: 1 Select CONFIG on the Utilities menu as described on page 7-3. The following display appears: Configuration EDIT-PRINT 2 Press ENTER, then press STEP four times. The following display appears: Idle state setpoint 25C 3 To change the idle state setpoint, press the appropriate numeric keys, then press ENTER. For your safety, set the idling temperature close to room temperature. 4 Press STEP to display the next configuration parameter or press BACK to display the previous configuration parameter. Press STOP to return to the first Configuration display. 7-25 Changing the Temperature Interval for the Setpoint Clock Whenever you run a program, there is an interval before the setpoint temperature is attained. The clock starts counting the hold time at the beginning of this interval. For example, if the setpoint temperature is 95 degrees C, and the temperature interval is 1 degree C, the clock will actually start counting at 94 degrees C. Figure 7-7 illustrates this example. Setpoint Temperature Setpoint clock starts here • 95 o C 1o C Interval 94 o C • o 94 C 95 o C Sample Temperature o C Time Figure 7-7 Diagram of a 1-degree C temperature interval. The default value for the temperature interval is 1 degree C. The Configuration function lets you change this value. CAUTION Always check this parameter before you start a run. To change the temperature interval for the setpoint clock: 1 Select CONFIG on the Utilities menu as described on page 7-3. The following display appears: Configuration EDIT-PRINT 7-26 2 Press ENTER, then press STEP five times. The following display appears: Start clock within 1.0C of setpoint This example shows the default temperature interval of 1 degree C. This means that the setpoint clock will start counting within 1 degree of the setpoint temperature. 3 To enter a temperature interval different from the default value, press the appropriate numeric keys, then press ENTER. The range of valid entries for the temperature interval is 0.5 to 1.0 degrees C. If you decrease the temperature interval from 1.0 degree C, the clock will start closer to the setpoint temperature. Note To maintain portability of PCR programs, we highly recommend that you use the default value of 1.0 degree C. The hold time decreases as the temperature interval for the setpoint clock decreases. Change this parameter only for specific experiments. 4 Press STEP to display the next configuration parameter or press BACK to display the previous configuration parameter. Press STOP to return to the first Configuration display. 7-27 Changing the Sample Tube Type The Configuration function lets you specify a future sample tube type by defining the tube time constant characteristics. We recommend not specifying a special tube type unless future sample tube types become available. To change the sample tube type and sample tube time constant value: 1 Select CONFIG on the Utilities menu as described on page 7-3. The following display appears: Configuration EDIT-PRINT 2 Press ENTER, then press STEP six times. The following display appears: Special tube? NO This display lets you specify a special type of sample tube when you start a run if you are not using MicroAmp Reaction Tubes or Thin-Walled GeneAmp Reaction Tubes. The default condition of this parameter is no special tube type, as indicated on the display by “NO.” 3 7-28 If you accept the default condition, you will be able to select one of two standard sample tube types when you start a run (MicroAmp Reaction Tubes or Thin-Walled GeneAmp Reaction Tubes). 4 To change the default condition, press the OPTION key. “NO” will change to “YES” on the display and you will be able to select a different tube type when you start a run (see Chapter 5 for more information). 5 Press ENTER. The following display appears: Rxn vol=100uL T= 9.5 Rxn vol= 50uL T= 7.0 This display lets you change the sample tube time constant. There are two default values for sample tube time constants on this display: one for sample tubes with a reaction volume of 100 µL, and one for sample tubes with a reaction volume of 50 µL. There is a time constant default value for sample tubes with a reaction volume of 20 µL that appears on a separate display. Press STEP to view this display: Rxn vol= 20uL T= 5.0 6 To change any of these time constant values, press the appropriate numeric keys, then press ENTER. To move the cursor from one time constant value to the next, press ENTER. To move from the first display to the second, press STEP. 7 Press STOP to return to the first Configuration display. 7-29 Setting Sample Tube Time Constants There are two additional parameters in the Configuration function that let you change the time constants for MicroAmp Reaction Tubes and Thin Walled GeneAmp Reaction Tubes. We recommend that you do not change the time constant values unless instructed to do so by future documentation. MICRO Time Constant To change the sample tube time constant value for MicroAmp Reaction Tubes: 1 Select CONFIG on the Utilities menu as described on page 7-3. The following display appears: Configuration EDIT-PRINT 2 Press ENTER, then press STEP until the following display appears: Set MICRO tube time constants? NO 7-30 3 The default condition of this parameter is no. Press the OPTION key. “NO” on the display will change to “DEFAULTS.” 4 Press the OPTION key again. “DEFAULTS” will change to “MODIFY.” Pressing the OPTION key again will change “MODIFY” back to “NO.” 5 Press ENTER. The following display appears: Rxn vol=100uL T= 9.5 Rxn vol= 50uL T= 7.0 This display lets you change the sample tube time constant. There are two default values for sample tube time constants on this display: one for sample tubes with a reaction volume of 100 µL, and one for sample tubes with a reaction volume of 50 µL. There is a time constant default value for sample tubes with a reaction volume of 20 µL that appears on a separate display. Press STEP to view this display: Rxn vol= 20uL T= 5.0 6 To change any of these time constant values, press the appropriate numeric keys, then press ENTER. To move the cursor from one time constant value to the next, press ENTER. To move from the first display to the second, press STEP. To move from the second time constant display to the first, press the BACK key. 7 Press STOP to return to the first Configuration display. 7-31 THIN Time Constant This parameter works the same way as the MICRO time constant. except that the default time constant values are different. Change the sample tube time constant value for Thin Walled GeneAmp Reaction Tubes as follows: 1 Select CONFIG on the Utilities menu as described on page 7-3. The following display appears: Configuration EDIT-PRINT 2 Press ENTER, then press STEP until the following display appears: Set THIN tube time constants? NO 3 The default condition of this parameter is no. Press OPTION to change “NO” to “DEFAULTS.” 4 Press OPTION again to change “DEFAULTS to MODIFY.” Press OPTION again to change “MODIFY” back to “NO.” 5 Press ENTER. ♦ If your instrument has software version 1.05 or higher, the following display appears: Rxn vol=100uL T=12.0 Rxn vol= 50uL T=12.0 ♦ If your instrument has software version 1.04 or lower, the following display appears: Rxn vol=100uL T=14.6 Rxn vol= 50uL T=14.6 7-32 These displays let you change the sample tube time constant. There are two default values for sample tube time constants on this display: one for sample tubes with a reaction volume of 100 µL, and one for sample tubes with a reaction volume of 50 µL. There is a time constant default value for sample tubes with a reaction volume of 20 µL that appears on a separate display. ♦ If your instrument has software version 1.05 or higher, press STEP to view the following display: Rxn vol= 20uL T=12.0 ♦ If your instrument has software version 1.04 or lower, press STEP to view the following display: Rxn vol= 20uL T=14.2 6 To change any of these time constant values, press the appropriate numeric keys, then press ENTER. To move from the first display to the second, press STEP. To move from the second time constant display to the first, press the BACK key. ♦ If your instrument has software version 1.05 or higher, press STOP to return to the first Configuration display. 7-33 CAUTION If your instrument has software version 1.04 or lower, configure the THIN tube time constant for a default response time of 12.0 seconds for 20-µL reaction volume. When initiating a PCR program, specify a reaction volume of 20 µL for all experiments using Thin-Walled GeneAmp Reaction Tubes. If your instrument has software version 1.05 or higher, the response time of 12.0 seconds for all three reaction volumes is correct for the Thin-Walled GeneAmp Reaction Tubes. Printing the Configuration Parameters The PRINT selection of the Configuration function lets you print all of the configuration parameters. To print the parameters: 1 Select CONFIG on the Utilities menu as described on page 7-3. The following display appears: Configuration EDIT-PRINT 2 Press OPTION to move the cursor to PRINT, then press ENTER. As the configuration parameters are printed, the following display appears: Configuration printing... 3 7-34 When printing has been completed, the first Configuration display appears. Press the STOP key to return to the Main menu. The Diagnostic Function (DIAG) The Diagnostic function gives you access to five different diagnostic tests. These tests are: ♦ review the most recent instrument run by examining the History file ♦ test the sample block heating system ♦ test the sample block cooling system ♦ test the overall performance of your instrument ♦ verify that your instrument is still calibrated Each of the diagnostic tests are numbered, 1 through 5, and each test appears on a separate display. The diagnostic tests and their corresponding numbers are: TEST TEST # Review History File 1 Heater Test 2 Chiller Test 3 System Performance Test 4 Verify Calibration 5 7-35 Selecting the Diagnostic Tests There are two ways to select a diagnostic test: ♦ You can enter the number of the test you want to run or ♦ You can use the STEP key to scroll forward through the test displays and the BACK key to scroll backward through the test displays. To select a diagnostic test by entering its test number: 1 Select DIAG on the Utilities menu as described on page 7-3. The following display appears: Enter Diag Test #1 REVIEW HISTORY FILE 2 Enter test # here Press the numeric key that corresponds to the Diagnostic test you want to run (1, 2, 3, 4, or 5), then press ENTER. The display for that test appears. To select a diagnostic test by using the STEP or BACK keys: 1 Select DIAG on the Utilities menu as described on page 7-3. The following display appears: Enter Diag Test #1 REVIEW HISTORY FILE 7-36 2 Press STEP to scroll forward through the remaining four Diagnostic test displays; press BACK to scroll backward through all four of the test displays. Press STOP at any time to return to the Utilities menu. Figure 7-8 shows the initial displays for the diagnostic tests. Press Enter Diag Test #1 REVIEW HISTORY FILE Step to move to the next display Enter Diag Test #2 HEATER TEST Press Enter Diag Test #3 CHILLER TEST Back to move to the previous display Enter Diag Test #4 SYSTEM PERFORMANCE Press Stop anytime to return to the Utilities menu Figure 7-8 Enter Diag Test #5 VERIFY CALIBRATION Initial displays for the five diagnostic tests. The following sections describe each diagnostic test in detail. 7-37 Reviewing the History file Diagnostic Test #1 lets you review the History file for the most recent run. About The History File The History file records the events that occurred during a run. If a run was terminated, you can view the History file to determine the cause and how much of the run was completed. The History file contains two types of information about a run. It includes: ♦ status records, which display general information about the run and status messages, such as “Run Complete” or “Method Complete” ♦ data records, which display all pertinent numerical data about the run, such as temperature and time The History file can contain up to 500 records. If a run produces more than 500 records, the earliest records are overwritten. The previously stored contents of a History file are automatically cleared at the start of a new run. When you review the History file, you can display or print: 7-38 ♦ all the status and data records of a run ♦ only the status records of a run ♦ only those records of a run that contain errors Status Records in a History File As mentioned earlier, a status record contains general information about a run. Every run has at least four status records that contain the sample tube type, the reaction volume, the temperature at which the clock started, and either a message indicating that the run was completed successfully, or a message indicating that an error occurred during the run. A status record displays the following information: ♦ type of program (HOLD, CYCL, AUTO, or METH) ♦ program number (or question marks, if no program number was assigned) ♦ method number, if the run contained linked programs ♦ status record number ♦ date on which the run was started, completed, or aborted ♦ time at which the run was started, completed, or aborted ♦ sample tube type ♦ sample tube reaction volume ♦ “start clock within...” parameter ♦ status message 7-39 Any one of the following messages can appear on a status record display: 7-40 “Tube Type xxxx” This message shows the sample tube type, and will always be the first record. “Reaction Vol xxxxuL” This message shows the reaction volume used in the run, and will always be the second record. “Clk starts w/in x.xC” This message shows the temperature at which the hold clock starts, and will always be the third record. “Start mm/dd/yy hh:mm” This message shows the date and time the run began, and will always be the fourth record. “End mm/dd/yy hh:mm” This message shows the date and time the run ended. “Meth Complete” This message will always appear at the end of a successful method run. “Sensor Error” This message will appear if the sample block temperature was read incorrectly ten times in a row. This is a fatal error message. “Power Failure xxx.x hrs” This message is also a fatal error message and will appear if a power failure occurred during the run. It shows how long the power was off. “Abort mm/dd/yy hh:mm” This message will appear if you pressed the STOP key during the run. It shows the time and date the run was aborted. “Pause Timeout hh:mm” The pause timeout limit was exceeded during the run. “Fatal Setpoint Error” The sample block did not reach its setpoint in a reasonable period of time. “Pause xx:xx at xx.xC” The run for this time and at this temperature. Figure 7-9 shows an example status record display for a successful run. Program Type Program #/Method # CYCL #2/7 5 Abort 12/21/90 14:47 Status Message Figure 7-9 Record # Time of Abort Date of Abort ,A typical status record display. The example in the figure tells you that CYCL program #2, which is one of the linked programs specified in Method #7, was aborted at 14:47 (2:47 PM) on December 21, 1990 and that this status record is Record #5 of your entire run. 7-41 Data Records in a History File As mentioned earlier, a data record contains all pertinent numerical data about a run. Every program has at least one data record. A simple HOLD program, for example, has only one data record. Data records include the following information: ♦ record number ♦ ending setpoint temperature ♦ cycle number (except in HOLD programs) ♦ setpoint number (except in HOLD programs) ♦ total setpoint time (ramp and hold times) ♦ error message, if an error occurred If the segment was successfully completed, the data record will also display: ♦ type of program (H for HOLD, C for CYCL, A for AUTO, or M for METH) ♦ program number (or question marks, if no program number was assigned) ♦ method number, if any If an error occurred during the run, the data record will display an error message in place of the program type and program number. 7-42 Any one of the following error messages can appear on a data record display: “Setp Error” This message will appear if the setpoint was not reached in a reasonable period of time. “Prog Error” This message will appear if, when you ran an AUTO program, either time became a negative number or the temperature went out of the range of 0.1° to 99.9 °C. “Temp Error” This message will appear if, at the end of a segment, the set-point temperature drifted +/− a previously entered amount. See “Changing the Allowed Setpoint Error” in this chapter. Figure 7-10 shows an example of a data record display for successful run. 7-43 Program Program # Type C# 2 Cyc 1 Ending Setpoint Temperature 25.2C 6 Setpt 2 0:10 Record # Elapsed Time Cycle # Setpoint # Figure 7-10 A data record display of a CYCL run. The above example tells you that this data record is record #6 of CYCL program #2. There is no method number because this program was not linked in a method. This record also tells you that this is setpoint #2 of cycle #1, the ending setpoint temperature was 25.2 degrees C, and the elapsed time was ten seconds. If this were a data record for a HOLD program, there would be no cycle number or setpoint number. If an error had occurred at this point in the run, an error message would also have appeared on this display. Displaying the History file To select Diagnostic Test #1 and display the History file: 1 Select DIAG on the Utilities menu as described on page 7-3. The following display appears: Enter Diag Test #1 REVIEW HISTORY FILE 2 Press ENTER to select Diagnostic Test #1. The following display appears: History 7 recs ALL-STAT-ERROR-PRINT 7-44 The total number of records in the History file appears on the top line of this display. In this example, there are seven records in the History file. On the bottom line, there are four options: 3 ALL view all the records in the History file beginning with the most recent record STAT view just the status records in the History file ERROR view just the records with error messages PRINT print some or all of the records in the History file Press the OPTION key to move the cursor to your desired selection and press ENTER. The last record will be displayed first. Note You can skip forward or backward a specified number of records to a specific record by typing the number of records to be skipped, followed by either the STEP key or the BACK key. a. For example, to skip forward three records, type 3 STEP. b. To skip backward three records, type 3 BACK. Figures 7-11 and 7-12 on the next two pages show all the possible displays in an example History file. A different example History file is shown in the printout in Figure 7-13. 7-45 Enter Diag Test #1 REVIEW HISTORY FILE Press Enter History 10 recs ALL-STAT-ERROR-PRINT Press Enter Status Record Data Record The most recent record is displayed first. CYCL# 2 Abort 12/21/90 10 14:47 Press Press Press Step Back Stop C# 2 Cyc 3 26.0C Setpt 1 9 0:05 to move to the next display to move to the previous display to return to the first display C# 2 Cyc 2 25.2C Setpt 2 8 0:10 CYCL# 2 4 Start 12/21/90 14:45 C# 2 Cyc 2 29.8C Setpt 1 7 0:10 CYCL# 2 3 Clk starts w/in 1.0C C# 2 Cyc 1 25.2C Setpt 2 6 0:10 CYCL# 2 Reaction vol C# 2 Cyc 1 29.9C Setpt 1 5 0:10 CYCL# 2 Tube type 2 100uL 1 MICRO Figure 7-11 Viewing (ALL) the records in a History file for a two-temperature CYCL program. 7-46 Enter Diag Test #1 REVIEW HISTORY FILE History 10 recs ALL-STAT-ERROR-PRINT Enter Press Stop to return to the first display Enter CYCL# 2 Abort 12/21/90 Status Message 10 14:47 Enter Enter If no error occurs during a run, “No Error records” will appear on the display. If an error occurs during a run, a data record containing an error message will appear here. History Print ALL-STAT-ERRORS Select this option to print only those data record with error messages Select this option to print all status and data records Select this option to print only status records Figure 7-12 Viewing the status (STAT) records, data records with error messages (ERROR), and printing records (PRINT). 7-47 Printing the History file To print the History file: 1 Select DIAG on the Utilities menu as described on page 7-3. The following display appears: Enter Diag Test #1 REVIEW HISTORY FILE 2 Press ENTER to select Diagnostic Test #1. The following display appears: History 10 recs ALL-STAT-ERROR-PRINT 3 Press the OPTION key three times to move the cursor to PRINT, then press ENTER. The following display appears: PRINT HISTORY ALL-STAT-ERRORS The menu items in this display give you the following choices: 7-48 ♦ Select ALL to print all status and data records in the History file. ♦ Select STAT to print only the status records. ♦ Select ERRORS to print only those data records that contain error messages. 4 Press OPTION to move the cursor to your desired selection, then press ENTER. The following display appears: History Print printing... Figure 7-13 shows a History file printout of all status and data records (ALL) for a CYCL program. Figure 7-13 Printout of all status and data records (ALL) of a typical History file. 7-49 Running the Heater Test Diagnostic Test #2 is the Heater Test, which verifies the performance of the sample block heater and electronics by stabilizing the block temperature at 35 degrees C, then applying full power to the heaters and measuring the temperature rise over a period of time. CAUTION Before you begin this test, make sure you place an empty MicroAmp Tray (MicroAmp Tray/Retainer Set, Part No. N801-0530) on the sample block, then slide the heated cover forward and turn the cover knob clockwise until the white mark on the knob lines up with the white mark on the cover. To run the Heater Test: 1 Select DIAG on the Utilities menu as described on page 7-3. The following display appears: Enter Diag Test #1 REVIEW HISTORY FILE 2 Select Diagnostic Test #2 by pressing 2, then pressing ENTER, or by pressing the STEP key. The following display appears: Enter Diag Test #2 HEATER TEST 3 7-50 Press ENTER to start the test. The following display appears: Heater Test Blk=xx.x going to 35C. . . ♦ When the temperature stabilizes, full power is applied to all heaters. The display then reads “ramping...”, then “timing...” and the block temperature is monitored. ♦ When the block reaches the setpoint, the following screen appears: Heater Test Passed This display will show “Passed” if the test was successful. If the test was not successful, the display will show “Failed.” If this should occur, contact an Applied Biosystems Service Engineer. 4 Press STOP to return to the first Diagnostic display. 7-51 Running the Chiller Test Diagnostic Test #3 is the Chiller Test, which verifies the performance of the refrigeration system by calculating the cooling rate of the sample block. CAUTION Before you begin this test, make sure you place an empty MicroAmp Tray (MicroAmp Tray/Retainer Set, Part No. N801-0530) on the sample block, then slide the heated cover forward and turn the cover knob clockwise until the white mark on the knob lines up with the white mark on the cover. To run the Chiller Test: 1 Select DIAG on the Utilities menu as described on page 7-3. The following display appears: Enter Diag Test #1 REVIEW HISTORY FILE 2 Select Diagnostic Test #3 by pressing 3, then pressing ENTER, or by pressing the STEP key twice. The following display appears: Enter Diag Test #3 CHILLER TEST 3 7-52 Press ENTER to start the test. ♦ The system first waits for the coolant temperature to get to 10 degrees C. (If it can't do this within 18 minutes, a failure message will be displayed.) The following display appears: Chiller Test Blk=xx.x going to 50C... The value “xx.x” on the screen pictured above represents the current temperature (in degrees C) of the sample block. ♦ When the temperature stabilizes, the system drives the sample block cold, the temperature is monitored for a specific amount of time, and the cooling rate is calculated. The following display appears: Chiller Test Passed This display will show “Passed” if the test was successful. If the test was not successful, the display will show “Failed.” If this should occur, contact an Applied Biosystems Service Engineer. 4 Press STOP to return to the first Diagnostic display. 7-53 Running the System Performance Test Diagnostic Test #4 is the System Performance Test. The System Performance Test is a series of comprehensive tests of the instrument's heating and cooling systems and is used to help an Applied Biosystems Service Engineer diagnose any special problem you may be having with your GeneAmp PCR System 9600. Run this test when you suspect problems with the instrument and the Heater Test and Chiller Test both pass. The System Performance takes about 30 to 40 minutes to complete. At the end of the test, the system will report the results of the tests with either a pass, warning, or fail message. If any of the tests fail, record the results (or print them out) and contact an Applied Biosystems Service Engineer. To run the System Performance Test: 1 Select DIAG on the Utilities menu as described on page 7-3. The following display appears: Enter Diag Test #1 REVIEW HISTORY FILE 2 Select Diagnostic Test #4 by pressing 4, then pressing ENTER, or by pressing the STEP key three times. The following display appears: Enter Diag Test #4 SYSTEM PERFORMANCE 7-54 3 Press ENTER. The following display appears: System Performance VIEW-RUN-PRINT This display lets you choose one of the following options: VIEW: Select this option to view the last test results on a series of displays. Use the STEP key to move forward through the displays; use the BACK key to move backward through the displays. RUN: Select this option to run the test. PRINT: Select this option to print a list of the test results. 4 Press the OPTION key once to move the cursor to RUN on the display, then press ENTER. The test will begin and will take about a half hour to complete. 5 After the System Performance Test has been completed, press ENTER with the cursor under the VIEW selection to view the test results. OR Press the OPTION key twice to move the cursor to the PRINT selection, then press ENTER. A list of the test results will be printed. 6 Review the test results with an Applied Biosystems Service Engineer. The Service Engineer will use the results to identify the instrument problem. 7 Press STOP to return to the first Diagnostic display. 7-55 Running the Verify Calibration Test Diagnostic test #5 is the Verify Calibration test. Run this test to verify that your instrument is still calibrated. To run this test, you will need the Temperature Verification System for the GeneAmp PCR System 9600, Applied Biosystems Part No. (N801-0435). Refer to Chapter 8, “Maintenance,” for complete instructions on how to verify you instrument's calibration. 7-56 The Delete Function (DEL) The Delete function lets you: ♦ delete unprotected programs one by one by specifying their program numbers, ♦ delete protected programs stored under a user number by specifying that user number, and ♦ delete all unprotected programs. In all cases, if a program is linked in a method, that program cannot be deleted until the method is first deleted. Deleting Programs by Program Number To delete an individual program by specifying its program number: 1 Select DEL on the Utilities menu as described on page 7-3. The following display appears: Delete PROGRAM-USER-ALL 2 With the cursor positioned under PROGRAM, press ENTER. 7-57 The following display appears: Delete Enter program #xxx “xxx” on the display pictured above represents the program number of the program you want to delete. 3 Press the numeric keys that correspond to the number of the program you want to delete, then press ENTER. You can delete any program or method. Note A program cannot be deleted if it is linked in a method, or if the program is protected (unless the correct user number is entered.) 4 7-58 Press the STOP key at any time to return to the first Delete display. Deleting Programs by User Number To delete all of the programs stored under a specified user number 1 Select DEL on the Utilities menu as described on page 7-3. The following display appears Delete PROGRAM-USER-ALL 2 Press the OPTION key to move the cursor to USER, then press ENTER. The following display appears Delete Enter user # xxxx 3 Press the numeric keys that correspond to the user number of the programs you want to delete, then press ENTER. If a program is linked in a method, it cannot be deleted. The following display appears if there is a program that is linked in a method: Progs linked in meth STEP to list progs 4 Press the STEP key to scroll through the list of linked programs. 7-59 The following display will appear, showing in which method the program is linked: Can't delete file xxx Linked in method xxx! The number “xxx” on the top line of the display pictured above represents the program number of the program that cannot be deleted. The number “xxx” on the bottom line represents the method number in which the program is linked. 5 If you want to delete all the unlinked programs under the given user number, press ENTER. The following display appears: User #xxxx Delete all progs?YES 6 7-60 Press ENTER to delete the files. Deleting All Unprotected Programs You can delete any program, provided that it is not linked in a method or protected under a user number. To delete all unprotected programs: 1 Select DEL on the Utilities menu as described on page 7-3. The following display appears: Delete PROGRAM-USER-ALL 2 Press the OPTION key twice to move the cursor to ALL, then press ENTER. The following display appears: Delete every unprotected prog?YES If you change your mind, press the OPTION key to change YES to NO, then press the STOP key to return to the first Delete display. 3 Press ENTER. All unprotected programs will be deleted. 7-61 Maintenance 8 8 Introduction This chapter describes how to perform routine maintenance on the GeneAmp® PCR System 9600 without the aid of an Applied Biosystems Service Representative. ! WARNING ! Do not remove the instrument cover. There are no components inside the GeneAmp PCR System 9600 that you can safely service yourself. If you suspect a problem, contact an Applied Biosystems Service Representative. Cleaning the Sample Wells The sample wells should be cleaned once a month or as needed. ! WARNING ! During instrument operation, the sample block can be heated as high as 100 degrees C. Before performing the following procedure, be sure to wait until the sample block reaches room temperature. To clean the sample wells: 1 Run a 25-degree HOLD program to bring the sample block to room temperature, then turn off the instrument for 15 minutes. 2 Remove the sample tray from the block and set aside. 3 Use a cotton swab soaked in isopropanol and clean the sample wells thoroughly. Make certain that the isopropanol has evaporated completely before reloading the sample tray. If the sample wells become contaminated, clean the wells thoroughly with a cotton swab soaked in Chlorox. 8-2 Cleaning the Heated Cover The heated cover should be cleaned once a month or as needed. ! WARNING ! During instrument operation, the heated cover can be heated as high as 107 degrees C. Before performing the following procedure, be sure to wait until the sample block reaches room temperature. To clean the heated cover, proceed as follows: 1 Run a 25-degree HOLD program to bring the sample block to room temperature, then turn off the instrument for 15 minutes. 2 Rotate the heated cover handle counterclockwise and slide the cover about 1/3 of the way towards the back of its range. 3 Note that there are notches in the cover rail, and, taking advantage of the notches, lift the cover straight up and set it down on its side on the instrument cover. Do not pull the heated cover away from the instrument. 4 Soak a clean cloth with isopropanol and gently wipe the bottom of the cover. 5 Remove any remaining isopropanol from the cover and replace the cover in its rail. (Remember, the rail is notched about 1/3 of the way towards the back of its run.) If the heated cover becomes contaminated, remove the cover, as described above, and wipe the bottom of the cover with a cloth soaked in Chlorox. 8-3 Temperature Calibration Verification Test Use this procedure to verify that your Applied Biosystems GeneAmp PCR System 9600 still meets the temperature accuracy specification. Equipment Required You will need the following equipment to perform this procedure: Temperature Verification System, (Part No. N801-0435) which includes: ♦ Digital thermometer with 9V battery installed ♦ RTD probe ♦ Cotton swabs ♦ Light mineral oil ♦ Probe tray Verifying the Temperature Calibration Perform the procedure as described in the following steps. We recommend that you perform this procedure immediately after you turn on the instrument. Note Refer to the Instructions included with your Temperature Verification System for a detailed description on operating the digital thermometer. 1 8-4 If the heated cover is in the forward position, turn the cover knob completely counterclockwise, then slide the cover back. 2 Using a cotton swab, coat wells D1 and E1 with mineral oil. Figure 8-1 shows the location of these wells. Figure 8-1 3 Location of sample wells E1 and D1. Place the probe tray on the sample block so that the probe tray notch faces the front of the instrument. The RTD probe assembly consists of two cones, one of which measures the temperature of the sample well. The wire is attached to the cone that does not measure the temperature of the sample well. This cone is a dummy probe. 4 Place the probe assembly into wells D1 and E1 so that the dummy probe sits in D1. Thread the probe wire through the notch in the probe tray (see Figure 8-2). Make sure the probe is connected to the digital thermometer. 8-5 Figure 8-2 Placing the probe assembly into the sample wells. 5 Slide the heated cover forward and turn the cover knob clockwise until the white mark on the cover knob is aligned with the white mark on the cover. 6 Turn on the digital thermometer by moving the ON-OFF/RANGE switch to the 200 position. 7 Turn on the GeneAmp PCR System 9600. The main menu appears: Select Option 9600 RUN-CREATE-EDIT-UTIL 8 8-6 Press the OPTION key three times to move the cursor to UTIL, then press ENTER. The utilities menu appears: Select function DIR-CONFIG-DIAG-DEL 9 Press the OPTION key twice to move the cursor to DIAG, then press ENTER. The following display appears: Enter Diag Test #1 REVIEW HISTORY FILE 10 Run the Verify Calibration Diagnostic Test (Test #5) by pressing 5, then ENTER. ♦ The temperature of the sample block and heated cover will go to 40 degrees C, and the following display will appear: Going to 40 ºC... Cvr= xxC Blk = xx.xC This display shows the current temperature of the heated cover (Cvr= xxC) and sample block (Blk = xx.xC). ♦ When the temperature of the heated cover is within ten degrees of the sample block temperature, the following display appears: Wait 3 minutes... Time=MM:SS Blk=40.0C This displays shows the current sample block temperature (“Blk=40.0C”) and a clock, which counts up from zero in minutes and seconds (“Time=MM:SS”). 8-7 ♦ When the clock reaches three minutes, the following display appears: Record Temperature Time=MM:SS Blk=40.0C 11 Measure the temperature of well E1 using the digital thermometer and record this temperature as T(40). See Figure 8-3 on the next page. 12 Press ENTER. ♦ The temperature of the sample block and heated cover will go to 95 degrees C, and the following display will appear: Going to 95°C... Cvr= xxC Blk = xx.xC This display shows the current temperatures of the block cover (Cvr= xxC) and the sample block (Blk = xx.xC). When the temperature of the block cover is within ten degrees of the sample block temperature, the following display appears: Wait 3 minutes Time=MM:SS Blk=95.0C This displays shows the current sample block temperature (“Blk=95.0C”) and a clock, which counts up from zero in minutes and seconds (“Time=MM:SS”). 8-8 When the clock reaches three minutes, the following display appears: Record Temperature Time=MM:SS Blk=95.0C 13 Measure the temperature of well E1 using the digital thermometer and record this temperature as T(95). Note To exit the test at any time, press the STOP key. Press 5 and ENTER to return to the Verify Calibration Diagnostic test. Figure 8-3 shows when you should take the two measurements. 0 95 3 Clock starts Temp °C 0 40 Clock starts Measure well E1 T(95) 3 Measure well E1 T(40) Time Figure 8-3 Temperature measurements in the temperature calibration verification test. 8-9 Test Results Perform the following steps to calculate the results of the test. You will need to refer to the calibration label that you pasted into Figure 8-4 below, for the High and Low Offset values. PASTE THE CALIBRATION LABEL HERE. Figure 8-4 GeneAmp PCR System 9600 Calibration Label. Note If you have more than one GeneAmp PCR System 9600 in your laboratory, make sure that the serial number on the calibration label matches the serial number on the instrument you are testing. 1 Use the following formula to calculate the average block temperature at the 95-degree hold: Block Average at 95°C = T(95) – High Offset 8-10 ♦ If the block average is more than 0.75 degree C above or below 95 degrees C, your instrument must be recalibrated. For example: If the measured temperature of well E1 at was 95.2°C, and the High Offset printed on your calibration label is –0.1, then you would use the following formula: Block Average at 95°C = 95.2 – (–0.1) = 95.3°C In this example, since 95.3°C does not differ by +/–0.75°C from your programmed target temperature, your instrument would not need to be recalibrated. Note The offset is the number of degrees Celsius that the temperature of well E1 differed from the average temperature of the block when the instrument was calibrated at the factory. 2 Use the following formula to calculate the average block temperature at the 40-degree C hold: Block Average at 40 °C = T(40) – Low Offset ♦ If the block average is more than 0.75 degree C above or below 40 degrees C, your GeneAmp PCR System 9600 needs to be recalibrated. For example: If the measured temperature of well E1 was 39.9°C, and the Low Offset printed on your calibration label is +0.1, then you would use the following formula for computing the block average at 40°C: Block Average at 40°C = 39.9 – (+0.1) = 39.8°C In this example, since 39.8°C does not differ by +/-0.75°C from your programmed target temperature, your instrument would not need to be recalibrated. 3 Remove the probe assembly from the sample block and move the digital thermometer ON-OFF/RANGE switch to the OFF position. 8-11 4 Clean the oil from wells D1 and E1 using cotton swabs. This completes the test. The calibration has now been verified. If your instrument needs to be recalibrated, contact an Applied Biosystems Service Representative. 8-12 Temperature Uniformity Test Use this procedure to test the temperature uniformity of the sample block in the GeneAmp PCR System 9600. Equipment Required You will need the following equipment: ♦ Temperature Verification System Testing the Temperature Uniformity Perform the procedure as described in the following steps: 1 If the heated cover is in the forward position, turn the cover knob completely counterclockwise, then slide the cover back. 2 Coat all the wells in sample block rows A, C, E, and H with mineral oil using a cotton swab. 3 Place the probe tray on the sample block with the notch facing the front of the instrument. The RTD probe assembly consists of two cones, one of which measures the temperature of the sample well. The wire is attached to the cone that does not measure the temperature of the sample well. This cone is a dummy probe. 4 Place the probe assembly into wells A1 and A2 with the dummy probe in A2. Thread the probe wire through the notch in the probe tray (see Figure 8-5). Make sure the probe is connected to the digital thermometer. 8-13 Figure 8-5 The probe assembly in sample wells A1 and A2. 5 Slide the heated cover forward and turn the cover knob clockwise until the white mark on the cover knob is aligned with the white mark on the cover. 6 Turn on the digital thermometer by moving the ON-OFF/RANGE switch to the 200 position. 7 Turn on the GeneAmp PCR System 9600 and set up a two-temperature CYCL program with the following parameters: Setpoint #1 Temperature = 95°C Hold Time = 2:00 minutes Ramp Time = 0:00 minutes Setpoint #2 Temperature = 40°C Hold Time = 2:00 minutes Ramp Time = 0:00 minutes Cycles = 99 Note Refer to Chapter 4 for detailed instructions on how to set up and run a CYCL program. 8-14 8 On the third cycle, measure the temperature of well A1 90 seconds into Setpoint #1 (95 degrees C setpoint temperature) using the digital thermometer. The time remaining clock on the run-time display will read “0:30” (30 seconds). Record this temperature. 9 Still on the third cycle, measure the temperature of well A1 90 seconds into Setpoint #2 (40 degrees C setpoint temperature) using the digital thermometer. The time remaining clock on the run-time display will read “0:30” (30 seconds). Record this temperature. Figure 8-6 shows when to measure the temperatures. Measure well A1 90 seconds into Setpoint #1 Measure well A1 90 seconds into Setpoint #2 Measure well A4 90 seconds into Setpoint #1 95 Temp °C Move the probe to well A4 40 Cycle #3 Measure well A4 90 seconds into Setpoint #2 Cycle #4 Move the probe to well A8 Time Figure 8-6 Measurements in the temperature uniformity test. Note You can also measure the temperature 30 seconds and one minute into Setpoints #1 and #2 if you would like to observe the dynamics of the system. 8-15 10 After you measure the second temperature of well A1, turn the cover knob completely counterclockwise, then slide the heated cover back. 11 Move the probe assembly to wells A4 and A5 with the dummy probe in A5. 12 Slide the heated cover forward and turn the cover knob clockwise until the white marks are aligned. 13 Repeat the measurements on wells A4, A8, A12, C1, C4, C8, C12, E1, E4, E8, and E12, H1, H4, H8, and H12. Make sure you place the measuring cone of the probe assembly into these wells and the dummy probe into adjacent wells. Figure 8-7 8-16 Location of wells used in uniformity test. 14 When you have completed all measurements, remove the probe assembly from the sample block and turn off the digital thermometer. 15 Clean the oil from the sample block. Test Results 1 For the 16 Setpoint #1 measurements (95°C hold) subtract the lowest measured temperature from the highest measured temperature. 2 For the 16 Setpoint #2 measurements (40°C hold), subtract the lowest measured temperature from the highest measured temperature. ♦ If either result is greater than 1°C, your GeneAmp PCR System 9600 must be serviced by an Applied Biosystems Service Representative. 8-17 Changing External Fuses There are two slow-blow fuses accessible from the left side of the instrument. Use the following procedure to change these fuses. Use 15-Amp slow-blow fuses for the 100 and 120 VAC instruments. Use 8-Amp slow-blow fuses for the 220-240 VAC instruments. See Chapter 10 for information on power requirements. 1 Turn off the GeneAmp PCR System 9600 and disconnect the power cord from the instrument. 2 The fuses are located next to the instrument power cord connection (see Figure 8-8). Fuse Holders Instrument Power Cord Connection F1 Figure 8-8 F2 Removing the fuses. 3 Remove the fuse(s) with a screwdriver. Replace the fuse(s) with the same type and rating of fuse. 4 Replace the instrument power cord. Troubleshooting 9 9 Introduction This chapter contains troubleshooting information to help you correct any problems you experience in operating the GeneAmp PCR System 9600. This chapter also explains what happens if a power failure causes the instrument to turn off while you are operating it. Troubleshooting The table that begins on the following page lists instrument problems you may have, the probable causes of these problems, and what you can do to correct them. Table 9-1 Troubleshooting Information Problem The power switch is on but there is no response. Possible Cause The power cable is loose or not plugged in. There is no display on Fuse is blown. the screen and no noise from the motor or fan. 9-2 Check and / or Remedy Plug the power cable in properly. Replace the fuse. Power is on but the screen is blank and the motor is running. Or, when you press a key, the display does not show the appropriate response or the screen is blank. An internal fuse may be blown, or there may be a controller problem. Call an Applied Biosystems Service Engineer. The displayed block temperature appears inaccurate. The temperature may need to be recalibrated. Perform a temperature calibration verification test using Diagnostic Test #5 and the Temperature Verification System (Applied Biosystems Part No. N801-0435). The heating or cooling is too slow. There is a possible controller or mechanical malfunction. Run Diagnostic Test #2 (Heater Test) and #3 (Chiller Test). Call an Applied Biosystems Service Engineer if either test fails. Table 9-1 Troubleshooting Information (continued) Problem Possible Cause Check and / or Remedy The system will not cool The laboratory is either down to subambient too humid or too hot. temperatures. Move the instrument to an air-conditioned room. Or run Diagnostic Test #3, the Chiller Test. Call an Applied Biosystems Service Engineer if the test fails. An error message is displayed when you turn on the instrument. One of the main instrument systems has failed. Call an Applied Biosystems Service Engineer. You are getting unexpected or unrepeatable cycle times, or temperatures that are too high or too low. Suspected poor cycling performance. Run Diagnostic Test #4 (System Performance Test), then call an Applied Biosystems Service Engineer. When starting a run, the following display appears: This is normal if you start a run just after turning the instrument on or completing a subambient hold. Wait a few minutes to allow the block cover to come up to temperature. If it doesn’t, contact an Applied Biosystems Service Engineer. Cover temp is xx ° C Run starts at 100 ° C 9-3 Table 9-1 Troubleshooting Information (continued) Problem Upon power-up or returning to an instrument that has been running unattended, the following display appears: Possible Cause Check and / or Remedy This is normal if the power has been interrupted or shut off while running a program. Review the history file to determine when the power failed. Note that the system comes up in a 4degree soak to save any samples. The display shows how long power was interrupted. Power Fail x min Review history? YES The printer is not printing run-time data. When you turn on the instrument, the following display appears: Call Service 9-4 The run-time printer mode Turn the run-time printer configuration parameter is mode on. not turned on. The printer has been incorrectly set up. Check the printer set-up. Bad Printer cable. Replace the printer cable. Possible controller failure. Contact an Applied Biosystems Service Engineer. If the Instrument Turns Off If power is interrupted and the instrument turns off while you are operating it, the following will occur when you turn it back on: ♦ If you were editing a program, you will lose the changes to that program and will have to re-edit it. ♦ The instrument will begin a 4-degree Hold program. If you were editing a program, review the History file to find out how much of your program was run before the instrument turned off (see Chapter 7). ♦ If you used a printer to generate run-time data (time and temperature) after each setpoint, you can reprogram the remaining programs in the sequence required to complete the interrupted run. 9-5 Specifications 10 10 Dimensions The physical dimensions of the instrument are: Height: 30.5 cm (12 in.) Width: 52 cm (20 in.) Depth: 61 cm (24 in.) Weight: 40.5 kg (90 lbs.) Sample Compartment The sample compartment contains an aluminum block with 96 sample positions in an eight by twelve microplate format. A heated cover over the sample vessels eliminates the need for oil. Sample Tubes The sample compartment can hold: 96 MicroAmp Reaction Tubes (0.2-mL) Power Requirements There are three versions of the GeneAmp PCR System 9600. The power requirements of these instrument versions are: ♦ 120VAC, 60 Hz, 10 amps, 15-amp slow blow fuse ♦ 220-240 VAC, 50 Hz, 5 amps, 8-amp slow blow fuse ♦ 100 VAC, 50-60 Hz, 12 amps, 15-amp slow blow fuse Control Panel The instrument control panel consists of the display, keypad, and indicator lights. Display The GeneAmp PCR System 9600 uses a 40-character blue luminescent display (20 characters x 2 lines). The sample temperature is displayed in degrees Celsius to the nearest 0.1 degree C. Keypad The keypad consists of nine function keys and ten numeric keys. Indicator Lights There are three indicator lights: Heating Cooling Hot 10-2 Sample Temperature Range The temperature range of the sample block is: 4.0 degrees to 99.9 degrees C. Sample Temperature Accuracy The displayed sample temperature matches the average true sample temperature within +/–0.75 degrees C. Displayed Sample Temperature The displayed sample temperature will match the specified setpoint temperature to within +/–0.2 degrees C, centered around the setpoint temperature two minutes after the sample temperature is within 1 degree C of setpoint. Sample Block Temperature Uniformity The sample block temperature uniformity is: +/–0.5 degrees C 30 seconds after the clock starts, over the range 50.0 to 99.9 degrees C. Sample Temperature Overshoot An average of 96 sample temperatures shows less than 0.5 degrees C overshoot for upramps and downramps. Figure 10-1 illustrates block temperature overshoot after ramping up. 10-3 Figure 10-1 Sample temperature overshoot after ramping up. Ramp Time Repeatability Thermal setpoints are achieved within +/–5 seconds (not including the first cycle). Sample Heating and Cooling Rate The sample temperature ramp rate for heating and cooling is approximately one degree C per second. 10-4 Printer Interface The GeneAmp PCR System 9600 uses an RS-232C serial port as its printer interface. In addition, the following specifications apply: Baud Rate: 9600 Setup: no parity, 8 data bits, one stop bit Temperature Calibration The GeneAmp PCR System 9600 has been calibrated to standards traceable to NIST (National Institute for Standards and Technology U.S.). 10-5 Index Note A page number in italics (e.g., 5-26) indicates an illustration. A Aborting a run, 6-20—6-21 ALL history file display option, 7-45, 7-46 ALL history file print option, 7-48 typical printout, 7-49 Allowed setpoint error changing, 7-23—7-24 default value, 7-23 definition of, 7-23 AUTO program automatic incrementing and decrementing of setpoints, 5-41 defining number of cycles in, 5-43 defining the number of setpoints in, 5-40 defining values for Setpoint #1, 5-40 defining values for Setpoint #2, 5-42 defining values for Setpoint #3, 5-43 definition of, 4-12 description of, 4-12—4-13, 4-13, 5-39—5-45 displays in, 5-39, 5-40—5-45 last display, 5-45 programming a pause in, 5-43—5-44 Average block temperature, calculating, 8-10—8-11 B BACK key function of, 5-8 moving to previous display, 3-11 selecting diagnostic tests, 7-36 use in directory function, 7-5 use of, 3-11, 3-16 Base, See Sample tray Beep while hold display, in HOLD program, 5-32 Beeper. See Run-time beeper 7-20 Block. See Sample Block Block Cover. See Sample block cover C Calibration. See Temperature Calibration Verification test Calibration label, 8-10 Caps. See MicroAmp reaction tubes CE key clearing entries, 3-15 function of, 5-8 Chiller test, 7-52—7-53 accessing, 7-52 in installation, 2-21 pass/fail display, 7-53 Cleaning sample wells, 8-2 Conventions notes and warnings, S-2, P-4 used in manual, S-1, P-3 Cleaning the sample block cover, 8-3 Clear Entry key. See CE key Condensation. See Loading samples CONFIG function. See Configuration function Configuration function, 7-16—7-34 changing the allowed setpoint error, 7-23—7-24 changing the pause time-out limit, 7-22 changing the sample tube time constant, 7-30—7-31 MicroAmp reaction tubes, 7-30—7-31 Thin walled GeneAmp reaction tubes, 7-32—7-34 changing the sample tube type, 7-28—7-29 changing the setpoint clock temperature interval, 7-26—7-27 description of, 7-2 displays in, 7-17 entering an idle state setpoint value, 7-25 in installation, 2-14—2-16 parameters in, 7-16 printing configuration parameters, 7-34 setting time and date, 7-18—7-19 turning runtime beeper on and off, 7-20—7-21 turning runtime printer mode on and off, 7-20—7-21 use of keys in, 7-16 Configuration parameters, 7-16 See also Configuration function editing, 7-16—7-17 in installation, 2-14—2-16 printing, 7-34 summary of, 2-15—2-18 Control panel, 10-2 display, 10-2 general description of, 1-4, 1-4 indicator lights, 6-16, 10-2 keypad, 10-2 Converting hold times from DNA Thermal Cycler, 5-4—5-7 Cooling indicator light, 6-16 Cooling samples. See Sample temperature Cover knob, use in sample tray installation, 6-7, 6-7 CREATE option on the main menu, 4-4 selecting on main menu, 3-8, 5-10 Creating a program, 5-10 Creating and editing programs, 5-9—5-16 summary of steps, 5-9 Creating methods, summary of steps, 5-17 Customer support. See Technical support CYCL program creating a two-temperature, 3-27 defining number of cycles in, 5-36 defining the number of setpoints in, 5-34 defining the number of setpoints, 3-14 defining values for Setpoint #1, 3-15, 5-34 defining values for Setpoint #2, 3-17, 5-35 defining values for Setpoint #3, 3-17, 5-36 definition of, 4-10 description of, 3-3, 3-3, 4-10—4-11, 5-33—5-38 displays in, 3-13, 5-33, 5-34—5-38 example printout, 5-16 example SETPOINT printout, 6-15 first display in, 3-8 hold times in, 3-4 in PCR method, 4-14 in temperature uniformity test, 8-14 last display, 3-19, 5-38 parameters of, 4-11 programming a pause in, 5-36—5-37 ramp times in, 3-4 Index-2 setpoints in, 3-3, 4-10, 5-33 specifying the number of cycles in, 3-18 storing, 3-20 target temperatures in, 3-4 CYCLE print option, 6-14 Cycle program. See CYCL program Cycles defining total number in AUTO program, 5-43 defining total number in CYCL program, 5-36 D Data record display, 7-44 error messages in, 7-43 in a history file, 7-42—7-44 information in, 7-42 Decimal values, entering, 5-35 Default values definition of, 3-4 See also HOLD program, CYCL program, AUTO program DEL function. See Delete function Delete function, 7-57—7-61 deleting all unprotected programs, 7-61 deleting programs by program number, 7-57—7-58 deleting programs by user number, 7-59—7-60 description of, 7-2, 7-57 Deleting programs all unprotected programs, 7-61 by program number, 7-57—7-58 by user number, 7-59—7-60 if linked in method, 7-59 Denaturation. See PCR technique DIAG function. See Diagnostic tests Diagnostic function description of, 7-2 See also Diagnostic tests Diagnostic tests, 7-35—7-56 Chiller Test #3, 7-52—7-53 Heater Test #2, 7-50—7-51 initial displays of, 7-37 Review History File Test #1, 7-38—7-49 selecting, 7-36—7-37 by test number, 7-36 using STEP and BACK keys, 7-36 summary of, 7-35 System Performance Test #4, 7-54—7-55 test numbers of, 7-35 Verify Calibration Test #5, 7-56 Digital thermometer, 8-4 Dimensions of instrument, 10-1 DIP switches on printer, 2-6, 2-9 on serial adapter card, 2-6 Directory function, 7-4—7-15 description of, 7-2 directory display, 7-4 selecting the PROG option, 7-4 selecting the TYPE option, 7-7 selecting the USER option, 7-10 example directory listed by program number, 7-6 example directory listed by program type, 7-9 example directory listed by user number, 7-12 listing programs by program number, 7-4—7-6 listing programs by program type, 7-7—7-9 listing programs by user number, 7-10—7-12 PRINT selection displays, 7-15 Printing a directory, 7-13—7-15 returning to main menu from, 7-4 types of directories, 7-4 Index-3 Displayed sample temperature, 10-3 G Documents on Demand S-19 GeneAmp PCR System 9600 description of software, 1-5—1-6 features of, 1-5 general description of, 1-3 input voltages, 2-4 installing, 2-1—2-21 instrument specifications, 10-1—10-5 Maintenance, 8-1—8-18 ordering accessories and replacement parts for, 2-3 parts supplied with, 2-2 setting hold times, 5-2—5-7 Dot-matrix printer. See Printer setup and configuration E Edit function, 5-13 EDIT option See also Editing programs See also Editing programs on the main menu, 5-13 Editing configuration parameters, 7-16—7-17 Editing keys, 4-3, 4-3, 5-8 description of, 5-8, 5-8 H Heated cover. See Sample block cover Editing methods, 5-23—5-25 Heater test, 7-50—7-51 accessing, 7-50 in installation, 2-19 pass/fail display, 7-51 Editing programs, 5-13—5-15 EDIT option on the main menu, 4-4 overwriting, 5-15 storing, 5-14 Heating and cooling rate, 10-4 Electrical power. See Power requirements Heating indicator light, 6-16 E-mail address for technical support, S-14 Heating ramps on System 9600 and DNA Thermal Cycler, 5-3 ENTER key accepting selections, 3-8 function of, 5-8 Heating samples. See Sample temperature Help. See Technical support S-14 Entering whole numbers, 3-15 ERROR history file display option, 7-45, 7-47 Error messages, in history file, 7-43 ERRORS history file print option, 7-48 F Files. See Programs Fuses, changing, 8-18 High offset, 8-10 History file description of, 6-22 display options, 7-45 example CYCL program printout, 6-22 PRINT HISTORY display, 7-47 printing, 7-48 printout of all records in, 7-49 records in, 7-38 viewing all records in, 7-46 Index-4 viewing data records with error messages in, 7-47 viewing status records in, 7-47 viewing, 7-44—7-47 HOLD program defining values in, 5-32 definition of, 4-8 description of, 4-8—4-9, 5-32 displays in, 5-32, 5-32 hold for a specific time interval, 4-9 in PCR method, 4-14 last display in, 5-32 run-time displays, 6-19, 6-19 turning beeper on, 5-32 types of, 4-8 Hold time default value in HOLD program, 5-32 definition of, 3-4 setting in AUTO program, 5-40 setting in CYCL program 5-34 Hold times converting from DNA Thermal Cycler for down ramps, 5-6—5-7 for up ramps, 5-4—5-5 default value in AUTO program, 5-40 default value in CYCL program, 5-34 in DNA Thermal Cycler 5-2 in GeneAmp PCR System 9600, 5-2 entering, 7-25 If the instrument turns off, 9-5 Incubation. See HOLD program, Hold time Indicator lights, 6-16, 10-2 Installation, 2-1—2-21 See also Configuration parameters configuring for a printer, 2-12—2-13 See also Configuration function configuring the instrument, 2-14—2-16 heater and chiller tests, 2-19—2-21 parts supplied, 2-2 power requirements, 2-4—2-5 precautions, 2-5 proper location of instrument, 2-5 setting up a printer, 2-6—2-13 115VAC printer, 2-6—2-13 230VAC printer, 2-10—2-13 unpacking, 2-2 Internet address Documents on Demand S-19 K Keypad, 1-4, 4-2 description of, 4-2—4-3 types of keys, 4-3 HOME option description of, 5-9 use in methods, 5-17 L Hot indicator light, 6-16 Link files display, 5-18 Humidity requirements for installation, 2-5 Loading a sample tray 96-position tray, 6-2—6-8 without samples, 3-22 I Idle state setpoint default value, 7-25 definition of, 7-25 Laboratory requirements, 2-5 Loading samples, 6-2—6-4 Low offset, 8-11 Index-5 M Main menu, 3-6 CREATE option, description of, 4-4 cursor on, 3-6 description of, 3-6, 4-4—4-5 EDIT option, description of, 4-4 getting to the, 4-4 options on, 4-4, 4-5 RUN option, description of, 4-4 selecting a function on, 4-5—4-6 selecting options on, 3-7, 3-7 using the STOP key to return to, 5-29 UTIL option, description of, 4-4 Maintenance procedures, 8-1—8-18 cleaning the sample block cover, 8-3 cleaning the sample wells, 8-2 temperature calibration verification test, 8-4—8-12 temperature uniformity test, 8-13 Messages in history file status records, 7-40 METH program description of, 4-14 selecting on main menu, 5-18 Method Program. See METH program Methods creating and editing, 5-17—5-27 summary of steps, 5-17 creating, 5-18—5-20 definition, 5-18 editing, 5-23—5-25 example printout, 5-26 linking files in, 5-18 printing, 5-25—5-27 program numbers in, 5-18 storing, 5-21—5-22, 5-24 MicroAmp reaction tubes changing the time constant, 7-30—7-31 installing caps on, 6-4 use in 96-position sample tray, 6-2 MORE key function of, 6-11 moving between two run-time displays, 3-26, 3-26, 6-18 O Offset definition of, 8-11 Oil. See Loading samples OPTION key changing a NO selection to YES, 3-18, 3-18 function of, 5-8 selecting options on main menu 3-7, 3-7 selecting utilities functions, 7-3 Ordering replacement parts, 2-3 Overshoot, 10-3, 10-4 Overwriting programs, 5-15 Overwriting protected programs, 5-15 P Pause during run in AUTO program, 5-43 in CYCL program, 5-36 PAUSE key, function of, 6-11 Pause time-out limit acceptable range, 7-22 changing, 7-22 default value, 7-22 definition of, 7-22 Pausing a run, 6-20 PCR method definition, 4-6 description of, 4-14 example of, 4-14 Index-6 PCR programs and methods overview of, 4-6—4-7 setting up, 5-1—5-45 PCR technique annealing step, 1-2 Denaturing step, 1-2 description of, 1-2 Extending step, 1-2 in AUTO program, 4-12 in CYCL program, 4-10 in HOLD program, 4-8 in methods, 4-14 Polymerase chain reaction, definition of, 1-2 Power interruption, 9-5 Power requirements, 2-4—2-5, 10-2 input voltages, 2-4 Power switch, location of, 3-5 Precautions, 2-5 Primer annealing. See PCR technique Primer extending. See PCR technique Printer cable connection, 2-7 Printer interface, 10-5 Printer Kit for 115VAC printer, 2-6 for 230VAC printer, 2-10 Printer setup and configuration, 2-6—2-13 See also Configuration function configuring for a printer, 2-12—2-13 connecting printer cable, 2-7 DIP switch settings and cable connections, 2-9 installing 115VAC printer, 2-6 Printer Kit, 2-6 serial adapter card, 2-6 installing 230VAC printer, 2-10 connecting a plug to 230V adapter, 2-10 Printer Kit, 2-10 serial adapter card 2-10 use of 230V adapter, 2-10 serial adapter card DIP switch settings, 2-8 serial adapter cards, 2-6 specifications, 10-5 PRINT on directory display, 7-15 on the directory display, 7-13—7-15 Printing a directory, 7-13—7-15 selecting a directory, 7-13 PRINT HISTORY display, 7-47 Printing methods, 5-25—5-27 METHOD option, 5-26 example printout, 5-26 PROGRAM DATA option, 5-26 example printout, 5-27 PRINT history file option, 7-45 Print mode available options, 6-14 CYCLE option, 6-14 OFF option, 6-14 SETPOINT option, 6-14 PRINT option See also Printing programs description of, 5-9 in methods, 5-25 in System Performance test, 7-55 selecting, 5-16 use in methods, 5-17 Printing configuration parameters, 7-34 Printing programs, 5-16 Printing the history file, 7-48—7-49 Probe tray, use in temperature calibration verification test, 8-5 Probe. See RTD probe PROG, on directory display, 7-4 Program not stored display, 5-28 Index-7 Program numbers assigning to methods, 5-21 assigning, 5-11 use in creating methods, 5-18, 5-45 use in deleting programs, 7-57 viewing a directory of programs by, 7-4—7-6, 7-6 Programming a pause in AUTO program, 5-43 in CYCL program, 5-36 Programs creating, 5-10 definition of, 1-5, 4-6 editing, 5-13—5-15 linking in methods, 4-6—4-7 overview of, 4-6—4-7 overwriting, 5-15 printing, 5-16—5-17 recalling, 5-30—5-31 running, 6-1—6-22 storing, 5-11—5-12, 5-14 types of, 1-5, 4-6, 4-7 Protected methods, 5-25 Protecting programs, 5-11 R Ramp time repeatability, 10-4 Ramp time, defining in CYCL porgram, 5-34 definition of, 3-4 Reaction volume, 7-29 Recalling programs, 5-30—5-31 Removing samples, 6-9 Removing the sample tray, 6-8 Retainer. See Sample tray retainer Reviewing the history file, 7-38—7-49 See also History file data records 7-42 status records, 7-39 Reviewing the history of a run, 6-22 RTD probe description of, 8-5 placing in sample wells A1 and A2, 8-14 placing in sample wells E1 and D1, 8-6 RUN key, function of, 6-11 RUN option description of, 5-9 in System Performance test, 7-55 on the main menu, 4-4 use in methods, 5-17 Running methods, specifying a method, 6-10 Running programs checking the start clock parameter, 6-12 in the Tutorial, 3-24—3-27 pausing a run, 6-20 RUN option, 6-12 run-time displays, 6-17—6-19 runtime keys, 6-11 selecting a print mode, 6-14 selecting sample tube type, 6-12—6-13 specifying a program, 6-10 starting a run, 6-11 stopping a run, 6-20 stored programs, 6-12 Running samples, 6-1—6-22 See also Running programs summary of steps, 6-1 Run-time beeper turning on and off, 7-20 Run-time display in CYCL program, 3-26, 6-18 use of the MORE key, 3-26, 3-26, 6-18 Run-time displays in CYCL and AUTO programs, 6-17 in CYCL program, 6-17 in HOLD program, 6-19 Index-8 Run-time displays, 6-17—6-19 Run-time printer mode turning on and off, 7-20 turning on, 2-13 Sample tray 96-position installing, 6-2, 6-3 loading without samples, 3-22—3-23 placing in the block, 6-5, 6-5 removing, 6-8 S Sample tray retainer installing, 6-4, 6-4 Sample block cover cleaning, 8-3 use in sample tray installation, 6-6 use in trial run, 3-23 use of cover knob, 6-7 Sample tube reaction volume, in configuration function, 7-29 Run-time keys, 4-3, 6-11 Sample block temperature idle state setpoint, 7-25 in chiller test, 7-53 in heater test, 7-51 in temperature calibration verification test, 8-7 range of, 10-3 uniformity of, 10-3 Sample block, 1-3 and target temperature, 5-2 general description of, 1-3—1-4 numbering of wells in, 6-2 Sample compartment, 10-1 sample tubes, 10-1 Sample temperature 5-2 accuracy of, 10-3 allowed setpoint error, 7-23 displayed, 10-3 in CYCL program 5-33 in HOLD program 5-31 overshoot, 10-3, 10-4 setting in AUTO program, 5-40 setting in CYCL program, 5-34 setting in HOLD program, 5-32 testing uniformity of, 8-13 verifying calibration of, 8-4—8-12 Sample tube time constant, specifying in configuration function, 7-30—7-34 Sample tube type, specifying in configuration function, 7-28—7-29 Sample tubes See also Loading samples, MicroAmp reaction tubes in configuration function, 7-28 installing caps on, 6-4 removing from sample tray, 6-9, 6-9 selecting type before a run, 6-12—6-13 Sample wells used in temperature calibration verification test, 8-5, 8-6 used in temperature uniformity test, 8-14, 8-16, 8-16, 8-16 Samples heating and cooling rate of, 10-4 loading, 6-2—6-4 removing, 6-9 Selecting a print mode, 6-14 available print options, 6-14 Selecting a utilities function, 7-3 Serial adapter card in printer installation, 2-6—2-7 setting DIP switches on, 2-6, 2-8 Setpoint clock, 7-26 changing the temperature interval, 7-26 temperature interval Index-9 temperature calibration, 10-5 default value, 7-26 temperature interval, 7-26, 7-26 Starting a run, 6-11—6-16 SETPOINT print option example printout, 6-15 Starting up the instrument, 3-5 STAT history file display option, 7-45, 7-47 SETPOINT print option, 6-14 STAT history file print option, 7-48 Setpoint time. See Hold time, Ramp time Setpoints defining number in AUTO program, 5-40 defining number in CYCL program, 5-34 in AUTO program automatic incrementing and decrementing of, 5-41 specifying a pause after, 5-44 in CYCL program, specifying a pause after, 5-37 in CYCL programs, 3-3 Setting hold times, 5-2—5-7 Status record display, 7-41 in a history file, 7-39 information in, 7-39 messages in, 7-40 STEP key accepting default values, 3-9 function of, 5-8 moving to the next display, 3-9, 3-13 selecting diagnostic tests, 7-36 use in directory function, 7-5 STOP key function as runtime key, 6-11 function of, 5-8 shortcuts, 5-28—5-29 Setting the time and date, 2-13, 7-18—7-19 Software basics of, 4-1—4-14 features of, 1-6 general description of, 1-5 shortcuts, 5-28—5-30 Stopping a run, 6-20—6-21 Specifications, 10-1—10-5 control panel, 10-2 display, 10-2 indicator lights, 10-2 keypad, 10-2 displayed sample temperature, 10-3 instrument dimensions, 10-1 power requirements, 10-2 printer interface, 10-5 ramp time repeatability, 10-4 sample block temperature range, 10-3 sample block temperature uniformity, 10-3 sample compartment, 10-1 sample heating and cooling rate, 10-4 sample temperature accuracy, 10-3 sample temperature overshoot, 10-3, 10-4 sample tubes, 10-1 STORE option description of, 5-9 selecting, 5-11 use in methods 5-17 Storing a method, 5-21—5-22 Storing a program, 5-11—5-12 assigning a program number, 5-11 entering user numbers, 5-12 protecting programs, 5-11 Storing methods, 5-24 System Performance test, 7-54—7-55 available options, 7-55 getting to, 7-54 viewing the results of, 7-55 Index-10 T Target temperature See also Sample temperature, Setpoints in CYCL programs, 3-4 See also Sample temperature use in Verify Calibration test, 7-56 Temperature, requirements for installation, 2-5 Test # 1. See Reviewing the history file Test # 2. See Heater test Technical support S-14—S-19 E-mail address S-14 Internet address S-18 Telephone/fax S-15—S-18 Test # 3. See Chiller test Temperature calibration specification, 10-5 Test results of temperature calibration verification test, 8-10 of temperature uniformity test, 8-17 Temperature calibration verification test, 8-4—8-12 See also Verify calibration test calculating results of, 8-10—8-12 equipment required, 8-4 first measurement in, 8-8 measurements in, 8-9 placing probe in sample wells, 8-6 sample block temperature in, 8-7 sample wells used in, 8-5 second measurement in, 8-9 use of Diagnostic Test #5, 8-7 Temperature interval. See Setpoint clock Temperature range, 10-3 Temperature uniformity test sample wells used in, 8-16 Temperature uniformity test, 8-13—8-17 calculating results of, 8-17 equipment required, 8-13 first measurement in, 8-15 measurements in, 8-15, 8-16 placing probe in sample wells, 8-14 procedure, 8-13—8-17 sample wells used in, 8-16, 8-16 second measurement in, 8-15 Test # 4. See System performance test Test # 5. See Verify calibration test Thin walled GeneAmp reaction tubes, changing the time constant, 7-32—7-34 Time constant. See Sample tube time constant Time. See Hold time, Ramp time Tray. See Sample tray Troubleshooting table, 9-2—9-4 Troubleshooting, 9-1—9-5 Tube type. See Sample tube type Tubes. See Sample tubes Tutorial, 3-1—3-27 about the, 3-1 before you start, 3-2 customizing a CYCL program, 3-14—3-19 getting to the CYCL program, 3-6—3-8 running a program, 3-24—3-27 starting a trial run, 3-22—3-27 storing a CYCL program, 3-20—3-21 viewing displays in CYCL program, 3-9—3-13 Temperature uniformity, 10-3 Two-temperature CYCL program, creating, 3-27 Temperature Verification System parts included, 8-4 TYPE, on directory display, 7-7 Index-11 by user number, 7-10—7-12, 7-12 U Viewing the history file, 7-44—7-47 Unpacking the instrument, 2-2 Unprotected programs, deleting, 7-61 User diagnostics. See Diagnostic tests User identification number. See User numbers W WWW address Applied Biosystems S-18 Documents on Demand S-19 User numbers, 5-12 use in deleting programs, 7-59—7-60 use in storing methods, 5-22 use in storing programs, 5-11 viewing a directory of programs listed by, 7-10—7-12 USER, on directory display, 7-10—7-12 UTIL option, on the main menu, 4-4 Utilities menu accessing, 7-2 functions on, 7-2 Utilities, 7-1—7-61 accessing, 7-2 Configuration function, 7-16—7-34 Delete function, 7-57—7-61 Diagnostic tests, 7-35—7-56 Directory function, 7-4—7-15 overview of utilities displays, 7-3 selecting a utilities function, 7-3 summary of functions, 7-2 V Verify Calibration test, 7-56 accessing, 8-6—8-7 VIEW option, in System performance test, 7-55 Viewing a directory by program number, 7-4—7-6, 7-6 by program type, 7-7—7-9, 7-9 Index-12 Headquarters 850 Lincoln Centre Drive Foster City, CA 94404 USA Phone: +1 650.638.5800 Toll Free: +1 800.345.5224 Fax: +1 650.638.5884 Worldwide Sales Offices Applied Biosystems vast distribution and service network, composed of highly trained support and applications personnel, reaches into 150 countries on six continents. For international office locations, please call our local office or refer to our web site at www.appliedbiosystems.com. www.appliedbiosystems.com Applera Corporation is committed to providing the world’s leading technology and information for life scientists. Applera Corporation consists of the Applied Biosystems and Celera Genomics businesses. Printed in the USA, 04/2001 Part Number 0993-8660 Rev. E an Applera business