1
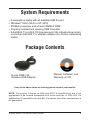
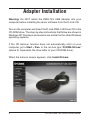
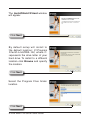
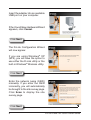
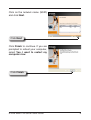
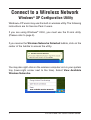
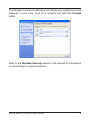
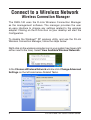
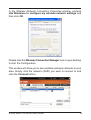
System Requirements
• A computer or laptop with an available USB 2.0 port
• Windows® 2000 (SP4) or XP (SP2)
• 300MHz processor and at least 32MB of RAM
• Properly installed and working USB Controller
• A draft 802.11n or 802.11b/g access point (for Infrastructure mode),
or another draft 802.11n wireless adapter (for Ad-Hoc networking
mode).
Package Contents
D-Link DWA-142
Wireless USB Adapter
Manual, Software, and
Warranty on CD
If any of the above items are missing, please contact your reseller.
NOTE: This product is based on IEEE draft 802.11n specifications and is not
guaranteed to be forward compatible with future versions of IEEE 802.11n
specifications. Compatibility with draft 802.11n devices from other manufacturers is
not guaranteed.
D-Link DWA-142 Quick Install Guide
Adapter Installation
Warning: Do NOT install the DWA-142 USB Adapter into your
computer before installing the driver software from the D-Link CD.
Turn on the computer and Insert the D-Link DWA-142 Driver CD in the
CD-ROM drive. The step-by-step instructions that follow are shown in
Windows XP. The steps and screens are similar for the other Windows
operating systems.
If the CD Autorun function does not automatically start on your
computer, go to Start > Run. In the run box type “D:\DWA142.exe”
(where D: represents the drive letter of your CD-ROM drive).
When the autorun screen appears, click Install Drivers.
D-Link DWA-142 Quick Install Guide
The InstallShield Wizard window
will appear.
Click Next
By default setup will install to
the default location: C:\Program
Files\D-Link\DWA-142, where C:
represents the drive letter of your
hard drive. To install to a different
location click Browse and specify
the location.
Click Next
Select the Program Files folder
location.
Click Next
D-Link DWA-142 Quick Install Guide
Insert the adapter into an available
USB port on your computer.
If the Found New Hardware Wizard
appears, click Cancel.
Click Next
The D-Link Configuration Wizard
will now appear.
If you are using Windows® XP
(SP2), you will have the option to
use either the D-Link utility or the
built-in Windows® Wireless utility.
Click Next
Enter the network name (SSID)
manually. If you enter the SSID
incorrectly, you will automatically
be brought to the site survey page.
Click Scan to display the site
survey page.
Click Next
D-Link DWA-142 Quick Install Guide
Click on the network name (SSID)
and click Next.
Click Next
Click Finish to continue. If you are
prompted to reboot your computer,
select Yes, I want to restart my
computer now.
Click Finish
D-Link DWA-142 Quick Install Guide
Connect to a Wireless Network
Windows® XP Configuration Utility
Windows® XP users may use the built-in wireless utility. The following
instructions are for Service Pack 2 users.
If you are using Windows® 2000, you must use the D-Link utility.
(Please refer to page 9).
If you receive the Wireless Networks Detected bubble, click on the
center of the bubble to access the utility.
You may also right-click on the wireless computer icon in your system
tray (lower-right corner next to the time). Select View Available
Wireless Networks.
D-Link DWA-142 Quick Install Guide
The Wireless Connection Manager will display any available wireless
networks in your area. Click on a network and click the Connect
button.
Refer to the Wireless Security section in the manual for information
on connecting to a secure network.
D-Link DWA-142 Quick Install Guide
Connect to a Wireless Network
Wireless Connection Manager
The DWA-142 uses the D-Link Wireless Connection Manager
as the management software. The manager provides the user
an easy interface to change any settings related to the wireless
adapter. Clicking on the D-Link icon on your desktop will start the
Configuration.
To disable the Windows® XP wireless utility, and use the D-Link
Wireless Connection Manager, follow the steps below:
Right-click on the wireless computer icon in your system tray (lower-right
corner next to the time). Select View Available Wireless Networks.
In the Choose a Wireless Network window click Change Advanced
Settings on the left side below Related Tasks.
D-Link DWA-142 Quick Install Guide
In the Wireless Network Connection Properties window, uncheck
Use Windows® to configure my wireless network settings and
then click OK.
Double-click the Wlreless Connection Manager icon on your desktop
to start the Configuration.
This window will allow you to see available wireless networks in your
area. Simply click the network (SSID) you want to connect to and
click the Connect button.
D-Link DWA-142 Quick Install Guide
10
If you are attempting to connect to a secure network, you must supply
the encryption key that is on the router or access point you are trying
to connect to.
Please refer to the manual on the CD for more information on Wireless
Security.
If the network you are connecting to is using WEP, enter the WEP
key for the network and click OK.
If the network you are connecting to is using WPA-PSK, enter the
passphrase for the network and click OK.
11
D-Link DWA-142 Quick Install Guide