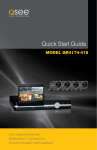
1
User Manual
QR-SERIES
H.264 NETWORK DVRs
1
About this Manual
Thank You for Choosing a Q-See Product!
All of our products are backed by a conditional service warranty covering all hardware for 12
months from the date of purchase. Additionally, our products also come with a free exchange
policy that covers all manufacturing defects for one month from the date of purchase.
Permanent upgrading service is provided for the software and is available at www.Q-See.com.
Be certain to make the most of your warranty by completing the registration form online. In
addition to warranty and technical support benefits, you’ll receive notifications of product
updates along with free downloadable firmware updates for your DVR. Register today at
www.Q-See.com!
This manual is written for the QR series of DVRs. Not all features and capabilities are shared
across all models so you may see features described which are not applicable or available on
your machine. In addition you may see screen images that do not exactly match those on your
display.
This manual was accurate at the time it was completed. However, because of our ongoing
effort to constantly improve our products, additional features and functions may have
been added since that time and on-screen displays may change. We encourage you to
visit our website at www.Q-see.com to check for the latest firmware updates and product
announcements.
Throughout the manual we have highlighted warnings and other important information that will
assist you in operating your new system in a safe and trouble-free manner. Please take the
time to read and follow all instructions and pay attention to alerts as shown below:
Please see the back of this manual for exclusions.
WARNING!
CAUTION: Boxes with this icon indicate warnings. To prevent
possible injury or damage to the product, read all warnings before
use.
The remote monitoring functions - including networking, monitoring the DVR over the Internet
and using smart phones - have been compiled in the separate Remote Monitoring Guide
which is included on the disk that accompanied your DVR. It is also available online at our
website, www.Q-See.com and can be found by looking up your product’s model number.
© 2010, 2011 Q-See. Reproduction in whole or in part without written permission is
prohibited. All rights reserved. This manual and software and hardware described herein, in
whole or in part, may not be reproduced, translated, or reduced to any machine-readable
form without prior written approval.
Trademarks: All brand names and products are trademarks or registered trademarks of their
respective owners.
Q-See is a registered trademark of DPS, Inc.
Disclaimer: The information in this document is subject to change without notice. The
manufacturer makes no representations or warranties, either express or implied, of any kind
with respect to completeness of its contents.
Manufacturer shall not be liable for any damages whatsoever from misuse of this product.
Rev. 1.1 3/24/2011
2
3
TABLE OF CONTENTS
TABLE OF CONTENTS
CONTENTS
FOR YOUR SAFETY
7
DVR Features
8
System Functions
Functions
8
Other Features 8
INSTALLING THE DVR
9
Install the Hard Drive
9
Connect DVR to Cameras
9
Connect DVR to External Monitor 9
Connect Power Supply STARTING THE DVR
10
18
18
19
19
20
20
20
Device Management
21
HDD Management
Set Alarm
Motion Detect
PTZ Setup
21
23
25
26
OPERATING THE DVR
27
Record
27
Stop Recording
27
PTZ Control
27
System Initialization
10
Main Interface Screen
10
Troubleshooting
11
Search Recordings
29
Video Loss
Alarm Sounds
11
11
Backup Recorded Files
30
Playback Software
31
Change To Full Screen View
CONFIGURING THE DVR
11
12
General
Cruise Setup
Multimedia Player Menu
Video Play Settings
Audio Settings
27
28
32
32
33
DVR Menu Overview
12
Pop-up Menu
13
Main Menu
13
Camera Setup
14
Operation Functions
35
14
14
15
15
Primary Settings
Advanced Settings
Network Settings
Network Functions
Auxiliary Functions
Menu Button
Basic Settings
35
35
36
36
36
36
36
Set Camera Name and Position Enable Live Viewing
Enable Auto-Sequence
Setup Color Hue, Brightness, Contrast and Saturation
Record Setup
Turn Camera Recording On/Off
Select Resolution
Quality
Audio
File Size
Customizing Record Mode
4
9
Setting The Date/Time
Password
Video Setup
Language Info System Maintenance
16
16
16
16
17
17
17
SPECIFICATIONS
34
APPENDIX
35
Setting up Alarm Record Mode
TROUBLESHOOTING
37
38
5
SYSTEM CONNECTIONS
39
Q-SEE PRODUCT WARRANTY
40
Questions or Comments? Contact Us
41
FOR YOUR SAFETY
To prevent damage to your Q-See product or injury to yourself or to others, read the
following safety precautions in their entirety before installing or using this equipment.
Keep these safety instructions where all those who use the product will read them.
Use the proper power source. Do not use this product with a power source that applies
more than the specified voltage (100-240V AC).
Never insert anything metallic into the DVR. Inserting anything into the DVR or its case
can be a source of dangerous electric shock.
Do not operate in dusty areas. Avoid placing the DVR in places that are dusty.
Do not expose this product to rain or use near water. If this product accidentally gets
wet, unplug it and contact an authorized dealer immediately.
Keep product surfaces clean and dry. To clean the outside case of the DVR, gently wipe
using a lightly dampened cloth (only use water, do not use solvents).
Do not attempt to remove the DVR cover. If there are any unusual sounds or smells
coming from the DVR, unplug it immediately and contact an authorized dealer or
service center. Warning: Do NOT remove the DVR cover as it may result in severe
electrical shock.
Handle DVR box carefully. If you accidentally drop your DVR on any hard surface, it
may cause a malfunction. If the DVR doesn’t work properly due to physical damage,
contact an authorized dealer for repair or exchange.
Use standard lithium cell battery (pre-installed). The standard lithium cell 3v battery,
located on the motherboard, should be replaced if the time clock resets during a power
outage. Warning! Unplug the DVR before replacing the battery or it may result in severe
electrical shock. Properly dispose of old batteries.
Make sure there is proper air circulation around the unit. This DVR system uses a hard
drive for video storage which generates heat during operation. Do not block air holes
located on the bottom, top, sides and back of the DVR as they are designed to keep the
system cool while running. Install or place this product in an area where there is ample
air circulation.
Provide proper ventilation. This DVR has a built-in fan that properly ventilates the
system. Do not cover or impede this fan.
6
7
DVR FEATURES
FUNCTIONS
INSTALLING THE DVR
WARNING!
Real-Time Monitoring: Supports Real-Time Surveillance via Monitor
Save Files: DVR Saves Real-Time Recording of Image Files to HDD
Caution: Always turn off the DVR’s power before installing or
removing the hard drive!
Backup Files: Supports DVR Backup of Recorded Image Files via USB Flash Drive and Hard
Drive
Playback Files: Supports DVR single CH and Multiple CH Playback of Recorded Files
Network Operation: Supports Remote Surveillance by Multiple Users Simultaneously
Alarm Setting: Supports HDD & video input alarm management and external alarm signal
inputs
Mouse Operation: Support for Faster Menu Navigation.
PTZ Control: Supports PTZ camera operations through RS-485.
INSTALL THE HARD DRIVE
1. Use the provided key to open the DVR’s Hard Disk Drive (HDD) drawer illustration
2. Remove screws and carefully open the top cover of the DVR illustration
3. Firmly connect the DVR’s power cord into its corresponding receptacle on the hard
drive illustration
4. Securely insert the data cable into its matching port on hard drive illustration
5. Carefully replace the top cover of the DVR and re-attach screws
CONNECT DVR TO CAMERAS
1. Connect the camera cable to the Video Input port on the DVR illustration
2. Follow same procedure for each camera
OTHER FEATURES
• H.264 Video Compression Format; Supports CIF, D1 and HD1 Resolution
• ADPCM Audio Compression Format
• Windows Graphics Interface
• BNC Video Out Port
• Supports Remote Live Viewing Via 3G Mobile Networks
• Email Notification Alerts when Motion is Detected by System
• Triplex Technology allows for Simultaneous Recording, Playback and
Internet Transmission
3. To connect a PTZ speed dome to the DVR System, connect the PTZ Camera data
cables to your RS485 A & B ports. Illustration See PAGEXXX for additional PTZ
Camera configuration instructions.
CONNECT DVR TO EXTERNAL MONITOR
Using the included BNC to RCA cable, connect the monitor to the Video Output port of the
DVR illustration
CONNECT POWER SUPPLY
1. Connect cameras’ power supply to outlet(s) illustration
2. Connect DVR power supply to outlet illustration
• Supports USB Mouse and IR Remote Control Operation
• Rear USB 2.0 Ports For Back-Up, Upgrade and Mouse Operation
• Supports Double Encoded Bit Network Transmission
• Adjustable Video Package Time
• Multiple Alarm Record Mode
• Multiple Language OSD (On Screen Display)
• Supports Auto Maintenance
8
WARNING!
Caution: Only use the power adapter supplied with your DVR
System. Failure to do so may result in system failure.
9
TROUBLESHOOTING
STARTING THE DVR
Video Loss:
SYSTEM INITIALIZATION
1. After connecting the power adapter, turn on the power button
2. The system will boot-up and launch a “System Initializing” message, as shown in
IMAGE 1.
If the system does not detect a video input, you will receive a “Video Loss” message for each
camera as depicted in IMAGE 3. Once the cameras have been connected, the Main Interface
screen will display a live feed from each camera in its respective box as shown in IMAGE 2.
Alarm Sounds:
If the first box on the Main Interface screen displays an “H” and an alarm sounds, the DVR
does not detect a HDD. To turn the alarm off, navigate to [Device Management, Alarm setting].
Choose the “off” option next to “HDD loss, HDD space not enough and alarm output”. Return
to the section on installing the DVR and ensure the HDD is installed correctly.
CHANGE TO FULL SCREEN VIEW
To change to a full screen view on one of the cameras, from the Main Interface screen, position the mouse over an image and double-click, as shown in IMAGE 4.
IMAGE 1
IMAGE 2
Double-click again to return to the multi-camera view (IMAGE 3).
MAIN INTERFACE SCREEN
Once the system initialization process is complete, the system will enter the main interface
screen (as shown in IMAGE 2).
IMAGE 3
10
IMAGE 4
11
POP-UP MENU
CONFIGURING THE DVR
The pop-up menu provides access to the Main Menu, Video Search, PTZ, Start Record,
Stop Record, Start Cruise, Start Auto Sequence, and Picture in Picture Mode options.
To display the pop-up menu, as shown in IMAGE 5: From the MAIN INTERFACE screen,
right-click the mouse
DVR MENU OVERVIEW
To exit the pop-up menu and return to the MAIN INTERFACE screen, click on any area outside
of the pop-up menu
COLOR SET
CAMERA
DWELL TIME DISPLAY
RECORD
NETWORK
SEARCH
SEARCH
PLAYBACK
LIST
FILE BACK-UP
IMAGE 5
IMAGE 6
MAIN MENU
HDD MANAGEMENT
MAIN MENU
ALARM SETTING
DEVICES
EMAIL
PTZ SETTING
To access the Main Menu (IMAGE 6) from the MAIN INTERFACE screen, right-click using the
mouse or select the Menu button on the front panel of the DVR.
MOBILE
MOTION
The Main Menu provides access to create management permissions, configure devices, customize recording parameters, and set system functions (such as time, date and passwords).
The Main Menu also allows access to controls for the camera, network, HDD, alarm, PTZ, and
mobile phone.
AREA SETTING
To navigate within the Main Menu:
DRAG AND CLICK MOUSE
TIME SETTING
USER PASSWORD
AUDIO/VIDEO SETTING
SYSTEM
LANGUAGE SELECT
SYSTEM INFORMATION
USE FWD AND REW BUTTONS ON DVR
USE FWD AND REW BUTTONS ON REMOTE
To return to the previous window within the Main Menu interface:
OPTION, RIGHT-CLICK “EXIT” WITH MOUSE
SELECT ESC BUTTON ON DVR
SYSTEM MAINTENANCE
12
13
CAMERA SETUP
Enable Auto-Sequence
Set Camera Name and Position
To set the system to automatically rotate the screen view image for each camera:
To set up the display name and position for each camera, complete the following instructions:
1. From the camera setup interface, select the AUTOSEQ button
1. From the Main Menu, select the camera icon
2. The AUTO ROTATION sub menu will appear (IMAGE 8)
2. From the camera setup interface (IMAGE 7), assign a name for each of camera, up to 8
characters long by highlighting the field next to the channel under the NAME column.
To enter letters, left click the mouse in the field to access the keyboard drop down.
3. Select the amount of view time, from 0 to 10 seconds, for each camera from
the drop-down list.
3. To select the camera’s position on the screen, select the arrow under the POSITION
column and select preference
4. Complete steps 2 and 3, for each camera
4. To set the rotation time for all cameras to 5 seconds, select DEFAULT.
5. When finished selecting times, select APPLY and then EXIT to close the AUTO
ROTATION menu
Note: changes will only be saved, when you select APPLY before exiting
5. Click APPLY, then EXIT
Enable Live Viewing
From the camera setup interface (IMAGE 7), enable live viewing for each camera.
1. From the Main Menu, select the camera icon
2. From the camera setup interface (IMAGE 7), select the arrow under the LIVE column
and select preference from the drop down menu
3. Complete step 2, for each camera
IMAGE 9
Setup Color Hue, Brightness, Contrast and Saturation
To adjust the image brightness, saturation, contrast and hue settings for each camera, from
the camera setup interface:
1. Under the COLOR column, select the SETUP button
2. The COLOR SETUP sub menu will appear (IMAGE 9)
3. Make desired changes by sliding the vertical line along each axis
4. Select DEFAULT to reset all values to the original factory installed settings
IMAGE 7
IMAGE 8
5. To close the window without applying changes, select EXIT, before selecting APPLY
6. To save changes, select APPLY
7. A prompt will appear to save your settings, select OK in order for the changes to take effect.
Note: changes will only be saved, when you select APPLY before exiting
14
15
RECORD SETUP
Audio
From the Record Setup menu turn the recording status for each camera channel on and off,
set the recorded image quality, enable audio recording, schedule recording times and set
recording file sizes.
Select enable or disable to turn the audio input on or off. When the audio is turned off,
the DVR system will not record audio and you will not hear sound during playback of your
recorded events.
To set up the recording options on DVR
File Size
1. From the Main Interface screen, go to the Main Menu
Select the FILE SIZE drop-down list to set the maximum recording time for all recorded files to
be 15, 30, 45 or 60 minutes in length
2. Select the RECORD icon to open the RECORD SETUP menu (IMAGE 10)
3. Select desired preferences or select DEFAULT to reset all values to the original factory
installed settings
4. To close the window without applying changes, select EXIT, before selecting APPLY
Customizing Record Mode
Select the REC MODE drop-down list and choose to record 24 hours a day, on a set schedule
or when motion is detected.
1. To record 24 hours a day, choose the ALWAYS option.
5. To save changes, select APPLY
6. A prompt will appear to save your settings, select OK in order for the changes to take
effect.
Note: changes will only be saved, when you select APPLY before exiting
2. To record on motion or a set schedule, select Time Schedule Record and select the
“Schedule” option and the SCHEDULE interface will open (IMAGE 11)
Note: For detailed motion detection setup, please read: “Device Management / Motion Detection”
3. Choose from the channel drop-down menu to adjust the recording options for all
cameras
4. Or to set the recording parameters for each camera separately choose each camera
from the drop down menu
5. To set up the recording by day use the drop down menus labeled “From” and “To” and
select times
6. Selecting the ALARM (motion record), GENERAL (always record) and NO RECORD
boxes allows further customization for each recording time and day
IMAGE 10
IMAGE 11
Turn Camera Recording On/Off
Select the arrow next to each camera from the top row labeled CHANNEL
Turn each camera to either ON or OFF
Select Resolution
Select D1, HD1 or CIF resolution option for each camera
7. The Default recording schedule is as follows:
HR 01:00 AM - 07:59 AM: NOT RECORDING
HR 08:00 AM - 18:59 PM: NORMAL RECORDING
HR 19:00 PM - 00:59 PM: ALARM RECORDING (RECORD ON ACTIVITY OR ALARM ONLY)
8. To close the window without applying changes, select EXIT, before selecting APPLY
9. To save changes, select APPLY
Quality
10. A prompt will appear to save your settings, select OK in order for the changes to
take effect.
Choose the quality of the recorded images for each camera (Best Good or Normal)
Note: changes will only be saved, when you select APPLY before exiting
16
17
SYSTEM FUNCTIONS
Password
The System Setup menu (IMAGE 25) provides access to configure the following system
settings: Date/Time, Password, Audio/Video, Language, System Info and System
Maintenance.
The Password Setup dialog box allows the user to enable or disable password protection and
set up an administrator password.
1. From the Main Menu, select SYSTEM to open the SYSTEM SETUP menu
2. Select PASSWORD to open the PASSWORD SETUP menu (IMAGE 28)
3. Change PASSWORD ENABLE setting to ON
4. Enter USER PASSWORD (up to 6 characters)
5. Enter ADMIN PASSWORD (up to 6 characters)
IMAGE 25
IMAGE 26
6. Select APPLY to save settings
7. Select EXIT to return to the SYSTEM SETUP menu
Setting The Date/Time
1. From the Main Menu, select SYSTEM to open the SYSTEM SETUP menu
2. Select DATE/TIME to open the TIME SETUP menu (IMAGE 26)
3. Enter the date and select the date format
4. Enter the time and select the time format
5. Select the time zone format (see IMAGE 27 for assistance in selecting the correct time zone)
6. Enable daylight savings time if applicable
IMAGE 28
IMAGE 29
7. Select DEFAULT to reset all values to the original factory installed settings
Video Setup
8. Select APPLY to save settings
9. Select EXIT to return to SYSTEM SETUP menu
*Note: The correct time zone must be selected from the Time Zone drop-down menu or the time
management software will not run properly. Follow the time zones as indicated on IMAGE 27. If necessary,
more information about time zones can be found at www.time.gov.
The Video Setup dialogue box allows the user to set the VGA resolution and PAL/NTSC
designation.
1. From the Main Menu, select SYSTEM to open the SYSTEM SETUP menu
2. Select VIDEO to open the VIDEO SETUP menu (IMAGE 29)
3. Select NTSC from the VIDEO SYSTEM drop down menu (NTSC is the standard in the USA)
4. Select APPLY to save settings
5. Select EXIT to return to the SYSTEM SETUP menu
IMAGE 27
18
19
Language
DEVICE MANAGEMENT
WARNING!
This DVR supports English, Spanish, Portuguese and French languages.
1. From the Main Menu, select SYSTEM to open the SYSTEM SETUP menu
The DEVICE MANAGEMENT menu, as shown in IMAGE 33, allows access to configure
the Hard Disk Drive, External Alarm, PTZ Cameras, Mobile Phone Monitoring, and Motion
Detection.
2. Select LANGUAGE to open the SYSTEM LANGUAGE menu (IMAGE 30)
3. Click the arrow next to the SYSTEM LANGUAGE drop down menu to select the
preferred language
4. Select APPLY to save settings (the selected language will go into effect after the
system is restarted)
5. Select EXIT to return to the SYSTEM SETUP menu
Info
The INFO panel allows the user to view the system’s device type, software version and MAC
address, as shown in IMAGE 31.
IMAGE 33
IMAGE 34
HDD Management
If a new hard drive is installed into this DVR, access the HDD Management menu after a new
HDD is installed.
HDD Status: If the new hard drive needs to be formatted, the system will automatically detect
and the alert will appear nest to HDD STATUS.
No Disk: The HDD STATUS will show NO DISK (as shown in IMAGE 34) if the hard drive is not
detected, indicating that it is not installed properly.
IMAGE 30
IMAGE 31
System Maintenance
The SYSTEM MAINTENANCE menu provides access to reset the DVR to factory default
settings, update the system software (firmware), and set the system’s auto-maintenance
feature.
1. From the Main Menu, select SYSTEM to open the SYSTEM SETUP menu
2. Select MAINTAIN to open the SYSTEM MAINTAIN menu (IMAGE 32)
3. To configure the DVR to automatically check for updates when the system is restarted,
click the arrow next to the SYSTEM MAINTAIN drop down menu, select ON
4. To manually check for system updates, select SYSTEM UPDATE
Not Format: If the HDD STATUS shows NOT FORMAT, the HDD disc needs to be formatted.
If the HDD STATUS shows NOT FORMAT, follow the instructions in the HDD FORMAT
paragraph in this section.
Normal: If the HDD STATUS shows NORMAL, the HDD disc does not need to be formatted.
Total Space indicates the total space size of the hard drive.
Free Space indicates the amount of unused space available on the hard drive.
Usable Rec Time indicates the amount of recording time remaining on the system based on
the current recording and resolution settings.
Overwrite allows the system to either automatically overwrite the oldest recorded files once
the hard drive is full or to turn off the automatic overwrite feature to prevent recordings from
accidentally being erased.
5. Select DEFAULT to reset all values to the original factory installed settings
6. Select APPLY to save settings
7. Select EXIT to return to the SYSTEM SETUP menu
20
21
1. From the Main Menu, select DEVICE to open the Device Mangement menu (IMAGE 33)
Set Alarm
2. Select HDD to open the HDD MANAGEMENT menu (IMAGE 34)
Alarm configuration options include: alarm buzzer notification for video loss, HDD connectivity
problem alerts, motion detection, and email notifications.
3. Next to OVERWRITE, click the arrow to access the drop down menu and select
ENABLE to turn on the automatic overwrite feature or select OFF to turn the feature
off
4. Select DEFAULT to reset all values to the original factory installed settings
5. Select APPLY to save settings
6. Select EXIT to return to the SYSTEM SETUP menu
HDD Format formats the HDD by erasing all of the data and files that are on the disc. Please
note: after installing a new hard drive, files cannot be recorded until the hard drive has been
formatted. To format the hard drive, use the following steps:
The DVR can be used in conjunction with motion sensors (not included) or the DVR’s built-in
motion detection settings can be used, which will signal if the DVR detects movement on one
of the cameras. The sensitivity can be adjusted to suit the specific situation.
To configure the alarm options:
1. From the Main Menu, select DEVICE to open the DEVICE MANAGEMENT menu
(IMAGE 33)
2. Click on the ALARM icon to open the ALARM SETUP dialogue box (IMAGE 35)
3. Use the following as a guide for selecting the preferred options
1. From the Main Menu, select DEVICE to open the Device Mangement menu (IMAGE 33)
2. Select HDD to open the HDD MANAGEMENT menu (IMAGE 34)
3. Click on HDD FORMAT button
4. A warning will appear asking: “All data wil be erased. Are you sure you wish to
format?”
5. To continue, click APPLY, then OK
6. When the formatting has been completed, a SUCCESSFUL FORMAT message will
appear and the system will automatically restart
USB Format formats USB devices by erasing all of the data and files that are on the USB
drive. To format the USB drive, use the following steps:
IMAGE 35
I/O Channel: The I/O channel indicates each camera
I/O Status: allows the configuration of each camera’s sensor alarm settings by selecting the
desired option from the drop down menu under each channel.
1. From the Main Menu, select DEVICE to open the DEVICE MANAGEMENT menu
(IMAGE 33)
• SENSOR: Select NORMAL-OPEN or NORMAL-CLOSE depending on the type of
sensor used.
2. Select HDD to open the HDD MANAGEMENT menu (IMAGE 34)
• OFF: Select OFF if either no external alarm sensors are being used or to use the DVR’s
built- in motion detection.
3. Click on USB FORMAT button
4. A warning will appear asking: “Formatting USB will erase all data. Are you sure you
wish to format?”
5. Click OK to continue
6. When the formatting has been completed, a SUCCESSFUL FORMAT message will
appear and the system will automatically restart
22
HDD Loss: The HDD Loss option enables an alarm notification when the system has its
connection with the HDD or that there is some sort of breach which has occurred between
your HDD and your DVR system.
• ON: Selecting ON from the HDD Loss drop down menu generates an alarm buzzer
when the connection to the HDD has been lost, is not detected, or needs to be
formatted.
23
• OFF: Selecting OFF from the HDD Loss drop down menu turns this buzzer notification off.
HDD Space: The HDD Space option enables an alarm buzzer when the HDD is running low
on available storage space.
Motion Detect
This DVR can be configured to detect motion using the following steps:
• ON: Selecting ON from the HDD Space drop down menu generates an alarm buzzer
when the HDD is running low on available storage space.
1. From the Main Menu, select DEVICE to open the DEVICE MANAGEMENT menu
(IMAGE 33)
• OFF: Selecting OFF from the HDD Space drop down menu turns this buzzer notification off.
2. Click on the MOTION icon to open the MOTION DETECTION dialogue box (IMAGE 38)
Video Loss: The Video Loss option creates a notification if the system loses video feed
for any reason, such as camera damage, disconnected camera cables or a power supply
malfunction.
• ON: Selecting ON from the Video Loss drop down menu generates an alarm buzzer
when video loss occurs.
• OFF: Selecting OFF from the Video Loss drop down menu turns this buzzer notification off.
Alarm Manager: The Alarm Manage options allow the configuration of how long the alarm will
send a signal to the output device, how long the buzzer will sound (if enabled), and how long
the system will record after the alarm ends.
• OUTPUT: Select 0 seconds, 10 seconds, 20 seconds, 40 seconds, or 60 seconds from
the Output drop down menu.
3. CH01-CH04 refers to each camera, which can be configured separately by defining
the settings under each column
4. Select ON or OFF from the STATUS drop down menu to enable or disable motion
detection on each camera
5. Select 1, 2, 3, or 4 from the SENSITIVITY drop down menu to set the sensitivity of the
motion detection (1 is the least sensitive and 4 is the most sensitive)
6. Click SETUP for each camera next to MD AREA, which allows you to define the area to
be detected for motion and when any object moves in the designated area, recording
will be triggered.
7. On the area selection grid (IMAGE 39), select each square to enable motion detection
for each area. Squares will turn red to indicate motion will be detected in that area.
Recording will not be triggered when motion occurs in areas that have not been
selected.
• BUZZER: Select 0 seconds, 10 seconds, 20 seconds, 40 seconds, or 60 seconds from
the Buzzer drop down menu.
• DURATION: Select 0 seconds, 30 seconds, 1 minute, 2 minutes or 5 minutes from the
Duration drop down menu.
24
IMAGE 38
IMAGE39
39
Image
25
PTZ Setup
If using a Point Tilt Zoom (PTZ) camera (not included), use the following instructions to
configure each PTZ camera:
1. From the Main Menu, select DEVICE to open the DEVICE MANAGEMENT menu
(IMAGE 33)
OPERATING THE DVR
RECORD
The DVR will start recording based on the settings that have been configured. To manually
record follow these steps:
2. Click on the PTZ icon to open the PTZ SETUP dialogue box (IMAGE 40)
3. Select the channel(s) associated with the PTZ camera(s) and configure all options
under that column
4. From the PROTOCOL drop-down menu, select Pelco-D or Pelco-P, to match the
settings on the PTZ camera
5. From the BAUD RATE drop down menu select 1200, 2400, 4800 or 9600, to match
the settings on the PTZ camera
6. From the STOP BIT drop down menu select 1 or 2, to match the settings on the PTZ
camera
7. From the PARITY drop down menu select None, Odd or Even Mark Space, to match
the settings on the PTZ camera
8. From the CRUISE drop down menu select ON or OFF, to match the settings on the
PTZ camera
9. Enter a number in the ADDRESS CODE, to match the settings on the PTZ camera
10. Repeat steps 4-9 for each PTZ camera connected to the DVR
1. From the MAIN INTERFACE screen, right click the mouse to open the pop-up menu
2. Select START RECORD
OR
1. On the FRONT PANEL of the DVR, press the RECORD button
STOP RECORDING
The DVR will stop recording based on the settings that have been configured. To manually
stop recording follow these steps:
1. From the MAIN INTERFACE screen, right click the mouse to open the pop-up menu
2. Select STOP RECORD
OR
1. On the FRONT PANEL of the DVR, press the STOP RECORD button
PTZ CONTROL
General
Once the PTZ camera has been connected and configured according to the instructions in the
DVR Setup section of this guide, the PTZ camera can be operated from the PTZ SETUP menu
(IMAGE 61). This screen enables the camera to zoom in and out, adjust focus and increase or
decrease the image brightness.
1. From the MAIN INTERFACE screen, use the mouse and right click to open the pop-up
menu
2. Select PTZ
IMAGE 40
IMAGE 41
After all of the settings and features have been configured, the DVR can be locked to ensure
nothing is changed accidentally.
Zoom: Next to the ZOOM option, select + to zoom in or the – to zoom out
Focus: Next to the FOCUS option, select + and – buttons to adjust the camera’s focus
Iris: Next to the IRIS option, select + to increase the brightness and select - to decrease the
brightness
1. From the MAIN MENU, use the mouse to right click
2. Select LOCK from the popup menu
3. To UNLOCK, the administrator password is required (IMAGE 41)
26
27
SEARCH RECORDINGS
To search previously recorded video, use the following steps:
1. From the MAIN MENU, select SEARCH to open the VIDEO SEARCH menu (IMAGE 43)
2. To search video by a specific date, enter the desired date into the VIDEO FILE field
by clicking on the left mouse button and entering the numbers from the drop down
keyboard
IMAGE 42
IMAGE 62
Cruise Setup
To configure the AUTO CRUISE function, open the CRUISE SETUP screen (IMAGE 43) by
clicking on the CRUISE SET button on the PTZ Setup menu (IMAGE 42).
Set: To set a stop point for the PTZ camera,
1. Select the PTZ camera from the channel drop down menu
2. Enter the bit quantity into the TOTAL field. (Get the bit quantity from the control board
on the PTZ camera
3. Set the cruise points by entering the number into the CUR POINT field. The system’s
default current cruise point (starting point) is 01. (Make your first cruise point, which is
the first stop on the cruise number 01, make the second stop 02, etc)
4. Enter the pause time for each stop in the STOP TIME field (This is the amount of time
you want the camera to stop at this point before going to the next stop point.)
5. Set the camera’s position by clicking the SET button and move the camera to the
desired position by using the arrows. Select the SET button again to save this
position.
6. To removes changes made to the settings, select CLEAN
7. Click the SAVE button for the set up to save the cruise settings.
The FILE LIST shows all available files by channel and type (all, normal, or alarm triggered files)
3. From the VIDEO SEARCH screen, select SEARCH, then select the FILE LIST button to
generate the FILE LIST submenu (IMAGE 44)
4. Search through the list of recorded files
The buttons on the FILE LIST interface are:
FIRST: This is the first page of recording history searched. When viewing other pages, clicking
the FIRST button returns the screen back to the first page.
PREV: Returns the screen to the previous page (except the first page).
NEXT: Moves the screen to the next page (except the last page).
LAST: When viewing other pages, clicking the LAST button takes the screen to the last page.
ALL (Select All): Selects all the events on current page.
REVERSE: Selects the opposite events than are currently selected.
The video can also be searched using the playback control bar on the DVR. It can be
searched at a normal speed, paused and played frame by frame. Recorded video files can be
searched at a forward frame rate of 2x, 4x, and 8x, at a slow play rate of 1/2x, 1/4x, and 1/8x.
When viewing recorded files in search mode, the system will return to the previous menu when
the end of the video is reached.
GOTO: Select the GOTO button to access specific pre-selected points
Note: this DVR model supports up to 100 pre-set points but the PTZ camera may be limited to different
number of pre-set points.
28
IMAGE 43
IMAGE44
29
BACKUP RECORDED FILES
PLAYBACK SOFTWARE
Back Up Files Manually:
To playback a file that has been backed up to a USB drive, use the following steps:
1. From the MAIN MENU, select SEARCH to open the VIDEO SEARCH menu (IMAGE 43)
1. Open the Playback Software program on your computer
2. From the VIDEO SEARCH screen, click search, then select the FILE LIST button to
generate the FILE LIST submenu (IMAGE 44)
2. Click on FILE and select OPEN LOCAL FILE to find/select the backup file (IMAGE 47)
This will generate a dialog box of all the files on the device or computer
3. Select an individual file by putting a check mark next to the desired file.
4. Select the file with .264 extension (IMAGE 48)
4. Select the BACKUP button
5. Click the OPEN button
5. The backup will begin and the progress will be tracked in the pop-up window as shown
in IMAGE 45
6. Select PLAY from the toolbar of the multimedia player (IMAGE 49) Doing this will
generate a pop up window with playback controls (IMAGE 50)
6. Once complete, the popup window will show backup successful message (IMAGE 46),
select OK to close the popup window
8. Click the
9. Select
button on the bottom of the multimedia player
button to start playing the file
NOTE: All files are automatically backup up using H264 compression, which can be converted to AVI using
the Multi Player program that comes with the DVR or through the net-viewer program. Once converted, files
can then be viewed through any program that supports the AVI file format
IMAGE 45
IMAGE 647
IMAGE 48
IMAGE 46
IMAGE 49
30
31
Audio Settings
Multimedia Player Menu
1.
2.
3.
4.
5.
6.
In the multimedia player interface, select SETTING from the toolbar
Select AUDIO CHANNEL SETTING
Select NORMAL VIDEO BAR (IMAGE 53)
Choose which audio channel to play from the CHANNEL drop down list (IMAGE 54)
Click on the box next to “The channel has sound data”
Click APPLY button then OK
NOTE: Setting changes will not take effect until the multimedia player is re-started.
IMAGE 50
The date of the recording is depicted in upper right hand corner
The 24H recorded timeline represents the time of the video in hours
The 0~60 minute recording timeline represents the time of the video in minutes
The green bar represents the length of time of the recorded video currently playing
1. Play
10. All the windows
2. Previously recorded file
11. Add window
3. Pause
12. Start
4. Stop
13. Cut
5. Previous frame / Next frame
14. Delete
6. Slow play, Normal play, Fast Play
15. Convert AVI
7. Next hour
16. On screen display
8. Capture picture
17. Mute
9. Reduce window
18. Volume adjust
IMAGE 53
IMAGE 54
Video Play Settings
1.
2.
3.
4.
5.
6.
In the multimedia player interface, select SETTING from the toolbar
Select VIDEO PLAY SETTING
Select NORMAL VIDEO BAR (IMAGE 51)
Choose which camera to play from the CHANNEL drop down list (IMAGE 52)
Click on the box next to “Play the Video”
Click APPLY button
32
IMAGE 51
IMAGE 52
33
SPECIFICATIONS
APPENDIX
Model Number QSDR74RTS
Video System NTSC or PAL
OPERATION FUNCTIONS
Video Compression Format H.264
Audio Compression Format 8kHz*16bit ADPCM
Video Input/Output 4-CH BNC Input / 1-CH BNC Output
Audio I/O 4-CH RCA Audio Input/ 2-CH RCA Audio Output
Display Resolution D1:704×576(PAL) 704×480 (NTSC)
Frame Rate Single CH PAL: 25 fps, NTSC 30 fps
Recording Resolution PAL: (CIF:352x288) | (HD1:704x288) | (D1:704x 576)
NTSC: (CIF:352x240) | (HD1:704x240) | (D1:704x 480)
Recording Frame Rate (Shared) PAL: (CIF:100fps) | (HD1:50fps) | (D1:25fps)
NTSC: (CIF:120fps) | (HD1:60fps) | (D1:30fps)
Hard Drive 1 SATA HDD, up to 1TB;USB removable HDD (Backup)
Recording Mode Constant/Scheduled/Manual/Motion Detection/Sensor Triggered/
Net-Viewer Recording
Record File Size 15/30/45/60 Min
Backup USB flash drive, Removable HDD, USB Burner and Network
Backup to AVI File Format
Playback Mode PLAY /SLOW /FWD/Frame by Frame
Primary Settings
Time Setting Setting system date, time and format and day-light saving time setting
Language Select Setting system language
Ch Setting Setting CH title and position; adjusting image color parameter value; setting CH
display to ON / Off and time display/recording time overlaying to On/Off.
Rec. Setting Setting image quality, resolution, volume, recording mode an pack time
Rec. Search Time based search, channel based search and rec. mode based search.
Rec. Playback Specified time playback, scheduled playback, file list playback
Playback Mode Play, play frame by frame, multi-speed forward and multi-speed rewind
File Backup USB flash disk and removable HDD backup, DVD recorder backup and network
download backup
HDD Manage Check HDD status, usage space, setting HDD auto-overwrite
Vid/Aud Setting Adjust VGA resolution, select system and volume control
Audio Input/Output 4-CH Input / 1-CH Output
Alarm Type Motion/Sensor Triggered/Video loss/HDD Space/HDD Loss
PTZ Control Built-in RS-485 port, supports PELCO-P & PELCO-D
USB 2.0 Port Supports USB Mouse, Removable HDD, USB Flash Drive to Backup
to AVI File and Upgrade System
Ethernet One RJ-45 10M/100M Self-Adaptable Ethernet Interface
Network Protocol Supports TCP/IP, DHCP, UDP, DDNS, PPPOE Network Protocol
Network Function Support Preview Live Display Remotely via Mobile Phone and
Real-Time Monitoring via IE-Based Browser and/or Network, and
Support Parameter Setting of DVR Remotely
Power Consumption 10-15 W (Excluding HDD)
Power Adapter DC 12V;5A
Advanced Settings
User Password Setting or modifying user password
Alarm Setting Setting HDD lost, HDD space, video loss, I/O status, alarm management and
Email alarm
Motion Detection Setting on/off status of MD; select sensitivity and setting motion detection area.
PTZ Control Selecting Channel and setting PTZ protocol, baud rate and PTZ address for the
Channel
MP Monitor Setting user name, password and server port.
System Setting system auto maintenance, maintenance time regularly, system upgrade,
Maintenance ex-factory default value recovery and manual restart system
Display Control PIP, ZOOM IN/OUT, Multiple Images display, Dwell time display and Cruise display
Working Temperature 50°F to 104°F (10°C to 40°C)
Working Humidity 10%~90%
Dimension (W x D x H) 15.75 x 11.25 x 2.75 in (400 × 286 × 70 [178 w/LCD up] mm)
34
35
Network Settings
Network And Selecting network mode and setting net-viewer port, web port, DNS and DDNS
Port Setting parameters
Network Functions
Live Display Real time video input remotely
Remote Recording Setting recording mode and status of DVR remotely
SETTING UP ALARM RECORD MODE
Use the chart below to determine the correct alarm mode. Once the alarm is triggered, the
alarm icon will appear, and when many alarms are triggered, alarm remarks will occur on the
screen.
AMR NLR
NOR
Alarm On Not Recording
Alarm Recording
Normal Recording
No Recording
Remote Playback Check local recording history via network
PTZ Control Remotely control PTZ camera, position, focus, zoom and iris etc.
Parameter Set Of Setting local CH display, recording, alarm, PTZ control parameter value via
DVR Remotely network
Network Download Backup recorded files via network
POWER ON
M
I/O Triggered Alarm
I
HDD Space Full
H
MD Alarm
ALARM
MODE HDD Loss,
Auxiliary Functions
RECORDING MODE
ALARM
ICON
RECORDING ALARM
SETTING
Video Loss
SCHEDULED
NOR
MANUAL
AMR
NLR
AMR
AMR
NLR
NLR
AMR
AMR
NLR
NLR
Video Loss
System Info Check device model, software version and MAC address
( ) Parenthesis Generally Indicates an Optional Parameter Value of Previous Menu
Menu Button
Confirm The button allows you save the modification of parameter value.
R
DVR is in recording mode
M
DVR is in recording mode
I
Motion alarm was triggered
H
Hard drive alarm has occurred.
Recover Default The button allows you recover default value of current menu or system
(The option will be effective once confirmed)
Exit Exit current menu
Basic Settings
Time Setting Adjust system time
HDD Manage Format HDD (The option will be effective after restart.)
Net Setting Set network type and web port (except of PPPoE, other type need forward web
port to router of DVR) (The option will be effective after restart.)
System Info Modify MAC address (The option will be effective after restart.)
Mp Monitoring
Other
36
Set relative parameters (The option will be effective after restart.)
PTZ setting, Recording set and Language select etc
37
TROUBLESHOOTING
Q: What can I do if the system does not detect the HDD?
A: Check the data and power cables and make sure they are securely connected.
Q: I am not getting any video signal on the DVR. What is wrong?
A: Check to make sure the cables are securely connected to the BNC ports on the DVR. You
can also try another cable to make sure there is not a problem with the cable. Make sure you
have selected the correct video format for your country (NTSC is standard USA format).
Q: Can the DVR have problems if it gets too hot? How can I prevent my system from
over-heating?
A: The DVR has a fan to help it dissipate heat while it is working. Please place the DVR where
there is good air circulation and away from high temperatures to increase the stability and
product life of your DVR.
SYSTEM CONNECTIONS
NOTE: This diagram is for reference only to show where to attach various devices to the DVR.
Your DVR will have a different combination and number of ports and likely in different locations
on the back panel. Cameras, external alarms, USB flash drives, monitors and computers are
not included with the standard DVR package.
Monitor
Network
EthernetCable
RJ-45
(BNC)
Power
Switch
Audio Audio
In
Out
Q: My remote control does not work when the DVR is in Live mode but the front panel
buttons are working. What is wrong?
A: Make sure nothing is blocking the LED on the remote or the DVR. If both are OK, check the
batteries of your remote.
Q: Can I use the hard drive from my PC in the DVR?
A: You can if the hard drive is the same type and the size supported by the DVR. However, once
you install the hard drive in your DVR, it will be formatted for use in the DVR and your PC will no
longer be able to read the hard drive.
Mouse
BNC Connectors
for Cameras
Alarm Output
Alarm Input
PTZ Support
Q: Do I have to stop recording to playback files on the DVR?
A: No you do not have to stop recording, the DVR will support both functions at the same time.
Q: Can I erase files from the hard drive of the DVR?
A: You can not erase individual files. You would need to re-format the hard drive which will erase
all of the files.
Q: Why can’t I log-in to the Net-Viewer program?
A: Please verify that the Net mode is correct, the cable to the RJ-45 port is securely connected
to the DVR and the router, and that you are using the correct password. Also check to make
sure your ActiveX controls are enabled and your pop-up blocker is turned off.
Q: We have attached a PTZ camera but cannot control it. What is wrong?
A: Verify that the protocol, baud rate, address and other settings on the PTZ camera match the
settings you have entered into the DVR setup. Make sure the data cables are securely attached
to the DVR’s RS485.
Q: Why does the Buzzer keep sounding?
A: Check to see if the Motion Detection option is enabled on your system and discern whether
or not your system has detected activity. If no motion has been detected, check to see if the
hard drive on your DVR has been recognized and that there is sufficient space available. Another
possibility to consider is that your cameras might have lost video. If this occurs, check the power
feed to the cameras and make sure that they are turned on.
38
39
Q-SEE PRODUCT WARRANTY
Thank You for Choosing a Q-See Product!
All of our products are backed by a conditional service warranty covering all hardware for 12
months from the date of purchase. Additionally, our products also come with a free exchange
policy that covers all manufacturing defects for one month from the date of purchase.
Permanent upgrading service is provided for the software.
Liability Exclusions:
Any product malfunction or abnormalities in operation or damage caused by the following
reasons are not within the free service scope of our company:
1. Equipment damage caused by improper operation.
2. Improper equipment operation environment and conditions (e.g., improper power,
extreme environmental temperatures, humidity, lightning and sudden surges of
electricity).
3. Damage caused by acts of nature (e.g., earthquake, fire, etc).
4. Equipment damage caused by the maintenance of personnel not authorized by Q-See.
5. Product sold over 12 months ago.
QUESTIONS OR COMMENTS? CONTACT US
MAILING ADDRESS
Q-See Products
Digital Peripheral Solutions, Inc.
8015 E. Crystal Drive
Anaheim, CA 92807
FAX
714-998-3509
WEBSITE
PRODUCT SUPPORT, DOWNLOADS,
FIRMWARE UPDATES
& MANUALS
www.Q-See.com
CUSTOMER SUPPORT
Live Chat at www.Q-See.com (M-F, 9-5 PST)
Email: [email protected]
Phone: 877-998-3440 (M-F, 9-5 PST)
www.Q-See.com
In order to fulfill the terms of your warranty, you must complete the registration process after
purchasing our product. To do this, simply fill out the User’s Information Card below and fax
or mail it in to us at the information listed below. You can also register the product by going to
the www.q-see.com website and clicking on the Register link.
40
41
Digital Peripheral Solutions, Inc.
8015 E. Crystal Drive
Anaheim, CA 92807
42