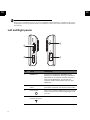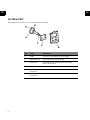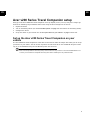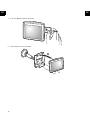
1
Acer v200 Series
Travel Companion
User Manual
EN
Copyright © 2007. Acer Incorporated.
All Rights Reserved.
Acer v200 Series User Manual
Original Issue: January 2007
Acer and the Acer logo are registered trademarks of Acer Inc. Other products or system names appearing in this document are
trademarks or registered trademarks of their respective owners. Further, the © or TM symbols are not used in the text.
Changes may be made periodically to the information in this publication without obligation to notify any person of such revision or changes. Such changes will be incorporated in new editions of this User's Guide or supplementary documents and publications. No part of this publication may be reproduced, stored in a retrieval system, or transmitted, in any form or by any
means, electronic, mechanical, photocopy, recording, or otherwise, without the prior written permission of Acer Inc.
DISCLAIMER AND LIMITATION OF LIABILITY
Acer and its subsidiaries makes no representations or warranties, either expressed or implied, with respect to the contents hereof and specifically disclaims the implied warranties of merchantability or fitness for a particular purpose. Acer and its subsidiaries assume no responsibility for any damage or loss resulting from the use of this Acer v200 Series Travel Companion User's
Guide.
NOTES
Record the device ID, serial number, purchase date, and place of purchase information in the space provided below. The serial
number is indicated on the label affixed to your Acer device. All correspondence concerning your unit should include the serial
number, device ID, and purchase information.
Acer v200 Series Travel Companion
Model number: __________________________________
Serial number: ___________________________________
Date of purchase: ________________________________
Place of purchase: ________________________________
EN
EN
Contents
Acer v200 Series Travel Companion feature highlights
Unpack the Acer v200 Series Travel Companion
First things first
System tour
Front and Rear panels
Left and Right panels
Top and Bottom panels
Car Mount Kit
Acer v200 Series Travel Companion setup
Set up the Acer v200 Series Travel Companion on your vehicle
Acer v200 Series Travel Companion fundamentals
Hardware interface
Charging your Acer v200 Series
System maintenance and user support
Using your Acer v200 Series Travel Companion safely
Troubleshooting your Acer v200 Series Travel Companion
Resetting your Acer v200 Series
FAQs
Customer support
System specifications
Performance
Display
Audio
USB connector
Expansion
Battery
Design and ergonomics
Environmental specifications
Information for your safety and comfort
Appendix A: Regulation & safety notices
FCC notice
Notice: Shielded cables
Notice: Peripheral devices
Caution
Operation conditions
Notice: Canadian users
Remarque à l'intention des utilisateurs canadiens
Declaration of Conformity for EU countries
LCD pixel statement
Federal Communications Comission Declaration of Conformity
EN
1
2
5
5
5
6
7
8
9
9
14
14
16
17
17
20
20
22
23
24
24
24
24
24
24
24
25
25
26
31
31
31
31
31
32
32
32
32
32
33
1
EN
Contents
2
EN
EN
EN
Acer v200 Series Travel Companion feature
highlights
No more fumbling with wieldy, outdated paper maps. No more sheepish "I think I'm lost" expression. And most
definitely, no more going in circles finding that particular spot. Get to your destination the fast and easy way
with your new Acer v200 Series Travel Companion.
Powerful system
•
•
•
Microsoft Windows CE .NET 5.0 operating system
Wide and accurate GPS coverage
Intuitive and Intelligent Navigation software
Mobile design
•
•
•
Compact and lightweight body makes it easy for users to carry it anywhere while driving or hiking
Car mount kit for multi-vehicle usage (windshield mounting)
On-the-road recharging via the car charger and USB cable
Battery life
•
Navigation software usage: 3 hours
Ergonomic features
•
•
•
•
•
3.5" QVGA (Transmissive with micro reflective; TMR) with touch panel
Accessible control hot keys for volume adjustment
Simple, easy-to-use user interface with large icons and command buttons
Multi-language support for user interface
Advanced power-saving options
1
EN
EN
Unpack the Acer v200 Series Travel Companion
Thank you for purchasing the Acer v200 Series Travel Companion. The Acer v200 Series Travel Companion box
contains all of the items listed below.
• Acer v200 Series Travel Companion unit
•
Car mount kit
• Car pedestal (Actual product might differ slightly from the illustrations)
•
2
Car Cradle
EN
EN
•
Map SD card
•
•
•
•
Acer v200 Series Travel Companion Starter Guide
Acer v200 Series Travel Companion Warranty Booklet
Navigation software Quick Starter Guide
Navigation software CD
Optional accessories:
Some optional accessories are standard accessories on some Acer v200 Series Travel Companion.
• External GPS antenna
•
GNS TMC receiver (applicable to model v210 only)
The car charger should be plugged into the GNS TMC module when you want to use it. The GNS TMC module
draws its power from the car charger and is not powered by the Acer v200 Series Travel Companion. For more
3
EN
EN
details on how to use the GNS TMC function, see your navigation software for more information. This function is
only available to model v210 only.
Report any product defects or missing items to the place of purchase immediately. Save the boxes and packing
materials for future use.
Some models may include optional accessories that might not be shown in the above illustrations. Please check
with your dealer for more details.
4
EN
EN
First things first
This section describes the hardware interface of the Acer v200 Series Travel Companion and its peripherals.
Instructions for setting up the device and some basic system operations are also discussed.
System tour
This section gives you a tour of the device hardware interface.
Front and Rear panels
No
.
Component
Description
1
LED Indicator
Display the status of the device:
• Green: Power on
• Red: Battery low
• Orange: Battery charging
2
3.5" TFT LCD (Finger-tap
Touch screen)
Displays the navigation software of your Acer
v200 Series.
3
Soft Reset button
Use to restore the device in the event the
device stop responding. See "Performing a
soft reset" on page 20 for more details.
4
Battery switch
Use to do a hard reset. See "Performing a hard
reset" on page 21 for more details.
5
Speaker
Outputs audio from your Acer v200 Series.
5
EN
EN
Note: For more information on how to use your Acer v200 Series Travel Companion in navigation mode, refer to
the Navigation software Quick Starter Guide or the Navigation software User's Guide (located in the Navigation
software CD).
Left and Right panels
6
No.
Label
Description
1
SD/MMC slot
Accepts a Secure Digital or MultiMedia Card,
allowing you to add more memory, install add-on
applications or use audio or text files stored on it
with internal applications. You can also use
expansion cards to back up data from your Acer
v200 Series.
2
Volume control
switch
Push up to increase the volume of the speaker,
push down to decrease the volume of the speaker.
3
Power button
Press to turn your Acer v200 Series on if it is off and
return to the last screen that was displayed, or off
if it is on.
4
External GPS
antenna connector
Connects to external GPS antenna (optional).
EN
EN
Top and Bottom panels
No.
Label
Description
1
mini USB
connector
Connects your device to a car charger to charge the
built-in battery.
2
Earphone jack
Connects to audio line-out devices (earphones).
3
Slots for car
cradle
Connects to the car cradle of the Car Mount kit.
7
EN
EN
Car Mount Kit
The Car Mount Kit consists of the car pedestal and the car cradle.
8
No.
Label
Description
1
Cradle
Connects the car pedestal to the car cradle.
2
Adjustment joint
Can be adjusted in eight directions.
3
Flexible rod
Can be adjusted to further enhance the viewing
comfort of the device.
4
Suction cup
Fixes the car pedestal on the selected mounting area.
5
Suction cup
release tab
Pull to release the vacuum seal of the suction cup.
6
Suction cup
locking lever
Secures the vacuum seal of the car pedestal.
EN
EN
Acer v200 Series Travel Companion setup
Using your new Acer v200 Series Travel Companion is a snap. Unpack, mount, turn on, and you're ready to go.
Perform the following easy installation tasks to start using the device straight out of the box:
1
Unpack the device
2
Turn on the Battery switch. (See "Front and Rear panels" on page 5 for the location of the Battery switch).
3
Configure the device.
4
Set up the device on your vehicle. See "To set up the device on your vehicle:" on page 11 more info.
Set up the Acer v200 Series Travel Companion on your
vehicle
The Acer v200 Series Travel Companion comes with a Car mount kit and a car charger with which you can set up
your device on your vehicle. You can choose to position the Car mount kit on the windshield using the suction
cup, or on the dashboard using the self adhesive power disc connector.
Some countries prohibit the mounting of any electronic device in any location on the vehicle dashboard. Be sure
to check your local laws for acceptable mounting areas before installing the Car pedestal bracket.
9
EN
EN
Some newer vehicle models may have a heat reflective shield embedded in the windshield. This may in some
cases obstruct the GPS signal reception. If you encounter this problem in your vehicle, you need to purchase an
external GPS antenna. For more information, contact your local Acer dealer.
10
EN
EN
Car mount kit installation reminders
Install the Car pedestal on the surface of your vehicle:
•
•
•
•
That is smooth, flat and free of dirt and oil
Where the driver can easily view/reach it without taking his/her eyes off too far from the road
Where the device will not obscure car controls nor restrict the driver's view of the road
Far from the air bag deployment area
To set up the device on your vehicle:
This section shows how to install the Car mount kit in your vehicle's windshield using the suction cup. For
dashboard installation procedures using the self adhesive power disc connector refer to the Acer v200 Series
Travel Companion Starter Guide.
1
Clean the mounting surface with a glass cleaner and a clean cotton cloth.
2
If the ambient temperature is below 15°C (60°F) warm the mounting area and the suction cup (e.g. with a
hair dryer) to ensure a strong suction bond.
3
Install the Car pedestal on the selected area.
a
Fix the suction cup to the selected area with the locking lever facing up.
b
Flip the locking lever away from you to create a vacuum between the suction cup and the mounting
surface.
c
Make sure that the suction bond is strong enough before proceeding to the next step.
d
Insert the pegs on the Car pedestal's cradle plate to the holes on the back of the car cradle, then move
the car cradle in the directions shown, until both parts are engaged.
11
EN
EN
4
Insert the Map SD card into the device.
5
Dock the device on the car cradle.
12
EN
EN
6
After setting up the device on the Car pedestal, connect the car charger.
If the car engine is turned off, you may be required to switch the vehicle ignition back into the Accessories
position. Consult your vehicle owner's manual.
The power LED indicator lights up orange during charging.
You can start using it once it is mounted in your vehicle and connected to the cigarette lighter. However, it is
recommended to charge your device to full capacity before using it the first time. When charging the device,
don’t switch off the battery switch.
13
EN
EN
Acer v200 Series Travel Companion
fundamentals
This section describes basic hardware procedures in using your Acer v200 Series Travel Companion. Information
on the device's command interface is also discussed.
Hardware interface
Using the SD/MMC slot
Your Acer v200 Series Travel Companion has an SD/MMC slot compatible with a range of SD and MMC storage
cards that you can use to back up or transfer files and data.
Also, the Acer v200's GPS navigation system has its core on the Navigation software program. Using this
program requires that users load the digital maps available in the Map SD card included with the device.
To insert a storage card:
Hold the device securely; then push the card into the slot until you hear an audible system sound; this will signal
that the card is already properly seated within the slot. The card is secure when it is not protruding from the
slot.
Correct SD card usage
Do not remove the SD card while the device is turned on. Only remove the SD card when the device is turned
off.
Back-up your SD card
Remember to back-up your SD card. All the information and data needed to run the software for the device are
inside your SD card. One way is to back-up your data to a PC.
14
EN
EN
To remove a storage card:
Hold the device securely; then push against the top of the card, as if you were pushing it further into the slot,
letting the card spring out. An audible system sound will signal that the card has been released. Gently remove
the card from the slot.
15
EN
EN
Charging your Acer v200 Series
For initial use, you need to charge your Acer v200 Series for 4 hours. Normally, you can use your Acer v200 Series
for 3 straight hours of operation before you need to recharge the battery.
Charging using the car adapter
1
Connect the car charger to the mini USB connector on the bottom of your Acer v200 Series.
2
Plug the car charger to the lighter outlet and charge the device for at least 4 hours. See "Car Mount Kit" on
page 8 for more instruction on mounting your device.
Power LED status during charging:
• Charging — LED indicator steady orange
• Charging complete — LED indicator steady green
Note: The battery switch should be turned on when you are charging your device.
Note: If you planned on not using your device for a long time, you should switch off the battery switch.
16
EN
EN
System maintenance and user support
This section contains information regarding system usage, maintenance, and troubleshooting. Lists of
frequently asked questions (FAQs) and user support contact information are also provided for reference.
Using your Acer v200 Series Travel Companion safely
The precautions and instructions stated in this Guide shall be executed in the English language. In the event of
any discrepancy between the English language original hereof and any translation hereof into any other
language, the English language original shall govern.
Driving precautions
When using the device in a vehicle, the vehicle operator is solely responsible for operating the vehicle in a safe
manner. It is your responsibility to comply with all traffic laws. Failure to follow the directions below could result
in death or catastrophic bodily injury to you or to others.
• Do not attempt to enter information or configure the device while driving. If you need to do so, pull
out of traffic and come to a stop in a legally permissible and safe location before using your device.
• Vehicle operators must maintain full surveillance of pertinent driving conditions at all times. Minimize
the need to view the device screen while driving and use voice prompts to guide you.
• Never place the device on the passenger seat or any place else in the car where it can become a
projectile during a collision or stop.
• An air bag inflates with great force. DO NOT mount the device in the area over the air bag or in the air
bag deployment area.
Although reasonable attempt has been made to ensure that the database in your Acer v200 Series Travel
Companion is accurate, such information may change from time to time. The Acer v200 Series Travel Companion
database does not include any of the following:
1
Legal restrictions (such as vehicular type, weight, height, width, load and speed restrictions)
2
Road slope, bridge height, weight or other limits
3
Construction work zones or hazards; road closures, traffic conditions
4
Weather conditions
5
Emergency events
It is your responsibility to disregard any unsafe, hazardous or illegal route suggestions. Your judgment and
common sense shall take precedence over any information that may be received through the use of your device.
Operating precautions
Device usage precautions
•
•
•
•
Do not use your device anywhere it may be exposed to water or in conditions of high humidity.
Do not expose the device to extreme temperatures, which could occur in a vehicle under direct sunlight.
Such exposure can shorten the life of the device, damage the plastic housing and/or battery, and increase
the risk of explosion. The operating temperature for the device is 0 to 40 Celsius.
Do not subject your device to sudden and severe temperature changes. This could result in moisture
condensation in the device that could cause damage to your device. In the event of moisture condensation,
allow your device to dry out completely.
Do not leave the device unattended on an automobile dashboard. When your vehicle is parked and the
17
EN
EN
•
•
•
•
device is not in use, protect it from theft and extreme heat by storing it in an unobtrusive location, away
from direct sunlight.
Your device is not a toy. Never allow children to play with your device.
Never touch the liquid that might leak from a broken liquid crystal display. Contact with this liquid could
cause a skin rash. If the crystal display liquid should come into contact with the skin or clothing, wash it
immediately with clean water.
Never raise the sound volume level too high when using the device with earphones. An excessive sound
volume level could cause damage to your hearing.
Never use the device's GPS inside an airplane.
Car mount kit precautions
•
•
•
•
•
•
18
Some countries prohibit the mounting of any electronic device in any location on the vehicle dashboard. Be
sure to check your local laws for applicable mounting before installing the Car mount kit.
Some newer vehicle models may have a heat reflective shield embedded in the windshield. This may in
some cases obstruct the GPS signal reception. If you encounter this problem in your vehicle, you need to
purchase an external GPS antenna. For more information, contact your local Acer dealer.
The heating and cooling cycle of a vehicle's interior will in some cases loosen the adhesion of the suction
cup. Check the vacuum seal of the Car mount kit for adequate adhesion each time you use the unit, and
reinstall it if necessary.
If the Car mount kit has problems staying on, clean the plastic suction cup with alcohol, then reinstall.
Moistening the suction cup may help adhesion in some cases.
To avoid extreme temperature from damaging the Car mount kit, remove the unit if the temperature inside
your vehicle exceeds 60°C.
The dip in humidity and temperature at night may loosen the adhesion of the suction cup. For this reason,
as well as for security, it is recommended that you remove both the Car mount kit and the Acer v200 Series
Travel Companion when leaving your vehicle overnight.
EN
EN
Storage precautions
•
•
Do not store your device anywhere it may be exposed to water or in conditions of high humidity.
When the device is not in use for an extended period of time, bring it indoors and store it in some location
with a temperature range of -10 to 60°C.
Accessories and repair precautions
•
•
Only Acer authorized accessories should be use with the device. The use of incompatible accessories could
result in bodily injury and/or damage to the device. The use of unauthorized accessories will also void your
warranty.
Never attempt to disassemble, repair or make any modification to your device. Refer all repair needs to your
local Acer dealer.
Cleaning your Acer v200 Series Travel Companion
•
•
Use a damp soft dry cloth to wipe the device's casing (not the display screen). Never use organic solvents
such as benzene or paint thinner to clean your device. Use of these solvents can cause deformation or
discoloration.
Use a soft, clean, lint-free cloth to clean the display screen. Moistened LCD screen wipes could also be used
as required.
19
EN
EN
Troubleshooting your Acer v200 Series Travel
Companion
Resetting your Acer v200 Series
You may have to perform a reset if your Acer v200 Series no longer responds to the buttons on the screen.
Performing a soft reset
A soft reset allows your Acer v200 Series to get a fresh start, similar to rebooting a computer. All records and
entries are retained after a soft reset.
To perform a soft reset:
1
Make sure that your device is turn on.
2
On the rear panel of you device, use a pen or the tip of the paper clip and press on the reset button to
execute a soft reset.
20
EN
EN
Performing a hard reset
A hard reset will erase the time and date in your Acer v200 Series. The device will take a little longer to reboot
when you do a hard reset. The device will then sync with the GPS time after receiving the GPS signal. Never
perform a hard reset unless a soft reset does not correct your problem. To perform a hard reset follow the
instructions below:
On the rear panel of you device, slide the battery switch down and up again to hard reset your device. See
illustration below.
21
EN
EN
FAQs
This section lists down frequently asked questions that may arise during the use of your Acer v200 Series Travel
Companion, and gives easy answer and solutions to these questions.
Why is there no sound coming from the device?
•
•
If the earphone is plugged into the device, the speaker is automatically shut off. Disconnect the earphone.
Check that the device’s volume is not set too low. Turn up the volume.
Why is it that sometimes my device takes longer than 5 minutes to get a GPS fix?
If the previous GPS fix position was more than 500 km or 12 hours apart from your current position and time, it
will take significantly longer than the standard TTFF time to get a GPS fix. This is due to the nature of the GPS
algorithm and rotational velocity between the satellites and planet Earth, and deemed normal and is not the
fault of your Acer v200 Series Travel Companion device.
How do I restore the system back to its default factory settings?
Performing a restore to factory default settings requires you to access the Navigation software settings. See your
Navigation software manual for more details.
Does performing a factory reset means a GPS reset as well?
Yes, it will reset the GPS settings.
What should I do if the system stops functioning normally?
Perform a soft reset on the device. Go to "Performing a soft reset" on page 20 for instructions.
I couldn’t turn on the device.
The battery power may be depleted. Recharge the device. Go to "Charging using the car adapter" on page 16
for instructions.
22
EN
EN
Customer support
Technical assistance
If you encounter a problem with your Acer v200 Series Travel Companion, review the following first:
• “FAQs” section
• Latest Acer v200 Series Travel Companion User’s Guide on your regional Acer website. Go to
http://global.acer.com/support/.
If the problem still persists, you will need technical assistance. Refer to
http://global.acer.com/about/webmaster.htm/ website for information on how and where to contact an Acer
Service Centers available in your area.
Product warranty
Refer to the Acer v200 Series Travel Companion Warranty Booklet for details on the warranty coverage of your
Acer v200 Series Travel Companion.
23
EN
EN
System specifications
This chapter lists the features and operating specifications of the Acer v200 Series Travel Companion.
Performance
• Centrality 300 MHz 32-bit RISC
• System memory:
• 64 MB SDRAM
• 64 MB NAND Flash ROM
• Microsoft® Windows CE.NET 5.0TM (with supports for seventeen European languages)
Display
• 3.5" QVGA (Transmissive with micro reflective; TMR) with touch panel
• 320 x 240 resolution
• 65536 (64K) color support
Audio
• Built-in 1W speaker
• 3.5 mm stereo earphone jack
USB connector
• 5 pin mini USB connector/charger
• USB power rating: 5V, 1A
Expansion
• SD/MMC slot for navigation software and maps
Battery
• Rechargeable 1100 mAh Li-Ion battery
• Battery life
• Navigation software usage: 3 hours
• 4-hour charging time from empty to full capacity
To avoid data loss, recharge the device within 30 minutes when the battery becomes low.
24
EN
EN
Design and ergonomics
• Thin, light and stylish design
Specifications
Dimensions
Length
95 mm
Height
79 mm
Depth
25 mm
Weight
172 g
• Special keys and buttons
•
Power switch
•
Volume control switch
•
Software reset button
•
Battery switch
Environmental specifications
Temperature:
• Operating: 0° to 40° Celsius
• Storage: -10° to 60° Celsius
Relative Humidity (non-condensing): 20% to 90% RH
25
EN
EN
Information for your safety and comfort
Safety instructions
Read these instructions carefully. Keep this document for future reference. Follow all warnings and instructions marked on
the product.
Turning the product off before cleaning
Unplug this product from the charger before cleaning. Do not use liquid cleaners or aerosol cleaners. Use a damp cloth for
cleaning.
Unplug this product during lightning storms or when unused for long periods of time.
CAUTION for Accessibility
Be sure that the power outlet you plug the power cord into is easily accessible and located as close to the equipment operator
as possible. When you need to disconnect power to the equipment, be sure to unplug the power cord from the electrical
outlet.
Warnings
•
•
•
•
•
•
Do not use this product near water.
Do not place this product on an unstable cart, stand or table. If the product falls, it could be seriously
damaged.
Slots and openings are provided for ventilation to ensure reliable operation of the product and to protect it
from overheating. These openings must not be blocked or covered. The openings should never be blocked
by placing the product on a bed, sofa, rug or other similar surface. This product should never be placed near
or over a radiator or heat register, or in a built-in installation unless proper ventilation is provided.
Never push objects of any kind into this product through cabinet slots as they may touch dangerous voltage
points or short-out parts that could result in a fire or electric shock. Never spill liquid of any kind onto or
into the product.
To avoid damage of internal components and to prevent battery leakage, do not place the product on a
vibrating surface.
Never use it under sporting, exercising, or any vibrating environment which will probably cause unexpected
short current or damage devices, and even exposure risk from lithium battery pack.
CAUTION for Listening
To protect your hearing, follow these instructions.
•
•
•
•
26
Increase the volume gradually until you can hear clearly and comfortably.
Do not increase the volume level after your ears have adjusted.
Do not increase the volume to block out noisy surroundings.
Decrease the volume if you can't hear people speaking near you.
EN
EN
Using electrical power
•
•
•
This product should be operated from the type of power indicated on the marking label. If you are not sure
of the type of power available, consult your dealer or local power company.
Do not allow anything to rest on the power cord. Do not locate this product where people will walk on the
cord.
Do not overload a power outlet, strip or receptacle by plugging in too many devices. The overall system
load must not exceed 80% of the branch circuit rating. If power strips are used, the load should not exceed
80% of the power strip's input rating.
Product servicing
Do not attempt to service this product yourself, as opening or removing covers may expose you to dangerous voltage points
or other risks. Refer all servicing to qualified service personnel.
Unplug this product from the wall outlet and refer servicing to qualified service personnel when:
•
•
•
•
•
•
the plug is damaged, cut or frayed
liquid was spilled into the product
the product was exposed to rain or water
the product has been dropped or the case has been damaged
the product exhibits a distinct change in performance, indicating a need for service
the product does not operate normally after following the operating instructions
Note: Adjust only those controls that are covered by the operating instructions, since improper adjustment of
other controls may result in damage and will often require extensive work by a qualified technician to restore
the product to normal condition.
Battery
This product uses a Lithium-Ion battery. Do not use it in a humid, wet and/or corrosive environment. Do not put, store or leave
your product in or near a heat source, in a high temperature location, in strong direct sunlight, in a microwave oven or in a
pressurized container, and do not expose it to temperatures over 60°C (140°F). Failure to follow these guidelines may cause
the Lithium-Ion battery to leak-acid, become hot, explode or ignite and cause injury and/or damage. Do not pierce, open or
disassemble the battery. If the battery leaks and you come into contact with the leaked fluids, rinse thoroughly with water
and seek medical attention immediately. For safety reasons, and to prolong the lifetime of the battery, charging will not occur
at low (below 0°C/32°F) or high (over 40°C/104°F) temperatures.
Additional safety information
Your device and its enhancements may contain small parts. Keep them out of the reach of small children.
Global Positioning System
The Global Positioning System (GPS) is a satellite-based system that provides location and timing information around the
globe. GPS is operated and controlled under the sole responsibility of the national government authority which is responsible
for its availability and accuracy. Any changes in GPS availability and accuracy, or in environmental conditions, may impact the
operation of your device. Acer cannot accept any liability for the availability and accuracy of GPS.
Use with Care
Use of this GPS device for navigation still means that you need to drive with due care and attention.
27
EN
EN
Mounting on a Car
Extreme care must be taken when mounting ACER v200 on a car. Read the description in "To set up the device on your
vehicle:" on page 11 carefully before mounting. ACER v200 shall be mounted in compliance with the relevant legislation and
the vehicle manufacturer’s rule. Failure to mount Acer v200 correctly could result in damage to your vehicle and serious injury
to the vehicle rider and other road users. ACER v200 is mounted on your car at your own risk.
Potentially explosive environments
Switch off your device when in any area with a potentially explosive atmosphere and obey all signs and instructions.
Potentially explosive atmospheres include areas where you would normally be advised to turn off your vehicle engine. Sparks
in such areas could cause an explosion or fire resulting in bodily injury or even death. Switch off the device at refueling points
such as near gas pumps at service stations. Observe restrictions on the use of radio equipment in fuel depots, storage, and
distribution areas; chemical plants; or where blasting operations are in progress. Areas with a potentially explosive
atmosphere are often, but not always, clearly marked. They include below deck on boats, chemical transfer or storage
facilities, vehicles using liquefied petroleum gas (such as propane or butane), and areas where the air contains chemicals or
particles such as grain, dust or metal powders.
Disposal instructions
Do not throw this electronic device into the trash when discarding.
To minimize pollution and ensure utmost protection of the global environment, please recycle. For more information on the
Waste from Electrical and Electronics Equipment (WEEE) regulations, visit
http://global.acer.com/about/sustainability.htm
Mercury advisory
For projectors or electronic products containing an LCD/CRT monitor or display:
Lamp(s) inside this product contain mercury and must be recycled or disposed of according to local, state or federal laws. For
more information, contact the Electronic Industries Alliance at www.eiae.org. For lamp-specific disposal information, check
www.lamprecycle.org.
Tips and information for comfortable use
Computer users may complain of eyestrain and headaches after prolonged use. Users are also at risk of physical injury after
long hours of working in front of a computer. Long work periods, bad posture, poor work habits, stress, inadequate working
conditions, personal health and other factors greatly increase the risk of physical injury.
Incorrect computer usage may lead to carpal tunnel syndrome, tendonitis, tenosynovitis or other musculoskeletal disorders.
The following symptoms may appear in the hands, wrists, arms, shoulders, neck or back:
•
•
28
numbness, or a burning or tingling sensation
aching, soreness or tenderness
EN
EN
•
•
•
pain, swelling or throbbing
stiffness or tightness
coldness or weakness
If you have these symptoms, or any other recurring or persistent discomfort and/or pain related to computer use, consult a
physician immediately and inform your company's health and safety department.
The following section provides tips for more comfortable computer use.
Finding your comfort zone
Find your comfort zone by adjusting the viewing angle using a footrest, or raising your sitting height to achieve maximum
comfort. Observe the following tips:
•
•
•
•
•
•
•
refrain from staying too long in one fixed posture
avoid slouching forward and/or leaning backward
stand up and walk around regularly to remove the strain on your leg muscles
take short rests to relax your neck and shoulders
avoid tensing your muscles or shrugging your shoulders
install the external display, keyboard and mouse properly and within comfortable reach
if you view your monitor more than your documents, place the display at the center of your desk to
minimize neck strain
Taking care of your vision
Long viewing hours, wearing incorrect glasses or contact lenses, glare, excessive room lighting, poorly focused screens, very
small typefaces and low-contrast displays could stress your eyes. The following sections provide suggestions on how to reduce
eyestrain.
Eyes
•
•
•
Rest your eyes frequently.
Give your eyes regular breaks by looking away from the monitor and focusing on a distant point.
Blink frequently to keep your eyes from drying out.
LCD Display
•
•
•
•
•
Keep your display clean.
Adjust the display brightness and/or contrast to a comfortable level for enhanced text readability and
graphics clarity.
Eliminate glare and reflections by:
placing your display in such a way that the side faces the window or any light source
•
•
minimizing room light by using drapes, shades or blinds
•
using a task light
•
changing the viewing angle
•
using a glare-reduction filter
Avoid adjusting your display to an awkward viewing angle.
Avoid looking at bright light sources, such as open windows, for extended periods of time.
Developing good work habits
Develop the following work habits to make your computer use more relaxing and productive:
•
•
•
•
Take short breaks regularly and often.
Perform some stretching exercises.
Breathe fresh air as often as possible.
Exercise regularly and maintain a healthy body.
29
EN
EN
Note: For more information, please refer to "Appendix A: Regulation & safety notices" on page 31.
30
Appendix A: Regulation & safety notices
FCC notice
EN
Appendix A:
Regulation & safety notices
This appendix lists the general notices of your PDA.
FCC notice
This device has been tested and found to comply with the limits for a Class B digital
device pursuant to Part 15 of the FCC rules. These limits are designed to provide
reasonable protection against harmful interference in a residential installation. This
device generates, uses, and can radiate radio frequency energy and, if not installed
and used in accordance with the instructions, may cause harmful interference to radio
communications.
However, there is no guarantee that interference will not occur in a particular
installation. If this device does cause harmful interference to radio or television
reception, which can be determined by turning the device off and on, the
user is encouraged to try to correct the interference by one or more of the following
measures:
•
Reorient or relocate the receiving antenna.
•
Increase the separation between the device and receiver.
•
Connect the device into an outlet on a circuit different from that to which
the receiver is connected.
•
Consult the dealer or an experienced radio/television technician for help.
Notice: Shielded cables
All connections to other computing devices must be made using shielded cables to
maintain compliance with FCC regulations.
Notice: Peripheral devices
Only peripherals (input/output devices, terminals, printers, etc.) certified to comply
with the Class B limits may be attached to this equipment. Operation with noncertified peripherals is likely to result in interference to radio and TV reception.
Caution
Changes or modifications not expressly approved by the manufacturer could void the
user's authority, which is granted by the Federal Communications Commission, to
operate this computer.
31
EN
EN
Appendix A: Regulation & safety notices
FCC notice
Operation conditions
This device complies with Part 15 of the FCC Rules. Operation is subject to the
following two conditions: (1) this device may not cause harmful interference, and (2)
this device must accept any interference received, including interference that may
cause undesired operation.
Notice: Canadian users
This Class B digital apparatus complies with Canadian ICES-003.
Remarque à l'intention des utilisateurs canadiens
Cet appareil numérique de la classe B est conforme a la norme NMB-003 du Canada.
Declaration of Conformity for EU countries
Hereby, Acer, declares that this notebook PC series is in compliance with the essential
requirements and other relevant provisions of Directive 1999/5/EC. (Please visit http://
global.acer.com/products/pda/reg/index.htm for complete documents.)
Compliant with Russian regulatory certification
LCD pixel statement
The LCD unit is produced with high-precision manufacturing techniques. Nevertheless,
some pixels may occasionally misfire or appear as black or
red dots. This has no effect on the recorded image and does not constitute
a malfunction.
32
EN
EN
Appendix A: Regulation & safety notices
Federal Communications Comission Declaration of Conformity
Federal Communications Comission Declaration of
Conformity
This device complies with Part 15 of the FCC Rules. Operation is subject to the
following two conditions: (1) This device may not cause harmful interference, and (2)
This device must accept any interference received, including interference that may
cause undesired operation.
The following local manufacturer/importer is responsible for this declaration:
Product name:
PDA
Model number:
v200
Machine type:
v200
SKU number:
v2xxx (“x” = 0~9, a ~ z, or A ~ Z)
Name of responsible
party:
Acer America Corporation
Address of responsible
party:
2641 Orchard Parkway
San Jose, CA 95134
USA
Contact person:
Mr. Young Kim
Tel:
408-922-2909
Fax:
408-922-2606
33
EN
EN
Appendix A: Regulation & safety notices
Federal Communications Comission Declaration of Conformity
EN
Acer Computer (Shanghai) Limited
3F, No. 168 Xizang medium road, Huangpu District,
Shanghai, China
Declaration of Conformity
We,
Acer Computer (Shanghai) Limited
3F, No. 168 Xizang medium road, Huangpu District,
Shanghai, China
Contact Person: Mr. Easy Lai
Tel: 886-2-8691-3089 Fax: 886-2-8691-3000
E-mail: [email protected]
Hereby declare that:
Product:
Trade Name:
Model Number:
SKU Number:
Travel Companion
Acer
v200
v2xxx (“x” = 0~9, a ~ z, or A ~ Z)
Is compliant with the essential requirements and other relevant provisions of the following EC directives,
and that all the necessary steps have been taken and are in force to assure that production units of the
same product will continue comply with the requirements.
EMC Directive 89/336/EEC, amended by 92/31/EEC and 93/68/EEC as attested by
conformity with the following harmonized standards:
-. EN55022:1998 + A1:2000 + A2:2003, AS/NZS CISPR22:2002, Class B
-. EN55024:1998 + A1:2001 + A2:2003
-. EN61000-3-2:2000, Class D
-. EN61000-3-3:1995 + A1:2001
Low Voltage Directive 2006/95/EC as attested by conformity with the following
harmonized standard:
-. EN60950-1:2001
RoHS Directive 2002/95/EC on the Restriction of the Use of certain Hazardous
Substances in Electrical and Electronic Equipment
_______________________________
Easy Lai / Director
Acer Computer (Shanghai) Limited
34
EN
EN
Index
display 24
expansion 24
R
B
Resetting 20
back-up your SD card 14
S
C
system tour
front and real panels 5
left and right panels 6
top and bottom panels 7
Car Mount kit 8
customer support 23
F
Features
audio 24
battery pack 24
connectivity 24
T
travel companion features
ergonomics 25
1