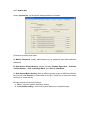
1
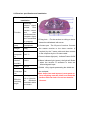
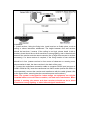
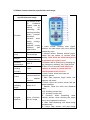
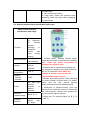
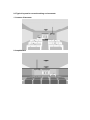
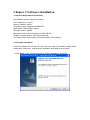
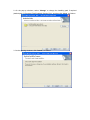
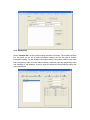
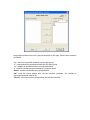
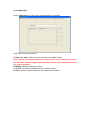
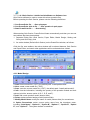
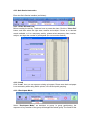
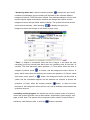
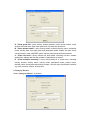
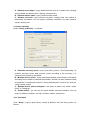
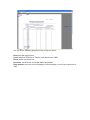
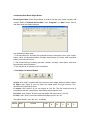
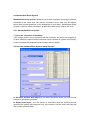
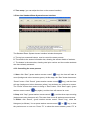
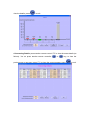
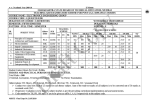
IQ Feedback Voting System User Manual Copyright(C) 2007 A Brighter Image Pty Ltd Web: www.abimage.com.au or www.iqboard.com.au Tel: +02 9938 6866 Fax: +02 9938 6899 E-mail: [email protected] Important Statements: 1. Use this product strictly in accordance with the detailed operation instructions in this User Manual to ensure proper use. Please read the instructions thoroughly to save installation time. 2. If this product is defective, please return it to the appointed agent or our company, together with your original sales receipt or invoice for replacement. 3. A Brighter Image Pty Ltd is not liable for any consequential, incidental or indirect damages (including damages for indirect personal injury, loss of business profits, business interruption, loss of business information and the like) arising out of the use or inability to use this product. 4. The product includes enclosed software, later software updates as well as correlative electronic documents and printed material. By installing, copying, downloading, visiting or using this product in any way, you agree to the terms and conditions of all the clauses in this user manual. The agreement on these clauses has the same effect as one signed through formal negotiation. You may not use this product unless you have agreed to all the clauses in this user manual 5. A Brighter Image Pty Ltd. will not accept returns of opened packages. 6. Special Notice ● Please do not deliberately interfere with, or use any tool or software to destroy the product’s normal running, or run FDISK/MBR, Repartition, or Low Level Format after boot from FD or CD. Otherwise this company assumes no liability for all losses arising therefrom, express or implied. ● Please do not use this product with highly sensitive applications without authorization of A Brighter Image Pty Ltd. Otherwise this company assumes no liability for all losses arising herefrom, express or implied. ● Regular backup of important data is necessary when using this product. A Brighter Image Pty Ltd does not undertake any compensation responsibility for any losses of HD arising from insufficient backup. Copyright Your purchasing of this product does not mean A Brighter Image Pty Ltd has transferred the Intellectual Property Rights. The product (includes but not limited to any trademarks, images, photos, flash, video, recorded music, writing and additional procedures, and other relative products), enclosed printing material, and any copies made under authorization from A Brighter Image Pty Ltd are products of A Brighter Image Pty Ltd and their Intellectual Property is owned by A Brighter Image Pty Ltd. The name of this product and all its copies are consistent in CD and the manual. The framework, organization and source code of this product are may not be transferred. This product is protected by PRC Copyright Law, related international treaties, and Australian laws. No part of the product may be copied, modified, rented, leased, transferred in any ways without the writing permission or authorization of A Brighter Image Pty Ltd. You are allowed to use one product on one computer only. Any reverse engineering, re-compiling, and decoding of this product, and retrieving the source code of the product by other ways is also prohibited. Any modification of Copyright marks, product names and brand names of this product and its copies is strictly prohibited. A Brighter Image Pty Ltd reserves all rights to charge the fee at anytime for product replacement, revision and update. The information in this document is subject to change at anytime without notice. Chapter 1 System Introduction 1.1 Brief Introduction The IQ Feedback Voting System is also named Telecontrol Electronic Voting System. It is an interactive demonstration and voting system developed by A Brighter Image Pty Ltd in conjunction with Returnstar Electronic Information Co., Ltd with its patented technology. It is a revolutionary system which combines the functions of class teaching, conference demonstration, poll voting, games entertainment, teaching evaluation, and outcome statistics together, and enables interactive teaching or demonstration in classes and assembly rooms equipped with a computer. Its powerful advantages are: 1. Low cost: A computer with a projector is the equipment required, and in conjunction with the IQ Feedback, the classroom or assembly room will be changed into an interactive multimedia classroom or examination room. 2. Excellent interactive effect: IQ Feedback changes the traditional “force-feed” teaching method, by introducing interaction, resulting in improved student enthusiasm and involvement. 3. Save Effort and Improve Lesson Effectiveness : The system is easy to install and operate, and doesn’t interfere with other teaching systems. The Teacher can prepare a lesson using PowerPoint, edit test papers etc or use courseware designed on the basis of PowerPoint platform (Such as TestGen_MAC etc) using IQ Feedback. The system will mark test papers and analyze the answers, and then evaluate the effectiveness of the activity, from which the Teacher can adjust the teaching content or process accordingly. You no longer waste time on marking. Hence, the simple and wieldy system will soon replace the traditional methods as one of the major instruments for the modern remote or field teaching and training, conference etc. It can be applied into various teaching and demonstration situation of different industries such as classroom, auditorium in school training centre, company boardroom, TV studio etc. 1.2 Functions The system functions include: Normal Quiz, Rush Quiz, Elimination, Vote Query, Voting investigation, Grade, AD-lib Quiz, Hand-raise (preemptive speaking), Roll Call, and Group Activity. The paperless activities will speed up & improve class activities, and increase the enthusiasm of the participants. The system also provides powerful report statistics and query functions. It will automatically generate complete and accurate various report formats as required by the teacher. It also offers enables the creation and browsing of report forms. It will automatically generate the forms for the Teacher after inputting the necessary information including: Class grade list, Class answer detail, Student score ledger, Student answer detail, Quiz answer detail, Question accuracy queue, Class roll book, Student roll book. In addition, the system will automatically generate Answer sheets and Ranking tables for each activity which could help the Teacher better understand the student results. Also, the system will generate result lists instantly for Vote Query and Grade. The software is embed-designed and based on Microsoft PowerPoint. It has strong functionality in test paper editing, courseware making, auto-play, and free input & output of multimedia signals. 1.3 Application Example 1.3.1 Teaching Application 1. Before the lesson Making multimedia courseware Teachers should be familiar with the PowerPoint operation other basic Powerpoint training is necessary. A quality interactive lesson can be easily prepared with only basic Powerpoint knowledge. The IQ Feedback system supports all types of multimedia files including text, picture, video, voice, flash film, etc., This enables the Teacher to utilize all available multimedia materials for teaching. The Teacher can compose teaching lessons using classwork or download resources from the internet for teaching use. The multimedia content and instant feedback will improve students’ enthusiasm, and the interaction of class greatly. With the test paper editor, the Teacher can preset the answers and generate marks for each subject rather than wasting time marking students’ answers. There are different templates for selection in the test paper editor such as select one correct answer from two options, three options, four options… etc. 2. During the teaching process Interactive Lecture Using PowerPoint, the Teacher can utilise any activity such as interactive ask and answer, test, voting and preemptive answer and so on, to involve the students and generate their interest. The teacher can move around the classroom to enhance the interaction and control the teaching process using master remote control. Interactive Answer Research has shown that the audience’s attention and memory can be improved by 3 to 5 times using interaction techniques. The IQ Feedback provides the techniques for involving the students. With the remote control, even timid or inarticulate students can express their opinions easily by pressing their remote controls. There will be no more “hiding” by such students, and will change the common problem where only a few students interact with the teacher. Lesson Evaluation Instant feedback for each question will be recorded (via the PC) and output into a diagram. Therefore, the results from each person will be clear at a glance. These results can be used to evaluate the students’ understanding, and effectiveness of the teaching method can be objectively assessed. By answering questions using the remote controls, the students will react instantly according to their understanding of the topic. Therefore, it helps the teacher better understand the comprehension of the students and adjust the teaching process accordingly. Other students can also be asked to comment on specific answers to a question, enhancing the students’ involvement and increasing interactivity. It also allows students to discuss a topic in groups, to develop skills as working as part of a team. Examination The Teacher can prepare the test paper using multiple choice format for the exam. Then the students select the answer in the test paper by remote control. IQ Feedback will collect, mark and print the answers automatically. The system will mark the test paper automatically and generate the results using a range of standard formats. The students will get the results immediately. Teaching Effect Evaluation IQ Feedback is also a poll voting system. When the voting begins, the only thing the participants have to do is to press relevant button on the remote controls. The computer will count the voting results instantly. It simplifies the work of voting greatly. 3. After the Lesson Clear Evaluation IQ Feedback will record all the results from the teaching process. It offers the Teacher comprehensive, precise and objective data about the students’ learning experience to and reduce the Teacher’s workload. The Teacher can browse the results by student, class, activity and so on. And the Teacher can also print out the forms for parents to understand their children’s results. The various report forms offer the Teacher objective information for evaluating the students results, and free up time to dedicate into the teaching process. The stored feedback information can be analyzed by the Teacher to determine the requirements in the next stage of lesson preparation. It helps students review the questions during the lesson. Students who did not understand the lesson contents during the lesson, or absent students, can be given additional coursework for self-study. Compared to traditional teaching methods, the above features also have several extra advantages: 1) interactive lessons can be held with extra students if required, and 2) the Teacher can fully understand the students’ learning level. 1.3.2 Polling Application IQ Feedback is also a Polling System. When voting or polling, the participants only need to press the button on their remote controls. The computer will prepare statistics of the voting result automatically. It is precise and convenient for use. Chapter 2 Hardware Installation IQ Feedback consists of a Master Remote Control, Student Controls, Signal Receiver and relative software. It is based on the platform of PowerPoint for instant interaction. The Teacher can use PowerPoint for eleven work modes such teaching and conference topic explanation, interactive ask and answer, class testing, and poll voting, etc., by pressing the buttons on the master control. The signal receiver will receive (or stop receiving) the feedback signals emitted from the student controls automatically and the result can be displayed in different graphic formats instantly. 2.1 Standard Configuration 1. One Signal Receiver (An additional slave Receiver may be required for large or unusual shape rooms); 2. One power adaptor; 3. One Installation CD; 4. One user manual; 5. One cable for connection with the computer (15m); 6. One cable (7m); 7. One Teacher Remote Control; 8. Thirty Student Remote Controls (other size systems and spare remotes available); 9. One List of Serial Number Label (sixty S/Ns, incl ten of them is empty for spares); 10. One warranty card. 2.2 Receiver specification and installation Receiver specification and installation Dimension (mm) Receiving infrared signal emitted from remoter control and then transformed into computer signal and transmitted 1. Fixing hole: Fix the receiver to ceiling or above to computer. interactive whiteboard with screw. 137×137×50 2. Connect port:The I/O port of receiver. Connect Hemisphere Weight 180g Working temperatu re 0-40 °C Working relative humidity 0-90% Power DC12V Function Power Consumpt ion Effective receiving angle the master receiver to the slave receiver (if required) by the 7-metre cable and then connect to the computer by the 15-metre cable. 3. Power indicator light(red):Indicate Power On/Off 4. Status indicator light (green): the light will flicker when the receiver is activated or there are infrared signals input. 5. Shield:Only signals penetrating the shield can 5W 45 degrees for left or right side, all directions permitted within one metre. be receipted. Note: keep clean and exposed; never paste or cover anything onto the shield, and clean the surface with wet cloth. Do not use abrasive cleaners. Installation: 1. Install receiver: Using the fixing hole, install receiver to fixable place, such as ceiling or above interactive whiteboard. The height between floor and receiver should be less than 3 metres (if the ceiling is too high, please install it with a bracket); there should be no direct sunshine or strong lighting, and no barrier block between the receiver and the remote controls (line of sight from remote to receiver necessary). If a slave receiver is required, it the fixing location of two receivers should be in line(master receiver in front centre of classroom or meeting room, above teacher’s desk, the slave receiver in the back of the room. 2. Connect the mainframe connection cable to computer RS232 port (any port of COM1-COM4 is OK), insert the transformer into 240V socket (socket with switch is recommended), connect the receiver and transformer with the cable (please refer to the figure above, ensuring that the connection ports are functional.) Note: The system is designed for indoor usage, so equipment can only be installed indoors to avoid direct sunshine, rain and outer interference. When system is running, the master and slave receivers should not be in direct sunshine or strong lighting, or other infrared signal interference. 2.3 Master remote controller specification and usage: Teacher remote control specification and usage Function Dimension (mm) Weight Working temperature Relative working humidity Power Effective radiating angle Longest distance The control of the IQ Feedback System, used by teacher for controlling the teaching (meeting demo) process; interactive activities; class testing (voting); showing feedback (voting 1. Laser emitter: Emitting laser signal. statistics) and Attention: the laser beam can not be directly report forms. towards any eyes. 40×100×15 2. Infrared emitter: Emitting infrared signal. flat rectangle Please aim the emitter at receiver when 60g emitting. Note: Keep the shield transparent (include batteries) to guarantee the signal is sent. 3. Indicator: Will be turned on by pressing any 0-40 °C key (except the “radiating” key), and will turn off after 0.5 to 2 seconds; Note: While the indicator is turned on, please aim the 0-90% infrared emitter at the receiver. two AAA size 4. Laser Pointer: Send laser beam as common batteries electronic pointer. or alkaline 5. Start: Start projector, begin action, end projector, exit action. batteries 6. Result: Show the answer results and the answer statistics. above 30 °C 7. Statistic: Show the mark and statistical range. 8. F2: Auxiliary function key. 9. F1: Auxiliary function key. 10. Previous: When answering, show above 15 meters, previous answer; when showing the report with 0°C angle forms, move upwards in the form. 11. Start: Start answering, and starts timing simultaneously. 12. Pause: Stop answer, and stop timing simultaneously. 13. OK: Confirm the function. 14. Page down: Show next question when answering, show next page when displaying the report forms 2.4. Student remote control specification and usage: Slave remote controller specification and usage: Function Used by student (or audience) for sending real-time message in interactive activity and class testing (voting). Dimension(mm) 40×100×15 flat rectangle Weight Working temperature Relative Working humidity Power Effective radiating angle Longest distance 1. Infrared emitter: Emitting infrared signal. Please aim the emitter at receiver when emitting: Note: Keep the shield transparent to 55g guarantee the signal is sent. (include 2. Indicator: Will be turned on by pressing any batteries) key (except the “radiating” key), and will turn off 0-40 °C after 0.5 to 2 seconds; Note: While the indicator is turned on, please aim the infrared emitter at the receiver. 0-90% 3. Number label sticking place: Label indicating the control number is placed here; For details, two AAA size please view the user manual [System common Setup]--[Remote Controller Address Setup]. batteries or 4. Hand-raise or Rush-to-answer: Send the alkaline signal that you know the answer for hand-raise batteries and rush-to-answer. (Anyone who presses the key first gets the right to answer). above 30 °C 5. Option key: For selecting option (A, B, C, D, above 15 E, and F). metres, with 0°C angle 2.5 Typical layouts for normal teaching environments. 1. Common Classroom 2. Amphitheatre 3. Auditoria Speech 4. Polling 5. Training Centre 6. Contest Program 7. Company Meeting 8. TV program Chapter 3 Software Installation 3.1 System Requirements (minimum) One 80X86 computer (laptop or desktop) CPU: Pentium II or above; Memory: 64MB or above: Operating system: Windows Me/2000/XP: Applications: Office 2000 or above: HD spare: Above 100MB; Mainboard: Serial communication port 9Pin RS-232; Display or output devices: VGA above 800x600; One large monitor and projector (Resolution 800 x 600 or above). 3.2 Software Installation Insert the software CD into the CD drive and then open the software setting folder, double-click “Setup.exe”, and finish the installation according to the prompts. 1. Click “Next” on the opening windows to confirm installation, as follows: 2. On the pop-up windows, select “Change” to change the installing path if required (default path: C:\Program Files\Feedback Genius Edu), and then click “Next”, as follows: 3. On the opening windows, click “Install”, as follows: 4. Click “Finish” to complete the installation of IQ Feedback System. After the installation, two desktop shortcut icons will be created automatically: Setting and Query, and Quiz Master. Also, in your Start/Programs/Feedback Genius Edu directory, there will also be 4 shortcuts displayed (Exam Paper Editor, Quiz Master, Setting and Query, Standard Exam). As follows: 3.3 Software Upgrades and Uninstall For Software Upgrades, please enter into “System Setting” --- “Database Management” to backup the database first, and then uninstall the former version and install the new version. For Uninstall, click “Start” menu, open “Setting”, then “Control Panel”, double-click “Add or Remove Program”, select “Feedback Genius Edu” and “Delete” option, then uninstall the software according to the system prompt. Chapter 4 System Software Use 4.1 System Setting Click “Setting and Query” on the desktop or select “Program” on “Start” menu, then “Feedback Genius Edu” --- “Setting and Query”, the “User Type” interface will appear. Select “General User”, and then enter into “Setting and Query” interface (Note: only the activity record can be browsed by “General User”, “Manager” can also configure the system); select “Manager”, input correct administrators password (default password: 88888888), then enter into “Setting and Query” interface. (As follows) (Note: When using the system for the first time; you must enter into the “Quiz Master”, and then input the serial number printed on the back of the main receiver (or the box) for registration.) Note: When entering the system setting interface, the system will check the receiver automatically. If the receiver is not on the normal working state (receiver and computer connection failure or power failure), the system will prompt an error message. The Software Query & Set Software Icon – System Set, includes settings for: 4.1.1: Hardware Test, 4.1.2: Remote ID Set, 4.1.3: Data Management, 4.1.4: Student Set, 4.1.5: Teacher Set, 4.1.6: Subject Set, 4.17: System Set. 4.1.1 Hardware Test On the system setting interface, select “Hardware Test”, as follows: The working performance of the receiver, student remote controls and teacher remote controller can be tested during the hardware test. All details of the test process are listed in the menu of system setup. If the receiver works normally, student remote controls and teacherr remote control shortcut buttons will also work normally. If you have any problems, please view Chapter Five - FAQ in the user manual. 4.1.2 Remote ID Set On the system setting interface, select “Remote ID Set”, as follows: Remote ID Set: if a remote control is damaged or lost, please use a standby remote control in its place by setting the ID the same as ID of the damaged or lost remote controller. For more details, please view the setting menu. Note: On “Quiz Master”, each remote ID must be different! You should check the remote control IDs and set/change the ID if necessary. Extension Receiver ID Set: if the system needs several extension receivers, you must set the extension receiver ID respectively. For more details, please view the setting menu. Note: the system supports up to 14 extension receivers, but extension receivers with the same IDs can not work together. 4.1.3 Data Management: Select “Data Management” on the system setting interface, as follows: Data Backup In order to prevent the database from damage in case of an accident, please use the backup function to save the database as “*.qlb” file. The file name and path can be customized. Recover Backup Data Name any recovered database file as “backup *.qlb” file. This is important as the operation may cause data to be lost. The recovered file should be checked before deleting the previous file version. An administrator data management password (the default password is 12345678) is needed for the operation. Note: Data Administer Password is different from Administrator Log On Password. Both passwords can be modified on “Setting and Query” --- “System Set” --- “System Parameter Set”. Clear Activity Record Click “Clear Activity Record” button, and then input the correct administrator database management password (default password is 12345678) to enter into the “Clear Activity Record” interface. Select the activity record according to class, quiz and activity time, then click “Clear Selected Activity” button. The user can clear the selected activity record to release HD space, as follows: 4.1.4 Student Set Select “Student Set” on the system setting interface as follows. The interface divides into two parts, on the left is class information setting, and on the right is student information setting. On the student information setting, the system offers a test class and a temporary class, the test class includes 6 students, and the temporarily class has a default of 100 students. It can be used for temporary testing without editing the class information. 4.1.4.1 Class Information Set A. Import: Click “Import” button to import the Excel sheet with class information into the database (the default path for import and export is CLASS catalogue under the install catalogue). The Excel sheet must be as per the following format: Number Name Group Integer from 1 to 100, Text information, cannot Integer from 1 to 24 A number cannot repeat repeat The first line of contents must be consistent with the above table. From the second line, each should be following the description in the second line of the above table. Note: The maximum number of students is 100 in the class import file, otherwise there will be an error message. B. Export: after setting the class (students) information, you can export the class information to an Excel sheet. Click “Export” button and select the class, then input the file name and confirm. The information will be exported. Note: Using the import and export functions will decrease the work to input information repeatedly, and is convenient for any the user accustomed to Excel. C. Add class: click “Add Class” button and input the class name, you can add a blank class. The length of the class name should be no more than 50 characters. Note: There is no limitation regarding the characters used for the class name and the number of classes, but the class name can not be repeated. D. Delete class: click “Delete Class” button, and then you can delete the selected class. Note: temporary class is not allowed to be deleted; the deleted class should be empty. Otherwise the system will forbid the deleting. E. Rename: click “Rename” button and then input the new class name. 4.1.4.2 Student Set (Note: only grouping set is available for temporarily class.) A. Add Student: click “Add Class” button and input the number, the name and the group number, then click “Save” button, the student information will be added. Note: There should be no more than 100 students in one class and the number from 1 to 100 never repeated. The length of student name should be no more than 20 characters, any character can be used, but the name can not be repeated. The grouping number should be from 1 to 24 (integer) and can be set by two ways: “Quick Grouping” of Quiz Master software or “Group Setting” of student set. B. Modify: modify information of the selected student. C. Cancel: cancel adding or modifying information. D. Delete: delete the selected student information. E. Save: save the student information which have been added or modified. F. Group setting: group students in the selected class. Click “Group” and then enter into the interface, as follows: Ungrouped students on the left, grouped students on the right. Each button functions as follows: “>>”: send all ungrouped students into the right group; “>”: send selected ungrouped students into the right group; “<<”: transfer all grouped students to ungrouped state; “<”: transfer selected grouped student to ungrouped state; “Reset”: transfer all students to ungrouped state; “OK”: save the group setting and exit the interface (attention: the number of ungrouped students must be 0) “Cancel”: cancel the current group setting and exit the interface. 4.1.5 Teacher Set Select “Teacher Set” on the system setting interface, as follows: Each button functions as follows: A. Add: click “add” button, input name, and then click “save” button. Note: There is no limitation about the number of teachers and any character can be used. But the ID number and name can not be repeated, and the length of name should be no more than 20 characters. B. Modify: modify information of the selected teacher; C. Cancel: cancel the added or modified teacher information; D. Delete: delete the selected teacher information; E. Save: save the added or modify teacher information. 4.1.6 Subject Set Select “Subject Set” on the system setting interface, as follows: Each button function as follows: A. Add: click “Add”, input quiz name, and then click “Save” button. Note: There is no limitation about the number of quiz and the character used for the quiz name. But the length of quiz should be no more than 20 characters, and can not be repeated. B. Modify: modify the selected subject; C. Cancel: cancel the modification of the selected subject; D. Save: save the subject which has been added and modified. 4.1.7 System Set Select “System Set” on the system setting interface, as follows: System set includes three parts: A. Modify Password: modify administrator log on password and data administer password; B. Quiz Genius Default Setting: options including “Display Status Bar”, “Publicize Correct Answer”, “Sort by Average Mark” and “Sort by Total Mark”. C. Quiz Genius Music Setting: there is different prompt music for different activities; the user can click “Browse” to select other music file (*.WAV File) or cancel the music setting for a certain activity. D. Other buttons functions as follower: 1. “Save”: save the system parameter setting; 2. “Load default setting”: restore the system parameter to default setting. 4.2 Quiz Genius: Labelled as Quiz Master on Software Icon Quiz Genius software is used to create the various question files. Before operating the Quiz Genius, please note the following definitions: 1. One PowerPoint file ←→One quiz paper 2. One PowerPoint slide in file ←→One question in quiz paper 3. Start PowerPoint file ←→ Start testing When starting Quiz Genius, PowerPoint will start automatically, and then you can see two toolbars that have been added: 1. Separate Dialog Box (Quiz Genius, Paper Editor, Model Design, Setting and Query and Quiz Help), and 2. An active window (Default Quiz Genius) on the PowerPoint window, as follows: Click the five new toolbars; the active window will be altered between Quiz Genius and Paper Editor, and some other applications will be activated when clicked. 4.2.1 Model Design 1. Load: load a model file (*.POT), the default path: “Install path\module”. 2. New: create a new model file (*.POT). 3. Save: save the current model file (*.POT), the default path: “Install path\module”. 4. Info: view the information, including the quantity of the question models and their options (quiz title; answer option A, B, C, D, E, and F). 5. Add: add a new question model (lantern slide). 6. Delete: delete selected testing model (lantern slide). 7. Modify Model Name: modify the name of model (lantern slide) for convenience. 8. Option Denominate: select current option name from the dropdown menu, including “Quiz Name”, “Option A”, “Option B”, “Option C”, “Option D”, “Option E”, and “Option F”. The system default is undefined. 4.2.2 Test Paper Editor A test paper is a PowerPoint file, so the test paper can be edited in PowerPoint, such as modify text content, insert picture, video and voice, set flash, adjust slide background, and so on. The Test Paper Editor is specially designed for quiz and other response activities. The buttons of the Paper Editor Interface (as follows) functions are as follows: 1. Quiz Genius Exit Test Paper Editor Interface and switch into Quiz Genius. 2. Load The default path: “Install path\ paper base” (Note: “Install path” is the system default: “C:\ Program files \ Feedback Genius Edu”); users can also select other paths for loading test papers; (we suggest users save it to “paper base” catalog, and then it will be convenient for use.) 3. New Click “New test paper”, the system will list all kinds of the templates for choice. Select an appropriate template, modify it, and then a new test paper can be created. (Tips: the system provides test paper templates such as test responding, preemptive answer game, vote, etc. Some of the templates have suffix name of 1, 2, or 3. The suffix means the display mode of the quiz and answer: display at the same time, display according to action sequence and display according to time order. The default path of the templates is “Install path\module”, and users can create new template [PowerPoint module file, suffix is .pot] and save it to a HD directory for convenient test paper editing). 4. Save System default save path: “Install path\ paper base”; if the quiz is not set (the detail refer to 8th point), the system will prompt a warning message. 5. Info During the process of editing a test paper, users can click it to view the information of the whole test paper, including name, path of the test paper, the total number of questions, total mark, total time requirements, statistics of questions according to the difficulty or answering state, and list the numbers of the questions that have not been answered correctly. 6. Add If the new test paper is a new template that has been created, it will add a new quiz to the paper. If the test paper exists, it will copy the first quiz as a new quiz. Users can also use PowerPoint to add a new slide (add quiz), but the auto apply template function will be lost. 7. Delete Delete the selected quiz of the current slide. 8. Quiz Set System statistics, report forms, etc relate to Quiz Set. Therefore, users are strongly recommended to set it after editing. On test paper edit interface, click “Quiz Set” to enter into the interface, as follows: A. Paper’s default activity mode: Set the default type of the paper's activity mode (a test paper can only be set one default activity mode). B. Question Number: the question could be set by selecting with its number, or with pressing “Previous Qu.”, “Next Qu.” button. C. Question Title (Grade Object): please input a brief introduction of the question or object name for “Grade choose”. The system will prompt a warning message if it is empty, and then default the question (grade object) number. D. Mark, Time Limited: set mark and the time limited of the current question. E. Correct Answer Selection: it is important since only after the correct answer is selected, can the system judge the student’s answer. F. Difficulty level: select the quiz’s difficulty level. G. Rush Quiz Set: Input the deduction mark (when the answer is wrong), and the time limit for answering after getting the go ahead to answer. H. Answer Option Setting: please input the answer options. I. Auto Acquire: when using the template provided by the system, the question title and answer options can be inputted using Auto Acquire. J. Previous, Next: select previous, next to set the questions. K. Cancel, OK: cancel or confirm the current modification, and then exit question setting interface. 9. Quiz Module….: Select an edited quiz template file to facilitate “add quiz”. 10. Quiz Module Dropdown Menu: select a quiz template from the list for the current test paper. 4.2.3 Quiz Genius Instruction Enter into Quiz Genius interface (as follows): 4.2.3.1 Class Set and Load Before creating the activity, Teachers have to preset the class. Click the “Class Set” button, and then select the right class, teacher and subject. If there is no relevant record available, or it is a temporary activity, please select temporary class, teacher, subject, and input the number of participants (do not count the teacher). 4.2.3.2 Load Click “Load”, then you can open an existing quiz paper. Please note that Load paper is not necessary when doing Ad-lib quizzes, roll call and quick grouping. 4.2.3.3 Participate Mode Select “Participate Mode” as individual or group. In group participating, the response of any member of the group will delegate the whole group. The marks of the members in the same group are identical. And group setting is needed if there is no group in the class settings. It can be set by group setting in “Quick Grouping” of “Activity Mode”. 4.2.3.4 Activity Mode There are 9 activity modes, each with a different quiz; details as follows: 1. Normal Quiz: Question displayed and all students answer. Quiz with standardized answer, and with no limitation regarding the type of participation (individual or group). The teacher can press” exam, press” ” to start; press “ ” to view the quiz results, and press “ ” to end the ” to view the mark results list. The students (audience) press A, B, C, D, E, or F on their remote control to select the answer. 2. Rush Quiz: Question displayed & first student to press answers. Quiz with standardized answer and with no limitation regarding the type of participation (individual or group). The teacher can press” ” to start, or press “ ” to end the ”gets the right to answer once. exam. The first student (or group) who presses “ The information of the student or group will be displayed automatically. If the answer is right, the score will be increased. If incorrect, the score will be decreased. (Please refer to “Quiz Set”---Rush Quiz setting). The right answer will not be displayed until the teacher presses “ ”, so a quiz question can be answered for several times, but individuals or groups who have already answered will not be allowed to answer the question again. 3. Elimination Quiz: Question displayed and students with wrong answers eliminated. Quiz with standardized answer and with no limitation regarding the type of participation (individual or group). The teacher can press” “ ” to start or press ” to end the exam. Students can answer the questions by pressing A, B, C, D, E or F on the remote controls. Students/groups who answered the question correctly will get the right to answer the next question; students/groups with wrong answers will be eliminated. And each quiz question can only be answered once. The game will continue until only one student/group remains. 4. Hand-raise: Similar to Rush Quiz but incorrect answers are not penalised. Quiz with standardized answer and with no limitation regarding the type of ” to start or press “ participation (individual or group). The teacher can press” ” ” to end the exam. When the question is displayed, the student who presses “ (hand-raise) first will get the right to answer. The teacher can grade the student accordingly. The same quiz can be answered by several students/groups, but students/groups who have answered once cannot answer the question again. 5. Vote & Query: Voting system or method to obtain student input. Questions with no standardized answer and with no limitation regarding the type of participation (individual or group). It can be used for voting and idea collection, and the voting options must be no more than 6 (A, B, C, D, E and F). The system will generate the voting result report forms automatically. When holding the activity, the teacher can ” to start. press “ press” ” to end the exam, and press “ ” to view the voting. Students select the option by pressing their remote controls (A, B, C, D, E or F). 6. Grade: System to obtain a relative grade result/comment from each student. Designed to grade different aspects of a specific topic. The quiz relates to the one topic, but each question is regarding a different aspect of that topic. A to F options are used. A: 10 points—excellence; B: 8 points— all right; C: 6 points – pass; D: 4 points – not good; E: 2 points—bad; F: 0 point—worst. The system will generate a list of the scores and sort the names according to the marks automatically. When holding the activity, the teacher can press” “ ” to start, press “ ” to view the mark choice, or press “ ” to end the exam, press ” to view the students mark arrangement list. Students mark and choose by pressing their remote controls (A, B, C, D, E or F). 7. Ad-lib Quiz: Standard Quiz without any preparation. Quiz with standardized answer but the questions & answers do not have to be prepared in advance. The teacher explains the question and options, and presses “ ” on the teacher remote, then the students can press A, B, C, D, E or F on their remote controls to answer the question. The teacher can set a time limit; when the teacher presses “ ” on the remote control, the exam ends. The system will prompt the teacher to set the right choice and scores, and then record the quiz result automatically. Then the teacher can press" " to view the answers or press" " to view the student’s marks. Note: The current version only supports an oral quiz of option selection. 8. Roll Call: Preparation of attendance list. teacher presses" Restricted to each individual. After the “, the students can check in by pressing any key on their control, and the roll call will be ended when the teacher presses" " on the teacher’s remote control. The system will display the roll call result automatically. 9. Quick Grouping: Preparation of Group Lists. Restricted to each individual. It can be used when there is no group setting or when you need to temporary alter the group settings. After the teacher presses" ” button, the students can choose their group from Group 1 to Group 7 by pressing the A, B, C, D, E, F or press “ button respectively. When the teacher presses" ” ", the grouping will be end and all students who have not pressed any button will be grouped into Group 1. The system will automatically display the member numbers and proportion of the groups, and mark the students’ names with different background colors accordingly at the “Answer State Bar". If the teacher chooses to save the quick group activity record, the groups will be set as default of the system. Grouping allocation should be continuous starting from Group 1 (ie: Group 1, Group 2, Group 3, etc) and Low group numbers should not be left empty (ie, Group 1, Group3, etc). 4.2.3.5 Answer Activity Interestingly quiz can be held after the above settings. Enter into activity Press " " on teacher’s remote control or click” begin the activity (or play PowerPoint file). If Shift and “ ” on Quiz Genius toolbar to ” keys are pressed simultaneously, the activity will start automatically. (That is, there is no need to control the system during the whole process, it will time and turn page automatically). After entered into the project state and began the activity, the screen will display as figure 4-16 as follows: "File playing area": used for displaying the current file; "Activity mode indicator”: used for displaying the current activity mode; "Command menu”: click the button, a command menu with the same functions as the teacher’s remote control will pop-up (including previous page, next page, start/stop, result, report forms and exit); “Answering status bar”: After the teacher presses “ ” to begin the quiz, the ID numbers of participants (group numbers) will be listed in this area with different background colours. The initial colour is black. Gray indicates absent in roll call, blue means respond signal received (the students can change their choice, and the background coluor will get thicker with the change. The system will record the last choice as their answers.). After pressing “ ” to display the result, the background colour will change to red (false) or green (true). “Timer”: it begins to countdown when the test is begun. It will show the time remaining (count by second) and alarm when the remaining time is less then 10 seconds. The timer has three status positions: (1) Time status: when the timer is stopped or paused, press “ ” to re-start, and the background colour will turn to green which means that the students can answer the questions; (2) Pause: under timer state, press “pause” or “ ” button, the background colour will be turned to yellow, and the countdown stopped, but the students can continue to answer the questions. (3) Stop: when the teacher presses “ ”button, or when the timer becomes 0, the background colour will turn red, and all students cannot answer the questions anymore. Controlling activity progress: the teacher can use the remote control or mouse to control the system functions such as start answer, stop answer, previous page, next page or slide. Note: The system will not respond to other orders if in the process of answering, until the timer ends, or until the " " button is pressed. Result, report forms: press" " and the result of all students will be listed on the ”Answering status bar ", and also with a result chart showing proportion of each answer options (green indicates right), average answer time and attendance information etc. Press" "key to see the ranking based on the mark (press” Up" or" Down" key to view the ranking). The sequence is from high to low, and ranked on time of response when the marks are the same. It reflects the accuracy and speed of the student. Answer time defines: the time is counted from when the teacher presses the “ ” button until the student inputs the answer (based on the last input). If no answer is inputted, the time will be counted from “ Exit: press “ ” to “ ” plus one second. ” button or click “Exit”. The system will ask whether you intended to exit or not, click “OK” to confirm. The system will prompt you to save the records for future use. 4.3 Query Setup, in Setting & Query Software Click “Setup Query Software” to enter into the “User Sort” selection interface. If you select “Common user”, you can enter into the main interface (as follows); if you select “Administrator”, must input the correct password. The difference is that the common user only can inquire the record, but the administrator can setup the system. “Administrator”, default password is “88888888”, enter into query, setup interface, click “Query”, and enter into administration interface. 4.3.1 Activity Record Query On setup query interface, click” Query” to enter into record query interface. Select query by class, query by person and query by activity. 1. Query by Class Select “Query by Class”, (system default display “Query by Class”) as follows: A. “Class grade list”: query activity, student number, name, group number, mark, answer time and rank, class mark pass rate, full mark rate and so on. B. “Class answer detail”: query activity detail, including activity name, interactive mode, activity date, test paper path and participate mode; display the quiz name, correct answer, mark, ABCDEF option and the answer that students selected. C. “Class roll book”: Query classes roll book detail, including roll time, student attendance, absent and the total number of attendance or absent. D. “Class activities summary”: query activity detail in a certain time, including activity number, activity name, activity mode, participate mode, subject name, teacher name, activity date and activity number. You can query by different condition, eg: class, student, subject, activity time, 2. Query by Person Select “Query by Person”, as follows: A. “Student score ledger”: query student activity score in a certain time, including activity details and person score, ranking, average score. B. “Student answer detail”: query student answer detail. C. “Student roll book”: query student roll detail, including time, the number in attendance and absent. You can query by different conditions, eg: class, student, subject, activity time. 3. Query by Activity Select “Query by Activity”, as follows: A. “Question accuracy queue”: query one activity (limit to “Test Responding”) of question accuracy queue data account, queue according to the accuracy; it is convenient for teacher to get details. B. “Multiple-choice queue”: query exam paper answer option details, and ranking according to the number of students who answer. Teacher can learn students habits and attitudes; it is especially useful for “Voting Questionnaire” where it can show the voting number clearly. C. “Multiple-choice queue histogram”: the same as above only switch “report forms” to “histogram”. D. “Grade details”: you can see the grade details, and then statistics. You can query by different condition, eg: class, student, subject, activity time 4.3.2. Operation Click “Query”, pop-up report forms, content is different from the query option. As follows: You can do the following operation (refer to sign on chart): Print: print the report forms Load: switch to HTML file or Text file, and then save to HDD Zoom: zoom in or zoom out Scroll bar: scroll screen to see the whole information. Page control: turn over to the first page or to the last page, or turn over to previous or next. 4.3.3 Relation between Activity mode and statistics Activity mode and Statistics differ as follows: Activity Mode Query by class Query by person Query by activity Class grade list Class answer detail Class roll book Class activities summary Student score ledger Student answer detail Student roll book Question accuracy queue Multiple-choice queue Multiple-choice queue histogram Normal Rush Elimination Quiz Quiz √ √ √ √ √ √ Hand- Vote AD-lib Roll Quick Grade raise Query Quiz call Group √ √ √ √ √ √ √ √ √ √ √ √ √ √ √ √ √ √ √ √ √ √ √ √ √ √ √ √ √ √ √ √ √ √ Grade details Explanation: “√” means you can query, blank means cannot query. √ 4.4 Standardized Exam Paper Editor Exam Paper Editor: Exam Paper Editor is used for set the quiz, marks, answer, and content. Select “Feedback Genius Edu” from “Program” on “Start” menu. Click it, and then enter into editor interface: It is divided into three parts: 1. The top button bar: including the operation button of test paper (new, open, import, export, save); the operation button of subject (add, delete, up, down); other operation button (exit, help) and so on. 2. The middle edit bar: including set mark, answer, edit topic, each option, and show the total mark and information. 3. The last part is for show the quiz information. 1. Test Paper Command Button A. New: click “New” & system will auto create an exam paper, and auto add a subject. B. Open: click “Open” & you can select an edited exam, the type must be “csv”, otherwise it will prompt an error. C. Import: click “Import” & you can import an “xls” file. The file format must be in accordance with the exam format, otherwise it will prompt an error. D. Export: click “Export” & the current test paper will export as an “xls” file. E. Save: click” Save” to save the edited test paper; save it as “csv”. Test paper details: “csv” and “xls”, as follows: Number Mark Answer Title Option Option Option Option Option A B C D E (1-250 (0-250 (Any (A,B,C,D,E,or“undefined” integer) integer) Test) (Any Test) (Any Test) (Any Test) (Any Test) (Any Test) Note: the first row is the table heading, content will the same as the first row; content in the following rows must be in accordance with the second row. 2. Test Question Command Button A. Add: click “Add” & the system will auto add a test question to the end of the file Its number is the largest number plus 1, mark default “10”, answer default ” undefined”. If the file has reached 250, you cannot allow add any more. B. Delete: click “Delete” to delete the current selected test question. C. Up: click “Up” & move to the question before the current selected test question. D. Down: click “Down ” & move to the question after the current selected test question. 3. Other Command Buttons A. Exit: click “Exit” to exit the exam paper editor, and if you modify it, the system will prompt you whether to save. B. Help: click “Help” & the system will show the help menu. 4. Select, setup and edit A. Select: on the top left corner of editor, select “Select Qu.”. You can select the previous one, next one, the first one or the last one; B. Mark and Answer Setup: input the 0-250 integer on “Mark” textbox, and then finish. Select the correct answer on “Answer” dropdown menu, and then finish. (They are the essential item). C. Option D and Option E: input title on the textbox. (it is convenient for your use) 4.5 Standardized Exam System Standardized Exam System: Students can answer questions according to different standards at the same time; can answer a question at any time (but the teacher should write the test questions on the whiteboard or print them). Standardized Exam System is used for collect information, graphically display query results, and so on. 4.5.1 Standardized Exam System 1. Check the connection of hardware If the receiver doesn’t connect properly with the computer; the power isn’t plugged in, or other software is opened at the same time (Genius Answer or system query setup), an error message will displayed so the students cannot answer. 2. Enter into Standard Exam System Setup Interface A. Set class, teacher, and subject: if you select temporary class, you must set the number of participating students. B. Select exam paper: “csv” file format, in accordance with the format standard, otherwise the system will prompt an error. If the format is correct, and it will show the total number and total mark. C. Time setup: (you can adjust the time on the answer interface) 3. Enter into Standard Exam System Answer Interface The Standard Exam System Answer Interface includes three parts: A. The top has command buttons, used to control the exam process. B. The middle is the answer information bar, showing the answer details of students. C. The bottom is the status bar, showing total quiz number and the number students who have already answered. 4.5.2 Controlling the exam process 1. Start: click “Start” (press teacher remote control” ” key), the timer will start to count (background colour becomes green). At this stage, the “Start” button becomes a “Pause” button. Click “Pause” (press teacher remote control “ ” key), and the timer will stop (background colour becomes yellow), but students can continue to answer. The “Pause” button then returns to being a “Start” button. Click “Start” again, (press teacher remote control” ” key again), and the timer will resume its count. 2. Stop: click “Stop” (press teacher remote control “ ”), and the timer stops counting, (background colour becomes red). The exam time is over & students cannot answer. 3. Result: click “Result”, (press teacher remote control “Result” key), show the histogram (as follows). You an press teacher remote control “ ” or “ ” key, to view the previous one or next one. Press “F1” to show the correct answer, press “F2” to view the details, press “ ” to exit. 4. Answering Details: press teacher remote control “F2” to view the exam details (as follows). You an press teacher remote controller “ ” or “ ” key, to view the previous one or next one, press “F1” to show the correct answer, press “ ” to exit. 5. Report: click “report format” (press teacher remote control “ scoreboard (as follows). You can press teacher remote controller “ press” ”) to show the ” or “ ” key, “to exit. 6. Help: click “Help”, enter into help interface. 7. Adjust Exam Time: click “up”, “down” on timer, (press teacher remote control “ or “ ” ” key), adjust timer setup. 8. Exit: click “Exit” to exit the system. If answers received, system will prompt “save” or no. If you save, you can view it on IQ Feedback System. 4.5.3 Student Answer Operation When the exam has started (start countdown or pause countdown), students can: ” on remote control to select 1. Select Test Questions: students can press “ the next question, or press “F” to select the previous one. The test questions which have already been answered have a background colour of blue, otherwise is black. 2. Select Answer: select test question, and then press A, B, C, D, E, and F key to select answer, the background colour will become blue, or change between navy-blue and cambridge blue. When finished, the student number will become blue. Chapter 5 FAQs 1. Remote control’s button reacts slower or indicator light not bright enough? A: Insert a new battery. 2. When starting Quiz Genius, the screen shows a communication error? A: Please check the transformer’s power outlet, making sure it is plugges in, and each connection cable or sub-joints are properly connected. 3. What other hardware is required for IQ Feedback to work? A: It can be used in any multimedia classroom. Now, many schools already have a computer, projector, and projection screen. The IQ Feedback System requires these to create an interactive teaching environment. 4. What is the difference between previous feedback systems and the IQ Feedback System? A: Previous feedback systems have been wired, and only allow several participators, and has limited applications. The IQ Feedback System uses advanced Infrared Technology, allows 100 people to participate simultaneously, and has interactive teaching software. It creates a true multimedia classroom. 5. Can the IQ Feedback System be used outdoors? A: Generally speaking, it is only for use indoors because sunlight has strong infrared and can interfere with the system’s normal operation. 6. It can receive students’ feedback information effectively in amphitheatre? A: The effective distance of single receiver is at least 15 metres. If the classroom is too big, then additional slave receivers can be added to extend the reception area. 7. If many students press their remote controls at the same time, can the receiver lose its code? A: No. Due to its advanced patent infrared technology, IQ Feedback can ensure multi-channel infrared signals are correct, and are received and processed quickly. 8. Due to the use of wireless technology, can two neighboring classrooms interfere with each other? A: No. The wireless technology has several sorts, including radio, infrared, ultrasonic and so on. If use radio technology, the signal may penetrate the wall and can therefore disturb neighboring classrooms. IQ Feedback uses infrared signals to ensure the signals cannot penetrate the wall and cause interference. 9. Can the IQ Feedback System project the quiz automatically? A: Yes, press “Shift” key simultaneously with the “Project” button, and it will project the quiz automatically. 10. If the IQ Feedback software CD is lost, where else can you find the sequence number? A: Besides on the CD, it can be found on main receiver. 11. If the Teacher’s computer doesn’t have a serial port, or the existing serial port has already occupied by other equipment, how do you connect the main receiver? A: Use a converter switch (USB to RS232) and plug into a USB port. 12. The Student’s remote control number is lost. How can I determine it? A: Open IQ Feedback System setup query software. Enter using Manager password, and then enter into “Setup“. Click “Receiver, Remote controller Hardware Test”. Press remote control button to display the serial number on the screen. 13. Remote control is lost or damaged? A: Use a standby remote control, setup its Remote Control Number using Setup Query software. Contact your Dealer or ABI regarding repairs or purchasing additional remotes. 14. Can the IQ Feedback data files be transferred to different computers?? A: IQ Feedback System V2.0 has an import and export class information function. After editing the class information on one computer, you can export the data to another PC. 15. The Teacher hasn’t set up any Class information, but wants to run a quick test. Can this be done? A: You can use the temporary class function in the system. The maximum number of students is 100. 16. If the teacher wants to create temporary groups, do you have to edit the IQ Feedback setup query software to re-group? A: No, select “Quick Group” on Quiz Genius, and then press the student’s remote control to finish. 17. If teacher has not prepared a quiz, can you hold a temporary quiz? A: Select “AD-lib Quiz” active mode, and the teacher can write or read the questions, and mark after answering. 18. Can I insert a picture, sound, or video into the quiz? A: Yes, IQ Feedback is based on Microsoft PowerPoint, using embedded design, so the system has powerful functionality in its exam paper edition. You can insert pictures, sound, video and so on.