1
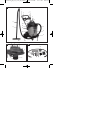
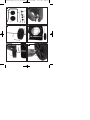
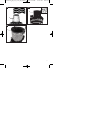
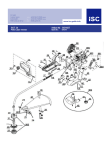
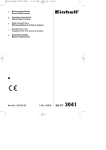
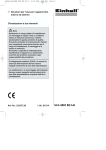
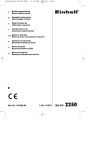
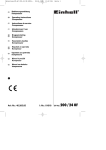
Anleitung_BT_VC_1450_SA_SPK7:_ 14.10.2008 7:57 Uhr Seite 1 Operating Instructions Wet and Dry Vacuum Cleaner � Art.-Nr.: 23.423.13 I.-Nr.: 01018 BT-VC 1450 SA Anleitung_BT_VC_1450_SA_SPK7:_ 14.10.2008 7:57 Uhr Seite 2 1 1 2 2 3 5 6 7 4 8 17 19 18 17 9 16 10 15 11 14 2 4 5 6 12 13 7 12 3 24 8 35 17 22 23 27 29 14 19 2 21 20 9 28 25 26 Anleitung_BT_VC_1450_SA_SPK7:_ 4 14.10.2008 7:57 Uhr Seite 3 5 1 12 30 13 34 33 31 33 6 13 32 31 30 7 30, 31, 13 31 10 33 33 8 9 33 33 13 30 13 3 Anleitung_BT_VC_1450_SA_SPK7:_ 10 14.10.2008 7:58 Uhr Seite 4 11 32 31 33 13 12 13 10 1 12 1. 1. 34 34 16 2. 12 14 2. 15 5 1. 2. 18 4 10 2. Anleitung_BT_VC_1450_SA_SPK7:_ 16 14.10.2008 7:58 Uhr Seite 5 17 24 25 18 35 5 Anleitung_BT_VC_1450_SA_SPK7:_ 14.10.2008 7:58 Uhr Seite 6 GB Important! When using equipment, a few safety precautions must be observed to avoid injuries and damage. Please read the complete operating manual with due care. Keep this manual in a safe place, so that the information is available at all times. If you give the equipment to any other person, give them these operating instructions as well. We accept no liability for damage or accidents which arise due to non-observance of these instructions and the safety information. 1. Safety information 쎲 쎲 쎲 쎲 쎲 쎲 쎲 쎲 쎲 쎲 쎲 쎲 쎲 쎲 쎲 쎲 쎲 쎲 쎲 쎲 6 Important: Read the operating instructions before assembling and using the appliance for the first time. Check that the mains voltage is the same as the mains voltage specified on the rating plate. Only connect the appliance to a properly fitted 230 V, ~ 50 Hz shock-proof socket. Fuse protection 13 A. Pull out the power plug in the following circumstances: Whenever the appliance is not in use, before opening the appliance and before all cleaning and maintenance work. Never clean the appliance with solvents. Never pull the plug out of the socket by pulling the cable. Never leave the appliance unattended when operational. Keep away from children. Take care to ensure that the power cable does not get damaged by being run over, crushed, pulled or suchlike. Do not use the machine if the power cable is in a less than perfect condition. If the power cable has to be replaced, the replacement must comply with the design specifications of the manufacturer. Power cable: H 05 VV - F 3 x 1.0 mm2 Never vacuum the following: Burning matches, smoldering ash and cigarette butts, combustible, caustic, inflammable or explosive substances, vapor or liquids. This appliance is not suitable for vacuuming dust which can be harmful to health. Store the appliance in a dry indoor location. Never use the appliance if it is damaged. Only allow the appliance to be serviced by an authorized after sales service outlet. Only use the appliance to carry out work for which has been designed. Take extra care when cleaning steps. Use only genuine accessories and spare parts. 2. Layout and items supplied (Fig. 1-4) 1 2. 3. 4. 5. 6. 7. 8. 9. 10. 11. 12. 13. 14. 15. 16. 17. 18. 19. 20. 21. 22. 23. 24. 25. 26. 27. 28. 29. 30. 31. 32. 33. 34. 35. Handle Hook for cable store Power cable Automatic socket-outlet for electric tools Head Handle ON/OFF/Automatic switch Suction hose connection Flexible suction hose Tank Water drain screw Castors Wheels Dual purpose nozzle Accessory compartment Holder for handle 2-piece suction tube Locking hook Blow connector Filter cage Safety float valve Electric tool adapter Crevice nozzle Pleated filter Foam filter Combination nozzle attachment for wet vacuum cleaning Combination nozzle attachment for smooth floors Combination nozzle attachment for carpets Air regulator 2 x Washers for fitting the wheels 2 x Split pins for fitting the wheels 2 x Covers for fitting the wheels Axle for fitting the wheels 2 x Screws for fitting the handle Tank bag 3. Intended use The wet and dry vacuum cleaner is designed for wet and dry vacuuming using the appropriate filter. The appliance is not suitable for the vacuuming of combustible, explosive or harmful substances. The machine is to be used only for its prescribed purpose. Any other use is deemed to be a case of misuse. The user / operator and not the manufacturer will be liable for any damage or injuries of any kind caused as a result of this. Please note that our equipment has not been designed for use in commercial, trade or industrial Anleitung_BT_VC_1450_SA_SPK7:_ 14.10.2008 7:58 Uhr Seite 7 GB applications. Our warranty will be voided if the machine is used in commercial, trade or industrial businesses or for equivalent purposes. 4. Technical data Mains voltage: 230 V ~ 50 Hz Power input: 1,400 watts Max. power consumption of the automatic socketoutlet: 1,440 watts Max. total power consumption: 2,840 watts Container volume: 50 l Weight: 10 kg 5. Before starting Important! 쎲 쎲 Before you connect the appliance to the mains supply make sure that the data on the rating plate are identical to the mains data. The appliance may only be connected to a shockproof socket. 5.1 Assembling the appliance 5.1 Appliance assembly Fitting the wheels (Fig. 4-11/13) Place a split pin for fitting the wheels (31) through the appropriate hole in the axle (33) and fit a washer (30) and a wheel (13) to the axle (33) (Fig. 5-6). Now slide the axle (33) through the guides provided for it on the underside of the tank (10) (Fig. 7). Fit the second wheel (13) to the empty end of the axle (33) and secure it with the other washer (30) and the split pin (31) (Fig. 8-10). Push the covers (32) on to the outside of the wheels (13) so that the detents engage on the covers (32) for the wheel (13). (Fig. 11). Fitting the castors (Fig. 12/12) Fit the castors (12) into the appropriate mountings on the underside of the tank (10). Push the castors (12) firmly into the mounting until they engage with a clicking noise (Fig. 12). Fitting the handle (Fig. 13/1) Place the handle (1) into the handle holders (16) and secure the handle with the supplied screws (34) as shown in figure 13. Fitting the appliance head (Fig. 14/5) The appliance head (5) is fastened to the container (10) by the locking hook (18). To remove the appliance head (5), open the locking hook (18) and remove the appliance head (5). When fitting the appliance head (5), make sure that the locking hook (18) locks into place correctly. 5.2 Fitting the filter Important! Never use the wet and dry vacuum cleaner without a filter. Check that the filter is securely fitted at all times. Fitting the foam filter (Fig. 16/25) For wet vacuuming, slip the supplied foam filter (25) over the filter basket (Fig. 2/20). The pleated filter (24) already fitted upon delivery is not suitable for wet vacuuming. Fitting the pleated filter (Fig. 17/24) For dry-vacuuming, slip the pleated filter (Fig. 3/24) over the filter basket (Fig. 2/20). The pleated filter (24) is suitable for dry-vacuuming only. 5.3 Fitting the tank bag (Fig. 3/35) Fit the tank bag (35) as shown in Fig. 18. 5.4 Fitting the suction hose (Fig. 3/9) Connect the suction hose (9) to the corresponding connector on the wet and dry vacuum cleaner, depending on the application required. Vacuuming Connect the suction hose (9) to the suction hose connector (8). Blowing Connect the suction hose (9) to the blow connector (19). To extend the suction hose (9) you can attach one or more of the elements which make up the 2-part suction tube (17) to the suction hose (9). Air regulator (Fig. 3/29) The air regulator (29) can be fitted between the suction hose (9) and the suction tube (17). The suction power of the nozzle can be infinitely adjusted using the air regulator (29). 5.5 Suction nozzles Dual-purpose nozzle (Fig. 3/14) The dual-purpose nozzle (14) is for vacuuming solids and liquids over medium to large areas. 7 Anleitung_BT_VC_1450_SA_SPK7:_ 14.10.2008 7:58 Uhr Seite 8 GB Various attachments can be fitted to the combination nozzle depending on what you sort of work you wish to carry out: Wet vacuuming Use the attachment for wet vacuuming (Fig. 3/26). Vacuuming smooth flooring Use the attachment for smooth floors (Fig. 3/27). Vacuuming carpets Use the attachment for carpets (Fig. 3/28). Fit the appropriate attachment into the combination nozzle (14) from underneath and secure it to the combination nozzle (14) using the side lugs (fig. 15). Ensure that the attachments are perfectly secure. Crevice nozzle (Fig. 3/23) The crevice nozzle (23) is designed for vacuuming solids and liquids in corners, edges and other areas that are difficult to access. 6. Operation 6.1 ON/OFF switch (Fig. 2/7) Switch position 0: Off Switch position I: Normal operation Switch position II: Automatic mode 6.2. Dry vacuuming Use the pleated filter (24) for dry vacuuming (see point 5.2). The tank bag (35) can also be fitted for removal particular heavy dirt (see point 5.3). Always ensure that the filters are perfectly secure. 6.3 Wet vacuuming For wet-vacuuming, use the foam filter (25) (see point 5.2). Check that the filter is securely fitted at all times. Water drain screw (Fig. 1/11) To make the tank (10) easier to empty after wet vacuuming, it is fitted with a water drain screw (11). Open the water drain screw (11) by turning it anticlockwise and drain the liquid. Important! When wet vacuuming, the floating safety switch (21) turns off the wet and dry vacuum cleaner automatically when the maximum level is reached. 8 Important! The wet and dry vacuum cleaner is not suitable for the vacuuming of combustible liquids. For wet vacuuming, use only the supplied foam filter. 6.4 Automatic mode Connect the power cable on your electric tool to the automatic socket-outlet (4) and connect the suction hose (9) to the extractor connector on your electric tool. Check that the connections are secure and airtight. You can use the supplied electric tool adaptor (22) to connect the suction hose (9) to the electric tool. To do so, fit it between the suction hose and the extractor port on the electric tool. Set the switch (7) on the wet and dry vacuum cleaner to position II, automatic mode. The moment you switch on the electric tool, the wet and dry vacuum cleaner switches on as well. When you switch off the electric tool, the wet and dry vacuum cleaner switches off as well after a pre-set delay. 6.5 Blowing Connect the suction hose (9) to the blow connector (19) on the wet and dry vacuum cleaner. 7. Cleaning, maintenance and ordering of spare parts Important! Always pull out the mains power plug before starting any cleaning work. 7.1 Cleaning Keep all safety devices, air vents and the motor housing free of dirt and dust as far as possible. 쎲 We recommend that you clean the appliance immediately after you use it. 쎲 7.2 Cleaning the appliance head (5) Clean the appliance regularly with a damp cloth and some soft soap. Do not use cleaning agents or solvents; these may be aggressive to the plastic parts in the appliance. 7.3 Cleaning the container (10) The container can be cleaned with a damp cloth and some soft soap or under running water, depending on the amount of dirt. Anleitung_BT_VC_1450_SA_SPK7:_ 14.10.2008 7:58 Uhr Seite 9 GB 7.4 Cleaning the filters Cleaning the pleated filter (24) Clean the pleated filter (24) regularly by carefully patting it and cleaning it with a fine brush or hand brush. Cleaning the foam filter (25) Clean the foam filter (25) with a little soft soap under running water and allow it to air-dry. 7.5 Maintenance At regular intervals and before each use, check that the filters in the wet and dry vacuum cleaner are securely fitted. 7.6 Ordering replacement parts Please quote the following data when ordering replacement parts: 앬 Type of machine 앬 Article number of the machine 앬 Identification number of the machine 앬 Replacement part number of the part required For our latest prices and information please go to www.isc-gmbh.info 8. Disposal and recycling The unit is supplied in packaging to prevent its being damaged in transit. This packaging is raw material and can therefore be reused or can be returned to the raw material system. The unit and its accessories are made of various types of material, such as metal and plastic. Defective components must be disposed of as special waste. Ask your dealer or your local council. 9 Anleitung_BT_VC_1450_SA_SPK7:_ 14.10.2008 Konformitätserklärung k t p m O U q T B Q Z z erklärt folgende Konformität gemäß EU-Richtlinie und Normen für Artikel declares conformity with the EU Directive and standards marked below for the article déclare la conformité suivante selon la directive CE et les normes concernant lʼarticle verklaart de volgende conformiteit in overeenstemming met de EU-richtlijn en normen voor het artikel declara la siguiente conformidad a tenor de la directiva y normas de la UE para el artículo declara a seguinte conformidade de acordo com a directiva CE e normas para o artigo förklarar följande överensstämmelse enl. EUdirektiv och standarder för artikeln ilmoittaa seuraavaa Euroopan unionin direktiivien ja normien mukaista yhdenmukaisuutta tuotteelle erklærer herved følgende samsvar med EUdirektiv og standarder for artikkel заявляет о соответствии товара следующим директивам и нормам EC izjavljuje sljedeću uskladjenost s odredbama i normama EU za artikl. declarå urmåtoarea conformitate cu linia directoare CE μi normele valabile pentru articolul. ürün ile ilgili olarak AB Yönetmelikleri ve Normlar∂ gere©ince aμa©∂daki uygunluk aç∂kla mas∂n∂ sunar. ‰ËÏÒÓÂÈ ÙËÓ ·ÎfiÏÔ˘ıË Û˘Ìʈӛ· Û‡Ìʈӷ Ì ÙËÓ √‰ËÁ›· ∂∂ Î·È Ù· ÚfiÙ˘Ô ÁÈ· ÙÔ ÚÔ˚fiÓ 7:58 Uhr Seite 10 ISC-GmbH · Eschenstraße 6 · D-94405 Landau/Isar C l j A X W e 1 . G 4 H E dichiara la seguente conformità secondo la direttiva UE e le norme per lʼarticolo attesterer følgende overensstemmelse i henhold til EU-direktiv og standarder for produkt prohlašuje následující shodu podle směrnice EU a norem pro výrobek. a következő konformitást jelenti ki a termékekre vonatkozó EU-irányvonalak és normák szerint pojasnjuje sledečo skladnost po smernici EU in normah za artikel. deklaruje zgodność wymienionego poniżej artykułu z następującymi normami na podstawie dyrektywy WE. vydáva nasledujúce prehlásenie o zhode podľa smernice EÚ a noriem pre výrobok. деклаpиpа следното съответствие съгласно диpективите и ноpмите на ЕС за пpодукта. заявляє про відповідність згідно з Директивою ЄС та стандартами, чинними для даного товару deklareerib vastavuse järgnevatele EL direktiivi dele ja normidele deklaruoja atitikti pagal ES direktyvas ir normas straipsniui izjavljuje sledeçi konformitet u skladu s odred bom EZ i normama za artikl Atbilstības sertifikāts apliecina zemāk minēto preču atbilstību ES direktīvām un standartiem Samræmisyfirl‡sing sta›festir eftirfarandi samræmi samkvæmt reglum Evfrópubandalagsins og stö›lum fyrir vörur Nass-/Trockensauger BT-VC 1450 SA X X 2006/42/EC 87/404/EEC 2006/95/EC R&TTED 1999/5/EC 97/23/EC 2000/14/EC_2005/88/EC: 2004/108/EC 95/54/EC: 90/396/EEC 97/68/EC: 89/686/EEC EN 60335-1; EN 60335-2-2; EN 50366; EN 55014-1; EN 55014-2; EN 61000-3-2; EN 61000-3-3 Landau/Isar, den 17.09.2008 Weichselgartner General-Manager Art.-Nr.: 23.423.13 I.-Nr.: 01018 Subject to change without notice 10 Liu Product-Management Archivierung: 2342310-28-4141750-07 Anleitung_BT_VC_1450_SA_SPK7:_ 14.10.2008 7:58 Uhr Seite 11 t For EU countries only Never place any electric tools in your household refuse. To comply with European Directive 2002/96/EC concerning old electric and electronic equipment and its implementation in national laws, old electric tools have to be separated from other waste and disposed of in an environment-friendly fashion, e.g. by taking to a recycling depot. Recycling alternative to the demand to return electrical devices: As an alternative to returning the electrical device, the owner is obliged to cooperate in ensuring that the device is properly recycled if ownership is relinquished. This can also be done by handing over the used device to a returns center, which will dispose of it in accordance with national commercial and industrial waste management legislation. This does not apply to the accessories and auxiliary equipment without any electrical components which are included with the used device. The reprinting or reproduction by any other means, in whole or in part, of documentation and papers accompanying products is permitted only with the express consent of ISC GmbH. Technical changes subject to change 11 Anleitung_BT_VC_1450_SA_SPK7:_ 14.10.2008 7:58 Uhr Seite 12 t GUARANTEE CERTIFICATE Dear Customer, All of our products undergo strict quality checks to ensure that they reach you in perfect condition. In the unlikely event that your device develops a fault, please contact our service department at the address shown on this guarantee card. Of course, if you would prefer to call us then we are also happy to offer our assistance under the service number printed below. Please note the following terms under which guarantee claims can be made: 1. These guarantee terms cover additional guarantee rights and do not affect your statutory warranty rights. We do not charge you for this guarantee. 2. Our guarantee only covers problems caused by material or manufacturing defects, and it is restricted to the rectification of these defects or replacement of the device. Please note that our devices have not been designed for use in commercial, trade or industrial applications. Consequently, the guarantee is invalidated if the equipment is used in commercial, trade or industrial applications or for other equivalent activities. The following are also excluded from our guarantee: compensation for transport damage, damage caused by failure to comply with the installation/assembly instructions or damage caused by unprofessional installation, failure to comply with the operating instructions (e.g. connection to the wrong mains voltage or current type), misuse or inappropriate use (such as overloading of the device or use of non-approved tools or accessories), failure to comply with the maintenance and safety regulations, ingress of foreign bodies into the device (e.g. sand, stones or dust), effects of force or external influences (e.g. damage caused by the device being dropped) and normal wear resulting from proper operation of the device. The guarantee is rendered null and void if any attempt is made to tamper with the device. 3. The guarantee is valid for a period of 2 years starting from the purchase date of the device. Guarantee claims should be submitted before the end of the guarantee period within two weeks of the defect being noticed. No guarantee claims will be accepted after the end of the guarantee period. The original guarantee period remains applicable to the device even if repairs are carried out or parts are replaced. In such cases, the work performed or parts fitted will not result in an extension of the guarantee period, and no new guarantee will become active for the work performed or parts fitted. This also applies when an on-site service is used. 4. In order to assert your guarantee claim, please send your defective device postage-free to the address shown below. Please enclose either the original or a copy of your sales receipt or another dated proof of purchase. Please keep your sales receipt in a safe place, as it is your proof of purchase. It would help us if you could describe the nature of the problem in as much detail as possible. If the defect is covered by our guarantee then your device will either be repaired immediately and returned to you, or we will send you a new device. Of course, we are also happy offer a chargeable repair service for any defects which are not covered by the scope of this guarantee or for units which are no longer covered. To take advantage of this service, please send the device to our service address. EH 10/2008 (01)