1
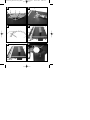
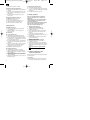
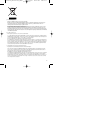
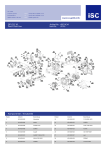
Anleitung BT-TS 800_SPK1:_ 25.09.2007 Bedienungsanleitung Tischkreissäge Operating Instructions Bench-Type Circular Saw Mode dʼemploi Scie circulaire à table de menuisier Istruzioni per lʼuso della Sega circolare da banco. Brukerveiledning Bordsirkelsag A Használati utasítás asztali körfűrész B f Naputak za upotrebu stolne kružne pile 4 Uputstva za upotrebu stone kružne testere j Návod k použití Univerzální kotoučová pila W Návod na obsluhu Stolná kotúčová píla 9:09 Uhr Seite 1 � Art.-Nr.: 43.407.60 I.-Nr.: 01017 BT-TS 800 Anleitung BT-TS 800_SPK1:_ 25.09.2007 9:09 Uhr Seite 2 Vor Inbetriebnahme Bedienungsanleitung und Sicherheitshinweise lesen und beachten Read and follow the operating instructions and safety information before using for the first time. Avant la mise en service, lisez le mode dʼemploi et les consignes de sécurité et respectez-les. Prima della messa in esercizio leggete e osservate le istruzioni per lʼuso e le avvertenze di sicurezza. Betjeningsvejledningen og sikkerhedsanvisningerne skal læses, inden maskinen tages i brug. Alle anvisninger skal følges. Üzembehelyezés előtt elolvasni és figyelembe venni a használati utasítást és a biztonsági utasításokat. Bf Prije puštanja u rad pročitajte i pridržavajte se ovih uputa za uporabu i sigurnosnih napomena. 4 Prije puštanja u pogon pročitajte i uvažite uputstva za upotrebu i napomene bezbednosti. j Před uvedením do provozu si přečíst návod k obsluze a bezpečnostní předpisy a oboje dodržovat. W Pred uvedením do prevádzky si prečítajte a dodržiavajte návod na obsluhu a bezpečnostné pokyny. 2 Anleitung BT-TS 800_SPK1:_ 1 25.09.2007 5 9:09 Uhr Seite 3 2 7 15 4 1 6 8 14 3 9 13 11 12 10 2 3 22 21 4 31 20 19 30 3 Anleitung BT-TS 800_SPK1:_ 25.09.2007 4 5 5 15 9:09 Uhr Seite 4 5 2 4 24 23 7 6 b 7 1 25 26 b 12 8 9 b 14 1 7 25 b 13 12 4 26 Anleitung BT-TS 800_SPK1:_ 10 25.09.2007 11 9:09 Uhr 7 Seite 5 5 14 3 5 Anleitung BT-TS 800_SPK1:_ 25.09.2007 9:09 Uhr Seite 10 GB Important! When using equipment, a few safety precautions must be observed to avoid injuries and damage. Please read the complete operating manual with due care. Keep this manual in a safe place, so that the information is available at all times. If you give the equipment to any other person, give them these operating instructions as well. We accept no liability for damage or accidents which arise due to non-observance of these instructions and the safety information. Layout (Fig. 1) 1 2 3 4 5 6 7 8 9 10 11 12 13 14 15 Saw table Saw blade guard Push stick Saw blade Splitter Table insert Parallel stop Motor Power cable Stand On/Off switch Star-grip screw for parallel stop Scale for angle settings Star-grip screw for height adjustment Screw for saw blade guard 2. Items supplied 앬 앬 앬 앬 앬 Carbide-tipped saw blade Parallel stop Push stick Bench-type circular saw Cross stop 3. Proper use The bench-type circular saw is designed for the slitting and cross-cutting of all types of timber, commensurate with the machineʼs size. The machine is not to be used for cutting any type of roundwood. The machine is to be used only for its prescribed purpose. Any use other than that mentioned is considered to be a case of misuse. The user/operator and not the manufacturer shall be liable for any damage or injury resulting such cases of misuse. The machine is to be 10 operated only with suitable saw blades. It is prohibited to use any type of cutting-off wheel. To use the machine properly you must also observe the safety regulations, the assembly instructions and the operating instructions to be found in this manual. All persons who use and service the machine have to be acquainted with this manual and must be informed about its potential hazards. It is also imperative to observe the accident prevention regulations in force in your area. The same applies for the general rules of occupational health and safety. The manufacturer shall not be liable for any changes made to the machine nor for any damage resulting from such changes. Even when the machine is used as prescribed it is still impossible to eliminate certain residual risk factors. The following hazards may arise in connection with the machineʼs construction and design: 앬 Contact with the saw blade in the uncovered saw zone. 앬 Reaching into the running saw blade (cut injuries). 앬 Kick-back of workpieces and parts of workpieces 앬 Saw blade fracturing. 앬 Catapulting of faulty carbide tips from the saw blade. 앬 Damage to hearing if essential ear-muffs are not worn. 앬 Harmful emissions of wood dust when the machine is used in closed rooms. Please note that our equipment has not been designed for use in commercial, trade or industrial applications. Our warranty will be voided if the machine is used in commercial, trade or industrial businesses or for equivalent purposes. 4. Important notes Please read this manual carefully and pay attention to the information provided. Use this manual to familiarize yourself with the machine, its correct use and safety regulations. The corresponding safety information can be found in the enclosed booklet. Anleitung BT-TS 800_SPK1:_ 25.09.2007 9:09 Uhr Seite 11 GB Noise emission values 앬 6. Before putting the machine into operation The sawʼs noise is measured in accordance with DIN EN ISO 3744; 11/95, E DIN EN 31201; 6/93, ISO 7960 Annex A; 2/95. The machine may exceed 85 dB(A) at the workplace. In this case, noise protection measures need to be introduced for the user (ear-muffs). Idling Sound pressure level LpA Sound power level LWA 92,2 dB 105,2 dB „The quoted values are emission values and not necessarily reliable workplace values. Although there is a correlation between emission and immission levels it is impossible to draw any certain conclusions as to the need for additional precautions. Factors with a potential influence on the actual immission level at the workplace include the duration of impact, the type of room, and other sources of noise etc., e.g. the number of machines and other neighboring operations. Reliable workplace values may also vary from country to country. With this information the user should at least be able to make a better assessment of the dangers and risks involved.“ 5. Technical data Asynchronous motor: Power rating: 230 V ~ 50 Hz 600 W S1 800 W S2 10 min Idle speed n0: Carbide saw blade: Number of teeth: Table size: Cutting height max. 90°: Cutting height max. 45°: Connector for dust extractor: Size, complete: Weight: 2950 rpm 200 x 16 x 2.4 mm 24 505 x 335 mm 45 mm 27 mm 앬 앬 앬 앬 앬 앬 The machine has to be set up where it can stand firmly, e.g. on a work bench, or it must be bolted to a strong stand. All the covers and safety devices have to be properly fitted before the machine is switched on. It must be possible for the saw blade to run freely. When working with wood that has been processed before, watch out for foreign bodies such as nails or screws etc. Before you actuate the On/Off switch, make sure that the saw blade is correctly fitted and that the machineʼs moving parts run smoothly. Before you connect the machine to the power supply, make sure the data on the rating plate is the same as that for your mains. 7. Assembly Always pull out the power plug before carrying out any maintenance or conversion work. 7.1 Fitting the saw blade (Fig. 2/3) 앬 Caution! Pull out the power plug. 앬 Unscrew the fixing screws (20) and remove chip bin cover (19). 앬 Undo the nut (21) with a ring wrench (30) on the nut itself and a face spanner (31) on the saw shaft to apply counter-pressure. 앬 Caution! Turn the nut in the direction of rotation of the saw blade (4). 앬 Take off the outer flange (22) and pull the old saw blade (4) off the inner flange by dropping the blade at an angle. 앬 Clean the mounting flange. 앬 Fit the new saw blade in reverse order. 앬 Caution! Note the direction of rotation (see arrow on the saw blade). dia. 24 mm 505 x 335 x 320 mm 10 kg Load factor: A load factor of S2 10 min (intermittent periodic duty) means that you may operate the motor continuously at its nominal power level (800 W) for no longer than the time stipulated on the specifications label (10 minutes ON period). If you fail to observe this time limit the motor will overheat. During the OFF period the motor will cool again to its starting temperature. 7.2 Adjusting the splitter (Fig. 4-6) 앬 Remove the saw blade guard (2) (see 7.3). 앬 Take out the table insert (6) (see 7.4). 앬 Slacken the two hexagon socket-head screws (24). 앬 Adjust the splitter (5) so that the gap between the saw blade (4) and the splitter (5) equals 3 - 5 mm (see Fig. 6) 앬 The splitter (5) has to be in line with the saw blade (4) in longitudinal direction. 앬 Retighten the two screws (24). 앬 The setting of the splitter has to be checked each 11 Anleitung BT-TS 800_SPK1:_ 25.09.2007 9:09 Uhr Seite 12 GB time after changing the saw blade. 8.3 Adjusting the angle (Fig. 9/10) Slacken the star-grip screws (14). You can now adjust the blade (4) to the required angle (see scale (13)) by sliding the two star-grip screws (14). 앬 Re-tighten the star-grip screws (14). 앬 7.3 Fitting the saw blade guard (Fig. 4) 앬 Mount the saw blade guard (2) on the splitter (5) and align. 앬 Insert the screw (15) through the hole in the saw blade guard (2) and in the splitter (5) and secure it with the nut. 앬 To remove the saw blade guard, proceed in reverse order. 앬 7.4 Replacing the table insert (Fig. 4) 앬 Caution! Pull out the power plug. 앬 Remove the 6 screws (23). 앬 Take off the saw blade guard (2) (see 7.3). 앬 Lift the worn table insert (6) up and out. 앬 Fit a new table insert in reverse order. After each new adjustment it is advisable to carry out a trial cut in order to check the set dimensions. After switching on the saw, wait for the blade to reach its maximum speed of rotation before commencing with the cut. Secure long workpieces against falling off at the end of the cut (e.g. with a roller stand etc.) Take extra care when starting the cut! 8. Using the saw 8.1 On/Off switch (Fig. 1) 앬 The saw can be switched on by pressing the green pushbutton �. 앬 The red pushbutton � has to be pressed to switch off the saw. 8.2 Parallel stop 8.2.1 Stop height (Fig. 7/8) 앬 The parallel stop (7) supplied with the benchtype circular saw has two different guide faces. 앬 For thick material you must use the stop rail (25) as shown in Fig. 7, for thin material you must use the stop rail as shown in Fig. 8. 앬 To change the height of the stop, slacken the two knurled screws (12) and pull the stop rail off the carrier rail. 앬 Turn the stop rail (25) 180° to the left or the right, depending on the required height of the stop, and plug in back on the carrier rail (26). 앬 Re-tighten the knurled screws (12). 8.2.2 Cutting width (Fig. 8) 앬 The parallel stop (7) has to be used when making longitudinal cuts in wooden workpieces. 앬 Slide the parallel stop (7) to the right or left side of the saw table (1). 앬 The parallel stop (7) can be set to the required dimension with the help of the scale (b) engraved on the saw table (1). 앬 Tighten the two thumb screws (12) in order to fix the parallel stop (7). 12 9. Sawing operations 9.1 Cutting narrow workpieces (width less than 120 mm) (Fig. 11) 앬 Adjust the parallel stop (7) to the width of workpiece you require. 앬 Feed in the workpiece with two hands. Always use the push stick (3) in the area of the saw blade (4). (A push stick is supplied with the saw!) 앬 Always push the workpiece through to the end of the splitter (5). 앬 Caution! With short workpieces, use the push stick from the beginning. 9.2 Cutting extremely narrow workpieces (width less than 30 mm) 앬 Adjust the parallel stop (7) to the width of workpiece you require. 앬 Use the push block (d) to press the workpiece against the stop rail (25) and push the workpiece with the push stick (3) through to the end of the splitter (5). There is no push block supplied with the saw! (Available from your specialist dealer) 10. Cleaning, maintenance and ordering of spare parts Always pull out the mains power plug before starting any cleaning work. 10.1 Cleaning Keep all safety devices, air vents and the motor housing free of dirt and dust as far as possible. Anleitung BT-TS 800_SPK1:_ 25.09.2007 9:09 Uhr Seite 13 GB Wipe the equipment with a clean cloth or blow it with compressed air at low pressure. We recommend that you clean the device immediately each time you have finished using it. Clean the equipment regularly with a moist cloth and some soft soap. Do not use cleaning agents or solvents; these could attack the plastic parts of the equipment. Ensure that no water can seep into the device. 10.2 Carbon brushes In case of excessive sparking, have the carbon brushes checked only by a qualified electrician. Important! The carbon brushes should not be rep laced by anyone but a qualified electrician. 10.3 Maintenance There are no parts inside the equipment which require additional maintenance. 10.4 Ordering replacement parts: Please quote the following data when ordering replacement parts: Type of machine Article number of the machine Identification number of the machine Replacement part number of the part required For our latest prices and information please go to www.isc-gmbh.info 11. Disposal and recycling The unit is supplied in packaging to prevent its being damaged in transit. This packaging is raw material and can therefore be reused or can be returned to the raw material system. The unit and its accessories are made of various types of material, such as metal and plastic. Defective components must be disposed of as special waste. Ask your dealer or your local council. 13 Anleitung BT-TS 800_SPK1:_ 25.09.2007 Konformitätserklärung k t p m O U q T B Q Z z erklärt folgende Konformität gemäß EU-Richtlinie und Normen für Artikel declares conformity with the EU Directive and standards marked below for the article déclare la conformité suivante selon la directive CE et les normes concernant lʼarticle verklaart de volgende conformiteit in overeenstemming met de EU-richtlijn en normen voor het artikel declara la siguiente conformidad a tenor de la directiva y normas de la UE para el artículo declara a seguinte conformidade de acordo com a directiva CE e normas para o artigo förklarar följande överensstämmelse enl. EUdirektiv och standarder för artikeln ilmoittaa seuraavaa Euroopan unionin direktiivien ja normien mukaista yhdenmukaisuutta tuotteelle erklærer herved følgende samsvar med EUdirektiv og standarder for artikkel заявляет о соответствии товара следующим директивам и нормам EC izjavljuje sljedeću uskladjenost s odredbama i normama EU za artikl. declarå urmåtoarea conformitate cu linia directoare CE μi normele valabile pentru articolul. ürün ile ilgili olarak AB Yönetmelikleri ve Normlar∂ gere©ince aμa©∂daki uygunluk aç∂kla mas∂n∂ sunar. ‰ËÏÒÓÂÈ ÙËÓ ·ÎfiÏÔ˘ıË Û˘Ìʈӛ· Û‡Ìʈӷ Ì ÙËÓ √‰ËÁ›· ∂∂ Î·È Ù· ÚfiÙ˘Ô ÁÈ· ÙÔ ÚÔ˚fiÓ 9:09 Uhr Seite 46 ISC-GmbH · Eschenstraße 6 · D-94405 Landau/Isar C l j A X W e 1 . G 4 H E dichiara la seguente conformità secondo la direttiva UE e le norme per lʼarticolo attesterer følgende overensstemmelse i henhold til EU-direktiv og standarder for produkt prohlašuje následující shodu podle směrnice EU a norem pro výrobek. a következő konformitást jelenti ki a termékekre vonatkozó EU-irányvonalak és normák szerint pojasnjuje sledečo skladnost po smernici EU in normah za artikel. deklaruje zgodność wymienionego poniżej artykułu z następującymi normami na podstawie dyrektywy WE. vydáva nasledujúce prehlásenie o zhode podľa smernice EÚ a noriem pre výrobok. деклаpиpа следното съответствие съгласно диpективите и ноpмите на ЕС за пpодукта. заявляє про відповідність згідно з Директивою ЄС та стандартами, чинними для даного товару deklareerib vastavuse järgnevatele EL direktiivi dele ja normidele deklaruoja atitikti pagal ES direktyvas ir normas straipsniui izjavljuje sledeçi konformitet u skladu s odred bom EZ i normama za artikl Atbilstības sertifikāts apliecina zemāk minēto preču atbilstību ES direktīvām un standartiem Samræmisyfirl‡sing sta›festir eftirfarandi samræmi samkvæmt reglum Evfrópubandalagsins og stö›lum fyrir vörur Tischkreissäge BT-TS 800 X 98/37/EG 87/404/EWG X 2006/95/EG R&TTED 1999/5/EG 97/23/EG 2000/14/EG: 89/336/EWG_93/68/EEC 95/54/EG: 90/396/EWG 97/68/EG: X 89/686/EWG EN 61029-2-1; EN 61029-1; EN 55014-1; EN 55014-2; EN 61000-3-2; EN 61000-3-3; TÜV Product Service GmbH; M6 07 09 24192 345 Landau/Isar, den 12.04.2007 Weichselgartner General-Manager Art.-Nr.: 43.407.60 I.-Nr.: 01017 Subject to change without notice 46 Baumstark Product-Management Archivierung: 4340760-28-4155050-07 Anleitung BT-TS 800_SPK1:_ 25.09.2007 9:09 Uhr Seite 47 k Nur für EU-Länder Werfen Sie Elektrowerkzeuge nicht in den Hausmüll! Gemäß europäischer Richtlinie 2002/96/EG über Elektro- und Elektronik-Altgeräte und Umsetzung in nationales Recht müssen verbrauchte Elektrowerkzeuge getrennt gesammelt werden und einer umweltgerechten Wiederverwertung zugeführt werden. Recycling-Alternative zur Rücksendeaufforderung: Der Eigentümer des Elektrogerätes ist alternativ anstelle Rücksendung zur Mitwirkung bei der sachgerechten Verwertung im Falle der Eigentumsaufgabe verpflichtet. Das Altgerät kann hierfür auch einer Rücknahmestelle überlassen werden, die eine Beseitigung im Sinne der nationalen Kreislaufwirtschaftsund Abfallgesetzes durchführt. Nicht betroffen sind den Altgeräten beigefügte Zubehörteile und Hilfsmittel ohne Elektrobestandteile. t For EU countries only Never place any electric tools in your household refuse. To comply with European Directive 2002/96/EC concerning old electric and electronic equipment and its implementation in national laws, old electric tools have to be separated from other waste and disposed of in an environment-friendly fashion, e.g. by taking to a recycling depot. Recycling alternative to the demand to return electrical devices: As an alternative to returning the electrical device, the owner is obliged to cooperate in ensuring that the device is properly recycled if ownership is relinquished. This can also be done by handing over the used device to a returns center, which will dispose of it in accordance with national commercial and industrial waste management legislation. This does not apply to the accessories and auxiliary equipment without any electrical components which are included with the used device. p Uniquement pour les pays de l'Union Européenne Ne jetez pas les outils électriques dans les ordures ménagères. Selon la norme européenne 2002/96/CE relative aux appareils électriques et systèmes électroniques usés et selon son application dans le droit national, les outils électriques usés doivent être récoltés à part et apportés à un recyclage respectueux de l'environnement. Possibilité de recyclage en alternative à la demande de renvoi : Le propriétaire de lʼappareil électrique est obligé, en guise dʼalternative à un envoi en retour, à contribuer à un recyclage effectué dans les règles de lʼart en cas de cessation de la propriété. Lʼancien appareil peut être remis à un point de collecte dans ce but. Cet organisme devra lʼéliminer dans le sens de la Loi sur le cycle des matières et les déchets. Ne sont pas concernés les accessoires et ressources fournies sans composants électroniques. 47 Anleitung BT-TS 800_SPK1:_ 25.09.2007 9:09 Uhr Seite 54 t GUARANTEE CERTIFICATE Dear Customer, All of our products undergo strict quality checks to ensure that they reach you in perfect condition. In the unlikely event that your device develops a fault, please contact our service department at the address shown on this guarantee card. Of course, if you would prefer to call us then we are also happy to offer our assistance under the service number printed below. Please note the following terms under which guarantee claims can be made: 1. These guarantee terms cover additional guarantee rights and do not affect your statutory warranty rights. We do not charge you for this guarantee. 2. Our guarantee only covers problems caused by material or manufacturing defects, and it is restricted to the rectification of these defects or replacement of the device. Please note that our devices have not been designed for use in commercial, trade or industrial applications. Consequently, the guarantee is invalidated if the equipment is used in commercial, trade or industrial applications or for other equivalent activities. The following are also excluded from our guarantee: compensation for transport damage, damage caused by failure to comply with the installation/assembly instructions or damage caused by unprofessional installation, failure to comply with the operating instructions (e.g. connection to the wrong mains voltage or current type), misuse or inappropriate use (such as overloading of the device or use of non-approved tools or accessories), failure to comply with the maintenance and safety regulations, ingress of foreign bodies into the device (e.g. sand, stones or dust), effects of force or external influences (e.g. damage caused by the device being dropped) and normal wear resulting from proper operation of the device. The guarantee is rendered null and void if any attempt is made to tamper with the device. 3. The guarantee is valid for a period of 2 years starting from the purchase date of the device. Guarantee claims should be submitted before the end of the guarantee period within two weeks of the defect being noticed. No guarantee claims will be accepted after the end of the guarantee period. The original guarantee period remains applicable to the device even if repairs are carried out or parts are replaced. In such cases, the work performed or parts fitted will not result in an extension of the guarantee period, and no new guarantee will become active for the work performed or parts fitted. This also applies when an on-site service is used. 4. In order to assert your guarantee claim, please send your defective device postage-free to the address shown below. Please enclose either the original or a copy of your sales receipt or another dated proof of purchase. Please keep your sales receipt in a safe place, as it is your proof of purchase. It would help us if you could describe the nature of the problem in as much detail as possible. If the defect is covered by our guarantee then your device will either be repaired immediately and returned to you, or we will send you a new device. Of course, we are also happy offer a chargeable repair service for any defects which are not covered by the scope of this guarantee or for units which are no longer covered. To take advantage of this service, please send the device to our service address. 54