1
Rl·ad This!
Read This!
Cubasc - Atari
I-1
Read This!
There are some pitfalls we want you to make sure to avoid, and some advice we want to give, before you start to work with Cubase Audio.
Software Licensing
At the back of this manual you will find a software licensing contract Read
this before you install Cubase Audio. By opening the sealed pack of disks or
sending back the registration card, you are declaring yourself to be in agreement with the conditions in the contract.
Installation
Plca<;e foll<lw the instructions in the Installation chapter meticulously or the
program 111ight not run properly.
Registration card
Send in the registration card! That's the only way for us to know that you exist. And we do want to know, believe us. If we receive the registration you will
be informed of upgrades of the program. There may be other direct benefits as
well, printed on the card.
Computer
This program runs on any Atari ST/STe, Mega ST/STe, TT or Falcon with at
lea<>t two megabyte of RAM, but we recommend four. We also recommend
you to usc TOS 1.4 or later. Cuhase can be made to autostart by selecting "Install Application" from the Desktop.
Monitor
This program works with Atari monochrome monitors, like the 12" SM-124
or SM-12:1 or the 19" SM-194. Other monochrome monitors may work. On
the 1T you may usc the program with a colour monitor in medium resolution
mode. On the Falcon you may use a VGA monitor. But please note that using
many colours makes the computer run slower.
Hard Disk and SCSI
Using Cuhasc with the CBX-D5 requires you to connect the computer and the
hard disk via SCSI. The ST/STe and Mega ST/STe don't have a SCSI connector. With these you have to connect a Steinberg "DMA To SCSI Mkll" (please
note that it has to be the "Mark II" model). Other brand converters will not
work!
I-2
Cubasc - Atari
Read This!
The requirements on the hard disk(s) are dictated by the Yamaha CBX-05.
Contact your dealer for a list of hard drives recommended by St<.:inhcrg and
Yamaha.
Do not use your internal hard disk for recording audio!
Program Disk
The program comes on a number of double sided disks. None of them arc copy
protected. You might not need all files on the original disks, sec page 2-2.
Backups
The first thing you do, make backups of the original disks that come with the
package. You can copy them to other 3.5" floppies or to a hard disk. II you arc
not familiar with this procedure, consult your Atari Operation Manual. The
disk is not copy protected and the copy will run if you have your Key (the
plastic cartridge that comes with the program) inserted into the cartridge port.
MIDI Interface
You can use CubaseAudio with the built in Atari MIDI connector only. However, the CBX-05 is connected to the computer via MIDI and if you plan to
use the "Sync Master:Cubase" synchronization feature (sec the Hardware Setup chapter), one MIDI Out connector should be reserved for the CBX-05
only. To then be able to connect other MIDI equipment to th<.: computer you
need an additional MIDI interface such as the Steinberg Midcx/Midcx+ or
SMPII.
The Hardware Key
To be able to run the program you must have the Key inserted into the cartridge port of your computer or into a Midcx or Midcx+ MIDI(fime code interface. The key is the verification to that you have actually txHJght the
program. If you loose it you have lost your program!
Never insert or remove the key with power turned on on the computer!
Make sure you don't put the key in upside down!
Defragmentation
When you create many files on your hard disk (as you do with audio recording) it will eventually become fragmented. Generally, fragmentation is not a
big problem with the Atari/CBX-D5 combination, but if the disk gets very severely fragmented, audio playback may suffer (the program will report if it
Cubase - Atari
1- 3
Read This!
has problems with the hard disk). You will then have to run a so called de/rag mentation program. For recommendations on which defragmentation program to usc, contact your Atari dealer.
If possible, keep the program files on one disk, and your audio and song files
on a separate disk.
Saving
Program crashes arc a well known fact in the computer industry, and a major
crash will probably result in that the material resident in memory is lost forever. The only way to insure yourself against disasters is to save regularly
while working or to usc the Autosavc function . You may run the program from
a RAM-di sk, hut we can't guarantee full functionality. Save your work regularly to ordinary disks, since RAM-disks are erased at power-down or after a
cra~h. Disks (even hard disks) can get damaged, so making backups of your
files is a must!
The ST/STEf fT/Falcon's MIDI Thru and MIDI cables
The Atari ST/STcm/Falcons' MIDI Out port is non-standard. It uses pins 1
and 3 in the conncaor as a MIDI Thru port. Unfortunately some MIDI cable
manufacturers shortcut these pins with the normal ones. This results in a hardware MIDI Thru function that can't be disabled. Make sure the MIDI cables
you usc arc of the right kind!
Accessories
You can usc Cubase with Accessory programs that follow the programming
conventions for the Atari computers. But beware, not all Accessories follow
the standard perfectly.
Steinberg can in no way guarantee the use of Cubase together with any
certain Au:essory or other type of utility program.
"Read Me" Files
There might be a file called "Read Me" on any of the disks that comes with
the program. This is a text file which describes any changes or additions to the
program that arc not stated in the manual. Double click on this file. Select one
of the two options in the dialog box, to either display the text on the screen or
to print it out on a printer.
I -4
Cubase- Atari
Read This!
Note OfT Controllers
Some Roland synthesizers send a MIDI message called All Notes Off as soon
as you release all keys on the keyboard. This may lead to very confusing results when the same synth is used to play back music from more than one
Track. If you experience this problem you should filter out this message using
the Controller filters in the MIDI Filter dialog box.
Running Status
There is a way to make MIDI transmission more compact, called Kunning
Status. This was not a part of MIDI from the beginning so not all units can ac cept this data compression method. If you experience problems with a Korg
DDDl or ODDS, an Ensoniq Mirage, a Sequential Prophet TX or a very old
Yamaha DX7 you should make sure that you are not transmining under Run ning Status from your computer. Check the setting in the MIDI Setup dialog
box. It will be obvious if you have this problem since the instrument will hardly play back sequenced material at all.
SMP-24
Users of the Steinberg SMP-24 must have software version 1.6 or higher to
make this unit work with Cubase. If you have an older software version, contact your dealer for an upgrade.
The Operation manual and Cubase Audio vs Cubao;e
This operation manual begins with a tutorial section showing you how to get
started with MIDI recording in Cubase. After that follow descriptions of all
aspects of the regular version of program, that is, the MIDI only version. The
audio aspects of the program are described in a separate section of this manual, at the end.
The whole manual is designed so that you don't have to read all the text, only
the sections that interest you. However, you should get familiar with all basic
operations as they are described in this book. At the end you will lind Indexes
so that you can look up any function or feature that you need to know more
about. In the back you also find a list of all computer keyboard commands.
Whenever the text in the manual refers to a key on the computer keyboard, the
key's name is shown in brackets, like this: [Return] .
Cubase - Atari
1- 5
Read This!
I -6
Cubase - Atari
Installation
Installation
Cubase - Atari
2- I
Installation
If your computer isn't already set up as it should be, do so, following the instructions in the computer's Operation Manual. You should also verify that the
computer works as it should. Make yourself reasonably familiar with operations like handling disks and using the mouse (clicking, selecting, doubleclicking and dragging).
Before connecting any hardware to the computer, make sure power is orr
on all units.
Installing MIDI Interfaces
The Atari computers have MIDI buill in, but you may want to add additional
MIDI connectors and time code sync. Steinberg manufacture MIDI peripherals for the Atari range of computers, the Midex, MideX+ (with time code sync)
and the SMPII (rackmounted with time code sync). The Midex and Midex+
also works as protection key expanders, allowing you to run several key protected program at the same time.
How to install the various MIDI interfaces is described in the documentation
that comes with the interface, but the general procedure is to connect the hardware and then activate a software driver. This last procedure is described on
page II in this chapter.
Installing a Printer
Exactly what cahlcs and what settings to make of course varies completely
with the type of printer you usc, and may include such things as changing the
printers so called "DIP switch settings". Please refer to the manuals that came
with your computer and the printer. If in doubt, ask your dealer for help. In the
Read Me File on the Program Disk you will find more information about compatible printers.
We recommend you to make sure the printer installation works as intended before trying to print a score. This will help you isolate the cause of any problems you may have.
2-2
Cubase - Atari
lmtallation
Installing SCSI and Hard Disks
The CBX-D5 and the hard disks (you may usc several!) for rccortling audio
are connected to the computer via SCSI (pronounced "scuzzy", short for Small
Computer System Interface, a world standard for data storage computer peripherals).
SCSI
0
0
The Atari TT and Falcon have SCSI built in, so users of these computers
may skip to the next heading, "Hard Disks".
With other Atari models you need a Steinberg "DMA To SCSI Mk II"
converter. Please observe that it has to be the Mark II model and that other
brand converters will not work.
How to install the Steinberg "DMA To SCSI Mkll" is described in the manual
that comes with it. The installation includes both hardware and software.
Please note that the computer will not be able to "boot" (start) from a hard disk
connected to the converter, you will need to have a floppy disk in the drive
when you tum on power.
Hard Disk
In the Yamaha "Questions and Answers" document that comes with your
CBX-D5 you will find a list of recommended hard disks. In the CBX D.'i lnanual you will find a very good general checklist for purchasing a SCSI IJ1 ive.
The drives normally come formatted. However, you will need to ini1alize and
partition them:
0
0
If you have an Atari TT or Falcon, initialisation and partitioning software
is included with the computer, and the procedures are dcscrib~ in the
manual that came with your computer.
If you use the Steinberg "DMA To SCSI MkJI" converter, the software
and instructions come with the converter.
Cubasc - Atari
2 -3
Installation
Setting SCSI IDs
All SCSI Devices must be set to unique IDs. The computer itself (or the SCSI
converter if you usc one) has a fixed SCSI ID set to 7. This means that no other
device can be set to SCSI ID 7.
CRX-D5
Yanwha recommend using SCSI ID 6 if you have one CBX-DS and SCSI ID
5 and 6 if you have two.
Hard di~ks wnm•cted to a DI\1A To SCSI Converter
Set the li rst hard disk to ID 0, the second to ID I etc.
Hard disks fonnected to an Atari IT
This computer has built in SCSI and a built in hard disk. This internal hard
disk is set to SCSI ID 0. Therefore, set the first external hard disk to I, the second to 2, etc.
Hard disks connected to a Falcon
Set the first hard disk to ID 0, the second to ID I etc.
The internal drive in a Falcon is not a SCSI drive at all and can not be
used to rerord audio!
We don't mean to discourage you, but setting up a network of SCSI peripherals docs contain some potential pitfalls. The CBX-DS manual and the computer/converter manual will give you further details and recommendations.
Install Devices
On the Atari computers, hard disks do not appear automatically on the Desktop the first time you tum on power. Select Install Devices from the Options
menu. This should make symbols for your hard drive(s) appear. Then select
"Save Desktop" from the same menu to make this configuration permanent.
The manual that came with your computer describes this procedure in detail.
2 -4
Cubase - Atari
Inst<JII<Jtion
Before you connect the CBX-DS to the computer, m<Jke sure all h<Jrd disks
operate as intended; that their symbols appear on the desktop, that you
can write to them and read from them without problems, etc.
Installing the CBX-DS(s)
Again we refer to the very comprehensive installation instructions in the manual the comes with the CBX-05. Specifically observe the following poinL~:
0
0
0
0
It is very important that you have your SCSI connections and terminations
done correctly.
If you have two CBX-D5s, install the second one on the SCSI chain, just
as with the first. Only use SCSI termination on the last CBX -D) in the
chain!
You must assign unique SCSI device IDs to all units on the SCSI ch<Jin.
If you have two D5s, you need to differentiate between them in Cuhase
Audio. Therefore, the CBX-05 with the highest SCSI ID will be assigned
the number "1" in Cubase Audio, the other will be assigned the number
"2".
0
The Atari Falcon is not mentioned in the Yamaha documentation, hut Falcon users may follow the Atari TT installation (except for the hard disk
SCSI IDs, see above).
MIDI Connections
You need to have communication from MIDI Out on the computer to MIDI In
on the CBX-05. If you have two CBX-05s, connect the MIDI Thru on the
first unit to MIDI In on the second.
The 05 can share MIDI connectors with other MIDI cquipmem, but it you
have the ability to reserve a specific MIDI port for the CBX-05 , we rlX:ommend you to do so.
If you plan to use the "Sync Master:Cubase" function in Cubase Audi11
(See Appendix 1 in the Audio part of this manual), you must reserve a
MIDI Out port for the CBX-DS. See the Hardware Specitiics chapter for
more details.
Cubasc · Atari
2-5
Installation
If you plan to usc the "Sync Master: OS" option (see Appendix 1 in the Audio
addendum), connect the MIDI Out on the 05 to the MIDI In of the computer.
This more or less requires that you have a Steinberg Midcx or SMPII, since
you also want to connect your keyboard and possibly MIDI sync sources to
the computer.
We do not recommend you to use so called MIDI mergers for this purpose.
If you have two D5s they must be connected to one MIDI In each.
Installing The MIDI Equipment
Depending on your setup, you may want to use other MIDI In and Outputs
than the computer's own. Since this is an option, the following text refers to
the built in MIDI connectors.
0
Connect the MIDI Out of the keyboard (or other MIDI device) you plan
to usc for recording, to the MIDI In of the computer.
0
Connect the MIDI Out of the computer to the MIDI In of the CBX-05.
0
Either connect the MIDI Thru of the CBX-DS to the MIDI In of the first
instrument or - if you have an extra MIDI Interface- use one MIDI Out
for the CBX-DS and another for your MIDI instrument<>. Continue to connect all units (maybe via MIDI Thru on each device) until they all have
their MIDI In connected to the computer. If you plan to use more than
three sound sources we recommend that you use a separate MIDI Thru
lxlx instead of the Thru jacks on each unit. If more than one instrument
do('sn't lwve a MIDI Thru, you will have to get a MIDI Thru box.
U
Make all audio connections on the MIDI equipment, tum on the instruments and verify that they sound (if possible).
Cl Set each instrument to receive on a certain MIDI Channel. Or if you have
multi-timbral instruments, set each Sound (Timbre, Part, Program, Patch)
to receive on a certain MIDI Channel.
2-h
Cubase - Atari
J
Installation
Installing the Copy Protection Key
Make sure that the computer's power is turned oil'!
0
0 . Insert the Key, the plastic cartridge that comes with the progralll into the
cartridge port of the computer. Make sure it is not upside down .
Installing the Program
Cubase Audio comes on four disks:
0
The Program Disk contains the Cubase Audio program ibdf and some
files (inside and out of folders) that go with it.
0
The other three disks contain additional files: Modules , Mixer Maps and
Drum Maps, example files (for the IPS and other things) , plu s printer
drivers and fonts needed for printing.
None of the files or disks are copy-protected so you may usc any n1cans of
copying that you find convenient.
You might not need all of these files, but it is very important to have the ones
you use in the right folders.
Before you start copying the files to a hard disk, make yourself a hack up
copy of all original disks as they were when they came from the factory.
You might need these at a later stage, for example when you huy additional hardware. Put the originals in a safe place and do the installation from
the backups.
Copying Files onto a Hard Disk
Copying the right files from the floppies is a relatively painless procedure. If
you wish, put everything in a folder or in the root directory, it doesn 't matter.
However, the relative positions between the files are very important, so when
Cubasc - Atari
'2 - 7
Installation
we say, "put thi s file at the same level as that file" they must both be visible at
the same time in a folder or in the root directory.
If you have an internal disk in your computer, put the program and additional
files on this.
However. all audio files should always be put on the external (SCSI) disk,
and it makes a good working habit to keep your Song files with your audio files. If you only have one SCSI disk (if you for example use the Steinberg" DI\1A to SCSI Mkll" converter) you must of course put all files on
thi'i d isk.
The Program Disk
On this di sk you will find a complete set of files absolutely needed to run the
program . CUBASE_A.PRG is of course the program itself. To be able to use
it you also need two folders called CUBASE.DAT and MROS, plus a folder
called SCSI_DRV.
0
The CU BASE.DAT folder must be found at the same level as the CUBAS E. PRG. It contains a number of ".SYS" files you shouldn't touch. It
al so conwins a number of font (" .FNT") files that you shouldn't touch either.
U
The MROS folder must also be at the same level as CUBASE.PRG. It
contai ns the M·ROS iL<;elf and drivers for Devices you can use. A driver
is a fil e with a name that is an abbreviation of the device's name and
whi ch has the suffix "DRY" (or if it is deactivated, only "DR"), for example "MIDEX .DRY ". Generally, don't keep any drivers here that you don't
need.
U The folder called SCSI DRY contains files needed for SCSI communication. This folder should also be found at the same level as the CUBASEPRG , and you should not touch its contents.
U On the program disk you will also find a file called DEF.ALL. You shou'ld
definitely keep this on your working disk and at the same level as your
Cubase Program file, because it will make the program start with sensible
settings. You can later alter this file or replace it with your own and thereby customize the program.
2-X
Cubase - Atari
.---.......
"---/
Installation
0
And finally, there might be a README text-file (or even a DOC Folder
with README files in it) on the Program Disk that contains additional
information and info about possible changes made to the program since
this manual was written. Double click on it and select Show or Pr int from
the dialog box that appears. If you select show you can at any tin •e ret urn
to the desktop by pressing [0]. This file is of course not net.xkd to run ( ·ubase.
Read the README file(s). They contain important information !
The Additional Files disks
On the three additional disks you will find a number files in and out of folders .
0
The MODULES folder contains all the modules that come frec with the
program. The Modules files have the extension ".MOD ". Modulcs that
you will want to use in everyday work should be moved to the samc fo lder
as your Cubase Program file on your hard disk. This will makc the program find them automatically and add them to the list of available modules. The following modules come with the progmm:
MIDIPROC.MOD
MIXER.MOD
IPS.MOD
SCORES .MOD
The MIDI Processor.
The MIDI Mixer.
The Interactive Phrase Synthesizer.
Score Editing and Printing.
Additional modules can be purchased separately. Installation instructions
for those comes with the Module.
0
The folder D5_MIX contains mixer maps for the Yamaha CU X-D'i. If yo u
only have one CBX-D5 you may not need these files , si ncc th e prog ram
will automatically start with the Mixer called BASICI--LMIX loaded.
However, when you get better acquainted with the system you may want
to try out one of the alternative mixers. Users of two CBX-D5s will find
special Mixer Maps in this folder.
0
One folder is called PRINTERS. This contains files needed for printing
on certain printers. You might be able to identify the printer you own by
the name of the file . If you don't find your printer there, look in the printer's manual for information about models it is compatible with , and use
that file instead. Additional information about each printer driver (e.g. the
Cubase - Atari
2-9
Installation
full name) is also found in a READ_ME file. For instance, many nine dot
printers arc compatible with the Epson FX-80 and therefore should use
the EPSONFX .PRN driver. Since you only use one printer at a time you
only need one of these files . Put the printer file you plan to use on the same
disk and at the same level as the Cubase Program.
Q
Two folders arc called FONTS, and contain type faces needed for score
printing.
The folder on the" Additional Files 1" disk contains screen fonts (the
ones disph•~· t•d in the program) and printer fonts for printing on dot
matrix printers. The FONTS folder on the "Additional Files 2" disk
contains printer fonts for printing on a laser printer.
Copy either FONTS folder on to the same "level" as the Cubase program.
Either way, the FONTS folders will be needed when printing. If not found
on the same level as Cubasc Audio, the program will ask you for it and
display a dialog box, so you can locate it The program will then remember where it was.
Two of the fonts are special Cubase designs needed to print symbols and
chords . These arc called CUBANT and CHORDS. In the CUBASE.DAT
folder you will already find the files needed to display these on screen.
But, two additional type faces come with the program. One is called
Dutch (Times comparable) and the file names for it contain the abbreviation "ATTR ". The other is called Swiss (Helvetica comparable) and its
name contains "ATSS".
In order for you to display these on the screen, you need have one or more
font files of the "plain" type (for example ATTRIO, 12, 18 and 24 without
any EP, SP or LS additions) in the CUBASE.DAT folder. The CUBASE.DAT folder on the Program Disk already contains a "ATTRlO" file and
you actually only need to keep the ATTR10/ATSS10 files there to be able
to usc both fonts. This will make text in other sizes than 10 point a bit jagged and ugly on screen, but then again it will save more memory for music (you will be able to record more notes) which is probably more
important in most ca~es. Note that it is only on the screen the font will be
displayed in a less pleasant way, when printing it will come out with full
rcso Iution.
2- 10
Cubase - Atari
Installation
You can also buy additional standard GEM fonts (also called GOOS
fonts) at your Atari dealer, and use them in the same way as the Dutch and
Swiss fonts.
The font files included support excellent quality output up to 300 dpi (dots per
inctl) and if a font with an even higher resolution is found in the FONTS folder
(and can be utilized with the printer you have) it will be used .
a
Other folders are EXAMPLES, DRUMSETS, MIXERMAP and
SCORES . These contain example files of ArrangemenL~, Drum Maps,
Mixers and so on. Load these whenever you are familiari1ing yourself
with a new part of Cubase and want something to sLart from. These files
are not needed for everyday usc.
a
There is also an IPS folder which contains DEF.COM and other tiles for
the Interactive Phrase Synthesizer. More on this in chapter 32.
a
There is a (deactivated) accessory called KEYSLOT.AC which is needed
if you have a MIDEX or MIDEX+ and use non-Steinberg programs with
hardware keys for copy protection. More info in the README document.
a
There's another (deactivated) accessory called SPOOLER .AC, which allows you to print scores in the background.
a
A folder called ATARI_TT contains alternative M•ROS drivers for the
Atari TT computers and a folder called MIDXFALC con La ins <m alternative MIDEX M•ROS drivers for the Atari Falcon computer.
Launching Cubase
a
Turn on the printer (if you have any).
a
Turn on the hard disk(s) and the CBX-DS.
a
Turn on the computer. The screen should come alive, showing the desktop. Open the folder where you have the Cubase Audio program .
a
Locate the MROS folder, and double click on it to open it. In it you will
find a number of files with the extension ".DR" . These arc the drivers for
Cubasc - Atari
2- 11
Installation
any devices you want to usc (like the Steinberg MIDEX, SMP-24 or
TimcLock). You now have to activate these drivers. This is done by
changing the extension in their name from ".DR" to ".DRV". Select the
first tile (click on it so that it turns black). Select "Show Info" from the
File menu. When the dialog box appears, press "V" on the computer keyboard so that a "V" is added to the end of the name of the file. Click OK
or press !Return] on the computer keyboard, and the dialog box closes.
Coni inue in this way to activate the drivers you need (usually not more
than one) .
If you hare an Atari n· and a Midex!Midex+, use the file MIDXTT.DR
found in a folder ~:ailed ATARI TT on one of the additional files disks!
If you have a Falcon and a Midex!Midex+, use a file called MIDEXFA I ,. DR found in the MROS folder on the Program disk. Please note
that older Midex's must be modified to work with the Falcon!
r.J Double click on the Cubase Audio program icon. The desktop should immediately disappear and after a while an Arrange window with the title
DEF.ARR should be displayed.
!.J
If you have :m Atari computer without a battery backed up clock, you will
he prompted to enter the date and time. CubaseAudio relies on your audio
files hcing rca~onably accurately "time stamped", so this must be filled
out with a correct time and date.
Before you go on, make sure that your MIDI Thru setting is correct (see
the "MIDI Setup" section in the chapter "The Options menu"). If you
use a synth for recording, set this to Local Off if possible, and Cubase to
Thru On (in the MIDI Setup Dialog box on the Options menu). If you use
a separate MIDI device like a MIDI keyboard with no sounding capabilities, a guitar to MIDI converter with no built in synth or similar, Cubase
should also be set to Thru On. If you use a synth or similar that can't be
set to Local 011', the options are a little bit more complicated due to the
nature of MIDI.
·
2- 12
Cubase - Atari
Installation
If you have your keyboard set to Local Off, or if you have a separate rnaqer key boa rd,
you should have MIDI Thru Active ticked and Thru Off Channel set
a
to
(>I- F.
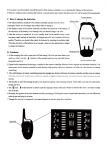
Play your MIDI keyboard or other device. Check the "I" box on the TrJnsport Bar so that you are sure that Cubasc receives MIDI data. If you have
Thru activated, the "0" box just below it should indicate Output of data
also.
il
The I and 0 symbols on the Transport Bar indicate MIDI In and Out Jctivity.
a
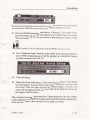
Select "Hardware Setup" from the Audio menu. In the dialog that appears,
use the MIDI Output pop-up to tell the program lO which MIDI Output
you have connected the CBX-D5.
CBH-05 Digital Rudio Setup
a
Close the dialog.
a
Select Save from the file menu. Click on the Song alternative in the dialog
box that appears. In the file dialog, type in DEF on the fi lc name Iinc and
click Save. This will make sure that the setting changes you have just
made will be made permanent (for more info on the DEF.ALL Song, sec
the chapter The File Menu.).
This completes the Installation procedure. Please proceed to the next chapter
to get acquainted with MIDI Recording, and then to the Getting Started chapter in the Audio part of this manual to try out audio recording .
Cubase - Atari
2- 13
Installation
2- 14
Cubase - Atari