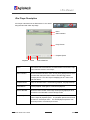
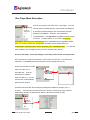
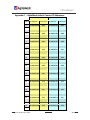
1
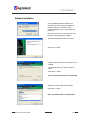
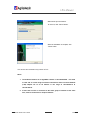
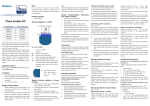
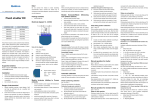
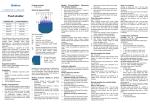
AgileMesh™ i-Pro Viewer
User’s Guide
Version 1.2.5a
November 14, 2008
i-Pro Viewer
Table of Contents
Table of Contents...............................................................................................................................2
Introduction ........................................................................................................................................3
Software Installation...........................................................................................................................4
Overview ............................................................................................................................................6
Initial Setup ........................................................................................................................................7
Adding a camera using Server Manager ...........................................................................................9
Viewing Cameras.............................................................................................................................11
On Screen Display ...........................................................................................................................12
Setting the date and time on cameras .............................................................................................12
General Tab & Buttons ...................................................................................................................13
Record Tab & Buttons......................................................................................................................14
Recording Setup ............................................................................................................................15
Image Tab & Slider Bars ................................................................................................................16
PTZ Tab & Buttons ..........................................................................................................................17
Pan/Tilt Control ................................................................................................................................18
i-Pro Player Description ...................................................................................................................19
i-Pro Player Menu Description .........................................................................................................20
Trouble Shooting Tips......................................................................................................................21
Appendix 1 – AgileMesh default Camera IP Addresses ..................................................................22
Appendix 2 – AgileMesh camera naming convention......................................................................23
© 2008 AgileMesh, Inc. Reproduction in whole or in part without written permission is prohibited. All rights
reserved. AgileMesh and the AgileMesh logo are trademarks of AgileMesh. All other trademarks are trademarks or
registered trademarks of their respective owners.
The information in this document is for information only and subject to change without notice. While reasonable
efforts have been made in the preparation of this document to assure its accuracy, AgileMesh assumes no liability
resulting from errors or omissions in this document, or from the use of the information contained here. AgileMesh
reserves the right to make changes or revisions in the product design or the product manual without reservation
and without obligation to notify any person of such revisions and changes.
Printed in USA.
i-PRO Viewer User’s Guide
2/23
i-Pro Viewer
Introduction
i-Pro Viewer is the software that enables users to view and record the images
from AgileMesh cameras at up to 16 different locations simultaneously. i-Pro
Viewer also allows users the ability to control or Pan/Tilt/Zoom (PTZ)
AgileMesh cameras from any computer that has the i-Pro software installed on
it. Any analog camera can be connect to an AgileMesh node and can be
displayed by I-Pro Viewer. A few of the features supported by I-Pro Viewer
are:
•
Simultaneous Multi-Channel Monitoring (1/4/9/16 camera views)
•
Sequential and Full Screen Monitoring
•
Snap Shot for a still image and Recording
•
Playback with the i-Pro player
•
Image Attributes Adjustment
•
Pan/Tilt/Zoom Control
i-PRO Viewer User’s Guide
3/23
i-Pro Viewer
Software Installation
Use the AgileMesh Master Installer CD or
download i-Pro Viewer form the AgileMesh
website (Products Software login.
Contact AgileMesh to get a unique login and
password.
Execute “i-Pro Viewer 1.2.5a Setup.exe” file to
install the viewing application software.
Select your language and click “OK” button.
Click “Next >“ button.
Assign the directory where I-Pro Viewer is to be
installed.
To change the directory, click the “Browse...”
button.
Click “Next >“ button.
Note: The default directory is recommended.
Assign the program folder to be installed.
Click “Next >“ button.
Note: The default folder is recommended.
i-PRO Viewer User’s Guide
4/23
i-Pro Viewer
Wait until the process finishes.
To cancel it, click “Cancel” button.
When the installation is complete, click
“Finish” button.
i-Pro Viewer can be loaded on any number of PCs.
Notes:
1. The default IP address of an AgileMesh camera is 192.168.224.XXX.
PCs used
to view and or record using I-Pro Viewer should have their local Area Network
(LAN) adapter set to an IP address in the range of 192.168.224.10 to
192.168.224.20.
2. If more than one PC is connected to the same group of cameras at the same
time, each PC should have a unique IP address.
i-PRO Viewer User’s Guide
5/23
i-Pro Viewer
Overview
Channel
Selection
Buttons
Viewing
Option
Buttons
Pan/Tilt
Control
Panel
Status
Window
Function Tab & Buttons
Display Window
Display Window
Shows images from cameras.
Channel Selection Buttons
Enables user to select the camera to control.
Viewing Option Buttons
Simultaneous Multi-Channel (1/4/9/16 camera view),
Sequential and Full Screen Monitoring.
Pan/Tilt Control Panel
Pan/Tilt Control. (Pan/Tilt and Zoom functions are
available on PTZ cameras with this button enabled)
Status Window
Shows Date & Time, Free Hard Disk Drive Space.
Function Tab & Buttons
Camera Connection, Setup, Record, Zoom Control,
Image Attributes Controls
i-PRO Viewer User’s Guide
6/23
i-Pro Viewer
Initial Setup
Locate and double-click the desktop icon for I-Pro Viewer to start the viewing
application.
i-Pro Viewer can be configured uniquely for each customer application.
The configuration will only be done once.
On the “General
tab” at the bottom left corner of the I-Pro Viewer frame,
click on the button that looks like an “ON/OFF” switch.
i-Pro Viewer
requires a password to start and stop the application.
A password
entry box will appear when I-Pro Viewer starts.
The default password
is “1234”.
Click on the “General tab” at the bottom left corner of the
I-Pro Viewer frame.
wrench.
Locate the button that resembles a
A single click on this button will bring up the “Setup” screen and allow the configuration
of I-Pro Viewer.
There are three tabs on the I-Pro Viewer Setup
screen.
The “General” tab, the “Recording” tab
and the “Sensor” tab.
The “Sensor” tab is not
implemented in the release.
The table below describes the options that can be
configured on the “General” tab.
Launch on Startup
Auto Connect
Language
Detect Language
Password
Clear Connect Information
Caption
Scan Interval
Use Sound for Sensor Alarm
i-PRO Viewer User’s Guide
Runs automatically when Windows starts
Connects to camera automatically as soon as it starts.
Language selection.
Detects the language version of Windows.
Set or change the password
Deletes all the previous connection information.
Selects the items to be displayed on the On Screen Display
Specifies the amount of time it shows images in the
Sequential Monitoring Mode (1 to 20 sec)
Not Implemented
7/23
i-Pro Viewer
The middle tab on the on the I-Pro Viewer
Setup screen is the “Recording” Tab.
The table below describes the options that can
be configured on the “Recording” tab.
The
“Record Interval” should be set to 1 Frame Per
Second (FPS) to conserve disk space.
Record Interval
Folder
Recording Size
Disk Margin
Delete Old Files
Frame rate to record. (FPS: Frames per Second)
Set to 1 FPS to save disk space.
Specifies the directory to record video. More than one hard
disk can be specified.
Shows selected Hard Disk Drive (HDD) Status. If you
select multiple HDDs in the folder above, you can set up the
disk margin for each HDD drive. If the recorded video file is
going to reach the Margin space in a HDD drive, it will
automatically switch the disk drive in alphabetic orders i.e.
C: D: E: etc.
Specifies the HDD free space that I-Pro Viewer will not use
for recording. The range is 100MB to 1GB. I-Pro Viewer
will not write over any existing applications. Set to 1GB.
When the all disks are full, this decides whether new files
overwrite the old files or not.
The right tab on the on the I-Pro Viewer Setup screen is the “Sensor” Tab. It is not implemented at
this time.
i-PRO Viewer User’s Guide
8/23
i-Pro Viewer
Adding a camera using Server Manager
Single click the “Connect” button on the “General” tab as
shown.
This will launch the Server Manager.
A single
click on “General” will select (highlight) it for editing.
to something meaningful to your application.
“SWAT Cams”.
Click “Edit” and rename the “General” entry
In this example, the “General” tab was changed to
Single- click“ SWAT Cams” to highlight it.
Next right click the highlighted “SWAT
Cams” and select “New Site” which will bring up the “Server Add” configuration box.
Select a
name for the camera to enter for “Server Name”. Camera IP addresses are set by the Node knob
on the front panel of the AgileMesh
equipment.
In this example, the
“Server Name” will be “Node 1”.
The IP address for a camera
connected
to
Node
1
is
192.168.224.52 and is entered in
“Server IP”.
not selected.
“DDNS Service” is
The “Video Port” is set to 7000 plus the last octet of the “Server IP” address, which
is 7000 + 52 or 7052 for this example.
The “User ID” and “User Password” are both “admin”.
Click “OK” to save the configuration.
Appendix 1 lists the camera IP addresses for each setting of the
Node knob on AgileMesh equipment.
Note: For AgileMesh dual video nodes, with the Node set to Node
1, consider the “Server Name” for the first camera to be Node 1A
and the second camera to be Node 1B.
i-PRO Viewer User’s Guide
9/23
i-Pro Viewer
Additional cameras can be added by a single-click to “SWAT
Cams” (this will highlight it).
Next right click the highlighted
“SWAT Cams” and select “New Site” which will bring up the
“Server Add” configuration box.
Refer to Appendix 1 for
the camera IP addresses and video port numbers.
Click
“OK” to add the second camera.
Note:
Alphanumeric characters can be used in the Server Name
(camera name), but the Server Name (camera name) must
start with a letter of the alphabet.
To view the video from ALL cameras, highlight “SWAT Cams”
and click “Connect”.
To view an individual camera, highlight
“Node 1” and click “Connect”.
An alternate method of
bringing up the video from all cameras is to click on
“Connect All” to connect all cameras that have been
configured and are set up.
Click on CH1 (upper left viewing location), This will select and
outline with a yellow rectangle, the first viewing location.
Individual cameras can be added into any viewing location
selected and outlined with a yellow rectangle.
Note: Make sure that a “Disconnect All” is clicked to shut down the video streams from all
cameras before clicking on “Connect All” again.
Multiple clicks to “Connect All” will result in multiple
copies for the same video streams presented by I-Pro
Viewer.
Multiple copies of the same video stream could limit the AgileMesh system
performance.
i-PRO Viewer User’s Guide
10/23
i-Pro Viewer
Viewing Cameras
i-Pro Viewer can present the video from 1 to 16 cameras on a display at one time.
Selection and Viewing Option controls are described below.
The Channel
Notice that
the 16 viewing locations in i-Pro
Viewer are labeled “CH1” through
“CH16”. Clicking on one of the
Channel Selection buttons will
select the camera to be controlled.
The user can also click on the viewing location directly to
select a camera as well.
The Viewing Option Controls are used to display 1, 4, 9 or 16 cameras at a time.
The 4 buttons
that control the number of cameras
to be displayed at one time are
outlined in the enlargement of the
Viewing Option Controls at the right.
The Viewing Option Controls can
also be used to go to a full screen
view (without any control buttons
visible).
Clicking on the button outlined at the right will cause the current
view to become a full screen view without the I-Pro Viewer frame or
controls.
A right click on the mouse or pressing the “ESC” key will return
to the previous view.
The “Left Arrow” button on the Viewing Option
Controls is used to move to the previous video display and the “Right arrow” is used to move to the
next video display.
The center button (outlined to the right) on the bottom
row of the Viewing Option Controls can be used to rotate through a
sequence of camera views.
The rotation sequence depends on the 1, 4, 9 or 16 camera view as shown
below.
The
scan
described
interval,
in
the
as
Initial
Setup section, can be set
from 1 to 20 seconds.
i-PRO Viewer User’s Guide
11/23
i-Pro Viewer
On Screen Display
The OSD button on the General tab of I-Pro Viewer turns
on the On Screen Display on all video displays. The video
from a camera named 72P749B is displayed in the Channel
1 window as shown below.
Notice that this viewing window has been selected as indicated by the
yellow rectangle surrounding the frame.
Also notice that PTZ controls are enabled for this
camera and there are 2 active viewers connected to this camera.
Camera Name
PTZ control
enabled for this
Date & Time
camera
Channel Number
Number of active
viewers
Setting the date and time on cameras
Setting the time on all cameras is very important.
The date and time are used
by i-Pro Viewer to generate the filename of recorded clips.
Use the Agilemesh
program CamUtility to set the time on all connected cameras.
CamUtiltity can
be downloaded from the AgileMesh website or installed from the Master Installation CD.
i-PRO Viewer User’s Guide
12/23
i-Pro Viewer
General Tab & Buttons
General Tab
“On/OFF” Button
Enter or exit the program. (enter the iPro Viewer password for both)
“Setup” Button
Configure I-Pro Viewer. All channels
must be disconnected when choosing
this setting.
“i-PRO Player” Button
Playback the video recorded by i-Pro.
“Sensor Alarm List” Button
This function is not implemented in this
release.
“OSD” Button
On/Off button for On Screen Display,
that shows the camera name, date &
time and connected users.
“Disconnect All” Button
Disconnects all cameras connected on
the i-Pro.
“Connect All” Button
Connects all cameras configured in
i-Pro Viewer simultaneously.
“Connect/Disconnect” Button
Connect or Disconnect the selected
i-PRO Viewer User’s Guide
13/23
i-Pro Viewer
Record Tab & Buttons
Recording Tab
“Image Capture” Button
Saves an image of the selected video in JPEG
format to the directory of your choice.
“Schedule Record” Button
Refer to the “Recording Setup” for more information.
Note: All channels should be disconnected.
“Stop All” Button
Stops the recording function of all the channels.
“Record All” Button
Records all cameras that are streaming video
in i-Pro Viewer. A red “R” will appear in each
video display.
Note: The directory for recording video is
set in the General Tab Setup
Recording.
“Record” Button
Records the selected video.
appear in each video display.
A red “R” will
Note: The directory for recording video is
set in the General Tab Setup
Recording
i-PRO Viewer User’s Guide
14/23
i-Pro Viewer
Recording Setup
Recording Tab
Click “Schedule Recording” Button in the Recording Tab to set up the automatic schedule
recording function of each channel with assigned date & time.
Channel
The video source to record.
Cycle
Enables a user to record
video periodically by
year/month/week/day.
Start Date/Time
The date & time to start
recording
End Date/Time
The date & time to end
recording
Add
Adds a schedule recording
list.
Update
Update the schedule
recording lists.
Delete
Deletes a schedule
recording list.
Example)
List item 1 shows that i-Pro Viewer records the images of the
selected channel from 17:01 to 18:01 every day.
List item 2 shows that i-Pro Viewer records the images of the
selected channel from 06:01 to 08:01 every Saturday.
i-PRO Viewer User’s Guide
15/23
i-Pro Viewer
Image Tab & Slider Bars
Image Tab
“Color” Slider Bar, Set to + (color)*
(−) position : Black & White
(+) position : Color
“Contrast” Slider Bar, Set to 64
Contrast Adjustment (0 - 127)
“Brightness” Slider Bar, Set to 128
Brightness Adjustment (0 - 255)
“Quality” Slider Bar, Set to 3
Video Quality Adjustment.(5 Levels)
Note: The higher the video quality, the more
bandwidth is consumed.
“Resolution” Slider Bar, Set to 1 (320 X 240)
Video Resolution Adjustment. (160×120,
320×240, 640×480).
Note: The higher the video resolution, the
more bandwidth is consumed.
*Some AgileMesh cameras have an IR cut filter that will go
to black & white in low light conditions
i-PRO Viewer User’s Guide
16/23
i-Pro Viewer
PTZ Tab & Buttons
“Preset” List (0 – 128)
PTZ Tab
PTZ Tab
Shows preset list.
“Save” Button
Sets the pan/tilt device to move to selected preset position.
“Delete” Button
Deletes all the previous information of the selected preset.
“Move” Button
Commands the pan/tilt device to move to selected preset position.
Pattern, Swing and Group functions are not
presently supported
“Digital Output” Button
Not presently supported
“Iris” Button
Adjusts the Iris of camera.
“Focus” Button
Adjusts the Focus of camera.
“Zoom” Button
Adjusts the optical zoom of camera.
i-PRO Viewer User’s Guide
17/23
i-Pro Viewer
Pan/Tilt Control
Pan and Tilt functions are available for Pan/Tilt control capable cameras connected to the Camera
1 or Camera 2 input on AgileMesh AV7510 or AV7520 tactical nodes.
RS-485 differential pair for PTZ control.
bits, no parity and 1 stop bit.
The AgileMesh nodes use
The default protocol setup is Pelco-D, 2400 baud, 8 data
A green “P” will appear in the upper right corner of a viewing
window if the node has been setup for PTZ controls.
Using the mouse, left-click the arrows to move the selected camera in the direction of the arrows.
The camera will continue to move while an arrow is held down by the left mouse button and stops
moving when the left mouse is released.
If the cursor moves off of the arrow while the left mouse
button is held down, the camera will continue to move until it reaches a mechanical stop point on
the camera.
Note: Zoom control is found on the PTZ tab of i-Pro Viewer.
i-PRO Viewer User’s Guide
18/23
i-Pro Viewer
i-Pro Player Description
i-Pro Player is launced from the General tab of I-Pro Viewer
using the button with a film strip image.
Menu
Status Indicator
Player Screen
Playback Speed
Playback
Pause
Search Slide Bar
Menu
“File” allows search and selection of recorded video to be viewed. “Help”
menu indicates version of i-Pro Player.
Status Indicator
Shows information about the video currently being displayed such as the
recorded date & time, the frame number / the total frame number.
th
Example) 50/100 : The i-Pro Player is displaying the 50 frame of the
total 100 frames.
Playback Button
Plays the recorded video. If clicked during playback, the playback stops.
Pause Button
Pauses playback. Click again to continue with playback.
Search Slide Bar
Shows the frame number of the image currently being displayed. Move
the button on the Slide Bar to search through the file.
Playback Speed
Shows the frame rate for playback in seconds per frame. Click the arrow
mark to adjust its playback speed. The playback speed is 0.01seconds
per frame to 1second per frame. The default playback speed is 0.05
seconds per frame or 20 frames per second.
i-PRO Viewer User’s Guide
19/23
i-Pro Viewer
i-Pro Player Menu Description
From the i-Pro Player menu, select “File” “File Open”
From the
“Record” directory (default directory), select the file to be displayed
by selecting the Channel Number, the Camera Name, the Date
(formatted YYYYMMDD).
1\CAM\20040621.
Example) . \Record\Channel-
See Appendix 2 for AgileMesh camera naming
convention. The default directory for I-Pro Viewer is C:\Program
Files\Network Video Server\i-Pro Viewer\Record when downloaded from the AgileMesh website.
When I-Pro Viewer is loaded from the AgileMesh Installation CD, the default directory is:
C:\PROGRAM DATA\NETWORK VIDEO SERVER\I_PRO VIEWER\RECORD.
For Microsoft
Vista compliance, the recordings should not be in the “Program Files” directory.
See the “Initial Setup” section describing the “Recording” tab to set the recording location.
There could be up to 24 files in this directory, one for each hour of the day.
The format of the
video files is: YYYYMMDDHH.imi where the HH is the hour ranging from 00 to 23.
Another way to find the recorded
video is to select “File” “Recording List”
From the
Recording List, select the
channel to search (1 – 16), the
camera name, Year/Month/Day.
Select and click “Search”.
Information about the video file currently being displayed is available by selecting “File” “Property”.
The information includes the file name, file size, camera name, image resolution
(width/height), the date, the start/end time and the total number of frames of video.
i-PRO Viewer User’s Guide
20/23
i-Pro Viewer
Trouble Shooting Tips
If video from cameras connected into AgileMesh equipment cannot be viewed and or controlled
by I-Pro Viewer, check the follow list of common issues and resolutions.
Symptom
“Cannot find the
network video server”
Possible cause
Can you ping 192.168.225.150?
•
error message displayed
If not, is the PC running I-Pro Viewer connected to
powered up AgileMesh node?
•
Is the PC LAN address set to 192.168.224.XX (10 <= X
<= 20)
•
“No Signal” displayed
•
Verify server Manager Setup
o
Is the proper IP address entered?
o
Is the proper port entered?
o
Is the User ID and Password correct?
Battery voltage is too low, recharge the battery or power
from AC.
•
Check the camera cable (does camera move during
power-on-self-test?)
•
Make sure each AgileMesh nodes set to unique Node
numbers?
Users connected shows
If only one copy of i-Pro Viewer is running and more than one (of
3/20 (more than the
20) users is displayed in the lower right corner of an individual
normal 1/20)
camera display window, there may be multiple copies of the video
streaming to the viewer.
cameras view.
On the General Tab, select the 16
If some or all of the cameras are displayed more
than once, click the “All Disconnect” button on the General Tab.
Video from an IP camera
Only analog cameras connected to AgileMesh nodes can be
is not displayed on I-Pro
displayed and controlled by I-Pro Viewer.
Viewer
Pan/Tilt/Zoom Controls do
Does the analog camera have Pan/Tilt/Zoom functionality?
not work on my analog
Is the connection between AgileMesh node and the camera
camera connected to an
installed properly?
AgileMesh node.
controls (+ and -) are required.
Is the camera powered?
RS-485 PTZ
Are you logged in as the Administrator (admin)?
Is the protocol set to match the AgileMesh node.
The default
setup is Pelco-D, 2400 baud, 8 data bits, no parity and 1 stop bit.
i-PRO Viewer User’s Guide
21/23
i-Pro Viewer
Appendix 1 – AgileMesh default Camera IP Addresses
Camera 1
Camera 2
Node #
IP Address
Video Port #
IP Address
Video Port #
0
192.168.224.49
7049
192.168.224.50
7050
1
192.168.224.52
7052
192.168.224.53
7053
2
192.168.224.55
7055
192.168.224.56
7056
3
192.168.224.58
7058
192.168.224.59
7059
4
192.168.224.61
7061
192.168.224.62
7062
5
192.168.224.64
7064
192.168.224.65
7065
6
192.168.224.67
7067
192.168.224.68
7068
7
192.168.224.70
7070
192.168.224.71
7071
8
192.168.224.73
7073
192.168.224.74
7074
9
192.168.224.76
7076
192.168.224.77
7077
10
192.168.224.79
7079
192.168.224.80
7080
11
192.168.224.82
7082
192.168.224.83
7083
12
192.168.224.85
7085
192.168.224.86
7086
13
192.168.224.88
7088
192.168.224.89
7089
14
192.168.224.91
7091
192.168.224.92
7092
15
192.168.224.94
7094
192.168.224.95
7095
16
192.168.224.97
7097
192.168.224.98
7098
17
192.168.224.100
7100
192.168.224.101
7101
18
192.168.224.103
7103
192.168.224.104
7104
19
192.168.224.106
7106
192.168.224.107
7107
20
192.168.224.109
7109
192.168.224.110
7110
21
192.168.224.112
7112
192.168.224.113
7113
22
192.168.224.115
7115
192.168.224.116
7116
23
192.168.224.118
7118
192.168.224.119
7119
24
192.168.224.121
7121
192.168.224.122
7122
25
192.168.224.124
7124
192.168.224.125
7125
26
192.168.224.127
7127
192.168.224.128
7128
27
192.168.224.130
7130
192.168.224.131
7131
28
192.168.224.133
7133
192.168.224.134
7134
29
192.168.224.136
7136
192.168.224.137
7137
30
192.168.224.139
7139
192.168.224.140
7140
31
192.168.224.142
7142
192.168.224.143
7143
i-PRO Viewer User’s Guide
22/23
i-Pro Viewer
Appendix 2 – AgileMesh camera naming convention
Note: the camera name must not contain a dash (“-“) and should be limited
to 7 characters.
1st character is “1” or “7” based on AV15XX (also AV12XX) or AV75XX series
2nd character is “1” or “2” based on number of video servers
3rd character is “P” or “_” (underscore) based on Public Safety or not
4th – 6th characters are the last 3 digits of the node serial number
7th character is “A” or “B” is the camera 1 (A) or camera 2 (B)
EXAMPLES
11_504A is an AV1510, non-PS, serial # 0610504, camera 1
72P501A is an AV7520-PS, serial # 0670501, camera 1
72P501B is an AV7520-PS, serial # 0670501, camera 2
i-PRO Viewer User’s Guide
23/23