1
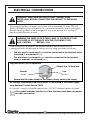
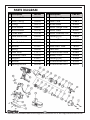
24V DC - 1/2” SQUARE DRIVE
IMPACT WRENCH KIT
Model No: CIR220
Part No 4500635
OPERATING & MAINTENANCE
INSTRUCTIONS
GC02/13
INTRODUCTION
Thank you for purchasing this CLARKE Impact Wrench.
Before attempting to operate the machine, it is essential that you read this
manual thoroughly and carefully follow all instructions given. In doing so you
will ensure the safety of yourself and that of others around you, and you can
also look forward to the product giving you long and satisfactory service.
GUARANTEE
This CLARKE product is guaranteed against faulty manufacture for a period of
12 months from the date of purchase. Please keep your receipt as proof of
purchase.
This guarantee is invalid if the product is found to have been abused or
tampered with in any way, or not used for the purpose for which it was
intended.
Faulty goods should be returned to their place of purchase, no product can
be returned to us without prior permission.
This guarantee does not effect your statutory rights.
CONTENTS
Introduction ............................................................................................ 2
Guarantee .............................................................................................. 2
Technical Specifications ....................................................................... 3
Safety Precautions ................................................................................. 4
Safety Symbols ....................................................................................... 7
Electrical Connections .......................................................................... 8
Component Inventory/Identification .................................................. 9
Battery Charging ................................................................................. 10
Operation ............................................................................................. 11
Maintenance ........................................................................................ 12
Spare Parts List and Diagram ............................................................. 14
Declaration of Conformity .................................................................. 15
2
Parts & Service: 020 8988 7400/E-mail:[email protected] or [email protected]
TECHNICAL SPECIFICATION
Feature
Specification
Dimensions (l x w x h)
246 x 97x 255 mm
Max bolt diameter
M14
Max tightening torque
220Nm
Impacts per minute
2700
Input voltage
230V/50Hz
Output voltage
DC-24V
Battery type
Nickel-Cadmium
Battery pack capacity
1.3 Amp/hr
Sound power level (Lp)
96 dB(A)
Sound pressure (Lw)
85 dB(A)
Sound power level guaranteed
99 dB(A)
Vibration level
11.4 m/s2
Uncertainty Factor
1.5 m/s2
Please note that the details and specifications contained herein, are correct
at the time of going to print. However, CLARKE International reserve the right
to change specifications at any time without prior notice.
3
Parts & Service: 020 8988 7400/E-mail:[email protected] or [email protected]
SAFETY PRECAUTIONS
WARNING: READ ALL INSTRUCTIONS. FAILURE TO FOLLOW ALL
INSTRUCTIONS LISTED BELOW MAY RESULT IN ELECTRIC SHOCK, FIRE AND
/OR SERIOUS INJURY. THE TERM” POWER TOOL” IN ALL WARNINGS
REFERS TO YOUR CIR220 IMPACT WRENCH.
WORK AREA
a. Keep the work area clean and well lit. Cluttered and dark areas invite
accidents.
b. Do not operate power tools in explosive atmospheres such as in the
presence of flammable liquids, gasses or dust. Power tools create sparks
which may ignite dust or fumes.
c. Keep children and bystanders away while operating a power tool.
Distractions can cause you to lose control.
ELECTRICAL SAFETY
a. Avoid body contact with earthed or grounded surfaces such as pipes,
radiators, ranges or refrigerators. There is an increased risk of electric
shock if your body is earthed or grounded.
b. Do not expose power tools to rain or wet conditions. Any water entering
power tools will increase the risk of electric shock.
c. When operating a power tool outdoors, use an extension cable suitable
for outdoor use. Use of a cable suitable for outdoor use reduces the risk of
electric shock.
PERSONAL SAFETY
a. Stay alert, watch what you are doing and use common sense when you
are operating a power tool. Do not operate a power tool when you are
tired, ill or under the influence of alcohol, drugs or medication. A moment
of inattention while operating a power tool may result in personal injury.
b. Use safety equipment. Always wear eye protection. Safety equipment
such as a dust mask, non-skid shoes or hearing protection used for
appropriate conditions will reduce personal injuries.
c. Avoid accidental starting. Ensure the switch is in the off position before
plugging the machine in to the power supply.
d. Do not over-reach. Keep your proper footing and balance at all times. This
enables better control of the power tool in unexpected situations.
4
Parts & Service: 020 8988 7400/E-mail:[email protected] or [email protected]
e. Dress properly. Do not wear loose clothing or jewellery. Keep your hair,
clothing and gloves away from moving parts. Loose clothes, jewelleryor
long hair can be caught on moving parts.
POWER TOOL USE AND CARE
a. Do not force the power tool. Use the correct power tool for your
application. The correct power tool will do a better and safer job at the
rate for which it was designed.
b. Do not use the power tool if the trigger does not turn it on and off. Any
power tool that cannot be controlled with the switch is dangerous and
must be repaired.
c. Disconnect the battery before making any adjustments, changing
accessories, or storing power tools. Such preventive measures reduce the
risk of starting the power tool accidentally.
d. Store idle tools out of the reach of children and do not allow persons
unfamiliar with these instructions to operate the power tool. Power tools
are dangerous in the hands of untrained users.
e. Maintain power tools. Check for misalignment or binding of moving parts,
broken parts, or any condition that may affect the power tools operation.
If damaged, have the power tool repaired before use. Many accidents
are caused by poorly maintained power tools.
f. Use the power tool and accessories in accordance with these instructions
and in the manner intended for the particular type of power tool, taking
into account the working conditions and the work to be performed. Use of
the power tool for operations different from intended could result in a
hazardous situation.
BATTERY TOOL USE AND CARE
a. Recharge only with the charger specified by the manufacturer. A charger
that is suitable for one type of battery pack may create a risk of fire when
used with another battery pack.
b. Use power tools only with specifically designed battery packs. Use of any
other battery pack may create a risk of fire when used with another
battery pack.
c. When the battery pack is not in use, keep it away from other metal
objects, like paper clips, coins, keys, nails, screws or other small metal
objects that can make a connection from one terminal to another.
Shorting the battery terminals together may cause burns or a fire.
d. Under abusive conditions, liquid may be ejected from the battery: avoid
contact. If contact accidentally occurs, flush with water. If liquid contacts
the eyes additionally seek medical help. Liquid ejected from the battery
may cause irritation or burns.
5
Parts & Service: 020 8988 7400/E-mail:[email protected] or [email protected]
IMPACT WRENCH SAFETY INSTRUCTIONS
a. ALWAYS use the impact wrench in the manner and for the functions
described in these instructions.
b. ALWAYS ensure the impact wrench is not moving with the switchbar in the
centre position when changing sockets etc.
c. Use only impact wrench sockets. DO NOT use standard sockets.
d. ALWAYS finish tightening wheel nuts or engine parts with a torque wrench
or suitable spanner to the correct torque as recommended by the vehicle
manufacturer.
e. ALWAYS avoid excessive use of the wrench. When tightening a nut or bolt,
never allow the wrench to impact more than 7 or 8 times - to avoid over
tightening - 3 to 4 impacts is normally sufficient.
SERVICE
a. When necessary, have your power tools serviced or repaired by a
qualified person using identical replacement parts. This will ensure that the
safety of the power tool is maintained.
Please keep these instructions in a safe place for future reference.
SAFETY SYMBOLS
The full technical specification of the battery charger is printed on a label on
the charger.
The meanings of the markings and symbols on the charger are shown below:
Class II appliance which does not need an earth connection.
Read the instructions before using the equipment.
The equipment falls under the Waste Electrical & Electronic
Equipment directive (WEEE). Do not dispose of with household
rubbish.
For indoor use only.
This charger is fitted with a thermal cutout at 130°C.
6
Parts & Service: 020 8988 7400/E-mail:[email protected] or [email protected]
Do not immerse in water or expose it to rain or moisture.
This charger is fitted with an isolating safety transformer.
The warning symbols attached to the battery pack are as follows;
Do not immerse in water or expose it to rain or moisture.
Do not allow this product to be subject to fire/incineration.
This battery contains nickel cadmium and must be disposed of
correctly.
Do not expose this battery to temperatures over 40°C.
The warning symbols attached to the impact wrench are as follows;
Read the instructions before using the equipment.
This equipment falls under the Waste Electrical & Electronic Equipment
directive (WEEE). Do not dispose of with household rubbish.
24V DC Current
7
Parts & Service: 020 8988 7400/E-mail:[email protected] or [email protected]
ELECTRICAL CONNECTIONS
WARNING! READ THESE ELECTRICAL SAFETY INSTRUCTIONS
THOROUGHLY BEFORE CONNECTING THE PRODUCT TO THE MAINS
SUPPLY.
This product battery charger is provided with a standard 13 amp, 230 volt
(50Hz), BS1363 plug for connection to a standard domestic electrical supply.
Should the plug need to be changed at any time, ensure that a plug of
identical specification is used.
WARNING! THE WIRES IN THE POWER CABLE OF THIS PRODUCT ARE
COLOURED IN ACCORDANCE WITH THE FOLLOWING CODE:
BLUE = NEUTRAL
BROWN = LIVE
If the colours of the wires in the power cable of this product do not
correspond with the terminal markings of your plug, proceed as follows.
•
The wire which is coloured Blue must be connected to the terminal which
is marked N or coloured Black.
•
The wire which is coloured Brown must be connected to the terminal
which is marked L or coloured Red.
Plug must be BS1363/A approved.
Always fit a 13 Amp fuse.
Neutral
(Blue)
Live
(Brown)
Ensure that the outer sheath of the cable is firmly held by the clamp
We strongly recommend that this product is connected to the mains supply
via a Residual Current Device (RCD).
If in doubt, consult a qualified electrician. DO NOT attempt repairs yourself.
This symbol indicates that this is a Class II product and does not require
an earth connection.
8
Parts & Service: 020 8988 7400/E-mail:[email protected] or [email protected]
COMPONENT INVENTORY
The CIR220 is a cordless impact wrench which is rechargeable using the
mains power adaptor.
Upon receipt, check the components against the following list. Any damage
or deficiency should be reported to your CLARKE dealer immediately.
• 1 x 24V Impact Wrench
• 2 x 24V Battery Packs
• 1 x Charger, Class II insulated (Double Insulated)
• 1 x 17mm Impact Socket, Chrome Vanadium, black
• 1 x 19mm Impact Socket, Chrome Vanadium, black
• 1 x 21mm Impact Socket, Chrome Vanadium, black
• 1 x 23mm Impact Socket, Chrome Vanadium, black
• 1 x Moulded Carry Case
COMPONENT IDENTIFICATION
1.
1/2” Square Socket Drive
2.
Ventilation Slots
3.
Switch-bar (Forward/Reverse)
4.
Variable Speed Trigger Switch
5.
Battery Release Button
6.
Battery Pack
1
2
4
3
5
6
9
Parts & Service: 020 8988 7400/E-mail:[email protected] or [email protected]
BATTERY CHARGING
The new battery pack will require charging
before use.
1. Squeeze the battery release buttons on
either side of the battery pack and pull
gently down to disengage the battery pack
from the wrench.
2. Insert the battery pack into the charger, as
shown, noting it will only fit one way.
3. Plug the charger into a 230V (mains) power
supply and switch ON.
• The green light illuminates to show the
unit is connected to the mains supply.
The red light illuminates when the battery
is placed into the charger and remains illuminated untill the battery
is charged. When the battery is charged, the red light goes out and
the green light illuminates.
• If charging does not take place, ensure all connections are clean
and free of grease etc.
• A new battery pack may initially not accept full charge. This is
common and does not indicate a fault. It can be recharged fully
after it has been discharged approximately five times.
4. The red charging light should remain on for about 1 hour during charging,
thereafter the green light comes back on and the battery cartridge may
be removed and used.
5. After charging, switch off and unplug the charger from the power supply.
6. Remove the battery pack from the charger and slide it back into the
wrench until it clips into place. The battery pack should slide in easily. If the
battery pack is not to be fitted immediately, ensure that the metal
contacts are protected so as to avoid the possibility of a short circuit
which would cause damage.
7. For maximum battery life, we recommend that you maintain the battery
in a fully charged state at all times.
• Remember to avoid extremes of heat or cold when charging. Avoid
temperatures outside the range of Minimum 4°C /Maximum 50°C. Avoid
placing batteries in direct strong sunlight or other heat source.
NOTE: Ni-Cad batteries as used in Clarke cordless power tools should
be given a full charge when first supplied new. Maximum battery
performance will be achieved after approximately 5 complete
charge/discharge cycles.
10
Parts & Service: 020 8988 7400/E-mail:[email protected] or [email protected]
• The battery should be fully discharged before recharging in order to
achieve its optimum performance. Constant topping up after only a small
amount of charge has been used will, in effect, reduce its capacity.
• Ni-Cad batteries will slowly lose their power whilst in storage. Do not leave
the batteries in this state for any length of time.
OPERATION
ALWAYS BE SURE THAT THE TOOL IS SWITCHED OFF BEFORE ATTACHING
OR REMOVING A SOCKET. ALWAYS TAKE CARE TO USE THE CORRECT
SIZE SOCKET FOR BOLTS AND NUTS. AN INCORRECT SOCKET WILL CAUSE
DAMAGE TO THE BOLT OR NUT.
1. Align the chosen socket and simply push it onto the anvil. Use only ½”
square drive impact sockets supplied or as listed on page 13.
2. Squeeze the trigger to start the wrench. Release the trigger to stop.
3. To run the impact wrench in reverse, push the switch-bar through the drive
unit. The direction of rotation is shown on the end face of the switch-bar.
• The switchbar selects the forward or reverse direction of rotation. Do not
move the switch-bar when the spindle is moving. When the switch-bar is in
the central position the trigger is locked.
4. Always check the direction of rotation before operation.
5. Turn off the wrench as soon as the impact sound is heard.
Note: As the battery becomes discharged, the power available will
drop. Operating the machine at low speed will cause a reduction
in torque.
6. When discharged, recharge the battery pack as on page 10.
LOOSENING A WHEEL NUT
1. Remove any wheel trim, before selecting the appropriate socket and
placing firmly on the square drive of the wrench.
2. With the switchbar in the REVERSE running position, and holding the
wrench firmly in BOTH HANDS, pull the trigger. The nut will be impacted
repeatedly until it is loosened. IMPORTANT! Release the trigger
immediately when the nut begins to loosen.
3. Jack up the vehicle according to the vehicles handbook so that the
wheel is clear of the ground, then proceed to fully undo the wheel nuts.
11
Parts & Service: 020 8988 7400/E-mail:[email protected] or [email protected]
TIGHTENING A NUT
1. Start the nut by hand, ensuring it is not cross threaded, then with the
appropriate socket installed on the wrench, place it on the nut.
2. With the FORWARD/NEUTRAL/REVERSE switch-bar in the forward running
position, and holding the wrench firmly in BOTH HANDS, pull the trigger.
3. Run each nut up in turn until it is ‘nipped’ up only - do not tighten. When
all nuts are nipped up, tighten progressively by pulling the trigger fully and
allowing the action to operate for only 3 to 4 impacts to prevent
overtightening.
4. ALWAYS finish tightening with a torque wrench. The weight of the vehicle
will need to be placed on the wheel to prevent it from rotating while the
nuts are tightened. Ensure the final torque applied to the nuts meets the
vehicle manufacturers recommendations.
MAINTENANCE
1. Ensure all fixings remain tight to ensure the machine is in safe working
condition.
2. Check the battery charger power cable to ensure it is free from cracks,
bare wires etc.
3. Avoid using solvents when cleaning plastic parts, most plastics are
susceptible to damage from the various types of commercial solvents.
Keep the unit clean by wiping with a dry cloth.
• All bearings etc, in this machine are lubricated with a sufficient amount of
high grade lubricant for the machines lifetime under normal operating
conditions, therefore no further lubrication is required.
• Refer to your CLARKE dealer if internal maintenance is required.
• Your Clarke impact wrench has been designed to give long and trouble
free service. If, however, having followed the instructions in this booklet
carefully, you encounter problems, take the unit to your local Clarke
dealer.
STORAGE
• Make sure that the machine is stored in a clean, dry place, out of reach of
children when not in use.
• Always store the machine and its charger in the case supplied.
12
Parts & Service: 020 8988 7400/E-mail:[email protected] or [email protected]
ENVIRONMENTAL PROTECTION
Do not dispose of this product with general household waste. All tools,
accessories and packaging should be sorted, taken to a recycling
centre and disposed of according to the laws governing Waste
Electrical and Electronic Equipment.
BATTERY DISPOSAL
Dispose of old batteries in accordance with local authority regulations.
Do not incinerate or crush, as this will increase the risk of explosion and
contamination. If the battery contents come into contact with skin or
the eyes, rinse with clean water for several minutes and seek medical
advice immediately afterwards.
ACCESSORIES
A wide range of accessories is available from your nearest CLARKE dealer, for
further information, contact your nearest dealer, or telephone CLARKE
International Sales department on 01992 565300.
Suitable Impact Wrench compatible socket sets include the following:
3110437
CAT37B
11 piece 1/2”square drive(metric)
1800310
CIS12/17
17 piece 1/2”square drive(metric/AF)
1800305
CIS9/32
32 piece 3/8” & 1/2”square drive (metric/AF)
1800345
CIS12/7M
7 piece 1/2”square drive universal joint (metric)
1800350
CIS12/7MD 7 piece 1/2”square drive universal joint (deep) metric
1800355
CIS12/6H
6 piece 1/2”square drive hex key set (metric)
1800360
CIS12/6S
7 piece 1/2”square drive TRX-Star
13
Parts & Service: 020 8988 7400/E-mail:[email protected] or [email protected]
PARTS DIAGRAM
No Description
Part No
No Description
Part No
1 Screw st 5x20
500200
17 Inner Gear Ring
210312
2 Gear Casing
234024
18 Gear Case
316812
3 O-ring
320013
19 Screw M5x8
504002
4
Shaft Sleeve
205522
20 Motor Flange Plate
225323
5
Small Washer
221239
21 Motor Gear
500027
6
Outer Shaft
213728
22 Motor Assembly 24V
130016
7 Steel ball 5.5 dia
516005
23 Housing (LH)
306053
8 Clutch
215506
24 Forward/Reverse Bar
311579
9
516000
25 Switch
163939
10 Washer
221241
26 Field-Effect Tube
164001
11 Spring
241534
27 Heat Sink
235500
Steel Ball 4 dia
12 Inner Shaft
213711
28 x-head Screw M3x6
500800
13 Planetary Gear
200028
29 Battery Pack
654808
14 King-pin
514021
30 Housing (RH)
306053
15 Washer
221240
31 x-head Screw M3.9
500200
16 Bearing 6002RS
520039
32 x-head Screw M3.9
500201
14
Parts & Service: 020 8988 7400/E-mail:[email protected] or [email protected]
DECLARATION OF CONFORMITY
15
Parts & Service: 020 8988 7400/E-mail:[email protected] or [email protected]