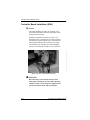
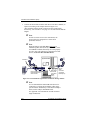
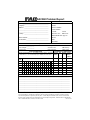
1
AcceleRAID™
Installation Guide
AcceleRAID 150
PCI to Ultra2 SCSI
RAID Controller
P/N: 775020-01
AcceleRAID™
Installation Guide
AcceleRAID™ 150
(DAC960PRL-1)
PCI to Ultra2 SCSI
RAID Controller
Part Number 775020-01
© Copyright 1999 Mylex Corporation.
All Rights Reserved.
All contents of this manual are copyrighted by Mylex
Corporation. The information contained herein is the
exclusive property of Mylex Corporation and shall not be
copied, transferred, photocopied, translated on paper, film,
electronic media, or computer-readable form; or otherwise
reproduced in any way, without the express written
permission of Mylex Corporation.
Greetings
Thank you for purchasing the Mylex AcceleRAID™ 150 controller. This manual
describes the installation of the Mylex AcceleRAID 150 controller. Requests for technical
information about this and other Mylex Corporation products should be made to your
Mylex authorized reseller or Mylex sales representative.
Please Notice
Mylex is a registered trademark, and AcceleRAID, DAC960PRL, and RAID EzAssist are
trademarks of Mylex Corporation.
Microsoft, MS-DOS and Windows are registered trademarks of the Microsoft
Corporation. Novell is a registered trademark of Novell corporation. UnixWare is a
registered trademark of Santa Cruz Operations. Other names that are trademarks may be
used herein for the purpose of identifying the products or services of their respective
owners.
Unless otherwise noted, companies, names and data used in examples herein are fictitious.
Our Policy
Although reasonable efforts have been made to assure the accuracy of the information
contained herein, this publication could include technical inaccuracies or typographical
errors. Mylex Corporation expressly disclaims liability for any error in this information,
and for damages, whether direct, indirect, special, exemplary, consequential or otherwise,
that may result from such error, including but not limited to loss of profits resulting from
the use or misuse of the manual or information contained therein (even if Mylex
Corporation has been advised of the possibility of such damages). Any questions or
comments regarding this document or its contents should be addressed to Mylex
Corporation at the address shown on the cover.
The following paragraph does not apply to the United Kingdom or any country where such
provisions are inconsistent with local law:
MYLEX CORPORATION PROVIDES THIS PUBLICATION “AS IS” WITHOUT
WARRANTY OF ANY KIND, EITHER EXPRESS OR IMPLIED, INCLUDING, BUT
NOT LIMITED TO, THE IMPLIED WARRANTIES OF MERCHANTABILITY OR
FITNESS FOR A PARTICULAR PURPOSE.
Some states do not allow disclaimer of express or implied warranties or the limitation or
exclusion of liability for indirect, special, exemplary, incidental or consequential damages
in certain transactions; therefore, this statement may not apply to you. Also, you may have
other rights which vary from jurisdiction to jurisdiction.
Information in this publication is subject to change without notice and does not represent a
commitment on the part of Mylex Corporation. Changes may be made periodically to the
information herein; these changes will be incorporated in new editions of the publication.
Mylex Corporation reserves the right to make improvements and/or changes at any time in
the product(s) and/or program(s) described in this publication.
It is possible that this publication may contain reference to, or information about, Mylex
Corporation products (machines and programs), programming or services that are not
announced in your country. Such references or information must not be construed to mean
that Mylex Corporation intends to announce, provide, or make available such Mylex
products, programming, or services in your jurisdiction.
About This Manual
This installation guide covers hardware set-up and configuration procedures
necessary for the installation of the Mylex AcceleRAID 150 PCI to Ultra2
SCSI RAID controller.
Chapter 1 describes the controller, standard package contents, and usersupplied items necessary for installation.
Chapter 2 describes steps to be performed prior to controller installation
and the physical installation of the controller.
Chapter 3 describes controller board start-up and the RAID EzAssist
resident utilities.
Appendix A describes installation notes.
Appendix B describes hardware and environmental specifications.
Appendix C describes error messages and how to correct problems causing
errors.
Appendix D describes enclosure management.
Appendix E provides regulatory information.
Conventions
Throughout the manual, the following conventions are used to describe user
interaction with the product:
prompt
This style of type indicates screen display messages.
Enter
Press the key labeled “Enter” (or “Delete”, etc.).
☛ Note
Supplementary information that can have an effect on
system performance.
m Caution
Notification that a proscribed action has the potential
to adversely affect equipment operation, system
performance, or data integrity.
, WARNING
Notification that a proscribed action will definitely
result in equipment damage, data loss, or personal
injury.
Contents
Chapter 1
Introduction
Product Description ........................................................................... 1-1
AcceleRAID 150 Controller Features ......................................... 1-3
Operating System Support ................................................................ 1-3
Standard Package Contents ............................................................. 1-4
Hardware .................................................................................... 1-4
Software ..................................................................................... 1-4
User-supplied Items .......................................................................... 1-5
Chapter 2
Installation
This chapter describes: ..................................................................... 2-1
AcceleRAID 150 with Standard PCI Bus ........................................... 2-1
Before You Begin (Standard) ............................................................ 2-2
Standard Installation Checklist .......................................................... 2-4
GET READY .............................................................................. 2-4
GET SET .................................................................................... 2-4
GO .............................................................................................. 2-4
Connectors, Jumpers, and LED’s (Standard) ............................. 2-5
Controller Board Installation (Standard) ............................................ 2-6
AcceleRAID 150 with SISL
(SCSI Interrupt Steering Logic) ..................................................... 2-15
Before You Begin (SISL) ................................................................. 2-16
SISL Installation Checklist ............................................................... 2-18
GET READY ............................................................................ 2-18
GET SET .................................................................................. 2-18
GO ............................................................................................ 2-18
Connectors, Jumpers, and LED’s (SISL) ......................................... 2-19
Controller Board Installation (SISL) ................................................. 2-20
Chapter 3
Controller Board Start-up
Procedural Overview ......................................................................... 3-1
Controller Board Start-up .................................................................. 3-2
BIOS Options Sequence ................................................................... 3-2
Setting BIOS Options ................................................................ 3-3
Manual No. 775020
v
RAID EzAssist Configuration Utility Sequence .................................. 3-6
Operating System .............................................................................. 3-7
Installing the AcceleRAID as the Primary Controller .................. 3-7
Installing the AcceleRAID into an Existing System with a SCSI
Boot Device .............................................................................. 3-7
Operating System Device Drivers ...................................................... 3-8
Global Array Manager (GAM) ............................................................ 3-8
In Case of Problems .......................................................................... 3-9
Appendix A
Installation Notes
Helpful AcceleRAID Installation Notes ...............................................A-1
SCSI Formats and Bus Lengths ........................................................A-1
SCSI Cabling for AcceleRAID 150
(Standard and SISL) ..........................................................................A-2
Appendix B
AcceleRAID Specifications
General Hardware Specifications ......................................................B-1
AcceleRAID ................................................................................B-1
Environmental Specifications ............................................................B-2
DAC960PRL Block Diagram (Standard) ............................................B-3
DAC960PRL Block Diagram (SISL) ...................................................B-4
Appendix C
AcceleRAID Error Messages
Error Messages ................................................................................ C-1
Start-up: Error Messages .......................................................... C-1
Drive Check: Error Messages .................................................... C-1
Aborted Installation ........................................................................... C-2
NVRAM Error ............................................................................ C-3
System Reboot or Power Down ........................................................ C-3
Appendix D
Enclosure Management
Introduction ....................................................................................... D-1
SAF-TE ............................................................................................ D-1
vi
AcceleRAID 150 Installation Guide
Appendix E
Regulatory Information
Class B Compliance ...................................................................E-1
Declaration of Conformity ...........................................................E-2
Declaration of Conformity ...........................................................E-3
Community of Europe ................................................................E-4
Underwriters Laboratories ..........................................................E-4
Glossary
Manual No. 775020
vii
viii
AcceleRAID 150 Installation Guide
Chapter 1
Introduction
This chapter describes:
• Product description
• Standard package contents
• User supplied items
Figure 1-1. AcceleRAID 150 Disk Array Controller
Product Description
The AcceleRAID™ 150 (DAC960PRL-1) is a single-channel PCI-to-Ultra2
SCSI, LVD (Low Voltage Differential) RAID Controller. It has all the
functions and performance characteristics of the Mylex line of RAID
controllers for several popular network operating systems.
The Mylex AcceleRAID 150 offers the ultimate flexibility in a controller
board, as a standard PCI configuration or as a SCSI Interrupt Steering Logic
(SISL) configuration.
The AcceleRAID 150 controller board works on two different types of
system boards: a standard system or PC board that has the standard PCI bus
interface, or a system board with embedded SCSI that allows the
AcceleRAID 150 controller to steer RAID features (the SISL feature) onto
the embedded SCSI channel(s).
Manual No. 775020
1-1
Product Description
Mylex’s AcceleRAID 150 can be used in either one of the following two
situations:
1. A cost-effective, single-channel, standard PCI RAID controller board,
which may reside in any PCI slot (to implement a standard RAID
connection), or
2. A cost-effective PCI RAID controller board with SISL, which must
reside in the prewired, SISL-dedicated slot on a system board (to
implement a SISL connection). See your system board documentation
to identify your board’s specific PCI slot that supports SCSI Interrupt
Steering Logic (SISL).
In addition to the choice of any system board for one of the above situations,
note that some Intel® boards also give you the following flexibility:
1. Use the AcceleRAID 150 board plugged into a standard PCI slot as a
single-channel board, or
2. Use the AcceleRAID 150 board plugged into a SISL enhanced PCI
slot. The controller board takes control of the SCSI channels allowing
RAID configurations to be extended from the controller board to the
embedded SCSI channels on the system board.
The following Intel boards: N440BX, T440BX, NA440BX, NC440BX and
SC450NX are examples of the server boards and systems that support the
SISL feature of the AcceleRAID 150 controller.
A specially configured dedicated SISL slot is required to use SCSI Interrupt
Steering Logic (SISL).
Mylex AcceleRAID controllers supply the necessary signals that enable
SISL hardware to capture and control the embedded SCSI channel(s) on the
system board. This feature implements RAID capabilities on the SCSI
channels that reside on the system board.
1-2
AcceleRAID 150 Installation Guide
Introduction
AcceleRAID 150 Controller Features
Includes the following features:
• Ability to operate in an ordinary PCI slot as a single-channel RAID
controller in any PCI system.
• Ability to add the functionality of an additional RAID SCSI channel
which is a Wide Ultra2 SCSI RAID LVD channel (see the note below
for further explanation).
☛ Note
The AcceleRAID 150 will work as a single-channel,
Wide Ultra2 SCSI LVD RAID controller with a
system board that has an available PCI slot.
A specially configured, dedicated PCI slot is required
to enable SISL, which allows the controller to add
RAID capability to a system board’s built-in SCSI
channels.
See your system board documentation to identify your
board’s specific PCI slot that supports SCSI Interrupt
Steering Logic (SISL).
Operating System Support
MS-DOS 5.x, 6.x, and above are supported using drivers that are included in
the Disk Array Software Kit. Many other popular operating systems are
supported using software drivers in the Disk Array Controller Software Kit
that is included with the AcceleRAID controller (see the Disk Array
Controller Software Kit Installation Guide and User Manual – P/N 771929)
Manual No. 775020
1-3
Standard Package Contents
Standard Package Contents
The following items are supplied with the standard shipping package:
Hardware
• AcceleRAID 150 Disk Array Controller with documentation
Software
• Disk Array Controller Configuration (RAID EzAssist™) utility with
documentation on CD-ROM
• Disk Array Controller Software Kit with documentation on CD-ROM
• OS drivers (controller drivers) on diskette
• Global Array Manager (GAM client and GAM Server) with
documentation on CD-ROM
AcceleRAID 150 Controller
Manuals
Drivers
Quick
Installation
Guide
Software
Utilities and
Drivers
Figure 1-2. Standard Package Contents
1-4
AcceleRAID 150 Installation Guide
Introduction
User-supplied Items
The following user-supplied items are required to perform this installation:
• Host system with a PCI slot, or
• Host system with a prewired SISL supported PCI slot in order to use
the SISL feature
• SCSI cables to connect SCSI channels to disk drives
• Operating system software
• Static grounding strap or electrostatic discharge (ESD) safe work area
• Disk array enclosure (or equivalent) and SCSI disk drives
☛ Note
The supported SCSI drive types include Ultra2 SCSI
with LVD as well as the following single-ended SCSI
types: SCSI-1, Fast SCSI, Wide Fast SCSI, Ultra
SCSI, and Wide Ultra SCSI.
Figure 1-3. AcceleRAID 150 External Connector (0.8mm UHD Centronics 68F):
68-Pin Very High Density Cable Interconnect (VHDCI)
Figure 1-4. AcceleRAID 150 Internal Connector (HD DB68F):
68-Pin High Density
Manual No. 775020
1-5
User-supplied Items
1-6
AcceleRAID 150 Installation Guide
Chapter 2
Installation
This chapter describes:
• Before you begin
• Connectors, Jumpers, and LED’s
• Safety considerations: Caution and Warning notes
• Installing the AcceleRAID 150 board (controller)
AcceleRAID 150 with Standard PCI Bus
☛ Note
If you will be installing the AcceleRAID 150
controller board with the SISL feature, please
go to the section titled “AcceleRAID 150 with SISL
(SCSI Interrupt Steering Logic)” on page 2-15.
m Caution
If an operating system or existing data resides on
drives already installed on the system, a full backup
should be performed on these drives prior to this
installation.
Manual No. 775020
2-1
Before You Begin (Standard)
Before You Begin (Standard)
Installing a standard AcceleRAID 150 PCI to Ultra2 SCSI RAID controller
board is no more difficult than installing any PCI adapter board. Follow
these steps and then follow the installation procedures in this chapter.
Occasionally, you may need to refer to the instructions that came with your
computer system.
, WARNING
Power OFF the system and disconnect the power
cord from the electrical wall outlet before opening
the system cabinet. Working with the system
covers off and power applied to the system can
result in shock and serious injury.
, WARNING
This controller board is furnished with a
nonvolatile RAM (NVRAM) chip that uses a sealed
lithium battery/crystal module. Replace the
module only with the same or equivalent type
recommended by the manufacturer.
Dispose of the used battery/crystal module
according to the manufacturer’s instructions.
Never incinerate a battery as it could explode and
cause serious injury.
2-2
AcceleRAID 150 Installation Guide
Installation
1. Power OFF the system and any enclosures, such as a tower, and
disconnect the power cord and cables before starting the installation.
Refer to the instructions provided in your system documentation. Do
not disconnect cables or power cords while system power is ON.
2. Read all of the instructions in this chapter completely before proceeding. Follow the Notes, Cautions, and Warnings described in this manual
and marked on the equipment.
3. Safety check the installation before powering ON the system:
• Make sure SCSI cables are properly connected.
• Make sure all SCSI conventions (cable type, cable length,
termination, and SCSI addresses) are followed. Examples of cable
types are: flat, rounded, shielded, or non-shielded -- use like types
together.
• For information about cable lengths and formats, please refer to
Table A-1 on page A-1.
Manual No. 775020
2-3
Standard Installation Checklist
Standard Installation Checklist
GET READY
☛ Note
It is recommended that you wear a grounded wrist
strap when working with hardware installation
procedures.
1. ____ Decide which available standard PCI slot will be used.
2. ____ Remove the plate from the I/O access port to the PCI slot.
3. ____ Remove the AcceleRAID 150 controller board from the antistatic bag.
4. ____ Check Jumper 10 (JP10). If it is installed on the jumper pins,
remove it according to Figure 2-6.
GET SET
5. ____ Plug the AcceleRAID 150 board into a standard PCI slot.
6. ____ Tighten the AcceleRAID 150 board into the mounting bracket.
7. ____ Connect the SCSI cable(s) drives and/or devices to the board.
8. ____ Check termination - Only internal or external devices.
9. ____ Check termination - Both internal and external devices.
10. ____ Remove or set termination jumpers to the disabled position on
the disk drive.
11. ____ Set SCSI ID on the disk drive.
12. ____ Enable termination power on disk drives.
13. ____ Safety check the installation.
☛ Note
Review Figure 2-1 and Table 2-1 to get familiar with
the layout of the AcceleRAID 150 controller board
and the Connectors, Jumpers, and LED descriptions.
GO
14. ____ Go to Chapter 3, Controller Board Start-up.
2-4
AcceleRAID 150 Installation Guide
Installation
Connectors, Jumpers, and LED’s (Standard)
Figure 2-1 is a diagram of the AcceleRAID 150 Low Profile board.
J1
Internal Connector
(68-Pin High Density)
J2
External
Connector
(VHDCI)
U1
JP1
SE
LVD
JP4 JP5
JP10
Note: J1 and J2 are both on the same Channel.
Figure 2-1. AcceleRAID Connectors, Jumpers, and LED’s
Table 2-1. AcceleRAID Connectors, Jumpers, and LED Descriptions
Component
Description
JP1
Two-pin header available for connection to a front panel LED
that indicates SCSI activity (user supplied).
JP4
Reserved
JP5
Not used / for maintenance only.
JP10
OFF = Disable SISL
J1
Channel 0 Internal Ultra2 SCSI LVD Connector –
68-Pin High Density Cable
J2
Channel 0 External Ultra2 SCSI LVD Connector –
68-Pin Very High Density Cable Interconnect (VHDCI)
U1
LED, ON indicates the controller board failed internal diagnostics
during start-up.
LVD (D3)
LED, ON = default; the light is always on unless a single-ended
device is connected. The light will turn OFF when a single-ended
device is detected*.
SE (D2)
LED, ON indicates a single-ended drive is detected.
ON = Enable SISL
* The LVD and SE lights will not be ON or OFF at the same time.
Manual No. 775020
2-5
Controller Board Installation (Standard)
Controller Board Installation (Standard)
m Caution
Anti-static handling procedures are required. Leave
the controller board in its anti-static bag until it is time
to plug it into the PCI slot.
Wearing a grounded wrist strap (see Figure 2-2),
having the power cord pluged into an electric-ground
wall outlet, having the computer power turned off, and
following other ESD protective measures are highly
recommended. See warning below about unpluging
the power cord when the computer cover is removed.
Figure 2-2. Wear a grounded wrist strap.
, WARNING
Disconnect the system from the electrical wall
outlet before opening the system cabinet. Working
with the system covers off and power applied to the
system can result in shock and serious injury.
2-6
AcceleRAID 150 Installation Guide
Installation
Follow these installation steps:
1. Choose any available standard PCI slot as shown in Figure 2-3.
Figure 2-3. Choose an Available PCI Slot
2. Remove the metal cover plate from the slot’s access port (usually at the
back of the cabinet). Save the retaining screw as shown in Figure 2-4.
.
Metal Plate
Remove screw to remove
metal plate. Save screw to
tighten the controller board.
Figure 2-4. Remove the Metal Plate
Manual No. 775020
2-7
Controller Board Installation (Standard)
3. Remove the AcceleRAID 150 controller board from the anti-static bag
as shown in Figure 2-5.
Figure 2-5. Remove the Anti-static Bag
4. If Jumper 10 (JP10) is installed, place it on only one peg to the OFF
position, as shown in Figure 2-6, when using the standard AcceleRAID
150 configuration.
Figure 2-6. Jumper 10 (JP10) on one peg, OFF position
2-8
AcceleRAID 150 Installation Guide
Installation
5. Plug the controller board firmly into the selected standard PCI slot as
shown in Figure 2-7.
System Board
Plug Controller
into any Available
PCI Slot
Figure 2-7. Plug Controller Board into any Standard PCI Slot
6. Use the retaining screw (see Figure 2-4) to tighten the controller board
by its mounting bracket. The controller board will go into the space
created when you removed the metal plate.
Manual No. 775020
2-9
Controller Board Installation (Standard)
7. Connect the SCSI cables from the disk drives to a SCSI connector on
the AcceleRAID 150 controller board, as shown in Figure 2-8.
(The controller board is already connected to the system board.)
If necessary, refer to Table A-1 on page A-1 for SCSI formats and bus
lengths.
☛ Note
In order to ensure an error free environment, the
proper cable type designed for a certain SCSI
speed must be used.
☛ Note
Wide and narrow SCSI disk drives must not be
installed together (mixed) on any one channel, or the
AcceleRAID controller board may not work properly.
It is ok to mix wide and narrow connections for other
devices, but do not mix SCSI disk drives.
T
T
Figure 2-8. Connecting Disk Drives to the AcceleRAID 150
☛ Note
It is recommended that non-RAID SCSI devices be
connected to a separate SCSI channel, either on the
system board or furnished by a SCSI host bus adapter
board, such as a Mylex FlashPoint board.
See Appendix A for information on LVD mode and
single-ended mode.
2-10
AcceleRAID 150 Installation Guide
Installation
8. Termination - Only Internal or External Devices (Standard)
Check that the drive channel is properly terminated according to
drawings below. The AcceleRAID 150 is equipped with automatic
SCSI termination circuitry which handles automatic enabling and
disabling of on-board termination. For example, if the controller board
is at the end of the SCSI bus, it automatically enables on-board
termination.
If all the SCSI devices on a channel are connected either to the
internal connector or to the external connector, the end of the SCSI
bus farthest from the controller board must have a terminator installed;
the controller board automatically enables on-board termination.
See Figure 2-9 for an example of an internal drive configuration.
See Figure 2-10 for an example of an external drive configuration.
T
T
Auto Termination
Enabled
Internal Drive
Configuration
Figure 2-9. Termination with Internal Drive Configuration
T Auto Termination External Drive
Enabled
Configuration
T
Figure 2-10. Termination with External Drive Configuration
Manual No. 775020
2-11
Controller Board Installation (Standard)
9. Termination - Both Internal and External Devices (Standard)
Check that the drive channel is properly terminated according to
drawing below. If the controller board is in the middle of the SCSI bus,
it automatically disables on-board termination. If some SCSI devices
on the channel are connected to the internal connector, and some are
connected to the external connector, the two ends of the SCSI bus
farthest from the controller board must each be terminated; this allows
hot swap capability.
See Figure 2-11 for an example of a combined internal and external
drive configuration. Notice that they are on the same channel.
☛ Note
It is better to terminate the ends of the SCSI bus itself
than it is to terminate the end devices on the bus. This
allows hot swap devices to be added or removed from
the SCSI bus without affecting termination.
☛ Note
The only devices controlled by the RAID
configuration are the ones physically
connected to the AcceleRAID 150 card.
T
Auto Termination
Disabled
Internal – External
Drive Configuration
T
Figure 2-11. Termination with Internal and External Drive Configuration
2-12
AcceleRAID 150 Installation Guide
Installation
10. Remove or set disk drive termination jumpers to the disabled position
(if needed). Refer to your system documentation furnished with your
disk drives to determine if your termination jumpers need to be
adjusted.
11. Set the SCSI ID on the disk drives: ID 7 is reserved for the controller
board.
☛ Note
Each drive must have a unique ID chosen from
0 through 6 or 8 through 15. Be careful not to
duplicate a drive address on the same channel.
Remember: ID 7 is reserved for the controller board;
therefore, it cannot be used as a disk drive ID.
ID’s from 0 through 6 are usually for Narrow,
8-bit devices. However, the full range of SCSI ID
addresses, 0 through 6 and 8 through 15 can be
used for Wide, 16-bit devices.
See your device documentation for instructions on
how to set your particular disk drive’s SCSI address.
SCSI ID Numbers
7 is reserved for the controller
Figure 2-12. SCSI ID Numbers
Manual No. 775020
2-13
Controller Board Installation (Standard)
12. Enable termination power to all the disk drives (usually there is a
jumper on the drive). See your device documentation for instructions
on how to set your particular disk drive’s termination power and
configuration options.
☛ Note
The supported SCSI drive types include Ultra2 SCSI
with LVD as well as the following single-ended SCSI
types: SCSI-1, Fast SCSI, Wide Fast SCSI, Ultra
SCSI, Wide Ultra SCSI, and Wide Ultra2 SCSI.
13. Safety check the installation by checking Pin 1 locations and cable
types. For more details, see step 3 in the section titled “Before You
Begin (Standard)” on page 2-2.
14. Replace the cover and connect the power cord.
The standard AcceleRAID 150 installation is complete.
Proceed to the next chapter for controller board start-up procedures and
other setup options.
2-14
AcceleRAID 150 Installation Guide
Installation
AcceleRAID 150 with SISL
(SCSI Interrupt Steering Logic)
☛ Note
If you will be installing the AcceleRAID 150
controller board as a standard unit without the SISL
feature, please go to the section titled “AcceleRAID
150 with Standard PCI Bus” on page 2-1.
m Caution
If an operating system or existing data resides on
drives connected to the system board’s resident SCSI
channels, a full backup must be performed on these
drives prior to this installation.
Manual No. 775020
2-15
Before You Begin (SISL)
Before You Begin (SISL)
Installing AcceleRAID PCI to Ultra2 SCSI RAID controller board is no
more difficult than installing any PCI adapter board. Follow these steps and
then follow the installation procedures in this chapter. Occasionally, you may
need to refer to the instructions that came with your computer system.
, WARNING
Disconnect the system from the electrical wall
outlet before opening the system cabinet. Working
with the system covers off and power applied to the
system can result in shock and serious injury.
, WARNING
This controller board is furnished with a
nonvolatile RAM (NVRAM) chip that uses a sealed
lithium battery/crystal module. Replace the
module only with the same or equivalent type
recommended by the manufacturer.
Dispose of the used battery/crystal module
according to the manufacturer’s instructions.
Never incinerate a battery as it could explode and
cause serious injury.
1. Power OFF the system and any enclosures, then, disconnect the power
cables before starting the installation. Refer to the instructions provided
in your system documentation. Do not disconnect cables or power
cords while system power is ON.
2. Read all of the instructions in this chapter completely before proceeding. Follow the Notes, Cautions, and Warnings described in this manual
and marked on the equipment.
2-16
AcceleRAID 150 Installation Guide
Installation
3. Safety check the installation before powering ON the system.
• Make sure cables are properly oriented so that the colored stripe
(Pin 1) on the edge of the ribbon cable aligns with Pin 1 on the
connector (see Figure 2-13).
Pin 1
This is a connector on the system board, face up.
Align the colored stripe on the edge of the ribbon
SCSI cable to Pin 1 on the connector.
Note: the colored stripe is Pin 1 in the SCSI cable.
Figure 2-13. SCSI Cable Pin 1 Alignment to the Connector
• Make sure all SCSI conventions (cable type, cable length,
termination, and SCSI addresses) are followed. Examples of cable
types are: flat, rounded, shielded, or non-shielded -- use like types
together.
• For information about cable lengths and formats, please refer to
Table A-1 on page A-1.
Manual No. 775020
2-17
SISL Installation Checklist
SISL Installation Checklist
GET READY
☛ Note
It is recommended that you wear a grounded wrist
strap when working with hardware installation
procedures.
1. ____ Locate the prewired SISL slot, see your system documentation.
2. ____ Remove the plate from the I/O access port to the SISL PCI slot.
3. ____ Remove the AcceleRAID 150 controller board from the antistatic bag.
4. ____ Check Jumper 10 (JP10). If it is not on the jumper pins, install it
to the ON position as shown in Figure 2-19.
GET SET
5. ____ Plug the AcceleRAID 150 board into the prewired SISL slot.
6. ____ Tighten the AcceleRAID 150 board into the mounting bracket.
7. ____ Connect the SCSI cable(s) drives and/or devices to the board.
8. ____ Check termination for both internal and external configuration.
9. ____ Check termination for embedded system board channels.
10. ____ Remove or set termination jumpers to the disabled position on
the disk drive.
11. ____ Set SCSI ID on the disk drive.
12. ____ Enable termination power on the disk drive.
13. ____ Safety check the installation.
☛ Note
Review Figure 2-14 and Table 2-2 to get familiar with
the layout of the AcceleRAID 150 board and the
Connectors, Jumpers, and LED descriptions.
GO
14. ____ Go to Chapter 3, Controller Board Start-up.
2-18
AcceleRAID 150 Installation Guide
Installation
Connectors, Jumpers, and LED’s (SISL)
Figure 2-14 is a design example of the AcceleRAID 150 Low Profile board.
J1
Internal Connector
(68-Pin High Density)
J2
External
Connector
(VHDCI)
U1
JP1
SE
LVD
JP4 JP5
JP10
Note: J1 and J2 are both on the same Channel.
Figure 2-14. AcceleRAID Connectors, Jumpers, and LED’s
Table 2-2. AcceleRAID Connectors, Jumpers, and LED Descriptions
Component
Description
JP1
Two-pin header available for connection to a front panel LED
that indicates SCSI activity (user supplied).
JP4
Reserved
JP5
Not used / for maintenance only.
JP10
OFF = Disable SISL
J1
Channel 0 Internal Ultra2 SCSI LVD Connector –
68-Pin High Density Cable
J2
Channel 0 External Ultra2 SCSI LVD Connector –
68-Pin Very High Density Cable Interconnect (VHDCI)
U1
LED, ON indicates the controller board failed internal diagnostics
during start-up.
LVD (D3)
LED, ON = default; the light is always on unless a single-ended
device is connected. The light will turn OFF when a single-ended
device is detected*.
SE (D2)
LED, ON indicates a single-ended drive is detected.
ON = Enable SISL
* The LVD and SE lights will not be ON or OFF at the same time.
Manual No. 775020
2-19
Controller Board Installation (SISL)
Controller Board Installation (SISL)
m Caution
Anti-static handling procedures are required. Leave
the controller board in its anti-static bag until it is time
to plug it into the PCI slot.
Wearing a grounded wrist strap (see Figure 2-15),
having the power cord pluged into an electric-ground
wall outlet, having the computer power turned off, and
following other ESD protective measures are highly
recommended. See warning below about unpluging
the power cord when the computer cover is removed.
Figure 2-15. Wear a grounded wrist strap.
, WARNING
Disconnect the system from the electrical wall
outlet before opening the system cabinet. Working
with the system covers off and power applied to the
system can result in shock and serious injury.
2-20
AcceleRAID 150 Installation Guide
Installation
Follow these installation steps:
1. Choose the dedicated PCI slot that was prewired for SISL functionality,
(see your system documentation to identify the position of the SISL
slot on your system board) as shown in Figure 2-16.
Figure 2-16. Identify SISL PCI Slot
2. Remove the metal cover plate from the slot’s access port (usually at the
back of the cabinet) as shown in Figure 2-17. Save the retaining screw.
Metal Plate
Remove screw to remove
metal plate. Save screw to
tighten the controller board.
Figure 2-17. Remove the Metal Plate
Manual No. 775020
2-21
Controller Board Installation (SISL)
3. Remove the AcceleRAID 150 controller board from the anti-static bag
as shown in Figure 2-18.
Figure 2-18. Remove Controller Board from the Anti-Static Bag
4. If Jumper 10 (JP10) is not in place, install it (ON position), as shown in
Figure 2-19, when using the AcceleRAID 150 with the SISL feature.
Figure 2-19. Install Jumper 10 (JP10) on two pegs, ON position
2-22
AcceleRAID 150 Installation Guide
Installation
5. Plug the AcceleRAID 150 controller board firmly into the dedicated,
prewired SISL PCI slot as shown in Figure 2-20.
System Board
T
Channel 0
T
Plug Controller into
the Specially Wired
SISL PCI Slot
Wide SCSI
Connector
on System
Board
(Ch 1)
Narrow
SCSI
Connector
on System
Board (Ch 2)
Figure 2-20. AcceleRAID 150 in a Typical SISL Installation
6. Use the retaining screw (see Figure 2-17) to secure the controller board
by its mounting bracket. The controller board will go into the space
created when you removed the metal plate.
Manual No. 775020
2-23
Controller Board Installation (SISL)
7. Connect the SCSI cables from the disk drives to the drive channels, as
required, according to the example shown in Figure 2-21.
(The controller board is already connected to the system board.)
If necessary, refer to Table A-1 on page A-1 for SCSI formats and bus
lengths.
☛ Note
In order to ensure an error free environment, the
proper cable type designed for a certain SCSI
speed must be used.
☛ Note
Wide and narrow SCSI disk drives must not be
installed together (mixed) on any one channel, or the
AcceleRAID controller board may not work properly.
It is ok to mix wide and narrow connections for other
devices, but do not mix SCSI disk drives.
System Board
T
Channel 0
T
Plug Controller into
the Specially Wired
SISL PCI Slot
Wide SCSI
Connector
on System
Board
(Ch 1)
Narrow
SCSI
Connector
on System
Board (Ch 2)
Figure 2-21. AcceleRAID 150 Typical SISL Installation showing channels
☛ Note
It is recommended that non-RAID SCSI devices be
connected to a separate SCSI channel, either on the
system board or furnished by a SCSI host bus adapter
board, such as a Mylex FlashPoint board.
See Appendix A for information on LVD mode and
single-ended mode.
2-24
AcceleRAID 150 Installation Guide
Installation
8. AcceleRAID 150 Termination (SISL)
Check to confirm that all drive channels are properly terminated as
shown in Figure 2-22. The AcceleRAID 150 is equipped with
automatic SCSI termination circuitry for the SCSI channel that resides
on the AcceleRAID board. If the controller board is at the end of the
SCSI bus, it automatically enables on-board termination.
If all the SCSI devices on a channel are connected either to the internal
connector or to the external connector, the end of the SCSI bus farthest
from the controller board must have a terminator installed. In this case,
the controller board automatically enables on-board termination.
If some SCSI devices on the channel are connected to the internal
connector, and some are connected to the external connector, the
two ends of the SCSI bus farthest from the controller board must each
be terminated. In this case, the controller board automatically disables
on-board termination. See Figure 2-22 for an example of an internal –
external drive configuration. Notice the terminator “T” symbol
indicating termination at the farthest bus ends. External drive cabinets
usually have termination built into the end of the SCSI bus.
☛ Note
The illustrated internal and external connectors are
both on the same channel.
It is better to terminate the ends of the SCSI bus itself
than it is to terminate the end devices on the bus. This
allows hot swap devices to be added or removed from
the SCSI bus without affecting termination.
T
T
Figure 2-22. Termination with Internal - External Drive Configuration
Manual No. 775020
2-25
Controller Board Installation (SISL)
9. SCSI Termination for Embedded System Board Channels (SISL)
Correct termination is critical for the SCSI channels. Termination on
the end of the bus connecting the disk drives (or other SCSI devices) is
required.
SCSI termination for the SCSI channels that reside on the system board
need to be properly controlled (notice the terminator “T” symbol) as
shown in Figure 2-23. You may also want to refer to documentation
that was provided with your system.
☛ Note
It is better to terminate the end of the SCSI bus itself
than it is to terminate the end device on the bus. This
allows hot swap devices to be added or removed from
the SCSI bus without affecting termination.
System Board
T
Channel 0
T
Plug Controller into
the Specially Wired
SISL PCI Slot
Wide SCSI
Connector
on System
Board
(Ch 1)
Narrow
SCSI
Connector
on System
Board (Ch 2)
Figure 2-23. System Board SCSI Termination
2-26
AcceleRAID 150 Installation Guide
Installation
10. Remove or set disk drive termination jumpers to the disabled position
(if needed). Refer to your system documentation furnished with your
disk drives to decide if your termination jumpers need to be adjusted.
11. Set the SCSI ID on the disk drives: ID 7 is reserved for the controller
board, as shown in Figure 2-24.
☛ Note
Each drive must have a unique ID chosen from
0 through 6 or 8 through 15. Be careful not to
duplicate a drive address on the same channel.
Remember: ID 7 is reserved for the controller board;
therefore, it cannot be used as a disk drive ID.
ID’s from 0 through 6 are usually for Narrow,
8-bit devices. However, the full range of SCSI ID
addresses, 0 through 6 and 8 through 15 can be
used for Wide, 16-bit devices.
See your device documentation for instructions on
how to set your particular disk drive’s SCSI address.
SCSI ID Numbers
7 is reserved for the controller
Figure 2-24. SCSI ID Numbers
Manual No. 775020
2-27
Controller Board Installation (SISL)
12. Enable termination power to all the disk drives (usually there is a
jumper on the drive). See your device documentation for instructions
on how to set your particular disk drive’s termination power and
configuration options.
☛ Note
The supported SCSI drive types include Ultra2 SCSI
with LVD as well as the following single-ended SCSI
types: SCSI-1, Fast SCSI, Wide Fast SCSI, Ultra
SCSI, Wide Ultra SCSI, and Wide Ultra2 SCSI.
m Caution
If wide drives are to be connected to an on-board
narrow SCSI connector (by a 68-pin to 50-pin
adapter), the 8-bit bus width parameter must be set
first, using the RAID EzAssist Configuration Utility.
Instructions on how to force the 8-bit bus width are in
the RAID EzAssist Configuration Utility User
Reference Guide (P/N 775029) under “Advanced
Parameters.”
13. Safety check the installation by checking Pin 1 locations and cable
types. For more details, see step 3 in the section titled “Before You
Begin (SISL)” on page 2-16.
14. Replace the cover and connect the power cord.
2-28
AcceleRAID 150 Installation Guide
Installation
m Caution
If the SCSI channels embedded on the system board
are controlled by a Symbios Logic® chipset, the
Symbios BIOS must be disabled in the system BIOS
before proceeding with RAID configuration, or with
operating system or driver installation. This is to
allow the AcceleRAID 150 to take over control of the
system board's embedded channels without any
conflicts.
The Symbios BIOS can be disabled by running the
CMOS setup routine when powering on your system
(see the documentation that is furnished with your
system).
The SISL AcceleRAID 150 installation is complete.
Proceed to the next chapter for controller board start-up procedures and
other setup options.
Manual No. 775020
2-29
Controller Board Installation (SISL)
2-30
AcceleRAID 150 Installation Guide
Chapter 3
Controller Board Start-up
This chapter describes:
• Start-up procedures
• BIOS options
• RAID EzAssist Configuration Utility
• Driver Installation
• What to check in case of problems
This chapter describes the AcceleRAID 150 controller start-up procedures
and messages produced by the BIOS during start-up or reboot. This chapter
also explains three BIOS options that are available for configuring the
controller operation.
Procedural Overview
The steps covered in this chapter include:
1. Setting BIOS options
2. RAID EzAssist configuration utility– refer to the RAID EzAssist
Configuration Utility User Reference Guide (P/N 775029) for
configuration instructions and default controller parameter definitions.
3. Loading the operating system and operating system drivers – refer to
the Disk Array Controller Software Kit Installation Guide and User
Manual (P/N 771929) for installation instructions for operating system
drivers and the GAM server module.
4. Installing Global Array Manager – refer to the Global Array Manager
Client Software Installation Guide and User Manual (P/N 771961) for
installation instructions for the GAM client.
Manual No. 775020
3-1
Controller Board Start-up
Controller Board Start-up
The start-up procedure should be performed prior to any software
configuration. There are two start-up sequences: the BIOS Options sequence
and the BIOS Configuration Utility sequence. Either start-up sequence can
be skipped by ignoring the <ALT-M> and/or the <ALT-R> prompt when the
computer is started up.
BIOS Options Sequence
After physically installing the controller and connecting the cabling, do the
following if you need to change any BIOS option settings. (See “Setting
BIOS Options” on page 3-3 for details.)
1. Before turning power on to the computer, power ON any external
enclosures connected to the controller.
2. Power ON the computer.
3. Watch the messages on the screen for the following prompt to be
displayed:
Press <ALT-M> for BIOS options
4. Press Alt–M to get into the BIOS Options menu.
5. The BIOS Options menu provides the following items to choose from:
6. To select any of the items in the menu, highlight the selection with the
Up Arrow or Down Arrow. Press Enter to toggle any of the three
items.
☛ Note
BIOS must be enabled to toggle the CD-ROM boot
and the Drive geometry parameters.
3-2
AcceleRAID 150 Installation Guide
Controller Board Start-up
Setting BIOS Options
The available BIOS options are:
• BIOS disabled / enabled
• CD-ROM boot disabled / enabled
• 2 GB / 8 GB drive geometry
BIOS Disable or Enable
This option must be enabled in order to toggle the CD-ROM boot and the
drive geometry parameters shown in the BIOS Options menu. The CD-ROM
BIOS must also be enabled in order to boot from any device (e.g., CD-ROM,
tape drive) or system drive configured on the controller, or to access any
DOS partition on any drive configured on the controller.
When BIOS Disable or Enable is selected, the following message will be
displayed. Pressing any key will restart the system.
CD-ROM Boot Disable or Enable
The default for this option is for the CD-ROM boot to be disabled (e.g., the
system will boot from a hard drive, even if there is a bootable CD installed).
If the CD-ROM boot option is enabled, and if a bootable CD is installed in
the CD-ROM drive, the system will boot from the CD.
If the CD-ROM boot option is enabled, the CD-ROM will take priority over
the disk drives. For example, under MS-DOS, the disk drive that is normally
Drive C will become Drive D. All subsequent drive IDs will similarly be
moved forward.
Manual No. 775020
3-3
BIOS Options Sequence
Enable 2 GByte or 8 GByte Drives
This setting affects how the BIOS reads the disk drives. Drive geometries
can be toggled between 2 GB and 8 GB. The default is 2 GB. When the drive
geometry setting is changed, the drive must be low level formatted.
m Caution
Changing this setting after data has been stored will
make the data unreadable. If you have already
configured your array and have stored data, you
should not change this setting.
The default BIOS geometry of the controller is set to 2 GB. This means that
the operating system through the BIOS can access only the first 2 GB of any
drive that has been configured on the controller. This is adequate in most
applications, since BIOS is used only to boot the operating system. However,
it does mean the operating system must be installed in the first 2 GB of the
capacity of the configured drive. Some operating systems are limited to a
2 GB boot partition.
If this is not adequate, the BIOS geometry can be changed to 8 GB, allowing
the operating system through the BIOS to access the first 8 GB of capacity.
3-4
AcceleRAID 150 Installation Guide
Controller Board Start-up
As a rule of thumb, select 8 GB geometry if the following three cases apply:
1. You have a system (RAID) drive that is greater than 2.145 GB in
capacity.
2. The DOS/Windows compatible partitions could be located in an area
above the first 2.145 GB.
Otherwise the 2 GB option is fine.
☛ Note
In the event that the RAID controller needs to be
replaced, the current drive geometry will be restored
from the configuration on disk (COD).
Manual No. 775020
3-5
RAID EzAssist Configuration Utility Sequence
RAID EzAssist Configuration Utility Sequence
After the BIOS options have been set as desired, do the following:
1. Power ON the computer (or allow the computer to restart normally
after the BIOS options have been set).
2. Watch the messages on the screen for the following prompt to be
displayed:
Press <ALT-M> for BIOS options
3. Wait approximately 5 seconds. Do not press any keys at this time.
4. Watch the messages on the screen for the following prompt to be
displayed:
Press <ALT-R> for RAID Configuration options
5. Press Alt–R to get into the BIOS Configuration Utility.
☛ Note
For detailed information on how to run the RAID
EzAssist Configuration Utility, refer to the RAID
EzAssist Configuration Utility User Reference Guide
(P/N 775029).
3-6
AcceleRAID 150 Installation Guide
Controller Board Start-up
Operating System
If an operating system is not already installed on the system, it can be
installed on a system disk on the controller. The operating system is installed
along with the operating system device drivers.
Installing the AcceleRAID as the Primary Controller
Follow the procedures indicated in the appropriate operating system chapter
of the Disk Array Controller Software Kit User’s Manual when installing
AcceleRAID along with the operating system software.
• Do NOT install the driver for the on-board Symbios Logic SCSI
adapter at any time during the operating system installation.
Installing the AcceleRAID into an Existing System with a
SCSI Boot Device
, WARNING
If an existing operating system is running on a
SCSI boot drive using the Symbios Logic SCSI
adapter embedded on the system board, the
AcceleRAID controller must be installed as the
primary (boot) controller.1 You must do the
following BEFORE installing the AcceleRAID
controller:
1. Back up all data on all SCSI devices (including the boot device) that
are controlled by an on-board Symbios Logic 810 SCSI device driver.
2. Shut down or exit from the operating system and run the system BIOS
setup utility when prompted by pressing F2.
3. Switch to Advanced Settings.
4. Open PCI Configuration.
5. Open PCI Device, Embedded SCSI Devices.
1. This warning does not apply if the operating system is installed
on an IDE device.
Manual No. 775020
3-7
Operating System Device Drivers
6. Change the Option ROM Scan to DISABLED. Enable Master should
be set to ENABLED, and Latency Timer should be at least 0040h.
7. Save the settings and exit by pressing F10.
8. At the memory check, power down the server.
Install the AcceleRAID as the primary controller as documented:
1. Install the AcceleRAID controller hardware and disk drives, and cable
and terminate properly as described in Chapter 2.
2. Run RAID EzAssist according to the instructions in “RAID EzAssist
Configuration Utility Sequence” on page 3-6.
3. Use the configuration utility to set up one or more disk arrays and save
the configuration (RAID EzAssist Configuration Utility User Reference
Guide P/N 775029).
4. Install the DAC driver for your operating system at the same time you
install the operating system itself onto the array, referring to the
appropriate chapter of the Disk Array Controller Software Kit
Installation Guide and User Manual (P/N 771929).
5. Reboot and restore your previously backed up data to the array.
Operating System Device Drivers
Device drivers that are compatible with the controller can be found in the
Software Kit. For details on how to install and load drivers, refer to the
Disk Array Controller Software Kit Installation Guide and User Manual
(P/N 771929) and the AcceleRAID 150 Quick Installation Guide
(P/N 775024) for Windows NT and NetWare operating systems.
Global Array Manager (GAM)
The controller can be configured using GAM. GAM can also be used from
the server or a system client to monitor status and verify data integrity of
disks connected to the controller while the system and disks are running.
For details on how to install and run GAM, refer to the Global Array
Manager Client Software Installation Guide and User Manual
(P/N 771961). This manual can be downloaded at no cost from the Mylex
web site (www.mylex.com).
3-8
AcceleRAID 150 Installation Guide
Controller Board Start-up
In Case of Problems
If problems are encountered during start-up, check the following:
• Check SCSI cabling for loose connections, pin mismatches (make sure
pin 1 on the cable matches pin 1 on the connector), bent pins, and
damaged or crossed cables.
• Check cable length. This includes internal bus lengths in enclosures.
• Check termination.
• Check SCSI IDs on all drives.
• Remove the system cover, power ON the system and observe the LEDs
(see Figure 3-1).
• Be sure the U1 light goes out after system is booted.
• Be sure the SE or LVD is lighted appropriately, see the table excerpt
following Figure 3-1 on the next page.
Manual No. 775020
3-9
In Case of Problems
• Check the LED lights when controller is installed. (See the LED
section of Table 2-1, “AcceleRAID Connectors, Jumpers, and LED
Descriptions,” or see the excerpt below for details.)
U1
J1
Internal Connector
(68-Pin High Density)
J2
External
Connector
(VHDCI)
U1
JP1
LVD
SE
SE
LVD
JP4 JP5
Figure 3-1. LED Descriptions
U1
LED, ON indicates the controller card failed internal
diagnostics during start-up.
–
LVD (D3)
LED, ON = default; the light is always ON unless a singleended device is connected. The light will turn OFF when a
single-ended device is detected*.
–
SE (D2)
LED, ON indicates a single-ended drive is detected.
–
* The LVD and SE lights will not be ON or OFF at the same time.
3-10
AcceleRAID 150 Installation Guide
Appendix A
Installation Notes
Helpful AcceleRAID Installation Notes
The purpose of this appendix is to provide additional information about your
AcceleRAID 150 installation of either the Standard or SISL configuration.
There are cross references to direct you to the appropriate topic in the main
installation section of this manual.
SCSI Formats and Bus Lengths
Table A-1. Supported SCSI Formats and Bus Lengths
Bus
Speed,
MB/Sec,
Max.
Bus
Width,
Bits
Single-ended
Low-Voltage
Differential
Max. Device
Support
(Including
Controller)
SCSI-1
5
8
6
-
8
Fast SCSI
10
8
3
-
8
Fast Wide SCSI
20
16
3
-
16
Ultra SCSI
20
8
1.5
-
8
Ultra SCSI
20
8
3
-
4
Wide Ultra SCSI
40
16
-
-
16†
Wide Ultra SCSI
40
16
1.5
-
8
Wide Ultra SCSI
40
16
3
-
4
Ultra2 SCSI
40
8
Not Defined
12
8
Wide Ultra2 SCSI
80
16
Not Defined
12
16
SCSI Drive Type*
Max. Bus Length, Meters*
* SCSI Trade Association (STA) Terms
† The maximum number of devices allowed on a Wide Ultra SCSI bus is 8 unless
bus extender technology is used
☛ Note
In order to ensure an error free environment,
the proper cable designed for a certain SCSI
speed must be used.
Manual No. 775020
A-1
SCSI Cabling for AcceleRAID 150 (Standard and SISL)
SCSI Cabling for AcceleRAID 150
(Standard and SISL)
An Ultra SCSI or an Ultra2 SCSI channel supports up to 15 SCSI devices.
Examples of SCSI devices include hard disk, tape, and CD-ROM.
m Caution
Wide and narrow SCSI cables must not be installed
together on any one channel, or the AcceleRAID
controller may not work properly.
LVD Mode
The controller supports Ultra2 SCSI with LVD. If all drives attached to a
controller drive channel support Ultra2 SCSI with LVD, then that channel
will operate at 80 MB/sec per bandwidth with Wide Ultra2 SCSI. This setup
allows a maximum SCSI bus length of up to 12 meters. See the topic about
connecting the SCSI cables, on page 2-10 and on page 2-25.
☛ Note
The SCSI bus length can be extended to 25 meters if
only the controller and one drive are on the bus.
☛ Note
Definition: The SCSI bus length is defined as the total
physical distance between the terminators, including
space needed for cables, connectors, and devices.
(See the illustrations under the termination sections
and notice the placement of the terminator
“ T ” symbol indicating termination at the farthest
ends of the configuration.)
Single-ended Mode
If any device on the channel is not Ultra2 SCSI capable, the channel will
revert to single-ended mode. The SCSI bus lengths will then be limited to the
single-ended bus lengths shown in Table A-1
A-2
AcceleRAID 150 Installation Guide
Appendix B
AcceleRAID Specifications
General Hardware Specifications
AcceleRAID
Controller
DAC960PRL
CPU
Intel i960 RP® RISC 32-bit microprocessor, 33MHz
Memory
EDO parity memory 60ns
4 MB or 16 MB
Cache
Write: Selectable, Write Through or Write Back
Error Protection: Parity
Firmware
PCI
SCSI
ROM Type, Flash EEPROM, 512K x 8
I/O
Processor:
Embedded in Intel i960 RP microprocessor
Transfer
Rate:
132 MB/second (burst)
I/O
Processor:
Number of
Controller
Channels
Manual No. 775020
Symbios 53C895 on AcceleRAID 150.
AcceleRAID supports 53C875, 53C876, 53C895, and
53C896 on system board
DAC960PRL-1 – one Ultra2 LVD channel on controller
B-1
Environmental Specifications
Environmental Specifications
Controller
DAC960PRL
Temperature
Operating
0°C to +50°C (+32°F to 122°F)
Storage
-20°C to +60°C (-4°F to +140°F) [was +70°C, 158°F]
Operating
10% to 90% relative humidity (non-condensing)
Storage
10% to 90% relative humidity (non-condensing)
Operating
Up to 3,048m (10,000 ft )
Storage
Up to 15,240m (50,000 ft)
Length:
7.225 inches
Width:
4.2 inches
Humidity
Altitude
Form Factor
[was +55°C, 131°F]
Maximum.
Component 0.105 inches solder side
Height:
0.570 component side.
Mean Time
Board
Width:
Not to exceed the width of one PCI slot
MTBF
350,000 hours at 55° C
Between Failure
B-2
AcceleRAID 150 Installation Guide
AcceleRAID Specifications
DAC960PRL Block Diagram (Standard)
Figure B-1 (example of a system board block diagram) shows a standard
configuration to use the Mylex AcceleRAID 150 Controller with any
available PCI Bus Slot on a capable system board.
AcceleRAID 150
DAC960PRL
Controller
CPU
RAID FW
Cache Memory
NVRAM
I960RP
PCI Interface
Control
Logic
SCSI
Protocol
Chip
Term.
PCI Bus Slot
PCI Bus Slot
PCI Bus Slot
PCI Bus Slot
PCI Bus Slot
System Board
Figure B-1. AcceleRAID Standard System Board
Manual No. 775020
B-3
DAC960PRL Block Diagram (SISL)
DAC960PRL Block Diagram (SISL)
Figure B-2 (example of a system board block diagram) shows the functional
relationship between the Mylex AcceleRAID 150 Controller and the SCSIcapable system board. The SCSI chip interrupt line(s) are routed to a PCI bus
slot (shaded to indicate SISL availability) specifically preconfigured to
accept the controller.
The non-shaded PCI bus slots indicate an example of available SCSI
connections that are not intended for SISL activity.
AcceleRAID 150
DAC960PRL
Controller
Cache Memory
RAID FW
NVRAM
I960RP
CPU
SCSI
Protocol
Chip
PCI Interface
Control
Logic
PCI Bus Slot
PCI Bus Slot
Term.
PCI Bus Slot
Interrupt Logic
PCI Slot
Pre-configured
for AcceleRAID
SCSI Protocol
Chip
SCSI Bus
PCI Bus Slot
Term.
System Board
SCSI Protocol
Chip
SCSI Bus
Term.
Figure B-2. AcceleRAID and SCSI-Capable System Board (SISL)
B-4
AcceleRAID 150 Installation Guide
Appendix C
AcceleRAID Error Messages
Error Messages
Start-up: Error Messages
The BIOS looks for any initialization message posted by the firmware during
the start-up sequence. If a message is found, one of the following errors
displays on screen and the installation process aborts.
DAC960Pn fatal error--memory test failed
DAC960Pn fatal error--command interface test failed
DAC960Pn hardware error--run diagnostics to pinpoint error
DAC960Pn firmware checksum error--reload firmware
Drive Check: Error Messages
If the firmware finds a valid controller configuration, but it doesn't match the
SCSI drives currently installed, one or more of the following messages
display:
Unidentified device found at channel x....
Device identified for chn x, tgt y found at chn x', tgt y'
SCSI device at chn x, tgt y not responding
If any of the above messages are displayed, the firmware will not proceed
any further in the initialization process, except to find other mismatches.
Then, the BIOS prints out the following:
DAC960Pn Configuration Checksum error--run configuration
utility
If the firmware detects that during the last power cycle the system was turned
off abruptly leaving some incomplete write operations, the following
message appears:
Recovery from mirror race in progress
The following messages may also appear:
Adapter cannot recover from mirror race!
Some system drives are inconsistent!
Manual No. 775020
C-1
Aborted Installation
During the initialization, if the firmware fails to respond to the BIOS inquiry
within two minutes, the following message displays:
DAC960Pn not responding--no drives installed.
The BIOS then inquires the firmware for its version number and other
information, and prints out the following message:
DAC960Pn firmware version x.xx
One or more of the following messages will be displayed if the firmware
reports the following conditions:
Warning: X system drives are offline
Warning: X system drives are critical
Warning: The following SCSI devices are dead--chn
x, tgt y...
No system drives found: None installed
X system drives installed
The BIOS repeats the same process for additional RAID controllers present
in the system. Then it proceeds to boot, if possible, from the first system
drive on the first controller.
Aborted Installation
With Firmware 4.x, the installation aborted message is displayed when the
BIOS finds that the configuration of the disk drives, as stored in the
NVRAM and configuration on disk, is different from what it senses at boot
time. When this happens, (and a brand new installation is not being
attempted) the cause is often a faulty cable or drive, or a loose connection.
Check all of the connectors, cables, drives, and try to boot. If the error
persists, it most likely indicates a genuine failure and needs to be corrected.
To correct it, run the RAID EzAssist (previously BIOS) Configuration
Utility (see “RAID EzAssist Configuration Utility Sequence” on page 3-6).
For more information, refer to the RAID EzAssist Configuration Utility User
Reference Guide (P/N 775029).
C-2
AcceleRAID 150 Installation Guide
AcceleRAID Error Messages
NVRAM Error
With Firmware 4.x, if the BIOS displays a mismatch between the NVRAM
and the COD, no drives will be installed. Normally this error will not be
displayed. If it is, boot and run the RAID EzAssist (previously BIOS)
Configuration Utility (see “RAID EzAssist Configuration Utility Sequence”
on page 3-6) to recover from the error. For more information, refer to the
RAID EzAssist Configuration Utility User Reference Guide (P/N 775029).
System Reboot or Power Down
Before you power-down or reboot the system, it is very important to make
sure that all data is written to the disk by waiting a minimum of 15 seconds
before resetting or rebooting the system.
The AcceleRAID is a caching controller with write back capability. Data
may still be in the cache waiting to be written to the disk drives when the
system reports that a write command was completed.
Manual No. 775020
C-3
System Reboot or Power Down
C-4
AcceleRAID 150 Installation Guide
Appendix D
Enclosure Management
Introduction
Mylex’s AcceleRAID controllers support the industry standard enclosure
management protocol SCSI Accessed Fault-Tolerant Enclosures (SAF-TE).
This feature allows the host to monitor drive enclosures and detect certain
faults or operating environment conditions. The host can make a decision to
shut down the system or issue a warning based on the type of fault detected.
SAF-TE
The SAF-TE protocol follows a specification jointly worked out by nStor
Corporation and Intel Corporation. Enclosures that are compliant with this
protocol are known as SCSI Accessed Fault-Tolerant Enclosures (SAF-TE).
The protocol is compatible with standard SCSI buses and cabling.
The SAF-TE interface standard’s objective is to provide a non-proprietary
means of allowing third-party disks and controllers to be automatically
integrated with peripheral enclosures that support:
• Status Signals (LEDs, audible alarms, LCDs, etc.)
• Hot swapping of drives
• Monitoring of fans, power supplies, and enclosure temperature
SCSI is the underlying transport mechanism for communicating enclosure
information. All standard SCSI host adapters will work. There is no need to
consider reserved signals or special cabling.
The SAF-TE interface can be implemented as a SCSI target that uses a SCSI
port and an 8-bit micro controller.
All communication is initiated by the host. The SAF-TE processor acts only
in target mode. The SAF-TE processor should be periodically polled by the
host approximately every 2 to 10 seconds.
Manual No. 775020
D-1
SAF-TE
D-2
AcceleRAID 150 Installation Guide
Appendix E
Regulatory Information
Class B Compliance
THIS DEVICE COMPLIES WITH PART 15 OF THE FCC RULES. OPERATION
IS SUBJECT TO THE FOLLOWING TWO CONDITIONS:
1. THIS DEVICE MAY NOT CAUSE HARMFUL INTERFERENCE,
AND
2. THIS DEVICE MUST ACCEPT ANY INTERFERENCE
RECEIVED, INCLUDING INTERFERENCE THAT MAY CAUSE
UNDESIRED OPERATION.
All external connections should be made using shielded cables.
This equipment has been tested and found to comply with the limits for a Class B
digital device, pursuant to Part 15 of the FCC rules. These limits are designed to
provide reasonable protection against harmful interference in residential installations.
This equipment generates, uses, and can radiate radio frequency energy, and if not
installed and used in accordance with the instructions, may cause harmful interference
to radio communications. However, there is no guarantee that interference will not
occur in a particular installation.
If this equipment does cause interference to radio or television equipment reception,
which can be determined by turning the equipment off and on, the user is encouraged
to try to correct the interference by one or more of the following measures:
1. Reorient or relocate the receiving antenna.
2. Move the equipment away from the receiver.
3. Plug the equipment into an outlet on a circuit different from that to which the
receiver is powered.
If necessary, the user should consult the dealer or an experienced radio/television
technician for additional suggestions.
m Caution
Only equipment certified to comply with Class B
(computer input/output devices, terminals, printers,
etc.) should be attached to this equipment.
Any changes or modifications to the equipment by the
user not expressly approved by the grantee or
manufacturer could void the user’s authority to
operate such equipment.
Manual No. 775020
E-1
Declaration of Conformity
Per FCC Part 2, Section 2.1077(a)
Mylex Corporation
Manufacturer’s Name:
Manufacturer’s Address: 34551 Ardenwood Blvd.
Fremont, CA 94555-3607
USA
Declares that the product:
Product Name:
AcceleRAID 150 Ultra2 SCSI RAID Controller
Model Number(s):
DAC960PRL-1
Year of Manufacture:
1998
Conforms to the following Product Specification(s):
CFR 47 Part 15, Subpart B, Section 15.107(e)
FCC:
and Section 15.109(g) Class B Digital Device
tested per ANSI C63.4–1992 procedures
Supplementary Information:
This device complies with part 15 of the FCC Rules. Operation is subject to
the following two conditions: (1) This device may not cause harmful
interference, and (2) this device must accept any interference received,
including interference that may cause undesired operation.
E-2
AcceleRAID 150 Installation Guide
Regulatory Information
Declaration of Conformity
Per 89\336\EEC
Responsible Party
Name:
Mylex Corporation
Address:
34551 Ardenwood Boulevard
Fremont, CA 94555-3607 USA
hereby declares that the product
Trade Name:
Model Number:
AcceleRAID 150 Ultra2 SCSI RAID Controller
DAC960PRL-1
conforms to the following specifications
Standards:
EN 50081-1:1992, EMI
EN 55022 Class B (Radiated), Class B (Conducted)
EN 50082-1:1992, Immunity
EN 61000-4-2:1995 Electrostatic Discharge
EN 61000-4-3:1996 Radiated Susceptibility
EN 61000-4-4:1995 Electrical Fast Transients/Burst
Manual No. 775020
E-3
Community of Europe
CE mark is rated for the AcceleRAID 150 Ultra2 SCSI RAID Controller as follows:
CISPR 22 Radiated Emission
EN55022, EN5082-1 Generic immunity standard for the following:
IEC 801-2 ESD, IEC 801-3 Radiated, and IEC 801-4 EFT/Burst
Warning!
This is a Class B product. In a residential environment this product may cause radio
interference, in which case the user may be required to take adequate measures.
Achtung!
Dieses ist ein Gerät der Funkstörgrenzwertklasse B. In Wohnbereichen können bei
Betrieb dieses Gerätes Rundfunkstörungen aufreten, in welchen Fällen der Benutzer
für entsprechende Gegenmaßnahmen verantwortlich ist.
Avertissement!
Cet appareil est un appareil de Classe B. Dans un environnement résidentiel cet
appareil peut provoquer des brouillages radioélectriques. Dans ce cas, il peut être
demandé à l’utilisateur de prendre des mésures appropriées.
Underwriters Laboratories
E-4
AcceleRAID 150 Installation Guide
Glossary
Cache
Controller memory used to speed up data transfer to and from a disk.
Cache Flush
Refers to an operation where all unwritten blocks in a Write-Back Cache are
written to the target disk. This operation is necessary before powering down
the system.
Cache Line Size
The Cache Line Size function is set in conjunction with stripe size and
represents the size of the data “chunk” that will be read or written at one
time.
Channel
Refers to one SCSI bus on a disk array controller. Each disk array controller
provides at least one channel.
Consistency Check
Refers to a process where the integrity of redundant data is verified. For
example, a consistency check of a mirrored drive will make sure that the data
on both drives of the mirrored pair is exactly the same.
Disk Failure Detection
The controller automatically detects SCSI disk failures. A monitoring
process running on the controller checks, among other things, elapsed time
on all commands issued to disks. A time-out causes the disk to be “reset”
and the command to be retried. If the command times out again, the disk
could be “killed” (taken “offline”) by the controller (its state changed to
“dead”). DAC960 controllers also monitor SCSI bus parity errors and other
potential problems. Any disk with too many errors will also be ‘killed’.
Manual No. 775020
G-1
Disk Media Error Management
When a disk reports a media error during a read, the controller reads the data
from the mirror (RAID 1 or 0+1), or computes the data from the other blocks
(RAID 3, RAID 5), and writes the data back to the disk that encountered the
error. If the write fails (media error on write), the controller issues a
“reassign” command to the disk, and then writes the data to a new location.
Since the problem has been resolved, no error is reported to the system.
When a disk reports a media error during a write, the controller issues a
“reassign” command to the disk, and writes the data out to a new location on
the disk.
Drive Groups (or Drive Packs)
A group of individual disk drives (preferably identical) that are logically tied
to each other and are addressed as a single unit. In some cases this may be
called a drive “pack” when referring to just the physical devices. Up to eight
(8) drives can be configured together as one drive group.
All the physical devices in a drive group should have the same size,
otherwise each of the disks in the group will effectively have the capacity of
the smallest member. The total size of the drive group will be the size of the
smallest disk in the group multiplied by the number of disks in the group.
For example, if you have five disks of 400MB plus one disk of 200 MB they
are equal to six disk of 200MB of total storage. With RAID 3 or RAID 5, one
disk’s worth of storage is dedicated to parity. Therefore, the equivalent data
capacity of the array would be five disks of 200MB or 1000MB (5*200).
Hot Replacement of Disks (Hot Swap)
The design of the DAC960 Series controllers allows for the replacement of
failed hard disk drives without interruption of system service. In the event of
a SCSI drive failure on a properly configured system (where the data
redundancy features of the controller are used), system service continues
without interruption.
G-2
AcceleRAID 150 Installation Guide
Glossary
When a replacement drive becomes available, the system operator can
remove the failed disk drive, install a new disk drive, and instruct the
controller to “rebuild” the data on the new drive, all without interrupting
system operations.
Once the rebuild is complete, the controller will be brought back into a fault
tolerant state.
Logical Drive States
The state of a logical (system) drive can be either ONLINE, CRITICAL, or
OFFLINE. Notice that the same term “online” is used for both physical and
logical drives.
Online: A Logical Drive is in an “online” state if...
All of its participating SCSI drives are “online.”
Critical: A Logical Drive is in a “critical” state if...
It has been configured at RAID level 1, 3, 5, or 0+1; and
One (and only one) of its SCSI drives is not “online.”
A logical drive is considered “critical” because any failure of another of its
SCSI drives may result in a loss of data.
☛ Note
I/O operation can only be performed with system
drives that are online or critical.
Offline: A Logical Drive is in an “offline” state if...
No data can be read from it or written to it.
System commands issued to offline logical drives are returned with an error
status: no operations can be performed on offline logical drives. A logical
drive can be “offline” under one of two situations described below:
• It is configured with a redundant RAID level (1, 3, 5, or 0+1), and two
or more of its SCSI drives are not “online”; or
• It is configured at RAID level 0, JBOD, or in a spanned set, and one or
more of its SCSI drives are not “online.”
Manual No. 775020
G-3
Logical Drives
See “System Drives.”
LVD – Low Voltage Differential
Low Voltage Differential is a form of SCSI signalling that was introduced
with Ultra2 SCSI. Low Voltage Differential allows cable lengths of up to 12
meters (approximately 39 feet) with up to 15 devices. The devices need to be
Ultra2 SCSI LVD devices in order to take advantage of the LVD signalling.
LVD uses data high and data low signal lines to increase transmission
distances over those of single-ended (conventional SCSI signalling). LVD
differs from conventional differential signalling. LVDs advantages are that it
consumes less power and it can sense single-ended devices on the bus and
revert to single-ended signalling.
Mirroring
Refers to the 100 percent duplication of data on one disk drive to another
disk drive. Each disk will be the mirror image of the other.
Pack
See “Drive Groups (or Drive Packs).”
Parity
See “Rotated XOR Redundancy.”
PCI
Peripheral Component Interconnect – This is a high-performance, backplane
interface, expansion slot architecture that is found on PCs, Macintoshes, and
UNIX workstations. PCI is a standardized architecture that provides a highspeed data path between peripherals and the CPU. PCI cards are portable
across hardware platforms with the help of various software drivers.
G-4
AcceleRAID 150 Installation Guide
Glossary
RAID
RAID stands for Redundant Array of Independent Disks. The DAC960
controllers implement this technology to connect up to 15 SCSI devices per
channel. Several different forms of RAID implementation have been
defined. Each form is usually referred to as a “RAID level.” All the RAID
levels supported by DAC960 Series controllers are shown below.
The appropriate RAID level for a system is selected by the system manager
or integrator. This decision will be based on which of the following are to be
emphasized:
Disk Capacity
Data Availability (redundancy or fault tolerance)
Disk Performance
RAID Levels
The disk array controllers monitored by this utility support four RAID
Advisory Board-approved (RAID 0, RAID 1, RAID 3, RAID 5) and two
special RAID levels (RAID 0+1, and JBOD).
Level 0. Block “striping” across multiple drives is provided, yielding higher
performance than is possible with individual drives. This level does not
provide any redundancy.
Level 1. Drives are paired and mirrored. All data is 100 percent duplicated
on a drive of equivalent size.
Level 3. Data is “striped” across several physical drives. Maintains parity
information which can be used for data recovery.
Level 5. Data is “striped” across several physical drives. For data
redundancy, drives are encoded with rotated XOR redundancy.
Level 0+1. Combines RAID 0 striping and RAID 1 mirroring. This level
provides redundancy through mirroring. (Mylex RAID 6)
JBOD. Sometimes referred to as “Just a Bunch of Drives.” Each drive is
operated independently like a normal disk controller, or drives may be
spanned and seen as a single drive. This level does not provide data
redundancy. (Mylex RAID 7)
Manual No. 775020
G-5
Level 10. Combines RAID 0 striping and RAID 1 mirroring spanned across
multiple drive groups (super drive group). This level provides redundancy
through mirroring.
Level 30. Data is “striped” across multiple drive groups (super drive group).
Maintains parity information which can be used for data recovery.
Level 50. Data is “striped” across multiple drive groups (super drive group).
For data redundancy, drives are encoded with rotated XOR redundancy.
☛ Note
The host operating system drivers and software
utilities remain unchanged regardless of the level of
RAID installed. The controller makes the physical
configuration and RAID level implementation.
Replacement Table
A replacement table contains information regarding which SCSI devices
have been replaced by other SCSI devices through standby replacement.
Rotated XOR Redundancy
This term (also known as “parity”) refers to a method of providing complete
data redundancy while requiring only a fraction of the storage capacity of
mirroring. In a system configured under RAID 5 (which require at least three
SCSI drives), all data and parity blocks are divided between the drives in
such a way that if any single drive is removed (or fails), the data on it can be
reconstructed using the data on the remaining drives. (XOR refers to the
Boolean “Exclusive-OR” operator.) In any RAID 5 array, the capacity
allocated to redundancy is the equivalent of one drive.
SCSI
SCSI is an acronym for “Small Computer Systems Interface,” although it is
often used in large systems. The SCSI interface supports disk drives, tape
drives, and CD-ROM drives. Narrow SCSI supports up to seven (7) devices
on a channel, and Wide SCSI, Ultra SCSI, and Ultra2 SCSI support up to 15
devices on a channel.
G-6
AcceleRAID 150 Installation Guide
Glossary
SCSI Drive
A disk drive equipped with a SCSI interface (sometimes referred to as a
SCSI Disk). Each disk drive will be assigned a SCSI address (or SCSI ID),
which is a number from 0 to 7 (0 to 15 under wide or Ultra SCSI). The SCSI
address uniquely identifies the drive on the SCSI bus or channel.
SCSI Drive States
Refers to a SCSI drive’s current operational status. At any given time, a SCSI
drive can be in one of five states: READY, ONLINE, STANDBY, DEAD, or
REBUILD.
The controller stores the state of the attached SCSI drives in its non-volatile
memory. This information is retained even after power-off. Hence, if a SCSI
disk is labeled DEAD in one session, it will stay in the DEAD state until a
change is made either by using a system level utility or after a rebuild. Each
of the states is described below:
Ready: A SCSI disk drive is in a “ready” state if it...
Is powered on, and
Is available to be configured during the current session but remains
unconfigured.
Online: A SCSI disk drive is in an “online” state if it...
Is powered on, and
Has been defined as a member of a drive group, and
Is operating properly.
Standby: A SCSI disk drive is in a “standby” state if it...
Is powered on, and
Is able to operate properly, and
Was NOT defined as part of any drive group.
Dead: A SCSI disk drive is in a “dead” state if it...
Is not present, or
Manual No. 775020
G-7
If it is present but not powered on, or
If it failed to operate properly and was ‘killed’ by the controller.
When the controller detects a failure on a disk, it “kills” that disk by
changing its state to “dead.” A SCSI drive in a dead state does not participate
in any I/O activity. No commands are issued to dead drives.
Rebuild: A SCSI disk drive is in a “rebuild” state...
While it is in the process of being rebuilt. During this process, data is
regenerated and written to the disk drive. This state is also referred to as
‘Write-Only’ (WRO).
SCSI Interrupt Steering Logic
This is the architecture that allows a RAID controller, such as AcceleRAID
to implement RAID on a system board embedded SCSI bus or a set of SCSI
busses.
Segment Size
See “Cache Line Size”.
Session
Refers to the period of time between any two consecutive system shutdowns.
System shutdown may be either a power OFF/ON, or a hardware reset.
SISL
See “SCSI Interrupt Steering Logic.”
Standard Disk Drive
This term refers to a hard disk drive with SCSI, IDE, or other interface, that
is attached to the host system through a standard disk controller.
Standby Replacement of Disks (“Hot Spare”)
The “Standby Replacement” (or “Hot Spare”) is one of the most important
features the controller provides to achieve automatic, non-stop service with a
G-8
AcceleRAID 150 Installation Guide
Glossary
high degree of fault-tolerance. The rebuild operation will be carried out by
the controller automatically when a SCSI disk drive fails and both of the
following conditions are true:
• A “standby” SCSI disk drive of identical size is found attached to the
same controller.
• All of the system drives that are dependent on the failed disk are
redundant system drives, e.g., RAID 1, RAID 3, RAID 5, RAID 0+1.
☛ Note
The standby rebuild will only happen on the SAME
DAC960 controller, never across DAC960 controllers.
A Standby or Spare disk can be created by using RAID EzAssist or Global
Array Manager Client software.
During the automatic rebuild process, system activity continues as normal.
System performance may degrade slightly during the rebuild process.
To use the standby rebuild feature, you should always maintain a standby
(spare) disk in your system. When a disk fails, the standby disk will
automatically replace the failed drive and the data will be rebuilt. The system
administrator can disconnect and remove the bad disk and replace it with a
new disk. The administrator can then make this new disk a standby.
Stripe Order
The order in which SCSI disk drives appear within a drive group. This order
must be maintained, and is critical to the controller’s ability to ‘Rebuild’
failed drives.
Stripe Size
The stripe size is defined as the size, in kilobytes (1024 bytes) of a single I/O
operation. A stripe of data (data residing in actual physical disk sectors,
which are logically ordered first to last) is divided over all disks in the drive
group.
Stripe Width
The number of striped SCSI drives within a drive group.
Manual No. 775020
G-9
Striping
Refers to the storing of a sequential block of incoming data across multiple
SCSI drives in a group. For example, if there are 3 SCSI drives in a group,
the data will be separated into blocks and block 1 of the data will be stored
on SCSI drive 1, block 2 on SCSI drive 2, block 3 on SCSI drive 3, block 4
on SCSI drive 1, block 5 on SCSI drive 2 and so on. This storage method
increases the disk system throughput by ensuring a balanced load among all
drives.
System Drives
A system drive is equivalent to a “logical” drive. System drives are presented
to the operating system as available disk drives, each with a capacity
specified by the DAC960 Series controller.
Target ID
A target ID is the SCSI ID of a device attached to a DAC960 controller. Each
SCSI channel can have up to 15 attached SCSI devices (target ID from 0 to
6, and 8 to 15).
Ultra SCSI
Ultra SCSI, or Fast 20 SCSI is a high performance SCSI protocol that has a
bus speed of 20 MegaBytes per second in the Narrow SCSI configuration
and 40 MegaBytes in the Wide SCSI (Fast 20 Wide SCSI) configuration.
Ultra2 SCSI
Ultra2 SCSI, or Fast 40 SCSI is a higher performance SCSI protocol than
Ultra SCSI. Ultra2 SCSI has a bus speed of 40 MegaBytes per second in the
Narrow SCSI configuration and 80 MegaBytes in the Wide SCSI (Wide
Ultra2 SCSI) configuration.
G-10
AcceleRAID 150 Installation Guide
Glossary
Write-Back Cache
Refers to a caching strategy whereby write operations result in a completion
signal being sent to the host operating system as soon as the cache (not the
disk drive) receives the data to be written. The target SCSI drive will receive
the data at a more appropriate time, in order to increase controller
performance.
Write Through Cache
Refers to a caching strategy whereby data is written to the SCSI drive before
a completion status is returned to the host operating system. This caching
strategy is considered more secure, since a power failure will be less likely to
cause loss of data. However, a write through cache results in a slightly lower
performance.
Manual No. 775020
G-11
G-12
AcceleRAID 150 Installation Guide
DAC960 Problem Report
Customer Identification DACPRL-1
Name: ___________________________________
Company: ________________________________
Address: _________________________________
________________________________________
________________________________________
Country: _________________________________
Phone Number:____________________________
Fax Number:______________________________
DACPRL-1 Identification
Date:
Purchase Date:
Model
Invoice Number:
Serial Number:
# Chnls:
Cache:
Firmware Ver: BIOS Ver:
Make/Model/Size/Type of
Drives:
Disk:
Non-Disk:
System Information
Motherboard: ____________
Video Adapter: ___________
Operating Sys: ___________
CPU Speed:
Network Card:
Other Disk Ctrl:
Pack Configuration
BIOS Ver:
MB Memory:
Other Cards:
System Drive Configuration
Indicate in matrix below 1, 2... for member of pack 1, pack 2... respective- System Size RAID
ly. Indicate S, T, C, or O for Standby, Tape, CDROM and other drives.
Drive
Level
Channel
0
1
2
SCSI ID
0
0 1 2 3 4 5 6 7 8 9 10 11 12 13 14 15
1
2
3
4
5
6
7
Write
Back/
Thru
Problem Description
_____________________________________________________________________
_____________________________________________________________________
_____________________________________________________________________
_____________________________________________________________________
_____________________________________________________________________
_____________________________________________________________________
_____________________________________________________________________
_____________________________________________________________________
This DPR form has been included with your Mylex product as a convenience to both you and our Technical
Services Department. If filled out completely, this will greatly assist Mylex personnel in quickly resolving
any technical problems or questions you may have. Use the Mylex fax number (510) 745-7715 to transmit
this form to the Technical Services Department, or mail to Mylex Corporation, Technical Services Department,
772014-DAC960
34551 Ardenwood Blvd., Fremont, CA 94555-3607
Mylex Warranty - Customer Policy
Thank you for purchasing this Mylex product for your computer system. In addition to this high-quality product,
your purchase entitles you to the warranty coverage set forth herein. In order to provide this warranty coverage, and
to indicate your acceptance of this warranty, we must have the attached Warranty Registration Card completed and
returned to us within 15 days of your purchase. Also, in order for us to provide you the highest level of service, we
must know where you purchased your MYLEX product.
Three Year Limited Warranty
If at any time during the thirty six month period immediately following the date of original purchase of the MYLEX
product enclosed herewith (the “PRODUCT”) you discover one or more defects in the material or workmanship,
MYLEX will repair, or at MYLEX’s sole option, replace the PRODUCT. If the PRODUCT fails to operate at any
time within seven days after the date of its original purchase, it will be replaced by MYLEX. Such repair or replacement will be your sole remedy against MYLEX, and MYLEX’s only liability to you, for any failure or malfunction
of the PRODUCT. The warranty set forth in this paragraph will be void if:
1. The PRODUCT has been installed in an improper manner or in an improper operating environment.
2. The PRODUCT has been modified or repaired by any party other than MYLEX or a MYLEX factory authorized
service center.
3. The PRODUCT has been damaged.
Some MYLEX products will have a Warranty Expiration Date label affixed to the product itself. When present, the
warranty period will extend through the last day of the month indicated.
This warranty will not apply to, and MYLEX provides no warranty for, any BIOS, software, ROM-based firmware,
or any other PRODUCT developed or manufactured by any third party, whether included with this PRODUCT or
not. Such warranty or warranties as are provided by third parties, to the extent permitted thereby, shall be made
available, and are hereby assigned, by MYLEX to the purchaser of this PRODUCT.
If MYLEX issues a revision to the BIOS, firmware or software included with this PRODUCT within 30 days of
your purchase, MYLEX will replace such firmware at no charge except handling fees.
Out of Warranty Service
Mylex products which are ineligible for warranty service may be serviced by MYLEX according to our standard
price list, as modified from time to time. A current copy of the standard price list is available from the Technical
Support Department.
Limitation of MYLEX Liability
MYLEX’s liability arising from the sale, use and disposition of this PRODUCT shall in no event exceed the amount
paid to MYLEX for this PRODUCT. MYLEX assumes no liability for damages arising from the use or failure of
any MYLEX product. The WARRANY DESCRIBED ABOVE CONSTITUTES THE ONLY WARRANY MADE
BY MYLEX. MYLEX EXPRESSLY DISCLAIMS ANY AND ALL OTHER WARRANTIES OF ANY KIND
WHATSOEVER, WHETHER EXPRESSED OR IMPLIED, INCLUDING WARRANTIES OF MERCHANTABILITY AND FITNESS FOR A PARTICULAR PURPOSE, WHICH ARE HEREBY EXPRESSLY
EXCLUDED. IN NO EVENT WILL MYLEX BE LIABLE FOR INCIDENTAL, SPECIAL OR CONSEQUENTIAL DAMAGES (INCLUDING WITHOUT LIMITATION LOSS OF DATA, USE, OR INCOME), EVEN IF
ADVISED OF SUCH DAMAGES IN ADVANCE. Your sole remedies shall be as provided herein.
P/N: 772058-03
6-98
Printed in U.S.A.
Returned Merchandise Procedures
If you suspect that there is a defect in the material or workmanship of this PRODUCT, you should contact the person or company from which you purchased it. That person or company may be able to solve the problem and if not,
will be able to contact us for technical assistance or repair.
If it is determined that the PRODUCT must be returned to MYLEX for repair or replacement, contact MYLEX’s
Technical Support Department at 510-608-2400 before it is returned. Each returned item must have a separate
Return Merchandise Authorization (RMA) number, provided by MYLEX.
The following rules apply to all returned items:
1. The PRODUCT must be returned either in its original packaging or in other packaging which is appropriate for
the PRODUCT and the manner of shipment, and the RMA number must be displayed prominently on the outside of
each such package.
2. If a PRODUCT is determined to be ineligible for warranty service, the customer will be notified before any further action is taken with the PRODUCT.
3. MYLEX will not be responsible for any loss or damage to property shipped with the RMA PRODUCT not originally sold by MYLEX (e.g., coprocessor chips, peripheral boards, memory modules, enclosures, power supplies, or
any other accessories or attached items).
4. Any item returned to MYLEX without a valid RMA number will be returned to the shipper.
Products shipped to MYLEX must be shipped or mailed at the shipper’s risk, freight prepaid, to the address below.
Mylex Corporation
34551 Ardenwood Blvd.
Fremont, California U.S.A.
94555-3607
Mylex will pay for return freight via such carrier as MYLEX shall deem appropriate.
Technical Support
MYLEX’s Technical Support Department, to assist you in resolving problems with MYLEX products, is available
through the world wide web. Contact the Technical Support web site through the Mylex Internet home page at
www.mylex.com, or by e-mail at [email protected]. In the U.S.A., the Technical Support Department can be
reached by telephone at (510) 608-2400 or by FAX at (510) 745-7715. Current hours of operation, which are subject
to change, are from 6:00 a.m. to 6:00 p.m. Pacific Time, Mondays through Fridays, excluding U.S.A. national holidays.
Included with the shipment of most MYLEX products is a System Problem Report (SPR) form. When contacting
the Technical Support Department for assistance with an installation or compatibility problem, we recommend that
this form be completed and sent by facsimile or mail to MYLEX. Completion of this form will allow our Technical
Support Department to solve most technical problems expeditiously.
Mylex will make reasonable efforts to address compatibility problems which may arise with respect to third party
products, but shall not be responsible for the compatibility of its products with the products of any third party. Customers are advised to verify each products compatibility with their installation before committing to any particular
procurement plan.
Corporate Offices ● 34551 Ardenwood Blvd., Fremont, CA 94555-3607, USA
Tel: 510.796.6100 ● Sales Fax: 510.745.8016 ● www.mylex.com
European Sales ● P.O. Box 513, Great Missenden, Bucks HP 16 OPG, United Kingdom
Tel: 44.1344.302200 ● Fax: 44.1344.301100 ● www.mylex.com