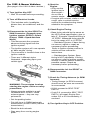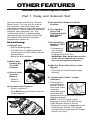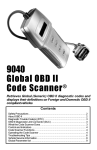
1
precision electronic solutions CODE SCANNER¨ AUDIO ON TO TES U T TPU Domestic Ford, Lincoln, Mercury with EEC-IV or MCU Engine Computer Control Systems S ELF Car Computer Code Reader TEST STO TM OFF HOLD Domestic Ford, CP9015 Lincoln & Mercury CP9015 About Codes Where do they come from and what are they for? Engine computers can find problems. The computer system in today’s vehicles does more than control engine operation – it can help you find problems, too! Special testing abilities are permanently programmed into the computer by factory engineers. These tests check the components connected to the computer which are used for (typically): fuel delivery, idle speed control, spark timing and emission systems. Mechanics have used these tests for years. Now you can do the same thing by using the Actron Code Scanner tool! Engine computers perform special tests. The engine computer runs the special tests. The type of testing varies with manufacturer, engine, model year etc. There is no “universal” test that is the same for all vehicles. The tests examine INPUTS (electrical signals going IN to the computer) and OUTPUTS (electrical signals coming OUT of the computer.) Input signals which have “wrong” values or output circuits which don’t behave correctly are noted by the test program and the results are stored in the computer’s memory. These tests are important. The computer can not control the engine properly if it has bad inputs or outputs! Code numbers give test results. The test results are stored by using code numbers, usually called “trouble codes” or “service codes.” For example, a code 63 might mean “throttle position sensor signal voltage is too low.” Code meanings are listed in Sections 5 and 8. Specific code definitions vary with manufacturer, engine and model year, so you may want to refer to a vehicle service manual for additional information. These manuals are available from the manufacturer, other publishers or your local public library. (See manual listing on page 4.) Read Codes with the Code Scanner. You obtain trouble codes from the engine computer memory by using the Actron Code Scanner tool. Refer to section 4 or 7 for details. After you get the trouble codes, you can either: • Have your vehicle professionally serviced. Trouble codes indicate problems found by the computer. or, • Repair the vehicle yourself using trouble codes to help pinpoint the problem. Trouble Codes and Diagnostics help you fix the problem. To find the problem cause yourself, you need perform special test procedures called “diagnostics”. These procedures are in the vehicle service manual. There are many possible causes for any problem. For example, suppose you turned on a wall switch in your home and the ceiling light did not turn on. Is it a bad bulb or light socket? Is the bulb installed correctly? Are there problems with the wiring or wall switch? Maybe there is no power coming into the house! As you can see, there are many possible causes. The diagnostics written for servicing a particular trouble code take into account all the possibilities. If you follow these procedures, you should be able to find the problem causing the code and fix it if you want to “do-ityourself.” Actron makes it easy to fix computer-controlled vehicles Using the Actron Code Scanner to obtain trouble codes is fast and easy. Trouble codes give you valuable knowledge – whether you go for professional vehicle servicing or “do-ityourself. ” Now that you know what trouble codes are and where they come from, you are well on your way to fixing today’s computer controlled vehicles! Scanner Basics When Do You Use it and What Does it Do? When to Use the Code Scanner 2 AUDIO ON • When the “Check Engine” light comes on (if used on vehicle). ST0 ® 3 • For a routine system check – even on vehicles with a “Check Engine” light. What the Code Scanner Does The Code Scanner makes the vehicle computer run special tests to check out various parts of the system. The Code Scanner plugs into vehicle wiring which connects directly into two engine computer circuits. One circuit is called Self-Test Input (STI). The Code Scanner uses this wire to tell the computer to run the tests. The other circuit is called SelfTest Output (STO). 1 TM OFF HOLD CP9015 – Ford, Lincoln & Mercury Domestic 1981& Newer 2 SELF-TEST OUTPUT light This light is connected to the STO circuit coming from the computer. • Light OFF – The STO signal is “high” (about 5 volts present). • Light ON – The STO signal is “low” (near zero volts). A pulse type signal on the STO wire will cause this light to blink. This is how the computer sends test results to the Code Scanner. See Section 4 or 7 for details. Note: With the Code Scanner connected and ignition key OFF, the light may be ON or OFF – depends upon vehicle. This does not affect testing performance. ry ln co CP 90 15 OF F -F or d, Lin ON AU DI O & Me r cu TM HO LD TE ST The computer sends test results back to the Code Scanner by using a pulse type signal on this wire. T TES OU UT TP • When you experience a driveability problem with your vehicle. SELF Use the Code Scanner: Code Scanner Controls 1 HOLD/TEST switch This switch connects to the computer’s Self-Test Input (STI) circuit. • HOLD – The STI wire is unconnected. (Normal position – no testing.) • TEST – The STI wire is connected to vehicle ground. (Computer starts testing procedure.) 3 AUDIO switch • Switch ON – A tone sounds whenever the Self-Test Output light is lit. • Switch OFF – Tone is always OFF. This feature is useful when the STO light can not be easily seen, such as when performing the “wiggle” test described in Section 6. Note: With the Code Scanner connected, Audio switch ON and ignition key OFF, the tone may be ON or OFF (no matter what the light does) – depends upon vehicle. This does not affect testing performance. A 9 volt transistor radio battery (NEDA 1604) is required to power the Code Scanner. Either a regular or alkaline battery may be used. The Code Scanner has an automatic battery shutoff when not in use. There is no “power off” switch because the unit uses no power when the light is off and the tone is quiet. The battery must be installed before use. Checking the Battery Do the following: 1) Put the Hold/Test switch in TEST position. ON T TES OU UT TP AUDIO SELF Code Scanner Power TEST ST0 Installing the Battery Do the following: 1) Remove two screws from the bottom side of the Code Scanner. ® TM OFF HOLD CP9015 – Ford, Lincoln & Mercury Domestic 1981& Newer 2) Separate the two halves of the Code Scanner. 3) Insert battery: 4) Reassemble Code Scanner case and replace screws. 2) Put the Audio switch in ON position. 3) Use a coin to touch the two side-byside terminals on the bottom row (the one with three terminals) of the Code Scanner connector. 4) Both the STO light and the tone should turn ON. Replace battery when the light or tone gets weak. Connector Location Where the Self-Test connector can be found. Connector Types Connector locations The Code Scanner plugs into the vehicle “Self-Test” connector which is located in the engine compartment. You can tell which computer system is in your vehicle by noting which connector type is installed! • The EEC-IV computer system (most 1984 & up vehicles) uses TWO test connectors. The connectors are located in one of six general areas. – A large six sided connector. • Near the fire wall (right or left side of vehicle) – A small single wire “pigtail” connector. • Near the wheel well (right or left side of vehicle) Both of these connectors must be plugged into the Code Scanner before use. • Near the front corner of the engine compartment (right or left side of vehicle) • The MCU system (most 1981 – 1983 vehicles) uses ONE test connector. TE ST – A large six sided connector, identical to the one used with EEC-IV systems. This connector must be plugged into the Code Scanner before use. The MCU system does NOT use the small “pigtail” connector. LF TES SE AU ON DI O TM or d, 19 Linc 81 ol & n& Ne M HOL D we er r cur y UT UTP TO The connectors are easy to miss – take your time looking! They are usually gray, or other dark color, and located close to a wiring harness. They may be capped with a plastic cover or shroud labeled “EEC TEST” or similar wording. Other Test Connectors Vehicles made after 1988 may have additional computer controlled systems installed, such as Anti-Lock Brakes (ABS), active suspension and the like. These systems use a test connector identical to EEC-IV six sided one. These systems do NOT use the extra “pigtail” connector! The Code Scanner is compatible with most of these systems – refer to vehicle service manual for system description and test methods. EEC-IV System Using the Code Scanner (EEC-IV Systems). Complete Description for Reading and Using Service Codes. Do This First Self-Test Summary This section shows you how to use the Code Scanner for: The Self-Test procedure (also called “Quick Test”) involves engine off and engine running tests. The entire procedure is summarized in the chart. Each part is fully explained on the following pages. • Running tests of the engine computer system. (Engine off, ignition timing and engine running tests.) • Reading service codes to pinpoint problem causes. Before using this section: – Read Sections 1 and 2 to learn about service codes and the Code Scanner tool. – Read Section 3 to find the location of the Self-Test connector in your vehicle. The connector type will tell you whether you have an EEC-IV system or an MCU system. – Read this section (4) if you have an EEC-IV system. Use Section 7 if you have an MCU system. IMPORTANT: All parts must be performed as shown for accurate test results! Part 1: Test Preparation. • Safety First! Follow all safety rules. • Perform Visual Inspection. This often reveals the problem. • Prepare Vehicle. Engine must be thoroughly warmed-up. Part 2: To Key On Engine Off (KOEO) Self-Test. • Get service codes to help pinpoint problems. Part 3: Check Engine Timing. • Verify correct “base” timing (no computer control) before doing next part. Part 4: Do Key On Engine Running (KOER) Self-Test. • Get more service codes to pinpoint problems found during engine operating conditions. Part 5: Evaluate/Erase “Continuous Memory” Codes • Helps locate intermittent problems. • Removes service codes stored in computer memory. Self-Test Part 1: Test Preparation • Inspect wiring for: 1) Safety First! • Set the parking brake. • Put shift lever in PARK (automatic transmission) or NEUTRAL (manual transmission). • Block the drive wheels. • Make sure ignition key is in OFF position. – Contact with sharp edges. (This happens often.) – Contact with hot surfaces, such as exhaust manifolds. – Pinched, burned or chafed insulation. – Proper routing and connections. 2) Perform Visual Inspection. Doing a thorough visual and “handson” underhood inspection before starting any diagnostic procedure is essential!! You can find the cause of many drivability problems by just looking, thereby saving yourself a lot of time. • Has the vehicle been serviced recently? Sometimes things get reconnected in the wrong place, or not at all. • Don’t take shortcuts. Inspect hoses and wiring which may be difficult to see because of location beneath air cleaner housings, alternators and similar components. • Inspect the air cleaner and ductwork for defects. • Check sensors and actuators for damage. • Check Electrical Connectors for: – Corrosion on pins. – Bent or damaged pins. – Contacts not properly seated in housing. – Bad wire crimps to terminals. Bent Pins Corrosion Problems with connectors are common in the engine control system. Inspect carefully. Note that some connectors use a special grease on the contacts to prevent corrosion. Do not wipe off! Obtain extra grease, if needed, from your vehicle dealer. It is a special type for this purpose. • Inspect all vacuum hoses for: – Correct routing. Refer to vehicle service manual, or Vehicle Emission Control Information (VECI) decal located in the engine compartment. – Pinches and kinks. – Splits, cuts or breaks. ST HVAC/ CRUISE STER GAP .S.A. EM EGR VAC REG BRAKE BOOSTER FUEL PRESS REG EGR VAC REG . .. TO TRANS MODE FRONT OF CAR 9RAC2LAB 3) Prepare Vehicle. • Turn off all electrical equipment and accessories in vehicle. • Keep all vehicle doors closed during testing. • Make sure radiator coolant and transmission fluid are at proper levels. • Start the engine and let it idle until the upper radiator hose is hot and pressurized and RPM has settled to warm engine idle speed. Check for leaks around hose connections. • Turn ignition key to OFF position. WARNING: Always operate vehicle in a well ventilated area. Do NOT inhale exhaust gases – they are very poisonous! 6) Have a Pencil and Paper Ready. • This is for writing down all the codes. 4) Check Code Scanner Battery. 7) Go to SELF-TEST PART 2: Key On Engine Off (KOEO) Self-Test. • Refer to Section 2. 5) Plug the Code Scanner into the Vehicle Self-Test Connectors. • Refer to Section 3, “Connector Location”. • Connect the Code Scanner to BOTH test connectors: the small, single wire connector and the larger 6-sided one. Note: One Code Scanner pin plugs into an unused position on large test connector. This is normal. Also, large test connector may have other contacts not used by Code Scanner. TE ST • The Code Scanner will not harm the vehicle engine computer. SE or AU ON DIO TM d, 19 Linc 81 ol & n& Ne M HOL D we er r cur y LF TES UT UTP TO • Do Self-Test Part 2 even if engine will not start, stalls or runs rough. The service codes you get may pinpoint the problem. If not, refer to vehicle service manual for troubleshooting charts related to the vehicle symptom. Self-Test Part 2: Key On Engine Off (KOEO) Self-Test. IMPORTANT: You must complete all steps in Self-Test Part 1 before proceeding to Part 2. Verify good battery in Code Scanner (Section 2). 1) Verify Ignition Key is in OFF Position. T TES OU UT TP ON SELF 5) Get Codes from the Flashing STO Light. AUDIO 2) Put Code Scanner HOLD/TEST Switch in HOLD Position. electrically operated fans.) TEST ST0 ® TM OFF HOLD CP9015 – Ford, Lincoln & Mercury Domestic 1981& Newer • Do the following also: – For 4.9L only, depress clutch until Step 5 (codes sent). – For 7.3L diesel only, completely depress throttle until Step 5 (codes sent). – For 2.3L turbo with octane switch, put switch in premium position. NOTE: If the light does not flash, go back and repeat SELF-TEST PART 2 starting with Step 1. If the light still does not flash, you have a problem which must be repaired before proceeding. Refer to the vehicle service manual “No Codes” troubleshooting chart. • Pay no attention to the brief, rapid blinks which occur before the regular codes are sent. • Count flashes to get service codes. Code 12 looks like: ❊ PAUSE ❊❊ FLASH (pause) FLASH FLASH (FLASH = 1, FLASH FLASH = 2. Put 1 and 2 together = code 12.) 3) Turn Ignition Key to ON Position but DO NOT START THE ENGINE. 4) Put Code Scanner HOLD/TEST Switch in TEST Position. • This starts the KOEO Self-Test. • Testing takes anywhere from 10 seconds to one minute before codes are sent. • You may hear clicking sounds in the engine compartment as relays are being tested. Code 23 looks like: ❊❊ PAUSE ❊❊❊ FLASH FLASH (pause) FLASH FLASH FLASH NOTE: Certain 1991 and newer vehicles use 3 digit codes (refer to vehicle service manual to determine whether your system uses 2 or 3 digit codes). These codes are sent as follows: Code 123 looks like: WARNING: Stay away from the radiator cooling fan! It may turn on momentarily during the test procedure. (On certain vehicles with ❊ PAUSE ❊❊ PAUSE ❊❊❊ FLASH (pause) FLASH FLASH (pause) FLASH FLASH FLASH • Two groups of codes are sent at this time. Each group is separated by a single flash (called a “separator code”) • The first code group has KOEO (Key On Engine Off) codes – for problems which are present now. Some service manuals call these “hard” or “on demand” codes. – The KOEO group will always contain at least one code. This will be a “system pass” code (11 or 111) if no problems were seen. – The KOEO code group is sent twice (so you can double check your code list). • The second code group has Continuous Memory codes – for problems which occurred in the past and have been “memorized” by the computer. These problems (sometimes called “intermittences”) may or may not be present now. – The Continuous Memory group will always contain at least one code. This will be a “system pass” code (11 or 111) if no problems were seen. – The Continuous Memory code group is sent twice (so you can double check your code list). • Code sequence example with KOEO codes = 21 and 32, Continuous Memory code =14: ❊❊ PAUSE ❊ FLASH FLASH (pause) FLASH (longer pause). ❊❊❊ PAUSE ❊❊ FLASH FLASH FLASH (pause) FLASH FLASH (longer pause). ❊❊ PAUSE ❊ FLASH FLASH (pause) FLASH (longer pause). ❊❊❊ PAUSE ❊❊ FLASH FLASH FLASH (pause) FLASH FLASH (very long pause) ❊ SEPARATOR CODE FLASH (“separator code”) (very long pause) ❊ PAUSE ❊❊❊❊ FLASH (pause) FLASH FLASH FLASH FLASH (longer pause). ❊ PAUSE ❊❊❊❊ FLASH (pause) FLASH FLASH FLASH FLASH • Write down codes in the order they are sent. 6) Turn Ignition Key to OFF Position. At this point you can either: • Have your vehicle professionally serviced. Codes indicate problems found by the computer. or, • Repair the vehicle yourself using service codes to help pinpoint the problem. Refer to Test Results Chart. Key On Engine Off (KOEO) Test Results KOEO CODES SEPARATOR CODES CONTINUOUS MEMORY CODES ACTION TO TAKE: 11 (or 111) 1 11 (or 111) System pass. No problem found by computer during KOEO Self-Test. No codes stored in computer memory. Go to SELF-TEST PART 3: Check Engine Timing. Note: If engine will not start, stalls or runs rough, refer to vehicle service manual for troubleshooting charts related to the symptom. Any Code(s) 1 11 (or 111) KOEO codes indicate system problems are present now. Write down all codes. Make repairs based on KOEO codes starting with the first code received. Refer to vehicle service manual for code troubleshooting charts and repair procedures. Repeat KOEO Self-Test after every repair. (Sometimes a repair procedure will eliminate more than one code.) Do not proceed to SELF-TEST PART 3 until a KOEO pass code (11 or 111) is received. Any Code(s) 1 Any Code(s) KOEO and Continuous Memory codes indicate system problems. Write down ALL codes. DO NOT repair Continuous Memory codes at this time! (But keep them written down for later use in Self-Test Step 5.) First make repairs based on KOEO codes starting with the first code received. Refer to vehicle service manual for code troubleshooting charts and repair procedures. Repeat KOEO Self-Test after every repair. (Sometimes a repair procedure will eliminate more than one code.) Do not proceed to SELF-TEST PART 3 until a KOEO pass code (11 or 111) is received. 11 (or 111) 1 Any Code(s) Continuous Memory codes indicate system faults. not in Write down ALL codes but DO NOT repair these Exceptions List codes at this time! Keep them written down for later use in Self-Test Step 5. Continue the Self-Test procedure: go to SELF-TEST PART 3. EXCEPTIONS: Some Continuous Memory codes must be repaired before going to Part 3. These are listed below. Refer to vehicle service manual for code troubleshooting charts and repair procedures. Repeat KOEO Self-Test after every repair. Do not proceed to SELF-TEST PART 3 until all code exceptions are eliminated. CONTINUOUS MEMORY 15 1989 & older CODE EXCEPTIONS 56, 66 1988-1989 5.0L SFI Mustang only (REPAIR NOW) 45, 46, 48, 215, 216, 217, 232 and 238 vehicles with DIS (Distributorless Ignition System) only. Self-Test Part 3: Check Engine Timing. HVAC/ CRUISE STER GAP EM BRAKE BOOSTER FUEL PRESS REG EGR VAC REG . .. TO TRANS MODE FRONT OF CAR 9RAC2LAB (NOTE: 7.3L Diesel This Part does not apply. Go to Part 4.) This portion of the Self-Test procedure is where you check both the “base” engine timing (no computer adjustment ) and the ability of the computer to control spark advance. The correct value for base engine timing is printed on the Vehicle Emission Control Information (VECI) decal, located in the engine compartment. (Base timing is 10° BTDC if not specified on the VECI decal.) A timing light is required for this test. Connect it to vehicle according to manufacturers directions. (For 2.3L dual plug engines, use exhaust side plug. Refer to ignition system section in vehicle service manual for specific instructions.) For 1991 & Older Vehicles: (See page 15 for 1992 & newer vehicles.) 1) Turn Ignition Key OFF. • Wait 10 seconds before proceeding. 2) Put Code Scanner HOLD/TEST Switch in HOLD Position. WARNING: The next step involves starting the engine. Observe safety precautions. • Always operate vehicle in a well ventilated area. Do NOT inhale exhaust gases – they are very poisonous! • Set the parking brake. • Put shift lever in PARK (automatic transmission) or NEUTRAL (manual transmission). • Block the drive wheels. • Stay away from moving engine parts. manual for troubleshooting charts related to the symptom. AUDIO T TES OU UT TP .S.A. EGR VAC REG SELF ST 4) Put Code Scanner HOLD/TEST CP9015 – Ford, Lincoln & Mercury Switch in Domestic 1981& Newer TEST Position. • The computer is now performing an Engine Running Self-Test, but do not be concerned with the test or the resulting codes at this time. It takes several seconds before codes are sent. ON TEST ST0 ® TM OFF HOLD 5) Wait For End of All Service Code Signals. • STO light on Code Scanner stops blinking. 6) Check Ignition Timing. • After the last code is sent, the timing will remain fixed for 2 minutes (unless Self-Test is deactivated by moving Test/Hold switch to HOLD position). • Ignition timing (only during this 2 minute period) should be 20 degrees more than the base timing value (give or take 3 degrees). EXAMPLE: If base timing is specified at 10°, the measured value in this step should be 10°+20°=30°±3°. That is, the timing should be in the range of 27° to 33° BTDC. • If measured timing does not meet this specification, refer to vehicle service manual for procedures to check base timing and computer timing advance circuits. • If measured timing is OK, proceed to SELF-TEST PART 4: Key On Engine Running (KOER) Self-Test. 7) Turn Ignition Key to OFF Position. 3) Start the Engine. • If engine will not start, stalls or runs rough, refer to vehicle service For 1992 & Newer Vehicles: (See page 14 for 1991 & older vehicles.) 1) Turn Ignition Key OFF. • Wait 10 seconds before proceeding. 2) Turn off Electrical Loads. • This includes radio, headlights, blower fans, air conditioner, and the like. 3) Disconnect the In-Line SPOUT or SAW Connector. (Depends upon ignition system: SPOUT= Spark Output; SAW = Spark Advance Word.) • This disconnects the computer advance timing signal from the ignition system. • The ignition system will now operate at “base engine” timing. • The connector is located close to the ignition module. • There are 3 different styles illustrated, depending upon your vehicle type. 4) Start the Engine. • Only use the ignition key to start engine – do not use a remote starter. • If engine will not start, stalls or runs rough, refer to vehicle service manual for troubleshooting charts related to the symptom. 5) Check Engine Timing. • Base timing should be the same as the VECI decal specification, give or take 2°. Example: Specified timing is 10° BTDC. Measured timing should be in the range of 8° to 12°BTDC. — Distributor System: If base timing not correct, adjust or repair as necessary before proceeding. Refer to ignition system section in vehicle service manual for instructions. — Distributorless System: Base timing is NOT adjustable. If timing not correct, refer to ignition system section in vehicle service manual for possible causes. Repair as necessary before proceeding. 6) Reconnect the In-Line SPOUT or SAW Connector. 7) Check for Timing Advance (or RPM Increase). WARNING: The next step involves starting the engine. Observe safety precautions. • Always operate vehicle in a well ventilated area. Do NOT inhale exhaust gases – they are very poisonous! • Set the parking brake. • Put shift lever in PARK (automatic transmission) or NEUTRAL (manual transmission). • Block the drive wheels. • Stay away from moving engine parts. • Timing change (or RPM increase) should occur as soon as connector is reconnected. • If O.K. proceed to SELF-TEST PART 4. • If not O.K. proceed to SELF-TEST PART 4, but repair Engine Run codes 213 or 218 immediately, if received. 8) Turn Ignition Key to OFF Position. Self-Test Part 4: Key On Engine Running (KOER) Self-Test. IMPORTANT: You must complete all steps in Self-Test Parts 1,2 and 3 before proceeding to Part 4. Verify good battery in Code Scanner (Section 2). 1) Verify Ignition Key is in OFF Position. 2) Put Code Scanner HOLD/TEST Switch in HOLD Position. WARNING: The next step involves starting the engine. Observe safety precautions. • Always operate vehicle in a well ventilated area. Do NOT inhale exhaust gases – they are very poisonous! • Set the parking brake. • Put shift lever in PARK (automatic transmission) or NEUTRAL (manual transmission). 7) Get Engine Identification (ID) Code from the Flashing STO Light. NOTE: If the light does not flash, go back and repeat SELF-TEST PART 4 starting with Step 5. If the light still does not flash, you have a problem which must be repaired before proceeding. Refer to the vehicle service manual “No Codes” troubleshooting chart. • An engine ID code is sent after a few seconds to signal the beginning of KOER Self-Test. • Count flashes on the STO light. – 4 cylinder: 2 Flashes. – 6 cylinder: 3 Flashes. – 8 cylinder: 4 Flashes. • Block the drive wheels. – 7.3L Diesel: 5 Flashes. • Stay away from moving engine parts. IMPORTANT: Some actions may be required at this time. 3) Start the Engine. • If engine will not start, stalls or runs rough, refer to vehicle service manual for troubleshooting charts related to the symptom. 4) Run the Engine to Warm the EGO Sensor. • The EGO (Exhaust Gas Oxygen) sensor must be warmed-up to operate for this test. • Run engine at 2000 RPM for at least 2 minutes. 5) Turn Engine OFF – Wait 10 Seconds – Restart Engine. 6) Put Code Scanner HOLD/TEST Switch in TEST Position. • This starts the KOER (Key On Engine Running) Self-Test. • Vehicles with PSPS (Power Steering Pressure Switch): Turn steering wheel one half turn and release within 1 or 2 seconds AFTER seeing engine ID code. (The computer checks for switch action.) • Vehicles with BOO (Brake On/Off switch) when used by computer: Press and release the brake pedal AFTER seeing engine ID code. (The computer checks for switch action.) • Vehicles with OCS (Overdrive Cancel Switch): Toggle the switch on and off AFTER seeing engine ID code. (The computer checks for switch action.) 8) Perform WOT Action After “Dynamic Response” Signal. • The Dynamic Response signal is a single flash on the STO light occurring 6 to 20 seconds after the engine ID code is sent. ❊ DYNAMIC RESPONSE • Perform a brief Wide-Open-Throttle (WOT) action right after the Dynamic Response signal. (Completely press and release throttle.) • Some vehicles do not use this signal – no throttle action is necessary. 9) Get Codes from the Flashing STO Light. • The KOER (Key On Engine Running) codes are sent 4 to 15 seconds after the Dynamic Response signal. There are no other code groups or separator signals sent. • Pay no attention to the brief, rapid blinks which occur before the regular codes are sent. • Count flashes to get service codes. This is done the same way as in Self-Test Part 2. Code 12 looks like: ❊ PAUSE ❊❊ FLASH (pause) FLASH FLASH (FLASH = 1, FLASH FLASH = 2. Put 1 and 2 together = code 12.) Code 23 looks like: ❊❊ PAUSE ❊❊❊ FLASH FLASH (pause) FLASH FLASH FLASH NOTE: Certain 1991 and newer vehicles use 3 digit codes (refer to vehicle service manual to determine whether your system uses 2 or 3 digit codes). These codes are sent as follows: Code 123 looks like: ❊ PAUSE ❊❊ PAUSE ❊❊❊ FLASH (pause) FLASH FLASH (pause) FLASH FLASH FLASH • The KOER (Key On Engine Running) codes are sent as a group. — The KOER group will always contain at least one code. This will be a “system pass” code (11 or 111) if no problems are seen. — The KOER code group is sent twice (so you can double check your code list). • Code sequence example with KOER codes = 21 and 32: ❊❊ PAUSE ❊ FLASH FLASH (pause) FLASH (longer pause). ❊❊❊ PAUSE ❊❊ FLASH FLASH FLASH (pause) FLASH FLASH (longer pause). ❊❊ PAUSE ❊ FLASH FLASH (pause) FLASH (longer pause). ❊❊❊ PAUSE ❊❊ FLASH FLASH FLASH (pause) FLASH FLASH • Write down codes in the order they are sent. • Code definitions are listed in Section 5, “Code Meanings (EEC-IV system).” 10) Turn Ignition Key to OFF Position. Refer to KOER Test Results chart following. Key On Engine Running (KOER) Test Results DYNAMIC RESPONSE CODE ENGINE RUNNING CODE 2,3,4 or 5 1 11 No problems found by computer during KOER Self(or 111) Test, however… •If Continuous Memory codes were obtained in Self-Test Part 2, go to SELF-TEST PART 5: Evaluate “Continuous Memory” codes. •If Continuous Memory codes were NOT obtained in Self-Test Part 2, BUT other vehicle symptoms are still present, refer to Diagnosis by Symptom Troubleshooting Charts in vehicle service manual. (The faults are probably not related to the computer system.) •If Continuous Memory codes were NOT obtained in Self-Test Part 2 and NO other vehicle symptoms are present, the Self-Test Diagnostic Procedure is complete. 2,3,4 or 5 1 Any Codes Engine Running codes indicate system problems are present now. Write down all codes. Make repairs based on Engine Running codes starting with the first code received. (Exception: Take care of code 213 or 218 first, if received.) Refer to vehicle service manual for code troubleshooting charts and repair procedures. Repeat KOER Self-Test after every repair. (Sometimes a repair procedure will eliminate more than one code.) Not sent Any Codes The Key On Engine Running Self-Test CANNOT be performed. The computer has spotted system problems which must be repaired before running this test. Go to Part 2: Key On Engine Off (KOEO) Self-Test and follow all steps. ENGINE ID CODE 98 (or 998) ACTION TO TAKE: Self-Test Part 5: Evaluate/Erase Continuous Memory Codes. Do this Part if “Continuous Memory” codes (other than an 11 or 111 pass code) were received during SELF-TEST PART 2: Key On Engine Off (KOEO) and, all other Parts of the Self-Test procedure have been completed. • Continuous Memory codes come from faults which occurred in the past. The problem may still be present, or it may have gone away. Regardless, the codes will remain in stored in computer memory (for retrieval during Self-Test Part 2) until: • The codes are erased using the procedure detailed later in this part. or, • Power is removed from the computer for more than a few minutes. (NOTE: The KAPWR circuit supplies vehicle battery power to the computer memory when the ignition key is off.) 4) If any codes remain, refer to vehicle service manual for Continuous Memory code troubleshooting charts and repair procedures. 5) Erase Continuous Memory codes after all repairs have been made. Erasing Continuous Memory Codes 1) Verify Ignition Key is in OFF Position. 2) Put Code Scanner HOLD/TEST Switch in HOLD Position. 3) Turn Ignition Key to ON Position but DO NOT START THE ENGINE. 4) Put Code Scanner HOLD/TEST Switch in TEST Position. • This starts the normal KOEO SelfTest. or, • The problem goes away and does not reappear. After at least 40 engine warm-up cycles (depends upon vehicle) the code will automatically be erased from computer memory if the problem stays away during that time. What to Do: 1) Look at the list of Continuous Memory codes obtained during SelfTest Part 2: Key On Engine Off (KOEO). 2) Previous repairs may have eliminated the causes of some (or all) of these codes! 3) Disregard codes which are related to repairs already made. For example, if repairs were made to the Engine Coolant Temperature (ECT) sensor circuit as the result of a KOEO code, then a Continuous Memory code 21 (ECT signal voltage too high) would be disregarded. WARNING: Stay away from the radiator cooling fan! It may turn on momentarily. (On certain vehicles with electrically operated fans.) 5) Wait for the STO Light to Start Blinking (Codes are Being Sent). 6) Put Code Scanner HOLD/TEST Switch in HOLD Position. • The switch must be moved during the time the STO light is blinking (the time period when codes are being sent). 7) The “Continuous Memory” Codes are Now Erased. 8) Turn Ignition Key to OFF Position. 9) Disconnect Code Scanner. CODE MEANINGS Code Definitions for FORD Engines with EEC-IV Computer System (Electronic Engine Control system, version IV) Code definitions are listed in this section • If more than one definition is listed, consult your vehicle service manual to get the specific meaning for your vehicle. • Code meanings can vary with vehicle, model year, engine type, options and type of test being performed. • Many of the codes listed may not apply to your vehicle. • Follow vehicle service manual procedures to find the cause of the code. Always start with the first code displayed. Remember: 1) Visual inspections are important! 2) Problems with wiring and connectors are common, especially for intermittent faults. 3) Mechanical problems (vacuum leaks, binding or sticking linkages, etc.) can make a good sensor look bad to the computer. 4) Incorrect information from a sensor may cause the computer to control the engine in the wrong way. Faulty engine operation might even make the computer show a different good sensor as being bad! Three Digit Codes: Certain 1991 and newer vehicles use 3 digit codes to report the results of the system Self-Test procedure. Refer to your vehicle service manual to determine if your system uses 2 or 3 digit codes. The listing of 3 digit code meanings. 11 System pass. 12 System cannot raise engine speed above normal idle. 13 RPM out of specification during normal idle operation. or, D.C. motor does not follow dashpot. 14 The Electronic Control Assembly (ECA) has detected an intermittent loss of Profile Ignition Pick-up (PIP) signal during recent operation. 15 Failure in Electronic Control Assembly (ECA) – problems with Keep Alive Memory. 16 RPM too low during Engine Run Self-Test (lean fuel test). or, Idle Speed Control (ISC) RPM out of Self-Test specification. or, Electronic Distributorless Ignition System (EDIS) fault – Ignition Diagnostic Monitor (IDM) signal not received. or, Exhaust Gas Oxygen (EGO) sensor – signal voltage indicates “rich” during Engine Run SelfTest (lean air/fuel conditions). 17 Exhaust Gas Oxygen (EGO) sensor - signal voltage indicates “rich” during Engine Run SelfTest (lean air/fuel conditions). or, RPM too low during Engine Run Self-Test (rich fuel test). or, Idle Speed Control (ISC) RPM below Self-Test specification. 18 Loss of TACH signal to Electronic Control Assembly (ECA). or, Distributorless Ignition System (DIS) fault – primary circuit failure in coil 1,2,3 or 4. or, Electronic Distributorless Ignition System (EDIS) fault – failure in Spark Angle Word (SAW) circuit. 19 Failure in Electronic Control Assembly (ECA) – problems with internal voltage regulator. or, RPM too low for EGR check during Engine Run Self-Test. or, Cylinder Identification (CID) sensor input failure. 21 Engine Coolant Temperature (ECT) sensor signal voltage: out of range (Key On Engine Off SelfTest), not at normal operating temperature (Engine Run Self-Test) or loss of signal (during normal engine operation). or, Electronic Distributorless Ignition System (EDIS) fault – problems with Crankshaft Position Sensor (CPS) circuit. 22 Manifold Absolute Pressure (MAP) sensor or Barometric Pressure (BP) sensor – signal voltage out of specification (engine off) or not at normal vacuum levels (engine running). 23 Throttle Position (TP) sensor – signal voltage out of Self-Test specification. 24 Air Charge Temperature (ACT) sensor or Vane Air Temperature (VAT) sensor – signal voltage is out of specification (engine off) or not at normal levels (engine running). or, Electronic Distributorless Ignition System (EDIS) fault – failure in coil 1 primary circuit. 25 Knock Sensor (KS) signal not detected during Engine Run Self-Test (Dynamic Response test). 26 Vane Air Flow (VAF) sensor or Mass Air Flow (MAF) sensor – signal voltage out of Self-Test specifications. or, Transmission Oil Temperature (TOT) sensor – signal voltage is out of Self-Test specification. 27 Vehicle Speed Sensor (VSS) – signal voltage is too low. or, Electronic Distributorless Ignition System (EDIS) fault – failure in coil 2 primary circuit. 28 Vane Air Temperature (VAT) sensor – signal voltage out of Self-Test specification. or, Electronic Distributorless Ignition System (EDIS) fault – failure in coil 3 primary circuit. or, Distributorless Ignition System (DIS) fault – Loss of right side TACH signal. signal voltage too high during normal engine run operation. or, RPM too low to perform EGR test (Engine Run SelfTest). Vehicle Speed Sensor (VSS) – signal voltage is too low. 39 29 31 EGR Valve Position (EVP) sensor or Pressure Feedback EGR (PFE) sensor – signal voltage is below minimum specification. or, EGR Vacuum Regulator (EVR) solenoid circuit problems. or, EGR valve is not in its normal closed position. 32 EGR Valve Position (EVP) sensor or Pressure Feedback EGR (PFE) sensor – signal voltage is below closed limit or has gone beyond set limits. or, Problems with EGR valve controlling. 33 EGR Valve Position (EVP) sensor or Pressure Feedback EGR (PFE) sensor indicates EGR valve is not opening. or, EGR Valve Position (EVP) sensor or Pressure Feedback EGR (PFE) sensor indicates EGR valve not seated (closed) properly. 34 EGR Valve Position (EVP) sensor or Pressure Feedback EGR (PFE) sensor: signal voltage out of Self-Test specification limits, or, signal voltage above closed limit during normal engine run operation, or, signal indicates insufficient EGR flow. 35 EGR Valve Position (EVP) sensor or Pressure Feedback EGR (PFE) sensor: signal voltage above Self-Test specification limits, or, 38 Idle Tracking Switch (ITS) circuit open. Transaxle problem: lock-up failed in torque convertor, or, convertor bypass clutch not applying properly. 41 Exhaust Gas Oxygen (EGO) sensor: voltage signal always “lean” (low value) – does not switch. 42 Exhaust Gas Oxygen (EGO) sensor: voltage signal always “rich” (high value) – does not switch. 43 Exhaust Gas Oxygen (EGO) sensor: voltage signal “lean” (low value) during wide-open -throttle driving condition, or, sensor has cooled down and may not have responded properly during Engine Run Self-Test. 44 Problems in Thermactor Air Control system. 45 Thermactor air flow is always upstream during Engine Run Self-Test. or, Distributorless Ignition System (DIS) or Electronic Distributorless Ignition System (EDIS) problems – primary circuit failure in coil 1, 2, 3 or 4. 46 Thermactor Air System unable to bypass air (vent to atmosphere). or, Distributorless Ignition System (DIS) or Electronic Distributorless Ignition System (EDIS) problems – primary circuit failure in coil 2. 47 Exhaust Gas Oxygen (EGO) sensor signal voltage indicates “rich” during “lean” air/fuel conditions. or, Vane AIr Flow (VAF) sensor – voltage signal is too low. or, Transaxle problem – 4x4L switch is closed. 48 Vane Air Flow (VAF) sensor – voltage signal too high. or, Distributorless Ignition System (DIS) problems: Coil 3 circuit failure, or, Loss of left side TACH signal. or, Exhaust Gas Oxygen (EGO) sensor – signal voltage indicates opposite from fuel. Electronic 4-Speed Overdrive Automatic Transaxle (E4OD): Transmission Oil Temperature (TOT) sensor – signal voltage is too high. 57 Neutral Pressure Switch (NPS) – open circuit failure, or, Circuit failed in Neutral position. or, Octane adjust service pin installed. 58 49 Vane Air Temperature (VAT) sensor – signal voltage too high (open connection in circuit). or, Crank fuel delay service pin in use – circuit connected to ground. or, Idle Tracking Switch (ITS) circuit failure – incorrect switch signal indications during SelfTest. 51 Transaxle problem – failure in 4/3 pressure switch circuit (open connection). or, Low speed fuel pump circuit failure. or, Idle speed adjust service pin in use – circuit connected to ground. Electronic Distributorless Ignition System (EDIS) – Spark Advance Word (SAW) signal error. or, Spark Output (SPOUT) signal changed ignition timing to 10° BTDC (Before Top Dead Center). or, Transaxle problem: 1-2 shift error. Engine Coolant Temperature (ECT) sensor – signal voltage is too high. 52 Power Steering Pressure Switch (PSPS) – circuit is open or no changes detected. 53 Throttle Position (TP) sensor – signal voltage is too high (as if indicating wide-open-throttle condition). 54 Air Charge Temperature (ACT) sensor or Vane Air Temperature (VAT) sensor – signal voltage is too high. 55 Open connection in Keypower circuit or electrical charging voltage too low. 56 Mass Air Flow (MAF) sensor or Vane Air Flow (VAF) sensor – voltage signal too high. or, 59 61 Engine Coolant Temperature (ECT) sensor – signal voltage is too low. or, Indicates that the Idle Tracking Switch is open (in contact with the throttle lever) with the Idle Speed Control Motor fully retracted. 62 Transaxle problem – 4/3 or 3/2 pressure switch circuit failed closed, or, convertor clutch failure. 63 Throttle Position (TP) sensor – signal voltage is too low. 64 Air Charge Temperature (ACT) sensor or Vane Air Temperature (VAT) sensor – signal voltage is too low. 65 Electrical charging system problem occurred – voltage too high (over 17.5 volts). or, Engine control system never went into closed loop fuel operation. or, Transaxle problem – Overdrive Cancel Switch (OCS) was not cycled during Engine Run SelfTest. 66 Mass Air Flow (MAF) sensor or Vane Air Flow (VAF) sensor – voltage signal too low. or, Transmission Oil Temperature (TOT) sensor – signal voltage is too low. 67 Improper signals are being received from either the Neutral Drive Switch (NDS), Neutral Gear Switch (NGS), Neutral Pressure Switch (NPS), Clutch Switch (CS), Manual Lever Position (MLP) sensor or Air Conditioner Clutch (ACC). or, Air Conditioner (A/C) on during Self-Test. 68 Vane Air Temperature (VAT) sensor – signal voltage is too low. or, Transmission Temperature Switch (TTS) – open circuit failure. or, Idle Tracking Switch (ITS) circuit failure – incorrect switch signal indications during Self-Test. 69 Transaxle problem – Open circuit failures with 3/2 pressure switch or 3/4 pressure switch, or, 3-4 switch error. 70 Problem with Electronic Control Assembly (ECA) – failure in Data Communications Link (DCL). 71 Problem with Electronic Control Assembly (ECA) – software reset detected. or, Problem with Message Center Control Assembly (MCCA) – failure in Data Communications Link (DCL). 72 Insufficient manifold vacuum change detected during Dynamic Response portion of Engine Run SelfTest. or, Problem with Message Center Control Assembly (MCCA) – failure in Data Communications Link (DCL). or, Power interrupt detected. 73 Insufficient throttle position change detected during Dynamic Response portion of Engine Run Self-Test. 74 Brake ON/OFF (BOO) switch action not detected during Dynamic Response portion of Engine Run Self-Test. 75 Brake ON/OFF (BOO) switch always closed circuit. 76 Insufficient Vane Air Flow (VAF) sensor change detected during Dynamic Response portion of Engine Run Self-Test. 77 Operator error during Dynamic Response portion of Engine Run Self-Test. 78 Power interrupt detected. or, Flexible fuel sensor circuit failure. 79 Air Conditioner (A/C) on during Self-Test. 81 Supercharger Bypass Solenoid (SBS): circuit failure. 83 High Speed Electro-Drive Fan (HEDF) – circuit failure. or, EGR Control (EGR-C) solenoid–open circuit failure. or, Low speed fuel pump relay – open circuit failure. 84 EGR Vacuum (EGR-V) solenoid – circuit failure. or, EGR Vacuum Regulator (EVR) solenoid–circuit failure. or, EGR Shut-Off (EGR S/O) solenoid – circuit failure. 85 Cannister Purge (CANP) solenoid – circuit failure. or, Transaxle problem – 3/4 shift solenoid circuit failure. or, Electronic Control Assembly (ECA) status – adaptive “lean” limit reached in fuel control program. 86 Transaxle problem – 3/4 shift solenoid circuit failure. or, Electronic Control Assembly (ECA) status – adaptive “rich” limit reached in fuel control program. or, Wide-open-throttle Air conditioner Clutch (WAC) solenoid – circuit failure. 87 Fuel Pump (FP) relay – circuit failure. 88 Thermactor Air Diverter (TAD or AM-2) solenoid: circuit failure. or, Electro-Drive Fan: circuit failure. or, Intake Air Control (IAC) valve: circuit failure. or, Boost solenoid – circuit failure. Electro-Drive Fan (EDF) relay – circuit failure. or, Converter Clutch Override (CCO) solenoid – circuit failure. or, Distributorless Ignition System (DIS) problems – loss of dual plug control. or, Throttle Kicker (TK) solenoid – circuit failure. Thermactor Air Bypass (TAB or AM-1) solenoid: circuit failure. or, Electro-Drive Fan: circuit failure. or, Lock-Up Solenoid (LUS) – circuit failure. or, Converter Clutch Override (CCO) solenoid – circuit failure. or, 82 89 Exhaust Heat Control (EHC) solenoid – circuit failure. 91 Exhaust Gas Oxygen (EGO) sensor – signal voltage always indicates “lean” either during Engine Run Self-Test (“rich” air/fuel conditions) or normal engine operating conditions. or, Transaxle problem – Shift Solenoid 1 (SS1) circuit failure. 92 Right side Exhaust Gas Oxygen (EGO) sensor – signal voltage always indicates “rich” during Engine Run Self-Test (“lean” air/fuel conditions). or, Transaxle problem – Shift Solenoid 2 (SS2) circuit failure. 93 Throttle Position (TP) sensor – signal voltage too low during Self-Test (at maximum extension of idle speed control motor). or, Right side Exhaust Gas Oxygen (EGO) sensor – cool down occurred. or, Transaxle problem – Coast Clutch Solenoid (CCS) circuit failure. 94 Thermactor Air System – problem on the right bank (passenger side). or, Transaxle problem – Shift Solenoid 1 (SS1) circuit failure. 95 Thermactor Air System problem – right (passenger) side air flow always upstream. or, Fuel Pump Monitor (FPM) signal – indicates circuit problem. 96 Thermactor Air System problem – right (passenger) side air flow will not bypass. or, Fuel Pump (FP) circuit failure. or, High speed fuel pump relay circuit failure. 97 Three Digit Codes 98 Certain 1991 and newer vehicles use 3 digit codes to report the results of the system Self-Test procedure. Refer to your vehicle service manual to determine if your system uses 2 or 3 digit codes. Right side Exhaust Gas Oxygen (EGO) sensor – signal voltage indicates “rich” during “lean” air/fuel conditions. or, Overdrive Cancel Indicator Light (OCIL) – circuit failure. A system problem is present causing the Electronic Control Assembly (ECA) to operate in Failure Management and Effects Mode (FMEM). or, Right side Exhaust Gas Oxygen (EGO) sensor – signal voltage indicates “lean” during “rich” air/fuel conditions. or, Electronic Pressure Control (EPC) solenoid – circuit failure. 99 The Electronic Control Assembly (ECA) has not learned to control engine idle speed (ignore code 12 or 13). or, Electronic Pressure Control (EPC) solenoid – circuit failure. • Code meanings can vary with vehicle, model year, engine type, options and type of test being performed. 113 Air Charge Temperature (ACT) sensor – signal voltage is too high. 114 Air Charge Temperature (ACT) sensor – signal voltage is higher or lower than expected. 116 Engine Coolant Temperature (ECT) sensor – signal voltage is higher or lower than expected. 117 Engine Coolant Temperature (ECT) sensor – signal voltage is too low. • Many of the codes listed may not apply to your vehicle. 118 • Follow vehicle service manual procedures to find the cause of the code. Always start with the first code displayed. 121 Remember: 1) Visual inspections are important! 2) Problems with wiring and connectors are common, especially for intermittent faults. 3) Mechanical problems (vacuum leaks, binding or sticking linkages, etc.) can make a good sensor look bad to the computer. 4) Incorrect information from a sensor may cause the computer to control the engine in the wrong way. Faulty engine operation might even make the computer show a different good sensor as being bad! 111 System pass. 112 Air Charge Temperature (ACT) sensor – signal voltage is too low. Engine Coolant Temperature (ECT) sensor – signal voltage is too high. Throttle Position (TP) sensor– signal voltage is higher or lower than expected. or, Throttle Position (TP) sensor– signal voltage inconsistent with engine intake air flow. 122 Throttle Position (TP) sensor – signal voltage is too low. 123 Throttle Position (TP) sensor – signal voltage is too high. 124 Throttle Position (TP) sensor – signal voltage is higher than expected. 125 Throttle Position (TP) sensor – signal voltage is lower than expected. 126 Manifold Absolute Pressure (MAP) or Barometric Pressure (BP) – signal values higher or lower than expected. 128 Manifold Absolute Pressure (MAP) sensor – vacuum hose disconnected or damaged. 129 Manifold Absolute Pressure (MAP) sensor or Mass Air Flow (MAF) sensor – insufficient signal value change during Dynamic Response test (Engine Run Self-Test). 136 Heated Exhaust Gas Oxygen (HEGO) sensor – voltage signal not switching during Engine Run SelfTest. Indicates “lean” (Bank #2). 137 Heated Exhaust Gas Oxygen (HEGO) sensor – voltage signal not switching during Engine Run SelfTest. Indicates “rich” (Bank #2). 138 Cold Start Injector (CSI) – insufficient flow during Engine Run Self-Test. 139 169 “Downstream” Heated Exhaust Gas Oxygen (HEGO) sensor – signal voltage too low. 171 Heated Exhaust Gas Oxygen (HEGO) sensor – voltage signal not switching (Bank #1). 172 Heated Exhaust Gas Oxygen (HEGO) sensor – voltage signal indicates “lean” (Bank #1). 173 Heated Exhaust Gas Oxygen (HEGO) sensor – voltage signal indicates “rich” (Bank #1). 185 Mass Air Flow (MAF) sensor – signal voltage is lower than expected. 186 Injector pulsewidth higher than expected or Mass Air Flow (MAF) sensor signal voltage is lower than expected. 187 Injector pulsewidth lower than expected or Mass Air Flow (MAF) sensor signal voltage is higher than expected. 188 Heated Exhaust Gas Oxygen (HEGO) sensor – voltage signal not switching: indicates “rich” during part throttle engine operation (Bank #2). Exhaust Gas Oxygen (EGO) sensor – no switching detected (Bank #2). 175 Fuel system indicates “lean” with high flow demand. 176 Exhaust Gas Oxygen (EGO) sensor – no switching detected (Bank #1). 177 191 179 192 141 144 157 Mass Air Flow (MAF) sensor – signal voltage is too low 158 Mass Air Flow (MAF) sensor – signal voltage is too high 159 Mass Air Flow (MAF) sensor – signal voltage is higher or lower than expected. 165 “Downstream” Heated Exhaust Gas Oxygen (HEGO) sensor – voltage signal indicates “lean” (Bank #1). 166 “Downstream” Heated Exhaust Gas Oxygen (HEGO) sensor – voltage signal indicates “rich” (Bank #1). 167 Throttle Position (TP) sensor – insufficient signal voltage change during Dynamic Response test (Engine Run Self-Test). 168 “Downstream” Heated Exhaust Gas Oxygen (HEGO) sensor – signal voltage too high. Heated Exhaust Gas Oxygen (HEGO) sensor – voltage signal not switching (Bank #2). Heated Exhaust Gas Oxygen (HEGO) sensor – voltage signal indicates “lean” (Bank #2). Heated Exhaust Gas Oxygen (HEGO) sensor – voltage signal indicates “rich” (Bank #2). Heated Exhaust Gas Oxygen (HEGO) sensor – voltage signal not switching: indicates “rich” during part throttle engine operation (Bank #1). 181 Heated Exhaust Gas Oxygen (HEGO) sensor – voltage signal not switching: indicates “lean” during part throttle engine operation (Bank #1). 182 Electronic Control Assembly (ECA) status – adaptive “rich” limit reached in fuel control program (engine idle, Bank #1). 183 Electronic Control Assembly (ECA) status – adaptive “lean” limit reached in fuel control program (engine idle, Bank #1). 184 Mass Air Flow (MAF) sensor – signal voltage is higher than expected. 189 Heated Exhaust Gas Oxygen (HEGO) sensor – voltage signal not switching: indicates “lean” during part throttle engine operation (Bank #2). Electronic Control Assembly (ECA) status – adaptive “rich” limit reached in fuel control program (engine idle, Bank #2). Electronic Control Assembly (ECA) status – adaptive “lean” limit reached in fuel control program (engine idle, Bank #2). 193 Flexible Fuel Sensor – circuit failure. 211 Profile Ignition Pick-Up (PIP) sensor – circuit failure. 212 Loss of Ignition Diagnostic Monitor (IDM) signal – short to ground in Spark Output (SPOUT) circuit. 213 Spark Output (SPOUT) circuit – open connection failure. 214 Cylinder Identification (CID) sensor – circuit failure. 215 Ignition system (distributorless) problem – Coil #1 primary side circuit failure. 216 Ignition system (distributorless) problem – Coil #2 primary side circuit failure. 217 Ignition system (distributorless) problem – Coil #3 primary side circuit failure. 218 Ignition system (distributorless) problem – Loss of left side Ignition Diagnostic Monitor (IDM) signal. 219 238 Ignition system (distributorless) problem – Coil #4 primary side circuit failure. 239 Electronic Distributorless Ignition System (EDIS) problem – Crankshaft Position Sensor (CPS) signal received with engine off. 241 221 Ignition Diagnostic Monitor (IDM) signal problem – pulsewidth error between Electronic Distributorless Ignition System (EDIS) and Electronic Control Assembly (ECA). 222 Distributorless Ignition System (DIS) problem – operating in failure mode. 223 Electronic Distributorless Ignition System (EDIS) problem – Secondary circuit failure in Coil #1, 2, 3 or 4. Ignition system problem – Spark Output (SPOUT) signal open circuit (no spark advance timing). Distributorless Ignition System (DIS) problem – Spark timing error. Distributorless Ignition System (DIS) problem – Loss of right side Ignition Diagnostic Monitor (IDM) signal. Distributorless Ignition System (DIS) problem – Loss of Dual Plug Inhibit (DPI) control. 224 Distributorless Ignition System (DIS) problem – Primary circuit failure in Coil #1, 2, 3 or 4. 225 Knock Sensor (KS) signal not detected during Dynamic Response Test (Engine Run Self-Test). 226 Electronic Distributorless Ignition System (EDIS) problem – Ignition Diagnostic Monitor (IDM) signal not received. 227 Electronic Distributorless Ignition System (EDIS) problem – Crankshaft Position Sensor (CPS) error. 232 Electronic Distributorless Ignition System (EDIS) problem – Coil #1, 2, 3 or 4 circuit failure. 233 Electronic Distributorless Ignition System (EDIS) problem – Spark Advance Word (SAW) signal error. 242 317 Thermactor Air System problem – air flow not bypassed (vented to atmosphere) during Engine Run Self-Test. 318 Engine Air Management (EAM) System problem – monitor circuit signal voltage is high when commanded off. 319 Engine Air Management (EAM) System problem – monitor circuit signal voltage is low when commanded on. 326 Pressure Feedback EGR (PFE) sensor or EGR Pressure Transducer (EPT) – signal voltage lower than expected. 243 327 244 328 Cylinder Identification (CID) circuit failure during Cylinder Balance Test. 311 Thermactor Air System problem – no operation during Engine Run SelfTest (Bank #1). 312 Thermactor Air System problem – air flow misdirected during Engine Run Self-Test. 313 Thermactor Air System problem – air flow not bypassed (vented to atmosphere) during Engine Run Self-Test. 314 Thermactor Air System inoperative during Engine Run Self-Test (Bank #2 with dual oxygen sensors). 315 Thermactor Air System problem – inadequate air flow during cold start. 316 Thermactor Air System problem – inadequate air flow during hot engine low RPM. EGR Valve Position (EVP) sensor, Pressure Feedback EGR (PFE) sensor or EGR Pressure Transducer (EPT) – signal voltage too low. EGR Valve Position (EVP) sensor – signal voltage lower than expected (closed valve position). 332 Insufficient EGR flow detected. 334 EGR Valve Position (EVP) sensor – signal voltage higher than expected (closed valve position). 335 Pressure Feedback EGR (PFE) sensor or EGR Pressure Transducer (EPT) – signal voltage higher or lower than expected (Key On Engine Off Self-Test). 336 Pressure Feedback EGR (PFE) sensor or EGR Pressure Transducer (EPT) – signal voltage higher than expected (exhaust pressure high). 337 EGR Valve Position (EVP) sensor, Pressure Feedback EGR (PFE) sensor or EGR Pressure Transducer (EPT) – signal voltage too high. 338 Engine Coolant Temperature (ECT) sensor – signal voltage lower than expected. 339 522 Engine Coolant Temperature (ECT) sensor – signal voltage higher than expected. Vehicle transmission not in PARK during Key On Engine Off Self-Test. Octane Adjust service pin in use. Low Speed Fuel Pump – open circuit failure between battery and Electronic Control Assembly (ECA). 341 381 Air Conditioner (A/C) clutch is cycling frequently. 411 Cannot control RPM during Engine Run Self-Test – low RPM check. 412 Cannot control RPM during Engine Run Self-Test – high RPM check. 413 Idle Speed Control actuator – operating at minimum limit. 414 Idle Speed Control actuator – operating at maximum limit. 415 Idle Speed Control system – minimum learning limit reached. 416 Idle Speed Control system – maximum learning limit reached. 452 Vehicle Speed Sensor (VSS) – signal too small. 461 RPM or Vehicle Speed Sensor (VSS) limit reached. NO REPAIR REQUIRED. 511 Electronic Control Assembly (ECA) problem – Read-Only Memory (ROM) test failure. 512 Electronic Control Assembly (ECA) problem – Keep Alive Memory test failure. 524 525 Vehicle transmission in gear or air conditioner on. 527 Neutral Position Switch (NPS) open circuit failure or Air Conditioner on during Engine Off Self-Test. 528 Clutch Switch (CS) – circuit failure. 529 Data Communication Link (DCL) or Electronic Engine Control (EEC) system – circuit failure. 532 Cluster Control Assembly (CCA) – circuit failure. 533 Electronic Instrument Cluster (EIC) – circuit failure in Data Communication Link (DCL). 536 553 Thermactor Air Diverter (TAD or AM-2) solenoid: circuit failure. 554 Fuel Pressure Regulator Control (FPRC) – circuit failure. 555 SBS circuit failure. 556 Fuel Pump (FP) relay – primary circuit failure. 557 Low Speed Fuel Pump – primary circuit failure. 558 EGR Valve Regulator (EVR) solenoid – circuit failure. 559 Air Conditioner Clutch (ACC) relay – circuit failure. 561 Turbocharger Control Solenoid (TCS) – output circuit failure. High Speed Electro-Drive Fan (HEDF) – circuit failure. 538 539 519 Power Steering Pressure Switch (PSPS) – circuit switching not detected. Thermactor Air Bypass (TAB or AM-1) solenoid: circuit failure. Insufficient RPM change during Dynamic Response Test (Engine Run SelfTest). or, Invalid cylinder balance test – throttle position movement. or, Invalid cylinder balance test – cylinder identification problems. Fuel Pump (FP) circuit open connection – Electronic Control Assembly (ECA) to motor ground. 521 552 562 Air conditioner or defroster on. Power Steering Pressure Switch (PSPS) – open connection circuit failure. Idle Air Control (IAC) solenoid – circuit failure. Brake On-Off (BOO) switch – circuit failure or not activated during Engine Run Self-Test. 513 Electronic Control Assembly (ECA) problem – internal voltage test failure. 551 542 543 Fuel Pump (FP) circuit open connection – Electronic Control Assembly (ECA) to battery. Auxiliary Electro-Drive Fan (AEDF) – circuit failure. 563 564 Electro-Drive Fan (EDF) – circuit failure. 565 Cannister Purge (CANP) solenoid – circuit failure. 566 3/4 Shift solenoid – circuit failure. 569 Auxiliary Cannister Purge (AUX-CANP) – circuit failure. 571 EGR vacuum solenoid – circuit failure. 572 EGR vent solenoid – circuit failure. 573 Electro-Drive Fan (EDF) – operation not detected during Key On Engine Off Self Test. 574 High Speed Electro-Drive Fan (HEDF) – operation not detected during Key On Engine Off Self-Test. 578 Variable Control Relay Module (VCRM) – Air Conditioner Pressure sensor circuit shorted. 579 Variable Control Relay Module (VCRM) – insufficient Air Conditioner Pressure change. 581 Variable Control Relay Module (VCRM) – excessive current flow in fan circuit. 582 Variable Control Relay Module (VCRM) – open circuit failure in fan circuit. 583 Variable Control Relay Module (VCRM) – excessive current flow in fuel pump circuit. 584 Variable Control Relay Module (VCRM) – open circuit failure in module power ground circuit. 585 Variable Control Relay Module (VCRM) – excessive current flow in Air Conditioner Clutch circuit. 624 Electronic Pressure Control (EPC) solenoid – circuit failure. 625 646 627 Converter Clutch Solenoid (CCC) – circuit failure. 628 Excessive converter clutch slippage. 629 Converter Clutch Solenoid (CCC), Converter Clutch Override (CCO) solenoid, Lock-Up Solenoid (LUS) or MLUS – circuit failure. 631 Transmission problem: 3-4 shift error. 621 Transmission problem – Shift Solenoid 1 (SS1) circuit failure. 622 Transmission problem – Shift Solenoid 2 (SS2) circuit failure. 647 Transmission problem – incorrect gear ratio obtained for third gear. 648 Transmission problem – incorrect gear ratio obtained for fourth gear. 649 Electronic Pressure Control (EPC) – signal higher or lower than expected. Overdrive Cancel Switch (OCS) – no switch action detected during Engine Run Self-Test. 652 632 633 4x4L switch closed during Key On Engine Off SelfTest. 634 617 619 Transmission problem – incorrect gear ratio obtained for second gear. 651 Transmission Oil Temperature (TOT) sensor – signal voltage higher or lower than expected. Transmission problem: 2-3 shift error. Transmission problem – incorrect gear ratio obtained for first gear. Overdrive Cancel Indicator Light (OCIL) – circuit failure. 587 618 Shift Solenoid #4 (SS4) – circuit failure. Coast Clutch Solenoid (CCS) – circuit failure. 626 Transmission Temperature Switch (TTS) – open circuit failure. Transmission problem: 1-2 shift error. 643 645 Manual Lever Position (MLP) sensor – signal voltage higher or lower than expected. Variable Control Relay Module (VCRM) – communication failure. Shift Solenoid 3 (SS3) – circuit failure. Electronic Pressure Control (EPC) solenoid – circuit driver problem in Electronic Control Assembly (ECA). 586 Variable Control Relay Module (VCRM) – open circuit failure in Air Conditioner Clutch circuit. 641 635 636 637 Transmission Oil Temperature (TOT) sensor – signal voltage too high. 638 Transmission Oil Temperature (TOT) sensor – signal voltage too low. 639 Turbine Speed Sensor (TSS) – insufficient signal level. Electronic Pressure Control (EPC) solenoid – circuit failure. Modulated Lock-Up Solenoid (MLUS) – circuit failure. 653 Transmission Control Switch (TCS) – did not switch during Key On Engine Run Self-Test. 654 Manual Lever Position (MLP) sensor – not indicating PARK position during Key On Engine Off Self-Test. 655 Manual Lever Position (MLP) sensor – not indicating NEUTRAL position during Key On Engine Off Self Test. 656 Converter Clutch Control – continuous slip error. 657 Excessively hot transmission oil temperature detected during engine operation. 659 High vehicle speed detected while shift lever indicating PARK position. 667 Manual Lever Position (MLP) sensor – signal voltage too low. 668 Manual Lever Position (MLP) sensor – signal voltage too high. 675 Manual Lever Position (MLP) sensor – signal voltage out of range. 676 Transmission problem – mechanical failure in first gear and reverse. 677 Transmission problem – mechanical failure in first gear and second gear. 678 Transmission problem – third gear to second gear downshift error. 679 Transmission problem – second gear to first gear downshift error. 691 4x4 low circuit failure. 811 Fuel injector Pump Lever (FIPL) – signal voltage higher or lower than expected. 812 Fuel Injector Pump Lever (FIPL) – signal voltage too high. 813 Fuel Injector Pump Lever (FIPL) – signal voltage too low. 998 Engine control system operating in Failure Mode and Effects Management (FMEM) programming strategy. OTHER FEATURES Additional Code Scanner Diagnostic Features. Part 1: Relay and Solenoid Test 6) Turn Ignition Key to ON Position but DO NOT START ENGINE 7) Put Hold/Test Switch in TEST Position 1) Safety First! • Set the parking brake. AUDIO ON T TES OU UT TP Do the following: 5) Put Hold/Test Switch in HOLD Position SELF Service manuals call this the “Output State Check.” You can turn on most of the computer controlled relays and solenoids except the fuel pump relay and fuel injectors. This is helpful for checking voltages, relay operation, etc. The “output state check” is automatically activated at the end of the normal Key On Engine Off Self-Test procedure (explained in Section 4). ® TM OFF • Put shift lever in PARK (automatic transmission) or NEUTRAL (manual transmission). • Block the drive wheels. TEST ST0 HOLD • Computer is CP9015 – Ford, Lincoln & Mercury Domestic 1981& Newer now running normal Key On Engine Off Self-Test. WARNING: Stay away from electric motor driven radiator fan. It may turn on during this procedure. 2) Make Sure Ignition Key is in OFF Position 8) Wait For End of All Service Code Signals • STO light on Code Scanner stops blinking. 3) Check Code Scanner Battery 9) “Output State Check” is Now Activated • Refer to Section 2. 4) Connect Code Scanner • Refer to Section 3. TE ST • Plug BOTH test connectors into the Code Scanner! SE or AU ON DI O TM d, 19 Linc 81 ol & n& Ne M HOL D we er r cur y LF TES UT UTP TO • Fully depress and release the throttle. At this time most of the computer controlled relays and solenoids (except fuel pump and fuel injectors) will be energized. NOTE: The STO circuit is also energized, so the STO light on the Code Scanner will turn on too! • Repeat the action of depressing and releasing the throttle. This will deenergize the components (STO light will turn off, also). • Throttle action may repeated as often as desired to turn the actuators on and off. NOTE: If vehicle is equipped with Integrated Vehicle Speed Control (IVSC), disconnect vacuum supply hose from the Speed Control Servo (to release stored vacuum). Otherwise, the Speed Control Solenoids will energize the first time the throttle is depressed causing the servo to hold the throttle wide open! Reconnect the vacuum hose after testing. 10) Turn Ignition Key to OFF Position 11) Disconnect Code Scanner Part 2: Cylinder Balance Test This test is only used on vehicles with Sequential electronic Fuel Injection (SFI) engines. (Where the injectors are fired individually in the same sequence as the spark plug firing sequence.) The test turns each injector on and off and checks for an RPM decrease. Codes indicate cylinders which are weak or not contributing due to problems such as damaged injectors, spark plugs and wiring. The test must be run at the end of the normal Key On Engine Running Self-Test procedure (explained in Section 4) and may be repeated as often as desired. Warning: The following procedure involves starting the engine. Always operate vehicle in a well ventilated area. Exhaust gases are very poisonous! 1) Safety First! • Set the parking brake. • Put shift lever in PARK (automatic transmission) or NEUTRAL (manual transmission). • Block the drive wheels. 2) Make Sure Ignition Key is in OFF Position 3) Check Code Scanner Battery • Refer to Section 2. 4) Connect Code Scanner • Refer to Section 3. • Plug BOTH test connectors into the Code Scanner! 5) Put Hold/Test Switch in HOLD Position 7) Start the Engine • Stay away from moving parts. 8) Put Hold/Test Switch in TEST Position • Computer is now running normal Key On Engine Running Self-Test. 9) Wait For End of All Service Code Signals • STO light on Code Scanner stops blinking. B egin the Cylinder Balance Test 10) Lightly Press and Release Throttle about 10 seconds after STO Light stops blinking • Do NOT press throttle all the way down! Exception: Do brief wide-openthrottle for 1986 only. • Test time is less than 3 minutes. • Do not move throttle until test is over. 11) Get Codes from Flashing STO Light • Count flashes to get codes. NOTE: This test can give single digit codes. Code 3 looks like: ❊❊❊ FLASH FLASH FLASH Code 12 looks like: ❊ PAUSE ❊❊ FLASH (pause) FLASH FLASH (FLASH=1, FLASH FLASH=2. 6) Have a Pencil and Paper Ready Put 1 and 2 together = code 12.) • This is for writing down the codes. • Testing is complete 12) Optional Retest - 1987 & Newer • Lightly press and release throttle within 2 minutes after the last code is sent. This will repeat the entire cylinder balance test. • IMPORTANT: (Some 1987 and all 1988 & newer) Repeating the test can tell you how weak a bad cylinder is. (The computer alters inspection during retest.) Test results will be different for a good, weak or “dead” cylinder. See charts below using cylinder #7 as an example. Example: All cylinders equal 1st TEST Code #9 (pass) 2nd TEST Not necessary 3rd TEST Not necessary 2nd TEST Code #9 (pass) 3rd TEST Not necessary 2nd TEST Code #7 3rd TEST Code #9 (pass) Example: Cylinder 7 is weak 1st TEST Code #7 Example: Cylinder 7 is very weak 1st TEST Code #7 Example: Cylinder 7 is extremely weak or dead 1st TEST Code #7 Service Code 9 1 2 3 4 5 6 7 8 77 2nd TEST Code #7 3rd TEST Code #7 Test Results System PASS #1 Cylinder / Injector problem #2 Cylinder / Injector problem #3 Cylinder / Injector problem #4 Cylinder / Injector problem #5 Cylinder / Injector problem #6 Cylinder / Injector problem #7 Cylinder / Injector problem #8 Cylinder / Injector problem Throttle was moved during test. Testing could not be completed. Repeat test procedure starting from step 1. 13) Turn Ignition Key to Off Position 14) Disconnect Code Scanner Part 3: Wiggle Test (Sometimes called Continuous Monitor test.) • This test can help locate intermittent faults in SOME circuits (see chart on page 36). • When Wiggle test is activated, the Code Scanner STO light and Audio tone will turn on if a problem is detected. • The STO light and tone are only energized as long as the fault is present. If the problem goes away, the light and tone will turn off. • If the STO light and tone come on as you wiggle a sensor, connector or wiring, that’s where the problem is! 8) Depending upon Vehicle Model Year.... • 1986 & Older: “Wiggle Test” is now activated! • 1987 & Newer: —Without pausing, move HOLD/ TEST switch to TEST then to HOLD and then back to TEST. —“Wiggle Test” is now activated! 9) Perform “Wiggle Test” on Suspected Circuit • Lightly tap sensor. ST • If the above actions recreate an intermittent fault, the STO light will light and a tone will sound for as long as the fault is present. This can help locate the area of an intermittent problem! 3) Check Code Scanner Battery • Refer to Section 2. 4) Connect Code Scanner • Refer to Section 3. • Plug BOTH test connectors into the Code Scanner! 5) Put HOLD/TEST Switch in HOLD Position 6) Put AUDIO Switch in ON Position 7) Turn Ignition Key to ON Position but DO NOT START ENGINE LD ry rcu Me & oln inc ,L rd Fo F 5- OF 90 1 CP 2) Make Sure Ignition Key is in OFF Position ON AU DI O • Block the drive wheels. • Twist and shake wiring between sensor and computer. HO • Put shift lever in PARK (automatic transmission) or NEUTRAL (manual transmission). • Wiggle sensor connector. TE • Set the parking brake. TM 1) Safety First! NOTE: If a fault is recreated this way, a service code will be stored in computer memory. Be sure to erase this code from memory after making all repairs. Refer to Section 4 (SelfTest Part 5: Erasing “Continuous Memory” codes). 10) Move Switches: • HOLD/TEST switch to HOLD. • AUDIO switch to OFF. 11) Turn Ignition Key to Off Position 12) Disconnect Code Scanner Circuits Checked by Continuous Monitor ACT .............. 1984 & up BP ................ 1984 & up ECT ............. 1984 & up EGO ............. 1990 & up EVP ............. 1984 & up IDM .............. 1990 & up (DIS or dual plug DIS only) ITS ............... 1990 & up MAF ............. 1990 & up MAP ............. 1984 & up PFE .............. 1986 & up TP ............... 1984 & up VAF .............. 1985 & up VAT .............. 1984 & up MCU SYSTEM Using the Code Scanner (MCU Systems) Complete Description for Reading and Using Service Codes Do This First This section shows you how to use the Code Scanner for: • Running tests of the engine computer system. • Reading service codes to pinpoint problem causes. Before using this section: — Read Sections 1 and 2 to learn about service codes and the Code Scanner tool. — Read Section 3 to find the location of the Self- Test connector in your vehicle. The connector type will tell you whether you have an MCU system or an EEC-IV system. — Read this section (7) if you have an MCU system. Use Section 4 if you have an EEC-IV system. Self-Test Summary The Self-Test procedure (also called “Quick Test”) involves engine off and engine running tests. The entire procedure is summarized below. Each part is fully explained on the following pages. IMPORTANT: All parts must be performed as shown for accurate test results! Self-Test Summary Part 1: Test Preparation. • Safety First! Follow all safety rules. • Perform Visual Inspection. This often reveals the problem. • Prepare Vehicle. Check choke voltage and warm-up engine. Part 2: Do Key On Engine Off (KOEO) Self-Test. • Get service codes to help pinpoint problems. Part 3: Do Key On Engine Running (KOER) Self-Test. • Get more service codes to pinpoint problems found during engine operating conditions. Self-Test Part 1: Test Preparation 1) Safety First! • Set the parking brake. • Put shift lever in PARK (automatic transmission) or NEUTRAL (manual transmission). • Block the drive wheels. • Make sure ignition key is in OFF position. 2) Perform Visual Inspection. Doing a thorough visual and “handson” underhood inspection before starting any diagnostic procedure is essential!! You can find the cause of many drivability problems by just looking, thereby saving yourself a lot of time. • Has the vehicle been serviced recently? Sometimes things get reconnected in the wrong place, or not at all. • Don’t take shortcuts. Inspect hoses and wiring which may be difficult to see because of location beneath air cleaner housings, alternators and similar components. • Inspect the air cleaner and ductwork for defects. not wipe off! Obtain extra grease, if needed, from your vehicle dealer. It is a special type for this purpose. Repair any problems found during the visual inspection and retest the vehicle. If the original symptom is still present, continue the test. Go to Step 3, “Prepare Vehicle.” 3) Prepare Vehicle. • Check sensors and actuators for damage. • Turn off all electrical equipment and accessories in vehicle. • Inspect all vacuum hoses for: – Correct routing. Refer to vehicle service manual, or Vehicle Emission Control Information S T (VECI) decal GAP . .. located in the .S.A. FRONT engine OF CAR compart9RAC2LAB ment. – Pinches and kinks. – Splits, cuts or breaks. • Keep all vehicle doors closed during testing. HVAC/ CRUISE STER EGR VAC REG BRAKE BOOSTER FUEL PRESS REG EM TO TRANS MODE EGR VAC REG • Inspect wiring for: – Contact with sharp edges. (This happens often.) – Contact with hot surfaces, such as exhaust manifolds. – Pinched, burned or chafed insulation. – Proper routing and connections. • Check electrical connectors for: – Corrosion on pins. – Bent or damaged pins. – Contacts not properly seated in housing. – Bad wire crimps to terminals. Bent Pins Corrosion Problems with connectors are common in the engine control system. Inspect carefully. Note that some connectors use a special grease on the contacts to prevent corrosion. Do • Make sure radiator coolant and transmission fluid are at proper levels. • If the air cleaner must be removed (for example to measure the choke voltage), leave all vacuum hoses attached to the air cleaner housing. • Start the engine and allow it to idle. If the engine does not start, refer to the “No Start” diagnostic procedure in the vehicle service manual. WARNING: Always operate vehicle in a well ventilated area. Do NOT inhale exhaust gases – they are very poisonous! Stay away from moving parts! • Check for power at the choke while the engine is running. Use a voltmeter to measure the voltage between the choke cap terminal and engine ground. — Battery Powered Choke: voltage should be about 12 volts. — Alternator Powered Choke: voltage should be about 7.5 volts. If any problems are found in the choke power circuit, make necessary repairs and re-do the Self-Test process starting with Step 1. Continue this procedure if no problems are found. • Allow the engine to idle until the upper radiator hose is hot and pressurized and RPM has settled to warm engine idle speed. Check for leaks around hose connections. • Turn ignition key to OFF position. 4) Plug the Code Scanner into the Vehicle Self-Test Connector. V-6 and V-8 engines. • Refer to Section 3, “Connector Location”. (The Self-Test connector is near the MCU computer module.) TE ST Not used in MCU systems LF TES SE Remove PCV valve from breather cap on valve cover. Be sure to replace PCV valve after testing and servicing is completed! or AU ON DIO TM d, 19 Linc 81 ol & n& Ne M HOL D we er r cu r y UT UTP TO • Connect the Code Scanner to the 6sided test connector only. The Code Scanner has a spot for a second small connector, which is NOT USED in MCU systems. Do not connect anything to this unused location. • The Code Scanner will not harm the vehicle engine computer. 2.3L engines with the GK code. Manifold Vacuum Remove cap Anti-backfire vacuum switch 5) Do Special Set-Up Procedures. The engine types listed require additional preparation before continuing with the Self-Test. In-Line 4 and 6 cylinder engines with a canister control valve Remove the cap from the anti-backfire vacuum switch tee during testing. The switch is located behind the MCU module. Be sure to replace the cap after testing and servicing is complete! 2.3L engines with an EGR vacuum load control (wide open throttle) valve. Remove hose from connection port B. (This hose runs between the canister control valve and the carbon canister.) Do NOT plug the hose for the remainder of the test procedure. Be sure to reconnect the hose after testing and servicing is completed! Cover the atmospheric vent holes with a piece of tape. Be sure to remove the tape after testing and servicing is completed! 4.2L and 5.8L engines with a vacuum delay valve. There is a tee with a restrictor in the Thermactor Vacuum control line. The restrictor must be uncapped during the test. Replace the cap after testing. Refer to drawing for location of restrictor on the TAD vacuum line (4.2L engines) or the TAB vacuum line (5.8L engines). 6) Have a Pencil and Paper Ready. • This is for writing down all the codes. 7) Go to SELF-TEST PART 2: Key On Engine Off (KOEO) Self-Test. Self-Test Part 2: Key On Engine Off (KOEO) Self-Test. IMPORTANT: You must complete all steps in Self-Test Part 1 before proceeding to Part 2. 1) Verify: • All codes are 2 digits long. Ignition Key is in OFF Position and Code Scanner is Connected. 2) Put Code Scanner HOLD/TEST Switch in TEST Position. • Optional: Turn the AUDIO switch ON to hear “beeps” when the codes are sent. 3) Turn Ignition Key to ON Position but DO NOT START THE ENGINE. • This starts the KOEO Self-Test. • Codes are sent after 5 seconds. • Pay no attention to a brief blink which may occur after ignition key is turned to ON position. 4) Get Codes from the Flashing STO Light. Note: If the light does not flash, go back and repeat SELF-TEST PART 2 starting with Step 1. If the light still does not flash, you have a problem which must be repaired before proceeding. Refer to the vehicle service manual “Self-Test Not Functional” (or similar title) troubleshooting chart. • Count flashes to get service codes. (Each flash lasts 1/2 second.) Code 12 looks like: • The pause between each digit is 2 seconds. • After all codes are sent, the whole group is sent again just one more time (so you can double check your code list). • The longer pause between each code is 4 seconds. Example of code 12 only: ❊ PAUSE ❊❊ FLASH (pause) FLASH FLASH (longer pause) ❊ PAUSE ❊❊ FLASH (pause) FLASH FLASH Example of code series 12 and 42: ❊ PAUSE ❊❊ FLASH (pause) FLASH FLASH (longer pause) ❊❊❊❊ PAUSE ❊❊ FLASH FLASH FLASH FLASH (pause) FLASH FLASH (longer pause) ❊ PAUSE ❊❊ ❊ PAUSE ❊❊ FLASH (pause) FLASH FLASH FLASH (pause) FLASH FLASH (longer pause) (FLASH = 1, FLASH FLASH = 2. (Put 1 and 2 together = code 12.) ❊❊❊❊ PAUSE ❊❊ Code 23 looks like: ❊❊ PAUSE ❊❊❊ FLASH FLASH (pause) FLASH FLASH FLASH FLASH FLASH FLASH FLASH (pause) FLASH FLASH 5) Turn Ignition Key to OFF Position. At this point you can either: • Have your vehicle professionally serviced. Codes indicate problems found by the computer. or, • Repair the vehicle yourself using service codes to help pinpoint the problem. Refer to Test Results Chart. Key On Engine Off (KOEO) Test Results KOEO CODES ACTION TO TAKE: 11* (all except high altitude) System pass. No problem found by computer during KOEO SelfTest. Go to SELF-TEST PART 3: Key On Engine Running (KOER) Self-Test. 62* (high altitude V-6 or V-8 ONLY) System pass. No problem found by computer during KOEO SelfTest. Go to SELF-TEST PART 3: Key On Engine Running (KOER) Self-Test. 65* (high altitude I-4 ONLY) System pass. No problem found by computer during KOEO SelfTest. Go to SELF-TEST PART 3: Key On Engine Running (KOER) Self-Test. Any Code(s) Codes indicate system problems are present now. Write down all codes. Refer to vehicle service manual for code troubleshooting charts and repair procedures. Repeat PART 2: Key On Engine Off (KOEO) Self-Test after every repair. Do not proceed to SELFTEST PART 3 until a system pass code is received. No Codes Received (STO light always on or off) You have a problem which must be repaired before proceeding. Refer to the vehicle service manual “Self-Test Not Functional” (or similar title) troubleshooting chart. *Note: “High Altitude” refers to vehicles with computer adjusted for operation at high elevations such as in Denver, Colorado. Self-Test Part 3: Key On Engine Running (KOER) Self-Test. IMPORTANT: You must complete all steps in Self-Test Parts 1 and 2 before proceeding to Part 3. For Vehicles With I-4 & I-6 Engines: (Refer to page 44 for V-6 & V-8 engines.) • Count flashes on the STO light. (Ignore any flashes lasting longer than 1 second.) – 4 cylinder: 2 Flashes. 1) Verify: • Ignition Key is in OFF Position. • Code Scanner is Connected. • HOLD/TEST Switch is in TEST Position. WARNING: The next step involves starting the engine. Observe safety precautions. • Always operate vehicle in a well ventilated area. Do NOT inhale exhaust gases – they are very poisonous! • Set the parking brake. • Put shift lever in PARK (automatic transmission) or NEUTRAL (manual transmission). • Block the drive wheels. • Stay away from moving engine parts. 2) Start the Engine. 3) Increase and Hold Engine Speed at 3000 RPM Within 20 Seconds of Start. • Maintain engine speed at 3000 RPM until service codes are sent (end of Step 5). 4) Get Engine Identification (ID) Code from the Flashing STO Light. • Maintain engine speed at 3000 RPM. • An engine ID code is sent after a few seconds to signal the beginning of KOER Self-Test. – 6 cylinder: 3 Flashes. Note: If the light does not flash or flashes the wrong number, go back and repeat SELF-TEST PART 3 starting with Step 1. If the light still does not flash correctly, you have a problem which must be repaired before proceeding. Refer to the vehicle service manual “Self-Test Not Functional” (or similar title) troubleshooting chart. 5) Get Service Codes From the Flashing STO Light. • Maintain engine speed at 3000 RPM until codes are sent, then release throttle and return to idle RPM. • Count flashes on the STO light. This is done the same way as in Self-Test Part 2. (Ignore any flashes lasting longer than 1 second.) Code 12 looks like: ❊ PAUSE ❊❊ FLASH (pause) FLASH FLASH (FLASH = 1, FLASH FLASH = 2. (Put 1 and 2 together = code 12.) • All codes are 2 digits long. • After all codes are sent, the whole series is sent again just one more time (so you can double check your code list). Example of code series 12 and 42: ❊ PAUSE ❊❊ • Block the drive wheels. • Stay away from moving engine parts. FLASH (pause) FLASH FLASH (longer pause) 2) Start the Engine. ❊❊❊❊ PAUSE ❊❊ 3) Warm-Up Engine. FLASH FLASH FLASH FLASH (pause) FLASH FLASH (longer pause) ❊ PAUSE ❊❊ • Allow engine to idle until it reaches normal operating temperature. Then... • Run engine at 2000 RPM for 2 minutes. FLASH (pause) FLASH FLASH (longer pause) ❊❊❊❊ PAUSE ❊❊ FLASH FLASH FLASH FLASH (pause) FLASH FLASH 6) Turn Ignition Key to OFF Position. 7) Remove Code Scanner. For Vehicles With V-6 & V-8 Engines: 4) Turn Engine Off, Then Immediately Restart Engine and Allow to Idle. Note: Vehicles with Throttle Kicker actuator – the Throttle Kicker will extend (increasing RPM) and remain so throughout the test. 5) Get Engine Identification (ID) Code from the Flashing STO Light. • An engine ID code is sent after a few seconds to signal the beginning of KOER Self-Test. • Count flashes on the STO light. (Ignore any flashes lasting longer than 1 second.) – 6 cylinder: 3 Flashes. – 8 cylinder: 4 Flashes. 1) Verify: • Ignition Key is in OFF Position. • Code Scanner is Connected. • HOLD/TEST Switch is in TEST Position. WARNING: The next step involves starting the engine. Observe safety precautions. • Always operate vehicle in a well ventilated area. Do NOT inhale exhaust gases – they are very poisonous! • Set the parking brake. • Put shift lever in PARK (automatic transmission) or NEUTRAL (manual transmission). Note: If the light does not flash or flashes the wrong number, go back and repeat SELF-TEST PART 3 starting with Step 1. If the light still does not flash correctly, you have a problem which must be repaired before proceeding. Refer to the vehicle service manual “Self-Test Not Functional” (or similar title) troubleshooting chart. 6) Test Knock Sensor (if used on vehicle). • If vehicle does not use knock sensor, skip this step and go to Step 7. • Do the following immediately after engine ID code is sent: – Simulate spark knock by placing a 3/8 inch socket extension (or similar tool) on manifold near base of knock sensor. – Tap on end of extension with a light (4 oz.) hammer for 15 seconds. – DO NOT TAP SENSOR! 8) Turn Ignition Key to OFF Position. 9) Remove Code Scanner. At this point you can either: • Have your vehicle professionally serviced. Codes indicate problems found by the computer. or, 7) Get Service Codes From the Flashing STO Light. • Count flashes on the STO light. This is done the same way as in Self-Test Part 2. (Ignore any flashes lasting longer than 1 second.) Code 12 looks like: ❊ PAUSE ❊❊ FLASH (pause) FLASH FLASH (FLASH = 1, FLASH FLASH = 2. (Put 1 and 2 together = code 12.) • All codes are 2 digits long. • After all codes are sent, the whole group is sent again just one more time (so you can double check your code list). Example of code series 12 and 42: ❊ PAUSE ❊❊ FLASH (pause) FLASH FLASH (longer pause) ❊❊❊❊ PAUSE ❊❊ FLASH FLASH FLASH FLASH (pause) FLASH FLASH (longer pause) ❊ PAUSE ❊❊ FLASH (pause) FLASH FLASH (longer pause) ❊❊❊❊ PAUSE ❊❊ FLASH FLASH FLASH FLASH (pause) FLASH FLASH • Repair the vehicle yourself using service codes to help pinpoint the problem. Refer to Test Results Chart. Code definitions are listed in Section 8, “Code Meanings (MCU system).” Key On Engine Running (KOER) Test Results KOER CODES ACTION TO TAKE: 11* (all except high altitude) System pass. No problem found by computer during KOER SelfTest. The Self-Test Diagnostic Procedure is complete. If vehicle symptoms are still present, they are probably not related to the computer system. 62* (high altitude V-6 or V-8 ONLY) System pass. No problem found by computer during KOER SelfTest. The Self-Test Diagnostic Procedure is complete. If vehicle symptoms are still present, they are probably not related to the computer system. 65* (high altitude I-4 ONLY) System pass. No problem found by computer during KOER SelfTest. The Self-Test Diagnostic Procedure is complete. If vehicle symptoms are still present, they are probably not related to the computer system. Any Code(s) Codes indicate system problems are present now. Write down all codes. Refer to vehicle service manual for code troubleshooting charts and repair procedures. Repeat PART 3: Key On Engine Running (KOER) Self-Test after every repair. No Codes Received (STO light always on or off) You have a problem which must be repaired before proceeding. Refer to the vehicle service manual “Self-Test Not Functional” (or similar title) troubleshooting chart. *Note: “High Altitude” refers to vehicles with computer adjusted for operation at high elevations such as in Denver, Colorado. CODE MEANINGS Code Definitions for FORD Engines with MCU Computer System (Microprocessor Control Unit) Code definitions are listed in this section • Many of the codes listed may not apply to your vehicle. • Use the definition that applies to your engine type: In-Line 4 or 6 cylinder (I-4, I-6) or V-6 or V-8. • Follow vehicle service manual procedures to find the cause of the code. Remember: 1) Visual inspections are important! 2) Problems with wiring and connectors are common, especially for intermittent faults. 3) Mechanical problems (vacuum leaks, binding or sticking linkages, etc.) can make a good sensor look bad to the computer. 11 “High Altitude” computer adjusted for operation at high elevations such as in Denver, Colorado. I-4 (All except High Altitude): System pass. I-4 (High Altitude only): Altitude (ALT) circuit is open. I-6: System pass. V-6 (All except High Altitude): System pass. V-6 (High Altitude only): Altitude (ALT) circuit is open. V-8 (All except High Altitude): System pass. V-8 (High Altitude only): Altitude (ALT) circuit is open. 12 V-8: RPM out of specification – Throttle Kicker (TK) system. 25 V-8: Knock Sensor (KS) signal not detected during Key On Engine Run (KOER) Self-Test. 33 All Engines: Key On Engine Run (KOER) SelfTest not initiated. 41 All Engines: Exhaust Gas Oxygen (EGO) sensor: voltage signal always “lean” (low value) – does not switch. 42 All Engines: Exhaust Gas Oxygen (EGO) sensor: voltage signal always “rich” (high value) – does not switch. 44 All Engines: Exhaust Gas Oxygen (EGO) sensor: signal voltage indicates “rich” (high value) with Thermactor air switched upstream to the exhaust manifold (a “lean” air/fuel condition). 45 All Engines: Thermactor air flow is always upstream (going to exhaust manifold). 46 All Engines: Thermactor Air System unable to bypass air (vent to atmosphere). 51 I-4: Low or Mid Temperature Switch circuit is open when engine is hot. I-6: Low Temperature Vacuum Switch circuit is open when engine is hot. V-6: Hi or Hi/Low Vacuum Switch circuit is always open. V-8: Hi or Hi/Low Vacuum Switch circuit is always open. 52 I-4 (car): Idle Tracking Switch (ITS) – voltage does not change from closed to open throttle. (Closed throttle checked during Key On Engine Off condition. Open throttle checked during Engine Running conditions.) I-4 (truck): Idle/Decel Vacuum Switch circuit always open. I-6: Wide Open Throttle (WOT) Vacuum Switch circuit is always open. 53 I-4: Wide Open Throttle (WOT) Vacuum Switch circuit is always open. I-6: CROWD Vacuum Switch circuit is always open. V-6: Dual Temperature Switch circuit is always open. V-8: Dual Temperature Switch circuit is always open. 54 V-6: Mid Temperature Switch circuit is always open. V-8: Mid Temperature Switch circuit is always open. 55 I-4: Road Load Vacuum Switch circuit is always open. V-6: Mid Vacuum Switch circuit is always open. V-8: Mid Vacuum Switch circuit is always open. 56 I-6: Closed Throttle Vacuum Switch circuit is always open. 61 V-6: Hi/Low Vacuum Switch circuit is always closed. V-8: Hi/Low Vacuum Switch circuit is always closed. 62 Note: “High Altitude” refers to vehicles with computer adjusted for operation at high elevations such as in Denver, Colorado. I-4 (car): Idle Tracking Switch (ITS) circuit is closed at idle. I-4 (truck): Idle/Decel Vacuum Switch circuit is always closed. I-6: Wide Open Throttle (WOT) Vacuum Switch circuit is always closed. V-6 (All except High Altitude): Altitude (ALT) circuit is open. V-6 (High Altitude only): System pass. V-8 (All except High Altitude): Altitude (ALT) circuit is open. V-8 (High Altitude only): System pass. 63 I-4: Wide Open Throttle (WOT) Vacuum Switch circuit is always closed. I-6: CROWD Vacuum Switch circuit is always closed. 65 Note: “High Altitude” refers to vehicles with computer adjusted for operation at high elevations such as in Denver, Colorado. I-4 (All except High Altitude): Altitude (ALT) circuit is open. I-4 (High Altitude only): System pass. V-6: Mid Vacuum Switch circuit is always closed. V-8: Mid Vacuum Switch circuit is always closed. 66 I-6: Closed Throttle Vacuum Switch circuit is always closed. COMPUTER BASICS What does the Engine Control Computer do? EEC-IV and MCU What has NOT changed? This section explains the EEC-IV engine computer control system, the types of sensors and how the computer controls fuel delivery, idle speed, spark timing and emission devices. The MCU system is described later, but this entire section must still be read for complete understanding. A computer controlled engine is basically the same as earlier types. It is still an internal combustion engine with pistons, spark plugs, valves and cams. The ignition, charging, starting, and exhaust systems are almost the same, as well. You test and repair these systems the same way as before, using familiar tools. The instruction manuals for these tools show you how to perform the tests. Your compression gauge, vacuum pump, dwell-tach meter, engine analyzer, timing light, etc., are still valuable! The following is an introduction to computer controlled engine systems. Additional information may be found in books dealing with this subject available at your local library or auto parts store. The more you know about the computer system, the better and faster you can troubleshoot and fix problems. Why Computers? Computer controls were installed in vehicles to meet Federal Government regulations for lower emissions and better fuel economy. This all began in the early 1980’s when purely mechanical control systems just were not good enough anymore. A computer could be programmed to precisely control the engine under various operating conditions and eliminate some mechanical parts making the engine more reliable. What the computer controls The main control areas of the computer are: • Fuel delivery • Idle speed • Spark advance timing • Emission devices (EGR valve, carbon cannister, etc.) The changes made to the basic engine to allow a computer to control these tasks are the only differences between an older engine and a computerized one. A little later we will discuss just how the computer handles these tasks. The Engine Computer Control System The computer module is the “heart” of the system. It is sealed in a metal box and linked to the rest of the system by a wiring harness. The computer module is located in the passenger compartment, usually behind the dashboard or front kick panels. This protects the electronics from moisture, extreme temperatures and excess vibration, which are common in the engine compartment. The computer is permanently programmed by factory engineers. The program is a complex list of instructions telling the computer how to control the engine under various driving conditions. To do its job, the computer needs to know what is happening and then it needs devices to control things. Sensors give the computer information The computer can only work with electrical signals The job of the sensor is to take something the computer needs to know, such as engine temperature, and convert it to an electrical signal which the computer can understand. You can think of sensors as “high tech” senders the devices found in older vehicles for gauges and dashboard message lights ECA BRAINS OF THE COMPUTER O AC UT TU P AT UT OR S UT INP SORS SEN (oil pressure, fuel level, etc.) Signals running into the computer are referred to as “inputs.” Sensors monitor such things as: • Engine temperature • Intake manifold vacuum • Throttle position • RPM • Incoming air (temperature, amount) • Exhaust gas oxygen content • EGR Valve flow Most engine computer systems will use the sensor types listed above. Additional sensors may be used depending upon the engine, vehicle type or other tasks the computer must do. Note that information from one sensor may be used by the computer for many different tasks. For example, engine temperature is something the computer needs to know when controlling fuel delivery, spark timing, idle speed and emission systems. The sensor information may be very important for one engine control function, but only used to “fine tune” a second one. OFF (no voltage signal to the computer). Switches connect to two wires and tell the computer simple things, such as whether or not the air conditioner is running. • Signal Generator – These create their own signal to tell the computer of some condition, such as exhaust gas oxygen content, camshaft position, or intake manifold vacuum. They may have one, two or three wires connected to them. The computer controls things with Actuators The computer can only send out electrical signals (referred to as “outputs”). Devices called actuators are powered by the computer to control things. Actuator types include: • Solenoids – These are used to control a vacuum signal, bleed air, control fuel flow, etc. • Relays – These switch high amperage power devices on and off, such as electric fuel pumps or electric cooling fans. • Motors – Small motors are often used to control idle speed. Other output signals Not all of the computer outgoing signals go to actuators. Sometimes information is sent to electronic modules, such as ignition or trip computer. There are several types of sensors How the computer controls Fuel Delivery • Thermistor – This is a resistor whose resistance changes with temperature. It is used to measure temperatures of coolant or incoming air. It has two wires connected to it. Operation and emission performance depend upon precise fuel control. Early computer controlled vehicles used electronically adjustable carburetors, but fuel injectors were soon introduced. • Potentiometer – This signals a position, such as throttle position or EGR valve position. It connects to three wires: one for power, one for ground and one to carry the position signal back to the computer. The job of the computer is to provide the optimum mixture of air and fuel (air/fuel ratio) to the engine for best performance under all operating conditions. • Switches – These are either ON (voltage signal to the computer) or The computer needs to know: • ...what the engine operating condition is. Sensors used: coolant temperature, throttle position, manifold absolute pressure, mass air flow, RPM. • ...how much air is coming into the engine. Sensors used: mass air flow or a combination of manifold absolute pressure, manifold air temperature, RPM. • ...how much fuel is being delivered. The computer knows this by how long it turns on the fuel injectors. (The computer uses a “feedback control” or “duty cycle” solenoid on electronic controlled carburetors.) • ...that everything is working the way it should. Sensor used: exhaust gas oxygen sensor. Note: Not all engines use every sensor listed above. Cold engine warm-up condition “Open Loop” operation The coolant temperature sensor tells the computer how warm the engine is. Factory engineers know what the best air/fuel mixture is for the engine at various operating temperatures. (More fuel is needed for a cold engine.) This information is permanently programmed into the computer. After the computer knows the engine temperature, it determines the amount of air coming in, then it will look at its programming to find out how much fuel to deliver and operate the fuel injectors accordingly. (Engines with feedback carburetors don’t do any of this. They use a “Variable Voltage Choke.” The computer controls the amount of choke opening.) This is an example of “Open Loop” operation by the computer. The control system performs an action (expecting a certain result), but has no way of verifying if the desired results were achieved. In this case, the computer pulses a fuel injector expecting a certain amount of fuel to be delivered. (The computer assumes everything in the fuel system is operating as expected.) In open loop operation, the computer has no way of checking the actual amount of fuel delivered. Thus, a faulty injector or incorrect fuel pressure can change the amount of fuel delivered and the computer would not know it. Hot engine cruise condition “Closed Loop” operation The computer watches the coolant temperature and throttle position sensors to tell when the engine is all warmed up and cruising. As before, the computer determines the amount of air coming into the engine, then delivers the amount of fuel that should provide the optimum air/ fuel mixture. The big difference is that this time the computer uses the oxygen sensor to check how well it’s doing and readjust things, if needed, to make sure the fuel delivery is correct. This is an example of “Closed Loop” operation. The control system performs an action (expecting a certain result), then checks the results and corrects its actions (if necessary) until the desired results are achieved. The oxygen sensor only works when it is very hot. Also, it can only monitor the “hot engine” air/fuel mixture value and send back a signal to the computer. The sensor can not monitor the other air/fuel mixture values used during engine warm-up, so the computer must operate “open loop” at that time. Acceleration, Deceleration & Idle Conditions As long as the engine and oxygen sensor are hot, the computer can operate “closed loop” for best economy and least emissions. During the drive conditions listed above, the computer may have to ignore the sensor and run “open loop,” relying on internal programming for fuel delivery instructions. During idle, for example, the oxygen sensor may cool down and stop sending a signal. A different situation can occur during wideopen-throttle acceleration. The computer sometimes adds additional fuel (on purpose) for temporary acceleration power. The computer knows it is running “rich” so it ignores the sensor signal until the wide-open-throttle condition is over. How the computer controls Idle Speed Throttle position and RPM sensors tell the computer when the vehicle is idling. (Sometimes an idle position switch on the throttle is used.) The computer merely watches RPM and adjusts an idle speed control device on the vehicle to maintain the desired idle condition. Note that this is another example of “closed loop” operation. The computer performs an action (activating an idle control device), then watches the results of its action (engine RPM) and readjusts as necessary until the desired idle speed is achieved. There are two types of idle speed control devices. The first is an adjustable throttle stop that can be positioned by a computer controlled motor. The second method allows the throttle to close completely, then has a computer controlled solenoid to pass air around the closed throttle to set the idle speed. Smaller engines can stumble or stall at idle when the air conditioner compressor turns on or the power steering is used. To prevent this, switches tell the computer when these demands are coming so it can increase the idle accordingly. A simple form of idle speed adjustment using a “throttle kicker” actuator is used on early EEC-IV V-8 engines. This device is described later in the MCU section. How the computer controls Spark Advance Timing You set spark timing in a non-computer engine by using a timing light and adjusting the distributor at idle RPM. During vehicle operation, timing is changed by either engine vacuum (vacuum advance function) or by engine RPM (centrifugal advance function.) These spark timing changes are done mechanically inside the distributor. Computer controlled vehicles using a distributor still have you set spark timing by using a timing light and adjusting the distributor at idle RPM. The timing changes which occur during vehicle operation, however, are controlled electronically. The computer looks at sensors to determine vehicle speed, engine load and temperature. (RPM, throttle position, coolant temperature and manifold pressure or mass air flow sensors are used.) Then, the computer adjusts timing according to factory programmed instructions. Some vehicles have a “knock” sensor. The computer can “fine tune” the spark timing if this sensor signals an engine knock condition. A timing advance signal is sent by the computer to an ignition module which eventually creates the spark. Computer Controlled Emission Systems • EGR Valve – The EGR valve lets exhaust gases re-enter the intake manifold and mix with the incoming air/ fuel. The presence of exhaust gases reduces combustion temperatures in the cylinders and this reduces poisonous NOx emissions. The computer controls the flow of gases through the EGR valve. The EGR system is only used during warm engine cruise conditions. A partially open EGR valve at other times can cause stalling. • Thermactor Air System – This system works with the catalytic convertor. The computer takes outside air from an air pump and directs it to the exhaust manifold or catalytic convertor as necessary for best emission performance. Refer to “Thermactor Air System” in Reference Glossary for more explanation. • Fuel Evaporation Recovery System – A special canister collects vapors evaporating from the fuel tank, preventing them from escaping into the atmosphere and causing pollution. During warm engine cruise conditions, the computer draws the trapped vapors into the engine for burning. (See “CANP” in Reference Glossary.) Other computer functions The computer controls other odd jobs like handling “speed control” and transmission torque convertor lock-up and shifting functions. Detailed explanations may be found in your vehicle service manual. More information How MCU measures Throttle Position The Reference Glossary describes the various sensors and actuators used in the EEC-IV and MCU systems. You can learn more by reading these definitions. • Some MCU systems use an Idle Tracking Switch. This is an electrical switch mounted near the throttle linkage on the carburetor. The switch is open when the throttle is resting in idle position. The switch closes as soon as the throttle is moved off idle. A Wide-Open-Throttle (WOT) Vacuum Switch is also used. Weak manifold vacuum due to WOT operation causes the WOT Vacuum Switch to send a signal to the MCU computer. THE MCU SYSTEM (Make sure you have read everything in the beginning part of this section before continuing!) The MCU system is similar (but simpler) than the EEC-IV version just described. The MCU computer module is located in the engine compartment. The MCU uses sensors to monitor engine operation and actuators to control things. What MCU controls The original MCU just controls fuel delivery (Air/Fuel ratio) and the Thermactor Air System. Features added later included limited control of idle speed, spark timing retard and fuel evaporation canister. To do these tasks, the MCU needs information about engine temperature, throttle position, tach signal and knock conditions. How MCU measures Engine Temperature • Some MCU systems use a single electrical switch (“Low Temperature Switch”). The switch is activated by vacuum. The vacuum comes from a “Ported Vacuum Switch” which is temperature controlled. When engine temperature reaches a certain value, the Ported Vacuum Switch sends vacuum to the Low Temperature Switch, which toggles and sends a signal to the MCU computer. The Low Temperature and Ported Vacuum switches may be separate units or combined into one assembly. • Other MCU systems use two switches: Mid and Dual Temperature. The Mid Temperature Switch is similar to the Low Temperature Switch. The Dual Temperature Switch sends a signal when engine temperature is either cold OR very hot. • Other versions of MCU monitor engine vacuum to sense idle (high vacuum), cruise (moderate vacuum) or WOT (low vacuum) conditions. Vacuum operated electrical switches are used. The switches toggle at various vacuum levels and send signals to the MCU computer. These parts are sometimes called “Low”, “Mid” and “High” vacuum switches (a “Zone Vacuum Switch” assembly). Other names are “Wide-OpenThrottle”, “Crowd” and “Closed Throttle” vacuum switches. Tach Signal information The MCU system monitors this ignition signal to measure engine RPM. A wire connects the computer to the Tach terminal on the ignition coil. The computer watches RPM to insure smooth operation when the air/fuel mixture is changed. Knock Sensor information Some MCU systems have a Knock Sensor which sends a pulse signal to the computer when an engine knock condition occurs. How MCU controls Fuel Delivery The MCU computer controls air/fuel delivery using a “Feedback Carburetor”. The choke and idle cam mechanisms are similar to those on a conventional carburetor. • One version has the computer controlling a fuel metering rod inside the carburetor. The computer controls an electric motor (“Feedback Carburetor Actuator”) to position this rod. • Another method uses a fuel metering rod positioned by vacuum. The computer controls vacuum to this rod by using a “Vacuum Regulator Solenoid”. The computer sends a duty cycle signal (see definition in Reference Glossary) to the solenoid to vary vacuum. • A third version has the computer controlling air into the carburetor idle and main system vacuum passages. A “Feedback Control Solenoid” is used to control air entry. A duty cycle signal from the computer controls this solenoid to vary air flow. mixture to deliver. MCU idle speed adjustment The MCU system does not control idle speed – a standard mechanical idle cam mechanism is used. However, some MCU systems have a vacuum operated “Throttle Kicker” actuator. The computer uses this device to push the throttle linkage off idle position when additional idle RPM is required. This happens when sensors indicate a cold start or engine overheat condition. The computer energizes a “Throttle Kicker Solenoid” to apply vacuum to the actuator. MCU spark retard Hot engine cruise condition “Closed Loop” operation The computer uses the engine temperature and throttle position information to tell when the engine is all warmed up and cruising. At this time the computer will use the Exhaust Gas Oxygen sensor to run the engine in a “closed loop” mode for minimum emissions and best fuel economy. Cold start, Acceleration, Deceleration and Idle “Open Loop” operation The computer runs the engine in an “open loop” mode when sensor information signals one of the driving conditions listed above. The computer relies on factory programmed instructions to determine the proper air/fuel The MCU system does not control spark timing – a standard distributor is used. However, some MCU systems can send a signal to retard timing if the knock sensor indicates an engine knock condition. The computer energizes a “Spark Retard Solenoid” to bleed control vacuum from the distributor advance to retard the ignition timing. MCU Controlled Emission Systems • Thermactor Air System – All MCU vehicles have this system which is similar to the one discussed earlier in this section. The MCU uses engine temperature throttle position information to determine proper operation of the thermactor system. • Fuel Evaporation Recovery System – This system is similar to the one discussed earlier in this section. It is only used on some MCU vehicles. The MCU uses engine temperature and throttle position information to determine proper operation of this system. REFERENCE GLOSSARY A/C Air conditioner ACC Air Conditioner Clutch signal. This tells the ECA that either the A/C compressor is running or that A/C operation is being requested (depends upon vehicle). ACT Air Charge Temperature sensor. This sensor is a thermistor – a resistor whose resistance decreases with temperature. It is threaded into the intake manifold so the ECA can determine the temperature of the incoming air. This is used for fuel delivery calculations. Actuator Devices which are powered by the ECA to control things. Actuator types include relays, solenoids and motors. Actuators allow the ECA to control engine operation. A/F Air/fuel. AM-1 Air Management solenoid #1. Also called TAB solenoid. (See TAB for explanation.) AM-2 Air Management solenoid #2. Also called TAD solenoid. (See TAD definition.) AXOD Automatic Transaxle with Overdrive gear. BOO Brake On-Off switch signal. Tells the ECA when the brakes are being applied. BP Barometric Pressure sensor. (See MAP definition.) CANP Canister Purge solenoid. This device controls the flow of fuel vapors from the canister to the intake manifold. The canister collects vapors evaporating from the fuel tank, preventing them from escaping into the atmosphere. During warm engine cruise conditions, the ECA energizes CANP so the trapped vapors are drawn into the engine and burned. CCC Converter Clutch solenoid. Located in certain electronically controlled transmissions. The ECA uses this solenoid to control the lock-up clutch in the torque converter. The ECA will engage or release lock-up depending upon engine operation. CCS Coast Clutch Solenoid. Located in certain electronically controlled transmissions. The ECA uses this solenoid to permit engine braking during deceleration when in third gear (with gear shift lever in Drive). CCO Converter Clutch Override solenoid. Located inside transmission having mechanically controlled lock-up torque converter. The ECA uses this solenoid to disable lock-up under certain engine operating conditions. CFI Central Fuel Injection. A fuel injection system having one (or two) injectors mounted in a centrally located throttle body, as opposed to positioning the injectors close to an intake valve port. CID Cylinder Identification signal. This is a frequency type signal coming from a camshaft mounted sensor. The ECA uses this signal to reference fuel injector operation and synchronize spark plug firing on distributorless ignitions. Closed Loop (C/L) This is when a control system performs an action (expecting a certain result), then checks the results and corrects its actions (if necessary) until the desired results are achieved. Example: The ECA pulses a fuel injector expecting a certain amount of fuel to be delivered. In closed loop operation, the ECA uses a sensor to check the actual amount of fuel delivered. The ECA will correct the injector pulse width as necessary to obtain the desired fuel delivery. Continuity An unbroken, continuous circuit through which an electric current can flow. Coolant Temperature Switches Used on MCU systems. These are vacuum controlled electrical switches which signal various engine operating temperatures to the MCU module. A ported vacuum switch is used along with the temperature switches. The normally closed ported vacuum switches open at a specific temperature and allow vacuum to pass. This vacuum then causes the temperature switches to switch and send a signal to the MCU module. Some MCU systems use a single Low Temperature Switch to tell the MCU module when the engine has warmed up. Other MCU systems use two switches: one for mid temperature and a second for high/low temperatures (the switch will signal when the temperature is either too high or too low). The MCU module uses temperature information when controlling fuel delivery, Thermactor Air System, spark retard, throttle kicker and canister purge. CPS Crankshaft Position Sensor. This crankshaft mounted sensor sends a frequency signal to the ECA. (See PIP signal definition.) It is used to reference fuel injector operation and synchronize spark plug firing on distributorless ignitions. CS Clutch switch. Cylinder Balance Test A diagnostic Self-Test only used on Sequential Electronic Fuel Injector (SEFI) engines. The test turns each injector on and off to check if they are closed or damaged. DCL Data Communication Link. A two wire circuit used by the ECA to exchange information with other computer controlled modules. Digital Signal An electronic signal which has only two (2) voltage values: a “low” value (close to zero) and a “high” value (usually 5 volts or greater). Sometimes the low voltage condition is called “Off” and the high voltage condition is called “On”. Signals which can have any voltage value are called “analog” signals. DIS Distributorless Ignition System. In general use, this refers to a system which produces the ignition spark without the use of a distributor. Ford technical manuals use DIS when referring to a particular distributorless ignition system where the ECA directly controls timing of spark firing. (Compare to EDIS definition.) Driver A transistor “switch” inside the ECA used to apply power to an external device. This allows the ECA to control relays, solenoids and small motors. Duty Cycle A term applied to frequency signals – those which are constantly switching between a small voltage value (close to zero) and a larger value (usually 5 volts or greater). Duty cycle is the percentage of time the signal has a large voltage value. For example, if the signal is “high” (large voltage) half of the time then the duty cycle is 50%. If the signal is “high” only one fourth of the time, then the duty cycle is 25%. A duty cycle of 0% means the signal is always at a “low” value and not changing. A duty cycle of 100% means the signal is always at a “high” value and not changing. The engine control computer uses duty cycle type signals when it wants more than just “onoff” control of an actuator. This is how it works: A 50% duty cycle signal going to a vacuum switching solenoid means the solenoid will be “on” (passing full vacuum) half the time and “off” (passing no vacuum) half the time. The average amount of vacuum passing through the solenoid will be one half of the full value because the solenoid is only “on” for one half of the time. (The signal switches at a rapid rate, such as ten times a second.) Thus, the computer can get a vacuum controlled actuator to move half way between “no vacuum” position and “full vacuum” position. Other positions can be achieved by changing the duty cycle of the control signal which in turn changes the average amount of control vacuum. DVM Digital Volt Meter. An instrument using a numeric readout to display measured voltage values as opposed to a moving needle on a gauge face. Usually the instrument has other measuring capabilities, such as resistance and current, and may be called a DMM (Digital Multi-Meter). Most DVM’s have 10 Megohm input impedance. This means the circuit under test will not be electronically disturbed when the DVM is connected for a measurement. Dynamic Response A user action expected by the ECA during the course of a diagnostic Self-Test. Normally, this means performing a brief wideopen-throttle action during the Engine Running SelfTest. The ECA sends a single voltage pulse through the STO circuit (making a blink on the Code Scanner LED) signaling the user to perform the Dynamic Response action. ECA Electronic Control Assembly. The “brains” of the engine control system. It is a computer housed in a metal box with a number of sensors and actuators connected with a wiring harness. Its job is to control fuel delivery, idle speed, spark advance timing and emission systems. The ECA receives information from sensors, then energizes various actuators to control the engine. Sometimes vehicles have additional computers controlling other functions. These include anti-lock brake and active suspension systems. ECT Engine Coolant Temperature sensor. This sensor is a thermistor – a resistor whose resistance decreases with increases in temperature. The sensor is threaded into the engine block and contacts the engine coolant. The ECA uses this signal for control of fuel delivery, spark advance, EGR flow and other emission control devices. EDF Electro-Drive Fan relay. The ECA energizes this relay to apply power to the Electro-Drive Fan (mounted in front of the radiator) for engine cooling purposes. The fan is only turned on when the ECA determines cooling is necessary. EDIS Electronic Distributorless Ignition System. Ford technical manuals use EDIS when referring to a particular distributorless ignition system where a separate module (EDIS module) directly controls spark firing and synchronization. All the ECA does is send a signal requesting a particular spark timing based on engine operation. (Refer to SAW definition.) The EDIS module and associated sensors take care of all other aspects of ignition system operation. EEC-IV Electronic Engine Control system, version 4. The name for Ford’s computerized engine control system used on vehicles starting in 1983. The system consists of a control module (ECA) containing a computer, and several different sensors and actuators. The system controls fuel delivery, idle speed, ignition timing and various emission devices. EFI Electronic Fuel Injection. In common usage, this term applied to any system where a computer controls fuel delivery to an engine by using fuel injectors. In Ford vehicle usage, an EFI system is one using one injector for each cylinder. The injectors are mounted in the intake manifold. The injectors are fired in groups (“banks”). Usually all injectors on one side of the engine are fired together. Injectors are fired individually in SFI engines (see SFI definition). EGO Exhaust Gas Oxygen sensor. The EGO sensor is threaded into the exhaust manifold, directly into the stream of the exhaust gases. The ECA uses the sensor to “fine tune” fuel delivery. The sensor generates a voltage of 0.6 to 1.1 volts when the exhaust gas is rich (low oxygen content). The voltage changes to 0.4 volts or less when the exhaust gas is lean (high oxygen content). The sensor only operates after it reaches a temperature of 349°C (660°F). EGR Exhaust Gas Recirculation. The EGR system recirculates exhaust gases back into the intake manifold to reduce NOx emissions. Various types of systems are in use on different vehicles. Usually the ECA directly controls EGR flow, but on some vehicles it may just activate a system controlled by nonelectronic means. Vacuum controlled EGR valves are normally closed. Applying vacuum opens the valve. EGR-C EGR Control solenoid. Used in certain EGR systems. The ECA energizes this actuator to apply vacuum (and thus open) the EGR valve. Used along with the EGR-V solenoid. EGR S/O EGR valve Shut-Off solenoid. Used in mechanically operated EGR systems where the ECA does not control EGR flow. The ECA can completely stop flow by energizing this solenoid, if engine operating conditions require this. EGR-V EGR Vent solenoid. Used in certain EGR systems. The ECA energizes this actuator to vent vacuum (and thus close) the EGR valve. Used along with the EGR-C solenoid. EHC Exhaust Heat Control solenoid. The ECA energizes this solenoid to apply vacuum (and thus activate) the EHC valve. When activated, this valve diverts hot gases from the exhaust manifold to the intake manifold heat riser pad. Heat is transferred from the exhaust gas to the riser pad, which in turn heats the incoming air. This aids in fuel atomization for better combustion efficiency during engine warm-up. EIC Electronic Instrument Cluster. A vehicle instrument panel using electronic displays (numbers or bar graph type) in place of standard gauges. Receives information from the ECA by using the Data Communications Link (DCL). EMI Electromagnetic Interference. Undesired signals interfering with a needed signal. For example: static on a radio brought about by lightning flashes or closeness to high voltage power lines. EPC Electronic Pressure Control solenoid. Located in certain electronically controlled transmissions. Used by the ECA to set hydraulic line pressures inside the transmission – for soft or firm shifting (depending upon vehicle acceleration). EVP EGR Valve Position sensor. This sensor is mounted on top of the EGR valve. It monitors the position of the EGR valve stem (that is, how far the valve is open). This signal allows the ECA to calculate EGR flow at any time. EVR EGR Vacuum Regulator solenoid. This solenoid is controlled by a duty cycle signal from the ECA and is used to vary the amount of vacuum applied to the EGR valve. The solenoid not only controls the vacuum, it also functions as a vent to allow the EGR valve to close. The ECA controls the amount of EGR valve opening by adjusting the vacuum being applied. (See Duty Cycle definition.) FBC Feedback Carburetor. This is used on early versions of computer controlled engines. It is a carburetor which can have its air/fuel delivery modified by an electronic signal from the ECA. Three versions are used. See definitions for FBCA, FCS and VRS. FBCA Feedback Carburetor Actuator. Used on feedback carburetors – those where the engine computer controls the air/ fuel ratio. The FBCA is a stepper motor (see Stepper Motor definition). It controls a metering assembly in the carburetor which can vary the amount of air entering the main discharge area. The computer uses FBCA to vary this metered air and control air/fuel mixtures anywhere from “rich” to “lean”. FCS Feedback Control Solenoid. Used on feedback carburetors – those where the engine computer controls the air/fuel ratio. This solenoid receives a duty cycle signal from the computer. (See Duty Cycle definition.) The solenoid introduces fresh air from the air cleaner into the idle and main system vacuum passages. A low duty cycle signal reduces air passing through the solenoid for “rich” operation. A high duty cycle signal increases air passing through the solenoid for “lean” operation. FMEM Failure Management and Effects Mode. The name given to the way the ECA operates when failures are detected in sensor or actuator circuits and normal operation is no longer possible. The ECA runs the engine the best way it can until the vehicle driver can get the problem repaired. The effect on engine performance can be slight or severe. Frequency The frequency of an electronic signal is a measure of how often the signal repeats a voltage pattern in a one second time span. For example: suppose a signal starts at zero volts, goes to five volts then returns to zero again. If this pattern repeats itself 100 times in one second, then the signal frequency is 100 cycles per second – or 100 Hertz. Fuel Injector An electronically controlled flow valve. Fuel injectors are connected to a pressurized fuel supply. (The pressure is created by a fuel pump.) No flow occurs when the injector is off (not energized). When the injector is powered, it opens fully allowing the fuel to flow. The ECA controls fuel delivery by varying the amount of time the injectors are turned on. FP Fuel Pump relay. The ECA energizes this relay to apply power to the vehicle fuel pump. For safety reasons, the ECA removes power from the fuel pump when ignition signals are not present. FPM Fuel Pump Monitor signal. This is a wire between the ECA and the fuel pump motor power terminal. The ECA uses this signal to verify when voltage is at the fuel pump (for diagnosing fuel system problems). Ground The return path for current to flow back to its source. (Usually the negative battery terminal.) It is also the reference point from which voltage measurements are made. That is, it is the connection place for the minus (-) test lead from the voltmeter. HEDF High-speed Electro-Drive Fan relay. The ECA energizes this relay when it determines extra engine cooling (more than that provided by EDF) is necessary. Depending upon the vehicle, the HEDF relay will either speed-up the same fan used by EDF, or it will turn on a second fan mounted in front of the radiator. HEGO Heated Exhaust Gas Oxygen sensor. An EGO sensor (see EGO definition) having a built-in electric heating element. The heater reduces sensor warm-up time. Hertz (Hz) A term for frequency – cycles per second. IAC Intake Air Control. IDM Ignition Diagnostic Monitor. A wire between the ECA and the switched side (Tach terminal) of the ignition coil. The ECA uses this circuit to check for the presence of ignition pulses. Inputs Electrical signals running into the ECA. These signals come from sensors, switches or other electronic modules. They give the ECA information about vehicle operation. Integrated Relay Control Module (IRCM) A single module containing several relays and some other circuitry. The ECA uses these relays for control of functions such as fuel pump, air conditioner clutch, electric cooling fan and EEC-IV system power. ISC Idle Speed Control. This refers to a small electric stepper motor mounted on the throttle body and controlled by the ECA. (See Stepper Motor definition.) The ISC motor moves a spindle back and forth. When the throttle is released during idle, it rests on this spindle. The ECA can control idle speed by adjusting this spindle position. The ECA determines the desired idle speed by looking at coolant temperature, engine load and RPM. The Idle Tracking Switch (see ITS definition) is built-into the tip of the spindle. The ISC motor also performs dashpot and anti-dieseling functions. ISC-BPA Idle Speed Control By-Pass Air valve. This is a solenoid type actuator mounted on the throttle body and controlled by the ECA with a duty cycle type signal. (See Duty Cycle definition.) It is used for idle speed control. The valve operates by regulating the amount of incoming air bypassing the closed throttle plate. When the ECA increases control signal duty cycle, more air is bypassed through the valve for faster idle speed. The ECA determines the desired idle speed by looking at coolant temperature, engine load and RPM. The ISC-BPA also performs dashpot and anti-dieseling functions. ITS Idle Tracking Switch. This is a mechanical switch built-into the tip of the Idle Speed Control motor spindle. (See ISC definition.) The ECA uses this switch to identify closed throttle condition. The switch is open when the throttle rests on it (closed throttle position). The MCU systems use a similar acting ITS which is mounted on the carburetor near the throttle linkage. IVSC Integrated Vehicle Speed Control. The name given to the speed control function when it is built-into the ECA and not controlled by an outside module. KAPWR Keep Alive Power. A power connection running from the ECA directly to the vehicle battery. This power is used energize the “learning memory” circuits inside the ECA – even when the ignition key is off. The memory stores adjustment information the ECA uses to compensate for aging sensors, and the like. The information is lost when power is disconnected, such as when the vehicle battery is removed for service, but can be “relearned” by the ECA during normal engine operation. Keypower The circuit which provides power to the engine control system. Includes the ignition key switch. KS Knock Sensor. The ECA uses this device to detect engine detonation (knocking). When spark knock occurs, the sensor sends a pulsing signal. The ECA than retards spark advance until no detonation is sensed. The sensor contains a piezoelectric element and is threaded into the engine block. Vibrating the element generates the signal. Special construction makes the element only sensitive to the engine vibrations associated with knocking. LED Light Emitting Diode. A semiconductor device which acts like a miniature light bulb. When a small voltage is applied, the LED glows. LED’s may be red, orange or yellow or green. They are often used as indicators or in numeric displays. LUS Lock-Up solenoid. Located in automatic transaxle. The ECA uses this solenoid to control the lock-up clutch in the torque converter. The ECA will engage or release lockup depending upon engine operation. MAF Mass Air Flow sensor. This sensor measures the amount of air entering the engine and sends a voltage signal to the ECA. The signal voltage increases when the amount of incoming air goes up. This gives the ECA information required for control of fuel delivery, spark advance and EGR flow. MAP Manifold Absolute Pressure sensor. This sensor measures manifold vacuum and sends a frequency signal to the ECA. This gives the ECA information on engine load for control of fuel delivery, spark advance and EGR flow. MCCA Message Center Control Assembly. A dashboard mounted electronic display giving the driver trip computer and vehicle status information. Exchanges information with the ECA by using the Data Communications Link (DCL). MCU Microprocessor Control Unit. A computerized engine control module used on many Ford vehicles between 1980 and 1984. The MCU system consists of a computerized control module (MCU), sensors and actuators. The system controls fuel delivery and thermactor air flow. Later versions of MCU also controlled canister purge (see CANP definition), spark retard and idle speed. The MCU system was eventually replaced by EEC-IV. MLP Manual Lever Position sensor. Connected to gear shift lever. Sends a voltage signal to the ECA indicating lever position (P, R, N, D, 2 or 1). Mode A type of operating condition, such as “idle mode” or “cruise mode.” NDS Neutral Drive Switch. Used on vehicles with automatic transmissions. The ECA uses this switch to determine when the transmission is in or out of gear. The ECA can adjust idle speed to compensate for increased engine loading due to engaged transmission. NGS Neutral Gear Switch. Used on vehicles with manual transmissions. The ECA uses this switch to determine when the transmission is in or out of gear. NPS Neutral Pressure Switch. Located in automatic transaxle. The ECA uses this switch to determine when the transaxle is in or out of gear. OCS Overdrive Cancel Switch. Used by vehicle operator. Signals ECA to prevent shifting transmission into overdrive (4th gear) regardless of operating conditions. OCIL Overdrive Cancel Indicator Light. Located in passenger compartment. Light turns on when vehicle operator uses Overdrive Cancel Switch to disable 4th gear transmission operation. Open (circuit) A break in the continuity of a circuit such that no electrical current can flow. Open Loop (O/ L) This is when a control system performs an action (expecting a certain result), but has no way of verifying if the desired results were achieved. Example: The ECA pulses a fuel injector expecting a certain amount of fuel to be delivered. (The ECA assumes everything in the fuel system is operating as expected.) In open loop operation, the ECA has no way of checking the actual amount of fuel delivered. Thus, a faulty injector or incorrect fuel pressure can change the amount of fuel delivered and the ECA would not know it. Outputs Electrical signals sent from the ECA. These signals may activate relays or other actuators for control purposes around the vehicle. The signals can also send information from the ECA to other electronic modules, such as ignition or trip computer. PFE Pressure Feedback EGR sensor. The ECA uses this sensor to determine the amount EGR flow. The task is involved. In this EGR system, a small opening separates the exhaust manifold from the EGR valve input. All the gases flowing through the EGR valve must first pass through this opening. Scientific principles allow the ECA to calculate EGR flow providing it can determine the pressure on both sides of this opening (that is, both the EGR valve input side and the manifold side). The PFE sensor measures the pressure seen at the EGR side. The sensor sends a voltage signal which increases as pressure is increased. The manifold side pressure must be calculated by the ECA based on RPM, exhaust system characteristics and other information. The ECA can then finally calculate EGR flow. Note that with this system, the PFE signal is NOT a direct measure of EGR flow! PIP Profile Ignition Pick-Up signal. It is a frequency type, providing crankshaft position and speed information. The ECA uses PIP as a reference to create properly timed ignition system and fuel injector signals. The PIP signal comes from a sensor mounted in the distributor (TFI-IV ignitions) or from a separate crankshaft mounted sensor (Crankshaft Position Sensor) used on distributorless ignitions. PSPS Power Steering Pressure Switch. This tells the ECA when power steering is being used. The ECA can prevent stalling on a small, idling engine by watching this switch and increasing idle speed if power steering is being used. Quick Test Another name for Self-Test. (See Self-Test definition.) Relay A mechanical device for switching high current circuits on and off. It is electronically controlled by a low current circuit. Relays allows a low power ECA signal to control a high power device such as an electric cooling fan. ROM Read-Only Memory. This is inside the ECA. The ROM contains permanent programming information the ECA needs to operate a specific vehicle model. Included are vehicle weight, engine and transmission type, axle ratio and other specifics. SAW Spark Advance Word. A signal used in some Distributorless Ignition Systems. Sent from the ECA to the DIS ignition module to control spark advance timing. The SAW signal is a series of voltage pulses. The width of the pulses is what tells the DIS module what timing is desired – wider pulses mean less spark advance. An extra-wide pulse puts the DIS module in a “repetitive spark” mode where several sparks are generated for every cylinder firing (used on some vehicles at idle for lower emissions and smoother performance). Self-Test Sometimes called “Quick Test”. A series of tests built-into the ECA which help locate vehicle problems. The Code Scanner is used to perform the tests and get the results (in the form of code numbers). Self-Test Connector The connector that the Code Scanner plugs into for testing purposes. The connector is wired to the ECA, and is located in the engine compartment. Tests are run and codes are read with the Code Scanner connected. Sometimes this connector is called VIP (Vehicle in Process). Self-Test Input (STI) A wire between the ECA and either the Self-Test connector (MCU systems) or a separate connector (EEC-IV systems). The wire is used to activate the Self-Test procedures. The Code Scanner connects STI to vehicle ground when the Test/Hold switch is in the TEST position and disconnects STI when the Test/Hold switch is in the HOLD position. Self-Test Output (STO) A wire between the ECA and the Self-Test connector. Results of vehicle diagnostic tests are sent along this circuit by using a voltage pulse signal. The signal switches between “High” (+5 volts) and “Low” (close to zero volts). The Code Scanner light is OFF when STO is “High” and ON when STO is “Low”. Note: the light may be on or off when the ignition key is off – depends upon vehicle. The flashes represent code numbers used to locate problems. Sensor Device which give the ECA information. The ECA can only work with electrical signals. The job of the sensor is to take something the ECA needs to know, such as engine temperature, and convert it to an electrical signal which the ECA can understand. The ECA uses sensors to measure such things as throttle position, coolant temperature, engine speed, incoming air, etc. SFI or SEFI Sequential Fuel Injection or Sequential Electronic Fuel Injection. A fuel injection system using one injector for each cylinder. The injectors are mounted in the intake manifold. The injectors are fired individually in the same sequence as the spark plug firing sequence. Short (circuit) A fault condition: an unwanted connection of one electric circuit to another causing a change in the normal current flow path. Solenoid A device to convert an elec- trical current to mechanical motion. It consists of a coil of wire with a movable metal rod in the center. When power is applied to the coil, the resulting electromagnetism moves the rod and performs some mechanical action. The ECA often uses solenoids to switch vacuum lines on and off. This allows the ECA to control vacuum operated devices such as an EGR valve. Fuel injectors are another type of solenoid. Spark Retard Solenoid Used on MCU systems having a knock sensor. The MCU module energizes this solenoid during engine knock conditions. The solenoid bleeds vacuum from the distributor advance to retard spark timing. SPOUT Spark Output signal from the ECA. Sent to TFI-IV or DIS ignition modules to fire the ignition coil(s) and create spark voltage. SS1 Shift Solenoid #1. Located in certain electronically controlled transmissions along with Shift Solenoid #2. The ECA energizes these solenoids (one or both) to engage the desired transmission gear. Stepper Motor A special type of electric motor with a shaft that rotates in small “steps” instead of a continuous motion. A certain sequence of frequency type signals is required to step the motor shaft. A different signal sequence will step the shaft in the opposite direction. No signals keeps the shaft still in position. A constant signal drive will continuously rotate the shaft. The shaft is usually connected to a threaded assembly which moves back and forth to control things such as throttle position. The engine computer sends the correct signals to the motor for control. STI Self-Test Input. (See SelfTest Input definition.) STO Self-Test Output. (See SelfTest Output definition.) TAB Thermactor Air Bypass solenoid. (Sometimes called AM-1.) The ECA energizes this solenoid to apply vacuum (and thus activate) the TAB valve. Normally, this valve allows incoming air to pass into the rest of the system. When activated, the valve takes the incoming air and dumps it back into the atmosphere. Refer to Thermactor Air System description for more details. TAD Thermactor Air Diverter solenoid. (Sometimes called AM-2.) The ECA energizes this solenoid to apply vacuum (and thus activate) the TAD valve. Normally, this valve directs incoming air to the catalytic converter. When activated, the valve takes the incoming air and and directs it to the exhaust manifold. Refer to Thermactor Air System description for more details. TDC Top Dead Center. When a piston is at its uppermost position in the cylinder – maximum compression. TFI-IV Thick Film Ignition system, version 4. An ignition system consisting of a distributor, ignition coil and TFI-IV module. The ECA controls the spark advance timing. A camshaft position sensor in the distributor sends a reference signal (called PIP) to the ECA. The ECA sends a spark advance signal (called SPOUT) to the TFI-IV module which fires the spark coil. The distributor mechanically switches the spark voltage to the various plugs in the usual manner. The ECA determines optimum spark timing from sensor information – engine speed and RPM, throttle position, coolant temperature, engine load, vehicle speed, gear lever position and knock sensor condition. Thermactor Air System An emission control system consisting of an air pump, air flow control valves (TAB & TAD) and a catalytic converter. The converter removes pollutants from the exhaust stream. An air pump brings outside air (when needed) and sends it either to the exhaust manifold (“upstream”) or directly into the converter (“downstream”). The ECA controls the air path for best performance under different engine operating conditions. The air pump always runs when the engine runs. Usually the incoming air is directed to the converter. Air is kept out during extended idling (prevent converter overheat) or during very cold engine starting. Air goes into the exhaust manifold during normal engine warm-up. This helps burn hot, unused fuel vapors in the exhaust stream (reduces pollutants – speeds exhaust warmup). The TAB and TAD valves may be separate units, or combined into one assembly. Thermistor A resistor whose resistance changes with temperature. Thermistors are used as sensors for vehicle coolant and manifold air temperature. The resistance decreases as temperature goes up. THS 3/2 and THS 4/3 Transmission Hydraulic Switch. These are pressure switches used in some automatic transaxles. They send gear information to the ECA as follows: THS 3/ 2 (only) signal means 2nd gear. Both THS 3/2 and THS 4/3 signals means 3rd gear. THS 4/3 (only) signal means 4th gear. TK Throttle Kicker solenoid. The ECA uses this solenoid to apply vacuum (and thus activate) the throttle kicker actuator. The actuator increases the amount of idle position throttle opening by a fixed amount. The ECA activates TK when operating conditions require faster idle, such as when the A/C compressor is on, or during cold engine start-up. TOT Transmission Oil Temperature sensor. This sensor is a thermistor – a resistor whose resistance decreases with temperature. It lies within the transmission housing in contact with the oil. The ECA uses this sensor to monitor transmission operating temperature. TP Throttle Position sensor. This is a rotary type potentiometer connected to the throttle shaft. It has a voltage signal output which increases as the the throttle is opened. The ECA uses this sensor to determine if the engine is in idle, part throttle or wide-openthrottle operation. Then the ECA can properly control systems such as idle speed, spark advance, fuel delivery and emission controls. TTS Transmission Temperature Switch. Sends a temperature status signal to the ECA. Vacuum Switch A vacuum operated electrical switch. The switching action occurs when applied vacuum reaches a certain level. The switches may either be normally closed or normally open. These are used mainly in the MCU engine control system. The switches send signals to the MCU module. VAF Vane Air Flow sensor. This sensor is a rotary type potentiometer connected to a moveable flap. It is located inside the vane meter assembly – a housing between the air cleaner and throttle body through which all incoming air passes. Flowing air pushes against the flap. The sensor sends a signal based on the flap position. The voltage signal increases when the flap moves because of increased incoming air flow. The ECA determines the amount of incoming air with this sensor. This information is used for for control of fuel delivery, spark advance and EGR flow. VAT Vane Air Temperature sensor. This sensor is a thermistor – a resistor whose resistance decreases with temperature. It is located inside the vane meter assembly – a housing between the air cleaner and throttle body through which all incoming air passes. The ECA measures incoming air temperature with this sensor. This information is used for fuel delivery calculations. VCRM Variable Control Relay Module. Contains electronic switches to control power to A/C clutch, engine cooling fan, fuel pump, etc. ECA controls module. A 2-wire DCL circuit carries ECA instruction signals to a computer circuit inside VCRM. Power delivered by VCRM can be adjusted so that, for example, engine fan can be slowly turned on or run at various speeds. WAC Wide-open-throttle Air conditioner Cut-off relay. Used by the ECA to turn off the A/C clutch and thus reduce engine loading. This is desirable during heavy acceleration, engine cranking or engine overheating conditions. WOT Wide Open Throttle. The vehicle operating condition brought about when the throttle is completely (or nearly so) open. The ECA VRS typically delivers extra fuel to (EEC-IV systems): Variable the engine at this time for acceleration purposes. The Reluctance Sensor. A ECA uses the Throttle sensor mounted on the Position sensor to identify the crankshaft which sends a frequency type signal to the WOT condition. ECA. The ECA uses VRS WOT Vacuum to obtain information on Switch crankshaft position and Wide Open Throttle speed.(MCU systems): Vacuum Switch. Used on Vacuum Regulator MCU systems. The switch Solenoid. Used with is closed when applied feedback carburetors having a vacuum controlled vacuum is weak, and open when vacuum is strong. The fuel metering system. MCU module detects WOT (Feedback carburetors let operation when the weak the engine computer control air/fuel ratios.) The manifold vacuum present MCU module sends a duty during WOT conditions causes the vacuum switch to cycle signal to VRS which controls vacuum applied to close. The MCU module the fuel metering rod in the provides extra fuel at this time for acceleration carburetor. (See Duty Cycle definition.) A low duty purposes. cycle signal reduces Zone Vacuum control vacuum for “rich” Switches operation. Used in some A high duty cycle signal Microprocessor Control Unit increases control vacuum (MCU) systems. These three for “lean” operation. switches are used to detect VSS low, medium and high Vehicle Speed Sensor. vacuum levels in the intake This sensor, mounted in manifold. They send electrical the transmission, sends a signals to the MCU module. frequency signal to the The MCU module can then ECA. The frequency calculate throttle position and increases as the vehicle engine load. moves faster to give the ECA vehicle speed information. VVC Voltage Variable Choke actuator. Used on feedback carburetors in MCU systems. The MCU module sends a duty cycle type signal to this actuator in order to control the amount of choke opening. (See Duty Cycle definition.) ACTRON HAND TOOLS