1
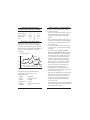
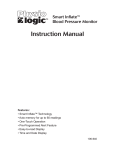
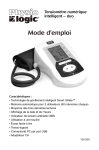
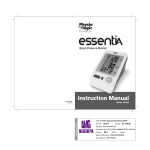
ys
Table of Contents
Important information . . . . . . . . . . . . . . . . . . . 3
®
Fuzzy Logic technology . . . . . . . . . . . . . . . . . 3
Statement of accuracy . . . . . . . . . . . . . . . . . . . 4
Now you know
About blood pressure . . . . . . . . . . . . . . . . . . . 4
Blood pressure standard. . . . . . . . . . . . . . . . 4-5
Auto Arm
Blood Pressure
Monitor
Featuring:
• One-touch operation • 85 memories
Blood pressure fluctuation . . . . . . . . . . . . . . . 5
Before taking a measurement . . . . . . . . . . . . . 6
Name / function of each part. . . . . . . . . . . . . . 7
Installing / replacing the batteries . . . . . . . . . . 7
Displays. . . . . . . . . . . . . . . . . . . . . . . . . . . . . . 8
To set the clock . . . . . . . . . . . . . . . . . . . . . . . . 9
To attach the cuff to the unit . . . . . . . . . . . . . . 9
To apply the cuff . . . . . . . . . . . . . . . . . . . . . . 10
Correct measuring posture . . . . . . . . . . . . . . 10
Taking a measurement. . . . . . . . . . . . . . . . . . 11
To recall memory . . . . . . . . . . . . . . . . . . . . . 12
To erase memory . . . . . . . . . . . . . . . . . . . 12-13
Troubleshooting . . . . . . . . . . . . . . . . . . . . . . 13
Cautionary notes . . . . . . . . . . . . . . . . . . . . . . 14
Specifications . . . . . . . . . . . . . . . . . . . . . . . . 15
Warranty . . . . . . . . . . . . . . . . . . . . . . . . . . . . 16
Instruction Manual
For any question concerning
this product, please call:
1-800-363-2381
www.amgphysiologic.com
Model: 106-964
2
IMPORTANT INFORMATION
Your physician's reading may sometimes
differ from your home readings. This could
be related to a phenomenon known as
“white coat syndrome”. You should not
assume that any one reading taken is your
usual blood pressure.
In fact, blood pressure varies constantly
throughout the day. Common activities
affect your level of heart activity and stress,
thereby influencing your blood pressure.
Statement of Accuracy
Blood pressure measurements obtained with this
unit are equivalent to those obtained by a trained
person using the cuff/stethoscope auscultation
method, within the limits prescribed by the
American National Standard, Electronic or
automated sphygmomanometers.
About Blood Pressure
Note: It is important that you take home
readings regularly, and that you follow the
procedures and precautions mentioned in the
instruction manual. Consistently
recording/charting your readings, along with
regularly consulting a health professional,
is an important aspect of your overall blood
pressure management program.
Blood pressure is the pressure exerted by the
blood at right angles to the walls of the blood
vessels, while blood flows through the arteries.
The pressure measured when the heart contracts
and sends blood out of the heart is called
systolic; it is the peak pressure in the arteries
during the cardiac cycle. The pressure measured
when the heart dilates with blood flowing back
into the heart is called diastolic; it is the lowest
pressure at the resting phase of the cardiac cycle.
This Blood Pressure Monitor does not replace
examination by a physician. As your doctor is the one
person best qualified to interpret your results, we
recommend that you keep a blood pressure journal to
bring to your visits to your healthcare professional.
High blood pressure’s strong correlation with
cardiovascular diseases and high morbidity has
made measuring blood pressure a necessity of
identifying those at risk.
Fuzzy Logic Technology
This Physio Logic® monitor uses the oscillometric
method to detect your blood pressure. Before the
cuff starts inflating, the device will establish a
baseline cuff pressure equivalent to the air
pressure. Your Physio Logic® monitor will
determine the appropriate inflation level based
on one's pressure oscillations, followed by cuff
deflation. During the deflation, the device will
detect the amplitude and slope of the pressure
oscillations and thereby determine the systolic,
diastolic, and pulse for you.
3
Blood Pressure Standard
The World Health Organization (WHO) and the
National High Blood Pressure Education
Program Coordinating Committee have
developed a blood pressure standard, in which
areas of low and high risk blood pressure are
identified. This standard is a guideline as blood
pressure varies among different people and
different age groups.
It is important that you consult with your
physician regularly. Your physician will tell you
your normal blood pressure range as well as the
point at which you will be considered at risk.
4
Blood Pressure Standard
Before taking a measurement
Blood Pressure for Adults Age 18 and Older
To help you obtain more accurate readings:
• Urinate if necessary.
• Remove any clothing and jewellery from your
left arm. Placing the cuff on anything other
than bare skin can result in an inaccurate
reading.
• Sit in a comfortable position with your legs
and ankles uncrossed and your back supported.
• Sit quietly for 15 minutes before measuring
your blood pressure.
• If you need to retake a reading, wait at least
5 minutes to allow your circulation to return
to normal.
• Pick a time of day, and take your blood
pressure at about the same time every day.
Since your blood pressure varies at different
times of the day, this will make it easier for
you to compare your daily blood pressure
readings. A good time to take your blood
pressure is in the morning, before breakfast.
• Don't smoke, eat or exercise for 30 minutes
before taking your blood pressure. These
activities can change your blood pressure.
• Do not measure your blood pressure
immediately after consuming a large meal.
To obtain more accurate readings, please wait
one hour before measuring.
• Only take your blood pressure in a quiet place
and when you are relaxed. Don't take your
blood pressure when you are under stress.
Any stress will raise your blood pressure.
• Position your arm so that the cuff is at the
level of your heart.
• If the monitor is stored at very low temperature
(near freezing), place it in a warm location for at
least one hour before using it.
Category
Systolic (mmHg)
Stage 2 Hypertension
Stage 1 Hypertension
Prehypertension
Normal
³
160
140-159
120-139
< 120
Diastolic (mmHg)
or
or
or
and
³
100
90-99
80-89
< 80
Blood Pressure Fluctuation
Blood pressure fluctuates all the time! You
should not be overly worried if you encounter
two or three measurements at high levels. Blood
pressure changes over the month and throughout
the day. It is also influenced by season and
temperature.
(Case: Male, 35 years old)
Systolic
150 mmHg
100
Diastolic
50 Wake Arrive Telephone Argument Leave
up office Discussion in a meeting office
6:00
18:00
12:00
Dinner
/ Sleep
Midnight
The following factors will influence blood
pressure and cause variations in your
measurement results:
•
•
•
•
•
•
Bathing
Talking
Exercise
Feeling tense
Thoughts
Smoking
•
•
•
•
•
•
Breathing
Drinking alcohol
Moving
Eating
Changes in temperature
Etc.
5
6
Name / Function of Each Part
Displays
Low Battery Indicator
Systolic
Clock
Diastolic
Cuff
Signal Output Port
LCD Screen
Pulse
Memory
Memory Button
Start / Stop
The pressure measured was
lower than 20 mmHg.
Measure again quietly.
Installing / Replacing the Batteries
1. Slide out the battery cover.
The pressure measured was
higher than 300 mmHg.
Measure again quietly.
2. Install 4 “AA” batteries, being careful to
respect the polarities (+ and -).
3. Slide back the battery cover.
Pumping error. Verify that the
cuff is properly applied and
measure again.
• Replace all batteries if the low battery
indicator appears.
• Remove the batteries if the unit will not be
used for a long period of time.
Pressure cannot be measured
due to signal noise. Measure
again.
• It is recommended to use the same type of
alkaline batteries to avoid incompatibility.
Pumping pressure exceeds
300 mmHg. Measure again.
or no display
7
Low battery. Verify that the
batteries are in place and
replace them if necessary.
8
To set the clock
1. To enter clock setting mode, press and hold
the MEMORY button for three (3) seconds.
2. The display will show a blinking year. To set
the year, press the START/STOP button
repeatedly until the desired value is reached.
To apply the cuff
1. Clothing sleeves should be rolled up and the
cuff should be wrapped on bare skin for
correct measurements.
2. Apply cuff to the left upper arm.
3. Fasten the cuff, making sure it is snug but not
too tight. Ensure that the edge of the cuff is
approx. 1” (2.5 cm) from the crook of your
arm, as illustrated.
1”(2.5 cm)
3. Press the MEMORY button again to adjust
the month and use the START/STOP button
to adjust the value. Repeat this step again
to set the day, hour and minute.
4. If your physician has diagnosed you with
poor circulation in your left arm, carefully
place the cuff around your right arm.
Correct Measuring Posture
To attach the cuff to the unit
Connect the tube to the socket at the back
of the unit.
9
1. Place your elbow on a table so that the cuff
is at the same level as your heart. If needed,
use a soft object such as a folded towel to
support your forearm in a proper position.
Turn your palm upwards, sit upright in
a chair, and take 5-6 deep breaths. Avoid
leaning back.
10
Taking a measurement
Wrap the cuff on your arm
as described. Press and release
the START/STOP button to
start measurement automatically.
Initial display
To recall memory
1. To recall the last reading,
press and release the
MEMORY button.
The display will show the last
stored reading, alternating with
the corresponding pulse.
Pumping
Measuring and
buzzer sounds
2. Press the MEMORY button again
to view the previous readings.
To erase memory (1)
Results
To delete only one stored reading:
1. Press and release the MEMORY button once
to recall memory, and again until you reach
the reading that you wish to delete.
2. Press and hold the START/STOP button
until the display shows « dEL » with the
number of the
reading selected.
When measurement is completed, the display
will show your blood pressure and pulse rate.
Press the START/STOP button to turn off the
unit or it will turn itself off automatically after
150 seconds.
11
3. Press and hold the START/STOP button.
Three (3) beeps will signal that the selected
reading is now deleted.
12
To erase memory (all)
To delete all recorded readings:
1. Press and release the MEMORY button once
to recall memory.
2. Press and hold
the START/
STOP button
until the display shows « dEL ».
3. Press the MEMORY
button again. The display
will show « dEL ALL ».
4. Press and hold the START/STOP button.
Three (3) beeps will signal that all readings
are now deleted.
Troubleshooting
Cautionary Notes
1. Avoid extreme temperatures, humidity, and
direct sunlight. Avoid strongly shocking the
unit, and protect it from dust.
2. Clean the blood pressure monitor body and
the cuff carefully with a slightly damp, soft
cloth. Do not press. Do not wash the cuff or
use thinner, benzene or other harsh cleaners.
3. Do not drop the blood pressure monitor. It is
not shock-proof.
4. Do not twist the arm cuff.
5. Do not press the Start key when the cuff is
not properly wrapped around your arm.
6. Remove the batteries when the unit is not
used for a long time.
7. The unit should not be operated by children.
Symptom: No display when the START/STOP
button is pressed.
8. Do not disassemble the main unit or cuff.
Correction: If the batteries have run down,
replace them with new alkaline batteries. If the
batteries are not in the correct position, re-insert
them with the correct polarities.
9. This device might not be suitable for use by
people with poor blood circulation, common
arrhythmias, such as atrial or ventricular
premature beats or atrial fibrillation. It is not
designed for ambulatory use.
Symptom: Error message shown on display
or the blood pressure value displayed is
excessively low (high).
10.To stop operation at any time, press
the START/STOP key and the cuff will
deflate.
Correction: Wrap the cuff properly so that it is
positioned correctly. If you talked or moved
during the measurement, measure it again quietly.
Always wait at least 5 minutes before taking
another measurement.
11.Pull off the velcro strap to detach the arm
cuff if the pressure is over 300mmHg and
the cuff does not deflate automatically.
Note: If the unit does not work, please call our
consumer information line at 1-800-363-2381.
Under no circumstance should you disassemble
the unit and attempt repairs.
13
14
Specifications
Display system : Liquid Crystal Display
(year/date/time,
pressure and pulse)
Measuring Method : Oscillometric
Power Source : 4 alkaline “AA” type
batteries (1.5V)
Measuring Range : Pressure: 20-300mmHg
Pulse: 40-200 beats/min.
Accuracy : Pressure: ± 3mmHg
Pulse: 5% of reading
Inflation : Electrical rolling pump
Pressure Exhaust : Solenoid valve
Memory : 85 sets
Low Battery Indicator : Yes
Auto Power-Off : 150 seconds after
last button operation
Battery Life : Approx. 250 operations
Warranty
This Physio Logic® blood pressure monitor is
warranted to the original retail purchaser to be
free from defects in material and workmanship
for a period of two (2) years of normal use
from the date of purchase. This warranty does
not cover failures resulting from misuse, abuse
or alteration. To make a warranty claim, please
call customer service at
AMG Medical, 1-800-363-2381.
Once you have received a return
authorization number, return this unit, freight
prepaid and insured to
AMG Medical Inc.
8505 Dalton, Montreal Quebec H4T 1V5
Include a copy of the original bill of sale,
and a money order of $5.00 to cover cost of
insurance and return transportation. AMG
Medical Inc. reserves the right to replace or
repair any part that has become defective.
Operating Environment : 50°F ~ 104°F; RH<85%
(10°C ~ 40°C)
Storage Environment : -4°F ~ 122°F; RH<85%
(-20°C ~ 50°C)
Dimensions : 3.2”(w) x 4.7”(L) x 1.5”(H)
80 mm(w) x 120 mm(L)
x 38 mm(H)
Specifications are subject to change for
improvement without notice.
15
AMG MEDICAL INC.
8505 Dalton, Montreal, QC H4T 1V5
www.amgphysiologic.com
www.amgmedical.com
16
REV: 1 0608
Weight : Approx. 0.98 pound
(443 g), when batteries
are placed in.