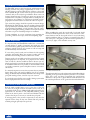
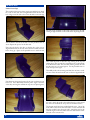
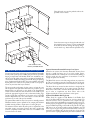
1
I N S TA L L AT I O N , O P E R AT I O N S
A N D U S E R ’ S M A N UA L
E n d l e s s Po o l Wa t e r We l l ®
Installation Instruction Booklet Information
Endless Pools, Inc. provides for every aspect of an Endless Pool® project. This manual assists in the installation process.
This manual should be used in conjunction with the appropriate Supplemental Guides based on the options you purchased.
Additional available resources including The Planning Guide, and Supplemental Guides are available to you. Copies of
all of our materials are online at www.myendlesspool.com/downloads.html. Supplemental Guides are referenced in the
following installation instructions. In addition we encourage installers to call our Customer Service Department at (800) 910-2714
before beginning installation to register their project and sign up for weekend technical support.
Please be advised that gloves and safety goggles should be worn during the installation of an Endless Pool.
Please take into consideration the following before proceeding:
If you have chosen our optional lights, jets or treadmill: the ideal placement of each of these options can vary for each person,
and you will need to cut the holes in panels to meet your needs. We have provided all of the proper drill bits for you to
easily accomplish this. You should also consider that you will need to access these fittings through your finish work in the
future. Please see the Supplemental Guides for those options for additional information.
Installation Instructions Table of Contents
Pool Arrival and Inspection . . . . . . . . . . . . . . . . . . . . . . . . . 3
Site Preperation . . . . . . . . . . . . . . . . . . . . . . . . . . . . . . . . . . 3
Assembly of Pool Panels (Overview) . . . . . . . . . . . . . . . . . 3
Exploded View of Panel Assembly . . . . . . . . . . . . . . . . . . . 4
Panel Assembly Instructions . . . . . . . . . . . . . . . . . . . . . . . . 5
Installation of Reinforcing Channels . . . . . . . . . . . . . . . . . . 5
Anchoring. . . . . . . . . . . . . . . . . . . . . . . . . . . . . . . . . . . . . . . 6
Optional Insulation. . . . . . . . . . . . . . . . . . . . . . . . . . . . . . . . 7
Installation of the Liner Hanger. . . . . . . . . . . . . . . . . . . . . . 7
Optional Liner Hangers . . . . . . . . . . . . . . . . . . . . . . . . . . . . 7
Foam Underlayment. . . . . . . . . . . . . . . . . . . . . . . . . . . . . . . 9
Liner . . . . . . . . . . . . . . . . . . . . . . . . . . . . . . . . . . . . . . . . . . . 9
Installation of Poolside Water Quality system. . . . . . . . . . 10
Keypad Installation . . . . . . . . . . . . . . . . . . . . . . . . . . . . . . 12
Electrical Requirements . . . . . . . . . . . . . . . . . . . . . . . . . . . 13
Water Quality System Cover . . . . . . . . . . . . . . . . . . . . . . . 13
Heater/Controller . . . . . . . . . . . . . . . . . . . . . . . . . . . . . . . . 13
Centrifugal Pump . . . . . . . . . . . . . . . . . . . . . . . . . . . . . . . . 15
Bonding and Grounding. . . . . . . . . . . . . . . . . . . . . . . . . . . 17
Installation of Bench Seat . . . . . . . . . . . . . . . . . . . . . . . . . 18
Optional Retractable Security Cover System . . . . . . . . . . 20
Optional Hydrotherapy Jets System. . . . . . . . . . . . . . . . . . 20
Optional Underwater Lights System . . . . . . . . . . . . . . . . . 20
Optional Corner Step . . . . . . . . . . . . . . . . . . . . . . . . . . . . . 20
Optional Interior Bench Stair . . . . . . . . . . . . . . . . . . . . . . 20
Optional Synthetic Coping System . . . . . . . . . . . . . . . . . . 21
WaterWell Warranty . . . . . . . . . . . . . . . . . . . . . . . . . . . . . . 26
Operations and Maintenance Table of Contents
Overview . . . . . . . . . . . . . . . . . . . . . . . . . . . . . . . . . . . . . . 21
Filling Your Endless Pool . . . . . . . . . . . . . . . . . . . . . . . . . 21
Pool Equipment and Safety . . . . . . . . . . . . . . . . . . . . . . . . 22
Balancing the Pool Water . . . . . . . . . . . . . . . . . . . . . . . . . 22
Maintenance and Use of Your Endless Pool . . . . . . . . . . . 23
Draining Your Endless Pool . . . . . . . . . . . . . . . . . . . . . . . . 24
2
Winterizing Your Endless Pool . . . . . . . . . . . . . . . . . . . . . 24
Keypad Functions and Troubleshooting . . . . . . . . . . . . . . 25
Spa Functions . . . . . . . . . . . . . . . . . . . . . . . . . . . . . . . . . . . 25
Smart Winter Mode . . . . . . . . . . . . . . . . . . . . . . . . . . . . . . 25
Purge Cycles. . . . . . . . . . . . . . . . . . . . . . . . . . . . . . . . . . . . 25
1. Pool Arrival and Inspection
The WaterWell® arrives in a skid of pool panels and all equipment and
finishing materials. This package is approxmately 54" x 48" x 7 feet
tall. Most shipping companies will lower the containers to the ground
with a hydraulic lift gate on their truck; the pool can remain in the
containers until you are ready to begin installation. Please contact our
shipping department prior to shipment to answer any questions you
may have. Since every delivery is slightly different, and depends to a
large extent on site conditions, it is important to speak with our shipping department well in advance to reduce the chance of surprises.
Upon arrival, the packages should be inspected for external damage.
Should there be visible damage, you must complete a damage-claim
report provided by the truck driver. Please call the Endless Pools shipping department immediately at (800) 732-8660. The pool components are not damaged by freezing conditions and may be stored outside under a tarp for an extended period prior to installation.
To begin installation, or to move components, begin unpacking the
pool. Using a hacksaw or tin snips, remove the steel packing straps.
2. Site Preperation
Hardware in Panel Kit.
When assembling the panels, the smooth wall of each panel should
face inward. The front panels have cutouts. Leave at least 24" of horizontal clearance from the front panel surface for access both during
and after installation. Only 7" of clearance is required for the other 3
sides of the pool — disregarding for the moment the requirements for
access for jets, lights, or the retractable security cover.
It is important that your WaterWell be installed over a smooth, level
concrete slab that is capable of supporting 260 pounds per square
foot. The thickness and the quality of the concrete slab will effect the
anchoring method. The floor must contain no voids or bumps and
should be relatively smooth and level.
If a new slab is poured, consult your local electrical codes regarding
grounding and bonding. Many areas require a bonding wire to be
attached to the reinforcing bar that is buried in the concrete.
Drainage needs to be provided around the pool and near the water
quality equipment. It is important to be prepared for the unlikely
event of a leak. It is ideal to install floor drains in the area just outside the pool panels, but not directly under the panel or the pool itself.
In installations where this is not possible, it is recommended to install
a secondary containment system to help divert water to a more desirable location.
It is extremely important to ensure that any water that may reach the
bottom flange of the pool panel, by splashing, run off, or accidental
leakage, be drained away immediately. With the bottom flange of the
pool panel standing in water, corrosion may occur over time.
It is worth the time and effort now to install a drainage system rather
than be unprepared in the event of a mishap.
Pool Panel and Hardware Kit.
The wall panels will form a pool enclosure with inside width and length
depending on the pool size selected. Each panel has a 3-1/2" bottom
flange and a 6-1/2" top flange. Consequently, the outside bottom
dimensions of the pool are 7" greater than the inside dimensions and
the outside top dimensions are 13" greater than the inside dimensions.
3. Assembly of Pool Panels (Overview)
Bolt the panels together leaving access at the front of the pool
for service. If jets, lights and/or a retractable security cover are to
be installed, outside access to additional walls will be required. Access
requirements are described in The WaterWell Planning Guide.
Packed in the skid of panels is the Pool Panel Hardware Kit that
contains all of the pieces necessary to assemble the pool panels.
If anchoring down to the concrete is impractical you may select the
optional Tension Straps. If they were ordered with the pool they
would be packaged separately in the pool crate.
Long side end flanges bolted together with a gusset.
3
4
End Flange
Top
Corner
Angle
Gusset
Outside
Corner Angle
tightening the bolts. Check that the panels come together evenly at
the corners. There is some play in the bolt holes to allow for
adjustment. Once the panels are bolted together to form the pool
enclosure make sure that the enclosure is square. First check that the
long walls made from 2 panels are straight. Then measure both
diagonals. Shift the panels by pushing at the corners until the
difference is less than 1/8".
If the pool is to be positioned next to a wall some bolts will be hard
to reach. In this case, one side may be bolted together first and then
slid back against the wall. You will probably want to use blocking
angle rather than anchor bolts for this inaccessible condition. Take
care when sliding the enclosure against a wall to leave enough room
for the coping and for the 18" of access at the front.
Fig 4.3: Outside corner angle, top corner angle, gusset and panel end flange shown.
If you have purchased 54" tall panels refer to the appropriate
Supplemental Guide at this time.
4. Pool Panel Assembly (42" and 48" panels)
On the long sides, the end flanges of the 2 adjoining panels bolt
together directly. Note: if you have purchased a 48" tall pool, an additional structural member called a California Brace should be installed
at this seam. The 4 corners of the pool are held together by 4 long outside corner angles. Install the gussets at every panel intersection—
Bolting the pool enclosure together. Note cut-outs on front panel.
5. Reinforcing Channel (42" and 48" panels)
Loosely bolt together the corner angle, top corner angle, gusset and panel.
1 on each side and 2 in each of the 4 corners. Do not install these gussets between the panels. Install the 4 top corner angles in each of the
4 corners. Loosely bolt together the entire enclosure, then check that
the top flange of each panel is flush with its neighboring panel before
Completing pool enclosure. Note cut-outs on front panel.
The 2 channels, each 6 5/8" wide, fit over the top flanges of the two
long sides of the pool. The channels bridge the joint between the panels on the long walls. Check that the enclosure is square. Put the
channels on loosely. Check to see if either channel has a sharp edge or
burr and be sure to locate this on the outside face of the pool or file it
down and/or cover the sharp edge securely with duct tape. The channels will be secured down later with the self-drilling fasteners provided in the liner hanger kit. These channels are structural and must be
installed correctly to withstand the hydrostatic load.
When possible, the walls of an WaterWell should be braced laterally
before filling with water to reduce outward deflection when the pool
is filled with water. The steel reinforcing channels supplied by Endless
Pools Inc. are sufficient to withstand the hydrostatic load but the pool
Installing the structural channels.
5
walls will deflect slightly without bracing. When a rigid coping such
as tile is planned this deflection is undesirable. For in-ground or partially in-ground WaterWell simply brace or shim laterally back to the
walls of the pit before filling. Be sure not to brace back to a load-bearing wall unable to resist this lateral load. Please call Endless Pools
Customer Service with any questions.
6. Anchoring
There are two anchoring methods. Bolting into a concrete slab, or
using the optional tension strap and leveling system.
Care should be taken to ensure that the pool is square before securing
the panels to the concrete. The bottom flange of each panel has predrilled holes to accept the 3/8" x 3" anchor bolts provided. An
absolute minimum of 10 anchor bolts is required. When possible
more anchor bolts should be used with an emphasis on the centers of
the panels and the center of the long sides of the pool enclosure.
will have a strap for every panel joint. These straps run under the bottom flanges and along the floor, connecting to the outside lips of the
flanges on each side. They are designed to resist the hydrostatic force
of the water in the pool. Assemble the panels as described above placing the Tension Straps under the bottom flange. The vertical lip of the
bottom flange of each panel has pre-punched holes to accept the 3/8"
nuts and bolts which are used to secure the tension straps. This is the
same hardware used to bolt the panel enclosure together. The Tension
Straps should connect between the centers of opposite panels and at
the joint in the long walls. Tighten the nuts and bolts securing the
tension straps before sliding the pool into a corner. If a strap bows up
check the dimension of the pool enclosure at the bottom as the panels may be bowed in. If necessary, you may loosen a tension strap bolt
on the accessible end of one tension strap and pull the strap taut. Be
sure to keep the nut and bolt in place and tighten them as you fill with
water and the panels push outward. Refer to the details in the Tension
Strap and Floor Leveling Supplemental Guide.
Concrete can also be used to anchor the pool to the slab provided that
the pool is at least partially recessed and the walls of the pit that the
pool sits in are strong enough to resist this outward load. Do not pour
concrete to bear against a non-structural wall.
Drilling through foundation to secure blocking angle.
If the pool is to be positioned next to a wall some bolts will be hard
to reach. In this case, one side may be bolted together first and then
slid back against the wall. You will probably want to use blocking
angle rather than anchor bolts for this inaccessible condition. Take
care when sliding the enclosure against a wall to leave enough room
for the coping and for the 18" of access at the front.
Tension straps in place under pool.
7. Optional Lights, Jets and Treadmills
A WaterWell is usually customized to meet the needs of the end user.
Pools of different lengths and widths are selected as well as deeper
pools. Naturally, the installation will vary depending on the options
selected so it is important to understand exactly what has been supplied. When options are sent, installation instructions are included in
the package. These instructions include information from the manufacturer when relevant, and a Supplemental Guide from Endless
Pools, Inc. Each of the options is also discussed more fully in the
Planning Guide which was used by the customer during discussions
with the Endless Pools, Inc. design professional.
Please note that if underwater lights, hydrotherapy jets or hydrualic
treadmill have been selected, you should cut those holes in the pool
panels at this time. More detailed installation information for these
options can be found in their respective Supplemental Guides.
Blocking angle installed with pool panel pushed flush against it.
When the floor is not level, or when anchoring into the concrete is
not desirable, our Tension Strap and Floor Leveling System may be
used. These are ordered from Endless Pools, Inc. for any size pool.
The kit for a standard 7' x 14' pool (42" or 48" tall) consists of 4 stainless steel tension straps, 1 long (14' 7") and 3 short (7' 7"). 54" pools
6
Additionally, the placement of the keypad needs to be considered. The
majority of our customer’s place the keypad in the pool coping or the
outside vertical finish. Please refer to the Keypad Section of these
installation instructions for a more detailed description.
8. Optional Insulation (by others)
To conserve heat and reduce operating costs we strongly recommend
that the WaterWell be insulated with rigid foam. Simple 2" thick
rigid foam insulation boards are usually adequate and are available
from any building supply house. Check with your supplier for a recommended adhesive appropriate for the type of rigid insulation that
they supply. Be sure to leave access to all of the panel cutouts when
you are installing the insulation. If the pool is to be installed outside
in a cold climate, you might consider using two layers. Be sure to
consider the danger of freezing for any pipes running outside the
insulation.
If you have selected the hydrotherapy jet option and your pool is
exposed to freezing conditions, please refer to Hydrotherapy Jet
Supplamental Guide for additional insulating measures.
pilot hole if you wish. Elsewhere, the fasteners must be drilled
through the shims and the panel flange.
Take the four 8' lengths of liner hanger that have been notched in
the center, and bend these pieces so that they will fit and be secured
in each. Use two self drilling fasteners and PVC shims to secure the
small corner length first, then secure the rest of the hanger to the end
and side panels, using shims when not securing through the channel.
The hanger pieces should be flush with the inside of the reinforcing
channel and will protrude into the pool the thickness of the channel
everywhere else.
Once the corner lengths are secured, install the remaining two
lengths of liner hanger along the side of the pool if required. These
pieces vary in length, depending upon your pool size, so they may
need to be trimmed. It is important that the gap at any joint between
two liner hanger pieces be no greater than 1/8".
Caulk the gap between the liner hanger and the panel to ensure that
no water falling on the top flange of the pool panel can work its way
down behind the liner. (With the same objective in mind, later caulk
the joint between the top of the liner hanger and the coping that you
install over the entire top flange of the pool.)
Rigid foam insulation being installed between the support struts.
9. Liner Hanger
The aluminum liner hanger installs around the perimeter of the pool
panel enclosure. The liner hangs from this extrusion using a bead
that is heat welded into the top edge of the liner. The liner hanger
system is packaged in the pool. Self-drilling fasteners are included in
the kit along with a nut driver attachment for your drill.
Caulking the liner hanger on the bottom.
10. Optional Liner Hangers
Because the height of the 2 steel reinforcing channels is slightly
higher than the surrounding top flange, we provide PVC shims
inside the kit to place under the liner hanger and to shim the hanger up to the level of the channels to keep the whole system level. The
shims can be cut with a hacksaw or scored with a utility knife and
snapped to fit the size of the pool. Over the channels, the fasteners
should be drilled through the channel and the flange. You may use a
Typically used when the pool is installed fully in-ground, the
Optional Bullnose Coping System allows the installer to finish with
concrete and/or tile right up to the water’s edge. The aluminum bullnose coping system acts as both a liner hanger and a finished edge.
Securing the liner hanger to the top of the pool panel
Optional Bullnose coping system.
Optional Bullnose Coping System
7
Endless Pools, Inc. supplies precut pieces to fit the specific pool size
ordered. Included in the kit are radius corners and straight pieces to
provide a finished look. These extrusions are fastened down to the top
flange of the pool panels through the PVC shims and the reinforcing
channels in the same fashion as the regular liner hanger system. The
installer is responsible for building a proper perimeter substrate for the
concrete or tile.
Optional Wood Receiver Coping System
Typically used when the pool is installed fully in-ground, the Optional
Wood Receiver Coping System allows the installer to finish with wood
or synthetic decking right up to the water’s edge. The aluminum Wood
Receiver Coping System acts as both a liner hanger and a finished edge
which can easily accept 2" wood coping. Endless Pools, Inc. supplies
precut pieces to fit the specific pool size ordered. Included in the kit
are mitered corners and straight pieces to provide a finished look.
These extrusions are fastened down to the top flange of the pool panels through the PVC shims and the reinforcing channels in the same
fashion as the regular liner hanger system. The installer is responsible
for building a proper perimeter substrate for the decking material.
Installing the aluminum coping snap strip.
Each coping kit contains pre-fabricated corners and straight aluminum pieces cut to match your pool size. The 8" wide profile of the
coping makes it ideally suited for pools which are freestanding or partially recessed. The coping is secured to the top of the wall panel with
tek screws, which are concealed beneath the aluminum snap strip of
the same finish as the coping. As an alternative the 6-3/8" snap strip
can be eliminated and a 6" accent tile can be installed. Joints between
the adjacent coping pieces are covered with an aluminum cover strip
with the same finish as the coping. At the front panel, additional
material must be added to allow skirting to clear the equipment
mounted there.
Optional Wood Receiver coping system.
Optional Aluminum Coping System
The Endless Pools Aluminum Coping Option offers a convenient
method to finish off the top edge of your Endless Pool, either indoors
or out. The coping, which also acts as a liner hanger, is 1-3/8" thick
and comes in a sand textured white finish. The pieces are precut to fit
your pool size and fit securely over the steel channel. The coping sys-
Installing the aluminum cover strip.
10. Liner Underlayment
If it is possible, finish the rest of the pool area, especially the ceiling
over the pool, before proceeding. This will help ensure that the liner
is not damaged, and also keep the pool water, skimmer, and filter free
of construction debris.
Securing aluminum coping system with tek screws.
tem is delivered with your pool. It may be ordered later and shipped
by UPS ground for an additional shipping charge. The kit’s weight
depends on the pool size and comes in 5 boxes.
Installing foam with spray adhesive.
8
Vacuum the pool floor carefully, and make sure there are no sharp
bumps that might damage the liner. Take special care to remove any
metal chips that may have fallen on the floor.
If you have purchased the Anchor Bolt Kit, then that will come with
a roll of closed cell foam. Install the protective foam underlayment on
the floor of the pool. The foam kit comes in a box with the four foam
corners and a can of spray adhesive. The foam is 3.5' x 32'. For wider
pools cut pieces as appropriate to cover the floor of the pool. Secure
the foam to the floor with the spray adhesive provided.
icone. Tape off all holes in the pool wall (lights, jets and front panel
holes) from the outside. Place a vacuum hose through the skimmer
hole and tape off the skimmer hole. The hose should be 3" – 4" off of
the bottom of the pool floor foam. Install the liner by starting at the
If you have purchased the Floor Leveling Kit, then that will come with
loose fill vermiculite and sheets of plastic flooring. The vermiculite will
be used to level the floor filling in voids or covering bumps. The plastic floor will be cut to fit and placed over the vermiculite and will be
taped to themselves and to the base of the panels.
Do not attach foam to the steel walls of the pool. Secure the foam
inserts in the 4 corners at the bottom.
Vacuum in place before liner is hung. Note thru-wall holes are sealed.
center of the front panel. Spread the liner in the pool enclosure. Shoes
should be removed for this and all future work in the pool to avoid
damaging the liner. Find the vertical seam in the liner and center it at
the front of the pool. Place the four bottom corners of the liner in the
four corners of the pool. While standing in one corner, fit the top bead
of the liner into the slot in the liner hanger. Work your way around
the pool, fitting the bead evenly into the hanger. We recommend not
ending in a corner. Smooth the liner on the floor, pushing any wrinkles toward the walls.
Secure the foam corner inserts with cauk
After verifying that the vacuum hose is off of the bottom, turn the
vacuum on. When the liner is drawn back, check to see that the cor-
11. Liner
Standard flat bottom pool liners are usually packaged in a cardboard
box. Check to see if your liner was backordered at the time of shipment. If you have any questions call Customer Service about the status of your liner.
Spread out the liner inside the pool enclosure.
Tape off all thru-wall holes and place vacuum hose through skimmer.
Ensure that all necessary holes have been cut in the panels and all
work around your pool has been completed before you install your
liner. Preparing for the liner installation, be sure that the liner hanger, corners, panel joints and panel to base material are sealed with sil-
ners are positioned properly. If not, turn the vacuum off and reposition the liner. With the vacuum running, smooth out all of the wrinkles. When you are satisfied with the placement of the liner, start to
fill with water.
Keep the vacuum running until there is about 6" of water in the shallowest portion of the pool. Turn the vacuum off and remove all tape
and the vacuum hose.
9
Included in the box with the liner are No Diving signs. Please post
these in prominent locations around the pool. The Endless Pool is
shallow and must never be used for diving. Diving into the pool is a
very serious hazard and these stickers are intended to warn children
of the risks. Naturally, adult supervision is also critical whenever children use the pool.
Install one rubber washer between the liner and the pool wall.
phillips head screwdriver. Remove the faceplate, locking rear plate,
and the gasket from the skimmer assembly. Place a small bead of silicone on the backside of the skimmer flange. Place the skimmer gasket on the backside of the skimmer flange making sure that the holes
in the gasket line up with the holes in the flange. Place another bead
Inserting the liner in the corner of the liner hanger.
12. Water Quality System
Once the water level is three inches below the lowest thru-wall, the
holes must be cut in the liner for the water return and any other
thru-wall penetrations. Please refer to the Supplemental Guides for
the hydrotherapy jets, underwater lights and/or hydraulic treadmill
for instructions specific to those penetrations. Cut a round hole in
the liner using the hole through the steel as a template. Please refer
Cut the liner using the skimmer opening in the panel as a template.
of silicone on the backside of the gasket. Position the skimmer into
the opening of the panel making sure to align the holes in the skimmer with the holes in the panel. Secure the skimmer to the pool using
the provided screws and locking rear plate. Snap on the skimmer faceplate. Glue the ball valve assembly onto the bottom of the skimmer so
that the valve handle is facing away from the center of the pool panel.
Make sure to use the PVC cleaner on both faces of the glue joint prior
Water Quality System Components
to the diagram on the next page for proper configuration of the fittings. We have provided two thru-wall fittings; the return fitting has
a male slip x male threaded fitting pre-glued into it. The thru-wall fittings have two rubber gaskets and one cork gasket. One rubber gasket
is placed between the liner and the pool panel. The other rubber gasket is placed between the fitting and the liner inside the pool. The cork
gasket is placed outside the pool under the large hex nut that holds the
fitting to the pool wall. This nut should only be firmly hand tightened. Install the threaded plugs into each of the thru wall fittings to
continue filling the pool.
Fill the pool until the water level is 3 inches below the bottom of the
skimmer opening. Cut the liner with a utility knife using the skimmer
opening in the panel as a template. Punch the ten screw holes with a
10
Position the skimmer into the opening of the panel.
Hold the heater and thread the pump heater connector onto the heater.
to applying the PVC glue. Close the ball valve. Place the pump gasket onto the face of the pump and firmly thread the pump to the
skimmer assembly union nut. Teflon sealant is not needed for these
threads. Make sure the discharge of the pump is facing the center of
the panel. Firmly attach the pump heater connector to the pump.
Now, attach the heater to the heater mounting board. The notch in
the board should be facing down. Using the provided machine screws,
Firmly thread the pump to the skimmer assembly union nut.
loosely thread in the two top screws. Place the heater over top of these
screws. This will force the lower holes in the mounting board to line
up with the holes in the heater. Tighten all four screws. Hold the
heater in place and thread the pump heater connector onto the heater.
You may need a helper for this step. When the heater is in place and
level, attach the support bracket directly to the panel Z-braces using
the provided tek screws.
Firmly attach the pump heater connector to the pump.
Unthread the union half from the return assembly. The return fitting
comes with a pre-glued adapter. Add Teflon tape onto the male threads
of the adapter and thread the union half, with union nut, onto the adapter.
Loosely reconnect the union half on the return fitting to the union half
of the return assembly. Make sure that the assembly is vertical.
Next, thread the heater union half onto the discharge of the heater.
Loosely place the elbow onto the return assembly and make sure that
Attach the support bracket directly to the panel Z-braces.
it is facing the heater. DO NOT GLUE THE ELBOW ONTO
THE RETURN ASSEMBLY! We have provided a length of flexible
PVC pipe to make the connection between the return assembly and
the heater. Take a measurement between the elbow and the heater
union half. Make sure that the socket depth of both the elbow and the
heater union are taken into account. Cut the provided flexible PVC to
that measurement. Glue the PVC pipe into the heater union. Make
Reconnect the union half to the union half of the return assembly.
11
Take a measurement between the elbow and the heater union half.
Completed water quality system.
sure that you use the PVC cleaner on both faces of the glue joints
before applying the PVC glue. Remove the elbow from the return
assembly. Make sure that the PVC pipe is level and make a mark on
the return assembly stub pipe. Remove the return assembly from the
pool and cut off the excess pipe at that mark. Now that both the flex-
13. Keypad
Additionally, the placement of the keypad needs to be considered. The
majority of our customers place the keypad in the coping at the front
of the pool. However, the keypad can be placed anywhere in the pool
coping or the outside vertical finish. The only constraint is the length
of the cord between the keypad and the poolside water quality system.
2 5/8''
66mm
1''
25,4mm
1''
25,4mm
Cutout template (not to size).
Make a mark on the return assembly stub pipe.
ible PVC pipe and the return assembly has been cut to fit, glue the
pieces together. Glue the elbow onto the flexible PVC first. Make sure
that the heater union is loose and then glue the elbow into the return
assembly. Make sure that all threaded connections have been tightened. Once the pool is full, remove the threaded plug in the return fitting and install the eyeball fitting. Leave the plug in the alternate suction. Open both ball valves and check for leaks. If you find any leaks,
please call Customer Service for assistance 800-910-2714.
When installing the keypad, drill two 1" diameter holes at 2-5/8"
from center to center. Then with an appropriate saw, cut out the piece
between the two holes. Please refer to page 3 of the Water Quality
Supplemental Guide.
1''
2
Next, peal of the adhesive protection on the backside of the keypad.
Feed the keypad cord through the cutout. Firmly press the keypad
into place. Then, feed the bracket through the cord and push the
bracket all the way up to the underside of the 1coping. Make sure that
Gasket with adhesive
1''
12
'
When the flexible PVC pipe and the return assembly has been cut to fit, glue
the pieces together.
1'
2 5/8
''
Feed the keypad, from the inside of the pool, through the cutout.
the bracket is placed over the two threaded studs on the back of the
keypad. Once that is completed, thread the two wing nuts over the
threaded studs and hand tighten them.
If you are going to have your keypad in a horizontal surface that is deeper than the threaded studs, then simply cut your holes, remove the adhesive protection, feed the cord into the hole, and firmly press the keypad
into place. When picking a location for the keypad in your finish work,
it is important to take into account the length of the keypad cord.
15. Electrical Requirements (50Hz)
One dedicated 220v 30amp RCD power supply is required for a
WaterWell. Ideally, a licensed electrician installs a shut-off close to
the pool’s location prior to installation. Then the power supply is
brought into the heater controller. All pumps and ancillary equipment will plug into the heater controller. National or local code will
dictate the shut off ’s proximity to the pool.
14. Electrical Requirements (60Hz)
A110Volt SystemOne dedicated 110v 15amp GFCI wall outlet is required for a110v
WaterWell. This GFCI outlet should be within 20 feet of the pools
intended location. The cord that is attached to the heater controller
should be plugged directly into the GFCI outlet; no extension cords
should be used. All pumps and ancillary equipment will plug into the
heater controller.
220Volt System*One dedicated 220v 30amp GFCI power supply is required for a 220v
WaterWell. A three-wire supply (2 hots, neutral, and a ground) is
required for this application. Ideally, a licensed electrician installs a
shut-off close to the pool’s location prior to installation.
Then the power supply is brought into the heater controller. All
pumps and ancillary equipment will plug into the heater controller.
National or local code will dictate the shut off ’s proximity to the pool.
*If you have purchased the optional Hydrualic treadmill, please refer
to that Suppleental Guide, as the treadmill power unit and the Water
Quality System can share the same power.
16. Water Quality System Cover
Now that the Water Quality System has been installed and your electrician has completed the wiring, you should install the Water Quality
System Cover. Place the cover over the entire water quality system.
Use the provided self-tapping screws to attach the cover to two of the
Z-braces.
17. Heater/Controller
The in.xe is a heater controller used by Endless Pools to control the
following water quality features:
• Water temperature can be set between 59ºF and 104ºF. Default set
point at 84ºF. The set point is changed with the up and down keys.
• The Circulating Pump, CP, is always on. The heater can only turn
on when CP is on.
13
• Pressing the light key will turn lights on/off with an on time of 120
minutes.
• Optional Pump #1 is for a single speed Jet pump. Pressing the first
key turns pump 1 on/off, with a run time of 30-minutes. The heating element is turned off when Pump #1 is activated. To aid in filtration there are 4-purges per day.
• Optional UV always on except when Pump #1 is on and remains off
or 30-minutes after pump #1 is turned on.
• Holding first key for 5-seconds will turn off all devices for 30 minutes
to allow for servicing. Pressing again will return to normal operation.
Electrical Requirements
In.xe features in.links connectors with colored and tagged polarizers.
This new plug and connector technology has been specifically
designed for easy and safe assembly. The tags are interchangeable
depending on the output; the polarizers are designed to avoid misconnections.
WARNINGS:
Before installing or connecting the unit, please read the following.
• FOR UNITS FOR USE IN OTHER THAN SINGLE-FAMILY
DWELLINGS,A CLEARLY LABELED EMERGENCY
SWITCH SHALL BE PROVIDED AS PART OF THE
INSTALLATION. THE SWITCH SHALL BE READILY
ACCESSIBLE TO THE OCCUPANTS AND SHALL BE
INSTALLED AT LEAST 5 FEET (1.52 M) AWAY,ADJACENT
TO, AND WITHIN SIGHT OF THE UNIT.
• ANY DAMAGED CABLE MUST BE IMMEDIATELY
REPLACED.
• TURN POWER OFF BEFORE SERVICING OR MODIFYING ANY CABLE CONNECTIONS IN THIS UNIT.
• TO PREVENT ELECTRIC SHOCK HAZARD AND/OR
WATER DAMAGE TO THIS CONTROL,ALL UNUSED
RECEPTACLES MUST HAVE A DUMMY PLUG.
• THIS CONTROLLER MUST NOT BE INSTALLED IN
PROXIMITY OF HIGHLY FLAMMABLE MATERIALS.
In.link connectors are easily and conveniently accessible from the
front of the pack offering a wide range of possible connection configurations. In.link connectors come in 3 sizes (HC, LC and low voltage) for all types of inputs and output devices.
They all include an integrated latch that keeps them safely in place
and provides audible and tactile feedback when properly connected.
Finally, colored and tagged polarizers provide a definite advantage in
easily configuring output devices.
Electrical Wiring
Correct wiring of the electrical service box, GFCI, and pack terminal
block is essential. Call an electrician if necessary.
Warning!
This product must always be connected to a circuit protected by a
ground fault interrupter.
Proper wiring of the electrical service box, GFCI and in.xe terminal
block is essential!
Check your electrical code for local regulations. Only copper wire
should be used, never aluminum.
To install the wiring for the in.xe heater controller, you'll need a
Phillips screwdriver and a flat screwdriver.
Loosen the 2 screws of the spa pack door and open it. Remove 5 1/2"
of cable insulation. Strip away 1" of each wire insulation. Pull the
cable through the cutout of the box and secure it with a strain relief
(1" NTP strain relief; hole diameter: 1.335"). Make sure that only the
uncut sheathing is clamped at this opening. Push the color-coded
wires into the terminals as indicated on the sticker and use the flat
screwdriver to tighten the screws on the terminals.
After making sure wire connections are secure, push them back into
the box and close the door. Tighten the 2 screws of the sp pack door.
Connect the bonding conductor to the bonding lug on the front of
the in.xe spa pack. Use a minimum 8 AWG solid copper wire.
14
in.link output connectors
High-Current - (HC) connectors:
Output
Typical Device
Out 1 . . . . . . . . . . . . . . . . . . .Pump 1
Low-Current - (LC) connectors: (relay controlled)
Output
Typical Device
Out 3 . . . . . . . . . . . . . . . . . .Circulation Pump (CP)/Blower
Out 4 . . . . . . . . . . . . . . . . . . .UV
Out 5 . . . . . . . . . . . . . . . . . . .Cover or Sump Pump
Low-Voltage - (LV) connectors:
Output
Typical Device
C . . . . . . . . . . . . . . . . . . . . .Main keypad
CO . . . . . . . . . . . . . . . . . . . .Comm.connector (in.stik)
L1 . . . . . . . . . . . . . . . . . . . . .Light
Typical Settings
General specifications:
Environmental:
Operating temperature: -20°C (-4°F) to 60°C (140°F)
Storage temperature: -25°C (-13°F) to 85°C (185°F)
Humidity: up to 85% RH, non condensing
IPx5 level of waterproofing is conditional on 3 items:
Set Point : 59°F to 104°F / Factory set at 84°F
Filter Cycle Duration: 0 to 24 hrs / Factory set at 24 hrs
• Both front covers (heater and input wiring) are closed and
screwed shut.
Jet Pump Run Time: 1 to 255 min. / Factory set at 30 min.
• A waterproof strain-relief/bushing is used for the cable entry
into the pack.
Light Timeout: 1 to 255 min. / Factory set at 120 min.
• Any unused in.link connections (HC, LC, or low voltage) is
plugged with the appropriate blank plug.
Max Set Point: 59°F to 104°F / Factory set at 104°F
Purge Cycle Frequency: 1 to 4 times a day / Factory set at 4
Mechanical:
Keypad doesn’t seem to work
Weight: 4.76 kg (10.5 lbs)
If a keypad doesn’t seem to work:
Dimensions (W x H x D):
• Verify keypad connections.
Chassis: 441.5mm x 298.5mm x 129mm (17.38" x 11.75" x 5.1")
• Replace keypad if problem is corrected.
• Replace in.xe if problem is not corrected.
UL/CSA Standards:
in.xe UL/CSA electrical specifications:
UL 1563 Fifth Ed.
Input rating: 120/240 VAC
File: E182156
(2-phase required, with neutral) 48 A maximum, 60Hz. Software limited to 24A. Install on a 30A GFCI circuit.
CSA No. 22.2 - 218.1-M89.
TUV Standards:
Output ratings:
Output
Voltage
Out 1
EN/IEC 60335 - 2 - 60
Current
Typical Device
EN55014-1
120/240V 17FLA
Pump 1
EN55014-2
Out 3
120/240V 0.8 A
Circulation Pump(CP)/Blower
EN61000-3-2
Out 4
120/240V 1 A
Ozone Generator
EN61000-3-3
Out 5
120/240V 5 A
Audio/Video device
The in.xe is lab tested to IPx5 enclosure protection levels.
L1
Light, 12VAC,
0.1 A
CO
Communications port *
C1
Top side controller *
*CO: Comm.connector (in.stik).
heat.wav ratings:
Voltage: 120/240VAC
Current: 17A resistive (4 kW heater at 240V)
18. E14 Series Sealless Centrifugal
Canned Motor Pumps
Laing centrifugal pumps are designed for circulation and transfer of a
variety of fluids compatible with their materials of construction limited
to maximum fluid temperatures and maximum line pressures as indicated below. Unique leakproof integrated motor/pump design eliminates the need for conventional mechanical seals or other shaft sealing
devices. They are self lubricating and require no external lubrication.
Frequency: 50 / 60 Hz
heat.wav heater flow rate:
Minimum of 18 GPM is required
Important:
• All low voltage accessories use + 5Vdc and/or + 12 Vdc.
Unpacking
When unpacking the unit inspect carefully for any damage that may have
occurred during transit. Check for loose, damaged, or missing parts (see
pump exploded view and replacement parts list). Do not attempt to
assemble or operate pump if any parts are missing or damaged.
• All low voltage accessories combined: 150 mA max, on + 12 Vdc.
15
General Safety Information
1. Know the pump application, limitations and potential hazards.
Warning: Pump should only be used with liquids compatible with
pump component materials. Do not use to pump flammable or
explosive fluids such as gasoline, fuel oil, kerosene, etc. Do not use in
flammable and/or explosive atmospheres.
11. All wiring should be performed by a qualified electrician.
12. Protect electrical cord from sharp objects, hot surfaces, oil, and
chemicals. Avoid kinking the cord. Replace or repair damaged or
worn cords immediately.
Warning: Do not handle a pump or pump motor with wet hands or
when standing on a wet or damp surface or in water.
Caution: These pumps have been evaluated for use with water only.
For your protection always wear proper clothing, eye protection, etc.
in case of any malfunction. For proper handling techniques and cautions, contact your chemical supplier, insurance company and local
agencies (fire dept., etc.). Failure to comply with this warning could
result in personal injury and/or property damage.
2. Make certain that the power source conforms to the requirements
of your equipment.
Electrical
These instructions must be followed to reduce risk of electrical
shock. All work should be performed by a qualified electrician and in
accordance with the current national and local electrical codes and regulations. Consult the nameplate for electrical data. The motor is
impedance protected.
3. Disconnect power before servicing. If the power disconnect is out
of sight, lock in the open position and tag it to prevent unexpected application of power. Failure to do so could result in fatal electric shock!
Make certain that a properly sized circuit is available. Wire size should
be based on the current carrying (amp) capacity of the conductor. The
circulator must be grounded in accordance with the current national
and local codes. Ground wire should be copper with current capacity at
least equal to that of the wire carrying power to the circulator. Observe
all minimum code requirements for your jurisdiction.
Warning: Risk of electric shock. This pump is supplied with a
grounding conductor and grounding-type attachment plug. To
reduce risk of electric shock, be certain that it is connected to properly grounded, grounding-type receptacle.
For circulators supplied with a power cord, the current carrying capacity of the cord is suitable for proper operation. Make certain the receptacle is properly configured and in good working order. Check to make
certain that the circuit is properly sized for the load.
4. Release all pressure within the system before servicing any component.
Valves should be positioned to avoid leakage onto the motor and electrical compartment. All elbows, tees, and sharp bends in the piping
should be installed sufficiently upstream or downstream of the suction
and discharge ports. Avoid welding or soldering close to the circulator,
which could cause damage to the unit.
5. Drain liquids from the system before servicing.
6. Personal Safety
a. Wear safety glasses at all times when working with pumps.
b. Wear a face shield and proper apparel when pumping hazardous chemicals.
c. Keep work area clean, uncluttered, and properly lighted.
Replace all unused tools and equipment.
d. Keep visitors at a safe distance from the work area.
e. Make workshop childproof - with padlocks, master switches
and by removing starter keys.
7. The motor is designed to be used in a clean dry location with
access to an adequate supply of cooling air. Ambient temperature
around the motor should not exceed 122ºF (50ºC). For outdoor
installations motor must be protected by a cover that does not
block airflow to and around the motor. This unit is not able to be
submersed in water.
8. When wiring an electrically driven pump follow all electrical and
safety codes, as well as the most recent United States National
Electrical Code (NEC) and the Occupational Safety and Health
Act (OSHA).
9. Single phase motors: All units are supplied with 115 volt, single
phase motors (unless otherwise noted) and provided with a 6 foot
3-wire flexible cord with 3-prong grounded plug suitable for a
standard grounded type 115 volt receptacle. Where a 2- prong wall
receptacle is encountered, it must be replaced with a properly
grounded 3- prong receptacle installed in accordance with the
National Electrical Code, local codes and ordinances. To ensure a
proper ground, the grounding means must be tested by a qualified
electrician.
10. Use only 3-wire extension cords that have 3-prong grounding
type plugs and 3-pole receptacles that accept the equipment plug.
16
Operation
1. Completely fill the system before operating the circulator. Do not
start the circulator until the system has been filled. Make sure the
isolation valves are fully open and that there is water in the circulator.
2. Purge air from the system prior to operating the circulator. These
two steps are very important. The circulator should never be
allowed to run dry. This can severely damage the circulator and will
void the warranty.
3. Operate the circulator for approximately 10 minutes to purge any
remaining air in the system. It may be necessary to open a discharge
valve, port and/or fixture to ensure that the air has been purged. The
circulator should be running quietly. If a “gurgling” noise is present it
may mean there is still air in the system. Turning the circulator on and
off several times will generally clear the remaining air. If this “gurgling” noise persists, recheck the system and re-purge the air. System
and circulator should now operate quietly and efficiently.
4. Dry Run Internal Thermostat:All plastic housing model pumps are
provided as standard with an integral dry run protection thermostat
that turns pump off when pump runs dry (thermostat off at 212ºF +
10ºF). If left unattended, the thermostat will automatically reset
within a relatively short amount of time when the unit cools down,
thereby allowing the pump to again begin operation (at 176ºF +
13ºF). Depending on the system conditions, many times one or two
of these off/on cycles will correct an air bound dry run condition by
itself with no harm done to the pump, thereby allowing continued
trouble free operation. However, if the off/on cycling persists then
measures should be taken to correct the problems in the circulation
system causing the on/off cycling. Stainless housing pumps are not
provided with a dry run thermostat.
Maintenance
Warning: Make certain that the unit is disconnected from the power
source before attempting to service or remove any components.
1. Since the rotor/impeller unit (see exploded views) is the only moving part, its replacement and/or the replacement of the motor is
simple to accomplish.
4. Remove and replace the rotor. Check to make sure that the ceramic bearing on the motor is intact and is not chipped or otherwise
damaged.
5. Replace the “O” ring with a new one and reverse the disassembly
procedure to reassemble the pump.
2. After the power has been disconnected remove the screws holding
the pump housing to the motor (in the case of model SM-909 and
SM-1212 units) or using a counter clockwise motion remove the
screw ring housing to motor connection on model SM-303 units.
6. Since these units are self lubricated by the pumped fluid, they never
need external lubrication.
3. Remove the “O” ring from the pump housing.
8. If provided, the suction line strainer should be cleaned at regular
intervals.
7. Pump should be drained when subjected to freezing temperatures.
Trouble Shooting Chart
Symptom
Possible Causes
Corrective Action
Motor will not start or run
1. Improperly wired
1. Check motor wiring diagram
2. Blown fuse or open circuit breaker
2. Replace fuse or circuit breaker after
reason for overload has been corrected
3. Loose or broke wiring
3. Tighten connections, repair wiring
4. Foreign object in impeller
4. Disassemble pump, remove object
5. Motor shorted out
5. Replace motor
6. Dry run cutout has opened circuit
6. Allow unit to cool, restart after
reason for cutout has been
determined and corrected
1. Leak, obstruction, or kink in
suction line
1. Repair as necessary
2. Suction line closed
2. Open
3. Pump is worn
3. Replace parts
1. Housing not filled with water
1. Properly prime housing
2. Suction piping too small
2. Increase to pump inlet size or one
size larger
3. Total head too high
3. Reduce discharge head
4. Impeller plugged
4. Disassemble pump and clean impeller
5. Pump not running
5. Check motor operation
1. Air trapped in housing
1. Check pump prime, also turn pump
on and off several times to bump
air pocket out of pump
2. Rotor bearing worn
2. Replace rotor assembly
3. Debris in housing
3. Disassemble pump and remove debris
Pump will not prime
Little or no discharge
Noisy pump operation
19. Bonding and Grounding
All of the electrical equipment that we supply is UL or CSA approved and must be installed in accordance with local electric codes by a
licensed local electrician. Bonding and Grounding is an important part of that process. All electrical components have bonding lugs and should
be bonded together and to the steel pool panels. A bonding conductor shall be solid copper not smaller than 8 AWG and may be insulated,
covered or bare. If new construction is involved where reinforcing rods are installed in the concrete under or adjacent to the pool this should
be included in the bonding circuit. Each of the pieces of equipment should be separately grounded.
A #8AWG bare copper wire and bonding kit will be provided in the hydraulic hose/electrical whip box. This wire will be the same length as
your electrical whip. Connect this wire you power unit and run it, with your hydraulic hose and whip, to the front of the pool. Inside the bonding kit there will be a machine screw and nut, a bonding lug, and a drill bit. Attach the bonding lug to the Z brace just under the heater controller. Feed the bonding wire through the bonding lug on the Z brace, through the opening in the heater controller mounting board, and connect it to the bonding bar on the heater controller.
17
20. Bench Seat
Interior Lower Steps
The assembly of the interior lower steps begins with the base; which
has 3 tabs on each side and a strength-bend in both the front and
back. Align one of the sides to base so that the holes in the side align
The short angles should be on the inside of the step facing the wall.
The larger angles should be on the outside of the step facing the wall.
with the holes in the tabs of the base. Use the provided screws to
attach. Repeat this process for the other side.
Next, align the back to the sides so that the tabs in the rear are
aligned with the hole in the sides and so that the rounded end of the
back is facing up. Again, use the provided screws to attach the rear
Next install the treads of the lower steps, starting at the top and
working down. The top tread has a turned down tab on the backside
of the horizontal surface. The tread will overhang towards the wall
that the stairs are to be seated against. Use the provided screws to
attach the step to the angles.
The middle tread is the remaining tread that does not have a rounded corner. Place the tread onto the stairs so that it is aligned with the
to the sides.
Next determine the optimal position for the stairs in relation to your
bench seat. Once determined, attach the plastic angles to the sides
so that they are facing the wall that the steps are to be placed against.
top tread. Attach the tread to the underside angles on the vertical
face and to the underside tab of top tread on the horizontal face.
Two bottom treads have been provided with the stairs. One of the
treads will be unused and can be discarded. Use the tread that will
have the rounded corner facing the wall. Attach the tread to the
underside angles on the vertical face and to the underside tab of middle tread on the horizontal face.
18
Once the interior lower steps have been assembled, place them in the desired position against the bench seat. Use the provided 11/64” drill
bit and drill through the holes in the top flange of the stairs into the vertical face of the bench seat. Thread in two of the provided screws into
the holes, securing the steps to the bench seat.
Bench with Pedestal Stabilizers Assembly
Place the bench pillars into the pool. Decide on which
side of the bench the interior steps will be attached.
Attach the step bracket as shown below onto that pillar. Attach the stabilizer to the remaining pillars as
shown. Use the provided screws to attach.
Pedestal
Pedestal
Stabilizer
Step
Bracket
Insert the support beams into the pedestals
as shown below.
Support
Beams
19
Place the bench caps onto the pedestals and use the
provided screws to attach.
Bench
Caps
Secure the interior steps to the step bracket with 2 of
the provided screws as shown. Use the provided drill
bit to drill out the holes through the top step flange
into the bench cap. Attach with the provided screws.
Drill out these holes
with the provided drill bit
21. Optional Retractable Security Cover Systems
Our most popular option and strongly recommended, the Retractable
Security Cover system protects children and pets from the pool while
keeping in temperature and humidity. With some installations, suitable access for this roll up cover system is complex and should be discussed with an Endless Pool design professional during the planning
stage. Supplemental Guide describes the cover installation more fully.
If your pool is to be outside, we can provide you with a cover pump to
remove any rain water that may accumulate.
The most popular configuration for this system is to have the cover
roll off the rear of the pool. Other alternatives are possible if space is
limited. These are discussed in more detail in the Supplemental
Guide. The kit includes the roller mechanism for the width of pool
purchased, appropriate lengths of track, an aluminum leading edge,
and the rugged fabric which floats on the water surface suspended
between the parallel tracks. Two steel brackets to mount the roller
mechanism at one end of the pool are available.
The optional Retractable Security Cover system is manually powered.
We believe that this system is optimal for our compact pool and when
installed correctly provides a simple means of covering the pool.
The aluminum track on either side of the pool is a requirement of the
retractable security cover option. Covering this track is possible but
increases complexity and will add to the cost of installation. Call
Customer Service for details.
20
Optional Automatic Retractable Security Cover System
Offered in two versions, the Automatic Retractable Security Cover
System is rapidly becoming one of our most popular options.
Operated with the turn of the key, the cover retracts easily making it
ideal for people want the convenience of automation or lack the
strength to operate one manually.
The Below Deck version can be fully integrated into any custom finish. The cover mechanism must be mounted at the front of the pool.
Please refer to the Supplemental for more information on this option.
The Above Deck can mounted at either the front or the back of the
pool and is compatible with any of our coping options. The Above
Deck version comes with a convenient bench cover offered in a variety of colors to compliment any decor. Please refer to the
Supplemental Guide for more information on this option.
Optional Solar Blanket Roll Up System
Endless Pools, Inc. supplies an Solar Blanket for all Endless Pool
sizes, if the Retractable Security Cover has not been chosen. For
those who wish it to serve as a permanent cover, a simple PVC pipe
may be used to roll up the blanket for storage when the pool is in use.
For this purpose, we supply PVC clips and PVC pipe long enough for
your pool width. Depending on the width of the pool the PVC pipe
will come in one or two pieces with a coupling attached to one end
of the one piece of pipe. Using the PVC cleaner and PVC cement you
received in your plumbing kit, glue the second piece of pipe into the
open end of the coupling. Alternatively, the roller mechanism from
the retractable security cover may be used in conjunction with a
length of 3" diameter PVC pipe to roll up the blanket. This optional
solar blanket roll up system is available from the Endless Pools, Inc.
Customer Service Department.
22. Optional Hydrotherapy Jets System
By providing a supplementary pump that is operated by the heater
controller and installing two additional suction fittings and four venturi-type jets through the wall of an Endless Pool, the user can enjoy
the therapy benefits of jets. Installation is relatively straightforward
but roughly doubles the plumbing work required. The kit provided by
Endless Pools Inc, includes everything necessary with the exception
of the 1-1/2" schedule 40 PVC pipe. Detailed instructions are included in the Supplemental Guide along with a typical layout drawing.
When jets are installed it is important to leave access to the outside
of the pool panel for service. The four holes for the jets should be cut
before installing the liner. If the pool is located outdoors where freezing is an issue, care must be taken with the jet system plumbing.
Additional insulation should be considered under these conditions.
Call Customer Service with any questions about this limitation.
23. Optional Underwater Lights System
Underwater Lights are an important aesthetic option. Typically
located on either the side or the end wall of the pool, these two lights
thread into in niches that are installed after the liner is in place. The
holes for these niches are cut using the holesaw provided before the
foam and the liner are installed. Directions come with the lights.
These directions are also found in the Supplemental Guide. Each
light consists of a dry niche which serves as a porthole. The low-voltage light threads into this porthole outside the pool. For outdoor
installations a weather resistant can is provided for added protection.
A 22' cord connects these lights plug directly into the the heater
controller and are then operated by the pool-side controls.
24. Optional Corner Step
To assist with access the optional Corner Step is available. For a more
complete discussion of access to a WaterWell please refer to the
Planning Guide. These optional steps are approximately 11" high and
are secured to the internal bench. They are easily installed using a
phillips screwdriver. If you wish to order them after the pool has
shipped, contact the Customer Service Department and they will
ship one to the address provided. The optional Corner Step is
described more fully in the Supplemental Guide.
25. Optional Interior Bench Stairs
For those needing an easier route into the pool our optional Interior
Bench Stair provides three low-rise steps. Typically installed with
fully in-ground WaterWell, the Interior Bench Stairs allows the user
to gradually enter the water from deck height. The Interior Bench
Stairs takes the swimmer down to the bench. The standard lower
steps must be placed on the opposite end of the bench and will take
you to the pool floor. The optional Interior Bench Stairs are described
more fully in the Supplemental Guide. The stairs should be ordered
with the pool to avoid substantial additional freight charges.
26. Optional Synthetic Coping System
An ideal solution for indoor installations, the Synthetic Coping
System finishes off an WaterWell quickly and easily. Typically used
when the pool is installed partially or fully aboveground,
the Optional Synthetic Coping System provides a finished 9-3/4”
wide waterproof edge to your pool. Made of synthetic boards and
corner pieces with shiplapped joints, the system comes in a
variety of colors. Please refer to Supplemental Guide for additional
installation information.
27. Aquatic Treadmill
Turn your Endless Pool into a complete home gym with the addition
of an Aquatic Treadmill!
Use the treadmill with the current on or off to vary the intensity of
your walk or jog. Take it to the next step and use the aquatic treadmill to cross-train in the Endless Pool. Alternate between swimming
and walking or jogging to get a full body workout!
Our new Aquatic Treadmills offer a spacious 20" wide belt for walking or running. Both manual and hydraulically powered versions are
available. Our underwater treadmills are typically installed in pools
with deeper panels. For placement options and additional information, please contact your design professional.
Operations and Maintenance User’s Manual
Included with your Endless Pool WaterWell and packaged with
your Water Quality System (WQS) are products to help with
start-up and on-going maintenance. These include:
(1) Container calcium hardness increaser
(1) Container water clarifier
(1) Container pH decreaser
(1) Container pH increaser
(1) Container total alkalinity increaser
(1) Container vinyl cleaner
(1) Pool patch kit "wet"
(1) Container stabilized chlorine (outdoor pools)
1. Overview
The Endless Pool WaterWell is a combination of several
independent systems. The primary system maintains the water
quality by circulating, filtering, heating, and purifying the
water. This “Water Quality System” (WQS) is comprised of the
pump, filter, Nature 2 purifiers, and heater. The Hydrotherapy jets
and a supplementary pump comprise a second system.
Endless Pools will provide toll free technical support during the
installation and start-up of your swimming machine. We encourage you to become familiar with the equipment and components,
in order to properly maintain the pool.
(1) Nature 2 cartridge
(1) Spa Wand
(1) Test kit
21
2. Filling your WaterWell
Your Pool Water
As with any swimming pool, a WaterWell requires water chemistry monitoring. The water quality system, which includes automated recirculating, heating, filtration and purification, does most
of the work for you. However, balancing and maintaining your
pool water is essential to the life and health of your equipment.
Your Source of Water
Endless Pools, Inc. recommends testing a sample of water before
you begin to fill the pool. Doing so will give you an idea of how
suitable your water source is for swimming pool use. Testing the
water can be done by using your Taylor test kit. A local swimming
pool supply store can also test your water at a minimal charge.
Take a copy of the “Water Chemistry Testing Log” with you.
Well Water
Certain geographic areas are high in mineral content. For pools
where well water is to be the water source, strong consideration
should be given to having water tanked in. Well water often has
high iron, calcium, and mineral content which is not ideal for your
swimming pool. If well water is the only available source, please
call our Customer Service Department, or seek advice from a local
pool store.
“Hard” Water and Water Softeners
The phrase “hard” water refers to having high levels of calcium in
the water. Many homes that have “hard” water will often have a
water softener installed in their homes that lowers the level of calcium in the water. For ideal water conditions in a vinyl liner pool,
the calcium hardness level should be between 180-250 ppm.
Please call us to discuss your options if you have a water softener
and/or high calcium in your water supply.
Nature 2
Sanitation of your pool water is partly accomplished by placing
one Nature2 purifier cartridge into the skimmer basket at the
front of your pool. The Nature 2 system included in your pool kit
significantly reduces the amount of chlorine you’ll need to use by
adding silver and copper to the pool, which will kill bacteria and
algae in the water. This cartridge should be replaced about every
four months.
Oxidation and Chlorine Requirements
Nature2 works well as a pool sanitizer, however it does not oxidize
or “burn-up” small particles of debris in the pool. Maintaining a
minimum level of 0.5 ppm free chlorine in your pool at all times
is necessary. Adding 1/2 cup of Clorox a day will add about 0.5
ppm of free chlorine to a standard sized pool. How quickly that
chlorine is consumed depends upon water temperature, bather
load, and the amount of direct sunlight the pool receives.
Chlorine Stabilizer and Outdoor Pools
Your Taylor test kit comes equipped with testing procedures for
cyanuric acid. Cyanuric acid is a chlorine stabilizer, meaning it
protects chlorine from getting broken down by sunlight. If your
pool is located outdoors, we recommend using the granular form
of stabilized chlorine (Should have an active ingredient of sodium
dichlor) instead of Clorox. Another option would be to supplement Clorox by adding cyanuric acid. Either method will necessitate testing for cyanuric acid every two weeks.
These chemicals are readily available at any pool supply store.
Chlorine Stabilizer and Indoor Pools
Many customers are sold a stabilized chlorine product for use in
their indoor WaterWell. Endless Pools would not recommend
this practice, as Clorox bleach is ideal for this setting. Using a sta-
22
bilized chlorine source is more expensive, and it also requires the
periodic testing for cyanuric acid levels. If the level gets too high,
it can render the chlorine ineffective, and it may necessitate the
partial draining of the pool in order to lower the levels.
Alternatives to Chlorine and Nature2
Although some alternative Sanitization systems can be used with
an WaterWell, the following precautions must be followed:
• Under NO circumstances can salt chlorine-generating
systems be used in an WaterWell.
• Bacquacil systems damage clear plastic products. Light
lenses and pump strainer lids will crack.
• Bromine can be used, but not in conjunction with
Nature2.
• Please call Customer Service with any questions about
alternate systems.
3. Pool and Equipment Start-Up
The pool is full when the water level is half way up the skimmer
mouth. A water level 1/2” or more lower than this can cause air to
get pulled through the skimmer into the WQS plumbing lines.
This can lead to problems with the filter, and can also cause your
heater to work intermittently. A water level 1” or more higher
than half way up the skimmer can lead to more water getting
splashed out of the pool, as well as water weeping out of the air
relief valve on the top of the skimmer body.
Once the pool is full and all connections are made, the water quality system can be started. Verify that the Nature 2 cartridge is
installed inside the skimmer-filter basket.
When power is first introduced to the heater controller, it will
go through a boot up cycle. It is very important not to press
any button on the keypad during this boot up process. The
boot up process will be done when the keypad displays just
the temperature.
Your WQS pump is programmed to run continuously, meaning
that your pool is receiving automated circulation and filtration
(through the skimmer/filter) 24 hours a day. The temperature of
your pool is controlled by the up and down keys on your keypad.
Test your pool water now with the kit provided and/or take a
sample of water to a local pool professional for testing. The test
kit provided by Endless Pools tests for chlorine, pH, total alkalinity, calcium hardness and cyanuric acid. While the test kit may
first seem intimidating, simply follow the instructions on the
underside of the test kit lid. These instructions walk you through
each of the tests step by step, and they are color coded with the
appropriate reagent bottles to use for that test.
When performing the water quality tests, write down your results
on the log sheet provided at the end of this bulletin. We would
strongly urge you to make copies of these blank logs for use in the
future. Any observations, chemical additions, or actions taken
should also be noted. While it may seem a bit tedious, all of this
information will prove invaluable in the event of a water quality
problem, or when you go to make similar adjustments to the water
chemistry in the future.
During this start-up period, which will last a few days, you will
need to “Balance” the pool water by following the instructions
listed below. After this initial start-up period, the testing procedures and emphasis are a little bit different, and they are explained
in the “Maintaining your WaterWell” instructions a few pages
later in this manual.
Floating Thermal Cover
Endless Pools, Inc. provides a lightweight cover for the
WaterWell, if a retractable security cover has not been purchased. This cover floats on the water surface, insulating the pool
while preventing evaporation. Consistent use of this cover will
keep the water cleaner, save energy, and help control humidity.
The cover should be completely removed from the water before
the machine is used. With standard width Endless Pools (7'
inside dimension) the cover is shipped in a box with clips along
with a 1-1/4” PVC pipe. Replacement covers are available from
our Customer Service Department. The cover, once cut to size
and installed on the PVC pipe, rolls out onto the water surface.
4. Balancing the Pool Water
The following steps need to be followed when the pool is first
filled, as well as anytime the pool is partially drained and refilled.
They will walk you through testing and adjusting the factors
affecting the “balance” of the water i.e., the water’s total alkalinity, pH and calcium hardness levels.
The level of chlorine inside the pool, as long as it is not above
5ppm, will not significantly affect the following tests and procedures used to balance the pool water. Therefore, if there is no
chlorine in the pool at this time, add some. Add 1-2 cups of liquid bleach (any brand is fine as long as it does not have an added
scent to it) to an indoor pool. If you have an outdoor pool, add
the appropriate amount of granules out of the bag of “stabilized”
chlorine. Test for chlorine in a day or two and add more if necessary.
1) Balance Total Alkalinity (TA)
Ideal reading: 100ppm
Acceptable range: 80-120ppm
Raise with: Sodium Bicarbonate (TA increaser)
Lower with: Sodium Bisulfate (pH decreaser)
Method of chemical application:
• Adjusting the level of TA in the pool requires that the
chemical be “slugged” i.e. pour chemical in four
different spots around the pool with the water calm. Let
the water remain calm until the next filtration cycle.
• Retest TA and adjust again if necessary.
• Add less chemical than you think is necessary to effect
the desired change. Keep track of how much chemical
it took to make that change.
Notes:
Many regions of the country and world will have water with a TA
higher than our recommended range. In a lot of cases, it will be
desirable to leave the TA alone as any adjustment to it will also
tend to affect the pH. The TA is mainly serving as a buffer for the
pH. If it is above 120ppm, but lower than 200-250ppm, leave the
level alone. It will simply over-stabilize the pH, which is not a
problem, especially if the pH is within range or close to being
within range.
If the TA is lower than our recommended range, though, we
would recommend increasing it to at least 80ppm. Once again,
the TA serves mainly as a buffer for the pH and if the TA is too
low, the pH level in the pool can change very rapidly causing
bather discomfort and damage to the pool and pool equipment.
Once the TA is within a tolerable range, move on to adjusting
the pH in the pool. You should find that the TA will be slow to
change—for this reason, test for it once a week as detailed in the
“Maintenance and Use of your WaterWell” instructions found
later in this guide.
2) Balance pH
Ideal reading: 7.5
Acceptable range: 7.4-7.8
Raise with: sodium carbonate (pH increaser)
Lower with: sodium bisulfate (pH decreaser)
Method of chemical application:
• Measure out and pour your dosage of chemical directly
into the pool. Test and apply more chemical as necessary.
Notes:
It is very important to keep the pH within range. If the level is
too low, severe damage can occur to the pool liner and the submerged hydraulic motor, and the pool equipment. If the level is
too high, damage can occur to the liner, and it can make the
water prone to “scaling,” when minerals and metals dissolved in
the water will be dropped out of solution and on to the benches
and liner. Having the pH too high or too low may cause bather
discomfort in the form of eye or skin irritation.
The pH will change slowly over the course of a week or two.
The number of bathers and the type of chlorine used are just two
factors that will cause the pH to change. For this reason, pH
should be tested three times a week and adjusted as needed. See
the “Maintenance and Use of your WaterWell” instructions
found later in this guide for further details.
Once the pH is within range, move on to adjusting the calcium
hardness.
3) Balance Calcium Hardness (CH)
Ideal reading: 180ppm
Acceptable range: 175-250ppm
Raise with: calcium chloride (calcium hardness increaser)
Lower with: water containing less calcium (softened water)
Method of chemical application:
• Fill a clean, five gallon bucket with pool water and dissolve
the dosage of calcium into this water. Do not mix this
solution with your hands. Pour the solution in to the swim
current, and let the current circulate the water in the pool
for a few minutes. Wait a few hours, test again, and add
more calcium if necessary. Once again, always add less
chemical than you think will be necessary to effect the
desired change.
Notes:
As with TA, many regions will have higher CH than what is specified by our recommended range. If it is available, partially filling
the pool with softened water will dilute the calcium content and
essentially lower the CH level inside the pool. If softened water
is unavailable, perhaps water tanked-in from an outside source
would be the best option for you. If this not possible either, we
would strongly suggest adding the “sequestering agent” sent with
the
pool.
This chemical helps the water hold all of its dissolved materials in
solution, including metals and calcium content. The main concern
with having CH levels too high is that the calcium may deposit
out of solution—a sequestering agent will help prevent this.
Calcium hardness will tend to slowly increase over time as water
evaporates from the pool and leaves its calcium behind. Periodic
testing of CH is detailed in the “Maintenance and Use of your
WaterWell” instructions below.
23
5. Maintenance and Use of Your WaterWell
Your Nature2 copper/silver purification system will help disinfect
the water but it will not keep the pool clean and clear by itself.
Nature2 is designed to be used in conjunction with chlorine. We
recommend getting into a routine that involves adding a measured amount of chlorine either after you swim or at the very least
every other day. This measured amount depends on pool use. One
person swimming every day for 30 minutes might add 1/2 cup of
Clorox after each swim. This small amount should maintain the
required 0.5 to 1.5 ppm chlorine residual. Heavier use and use by
children generally requires more chlorine. Adding 1 cup of Clorox
bleach to a standard-sized WaterWell raises the chlorine level by
about 1 ppm. It is safe to swim in any pool where the chlorine
level is between 0.5 to 3.0 ppm free chlorine.
Recommended Maintenance Schedule
Daily:
• Test for free chlorine (FC) after you swim, or at least a few
times a week. Add chlorine to maintain FC levels between
0.5 - 1.5 ppm. As you become familiar with the chlorine
demand for your pool, you will find that you may not have to
test for chlorine as frequently in order to maintain a minimum
level of 0.5ppm.
Twice a week:
• Check and adjust water level. Again, the water level should be
half way up the skimmer. A water level higher than this will
cause the air relief port on the top of the skimmer body to leak
water.
• Test for pH at least twice a week. Broadcast (i.e. pour chemical into current) pH increaser or pH decreaser to maintain
levels between 7.4-7.8.
Weekly:
• Test for total alkalinity (TA) once a week. Slug (i.e. pour
chemical in 4 spots around pool with water calm) TA increaser or pH decreaser to maintain levels between 80-120. If TA
is too high, it is usually not necessary to decrease as it merely
serves as a buffer for the pH and will not cause damage in the
pool.
• Test for total chlorine (TC) once a week. If the test for TC
yields a result that is significantly higher than level of FC (i.e.
the solution gets noticeably more pink) then you have a significant amount of combined chlorine (CC) in the pool water.
Combined chlorine generates a heavy chlorine odor, and can
cause bather discomfort in the form of eye and skin irritation.
If you have significantly more total chlorine than you do free
chlorine, then it is time to shock the pool (i.e. add enough
chlorine to get the FC between 3-5ppm, but don’t swim until
FC falls below 3ppm). Shocking the pool should burn off the
combined chlorine.
Every two weeks:
• Test for calcium hardness (CH) once every two weeks.
Predissolve calcium hardness increaser (i.e. fill a 5-gallon
bucket with pool water and dissolve calcium in bucket) then
pour the solution into the current to keep levels between 175250 ppm. If CH is too high, it can only be decreased by
adding water with less calcium (i.e. softened water).
• If you have an outdoor pool, or if you use stabilized chlorine
(i.e. sodium dichlor or sodium trichlor), test the cyanuric acid
(CYA) level every two weeks. Maintain levels between 20-50
24
ppm. If CYA is above 80 ppm, the pool should be partially
drained and refilled, or un-stabilized chlorine should be temporarily used in place of the stabilized. If CYA is above
100ppm, the pool should be partially drained and refilled.
Every two months:
• Remove and clean the filter cartridges that are located inside
your skimmer. To access the filters, first turn off your circulating pump button (key 1) on your keypad, then remove the
skimmer weir (flapper), skimmer basket, and Nature2 cartridge, and then remove the diverter plate just beneath the
basket. Reach in and pull out the top filter. There is an identical filter beneath the top filter, remove that as well. The filter cartridges can be cleaned either by just rinsing them off or
by using a filter-specific detergent. Once they have been
cleaned, simply place the filters back in the skimmer body and
reinstall the diverter plate, skimmer basket, and skimmer weir.
After several uses, the cartridges will need to be replaced, and
new filter cartridges can be purchased on our Customer
Service website, myendlesspool.com. Your circulating pump
turns back on automatically after 30 minutes.
Every four months:
• Remove the Nature2 cartridge located in your skimmer/filter, discard, and install a new one. Because this needs to be
done every four months, it is best to coordinate this around
the cleaning of your filter cartridges (see “Every two
months” above). New Nature2 cartridges can be purchased
on our customer website, myendlespool.com.
As Needed:
• Clean the water line around the perimeter of the pool and
the underside of the cover as needed. Body oils and mold
may build up slowly in these areas and should be cleaned off
periodically.
• The spa wand we provided with your pool can be used to
help remove any debris that has settled on the floor of the
pool floor.
• If you happen to get cloudy water, or if the liner feels slippery, it likely means that you have algae in the pool. A vinyl
liner pool brush and pole may be purchased in order to wipe
down all the surfaces in the pool, Increasing free chlorine
level temporarily to 5 ppm will help, as will maintaining the
free chlorine level in the pool at 3 ppm until the water is
clear. Test the chlorine level frequently during this time.
• If you have selected the gas heater for your WaterWell, we
would encourage you to have the heater serviced on a
yearly basis. This is very important if you have elected to put
the gas heater outdoors or if the pool is drained for
extended periods of time.
6. Draining Your WaterWell
1) Disconnect electrical power to all pool equipment.
2) Begin to drain down pool water by placing a suitable sump
pump in the pool, or by setting up a siphon using a garden hose.
If using a siphon, two or more hoses may be used simultaneously in order to expedite the process.
3) If you have the Optional Interior Entry Steps, they should be
unfastened from the panel and shifted away from the corner
enough to allow the liner to pull in toward the pool a little bit.
If you have a corner step, remove the step as the water level lowers to the top of that step.
4) Continue draining pool until 6” of water is remaining in the
pool. Do not drain further than this as the liner needs this
much water in order to be held stretched out and in place. If
you are leaving the water like this for an extended period of
time, add chlorine and possibly an algaecide in order to minimize the clean-up required before refilling the pool.
5) When you are ready, refill the pool using a garden hose with a
“bobby filter” on the end to screen out debris and fine
sediment. If you do not have one of these filters, contact
Endless Pools Customer Service. If you have high calcium
content and/or high metal content in you area, you should also
add some “sequestering agent” to the pool water to help
prevent scaling/ staining. You may also be able to find both of
these items at a local pool store.
6) The pool is full when the water level is half way up the skimmer mouth. Reestablish electrical power to the pool equipment, and start balancing the pool water. Shock the pool to 3.0
ppm free chlorine. Turn on your WQS in order to get your new
body of water filtered, circulated, and heated.
7. Winterizing Your WaterWell
A WaterWell may be used year round, even in colder climates. If
you will not be using the pool during the winter in an area where
freezing is a problem, special consideration must be taken to protect the pool and ancillary equipment if either is located outside.
If you have any questions regarding precautions to take against
freezing, please call our Customer Service Department at (800)
910-2714.
25
8. Keypad Functions and Troubleshooting
The Quick Reference Card provides a quick
overview of your spa’s main functions and
the operations accessible with your digital
control pad.
Smart winter mode
indicator
Jet Pump
indicator
Light
indicator
Filter
indicator
Heat
indicator
Set Point
indicator
98
key 1
Spa Functions
Light key
A built-in timer automatically turns pump
off after 20 minutes, unless pump has been
manually deactivated first.
The “Pump 1” indicator lights up
when Pump 1 is on.
98
Light Key
Press Light key to turn light on. Press a second time to turn light off. A built-in timer
automatically turns light off after 2 hours,
unless it has been manually deactivated first.
Hr
An internal hardware error has been
detected in in.xe. Contact Customer
Service.
HL
AOH
The “Light” indicator lights up when
light is on.
98
Up/Down Keys
Use Up or Down key to set desired water
temperature. The temperature setting will be
displayed for 5 seconds to confirm your
new selection.
FLO
The “Set Point” icon indicates that the
display shows the desired temperature,
NOT the current water temperature!
OFF
Off Mode
This mode allows you to stop all outputs for
30 minutes to perform a quick spa maintenance.
While the Off mode is engaged, the display
will toggle between OFF and the water
temperature.
Water temperature
In a heating cycle, the system first generates water flow through
the heater housing and the plumbing, in order to ensure accurate
water temperature readings as well as avoiding heater activation
in dry conditions.
After verifying pump activation and taking a water temperature
reading if required, the system automatically turns the heater on
to reach and maintain water temperature at Set Point.
The “Heater” indicator lights up when the heater is on.
It flashes when there is a request for more heat but the
heater has not yet started.
HL
The system has shut the heater down
because the temperature at the heater
has reached 119°F (48°C). Do not
enter the water! Remove the spa cover
and allow the water to cool down,
then shut power off and power your
spa up again to reset the system.
AOH
Temperature inside the spa skirt is too
high, causing the internal temperature
in the in.xe to increase above normal
limits. Open skirt and wait until error
clears.
FLO
The system does not detect any water
flow while the primary pump is running. Check and open water valves.
Check for water level. Clean filter. If
the problem persists, call Customer
Service.
Prr
A problem is detected with the temperature probe.Call Customer Service.
OH
Press and hold Key 1 key for 5 secs to activate
the Off mode. Quick press Key 1 key to
reactivate the system before the expiration
of the 30-minute delay.
26
Down Key
Troubleshooting
Key 1
Press Key 1 key once to turn the optional jet
pump on. Press it again time to turn jets off.
98
Up key
UPL
OH
The water temperature in the spa has
reached 108°F (42°C). Do not enter
the water! Remove the spa cover and
allow the water to cool down to a
lower temperature. Call Customer
Service if problem persists.
UPL
No low level configuration software has
been installed into the system. Call
Customer Service.
Smart Winter Mode
Our Smart Winter Mode protects your system from the cold by
turning pumps on several times a day to prevent water from
freezing in pipes.
The “Smart Winter Mode” indicator lights up when the Smart
Winter Mode is on.
Purge Cycles
The system is programmed to automatically turn on the optional jet pump 4 times daily, for 60 seconds, in order to purge the
plumbing lines and keep plumbing lines filtered clean.
Endless Pools® WaterWell Limited Warranty
ENDLESS POOLS, INC. WARRANTS TO THE ORIGINAL PURCHASER OF THE WaterWell MANUFACTURED BY US
TO BE FREE FROM DEFECTS IN MATERIALS AND WORKMANSHIP UNDER NORMAL USE FOR TWO YEARS
FROM PURCHASE.
Our obligation under the warranty shall be limited to the repair or exchange (at our option) of any part or parts which
may thus prove defective under normal use within two years from date of purchase by the original purchaser, and which our examination shall disclose to our satisfaction to be thus defective. All labor costs for removal and re-installation of the defective part and all
freight charges shall be paid by the purchaser and will not be reimbursed by Endless Pools, Inc. This warranty is expressly in lieu of all
other warranties expressed or implied including the warranties of merchantability and fitness for use and of all other obligations or liabilities for all damages direct or consequential to person, property or business whether or not occasioned by our negligence, and we neither assume for us any other liability in connection with the sale of this WaterWell.
IN ADDITION, ENDLESS POOLS, INC. OFFERS A TEN-YEAR STRUCTURAL WARRANTY ON THE STEEL WALL
PANEL SYSTEM. If a panel should deteriorate beyond structural use in this ten-year period, we will repair or replace the panel at
our option after receipt and inspection of the defective panel. The structural warranty is voided when suitable drainage is not provided, and/or panels are not properly bonded, as stipulated in the installation instructions.
THIS WARRANTY SHALL NOT APPLY TO THIS WaterWell OR ANY PART THEREOF, WHICH HAS BEEN SUBJECT
TO SALT CHLORINE GENERATORS, ACCIDENT, NEGLIGENCE, FREEZING, IMPROPER INSTALLATION OR
OPERATION, ALTERATION, ABUSE OR MISUSE. THIS INCLUDES, BUT IS NOT LIMITED TO, FLOW RESTRICTIONS OR OBSTRUCTIONS ON ALL WATER AND HYDRAULIC SYSTEMS AND NOT MAINTAINING PROPER
WATER CHEMISTRY (pH level must be maintained between 7.4 and 7.8 and total alkalinity between 80 and 120 ppm.
Total dissolved solids (TDS) must be no greater than 3,000 ppm).
All orders are FOB Aston, PA. We will NOT be liable for any costs or losses due to changes in shipping schedules, or delivery times.
It is the responsibility of the Customer to supply safe and proper site preparation, installation and operation for all Endless Pool
Swimming Machines. This includes, but is not limited to, adequate drainage at any pool and/or equipment site, to control humidity, to
post necessary safety signage and to ensure safe and proper use of all Endless Pool Swimming Machines. Customer shall be responsible for any and all building permits, fees, licenses, and authorizations necessary to comply with local building codes or requirements.
Customer takes all responsibility for site preparation including, but not limited to, any slab or foundation. Any Endless Pools product
installed above grade must be placed on a properly engineered structure, which is the responsibility of the customer.
We make no warranty whatsoever in respect to accessories or parts not supplied by Endless Pools, Inc. directly. The term
“original purchaser”, as used in this warranty, shall be deemed to mean the person for whom the WaterWell was
originally installed. We DO NOT warrant this machine to meet requirements of any safety code of any state, municipality,
or other jurisdiction. Purchaser assumes all risk and liability whatsoever resulting from the use thereof.
In order to claim this warrant, original purchaser must promptly notify our Customer Service Department in writing
of the existence of the claim and then follow our written instructions regarding the procedures for remedying the defect. Endless Pools,
Inc. shall not be responsible for cartage, transportation, removal and/or reinstallation labor or any other such costs relating to performance of the warranty. In the event any portion of this warranty shall be deemed unenforceable by a court of law, the remainder of this
warranty shall remain in full force and effect as if the voided portion were never included.
Prepaid returns of all WaterWell products are accepted less a 10% restocking fee, up to 30 days from the date of
purchase if undamaged and in its original shipping containers. Accessories, options and equipment that have been used
are non-refundable. Before returning any product, you must call our Customer Service Department to receive proper
return authorization.
Endless Pools, Inc., 1601Dutton Mill Rd., Aston, PA 19014
800-910-2714
15
Endless Pools, Inc. • 1601 Dutton Mill Rd • Aston, PA 19014-2931
800-910-2714 • 610-497-8693 fax • www.myendlesspool.com
OM31 9-10