1
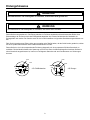
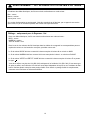
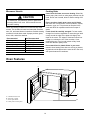
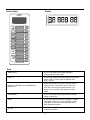
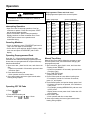
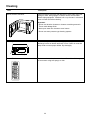
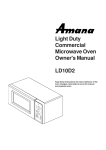
Light Duty
Commercial
Microwave Oven
Owner's Manual
LD510P
Keep these instructions for future reference. If the
oven changes ownership, be sure this manual
accompanies oven.
Contents
Model Identification
Complete enclosed registration card and promptly return.
If registration card is missing, call Consumer Affairs
Department at 1-800-843-0304 inside U.S.A.
1-319-622-5511 outside U.S.A.
When contacting Amana, provide product information.
Product information is located on equipment serial plate.
Record the following information:
Model Number: ________________________________
Manufacturing Number: __________________________
Serial or S/N Number: ___________________________
Date of purchase: ______________________________
Dealer’s name and address: ______________________
_____________________________________________
_____________________________________________
_____________________________________________
Keep a copy of sales receipt for future reference or in
case warranty service is required.
Service
Any questions or to locate an authorized servicer, call
1-800-843-0304 inside U.S.A. 1-319-622-5511 outside
U.S.A. If an automated telephone system is reached,
select Commercial Microwave Ovens category. Warranty
service must be performed by an authorized servicer.
Amana also recommends contacting an authorized
servicer if service is required after warranty expires.
Model Identification ..........................................................2
Specifications ...................................................................2
IMPORTANT SAFETY INSTRUCTIONS READ
CAREFULLY AND KEEP FOR FUTURE REFERENCE
WARNING ......................................................................3
CAUTION .......................................................................3
WARNING ........................................................................4
Grounding Instructions .....................................................5
WICHTIGE SICHERHEITSHINWEISE ............................6
WARNUNG ...................................................................6
VORSICHT ...................................................................6
WARNUNG ......................................................................7
Erdungshinweise ..............................................................8
IMPORTANTES INSTRUCTIONS DE SECURITE ..........9
AVERTISSEMENT ........................................................9
ATTENTION ..................................................................9
AVERTISSEMENT .........................................................10
Instructions de mise à la masse.....................................11
Installation ......................................................................12
Unpacking Equipment.................................................12
Radio Interference ......................................................12
Equipment Placement.................................................12
Cooking Guidelines ........................................................12
How Microwave Ovens Heat Food .............................12
Food Variables ............................................................12
Manipulation of Foods ................................................13
Microwave Utensils .....................................................14
Cooking Hints..............................................................14
Oven Features ...............................................................14
Control Panel ..............................................................15
Display ........................................................................15
Operation........................................................................17
Interrupting Operation .................................................17
Canceling Mistakes.....................................................17
Operating Preprogrammed Pads................................17
Manual Time Entry......................................................17
Programming..................................................................18
Preprogrammed Number Pads...................................18
Multiple Heating Stages..............................................18
User Options ...............................................................19
Cleaning .........................................................................20
Before Calling for Service ..............................................21
Warranty.........................................................................22
Quick Reference Instructions .........................................24
Specifications
Product specifications can change at any time without notice.
Power Supply
230V AC, 50 Hz
Input Power
1300W
Cooking Power
1000 W I.E.C. 60705 of microwave power test.
Frequency
2450 MHz
Rated Current
6.0 A
Overall Dimensions (WxHxD) inches
20-7/8” x 12-3/8” x 15-1/2”
Oven Cavity Dimensions (WxHxD) inches
13-9/16” x 9-5/32” x 14-3/8”
Oven Cavity Capacity
1.0 Cu. ft.
Power Cord
4.7 ft.
2
IMPORTANT SAFETY INSTRUCTIONS
READ CAREFULLY AND KEEP FOR FUTURE
REFERENCE
WARNING
1. Liquids or other foods must not be heated in
sealed containers since they are liable to explode.
It is hazardous for anyone to carry out any service
or repair operation which involves the removal of
any cover which gives protection against exposure
to microwave energy.Repair should only be undertaken by a qualified service technician.
2. Only allow children to use the oven without supervision when adequate instructions have been
given so that the child is able to use the oven in a
safe way and understands the hazards of improper
use.
5. Microwave heating of beverages can result in
delayed eruptive boiling, therefore care has to be
taken when handing the container.
3. If the oven door and door seal are damaged,the
oven must not be operated until it has been
repaired by a qualified service technician.
6. Feeding bottles and baby food jars shall be open
when heated and the contents are to be stirred or
shaken, and the temperature is to be checked
before consumption ,in order to avoid burns.
4. Do not attempt to tamper with,or make any adjustments or repairs to the door,control panel,safety
interlock switches or any other part of the oven.
CAUTION
1. If the supply cord is damaged , it must be replaced
by the manufacturer or its service agent or a similarly qualified person in order to avoid a hazard.
5. If smoke is observed, switch off or unplug the
appliance and keep the door closed in order to
stifle any flames.
2. The door and door seals should be kept clean at
all times . Use only warm , soapy water to rinse
then dry thoroughly.
6. (Stationary oven (18kg>))
Microwave oven must be positioned so that plug is
accessible.
DO NOT USE ABRASIVE MATERIALS, SUCH AS
CLEANING POWDERS OR STEEL AND PLASTIC PADS.
7. Do not use metal utensils.
8. When heating food in plastic or paper
containers,check the oven frequently due to the
possibility of ignition.
3. Metal parts will be easier to maintain if wiped frequently with a damp cloth.
9. Eggs in their shell and whole hard-boiled eggs
should not be heated in microwave ovens since
they may explode.
4. Utensils should be checked to ensure that they are
suitable for use in microwave ovens.
3
WARNING:THIS APPLIANCE MUST BE EARTHED
The wires in the mains lead are coloured in accordance with the following code:
Blue - Neutral
Brown - Live
Green and Yellow - Earth
If the power cord is damaged,it must be replaced by the manufacturer or its service agent or a similarly qualified
person in order to avoid hazard.
Wiring -U.K.Only
The wires in this mains lead are coloured in accordance with the following codes
BLUE ~ Neutral
BROWN ~ Live
GREEN &YELLOW ~ Earth
As the colours of the wires in the mains lead of this appliance may not correspond with the
coloured markings on the terminals in your plug proceed as follows.
The wire which is coloured BLUE must be connected to the terminal which is marked with the
letter N or Coloured BLACK.
The wire which is coloured BROWN must be connected to the terminal which is marked with
the letter L or coloured RED.
The wire which is coloured GREEN &YELLOW or GREEN must be connected to the terminal which is marked
with the letter E or
.
You must use a 13 Amp plug (BS 1363)and fit a 13 Amp fuse (BS 1362).If any other of type of plug is used a
13 Amp fuse must be fitted either in the plug adapter or at the distribution board.Never use this plug with the
fuse cover omitted.To obtain a replacement fuse cover contact your supplying dealer or Amana.
4
Grounding Instructions
WARNING
To avoid risk of electrical shock or death, this equipment must be grounded.
WARNING
To avoid risk of electrical shock or death, do not alter the plug.
This equipment MUST be grounded. In the event of an electrical short circuit, grounding reduces the risk of electric
shock by providing an escape wire for the electric current. This oven is equipped with a cord
having a grounding wire with a grounding plug. The plug must be plugged into an outlet that is properly installed and
grounded.
Consult a qualified electrician or servicer if grounding instructions are not completely understood, or if doubt exists as
to whether the equipment is properly grounded
This oven should be plugged into a separate 50 hertz circuit with the electrical rating as shown in the appropriate
drawing. This model requires a 230 supply voltage. When a microwave oven is on a circuit with other equipment, an
increase in cooking times may be required and fuses can be blown.
Ground
Ground
Neutral
Neutral
230 ± 23
VAC
0
VAC
230 ± 23
VAC
<For England>
0
VAC
230 ± 23
VAC
230 ± 23
VAC
5
Ground
<For Europe>
WICHTIGE SICHERHEITSHINWEISE
WARNUNG
Es ist für jedermann gefährlich, jegliche Serviceoder Reparaturarbeit auszuführen, bei der das
Entfernen einer Schutzabdeckung gegen
Mikrowellenenergie erforderlich ist. Eine Reparatur
darf ausschließlich von einem qualifizierten
Kundendiensttechniker vorgenommen werden.
1. Flüssigkeiten oder andere Nahrungsmittel dürfen
nicht in verschlossenen Behältern erwärmt werden,
da diese explodieren können.
2. Kinder nur dann das Gerät ohne Aufsicht verwenden lassen, wenn entsprechende Anweisungen
gegeben wurden, sodass das Kind in der Lage ist,
das Gerät sicher zu bedienen und die Gefahren
einer falschen Bedienung versteht.
5. Beim Erhitzen von Flüssigkeiten im
Mikrowellengerät kann es zu einer Verzögerung
des Sprudelns beim Kochen kommen. Daher ist
beim Entnehmen des Behälters größte Vorsicht
geboten.
3. Wenn die Gerätetür oder die Türdichtung
beschädigt sind, darf das Gerät nicht betrieben
werden, bevor es von einem qualifizierten
Kundendiensttechniker repariert wurde.
6. Baby-Fläschchen und Gläser mit Baby-Nahrung
müssen vor dem Erwärmen geöffnet werden, der
Inhalt ist zu rühren oder zu schütteln, und vor dem
Füttern muss die Temperatur geprüft werden, um
Verbrennungen zu vermeiden.
4. Versuchen Sie nicht, die Tür, das Bedienfeld, die
Sicherheitsschalter oder einen Teil des Geräts zu
manipulieren bzw. einzustellen oder zu reparieren.
VORSICHT
1. Wenn das Stromkabel beschädigt ist, muss es
durch den Hersteller oder dessen
Kundendienstvertreter bzw. eine ähnlich qualifizierte Person ersetzt werden, um Risiken zu vermeiden.
5. Wenn eine Rauchentwicklung beobachtet wird, das
Gerät ausschalten bzw. ausstecken und die Tür
geschlossen halten, um etwaige Flammen zu
ersticken.
6. (Stationäres Gerät (18kg>))
Das Mikrowellengerät ist so aufzustellen, dass der
Stecker zugänglich ist.
2. Die Tür und die Türdichtung sind jederzeit sauber
zu halten. Dazu nur warme Seifenlauge verwenden, nachspülen und gründlich trocknen.
7. Benutzen Sie keine Küchenutensilien aus Metall im
Gerät.
KEINE SCHEUERMITTEL WIE SCHEUERPULVER ODER STAHL- BZW. KUNSTSTOFFPADS
VERWENDEN.
8. Wenn Nahrung in Kunststoff- oder Papierbehältern
erwärmt wird, überprüfen Sie das Gerät wegen der
Entzündungsgefahr häufig.
3. Metallteile sind leichter sauber zu halten, wenn sie
häufig mit einem feuchten Tuch abgewischt werden.
9. Eier in der Schale und ganze, hart-gekochte Eier
nicht in Mikrowellengeräten erwärmen, da sie
explodieren können.
4. Küchenutensilien müssen überprüft werden, um
sicherzustellen, dass sie sich für den Gebrauch im
Mikrowellengerät eignen.
6
WARNUNG: DIESES GERÄT MUSS GEERDET SEIN
Die Drähte in diesem Stromkabel sind folgendermaßen farbcodiert
BLAU - Null
BRAUN - Phase
GRÜN/GELB - Erde
Wenn das Netzkabel beschädigt ist, muss es zur Vermeidung von Risiken durch den Hersteller oder dessen
Kundendienstvertreter bzw. eine ähnlich qualifizierte Person ersetzt werden.
Verdrahtung – nur GB
Die Drähte im Stromkabel sind folgendermaßen farbcodiert
BLAU - Null
BRAUN - Phase
GRÜN/GELB - Erde
Da die Farben der Drähte im Stromkabel dieses Geräts möglicherweise nicht mit den farbigen Markierungen
der Drahtenden Ihres Steckers übereinstimmen, gehen Sie vor wie folgt.
Der BLAUE Draht ist mit dem Drahtende zu verbinden, das mit dem Buchstaben N gekennzeichnet oder
SCHWARZ gefärbt ist.
Der BRAUNE Draht ist mit dem Drahtende zu verbinden, das mit dem Buchstaben L gekennzeichnet oder
ROT gefärbt ist.
Der GRÜN/GELBE oder GRÜNE Draht ist mit dem Drahtende zu verbinden, das mit dem Buchstaben E oder
<
> gekennzeichnet ist.
Verwenden Sie einen 13-Ampere-Stecker (BS 1363) und setzen Sie eine 13-Ampere-Sicherung (BS 1362) ein.
Falls ein anderer Stecker verwendet wird, muss eine 13-Ampere-Sicherung entweder in den Stecker-Adapter
oder im Verteilerkasten eingesetzt werden. Verwenden Sie diesen Stecker niemals ohne den Deckel des
Sicherungsgehäuses. Um eine Ersatz-Sicherungsdeckel zu erhalten, nehmen Sie Kontakt mit Ihrem Händler
oder Amana auf.
7
Erdungshinweise
WARNUNG
Um Elektroschock- und Lebensgefahr zu vermeiden, muss dieses Gerät geerdet sein.
WARNUNG
Um Elektroschock- und Lebensgefahr zu vermeiden, den Stecker nicht verändern.
Dieses Gerät muss geerdet sein. Die Erdung reduziert im Fall eines elektrischen Kurzschlusses das Risiko eines
Elektroschlags, da der Strom durch den Erdungsdraht abgeleitet wird. Dieses Gerät besitzt ein Netzkabel mit
Erdungsdraht und -stecker. Der Stecker muss an eine korrekt installierte und geerdete Steckdose angeschlossen werden.
Falls Sie die Anweisung zur Erdung nicht ganz verstehen oder Zweifel haben, ob das Gerät korrekt geerdet ist, ziehen
Sie einen qualifizierten Elektriker oder Kundendiensttechniker zu Rate.
Dieses Gerät ist, wie in der entsprechenden Zeichnung dargestellt, mit einem separaten 50-Hertz-Stromkreis zu
verbinden. Dieses Modell erfordert eine Spannung von 230 Volt. Wenn ein Mikrowellengerät mit anderen Geräten in
einem Stromkreis angeschlossen ist, kann es zu verlängerten Garzeiten und zum Durchbrennen von Sicherungen
kommen.
Erde
Erde
Null
230 ± 23
Volt
0
Volt
Null
230 ± 23
Volt
<für Großbritannien>
230 ± 23
Volt
0
Volt
230 ± 23
Volt
8
Erde
<für Europa>
IMPORTANTES INSTRUCTIONS DE SECURITE
AVERTISSEMENT
aux commutateurs d’enclenchement ou à toute
autre partie du four. Pour qui que ce soit, il est dangereux de procéder à des opérations de maintenance ou de réparation nécessitant le déplacement
de n’importe quel couvercle destiné à protéger contre l’exposition à l’énergie du four à micro-ondes.
Les réparations ne peuvent être effectuées que par
du personnel de maintenance qualifié.
1. Les aliments liquides ou autres aliments ne doivent
pas être réchauffés dans des récipients
hermétiquement fermés, en raison du risque
d’explosion.
2. Ne permettez aux enfants d’utiliser le four sans
surveillance que s’ils ont reçu les instructions
adéquates à cet égard, leur permettant d’utiliser le
four en toute sécurité en étant conscients des
risques d’une utilisation erronée.
5. Les boissons réchauffées dans le four à microondes peuvent entrer en ébullition à retardement,
d’où la nécessité de manipuler le récipient avec
précaution.
3. Si la porte du four et son joint d’étanchéité sont
endommagés, il ne faut pas utiliser le four jusqu’à
ce qu’ils soient réparés par du personnel de maintenance qualifié.
6. Les biberons et les petits pots de nourriture pour
enfant doivent être réchauffés ouverts, et il importe
d’en agiter ou d’en remuer le contenu et d’en
vérifier la température avant la consommation, pour
éviter tout risque de brûlure.
4. Ne tentez pas de bricoler la porte, ou de procéder
à des ajustements ou à des réparations la concernant, ou relatifs au tableau de commande,
ATTENTION
1. Si le cordon d’alimentation est endommagé, il doit
être remplacé par le fabricant, par son service
après-vente ou par un technicien qualifié, afin
d’éviter tout risque d’accident.
5. Dans le cas d’apparition de fumée, éteignez
l’appareil ou débranchez-le, et gardez la porte
fermée afin que les flammes s’éteignent.
6. (Four fixe (18kg>))
Le four à micro-ondes doit être placé de manière à
ce que la prise soit accessible.
2. La porte et les joints d’étanchéité doivent être toujours parfaitement propres: N’utilisez que de l’eau
chaude et savonneuse pour les rincer et essuyez
soigneusement.
7. Ne jamais mettre des objets métalliques dans le
four à micro-ondes.
NE PAS UTILISER DE PRODUITS ABRASIFS
COMME DES POUDRES A RECURER OU DES
TAMPONS A RECURER, METALLIQUES OU EN
PLASTIQUE.
8. Lorsque les aliments à réchauffer se trouvent dans
des récipients en papier ou en plastique, il convient
de contrôler fréquemment le four en raison des
risques d’ignition.
3. Les parties en métal de l’appareil se conserveront
mieux si vous les essuyez fréquemment avec un
chiffon humide.
9. En raison du risque d’explosion, il ne faut réchauffer dans un four à micro-ondes ni des oeufs dans
leur coque, ni des oeufs durs entiers.
4. Avant d’utiliser des ustensiles, assurez-vous qu’ils
sont compatibles avec l’usage d’un four à microondes
9
AVERTISSEMENT : CET APPAREIL DOIT ETRE MIS A LA TERRE
A l’intérieur des câbles électriques, les fils sont colorés conformément au code suivant :
Bleu - neutre
Marron - tension
Vert et jaune - terre
Si le cordon d’alimentation est endommagé, il doit être remplacé par le fabricant, par un agent de son service
après-vente, ou par un technicien qualifié, afin d’éviter tout risque d’accident.
Câblage – uniquement pour le Royaume - Uni
Dans ces câbles électriques, les fils sont colorés conformément aux codes suivants :
BLEU - neutre
MARRON - tension
VERT & JAUNE - terre
Dans le cas où les couleurs des fils électriques dans les câbles de cet appareil ne correspondraient pas aux
repères de couleur sur les bornes de votre prise, procédez comme suit :
Le fil de couleur BLEUE doit être connecté à la borne marquée de la lettre N ou colorée en NOIR.
Le fil de couleur MARRON doit être connecté à la borne marquée de la lettre L ou colorée en ROUGE.
Le fil de couleur VERTE ou VERT ET JAUNE doit être connecté à la borne marquée de la lettre E ou portant
le signe
.
Vous devez utiliser une prise de 13 A (BS 1363) et disposer d’un fusible de 13 A (BS 1362). Si tout autre type
de prise est utilisé, une fusible de 13 A doit être monté dans l’adaptateur de la prise ou sur le tableau de distribution. N’utilisez jamais cette prise sans protège-fusible. Pour obtenir un protège-fusible de remplacement,
contactez votre fournisseur ou directement Amana.
10
Instructions de mise à la masse
AVERTISSEMENT
Pour éviter tout risque de choc électrique ou de mort, cet appareil doit être mis à la masse.
AVERTISSEMENT
Pour éviter tout risque de choc électrique ou de mort, n’opérez aucune modification sur la prise.
Cet appareil DOIT être mis à la masse. Dans le cas d’un court-circuit, la mise à la terre réduit les risques de choc
électrique en fournissant un fil électrique de décharge pour le courant électrique. Ce four est équipé avec un cordon
électrique pourvu d’un fil de mise à la terre avec une prise de mise à la terre : la prise mâle de l’appareil doit être
fichée dans une prise électrique correctement installée, elle-même mise à la masse.
Si vous n’avez pas parfaitement compris les instructions de mise à la masse, ou si vous n’êtes pas certain que
l’appareil est correctement mis à la masse, consultez un électricien qualifié ou le service après-vente.
Ce four doit être branché sur un circuit électrique séparé de 50 hertz avec des caractéristiques électriques correspondant à l’un des deux schémas ci-dessous. Le modèle requiert une alimentation de 230 volts. Si un four à micro-ondes
est alimenté par un circuit ayant des caractéristiques différentes, il peut être nécessaire de prolonger les temps de
cuisson, et les fusibles peuvent sauter.
Terre
Terre
Neutre
230 ± 23
VCA
0
VCA
Neutre
230 ± 23
VCA
<Pour l’Angleterre>
230 ± 23
VCA
0
VCA
230 ± 23
VCA
11
Terre
<Pour l’Europe>
Installation
Cooking Guidelines
Unpacking Equipment
The Amana Microwave Oven can make your job easier.
You’ll cook ahead and pre-portion more. You’ll also spend
less time preparing special-order dishes.
• Inspect equipment for damage such as dents in door or
dents inside oven cavity.
• Report any dents or breakage to source of purchase
immediately. Do not attempt to use oven if damaged.
• Remove all materials from oven interior.
• If oven has been stored in extremely cold area, wait a
few hours before connecting power.
Radio Interference
To be sure of consistently good results, remember a few
simple guidelines.
How Microwave Ovens Heat Food
All food and liquid molecules have positive and negative
particles which are in constant, but slow, motion. (Positive
and negatives attract and repel each other like magnets.)
In microwave cooking this molecular action is then
accelerated. The instant microwaves bombard food they
agitate the molecules. Agitation causes friction as
molecules rub and bump into each other at a increased
rate. Friction results in heat that cooks food and boils
water.
Microwave operation may cause interference to radio,
television, or similar equipment. Reduce or eliminate
interference by doing the following:
• Clean door and sealing surfaces of oven according to
instructions in “Care and Cleaning” section.
• Place radio, television, etc. as far as possible from oven.
• Use a properly installed antenna on radio, television,
Once the microwaves stop, this friction action continues by
etc. to obtain stronger signal reception.
itself, eventually tapering off and returning to normal
molecular action.
Equipment Placement
• Do not install equipment next to or above source of
heat, such as a deep fat fryer. This could cause
microwave oven to operate improperly and could
shorten life of electrical parts.
Microwaves penetrate food to a short depth .
As cooking begins, heat is spread by conduction to the
interior portion of the food just as in conventional cooking
methods.
• Do not block or obstruct oven filter. Allow access for
cleaning.
• Install oven on level countertop surface.
• Place the oven in the level location of your choice with
more than 85 cm height but make sure there is at least
30 cm of space on the top and 10 cm at the rear for
proper ventilation.
Food Variables
Microwave cooking can be directly affected by different
food variables.
The shape of foods can greatly affect the amount of
cooking time. Foods that are flat and thin heat faster than
foods which are chunky. For example, a casserole will
cook faster in a flat dish, rather than if heaped in a small
dish. Foods cut into small pieces will cook faster than
large-shaped foods. Pieces should be of a uniform size
and shape for more uniform cooking, or the smaller pieces
will cook faster. The greatest amount of heating takes
place near the food’s surface. The interior of large food
items, or dense foods, is heated by the heat
conducted from the outer food layer. The most uniform
heating occurs in flat, doughnut-shaped foods. For best
results, cook foods together which have similar sizes and
shapes.
12
The quantity or volume of a food can affect the amount
of cooking time. As the volume of the food is increased,
the time required to cook or heat the item increases
almost proportionately. If twice the amount of food is
placed in the oven, it will take almost twice as long to
cook. To determine the time for larger quantities, multiply
the individual serving time by the increased amount, then
reduce the total heating time by about 20%.
The density of foods can greatly affect the amount of
cooking time. Porous foods, such as breads, cakes or
pastries, will heat much more quickly than dense meats
of the same size. Porous foods absorb microwaves
quickly throughout. Meats absorb microwaves mostly at
the exterior surface, and the interior is heated by
conduction, increasing the cooking time. Meats can be
cooked in a sauce, if desired. Due to the moisture
content, a sauce will heat rapidly. The heat will transfer to
the meat, so the meat will heat faster due to heat by
conduction as well as by microwaves.
The starting temperature of foods affects the amount of
cooking time. Each temperature degree that the food
item is to raise must be supplied with a definite amount of
energy. Lower initial starting temperatures require more
energy and more time to cook. Therefore, refrigerator
temperature foods require a longer cooking time than
room temperature foods. Foods already slightly warm will
heat very quickly in the oven.
The moisture content of foods affects the amount of
cooking time. The higher the moisture content is in a food
the longer the amount of cooking time.
The fat and sugar content of foods affects the amount
of cooking time. Foods containing high fat and sugar
levels heat very quickly and may reach much higher
tempera-tures than foods having low fat and sugar levels.
Foods having lower fat and sugar levels require longer
cooking times.
The arrangement of food within a microwave oven cavity
affects the way in which the food cooks. A “round”
arrangement is best. Use round utensils whenever
possible. Also, arrange foods such as baked potatoes in
a circle, rather than in rows, for cooking. When only one
food item is being cooked, place it in the center of the
oven glass shelf for cooking.
Manipulation of Foods
Sometimes recipes suggest manipulating or moving food
during cooking. There are several forms of manipulation:
Stirring is required less often in microwave cooking than
in conventional cooking. In conventional cooking, you use
a spoon to move food up from the bottom of a pan to
evenly distribute the heat. In microwave cooking, you still
stir to redistribute the heat within some foods, but you
need to stir from the outside of a dish toward the inside or
center. If a recipe states to stir once or twice during
cooking, stir at approximately even intervals. For
example, in a 12-minute cooking period, if a recipe states
to stir twice, stir after 4 minutes of cooking and again,
after 8 minutes of cooking. However, it is not necessary to
be precise. Stir only when necessary. When using lower
power levels or settings, less stirring is required. Some
examples of foods which may require stirring are
puddings, some casseroles, some sauces, some soups,
and some egg dishes. Some foods can’t be stirred. These
foods are rearranged or turned.
Some foods can’t be stirred and should be repositioned
or rearranged during cooking. Some examples include
baked potatoes, cupcakes (in custard cups), and chicken
pieces. Rearranging allows for more even cooking of
foods. Foods which are cooked, covered or which are
cooked using lower power levels, usually require little
rearranging.
There are actually two types of turning. Turning is done
when foods cannot be stirred. Foods which are cooked,
covered or which are cooked at lower power levels
usually require little turning.
Turning foods over: Turning foods over is done to
distribute heat. Meat and poultry are two types of foods
which are sometimes “turned over.” Examples include
roasts, turkeys and whole chickens. Small meat items
such as poultry pieces may need to be turned over when
in casseroles, or when in a browning skillet.
13
Microwave Utensils
Cooking Hints
Cover foods for faster, more even heating. Glass lids,
plastic wrap, plate covers or other paper products may be
used. Do not seal. Instead, allow for steam-venting at all
times.
CAUTION
To avoid burns, use protective gloves or pads when
removing dishes from oven. Some utensils become
hot while cooking.
Pierce pouches, plastic wrap covers and all foods
with a thin skin or membrane, such as potatoes, squash,
tomatoes, eggs, etc. This prevents an eruption in the
oven and allows for expansion and/or the escape of
steam.
Never use cooking containers or covers with any metal
content. This includes all metal and enameled metalcore
ware, foil, and metal-trimmed containers. Suitable heating
containers include those made of paper products, glass,
china, cloth, and wicker baskets.
Recommended
Glass/ceramic
Natural fiber cloth
Non-recycled paper
Plastic
Wood
Foods should be carefully arranged. For best results,
arrange food such as vegetables or casserole-type items
evenly around the edge of the plate with slightly less
depth in the center. The edges of food items should not
overlap or overhang the rim of the container. Cover
meats with gravy or au jus and moisten all dry foods
other than bread or pastry items.
Not Recommended
Aluminum foil
Grocery bags
Recycled paper
Lead crystal
Newspapers
Metal
Metallic trimmed china
Do not stack food or plated dishes in your oven.
Instead, when heating more than one serving or platters,
all plates should be placed at the same level in the oven,
with space between all containers.
Oven Features
A
LD510P
B
C
A—Window Door Screen
B—Electronic Control
C—Door Open Button
D—Safety Door Lock System
D
Oven Features
14
Control Panel
Display
LD510P
1000 WATT
COOK
10 PROGRAM PADS
1
TIME
ENTRY
HOLD
0%
2
3
DEFROST
20%
MEDIUM
50%
MED-HI
70%
QTY
2X
4
5
6
7
STOP
8
RESET
9
START
0
3 COOKING STAGES
Pads
TIME ENTRY
Use to enter heating time without changing
preprogrammed number pads.
Pads 1-0
Use to begin heating with preprogrammed times and
power levels or to enter times for "Manual Time
Entry" cooking.
HOLD 0%, DEFROST 20%, MEDUIM 50%,
MED-HI 70%
Use to select power level. Oven can heat at full or
reduced power. If oven power level is set to 0%
oven does not heat for programmed time. If no
power level is selected, oven operates at 100%
power.
STOP/RESET
Use to exit programming mode and stop cooking
during cooking cycle.
START
Use to start “Manual Time Entry” program or restart
interrupted cooking cycle. Use to advance to next
user option. Use to save times and power levels
when programming pads.
QTY 2X
Use to automatically increase the programmed time
for double quantities.
15
Cooking Displays
Shows when power is connected to oven. Open and
close door to clear.
READY shows when oven control will accept entries.
Appears after oven door is opened and closed.
shows heating time. When more than 1 heating
stage is programmed, total time for all stages displays.
COOK shows when oven is operating.
COOK
indicates the microwave power level used. If power
level does not show, oven is heating at 100% power.
Programming Displays
Indicates programming mode. See “Programming”
section of manual for programming procedure.
Indicates programming user options mode. See “User
Options” section of manual for programming procedure.
16
Operation
Preprogrammed Times and Cook Level
All preprogrammed pads arrive set at full power.
CAUTION
To avoid fire, do not dry newspapers or clothes in
microwave oven.
Interrupting
Option: Double Digit
Option: Single Digit
Operation
• Open oven door to interrupt operation. Oven fan
continues to operate. Close door and press START
pad to resume oven operation.
• Press STOP/RESET pad to interrupt operation.
Display continues to show countdown time. Press
START pad to resume oven operation and
countdown timing.
Canceling Mistakes
• If oven is operating, press STOP/RESET pad once to
stop oven, then again to clear display.
• If oven door is open and time shows in display, close
oven door and press STOP/RESET pad to clear
display.
Pads
Heating
Times
Pads
Heating
Times
Pads
Heating
Times
1
10 sec.
01
10 sec.
11
20 sec.
2
20 sec.
02
20 sec.
12
40 sec.
3
30 sec.
03
30 sec.
13
1 min.
4
45 sec.
04
45 sec.
14
1:30 min.
5
1 min.
05
1 min.
15
2 min.
6
1:30 min.
06
1:30 min.
16
3 min.
7
2 min.
07
2 min.
17
4 min.
8
3 min.
08
3 min.
18
6 min.
9
4 min.
09
4 min.
19
8 min.
0
5 min.
10
5 min.
20
10 min.
Operating Preprogrammed Pads
Oven has 10 ~ 20 preprogrammed number pads.
Instructions are written for factory programmed ovens.
Ovens that are reprogrammed can respond differently
than described below.
1. Open oven door , place food in oven, and close oven
door
• If pad is not pressed in 30 seconds, open and close
oven door again.
2. Press desired number pad.
• Oven operates and time counts down.
3. Oven stops heating and oven signal sounds when
heating timing elapses.
Operating QTY 2X Pads
1. Press
QTY
2X
Pad.
2. Press desired number pad
• Example : press QTY
+
2X
1 = 18 sec.
Manual Time Entry
Manual Time Entry feature allows the operator to enter
time and power levels, and heat without changing the
preprogrammed pads.
1. Open oven door, place food in oven, and close door.
• Display shows "READY".
• If pad is not pressed in 30 seconds, open and close
oven door again.
2. Press TIME ENTRY pad.
• Display shows "00:00".
3. Press number pads to enter desired cooking time.
• For example, to heat for 2 minutes 30 seconds,
press 2, 3, and 0 pads.
4. Press desired power level pad to change power level.
• If a power level pad is not pressed, oven defaults to
100% power.
• For example, pressing MEDIUM 50% pad sets oven
to 50% power.
• Display shows current power level if other than 100
percent power.
5. Press START pad.
• Oven operates and time counts down.
6. Oven stops heating and oven signal sounds when
heating timing elapses.
17
Programming
Multiple Heating Stages
Follow instructions below to program oven to perform 3
consecutive heating cycles without interruption.
1. Open oven door.
• If door is closed or RESET pad is pressed before
finishing programming sequence, oven exits programming mode.
2. Press pad 1 for approximately 5 seconds.
• After 5 seconds, signal sounds.
3. Press desired number pad.
• Display shows heating time and preprogrammed
number.
4. Press number pads to enter desired cooking time.
• For example, to heat for 2 minutes 30 seconds,
5. Press desired power level pad to change power
level.
• If a power level pad is not pressed, oven defaults
to 100% power.
• For example, pressing MEDIUM 50% pad sets
oven to 50% power.
• Display shows current power level if other than
100 percent power.
6. Press TIME ENTRY pad.
• Display briefly shows "STAGE 2" . Then cook time
and power level for stage show in display.
• Repeat steps 5-6 to create additional stages.
7. Press START pad to save new heating time and
power level in oven memory.
8. Press RESET pad or close oven door to exit
programming mode.
Preprogrammed Number Pads
Oven has 10~20 preprogrammed number pads. Follow
instructions below to program heating times and
power levels for customized cooking.
1. Open oven door.
• If door is closed or RESET pad is pressed before
finishing programming sequence, oven exits
programming mode.
2. Press and hold pad 1 for approximately 5 seconds.
• After 5 seconds, signal sounds. Display shows
“PROGRAM” indicating program mode.
3. Press desired number pad.
• Display shows heating time, “COOK LEVEL” and
power level if other than 100 percent power.
4. Press number pads to enter desired cooking time.
• For example, to heat for 2 minutes 30 seconds, press
2, 3, and 0 pads.
5. Press desired power level pad to change power level.
• If a power level pad is not pressed, oven defaults to
100% power.
• For example, pressing MEDIUM 50% pad sets oven
to 50% power.
• Display shows current power level if other than 100
percent power.
6. Press START pad to save new heating time and power
level in oven memory.
• Repeat step 3-6 to program additional pads.
7. Press RESET pad or close oven door to exit
programming mode.
18
User Options
Follow the instructions below to customized the
microwave oven’s operation. End-of-cycle signal,
maximum heating time and other options can be
changed to meeting your cooking needs.
1. Open oven door.
• If door is closed or RESET pad is pressed before
finishing programming sequence, oven exits
programming mode.
2. Press and hold pad 2 for approximately 5 seconds.
• After 5 seconds, signal sounds. Display shows
“OPTION”.
3. Press number pad that matches desired option.
• “OP” represents optional program mode, first
number represents option number and second
number represents functions currently selected
for option.
4. Press START pad to advance to next option. See table
for options.
5. Press number pad (0,1-3) to change option.
6. Press START pad to save changes.
• Repeat steps 4-6 to change additional options.
7. Press STOP/RESET pad or close oven door to exit
programming mode.
Optional Program
Pad
Indicator
Number Selected
Option
Display
OP:10
OP:11
OP:12
Options ( ) = Factory Setting
3 second continuous beep
(Continuous Beep until door is opened)
5 beeps bursts until door is opened
OP:20
OP:21
OP:22
OP:23
OP:30
OP:31
Eliminates beep
Sets volume to low; 60-70dB
Sets volume to medium; 70-80dB
(Sets volume to high; 80-90dB)
Prevents signal when pad is pressed.
(Allows signal when pad is pressed.)
4
Keyboard Enable
Window
OP:40
OP:41
(30 seconds after oven door is opened, keyboard disabled)
2 minutes after oven door is opened, keyboard disabled
5
Add Time during
Heating
OP:50
OP:51
(Prevents adding heating time while oven is heating.)
Allows adding heating time while oven is heating.
6
Reset Door Open
OP:60
OP:61
(Allows oven to resume heating time countdown after door is opened
during cycle.)
Cancels heating time count down after door is opened during cycle.
7
Maximum Heating
Time
OP:70
OP:71
Allows 10 minutes of heating time.
(Allows 60 minutes of heating time.)
8
Manual Operation
OP:80
OP:81
Allows use of preprogrammed pads only.
(Allows use of manual time entry and preprogrammed pads.)
9
Double Digit
OP:90
OP:91
(Allows use of single digit only.)
Allows use of double digit only.
Numbered Pads
1
End of Cycle Beep
2
Speaker Volume
3
Key Beep
19
Cleaning
Part
Description
Interior, Exterior, and Door
Clean microwave oven with mild detergent in warm water using soft
sponge or cloth. Wring sponge or cloth to remove excess water
before wiping equipment. If desired, boil a cup of water in microwave
oven to loosen soil before cleaning.
LD510P
Important:
• Do not use abrasive cleansers or cleaners containing ammonia.
These could damage finish.
• Never pour water into microwave oven bottom.
• Do not use water pressure type cleaning systems.
Check monthly for a buildup of cooking vapors along intake and
discharge louvers on bottom and back of oven. Clean air vents with
damp cloth to ensure proper airflow. Dry thoroughly.
Discharge Air Vents
Intake
Discharge
Control Panel
Open oven door to deactivate oven timer. Clean with mild detergent
in warm water using soft sponge or cloth.
LD510P
1000 WATT
10 PROGRAM PADS
1
TIME
ENTRY
HOLD
0%
2
3
DEFROST
20%
MEDIUM
50%
MED-HI
70%
QTY
2X
4
5
6
7
STOP
8
RESET
9
START
0
3 COOKING STAGES
20
Before Calling for Service
Record all inspections and repair for future reference.
WARNING
To avoid electrical shock which can cause severe personal injury or death, do not remove outer case at any time.
Only an authorized servicer should remove outer case.
Symptom
Check
If oven does not operate:
• Check fuse or circuit breaker.
• Confirm oven is plugged into dedicated circuit.
• Confirm oven is on grounded and polarized circuit.
Contact electrician to confirm.
If oven light does not work:
• Oven light must be replaced by a servicer.
If oven operates intermittently:
• Check air discharge area for obstructions.
Oven operates, but does not heat food:
• Place one cup cool water in oven. Heat for one minute.
If water temperature does not rise, oven is operating
incorrectly and a servicer should be called.
Any questions or to locate an authorized servicer, call 1-800-843-0304 inside U.S.A. 1-319-622-5511 outside U.S.A. If
an automated telephone system is reached, select Commercial Microwave Ovens category. Warranty service must be
performed by an authorized servicer. Amana also recommends contacting an authorized servicer if service is required
after warranty expires.
21
Commercial Microwave Oven
Warranty AMENDMENT
Applies to units produced in March 2002 (serial number 10100001AE) and forward.
Amana Appliances warrants this product when the original purchaser uses the
oven for commercial food service preparation.
Limited ONE Year Warranty
First Year
Amana Appliances will replace any part (f.o.b. Amana, Iowa, U.S.A.), except for the oven cavity teflon coating or
glass turntable (if applicable), which has failed due to workmanship or materials.
Limited THREE Year Warranty
Second Through Third Year
Amana Appliances will replace any electrical part (f.o.b. Amana, Iowa, U.S.A.) which has failed due to
workmanship or materials.
OWNER'S RESPONSIBILITIES:
Provide proof of purchase
Provide normal care and maintenance, including
cleaning as instructed in owner’s manual.
Make product accessible for service.
Pay for premium service costs for service outside
servicer’s normal business hours.
Pay for service calls related to product installation and
customer education.
Provide any defective part to an authorized
Amana Servicer.
Replace owner replaceable items where directions
appear in the Owner’s Manual.
ITEMS NOT COVERED:
Teflon coating in oven cavity interior (if applicable)
Glass or ceramic turntable (if applicable)
Normal product maintenance and cleaning.
Lost or broken air filters.
Light bulbs
Lost or broken grease shields.
Damages which occur in shipment.
Broken ceramic shelves
General rebuilding or refurbishing
Failures caused by:
- Unauthorized service
- Grease or other material buildup due to improper
cleaning or maintenance.
- Accidental or intentional damage.
- Connection to an improper power supply.
- Acts of God.
- Operating an empty oven.
- Use of improper pans, containers, or accessories
that cause damage to the product.
WARRANTY LIMITATIONS:
Begins at date of original purchase.
Applies to product used for NORMAL commercial food
preparation.
Service must be performed by an authorized Amana
Servicer.
Applies to product used within the United States or in
Canada if product has appropriate agency listing when
shipped from the factory.
Damage due to shipping and handling is not covered.
V.A.T, duties, customs fees, and other related
expenses are not covered by this warranty.
WARRANTY IS VOID IF:
Serial plate is defaced.
Product is altered by user.
Product is not installed or used according to
manufacturer’s instructions.
IN NO EVENT SHALL AMANA APPLIANCES BE LIABLE
FOR INCIDENTAL OR CONSEQUENTIAL DAMAGES*
This warranty gives you specific legal rights and you may have
others from state to state. For example, some states do not
allow the exclusion or limitation of incidental or consequential
damages so this exclusion may not apply to you.
For answers to questions regarding the above, contact
equipment supplier or;
Amana Commercial Products
2800 220th Trail PO Box 8901
Amana, Iowa 52204-0001
1-800-843-0304 inside U.S.A.
1-319-622-5511 outside U.S.A.
Amana Appliances Online • http://www.amanacommercial.com
22
Amana Commercial Products
Amana, Iowa 52204
23
Quick Reference Instructions
Preprogrammed Number Pads
Read “Important Safety Information” before using “Quick
Reference Instructions”. If there are unanswered questions, 1. Open oven door.
see detailed sections of this manual.
2. Press and hold pad 1 for approximately 5 seconds.
3. Press desired number pad.
Interrupting Operation
• Open oven door to interrupt operation. Oven fan
4. Press number pads to enter desired cooking time.
continues to operate. Close door and press START pad
5. Press desired power level pad to change power level.
to resume oven operation. Display continues to show
6. Press START pad to save new heating time and
countdown time. Press START pad to resume oven
power level in oven memory.
operation and countdown timing.
7. Press STOP/RESET pad or close oven door to exit
Canceling Mistakes
programming mode.
• If oven is operating, press STOP/RESET pad once to
Multiple Heating Stages
stop oven, then again to clear display.
1. Open oven door.
• If oven door is open and time shows in display, close
oven door and press STOP/RESET pad to clear display. 2. Press pad 1 for approximately 5 seconds.
3. Press desired number pad.
Operating Preprogrammed Pads
4. Press number pads to enter desired cooking time.
1. Open oven door, place food in oven, and close oven
5. Press desired power level pad to change power level.
door.
6. Press TIME ENTRY pad.
2 Press desired number pad(s).
7. Press START pad to save new heating time and
3. Oven stops heating and oven signal sounds when
power level in oven memory.
heating timing elapses.
8. Press STOP/RESET pad or close oven door to exit
programming mode.
Manual Time Entry
1. Open oven door, place food in oven, and close door.
2. Press TIME ENTRY pad.
3. Press number pads to enter desired cooking time.
4. Press desired power level pad to change power level.
5. Press START pad.
6. Oven stops heating and oven signal sounds when
heating timing elapses.
Part No. 12474312/3828W5A2497
Printed in Korea
www.amanacommercial.com
24
2002 Amana Commercial Products
Amana, Iowa 52204