1
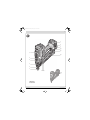
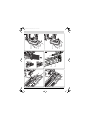
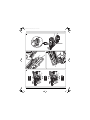
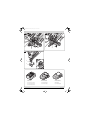
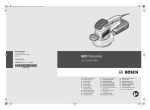
OBJ_BUCH-1335-003.book Page 1 Friday, July 15, 2011 11:15 AM Robert Bosch GmbH Power Tools Division 70745 Leinfelden-Echterdingen Germany GSK 18 V-LI Professional www.bosch-pt.com 1 619 929 K10 (2011.07) PS / 133 UNI de en fr es pt it nl da sv no fi Originalbetriebsanleitung Original instructions Notice originale Manual original Manual original Istruzioni originali Oorspronkelijke gebruiksaanwijzing Original brugsanvisning Bruksanvisning i original Original driftsinstruks Alkuperäiset ohjeet el tr pl cs sk hu ru uk ro bg sr Ðñùôüôõðï ïäçãéþí ÷ñÞóçò Orijinal işletme talimat Instrukcja oryginalna Původní návod k používání Pôvodný návod na použitie Eredeti használati utasítás Îðèãèíàëüíîå ðóêîâîäñòâî ïî ýêñïëóàòàöèè Îðèã³íàëüíà ³íñòðóêö³ÿ ç åêñïëóàòàö³¿ Instrucţiuni originale Îðèãèíàëíà èíñòðóêöèÿ Originalno uputstvo za rad sl hr et lv lt ar fa Izvirna navodila Originalne upute za rad Algupärane kasutusjuhend Instrukcijas oriģinālvalodā Originali instrukcija ΔϴϠλϷ ϞϴϐθΘϟ ΕΎϤϴϠόΗ ̶Ϡλ έΎ̯ ίήσ ̵ΎϤϨϫέ OBJ_BUCH-1335-003.book Page 3 Friday, July 15, 2011 11:15 AM |3 7 8 9 10 11 6 12 5 4 3 2 1 15 14 13 9 GSK 18 V-Li Professional Bosch Power Tools 1 619 929 K10 | (15.7.11) OBJ_BUCH-1335-003.book Page 4 Friday, July 15, 2011 11:15 AM 4| A 8 7 B1 8 7 B2 maximum 12 16 12 B3 17 B4 13 14 14 1 619 929 K10 | (15.7.11) 13 12 Bosch Power Tools OBJ_BUCH-1335-003.book Page 5 Friday, July 15, 2011 11:15 AM |5 C 5 D1 D2 14 13 12 17 E 4 Bosch Power Tools 4 1 619 929 K10 | (15.7.11) OBJ_BUCH-1335-003.book Page 6 Friday, July 15, 2011 11:15 AM 6| F1 F2 3 3 G 2 10 1 18 V (Li-Ion) 2 607 336 170 (1,3 Ah) 2 607 336 092 (2,6 Ah) 2 607 336 236 (3,0 Ah) 1 619 929 K10 | (15.7.11) AL 1820 CV (18 V) 2 607 225 424 (EU) 2 607 225 426 (UK) AL 1860 CV (18 V) 225 322 (EU) 2 607 225 324 (UK) Bosch Power Tools OBJ_BUCH-1335-003.book Page 11 Friday, July 15, 2011 11:15 AM English | 11 Problem Ursache Das Elektrowerkzeug überspringt Nägel oder hat einen zu gro- Die verwendeten Eintreibgegenstände sind unzulässig. ßen Taktvorschub. Abhilfe – Verwenden Sie nur Original-Zubehör. Es dürfen nur die Eintreibgegenstände (Nägel, Klammern etc.) verwendet werden, die in der Tabelle „Technische Daten“ spezifiziert sind. Die Feder des Magazinschiebers ist zu schwach oder de- – Kontaktieren Sie eine autorisierte Bosch-Kundendienstfekt. stelle. Lassen Sie dort das Bauteil austauschen. Die Nägel verklemmen sich häufig im Schusskanal. Die verwendeten Eintreibgegenstände sind unzulässig. – Verwenden Sie nur Original-Zubehör. Es dürfen nur die Eintreibgegenstände (Nägel, Klammern etc.) verwendet werden, die in der Tabelle „Technische Daten“ spezifiziert sind. – Kontaktieren Sie eine autorisierte Bosch-Kundendienststelle. Die eingeschossenen Nägel sind verbogen. Der Schlagstempel ist beschädigt. Transport Entsorgung Die enthaltenen Li-Ionen-Akkus unterliegen den Anforderungen des Gefahrgutrechts. Die Akkus können durch den Benutzer ohne weitere Auflagen auf der Straße transportiert werden. Beim Versand durch Dritte (z.B.: Lufttransport oder Spedition) sind besondere Anforderungen an Verpackung und Kennzeichnung zu beachten. Hier muss bei der Vorbereitung des Versandstückes ein Gefahrgut-Experte hinzugezogen werden. Elektrowerkzeuge, Akkus, Zubehör und Verpackungen sollen einer umweltgerechten Wiederverwertung zugeführt werden. Werfen Sie Elektrowerkzeuge, Ladegeräte und Akkus/Batterien nicht in den Hausmüll! Nur für EU-Länder: Gemäß der europäischen Richtlinie 2002/96/EG müssen nicht mehr gebrauchsfähige Elektrowerkzeuge und gemäß der europäischen Richtlinie 2006/66/EG müssen defekte oder verbrauchte Akkus/Batterien getrennt gesammelt und einer umweltgerechten Wiederverwendung zugeführt werden. Nicht mehr gebrauchsfähige Akkus/Batterien können direkt abgegeben werden bei: Deutschland Recyclingzentrum Elektrowerkzeuge Osteroder Landstraße 3 37589 Kalefeld Schweiz Batrec AG 3752 Wimmis BE Akkus/Batterien: Li-Ion: Bitte beachten Sie die Hinweise im Abschnitt „Transport“, Seite 11. Versenden Sie Akkus nur, wenn das Gehäuse unbeschädigt ist. Kleben Sie offene Kontakte ab und verpacken Sie den Akku so, dass er sich nicht in der Verpackung bewegt. Bitte beachten Sie auch eventuelle weiterführende nationale Vorschriften. Kundendienst und Kundenberatung Der Kundendienst beantwortet Ihre Fragen zu Reparatur und Wartung Ihres Produkts sowie zu Ersatzteilen. Explosionszeichnungen und Informationen zu Ersatzteilen finden Sie auch unter: www.bosch-pt.com Das Bosch-Kundenberater-Team hilft Ihnen gerne bei Fragen zu Kauf, Anwendung und Einstellung von Produkten und Zubehören. www.powertool-portal.de, das Internetportal für Handwerker und Heimwerker. www.ewbc.de, der Informations-Pool für Handwerk und Ausbildung. Deutschland Robert Bosch GmbH Servicezentrum Elektrowerkzeuge Zur Luhne 2 37589 Kalefeld – Willershausen Tel. Kundendienst: +49 (1805) 70 74 10* Fax: +49 (1805) 70 74 11* (*Festnetzpreis 14 ct/min, höchstens 42 ct/min aus Mobilfunknetzen) E-Mail: [email protected] Tel. Kundenberatung: +49 (1803) 33 57 99 (Festnetzpreis 9 ct/min, höchstens 42 ct/min aus Mobilfunknetzen) Fax: +49 (711) 7 58 19 30 E-Mail: [email protected] Österreich Tel.: +43 (01) 7 97 22 20 10 Fax: +43 (01) 7 97 22 20 11 E-Mail: [email protected] Schweiz Tel.: +41 (044) 8 47 15 11 Fax: +41 (044) 8 47 15 51 Luxemburg Tel.: +32 (070) 22 55 65 Fax: +32 (070) 22 55 75 E-Mail: [email protected] Bosch Power Tools Änderungen vorbehalten. English Safety Notes General Power Tool Safety Warnings WARNING Read all safety warnings and all instructions. Failure to follow the warnings and instructions may result in electric shock, fire and/or serious injury. Save all warnings and instructions for future reference. The term “power tool” in the warnings refers to your mainsoperated (corded) power tool or battery-operated (cordless) power tool. Work area safety f Keep work area clean and well lit. Cluttered or dark areas invite accidents. f Do not operate power tools in explosive atmospheres, such as in the presence of flammable liquids, gases or dust. Power tools create sparks which may ignite the dust or fumes. f Keep children and bystanders away while operating a power tool. Distractions can cause you to lose control. – Kontaktieren Sie eine autorisierte Bosch-Kundendienststelle. Lassen Sie dort das Bauteil austauschen. Electrical safety f Power tool plugs must match the outlet. Never modify the plug in any way. Do not use any adapter plugs with earthed (grounded) power tools. Unmodified plugs and matching outlets will reduce risk of electric shock. f Avoid body contact with earthed or grounded surfaces, such as pipes, radiators, ranges and refrigerators. There is an increased risk of electric shock if your body is earthed or grounded. f Do not expose power tools to rain or wet conditions. Water entering a power tool will increase the risk of electric shock. f Do not abuse the cord. Never use the cord for carrying, pulling or unplugging the power tool. Keep cord away from heat, oil, sharp edges and moving parts. Damaged or entangled cords increase the risk of electric shock. f When operating a power tool outdoors, use an extension cord suitable for outdoor use. Use of a cord suitable for outdoor use reduces the risk of electric shock. f If operating a power tool in a damp location is unavoidable, use a residual current device (RCD) protected supply. Use of an RCD reduces the risk of electric shock. Personal safety f Stay alert, watch what you are doing and use common sense when operating a power tool. Do not use a power tool while you are tired or under the influence of drugs, alcohol or medication. A moment of inattention while operating power tools may result in serious personal injury. f Use personal protective equipment. Always wear eye protection. Protective equipment such as dust mask, non-skid safety shoes, hard hat, or hearing protection used for appropriate conditions will reduce personal injuries. f Prevent unintentional starting. Ensure the switch is in the off-position before connecting to power source and/or battery pack, picking up or carrying the tool. Carrying power tools with your finger on the switch or energising power tools that have the switch on invites accidents. f Remove any adjusting key or wrench before turning the power tool on. A wrench or a key left attached to a rotating part of the power tool may result in personal injury. f Do not overreach. Keep proper footing and balance at all times. This enables better control of the power tool in unexpected situations. f Dress properly. Do not wear loose clothing or jewellery. Keep your hair, clothing and gloves away from moving parts. Loose clothes, jewellery or long hair can be caught in moving parts. f If devices are provided for the connection of dust extraction and collection facilities, ensure these are connected and properly used. Use of dust collection can reduce dust-related hazards. 1 619 929 K10 | (15.7.11) OBJ_BUCH-1335-003.book Page 12 Friday, July 15, 2011 11:15 AM 12 | English Power tool use and care f Do not force the power tool. Use the correct power tool for your application. The correct power tool will do the job better and safer at the rate for which it was designed. f Do not use the power tool if the switch does not turn it on and off. Any power tool that cannot be controlled with the switch is dangerous and must be repaired. f Disconnect the plug from the power source and/or the battery pack from the power tool before making any adjustments, changing accessories, or storing power tools. Such preventive safety measures reduce the risk of starting the power tool accidentally. f Store idle power tools out of the reach of children and do not allow persons unfamiliar with the power tool or these instructions to operate the power tool. Power tools are dangerous in the hands of untrained users. f Maintain power tools. Check for misalignment or binding of moving parts, breakage of parts and any other condition that may affect the power tool’s operation. If damaged, have the power tool repaired before use. Many accidents are caused by poorly maintained power tools. f Keep cutting tools sharp and clean. Properly maintained cutting tools with sharp cutting edges are less likely to bind and are easier to control. f Use the power tool, accessories and tool bits etc. in accordance with these instructions, taking into account the working conditions and the work to be performed. Use of the power tool for operations different from those intended could result in a hazardous situation. Battery tool use and care f Recharge only with the charger specified by the manufacturer. A charger that is suitable for one type of battery pack may create a risk of fire when used with another battery pack. f Use power tools only with specifically designated battery packs. Use of any other battery packs may create a risk of injury and fire. f When battery pack is not in use, keep it away from other metal objects, like paper clips, coins, keys, nails, screws or other small metal objects, that can make a connection from one terminal to another. Shorting the battery terminals together may cause burns or a fire. f Under abusive conditions, liquid may be ejected from the battery; avoid contact. If contact accidentally occurs, flush with water. If liquid contacts eyes, additionally seek medical help. Liquid ejected from the battery may cause irritation or burns. Service f Have your power tool serviced by a qualified repair person using only identical replacement parts. This will ensure that the safety of the power tool is maintained. Safety Warnings for Cordless Tackers f Always assume that the tool contains fasteners. Careless handling of the tacker can result in unexpected firing of fasteners and personal injury. f Do not point the tool towards yourself or anyone nearby. Unexpected triggering will discharge the fastener causing an injury. f Do not actuate the tool unless the tool is placed firmly against the workpiece. If the tool is not in contact with the workpiece, the fastener may be deflected away from your target. f Disconnect the tool from the power source when the fastener jams in the tool. While removing a jammed fastener, the tacker may be accidentally activated if it is plugged in. f Use caution while removing a jammed fastener. The mechanism may be under compression and the fastener may be forcefully discharged while attempting to free a jammed condition. 1 619 929 K10 | (15.7.11) f Do not use this tacker for fastening electrical cables. It is not designed for electric cable installation and may damage the insulation of electric cables thereby causing electric shock or fire hazards. f Use appropriate detectors to determine if utility lines are hidden in the work area or call the local utility company for assistance. Contact with electric lines can lead to fire and electric shock. Damaging a gas line can lead to explosion. Penetrating a water line causes property damage. f Observe the conditions of the job site. It is possible that fasteners can burst through thin workpieces or be deflected when working in corners or against edges, and harm persons. f When working, hold the power tool in such a manner that your head and body cannot be injured in case of sudden kickback due to a malfunction of the energy supply or from hard objects/locations in the workpiece. f Do not open the battery. Danger of short-circuiting. Protect the battery against heat, e. g., against continuous intense sunlight, fire, water, and moisture. Danger of explosion. f In case of damage and improper use of the battery, vapours may be emitted. Provide for fresh air and seek medical help in case of complaints. The vapours can irritate the respiratory system. f Use the battery only in conjunction with your Bosch power tool. This measure alone protects the battery against dangerous overload. f Use only original Bosch batteries with the voltage listed on the nameplate of your power tool. When using other batteries, e. g. imitations, reconditioned batteries or other brands, there is danger of injury as well as property damage through exploding batteries. Product Description and Specifications Read all safety warnings and all instructions. Failure to follow the warnings and instructions may result in electric shock, fire and/or serious injury. Intended Use The power tool is intended for connecting work in roofing, encasing, battening, manufacturing wall and ceiling elements, wood facades, pallets, wood fences, noise-reduction walls and boxes. Only the fasteners (nails, staples, etc.) specified in table “Technical Data” may be used. Product Features The numbering of the product features refers to the illustration of the machine on the graphics page. 1 Workpiece protector 2 Discharge lock-off 3 Clamping lever for opening/closing the shot duct 4 Thumbwheel for depth stop adjustment 5 Switch for blocking the actuation system 6 Trigger 7 Battery unlocking button 8 Battery 9 Handle (insulated gripping surface) 10 Storage for workpiece protector 11 Belt hook 12 Magazine 13 Magazine slider 14 Nail pusher 15 Outlet 16 Nail strip* 17 Magazine spring *Accessories shown or described are not part of the standard delivery scope of the product. A complete overview of accessories can be found in our accessories program. Technical Data Cordless nailer GSK 18 V-LI Professional Article number 3 601 D80 3.. Actuation system – Single actuation with safety run Fastener – Type – Length – Diameter – Angle z mm mm 105 Magazine capacity, max. Dimensions – Height – Width – Length Brads 32–64 1.6 20° mm mm mm Weight according to EPTA-Procedure 01/2003 kg 295 96 334 3.5 Li-Ion Battery Rated voltage V= 18 Capacity Ah 3.0 Operating duration per battery charge (continuous operation) approx. 700 nails Please observe the article number on the type plate of your machine. The trade names of the individual machines may vary. Noise/Vibration Information Measured sound values determined according to EN 60745. Typically the A-weighted noise levels of the product are: Sound pressure level 91 dB(A); Sound power level 102 dB(A). Uncertainty K =3 dB. Wear hearing protection! Vibration total values ah and uncertainty K determined according to EN 60745: ah <2.5 m/s2, K=1.5 m/s2. The vibration emission level given in this information sheet has been measured in accordance with a standardised test given in EN 60745 and may be used to compare one tool with another. It may be used for a preliminary assessment of exposure. The declared vibration emission level represents the main applications of the tool. However if the tool is used for different applications, with different accessories or poorly maintained, the vibration emission may differ. This may significantly increase the exposure level over the total working period. An estimation of the level of exposure to vibration should also take into account the times when the tool is switched off or when it is running but not actually doing the job. This may significantly reduce the exposure level over the total working period. Identify additional safety measures to protect the operator from the effects of vibration such as: maintain the tool and the accessories, keep the hands warm, organisation of work patterns. Declaration of Conformity We declare under our sole responsibility that the product described under “Technical Data” is in conformity with the following standards or standardization documents: EN 60745 according to the provisions of the directives 2004/108/EC, 2006/42/EC. Technical file (2006/42/EC) at: Robert Bosch GmbH, PT/ESC, D-70745 Leinfelden-Echterdingen Dr. Egbert Schneider Dr. Eckerhard Strötgen Senior Vice President Head of Product Engineering Certification Robert Bosch GmbH, Power Tools Division D-70745 Leinfelden-Echterdingen Leinfelden, 04.02.2011 Bosch Power Tools OBJ_BUCH-1335-003.book Page 13 Friday, July 15, 2011 11:15 AM English | 13 Assembly Operation Battery Charging Actuation system f Use only the battery chargers listed on the graphics page. Only these battery chargers are matched to the lithium ion battery used in your machine. Note: The battery is supplied partially charged. To ensure full capacity of the battery, completely charge the battery in the battery charger before using your power tool for the first time. The lithium-ion battery can be charged at any time without reducing its service life. Interrupting the charging procedure does not damage the battery. The “Electronic Cell Protection (ECP)” protects the lithium ion battery against deep discharging. When the battery is discharged, the power tool is switched off by a protective circuit: Fasteners can no longer be shot. WARNING After the automatic shut-off of the power tool, do not continue to press the trigger. The battery could become damaged. The battery is equipped with a NTC temperature control which allows charging only within a temperature range of between 0 °C and 45 °C. A long battery service life is achieved in this manner. Observe the notes for disposal. Single actuation with safety run With this actuation system, the discharge lock-off 2 must first be firmly pressed against the workpiece. A fastener is not discharged until the trigger 6 is pulled. Afterwards, further discharging procedures can only be actuated, when the trigger and the discharge lock-off have first been set back to the starting position. Removing the Battery (see figure A) The battery 8 has two locking levels, which are supposed to prevent the battery from falling out in case of vibrations from intensive use. – Press battery unlocking button 7 (1.) and at the same time push the battery toward the front. – Press the battery unlocking button 7 (2.) again and pull the battery out completely, toward the rear. Loading the Magazine (see figures B1 – B4) Block the actuation system and remove the battery before making any adjustments, changing accessories, or placing the power tool aside. This safety measure prevents accidental starting of the power tool. f Use only original Bosch accessories (see “Technical Data”). The precision parts of the power tool, such as the magazine, the outlet and the shot duct, are matched to Bosch staples, nails and brads. Other manufacturers use other steel qualities and sizes. Using fasteners not permitted can damage the power tool and cause injuries. While loading the magazine, hold the power tool in such a manner that the outlet 15 is not pointed at your own body or at other persons. – Clean the magazine slider 13 as required and make sure that the magazine 12 is not dirty/soiled. – Insert a fitting nail strip 16 in the T-slot at the end of the magazine 12. – Push the nail strip in the magazine toward the front until the last nail is positioned in front of the magazine spring 17. Note: A lock function of the magazine slider prevents the power tool from being started with an empty magazine. The discharge lock-off cannot be pressed in and blank firing is thus prevented. – Press the pretensioned nail pusher 14 against the magazine slider 13 and at the same time, pull the magazine slider completely to the end of the magazine 12. Note: The magazine slider must slide back with only low force (finger-pressure). A tight-running magazine slider causes the nails to be driven in at an incorrect angle. – With the nail pusher 14 pressed, carefully guide the magazine slider 13 toward the front until the nail pusher is over the last nail, thus pushing the nail strip in the magazine completely to the front. Note: Do not let the magazine slider snap back without guiding it. Otherwise, the magazine slider could become damaged, and there is danger of your fingers being caught or pinched. Bosch Power Tools Starting Operation Block the actuation system and remove the battery before making any adjustments, changing accessories, or placing the power tool aside. This safety measure prevents accidental starting of the power tool. Inserting the Battery f Use only original Bosch lithium ion batteries with the voltage listed on the nameplate of your power tool. Using other batteries can lead to injuries and pose a fire hazard. – Press switch 5 toward the left to block the actuation system. This prevents a nail from being shot out, even when the discharge lock-off 2 is positioned against the workpiece and the trigger 6 is pulled. – Insert the charged battery 8 into the handle until it can be felt to engage and faces flush against the handle. Shooting Nails (see figure C) – Press switch 5 toward the right to disengage the actuation system. The actuation system is now released. – Firmly position the outlet 15 or the rubber workpiece protector 1 on the workpiece until discharge lock-off 2 is pressed in completely. – Afterwards, briefly press trigger 6 and release again. A nail is discharged. – Allow the power tool to bounce back from the workpiece. – For another driving procedure (shot), completely lift the power tool from the workpiece and position it firmly at the next desired location. f If the trigger 6 and the discharge lock-off 2 are pressed and held longer than 1 second after firing a nail, it is possible that further nails are fired due to a kickback-effect. Blocking the Actuation System Block the actuation system before making any adjustments on the power tool, changing accessories, placing the machine aside for longer breaks or after finishing work. – Press switch 5 toward the left to block the actuation system. This prevents a nail from being shot out, even when the discharge lock-off 2 is positioned against the workpiece and the trigger 6 is pulled. Working Advice Block the actuation system and remove the battery before making any adjustments, changing accessories, or placing the power tool aside. This safety measure prevents accidental starting of the power tool. Check the proper function of the safety and actuation devices, and the tight seating of all screws and nuts each time before using. Disconnect a defective or not properly operating power tool immediately from of the power supply and contact an authorised service agent for Bosch power tools. Do not perform any incorrect manipulations on the power tool. Do not disassemble or block any components of the power tool, such as the discharge lock-off. Do not carry out “emergency repairs” with unsuitable means. The power tool is to be maintained regularly and properly (see “Maintenance and Cleaning”, page 14). Avoid any tampering and damage to the power tool, e. g. from: – Imprinting or engraving, – Retrofitting measures not approved by the manufacturer, – Guiding along templates manufactured of hard material, e. g. steel, – Dropping on or sliding over the floor, – Using as a hammer, – Applying any kind of force. Make sure to check whatever is below or behind your workpiece. Do not shoot nails into walls, ceilings or floors, when persons are behind them. The nails can burst through the workpiece and injure someone. Do not shoot a nail onto an already driven-in one. This could cause the nail to deform, the nails could become jammed or the power tool could move uncontrolled. When the power tool is used under cold ambient conditions, the first nails will be driven in slower than usual. Once the power tool has warmed up during working, normal operating speed will be regained. Avoid blank shots in order to reduce the wear of the impact striker. For longer work breaks or after finishing work, block the actuation system and empty the magazine if possible. Emptying the Magazine (see figures D1 – D2) – With the nail pusher 14 pressed, pull the magazine slider 13 to the rear until the last nail is free; then carefully guide the magazine slider toward the front to the beginning of the magazine 12. Note: Do not let the magazine slider snap back without guiding it. Otherwise, the magazine slider could become damaged, and there is danger of your fingers being caught or pinched. – Turn the power tool so that the nails in the magazine slide back to the magazine spring 17. – Push the magazine spring down and allow the nails to slide past the nail pusher 14 out of the magazine 12. Adjusting the Depth Stop (see figure E) The driving depth of the nails can be set with thumbwheel 4. – Empty the magazine 12. (See “Emptying the Magazine”, page 13) – Nails are driven in too deeply: To reduce the driving depth, turn thumbwheel 4 in anticlockwise direction. or Nails are not driven in deep enough: To increase the driving depth, turn thumbwheel 4 in clockwise direction. – Refill the magazine. (See “Loading the Magazine”, page 13) – Test the new driving depth on a test workpiece. Repeat the worksteps as required. Clearing Jams (see figures F1 – F2) Single nails can become jammed in the shot duct. If this should occur frequently, please contact an authorised service agent for Bosch power tools. Note: When the driver blade does not return after clearing a jam, please contact an authorised service agent for Bosch power tools. – Release the trigger 6. – Block the actuation system (see “Blocking the Actuation System”, page 13) and remove the battery 8. – Empty the magazine 12. (See “Emptying the Magazine”, page 13) – Press clamping lever 3 down so that the shot duct opens. – Remove the jammed nail. For this, us a pair of pliers, if required. – Close the shot duct, hang the clip of clamping lever 3 into the hooks on the shot duct and then push the clamping lever up again. – Refill the magazine. (See “Loading the Magazine”, page 13) 1 619 929 K10 | (15.7.11) OBJ_BUCH-1335-003.book Page 14 Friday, July 15, 2011 11:15 AM 14 | English Changing the Workpiece Protector (see figure G) The workpiece protector 1 at the end of the discharge lockoff 2 protects the workpiece until the power tool is correctly placed for the driving procedure. The workpiece protector can be removed and replaced. – Pull the workpiece protector from the discharge lockoff. – Push the new workpiece protector via the open end over the discharge lock-off. Note: A spare workpiece protector can be stored at the top side of magazine 12. For this, push the workpiece protector into the depot 10. Transport and Storage When transporting the power tool, block the actuation system (see “Blocking the Actuation System”, page 13), especially when using ladders or moving in an unusual stance or posture. At the workplace, carry the power tool only by the handle 9 and with the trigger released 6. Always store the power tool disconnected from the battery and at a dry and warm location. When not using the power tool for a longer period of time, apply a fine oil coating to steel parts. This prevents the formation of rust. Maintenance and Service Maintenance and Cleaning Block the actuation system and remove the battery before making any adjustments, changing accessories, or placing the power tool aside. This safety measure prevents accidental starting of the power tool. f For safe and proper working, always keep the machine and ventilation slots clean. If the machine should fail despite the care taken in manufacturing and testing procedures, repair should be carried out by an after-sales service centre for Bosch power tools. In all correspondence and spare parts order, please always include the 10-digit article number given on the type plate of the machine. Maintenance Schedule Clean the magazine 12. Remove any plastic or wood chips that may accumulate in the magazine during operation. Clean the power tool in regular intervals using compressed air. Measure Explanation Action Cleaning the magazine 12 and magazine slider 13. Prevents the jamming of nails. – Blow out the mechanism of the magazine/magazine slider daily with compressed air. Ensuring that the discharge lock-off 2 functions properly. Promotes your work safety and efficient use of the power – Blow out the mechanism of the discharge lock-off daily with tool. compressed air. Correction of Malfunctions Problem Cause Corrective Measure The machine is not operative. The battery is discharged or defective. – Fully recharge the battery or exchange it. The battery is not properly inserted. – Make sure that the battery has engaged properly in the handle. The battery temperature is too high or too low. – Wait until battery has reached the optimal operating temperature again. The battery contacts are contaminated/dirty or defective. – Contact an authorised service agent for Bosch power tools. Have the component replaced there. The actuation system is blocked. – Press switch 5 toward the right to disengage the actuation system. The magazine 12 is empty. – Refill the magazine. (See “Loading the Magazine”, page 13) The discharge lock-off 2 is bent. – Contact an authorised service agent for Bosch power tools. Have the component replaced there. The electronic system is defective. – Contact an authorised service agent for Bosch power tools. The following components may be faulty: – Trigger 6 – Driver blade – Motor or drive belt – Electronic system – Contact an authorised service agent for Bosch power tools. Have the component replaced there. Foreign objects have accumulated in the shot mechanism. – Contact an authorised service agent for Bosch power tools. Have the component replaced there. Foreign objects have accumulated in the outlet 15 or in the magazine 12. – Clean the outlet 15 or the magazine 12. A nail is jammed in the shot duct. – Clear the jam. (See “Clearing Jams”, page 13) The magazine slider is 13 defective. – Clean the magazine slider 13 as required and make sure that the magazine 12 is not dirty/soiled. The spring of the magazine slider is too week or defective. – Contact an authorised service agent for Bosch power tools. Have the component replaced there. The fasteners being used are not permitted. – Use only original accessories. Only the fasteners (nails, staples, etc.) specified in table “Technical Data” may be used. The magazine 12 is empty. – Refill the magazine. (See “Loading the Magazine”, page 13) The power tool is ready for operation, but no nails are discharged. 1 619 929 K10 | (15.7.11) Bosch Power Tools