1
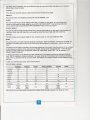
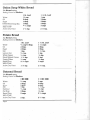
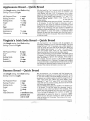
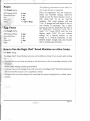
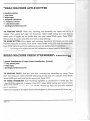
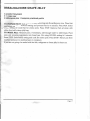
Congratulations on your purchase of a new Deluxe Electronic Breadmaker from Magic Chef®. Our many years of
experience have enabled us to continually develop new and innovative technology in our products. Your
breadmaker is the latest design in our constantly growing family of bread machines.
You will find that your breadmaker is an extremely simple and fun product to operate. We have attempted to make
the operating instructions as simple as possible to follow and we have included many kitchen-tested recipes for
your enjoyment. Once you become familiar with the operation of your breadmaker, feel free to experiment with
variations of our recipes for your own use. Your only limit is your imagination!
BEFOR.E
YOU
START
Many factors can affect the quality of the bread produced in your new bread maker. It is important to understand
these factors to ensure that you get a perfect loaf every time.
TEMPERATIJRE
All ingredients, including liquids, should be at room temperature. Your kitchen should be between 18°C (65°F)
and 23°C (74°F) when baking.
ALTITUDE
At higher altitudes (+3000 ft) water evaporates more rapidly and fermentation (rising) is faster. Therefore, slight
recipe adjustments may be necessary.
INGREDIENT
11/2
1 LB LOAF
Water
+1 Tbsp
+1 1/2 Tbsp
-1 Tbsp
-1 1/2 Tbsp
-1 Tbsp
-1 1/2 Tbsp
-1/4tsp
-1/4 tsp
--
Flour
Sugar
Yeast
LB LOAF
INGREDIENTS
The most CRITICAL factor affecting the success
of your baking is the quality, freshness, and accurate
measurement of your ingredients.
FLOUR
For best results, use bread flour. It is milled for yeast
bread baking and has a higher protein content than allpurpose flour. It is the protein in the flour that turns to
gluten when mixed with liquid. The gluten then
becomes elastic when kneaded and forms the
structure of the dough. All-purpose flour forms a weak
structure and a small loaf.
Whole wheat flour is ground from the whole kernel of
wheat so the flour is coarser than white flour. It
requires a longer kneading time than white flour. If
whole wheat flour makes up more than half of the total
flour amount, select the WHOLE WHEAT cycle.
Rye flour does not become elastic when kneaded.
Therefore, it is always mixed with bread flour in a
recipe. Sometimes the rye flour will cause the loaf to
be shorter and denser than an all white flour bread.
GLUTEN
Gluten is a flour-like substance that assists rising
and adds structure to the loaf. It could be used with
low protein flours, such as whole wheat or rye.
YEAST
Yeast the leavening agent used to make bread dough
rise, is a single cell organism that grows and
multiplies as it ferments sugar. The fermentation
process produces gases which are trapped in the
dough in the form of small bubbles and force the
dough to rise.
There are two basic types or strains of RED STAR®
Yeast available: RED STAR® Active Dry Yeast and
QUICK-RISETMActive Dry Yeast. Both types of yeast
will work fine in your breadmaker. To use RED STAR®
QUICK-RISETMYeast, decrease the amount of Yeast to
1/2 teaspoon for each cup of flour in the recipe.
Always make sure your yeast is fresh. Unopened
packages of yeast have a one year shelf life from the
date they are packaged. Since yeast is very perishable
when exposed to air, moisture and/or warmth, all
opened packages of yeast must be refrigerated or
frozen in an airtight container. Under refrigeration, the
life of yeast is about six weeks and when frozen, six
months.
INGREDIENTS
FAT
Fats add flavor and tenderness to your bread. Oil, solid
shortening, and butter may be interchanged equally.
Use cold butter cut into small pieces. DO NOT use
spreads or diet margarine for the required fat amount.
SALT
Salt controls the action of the yeast and prevents
over-rising.
SUGAR
Sugar is a food source for the yeast and aids the rising
process. Regular white sugar, brown sugar, molasses,
or honey may be used. DO NOT substitute artificial
sweeteners for sugar as they are not fermentable.
liQUIDS
Liquids include water, milk, egg, cottage cheese,
yogurt, and sour cream. DO NOT use any perishable
liquid with the timer. Fruit juice, vegetable juice, soy
milk or rice milk can be substituted for people who are
lactose intolerant or have milk allergies.
(CONT'D)
The amount and temperature of liquids is extremely
important. The ratio of flour to liquid is the most
critical, yet the most easily remedied factor in any
bread recipe. During periodS of high humidity, flour
will have absorbed moisture from the environment
and will not be able to use as much liquid as is stated
in a recipe. It is all right to open the machine to check
the consistency of the dough. Do this after about 5
minutes of KNEADING. The dough should be a soft,
tacky ball. If it is too dry, add liquid 1/2 to 1
tablespoon at a time; too wet, add one tablespoon of
flour at a time.
FRUIT AND NUTS
Fruit and nuts may be added at the beginning with the
dry ingredients.
ABOUT
YOUR
BREADMAKER
This section will help you become familiar with your Magic Chef® Breadmaker. Review this information thoroughly
before baking your first loaf.
SELECT BUITON
Pressing this button lets you select which cycle you desire. Each time you press the SELECT button, the cycle will
change. (See next section for explanation of different cycles.)
START BUITON
You must select desired cycle before pushing START button.
STOPBUITON
To stop your breadmaker, hold the STOP button in until "0:00" appears on the time display (about 10 seconds).
Always press STOP before removing bread from machine. Otherwise, the heater will continue to operate for the
"Warming" cycle. Pressing STOP turns off power completely.
CRUST CONTROL
Push center of CRUST CONTROL to set light or dark crust color after selecting the desired cycle. If medium crust
is desired, do not press the crust control button.
TIMER SET
These buttons allow you to program your breadmaker to bake bread for completion at a later time. You can only
use the TIMER after pressing SELECT to determine which cycle you wish. Each time"
is pushed, the timer will
advance 10 minutes. Each time" •. " is pushed the timer will decrease 10 minutes.
t"
The time shown on the clock display is the total time required to COMPLETE baking. The timer cannot be set
beyond 13 hours.
Example: If it is 8:30 p.m. and you want your bread ready at 7:00 a.m.:
1.
Combine all ingredients in baking pan as per recipe.
2. Place baking pan securely inside breadmaker.
3. Close lid.
4. Press SELECT to desired cycle.
5. Press CRUST to select desired crust color.
t"
until display reads "10:30" since it is 10 hours and 30 minutes from the time you press START
6. Press"
until the desired completion time.
7. Press START. The colon on the display will flash and the timer will start to count backwards by minutes until
the correct time for the machine to start is reached. The breadmaker will then go through KNEADING, RISING
AND BAKING to provide you with a fresh loaf of bread at the time you programmed it to be ready.
DO NOT USE TIMER IF YOU ARE USING PERISHABLE INGREDIENTS (i.e.: FRESH MILK, EGGS, CHEESE, ETC.)
WARNING SIGNALS
If the display shows "H:HH," the internal temperature of your breadmaker is too warm. Press STOP (hold for 10
seconds), then leave lid open and allow to cool for 10-20 minutes.
If the display shows ":," you have not plugged machine in correctly. Check connection.
Your Magic Chef® Breadmaker has several different modes to choose from. Each mode allows you to prepare a
different type of bread or pastry.
NORMAL
This is the cycle most often used as it gives the best results with almost any recipe.
FRENCH
This cycle provides more kneading and rising time than the NORMAL cycle.
RAPID
This cycle should only be used for regular white bread, or variations of white bread, as it skips rising steps.
Loaves size will usually be smaller using this cycle. RED STAR®aUICK·RISETM Yeast will produce the best
volume. Use the same amount of RED STAR®aUICK·RISETM Yeast as the recipe requires.
WHOLE WHEAT
This cycle is used for breads requiring heavier flours, such as whole wheat or rye, that require more kneading and
rising time. Bread made with these flours will usually be shorter than bread made with white bread flour.
DOUGH
This cycle enables you to prepare dough for rolls, croissants, pizza, etc. This cycle DOES NOT BAKE.
BAKE
This cycle enables you to bake previously prepared bread dough - either homemade or commercially prepared. Put
the dough in the baking pan and allow to rise according to the manufacturer's instructions - then you are ready to
bake!
The BAKE cycle also makes it possible to use the bread machine as a rice cooker. Place the amounts of rice and liquid
in the baking pan as directed in the recipe and press START. The rice will be done to perfection. If it should happen
that the rice needs a little longer cooking time, press STOP. Select BAKE, press START. Test for doneness in 10
minutes. Repeat if necessary.
To make quick breads, use the DOUGH cycle just until the flour is completely moist and then change to the BAKE
cycle. Test for doneness by sticking a toothpick in the center of the top. If the toothpick shows any sign of unbaked
dough when it is removed from the loaf, press STOP. Select BAKE, press START and bake until the toothpick comes
out clean.
.
- 2025-
I
50
50 min.
10
60
74
22
35
30
15
30
40
14
18
20
20
START
after
START
43
33
45
50
45
40
50
45
60
1:30
3:30
2:40
3:20
60
1:20min.
99
39
10
min
N/A
START
after
N/A
after
after
50
60
60
6
4RAPID
min.
FRENCH
WHOLE
WHEAT
BAKE
DOUGH
To help you understand
each
cycle, refer to the time charts.
produced in CYCLE
the dough
as it NORMAL
rises.
TIMES
- ES1850
LET'S
BAKE
BREAD
DURING KNEADING, IT IS QUITE NORMAL FOR YOUR BREADMAKER TO VIBRATE AND MAKE NOISE. THIS IS
DUE TO THE POWERFUL DRIVE ASSEMBLY REOUIRED FOR KNEADING TO BE DONE PROPERLY.
Remove bread pan.
Hold handle of bread pan firmly and pull straight up.
Place kneading blade on drive shaft.
Ensure the blade is set securely. There is only one way
it can be mounted properly.
Place ingredients
into bread pan.
Always add ingredients in the order specified in the
recipe - water first, then solid ingredients and yeast
LAST.
Place bread pan into machine.
Wipe any liquids, etc. off the outside of the pan. Place
the pan into the machine using the metal guides on
each side. Push pan down securely so the guides are
firmly set against the tension plates on either side of
the oven.
II
Close lid.
Plug into outlet.
The clock display will show "0:00."
B
Select Mode.
Press the SELECT button to set your desired cycle.
Each time you press the SELECT button the cycle will
advance.
Set crust color.
Press button for LIGHT or DARK. Do not press if
MEDIUM crust is desired.
Set timer if desired.
Do not use timer if you are using perishable
ingredients
Start machine.
Press START. The clock will begin counting down the
minutes until final completion. At the start of cycle, the
display will show the following times (unless you are
using the timer):
1 Ib
1.51b
NORMAL
2:40
2:40
FRENCH
3:30
3:30
RAPID
1:30
1:30
WHOLE WHEAT
3:20
3:20
DOUGH
1:20
1 :20
BAKE
0:50
0:50
If you are using the timer, the Timing light will illuminate when you press START.
NOTE: During the baking stage, you may notice smoke coming from the vents on the lid. This is normal.
Completion.
When the machine is finished, press and hold STOP
button until "0:00" appears on time display (about 10
seconds); open the lid and remove baking pan.
CAUTION:BAKINGPAN WILL BE HOT- USEOVEN
MITTS OR POTHOLOERS.
Turn baking pan upside down over the countertop and
shake to release loaf. Take care not to place hot baking
pan on countertop, tablecloth, or plastic surface. If the
kneading blade comes out in the bottom of the loaf,
use a narrow cylindrical tool (crochet hook/nut pick) to
remove it. DO NOT use your fingers as it will be very
hot.
Place bread on wire rack to cool. Do not cut bread for 15-20 minutes.
KEEP WARM PERIOD
Upon completion, the "WARMING" will be on. If you wish, you may leave the loaf in the baking pan inside the
machine. The heater will keep operating at a low level for 1 hour and gradually decrease in temperature. Always
press and hold STOP when you remove baking pan.
Bread left in your breadmaker after baking may become quite moist so it is always best to remove loaf as soon as
possible after completion.
CLEAN
UP
UNPLUG YOUR MACHINE AND ALLOW TO COOL BEFORECLEANING.
1.
Bread Pan - Do not immerse bread pan in water. Wipe interior and exterior with a damp cloth. Do not use
detergents as a residue will build up and cause the bread to stick in the pan. Do not use abrasive cleansers or
scouring pads as they may damage the nonstick interior.
2. Kneading Blade - Wipe with a damp cloth. If blade is difficult to remove from drive shaft, pour a cup of hot
water inside pan and let soak for a few minutes.
3. Lid and Window - Lid can be removed for easy cleaning. Open lid approximately halfway. When you see
locking tab in right lid hinge aligned with guide slots in right hinge, angle lid out towards front of machine.
Use a small amount of soap to clean viewing window and then wipe clean with a damp cloth (Models
ES1850). Use nonabrasive all-purpose cleanser or dishwashing liquid to clean inside lid.
4. Interior - You can clean the interior as needed with a damp cloth. Make sure unit is completely cool.
HINTS
AND
SUGGESTIONS
Your Magic Chef® Breadmaker has been designed to eliminate most of the problems typically encountered with
home bread baking. All of our recipes have been kitchen tested and produce perfect loaves of bread. However,
sometimes things can go wrong. The helpful hints listed below will help you achieve consistent results with your
Breadmaker.
REMEMBER: A Breadmaker isn't human. It doesn't measure ingredients or check that the yeast is fresh. It doesn't
remember to put the kneading paddle in place, make sure the power is turned on, or remove the bread before it
sits too long in the machine, getting soggy with condensation. For these tasks, the baker is still responsible.
• Make sure your ingredients are FRESH - especially the yeast.
• When there is doubt regarding the activity of the yeast, you may use this simple test to determine its
strength.
To test 1 package (21/4 teaspoons) RED STAR® Active Dry or QUICK-RISETMYeast, use a liquid
measuring cup and fill to the 1/2 cup level with warm water (11 0-115l). Stir in 1 teaspoon granulated sugar
and 1 package (2 1/4 teaspoons) of RED STAR® Active Dry or QUICK-RISETMYeast. In 3 or 4 minutes, it will
have absorbed enough liquid to activate and will start rising to the surface. If at the end of 10 minutes, the
yeast has multiplied to the 1 cup mark, it is very active. The yeast mixture may be used in your automatic
bread machine. (Remember, to adjust your recipe for the 1/2 cup of water used in the test.)
• Check your dough during the kneading process. After 5 minutes, it should look like a smooth, elastic round
ball. If it has a "lumpy" consistency, add water 1 tablespoon at a time. If it is "soupy", add flour 1 tablespoon
at a time.
TROUBLESHOOTING
If you are having difficulty producing a satisfactory loaf, check the following points before calling for service.
1. MY BREAD DIDN'T RISE!
• Whole wheat or rye loaves will not rise as much as white loaves
• Use Fresh Yeast - quick-rising is best
• Add Yeast LAST and away from salt, sugar, and water
• Adding gluten assists rising
• Increase water by 1 oz.
• Check to ensure kneading blade is properly in place
• Key ingredients miss measured or omitted
• Too much salt
• Ingredients not room temperature
2. MY BREAD LOOKS LIKE A CRATER!
• Too much moisture in mixture - reduce liquid slightly
• Increase salt by 1/2 tsp. or increase flour by 1 Tbsp.
• Bread left in machine too long after baking
3. MY BREAD ROSE TOO HIGH AND STUCK TO THE LID!
• Reduce yeast by 1/2 tsp.
• Reduce all ingredients slightly
• Too much water - reduce by 1 tsp.
• Not enough salt - add 1/4 tsp.
4. MY BREAD IS NOT COOKED ALL THE WAY THROUGH
• Too much moisture - reduce liquid slightly
• Can happen with heavier flours - an extra knead will solve this. After the first knead and rise, stop the
machine and start over from the beginning as for a new loaf of bread. This puts more air into the dough.
5. MY BREAD IS TOO HEAVY OR ROUGH TEXTURED
• Not enough water - add 1 Tbsp.
• Flour is too dry - store in airtight container
6. MY BREAD HAS TOO MANY HOLES
• Too much water - reduce by 1 Tbsp.
• Too much yeast - reduce by
1/8 tsp.
• Not enough salt - add 1/4 tsp.