1
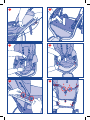
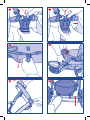
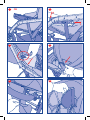
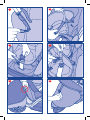
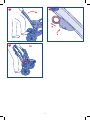
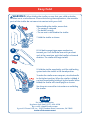
PASSEGGINO S3
•
•
•
•
•
•
Istruzioni dʼuso
Mode dʼemploi
Gebrauchsanweisung
Instructions for use
Instrucciones de uso
Instruções para a
utilização
• Gebruiksaanwijzing
•
•
•
•
•
•
Brugsanvisning
Käyttöohjeet
Bruksanvisning
Bruksanvisning
Návod k použití
Instrukcje sposobu
użycia
• Oδηγίες χρήσης
1
2
3
4
5
6
2
7
8
9
10
11
12
3
12a
13a
13b
14
15
16
1
B
B
A
4
4
3
5
2
17
18
19
20
21
22
5
23a
23b
A
B
B
24
25
26
27a
2
1
6
27b
28
OK
2
1
29
30
31
32
7
33
34
35
36
37
38
8
39
40a
40b
41
42
43
9
45
44
2
1
46
OK
10
I
IMPORTANTE: PRIMA DELL’USO LEGGERE ATTENTAMENTE QUESTO LIBRETTO D’ISTRUZIONI PER
EVITARE PERICOLI NELL’UTILIZZO E CONSERVARLO PER OGNI FUTURO RIFERIMENTO. PER NON
COMPROMETTERE LA SICUREZZA DEL VOSTRO BAMBINO SEGUITE ATTENTAMENTE QUESTE
ISTRUZIONI
F
IMPORTANT: LIRE ATTENTIVEMENT CE LIVRET D’INSTRUCTIONS AFIN D’EVITER TOUT DANGER D’UTILISATION ET LE CONSERVER EN VUE D’UNE EVENTUELLE CONSULTATION FUTURE. POUR NE PAS
FAIRE COURIR DE RISQUES A VOTRE ENFANT, RESPECTER SCRUPULEUSEMENT CES INSTRUCTIONS
D
WICHTIG: VOR DEM GEBRAUCH AUFMERKSAM DIESE ANLEITUNG LESEN, UM GEFAHREN BEI
DER BENUTZUNG ZU VERMEIDEN UND FÜR ZUKÜNFTIGES NACHSCHLAGEN AUFBEWAHREN.
BEFOLGEN SIE SORGFÄLTIG DIESE ANLEITUNG, DAMIT DIE SICHERHEIT IHRES KINDES NICHT
BEEINTRÄCHTIGT WIRD
USA
GB
IMPORTANT: RETAIN FOR FUTURE REFERENCE - READ CAREFULLY - YOUR CHILD’S SAFETY MAY
BE AFFECTED IF YOU DO NOT FOLLOW THESE INSTRUCTIONS CAREFULLY.
E
IMPORTANTE: ANTES DEL USO LEA ATENTAMENTE ESTE MANUAL DE INSTRUCCIONES PARA
EVITAR PELIGROS Y CONSÉRVELO PARA FUTURAS CONSULTAS. PARA NO COMPROMETER LA
SEGURIDAD DE SU BEBÉ, SIGA ATENTAMENTE ESTAS INSTRUCCIONES.
P
IMPORTANTE: PARA EVITAR ACIDENTES DURANTE A UTILIZAÇÃO, ANTES DE UTILIZAR O PRODUTO, LEIA, ATENTAMENTE ESTE LIVRO DE INSTRUÇÕES E CONSERVE-O PARA CONSULTAS FUTURAS. A SEGURANÇA DO SEU FILHO PODE ESTAR EM PERIGO SE NÃO SEGUIR, ATENTAMENTE,
ESTAS INSTRUÇÕES
NL
BELANGRIJK: LEES DEZE GEBRUIKSAANWIJZINGEN VÓÓR HET GEBRUIK GOED DOOR OM GEVAREN TIJDENS HET GEBRUIK TE VOORKOMEN EN BEWAAR ZE VOOR LATERE RAADPLEGING.
VOLG DEZE GEBRUIKSAANWIJZINGEN NAUWKEURIG OM DE VEILIGHEID VAN JE KIND NIET IN
GEVAAR TE BRENGEN
DK
VIGTIGT: INDEN PRODUKTET TAGES I ANVENDELSE, SKAL DENNE BRUGSANVISNING
GENNEMLÆSES NØJE FOR AT UNDGÅ FARE UNDER ANVENDELSEN. BRUGSANVISNINGEN SKAL
OPBEVARES MED HENBLIK PÅ AL FREMTIDIG REFERENCE. FOR IKKE AT LADE DET GÅ DU OVER
JERES BARNS SIKKERHED, SKAL DISSE ANVISNINGER FØLGES MEGET NØJE.
FIN
TARKEÄÄ: ENNEN KÄYTTÖÄ LUE NÄMÄ OHJEET TARKKAAN JA NOUDATA NIITÄ HUOLELLISESTI,
JOTTA ET VAARANTAISI LAPSESI TURVALLISUUTTA. SÄILYTÄ OHJEET TULEVAA TARVETTA
VARTEN.
S
VIKTIGT: INNAN ANVÄNDNINGEN SKA DENNA BRUKSANVISNING LÄSAS NOGA FÖR ATT UNDVIKA
FAROR VID ANVÄNDNINGEN. BEVARA BRUKSANVISNINGEN FÖR FRAMTIDA BRUK. FÖLJ NOGA
INSTRUKTIONERNA FÖR ATT INTE ÄVENTYRA DITT BARNS SÄKERHET
N
VIKTIG: LES NØYE DENNE HÅNDBOKEN FØR BRUK FOR Å UNNGÅ FARER VED ANVENDELSE OG
OPPBEVAR DEN TIL ALLE SENERE INFORMASJONER. DERE KAN KOMPROMITTERE BARETS SIKKERHET HVIS DERE IKKE FØLGER NØYE DISSE INSTRUKSJONENE.
CS
DŮLEŽITÉ: PŘED POUŽITÍM SI POZORNĚ PROČTĚTE TENTO NÁVOD, ABYSTE SE VYHNULI MOŽNÝM
NEBEZPEČÍM A USCHOVEJTE JEJ PRO DALŠÍ POUŽITÍ. ŘIĎTE SE PŘESNĚ POKYNY UVEDENÝMI V TOMTO
NÁVODU, ABYSTE NEOHROZILI BEZPEČNOST VAŠEHO DÍTĚTE.
PL
WAŻNE: PRZED PRZYSTĄPIENIEM DO UŻYTKOWANIA PRODUKTU, PROSZĘ UWAŻNIE PRZECZYTAĆ NINIEJSZĄ
INSTRUKCJĘ, ABY BEZPIECZNIE SIĘ NIM POSŁUGIWAĆ. ZACHOWAĆ INSTRUKCJĘ NA PRZYSZŁOŚĆ. ABY ZAPEWNIĆ
BEZPIECZEŃSTWO WASZEMU DZIECKU, NALEŻY DOKŁADNIE STOSOWAĆ SIĘ DO NINIEJSZEJ INSTRUKCJI.
GR
ΣΗΜΑΝΤΙΚΟ:ΠΡΙΝ ΤΗ ΧΡΗΣΗ ΔΙΑΒΑΣΤΕ ΠΡΟΣΕΚΤΙΚΑ ΑΥΤΕΣ ΤΙΣ ΟΔΗΓΙΕΣ ΧΡΗΣΗΣ ΓΑ ΝΑ ΑΠΟΦΥΓΕΤΕ ΤΥΧΟΝ
ΚΙΝΔΥΝΟΥΣ ΚΑΙ ΚΡΑΤΗΣΤΕ ΤΕΣ ΓΙΑ ΝΑ ΤΙΣ ΣΥΜΒΟΥΛΕΥΕΣΤΕ ΣΤΟ ΜΕΛΛΟΝ. ΓΙΑ ΝΑ ΜΗ ΘΕΣΕΤΕ ΣΕ ΚΙΝΔΥΝΟ
ΤΟ ΠΑΙΔΙ ΣΑΣ ΑΚΟΛΟΥΘΗΣΤΕ ΠΙΣΤΑ ΑΥΤΕΣ ΤΙΣ ΟΔΗΓΙΕΣ.
11
USA
GB
INSTRUCTIONS FOR USE
torn or missing.
WARNING: When it is not used, the stroller must be
kept away from the reach of children.
WARNING: The stroller must not be used while running
or skating.
WARNING: Do not use the rain cover if the stroller is
not fitted with the hood or sun canopy to prevent the
risk of suffocation.
WARNING: To prevent the risk of overheating, never
leave the stroller under the sun with the child seated in
it if the rain cover is fitted to the stroller.
Prevent the stroller from coming into contact with salt
water. It may cause the formation of rust.
Do not use the stroller on the beach.
WARNINGS
IMPORTANT: PLEASE READ THESE INSTRUCTIONS
CAREFULLY BEFORE USE AND KEEP THEM FOR FUTURE REFERENCE.
CAUTION: BEFORE USE, REMOVE AND DISPOSE OF
ALL PLASTIC BAGS AND PACKAGING MATERIALS
AND KEEP THEM OUT OF REACH OF CHILDREN.
WARNINGS
WARNING: Children should be harnessed in at all times
and should never be left unattended.
WARNING: Before assembly, check that the product
and all of its components have not been damaged during transportation. Should any part be damaged, do
not use and keep out of reach of children.
This stroller is intended for use for children aged between 6 and 36 months of age, and weighing up to
15 kg.
WARNING: This stroller is not suitable for children from
birth to 6 months of age.
WARNING: Before use, ensure that all the safety devices are correctly fitted and working. In particular, ensure that the stroller is locked in the open position, by
checking that the two sides are correctly locked into
position.
Do not overload the storage basket. Maximum weight
3 kg.
Do not carry more than one child at a time.
Do not use accessories, spare parts, or any component not supplied or approved by the manufacturer as
they may make the stroller unsafe.
Overloading, incorrect folding and the use of non-approved accessories may damage or break this stroller
WARNING: Do not attach any items to the handles,
this may affect the stability of the stroller.
WARNING: The use of the crotch strap and safety harness is necessary to guarantee the safety of your child.
Always use the safety harness together with the crotch
strap.
Ensure that the person using the stroller knows how
to use it safely.
Do not attempt to open or close the stroller with a child
on board.
WARNING: When opening, adjusting or closing the
stroller, ensure that your child is at a safe distance: ensure that during these operations, the movable parts of
the stroller do not come into contact with your child.
Always apply the brakes whenever the stroller is stationary. WARNING: never leave the stroller on a sloped
surface with a child on board, even with the brakes
applied.
Do not let other children play unattended close to the
stroller or climb on it.
If the stroller is left exposed to direct sun light for a
long time, allow it to cool before placing your child in it.
Prolonged exposure to direct sunlight may cause the
fabric to fade.
Do not use the product if some of its parts are broken,
CLEANING AND MAINTENANCE
This product requires regular maintenance.
The cleaning and maintenance of the stroller must only
be carried out by an adult.
CLEANING
To remove the cover of the stroller and the rigid backrest
support, please refer to the section “how to fit/remove
the cover”.
Please refer to the care label for instructions on cleaning
the fabric parts of the stroller.
Periodically wipe clean plastic parts with a soft damp
cloth.
Always dry the metal parts to prevent the formation of
rust if the stroller has come into contact with water.
MAINTENANCE
Lubricate the moving parts only if necessary, with a light
application of a silicone based lubricant.
Periodically check the condition of the wheels, and keep
them clean of dust and sand.
Is the stroller has inflatable wheels, check their pressure
regularly and, if necessary, pump them with the pump
supplied (check the pressure of the wheels also before
using the stroller the first time). In case of a flat tyre, the
pneumatic may be mended with a bicycle repair kit.
WARNING: Do not exceed the maximum pressure indicated on the pneumatic. WARNING: Do not use compressors to pump the wheels.
WARNING! After having inflated the tyres, ensure that
the small plastic valve caps are screwed tightly onto the
valve, since they are small parts that can be swallowed.
Keep the stroller in a dry place.
GENERAL INSTRUCTIONS
WARNING: When assembling, disassembling opening
or closing the stroller, ensure that your child, or other
children, are at a safe distance. Ensure that during these
operations the movable parts of the stroller do not come
into contact with your child.
HOW TO OPEN THE STROLLER
1. After removing the frame from the package, the stroller will look as shown in diagram 1.
2. Before opening the frame, release the locking device
located at the right side, as shown in diagram 2.
24
strap correctly, slide it through the hole of the cover, as
shown in diagram 13 B. To use the safety harness correctly, please refer to the paragraph “How to Use the
safety harness”.
14. Fasten the 2 press studs (diagram 14).
15. Fit the two cover flaps of the armrests, inserting the
plastic joints of the cover into the holes located on the
armrests (diagram 15).
16. Before fixing the seat to the frame, check that the
backrest’s adjustment belt (Diag. 16-component A) is
inserted correctly into the holes B. If it is not inserted as
shown in diag. 16, insert belt A inside the two holes B.
Then fix the 5 male, plastic spring catches, located on
the fabric cover, to the 5 female, plastic spring catches
located on the frame, as shown in diagram 16.
WARNING: Check that the cover is fitted correctly to the
frame of the stroller.
3. Raise the stroller as shown in diagram 3; the stroller
will start to open.
WARNING: Before use, ensure that the stroller is locked
in the open position, checking that the locking devices
located at the sides are locked.
HOW TO OPEN/CLOSE THE FRONT FOOTREST
The stroller is supplied with the front footrest closed, to
make the stroller more compact.
WARNING: Lock the footrest in the use position immediately after opening the stroller (please refer to the paragraph: “How to open the stroller”).
4. Turn the footrest as shown in diagram 4.
5. Open the locking device located at the rear of the footrest, then align the hole located on the footrest to the
locking joint, and slide the joint until it is safely locked, as
shown in diagram 5.
WARNING: Check that the footrest is locked in the use
position.
To make the stroller more compact when closed, after
removing the front wheel, fold the footrest, carrying out
the above operations in the reverse order.
HOW TO USE THE SAFETY HARNESS
This stroller has a 5-point safety harness featuring two
shoulder straps, a lap belt and a crotch strap with dual
safety buckle.
The safety harness has dual safety buttons to prevent
the accidental opening of the buckle by the child.
17. After seating your child in the stroller, insert the two
clips into the buckle and adjust the shoulder straps as
required, passing them through the holes at the most
suitable height. Adjust the height of the shoulder straps
and lap belt using the buckles.
18. To unfasten the lap belt, press the red central buttons with one hand and, at the same time, press the two
lateral pins.
WARNING: To guarantee the safety of your child, always
use the safety harness.
HOW TO FIT/REMOVE THE FRONT WHEEL
6. The front wheel is different from the other wheels because it has a rapid removal system similar to the system
used by cyclists (diagram 6).
7. Insert the joint of the wheels into the correct slots located at the end of the front fork, as shown in diagram 7;
Check that the axis of the wheel is correctly inserted to
the end of both sides of the fork.
8. After fitting the wheel, tighten the locking lever, first
turning it, and then folding it as shown in diagram 8.
To remove the front wheel, loosen the locking lever and
detach the wheel from the fork, carrying out the above
operations in the reverse order.
WARNING: Check that the wheel unit is safely locked
into position.
WARNING: Always check that the lever is locked correctly.
HOW TO ADJUST THE BACKREST
The backrest can be adjusted through a belt adjustment
system.
19. To lower the backrest, it is necessary to operate the
rear adjustment system. Press the two side buttons as
shown in diag. 19, adjusting the backrest until the desired position has been reached.
Vice versa, to raise the backrest, it is necessary to press
the two side buttons of the adjustment system, and pull
the strap until the desired position has been reached.
WARNING: The child’s weight can make these operations difficult.
HOW TO FIT/REMOVE THE REAR WHEELS
The rear wheels have internal braking crowns, as shown
in diagram 9.
10. Insert the joint of the wheel into the correct slot, until
a “clak” is heard, signalling that it is locked into position;
repeat the operation with the other rear wheel.
11. To remove the wheels, raise the release buttons
shown in diagram 11, and remove the first wheel. Repeat the operation with the other rear wheel.
WARNING: Check that the wheel units are fitted correctly.
The wheels may be removed to make the stroller more
compact when closed.
REMOVABLE BUMPER BAR
20. To remove the bumper bar, press the two small buttons located in the inner side of the armrests (diag. 20),
and pull the bumper bar towards your direction.
HEIGHT ADJUSTABLE HANDLE
To make the stroller more ergonomic and compact, it is
possible to adjust the height of the handle.
21. To raise or lower the handle of the stroller, operate
the external buttons, and adjust the handle to the position that you find most comfortable (diag. 21).
HOW TO FIT/REMOVE THE COVER
12. Insert the small round plastic devices, located at the
sides of the cover, into the slots inside the tubes (diagram 12); ensure that they are completely fitted to the
end of the slots (diagram 12 A).
13 Warning: The crotch strap is fixed to the seat support
of the frame (as shown in diag. 13 A): To use the crotch
SAFETY BRAKE
The safety brake locks both the rear wheels of the stroller
25
armrests as shown in the diagram. It is recommended
to raise the central part of the flap and then release the
plastic joints from the slots located on the armrests. Remove the bumper bar.
27. Operate the rear buttons on the armrests (diagram
27 A), and adjust them to the highest position (diagram
27 B).
WARNING: Before fitting the carrycot or the car seat,
check that the armrests are locked in the highest position. To fix the carrycot or car seat to the frame of the
stroller, please refer to the instructions supplied.
28. Remove the carrycot or the car seat as indicated in
the instructions, and readjust the armrests to the lowest
position, operating the rear button located on the armrests. Then push the armrests in a downward direction,
until they are safely locked into position (diag. 28).
WARNING: When using the transport system as a stroller, before seating the child on the cover of the stroller,
ensure that the armrests are adjusted to the low position,
with the fabric part fixed to the armrests.
The stroller may be closed with the armrests in the highest position; this will make the fitting of the carrycot and
car seat easier when the stroller is reopened.
at the same time.
22. To operate the brakes of the stroller, push the lever
located between the rear wheels in a downward direction, as shown in the diagram. To release the brake, pull
the lever located between the rear wheels in an upward
direction.
WARNING: Always apply the brakes whenever the stroller is stationary. WARNING: Never leave the stroller on
a sloped surface, with a child on board, even with the
brakes applied.
SLOWING DOWN BRAKE
WARNING: The intended use of the slowing down brake
is to slow down the speed of the stroller. Never use the
slowing down brake as a safety brake.
23. To slow down the stroller’s speed, use the brake
lever located on the handle (diag. 23 A). It is recommended to adjust the brakes regularly by turning nut A
(as shown in diagram 23 B), which adjusts both brake
shoes; If the two brakes are not aligned, it is possible
to adjust them independently operating nuts B. In both
cases, the brakes operate more efficiently if the nuts are
screwed in an anti-clockwise direction.
FRONT SWIVEL WHEEL
The stroller has a fixed/swivel front wheel.
It is recommended to use the fix wheel when using the
stroller on particularly uneven surfaces. The use of the
swivel wheel is recommended to increase the manoeuvrability of the stroller.
24. To use the front wheel in the swivel mode, push the
front lever in a downward direction with your foot, as
shown in diagram 24. To use the front wheel in the fixed
mode, lift the lever with the foot: the wheel will lock in the
straight position independently of its position.
ACCESSORIES:
WARNING: The accessories described below may not
be available for some of the models purchased. Please
read carefully the instructions on the accessories available for the model purchased.
SUMMER/WINTER HOOD
29. The stroller has two slots located on the sides which
allow you to fit accessories like the sun canopy and the
hood. To fit the canopy, insert the locking system of the
hood into the slots of the stroller’s frame, as shown in
diagram 29. To remove the hood, it is sufficient to slide
the locking devices in the opposite direction.
30. To open the hood, push the small front arch in a
forward direction, and lock it by operating the two small
side arches, as shown in diagram 30.
31. The hood may feature a zip, which allows you to
detach the rear panel and use the hood as a summer
canopy, as shown in diag. 31.
WARNING: Some stroller models may have a simpler
hood that does not feature the removable rear panel.
WARNING: The hood must be fixed on both sides of
the stroller. Check that the hood is safely fitted to the
stroller.
WARNING: Some hood models have a side pocket
that allows you to store some small object (e.g.: keys,
glasses, etc).
WARNING: Do not overload the pocket, since it has
been designed to store only small objects.
ADJUSTABLE REAR SUSPENSION
The stroller has an adjustable rear suspension.
25. To adjust the suspension, operate the lever indicated
in diag. 25. By moving the lever inward, the suspension
becomes softer (ideal for use with young children), while
by moving the lever externally, the suspension becomes
harder (ideal for older children).
Both suspension must be adjusted in the same way.
HOW TO USE THE CAR SEAT AND CARRYCOT
WARNING: Please read carefully the instruction booklets
on how to use the carrycot and car seat.
WARNING: Only the CHICCO car seats and carrycots
featuring the CLIK CLAK devices can be fitted to the
stroller. Before using the stroller with the carrycot or car
seat fitted to it, always check that the locking system is
correctly and safely locked.
The stroller has the Clik Clak system, which allows you
to fit the carrycot or car seat without using any further
locking devices.
The stroller can be fitted with the carrycot or the car seat,
both with or without stroller cover. To fit and remove the
cover of the stroller, please refer to the paragraph “How
to fit/remove the cover”.
26. The Clik Clak locking system is located on the armrests of the stroller. First unfasten the fabric cover of the
PILLOWS/INSERTS
The stroller can be fitted with two pillows/inserts, one for
the seat and one for the head. They can be used on either side. On one side, they have a soft and warm fleece
cover that is ideal for the winter, while on the other side
they have a special netting cover that ensures maximum
aeration in the summer (diag. 32).
The pillows have been designed and realized to ensure
26
43. Fit the monoshoulder rucksack as shown in diagram
43.
WARNING: The monoshoulder rucksack may be fitted
to the stroller’s frame only if the carrycot or car seat have
been fixed to the stroller. When the rucksack is fitted to
the handle, its weight must not exceed 2 Kg.
WARNING: Exceeding the above weight may affect the
stability of the stroller and overturn it.
WARNING: The rucksack must be fitted to the parent’s
shoulders, and not to the handle, when the transport
system is used as a stroller.
maximum comfort in each phase of baby’s growth and
in every season.
33. Check that the shoulder straps are adjusted to the
correct shoulder height of your child; if necessary, slide
them through the fabric holes of the stroller’s cover to
adjust their length (diagram 33).
34. Slide the shoulder straps in the holes of the pillow/insert (diagram 34).
35. Slide the crotch strap in the hole of the seat pillow
(diagram 35).
36. Slide the lap belt into the two side holes of the seat
pillow (diagram 36).
APRON
Some models may feature the apron, which is ideal in
cold weather.
37. Fit the apron as shown in the diagram, fastening the
press stud located on the lower part of the cover to the
stud located inside the apron (diagram 37).
38. Slide the apron under the bumper bar, and turn the
upper part over the bumper bar. Fasten the upturned
part to the apron through the correct device, as shown
in diagram 38.
HOW TO CLOSE THE STROLLER
Before closing the stroller, ensure that:
- The hood is closed.
- The basket is empty.
- The carrycot or car seat is not fitted to the stroller.
WARNING: When closing the stroller, ensure that your
child and other children are at a safe distance: ensure
that during these operations, the movable parts of the
stroller do not come into contact with your child.
44. Hold the stroller as shown in diagram 44.
45. The trigger open mechanism on the right has a
safety device. Operate the safety device, and then pull
both trigger open mechanisms towards you. Push the
brake lever with your foot and, at the same time, push
the handle in a forward direction. The stroller will begin
to close (diag. 45).
46. Close the stroller completely, until the side locking
system locks the stroller in the close position (diag. 46).
To make the stroller more compact, the handle may be
reclined to the forward position.
When the stroller is closed, it can be transported by
holding it by the handle.
When closed, the stroller will stand upright on its own.
FOOTMUFF
Some versions have a footmuff, which is ideal in very
cold weather.
39. The footmuff has holes which allow you to slide
through and use the safety harness even when you use
the footmuff (diag. 39). To ensure maximum comfort, you
may fit the pillows/inserts inside the footmuff.
40. The footmuff can be used as a footmuff (as shown in
diag. 40 A), turned inside out (as shown in diag. 40 B),
or it can be used as a normal apron, by opening the zips
and removing the lower part made of fleece.
RAIN COVER
The stroller may come with a rain cover.
41. Fix the rain cover as shown in diagram 41. After use,
if the rain cover is wet, let it dry in the air before storing
it.
WARNING: Do not use the rain cover if the stroller is not
fitted with the hood or sun canopy to prevent the risk of
suffocation.
WARNING: To prevent the risk of overheating or suffocation, never leave the stroller under the sun with the rain
cover fitted to it.
WARNING: Be extremely careful when using the rain
cover.
SHOPPING BASKET
42. The stroller has a shopping basket. Fix the basket by
pressing the studs, as shown in diagram 42. Do not load
the shopping basket with objects weighing over 3 Kg.
The rear side of the shopping basket has a pocket where
the pump and rain cover can be stored so as to have
them always ready to hand.
It is recommended to remove all objects from the shopping basket before closing the stroller.
CHICCO UK LTD
PROSPECT CLOSE - KIRKBY IN ASHFIELD
NOTTINGHAMSHIRE - NG17 7LF
Telephone: 01623 750870
Website: www.chicco.co.uk section “contact us”
MONOSHOULDER RUCKSACK
For some models it is available a practical monoshoulder
rucksack with changing mat.
27
66625_Z_1
EN 1888: 2003
www.chicco.com
COMO - ITALY
Cod. 60416
���
6-36
NF S 54-001
S3 Stroller - USA Model
WARNING: This S3 stroller can be used with children from 6 months and up to
40 lbs. To carry infants 0-6 months you MUST use a Chicco KeyFit or KeyFit 30 infant car
seat properly attached to the stroller (see KeyFit attachment instructions).
WARNING: Do not attempt to attach any infant car seat other than the Chicco
KeyFit or KeyFit 30. Injury or death may result when attempting to use this stroller in
conjunction with infant car seats from other manufacturers.
Before using the stroller with the car seat fitted to it, always check that the KeyFit car
seat attachment strap is positioned correctly and tightly fastened. The stroller can be fitted with the car seat, both with or without stroller soft goods. To fit and remove the soft
goods from the stroller, please refer to the main manual “How to fit/remove the cover”.
WARNING: Never leave child unattended in the stroller.
WARNING: Avoid serious injury from falling or sliding out. Always use seat belt.
Do not overload storage basket. Maximum weight 6 lbs.
Do not overload backpack while hanging on stroller. Maximum weight 1 lb.
Excessive weight will cause a hazardous unstable condition. Maximum weight for stroller
occupant is 40 lbs.
Do not add to the stroller any items or accessories not included as it may
become unstable.
EVA Tires
3
KeyFit® Attachment
4
2
This stroller has a 5-point safety harness featuring
two shoulder straps, a lap belt and a crotch strap
with dual safety buckle. The safety harness has
dual safety buttons to prevent the accidental
opening of the buckle by the child.
1. After seating your child in the stroller, insert the
two clips into the buckle and adjust the shoulder
straps as required, passing them through the holes
at the most suitable height. Adjust the height of
the shoulder straps and lap belt using the buckles.
2. To unfasten the lap belt, press the two
lateral pins and lift up.
WARNING: Always use the safety harness.
To attach the car seat to the stroller, make sure
seatback is fully-reclined (see section 19 in the
main manual).
4. Place car seat in stroller.
To remove the car seat from the stroller, unfasten
the KeyFit car seat attachment strap and pull up on
the car seat.
How To Use the Safety Harness
1
3. This model of the S3 stroller features EVA
tires which resist punctures, absorb shock, and
do not require inflation.
5
5. KeyFit infant seat will rest on stroller front bar.
Check to ensure the curvature on back of the
Chicco KeyFit infant car seat is resting securely on
stroller's front bar.
6
6. Secure the infant seat by fastening the
KeyFit car seat attachment strap over the seat.
Pull the strap so infant seat is tightly fastened.
Easy Fold
WARNING: When folding the stroller, ensure that your child and other
children are at a safe distance. Ensure that during these operations, the movable
parts of the stroller do not come into contact with your child.
7
Before folding the stroller, ensure that:
• The canopy is colapsed.
• The basket is empty.
• The car seat is not fitted to the stroller.
7. Hold the stroller as shown.
8
8. Pull both orange trigger open mechanisms
towards you. Push the brake lever with your foot
and, at the same time, push the handle in a forward
direction. The stroller will begin to fold.
9
9. Fold the stroller completely, until the side locking
system locks the stroller in the closed position.
To make the stroller more compact, raise the handle
to the highest position. When the stroller is folded, it
can be transported by holding it by the handle. When
folded, the stroller will stand upright on its own.
See the main manual for instructions on unfolding
the stroller.
For More Information:
By phone (toll free): (877)-424-4226
By e-mail: [email protected]
By mail: Chicco USA, Inc., 1835 Freedom Road, Lancaster, PA 17601
www.chiccousa.com