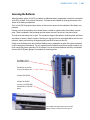
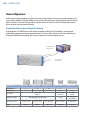
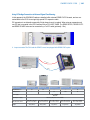
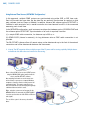
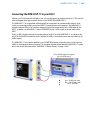
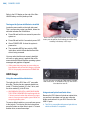
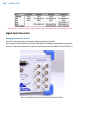
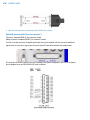
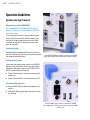
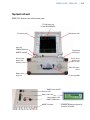
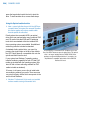
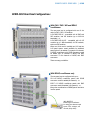
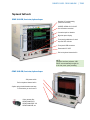
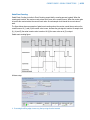
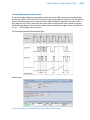
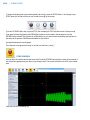
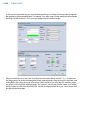
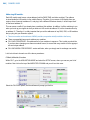
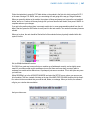
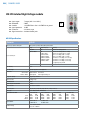
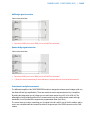
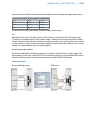
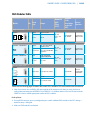
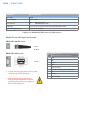
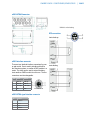
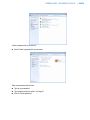
1
Dewetron USA Owner’s Guide Energy test Flight test Vehicle test Industrial D3PC, D310, DEWE-3210 DEWE-3040-RM DEWE-3050 data acquisition instruments Important notices Contents © 2007-2013 Dewetron, Inc. The contents of this manual are protected by copyright law, and may be reproduced only with the express written permission of Dewetron, Inc. All rights are reserved. Contact the company at our address here: Dewetron, Inc. 10 High Street, Ste K, Wakefield, RI 02879 USA Telephone: +1 401-284-3750 Fax: +1 401-284-3755 email: [email protected] web: www.dewamerica.com SideHAND is a registered trademark of Dewetron, Inc. Dewetron is a trademark of Dewetron GesmbH Microsoft, Microsoft Windows XP and Microsoft Windows 7 are registered trademarks of Microsoft Corporation Matlab® is a trademark of The Mathworks, Inc. Flexpro® is a trademark of Weisang GMBH nCode is copyrighted by HBM, Inc. Dewesoft is a trademark of Dewesoft d.o.o. Met/CAL® is a trademark of Fluke Corporation Vector and DBC are the properties of Vector Informatik GmbH All copyrights and trademarks acknowledged to be the properties of their owners. Printed in USA 10 9 8 7 6 5 4 3 2 1 OWNER’s GUIDE - DEWE-3210 series | iii Contents 1 Introduction1-11 Training . . . . . . . . . . . . . . . . . . . . . . . . . . . . . . . . . 1-11 Support . . . . . . . . . . . . . . . . . . . . . . . . . . . . . . . . . 1-11 Calibration . . . . . . . . . . . . . . . . . . . . . . . . . . . . . . . . 1-12 Certificate included. . . . . . . . . . . . . . . . . . . . . . . . . . . . 1-12 Models Covered . . . . . . . . . . . . . . . . . . . . . . . . . . . . . . 1-12 What’s in this Guide. . . . . . . . . . . . . . . . . . . . . . . . . . . . 1-12 And what is not in this guide: . . . . . . . . . . . . . . . . . . . . . . . 1-12 2 Safety precautions 2-13 BIOS notification:. . . . . . . . . . . . . . . . . . . . . . . . . . . . . 2-14 Windows updates and antivirus/security software . . . . . . . . . . . . . . 2-15 Problematic network stacks . . . . . . . . . . . . . . . . . . . . . . . . 2-15 System and Components Recycling. . . . . . . . . . . . . . . . . . . . . 2-15 Restriction of Hazardous Substances . . . . . . . . . . . . . . . . . . . . 2-15 3 D310 Series 3-17 System Dimensions. . . . . . . . . . . . . . . . . . . . . . . . . . . . 3-18 Top-level call-outs. . . . . . . . . . . . . . . . . . . . . . . . . . . . . 3-19 Top-level call-outs (continued). . . . . . . . . . . . . . . . . . . . . . . 3-20 D310 Left Side Panel. . . . . . . . . . . . . . . . . . . . . . . . . . . . 3-20 Accessing the Batteries . . . . . . . . . . . . . . . . . . . . . . . . . . 3-21 Signal conditioning . . . . . . . . . . . . . . . . . . . . . . . . . . . . 3-22 A/D card(s). . . . . . . . . . . . . . . . . . . . . . . . . . . . . . . . 3-22 Interface(s). . . . . . . . . . . . . . . . . . . . . . . . . . . . . . . . 3-23 Video Cameras . . . . . . . . . . . . . . . . . . . . . . . . . . . . . . 3-23 Installing the 310-UPS option . . . . . . . . . . . . . . . . . . . . . . . . 3-24 Configuration guide, D310 with MDAQ panel. . . . . . . . . . . . . . . . 3-26 iv | Table of Contents Configuration guide, D310 model. . . . . . . . . . . . . . . . . . . . . . 3-27 Connecting EPAD2 modules to your D310 (DAQ or MDAQ version). . . . . . . 3-27 System Connectors. . . . . . . . . . . . . . . . . . . . . . . . . . . . . 3-28 System/PC connectors. . . . . . . . . . . . . . . . . . . . . . . . . . . 3-28 Computer Connectors. . . . . . . . . . . . . . . . . . . . . . . . . . . 3-30 Signal Input Connectors . . . . . . . . . . . . . . . . . . . . . . . . . . 3-36 Channel Expansion . . . . . . . . . . . . . . . . . . . . . . . . . . . . 3-40 Connecting the MOB-DISP-17 to your D310. . . . . . . . . . . . . . . . . 3-43 Operation Guidelines. . . . . . . . . . . . . . . . . . . . . . . . . . . . 3-44 System Startup Protocol. . . . . . . . . . . . . . . . . . . . . . . . . . 3-44 HDD Usage. . . . . . . . . . . . . . . . . . . . . . . . . . . . . . . . 3-46 Basic Specifcations. . . . . . . . . . . . . . . . . . . . . . . . . . . . 3-47 Additional Specifications. . . . . . . . . . . . . . . . . . . . . . . . . . 3-48 Digital and clock line specs . . . . . . . . . . . . . . . . . . . . . . . . . 3-48 Standard Counter/Encoders. . . . . . . . . . . . . . . . . . . . . . . . 3-49 Advanced Counter/Encoders (UP-ORION-CTR8 option). . . . . . . . . . . . 3-49 CAN BUS specs (UP-ORION-CAN2 option). . . . . . . . . . . . . . . . . . 3-49 4 D3PC-8 Model 4-51 System Dimensions. . . . . . . . . . . . . . . . . . . . . . . . . . . . 4-52 Top-level call-outs. . . . . . . . . . . . . . . . . . . . . . . . . . . . . 4-53 Signal conditioning . . . . . . . . . . . . . . . . . . . . . . . . . . . . 4-54 A/D card . . . . . . . . . . . . . . . . . . . . . . . . . . . . . . . . . 4-54 Interface(s). . . . . . . . . . . . . . . . . . . . . . . . . . . . . . . . 4-55 Video Cameras . . . . . . . . . . . . . . . . . . . . . . . . . . . . . . 4-55 Connecting EPAD2 modules to your D3PC-8. . . . . . . . . . . . . . . . . 4-56 Connecting a Standard VGA/XGA Monitor to your D3PC-8. . . . . . . . . . . 4-57 Connecting the MOB-DISP-17 to your D3PC-8. . . . . . . . . . . . . . . . 4-58 Using the New iPAD as a Wireless Display with your D3PC-8. . . . . . . . . . 4-59 System Connectors. . . . . . . . . . . . . . . . . . . . . . . . . . . . . 4-60 Computer Connectors. . . . . . . . . . . . . . . . . . . . . . . . . . . 4-61 Signal Input Connectors . . . . . . . . . . . . . . . . . . . . . . . . . . 4-68 Synchronizing Multiple D3PC-8 Systems. . . . . . . . . . . . . . . . . . . 4-71 | v Operation Guidelines. . . . . . . . . . . . . . . . . . . . . . . . . . . 4-72 System Startup Protocol. . . . . . . . . . . . . . . . . . . . . . . . . . 4-72 Hardware Protocols . . . . . . . . . . . . . . . . . . . . . . . . . . . . 4-73 Basic Specifcations. . . . . . . . . . . . . . . . . . . . . . . . . . . . 4-74 Digital and clock line specs . . . . . . . . . . . . . . . . . . . . . . . . . 4-75 Standard Counter/Encoders. . . . . . . . . . . . . . . . . . . . . . . . 4-75 Advanced Counter/Encoders (UP-ORION-CTR8 option). . . . . . . . . . . . 4-76 CAN BUS specs (UP-ORION-CAN2 option). . . . . . . . . . . . . . . . . . 4-76 5 DEWE-3210 Series 5-77 System Dimensions. . . . . . . . . . . . . . . . . . . . . . . . . . . . 5-78 Top-level call-outs. . . . . . . . . . . . . . . . . . . . . . . . . . . . . 5-79 Signal conditioning . . . . . . . . . . . . . . . . . . . . . . . . . . . . 5-80 A/D card(s). . . . . . . . . . . . . . . . . . . . . . . . . . . . . . . . 5-80 Interface(s). . . . . . . . . . . . . . . . . . . . . . . . . . . . . . . . 5-81 Video Cameras . . . . . . . . . . . . . . . . . . . . . . . . . . . . . . 5-81 Configuration guide, DEWE-3211 model. . . . . . . . . . . . . . . . . . 5-82 Configuration guide, DEWE-3210 model. . . . . . . . . . . . . . . . . . 5-82 System Connectors. . . . . . . . . . . . . . . . . . . . . . . . . . . . . 5-83 System/PC connectors. . . . . . . . . . . . . . . . . . . . . . . . . . . 5-83 Computer Connectors. . . . . . . . . . . . . . . . . . . . . . . . . . . 5-85 Signal Input Connectors . . . . . . . . . . . . . . . . . . . . . . . . . . 5-91 Expansion connector (DEWE-3210 model). . . . . . . . . . . . . . . . . . 5-93 Operation Guidelines . . . . . . . . . . . . . . . . . . . . . . . . . . . 5-95 System Startup Protocol. . . . . . . . . . . . . . . . . . . . . . . . . . 5-95 Hardware Protocols . . . . . . . . . . . . . . . . . . . . . . . . . . . . 5-97 Analog Specifications. . . . . . . . . . . . . . . . . . . . . . . . . . . 5-99 Counter/Encoder Specifications. . . . . . . . . . . . . . . . . . . . . . 5-100 CAN BUS Specifications. . . . . . . . . . . . . . . . . . . . . . . . . . 5-100 Interfaces. . . . . . . . . . . . . . . . . . . . . . . . . . . . . . . . 5-101 Accessories Included. . . . . . . . . . . . . . . . . . . . . . . . . . . 5-101 Computer System Specifications. . . . . . . . . . . . . . . . . . . . . . 5-102 Data Acquisition Software Specifications . . . . . . . . . . . . . . . . . . 5-103 vi| 6 DEWE-3050 Series 6-105 System Dimensions. . . . . . . . . . . . . . . . . . . . . . . . . . . . 6-106 Top-level call-outs. . . . . . . . . . . . . . . . . . . . . . . . . . . . 6-107 Top-level call-outs (continued). . . . . . . . . . . . . . . . . . . . . . . 6-108 DEWE-3050, rear view, TWO 2.5U-PANEL-16s installed (32 slots). . . . . . . 6-108 DEWE-3050 Rear Panel Configurations. . . . . . . . . . . . . . . . . . . 6-109 DEWE-3050, front view, display removed - keyboard revealed. . . . . . . . 6-110 Additional Function Panels. . . . . . . . . . . . . . . . . . . . . . . . 6-110 Signal conditioning . . . . . . . . . . . . . . . . . . . . . . . . . . . 6-112 A/D card(s). . . . . . . . . . . . . . . . . . . . . . . . . . . . . . . 6-112 Interface(s). . . . . . . . . . . . . . . . . . . . . . . . . . . . . . . 6-113 Video Cameras . . . . . . . . . . . . . . . . . . . . . . . . . . . . . . 6-113 System Connectors. . . . . . . . . . . . . . . . . . . . . . . . . . . . 6-114 System/PC connectors. . . . . . . . . . . . . . . . . . . . . . . . . . . 6-114 PC Connector Call-Outs . . . . . . . . . . . . . . . . . . . . . . . . . . 6-115 Signal Input Connectors . . . . . . . . . . . . . . . . . . . . . . . . . 6-119 Operation Guidelines. . . . . . . . . . . . . . . . . . . . . . . . . . . 6-122 System Startup Protocol. . . . . . . . . . . . . . . . . . . . . . . . . 6-122 Hardware Protocols . . . . . . . . . . . . . . . . . . . . . . . . . . . 6-124 Additional Specifications . . . . . . . . . . . . . . . . . . . . . . . . . 6-127 7 DEWE-3040-RM Series 7-129 System Dimensions. . . . . . . . . . . . . . . . . . . . . . . . . . . . 7-130 Top Level Call-outs . . . . . . . . . . . . . . . . . . . . . . . . . . . . 7-131 Top-level call-outs (continued). . . . . . . . . . . . . . . . . . . . . . . 7-132 DEWE-3040-RM, front view, Control Panel Close-up. . . . . . . . . . . . . 7-132 DEWE-3040-RM Rear Panel Configurations. . . . . . . . . . . . . . . . . 7-133 DEWE-3050, front view, display removed - keyboard revealed. . . . . . . . 7-134 Signal conditioning . . . . . . . . . . . . . . . . . . . . . . . . . . . 7-136 A/D card(s). . . . . . . . . . . . . . . . . . . . . . . . . . . . . . . 7-136 Interface(s). . . . . . . . . . . . . . . . . . . . . . . . . . . . . . . 7-137 Video Cameras . . . . . . . . . . . . . . . . . . . . . . . . . . . . . . 7-137 System Connectors. . . . . . . . . . . . . . . . . . . . . . . . . . . . 7-138 |vii System/PC connectors. . . . . . . . . . . . . . . . . . . . . . . . . . . 7-138 Top Rear Panel Connectors. . . . . . . . . . . . . . . . . . . . . . . . . 7-139 Right Side Panel. . . . . . . . . . . . . . . . . . . . . . . . . . . . . 7-139 Signal Input Connectors . . . . . . . . . . . . . . . . . . . . . . . . . 7-143 Operation Guidelines. . . . . . . . . . . . . . . . . . . . . . . . . . . 7-145 System Startup Protocol. . . . . . . . . . . . . . . . . . . . . . . . . 7-145 Hardware Protocols . . . . . . . . . . . . . . . . . . . . . . . . . . . 7-145 Additional Specifications . . . . . . . . . . . . . . . . . . . . . . . . . 7-147 8 Signal Connections / Counters 8-149 Analog input connections. . . . . . . . . . . . . . . . . . . . . . . . . 8-149 Counter/Encoder input connections . . . . . . . . . . . . . . . . . . . . 8-150 Counter Applications. . . . . . . . . . . . . . . . . . . . . . . . . . . 8-151 9 Software Overview 9-167 LabVIEW Drivers for ORION and DAQ Modules . . . . . . . . . . . . . . . 9-168 DEWESoft Turn-key Application (DS-7). . . . . . . . . . . . . . . . . . . 9-171 DS-7 Software Specifications. . . . . . . . . . . . . . . . . . . . . . . 9-172 DS-7 Operation Part 1: Acquisition and Analysis. . . . . . . . . . . . . . . 9-175 Projects and Global settings. . . . . . . . . . . . . . . . . . . . . . . . 9-211 Matlab - Exporting Data from DS-7 . . . . . . . . . . . . . . . . . . . . 9-237 10 Important Accessories 10-243 DPS-2410 external AC/DC power supply. . . . . . . . . . . . . . . . . 10-243 Neutrino-4. . . . . . . . . . . . . . . . . . . . . . . . . . . . . . .10-247 BAT-CHARGER-1. . . . . . . . . . . . . . . . . . . . . . . . . . . . 10-251 DEWE-DCDC-24-300-ISO. . . . . . . . . . . . . . . . . . . . . . . . 10-255 MOB-DISP-17 Mobile Display . . . . . . . . . . . . . . . . . . . . . . 10-256 11 Signal/Sensor Adapters 11-261 MSI series interfaces. . . . . . . . . . . . . . . . . . . . . . . . . . 11-261 Adapters. . . . . . . . . . . . . . . . . . . . . . . . . . . . . . . . 11-263 viii| 12 HSI Series Signal Conditioners 273 HSI Series Modules. . . . . . . . . . . . . . . . . . . . . . . . . . . . . 273 HSI-HV Isolated High Voltage module . . . . . . . . . . . . . . . . . . . . 280 HSI-LV Isolated Low Voltage Module. . . . . . . . . . . . . . . . . . . . . 282 HSI-STG Isolated Universal Input Module. . . . . . . . . . . . . . . . . . . 286 13 DAQ Series Signal Conditioners 13-293 DAQ Series Modules. . . . . . . . . . . . . . . . . . . . . . . . . . .13-293 DAQP-HV (and -S3) Isolated High Voltage module (300/700 kHz). . . . . . 13-303 DAQP-DMM Isolated High Voltage Module (20/30 kHz). . . . . . . . . . 13-305 DAQP-LV Isolated Low Voltage Module (300 kHz) . . . . . . . . . . . . . 13-307 DAQP-V Isolated Low Voltage Module (50 kHz) . . . . . . . . . . . . . . 13-311 DAQP-LA and LA-SC Isolated Current Module . . . . . . . . . . . . . . . 13-313 DAQP-STG Isolated Universal Input Module . . . . . . . . . . . . . . . . 13-315 DAQP-BRIDGE-A Isolated Strain Gage Module. . . . . . . . . . . . . . . 13-323 DAQP-BRIDGE-B Strain Gage Module. . . . . . . . . . . . . . . . . . . 13-327 DAQP-CFB Carrier Frequency/LVDT module. . . . . . . . . . . . . . . . 13-331 DAQP-ACC-A IEPE Accelerometer module. . . . . . . . . . . . . . . . . 13-335 DAQP-CHARGE-A Charge/IEPE module. . . . . . . . . . . . . . . . . . 13-337 DAQP-CHARGE-B Isolated Static/Dynamic Charge module. . . . . . . . . 13-339 DAQP-THERM Isolated Thermocouple module. . . . . . . . . . . . . . . 13-341 DAQP-MULTI Isolated Multifunction module . . . . . . . . . . . . . . . 13-343 DAQP-FREQ-A Frequency to Voltage module . . . . . . . . . . . . . . . 13-349 DAQN-V-OUT Isolated Voltage Output module . . . . . . . . . . . . . . 13-351 14 PAD series Signal Conditioners 14-353 PAD Series Common Information . . . . . . . . . . . . . . . . . . . . . 14-353 Calibration information. . . . . . . . . . . . . . . . . . . . . . . . . 14-353 General PAD module specifications. . . . . . . . . . . . . . . . . . . . 14-353 PAD Module Connectors. . . . . . . . . . . . . . . . . . . . . . . . . 14-354 PAD Modules Table. . . . . . . . . . . . . . . . . . . . . . . . . . . 14-355 Adding PAD modules to your Dewtetron system: . . . . . . . . . . . . . 14-356 Typical hook-ups . . . . . . . . . . . . . . . . . . . . . . . . . . . . 14-356 |ix Addressing PAD modules. . . . . . . . . . . . . . . . . . . . . . . . 14-357 PAD-V8-P Isolated 8-channel Voltage module. . . . . . . . . . . . . . .14-361 PAD-TH8-P Isolated 8-channel Temperature module. . . . . . . . . . . . 14-363 PAD-DO7 Isolated 7-channel Relay Output module. . . . . . . . . . . . 14-365 PAD-AO1 Isolated 1-channel Analog Output module. . . . . . . . . . . . 14-367 15 MDAQ Series Conditioners 15-369 MDAQ Series Common Information . . . . . . . . . . . . . . . . . . . . 15-369 General MDAQ module specifications. . . . . . . . . . . . . . . . . . .15-369 MDAQ-BASE-5 Mother Board. . . . . . . . . . . . . . . . . . . . . . 15-370 MDAQ-SUB-STG 8-channel Strain Gage/Bridge module . . . . . . . . . . 15-372 MDAQ-SUB-BRIDGE 8-channel Bridge module. . . . . . . . . . . . . . 15-377 MDAQ-SUB-V200 Differential Voltage Input module . . . . . . . . . . . 15-381 MDAQ-SUB-ACC IEPE Accelerometer module . . . . . . . . . . . . . . . 15-385 MDAQ-SUB-ACC-A IEPE Accelerometer module . . . . . . . . . . . . . . 15-387 MDAQ-FILT-5-Bx Filter card. . . . . . . . . . . . . . . . . . . . . . . 15-389 MDAQ-AAF4-5-Bx Filter card . . . . . . . . . . . . . . . . . . . . . . 15-390 16 EPAD2 and CPAD2 Series 16-391 EPAD2 and CPAD2 overview. . . . . . . . . . . . . . . . . . . . . . . 16-391 General EPAD2/CPAD2 Module Specifications . . . . . . . . . . . . . . . 16-392 xPAD2 Series Calibration Information. . . . . . . . . . . . . . . . . . .16-395 EPAD2-TH8-X and CPAD2-TH8-X. . . . . . . . . . . . . . . . . . . . . 16-396 EPAD2-V8-X and CPAD2-V8-X . . . . . . . . . . . . . . . . . . . . . . 16-398 EPAD2-RTD8 and CPAD2-RTD8. . . . . . . . . . . . . . . . . . . . . . 16-400 EPAD2-TH8 and CPAD2-TH8. . . . . . . . . . . . . . . . . . . . . . . 16-402 EPAD2-LA8 and CPAD2-LA8. . . . . . . . . . . . . . . . . . . . . . . 16-404 17 ORION Series A/D Cards 17-407 ORION series Cross-Reference. . . . . . . . . . . . . . . . . . . . . . 17-407 ORION Overview. . . . . . . . . . . . . . . . . . . . . . . . . . . . 17-408 A/D Technologies within the ORION series. . . . . . . . . . . . . . . . .17-408 Combining ORION cards. . . . . . . . . . . . . . . . . . . . . . . . . 17-409 x| ORION-0424-200. . . . . . . . . . . . . . . . . . . . . . . . . . . . 17-412 ORION-0824-200. . . . . . . . . . . . . . . . . . . . . . . . . . . . 17-413 ORION-1624-200. . . . . . . . . . . . . . . . . . . . . . . . . . . . 17-414 ORION-1622-100 and ORION-3222-100. . . . . . . . . . . . . . . . . 17-415 18 DEWETRON Interfaces 18-417 DEWE-CLOCK time code interface card. . . . . . . . . . . . . . . . . . 18-417 VIDEO-FG-4 interface card. . . . . . . . . . . . . . . . . . . . . . . . 18-433 ARINC-429 and MIL-STD-1553 interfaces. . . . . . . . . . . . . . . . . 18-437 CAN BUS interfaces . . . . . . . . . . . . . . . . . . . . . . . . . . . 18-442 19 DEWETRON Sensors 19-451 DEWE-CAMS. . . . . . . . . . . . . . . . . . . . . . . . . . . . . . 19-452 DEWE-CAM-USB. . . . . . . . . . . . . . . . . . . . . . . . . . . . 19-452 DEWE-CAM-FW-70 . . . . . . . . . . . . . . . . . . . . . . . . . . .19-456 GPS Sensors . . . . . . . . . . . . . . . . . . . . . . . . . . . . . . 19-461 DEWE-VGPS-200C. . . . . . . . . . . . . . . . . . . . . . . . . . . 19-461 DEWE-VGPS-HS High Speed GPS Sensor . . . . . . . . . . . . . . . . . 19-462 20 Using the iPad as a Wireless Display 20-463 System Requirements. . . . . . . . . . . . . . . . . . . . . . . . . . 20-463 1. Create a Passworded USER account . . . . . . . . . . . . . . . . . . 20-464 2. Allow Remote Desktop in Windows . . . . . . . . . . . . . . . . . . 20-466 3. Connect your USER account to RDP. . . . . . . . . . . . . . . . . . .20-468 4. Set the DEWE Computer’s WIFI adapter to a fixed IP Address. . . . . . . 20-468 5. Allowing Remote Desktop through the DEWE Computer’s Firewall . . . . 20-472 6. Create a Private WIFI network with your Wireless Router. . . . . . . . .20-474 7. Connect the DEWE computer to your private network . . . . . . . . . . 20-475 8. Connect the new iPad to your private network. . . . . . . . . . . . . 20-476 9. Gestures. . . . . . . . . . . . . . . . . . . . . . . . . . . . . . .20-480 Appendix A-485 OWNER’s GUIDE - Section 1, Introduction | 1-11 1 Introduction The products covered in this manual are the data acquisition instruments within the DEWETRON line manufactured by Dewetron, Inc in the United States of America. D300 and DEWE-3000 series instruments are a unqiue combination of a state-of-the-art computer which has been ruggedized for field applications in industrial applications, plus a signal conditioning front-end system for interfacing with sensors and interfaces, an A/D card for digitizing the conditioned signals, and powerful data acquisition software that allows you to set up and initiate data acquisition, as well as to analyze data that has been replayed. There are several models, because there are so many applications for our products, in different industries, and with different requirements for size, form factor, and capabilities. Training DEWETRON offers training at various offices around the world several times each year. DEWETRON headquaters in Austria have a very large and professional conference and seminar center, where training classes are conducted on a regular basis starting with sensors and signal conditioning, A/D technology and software operation. Dewetron Inc. in the USA also has a dedicated training facility connected to its headquarters, located in Rhode Island. For more information about training services in the US, please visit: http://www.dewamerica.com/support/training Support DEWETRON has a team of people ready to assist you if you have any questions or any technical difficulties regarding the system. For any support please contact your local distributor first or DEWETRON directly. For North and South America, please contact: Dewetron, Inc. 10 High Street, Suite K Wakefield, RI 02879 U.S.A. Tel: +1 401-284-3750 Fax: +1 401-284-3755 [email protected] www.dewamerica.com For Asia and Europe, please contact: Dewetron Ges.m.b.H. Parkring 4 A-8074 Graz-Grambach AUSTRIA Tel.: +43 316 3070 Fax: +43 316 307090 [email protected] www.dewetron.com 1-12| OWNER’s GUIDE Calibration Every measuring instrument should be calibrated at regular intervals. The norm across nearly every industry is annual calibration, although this can vary according to the industry, environment, government regulations, and other regulations. Models Covered This owner’s guide covers the following model(s): D3PC D310 DEWE-3210 Before your Dewetron data acquisition system is delivered, it is calibrated at our factory in the USA. Dewetron utilizes a NIST traceable metrology system based on the Fluke 5500 series calibrator and other industry leading instruments. We have created numerous Met/CAL® procedures and specialized calibration hardware and software to allow the automation of calibration check and adjustment of nearly every signal conditioner and A/D card that we manufacture. These procedures are proprietary to Dewetron, although they are available for purchase. Customers who have the same Fluke hardware can use them to similarly automate their calibration of Dewetron instruments. DEWE-3040-RM Calibration services are available directly from Dewetron, on whatever frequency you require. We do not subcontract calibration services, and perform it ourselves in house. Detailed specs for each model Contact Dewetron for further information about calibration services and calibration equipment that is available for purchase. As a top-level reference, This manual is not meant to replace the comprehence reference manuals related to Dewetron sensors, signal conditioners, A/D cards, interfaces, and software. Certificate included Each system is delivered with a certificate of compliance with our published specifications. However, if you require a traceable calibration certification with data, calibration reports are available for purchase with each order. We retain them for at least one year, so calibration reports can be purchased after your system was delivered. DEWE-3050 What’s in this Guide This guide is intended to serve as the top level reference document for the models listed above. As such, it contains the following key information: Support and calibration contact info Safety precautions System overview and block diagram Overview of all models Quick start guide operation And what is not in this guide: Please see those manuals for complete details. OWNER’s GUIDE - Section 2, Safety Precautions | 2-13 2 Safety precautions Your safety is our primary concern! Please be safe at all times. General safety and hazard warnings for all Dewetron systems: Symbols used in this manual: ♦♦ Use this system under the terms of the specifications only to avoid any possible danger. Maintenance should be performed by qualified personnel only. ♦♦ During the use of the system, it might be possible to interact with non-Dewetron systems. Please read and follow the safety instructions provided in the manuals of all other components regarding warning and security advices for using the system. ♦♦ With this product, only use the power cable delivered or defined for the host country. ♦♦ Do not connect or disconnect sensors, probes or test leads, as these parts are connected to a voltage supply unit. ♦♦ The system is grounded via a protective conductor in the Indicates hazardous voltages WARNING power supply cord. To avoid electric shocks, the protective conductor must be connected with the ground of the power network. Before connecting the input or output connectors of the system, make sure that there is a proper grounding to guarantee potential free usage. For countries, in which there is no proper grounding, please refere to your local legally safety regulations for safety use. Calls attention to a procedure, practice, or condition that could cause bodily injury or death. ♦♦ DC systems: Every DC system has a grounding connected to CAUTION ♦♦ Please note the characteristics and indicators on the system Calls attention to a procedure, practice, or condition that could possibly cause damage to equipment or permanent loss of data. ♦♦ The inputs are not, unless otherwise noted (CATx identifica- ⇒⇒ These notices are sometimes indicated in this graphical motif. The following general safety precautions must be observed during all phases of operation, service, and repair of this product. Failure to comply with these precautions or with specific warnings elsewhere in this manual violates safety standards of design, manufacture, and intended use of the product. DEWETRON Elektronische Messgeraete Ges.m.b.H. assumes no liability for the customer’s failure to comply with these requirements. the chassis (yellow/green safety banana plug). to avoid fire or electric shocks. Before connecting the system, please carefully read the corresponding specifications in the product manual. tion), for connecting to the main circuit of category II, III and IV. ♦♦ The power cord separates the system from the power supply. Do not block the power cord, since it has to be accessible for the users. ♦♦ Do not use the system if equipment covers or shields are removed. ♦♦ If you assume the system is damaged, get it examined by authorized personnel only. ♦♦ Any use in wet rooms, outdoors or in adverse environmental condition is not allowed! Adverse environmental conditions are: moisture or high humidity, dust, flammable gases, fumes or storms. et al. 2-14| OWNER’s GUIDE ♦♦ The measurement category can be adjusted depending on module configuration. ♦♦ Any direct voltage output is protected with a fuse against short cut and reverse-polarity, but is not galvanically isolated (except when explicitly marked on the system). ♦♦ The system must be connected and operated to a properly grounded wall socket at the AC mains power supply only (except for DC systems). ♦♦ Any other use than described above may damage your system and is attended with dangers like shortcut, fire or electric shocks. ♦♦ The whole system must not be changed, rebuilt or opened (except for changing DAQP, HSI, PAD, CPAD2, and EPAD2 modules). ♦♦ If you believe for any reason that the system cannot be used without risk, the system must be rendered inoperative and should be protected against inadvertant operation. You should assume that riskless operation is not possible if the system is: visibly damaged; emits unusual noises, smoke, or flames; if it does not function anymore; if the system has been exposed to long storage in adverse environmental conditions; if the system has been exposed to heavy stresses. ♦♦ Do not touch any exposed connectors or components if they are carrying voltage and/or current. The use of non-insulated wires with the system is never allowed. There is a risk of short circuit and fire hazard. please refer to the specifications. ♦♦ Make sure that your hands, shoes, clothes, the floor, the sys- tem or measuring leads, integrated curcuits and so on, are dry. ♦♦ DO NOT use the system in rooms with flammable gases, fumes or dust or in adverse environmental conditions. ♦♦ Avoid operation in the immediate vicinity of high magnetic or electromagnetic fields transmitting antennas or high-frequency generators ♦♦ For exact values please refere to enclosed specifications. ♦♦ Use measurement leads or measurement accessories aligned to the specification of the system only. Fire hazard in case of overload! ♦♦ Do not switch on the system after transporting it from a cold into a warm room and vice versa. The thereby created condensation may damage your system. Acclimate the unpowered system to room temperature. ♦♦ Do not disassemble the system! There is a high risk of getting a perilous electric shock. Capacitors may still be charged, even the system has been disconnected from the power supply. ♦♦ The electrical installations and equipments in industrial facilities must be observed by the security regulations and insurance institutions. ♦♦ The use of the measuring system in schools and other training facilities must be observerd by skilled personnel. ♦♦ Warranty void if damages caused by disregarding this manual. ♦♦ The measuring systems are not designed for use on human ♦♦ Warranty void if damages to property or persons caused by ♦♦ Please contact a professional if you have doubts about the ♦♦ Unauthorized changing or rebuilding the system is prohibited ♦♦ Please be careful with the product. Shocks, hits and dropping For consequential damages NO liability will be assumed! improper use or disregarding the safety instructions. due to safety and permission reasons (CE). Exception: changing modules like DAQ, DAQP or PAD. ♦♦ The assembly of the system is equivalent to protection class I. For power supply, only the correct power socket of the public power supply must be used, except the system is DC powered. ♦♦ Be careful with voltages >25 VAC or >35 VDC! These voltages are already high enough in order to get a dangerous electric shock by touching the wiring. ♦♦ The system heats up during operation. Make sure there is beings or animals. method of operation, safety or the connection of the system. it from even low levels may damage the batteries, or the whole system. For exact values please refere to enclosed specifications. ♦♦ Please also consider the detailed technical reference manual as well as the security advices of the connected systems. ♦♦ This product has left the factory in safety-related proper condition. In order to maintain this condition and guarantee safety use, the user must observe the security advice, protocols, and warnings in this manual. adequate ventilation. Ventilation slots must not covered! ♦♦ Only fuses of the specified type and nominal current may be used. The use of patched fuses is prohibited. ♦♦ Prevent using metal bare wires! Risk of short cut and fire hazard! ♦♦ DO NOT use the system before, during or shortly after a thunderstorm (risk of lightning and high energy overvoltage). An advanced range of application under certain conditions is allowed with therefore designed products only. For details BIOS notification: The system BIOS is protected by password. Any change in the BIOS may cause a system crash. When the system is booting, do not press ESC-button on keyboard. This may clear the BIOS settings OWNER’s GUIDE - Section 2, Safety Precautions | 2-15 and cause system faults. Any change in the file structure as deleting or adding files or directories might cause a system crash. Before installing software updates contact Dewetron or your local distributor. Use only software packages which are released by DEWETRON. Further informations are also available in the internet (http:// www.dewetron.com). After power off the system wait at least 10 seconds before switching the system on again. Otherwise the system may not boot correct. This prolongs also the life of all system components. Windows updates and antivirus/ security software ♦♦ Before installing Windows software updates consult with Dewetron for compatibility guidance. Please also keep in mind that the use of any antivirus or other security software may slow down your system and may cause data loss. Problematic network stacks ♦♦ Often intrusive IT software or network processes can interfere with the primary function of the Dewetron system: to record data. Therefore we recommend strongly against the installation of IT/MIS software and running their processes on any Dewetron data acquisition system, and cannot guarantee the performance of our systems if they are so configured. Product End-of-Life Handling Observe the following guidelines when recycling a Dewetron system: System and Components Recycling Production of these components required the extraction and use of natural resources. The substances contained in the system could be harmful to your health and to the environment if the system is improperly handled at it’s end of life! Please recycle this product in an appropriate way to avoid an unnecessary pollution of the environment and to keep natural resources. tron.com This symbol indicates that this system complies with the European Union’s requirements according to Directive 2002/96/EC on waste electrical and electronic equipment (WEEE). Please find further informations about recycling on the DEWETRON web site www.dewe- Restriction of Hazardous Substances This product has been classified as Monitoring and Control equipment, and is outside the scope of the 2002/95/EC RoHS Directive. This product is known to contain lead. 2-16| OWNER’s GUIDE OWNER’s GUIDE - D310 | 3-17 3 D310 Series The D310 is an economical and portable data acquisition instrument. In this model the 15” touchscreen display and battery capabilities are options that must be ordered with the machine is built. It is capable of housing any 8 Dewetron plug-in isolation modules (DAQ/PAD/HSI series) or 16 MDAQ differential conditioner channels. This model is manufactured at the company’s facilities in the USA. It has all of the capabilties of the DEWE-3210, except in a more affordable package. This section will review the hardware characteristics and specifications of the D310 series, including its properties as a computer instrument, and all data acquisition components, including the A/D cards, signal conditioners, and interfaces with which it is compatible. Please refer to the SOFTWARE section of this manual to learn how to operate the turn-key data acquisition software installed on the system. Please refer to the separate sections for the SIGNAL CONDITIONERS, A/D CARDS, INTERFACES and SENSORS for complete details about those components that may be installed within your system. 3-18| OWNER’s GUIDE System Dimensions D310 with battery and display option installed 165 (with battery option) 128 (without battery option) 381 312 (Left Side) Dimensions in millimeters (mm) Divide by 25.4 for inches (Top, with screen option) (Right Side) Add 10 mm all around for BNC connectors, knobs, and other protrusions. Allow plenty of room for cooling fans to function properly. Never block air exchange. OWNER’s GUIDE - D310 | 3-19 Top-level call-outs D310, Left/Front Angle, with optional display and batteries Optional 15” XGA display with resistive TOUCHSCREEN 2 Counter LEMOs Rubber side shock absorbers Computer connections (see next page) EPAD LEMO DAQ/PAD/HSI slots or MDAQ conditioners 12VDC output CHs 8-15* Rubber side shock absorbers Accessory / digital I/O connector Chassis tie-down hard points Optional ORIONSYNC I/O and LEDs Filtered air intakes (2 fans) Optional CAN BUS DB9 connectors Chassis tie-down hard points Battery door release button Optional 310-UPS battery compartment D310 without the display and battery options 3-20| OWNER’s GUIDE Top-level call-outs (continued) D310 Right Side Panel Removable hard drive bay 9~29 VDC Power Input 3 x PCI slot card edges Chassis tie-down hard point Power Switch DC output from battery option Computer I/O RS232, 3 x ethernet, 4 x USB 2.0, Audio I/O, VGA output, 2 x PS/2, 1 x IEEE-1394 DC input to battery option Battery option Battery compartment release button D310 Left Side Panel EPAD LEMO 2 x Counter LEMOs 12VDC convenience outlet DAQ/PAD/HSI slots (or MDAQ positions) Rubberized side bumpers Not used (Reserved) Accessory/Digital I/O DSUB-37 Sync In/Out and LEDs (option) CAN BUS (2 x DB9) (option) Battery option Analog chs 8~15 (when DAQ slots are installed only) Battery compartment release button OWNER’s GUIDE - D310 | 3-21 Accessing the Batteries When the battery option (310-UPS) is installed, an additional battery compartment is fixed to the underside of the D310 chassis. This is done at the factory. The batteries are installed on the large flat surface at the bottom of the battery compartment. First, turn the D310 upright as shown below, so that you have access to the underside of the battery compartment. Second, press in the two battery door release buttons, located on opposite sides of the battery compartment. These are labeled in the preceding top-level chassis call-outs, as well as in the picture below. This will cause the battery door to open. This reveals the edges of the batteries. Grab the plastic pull tab on any battery to remove it from the system. Similarly you may insert new or recharged batteries into this compartment, making sure that they are aligned properly and fit all the way into the slot. Simply close the battery door when finished. Batteries can be swapped even when the system is powered up and running from the batteries. The only caveat is that the batteries should have enough charge to continue running the system; generally 25% is sufficient. You can look at the batteries while they are installed and see their LCD power gauges, to estimate their remaining power. Four battery slots for SideHAND2 batteries Push-buttons on each side, to release the battery door DC output (14-24 VDC) DC input (18-24 VDC) (connects to the DPS-2410, included with the 310-UPS option) You can pull on the plastic tab at the end of any battery in order to remove it from the system. 3-22| OWNER’s GUIDE Signal conditioning The D310 can be equipped with either: 8 x DAQ / PAD / HSI series plug-in signal conditioners, or 2 x 8-channel MDAQ-SUB conditioners (16 channels total) It is not possible to install both DAQ/PAD/HSI slots and MDAQ conditioners into the body of the D310. However, mixed systems can be created by connecting external conditioners of any kind to the system. Therefore it is common that the D310 is configured with 8 internal DAQ modules, plus connected to 16 ot more external MDAQ conditioners. Or the other way around, with 16 built-in MDAQ conditioners, and 16 or more DAQ/PAD/HSI modules connected externally. There are many possibilities. Model D310 with 8 DAQ modules Model D310 with 16 MDAQ channels A/D card(s) The D310 has three half length PCI slots inside. As a standard, the ORION-1616-100 A/D card is installed when you buy the D310 data acquisition system. This card provides the following basic specifications (further details are shown in the specification tables in the next pages): 16 simultaneously sampled analog input channels 16-bit resolution, separate ADC per channels 100 kS/s/ch maximum sample rate 2 synchronous counter/encoder inputs 8 each digital input and output lines At the time of ordering, this card can be upgraded, using any of the options available for increasing the channel count, the bit resolution to 22 or 24-bit, or increasing the sample rate up to 1 MS/s/ch, and many combinations of the preceding. See the UP-ORION options for all of the possibilities. OWNER’s GUIDE - D310 | 3-23 In addition, many options can be factory installed onto the ORION cards, including adding two high speed CAN BUS interfaces, or expanding the number and capabilities of the digital counters that are installed. Interface(s) The D310 is compatible with ORION, PCI card, and USB connected interfaces These include the CAN BUS interfaces added to the ORION A/D card, as well as separate PCI cards available for adding multiple ARINC 429, MIL-STD-1553 interfaces to the system. If all three PCI slots were used up, ARINC and MIL-STD-1553 interfaces can also be added as USB devices. There are numerous interfaces available for your DEWE system. Typical ARINC or MIL-STD-1553 interface Typical ARINC or MIL-STD-1553 interface PCI format USB format Video Cameras The D310 is compatible with several kinds of video cameras, including: DEWE-CAM-USB DEWE-CAM-FW DEWE-CAM-GIG-E USB camera Hard sync Firewire camera Gigabit ethernet camera 3-24| OWNER’s GUIDE Installing the 310-UPS option The standard D310 chassis has three tapped holes on the side opposite the display (the side with the large DEWETRON logo on it). These holes are used to mount the 310-UPS option. Tapped mounting holes for the 310-UPS option STEP 1 Line up the 310-UPS stanchions with the three tapped holes. STEP 2 Insert a standard blade screw driver into each of the round holes in the back of the 310-UPS and tighten the screw clockwise until it seats firmly. Repeat until all three screws are secure. Do not overtighten. OWNER’s GUIDE - D310 | 3-25 STEP 3 Connect the 310-CBL-UPS between the battery box and the D310 mainframe, as shown below: 310-CBL-UPS cable connects the DC power output from the battery option, to the main DC power input on the D310 STEP 4 To charge the 310-UPS, connect the DPS-2410 to the DC input of the battery box, as shown below. Plug into 120 VAC mains DC power cable: connects the output of the DPS-2410 to the input of the battery box 3-26| OWNER’s GUIDE Configuration guide, D310 with MDAQ panel The D310 has a 2U height space on its left side panel, which can accept either a 2U high MDAQ panel, such as either the DSUB connector panel or half BNC/half DSUB9 panel ... or a 1.5U panel plus any of the 0.5U accessory panels, as shown below: MDAQ panels Accessory panels 0.5U-AMPFLEX-POWER-4 0.5 U 0.5U-AMPFLEX-POWER-8 2U 0.5 U Power supply for PNA-A100 current clamps 0.5U-AOUT-BNC-2 0.5 U 1U-AOUT-BNC-4 2U MDAQ panel with BNC connectors is only 1.5U, leaving 0.5U above for any accessory panel 2U 2.0 U 1.5 U When a combo MDAQ panel is used (half BNC and half DSUB), this takes 2.0U panel height. When a BNC only MDAQ panel is used, this occupies 1.5U of height, and 0.5U remains available for any 0.5U accessory panel to be installed. If you don’t order any of the available 0.5U panels we will install a blank panel in the space. OWNER’s GUIDE - D310 | 3-27 Configuration guide, D310 model The D310 has a fixed configuration: there is a RACK-8 built into the side panel, so all you need to do is choose any any of our DAQ, PAD, or HSI series plug-in modules to fill the slots. Connecting EPAD2 modules to your D310 (DAQ or MDAQ version) Both D310 versions accept optional EPAD2 series external PAD modules for adding many channels of slower temperature signals, voltage, current, and RTD inputs. Simply connect the first EPAD2 module to the standard EPAD connector. Further EPAD2 modules can be daisy-chained from one to the next. The last EPAD2 module must have the terminator installed in the open connector (even if there is only one EPAD2 module the terminator must be installed). Up to 16 EPADs in any combination can be connected. EPAD-TERM-L terminator at the last module in the chain EPAD2 cable xPAD-CBL-LL-?? (where ?? is the length in meters) 3-28| OWNER’s GUIDE System Connectors System/PC connectors DC power input Connector: LEMO power connector, as shown in the picture above. The connector is this LEMO model: EGJ-2B-302-CLA. The appropriate mating connector is LEMO FGJ.302.CLLD-XX (where XX is the cable size). The mating cable called 310-CBL-DC is provided to connect the D310 to the included external AC/DC power supply. This cable is 2 meters long. It has FGJ.302.CLLD-XX on the side that plugs into the D310, and FGG.2B.302-CLAD-XX on the side that plugs into the external AD/DC power supply. Permissable power inputs are 9-29 VDC. ⇒⇒ Important note - power input must not exceed 29 VDC! System damage may occur. DC Power Input KEY PIN: (+) LOW PIN: (–) LEMO connector EGJ-2B-302-CLA OWNER’s GUIDE - D310 | 3-29 RS232C interface (com1) PS/2 mouse (green) XGA video output PS/2 keyboard (violet) IEEE-1394 firewire USB 2.0 ports (4) Ethernet ports (3) Audio stack (see description for color codes) 3-30| OWNER’s GUIDE Computer Connectors The door on the right side of the chassis opens to allow access to a collection of computer interface connections, as follows: RS232C interface connector (com1) Connector: 9-pin DSUB (male) Mating connector: 9-pin DSUB (female) Function: Can be used to connect devices which utilize the RS232C serial interface. The typical interpretation of the signals in the COM ports is as fol The connector pin-out is defined here: PS/2 mouse (green) and PS/2 keyboard (violet) Connectors: Standard PS/2 green (mouse) and violet (keyboard) Mating connectors: Standard PS/2 keyboard and mouse plugs or USB-PS/2 adapters Function: Attachment of a keyboard or PS/2 mouse adapter via the stacked PS/2 mouse and keyboard connector (MSE & KBD). Description: Both interfaces utilize open-drain signaling with on-board pull-up. The PS/2 mouse and keyboard is supplied from 5V_STB when in standby mode in order to enable keyboard or mouse activity to bring OWNER’s GUIDE - D310 | 3-31 the system out from power saving states. The supply is provided through a 1.1A resetable fuse. Above left: Stacked PS/2 connector pinning and call-outs Above right: view of a typical PS/2 connector, showing the pin numbering schema. -- Note: PS/2 devices should be connected before the system is powered on. PS/2 mice in particular will typically not be recognized by Windows if connected after Windows has loaded. IEEE-1394 Firewire interface Connector: Standard 6-pin full size IEEE-1394b female connector Mating connector: Standard 6-pin IEEE-1394b male plug Function: Can be used to connect devices which utilize the IEEE-1394 firewire interface. Description: This port is an IEEE Std 1394a-2000 fully compliant cable port which provides interfacing at 100M bits/s, 200M bits/s, and 400M bits/s. -- Note: The DEWE-CAM-FW high speed video camera from Dewetron connects via firewire. However, it is highly recommended to add a dedicated firewire card to your system to get the best performance from the DEWE- 3-32| OWNER’s GUIDE CAM-FW sensor. The full speed may not be achievable using the on-board interface shown above. Ethernet interfaces (3) Connectors: RJ45 CAT5e standard jack Mating connectors: RJ45 CAT5e or CAT6 plugs Function: for connecting the DEWE-321x to a local area network (LAN), or for connecting ethernet peripherals (printers, cameras, etc.). Description: Three channels of 10/100/1000Mb Ethernet RTL8111B LAN controllers. In order to achieve the specified performance of the Ethernet port, Category 5 twisted pair cables must be used with 10/100MB and Category 5E, 6 or 6E with 1Gb LAN networks. The signals for the Ethernet ports are as follows: The pinout of the RJ45 connector is as follows: Above right: typical mating plug, showing the pin outs On top of Ethernet connectors there is a Green LED (to the left) turning on when a 100MHz connection is made and it is flashing when 100MHz traffic is ongoing. The Yellow LED (to the right) turns on when a 1GHz connection is made and it is flashing when traffic is ongoing. Please refer to the CAT5e, CAT6, and structured cabling standards for computer networks when interfacing to the DEWE system. OWNER’s GUIDE - D310 | 3-33 CRT/VGA video output Connector: three-row 15-pin DE-15 (female) connector Mating connector: 15-pin DE-15 video (male) plug Function: For connecting an additional display to the DEWE-321x, which will show an exact duplicate of the built-in display. Description: There are has two basic types of interfaces to a display: Analog CRT interface and a digital interface typically used with flat panels. The digital interface to flat panels is connected internally to the built-in flatpanel display. The CRT interface is available externally to the user. ⇒⇒ Note: The 5V supply in the CRT connector is fused by a 1.1A resetable fuse. Left: typical mating cable for connecting an external VGA/XGA monitor -- Note: the CRT output cannot be used in a “multiple monitors” setup under Windows. To support multiple moni- tors with different images on them requires that a separate video card be added to the system. This is possible to do, using a PCI video card (PCIe slots are not available in this model). -- Note: D310’s 15” display has a max resolution of 1024x768; the CRT output is set to the same resolution as the built-in flatpanel display. 3-34| OWNER’s GUIDE USB 2.0 interfaces (4) Connector: USB2.0 Standard-A receptacle Mating connector: USB2.0 Standard-A plug Function: For the connection of peripheral devices which utilize the USB 2.0 or USB 1.1 interface. (USB 1.1 devices may work, but will be limited in speed.) Description: The mainboard contains an Enhanced Host Controller Interface (EHCI) host controller that supports USB 2.0 allowing data transfers up to 480Mb/s. There are four user-accessible Universal Host Controller Interface (UHCI Revision 1.1) controllers that support USB full-speed and low-speed signaling. All ports are high-speed, full-speed, and low-speed capable and USB Legacy mode is supported. Over-current detection on all four USB ports is supported. USB ports 0 and 2 are supplied on the combined ETHER1, USB0, USB2 connector. USB ports 4 and 5 are supplied on the combined IEEE1394_0, USB4, USB5 connector. Note: It is recommended to use only High-/Full-Speed USB cable, specified in USB2.0 standard: -- Note: USB is most often used to connect webcams for recording video in sync with the data in your Dewetron data acquisition system. It is also used to connect inertial sensors such as the XSENS MTI series of sensors. OWNER’s GUIDE - D310 | 3-35 Audio stack connectors (6) Connectors: 3.5 mm (~1/8 in.) TRS jacks, color coded Mating connectors: 3.5 mm (!1/8 in.) TRS plugs Function: for outputting or inputting audio Description: Audio Line-in, Line-out and Microphone are available in the stacked audio jack connector. Below is shown audio stack configuration when configured for 8-channel audio. ⇒⇒ Note: Always use industry standard plugs and cables when connecting to any part of the DEWE system. 3-36| OWNER’s GUIDE Signal Input Connectors Analog input connectors (8 or 16) Connector: Varies according to the signal conditioning module(s) installed See the signal conditioning tables for further details about the module(s) installed within your system. Function: to input analog signals to the dynamic measuring inputs of the DEWE-3210 or DEWE-3211. Above: typical DEWE-3210 showing 8 DAQ modules plugged in Counter/encoder connectors (2) Connector: LEMO EGG.1B.307CLAD52 Mating connector: LEMO FGG.1B.307CLAD52 Mating cable available: CTR-CABLE-05 (includes connector) Function: used to input tachometer, TTL level pulse train, or encoder outputs for measuring and conversion. -- Note: see the COUNTER configuration section later in this guide. OWNER’s GUIDE - D310 | 3-37 CAN BUS interface connector (installed when you order CAN BUS option) Connectors: DSUB 9 connectors (option UP-ORION-CAN2) Mating connector: DSUB 9 Mating cable: Standard CAN cable Function: used to connect to vehicle CAN BUS interfaces. Also can be used to read data from sensors which have a CAN BUS output, such as Dewetron’s own CPAD2 series signal conditioning modules. The typical DB-9 connectors are wired the same way, as shown below: When you connect either CAN bus interface to your vehicle or other CAN network, it is necessary to add termination resistors (not included) at each end of the cable: -- Note: this connector does not provide power for CPAD2 series modules. Expansion connector (DAQ module version only) Connector: DSUB HD-44 pin female connector Mating cable: DSUB HD-44 pin male connector Function: The D310 is configured with a 16 channel A/D card inside (ORION-1616-100) as a standard. The first eight channels are wired to the DAQ modules on the left side panel. Therefore, the other eight channels are brought to this ANALOG INPUT connector on the left side panel, whereby you may connect an expansion rack such as the DEWE-30-8, in order to address these eight channels. This is an HD44 connector, which looks like a DSUB25, but it actually has three rows of pins (44 connections). 3-38| OWNER’s GUIDE Pin Signal Pin Signal 16 GND Pin Signal 1 AI 8 17 AI 10 31 AI 19 2 GND 18 GND 32 GND 3 AI 11 19 AI 13 33 AI 12 4 GND 20 GND 34 GND 5 AI 14 21 AI 16 35 AI 15 6 GND 22 GND 36 GND 7 AI 17 23 AI 19 37 AI 18 8 GND 24 GND 38 GND 9 AI 20 25 AI 22 39 AI 21 10 GND 26 GND 40 GND 11 AI 23 27 RS-485 B 41 AI SENSE 2 12 RS-485 A 28 -- 42 RS-485 GND 13 -- 29 -- 43 -- 14 -- 30 -- 44 -- 15 -- HDD-44 ANALOG INPUT connector Above are the pin-outs of the HD-44 connector for the input of the additional 8 analog channels, when the DAQ version of the D310 is ordered. The pins colored in GREEN apply to the standard configuration, where a 16 channel ORION card is installed. However, if you have upgraded this card to a 32-channel ORION, then the pins in white will apply for channels 16 to 31. The DEWE-30-8 expansion rack is connected via a cable plugged into the DSUB-25 expansion connector, which also includes the RS485 for module control. DEWE-30-8-EXPANSION Rack (Optional) Signal and power cable A cable connects the DEWE-30-8 expansion rack to the D310 mainframe. It provides signal connection and RS485 module control. The DEWE-30-8 should be powered separately. -- This expansion/connector does not apply to the model that already has 16 MDAQ channels on its left side panel Digital I/O connector (AKA “Accessory connector”) OWNER’s GUIDE - D310 | 3-39 Connector: Standard DSUB 37-pin connector, female Mating connector: Standard DSUB 37-pin connector, female Function: Provides access to the digital input/output lines on the installed A/D card, as well as additional signals such as clock input, trigger input, and more (see A/D card table related to the installed card). The exact pin-out of this connector can vary according to the system configuration, but here is the typical pin-out diagram when an ORION-1616-100 card is installed: 3-40| OWNER’s GUIDE Channel Expansion As shown previously, expanding your D310 to contain a large number of slow (non-dynamic) analog inputs is easy via the addition of external EPAD2 series modules. But what about expanding the number of fast (dynamic) channels? Of course this is possible, and this section will show the various methods that are available to achieve more fast analog channels. Using Analog Cables to External Signal Conditioning In this approach, the ORION series A/D cards are installed within the D310 mainframe, and the signal conditioners to support them are connected externally. Since the D310 has three PCI slots, and there are 32-channel ORION cards available, the maximum channel count of this approach is 96. To the ORION card inside the D310 AN PO A LO WE ALS G SIGN P P LY R SU AC (optional DC) power supply DEWE-31-12 Specifications DEWE-30-8 DEWE-30-16 DEWE-30-32 DEWE-31-16 DEWE-31-32 DAQ/PAD/HSI slots 8 16 32 -- -- MDAQ channels -- -- -- 16 32 95 ~ 260VAC 50/60 Hz From the ORION (10-36 VDC) 95 ~ 260VAC 50/60 Hz Wide range DC power (11 to 32 VDC) N/A Wide range DC power (11 to 32 VDC) Power supply Optional power supply Dimensions W x D x H Weight 230 x 181 x 104 mm 9.1 x 7.1 x 4.1 in. 435 x 133 x 245 mm 17.1 x 5.2 x 9.6 in. 435 x 223 x 245 mm 17.1 x 8.8 x 9.6 in. 208 x 95 x 108 mm 8.2 x 3.7 x 4.3 in. 435 x 133 x 245 mm 17.1 x 5.2 x 9.6 in. 3 kg (7 lbs) 4 kg (9 lbs) 7 kg (15 lbs) 1.6 kg (3.5 lbs) 4 kg (9 lbs) OWNER’s GUIDE - D310 | 3-41 Using PCI bridge Connection to External Signal Conditioning In this approach, the ORION A/D cards are installed within external DEWE-5X-PCI chassis, and are connected back to the D310 via a single high-speed PCI expansion cable. PCI expansion is an alternative especially if high channel count is needed. When using an expansion only one PCI slot is occupied in the D310 instrument by a PCI-HOST-CARD. The DEWE-50-PCI, DEWE-51-PCI and DEWE-52 ADC racks can be connected by a 1m PCI cable (optionally 1.5m). -- Important notice: The D310 and the DEWE-5x must be equipped with ORION-SYNC option. PCI H OST DEWE-52-PCI-3216 SY N C D310 Specifications DEWE-50-PCI-32 DEWE-50-PCI-64 DEWE-51-PCI-64 DEWE-51-PCI-128 DEWE-52-PCI-3216 DAQ/PAD/HSI slots 32 64 -- -- 16 MDAQ channels -- -- 64 128 32 95 ~ 260VAC 50/60 Hz Power supply Optional power supply Dimensions W x D x H Weight Wide range DC power (11 to 32 VDC) 435 x 287 x 223 mm 17.1 x 11.3 x 8.8 in. 408 x 287 x 410 mm 16.1 x 11.3 x 16.1 in 435 x 287 x 178 mm 17.1 x 11.3 x 7.0 in. 408 x 287 x 267 mm 16 x 11.3 x 10.5 in. 435 x 287 x 223mm 17.1 x 11.3 x 8.8 in. 10 kg (22 lbs) 15 kg (33 lbs) 6 kg (13 lbs) 9 kg (20 lbs) 9 kg (20 lbs) 3-42| OWNER’s GUIDE Using External Time Sources (NETWORK Configuration) In this approach, multiple DEWE systems are synchronized using either IRIG or GPS time code. Each still records their own data, but the data files are perfectly synchronized for analysis in third party software (such as Flexpro or Matlab). In addition, because the software option DS-OPT-NET is installed on each acquistion unit, a master controller can view channels from ALL of the connected measuring units in real time. In the NETWORK configuration, each instrument must have the hardware option UP-ORION-SYNC and the software option DS-OPT-NET. Synchronization of all units is required, via either (1) a simple SYNC cable connection, for distances up to 200 m, or (2) DEWE-CLOCK (internal or external), for long distances when a SYNC cable connection is not possible. The DS-OPT-NET software offers full remote setup, online data transfer up to the limit of the network connection and offline data transfer between the instruments. -- User tip: The NET expansion allows multiple usages of the PC power and fast storing capability. Multiple decen- tralized hard disks offer almost no limit for fast data storing. D310 D310 0.000 ms SYNC ETHERNE T Above - direct SYNC of two or more DEWE systems using the ORION-SYNC option installed onto the chassis, and DS-OPT-NET software. One measuring unit can be set as the master controller of both, or you can use a separate Windows computer as a master client to remotely control all synchronized units. The master controller is connected via ethernet to each measuring unit (typically a dedicated ethernet switch is used). GPS-CLOCK SYNC D310 Right - when the systems are too far apart for the ORION-SYNC to be connected, the DEWE-CLOCK is used to sync the units via either IRIG or GPS time code signals. The rest of the system is the same, as described above. DEWE-CLOCK ETHER D310 SYNC NET OWNER’s GUIDE - D310 | 3-43 Connecting the MOB-DISP-17 to your D310 Whether your D310 has a built-in display or not, you can still connect an external monitor to it. This could be either a standard office type computer monitor, or the DEWETRON MOB-DISP-17. The MOB-DISP-17 is a ruggedized mobile display that is designed to be installed inside vehicles. It has suction cup mounting positions, as well as VESA 75 mounting holes for this purpose. The MOB-DISP-17 accepts a standard VGA or DVI interface, therefore it can be connected directly to the VGA output of the D3PC. In addition, the MOB-DISP-17 can be POWERED by the 12VDC output on the rear panel of the D3PC. Finally, a USB 2.0 cable should be connected between the D310 and the MOB-DISP-17, to enable the display’s TOUCHSCREEN capabilities, and to activate the USB 2.0 convenience jacks that are located on the mobile display. The MOB-DISP-17 is the perfect addition to your DEWETRON system, especially when it will be used in a mobile or challenging physical environment. For complete technical details about the MOB-DISP-17, please refer to the section of this document, “MOB-DISP-17 Mobile Display” on page 10-266. (To the 12VDC output on the opposite side of the D310 chassis) Red - 12 VDC power cable Blue - USB 2.0 cable (A/B) Green - VGA cable 3-44| OWNER’s GUIDE Operation Guidelines System Startup Protocol DC powered systems (STANDARD) The standard D310 runs from wide-ranging DC power: 9-29 VDC. An AC/DC adapter is included with your system. To run the system from AC, connect the AC power cord to AC mains and to the AC/DC adapter. Connect the DC output cable that has a round LEMO connector on it to the DC power input on the right side of the D310. Press then release the soft power switch on the D310, and the system will boot up. VGA output for connecting external monitor Soft power switch DC power input (9~29 VDC) If your D310 does not have a display, please connect a standard VGA or XGA monitor to the VGA connector on the right side of the system. OWNER’s GUIDE - D310 | 3-45 Installing the Smart Batteries (310-UPS option) ⇒⇒ Do not block the cooling fan of the DPS-2410! Over- Systems are shipped with the hot-swappable batteries removed. You should install them, connect power, and charge up the batteries. Please follow these guidelines shown in the previous section, Accessing the Batteries. For faster recharging, do NOT power up the D310 mainframe, but make certain that the DPS-2410 is powered on and all power connections are made as shown below. ⇒⇒ Never use any battery which appears to be dam- Using the smart batteries aged, or which is cracked, broken, hot to the touch, or unusual in any way. Lithium batteries can be dangerous if mistreated or improperly charged. Please locate your DPS-2410 external power supply. This is included with the battery option. ♦♦ Connect the included AC power cord to the DPS- 2410, and then to a 120VAC power receptable. ♦♦ Connect the included DC power cord to the DPS- 2410 and then to the D310’s DC power input jack. heating any electrical component is dangerous. The SideHAND2 “smart batteries” supplied with your Dewetron battery powered system are equipped with an integrated circuit which stores information such as manufacturer, serial number, production date, etc., and monitors the current battery status in terms of discharge rate, predicted remaining capacity, temperature, voltage etc. SideHAND2 “smart batteries” are capable of displaying their charge state even when not plugged into anything. ♦♦ Turn on the DPS-2410 power switch. A power LED will confirm that that it is receiving AC power and operating properly. 4) Connect the short DC cable between the 310-UPS output and the D310 DC power input. 1) Connect the AC power plug to a valid AC mains source 2) Connect the other end of the AC cord to the DPS-2410 3) Connect the DC power cord between the DC output of the DPS-2410 and the input of the 301-UPS option 3-46| OWNER’s GUIDE Refer to the LCD display on the end of the SideHAND2 battery near the plastic pull tab. Turning on the System with Batteries installed Locate the power switch on the right side panel. This is a momentary rocker type switch, where the white dot indicates the ON direction. ♦♦ Press ON and hold for one second to power the system on. ♦♦ Press ON and hold for 3 seconds to power OFF. ♦♦ Green POWER LED: lit when the system is Refer to the four segment LCD indicator on the end of the battery near the pull-tab. It will indicate the relative charge remaining in the battery in 25% steps. powered on ♦♦ The removable HDD(s) have activity LEDS inside them, which indicate that the hard disk drive is being accessed. You may notice that the main screen’s backlight will come on when power is applied. After a few moments the BIOS and Windows operating system messages and graphics will appear. ⇒⇒ If the system does not power on, ensure that you have batteries with at least 30% charge, or that the DPS-2410 is properly connected and TURNED ON. HDD Usage Using the removable hard disk drives The right side of the D310 has a 2.5” removable drive bay. This bay has two separate hard drives inside it. The drive marked (1) is the C drive, and the drive marked (2) is the D drive. ⇒⇒ NEVER REMOVE OR INSTALL HARD DRIVES WHEN THE SYSTEM IS POWERED ON. Interfering with the C drive in particular when the software is trying to access it can cause catastrophic system failures via corrupting the file system. To remove either hard drive, you must have access to the keylock. Turn the key into the lock and then press the button on either drive to eject it. To insert another drive, reverse these steps. The 2.5” drive carrier actually has TWO separate removable HDDs inside! Drive 1 is the OS drive letter ‘C,’ while Drive 2 is the data drive letter ‘D.’ Using external optical read/write drives Because the D310 does not include an optical drive, you are free to purchase one from any computer retailer, and connect it to your D310 via one of the USB 2.0 ports. -- The D310 is compatible with external optical drives which are Windows7 compatible. OWNER’s GUIDE - D310 | 3-47 Basic Specifcations Input specifications Slots for DAQ or PAD modules MDAQ-SUB positions D310 with DAQ conditioners D310 with MDAQ conditioners 8 -- N/A 2 (16 channels) Main system Total PCI slots Hard disk Data throughput to disk Power supply Battery power (option 310-UPS) Display (option 310-DISP) Processor 3 x half-length PCI slots 500 GB standard removable drive (optional solid state drive) 80 MB/s typical; faster rates available with the additional of an internal RAID controller and/or additional drives 9~29 VDC. Includes external AC/DC power adapter. Adds a battery compartment with 4 SideHAND2 series hot-swappable batteries, and connecting cable. 15” XGA display, 1024 x 768 px, with resistive touchscreen Intel Core2Duo 2.0 GHz CPU, on a standard industrial grade MiniITX mainboard RAM Ethernet USB RS232 Operating system Dimensions (W x D x H) 4 GB standard 3 x ethernet interfaces standard (1 Gb) Four x USB 2.0 interfaces available One serial interface on a DB9 connector available Microsoft Windows7 32-bit included (upgrades to 64-bit will be available Summer 2013) 14W x 10.5D x 4.25H (inches) / 355 x 267 x 108 (mm) Weight Free PCI slots 8 kg typical (17.6 lbs) 2 (the standard ORION-1616-100 A/D card uses one of the three PCI slots) Environmental specifications Operating temperature -20 to 50C (0 to 45C with batteries installed) (storage temp -20 to 60C) Humdity 10 to 80% non-condensing, 5 to 95% relative humidity Vibration MIL-STD-810F, EN 60068-2-6, EN 60721-3-2 class 2M2 Shock MIL-STD-810F, EN 60068-2-27 Required to complete this model Conditioners: A/D card(s) Software Any 8 DAQ series plugin modules Any two MDAQ-SUB modules The ORION-1616-100 is included as standard. You may upgrade this card as follows: UP-ORION-16-22 upgrade the resolution to 22-bits, add antialiasing filters (AAF), max. SR remains at 100 kS/s/ch UP-ORION-16-24 upgrade the resolution to 24-bits, add AAF, max. SR increases to 200 kS/s/ch UP-ORION-16-22-32 upgrade the resolution to 22-bits, add AAF, increase from 16 to 32 analog channels UP-ORION-100-1000 upgrade the max. SR to 1000 kS/s/ch UP-ORION-100-200-8 upgrade the resolution to 24-bits, add AAF, max.SR increases to 200 kS/s/ch, decrease to 8 channels UP-ORION-100-1000-8 upgrade the max. SR to 1000 kS/s/ch, decrease to 8 channels DS-7-SE data acquisition software is included as standard* 32 analog channels, or multiple video cameras, or DEWE-CAM-FW-70, or DEWE-CLOCK use requires upgrade to PROF edition. 64 analog channels requires upgrade to DSA edition. LabVIEW VIs are available for Dewetron ORION series A/D cards and DAQ series signal conditioners. Popular upgrades Counter expansion (UP-ORION-CTR8) Upgrades the A/D card from 8 TTL digital I/Os and 2 TTL counter / encoders to: 8 synchronous TTL digital inputs protected up to 25 VDC 8 synchronous counter / encoder or 24 digital inputs with programmable threshold levels (0-40 V), input voltage range -35 to 60 V, AC/DC coupling Includes DB37 pin connectors installed Synchronization interface (UP-ORION-SYNC) Installs the SYNC hardware input/output ports and LED indicators onto the mainframe. Allows systems with the same base ORION card to be synced. Additionally Requires DS-OPT-NET software option for synchronization under DS-7 software. 3-48| OWNER’s GUIDE Input specifications D310 with DAQ conditioners Digital Isolation (ORION-BASE-DI-ISO) HDD upgrade to solid state disks D310 with MDAQ conditioners Isolation for the 16 digital inputs of ORION base cards. Input low: 0 - 2 V, Input high: 3 - 50 V bandwidth: DC up to 1MHz Isolation voltage between channels: 150 VDC Isolation voltage between Input and Output: 250 VDC Connector: DSUB-37 connector (replaces standard digital I/O connector) HDD-UP-SSD-120 Upgrade to 120 GB flash disk (replaces standard spinning hard disk), $ no moving parts, max. data throughput 90 MB/s HDD-UP-SSD-240 Upgrade to 240 GB flash disk (replaces standard spinning hard disk), $ no moving parts, max. data throughput 90 MB/s HDD-UP-SSD-480 Upgrade to 480 GB flash disk (replaces standard spinning hard disk), $ no moving parts, max. data throughput 100 MB/s Time code interface Adds an internal IRIG or GPS time code interface (does not require a PCI slot) Popular interface add-ons CAN expansion (UP-ORION-CAN2) IRIG / GPS time code (DEWE-CLOCK-INT) Adds 2 synchronous high speed CAN bus interfaces to the ORION card inside the system. Includes two DB9 factory installed connectors for these counters on the side panel of the D310, and rear panel of the DEWE-3040 and DEWE3050. Includes DS-OPT-CAN software option supporting CAN BUS interface. IRIG or GPS synchronized clock source for DEWETRON systems, installed inside a new DEWETRON base unit Input: IRIG signal code A or B, AM or DC, or GPS signal Output: TTL clock from 10 Hz to 10 MHz, PPS and ORION-DSA-SYNC, IRIG-B DC (requires DS-PROF or higher) Please order GPS antenna GPS-ANT-1 separately (if GPS is needed) VIDEO-FG-4 Adds a four channel VIDEO INPUT PCI card to the system. Four BNCs for analog NTSC video input on the right side panel, allowing four video streams to be recorded in sync with the data ARINC-429 / 1553 interfaces Adds a multi-channel ARINC-429 or MIL-STD-1553 interface to the system. Available as a single PCI card with either or both interfaces on it, or as separate external USB interfaces. See the INTERFACES section for a comprehensive list. External channel expansion EPAD2 and CPAD2 series modules Add one or more EPAD2 series external signal conditioners to your system. Each one provides 8 thermocouple, RTD, low voltage, or low current inputs. EPAD2 modules can be daisy-chained up to 8 modules per system. CPAD2 modules are the same except with CAN BUS interface. Additional Specifications ORION-1616-100 analog input specifications Number of analog channels 8 channels Bit-resolution 16-bit ADC converters (one per channel) 14.7 effective number of bits Maximum sample rate 100 kS/s/ch simultaneous Input configuration Single-ended (note that the DAQ, HSI, or MDAQ conditioners are in front of the ORION card, and serve as the differential front-end for your signals. ADC type Successive approximation (SAR) Channel separation (cross-talk) > 90 dB @ fin 1 kHz DC accuracy ±0.02 % of reading ±0.013 % of range Signal to noise 89 dB THD (fin = 1kHz) 0 dBFS input < -86 dB THD (fin = 1kHz) -20 dBFS input < -93 dB Interchannel gain mismatch ±0.015 % Interchannel phase mismatch 0.02° * fin (kHz) + 0.08° Digital and clock line specs Digital input lines 16 Digital input characteristics TTL/CMOS signal levels: Low voltage level -0.7 V to 0.8 V High voltage level 2 V to 5 V Pull-up with 100 kΩ resistor Input capacitance < 5pF Input protection -1 V to 6 V Digital output lines 8 Digital output characteristics TTL/CMOS signal levels: Low voltage level < 0.4 V @ 4 mA load High voltage level > 3 V @ 4 mA load Output current Sink (low level) -20 mA Source (high level) 20 mA Output impedance 50 Ω Clock divider output line 1, same characteristics as digital output lines OWNER’s GUIDE - D310 | 3-49 Standard Counter/Encoders RPM-Measurement Encoder Standard counter/encoders 2 x 32-bit (LEMO connectors for each) Note - used as pair counters when advanced features are used. If you need two or more full-featured counters, please order the UP-ORION-CTR8 Counter timebase 80 MHz (40 MHz max. input frequency) Time base accuracy 25 ppm Measurement modes Event counting, up/down counting, gated event counting, period time, pulse width, two-edge separation, frequency and encoder measurements Gearthooth, CDM Standard counter/encoder signal levels TTL/CMOS, pull-up with 100 kΩ Input low level: -0.7 V to 0.8 V Input high level: +2 to +5V Gearthooth, TRG, CDM and TRG Overvoltage input protection (DI 0 to DI 7): ±25 V continuous (DI 8 to DI 15): -1 to 6 V Advanced Counter/Encoders (UPORION-CTR8 option) Advanced counter/encoders 8 advanced 32-bit counters Counter timebase 80 MHz (40 MHz max. input frequency) Measurement modes Event counting, up/down counting, gated event counting, period time, pulse width, two-edge separation, frequency and encoder measurements Signal levels Symmetrical, differential AC/DC coupling selectable Trigger adjustment range 0 to 40 VDC with 40 mV resolution Trigger level accuracy ±100 mV ±1% of trigger level Common voltage range -35 to 50V Overvoltage input protection ±100 V continuous Max. DC level @ AC coupling: ±50 V continuous CAN BUS specs (UP-ORION-CAN2 option) High-speed CAN interfaces 2 CAN 2.0B high speed interfaces Bus pin fault protection ±36 V ESD protection 12kV Physical layer High speed Compatibility 2.0B standard, J1939 protocol support OBD II via software option Tacho Gearthooth with missing teeth Gearthooth with double teeth Length-measurement Linear encoder Linear pulse sensor Event Counting Basic counting Gated counting Up/down counting Waveform Timing Period frequency Two pulse edge separation Period, pulse width, frequency, duty cycle 3-50| OWNER’s GUIDE OWNER’s GUIDE - D3PC-8 | 4-51 4 D3PC-8 Model The D3PC-8 is our most economical and portable data acquisition instrument. This model is preconfigured with an ORION-0824-200 card inside, which means that it has eight IEPE (ICP) analog inputs with very high dynamic range, perfect for accelerometers and microphones. Each channel can also be used as a voltage input up to ±10V. This model is manufactured at the company’s facilities in the USA. This section will review the hardware characteristics and specifications of the D3PC-8 model, including its properties as a computer instrument, and all data acquisition components, including the A/D card, signal conditioners, and interfaces with which it is compatible. Please refer to the SOFTWARE section of this manual to learn how to operate the turn-key data acquisition software installed on the system. Please refer to the separate sections for the SIGNAL CONDITIONERS, A/D CARDS, INTERFACES and SENSORS for complete details about those components that may be installed within your system. Model D3PC-8 Standard Configuration 4-52| OWNER’s GUIDE System Dimensions 267 212 127 113 (Left Side) 18 12 204 (Right Side) 274 Add 10 mm all around for BNC connectors, knobs, and other protrusions. Dimensions in millimeters (mm) Divide by 25.4 for inches Allow plenty of room for cooling fans to function properly. Never block air exchange. OWNER’s GUIDE - D3PC-8 | 4-53 Top-level call-outs D3PC-8, Left/Front Angle EPAD LEMO Power Switch Rubberized corner shock absorbers Accessory / digital I/O connector Filtered air intakes 2 Counter LEMOs USB 2.0 ports (2) Chassis ground point 8 x ANALOG input BNC connectors Optional CAN BUS interfaces (DB9s) D3PC-8, Left/Rear Angle Removable HDD PCI card door Computer subsectionand door Spring loaded captive hardware (both doors) Rubberized corner shock absorbers 12VDC power outlet LEMO Automotive type fuse Master power switch 9-29 VDC power input LEMO 4-54| OWNER’s GUIDE Signal conditioning The D3PC is equipped with eight built-in analog inputs, with these signal input capabilities: Selectable voltage / IEPE mode Selectable constant current excitation (IEPE mode), 4 or 8 mA Constant current excitation compliance up to 24 VDC Differential or single-ended input mode (software selectable) Voltage input mode with ranges ±10, ±2, ±0.5 or ±0.1 V Selectable DC or AC coupling, high-pass 0.16 or 3.4 Hz High-pass filter selectable between 0.16 or 3.4 Hz (when AC coupling is engaged) 30V over-voltage input protection All channels can be set completely independently` A/D card The D3PC includes the ORION-0824-200 A/D card as standard. This card provides these digitization capabilities: 8 simultaneously sampled analog input channels 24-bit resolution, separate ADC per channels Sigma-delta ADC converter for each channel 204.8 kS/s/ch maximum sample rate (all channels simultaneously) Powerful anti-aliasing filtering is standard and automatically adjusts to the selected sample rate Crosstalk 114 dB 2 synchronous counter/encoder inputs 8 each digital input and output lines The A/D card can be upgraded to have several options installed on it, including UP-ORION-CAN2 Adds two high-speed synchronous CAN BUS interfaces to the system, including mounting the connectors on the front panel, and installing the DS-OPT-CAN software support for CAN UP-ORION-CTR8 Adds 8 additional counters, which have adjustable threshold levels, and higher input voltage capabilities. In addition, each counter can handle any measurement type without needing a second counter in a “pair.” Thus, 8 separate quadrature encoders could be input. Due to space limitations on the D3PC chassis, it is recommended to also purchase the external break-out box when the counter expansion is ordered. OWNER’s GUIDE - D3PC-8 | 4-55 Interface(s) The D3PC is compatible with USB connected interfaces, including ARINC 419 and MIL-STD-1553 interfaces, and more. There is a wide assortment of interfaces available for your DEWE system. MIL-STD-1553, interface, USB format ARINC 429, interface, USB format Video Cameras The D3PC is compatible with several kinds of video cameras, including: DEWE-CAM-USB DEWE-CAM-FW DEWE-CAM-GIG-E USB camera Hard sync Firewire camera Gigabit ethernet camera USB cameras are the most convenient and least expensive. But they also provide the lowest performance, and place the highest load on the CPU, therefore we recommend only one be used. The DEWE-CAM-FW can be used to a limited extent in the D3PC because a dedicated Firewire interface cannot be installed for it. For best results we recommend the D310, or any other DEWE platform that has a PCI slot available to install a dedicated separate Firewire interface card. The DEWE-CAM-GIG-E will work fine with the D3PC. Gigabit ethernet cameras place a load on the computer CPU similar to USB cameras, so we recommend not over-taxing the system. 4-56| OWNER’s GUIDE Connecting EPAD2 modules to your D3PC-8 The D3PC-8 accepts optional EPAD2 series external PAD modules for adding many channels of slower temperature signals, voltage, current, and RTD inputs. Simply connect the first EPAD2 module to the standard EPAD connector. Further EPAD2 modules can be daisy-chained from one to the next. The last EPAD2 module must have the terminator installed in the open connector (even if there is only one EPAD2 module the terminator must be installed). Up to 16 EPADs in any combination can be connected. EPAD-TERM-L terminator at the last module in the chain EPAD2 cable xPAD-CBL-LL-?? (where ?? is the length in meters) OWNER’s GUIDE - D3PC-8 | 4-57 Connecting a Standard VGA/XGA Monitor to your D3PC-8 The D3PC-8 accepts any standard computer monitor that can be plugged into the standard VGA connector on the rear of the system. Open the computer door by turning the captive spring-loaded thumbscrew hardware counter-clockwise, until the door opens. The VGA connector is the ‘D’ connector with three rows of pin holes. This connector is normally located in the bottom left corner of the computer area. Connect your monitor and turn on the D3PC-8. The Windows operating system should recognize that a monitor has been connected and utilize it. After the system is booted up into Windows you can use the standard commands to configure the monitor the way that you prefer. We recommend setting the resolution to 1024 x 768 pixels for best performance within the software. However, you can also set it higher, for example, to 1280 x 1024 pixels. This should also provide excellent performance. D3PC with a standard computer monitor connected to it. Use a standard VGA cable to make the connection. The monitor must be powered separately from VAC mains. 4-58| OWNER’s GUIDE Connecting the MOB-DISP-17 to your D3PC-8 The D3PC-8 has been made specifically to support the MOB-DISP-17 (Mobile Display, 17 inches) from DEWETRON. This is a ruggedized mobile display that is designed to be installed inside vehicles. It has suction cup mounting positions, as well as VESA 75 mounting holes for this purpose. The MOB-DISP-17 accepts a standard VGA or DVI interface, therefore it can be connected directly to the VGA output of the D3PC. In addition, the MOB-DISP-17 can be POWERED by the 12VDC output on the rear panel of the D3PC. Finally, a USB 2.0 cable should be connected between the D3PC and the MOB-DISP-17, to enable the display’s TOUCHSCREEN capabilities, and to activate the USB 2.0 convenience jacks that are located on the mobile display. The MOB-DISP-17 is the perfect addition to your DEWETRON system, especially when it will be used in a mobile or challenging physical environment. For complete technical details about the MOB-DISP-17, please refer to the section of this document, “MOB-DISP-17 Mobile Display” on page 10-266. Red - 12 VDC power cable Blue - USB 2.0 cable (A/B) Green - VGA cable OWNER’s GUIDE - D3PC-8 | 4-59 Using the New iPAD as a Wireless Display with your D3PC-8 The D3PC-8 can also be controlled wirelessly using the new iPad from Apple computer, because it has sufficient resolution to be used as a wireless display. Other tablet devices can also be used, of course. The more resolution the device has, the more convenient and comfortable it will be to operate the software. See Section “19 Using the iPad as a Wireless Display” on page 20-473 of this document to learn how the new iPad is installed and operated. But it is worth pointing out that a WIFI interface must be installed on the D3PC. If one was not factory installed, then you can add one in the form of a USB WIFI interface, which can be installed any time. 4-60| OWNER’s GUIDE System Connectors Ground (earth) Connector Connector: insulated banana jack, marked with the ground/earth symbol, yellow with green stripe Mating connector: insulated banana plug, yellow with green stripe Function: Depending on your electrical environment, it may be necessary to give the system an additional ground connection. This is an international standard mini-banana jack, color coded yellow/green, located near the DC power input. DC Power Input KEY PIN: (+) LOW PIN: (–) LEMO connector EGJ-2B-302-CLA DC power input Connector: LEMO power connector, as shown in the picture above. The connector is this LEMO model: EGJ-2B-302-CLA. The appropriate mating connector is LEMO FGJ.302.CLLD-XX (where XX is the cable size). The mating cable called 310-CBL-DC is provided to connect the D310 to the included external AC/DC power supply. This cable is 2 meters long. It has FGJ.302.CLLD-XX on the side that plugs into the D310, and FGG.2B.302-CLAD-XX on the side that plugs into the external AD/DC power supply. Note: some external power supplies have a built-in DC output cable, and there is no separate cable needed. Permissable power inputs are 9-29 VDC. ⇒⇒ Important note - power input must not exceed 29 VDC! System damage may occur. Fuse The system DC power is fused using a REGULAR ATO 15A fast-acting blade fuse. Blue is the ATO standard color code for a15 amperes fuse rating. ISO 8820-3:2002 standard. ⇒⇒ Replace this fuse only with exactly the same type, or equipment damage, injury or even death can result. OWNER’s GUIDE - D3PC-8 | 4-61 Computer Connectors The door on the right side of the chassis opens to allow access to a collection of computer interface connections, as follows: RS232C interface (com1) V/XGA video output PS/2 mouse (green) PS/2 keyboard (violet) IEEE-1394 firewire USB 2.0 ports (4) Ethernet ports (3) Audio stack (see description for color codes) 4-62| OWNER’s GUIDE RS232C interface connector (com1) Connector: 9-pin DSUB (male) Mating connector: 9-pin DSUB (female) Function: Can be used to connect devices which utilize the RS232C serial interface. The typical interpretation of the signals in the COM ports is as follows: The connector pin-out is defined here: PS/2 mouse (green) and PS/2 keyboard (violet) Connectors: Standard PS/2 green (mouse) and violet (keyboard) Mating connectors: Standard PS/2 keyboard and mouse plugs or USB-PS/2 adapters Function: Attachment of a keyboard or PS/2 mouse adapter via the stacked PS/2 mouse and keyboard connector (MSE & KBD). Description: Both interfaces utilize open-drain signaling with on-board pull-up. The PS/2 mouse and keyboard is supplied from 5V_STB when in standby mode in order to enable keyboard or mouse activity to bring the system out from power saving states. The supply is provided through a 1.1A resetable fuse. OWNER’s GUIDE - D3PC-8 | 4-63 Above left: Stacked PS/2 connector pinning and call-outs Above right: view of a typical PS/2 connector, showing the pin numbering schema. -- Note: PS/2 devices should be connected before the system is powered on. PS/2 mice in particular will typically not be recognized by Windows if connected after Windows has loaded. IEEE-1394 Firewire interface Connector: Standard 6-pin full size IEEE-1394b female connector Mating connector: Standard 6-pin IEEE-1394b male plug Function: Can be used to connect devices which utilize the IEEE-1394 firewire interface. Description: This port is an IEEE Std 1394a-2000 fully compliant cable port which provides interfacing at 100M bits/s, 200M bits/s, and 400M bits/s. -- Note: The DEWE-CAM-FW high speed video camera from Dewetron connects via firewire. However, it is highly recommended to add a dedicated firewire card to your system to get the best performance from the DEWECAM-FW sensor. The full speed may not be achievable using the on-board interface shown above. 4-64| Ethernet interfaces (3) Connectors: RJ45 CAT5e standard jack Mating connectors: RJ45 CAT5e or CAT6 plugs Function: for connecting the DEWE-321x to a local area network (LAN), or for connecting ethernet peripherals (printers, cameras, etc.). Description: Three channels of 10/100/1000Mb Ethernet RTL8111B LAN controllers. In order to achieve the specified performance of the Ethernet port, Category 5 twisted pair cables must be used with 10/100MB and Category 5E, 6 or 6E with 1Gb LAN networks. The signals for the Ethernet ports are as follows: The pinout of the RJ45 connector is as follows: Above right: typical mating plug, showing the pin outs On top of Ethernet connectors there is a Green LED (to the left) turning on when a 100MHz connection is made and it is flashing when 100MHz traffic is ongoing. The Yellow LED (to the right) turns on when a 1GHz connection is made and it is flashing when traffic is ongoing. Please refer to the CAT5e, CAT6, and structured cabling standards for computer networks when interfacing to the DEWE system. | 4-65 CRT/VGA video output Connector: three-row 15-pin DE-15 (female) connector Mating connector: 15-pin DE-15 video (male) plug Function: For connecting a display to the system. Description: There are has two basic types of interfaces to a display: Analog CRT interface and a digital interface typically used with flat panels. The digital interface to flat panels is connected internally to the built-in flatpanel display. The CRT interface is available externally to the user. ⇒⇒ Note: The 5V supply in the CRT connector is fused by a 1.1A resetable fuse. Left: typical mating cable for connecting an external VGA/XGA monitor -- Note: the CRT output cannot be used in a “multiple monitors” setup under Windows. To support multiple moni- tors with different images on them requires that a separate video card be added to the system. This is possible to do, using a PCI video card (PCIe slots are not available in this model). -- Note: D310’s 15” display has a max resolution of 1024x768; the CRT output is set to the same resolution as the built-in flatpanel display. 4-66| USB 2.0 interfaces (4) Connector: USB2.0 Standard-A receptacle Mating connector: USB2.0 Standard-A plug Function: For the connection of peripheral devices which utilize the USB 2.0 or USB 1.1 interface. (USB 1.1 devices may work, but will be limited in speed.) Description: The mainboard contains an Enhanced Host Controller Interface (EHCI) host controller that supports USB 2.0 allowing data transfers up to 480Mb/s. There are four user-accessible Universal Host Controller Interface (UHCI Revision 1.1) controllers that support USB full-speed and low-speed signaling. All ports are high-speed, full-speed, and low-speed capable and USB Legacy mode is supported. Over-current detection on all four USB ports is supported. USB ports 0 and 2 are supplied on the combined ETHER1, USB0, USB2 connector. USB ports 4 and 5 are supplied on the combined IEEE1394_0, USB4, USB5 connector. Note: It is recommended to use only High-/Full-Speed USB cable, specified in USB2.0 standard: -- Note: USB is most often used to connect webcams for recording video in sync with the data in your Dewetron data acquisition system. It is also used to connect inertial sensors such as the XSENS MTI series of sensors. OWNER’s GUIDE - D3PC-8 | 4-67 Audio stack connectors (6) Connectors: 3.5 mm (~1/8 in.) TRS jacks, color coded Mating connectors: 3.5 mm (!1/8 in.) TRS plugs Function: for outputting or inputting audio Description: Audio Line-in, Line-out and Microphone are available in the stacked audio jack connector. Below is shown audio stack configuration when configured for 8-channel audio. 4-68| OWNER’s GUIDE ⇒⇒ Note: Always use industry standard plugs and cables when connecting to any part of the DEWE system. Signal Input Connectors Analog input connectors (8 or 16) Connector: Varies according to the signal conditioning module(s) installed See the signal conditioning tables for further details about the module(s) installed within your system. Function: to input analog signals to the dynamic measuring inputs of the DEWE-3210 or DEWE-3211. Above: typical D3PC with BNC input connectors for the ANALOG INPUTS OWNER’s GUIDE - D3PC-8 | 4-69 Counter/encoder connectors (2) Connector: LEMO EGG.1B.307CLAD52 Mating connector: LEMO FGG.1B.307CLAD52 Mating cable available: CTR-CABLE-05 (includes connector) Function: used to input tachometer, TTL level pulse train, or encoder outputs for measuring and conversion. -- Note: see the COUNTER configuration section later in this guide. CAN BUS interface connector (installed when you order CAN BUS option) Connectors: DSUB 9 connectors (option UP-ORION-CAN2) Mating connector: DSUB 9 Mating cable: Standard CAN cable Function: used to connect to vehicle CAN BUS interfaces. Also can be used to read data from sensors which have a CAN BUS output, such as Dewetron’s own CPAD2 series signal conditioning modules. The typical DB-9 connectors are wired the same way, as shown below: When you connect either CAN bus interface to your vehicle or other CAN network, it is necessary to add termination resistors (not included) at each end of the cable: 4-70| OWNER’s GUIDE -- Note: this connector does not provide power for CPAD2 series modules. Digital I/O connector (AKA “Accessory connector”) Connector: Standard DSUB 37-pin connector, female Mating connector: Standard DSUB 37-pin connector, female Function: Provides access to the digital input/output lines on the installed A/D card, as well as additional signals such as clock input, trigger input, and more (see A/D card table related to the installed card). The exact pin-out of this connector can vary according to the system configuration, but here is the typical pin-out diagram when an ORION-0824-200 card is installed: OWNER’s GUIDE - D3PC-8 | 4-71 Synchronizing Multiple D3PC-8 Systems Using Direct SYNC or External Time Sources (NETWORK Configuration) In this approach, multiple DEWE systems are synchronized using either IRIG or GPS time code. Each still records their own data, but the data files are perfectly synchronized for analysis in third party software (such as Flexpro or Matlab). In addition, because the software option DS-OPT-NET is installed on each acquistion unit, a master controller can view channels from ALL of the connected measuring units in real time. In the NETWORK configuration, each instrument must have the hardware option UP-ORION-SYNC and the software option DS-OPT-NET. Synchronization of all units is required, via either (1) a simple SYNC cable connection, for distances up to 200 m, or (2) DEWE-CLOCK (internal or external), for long distances when a SYNC cable connection is not possible. The DS-OPT-NET software offers full remote setup, online data transfer up to the limit of the network connection and offline data transfer between the instruments. -- User tip: The NET expansion allows multiple usages of the PC power and fast storing capability. Multiple decen- tralized hard disks offer almost no limit for fast data storing. D3PC D3PC 0.000 ms SYNC ETHER NET Above - direct SYNC of two or more DEWE systems using the ORION-SYNC option installed onto the chassis, and DS-OPT-NET software. One measuring unit can be set as the master controller of both, or you can use a separate Windows computer as a master client to remotely control all synchronized units. The master controller is connected via ethernet to each measuring unit (typically a dedicated ethernet switch is used). GPS-CLOCK SYNC D3PC Right - when the systems are too far apart for the ORION-SYNC to be connected, the DEWE-CLOCK is used to sync the units via either IRIG or GPS time code signals. The rest of the system is the same, as described above. DEWE-CLOCK ETHER D3PC SYNC NET 4-72| OWNER’s GUIDE Operation Guidelines System Startup Protocol DC powered systems (STANDARD) The standard D3PC runs from wide-ranging DC power: 9-29 VDC. An AC/DC adapter is included with your system. To run the system from AC, connect the AC power cord to AC mains and to the AC/DC adapter. Connect the DC output cable that has a round LEMO connector on it to the DC power input on the rear panel of the D3PC. Connect a display Please connect a standard VGA or XGA monitor to the VGA connector on the rear of the system, behind the computer protection door. The D3PC MASTER power switch is located on the REAR panel, directly above the 9-29 VDC power input connector. Turning on the System Ensure that the master power switch on the REAR panel is in the ON position, then press and quickly release the soft power switch on the FRONT of the D3PC, and the system will boot up. ♦♦ Press ON and hold for one second to power the system on. ♦♦ Press ON and hold for 3 seconds to power OFF. Front Panel LED indicators ♦♦ Green POWER LED: Indicates that power is on, when lit ♦♦ Red HDD LED: indicates hard disk activity, when lit / flashing The D3PC SOFT power switch is located on the FRONT panel. Adjacent are LEDs for system power (green) and HDD activity (red). OWNER’s GUIDE - D3PC-8 | 4-73 Hardware Protocols Using the removable hard disk drive The rear panel of the D3PC has a 2.5” removable drive bay. This single bay has at least one hard drives inside it. Some systems are configured with two separate drives inside this single carrier (a C drive for Windows and applications, and a D drive for data.) ⇒⇒ If this is the only hard drive in the system, do NOT remove it when the system is powered on! This will cause Windows to crash very badly. If you have an internal hard drive which has the Windows operating system, then removing the external drive is permitted when power is on, because you are not writing to it at that time. To remove the hard drive, you must have access to the keylock. Turn the key into the lock and then press the large button beside the lock to eject the drive. To insert another drive, reverse these steps. Using external optical read/write drives Because the D3PC does not include an optical drive, you are free to purchase one from any computer retailer, and connect it to your D3PC via one of the USB 2.0 ports. -- The D3PC is compatible with external optical drives which are Windows7 compatible. The removable HDD is located on the rear panel. Two keys are provided with your system, so that you may remove the HDD and replace it with a different one. 4-74| OWNER’s GUIDE Basic Specifcations Input specifications Analog inputs Optional slow analog input channels (EPAD2) Digital I/O lines and Counters Number of analog channels Bit-resolution Maximum sample rate Input configuration ADC type Input ranges D3PC-8 model 8 IEPE / Voltage input channels Up to 128 channels (16 EPAD2 series modules, each with 8 channels) 8 x DIO, 2 counters 8 channels 24-bit ADC converters (one per channel) 204.8 kS/s/ch simultaneous Differential or single-ended (software selectable) Sigma-delta ±10, ±2, ±0.5 or ±0.1 V Voltage mode coupling DC or AC, high-pass 0.16 or 3.4 Hz IEPE mode and coupling 4 or 8 mA, high-pass 0.16 or 3.4 Hz Over-voltage protection Bandwidth Signal to noise ratio Crosstalk Analog input connectors ±30 V Sample rates up to 102.4 kS/s: 49 kHz -3dB Sample rates up to 204.8 kS/s: 76 kHz -3dB 1 kS/s ≤ fS ≤ 51.2 kS/s: 108 dB 51.2 kS/s < fS ≤ 102.4 kS/s: 105 dB 102.4 kS/s < fS ≤ 204.8 kS/s: 80 dB 114 dB Insulated BNC (female) (8) Main system Total PCI slots Hard disk Data throughput to disk Power supply Processor RAM Ethernet USB RS232 Operating system Dimensions (W x D x H) Weight 1 half length PCI slot, occupied by the ORION-0824-200 card (standard) 500 GB standard removable drive (optional solid state drive) 80 MB/s typical; faster rates available by changing to SSD drives 9~29 VDC. Includes external AC/DC power adapter. Intel Core2Duo 2.0 GHz CPU, on a standard industrial grade MiniITX mainboard 4 GB standard 3 x ethernet interfaces standard (1 Gb) Four x USB 2.0 interfaces available One serial interface on a DB9 connector available Microsoft Windows7 32-bit included (upgrades to 64-bit will be available Summer 2013) 8W x 10.5D x 4.25H (inches) / 203 x 267 x 108 (mm) 3 kg typical (7 lbs) Environmental specifications Operating temperature -20 to 50C (0 to 45C with batteries installed) (storage temp -20 to 60C) Humdity 10 to 80% non-condensing, 5 to 95% relative humidity Vibration MIL-STD-810F, EN 60068-2-6, EN 60721-3-2 class 2M2 Shock Software LabVIEW drivers MIL-STD-810F, EN 60068-2-27 DS-7-SE data acquisition software is included as standard* Multiple video cameras, or DEWE-CAM-FW-70, or DEWE-CLOCK use requires upgrade to PROF edition. LabVIEW VIs are available for Dewetron ORION series A/D cards and DAQ series signal conditioners. Popular upgrades Counter expansion (UP-ORION-CTR8) Upgrades the A/D card from 8 TTL digital I/Os and 2 TTL counter / encoders to: 8 synchronous TTL digital inputs protected up to 25 VDC 8 synchronous counter / encoder or 24 digital inputs with programmable threshold levels (0-40 V), input voltage range -35 to 60 V, AC/DC coupling Includes DB37 pin connectors installed OWNER’s GUIDE - D3PC-8 | 4-75 Input specifications D3PC-8 model Synchronization interface (UP-ORION-SYNC) Installs the SYNC hardware input/output ports and LED indicators onto the mainframe. Allows systems with the same base ORION card to be synced. Additionally Requires DS-OPT-NET software option for synchronization under DS-7 software. Digital Isolation (ORION-BASE-DI-ISO) HDD upgrade to solid state disks Isolation for the 16 digital inputs of ORION base cards. Input low: 0 - 2 V, Input high: 3 - 50 V bandwidth: DC up to 1MHz Isolation voltage between channels: 150 VDC Isolation voltage between Input and Output: 250 VDC Connector: DSUB-37 connector (replaces standard digital I/O connector) HDD-UP-SSD-120 Upgrade to 120 GB flash disk (replaces standard spinning hard disk), no moving parts, max. data throughput 90 MB/s HDD-UP-SSD-240 Upgrade to 240 GB flash disk (replaces standard spinning hard disk), no moving parts, max. data throughput 90 MB/s HDD-UP-SSD-480 Upgrade to 480 GB flash disk (replaces standard spinning hard disk), no moving parts, max. data throughput 100 MB/s Time code interface DEWE-CLOCK (internal or external) Adds an internal IRIG or GPS time code interface (does not require a PCI slot) Popular interface add-ons CAN expansion (UP-ORION-CAN2) IRIG / GPS time code (DEWE-CLOCK-INT) Adds 2 synchronous high speed CAN bus interfaces to the ORION card inside the system. Includes two DB9 factory installed connectors for these counters on the side panel of the D310, and rear panel of the DEWE-3040 and DEWE3050. Includes DS-OPT-CAN software option supporting CAN BUS interface. IRIG or GPS synchronized clock source for DEWETRON systems, installed inside a new DEWETRON base unit Input: IRIG signal code A or B, AM or DC, or GPS signal Output: TTL clock from 10 Hz to 10 MHz, PPS and ORION-DSA-SYNC, IRIG-B DC (requires DS-PROF or higher) Please order GPS antenna GPS-ANT-1 separately (if GPS is needed) VIDEO-FG-4 Adds a four channel VIDEO INPUT PCI card to the system. Four BNCs for analog NTSC video input on the right side panel, allowing four video streams to be recorded in sync with the data ARINC-429 / 1553 interfaces Adds a multi-channel ARINC-429 or MIL-STD-1553 interface to the system. Available as a single PCI card with either or both interfaces on it, or as separate external USB interfaces. See the INTERFACES section for a comprehensive list. External channel expansion EPAD2 and CPAD2 series modules Add one or more EPAD2 series external signal conditioners to your system. Each one provides 8 thermocouple, RTD, low voltage, or low current inputs. EPAD2 modules can be daisy-chained up to 8 modules per system. CPAD2 modules are the same except with CAN BUS interface. Digital and clock line specs Digital input lines 8 Digital input characteristics TTL/CMOS signal levels: Low voltage level -0.7 V to 0.8 V High voltage level 2 V to 5 V Pull-up with 100 kΩ resistor Input capacitance < 5pF Input protection -1 V to 6 V Digital output lines 8 Digital output characteristics TTL/CMOS signal levels: Low voltage level < 0.4 V @ 4 mA load High voltage level > 3 V @ 4 mA load Output current Sink (low level) -20 mA Source (high level) 20 mA Output impedance 50 Ω Clock divider output line 1, same characteristics as digital output lines Standard Counter/Encoders Standard counter/encoders 2 x 32-bit (LEMO connectors for each) Note - used as pair counters when advanced features are used. If you need two or more full-featured counters, please order the UP-ORION-CTR8 Counter timebase 80 MHz (40 MHz max. input frequency) Time base accuracy 25 ppm Measurement modes Event counting, up/down counting, gated event counting, period time, pulse width, two-edge separation, frequency and encoder measurements Standard counter/encoder signal levels TTL/CMOS, pull-up with 100 kΩ Input low level: -0.7 V to 0.8 V Input high level: +2 to +5V Overvoltage input protection (DI 0 to DI 7): ±25 V continuous (DI 8 to DI 15): -1 to 6 V 4-76| OWNER’s GUIDE Advanced Counter/Encoders (UPORION-CTR8 option) Advanced counter/encoders 8 advanced 32-bit counters Counter timebase 80 MHz (40 MHz max. input frequency) Measurement modes Event counting, up/down counting, gated event counting, period time, pulse width, two-edge separation, frequency and encoder measurements Signal levels Symmetrical, differential AC/DC coupling selectable Trigger adjustment range 0 to 40 VDC with 40 mV resolution Trigger level accuracy ±100 mV ±1% of trigger level Common voltage range -35 to 50V Overvoltage input protection ±100 V continuous Max. DC level @ AC coupling: ±50 V continuous CAN BUS specs (UP-ORION-CAN2 option) High-speed CAN interfaces 2 CAN 2.0B high speed interfaces Bus pin fault protection ±36 V ESD protection 12kV Physical layer High speed Compatibility 2.0B standard, J1939 protocol support OBD II via software option RPM-Measurement Encoder Tacho Gearthooth, CDM Gearthooth, TRG, CDM and TRG Gearthooth with missing teeth Gearthooth with double teeth Length-measurement Linear encoder Linear pulse sensor Event Counting Basic counting Gated counting Up/down counting Waveform Timing Period frequency Two pulse edge separation Period, pulse width, frequency, duty cycle OWNER’s GUIDE - DEWE-3210 | 5-77 5 DEWE-3210 Series The DEWE-3210 is a powerful and portable “all in one” data acquisition instrument. It features a flipup screen that resembles a notebook computer’s. And like a notebook computer, it has lithium ion batteries that keep the system running for hours when external power is not available. This model is designed and manufactured at the company’s facilities in the USA. This is where the SideHAND battery power system was invented, hence why this model is made at that factory. This section will review the hardware characteristics and specifications of the DEWE-3210 series, including its properties as a computer instrument, and all data acquisition components, including the A/D cards, signal conditioners, and interfaces with which it is compatible. Please refer to the SOFTWARE section of this manual to learn how to operate the turn-key data acquisition software installed on the system. Please refer to the separate sections for the SIGNAL CONDITIONERS, A/D CARDS, INTERFACES and SENSORS for complete details about those components that may be installed within your DEWE-3210. Model DEWE-3210 Rear view, screen closed 5-78| OWNER’s GUIDE System Dimensions 334 340 6 6 164 408 8 350 Add 10 mm all around for BNC connectors, knobs, and other protrusions. Allow room for the display to be opened - approximately 350mm H. 420 Dimensions in millimeters (mm) Divide by 25.4 for inches Allow plenty of room for cooling fans to function properly. Never block air exchange. OWNER’s GUIDE - DEWE-3210 | 5-79 Top-level call-outs DEWE-321x, head on view, with the screen open 17” XGA display and resistive TOUCHSCREEN Right speaker grille Left speaker grille Power and STORE/STOP buttons Touchpad and mouse buttons QWERTY keyboard Screen release buttons (slide inward to release) Screen release buttons (slide inward to release) Filtered air intakes (2 fans) Rubber corners on all sides Carrying handle POWER switch and LED HDD busy LED Battery status LCD Storing indicator LED STORE / STOP buttons * QWERTY keyboard * STORE/STOP buttons may not be present in all models 5-80| OWNER’s GUIDE Signal conditioning The DEWE-3210 can be equipped with either: 8 x DAQ / PAD / HSI series plug-in signal conditioners, or 2 x 8-channel MDAQ-SUB conditioners (16 channels total) It is not possible to install both DAQ/PAD/HSI slots and MDAQ conditioners into the body of the DEWE3210. However, mixed systems can be created by connecting external conditioners of any kind to the system. Therefore it is common that the DEWE-3210 is configured with 8 internal DAQ modules, plus connected to 16 ot more external MDAQ conditioners. Or the other way around, with 16 built-in MDAQ conditioners, and 16 or more DAQ/PAD/HSI modules connected externally. There are many possibilities. Model DEWE-3210 with 8 DAQ modules Model DEWE-3211 with 16 MDAQ channels Left side, screen open Left side, screen open A/D card(s) The DEWE-3210 has three half length PCI slots inside. As a standard, the ORION-1616-100 A/D card is installed when you buy the DEWE-3210 data acquisition system. This card provides the following basic specifications (further details are shown in the specification tables in the next pages): 16 simultaneously sampled analog input channels 16-bit resolution, separate ADC per channels 100 kS/s/ch maximum sample rate 2 synchronous counter/encoder inputs 8 each digital input and output lines At the time of ordering, this card can be upgraded, using any of the options available for increasing the channel count, the bit resolution to 22 or 24-bit, or increasing the sample rate up to 1 MS/s/ch, and many combinations of the preceding. See the UP-ORION options for all of the possibilities. OWNER’s GUIDE - DEWE-3210 | 5-81 In addition, many options can be factory installed onto the ORION cards, including adding two high speed CAN BUS interfaces, or expanding the number and capabilities of the digital counters that are installed. Interface(s) The DEWE-3210 is compatible with ORION, PCI card, and USB connected interfaces These include the CAN BUS interfaces added to the ORION A/D card, as well as separate PCI cards available for adding multiple ARINC 429, MIL-STD-1553 interfaces to the system. If all three PCI slots were used up, ARINC and MIL-STD-1553 interfaces can also be added as USB devices. There are numerous interfaces available for your DEWE system. Typical ARINC or MIL-STD-1553 interface Typical ARINC or MIL-STD-1553 interface PCI format USB format Video Cameras The DEWE-3210 is compatible with several kinds of video cameras, including: DEWE-CAM-USB DEWE-CAM-FW DEWE-CAM-GIG-E USB camera Hard sync Firewire camera Gigabit ethernet camera 5-82| OWNER’s GUIDE Configuration guide, DEWE-3211 model The DEWE-3211 has a 2U height space on its left side panel, which can accept either a 2U high MDAQ panel, such as either the DSUB connector panel or half BNC/half DSUB9 panel ... or a 1.5U panel plus any of the 0.5U accessory panels, as shown below: MDAQ panels Accessory panels 0.5U-AMPFLEX-POWER-4 0.5 U 0.5U-AMPFLEX-POWER-8 2U 0.5 U Power supply for PNA-A100 current clamps 0.5U-AOUT-BNC-2 0.5 U 1U-AOUT-BNC-4 2U MDAQ panel with BNC connectors is only 1.5U, leaving 0.5U above for any accessory panel 2U 1.5 U Note - if your system is ordered with any 1.5U MDAQ panel (MDAQ-SUB-V200-BNC or MDAQ-SUB-ACCBNC are perfect examples), and you do not order a 0.5U accessory panel, we will install a blank panel in the 0.5U space. Configuration guide, DEWE-3210 model The DEWE-3210 has a fixed configuration: there is a RACK-8 built into the side panel, so all you need to do is choose any any of our DAQ, PAD, or HSI series plug-in modules to fill the slots. Both models accept optional EPAD2 series external PAD modules for adding many channels of slower temperature signals, voltage, current, and RTD inputs. OWNER’s GUIDE - DEWE-3210 | 5-83 System Connectors System/PC connectors Ground (earth) Connector Connector: insulated banana jack, marked with the ground/earth symbol, yellow with green stripe Mating connector: insulated banana plug, yellow with green stripe Function: Depending on your electrical environment, it may be necessary to give the system an additional ground connection. This is an international standard mini-banana jack, color coded yellow/green, located near the DC power input. DC Power Input KEY PIN: (+) LOW PIN: (–) LEMO connector EGJ-2B-302-CLA DC power input Connector: LEMO power connector, as shown in the picture above. The connector is this LEMO model: EGJ-2B-302-CLA. The appropriate mating connector is LEMO FGJ.302.CLLD-XX (where XX is the cable size). The mating cable called CBL-DPS-2410 is provided to connect the DEWE-3210 to the DPS-2410 power supply. This cable is 2 meters long. It has FGJ.302.CLLD-XX on the side that plugs into the DEWE-3210, and FGG.2B.302-CLAD-XX on the side that plugs into the DPS-2410 AD/DC power supply. Permissable power inputs are 18-24VDC. ⇒⇒ Important note - power input must not exceed 24VDC! System damage will occur. Fuse The system DC power is fused using a REGULAR ATO 15A fast-acting blade fuse. Blue is the ATO standard color code for a15 amperes fuse rating. ISO 8820-3:2002 standard. ⇒⇒ Replace this fuse only with exactly the same type, or equipment damage, injury or even death can result. 5-84| OWNER’s GUIDE RS232C interface (com1) PS/2 mouse (green) XGA video output PS/2 keyboard (violet) IEEE-1394 firewire USB 2.0 ports (4) Ethernet ports (3) Audio stack (see description for color codes) OWNER’s GUIDE - DEWE-3210 | 5-85 Computer Connectors The door on the right side of the chassis opens to allow access to a collection of computer interface connections, as follows: RS232C interface connector (com1) Connector: 9-pin DSUB (male) Mating connector: 9-pin DSUB (female) Function: Can be used to connect devices which utilize the RS232C serial interface. The typical interpretation of the signals in the COM ports is as follows: The connector pin-out is defined here: PS/2 mouse (green) and PS/2 keyboard (violet) Connectors: Standard PS/2 green (mouse) and violet (keyboard) Mating connectors: Standard PS/2 keyboard and mouse plugs or USB-PS/2 adapters Function: Attachment of a keyboard or PS/2 mouse adapter via the stacked PS/2 mouse and keyboard connector (MSE & KBD). Description: Both interfaces utilize open-drain signaling with on-board pull-up. The PS/2 mouse and keyboard is supplied from 5V_STB when in standby mode in order to enable keyboard or mouse activity to bring the system out from power saving states. The supply is provided through a 1.1A resetable fuse. 5-86| OWNER’s GUIDE Above left: Stacked PS/2 connector pinning and call-outs Above right: view of a typical PS/2 connector, showing the pin numbering schema -- Note: PS/2 devices should be connected before the system is powered on. PS/2 mice in particular will typically not be recognized by Windows if connected after Windows has loaded. IEEE-1394 Firewire interface Connector: Standard 6-pin full size IEEE-1394b female connector Mating connector: Standard 6-pin IEEE-1394b male plug Function: Can be used to connect devices which utilize the IEEE-1394 firewire interface. Description: This port is an IEEE Std 1394a-2000 fully compliant cable port which provides interfacing at 100M bits/s, 200M bits/s, and 400M bits/s. -- Note: The DEWE-CAM-01 high speed video camera from Dewetron connects via firewire. However, it is highly recommended to add a dedicated firewire card to your system to get the best performance from the DEWECAM-01 sensor. The full speed may not be achievable using the on-board interface shown above. Ethernet interfaces (3) | 5-87 Connectors: RJ45 CAT5e standard jack Mating connectors: RJ45 CAT5e or CAT6 plugs Function: for connecting the DEWE-321x to a local area network (LAN), or for connecting ethernet peripherals (printers, cameras, etc.). Description: The DEWE-321x provides three channels of 10/100/1000Mb Ethernet RTL8111B LAN controllers. In order to achieve the specified performance of the Ethernet port, Category 5 twisted pair cables must be used with 10/100MB and Category 5E, 6 or 6E with 1Gb LAN networks. The signals for the Ethernet ports are as follows: The pinout of the RJ45 connector is as follows: Above right: typical mating plug, showing the pin outs On top of Ethernet connectors there is a Green LED (to the left) turning on when a 100MHz connection is made and it is flashing when 100MHz traffic is ongoing. The Yellow LED (to the right) turns on when a 1GHz connection is made and it is flashing when traffic is ongoing. Please refer to the CAT5e, CAT6, and structured cabling standards for computer networks when interfacing to the DEWE-321x. CRT/VGA video output 5-88| Connector: three-row 15-pin DE-15 (female) connector Mating connector: 15-pin DE-15 video (male) plug Function: For connecting an additional display to the DEWE-321x, which will show an exact duplicate of the built-in display. Description: The DEWE-321x has two basic types of interfaces to a display: Analog CRT interface and a digital interface typically used with flat panels. The digital interface to flat panels is connected internally to the built-in flatpanel display. The CRT interface is available externally to the user. ⇒⇒ Note: The 5V supply in the CRT connector is fused by a 1.1A resetable fuse. Left: typical mating cable for connecting an external VGA/XGA monitor -- Note: the CRT output cannot be used in a “multiple monitors” setup under Windows. To support multiple moni- tors with different images on them requires that a separate video card be added to the system. -- Note: DEWE-321x’s with 15” displays (made in 2010) have a max resolution of 1024x768; DEWE-321x (made in 2011 or later) with 17” displays have a max resolution of 1280x1024 . The CRT output is set to the same resolution as the built-in flatpanel display. USB 2.0 interfaces (4) Connector: USB2.0 Standard-A receptacle Mating connector: USB2.0 Standard-A plug Function: For the connection of peripheral devices which utilize the USB 2.0 or USB 1.1 interface. | 5-89 Description: The DEWE-321x’s mainboard contains an Enhanced Host Controller Interface (EHCI) host controller that supports USB 2.0 allowing data transfers up to 480Mb/s. There are four user-accessible Universal Host Controller Interface (UHCI Revision 1.1) controllers that support USB full-speed and low-speed signaling. All ports are high-speed, full-speed, and low-speed capable and USB Legacy mode is supported. Over-current detection on all four USB ports is supported. USB ports 0 and 2 are supplied on the combined ETHER1, USB0, USB2 connector. USB ports 4 and 5 are supplied on the combined IEEE1394_0, USB4, USB5 connector. Note: It is recommended to use only High-/Full-Speed USB cable, specified in USB2.0 standard: -- Note: USB is most often used to connect webcams for recording video in sync with the data in your Dewetron data acquisition system. It is also used to connect inertial sensors such as the XSENS MTI series of sensors. Audio stack connectors (6) Connectors: 3.5 mm (~1/8 in.) TRS jacks, color coded Mating connectors: 3.5 mm (!1/8 in.) TRS plugs Function: for outputting or inputting audio Description: Audio Line-in, Line-out and Microphone are available in the stacked audio jack connector. Below is shown audio stack configuration when configured for 8-channel audio. 5-90| OWNER’s GUIDE ⇒⇒ Note: Always use industry standard plugs and cables when connecting to any part of the DEWE-321x OWNER’s GUIDE - DEWE-3210 | 5-91 Signal Input Connectors Analog input connectors (8 or 16) Connector: Varies according to the signal conditioning module(s) installed See the signal conditioning tables for further details about the module(s) installed within your system. Function: to input analog signals to the dynamic measuring inputs of the DEWE-3210 or DEWE-3211. Above: typical DEWE-3210 showing 8 DAQ modules plugged in Counter/encoder connectors (2) Connector: LEMO EGG.1B.307CLAD52 Mating connector: LEMO FGG.1B.307CLAD52 Mating cable available: CTR-CABLE-05 (includes connector) Function: used to input tachometer, TTL level pulse train, or encoder outputs for measuring and conversion. -- Note: see the COUNTER configuration section later in this guide. 5-92| OWNER’s GUIDE CAN BUS interface connector (installed when you order CAN BUS option) Connectors: LEMO EGG.1B.306.CLL Mating connector: LEMO FGG.1B.306.CLL Mating cable: CAN-CBL-Y PIN Function Comment 1 CAN0 Lo First CAN port 2 CAN0 Hi First CAN port 3 D GND 4 CAN1 Lo Second CAN port 5 CAN1 Hi Second CAN port 6 GND Function: used to connect to vehicle CAN BUS interfaces. Also can be used to read data from sensors which have a CAN BUS output, such as Dewetron’s own CPAD2 series signal conditioning modules. When the CAN option is installed, this single LEMO connector will contain two CAN BUS interfaces. The CAN-CBL-Y mating cable is optionally available to split the single LEMO connector to two standard CAN DB-9 (female) connectors. Both DB-9 connectors are wired the same way, as shown below: When you connect either CAN bus interface to your vehicle or other CAN network, it is necessary to add termination resistors (not included) at each end of the cable: -- Note: this connector does not provide power for CPAD2 series modules. OWNER’s GUIDE - DEWE-3210 | 5-93 Expansion connector (DEWE-3210 model) ANALOG INPUT connector Connector: LEMO 19-pin LEMO EGG.2B.319.CLL, marked ANALOG INPUT Mating cable: 3210-EXP8-L Function: The DEWE-3210 can be configured with a 16 channel A/D card inside. The first eight channels are wired to the DAQ modules on the left side panel. Therefore, the other eight channels are brought to this ANALOG INPUT connector on the left side panel, whereby you may connect an expansion rack such as the DEWE-30-8, in order to address these eight channels. Pin Signal Pin Signal 1 AI 8+ 2 AI 8 GND 3 AI 9+ 4 AI 9 GND 5 AI 10+ 6 AI 10 GND 7 AI 11+ 8 AI 11 GND 9 AI 12+ 10 AI 12 GND 11 AI 13+ 12 AI 13 GND 13 AI 14+ 14 AI 14 GND 15 AI 15+ 16 AI 15 GND 17 N.C. 18 N.C. 19 N.C. The DEWE-30-8 expansion rack needs two connections to the DEWE-3210 mainframe: 1. The analog connection as shown above via the 3210-EXP8-L cable as shown above, and 2. POWER and MODULE CONTROL are carried to the DEWE-30-8 expansion rack via the EPAD connector. Therefore, the additional modules in the expansion rack will be controllable within the software just as if the inputs were physically installed within the DEWE-3210 mainframe. DEWE-30-8-EXPANSION Rack (Optional) 5-94| OWNER’s GUIDE DC Power & control cable 3210-EXP8-L analog cable The 3210-EXP8-L cable connects the DEWE-30-8-EXP expansion rack to the DEWE-3210 model. It provides signal connection. Power and RS485 module control are via a separate cable. -- This expansion/connector does not apply to the DEWE-3211 model, which already has 16 MDAQ channels on its left side panel Digital I/O connector (AKA “Accessory connector”) Connector: Standard DSUB 37-pin connector, female Mating connector: Standard DSUB 37-pin connector, female Function: Provides access to the digital input/output lines on the installed A/D card, as well as additional signals such as clock input, trigger input, and more (see A/D card table related to the installed card). The exact pin-out of this connector can vary according to the system configuration, but here is the typical pin-out diagram when an ORION-1616-100 card is installed: OWNER’s GUIDE - DEWE-3210 | 5-95 Operation Guidelines System Startup Protocol Installing the Smart Batteries Systems are shipped with the hot-swappable batteries removed. You should install them, connect power, and charge up the batteries. Please follow these guidelines: ♦♦ Open the battery door on side of DEWE-321x and insert one battery into the top slot, and the other into the bottom slot. Leave the center slot open unless you have a third battery! ♦♦ When inserting the first battery you may notice that the system LEDs and fans will turn on for a second, this is normal when the battery module “wakes up.” The battery door on the side of the DEWE-321x is hinged, allowing you to access the battery compartment. Batteries can be removed by pulling on their flexible tabs. ⇒⇒ Never use any battery which appears to be dam- aged, or which is cracked, broken, hot to the touch, or unusual in any way. Lithium batteries can be dangerous if mistreated or improperly charged. Please locate the BATTERY STATUS LCD, located on the panel just above the keyboard. ♦♦ With batteries in place, the LCD screen will display the charge level, charge/discharge state, power consumption and total current. The battery status LCD keeps you informed of how many batteries are installed (2 above), the charge level (100% above), and whether the system is charging or discharging. ♦♦ The LCD (and battery module circuit) will always be ON, unless the batteries are removed Please locate your DPS-2410 external power supply. This is included with each DEWE-321x system. ♦♦ Connect the included AC power cord to the DPS- 2410, and then to a 120VAC power receptable. ♦♦ Connect the included DC power cord to the DPS- 2410 and then to the DEWE-3031’s DC power input jack. ♦♦ Turn on the DPS-2410 power switch. A power LED will confirm that that it is receiving AC power and operating properly. The DPS-2410 AC/DC converter/power supply is fused with an automotive type power fuse. Please replace only with the same type and rating of fuse. 5-96| OWNER’s GUIDE ⇒⇒ Do not block the cooling fan of the DPS-2410! Over- heating any electrical component is dangerous. -- NOTE: The DEWE-321x can be operated without bat- teries simply by connecting the DPS-2410. -- This can also help you refresh batteries which have become 100% discharged, which can happen over time. If the mainframe will not start up, simply remove all of your batteries, then power up the system using the DPS-2410. When the system is up and running, insert only one battery into the top slot. Wait 30 minutes and then insert a second battery into the second slot. For faster recharging, do NOT power up the DEWE3xxx mainframe, but make certain that the DPS2410 is powered on. -- There are also one, two, and four slot external bat- The DPS-2410 has a POWER SWITCH - be sure to turn it on, otherwise, DC power will not flow from it. Optional BAT-CHARGER-1 is ideal for desktop usage. tery chargers optionally available. For an easy to use desktop charger for a single battery, please order the BAT-CHARGER-1. For a more robust four battery charger which can also be used as a DC power source, choose the Neutrino-4. Using the smart batteries The “smart batteries” supplied with your Dewetron battery powered system are equipped with an integrated circuit which stores information such as manufacturer, serial number, production date, etc., and monitors the current battery status in terms of discharge rate, predicted remaining capacity, temperature, voltage etc. Optional NEUTRINO-4 is a ruggedized four battery charger that also serves as a DC power supply BATT-95WH “smart batteries” are capable of displaying their charge state even when not plugged into anything. With the push of a button, an LED display on the battery pack shows the current charge state in 25% steps. An intelligent battery controller, integrated in our DEWETRON systems, takes care of the charging and discharging process in order to ensure maximum battery performance and lifetime. Press the white dot on the battery and the charge percentage indicator will show the approximate remaining charge, in 25% steps. OWNER’s GUIDE - DEWE-3210 | 5-97 Turning on the System Locate the power switch on the front panel above the main screen. This is a momentary rocker type switch, where the white dot indicates the ON direction. ♦♦ Press ON and hold for one second to power the system on. ♦♦ Press ON and hold for 3 seconds to power OFF. ♦♦ Green POWER LED: lit when the system is powered on -- The LCD battery display is ALWAYS on when any bat- teries are installed. This does not indicate that the system is powered on! Only the green POWER LED indicates system power on/off status. ♦♦ Red HDD LED: lit when there is hard disk activ- The DEWE-321x power switch is a momentary type, located on the front panel near the LED battery status display. To its right are LEDs for system power (green) and HDD activity (red). ity. You will notice that the main screen’s backlight will come on when power is applied. After a few moments the BIOS and Windows operating system messages and graphics will appear. ⇒⇒ If the system does not power on, ensure that you have batteries with at least 30% charge, or that the DPS-2410 is properly connected and TURNED ON. Hardware Protocols Using the removable hard disk drive The right side of the DEWE-321x has a 2.5” removable drive bay. This single bay has two separate hard drives inside it: a C drive for Windows and applications, and a D drive for data. ⇒⇒ If this is the only hard drive in the system, do NOT remove it when the system is powered on! This will cause Windows to crash very badly. If you have an internal hard drive which has the Windows operating system, then removing the external drive is permitted when power is on, because you are not writing to it at that time. To remove the hard drive, you must have access to the keylock. Turn the key into the lock and then The DEWE-321x right side panel contains the removable HDD and the optical media drive as standard. 5-98| OWNER’s GUIDE press the large button beside the lock to eject the drive. To insert another drive, reverse these steps. Using the Optical read/write drive -- Note - systems built after August 2012 do NOT have an optical drive. This option was removed. Therefore this section applies only to those models which have the optical drive installed. Directly above the removable HDD is an optical drive which can read and write many formats of DVD and CD media. Note that DVD and CD authoring tools which are standard within the installed Windows operating system are available. No additional authorizing tools are included as standard. A standard slimline optical drive, you open it by pressing the single button on the drive door beside the LED. Gently press-fit a compatible disk onto the spindle and then close the door. If your system has Windows 7 operating system installed, authoring capability for both CD and DVD media are included with the operating system (Windows XP did not have authoring software for DVD media included as standard). Of course, in all cases, you are free to install whatever authoring software you prefer. There are some very nice third party utilities which are superior to the ones built into Windows. -- Windows 7 Professional, 32-bit mode, was installed on these models starting in December 2010. The optical drive is located above the computer access door. Press the EJECT button to open the optical drive. This optical drive is no longer included with the DEWE-3210. Please purchase an external USB optical drive if you require one. Any Windows7 compatible optical drive with a USB 2.0 interface will work. OWNER’s GUIDE - DEWE-3210 | 5-99 Analog Specifications DEWE-3210 (DAQ) DEWE-3211 (MDAQ) 8 -- On-board DAQ /PAD/HSI module slots On-board MDAQ channels -16 Compatible modules All DAQ, PAD, and HSI series plug-in signal conditioning modules All MDAQ-SUB series conditioners Module configuration Any combination of 8 DAQ, PAD, and HSI modules can be plugged in at any time. (See DAQ, PAD, and HSI tables) One MDAQ-BASE-5 holds any two MDAQ-SUB modules (See MDAQ table) Modularity Plug-in modules can be removed with 2 screws, even when power is applied to the system. MDAQ conditioners are factory installed and are not fieldmodular. Input configuration Differential, isolated (See DAQ, PAD, and HSI section for complete details) Differential, non-isolated (See MDAQ section for complete details) Signal/sensor compatibility Voltages, currents, strain, pressure, acceleration, sound pressure, temperature, force, displacement, and more. DAQ, PAD and HSI modules are available which are compatible with virtually all sensors in common use today. Voltages, currents, strain, pressure, acceleration, sound pressure, temperature, force, displacement, and more. MDAQ modules (when combined with MSI adapters) are available which are compatible with virtually all sensors in common use today. Detailed input specifications According to the installed signal conditioners and installed A/D cards (see tables for DAQ, MDAQ, PAD, HSI, EPAD2, CPAD2 conditioners, and ORION and AD series A/D cards) 3 (using all three PCI slots for A/D cards) Max A/D card quantity Channel expansion - DYNAMIC input channels Max channel expansion with analog connection 96 dynamic channels (3 x 32 channel A/D cards inside, plus one or more expansion signal conditioning chassis (external) Max channel expansion with PCI-bridge connection 200 dynamic channels (8 internal plus external DEWE-51-PCI-192 chassis with PCI bridge interface to the mainframe) Channel expansion - SLOW input Channels Max EPAD2 series conditioners 16 (128 channels). EPAD2 modules provide 8 channels each. They are plugged into the standard EPAD connector, and one is daisy-chained to the next one. The last EPAD2 module in the chain must have the small terminator plugged into it to ensure that the communication bus works properly. 5-100| OWNER’s GUIDE Counter/Encoder Specifications Parameter DEWE-3210 series DEWE-3211 series DEWE-3213 series Number of counter channels According to the A/D card installed (see tables) Counter modes ORION cards: Event counting, waveform timing, encoder, tacho, geartooth sensor AD series cards: Event counting, waveform timing, tacho Counter input signal level Standard: TTL level Optional: user adjustable trigger level (when ORION cards whose model names end in 4 or 5 are ordered. See A/D card tables) Standard: TTL level Counter input connectors Standard: Two LEMO connectors on the left side panel, one for each counter input Optional: More LEMO connectors, or alternative connectors, for the counters Standard: Eight LEMO connectors Number of Digital input/outputs According to the A/D card installed (see tables) 24 digital inputs Digital input signal level Standard: TTL, non-isolated Optional: Wider range, isolated digital input According to the A/D card installed (see tables) TTL level, non-isolated Digital input connector DSUB37 connector on the left side panel, which has the digital I/O lines, counter, and trigger line from the first installed A/D card. Each of the 8 LEMOs has three digital inputs 8 CAN BUS Specifications Parameter DEWE-3210 series Number of CAN bus interfaces According to the A/D card installed (see tables below) DEWE-3211 series DEWE-3213 series Interface type CAN 2.0B, up to 1 MBit/sec Special protocols supported J1939 (standard) OBDII PLUGIN-OBDII option) CAN output (DEWESoft-OPT-CAN option) Isolation not isolated, however, CAN-OPT-ISO adapters are available optionally, which will isolated the CAN BUS interfaces. 2 x high speed CAN ports OWNER’s GUIDE - DEWE-3210 | 5-101 Interfaces Parameter DEWE-3210 series DEWE-3211 series EPAD2 interface Standard, via LEMO connector. See signal conditioner tables below for EPAD2 details. Video camera interfaces USB 2.0, Firewire (IEEE-1394), and ethernet may be used for optional DEWE-CAM VIDEO cameras. The optional FG-VIDEO-4 can be installed to provide four NTSC video inputs in addition (requires one PCI slot). GPS interfaces RS232C and USB 2.0 may be used for optional GPS interfaces/sensors ARINC 429 / MIL-STD-1553 Optional ARINC 429 and MIL-STD-1553 interfaces may be added either as PCI cards or as external USB 2.0 or ethernet-connected boxes. PCM data PCM bit sync/decom interface optionally available. This is a full length card and thus cannot fit within the DEWE-3210 or DEWE-3211. However, it can be connected via a PCI bridge expansion chassis. Or it can be installed into the DEWE-3218 computer version of the DEWE-3210, which does not have analog signal conditioning. CAN BUS Two high speed CAN bus interfaces can be installed on each ORION card as an option. (factory installed). Up to 6 CAN BUS interfaces therefore can be installed within the DEWE-3210 mainframe. Accessories Included Carrying bag 3200-BAG, soft sided carrying bag made from ballistic nylon, black. Pouches for accessories, cords, DPS-2410, straps and adjustable shoulder strap System restore DVD DVD allows the system to be reloaded to factory conditions, including Windows configuration and Dewetron software configuration Printed manuals DEWE-3210/3211 Owner’s Guide Documentation Certificate of conformance with manufacturer’s specifications Calibration report (optional) Complete NIST traceable calibration report from Met/CAL® 5-102| OWNER’s GUIDE Computer System Specifications Parameter DEWE-3210 series DEWE-3211 series CPU Intel® Core2Duo® 2 GHz CPU RAM 2 GB RAM standard (up to 4 GB optionally) Hard disk drive 500 GB removable S-ATA spinning drive standard, plus internal 160 GB fixed drive for Windows OS and applications Optional drives: 32, 64, or 128 GB removable flash drive (no moving parts) Internal spinning or flash drive added in addition to the removable drive Larger removable drive (up to 1 TB) Optical drive None (this was removed in 2012). External optical drives can be purchased at any computer retailer and connected via USB 2.0 interface. Operating System Microsoft® Windows 7 Professional® (32-bit) Keyboard and pointing device Built-in Cherry brand QWERTY keyboard with touchpad Display Built-in 17” XGA display 1280x1024 pixels, with resistive touchscreen as stanard Interfaces 2 x Ethernet interfaces (1 Gb/s max. transfer speed) 4 x USB 2.0 interfaces 1 x IEEE-1394 Firewire interface 1 x RS232C serial interface 1 x VGA interface Audio and video I/O connectors PCI slots Three half-length 32-bit PCI slots. The first slot always used by an A/D card. The other slots may be used for additional A/D cards, or additional interfaces. Power system SideHAND® battery power system installed 2 x Lithium Ion smart batteries are included Three battery slots are built into the left side panel DPS-2410 external AC/DC adapter/charger is included Built-in 2 line LCD display shows the battery status at all times Battery running time Approximately 2 hours of battery operation (depends on workload of the system) AC running time Unlimited. With the DPS-2410 connected, the system will run indefinitely. Batteries are recharged automatically when power is connected. Dimensions: 425 x 340 x 191 mm (16.7 x 13.4 x 7.5 in.) (with screen closed) Weight: Without batteries: 10 kg (22 lb.) Battery weight: approx. 1.5 lbs each Temperature & humidity 0 to +50 °C (-20 when pre-warmed) (10 to 80 % non cond., 5 to 95 % rel. humidity) Shock and vibration Shock: EN 60068-2-27, MIL-STD-810F Vibration: EN 60068-2-6, EN 60721-3-2 class 2M2 OWNER’s GUIDE - DEWE-3210 | 5-103 Data Acquisition Software Specifications DEWESoft software specifications General Compatibility Microsoft® Windows XP® and Windows 7® (32-bit operating systems) Computer requirements Recommended: Intel® Core2Duo® 2 GHz CPU with 2 GB RAM and S-ATA HDD with 100 GB of free space Minimum: Intel® Atom® 1.2 GHz CPU with 1 GB RAM and IDE HDD with 50 GB of free space Licensing requirements A valid license is required for data acquisition operation No license is required to use the software in analysis mode Software name and edition DEWESoft 7 SE (standard edition) is included with the DEWE-321x system. Upgrades from SE to PROF or DSA or EE editions are available for purchase at any time. Hardware compatibility Controls all programmable aspects of the integrated DEWE-43 acquisition module TEDS Supports TEDS sensors, and includes TEDS compatible sensor database Input scaling Channel setup screen: supports linear scaling of analog channels via 2-point method and funtional method (y=mx+b) Math formula and sensor database: support both linear and non-linear (polynomial) scaling, via multi-sectional coefficients or look-up table scaling Counter setup Counter/encoder channel setup screen supports graphical configuration of all counter and encoder decoding modes. Recording setup Recording modes Always fast (continuous recording to disk at the dynamic sample rate) Fast on trigger (dynamic sample rate recording when one or more trigger conditions are true) Always slow (reduced rate storage of min/max/ave/rms values at a user-selectable decimation of the dynamic sample rate Fast on trigger, slow otherwise (combination of fast triggering and slow recording in between triggers) Pre-trigger time Pre-trigger time can be entered when using any triggered recording mode. Pretrigger time limited to the amount of physical RAM available divided by the number of samples per second being streamed across the PCI bus Post-trigger time Post-trigger time may be selected without limit When one or more channels are being used to stop recording, any selected posttrigger time will be added to the end of the acquisition File naming Data files may be named freely within Windows file naming constraints File protection Files canno be over-written accidentally due to a warning screen, which provides a way to cancel recording, continue and overwrite the existing file, or rename the new file (preserving the existing file) Multi-file naming Selectable automatic numbering of files. Software will append an underscore and four digits to the end of the user-entered filename. Subsequent recordings are increased one digit at a time. Alternatively the date and/or time (hh:mm:ss) can be added to the filename. 5-104| OWNER’s GUIDE OWNER’s GUIDE - DEWE-3050 | 6-105 6 DEWE-3050 Series The DEWE-3050 is a powerful yet portable data acquisition instrument. It features a removable touchscreen display that can be placed on facing when for protection when the system is not being used. In addition, the keyboard and cables are stored in a compartment behind the display when not in use. The rear panel of this model is the most capable and flexible that we have ever made, capable of holding up to 32 plugin-modules, or up to 128 MDAQ channels, and many combinations. The DEWE-3050 runs from AC power, but has a built-in battery UPS system that will keep it running for hours in the event that the power is lost. This model is designed and built at our Wakefield, RI manufacturing facility in the USA. Model DEWE-3050 Front view, display installed facing outward for normal use This section will review the hardware characteristics and specifications of the DEWE-3050 series, including its properties as a PC-based instrument, and all data acquisition components, including the A/D cards, signal conditioners, and interfaces with which it is compatible. Please refer to the SOFTWARE section of this manual to learn how to operate the turn-key data acquisition software installed on the system. Please refer to the separate sections for the SIGNAL CONDITIONERS, A/D CARDS, INTERFACES and SENSORS for complete details about those components that may be installed within your DEWE-3050. 6-106| OWNER’s GUIDE System Dimensions 419 5 384 10 394 340 343 Dimensions in millimeters (mm) Divide by 25.4 for inches Add 10 mm all around for BNC connectors, knobs, and other protrusions. Allow plenty of room for cooling fans to function properly. Never block air exchange. OWNER’s GUIDE - DEWE-3050 | 6-107 Top-level call-outs DEWE-3050, front view, display facing out and mounted High-impact rubberized side / corner protectors PCI card edge access (for ARINC, 1553, PCM, D/A cards) (INSIDE) ORION-1616-100 A/D card included as standard Computer interfaces (ethernet, USB, RS232, audio, and more) Two removable 2.5” HDDs (C and D) Video cameras like: DEWE-CAM-FW-70 DEWE-CAM-GIG-E-120 DEWE-CAM-USB, etc. Convenient large handle LCD battery status display 17” removable TOUCHSCREEN display Air cooling (filtered intakes) 120 / 240 VAC mains power input Door for 4 x SideHAND2 series hot-swappable batteries 6-108| OWNER’s GUIDE Top-level call-outs (continued) DEWE-3050, rear view, 2.5U-PANEL-16 installed Accessory / DIO connector (DSUB 37) ORION-SYNC (option) EPAD connector (LEMO) 12 VDC output (LEMO Counters (2) (LEMO) 16 slots for DAQ / PAD / HSI modules Modular spaces for the installation of additional function panels Rubberized corner protectors DEWE-3050, rear view, TWO 2.5U-PANEL-16s installed (32 slots) 5 x PCI slots (full length) Filtered air intakes for colling Two removable HDDs (C and D) Computer interfaces OWNER’s GUIDE - DEWE-3050 | 6-109 DEWE-3050 Rear Panel Configurations With DAQ / PAD / HSI and MDAQ conditioners The rear panel can be configured with one 16 slot racks for DAQ / PAD / HSI modules 2.5U-PANEL-DAQ-16 - compatible with all DAQ and PAD modules, and HSI modules (up to 300 kHz bandwidth) - or 2.5U-PANEL-DAQ-16-HSI - compatible with all HSI modules up to 2 MHz bandwidth, all PAD modules, and most DAQ modules When one 16-slot rack is installed, two 2.5U and two 2.0U panel spaces remain available for additional panel options to be added. For example: 32 channels of MDAQ conditioners with DSUB connectors could be added, plus 32 channels of MDAQ with BNC connectors. Or 64 channels of MDAQ with BNC connectors. There are many possibilities. With MDAQ conditioners only The rear panel can be configured with up to: SIX 2.0U MDAQ conditioner panels with DSUB connectors could be added (96 channels) - or EIGHT 1.5U MDAQ conditioner panels with BNC connectors would be added (128 channels) - or Many other comibinations of MDAQ panels and other function panels (ALL MODELS) EPAD2 signal conditioners for adding slow thermocouple inputs, RTDs, voltages, and currents (daisy-chain) 6-110| OWNER’s GUIDE DEWE-3050, front view, display removed - keyboard revealed Inside compartment for cable storage (remove the display to access it) Removable kayboard with touchpad located behind the display. Held in by spring-loaded clips. You can stow the keyboard and your cables inside here when the system is not being used. Additional Function Panels Note that the screen can be put on backwards to protect it when the system is not in use. 0.5U-DA2-BNC 0.5 U panel with 2 BNC connectors connected to the 2 analog outputs of an AD16-1000-16-OUT2 card 0.5U-DA4-BNC 0.5 U panel with 4 BNC connectors connected to the 4 analog outputs of a DA4-1000-16 card 0.5U-DA8-BNC 0.5 U panel with 4 BNC connectors connected to the 8 analog outputs of a DA8-1000-16 card 0.5U-AMFLEX-POWER-4 0.5U panel with BINDER 712 connectors, 9VDC power supply for up to four PNA-100 current sensors. OWNER’s GUIDE - DEWE-3050 | 6-111 0.5U-AMFLEX-POWER-8 0.5U panel with BINDER 712 connectors, 9VDC power supply for up to four PNA-100 current sensors. 0.5U-CLAMP-DC-POWER-4 0.5U panel with LEMO connectors, 15VDC power supply and digital status lines for up to four PNA-CLAMP-150-DC current sensors. 0.5U-CLAMP-DC-POWER-8 0.5U panel with LEMO connectors, 15VDC power supply and digital status lines for up to eight PNA-CLAMP-150-DC current sensors. 1U-DA8-BNC 1U panel with 8 BNC connectors supporting up to 8 analog outputs 1U-DA16-BNC 1U panel with 8 BNC connectors supporting up to 16 analog outputs 1.5U-ORION-DIO-PANEL-1 1.5U panel with 8 LEMO connectors (EGG.1B.307) for up to 8 counters, plus one DSUB37 connector for up to 16 digital input lines, including mating connectors (included with UP-ORIONCTR8 upgrade) 1.5U-TC-PANEL-32 1.5U panel prepared for up to 32 thermocouple input channels. Up to four MPAD-TH8-X modules can be factory installed into this panel. Each MPAD block provides 8 channels. 6-112| OWNER’s GUIDE Signal conditioning The DEWE-3050 can be equipped in countless ways. Here are the most popular configurations: 16 x DAQ / PAD / HSI series plug-in signal conditioners, or 32 x DAQ / PAD / HSI series plug-in signal conditioners, or 16 x 8-channel MDAQ-SUB-BNC conditioners (128 channels total), or 12 x 8-channel MDAQ-SUB-DSUB conditioners (96 channels total), or 16 x DAQ / PAD / HSI modules PLUS up to 64 channels of MDAQ conditioners When every possible panel space is not filled, other function panels can additionally be added. Please see the previous page for a listing of these panels. A/D card(s) The DEWE-3050 has five full length PCI slots inside. As a standard, the ORION-1616-100 A/D card is installed when you buy the data acquisition system. This card provides the following basic specifications (further details are shown in the specification tables in the next pages): 16 simultaneously sampled analog input channels 16-bit resolution, separate ADC per channels 100 kS/s/ch maximum sample rate 2 synchronous counter/encoder inputs 8 each digital input and output lines At the time of ordering, this card can be upgraded, using any of the options available for increasing the channel count, the bit resolution to 22 or 24-bit, or increasing the sample rate up to 1 MS/s/ch, and many combinations of the preceding. See the UP-ORION options for all of the possibilities. In addition, many options can be factory installed onto the ORION cards, including adding two high speed CAN BUS interfaces, or expanding the number and capabilities of the digital counters that are installed. Furthermore, multiple ORION series cards may be installed. A few examples: 5 x ORION-1624-200 cards for a 40 channel noise and vibration analyzer 3 x ORION-3216-100 cards for a 96 channel general purpose system 4 x ORION-1616-1000 cards for a 64 channel HIGH SPEED acquisition system (1 MS/s/ch) OWNER’s GUIDE - DEWE-3050 | 6-113 Interface(s) The DEWE-3050 is compatible with ORION, PCI card, and USB connected interfaces These include the CAN BUS interfaces added to the ORION A/D card, as well as separate PCI cards available for adding multiple ARINC 429, MIL-STD-1553 interfaces to the system. If all three PCI slots were used up, ARINC and MIL-STD-1553 interfaces can also be added as USB devices. There are numerous interfaces available for your DEWE system. Typical ARINC or MIL-STD-1553 interface Typical ARINC or MIL-STD-1553 interface PCI format USB format Video Cameras The DEWE-3050 is compatible with several kinds of video cameras, including: DEWE-CAM-USB DEWE-CAM-FW DEWE-CAM-GIG-E USB camera Hard sync Firewire camera Gigabit ethernet camera 6-114| OWNER’s GUIDE System Connectors System/PC connectors Ground (earth) Connector Connector: insulated banana jack, marked with the ground/earth symbol, yellow with green stripe Mating connector: insulated banana plug, yellow with green stripe Function: Depending on your electrical environment, it may be necessary to give the system an additional ground connection. This is an international standard mini-banana jack, color coded yellow/green, located near the DC power input. AC power input Connector: Standard AC receptacle, compatible with 120/240 VAC (the receptacle has to be reversed to switch it between 120 VAC/60 Hz and 240 VAC/50 Hz. ⇒⇒ Important note - applied power must fall within the posted ranges. Fuse The AC power is fused within the AC receptacle, using a REGULAR ATO 15A fast-acting blade fuse. Blue is the ATO standard color code for a15 amperes fuse rating. ISO 8820-3:2002 standard. ⇒⇒ Replace this fuse only with exactly the same type, or equipment damage, injury or even death can result. OWNER’s GUIDE - DEWE-3050 | 6-115 PC Connector Call-Outs Audio I/O stack DVI video output USB 2.0 ports DisplayPorts (2) Ethernet (3) 6-116| OWNER’s GUIDE Ethernet interfaces (3) Connectors: RJ45 CAT5e standard jack Mating connectors: RJ45 CAT5e or CAT6 plugs Function: for connecting the DEWE-321x to a local area network (LAN), or for connecting ethernet peripherals (printers, cameras, etc.). Description: The DEWE-321x provides three channels of 10/100/1000Mb Ethernet RTL8111B LAN controllers. In order to achieve the specified performance of the Ethernet port, Category 5 twisted pair cables must be used with 10/100MB and Category 5E, 6 or 6E with 1Gb LAN networks. The signals for the Ethernet ports are as follows: The pinout of the RJ45 connector is as follows: Above right: typical mating plug, showing the pin outs On top of Ethernet connectors there is a Green LED (to the left) turning on when a 100MHz connection is made and it is flashing when 100MHz traffic is ongoing. The Yellow LED (to the right) turns on when a 1GHz connection is made and it is flashing when traffic is ongoing. Please refer to the CAT5e, CAT6, and structured cabling standards for computer networks when interfacing to the DEWE-321x. OWNER’s GUIDE - DEWE-3050 | 6-117 DVI Video Output Connector: Standard DVI connector Mating connector: Standard DVI-to-DVI or DVI-to-VGA cable Function: For connecting the standard display. -- Note: the CRT output cannot be used in a “multiple monitors” setup under Windows. To support multiple moni- tors with different images on them requires that a separate video card be added to the system. -- Note: DEWE-321x’s with 15” displays (made in 2010) have a max resolution of 1024x768; DEWE-321x (made in 2011 or later) with 17” displays have a max resolution of 1280x1024 . The CRT output is set to the same resolution as the built-in flatpanel display. USB 2.0 interfaces (6) Connector: USB2.0 Standard-A receptacle Mating connector: USB2.0 Standard-A plug Function: For the connection of peripheral devices which utilize the USB 2.0 or USB 1.1 interface. Description: The DEWE-3050 mainboard contains an Enhanced Host Controller Interface (EHCI) host controller that supports USB 2.0 allowing data transfers up to 480Mb/s. There are typically six user-accessible Universal Host Controller Interface (UHCI Revision 1.1) controllers that support USB full-speed and low-speed signaling. All ports are high-speed, full-speed, and low-speed capable and USB Legacy mode is supported. Over-current detection on all USB ports is supported. Note: It is recommended to use only High-/Full-Speed USB cable, specified in USB2.0 standard: 6-118| -- Note: USB is most often used to connect webcams for recording video in sync with the data in your Dewetron data acquisition system. It is also used to connect inertial sensors such as the XSENS MTI series of sensors. Audio stack connectors (3) Connectors: 3.5 mm (~1/8 in.) TRS jacks, color coded BLUE, GREEN and PINK Mating connectors: 3.5 mm (!1/8 in.) TRS plugs Function: for outputting or inputting audio Description: Audio Line-in, Line-out and Microphone are available in the stacked audio jack connector. Below is shown audio stack configuration when configured for 8-channel audio. ⇒⇒ Note: Always use industry standard plugs and cables when connecting to any part of the system. | 6-119 Signal Input Connectors Analog input connectors (up to 128) Connector: Varies according to the signal conditioning module(s) installed. See the signal conditioning tables for further details about the module(s) installed within your system. Function: to input analog signals to the dynamic measuring inputs of the DEWE-3050. Counter/encoder connectors (2) Connector: LEMO EGG.1B.307CLAD52 Mating connector: LEMO FGG.1B.307CLAD52 Mating cable available: CTR-CABLE-05 (includes connector) Function: used to input tachometer, TTL level pulse train, or encoder outputs for measuring and conversion. -- Note: see the COUNTER configuration section later in this guide. CAN BUS interface connector (UP-ORION-CAN2 option) Connectors: DSUB-9 standard CAN wiring Mating connector: DSUB-9 male mate PIN Function Comment 1 CAN0 Lo First CAN port 2 CAN0 Hi First CAN port 3 D GND 4 CAN1 Lo Second CAN port 5 CAN1 Hi Second CAN port 6 GND Function: used to connect to vehicle CAN BUS interfaces. Also can be used to read data from sensors which have a CAN BUS output, such as Dewetron’s own CPAD2 series signal conditioning modules. 6-120| When the CAN option is installed, this single LEMO connector will contain two CAN BUS interfaces. The CAN-CBL-Y mating cable is optionally available to split the single LEMO connector to two standard CAN DB-9 (female) connectors. Both DB-9 connectors are wired the same way, as shown below: When you connect either CAN bus interface to your vehicle or other CAN network, it is necessary to add termination resistors (not included) at each end of the cable: -- Note: this connector does not provide power for CPAD2 series modules. Digital I/O connector (AKA “Accessory connector”) OWNER’s GUIDE - DEWE-3050 | 6-121 Connector: Standard DSUB 37-pin connector, female Mating connector: Standard DSUB 37-pin connector, female Function: Provides access to the digital input/output lines on the installed A/D card, as well as additional signals such as clock input, trigger input, and more (see A/D card table related to the installed card). The exact pin-out of this connector can vary according to the system configuration, but here is the typical pin-out diagram when an ORION-1616-100 card is installed: 6-122| OWNER’s GUIDE Operation Guidelines System Startup Protocol Installing the Smart Batteries Systems are shipped with the hot-swappable batteries removed. You should install them, connect power, and charge up the batteries. Please follow these guidelines: ♦♦ Open the battery door on the side of the DEWE- 3050 and insert four SideHAND2 series smart batteries into the four slots. ♦♦ When inserting the first battery you may notice that the system LEDs and fans will turn on for a second, this is normal when the battery module “wakes up.” The battery door on the side of the DEWE-3050 is hinged, allowing you to access the battery compartment. Batteries can be removed by pulling on their flexible tabs. ⇒⇒ Never use any battery which appears to be dam- aged, or which is cracked, broken, hot to the touch, or unusual in any way. Lithium batteries can be dangerous if mistreated or improperly charged. Please locate the BATTERY STATUS LCD, located on the left side panel. ♦♦ With batteries in place, the LCD screen will display the charge level, charge/discharge state, power consumption and total current. ♦♦ The LCD (and battery module circuit) will always be ON, unless the batteries are removed Plug the standard AC power cord into a valid mains power source. Turn on the master power switch on the left side panel. Press and release the smaller soft power switch adjacent to the larger master power switch. The system, will boot up. ⇒⇒ Do not block the cooling fan of the DEWE-3050. The battery status LCD keeps you informed of how many batteries are installed (2 above), the charge level (100% above), and whether the system is charging or discharging. OWNER’s GUIDE - DEWE-3050 | 6-123 Overheating any electrical component is dangerous. -- NOTE: The DEWE-3050 can be operated without bat- teries simply by connecting the DPS-2410. -- This can also help you refresh batteries which have become 100% discharged, which can happen over time. If the mainframe will not start up, simply remove all of your batteries, then power up the system using external AC power. When the system is up and running, insert only one battery. Wait 30 minutes and then insert a second battery into the second slot, and so on. For faster recharging, do NOT power up the DEWE3050 mainframe, but make certain that the AC power is connected. Optional BAT-CHARGER-1 is ideal for desktop usage. -- There is a one-slot desktop style battery charger available (BAT-CHARGER-1). Using the smart batteries The “smart batteries” supplied with your Dewetron battery powered system are equipped with an integrated circuit which stores information such as manufacturer, serial number, production date, etc., and monitors the current battery status in terms of discharge rate, predicted remaining capacity, temperature, voltage etc. SideHAND2 series “smart batteries” are capable of displaying their charge state even when not plugged into anything. A small LCD display on the battery pack shows the current charge state in 25% steps. An intelligent battery controller, integrated in our DEWETRON systems, takes care of the charging and discharging process in order to ensure maximum battery performance and lifetime. SideHAND2 series batteries have a small LCD display on their end near the plastic pull tab. This LCD will indicate the approximate level of charge in 25% steps. 6-124| OWNER’s GUIDE Turning on the System The MASTER power switch must be set to the on position. Now locate the smaller soft power switch nearby on the left side panel. This is a momentary rocker type switch, where the white dot indicates the ON direction. ♦♦ Press ON and hold for one second to power the system on. ♦♦ Press ON and hold for 3 seconds to power OFF. ♦♦ Green POWER LED: lit when the system is powered on -- The LCD battery display is ALWAYS on when any bat- teries are installed. This does not indicate that the system is powered on! Only the green POWER LED indicates system power on/off status. The larger power switch is the MASTER. The smaller one is a “soft,” or momentary type, located nearby, on the left side panel. In between is a green LED which lights up to indicate that system power is on. You may notice that the main screen’s backlight will come on when power is applied. After a few moments the BIOS and Windows operating system messages and graphics will appear. ⇒⇒ If the system does not power on, ensure that you have batteries with at least 30% charge, or that the DPS-2410 is properly connected and TURNED ON. Hardware Protocols Using the removable hard disk drives The left side of the DEWE-3050 has two 2.5” removable drive bays. One is marked as the C drive for Windows and applications, and the other as the D drive for data. ⇒⇒ Never remove the C drive when the system is powered on or plugged in! The operating system can become corrupted and the system will fail if you do this. Also take care with the D drive, that no application is trying to access it. It’s always safer to completely turn off the system before removing or installing any hard drive. To remove the hard drive, you must have access to the keylock. Turn the key into the lock and then press the large button beside the lock to eject the drive. To insert another drive, reverse these steps. The DEWE-3050 right side panel contains two removable HDD s (hard disk drives). OWNER’s GUIDE - DEWE-3050 | 6-125 Using external optical read/write drives Because the DEWE-3050 does not include an optical drive, you are free to purchase one from any computer retailer, and connect it to your system via one of the available USB 2.0 ports. -- The DEWE-3050 is compatible with external optical drives which are Windows7 compatible. 6-126| OWNER’s GUIDE DEWE-3050 SPECIFICATIONS Input specifications Slots for DAQ or PAD modules MDAQ-SUB positions DEWE-3050 - DAQ version DEWE-3050 - MDAQ version 16 or 32 -- When 16 DAQ slots are installed, up to 64 more channels of MDAQ can be added to the system, for 80 channels total. Consult Dewetron for configuration assistance. Up to 6 x 2.0U MDAQ-DSUB (96 channels) or 8 x 1.5U MDAQ-BNC (128 channels) can be installed. Also many combinations of MDAQ and other panels are possible. Consult Dewetron for configuration. Main system Total PCI slots Hard disk Data throughput to disk 5 x full-length PCI slots (one is used by the standard A/D card) C: 100 GB removable C drive / 500 GB removable D drive (optional solid state drive) 80 MB/s typical; faster rates available with the additional of an internal RAID controller and/or additional drives Power supply 120/240 VAC, 50/60 Hz AC mains power. Battery power Includes standard UPS with four hot-swappable SideHAND2 series batteries. Batteries are charged automatically when AC power is connected. Display Processor 17” SXGA display, 1280 x 1024 px, with resistive touchscreen. Display is removable, and can be mounted backwards when not in use. Intel 8-core i7 2.0 GHz CPU, on a standard ATX mainboard RAM Ethernet USB RS232 Operating system Dimensions (W x D x H) Weight Free PCI slots 4 GB standard 3 x ethernet interfaces standard (1 Gb) Four x USB 2.0 interfaces available One serial interface on a DB9 connector available Microsoft Windows7 32-bit included (upgrades to 64-bit will be available Summer 2013) 425 x 340 x 191 mm (16.7 x 13.4 x 7.5 in.) 12 kg typical (26.4 lbs) 4 (the standard ORION-1616-100 A/D card uses one of the PCI slots) Environmental specifications Operating temperature -20 to 50C (0 to 45C with batteries installed) (storage temp -20 to 60C) Humdity 10 to 80% non-condensing, 5 to 95% relative humidity Vibration MIL-STD-810F, EN 60068-2-6, EN 60721-3-2 class 2M2 Shock MIL-STD-810F, EN 60068-2-27 Required to complete this model Conditioners: A/D card(s) Software Any 16 or 32 DAQ series plugin modules Up to 128 MDAQ series channels The ORION-1616-100 is included as standard. You may upgrade this card as follows: UP-ORION-16-22 upgrade the resolution to 22-bits, add antialiasing filters (AAF), max. SR remains at 100 kS/s/ch UP-ORION-16-24 upgrade the resolution to 24-bits, add AAF, max. SR increases to 200 kS/s/ch UP-ORION-16-22-32 upgrade the resolution to 22-bits, add AAF, increase from 16 to 32 analog channels UP-ORION-100-1000 upgrade the max. SR to 1000 kS/s/ch UP-ORION-100-200-8 upgrade the resolution to 24-bits, add AAF, max.SR increases to 200 kS/s/ch, decrease to 8 channels UP-ORION-100-1000-8 upgrade the max. SR to 1000 kS/s/ch, decrease to 8 channels DS-7-SE data acquisition software is included as standard* 32 analog channels, or multiple video cameras, or DEWE-CAM-FW-70, or DEWE-CLOCK use requires upgrade to PROF edition. 64+ analog channels requires upgrade to DSA edition. LabVIEW VIs are available for Dewetron ORION series A/D cards and DAQ series signal conditioners. Popular upgrades Counter expansion (UP-ORION-CTR8) Upgrades the A/D card from 8 TTL digital I/Os and 2 TTL counter / encoders to: 8 synchronous TTL digital inputs protected up to 25 VDC 8 synchronous counter / encoder or 24 digital inputs with programmable threshold levels (0-40 V), input voltage range -35 to 60 V, AC/DC coupling Includes DB37 pin connectors installed Synchronization interface (UP-ORION-SYNC) Installs the SYNC hardware input/output ports and LED indicators onto the mainframe. Allows systems with the same base ORION card to be synced. Additionally Requires DS-OPT-NET software option for synchronization under DS-7 software. OWNER’s GUIDE - DEWE-3050 | 6-127 Input specifications DEWE-3050 - DAQ version Digital Isolation (ORION-BASE-DI-ISO) HDD upgrade to solid state disks DEWE-3050 - MDAQ version Isolation for the 16 digital inputs of ORION base cards. Input low: 0 - 2 V, Input high: 3 - 50 V bandwidth: DC up to 1MHz Isolation voltage between channels: 150 VDC Isolation voltage between Input and Output: 250 VDC Connector: DSUB-37 connector (replaces standard digital I/O connector) HDD-UP-SSD-120 Upgrade to 120 GB flash disk (replaces standard spinning hard disk), $ no moving parts, max. data throughput 90 MB/s HDD-UP-SSD-240 Upgrade to 240 GB flash disk (replaces standard spinning hard disk), $ no moving parts, max. data throughput 90 MB/s HDD-UP-SSD-480 Upgrade to 480 GB flash disk (replaces standard spinning hard disk), $ no moving parts, max. data throughput 100 MB/s Time code interface Adds an internal IRIG or GPS time code interface (does not require a PCI slot) Popular interface add-ons CAN expansion (UP-ORION-CAN2) IRIG / GPS time code (DEWE-CLOCK-INT) Adds 2 synchronous high speed CAN bus interfaces to the ORION card inside the system. Includes two DB9 factory installed connectors for these counters on the side panel of the DEWE-3050, and rear panel of the DEWE-3040 and DEWE-3050. Includes DS-OPT-CAN software option supporting CAN BUS interface. IRIG or GPS synchronized clock source for DEWETRON systems, installed inside a new DEWETRON base unit Input: IRIG signal code A or B, AM or DC, or GPS signal Output: TTL clock from 10 Hz to 10 MHz, PPS and ORION-DSA-SYNC, IRIG-B DC Uses one USB interface (requires DS-PROF or higher) Please order GPS antenna GPS-ANT-1 separately (if GPS is needed) VIDEO-FG-4 Adds a four channel VIDEO INPUT PCI card to the system. Four BNCs for analog NTSC video input on the right side panel, allowing four video streams to be recorded in sync with the data ARINC-429 / 1553 interfaces Adds a multi-channel ARINC-429 or MIL-STD-1553 interface to the system. Available as a single PCI card with either or both interfaces on it, or as separate external USB interfaces. See the INTERFACES section for a comprehensive list. External channel expansion EPAD2 and CPAD2 series modules Add one or more EPAD2 series external signal conditioners to your system. Each one provides 8 thermocouple, RTD, low voltage, or low current inputs. EPAD2 modules can be daisy-chained up to 8 modules per system. CPAD2 modules are the same except with CAN BUS interface. Additional Specifications ORION-1616-100 A/D specifications Number of analog channels 8 channels Bit-resolution 16-bit ADC converters (one per channel) 14.7 effective number of bits Maximum sample rate 100 kS/s/ch simultaneous Input configuration Single-ended (note that the DAQ, HSI, or MDAQ conditioners are in front of the ORION card, and serve as the differential front-end for your signals. ADC type Successive approximation (SAR) Channel separation (cross-talk) > 90 dB @ fin 1 kHz DC accuracy ±0.02 % of reading ±0.013 % of range Signal to noise 89 dB THD (fin = 1kHz) 0 dBFS input < -86 dB THD (fin = 1kHz) -20 dBFS input < -93 dB Interchannel gain mismatch ±0.015 % Interchannel phase mismatch 0.02° * fin (kHz) + 0.08° 6-128| OWNER’s GUIDE Digital I/O and Clock line specs Digital input lines 16 Digital input characteristics TTL/CMOS signal levels: Low voltage level -0.7 V to 0.8 V High voltage level 2 V to 5 V Pull-up with 100 kΩ resistor Input capacitance < 5pF Input protection -1 V to 6 V Digital output lines 8 Digital output characteristics TTL/CMOS signal levels: Low voltage level < 0.4 V @ 4 mA load High voltage level > 3 V @ 4 mA load Output current Sink (low level) -20 mA Source (high level) 20 mA Output impedance 50 Ω Clock divider output line 1, same characteristics as digital output lines Standard counter/encoder specs Standard counter/encoders 2 x 32-bit (LEMO connectors for each) Note - used as pair counters when advanced features are used. If you need two or more full-featured counters, please order the UP-ORION-CTR8 Counter timebase 80 MHz (40 MHz max. input frequency) Time base accuracy 25 ppm Measurement modes Event counting, up/down counting, gated event counting, period time, pulse width, two-edge separation, frequency and encoder measurements Standard counter/encoder signal levels TTL/CMOS, pull-up with 100 kΩ Input low level: -0.7 V to 0.8 V Input high level: +2 to +5V Overvoltage input protection (DI 0 to DI 7): ±25 V continuous (DI 8 to DI 15): -1 to 6 V Advanced counter/encoders (UP-ORION-CTR8 option) Advanced counter/encoders 8 advanced 32-bit counters Counter timebase 80 MHz (40 MHz max. input frequency) Measurement modes Event counting, up/down counting, gated event counting, period time, pulse width, two-edge separation, frequency and encoder measurements Signal levels Symmetrical, differential AC/DC coupling selectable Trigger adjustment range 0 to 40 VDC with 40 mV resolution Trigger level accuracy ±100 mV ±1% of trigger level Common voltage range -35 to 50V Overvoltage input protection ±100 V continuous Max. DC level @ AC coupling: ±50 V continuous CAN BUS specs (UP-ORION-CAN2 option) High-speed CAN interfaces 2 CAN 2.0B high speed interfaces Bus pin fault protection ±36 V ESD protection 12kV Physical layer High speed Compatibility 2.0B standard, J1939 protocol support OBD II via software option OWNER’s GUIDE - DEWE-3040-RM | 7-129 7 DEWE-3040-RM Series The DEWE-3040-RM is our best “all in one” rack mounting data acquisition instrument. It features a huge 19” display, and a keyboard (with touchpad) that pulls out for easy access any time you need it, then hides away again when you don’t The rear panel of this model is very flexible, capable of holding up to 16 plugin-modules, or up to 64 MDAQ channels, and many combinations. The DEWE-3040-RM runs from AC power, and comes with slide rack hardware for easy installation in your standard 19” rack enclosure. This model is designed and built at our Wakefield, RI manufacturing facility in the USA. Model DEWE-3040-RM Front view, keyboard not deployed This section will review the hardware characteristics and specifications of the DEWE-3040-RM series, including its properties as a PC-based instrument, and all data acquisition components, including the A/D cards, signal conditioners, and interfaces with which it is compatible. Please refer to the SOFTWARE section of this manual to learn how to operate the turn-key data acquisition software installed on the system. Please refer to the separate sections for the SIGNAL CONDITIONERS, A/D CARDS, INTERFACES and SENSORS for complete details about those components that may be installed within your DEWE-3040-RM. 7-130| OWNER’s GUIDE System Dimensions 436 352 483 (19”) 276 317 Add 10 mm all around for BNC connectors, knobs, and other protrusions. When the keyboard is pulled out, it protrudes ~140 mm (~5.5”) Dimensions in millimeters (mm) Divide by 25.4 for inches Allow plenty of room for cooling fans to function properly. Never block air exchange. OWNER’s GUIDE - DEWE-3040-RM | 7-131 Top Level Call-outs DEWE-3040-RM, front view, keyboard open Standard 19” rack-mounting (slides also included) (INSIDE) ORION-1616-100 A/D card included as standard Convenient pull-out handles Big wide aspect display Front-panel pushbuttons for start/ stop and REC indicator Front-panel USB connectors Removable 2.5” HDD Pull-out keyboard drawer built-in NOTE; Computer interfaces (ethernet, USB, RS232, are automatically brought out to the rear panel, space permitting. DEWE-3040-RM, front view, keyboard open Soft power switch Pull-out keyboard drawer built-in Captive spring-loaded thumbscrews keep it closed when you don’t need it Video cameras like: DEWE-CAM-FW-70 DEWE-CAM-GIG-E-120 DEWE-CAM-USB, etc. 7-132| OWNER’s GUIDE Top-level call-outs (continued) DEWE-3040-RM, right side/rear oblique view PCI and PCIe card edge access door Air cooling (filtered intakes) Computer subsystem access door (all needed ports are brought to the rear panel already) 120 / 240 VAC mains power input DEWE-3040-RM, front view, Control Panel Close-up Soft Power Switch Store / Stop Pushbuttons Power LED / HDD busy LED USB 2.0 interfaces Pull-out Keyboard drawer Removable HDD Optical Drive OWNER’s GUIDE - DEWE-3040-RM | 7-133 DEWE-3040-RM Rear Panel Configurations 2.5U With DAQ / PAD / HSI modules only The rear panel can be configured with one 16 slot racks for DAQ / PAD / HSI modules 2.5U-PANEL-DAQ-16 - compatible with all DAQ and PAD modules, and HSI modules (up to 300 kHz bandwidth) 2.0U 1.5U 2.5U-PANEL-DAQ-16-HSI - compatible with all HSI modules up to 2 MHz bandwidth, all PAD modules, and most DAQ modules When a 16-slot rack is installed, two 2U and two 1.5U panel spaces remain available for additional panel options to be added. With DAQ / PAD / HSI and MDAQ conditioners 2.5U The rear panel can be configured with one 16 slot racks for DAQ / PAD / HSI modules - and still leave room for MDAQ conditioners! 2.5U-PANEL-DAQ-16 - compatible with all DAQ and PAD modules, and HSI modules (up to 300 kHz bandwidth) - or - 2.0U 1.5U 2.5U-PANEL-DAQ-16-HSI - compatible with all HSI modules up to 2 MHz bandwidth, all PAD modules, and most DAQ modules Thus, you could still add 32 more channels of MDAQ signal conditioning, and a 1.5U panel for 32 channels of thermocouples, as one example. Or you could add three blocks of 16 channels of MDAQ signal conditioning, as long as one of them was using the 1.5U high BNC panel type. This means 48 MDAQ channels PLUS 16 isolated DAQ / PAD / HSI conditioner channels. 7-134| OWNER’s GUIDE DEWE-3050, front view, display removed - keyboard revealed With MDAQ conditioners only 2.0U The rear panel can be configured with up to: FIVE 2.0U MDAQ conditioner panels with DSUB connectors can be added (80 channels) - or FIVE 1.5U MDAQ conditioner panels with BNC connectors can be added (80 channels) - or - 0.5U Many other combinations of MDAQ panels and other function panels 1.5U (ALL MODELS) EPAD2 signal conditioners for adding slow thermocouple inputs, RTDs, voltages, and currents (daisy-chain) 0.5U-DA2-BNC 0.5 U panel with 2 BNC connectors connected to the 2 analog outputs of an AD16-1000-16-OUT2 card 0.5U-DA4-BNC 0.5 U panel with 4 BNC connectors connected to the 4 analog outputs of a DA4-1000-16 card 0.5U-DA8-BNC 0.5 U panel with 4 BNC connectors connected to the 8 analog outputs of a DA8-1000-16 card 0.5U-AMFLEX-POWER-4 0.5U panel with BINDER 712 connectors, 9VDC power supply for up to four PNA-100 current sensors. OWNER’s GUIDE - DEWE-3040-RM | 7-135 0.5U-AMFLEX-POWER-8 0.5U panel with BINDER 712 connectors, 9VDC power supply for up to four PNA-100 current sensors. 0.5U-CLAMP-DC-POWER-4 0.5U panel with LEMO connectors, 15VDC power supply and digital status lines for up to four PNA-CLAMP-150-DC current sensors. 0.5U-CLAMP-DC-POWER-8 0.5U panel with LEMO connectors, 15VDC power supply and digital status lines for up to eight PNA-CLAMP-150-DC current sensors. 1U-DA8-BNC 1U panel with 8 BNC connectors supporting up to 8 analog outputs 1U-DA16-BNC 1U panel with 8 BNC connectors supporting up to 16 analog outputs 1.5U-ORION-DIO-PANEL-1 1.5U panel with 8 LEMO connectors (EGG.1B.307) for up to 8 counters, plus one DSUB37 connector for up to 16 digital input lines, including mating connectors (included with UP-ORIONCTR8 upgrade) 1.5U-TC-PANEL-32 1.5U panel prepared for up to 32 thermocouple input channels. Up to four MPAD-TH8-X modules can be factory installed into this panel. Each MPAD block provides 8 channels. 7-136| OWNER’s GUIDE Signal conditioning The DEWE-3040-RM can be equipped in countless ways. Here are the most popular configurations: 16 x DAQ / PAD / HSI series plug-in signal conditioners, or 10 x 8-channel MDAQ-SUB (any connector) conditioners (80 channels total), or 16 x DAQ / PAD / HSI modules PLUS up to 48 channels of MDAQ conditioners When every possible panel space is not filled, other function panels can additionally be added. Please see the previous page for a listing of these panels. A/D card(s) The DEWE-3040-RM has two full length PCI slots and two full length PCIe slots inside. As a standard, the ORION-1616-100 A/D card is installed when you buy the data acquisition system. This card provides the following basic specifications (further details are shown in the specification tables in the next pages): 16 simultaneously sampled analog input channels 16-bit resolution, separate ADC per channels 100 kS/s/ch maximum sample rate 2 synchronous counter/encoder inputs 8 each digital input and output lines At the time of ordering, this card can be upgraded, using any of the options available for increasing the channel count, the bit resolution to 22 or 24-bit, or increasing the sample rate up to 1 MS/s/ch, and many combinations of the preceding. See the UP-ORION options for all of the possibilities. In addition, many options can be factory installed onto the ORION cards, including adding two high speed CAN BUS interfaces, or expanding the number and capabilities of the digital counters that are installed. Furthermore, multiple ORION series cards may be installed. A few examples: 2 x ORION-1624-200 cards for a 32 channel noise and vibration analyzer 2 x ORION-3216-100 cards for a 64 channel general purpose system 2 x ORION-1616-1000 cards for a 64 channel HIGH SPEED acquisition system (1 MS/s/ch) OWNER’s GUIDE - DEWE-3040-RM | 7-137 Interface(s) The DEWE-3040-RM is compatible with ORION, PCI / PCIe card, and USB connected interfaces These include the CAN BUS interfaces added to the ORION A/D card, as well as separate PCI and PCIe cards available for adding multiple ARINC 429, MIL-STD-1553 interfaces to the system. If all three PCI slots were used up, ARINC and MIL-STD-1553 interfaces can also be added as USB devices. There are numerous interfaces available for your DEWE system. Typical ARINC or MIL-STD-1553 interface Typical ARINC or MIL-STD-1553 interface PCI or PCIe format USB format Video Cameras The DEWE-3040-RM is compatible with several kinds of video cameras, including: DEWE-CAM-USB DEWE-CAM-FW DEWE-CAM-GIG-E USB camera Hard sync Firewire camera Gigabit ethernet camera 7-138| OWNER’s GUIDE System Connectors System/PC connectors Ground (earth) Connector Connector: insulated banana jack, marked with the ground/earth symbol, yellow with green stripe Mating connector: insulated banana plug, yellow with green stripe Function: Depending on your electrical environment, it may be necessary to give the system an additional ground connection. This is an international standard mini-banana jack, color coded yellow/green, located near the DC power input. AC power input Connector: Standard AC receptacle, compatible with 120/240 VAC @ 50/60 Hz. ⇒⇒ Important note - applied power must fall within the posted ranges. Fuse The AC power is fused. ⇒⇒ Replace this fuse only with exactly the same type, or equipment damage, injury or even death can result. Ethernet interfaces (2 or 3) OWNER’s GUIDE - DEWE-3040-RM | 7-139 Top Rear Panel Connectors EPAD LEMO Accessory / Digital I/O (DSUB-37) ORION-SYNC (option) 12VDC output Counters (2) LEMO Reserved Right Side Panel Both of the panels can be accessed by removing the four philips head screws. UPPER PANEL Remove this panel to access the PCI and PCIe card edges. LOWER PANEL Remove this panel to access the computer inside the system. 7-140| OWNER’s GUIDE Connectors: RJ45 CAT5e standard jack Mating connectors: RJ45 CAT5e or CAT6 plugs Function: for connecting the DEWE-3040-RM to a local area network (LAN), or for connecting ethernet peripherals (printers, cameras, etc.). Description: The DEWE-321x provides three channels of 10/100/1000Mb Ethernet RTL8111B LAN controllers. In order to achieve the specified performance of the Ethernet port, Category 5 twisted pair cables must be used with 10/100MB and Category 5E, 6 or 6E with 1Gb LAN networks. The signals for the Ethernet ports are as follows: The pinout of the RJ45 connector is as follows: Above right: typical mating plug, showing the pin outs On top of Ethernet connectors there is a Green LED (to the left) turning on when a 100MHz connection is made and it is flashing when 100MHz traffic is ongoing. The Yellow LED (to the right) turns on when a 1GHz connection is made and it is flashing when traffic is ongoing. Please refer to the CAT5e, CAT6, and structured cabling standards for computer networks when interfacing to the DEWE-321x. DVI Video Output OWNER’s GUIDE - DEWE-3040-RM | 7-141 Connector: Standard DVI connector Mating connector: Standard DVI-to-DVI or DVI-to-VGA cable Function: For connecting the standard display. -- Note: the CRT output cannot be used in a “multiple monitors” setup under Windows. To support multiple moni- tors with different images on them requires that a separate video card be added to the system. -- Note: DEWE-321x’s with 15” displays (made in 2010) have a max resolution of 1024x768; DEWE-321x (made in 2011 or later) with 17” displays have a max resolution of 1280x1024 . The CRT output is set to the same resolution as the built-in flatpanel display. USB 2.0 interfaces (6) Connector: USB2.0 Standard-A receptacle Mating connector: USB2.0 Standard-A plug Function: For the connection of peripheral devices which utilize the USB 2.0 or USB 1.1 interface. Description: The DEWE-3050 mainboard contains an Enhanced Host Controller Interface (EHCI) host controller that supports USB 2.0 allowing data transfers up to 480Mb/s. There are typically six user-accessible Universal Host Controller Interface (UHCI Revision 1.1) controllers that support USB full-speed and low-speed signaling. All ports are high-speed, full-speed, and low-speed capable and USB Legacy mode is supported. Over-current detection on all USB ports is supported. Note: It is recommended to use only High-/Full-Speed USB cable, specified in USB2.0 standard: 7-142| -- Note: USB is most often used to connect webcams for recording video in sync with the data in your Dewetron data acquisition system. It is also used to connect inertial sensors such as the XSENS MTI series of sensors. Audio stack connectors (3 or 6) Connectors: 3.5 mm (~1/8 in.) TRS jacks, color coded BLUE, GREEN and PINK Mating connectors: 3.5 mm (!1/8 in.) TRS plugs Function: for outputting or inputting audio Description: Audio Line-in, Line-out and Microphone are available in the stacked audio jack connector. Below is shown audio stack configuration when configured for 8-channel audio. ⇒⇒ Note: Always use industry standard plugs and cables when connecting to any part of the system. | 7-143 Signal Input Connectors Analog input connectors (up to 128) Connector: Varies according to the signal conditioning module(s) installed. See the signal conditioning tables for further details about the module(s) installed within your system. Function: to input analog signals to the dynamic measuring inputs of the DEWE-3050. Counter/encoder connectors (2) Connector: LEMO EGG.1B.307CLAD52 Mating connector: LEMO FGG.1B.307CLAD52 Mating cable available: CTR-CABLE-05 (includes connector) Function: used to input tachometer, TTL level pulse train, or encoder outputs for measuring and conversion. -- Note: see the COUNTER configuration section later in this guide. CAN BUS interface connector (UP-ORION-CAN2 option) Connectors: DSUB-9 standard CAN wiring Mating connector: DSUB-9 male mate PIN Function Comment 1 CAN0 Lo First CAN port 2 CAN0 Hi First CAN port 3 D GND 4 CAN1 Lo Second CAN port 5 CAN1 Hi Second CAN port 6 GND Function: used to connect to vehicle CAN BUS interfaces. Also can be used to read data from sensors which have a CAN BUS output, such as Dewetron’s own CPAD2 series signal conditioning modules. 7-144| When the CAN option is installed, this single LEMO connector will contain two CAN BUS interfaces. The CAN-CBL-Y mating cable is optionally available to split the single LEMO connector to two standard CAN DB-9 (female) connectors. Both DB-9 connectors are wired the same way, as shown below: When you connect either CAN bus interface to your vehicle or other CAN network, it is necessary to add termination resistors (not included) at each end of the cable: -- Note: this connector does not provide power for CPAD2 series modules. Digital I/O connector (AKA “Accessory connector”) Connector: Standard DSUB 37-pin connector, female Mating connector: Standard DSUB 37-pin connector, female Function: Provides access to the digital input/output lines on the installed A/D card, as well as additional signals such as clock input, trigger input, and more (see A/D card table related to the installed card). The exact pin-out of this connector can vary according to the system configuration, but here is the typical pin-out diagram when an ORION-1616-100 card is installed: OWNER’s GUIDE - DEWE-3040-RM | 7-145 Operation Guidelines System Startup Protocol Plug the standard AC power cord into a valid mains power source. ⇒⇒ Do not block the cooling fans of the DEWE-3040-RM. Overheating any electrical component is dangerous. Turning on the System The MASTER power switch must be set to the on position. Now locate the smaller soft power switch nearby on the front panel. This is a momentary rocker type switch, where the white dot indicates the ON direction. ♦♦ Press ON and hold for one second to power the The rear panel of the DEWE-3040-RM is where the MASTER power switch is located. system on. ♦♦ Press ON and hold for 3 seconds to power OFF. ♦♦ Green POWER LED: lit when the system is powered on Hardware Protocols Using the removable hard disk drives The front panel of the DEWE-3040-RM has a 2.5” removable drive bay. The front panel of the DEWE-3040-RM is where the soft power switch is located. ⇒⇒ Never remove the C drive when the system is powered on or plugged in! The operating system can become corrupted and the system will fail if you do this. It’s always safer to completely turn off the system before removing or installing any hard drive. To remove the hard drive, you must have access to the keylock. Turn the key into the lock and then press the large button beside the lock to eject the drive. To insert another drive, reverse these steps. The front panel of the DEWE-3040-RM is where the removable hard disk drive is located. 7-146| OWNER’s GUIDE DEWE-3040-RM Specifications Input specifications Slots for DAQ or PAD modules MDAQ-SUB positions DEWE-3040-RM - DAQ version DEWE-3040-RM - MDAQ version 16 48 possible channels When 16 DAQ slots are installed, up to 48 more channels of MDAQ can be added to the system, for 64 channels total. Consult Dewetron for configuration assistance. Up to 8 x 2.0U MDAQ-DSUB (64 channels) plus two 1.5U MDAQ-SUB-BNC (16 channels) can be installed (80 channels maximum). Main system Total PCI slots Hard disk Data throughput to disk Power supply Display Processor 2 x full-length PCI slots (one is used by the standard A/D card) plus 2 x full-length PCIe slots are available C: 100 GB removable C drive / 500 GB removable D drive (optional solid state drive) 80 MB/s typical; faster rates available with the additional of an internal RAID controller and/or additional drives 120/240 VAC, 50/60 Hz AC mains power. 19” SXGA display, 1280 x 1024 px, with resistive touchscreen. Display is removable, and can be mounted backwards when not in use. Intel 8-core i7 2.0 GHz CPU, on a standard ATX mainboard RAM Ethernet USB RS232 Operating system Dimensions (W x D x H) 4 GB standard 3 x ethernet interfaces standard (1 Gb) Four x USB 2.0 interfaces available One serial interface on a DB9 connector available Microsoft Windows7 32-bit included (upgrades to 64-bit will be available Summer 2013) 425 x 340 x 191 mm (16.7 x 13.4 x 7.5 in.) Weight Free PCI slots 10 kg typical (22 lbs) One (the standard ORION-1616-100 A/D card uses one of the PCI slots) Free PCIe slots Two Environmental specifications Operating temperature -20 to 50C (0 to 45C with batteries installed) (storage temp -20 to 60C) Humdity 10 to 80% non-condensing, 5 to 95% relative humidity Vibration MIL-STD-810F, EN 60068-2-6, EN 60721-3-2 class 2M2 Shock MIL-STD-810F, EN 60068-2-27 Required to complete this model Conditioners: A/D card(s) Software Any 16 DAQ series plugin modules Up to 80 MDAQ series channels The ORION-1616-100 is included as standard. You may upgrade this card as follows: UP-ORION-16-22 upgrade the resolution to 22-bits, add antialiasing filters (AAF), max. SR remains at 100 kS/s/ch UP-ORION-16-24 upgrade the resolution to 24-bits, add AAF, max. SR increases to 200 kS/s/ch UP-ORION-16-22-32 upgrade the resolution to 22-bits, add AAF, increase from 16 to 32 analog channels UP-ORION-100-1000 upgrade the max. SR to 1000 kS/s/ch UP-ORION-100-200-8 upgrade the resolution to 24-bits, add AAF, max.SR increases to 200 kS/s/ch, decrease to 8 channels UP-ORION-100-1000-8 upgrade the max. SR to 1000 kS/s/ch, decrease to 8 channels DS-7-SE data acquisition software is included as standard* 32 analog channels, or multiple video cameras, or DEWE-CAM-FW-70, or DEWE-CLOCK use requires upgrade to PROF edition. 64+ analog channels requires upgrade to DSA edition. LabVIEW VIs are available for Dewetron ORION series A/D cards and DAQ series signal conditioners. Popular upgrades Counter expansion (UP-ORION-CTR8) Upgrades the A/D card from 8 TTL digital I/Os and 2 TTL counter / encoders to: 8 synchronous TTL digital inputs protected up to 25 VDC 8 synchronous counter / encoder or 24 digital inputs with programmable threshold levels (0-40 V), input voltage range -35 to 60 V, AC/DC coupling Includes DB37 pin connectors installed Synchronization interface (UP-ORION-SYNC) Installs the SYNC hardware input/output ports and LED indicators onto the mainframe. Allows systems with the same base ORION card to be synced. Additionally Requires DS-OPT-NET software option for synchronization under DS-7 software. OWNER’s GUIDE - DEWE-3040-RM | 7-147 Input specifications DEWE-3040-RM - DAQ version Digital Isolation (ORION-BASE-DI-ISO) HDD upgrade to solid state disks DEWE-3040-RM - MDAQ version Isolation for the 16 digital inputs of ORION base cards. Input low: 0 - 2 V, Input high: 3 - 50 V bandwidth: DC up to 1MHz Isolation voltage between channels: 150 VDC Isolation voltage between Input and Output: 250 VDC Connector: DSUB-37 connector (replaces standard digital I/O connector) HDD-UP-SSD-120 Upgrade to 120 GB flash disk (replaces standard spinning hard disk), $ no moving parts, max. data throughput 90 MB/s HDD-UP-SSD-240 Upgrade to 240 GB flash disk (replaces standard spinning hard disk), $ no moving parts, max. data throughput 90 MB/s HDD-UP-SSD-480 Upgrade to 480 GB flash disk (replaces standard spinning hard disk), $ no moving parts, max. data throughput 100 MB/s Time code interface Adds an internal IRIG or GPS time code interface (does not require a PCI slot) Popular interface add-ons CAN expansion (UP-ORION-CAN2) IRIG / GPS time code (DEWE-CLOCK-INT) Adds 2 synchronous high speed CAN bus interfaces to the ORION card inside the system. Includes two DB9 factory installed connectors for these counters on the side panel of the DEWE-3050, and rear panel of the DEWE-3040 and DEWE-3050. Includes DS-OPT-CAN software option supporting CAN BUS interface. IRIG or GPS synchronized clock source for DEWETRON systems, installed inside a new DEWETRON base unit Input: IRIG signal code A or B, AM or DC, or GPS signal Output: TTL clock from 10 Hz to 10 MHz, PPS and ORION-DSA-SYNC, IRIG-B DC Uses one USB interface (requires DS-PROF or higher) Please order GPS antenna GPS-ANT-1 separately (if GPS is needed) VIDEO-FG-4 Adds a four channel VIDEO INPUT PCI/e card to the system. Four BNCs for analog NTSC video input on the right side panel, allowing four video streams to be recorded in sync with the data ARINC-429 / 1553 interfaces Adds a multi-channel ARINC-429 or MIL-STD-1553 interface to the system. Available as a single PCI/e card with either or both interfaces on it, or as separate external USB interfaces. See the INTERFACES section for a comprehensive list. External channel expansion EPAD2 and CPAD2 series modules Add one or more EPAD2 series external signal conditioners to your system. Each one provides 8 thermocouple, RTD, low voltage, or low current inputs. EPAD2 modules can be daisy-chained up to 8 modules per system. CPAD2 modules are the same except with CAN BUS interface. Additional Specifications ORION-1616-100 A/D specifications Number of analog channels 8 channels Bit-resolution 16-bit ADC converters (one per channel) 14.7 effective number of bits Maximum sample rate 100 kS/s/ch simultaneous Input configuration Single-ended (note that the DAQ, HSI, or MDAQ conditioners are in front of the ORION card, and serve as the differential front-end for your signals. ADC type Successive approximation (SAR) Channel separation (cross-talk) > 90 dB @ fin 1 kHz DC accuracy ±0.02 % of reading ±0.013 % of range Signal to noise 89 dB THD (fin = 1kHz) 0 dBFS input < -86 dB THD (fin = 1kHz) -20 dBFS input < -93 dB Interchannel gain mismatch ±0.015 % Interchannel phase mismatch 0.02° * fin (kHz) + 0.08° 7-148| OWNER’s GUIDE Digital I/O and Clock line specs Digital input lines 16 Digital input characteristics TTL/CMOS signal levels: Low voltage level -0.7 V to 0.8 V High voltage level 2 V to 5 V Pull-up with 100 kΩ resistor Input capacitance < 5pF Input protection -1 V to 6 V Digital output lines 8 Digital output characteristics TTL/CMOS signal levels: Low voltage level < 0.4 V @ 4 mA load High voltage level > 3 V @ 4 mA load Output current Sink (low level) -20 mA Source (high level) 20 mA Output impedance 50 Ω Clock divider output line 1, same characteristics as digital output lines Standard counter/encoder specs Standard counter/encoders 2 x 32-bit (LEMO connectors for each) Note - used as pair counters when advanced features are used. If you need two or more full-featured counters, please order the UP-ORION-CTR8 Counter timebase 80 MHz (40 MHz max. input frequency) Time base accuracy 25 ppm Measurement modes Event counting, up/down counting, gated event counting, period time, pulse width, two-edge separation, frequency and encoder measurements Standard counter/encoder signal levels TTL/CMOS, pull-up with 100 kΩ Input low level: -0.7 V to 0.8 V Input high level: +2 to +5V Overvoltage input protection (DI 0 to DI 7): ±25 V continuous (DI 8 to DI 15): -1 to 6 V Advanced counter/encoders (UP-ORION-CTR8 option) Advanced counter/encoders 8 advanced 32-bit counters Counter timebase 80 MHz (40 MHz max. input frequency) Measurement modes Event counting, up/down counting, gated event counting, period time, pulse width, two-edge separation, frequency and encoder measurements Signal levels Symmetrical, differential AC/DC coupling selectable Trigger adjustment range 0 to 40 VDC with 40 mV resolution Trigger level accuracy ±100 mV ±1% of trigger level Common voltage range -35 to 50V Overvoltage input protection ±100 V continuous Max. DC level @ AC coupling: ±50 V continuous CAN BUS specs (UP-ORION-CAN2 option) High-speed CAN interfaces 2 CAN 2.0B high speed interfaces Bus pin fault protection ±36 V ESD protection 12kV Physical layer High speed Compatibility 2.0B standard, J1939 protocol support OBD II via software option OWNER’s GUIDE - Signal Connections | 8-149 8 Signal Connections / Counters Analog input connections Because DEWETRON systems are compatible with so many different DAQ, MDAQ, PAD, EPAD, CPAD, and other Dewetron modules, please refer to those signal conditioners in the Appendix for complete details about how to connect your signals to them. Choice of Cables Voltage cables should be instrumentation grade 50 Ω cables with a braided shield. Using good quality cables can make the difference between making a good measurement and not. Why spend thousands of dollars on a powerful data acquisition system, and then apply low quality cables? Long cable runs should use twisted pairs, where each pair is individually shielded. Then the entire cable should have a shield around all of the pairs, and a high quality insulation. Thermocouple cables should be instrumentation grade thermocouple wires with a high quality insulation. It is not necessary to shield thermocouple cables. Shielding Best Practices Normally a cable’s main shield will drain into the ground pin on the Dewetron side. It is a best practice NOT to connect the cable drain shield on both sides. This will help you to avoid ground loops (voltage potential differences which can adversly influence the measurements. 8-150| OWNER’s GUIDE Counter/Encoder input connections The DEWE-321x is suited with synchronous 32-bit advanced counter and digital inputs. In addition to the basic counter function like simple event counting, up/down counting and gated event counting also period time, pulse width, two-edge separation, frequency and all encoder measurements are supported. All counter inputs can also be used as digital inputs. In addition to the basic counter input selections, the ADC clock can also be used as counter source. The figure below shows the block diagram of the counter and input overvoltage protection. 1) Pull-up resistors 2) Over-voltage protection 3) Buffers OWNER’s GUIDE - Signal Connections | 8-151 Counter Applications each counter block is equipped with three inputs. With this three inputs the following applications can be done: Event Counting Gated Event Counting Up/Down Counter Frequency Measurement Period Time Measurement / Pulse Width Measurement Two Pulse Edge Separation Quadrature Encoder (X1, X2, X4, A-Up/B-Down) Event Counting In Event Counting the counter counts the number of pulses that occur on counter source. At each sample clock the counter value is read without disturbing the counting process. The figure below shows an example of event counting where the counter counts eight events on Counter Source. The synchronized value is the value read at the sample clock (see the encircled numbers in the figure, e.g. (1), (2), (3)... ). Event counting figure : 8-152| OWNER’s GUIDE Software setup: -- If counting the falling edges is necessary, the input signal can be inverted. OWNER’s GUIDE - Signal Connections | 8-153 Gated Event Counting Gated Event Counting is similar to Event Counting except that the counting process is gated. When the counter gate is active, the counter counts pulses which occur at the counter source. When the counter gate is inactive the counter retains the current count value. At each sample clock interval the current value is read. The figure below shows an example of gated event counting where the counter counts three events on the counter source. At (1) and (2) the counter value is zero, because the gate signal is inactive. At sample clock (3), (4) and (5) the actual counter value is read out. At (6) the same value as at (5) is output. Gated event counting figure: Software setup: -- If counting the falling edges is necessary, the input signal can be inverted. 8-154| OWNER’s GUIDE Up/Down Counter The Up/Down Counter counts the rising edges on the counter source. The direction of the counting depends on the signal state on the counter aux pin. If counter aux is active (high level), the counter value increases; if counter aux is inactive (low level), the counter value decreases. Up/Down counting figure: Software setup: OWNER’s GUIDE - Signal Connections | 8-155 Period Time Measurement In Period Time Measurement the counter uses the internal time base to measure the period time of the signal present on Counter Source. The counter counts the rising edges of the internal time base which occurs between two rising edges on Counter Source. At the completion of the period interval the counter value is stored in a register and the counter starts counting from zero. At every Sample Clock ((1), (2), ... (6)) the register value is read out. Period time measurement figure: Software setup: 8-156| OWNER’s GUIDE Pulse Width Measurement In Pulse Width Measurement the counter uses the internal time base to measure the pulse width of the signal present on Counter Source. The counter counts the rising edges of the internal time base after a rising edge occurs on counter source. At the falling edge on Counter Source the counter value is stored in a register and the counter is set to zero. With the next rising edge on Counter Source the counter starts counting again. At every Sample Clock ((1), (2), ... (6) ) the register value is read out. Pulse width measurement figure: Software setup: -- Note: to measure the LOW time of the signal, invert the input. OWNER’s GUIDE - Signal Connections | 8-157 Two Pulse Edge Separation Measurement The two pulse edge separation measurement is similar to the pulse width measurement, except that there are two input signals: Counter Start and Counter Stop. After a rising edge has occurred on Counter Start the counter counts rising edges of the internal time base. Additional edges on signal start are ignored. After a rising edge has occurred on Counter Stop the counter stops counting and the value is stored in a register. At the next rising edge on Counter Start the counter starts counting from zero again. At every Sample Clock ((1), (2), ... (6)) the register value is read out. Two Pulse Edge Separation Measurement figure: Software setup: -- If the input signals are inverted, the falling edges will be used for counting. 8-158| OWNER’s GUIDE Motion Encoders Motion encoders have usually three channels: channel A, B and Z. Channel A and channel B provide the square signals for the counter, and have a phase shift of 90°. From this phase shift the decoder is able to recognize the rotation direction of the motion encoder. The third channel outputs one pulse at a certain position at each revolution. This pulse is used to set the counter to zero. The number of counts per cycle at a given motion encoder depends on the type of decoding: X1, X2, or X4. Some motion encoders have two outputs, which work in a different way. Either channel A or channel B provides the square signal, depending on the direction of the rotation. The next sections illustrate the basic encoder modes that are supported: Quadrature Encoder In the first case, X1 decoding is explained. When Input A leads Input B in a quadrature cycle, the counter increments on rising edges of Input A. When Input B leads Input A in a quadrature cycle, the counter decrements on the falling edges of Input A. At every Sample Clock ((1), (2), ... (9)) the counter value is read out. Quadrature Encoder X1 Mode figure: OWNER’s GUIDE - Signal Connections | 8-159 For X2 encoding the rising edges and the falling edges of Input A are used to increment or decrement. The counter increments if Input A leads Input B and decrements if Input B leads Input A. Quadrature Encoder X2 Mode figure: Similarly, the counter increments or decrements on each edge of Input A and Input B for X4 decoding. The condition for increment and decrement is the same as for X1 and X2. Quadrature encoder X4 figure: 8-160| OWNER’s GUIDE The third channel Input Z, which is also referred as the index channel, causes the counter to be reloaded with zero in a specific phase of the quadrature cycle. The figure below shows the results for X1 encoding with input Z. Quadrature Encoder with channel Z figure: Software setup: OWNER’s GUIDE - Signal Connections | 8-161 A-Up/B-Down Encoder The A-Up/B-Down Encoder supports two inputs, A and B. A pulse on Input A increments the counter on its rising edges. A pulse on Input B decrements the counter on its rising edges. At every Sample Clock ((1), (2), ... (9)) the counter value is read out. A-up/B-down Encoder figure: Software setup: 8-162| OWNER’s GUIDE Frequency Measurement In general it is possible to take the inverse of a period measurement to get the frequency of the input signal. If the period time measurement is done an inaccuracy of counted internal time base cycles of ±1 cycle appears, because the counted cycles of the internal time base depends on the phase of the input signal with re- spect to the internal time base. For long period times, and therewith low frequencies, the measurement error is negligible. At high frequencies, and therewith short period times, few cycles are counted. In this case the error of ±1 cycle becomes significant. Accuracy at period time measurement figure: For higher precision result the frequency measurement is done with two counters. In each case two counters are paired, i.e. it have to be used counter 0 and counter 1 or counter 2 and counter 3 or counter 4 and counter 5 or counter 6 and 7 for the frequency measurement. The first coun- ter counts the rising edges on Counter Source. The second counter counts the rising edges of the internal time base. At every rising edge on Counter Source the counter value of the second counter is stored in a register. At every Sample Clock ((1), (2), ... (6)) the values of both counters are read out. Frequency measurement figure: With these both measurement results not only the frequency can be calculated in a precise way. Also the event counter result can be show in fractions because the exact time when the event occurs at the input is known. The event counting result is recalculated with interpolation to the exact sample point like shown in the diagram above. OWNER’s GUIDE - Signal Connections | 8-163 In the next figure, the difference of the measurement result is shown. While a standard counter input shows the value up to one sample delayed, the counter input of the counter calculates the counter result at the exact sample point: -- For low frequency input signals the frequency also can be obtained by measure the period time and take its inverse without more inaccuracy. Period, pulsewidth, and duty cycle Software setup: 8-164| OWNER’s GUIDE Miscellaneous counter functions Filters Each counter input has a digital filter, which can be set to various gate times. If the gate time is set to “Off”, no filter is on the input signal. The purpose of filtering is to eliminate unstable states, e.g. glitches, chatter,et al, which may appear on the input signal. Noise can be mis-counted, and should therefore be eliminated. The filter circuit samples the input signal on each rising edge of the internal time base. If the input signal maintains his state for at least the gate time, the new state is propagated. As an effect the signal transition is shifted by the gate time. The figure demonstrates the function of the filter: Below, input signal with chatter, before and after filtering: The filter can be chosen between eight filter settings: Off, 100 ns, 200 ns, 500 ns, 1 μs, 2 μs, 4 μs and 5 μs. OWNER’s GUIDE - Signal Connections | 8-165 Two examples of filter settings: The 100 ns filter will pass all pulse widths (high and low) that are 100 ns or longer. It will block all pulse widths that are 75 ns or shorter. The 5 μs filter will pass all pulse widths (high and low) that are 5 μs or longer and will block all pulse widths that are 4.975 μs or shorter. The internal sampling clock (time base) is 80 MHz, so the period time amounts 12.5 ns. Pulse widths between gate time minus two internal time base period times may or may not pass, depending on the phase of the input signal with respect to the internal time base. Properties of all filter settings: Reset on start measure Usually all counters are reset at the start of data acquisition, i.e., the counter value is set to zero at the start of data acquisition. In some applications this is not required. For example, an angle encoder is adjusted to the physical zero position at the beginning of a test procedure. By resetting the counter at every start of the measurement this adjustment will be lost. Without this reset the counter is also active if the acquisition is interrupted between the test cycles. As a result the counter types out the absolute angle position at the measurement output all the time. Count Direction As default setting the count direction is in up-counting mode. Every rising edge at the input will increase the counter value. The DEWE-ORION-1616-10x supports also down counting without the need of an additional input like in the up/down counting mode. No new value available Especially in every kind of input period time measurement mode (also pulse width or two pulse edge separation measurement) there may be new information between two samples. Also measuring the line frequency of about 50 Hz with a sample rate of 10 kSamples/sec means, that only after every 200th measurement new input frequency information is available. Another example is the measurement on rotating machines if the sensor output frequency is lower than the sample rate. Depending on the application you can choose between two different output data settings: Repeat last value: last measured cycle time is taken until a new measured cycle time is available Make zero value: as soon as no input information is available the output is set to zero 8-166| OWNER’s GUIDE OWNER’s GUIDE - Software | 9-167 9 Software Overview Your DEWETRON system is compatible with several software applications. For turn-key data acquisition, we offer DEWESoft 7, aka DS-7 for short. This is a very powerful yet fairly easy to use application that has reached wide acceptance among nearly all DEWETRON customers worldwide. It is the ideal application for R&D applications, since it can be so quickly configured to handle quickly changing requirements. If your application is more industrial in nature, especially involving closed-loop testing, ATP testing, process control and automation, the software of choice is normally LabVIEW from National Instruments. LabVIEW is a powerful development environment used by many thousands of engineers and technicians worldwide. DEWETRON offers robust LabVIEW drivers, socalled VI;s (virtual instruments), that you can drop onto your worksheet and integrate our ORION cards and DAQ series signal conditioners very easily. This section will provide the basic specifications of both DS-7 turn-key software application, as well as the LabVIEW drivers now available from DEWETRON for ORION series A/D cards and DAQ series isolation signal conditioners. 9-168| OWNER’s GUIDE LabVIEW Drivers for ORION and DAQ Modules Dewetron customers creating automated test systems, manufacturing test, or any special function system, rely on LabVIEW from National Instruments as their development environment. LabVIEW is perhaps the best known application of its type, all around the world. It’s no surprise therefore that DEWETRON has developed robust VIs (virtual instruments) that you can drop directly onto your LabVIEW application, integrating our hardware easier than ever before. You might be aware that it is possible to program on top of Dewesoft as well, but you need to run Dewesoft at least hidden, and have a paid license for it. But using DEWETRON’s LabVIEW VIs you get native LabVIEW support for our hardware, and eliminate the need for Dewesoft. Hardware Supported by DEWETRON’s LabVIEW VI’s DEWETRON ORION series A/D cards are supported, including: ORION 16-bit A/D cards ORION 22-bit A/D cards ORION 24-bit A/D cards In addition, we’ve been adding our DAQ series plug-in ISOLATION modules, starting with these most popular models: DAQP-STG - universal / strain / bridge module DAQP-HV - high voltage module DAQP-LV - low voltage module Additional DAQ series modules are being added all the time, according to our customer requests. DwDAQ Library for LabVIEW There are 15 VI’s as of this writing: Using these functions you can setup the A/D card, read its current settings, and more importantly, configure it the way that you want, including which channels to acquire, the acquisition rate, and how many samples to get from the card. Error checking is built in, so that you can verify at every step that the hardware is doing what you expect. OWNER’s GUIDE - Software | 9-169 DAQP Signal Conditioner Implementation A great assortment of functions are provided so that you can control your DAQP signal conditioners. In particular we have implemented the three most popular ones as shown at left, but more modules will be added to the mix over time. DAQP modules are controlled by way of the RS485 interface that is built into the ORION card (complete functionality is built in for module control). But for those applications where only DEWETRON DAQP series modules are used without DEWETRON ORION A/D cards, you can still control the DAQP modules using a traditional serial interface that connects your computer to the DEWE-30 “rack” that holds your DAQP modules. No matter what the application, with or without ORION cards, we have created a great library of LabVIEW VIs that will allow you to create your project more easily than you ever imagined. Top level COUNTER related functions, from the DEWETRON LabVIEW manual 9-170| OWNER’s GUIDE Counter Inputs and Counter Expansion ORION cards also have synchronous counter/encoder inputs on them, as well as digital I/O lines. These are also implemented in the VIs, using their own functions. The top level nine functions are shown in the figure at right. Below these are an array of subfunctions that allow you to read and control every function of the counters. Certain ORION cards have a “counter expansion” option installed, which means that not only that there are additional counters (and digital input) lines are installed, but also that the counters have adjustable threshold levels. These advanced capabilities can be controlled from within the VI, too, if they are installed. Digital I/O Lines Every ORION card also provides at least 8 digital input and 8 digital output lines. These are TTL level lines as a standard, but can be expanded in quantity and voltage input capability via various hardware options. Once again, these lines are accessible via a group of related functions in the VI. You can query the card to find out how many analog inputs, counters, and digital I/O lines that are installed, so that you know exactly what the hardware capabilities are in order to implement them perfectly in your application. CAN BUS Input Channel Functions Finally, ORION cards feature optional CAN BUS interfaces, and there is a group of nine functions related to controlling these ports, setting up the messages and channels within them, scaling them, and more. You can both read from and write to the CAN BUS, creating a complete implementation of CAN BUS data in sync with your analog and other digital channels. Sample LabVIEW Application We have written a sample LabVIEW application that works with our hardware. Installing it will also install the LabVIEW drivers that you would need to start your own developments. This is a great time saver and will start you off in the right direction. Top level COUNTER related functions, from the DEWETRON LabVIEW manual OWNER’s GUIDE - Software | 9-171 DEWESoft Turn-key Application (DS-7) DEWETRON customers in the R&D world don’t want to write software, or run on LINUX - they just want a turn-key software application that can be used within minutes. DEWESoft (DS-7 for short) is a great package that perfectly supports most DEWETRON hardware. Key DS-7 Capabilities and Features Runs under Windows DS-7 was written specifically for Windows, and does not run on any other operating system. But that’s perfectly fine for test and measurement specialists in the research sector. Data acquisition systems used in this sector are typically used for something different all the time, and flexibility is more important than long-term stability. The feature set provided by DS-7 is truly impressive. You can acquire high speed (dynamic) data from DEWETRON ORION and TRION series hardware (plus all of our signal conditioners), as well as hundreds of channels of asynchronous data from CAN, ARINC, 1553, SERIAL, and more. Easy visualization One of the most popular aspects of DS-7 is how easy it makes it for you to arrange the screens just the way that you like them. It provides recorder graphs, scopes, analog and digital meters, 2D and 3D graphs, tabular displays, text objects, X-Y graphs, and more. Place them in any arrangement and assign the channels into them that you want. DS-7 makes that very fast and easy. The entire setup is saved, so you can create countless configurations and recall them in a matter of seconds. MATH functions DS-7 includes a rich set of pre-made MATH functions that you can apply to your data DURING recording, or AFTER recording. These include programmable filters, integration, FFT analysis, and so much more. When the computer is not powerful enough to handle what you want to do in real-time, you can set any or all of the MATH functions to be processed after recording. DS-7 is not as powerful as a real analysis tool such as Flexpro or Matlab, but it’s pretty darn good for the money. 9-172| OWNER’s GUIDE DS-7 Software Specifications DEWESoft software specifications Data file size No restrictions, however we suggest to keep files to within 8 GB for your convenience Setup files A setup file contains all hardware settings and all display settings that can be configured within the software. An unlimited number of setup files may be saved for easy loading and re-use any time in the future Setup file format XML data format is used with D7s extension or XML extension Data file format Binary file with XML header portion containing the entire setup file, with D7d extension. A library DLL is available for adding Dewesoft 7 data file importation into any software program under your control. Several commercially available analysis programs have added direct reading of Dewesoft 7 data files in this way, including Matlab®, Flexpro®, and nCode®. Data display Built-in screens Scope, Overview, Recorder, FFT, Video, Power Screen design Every display screen can be modified by the user Screens can be deleted, and new screens added Subscreens may be added below main screens Screens may be renamed and moved on the toolbar Data display widgets (standard) Recorder (y/t strip chart) graph, horizontal, up to 16 channels/graph Recorder (strip chart) graph, vertical, 1 channels/graph Scope y/t graph, up to 32 channels/graph Digital meter with color coded alert levels, user programmable Analog meter with color coded alert levels, user programmable Bar graph, horizontal or vertical, with color coded alert levels, user programmable X-Y graph, X-YYY or 4 x X-Y, linear or angle based X-Y modes supported FFT graph, up to 4 channels/graph 2D array graph 3D array graph Background image container Video display container GPS track display container, compatible with map background images Discrete display, LED with color change, user programmable Discrete display, Alphanumeric, user programmable messages based on discrete levels Text container, user programmable Line tool, for drawing connections from meters/graphs to other widgets Data display widgets (optional) Vectorscope, harmonic FFT for voltage and current (included with DEWESoft-OPTPOWER) Third-octave display (included with DEWESoft-OPT-SNDLVL) On-line and Off-line MATH Function blocks included Formula editor: user-programmable arithmetic, algebra, trigonometry, boolean logic, measuring functions (time distance and ampltitude delta), and more. Filtering: IIR, FIR, FFT, and Envelope Integration, Double integration, Derivation and Double derivation (IIR filter module) Polynomial / coefficient scaling (IIR filter module) Basic statistics, array statistics, Latch math, counting functions, classification Reference curves: Y/T, X/Y, and FFT Constant function OWNER’s GUIDE - Software | 9-173 DEWESoft software specifications Function blocks (continued) Exact frequency calculation CA noise (included with DEWESoft-OPT-CA combustion analyzer) Angle sensor (user definable angle-based sensor toolkit) FFT, SFFT, CPB Scope trigger math function Strain gage rosette calculator Math channel operation modes Math channels can be created before or after recording Math channels created before recording may be set to not process until after recording, or may be set to process during recording Math functions created after recording can be processed on a subset of the data, or all of the data New channels resulting from math channels are saved to the data file, both before and after recording On-screen analysis capabilities Cursor measurements Recorder graphs have selectable cursors which can be used to take precise measurements anywhere within the data, or any channels Delta ampltidue and delta time are calculated, displayed, and printable Cursors can be locked individually Graph may still be zoomed/unzoomed when cursors are locked Cursors and their readings appear on the paper when screen is printed Data zoom in/out Any recorder graph can be used to zoom the data in or out, as many times as necessary Data replay Data can be replayed to make it look like it did when recording Replay speed and direction Replay can be increased or decreased in speed up to 8000x Replay can be forward or reverse Data export capabilities Export file formats available Matlab®, Flexpro, Excel®, delimited ASCII text Diadem®, Universal 58, FAMOS®, nsoft time series, Sony log, RPC III, Comtrade®, ATI®, Technical Data Management TDM, Impression Diadem®, Standard Data File, WFT, Replay RPL, Wave (audio wav), Google Earth® KML Export selection The area zoomed using the cursors will be exported. If no zooming has been done, the entire data file will be exported Export channel selection Any combination of channels may be exported, from 1 to all Export mode Data may be exported at the full acquisition rate, or at the reduced storage rate. When reduced is chosen, user may select to export up to four columns per channel: min, max, ave, rms Export timebase User selectable absolute time, relative time, or trigger (zero) time Software licensing and distribution Acquisition mode A valid DEWESoft license is required to RECORD (acquire) data Analysis mode No license is required to use DEWESoft to analyze data DEWESoft may be given to third parties for installation and use to analyze data files Off line math, zooming, printing, and data export are all supported 9-174| OWNER’s GUIDE DEWESoft software specifications Input sensor types supported Analog sensors Virtually all analog type sensors are supported (see Conditioners section for compatibility details), abbreviated list: Strain gages, accelerometers, microphones, RTDs, thermocouples, load cells, force sensors, voltages, currents, string potentiometers, LVDTs, resistive sensors Digital inputs Digital I/O “discrete” lines, position encoders, tachometers, frequency meters Video sensors USB and Firewire webcams which support DirectShow/DirectX under Windows7® Gig-E ethernet video camera (DEWE-CAM-GIG-E-50 option) Synchronized Firewire camera (DEWE-CAM-01 option) NSTC and PAL video streams (VIDEO-FG-4 option) Sound sensors IEPE and charge type microphones (see analog sensors) GPS sensors Compatible with: DEWE-VGPS-200C, NMEA compatible GPS stream, Leane V-SAT®, Racelogic VBOX II® GPS, Javad® GPS, Microsat® GPS Inertial sensors Compatible with: XSENS MTI® and MTI-G® series MEMS based sensors (requires PLUGIN-XSENS software option) Genesys ADMA® series gyro / GPS platforms (requires PLUGIN-ADMA software option) BUS interfaces supported CAN BUS CAN 2.0B, with several additional protocols, including J1939 and OBD II (optional interface and software option DEWESoft-OPT-CAN) Importation of Vector DBC files is included with this option Note: CAN output is available via option DEWESoft-OPT-CAN-OUT) This option also includes a Vector license for the export of Vector DBC files Hardware supported: All Dewetron CAN hardware, Softing® CAN PCI and USB, Vector® CAN, National Instruments® PCI-CAN/2 card ARINC 429 Internal half-length PCI card and external USB ARINC 429 interfaces optionally available. Requires also DEWESoft-OPT-ARINC/1553 MIL-STD-1553 Internal half-length PCI card and external USB ARINC 429 interfaces optionally available. Requires also DEWESoft-OPT-ARINC/1553 PCM data Internal full-length PCI format bit-sync/decom interface optionally available Requires also DEWESoft-OPT-PCM Requires a model with a full length PCI slot available, or external expansion chassis with PCI slot(s). OWNER’s GUIDE - Software | 9-175 DS-7 Operation Part 1: Acquisition and Analysis Where to Start? Turn on your Dewetron system. When Windows is loaded, find the DS-7 icon on the desktop. It looks like this: Double-click it. When DS-7 loads, it will be in the ACQUISITION mode by default, showing any existing SETUP FILES that you have created. It should look like this:  The files might also look like icons. This is selectable near the top right corner of the window using these buttons: You can load any setup file by simply double-clicking it from this page. But don’t do that yet: let’s make a new setup file. Before doing anything, we need to cover some questions that you might have already: What kind of files are these? These are SETUP files. In the ACQUISITION mode you create a system setup, which is used to record a DATA file. Are these my data files? No, these are not data files. You cannot see or load your data files in the ACQUISITION mode! Why can’t I see my data files? You can if you change to the ANALYSIS mode. But DEWESoft starts up in the ACQUISITION mode by default. 9-176| OWNER’s GUIDE What is the difference between ACQUISITION and ANALYSIS modes? Why do I need them? ACQUISITION - in this mode you set up the system and store (record) your data ANALYSIS - in this mode you can see your stored data, print it out, export it, and analyze it further Where is my data stored? How do I get to it? It’s stored on the hard drive. And don’t worry, we will be loading and replaying captured data files in a few minutes! Start with a Blank Setup Click [Ch. Setup] in the ribbon:  When you do this, you will be on the ANALOG setup screen first. This is where you set up the analog inputs of your system. You might have other setup screens for DIGITAL, COUNTER, CAN, VIDEO and more inputs… but let’s focus on the analog inputs in this QuickStart. Notice that the Analog screen is highlighted in yellow when selected. Below it you will see your channels. How this looks will vary according to which kinds of signal conditioners your system has, and how many channels. Here is a system with eight DAQ modules: OWNER’s GUIDE - Software | 9-177  otice that DEWESoft automatically activates the first channel for you. You need to activate the ones that N you want to store when you record data. Each channel is shown on one row which has these fields: Slot, On/Off, (Color), Name, Amplifier, Physical Values, CAL, and SETUP: 9-178| OWNER’s GUIDE Activate the Channels All channels that are set to USED will be stored when you press STORE. It does not matter whether the channel is shown on the display screen or not! If it is activated here as USED, it will be stored. It is possible to activate a channel but not store it - this is an advanced feature not covered here. To turn on more channels, simply press their [Unused] buttons, and they will change to [Used]. -- HINT: to turn on (or off ) all channels at once, click the top of the column and select from the menu that will ap- pear:  “Select all” will turn ON all channels, while “Deselect all” will turn them all OFF. Set Up Your Channels The easiest and most direct way to configure a channel is to click the “Set ch. #” button all the way to the right: To configure channel 0, for example, click the [Set ch. 0] button. The channel setup dialog will appear. This is a critical screen to learn about, so let’s take a close look at what it does and how to use it. OWNER’s GUIDE - Software | 9-179 Channel Setup Dialog This dialog seems complex at first, but it’s really quite simple once you understand what it contains and how to use it. There are four sections: 9-180| OWNER’s GUIDE PART 1: signal conditioner hardware control (top-right quadrant) It is best to configure this section first, because this actually conthe signal conditioning HARDWARE. In the example above, we a DAQP-LV low voltage module, which has two basic input types: age and current. trols have volt- Assuming we want to measure voltage, simply set the RANGE the selector: using Now set the filter (if you have an MDAQ system, you may or may not have the filter option). Different signal conditioners have different settings, so please refer to the details about them. In this quick start we will just use voltage modules and keep it simple. In our example we set the range to 50V. Have a look at the reference section and you will see this on the LEFT SIDE of the bar graph. Note that if you change the range, this will change directly below on the bar graph: OWNER’s GUIDE - Software | 9-181 PART 2: channel name, units, color… (top-left quadrant) Now enter a short name for this input channel, any additional info you want into the next field, and then the UNIT OF MEASURE. This is important to do before moving to the next section. In the example above, we are configuring a channel which will be used to measure air pressure in PSI. You can also set the color here. The “Min value” and “Max value” and “Sample rate divider” fields will be explained later. These are more advanced, so please ignore them for now. 9-182| OWNER’s GUIDE PART 3: Scale/CAL your channel (bottom-left quadrant) In this section you enter whatever scaling your input needs. -- NOTE : If you are simply measuring voltage from a voltage module, you don’t need to do any scaling (unless the voltage has been stepped down before being input to the Dewetron system). Let’s say that your transducer outputs 1V for 500 PSI. All you need to do is enter these values into the “by two points” fields, as shown here: In other words, when your sensor outputs 0V, this represents 0 PSI. But when it outputs 1V, that represents 500 PSI. This simply establishes the slope of the scaling. In this case it is a linear function which multiplies the input by 500 and changes the UM from V to PSI. You can click the [by function] button and see this algebraically: This slope is the famous y = mx + b equation from high school. The scaling is created by a multiplier and an offset. In our example, the offset is zero (none). But there are times when the offset is not zero. For example, if you are scaling from Celcius to Fahrenheit. These two temperature measurement systems have placed ZERO at different places: 0° C = 32° F. So to scale from C to F you would set it up like this: or… OWNER’s GUIDE - Software | 9-183 It doesn’t matter whether you use the 2-point scaling method or the function scaling method to scale your channel! Use whichever one is more comfortable to you and the scaling factor that you prefer. Both of the methods above are the same. They both express the equation C x 1.8 + 32 = F Reference Check (bottom-right quadrant) This fourth quadrant of the channel setup screen provides a handy reference, where the ACTUAL input scale is shown on the left side of the bar graph, and the result of your scaling is shown on the right side of the bar graph: or … -- NOTE : DEWESoft will show the data in your scaled units of measurement from this point forward! Of course, the data are really stored unscaled, to preserve all of their resolution, but they are always shown scaled according to what you do here, during and after recording. They are also exported in scaled engineering units. Look at the channel above on the right, our PSI channel. It shows ±25,000 PSI. But this is too much: your sensor will output only 8 volts max, so the 50V range is too much. No problem! Change the ACTUAL measuring range from 50 to 10V, and look what happens: >> results in >>  Now the measurement range of 10V yields a scaled measurement range of ±5000 PSI, which is what you were looking for. In this way you can see the relationship between the ACTUAL hardware measuring range and the SCALED measuring range. 9-184| OWNER’s GUIDE If everything looks good, then you are ready to move on to the next channel. You can either click [OK] at the bottom of the setup dialog, or click the [ > > ] button to move to the next channel:  Change the Display Scale One very important thing to note is that the scaled range shown on the right side of the bar graph on the setup screen sets the DEFAULT DISPLAY RANGE for this channel. Therefore, if you were to put this channel into a strip chart, scope, or analog meter gauge on the display screens, the scale will be taken from this bar graph. Let’s take the example of the thermocouple channel, which is scaled like this: So, if we put this channel into a strip chart, DEWESoft will set the scale to match the right side of the bar graph, like this: Note that DEWESoft set the channel’s display scale from -4.5e2 (-454°F) to 2.5e3 (+2498°F). But what if this range is too much? Let’s say that you expect to only really measure from -100°F to +400°F? OWNER’s GUIDE - Software | 9-185 You can change it right here on the graph, which we will cover later. But even better would be to PRE-set the display scale of this channel, so that when you put it into a graph or meter which has a scale, it will automatically be set to the desired span. How to preset this default display scale? It is back on the channel’s setup screen, in section 2: Setting the Default Display Range If you refer back to PART 2: channel name, units, color..., you will find two fields that we skipped over before. They are labeled “Min value” and “Max value”. By default they say “Auto” in them, which means that the display range of this channel will be set to the same min and max values of the reference bar graph. But you can override that by entering numbers into either or both of these fields! So in our example, we want the temperature channel’s default range to be -100°F to ±400°F, therefore we would enter that like this: Note that making this change will not CHANGE the range of any existing graph, but you can coax them to defer to these settings by right-clicking on the channel name within the graph: 9-186| OWNER’s GUIDE after right-clicking on the channel name inside the graph:  And when you add this channel into graphs for the first time, they will be scaled at -100°F to ±400°F automatically! Above, the same temperature channel shown in several different kinds of graphs and meters, they all have the default -100°F to +400°F display scale, because you have preset the display scale back on the setup screen for that channel. OWNER’s GUIDE - Software | 9-187 Copying Channel Settings You just learned a lot in setting up that channel. You set the actual hardware range/filter, then moved left to the channel name, description, units, and possibly set the display range, then moved down to do the scaling… all the while keeping an eye on the reference bar graph to ensure that this channel was set correctly. At this point you might be worrying that this is a lot of work to do on every single analog channel. Is there a shortcut you can take to speed up the process? Yes! Normally you will have several channels whose configurations are very similar. Here is our set up screen: OK, you just set the first channel up … and the next three channels are going to be very similar. Their hardware settings will be the same, and possibly even their scaling, display scale settings, etc. How do you copy those settings from channel 0 to the next three channels? Easy. Click the first box in the SLOT column of the channel that you want to copy: When you click the SLOT box of any channel, it pops up the Copy/Paste menu. Only Copy is active, since there is nothing to paste yet. Click Copy. Now click on the SLOT box of channel 1, the next channel down. Suddenly the Paste menu item is active, so click it to paste the settings from Channel 0 to Channel 1: Now you get some very nice choices, which make the copy/paste process very flexible. Here is what each of 9-188| OWNER’s GUIDE the three sub choices under Paste source (<module type> : <channel>) means: Paste - it will simply paste the settings from the channel you copied to this channel, EXCEPT that it will not paste the channel name, channel color, or the Used/Unused status to this channel. Paste to all - it will paste the settings from the channel you copied to ALL channels, EXCEPT that it will not paste the channel name, channel color, or the Used/Unused status to the other channels. Paste special… - here you can choose exactly which parameters it will paste from the channel you cop- ied to this channel, or even a range of channels. So if you wanted to really make them all the same color, or paste to a range of channels (example: copy channel 14 and then paste it to channels 23 to 31). If you select the Paste special... option, you get this screen where you can control what gets pasted, and to which range of channels: You can click the boxes in the PASTE column to toggle whether this parameter gets pasted or not. As mentioned, the Used/Unused status is not normally pasted from one channel to another, but here we can override that and paste that, too, as well as the channel name, etc. At the top we told it to paste from Slot 1 to Slot 3, so that channels 1, 2, and 3 will receive this paste simultaneously. Click OK to execute the paste, and see what happens: OWNER’s GUIDE - Software | 9-189 The Paste Special function turned those three channels on and pasted every parameter except the channel names and colors from channel 0 to channels 1, 2, and 3. Now you can just modify the channel names right here, and you’re ready to go. Just double-click in the white field under the Name column to directly edit any channels’ name. You don’t need to open up the [Set ch. #] dialog box to enter a name or pick a color. OK, our analog channels are all set up - let’s make the final adjustments and then record some data. 9-190| OWNER’s GUIDE Set the Data File Name You need to tell DEWESoft what to NAME your captured data file. In other words, you need to set the file name. For this function, please click the File details button in the toolbar: By default, DEWESoft will put a name like Data into this field. Type in whatever you want, avoiding characters that are illegal to use in Windows filenames, such as $ <> {} [] / \ | ; : , -- you know the list! If you stick with numbers, letters, underscores and hyphens you will be OK. Automatic Recording STOP function Let’s say that you want to start storing, and then have DEWESoft record for one hour automatically. Or stop after a certain file size is reached. These functions are easy to control using the Stop storing after checkbox that you can see here. Check it, and some settings controls will appear automatically for you: With Stop storing after checked, you can set DEWESoft to stop storing automatically based on time (hours, minutes, or seconds), or file size (in MB), or number of triggers within the file. Automatic File Numbering Notice the checkbox called Create a Multifile. This means that DEWESoft will automatically name your files for you, so you don’t have to keep entering a new name each time you want to record data. If you don’t use multifile, and you stored data right now, it would be stored to the filename Data.d7d. If you come back here, this screen would look different. Do you notice the difference? OWNER’s GUIDE - Software | 9-191  If you saw that the filename “Data” is now written in RED, then you were correct. DEWESoft shows a filename in RED here if this file already exists! So if you were to try and store again, DEWESoft would stop and tell you that this file exists, and give you the chance to either overwrite it with new data, or enter a new name. To avoid this, check the Multifile box, and then use the setup button that will appear to pre-configure how DEWESoft will automatically name your files, like so: The way it is set above, the base part of the filename will be Data, and each time you store data, DEWESoft will add an underscore and then four digits, starting at zero. So you will get a series of data files called: Data_0000.d7d Data_0001.d7d Data_0002.d7d Data_0003.d7d Data_0004.d7d … and so on. 9-192| OWNER’s GUIDE Notice also that you could elect to start numbering the files at something higher than 0000. Simply select or enter a starting file number. Of course, you can change the base part of the filename to anything supported by the Windows OS. In the example below we entered Gear_check as the base part of our filename. You may also turn on the DATE to be added to the filename. You could also turn on the TIME, which will disable the number at the end (you cannot have both). In the gray example area, you will see a preview of how your files will be named (as shown above). Automatic file SWITCHING function When multifile is not checked, the box below it is called Stop storing after, and as we saw, it allows you to set DEWESoft to stop storing according to how big the file is, or when a certain amount of time has elapsed. But when multifile is checked, the Stop storing after function changes slightly to be called Make new file after. In this case, DEWESoft will not stop recording per se, but it will close the current data file and immediately open a new one, which will be named according to the active multifile settings. In other words, instead of STOPPING storage outright, DEWESoft will switch to the next file in the series automatically. Check the box and you will get similar configuration controls as before: As before, DEWESoft can switch files automatically based on time (absolute or relative), file size, or trigger count. If you want one triggered event per data file, this is the way to do it, for example. Set it to triggers and set the quantity to 1. OWNER’s GUIDE - Software | 9-193 Set the Sample Rate You need to select a sample rate. This is the number of samples per second that DEWESoft will store for each of your active analog channels. If you have four channels active, and you select a sample rate of 10 kS/s for example, DEWESoft will stored 10 thousand samples per second for each of the four channels. This means that 40,000 samples will be stored each second. In a 16-bit system that means 80,000 bytes of data per second. In a 22 or 24-bit system, it is 160,000 bytes of data per second. -- Note : Typically you should select a sample rate which is at least twice as high as the highest frequency that you want to measure. The higher the rate, the more time axis resolution you will get, but the bigger the file will get! You set the rate right here on the ANALOG setup screen, just above the channel list: Use the Dynamic acquisition rate to set the sample rate. Using the small triangle at the bottom of the field you can change the units of the sample rate, as shown here. So if you think in kiloHertz, for example (kSamples per second per channel), you can select that instead of Hz/ch). You can work in Hz, kHz, or even MHz if you have a really fast system. When you change sample rate units, the value shown in the box will also change accordingly. To select a rate, either choose one from the list that drops down from the little triangle, or simply type one into the field and press ENTER on the keyboard. If DEWESoft cannot do this range, it will correct it and show you what it can do: There are several storing modes in DEWESoft, but in this first example we are simply going to store manually, by pressing STORE then STOP. Later in this QuickStart guide we will come back and learn how to use reduced storage mode and the triggered modes. 9-194| OWNER’s GUIDE Save Your Setup Everything that you can set up in DEWESoft is saved to a setup file that you can name freely (according to Windows file naming restrictions of course). It is ALWAYS a good idea to save your setup before moving on from here. You need to be in the SETUP mode (as we have been for many pages now). On the left side of the toolbar are large buttons for [Save] and [Save as]. If you have not yet named this setup file and you click [Save], DEWESoft treat this the same as if you had clicked [Save as]. Use [Save as] to save the current setup configuration to a new name. So you can open an existing setup that you like, use [Save as] to make a copy of it under a new name, then change it freely! No need to start from the beginning each time. WHAT’S NEXT? Yes, there are many other kinds of channels that Dewetron systems typically have, such as digital inputs, counter/encoders, video cameras, CAN BUS interfaces, and more… but this is a quickstart guide and we will focus on making simple analog input recordings. There are also several storing methods, such as triggering and reduced data. But for the quickstart we will focus on the ALWAYS FAST mode, which is like a tape recorder: you manually press STORE and DEWESoft records your active input channels at the selected dynamic acquisition rate, until you press STOP. Are you ready to record some data? It is better if you have some real signals connected to your channels. Even a simple 9VDC transistor battery, or a function generator that can output a sine wave, is a great way to input signals. If you have nothing but straight lines on the screen, it is impossible to learn how to zoom in, for example. So please take a moment and connect at least one real signal to your dewetron system, and then let’s move forward to the MEASURE screen, where we will use the default displays and STORE some data. After that we will learn how to replay it. Using the Acquisition Screens When you click ACQUISITION from the ribbon at the top of the DEWESoft window, the default displays will appear: Overview, Scope, Recorder, and FFT: OWNER’s GUIDE - Software | 9-195 If this is your first visit to Overview, there will be a digital meter group containing any channels that are set to USED back on the analog setup screen. In the example above, just one channel is active. -- Note : going back and activating more channels will not automatically add them to this screen - you have to do that manually. Elements of the Acquisition screen What exactly do the Acquisition screens contain? It might seem complex at first, but there are really just four main functional groups of objects, as shown here: 9-196| OWNER’s GUIDE Notice that four screens are created for you by default. click on the Scope, Recorder, and FFT screens and see how they are set up by default. You can change everything about these screens as mentioned earlier, but for now let’s use them as they are, and then come back to the design functions later. 1. RIBBON AND TOOLBAR - contains the DEWESoft ribbon, where you can navigate among the setup screens, display screens, and design mode. Also contains the toolbar, which has buttons to start and stop storing data, and select which screen to display. 2. PROPERTIES BAR - where you can set the properties of any display widget in the Data display area, as well as the properties of each display screen 3. DATA DISPLAY AREA - where your signals are shown, according to which display screen has been selected from the toolbar 4. CHANNEL LIST - shows your channels, and allows you to assign them into graphs and widgets.  OWNER’s GUIDE - Software | 9-197 Please click on the Recorder button in the toolbar to activate that display: The recorder shows you one big graph by default. Or perhaps more graphs depending on how many channels were set to USED when you first come here after leaving the setup screen. We had only one channel USED, so DEWESoft gave us one graph with our one channel on it. Common questions at this point: Is my data being stored already? I see it moving on the screen! No. It is being monitored but not yet stored, because we did not click the STORE button yet. I see some data that just went by, but I want to save it to disk. Is this possible? No, data being monitored is not stored. It is not possible to capture it now. Can I freeze this display right now? What about when I am storing data? 9-198| OWNER’s GUIDE To freeze the display when just monitoring data (not storing), press the STOP button. It will change to say START when you do that, so that you can re-start it moving on the screen. If you are STORING data, and you press STOP, the recording will STOP and the screen will stop moving. If you want to freeze the display while DEWESoft continues to store data in the background, use the FREEZE button instead! This is limited by a RAM buffer, so you cannot freeze the display and look back in time beyond the amount of RAM that is available for this function. Speed up/Slow down the recorder graph If the data are scrolling past too slowly or too fast, use the blue [+] and [-]  STORE SOME DATA Let’s get down to business and record some data. Press the STORE button and the screen will be cleared. A red vertical line appears and your data is now storing to disk. This is also indicated in the LOG in the toolbar area: Close-up view of the recording log: OWNER’s GUIDE - Software | 9-199 Marking your recordings with EVENTS During recording, you can mark your data in three ways: Notice event - just hit the spacebar on the keyboard, and a gray line will be time-stamped and added to the recorder graph. This is like the simple event marker of an old fashioned chart recorder. Text event - press the N key on the keyboard. Click on the log area if necessary to open the log for typ- ing. Just type in whatever you like. The text event will be time-stamped according to when you pressed N, not when you finish typing, so there is no rush! Voice event - (requires that sound events be activated in the project configuration, and that your Dewetron system has a usable sound card installed) press and hold V on the keyboard, and talk into your PC mic (not included by Dewetron). A short voice message will be added to the data file. You will see all of these events later when you reload this captured data to the screen. More about that later. Each event type is indicated on the screen with a vertical line of a different color. You can also activate them using the little icons near the log area instead of the keyboard shortcuts, as shown here. Stop storing... Press the STOP button and the recording will be closed. The screen will freeze. Reloading your Data Files This is as simple as pressing the ANALYSIS button near the top-left of the screen! If you have not gone to any other screen since stopping the recording, DEWESoft will automatically load the last data file that you recorded. Here it is! 9-200| OWNER’s GUIDE Replay reference strip Across the top of the DISPLAY AREA is something new: the display reference bar. By default, DEWESoft puts the first channel into this reference strip. When you load a data file, the entire file is displayed. The beginning of the data is on the left, and the end is on the right. This reference strip will become very useful when you ZOOM IN on the data. Let’s learn how to do that now Zooming in and zooming out OWNER’s GUIDE - Software | 9-201 It is important to know how to zoom in and out on various parts of your data, to look closer and make measurements. Notice that when you are in the Analysis mode, there are two grey cursors and one yellow cursor on the screen. The yellow cursor is also shown in the reference strip at the top. But let’s use the gray cursors to zoom. Simply drag them into position around the area that you want to zoom. Or, you can simply click and drag to the right, then release, to set the cursors. Now move the pointer between them, and you will notice that it changes to a pointer with a small PLUS symbol below it: To zoom this area, simply CLICK with your mouse (or touch with your finger, if you have a touchscreen) between these cursors! Notice what the screen looks like now:  9-202| OWNER’s GUIDE See how the area that you zoomed has been highlighted into a little box? This is done to show you WHERE in the data file you are looking on the recorder, and roughly how much of the data is being shown. This is a great reference, and is needed once you start zooming in. Zoom in again and again! You can zoom in as many times as you like. How to unzoom? There are two ways: 1. Simply RIGHT-CLICK onto the recorder graph, and each zoom that you have done will be un-zoomed in reverse order. So you can step backward through your zooms perfectly. 2. Use the blue MINUS button at the bottom right corner of the recorder graph to reduce the amount of time shown on the graph. Move the zoom box The small zoom box shown in the reference strip can be directly moved. Use the mouse and drag it left or right. Or, use the PAGE+UP and PAGE+DOWN buttons on your keyboard to move it in whole steps. You can also move it in half steps by using the left and right arrow keys on your keyboard. Make direct measurements on any channel Simply by moving the pointer along any waveform, DEWESoft will show you a color-coded X and Y values in engineering units in the top-left corner of the recorder graph. The pointer turns into a crosshairs when you OWNER’s GUIDE - Software | 9-203 move it along a waveform. Notice the values shown at the top of the graph: Using the Cursors DEWESoft uses these cursors in two ways: to zoom as shown above, and to make measurements on the signals. To make full use of them, activate the cursor checkbox in the properties panel on the left, when your recorder graph is active: Before you check the box Show cursor values, the delta-T is already shown here. In the screen shot above, notice the label: dt = 6.7 ms f = 149 Hz Therefore, the delta time between the cursors is less than 7 ms (<0.007 s), and the reciprocal of that time interval is 149 Hz. Now check the Show cursor values box, and notice that the recorder graph will get a new panel on its right side, which shows the cursor I and cursor II values in a table: So we see the value of the channel called Master Cylinder at cursor I, cursor II, and then the calculated delta amplitude value. 9-204| OWNER’s GUIDE If a recorder graph has more than one channel in it, cursor readings for the other channels will also be shown here, like in this example: You can also move the cursors and take readings at exact locations. Simply drag each cursor into position. To prevent accidentally zooming because you clicked in between them, you can LOCK each cursor using the little padlock icons on the properties panel. Print Out Your Data You might want to make a print out on paper after recording data. To do this, make the screen look how you want it to appear on the paper by zooming and using the cursor controls. Next, click the PRINT item from the ribbon along the top of the DEWESoft window. OWNER’s GUIDE - Software | 9-205 You can turn the page to portrait or landscape orientation using the buttons in the toolbar. Want to add some text to the page? Simply type it into the text field in the toolbar, and it will appear on the header of the printed page. Add your company logo to printouts You can associate a BMP image to DEWESoft, so that it will be printed in the header when you print your data. Click the Settings menu near the top right corner of the DEWESoft screen. Click on Global setup... to open the dialog box. 9-206| OWNER’s GUIDE When the dialog opens, click on the Print tab to see those settings: Click on the ellipsis […] button and then choose the bitmap (*.bmp) image that you want to appear on your printed output. Next time you print something, it will have your logo at the top-left. OWNER’s GUIDE - Software | 9-207 Export Your Data You might need to convert the DEWESoft data file to another format, so that you can open it in a different analysis program. You can do this from the Analysis mode. Open a data file, and then zoom in if you want to export only a certain portion of the data file. If you want to export it all, do not zoom in. After opening a data file, click the EXPORT item from the ribbon near the top of the DEWESoft screen: Now click the File export button from the toolbar. When you do, you will see a list of file formats that you can convert this data file to. Select any one of them. DEWESoft will put the name of this data file into the Export file name field automatically - however, you can change it to whatever you like. But please do not add the file extension, because DEWESoft will add it automatically. -- NOTE : to export to either Excel or Flexpro formats, you need to have these applications on this computer! Oth- erwise, exporting will not work! This is because DS-7 needs to communicate with these programs. Modify the Screens It is not possible to do this subject justice in such a short manual. But you should know that you can enter the Design mode by clicking the Design button in the ribbon near the top of the DEWESoft screen, and then 9-208| OWNER’s GUIDE change virtually every aspect of each screen. This is one of the most powerful and popular features of DEWESoft. Have a look at just a few of the screens that you can make in a matter of moments:   Use the hardware STORE and STOP buttons Some Dewetron instruments include hardware buttons for starting and stopping recording. You may use OWNER’s GUIDE - Software | 9-209 them just like you use the on-screen buttons labeled the same: STORE and STOP. These hardware buttons are active at the same time that the software buttons are active. The built-in LED will illuminate when data is storing. When you press STOP, the LED will go dark, and the storing will stop. 9-210| OWNER’s GUIDE OWNER’s GUIDE - Software | 9-211 Projects and Global settings This is part 2 of our QuickStart Guide to DEWESoft 7! It was written at the time of DEWESoft version 7.0.1, however it will remain largely compatible with higher versions of the software. It is meant to help you reach the next level of knowledge with DEWESoft. Part 1 focused 100% on the analog inputs, and using the measure screens as they are. In Part 2, you will see how to configure DEWESoft the way that you like it both at the highest possible level (Global level) as well as at the Project level -- and explain the difference. The Project level is especially important to learn about, since it never existed before DEWESoft7. NOTE : In this manual we will often refer to DEWESoft as “DS-7” as shorthand. There is no difference. What is a Dewesoft Project? You can consider a Project to be like a “hardware profile,” in that it defines the hardware that you will be using with DEWESoft. It also contains flexible settings that control how the system behaves. Let’s say that you have a computer that you sometimes use a DEWE-43-V (USB connection), and other times you connect a DEWESoft-NET ethernet based system, or other times yet, you use an ORION A/D card and rack of DAQ modules outside your computer. In DEWESoft6, there was only one global hardware setup, which you would have to change each time you wanted to connect these different pieces of hardware to. But now with “Projects,” you can make and name a hardware profile for each possibility. But a project defines more than just the hardware setup, as we will learn in this QuickStart Guide. To see your Projects, click the [Settings] button near the top-right corner of the DEWESoft window: The first item is called Project > Click it to open the submenu, where you can see your existing Projects, and then some controls below them for adding a new Project, renaming the active Project, removing a Project, etc. If you have not visited here before, you probably have a single Project called Default (you always need to have at least one Project, otherwise you would have no hardware setup!). 9-212| OWNER’s GUIDE In our case, we have a Project called “DEMO,” in which there is no data acquisition hardware defined, and DEWESoft creates waveforms for demo and training purposes. The checkbox tells us that this is the currently active Project. There is also another project called “DEWE43,” which is used when we connect our DEWE-43-V unit, and a third Project called “Sound card,” in which we use the computer’s sound card as a two channel sound recorder. Hardware setup screen Let’s check the hardware settings of the active Project. Simply click the Hardware setup… menu item. This menu will close and the hardware setup dialog will open. Hardware setup is where you control all of the hardware connected to your system, as well as the options that you might have purchased for DEWESoft. Your license info is also stored here. There are several screens, starting with ANALOG. You can see that we have selected No A/D Hardware, since we want this project to be purely for demo and training purposes, even when there is no hardware connected. But we have selected the Amplifiers to be COM port or offline, so that we can use them in the setup mode for training. In our other Project where we connect the DEWE-43-V and DAQ modules to make real measurements, the hardware setup screen looks different, of course: OWNER’s GUIDE - Software | 9-213 There are other tabs for setting up other input types, such as CAN, GPS, VIDEO...and more. The Plugins tab is where you activate software plugins that you have purchased for DEWESoft (some plugins are free). Registration is where you enter your license information. One source of potential confusion is the Math tab, so it is worth mentioning here: MATH Options It is important to note that the Basic functions (Filter, Formula, Statistics…) box can be checked. These functions are included with all versions of DEWESoft. It should be checked for you already, but if it isn’t, go ahead and check it. However, the additional features below that are OPTIONAL - i.e., they have to be paid for. If you check their boxes, and you do not have a license, you will not be able to click OK and use DEWESoft! -- Note : The DEWESoft-DEWESoftA version includes most of these options. However, Power requires the addi- 9-214| OWNER’s GUIDE tional option called DEWESoft-OPT-POWER. BUT if you want to try them before buying them, the solution is simple: create a new project called DEMO and then set it up with NO A/D HARDWARE like we did, and then you can turn on every option in the world! No license is needed for the demo mode! In demo mode, DEWESoft will generate sinusoidal waveforms that you can use to test any function that you want, without any license. And now with the ability to have different projects, you don’t have to take a risk by changing your “real” hardware setup -- just make a project called DEMO and then set up the hardware for this demo/testing mode, where every option is turned on. The only thing you cannot do is try these functions with real data coming in (unless you purchase the option of course). These options are called “built-ins” because they are included already in the DEWESoft source code - they simply require a valid license to be used for real. DEWESoft Plugins Then there are options which can be added in to DEWESoft as little snippets of code, or quick large chunks, called PLUGINS. These plugins are easy to install - you simply copy them into the \addons directory under the DEWESoft program file location on the hard disk. Then restart DEWESoft, and all installed plugins will be shown in the Plugins tab here on hardware setup. For example: Above you can see that we have a variety of plugins installed. Some of them are free of charge, while others are included with the hardware option that you have purchased from us, or are an extra cost option. OWNER’s GUIDE - Software | 9-215 To activate a plugin you need to toggle it to Used, as you can see we have done above with the DEWESoftNET plugin. When you click some plugins, they may have some additional features or configuration selections that will appear in the Plugin properties area at the bottom of the dialog box. Not all plugins have this. Please consult with your Dewetron sales person to learn more about which plugins are available for DEWESoft. More Project Properties In addition to the hardware and licensing configuration that you set up on the Hardware setup dialog, each project also contains several other properties that you can configure according to your needs. Click again on the [Settings] button near the top-right corner of the DEWESoft window: Notice now the item called “Project setup…”. Please click it to open the dialog box: This dialog has several subsections, including: Project folders - where you can set your default folders for setup files, data files, and exported data files 9-216| OWNER’s GUIDE Starting setup - where you can force DEWESoft to load a particular setup and screen when it loads Security - where you can establish password protection of the setup mode Internal variables - where you can define project level variables which can be used in Math channels, displayed on the screen, etc. These can be text or numeric variables. Data header - where you can set up a data entry box that will appear automatically before or after data storage, to force the operator to enter whichever test parameters you want added to the data file Memory - top level control of DEWESoft’s use of physical RAM The settings that you make here will apply to only the active Project! This is a lot of flexibility. Most of the project subsections are obvious how to use, so we won’t get into them here in the QuickStart. But there are two subsections worth a closer look: Internal Variables and Data Header, so we will do that now! Internal Variables Here you can define variables which will exist at the Project level. That means that they will be available to all setups which are created when this project is active. Variables can be in the form of TEXT or NUMERIC values. To create a variable, click the [+] symbol, and a default channel will be added, which you can directly edit. You can rename the variable’s ID, channel name, and even give it a unit of measurement and color, if it will be used as a channel. Next you can set the TYPE of data that it should contain: whether a floating, integer, or text value. If it is a numeric type, you can set the channel type to single or async. This does not apply to text data types. A “single” value means that it is treated like a static number in DEWESoft. OWNER’s GUIDE - Software | 9-217 An “Async” value is treated more like a channel in DEWESoft. This means that it could be processed in a series of calculations, like a filter. But there is no way to filter a static value. As a result of this distinction, both async and single value numeric variables can be used within the FORMULA kind of math channel. However, only an async value could be processed by a FILTER math channel. Do you see the difference? Finally, you can set the default value. This field is quite wide, which is useful when this variable will hold some text. Above we have created four variables - one of each basic type: text, floating number, and integer number. In addition, there are two versions of floating numbers: one which is async and another which is a single value. So now what can we do with these variables? Well basically, we can use them in MATH channels, and we can also simply put them on the screen in any setup that is active when this Project is active! These values will be stored with any data files that are created when this project is active. Using variables in Math channels Numeric variables can be used within your MATH channels, which is their primary purpose after all. You can use these variables to hold constants, for example, which are needed in your calculations. If you create a new FORMULA math channel, you will see how you can use them: 9-218| OWNER’s GUIDE Above you can see that in the formula math setup, there is a tab called Variables, which will appear as soon as there is at least one variable created for the current Project! So you can use these values within your MATH formulas, as shown above… we are dividing the real analog signal called ‘Oil’ by the variable called ‘Oil_Temp.” This formula creates a new virtual channel called ‘Oil_calc’ with the units ‘C’ (notice how we entered those parameters near the top-left corner of the screen above). So now this new math channel is available to be placed on the screen. Let’s take a look at that by clicking the Measure button near the top of the DEWESoft window: Click Measure from the ribbon... After clicking Measure you will see the first display screen, called Overview. If this is the first time you have visited the Overview screen with this setup, DEWESoft will automatically put your USED channels onto the screen in the form of digital meters, like this: OWNER’s GUIDE - Software | 9-219 Looking at the right side of the display, you can see a list of channels shown in the grey, vertical task bar. By default these channels are GROUPED according to type. In this setup we have analog channels, then the one Math channel, then our Variables. Each channel is shown within its group. Each group is collapsible. In the first DEWESoft QuickStart Guide we showed you the channel list, but we did not show you how to get the most from it. We will do that in a future QuickStart Guide. For now just have a look at the screen -- and notice how your channels appear within the digital meters: Even your text variable can be shown in a digital meter! Basically every kind of channel can be displayed in this meter (there are very few exceptions, and not worth mentioning at this point). 9-220| OWNER’s GUIDE Data header In this subsection of the Project setup, you can define a form that will appear when you record data, in order to collect some additional information from the operator about the test. When you first come to this subsection, it will look like the screen shot above. The main part of the dialog box will be completely empty, as shown here. This is your workspace, where you can create data input fields that the test operator will use later. There are three things that you can add to this workspace: Info - This is basically just a section header, which you can freely name. Input - A field which will collect alphanumeric input from the user Selection - A control that allows the user to pick from a list that you have predefined OK, let’s see how all these work. It is normally a good idea to start by writing down on paper what you want to collect from the user. Just use a piece of paper, and then refer to it as you duplicate it in the software. Let’s say that you want to collect this information, arranged in these groups: Test operator info: name ID number Test article info: model name (could be model A, model B, or model C) serial number lot number Test procedure info: ATP number (could be 1-1, 1-2, 1-3, or 22a) ATP step (could be any number from 1 to 100) OWNER’s GUIDE - Software | 9-221 How would you create this? It’s quite simple. Let’s start with the first group of info: Test operator info: name ID number First we create the group, by clicking the icon, then editing its label below, like this: Now we have a section, and we can add the fields below it. The first field we want to collect is the operator’s name. If you have a lot of operators and it is not practical to predefine them all, just use an Input field, so that the user can type his or her name freely. Click the icon, then edit the label, as shown here: Now we want to add the ID number field. Repeat the same step: click the label: icon, then edit the 9-222| OWNER’s GUIDE Great! Section 1 is done. We have created a category, and then defined two input fields that the operator can type into when data is recorded. Let’s move on and create the next section, and learn how to create a selection field. As a reminder, here is what we need to create: Test article info: model name (could be model A, model B, or model C) serial number lot number So first we create the category header by clicking the icon, then editing its label below: Easy enough. But now we need to create a selector so that the operator can simply choose from model A, model B, or model C (and nothing else). To do that, you click the icon, and then edit its label: But this field looks different than the simpler Input fields that we created before. A selector control requires that you define the selections right now. To do that, click the (ellipsis) button: OWNER’s GUIDE - Software | 9-223 The selection list dialog opens, where you can add new items to the list. Above we have typed “model A” into the new item field, then clicked the Add item button below, to move it into the list. Do the same for “model B” and “model C,” then click OK. At this point you have the idea, right? Please continue along and add the rest of the items from our checklist, until it looks like this: If you change your mind and want to delete a field, or rearrange the order of them, there are controls exactly for those functions: To move a field up or down, use the icons shown here. Also, you can use the Delete icon to remove a field completely. To select WHICH FIELD to move or delete, simply click on the field, and it will get a darker color field behind it, like the one called “Rabbits” here: 9-224| OWNER’s GUIDE With this field selected, click the icon and it will go away. There is no UNDO, so be careful. If your form is ready, there is still one very important step left: you must tell DEWESoft WHEN to show this form to the operator! There are checkboxes near the bottom, where you can tell DEWESoft to pop up this form at the start of acquisition, or at the end, or both.  It is critical to check at least ONE of these boxes, otherwise the form will never appear! Remember that this data header exists at the PROJECT LEVEL. Therefore, it does not matter which setup you use when storing data: when this project is active, the data header and internal variable settings that you establish here will be applied during recording. Let’s see how this works. OWNER’s GUIDE - Software | 9-225 OK, we have our system set up and ready to record. Using the info in DEWESoft QuickStart-1 you learned how to set up and scale your channels, and in QuickStart-2 you have learned how to create internal variables and a data header. You have combined variables and real data in the MATH section to create virtual channels, which will be displayed and recorded, too. The sample rate is set up and you have a nice screen to look at. Press STORE and watch what happens: 9-226| OWNER’s GUIDE Congratulations! When you press STORE, the Data Header dialog will instantly appear, and your operator can fill in the fields and then click OK to continue. Selectors that you have predefined will show their first value by default, so if you want to force the operator to make a choice, you can create a first selection like “--” or “choose” when you define the selection. If you think that your operators will be annoyed by this data header and will skip over it, you could also check the box to have it appear at the end of storing, when they have more time to fill it out. Data headers can be as long as you like. If you create many fields, the screen will automatically create NEXT and PREV buttons to navigate through multiple pages of fields. But take care: few people want to fill OWNER’s GUIDE - Software | 9-227 out so many fields, and will quickly grow tired of it. If you store data, stop, and then store again, the data header will appear again -- with the fields already filled in from the first run. So the operator just needs to change any fields which might have a different value now… the other fields can be left alone. Looking at the data header information later Data header values, and all variables from the project that was active when a given data file was created, are stored within the header of the data file. This is crucial for documentation purposes! How can you see this info? In the Analyze mode, click ONCE on any data file. In our case, we just captured some data called Test.d7d, so let’s have a look: When you click on the name of a data file here, you will see the header information from this file below, in several tabbed areas: 9-228| OWNER’s GUIDE Settings shows the basic settings of the data file (sample rate, date and time of storing, duration, and many more elements about each of the captured channels) Events there are always at least two events in any data file: the date and time storing started, and the date and time when it stopped. Data header what we just created! The fields are captured here File locking whether this file is protected against post-processing or not Preview a simple look at one of the display screens We cover all of this in more detail in the manual, but for now click the Data header tab and see what is captured here: Yes, your inputs are safely stored within the data file, for documentation purposes! What else can you do with these values? Can you print them out or show them on the screens? OWNER’s GUIDE - Software | 9-229 To print out the data header info: First, load the data file by double-clicking its name from the list. Then click the SETUP button in the ribbon: At this point you can review the various elements contained within the header by clicking their icons: Channels, Events, Data header, File locking, etc. But if you just want to make a print-out, click the PRINT button in the ribbon, and you will get a preview of what the paper will look like: When you do a print preview from captured data, with the SETUP clicked in the ribbon, you will see a preview of the entire header section of the data file. To get a preview of the DATA itself, i.e., any of your display screens, simply click REVIEW from the ribbon, then click PRINT in the ribbon: 9-230| OWNER’s GUIDE Variables within the data header You might have noticed that DEWESoft creates a variable from each of the fields that you create in your data header. These variables can be displayed and used in processes, just like the internal variables that you created earlier! For example, let’s say that each time you run a test you need to input a variable that will be used in a math channel. Like doing repetitive valve tests, where different valve diameters are used all the time, as one example. You could ask the operator to simply enter the valve diameter using the Data header pop-up, and then this value will be processed mathematically in whatever way you want! Imagine a situation where a tolerance is calculated by multiplying a constant value by another value which might change from test to test? This is not a problem: you can use the Internal Variables that we learned about earlier to hold a constant value, and use the Data header field to collect a second value at run time from the operator…. then put them together in a math channel. Above - we add an internal variable to hold the valve circumference, which will not change from test to test... OWNER’s GUIDE - Software | 9-231 Above - then we create a data header question that the operator needs to respond to at the beginning of each recording, called Valve diameter. DEWESoft automatically assigns it a unique ID - but let’s change it to “ValveDiam” to make it easier to identify this parameter later. Now you should also define the TYPE of data that can be entered: text, integer, or floating number. Since a number is absolutely required here, you should not allow the operator to enter text, for example! You may also define the units and color of this channel. Above - we create a MATH channel that we named ‘Valve_calc’ which will combine these two values and give you the output that you need to test against! This particular math channel doesn’t really make any sense: it is just one hypothetical example of how you can use these variables in DEWESoft. Displaying variables on the screen So now you can see that project variables - whether they are predefined or collected from the operator at 9-232| OWNER’s GUIDE run time, can be quite powerful. Importantly, they are captured within the header of the data file, and are thus a permanent part of the documentation. You can use them mathematically, or simply show them on the screen. How to do that? Let’s see: Did you notice that in the channel list, ALL VARIABLES are shown? If your variables are not showing, then perhaps you are clicked on a display object which cannot hold them, like a scope or FFT graph. To reveal all of them, click on a digital meter … then look at the channel list. You can see in the example above that there is a group of variables, and within it, there are now two sub-groups, labeled ‘Data Header’ and ‘Internal Variables’, and they contain exactly the variable names that we defined above. In the screen above we have simply put these variables, as well as the real and math channels into meters. Note that the data header variable is unknown until you press STORE and then the operator enters a number! Then that value will be known to DEWESoft, and also will be used in the MATH channel that calls for it. This is what has happened above. Projects Summary You can make as many Projects as you require. This is a handy way to quickly configure the system for OWNER’s GUIDE - Software | 9-233 different test scenarios, and different hardware configurations. A great example is when you have a channel expansion box: sometimes you need it, and sometimes you don’t You can therefore make a different Project for each configuration. But that’s only the beginning: you might have only one hardware configuration, but you can use Projects for different test scenarios, since the data header and internal variables exist at the project level, and they are a great source of automation and documentation, as you have seen above. We suggest that you make a Project called DEMO that you can use for training, as well as to try all of the options that are available as built-ins and plug-ins. Global Setup 9-234| OWNER’s GUIDE In the previous section you learned how to create Projects, which will set up the system in a certain configuration. But then there are some configuration parameters that you can at the highest level, i.e., above the level of any particular Project. This is the Global setup, and by definition there can be only one. Referring again to the [Settings] button, click it and then select the “Global setup…” item. When you select this item you will get the Global setup dialog box: There are several tabs on this dialog, which allow you to configure these parameters: General where you can set the language, character set, default sample rate, and similar Displays where you can control which screens are active by default, and set the display background color Sound where you can active VOICE EVENTS for data storing, and trigger sounds from the PC sound card Print where you can define several aspects of printing, and link to your company’s logo to print on reports Folders where you can set up the default folders for top level settings and the sensor database Amplifier (Infrequently used) top level Amplifier setting. Please leave this alone unless instructed otherwise The most often-used features at this top level are: Changing the DEWESoft background color The default background color is dark blue. However, if you plan on printing reports frequently directly from OWNER’s GUIDE - Software | 9-235 DEWESoft, you might want to change the background to WHITE, because then the screen and paper output will match. Also, this will prevent you from using really light colors like yellow (or white), which look great against dark blue, but which are impossible to see when printed on white paper. To change the background color to white, click the [Displays] button on the Global settings dialog box: Here you can simply set the color to white using the selector. Here is the difference: Adding a logo to your printouts To add a logo, click the [Print] button on the Global settings dialog box: 9-236| OWNER’s GUIDE Now click the […] button and then choose a BMP logo file that will be printed when you print stored data onto paper. Summary This concludes Part 2 of the DEWESoft QuickStart Guide. We have still only scratched the surface of this amazing data acquisition software program. There are more input types, more math functions, and … well, it’s a long list. Please refer to the DEWESoft 7 Manual and DEWESoft 7 Tutorials for further information about how to use these advanced capabilities, or make arrangements to attend a Dewetron training class, where you can really learn a lot. Finally, please experiment with DEWESoft and try everything. The software is quite intuitive once you get started. OWNER’s GUIDE - Software | 9-237 DS-7 Plugins DEWEsoft software can be expanded with the installation of software PLUGINS. There are several kinds available: Drivers for different hardware (A/D card, serial or other port connected devices, wireless devices, etc.) Graphical display widgets for the measurement displays Export filters to convert captured data to additional file formats Extensions of the functionality of DS-7 New MATH functions for custom processes This section will focus on a few of the key PLUGINs that are used with our systems. It is not meant to replace all of the documentation that is available separately related to DS-7, but as a convenience within this manual. PLUGIN Installation and Configuration How to Install a PLUGIN All plugins need to be copied to the ADDONS folder within your Dewesoft installation. Normally this will be at this path, but your system might be different: D:\DEWESoft7\Bin\V7_0\Addons\ In addition, all PLUGINS must be registered. Starting with Windows7, Microsoft does not allow an application to directly register a plugin, so you must manually start the process with a mouse-click. This is easily accomplished by clicking on the SETTINGS button near the top right corner of the DS-7 window (while in the setup mode). Then click HARDWARE SETTINGS from the menu. When the dialog box opens up, click on the ADDONS tab. Then click the REGISTER PLUGINS at the bottom of the screen. When this process completes after a few moments, you must click OK on this dialog. Then quit the DS-7 application and restart it in order that the newly registered plugins (of any kind) are registered. The PLUGINS tab of the HARDWARE SETUP screen 9-238| OWNER’s GUIDE Configuring Certain PLUGINS Some plugins have a setup interface that must be configured. From the ADDONS tab of the hardware setup screen, click once on the designed PLUGIN and you will see any user-configurable settings below. In the example we click on the TARSUS plugin, and below within the gray area several selectors appear, where you can configure this software. Plugins tab, showing the configuration of a certain plugin Make the appropriate changes and then click OK to register them and close this box. Your settings will be saved under this hardware project. The OK button at the bottom of the HARDWARE SETUP dialog box We learned about PROJECTS in an earlier section of this chapter - so you know that you can create multiple projects, which are essentially hardware profiles, that allow you to have different hardware configurations. So if sometimes you use a certain piece of hardware, but other times you don’t, you can make different PROJECTS, and load the one that you prefer. OWNER’s GUIDE - Software | 9-239 Testing plugins without a license Nearly all plugins require a license specific to them, in order to make them work. So how can you try out a plugin without first buying it? Answer: get a 30 day eval code. Even if your system is 100% licensed, you can still add a 30-day code to your license, and it will unlock all features, including any installed and registered plugins. Contact DEWETRON to get a 30 day evaluation code. In the screen shot above notice that a TRIAL license was installed when the screen shot was made. -- Note - some plugins require HARDWARE in order to function - you must also have that hardware! PLUGIN-ETHERNET-REC This plugin allows you to display and record data parsed from an ethernet stream, including UDP packets. No special hardware is needed, because basically every DEWETRON system has at least one ethernet interface already. Assuming you have an available ethernet interface on your DEWETRON system and you want to capture data from it, you can use this PLUGIN. First, install it according to the process mentioned at the beginning of this section. Make sure it is enabled, and licensed (even using a 30 day TRIAL / EVALATION license is fine for testing purposes). WinpCAP installation In addition to the plugin itself, we require that a third-party ethernet sniffer package be installed onto the DEWETRON computer. WINpCAP enables the access to the network interface (driver and DLL libraries). Please visit this page in order to download the software: http://www.winpcap.org/ Download WinPcap_4_1_3.exe There might be a newer version by the time you visit this page - no worries, simply get the latest version and use this name as a reference only. After installation you should restart your DEWETRON computer to make sure that all of the new libraries are instantiated. 9-240| OWNER’s GUIDE Setting up your Ethernet streams, filters and channels Once the plugin has been installed and enabled, and WinPcap has been installed, you should be able to see a new icon on your DS-7 SETUP toolbar, which looks like this: The first thing we need to do is to add a STREAM. Click the button in the toolbar below the ETHERNET icon to do that: Click the “+” button to add an ethernet STREAM Some controls will appear below: Datastream dialog, ethernet data source selected Data Source Choose ETHERNET, or UDP, or DEWESOFT (with Dewetron hardware this will always be either ethernet or UDP). We will cover ETHERNET and UDP setups below. Select Interface Choose the appropriate network card (the one that you will be reading the data from). Max Packet Size 1520 is the default, and is also the maximum length of the ethernet frame. -- Hint: If you have a fast stream with shorter frames, you can improve the performance and reduce data file size by reducing this value. Selecting ETHERNET is the simplest to setup. Simply choose the interface and maximum packet size as mentioned above. Then click OK at the bottom of this dialog box to register these settings. However, if you have chosen UDP, the dialog box will change slightly, and provide some alternate setup parameters to configure: OWNER’s GUIDE - Software | 9-241 Datastream dialog, UDP data source selected Input Type This can be set to either UDP PORT or REPLAY FILE. If you select a port, you need to give the port number and max packet size. The default values of 2999 and 2048 are entered for you. However if you select REPLAY FILE, you need to point to a file that contains the data you want to read, as well as the max packet size. UDP source, replay file input type Forward UDP packets This can be set to one of three selections: Disabled UDP packets will not be forwarded UDP Port UDP packets will be forwarded to the selected port and destination IP address (boxes will appear where you can enter these values) Replay file UDP packets will be written into the named file (a text box will appear where you can enter the filename) 9-242| OWNER’s GUIDE Regardless of whether you have selected ETHERNET or UDP as your data source, as soon as you can set one up, this will appear on the large open area of the software: Ethernet Stream ready to be further defined So far this section has column headings, but is emtpy. Therefore now we must add a filter chain, and then some CHANNELS to be displayed and recorded. Defining the Filter Chain Since each stream can have one or more filter chains, we need to define the one(s) that we need. Click the [ + ] button under the capture “Filter chains.” When you do, a single filter will be created for this stream, and it will appear like this: Ethernet filter within the first stream OWNER’s GUIDE - Software | 9-243 Defining the Filter Chain We need to define this filter chain. Let’s start by clicking the SETUP button on it the right side of it. When you click this SETUP button it will open up the Filter Settings dialog box: The Filter Settings dialog box The Filter chain is used to filter out ethernet frames by MAC address, IP address, packet type, etc. This is a very flexible setup, because you have the ability to include or exclude specific fields. You can also write multiple strings in each field. -- Note - if you write multiple strings in each field, they must be separated by a space character Here is an example: IP Address: 192.168.10.1 192.168.10.2 This will include both addresses. This also works with all other fields. If you click in the fields, e.g. “Destination IP”, the according part in the protocol will be highlighted. Here for instance we search for all messages going to 192.168.1.255; switch the view to “DEC” to see the plain numbers: 9-244| OWNER’s GUIDE Example of a filter chain setup Notice that we are already seeing the data stream at the bottom of the dialog box. This is a great convenience when setting up these filter chains. If you happen to know the exact position of the string, you can search for specific bytes or characters, by using the Data filter. Switch the preview to ASCII to see plain text. You can clear the previous values from the screen, to make sure that you are seeing the latest real data, or to discover if data is really moving or not. Using the DATA FILTER OWNER’s GUIDE - Software | 9-245 In the example below we will define a filter chain under the UDP protocol. We will search for messages with a destination port of 5001. We will see short test messages coming in, and the we can decode/extract our channel from it. Sample filter chain setup using UDP protocol And what do we get from this? Depending on the protocol, the packets can vary. For example, IPv6 addresses are longer than IPv4 addresses. Configuring your channels Well, now that we have configured the stream and the filter chain, we can finally define the actual CHAN- 9-246| OWNER’s GUIDE NELS that we want to measure, display, and store. Channels are always defined as a “child” of the selected Filter Chain. So first select the Filter Chain, and then click the [ + ] CHANNEL button to create one or more channels: The ADD CHANNEL button [+] Notice that you can add multiple channels below a given filter chain, simply by pressing the [+] key again. Click the channel to turn it to a darker gray color, if you want to remove it. Once it’s selected in this fashion, simply press the [-] key and any selected channel will be deleted. ⇒⇒ Take care - there is no UNDO function here, so if you accidentally delete a filter chain or channel, you will need to add it back again manually. Several channels added below a Filter Chain Of course, each channel needs to be set up. This is done by clicking the SETUP button on the far right of any channel. When you do that, the Channel Setup dialog will appear: OWNER’s GUIDE - Software | 9-247 Notice that the selected bytes have been highlighted to make it easier for you to see them: Just like with analog channels, this dialog box is where you can enter your slope (a scaling FACTOR and OFFSET). For example, to convert from Celcius to Fahrenheit you would enter a factor of 1.8 and and offset of 32. You can also define the default DISPLAY SCALE here using the Min Value and Max Value fields. This will not affect recording at all, but simply predefines the display scale of this channel when shown on a graph or meter that has a scale. For example, if this channel might have a max possible range of -1500 to +2000°C, but you just want to display it from -300 to +600°C, you would enter those two numbers into the min and max fields. -- Note - just as with analog channels, please do not enter the + sign. It is understood that numbers that do not have a minus sign are positive numbers. Our sample channel starts at byte 42 and is 16 bits long: 9-248| OWNER’s GUIDE Set your channels to USED It is an absolute MUST that channels be set to USED. Only channels which are USED can be shown on the displays, recorded, or processed within MATH functions. Be sure to press this button for all channels that you want to record / display / process in math! Filter chains and channels MUST be set to USED here in order to be displayed/recorded/processed You’re Ready Record Data Now that your ethernet data has been defined, you can use these channels just as if they were analog channels. Display Move to your display screens and you will see these channels in the channel LIST on the right side of the display. You can put them into digital and analog meters, Recorder Graphs, and Tabular displays. -- Note - because ethernet data is essentially asynchonous channels, they cannot be put into the SCOPE graph or FFT graph directly. Recording Just like any other channel(s) within the software, these channels will be STORED when you record data. And of course, replayed later when you analyze the data file. Process Just like any other channel(s) within the software, these channels can be used within your MATH functions, and even combined with other synchronous and asynchronous channels to create unlimited derived parameters. OWNER’s GUIDE - Software | 9-249 Matlab - Exporting Data from DS-7 Data exchange is an important matter for our customers, so there are several options how the proprietary DS-7 data and file format can be transferred and read by other software. Exporting MAT files from the DS-7 (DEWESoft 7) Export menu There are basically two methods of exporting data from DS-7: DirectX export into Flexpro or Matlab - including templates to automatically process data into reports. Then there is ... File export, which either writes other vendors’ proprietary data formats (e.g. MAT file) or commonly used interchange formats like CSV. This section is concerned with using File export from DS-7 to Matlab analysis software. Matlab is a very powerful tool made by The Mathworks, a company separate from and not affiliated with DEWETRON. The Mathworks owns the product Matlab, its intellectual property, including any and all Matlab related patents, trademarks and copyrights. The 2 GB Export Limitation, and How to Overcome DS-7 uses standard MATLAB™ libraries to write this specific file format as version 5 files with a 2 GB size limit. The DS-7 export function has an inherent 2 GB limit 9-250| OWNER’s GUIDE However, starting with DS-7 version 7.1 this limit can be overcome if newer MATLAB™ libraries are installed on the system. These libraries must be the 32-bit ones, because DS-7 is a 32-bit application. It is possible to install MATLAB™ 64-bit and 32-bit in parallel on the same machine with the same installer medium, but the latter one has to be started manually (e.g.: bin\win32\setup.exe). By installing this version, also 32-bit libraries are installed and registered and DEWESoft shows a new MATLAB™ export file type, MAT file version 7.3 removing the 2GB barrier. The export screen under DS-7.1 has additional choices regarding the data export OWNER’s GUIDE - Software | 9-251 Using DWDataReader Library inside MATLAB™ The DWDataReader library (including many examples) is available for download free of charge. It can be found on the www.dewamerica.com homepage on the DS-7 pages. Because our library is a native DLL, depending on the programming language in use and its included interop support, data types have to be converted and memory allocated. To make this easier for the end-user a number of examples are available for Win32 & Win64-bit MATLAB™ or C language, Win32 VBA and Linux C. The MATLAB™ example includes 3 files, the MATLAB™ script, the library and the header file. dw_data_reader.m DWDataReaderLib.dll DWDataReaderLib.h The basic steps to access D7D data files are explained in the library’s documentation: 1.Call DWInit to initialize the dynamic link library 2.Call DWOpenDataFile to open DEWESoft data file (*.d7d) 3.Call DWGetChannelListCount to get the number of channels 4.Allocate the DWChannel structure then call DWGetChannelList to get channel list properties 5.Call DWGetScaledSamplesCount to get the number of all samples 6.Allocate memory (data and time_stamp) then call DWGetScaledSamples 7.Call DWCloseDataFile to close data file 8.Call DWDeInit to clear and close dynamic link library Short walk-through of the example: -- Hint: The steps inside the demo are documented, so just look at the comments for more information. 64-bit operation mode is checked at first. Then the DLL is loaded into MATLAB™. The steps above have to be followed for correct operation, so the next step is to init the library. Get version is an optional step. Structures and referring pointers are created to be used as return types later on. The data file being opened is defined in line 41, default path is c:\Test.d7d. [stat, file_name, info_data] = calllib(DWDataLibFile, ‘DWOpenDataFile’, ‘c:\Test. d7d’, sptr.Value); DWGetChannelListCount returns the number of channels inside the data file. Events, such as start storing, are checked with DWGetEventListCount and DWGetEventListItem All data channels are then looped through and parameters such as name and color are read with 9-252| OWNER’s GUIDE DWGetChannelListItem Data itself is opened by reserving data and time_stamp variables and then using the DWGetScaledSam- ples function Color representation varies from different software, so the appropriate conversion is shown next by doing an example plot. As final steps the data file is closed by using DWCloseDataFile and the library de-initialized by calling DWDeInit. If the DLL is no longer used inside MATLAB™, the unloadlibrary function frees up memory. This demo shows basic operation and can be modified according to your own programming needs. Using DCOM to access DEWESoft data online with MATLAB™ After installation, DS-7 is a registered DCOM component on your Windows system, giving you access to a large number of functions, among them remote control and optionally hiding the software or loading a measurement setup and accessing data online or offline. This same DCOM standard is used when programming your own plugins, math modules, import or export filters or additional hardware drivers – independent from the used programming language. Again, there are programming examples on the www.dewamerica.com webpage on the DS-7 product pages. Example ListChannels: Start DEWESoft from inside MATLAB: global h; h = actxserver(‘Dewesoft.App’); h.Init(); h.Visible = true; Build ChannelList h.Data.BuildChannelList; Count all available channels h.Data.AllChannels.Count Count used ones only h.Data.UsedChannels Access channel with index and get Name property: h.Data.UsedChannels.Item(0).Name OWNER’s GUIDE - Software | 9-253 Example ReadDataFile (offline data): Start ActiveX server Go to Setup screen Start storing a data file Load the file in analysis mode Get global parameters, such as sampling rate, number of channels Loop through all the channels and get specific parameters, such as channel names Read data and time_stamp from channel Plot data Clear handle Example DewesoftEvents (online data): This example shows how to access data online via DCOM interface, and display this data in a MATLAB™ plot directly. Matlab screen showing data import from DS-7 software 9-254| OWNER’s GUIDE The main file here is actx_dewe_events, while the eventhandler is called from DEWESoft to transmit data online. actx_dewe_events: Start ActiveX server Init DEWESoft Load measurement setup Register events Start measure mode Pause main thread to be able to get data-events Stop and clear ActiveX components eventhandler: Listen for OngetData event Calculate data position from block size, no. of blocks, previous samples,… Loop through all channels and read data Plot data block Remember data position for next iteration OWNER’s GUIDE - Important Accessories | 10-255 10 Important Accessories DPS-2410 external AC/DC power supply Certain models include a Dewetron Power Supply (DPS) which outputs 24VDC at 10 amps (2410). Thus, the model name is DPS-2410. The DPS-2410 is used to power your system from 120/240VAC. When connected and powered on, it will also recharge any batteries which are installed within the system at the same time. Here are the relevant specifications for this power supply: Parameter DSP-2410 Power input: 100~250 VAC, 50/60 Hz standard worldwide power from AC mains Power output: 24 VDC nominal level, up to 10.5A absolute max (10A nominal and fused) Ground: yellow/green stripe color coded mini banana jack referenced to ground. Switch: AC mains power switch, turns off the DPS-2410 completely (there is no hot standby mode) Indicator Green LED indicates that the DPS-2410 is connected to power and turned ON. Fuse 10A fast blow automotive type fuse Fan: Built into the top cover. Series 1 models: black plastic fan bezel. Series 2 models: flush metal fan grille. Construction: Aluminum with rubber shock protection corners DPS-2410 Compatibility The DPS-2410 is included as standard with the DEWE-3210 series, and is included with the 310-UPS battery option for the D310 series. It is not required by nor compatible with the DEWE-3040-RM or DEWE-3050 series. 10-256| OWNER’s GUIDE DPS-2410 Dimensions OWNER’s GUIDE - Important Accessories | 10-257 DPS-2410 Call-outs LED power on indicator Rubberized shock absorbing corners AC Mains input receptacle 24 VDC power output 20A fuse Power on/off Chassis ground point Important safety notices: ⇒⇒ Never block the vetilation holes on any side of the DSP-2410 ⇒⇒ Always locate the DPS-2410 in an open, well ventilated area ⇒⇒ Never apply power to the DPS-2410 when it is enclosed within the carry bag, shipping case, or any other loca- tion where air flow is restricted. ⇒⇒ Always replace the external fuse with the same value and type. Never substitute a larger A value. ⇒⇒ Use the chassis ground point if needed to reference the voltage to the UUT or test stand ⇒⇒ Do not open the DPS-2410. Service must be performed by qualified DEWETRON service personnel. ⇒⇒ If the chassis appears damaged, or any connector is loose or damaged in any way, do not apply power to the DPS-2410. ⇒⇒ Never use the DPS-2410 for any purpose other than for which it was supplied by DEWETRON. ⇒⇒ Failure to observe these safety protocols, as well as other best practices related to electronic equipment and power conversion equipment, can lead to equipment damage, or bodily harm or even death to you and others. 10-258| OWNER’s GUIDE Neutrino-4 The Neutrino-4 is an optional external battery charger and additional DC power supply unit. It can recharge four Dewetron standard batteries (model BATT-95WH) simultaneously when powered from 120/240 VAC. The Neutrino-4 has a built-in LCD display exactly like the one which is on the DEWE-321x mainframe, so it will show you the number of batteries inside and their aggregate charge status. Using a special power cable, the Neutrino-4 can also be unplugged from AC and plugged into the DC input of many DEWETRON systems to provide an additional power source. With a full loaded and charged Neutrino-4 plus the batteries already within models like the D310 (with 310-UPS option), DEWE-3050, and DEWE-3210, you then have the power of six Dewetron BATT-95WH batteries. Since a rule of thumb is that you typically get one hour of data acquisition time per battery, this means your system can run practically an entire work day without being connected to external power. Above left: with the door open and batteries partially or completely removed Above right: with the door closed The Neutrino also supports hot-swapping of its batteries, so you can feed in fresh batteries at regular intervals, to keep it supplying DC power indefinitely. What’s included with the Neutrino-4: The Neutrino-4 mainframe AC mains input power cord One (1) BATT-95WH smart battery (please order additional batteries separately if you require them) Note - the Neutrino-4 is not compatible with the SideHAND2 series batteries used within the D310 with the 310-UPS option, or the DEWE-3050. We offer a desktop charger called the BAT-CHARGER-1, which supports both the original BAT-95W and newer SideHAND2 series batteries OWNER’s GUIDE - Important Accessories | 10-259 Neutrino-4 Outline and Dimensions 10-260| OWNER’s GUIDE Important safety notices: ⇒⇒ Never block the vetilation holes on any side of the Neutrino-4 ⇒⇒ Always locate the Neutrino-4 in an open, well ventilated area ⇒⇒ Never apply power to the Neutrino-4 when it is enclosed within the carry bag, shipping case, or any other loca- tion where air flow is restricted. ⇒⇒ Always replace the external fuse with the same value and type. Never substitute a larger A value. ⇒⇒ Use the chassis ground point if needed to reference the voltage to the UUT or test stand ⇒⇒ Do not open the Neutrino-4. Service must be performed by qualified DEWETRON service personnel. ⇒⇒ If the chassis appears damaged, or any connector is loose or damaged in any way, do not apply power to the Neutrino-4. ⇒⇒ Never use the Neutrino-4 for any purpose other than for which it was supplied by DEWETRON. ⇒⇒ Failure to observe these safety protocols, as well as other best practices related to electronic equipment and power conversion equipment, can lead to equipment damage, or bodily harm or even death to you and others. OWNER’s GUIDE - Important Accessories | 10-261 BAT-CHARGER-1 This is a desktop (non-ruggedized) style battery charger, capable of recharging one battery at a time. The charger will also recalibrate our smart batteries automatically, whenever needed. The BAT-CHARGER-1 is compatible with both the classic BAT-95W batteries used in DEWETRON DEWE-3210, DA120, DA-121, DA124, DEWE-3020, DEWE-5000, DEWE-571, DEWE-2600 and DEWE-3040 instruments, as well as the smaller “SideHAND2” series smart batteries used in the DEWE-3050 and D310 series. What’s included with the BAT-CHARGER-1: The single battery charger, plastic office use type construction AC/DC power adapter and power cord. Owner’s manual Above: the BAT-CHARGER-1 shown with a SideHAND2 series battery plugged in, and a BAT-95W battery lying nearby. Right: The DEWE-3050 includes four SideHAND2 series batteries. They can be hotswapped on the left side panel. Above: the BAT-CHARGER-1 shown with the included AC/ DC adapter. Not shown but also included is a standard AC power cable. 10-262| OWNER’s GUIDE BAT-CHARGER-1 Specifications Specification Weight: 235 g (8 oz.) Dimensions: (W x L x H) 92 x 180 x 58 mm (3.5 x 7 x 2.25 in.) Mating Connector: 5-pin standard battery connector LED Status Display Green flashing: Charging Green solid: Charge complete Blue flashing: Calibrating Blue solid: Calibration complete Red flashing: battery fuel gauge recalibration recommended Red solid: Error AC/DC power supply (External) 90~260VAC, 24V, 2.5A DC, 119 x 38 x 60 mm, 500 g (18 oz) AC Cord Standard: 110V N. American 3-pin connector Optional: 220V European 2-pin connector with ground recess Optional: CH5000U: 240V UK 3-pin connector Compliances System Management Bus Rev 1.0, Smart Battery Data Specification rev 1.0 and Smart Battery Charger specification Rev 1.0 compliant Certifications UL listed, CE Compliant Outline Dimensions Dimensions in inches (in.) Multiply by 25.4 for mm OWNER’s GUIDE - Important Accessories | 10-263 Safety ⇒⇒ Do not expose the charger or power supply to water or liquids; this is not a sealed case. 2. Do not open the charger or power supply case, no user serviceable parts are inside. ⇒⇒ Do not cover the fan exhaust or obstruct the airflow, this will cause overheating. ⇒⇒ Use only the manufacturer’s power supply and observe terminal polarity. ⇒⇒ Place the charger in a cool spot, away from external heat sources ⇒⇒ Caution - during recalibration the charger may become warm. Operation Guidelines Place the charger on a flat, level surface away from sources of heat and moisture. Plug the DC connector from the power supply into the back of the charger and connect the power supply to the mains AC supply using the cable supplied. Charging Batteries Place the battery into the battery bay ensuring that the 5-way connector is fully seated. The LEDs in the status window will provide status information and the charger will automatically begin charging. The BAT-CHARGER-1 charger is capable of sensing and delivering an appropriate charge to all Inspired Energy NiMH and Li Ion standard battery packs, including the BAT-95WH and SIdeHAND2 batteries used inDEWETRON systems. Upon inserting the battery into the charger, the battery communicates to the charger over the SMBus telling the charger what type of cell chemistry it is and what type of charge regime it needs. The charger then configures its output to provide the charge regime requested by the battery. If no SMBus communications are issued from the battery, the charger interrogates the thermistor/resistor I.D. pin on the battery terminal and delivers an appropriate charge. LED Indication: The status of the battery is indicated by the LEDs visible in the status window: Green flashing: Battery charging Green solid: Battery fully charged Blue flashing: Battery in calibration mode Blue solid: Battery fuel gauge calibrated Red flashing: Battery fuel gauge in need of recalibration Red solid: Error 10-264| OWNER’s GUIDE Recharging and Calibration Times Different battery packs will require differing recharge times. The times given below are for a full charge from 0% to 100% state of charge. They are valid for all variants and custom hybrids of each battery model. (For example the NJ1020HP has the same recharge time as the NJ1020. DEWETRON model Mfr. Model Name Recharge Time Recalibration Time BAT-95WH NL2404 3 hours 7 - 10 hours SideHAND2 NH2054 5 hours 18 - 24 hours Recalibration Time Recalibration consists of a calibration charge, followed by a calibration discharge. Finally the battery is given a regular charge. A calibration cycle will be faster if the battery is fully charged to begin with. Recalibration time is governed by the battery voltage and capacity. Larger batteries, and lower voltage batteries will take longer to recalibrate. Calibration is initiated each time the button is pressed, so it is not recommended to press the recalibration button part way through the recalibration cycle. What are the SMBus and the SBS? The Smart Battery System defines the parameters that are stored by an SBS-compliant battery. These parameters include full battery status and fuel gauging information. The System Management Bus is the language by which these parameters are communicated between the battery, the charger and the host device. How does the charger know what to deliver? The charger is capable of sensing and delivering an appropriate charge to all Inspired Energy NiMH and Li Ion standard battery packs. Upon inserting the battery into the charger, the battery communicates to the charger over the SMBus telling the charger what type of cell chemistry it is and what type of charge regime it needs. The then configures its output to provide the charge regime requested by the battery. If no SMBus communications are issued from the battery, the charger interrogates the thermistor/resistor I.D. pin on the battery terminal and delivers an appropriate charge. Above: the BAT-CHARGER-1 includes an AC/DC adapter and AC power cable that connects to USA power receptacles. Customers in Europe / UK can order compatible power cables with their BATCHARGER-1. Please consult DEWETRON about your requirements. OWNER’s GUIDE - Important Accessories | 10-265 DEWE-DCDC-24-300-ISO This is an isolated DC-DC converter that will power your Dewetron battery powered instrument from a wide ranging DC input power source, and also isolate it from that source. This option is very popular in automotive applications, due to its isolation. And of course, it runs from such a wide range of DC input power: 10 VDC to 36 VDC, that it is very convenient for use in cars, trucks, busses, and even aircraft. You can order the DEWE-DCDC-24-300-ISO as an accessory for any Dewetron instrument which runs from DC power, as long as that instrument accepts 24 VDC. Parameter DEWE-DCDC-24-300-ISO Input: Input voltage: Max. input current: Input connector: 10 to 36 VDC (the input is protected against wrong polarity) 36 A @ 10 VDC input voltage (15 A @ 24 VDC) 2-pin LEMO connector male, type: EGJ.3B.302 Output: Output voltages: Output power: Output current: Output connector: 24 V 300 W 12.5 A 2-pin LEMO connector female, type: EGG.2B.302 Operating temperature: Derating above 45 °C: -20 °C to 60 °C 8 Watt/°C Isolation voltage: 500 VDC Status LED: Green LED indicates an output voltage > 21 VDC Dimensions: (W x D x H): ~219 x 122 x 50 mm (8.6 x 4.8 x 2 in.) Weight: 1.3 kg (2.9 lbs) Power on sequence: First: Connect the system and the DCDC! Followed by the DCDC and the power supply connection. The DEWE-DCDC-24-300-ISO has the CE Mark 10-266| OWNER’s GUIDE MOB-DISP-17 Mobile Display For mobile applications, particularly in car and train testing, our MOBILE displays are highly useful. The MOB-DISP-17 is our largest display, featuring a high brightness 17” TFT panel, which is also a touchscreen that connects to your DEWE system via a USB 2.0 interface. The MOB-DISP-17 can be mounted using suction cups, or more permanently using the VESA 75 mounts, or the other #1/4-20 tapped holes on most sides, to fasten it to an AUTOPOLE or other fixture within your vehicle. The MOB-DISP-17 has three important connections: POWER - it runs from a wide ranging 9-29 VDC power source VIDEO - it connects to your computer via a standard cable with either VGA or DVI video output USB 2.0 - the touchscreen interface is connected via a standard A/B USB 2.0 cable A set of standard length cables is included with the MOBDISP-17, which is suitable for short distance hookups. The display does include an AC/DC adapter so that you can operate it from regular AC mains power. MOB-DISP-17, front view You can purchase an accessory kit for the MOB-DISP-17 called the DISP-17-OPT, which includes: Suction cups (2) 3 meter USB cable 3 meter VGA cable 1 m power cable with cigarette lighter plug on the input side The MOB-DISP-17 installed on a car dashboard. In the foreground is the DEWE-214 data acquisition system. OWNER’s GUIDE - Important Accessories | 10-267 MOB-DISP-17 Outline and Dimensions 10-268| OWNER’s GUIDE MOB-DISP-17 Call-outs Two USB 2.0 (type A) convenience jacks Status LED Screen set-up MENU buttons B, A, SELECT, MENU, POWER One USB 2.0 (type A) convenience jack VGA video input DVI video input USB 2.0 (type B) input from host computer Power input jack (LEMO FGG.1B.302.CLA) Hook-up Example: Connecting to the D3PC Red - 12 VDC power cable Blue - USB 2.0 cable (A/B) Green - VGA cable OWNER’s GUIDE - Important Accessories | 10-269 MOB-DISP-17 Specifications Parameter MOB-DISP-17 Description 17” Ruggedized video display, suitable for mobile applications Power requirements 12VDC, 5A peak. External AC/DC adapter included Power input connector LEMO FGG.1B.302.CLA Screen resolution SXGA (1280 x 1024 pixels) resolution, Low power consumption Backlight 90 LEDs TFT details Pixel pitch: 0.264(H) x 0.264(W) mm Active display area: 337.92(H) x 270.336(V) mm Surface treatment: Haze 25%, Hard-coating (3H) Display colors: 16.7M (Hi-FRC) Pixel arrangement: RGB vertical stripe White luminance: 360(Typ.) cd/m2 DIsplay OEM Based on the Samsung LTM170ET01 TFT display with LED backlight unit Touchscreen Capacitive touchscreen included, with USB 2.0 interface and drivers for Windows 7 Mounting positions VESA 100 tapped holes on the side opposite the display, and #1/4-20 tapped holes on top and bottom for suction cup mounting Standard accessories 1m VGA cable with DVI adapter 2.5 m USB cable 1 m power cable, FGG.1B.302.CLA LEMO to banana plugs AC/DC adapter for lab usage Optional accessories (DISP-17-OPT) 2 high-grade suction cups 3 m VGA cable 3 m USB cable 1 m power cable (LEMO to cigarette lighter plug) USB convenience jacks Three (3) USB 2.0 (type A) convenience jacks. Requires that the USB 2.0 (type B) input jack be connected to the DEWE system’s USB 2.0 interface via a standard USB 2.0 A to B type cable (one is included) Environmental Operating temperature: 0 °C to 50 °C, 95% RH Center of glass surface temperature absolute max: -10 °C to +60 °C Storage temperature: -25 °C to 70 °C, 70% RH (do not store in direct sunlight) Dimensions: (W x D x H): 384 x 39 x 337 mm (15.1 x 1.53 x 13.27 in.) Weight: 4.5 kg (10 lbs), not including cables MOB-DISP-17 Safety Notices Storage ⇒⇒ (a) Do not leave the MOB-DISP-17 in high temperature, and high humidity for a long time. It is highly recom- mended to store the Module with temperature from 0 to 35°C and relative humidity of less than 70%. ⇒⇒ (b) Do not store the MOB-DISP-17 Module in direct sunlight. ⇒⇒ (c) The MOB-DISP-17 should be stored in a dark place. It is prohibited to apply sunlight or fluorescent light in storing. Operation ⇒⇒ (a) Do not connect or disconnect the Module in the “Power On” condition. ⇒⇒ (b) Power supply should always be turned on/off by the item 6.3 “Power on/off sequence” 10-270| OWNER’s GUIDE ⇒⇒ (c) The TFT module within the MOB-DISP-17 has high frequency circuits. Sufficient suppression to the electro- magnetic interference should be done by system manufacturers. Grounding and shielding methods may be important to minimize the interference. Operation Condition Guide The MOB-DISP-17 should be operated under normal conditions. Normal condition is defined as below; Temperature : 20±15°C Humidity : 65±20% Display pattern : continually changing pattern (Not stationary) ⇒⇒ (b) If the MOB-DISP-17 will be used in extreme conditions such as high temperature, humidity, display patterns or operation time etc.., It is strongly recommended to contact SEC for Application engineering advice. Otherwise, its reliability and function may not be guaranteed. Others ⇒⇒ (a) Avoid condensation of water. It may result in improper operation or disconnection of electrode. ⇒⇒ (b) Do not exceed the absolute maximum rating value. (supply voltage variation, input voltage variation, varia- tion in part contents and environmental temperature, and so on). Otherwise the MOB-DISP-17 may be damaged. Connecting the MOB-DISP-17 There are two essential connections, and one non-essential connection, to be made on the MOB-DISP-17. Essential connections: The VGA cable The power Non-essential connection: USB 2.0 The VGA and power connections absolutely must be made in order for the MOB-DISP-17 to function at all. However, you do not connect the USB 2.0 cable between your DEWETRON system and the MOB-DISP-17, the touchscreen will not function, and the USB jacks on the MOB will not function. In order to activate the touchscreen, the driver must be installed onto the computer / DEWETRON system. If you have purchased the MOB-DISP-17 and the DEWETRON system together, we will have already installed the driver for you. Otherwise, you may have to download the display driver from our website and install it yourself onto the DEWETRON system. Please visit the MOB-DISP-17 product page on www.dewamerica. com and locate the downloader for the driver. If you cannot find it, please contact Dewetron in Wakefield, RI for a copy of it. OWNER’s GUIDE - Signal/Sensor Adapters | 11-271 11 Signal/Sensor Adapters MSI series interfaces Most DEWETRON instruments are compatible with MSI series intelligent sensor interfaces. Exactly which MSI interfaces can be used depends entirely on which signal conditioners are installed within your system. The table on the next page cross references the compatibility of each MSI with various Dewetron DAQ and MDAQ series signal conditioners, so please refer to that table when choosing MSIs for your system. Several MSIs are available for both bridge series modules and voltage input modules, namely the ACC, V200, and charge adapters. When you plug in an MSI interface to any of the analog inputs, it should show up automatically on the SETUP screen within DS-7, within the AMPLIFIER column. -- Note - if your MSI interfaces are NOT showing up on the screen as shown above, then there are two possible explanations: 1. You have not upgraded your software to DS 7.0 or higher 2. Perhaps MSIs are not activated at the hardware setup level. To remedy this, please click the SETTINGS menu then select HARDWARE SETUP. On the analog page, ensure that the checkbox for MSIs is checked, then click OK to save this setting. -- Note - please make sure that any conditioners that you have are checkmarked on this screen. If you are using DS-7 and have activated MSI interface as described above, and MSI interfaces are still not showing up when plugged into your analog inputs, please contact us for technical support. Be sure to try more than one MSI interface, to rule out a defective MSI interface being the cause of this problem. 11-272| OWNER’s GUIDE MSI Compatibility Reference MSI Modular Smart Interfaces for MDAQ and DAQ series modules MSI-BR-ACC MDAQ-SUBSTG-D MDAQ-SUBBRIDGE-D MDAQ-SUBV200-D DAQP-STG DAQPBRIDGE-A* DAQPBRIDGE-B DAQP-LV-D √ √ -- √ -- -- -- Isotron (constant current powered) adapter for MDAQ-SUB-BRIDGE / -STG modules with DB9 connector Excitation current 4 mA at 21 V, High pass filter 1.5 Hz, BNC connector Bandwidth and ranges are defined by connected amplifier Automatic identification via TEDS MSI-BR-V-200 √ √ -- √ -- -- -- 200 V input adapter for MDAQ-SUB-BRIDGE / -STG modules with DB9 connector Differential input configuration, BNC connector Bandwidth and ranges are defined by connected amplifier Automatic identification via TEDS MSI-BR-RTD √ √ -- not needed -- -- -- Pt100, Pt200, Pt500, Pt1000 and Pt2000 adapter for MDAQ-SUB-BRIDGE / -STG modules with DB9 connector 2, 3 and 4 wire connection methods, 5-pin Binder 710 series connector Automatic identification via TEDS MSI-BR-CH-50 √ √ -- √ -- -- -- Charge input interface for DAQP-STG and MDAQ-SUB-BRIDGE / -STG with DB9 connector Range up to 50000 pC, AC coupled with 0.07 Hz, BNC signal connection Max. 100 kHz bandwidth (dependent on the max. bandwidth of the amplifier) Automatic identification via TEDS MSI-BR-TH-X √ √ -- √ √ √ -- Thermocouple type K / J / T adapter for DAQP-BRIDGE-x and MDAQ-SUB-BRIDGE / -STG modules For use with isolated thermocouple sensors only ! (except in combination with DAQP-STG-D or DAQP-BRIDGE-A*, which are isolated) High accuracy cold junction reference measurement, 1 m thermo cable with Mini TC connector Automatic identification via TEDS* MSI-V-ACC -- -- √ -- -- -- √ Isotron (constant current powered) adapter for DAQP-V-D and MDAQ-SUB-V200-D Excitation current 4 mA at 21 V, High pass filter 1.5 Hz, BNC connector Bandwidth and ranges are defined by connected amplifier Automatic identification via TEDS MSI-V-RTD -- -- √ -- -- -- √ Pt100, Pt200, Pt500 and Pt1000 adapter for DAQP-V-D and MDAQ-SUB-V200-D 2, 3 and 4 wire connection methods, 5-pin Binder 710 series connector Automatic identification via TEDS MSI-V-CH-50 -- -- √ -- -- -- Charge input interface for DAQP-LV-D and MDAQ-SUB-V200-D Range up to 50000 pC, AC coupled with 0.07 Hz, BNC signal connection Max. 100 kHz bandwidth (dependent on the max. bandwidth of the amplifier) Automatic identification via TEDS * DAQP-BRIDGE-A does not have TEDS, therefore it cannot recognize MSI interfaces √ OWNER’s GUIDE - Signal/Sensor Adapters | 11-273 MSI Operation within DS-7 When you plug any one of them into the analog inputs, the software will detect it and show its name and serial number on the main channel setup screen, as shown here: ⇒⇒ The only exception to automatic identification within DS-7 is the DAQP-BRIDGE-A module, which does not have TEDS interface. Therefore, although they will literally work, it is not convenient to use MSI adapters with that signal conditioner. The DAQP-STG-D is a much better choice. Adapters ADAP series interfaces are passive adapters, available for various types of signal inputs. Unlike MSI interfaces, they are not controlled under the software, nor do they have a TEDS interface inside. They are strictly passive adapters. A popular one, for example, has a precision 50Ω resistor inside it, wired across the inputs, which serves as a current shunt for 0-20 mA applications. Following these single function adapters is a table with the most popular adapters for wider applications. ADAP-BNC-MICRODOT The DAQP-CHARGE-A module comes with an adapter from microdot connector to BNC, allowing you to connect charge sensors with the small 10-32 microdot connectors to the BNC input. This adapter is also available for purchase for the DAQP-CHARGE-A, or to be used in conjunction with the MSI-BR-CH-50 and MSI-V-CH-50 charge interfaces. ADAP-CAN-OPT-ISO Isolation adapter for one CAN BUS interface. This small interface plugs into a standard DSUB9 CAN BUS interface connector, and provides real isolation between the vehicle CAN bus and the Dewetron CAN interface. This is very often needed in electrically noisy environments, and on military vehicles. -- Being passive, ADAP series adapters do not show up on the DS-7 setup screen. However, you can select them manually in many cases, as we will show below. 11-274| OWNER’s GUIDE Adapters for various MDAQ and DAQ series modules DAQ-SHUNT-1 MDAQ-SUBSTG-D MDAQ-SUBBRIDGE-D MDAQ-SUBV200-D MDAQ-SUBV200-BNC DAQP-LV-B DAQP-LVBNC DAQP-LV-D DAQP-STG-D -- -- -- -- √ -- -- -- Shunt adapter for 0-20 mA or 4-20 mA measurements, internal precision 50Ω shunt resistor 100 mA input range, 1 W maximum, 1% accuracy banana plug to Dewetron module / banana jacks on sensor side DAQ-SHUNT-1-BNC √ √ √ -- -- -- √ √ Shunt adapter for 0-20 mA or 4-20 mA measurements, internal precision 50Ω shunt resistor 100 mA input range, 1 W maximum, 1% accuracy 9-pin DSUB to Dewetron module / BNC jack on sensor side DAQ-SHUNT-3 -- -- -- -- √ -- -- -- -- -- -- -- √ √ -- -- Shunt box for measurements up to 5A (0.1 Ω, ±0.1%, 3W) Current input via 2 x 0.3 meter cables with banana plugs Voltage output via 2 x 0.3 meter cable with banana plugs DAQ-SHUNT-4 -- -- -- √ -- Shunt box for measurements up to 5A (0.1 Ω, ±0.1%, 3W) Current input via 2 x safety banana jacks Voltage output via 2 x 0.3 meter cable with banana plugs DAQ-SHUNT-5 -- -- -- √ -- Shunt box for measurements up to 5A (0.1 Ω, ±0.1%, 3W) Current input via 2 x safety banana jacks Voltage output via 2 x safety banana jacks CONN-DSUB-9 √ √ √ -- -- -- Mating connector for 9-pin DSUB connectors with convenient screw terminals inside Eliminates soldering/desoldering ADAP-MDAQ-BNC √ √ √ -- -- -- Converter from 9-pin DSUB to BNC input connector, for MDAQ series modules (pin-outs are the same as ADAP-DAQ-BNC, but there is an additional isolation resistor in this adapter to improve noise performance of differential MDAQ series modules) ADAP-DAQ-BNC -- -- -- -- -- -- √ √ -- -- Converter from 9-pin DSUB to BNC input connector, for DAQ series modules ADAP-BAN-BNC -- -- -- √ not needed √ OWNER’s GUIDE - Signal/Sensor Adapters | 11-275 Adapters for various MDAQ and DAQ series modules MDAQ-SUBSTG-D MDAQ-SUBBRIDGE-D MDAQ-SUBV200-D MDAQ-SUBV200-BNC DAQP-LV-B DAQP-LVBNC DAQP-LV-D DAQP-STG-D Adapter from banana jack to BNC. Allows you to connect your cables with banana plugs into Dewetron modules which have BNC input connectors. ADAP-MIC-BNC-CBL -- -- -- √ -- √ -- -- Microphone adapter and 6 ft BNC cable. Allows the use of standard unpowered mics with your Dewetron system. Adapter: 3 Pin XLR Male to BNC Female Audio Adapter Contacts (XLR) : 3 Genders: BNC (Female) / XLR (Male) Wired: Pin 1 & 3 = Ground / Pin 2 = Hot Includes 6 ft BNC-BNC cable (not shown in picture here) ADAP-BR-1/4-120 not needed √ -- -- -- -- -- not needed -- -- not needed Bridge completion terminal, 1/4 bridge @ 120 Ω DSUB9 input and output connectors ADAP-BR-1/4-350 not needed √ -- -- -- Bridge completion terminal, 1/4 bridge @ 350 Ω DSUB9 input and output connectors Using Adapters in DS-7 Since ADAP adapters do not have any kind of electronic interface, they do not show up in the software automatically - you have to set them up yourself. But DEWESoft makes this easy. Simply access the SETUP screen for any channel that you have an adapter plugged into, and enter the appropriate settings and scaling information there. In the next section we will look at setting up a few popular adapters in the most commonly requested scenarios. 11-276| OWNER’s GUIDE Using the DAQ-SHUNT-1 adapter Let’s take the case of the DAQ-SHUNT-1, which is a 50Ω shunt adapter for making 4-20 mA current measurements. Let’s see how to set it up within a DAQP-LV-B module. When you first open the SETUP dialog for this channel, by default it will be set to the VOLTAGE measurement mode, like this: Therefore, it is necessary to change the mode from voltage to current, as shown here: When you do this, the software changes the unit of measure from V to mA, and also presents you with the ability to select Shunt 1, Shunt 2 (Shunt 2 applies to Shunt 3, Shunt4, and Shunt 5, which are the same electrically, but which only have different I/O connector configurations), as well as a variety of Dewetron specialized shunts for automotive applications: OWNER’s GUIDE - Signal/Sensor Adapters | 11-277 Simply select the shunt that is appropriate. In this case, when you choose Shunt 1, DEWESoft will automatically scale the input. And notice that the measuring ranges are now given directly in mA instead of voltage units. Have a look at the range selector: Therefore you can simply select the 20 mA range, and there is no need to do any other scaling unless you need to convert the 20 mA signal to something else. 11-278| OWNER’s GUIDE For instance, if your 4 - 20 mA signal really represents -100 to 5000 PSI, you could enter these scaling values quite easily on this same screen. First change the Units from mA to PSI, then below in the Scaling area, enter these values: That’s all you would have to do! Any scaling parameters which are linear can be entered in this way. -- Note: the ranges shown above apply to the DAQP-LV module. When you use the DAQ-SHUNT-1 with other mod- ules, the ranges will be different according to which module is being used. Using custom Shunt resistors After selecting CURRENT input type you can also select CUSTOM instead of one of the preset current adapters, at the end of the list: OWNER’s GUIDE - Signal/Sensor Adapters | 11-279 When you do this, the software allows you to enter the value of the shunt resistor that you are using, as well as the maximum wattage. The software will do the appropriate Ω’s law calculations to amperage for you automatically. -- Note - Dewetron conditioners such as the MDAQ-SUB-BRIDGE and MDAQ-SUB-STG also support the direct selection of CURRENT as a measuring type. Therefore you can use them with shunts as shown above. You simply need to adapt the input connector to handle a shunt resistor. An idea choice is the CONN-DSUB-9 mating connector, which makes it easy to insert your own shunt resistor into the mating connector and plug it into the DSUB 9-pin input connector of the module. …Using Current sensors 11-280| OWNER’s GUIDE In this case we recommend that you leave the Measurement type to Voltage, and simply enter the appropriate engineering units and scaling factor. For example, if you were using a current clamp that could measure 250 Amps, but which output 0.1 V/A, you would simply set up this channel like this: After you set the Units to A, then enter the scaling factors as shown above so that 0.1 V = 1 A, simply use the Range selector to choose the appropriate current measuring range. Keep an eye on the right side of the scaling BAR in the bottom left corner of the screen. Notice that when you select the 25V measuring range, you will get a full scale 250 A measuring range. This is perfect. You can select smaller ranges if you expect that the current input will not really reach 250 A. Choose the range that best fits to your current sensor AND the desired measuring range. OWNER’s GUIDE - Signal/Sensor Adapters | 11-281 Using the ADAP-BR-1/4-120 or 350 bridge completion adapters These adapters are only needed for Dewetron bridge conditioners which do not have internal completion for 1/4 bridge sensors. Therefore they are not needed by the DAQP-STG, DAQP-BRIDGE-A, DAQP-BRIDGEA, or MDAQ-SUB-STG-D, because these all support full bridge, half bridge and quarter bridge with internal completion for many bride wiring scenarios. However, these adapters to apply to Dewetron conditioners that lack 1/4 bridge completion, including the MDAQ-SUB-BRIDGE-D (which supports full and half bridge inputs only), as well as the inputs of the DEWE43, DEWE-101, and DEWE-3213 (those models support full bridge inputs only). Select the full bridge mode of the MDAQ-SUB-BRIDGE, and then plug in the completion adapter. This is less convenient than using a more capable signal conditioner, not only because of the external adapter, but because you cannot use the balance buttons in this mode. But it serves to adapt this less capable conditioner to handle 1/4 bridge sensors. 11-282| OWNER’s GUIDE OWNER’s GUIDE - Conditioners, HSI | 283 12 HSI Series Signal Conditioners There are several series of Dewetron signal conditioners that may be installed in your system in many possible combinations. This section covers the HSI series plugin modules. These are user-exchangeable modules, all of which have the highest bandwidth that we offer in a plug-in module, and robust signal isolation, protecting you and your measurements against ground loops and other typical measurement problems. HSI modules have the advantage of being “hot swappable,” meaning that they can be exchanged by the user any time, even with the system is powered on. This modularily also means that the DEWETRON system can be converted very quickly to handle different measuring requirements and applications - simply plug in the modules that you need, make sure their addresses are correct, and then you’re up and running in a matter of moments. DEWETRON HSI modules are small, multi-range ISOLATED signal conditioners, and hundreds of thousands of them are in use all around the world right now. HSI Series Modules HSI Module Connectors Front Panel Connector Accessible to the user. The connector type and pin assignment varies from module to module. Detailed pin assignment of each module is shown in the appropriate module description. Rear Connector Not user accessible. 9-pin male SUB-D, interface to the Dewetron System. HSI, DAQ, and PAD module rear panel 284| OWNER’s GUIDE General module specifications Module dimensions: 20 x 65 x 105 mm (0.79 x 2.56 x 4.13 in.) (W x H x D without front cover and connectors) Front cover: Environmental: Temp. range storage: Temp. range operating: Rel. humidity (MIL202): RFI susceptibility: 20 x 87 x 2 mm (0.79 x 3.43 x 0.08 in.) (W x H x D without connector) -30 °C to +85 °C (-22 °F to 185 °F) -5 °C to +60 °C (23 °F to 140 °F) 0 to 95 % at 60 °C, non-condensing ±0.5 % span error at 400 MHz, 5 W, 3 m All specifications within this manual are valid at 25 °C. All modules are produced according to ISO9001 and ISO14001. Common Information Calibration information All DEWETRON modules are calibrated at 25°C after a warmup time of 30 minutes and meet their specifications when leaving the factory. The time interval for recalibration depends on environmental conditions. Typically, the calibration should be checked once a year. Calibration certificates are available from DEWETRON as an option. DEWETRON offers several types: NIST traceable DEWETRON calibration certificate (USA CAL LAB only) ISO traceable DEWETRON certificate (European CAL LAB only) Calibration certificate according to ÖKD (equivalent to DKD) RS-232/485 interface HSI modules can be configured via RS-485 interface. DEWETRON instruments include an internal RS232/485 converter and interface. This converter allows communication with all DEWETRON signal conditioning modules. To communicate with the modules, the RS-232 interface must be set to the following parameters: baud rate: 9600 data bits: 8 parity: no parity stop bits: 1 handshake: not required OWNER’s GUIDE - Conditioners, HSI | 285 Adding HSI modules to your Dewtetron system: HSI modules can be plugged directly into DEWETRON models which have slots for DAQ/PAD/HSI series plug-in modules. Additional modules can be connected to most models by adding an external DEWE-30 or DEWE-50 series expansion chassis to the system. Typical HSI module configurations: Installing 8 modules directly into the DEWE-3210: Adding a DEWE-30-8 expansion rack, for accessing 16 total channels: Analog/ Power/ RS485 Adding a DEWE-30-8 expansion rack, plus another 16 slot DEWE-30-16 rack, for a total of 32 HSI modules: Analog/ RS485 Analog/ Power/ RS485 The DEWE-30-16 requires that an additional 16-ch A/D card be added into the DEWE-3210 mainframe! 286| OWNER’s GUIDE Addressing HSI modules Each HSI module must have a unique address (just like DAQP, PAD, and other modules). The address is stored inside the HSI module in non-volatile memory. Therefore, if you remove a HSI module from one system, where it was set to address 31, and plug it into a different Dewetron chassis, it will still report itself on the bus at address 31. This can cause a conflict if you already have a module at this address. In addition, it will be confusing to you when you hook up your signals to what you believe is HSI module at address 16, but the channels show up on address 31. Therefore, it is vitally important that you set the addresses of any DAQ, PAD, or HSI modules that you plug into your Dewetron system. -- There is no need to set the addresses of MDAQ modules, except when initially installed at the factory. There are essentially two ways to address your modules: FILL RACK PROCEDURE - this addresses all of your modules in sequence. This is what you should do if you have been changing more than one module around, to ensure that every module is at the appropriate and unique address. FILL ONE MODULE PROCEDURE - easier and faster, when you simply want to exchange one module. Let’s look at how to do each one of the above procedures: Fill Rack (all Modules) Procedure Within DS-7, go to the ACQUISITION MODE and select the SETUP screen, where you can see your list of modules. Now click on the top of the AMPLIFIER COLUMN and you will see this menu: Select the FILL RACK option, and the software will prompt you like this: OWNER’s GUIDE - Conditioners, HSI | 287 Follow the instruction to press the TOP black button on the module in the first slot, which is always SLOT 0 in the case of doing a FILL RACK, since you are starting at 0 and going all the way up, filling all modules. When you press this button on the module, the system will beep and prompt you to press the next module’s button, and so on. Continue all the way through until you have done the last module, then press CANCEL to complete and save your changes. If you get to the position where there is an empty module slot, or a non-programmable module from the old days in that slot, press the SKIP button to move past it to the next module. You can do this as many times as needed. When you’re done, the rack should be filled with all of the modules that are physically installed within this system, like this: FILL (or CLEAR) One Module Procedure FILL RACK is a great way to ensure that your modules are all addressed correctly, and we highly recommend it if you make several module exchanges at once. But there are times when you simply want to exchange one module with a different one, or perhaps to just remove a module. This is also quite easy once you know how. Within DEWESoft, go to the ACQUISITION MODE and select the SETUP screen, where you can see your list of modules. This time, instead of clicking on the top of the AMPLIFIER COLUMN, double-click the amplifier column for the one module that you want to add, delete, or exchange. When you do this, the software will give you a similar choice as before: And your choices are: 288| OWNER’s GUIDE If you have plugged a new module into this slot, choose FILL, then follow the prompts. If you change you mind and want to do a FILL RACK anyway, starting at slot 0, choose FILL FROM #0, then follow the prompts. If there is a module in this slot that you have removed, but it continues to show up in RED (because the software cannot really find it), choose CLEAR to remove it from the list. If you have clicked this by accident and want to cancel without making any changes, choose CANCEL Module Installation Trouble-shooting There may be times when you have trouble addressing your modules, for a variety of reasons. Here are some good tips for solving these issues: ⇒⇒ Problem: some or all modules are showing up in RED letters. Analysis: a module shown in RED letters on the setup screen tells you that the software cannot find this module. Or, it can mean that there is a conflict with another module, like when you plug two modules with the same address into the system at the same time and don’t do a FILL RACK or FILL (or CLEAR) one of them. A very rare condition might be that a module is defective and cannot communicate properly. -- Solution: the trusty FILL RACK is always a great and easy way to solve nearly all these issues. If the FILL RACK does not solve them, remove any modules shown in RED and add them back in one at a time, using the FILL ONE MODULE procedure. Fill one module at a time until the offending modules’ addresses have been resolved. ⇒⇒ Problem: you plug in a new module into a previously unused slot, but it does not show up. Analysis: more than likely it was already set to an address that you were using, and it has either taken another module’s address, or is conflicting with it. -- Solution: the trusty FILL RACK is always a great and easy way to solve nearly all these issues. If the FILL RACK does not solve them, remove any modules shown in RED and add them back in one at a time, using the FILL ONE MODULE procedure. Fill one module at a time until the offending modules’ addresses have been resolved. ⇒⇒ Problem: you want to use a very old PAD module which does not have the upper black button on it, so you don’t know how to address it Analysis: These modules have been out of production for a long time, but there are still some around, and they are still perfectly good modules. -- Solution: Start with the old PAD module in the slot, but NOT PRESSED IN!! Make sure the connector on the inside is not mated or making contact in any way. Now double click on the amplifier slot where you want to install this module. Select FILL when prompted. Then when the next prompt appears to press the black button OWNER’s GUIDE - Conditioners, HSI | 289 or push in the module... PUSH IN THE MODULE. The green LED on its front panel should light up, and it should show up on the list on your SETUP screen. ⇒⇒ Problem: some modules show up with the SERIAL NUMBERS in the amplifier column, and some do not. Analysis: There is nothing wrong here. With each Dewetron module there is a certain revision before which the serial number was not available for external query, so these modules will not show this information on the setup screen. Solution: N/A 290| OWNER’s GUIDE HSI-HV Isolated High Voltage module Input ranges: Bandwidth: Isolation: Input impedance: Protection: Signal connection: 7 ranges (±20 V to ±1400 V) 2 MHz 1.8 kVRMS line to line 1.4 kVRMS line to ground 10 MΩ 4 kV burst, surge Insulated banana jacks V HSI-HV Specifications Parameter HSI-HV Input ranges unipolar and bipolar: 20 V(1), 50 V(1), 100 V, 200 V, 400 V, 800 V, 1400 V Range Signal frequency Accuracy 20 V; 50 V DC ±0.05 % of reading ±60 mV 100 V to 1400 V DC 0.1Hz to 1kHz >1kHz to 10kHz >10kHz to 50kHz >50kHz to 100kHz >100kHz to 1MHz >1MHz to 2MHz ±0.05 % of reading ±0.05 % of range ±0.05 % of reading ±0.01 % of range ±0.1 % of reading ±0.05 % of range ±0.4 % of reading ±0.05 % of range ±(0.016*f) % of reading ±0.1 % of range ±(0.010*f) % of reading ±1 % of range ±(0.014*f) % of reading ±3 % of range f = signal frequency in kHz 1 year accuracy (2) Gain linearity: 0.05% Gain drift range: Typically 20 ppm/°C (max. 50 ppm/°C) Offset drift: 20 V to 100 V 200 V to 1400 V typical 0.5mV/°C typical 5ppm/°C max. 4mV/°C max. 20 ppm of Range/°C Long term stability: 100 ppm/sqrt (1000 hrs) Input resistance: 10 MΩ || 2.2 pF -3dB Bandwidth: 2 MHz Signal delay @ full bandwidth ~ 290 ns Filter selection: Push button or software Filter (low-pass): 100, 300, 1k, 3k, 10k, 30k, 100k, 300 kHz, 1 MHz, 2 MHz (3) Filter type: Bessel or Butterworth, 40 dB/decade Typical SFDR and SNR: 10 kHz bandwidth SFDR SNR 110 dB 91 dB 110 dB 95 dB 110 dB 95 dB 100 kHz bandwidth SFDRSNR 110 dB 82 dB 110 dB 92 dB 110 dB 95 dB Typical CMRR: >80 dB @ 50 Hz 70 dB @ 400 Hz 60 dB @ 1 kHz 48 dB @ 10 kHz Isolation voltage Line to Ground 1.4kVrms Line to Line 1.8kVrms 50 V: 200 V: 1400 V: 1 MHz bandwidth SFDR SNR 94 dB 76 dB 94 dB 82 dB 94 dB 82 dB 2 MHz bandwidth SFDR SNR 84 dB 73 dB 84 dB 77 dB 84 dB 77 dB OWNER’s GUIDE - Conditioners, HSI | 291 Parameter HSI-HV Protection: Surge (1.2 / 50) Burst (5 kHz) CAT III 600 CAT IV 300 ±4000 V ±4000 V Output voltage: ±5 V Output resistance: 10 Ω Output current maximum 35 mA CAUTION: do not exceed maximum output current! Output protection Short to ground for 10 sec. Power supply ±9 VDC ± 1% Power consumption 1.2 W Power On default settings Software programable RS485 interface for module control Yes Power supply Integrated temperature sensor TEDS support: N/A MSI support: N/A (1) 20 V and 50 V are auxiliary ranges and have a limited bandwidth. 20 V range typically 0.9 Mhz 50 V range typically 1.9 Mhz (2) Conditions for accuracy: Module temperature is calibration temperature ±5 °C; humidity is 30 to 90 RH; AC accuracy: the highest filter (2 Mhz) has to be activated. f = signal frequency in kHz. for the 2 year accuarcy multiply all % of range and % of reading values by 1.5. (3) 2 MHz filter: exclusively Butterworth 60 dB/decade. Please consider possible bandwidth limitation of further components in the measuring chain, e.g. A/D cards or signal conditioning mainframe Signal hook-up HSI-HV: The insulated banana jacks are the signal connection point. Use only mating cables which have molded insulated/safety type plugs. These plugs should be the kind which prevent you from coming into contact with high voltages or currents. ⇒⇒ Use only insulated cables and the appropriate mating plugs or connectors when using this module! ⇒⇒ Never handle cables when high voltage is applied! Connect your signal points before applying high voltage! ⇒⇒ Failure to observe safety protocols can result in equipment damage, and personal injury or even death! ⇒⇒ Always check that positive and negative lines are connected with the correct polarity on the DAQP-HV and DAQP-HV-S3 module, and at the signal source side. ⇒⇒ Use of red (+) and black (-) color coded cables is highly recommended. ⇒⇒ High voltages can be lethal! Observe all safety protocols at all times. 292| OWNER’s GUIDE HSI-LV Isolated Low Voltage Module Voltage input: 12 ranges (10 mV to 50 V) Current input: ±20 mA using DAQ-SHUNT-1 (option) ±5 A using DAQ-SHUNT-4 or DAQ-SHUNT-5 Bandwidth: 2 MHz Isolation: 1 kV RMS with banana jacks Additional signal input types using MSI interfaces: IEPE Constant current sensors 12 ranges (10 mV to 5 V) RTD Resistance Temperature Detector (Pt100 to Pt2000) 9 resistance ranges (8 to 4000 Ω); requires MSI-V-RTD CHARGE Charge up to 50000 pC requires MSI-V-CHA-50 V HSI-LV Specifications Parameter HSI-LV Input ranges ±10, ±20, ±50, ±100, ±200, ±500 mV and ±1, ±2.5, ±5, ±10, ±25, ±50 V Push button selectable ranges ±10 mV, ±50 mV, ±200 mV, ±1 V, ±5 V, ±10 V, ±50 V One year accuracy (1) Range Signal Frequency Accuracy 10 mV to 100 mV DC ±0.02 % of reading ±60 μV 2.5 V DC ±0.02 % of reading ±0.1 % of range 200 mV to 50 V DC ±0.02 % of reading ±0.05 % of range 10 mV to 100 mV 0.1 Hz to 10 kHz >10 kHz to 50 kHz >50 kHz to 100 kHz >100 kHz to 1 MHz >1 MHz to 2 MHz ±0.1 % of reading ±30 μV ±0.4 % of reading ±30 μV ±(0.016*f) % of reading ±0.1 % of range ±(0.010*f) % of reading ±1 % of range ±(0.014*f) % of reading ±3 % of range 200 mV to 50 V 0.1 Hz to 1 kHz >1 kHz to 10 kHz >10 kHz to 50 kHz >50 kHz to 100 kHz >100 kHz to 1 MHz >1 MHz to 2 MHz ±0.05 % of reading ±0.01 % of range ±0.1 % of reading ±0.05 % of range ±0.4 % of reading ±0.05 % of range ±(0.016*f) % of reading ±0.1 % of range ±(0.010*f) % of reading ±1 % of range ±(0.014*f) % of reading ±3 % of range 10 mV to 100 mV 200 mV to 50 V DC DC ±0.02 % of reading ±60 μV ±0.02 % of reading ±0.08 % of range Bipolar Unipolar Input coupling DC or AC software selectable (1.5 Hz standard, custom filters upon request, down to 0.01 Hz) Gain linearity Typically 0.01 %; max. 0.04 % of full scale Gain drift range Typically 10 ppm/°C (max. 30 ppm/°C) Offset drift: 10 mV to 200 mV: 500 mV to 50 V: Typically 3 μV/°C Typically 10 ppm of range/°C Long term stability: 100 ppm/sqrt (1000 hrs) Input resistance: 1 MΩ -3dB Bandwidth: 2 MHz Filter selection: Push button or software OWNER’s GUIDE - Conditioners, HSI | 293 Filter 100 Hz, 300 Hz, 1 kHz, 3 kHz, 10 kHz, 30 kHz, 100 kHz, 300 kHz, 1 MHz, 2 MHz (2) Filter type Bessel or Butterworth; 40 dB/decade Typical SFDR and SNR 20 mV 1V 50 V Typical CMRR 50 Hz 1 kHz 10 kHz 100 kHz 10 kHz bandwidth SFDRSNR 88 dB 78 dB 110 dB 98 dB 110 dB 98 dB 10 mV to 1 V range 130 dB 120 dB 95 dB 75 dB 10 kHz bandwidth SFDRSNR 88 dB 71 dB 110 dB 95 dB 110 dB 95 dB 1 MHz bandwidth SFDRSNR 77 dB 60 dB 93 dB 82 dB 94 dB 82 dB 2 MHz bandwidth SFDRSNR 76 dB 56 dB 84 dB 75 dB 85 dB 75 dB 2.5 V to 50 V range: 100 dB 75 dB 55 dB 25 dB Input overvoltage protection 350 VDC Isolation voltage 350 VDC (1 kVRMS with banana connectors) Sensor supply ±9 V (±1 %), 12 V (±5 %), 200 mA resettable fuse protected (3) Output voltage ±5 V Output resistance 10 Ω Maximum Output current 5 mA Output protection Short to ground for 10 sec. Power On default settings Software programable Power supply ±9 VDC ± 1% Power consumption 0.8 W without sensor supply RS-485 interface for module control Yes TEDS support Yes, compatible with TEDS chips DS2406, DS2430A, DS2432, DS2433, DS24313) MSI support MSI-V-ACC; MSI-V-RTD; MSI-V-CHA-50 (1) Conditions for accuracy: Module temperature is calibration temperature ±5 °C; humidity is 30 to 90 RH. AC accuracy: the highest filter (2 MHz) has to be activated. f = signal frequency in kHz. For the 2 year accuracy multiply all % of range and % of reading values by 1.5. (2) 2 MHz filter: exclusively for Butterworth 60 dB/decade - refer to filter specifications. Please consider possible bandwidth limitation of further components in the measuring chain, e.g. A/D card or signal conditioning mainframe. (3) Overall current should not exceed DEWE-30-xx maximum power. HSI-LV Signal Hook-up HSI-LV pin-outs With 9-pin DSUB (DB9) or LEMO (EGG.1B.307) HSI-V-B model with banana jacks DB9 Hot: IN+ Shield: IN- HSI-V-BNC model with BNC connector LEMO Description 1 7 TEDS 2 1 IN + 3 N/A 4 5 Reserved for custom sensor supplies GND (not isolated) 5 3 +9 V (200 mA max.) 6 6 +12 V (200 mA max.) IN - 7 2 Hot: IN+ 8 N/A Shield: IN- 9 4 Reserved for custom sensor supplies -9 V (200 mA max.) 294| OWNER’s GUIDE HSI-LV: Typical sensor connections Sensor with differential output, module powered Current measurement using external shunt Current loop-powered measurement with external shunt Sensor with common ground OWNER’s GUIDE - Conditioners, HSI | 295 HSI-LV Shunt Options There are several current shunts that are available for this module, which can handle currents up to 5A. For higher currents, please use a rated CLAMP or FLEX COIL or other current transformer which has a voltage output. Model Input Range Accuracy Description 100 mA 0.1% 50 Ω shunt adapter (1 W) Compatible with all Dewetron voltage modules and break-out boxes with banana jacks 100 mA 0.1% 50 Ω shunt adapter (1 W) (This is the resistor from the DAQ-SHUNT-1 option above - for user mounting/integration) 5A ±0.1% < 10 ppm 100 mΩ Shunt box Current input via 2x safety banana jacks Voltage output via 2x 0.3 meter cable with banana plugs 5A ±0.1% < 10 ppm 100 mΩ Shunt box Current input via 2x safety banana jacks Voltage output via 2x safety banana jacks DAQ-SHUNT-1 DAQ-SHUNT-1R DAQ-SHUNT-4 DAQ-SHUNT-5 296| OWNER’s GUIDE HSI-STG Isolated Universal Input Module Strain gauge, bridge sensors: Piezoresistive bridge: Voltage input: RTD: Resistance: Isolation: Signal input connection: ±0.1 to ±1000 mV/V (@ 5 VDC excitation) ±0.5 to ±10000 mV/mA (@ 1 mA excitation) ±500 μV to ±10 V Resistance Temperature Detector (Pt100 to Pt2000) 9 resistance ranges (8 to 4000 Ω) 25 mΩ to 100 kΩ 350 VDC 9-pin SUB-D connector (standard) or LEMO (optional) Additional signal input using MSI interfaces: IEPE Constant current powered sensors (accelerometers, mics); 12 ranges (±2.5 mV to 10 V); requires MSI-V-ACC THERMOCOUPLE Popular T/C types; requires MSI-BR-TH-J, -K, or -T CHARGE Charge sensors up to 50000 pC requires MSI-V-CH-50 VOLTAGE up to ±200 V requires MSI-BR-V-200 V HSI-STG specifications Parameter HSI-STG Gain: 0.5 to 10 000 Voltage Input ranges: Sensitivity @ 5 VDC excitation: ±0.5 , ±1, ±2.5, ±5, ±10, ±25, ±50, ±100, ±250, ±500 mV, ±1 V, ±2V, ±5 V,±10 V ±0.1 , ±0.2, ±0.5, ±1, ±2, ±5, ±10, ±20, ±50, ±100, ±200, ±400, ±1000 mV/V Resistance: 25 mΩ to 100 kΩ Input impedance: >100 MΩ (power off: 50 kΩ) Input noise: 3.5 nV * √Hz Voltage Input Accuracy: Excitation voltage: Excitation current: Gain drift Offset drift Linearity Accuracy Drift Current limit Protection Accuracy Drift Compliance voltage Output impedance ±0.05 % of reading ± 0.02 % of range ±10 μV typical 10 ppm/°K max. 20 ppm/°K typical 0.3 μV/°K + 10 ppm of range, max 2 μV/°K + 20 ppm of range typical 0.02 % 0, 0.25, 0.5, 1, 2.5, 5,10 and 12 VDC software programmable (16 Bit DAC) ±0.03 % ±1 mV ±10 ppm/K ±50 μV/K 100 mA Continuous short to ground 0.1, 0.2, 0.5, 1, 2, 5, 10 and 20mA software programmable (16 Bit DAC) 0.05% ±2μA 15ppm/°K 12V >1 MΩ Supported Sensors: 4- or 6-wire full bridge 3- or 5-wire 1⁄2 bridge with internal completion (software programmable) 3- or 4-wire 1⁄4 bridge with internal resistor for 120 and 350 Ω (software programmable)1) 4-wire full bridge with constant current excitation (piezoresistive bridge sensors) Potentiometric Resistance Resistance Temperature Detection: PT100 PT200 PT500 PT1000 Bridge resistance: 80 Ω to 10 kΩ @ ≤ 5 VDC excitation Shunt calibration: Two internal shunt resistors 59.88 kΩ and 175 kΩ Shunt and completion resistor accuracy: 0.05% ±15ppm/°K Automatic bridge balance: Input range 500μV to 1V: 2.5V to 5V: Bandwidth (-3dB): 2 MHz Filters (low pass): 10 Hz, 30 Hz, 100 Hz, 300 Hz, 1 kHz, 3 kHz, 10 kHz, 30 kHz, 100 kHz (±1.5 dB @ f0) Filter characteristics: 10Hz to 100Hz: 300kHz: ±200 % of Range ±40% of Range Butterworth or Bessel 40 dB/dec ( 2nd order) Bessel 60 dB/dec (3rd order) OWNER’s GUIDE - Conditioners, HSI | 297 Parameter HSI-STG Typical SNR @ 100 kHz [1 kHz] and 5 VDC excitation: 66 dB [84 dB] @ 1 mV/V 82 dB [100 dB] @ 50 mV/V Typical CMRR @ 0.1 mV/V [1 mV/V] and 5 VDC excitation: 160 dB [160 dB] @ DC 115 dB [110 dB] @ 400 Hz 110 dB [105 dB] @ 1 kHz Isolation ±350 VDC continuous (for input, excitation and TEDS interface) Common mode Voltage ±350 VDC input to housing Over voltage protection: ±50 VDC input (+) to input (-) Output voltage: ±5 V Output resistance: <1Ω Output current: Max. 5 mA; short to ground protected for 10 seconds RS-485 interface: Yes TEDS support: Yes, compatible with TEDS chips DS2406, DS2430A, DS2431, DS2432, DS2433 MSI support: MSI-BR-TH-x, MSI-BR-ACC, MSI-BR-V-200 ,MSI-BR-CH-50 Power supply voltage: ±9 VDC (±1 %) Power consumption: Typ. 1.7 W @ 350 Ω, 2.15 W @ 120 Ω (both full bridge @ 5 VDC excitation) Absolute max.: 3 W (maximum excitation @ maximum current) HSI-STG Pin-outs ⇒⇒ CAUTION: The sensor shield can be connected to either pin 4 (SUB-D version only) or the housing of the 9-pin SUB-D / 8-pin LEMO connector, depending on your application. 298| OWNER’s GUIDE HSI-STG-D Cables and Shielding To reduce the influence of electromagnetic disturbances, shielded twisted pair cables are recommended. Connect the shield to the isolated GND (Pin4) to get the best result. The twisted pairs for full bridge, half bridge, voltage and resistance mode are: Twisted pair 1 EXC+ PIN1 EXC- PIN8 Twisted pair 2 Sense+ PIN6 Sense- PIN3 Twisted pair 3 IN+ PIN2 IN- PIN7 Twisted pair 4 R+ PIN5 GND(isolated) PIN4 If TEDS is used also the shield could be used as GNDisolated For quarter bridge mode: Twisted pair 1 IN+ PIN2 Sense1 PIN3 Twisted pair 2 R+ PIN5 EXC- PIN8 HSI-STG Operation Notes Free variable gain and excitation The gain, excitation and offset values of this module are free programmable. So it is possible to normalize any physical sensor input signal to the ±5V output of the module. By using these settings as power on default, standalone solutions could be easily realized. Gain: from 0.5 to 10000. The module input ranges are based on predefined gain values. The module automatically chose the best gain combination of the internal amplifiers to keep the overall noise and drift as low as possible. Output offset: Could be programmed from the positive to the negative full scale range except on the input ranges above 1V. Due to internal structure here the offset could be set from +20 % to – 20 %. Excitation Voltage: The excitation voltage is programmable from 0 to 12 V in 185 μV steps. Setting the excitation to 0 V for example allows you to determine the noise of the sensor cabling. The sense terminals have to be connected to the excitation terminals all the time. Even if the remote sensing is not required. Excitation current: The current could be programmed from 0.1 mA to 20 mA in 0.3 μA steps. The maximum compliance voltage is 12 V. The compliance voltage is automatically balanced around the internal GND. This minimizes the common mode error. Power On Default function You can store the latest settings of the module in the internal EE-Prom memory. Once the module restarts, it comes up automatically with these setting. This is important for stand alone applications and for fail-safe reasons. Filter The Module has nine selectable low-pass filters from 10 Hz to 100 kHz. The filter characteristic can be set to Butterworth 2nd order or Bessel 2nd order. An additional fixed filter inside this module is a 3rd order Bessel filter with a guaranteed -3 dB bandwidth of 300 kHz. OWNER’s GUIDE - Conditioners, HSI | 299 HSI-STG Amplifier balance The amplifier balance allows eliminating automatically all internal amplifier offsets. It switches the differential amplifier inputs IN+ and IN- to the internal isolated GND reference point. Then the output offset of the module is automatically adjusted to zero for all ranges. This function takes up to 8 seconds. Automatically previous stored sensor offset values are cleared. Sensor Balance Typically every strain gage sensor has a certain offset. That comes from manufacturing tolerances or because of sensor mounting. By performing a bridge balance this sensor offset could be completely removed on the analog side up to 200 % of the actual range. This allows using the full dynamic of the AD-board instead of losing resolution because of digital offset shifting. Output offset and sensor balance may not exceed 200 % of range (20 % for ranges above 1 V). Internal Completion Resistors The DAQP-STG has an internal half bridge completion and two internal quarter bridge completions for 120 Ω and 350 Ω strain gages. The used high precision resistors with low temperature drift allow a long- time stable measurement of almost every strain gage type without using an external completion network. Internal Shunt With two internal shunt resistors (59.88 kΩ and 175 kΩ) and one spare socket for a customised shunt, the DAQP-STG has wide flexibility in case of shunt calibration. A jumper network gives the possibility to connect the internal shunts to either Sense+ Sense – IN+ or IN- to be compatible to existing sensor types and correction calculation methods. This technology is used to correct the complete measurement chain gain error from the sensor input to the digital signal output. It is based on the known ratio between the shunt resistor and the strain gage resistance. Short It switches the differential amplifier inputs IN+ and IN- from the input terminals to the internal isolated GND reference point. With this function the absolute sensor offset could be determined. CAL It applies a high precision internal reference signal with 80% of the full scale value to the module. For ranges above 1V the reference signal level is 20 % of range. Self Test The self test function is a software controlled procedure that checks in the first step the amplifier itself. In the second step a basic sensor check will be performed. This test is only available in DeweSoft if an AD-Card is installed. Part 1: Amplifier Test The amplifier offset is checked by using the Short function The 80% Cal signal is applied to the amplifier. The complete isolation amplifier including the AD-Card is checked by using this test signal. The self test circuit switches the amplifier input to the positive excitation voltage, so also the input amplifier is checked. Warning: if there is a short circuit on the excitation this test will fail. Part 2: Basic Sensor Test Bridge Sensor: It is checked if the supply current doesn’t exceed the maximum value, and if the excitation voltage is within the predefined value. 300| OWNER’s GUIDE HSI-STG Full bridge signal connection 6-wire and 4-wire sensor connection Voltage or Current excitation are allowed. Sense lines MUST be connected to the excitation also when 4-wire connection is used. 6-wire sensor connection: Sense+ is connected to EXC+ at the sensor 4-wire sensor connection: Sense+ is connected to EXC+ at the connector HSI-STG Half bridge signal connection 5-wire and 3-wire sensor connection, and potentiometric sensors 5-wire sensor connection: Sense+ is connected to EXC+ at the sensor 3-wire sensor connection: Sense+ is connected to EXC+ at the connector Voltage or Current excitation are allowed. Sense lines MUST be connected to the excitation also when 4-wire connection is used. A potentiometer can be seen similar to a half bridge sensor with ±500 mV/V sensitivity. Therefore potentiometric sensors can be measured with bridge amplifiers. The advantages of using the DAQP-STG for potentiometric measurements is by adjusting the offset and range, you can focus on a certain potentiometer position with higher resolution. OWNER’s GUIDE - Conditioners, HSI | 301 The scaling is ±500 mV/V equals ±50 % of potentiometer position. 1) ‘R+’ has to be connected only if shunt calibration is required, otherwise it can be left unconnected. HSI-STG Quarter bridge signal connection 3-wire sensor connection (Sense+ is connected to EXC+ at the sensor) ⇒⇒ Sense leads (SUB-D: pin 3 and 6 must be connected! -- The 3-wire quarter bridge is only able to compensate symmetrical wire resistance 4-wire sensor connection (Sense+ is connected to EXC+ at the sensor) In the quarter bridge 4-wire mode the HSI-STG internally adjusts its excitation so that on the gage the resistor terminates exactly on the half of the excitation voltage. All wire resistances are compensated. 302| OWNER’s GUIDE Resistance, RTD 2-wire and 4-wire For resistance and RTD mode, 4-wire connection is recommended (2-wire connection will not compensate wire resistance). Other measurement modes and hook-ups Voltage and microvolt measurement signal connection ⇒⇒ CAUTION: If the excitation is not used for sensor supply it has to be deactivated by setting it to 0 V. This will internally connect the IN- to the GNDisolated to improve the common mode rejection. Sensor with supply, and voltage output In the quarter bridge 4-wire mode the DAQP-STG internally adjusts its excitation so that on the gage the resistor terminates exactly on the half of the excitation voltage. All wire resistances are compensated. OWNER’s GUIDE - Conditioners, DAQ | 13-303 13 DAQ Series Signal Conditioners There are several series of Dewetron signal conditioners that may be installed in your system in many possible combinations. This section covers the DAQ series plugin modules. These are user-exchangeable modules, nearly all of which have robust signal isolation, protecting you and your measurements against ground loops and other typical measurement problems. DAQ modules have the advantage of being “hot swappable,” meaning that they can be exchanged by the user any time, even with the system is powered on. This modularily also means that the DEWETRON system can be converted very quickly to handle different measuring requirements and applications - simply plug in the modules that you need, make sure their addresses are correct, and then you’re up and running in a matter of moments. DEWETRON DAQ modules are small, multi-range ISOLATED signal conditioners, and hundreds of thousands of them are in use all around the world right now. DAQ Series Modules DAQ Module Connectors Front Panel Connector Accessible to the user. The connector type and pin assignment varies from module to module. Detailed pin assignment of each module is shown in the appropriate module description. Rear Connector Not user accessible. 9-pin male SUB-D, interface to the Dewetron System. HSI, DAQ, and PAD module rear panel 13-304| OWNER’s GUIDE Module Input type Ranges TEDS Bandwidth (BW) Filters (LP / HP) ISOLATION (ISO) Over-voltage Protection (OP) High Voltage Measurement DAQP-HV V High voltage ±20, ±50, ±100, ±200, ±400, ±800, ±1400 V N/A BW: 300 kHz LP: 10, 30, 100, 300 Hz 1, 3, 10, 30, 100, 300 kHz ISO: 1.8 kVrms (line-to-line) High voltage ±20, ±50, ±100, ±200, ±400, ±800, ±1400 V N/A BW: 700 kHz ISO: 1.8 kVrms (line-to-line) High voltage ±10, ±40, ±100, ±200, ±400, ±1000 V N/A BW: 20/30 kHz LP: 10, 100, Hz 1, 2, 20/30 kHz ISO: 1.5 kVrms N/A BW: 300 kHz LP: 10, 30, 100, 300 Hz 1, 3, 10, 30, 100, 300 kHz ISO: up to 1 kVrms (with banana jacks) OP: 350 VDC DAQP-HV-S3 V DAQP-DMM V Low/Medium Voltage & Current Measurement DAQP-LV V DAQP-V V Voltage, current with external shunt or current sensor ±10, ±20, ±50, ±100, ±200, ±500 mV ±1, ±2.5, ±5, ±10, ±25, ±50 V IEPE via MSIV-ACC ±10, ±20, ±50, ±100, ±200, ±500 mV ±1, ±2.5, ±5, ±10 V PT100, Pt200, Pt500, Pt1000, Pt2000 and resistance via MSIV-RTD -200 to 1000 C and 0 to 6.5 kΩ Voltage, current with external shunt or current sensor ±10, ±100 mV ±1, ±5, ±10, ±50 V N/A BW: 50 kHz LP: 10, 100 Hz 1, 10, 50 kHz ISO: up to 1 kVrms OP: ±500 VDC or 350 Vrms Current Note: 5Arms continuous ±0.1, ±0.3, ±1, ±3 A ±10 A peak, ±30 A peak max 5Arms continuous current N/A BW: 300 kHz LP: 10, 30, 100, 300 Hz 1, 3, 10, 30, 100, 300 kHz ISO: 1.4 kVrms Current Note: intended for 4-20 mA applications ±2, ±6, ±20 mA ±60 mA, ±200 mA, ±0.6A max 0.6 A N/A BW: 300 kHz LP: 10, 30, 100, 300 Hz 1, 3, 10, 30, 100, 300 kHz ISO: 1.4 kVrms DAQP-LA-SC DAQP-LA-B Bridge / Strain Gage Measurement OWNER’s GUIDE - Conditioners, DAQ | 13-305 Module DAQP-STG DAQP-BRIDGE-A DAQP-BRIDGE-B DAQP-CFB Input type Ranges Strain gages, bridge sensors, voltages Bridge: Voltage: Pot/Ωic sensors Resistance/Ωs Thermocouple via MSR-BR-TH series Full range of thermocouple type Strain gages, bridge sensors ±1, ±2, ±5, ±10, ±20, ±50 mV/V (@ 5 Vdc excitation) Pot/Ωic sensors 200 Ω to 10 kΩ Thermocouple via MSR-BR-TH series Full range of thermocouple type Strain gages, bridge sensors ±0.1, ±0.2, ±0.5, ±1, ±2, ±5, ±10, ±20, ±50, ±100 mV/V (@ 5 Vdc excitation) Pot/Ωic sensors 200 Ω to 10 kΩ Thermocouple via MSR-BR-TH series Full range of thermocouple type AC bridge, strain gage, carrier sensors Bridge: 0.1 to 1000 mV/V Inductive: 5 to 1000 mV/V TEDS Bandwidth (BW) Filters (LP / HP) ISOLATION (ISO) Over-voltage Protection (OP) BW: 300 kHz LP: 10, 30, 100, 300 Hz 1, 3, 10, 30, 100, 300 kHz ISO: 350 VDC OP: ±10 VDC N/A BW: 20 kHz LP: 10, 100 Hz 1, 5, 20 kHz ISO: 350 VDC OP: ±50 VDC Yes BW: 200 kHz LP: 10, 30, 100, 300 Hz 1, 3, 10, 30, 100, 200 kHz ISO: N/A OP: ±10 VDC N/A BW: dc to 2.3 kHz LP: 10, 30, 100, 300 Hz 1 kHz ISO: N/A OP: ±10 VDC Inductive/ LVDT sensors Voltage: 0.2 to 1000 mV/vrms IEPE sensors ±50, ±166, ±500 mV; ±1.66, ±5 V (Gain: 1, 3, 10, 30, 100) Yes BW: 0.5 Hz to 300 kHz LP: 1, 10, 100, 300 kHz HP: 0.5 Hz, 5 Hz N/A IEPE and charge sensors Note: selectable integration and double integration Charge: 5, 50, 500, 5000, 50000 pC IEPE: ±5, ±50, ±500 mV, ±5 V (0, 20, 40, 60 dB) N/A BW: 0.1 Hz to 50 kHz LP: 100 Hz; 1, 3, 10, 50 kHz HP: 0.1 Hz, 1 Hz, 10 Hz N/A Charge sensors Note: selectable time constant for static charge sensors ±100, ±500, ±2 000, ±10 000, ±40 000, ±200 000, ±1 000 000 pC N/A BW: 0.5 Hz to 100 kHz LP: 10, 30, 100, 300 Hz; 1, 3, 10, 30, 100 kHz HP: DC, 0.0001 Hz to 0.5 Hz ISO: 350 VDC Charge / IEPE Measurement DAQP-ACC-A DAQP-CHARGE-A DAQP-CHARGE-B Temperature and Universal Measurement 13-306| OWNER’s GUIDE Module Input type DAQP-THERM Thermocouple (universal) K, J, T, R, S, N, E, B, L, C, U freely programmable within the maximum range of the selected thermocouple type, internal linearization, internal CJC Thermocouple (universal) K, J, T, R, S, N, E, B, L, C, U type, internal linearization, freely programmable range, internal CJC RTD Pt100, Pt200, Pt500, Pt1000 and Pt2000 sensors, programmable range (2-wire and 4-wire only) TEDS Bandwidth (BW) Filters (LP / HP) ISOLATION (ISO) Over-voltage Protection (OP) N/A BW: 3 kHz LP: 3Hz, 10 Hz, 30 Hz, 100 Hz, 300 Hz, 1 kHz Butterworth or Bessel; 2nd, 4th, 6th, or 8th order (programmable) ISO: ±1000 Vrms continuous Yes BW: 3 kHz LP: 3Hz, 10 Hz, 30 Hz, 100 Hz, 300 Hz, 1 kHz Butterworth or Bessel; 2nd, 4th, 6th, or 8th order programmable ISO: 1000 Vrms continuous (for input, excitation and TEDS interface) Frequency to voltage 100, 1k, 5k, 20k, 100k and 200 kHz ranges; Trigger level range 0 to 130 V, Additional TTL output (isolated pulse output of input signal) N/A BW: 200 kHz Selectable input and output filters (range-dependent) ISO: 350 Vrms Analog output 1:1 output module, from 0 to ±10 V; Accuracy ±0.05 % Connector choices: banana, BNC, or 9-pin DSUB connector N/A BW: 400 Hz ISO: CMV output to input, continuous: 1500 VRMS max DAQP-MULTI V Ranges Voltage 10 ranges from ±5 mV to ± 5V Resistance freely programmable range from 1 Ω to 1 MΩ Bridge (constant current) 4-wire full bridge sensors, 13 ranges from ±0.5 to 5000 mV/mA Frequency to Voltage Measurement DAQP-FREQ-A Output modules DAQN-V-OUT OUT OWNER’s GUIDE - Conditioners, DAQ | 13-307 General module specifications Module dimensions: 20 x 65 x 105 mm (0.79 x 2.56 x 4.13 in.) (W x H x D without front cover and connectors) Front cover: Environmental: Temp. range storage: Temp. range operating: Rel. humidity (MIL202): RFI susceptibility: 20 x 87 x 2 mm (0.79 x 3.43 x 0.08 in.) (W x H x D without connector) -30 °C to +85 °C (-22 °F to 185 °F) -5 °C to +60 °C (23 °F to 140 °F) 0 to 95 % at 60 °C, non-condensing ±0.5 % span error at 400 MHz, 5 W, 3 m All specifications within this manual are valid at 25 °C. All modules are produced according to ISO9001 and ISO14001. Common Information Calibration information All DEWETRON modules are calibrated at 25°C after a warmup time of 30 minutes and meet their specifications when leaving the factory. The time interval for recalibration depends on environmental conditions. Typically, the calibration should be checked once a year. Calibration certificates are available from DEWETRON as an option. DEWETRON offers several types: NIST traceable DEWETRON calibration certificate (USA CAL LAB only) ISO traceable DEWETRON certificate (European CAL LAB only) Calibration certificate according to ÖKD (equivalent to DKD) RS-232/485 interface DAQP modules can be configured via RS-485 interface. DEWETRON instruments include an internal RS232/485 converter and interface. This converter allows communication with all DEWETRON signal conditioning modules. To communicate with the modules, the RS-232 interface must be set to the following parameters: baud rate: 9600 data bits: 8 parity: no parity stop bits: 1 handshake: not required 13-308| OWNER’s GUIDE Adding DAQ modules to your Dewtetron system: DAQ modules can be plugged directly into DEWETRON models which have slots for DAQ/PAD/HSI series plug-in modules. Additional modules can be connected to most models by adding an external DEWE-30 or DEWE-50 series expansion chassis to the system. Typical DAQ module configurations: Installing 8 modules directly into the DEWE-3210: Adding a DEWE-30-8 expansion rack, for accessing 16 total channels: Analog/ Power/ RS485 Adding a DEWE-30-8 expansion rack, plus another 16 slot DEWE-30-16 rack, for a total of 32 DAQ modules: Analog/ RS485 Analog/ Power/ RS485 The DEWE-30-16 requires that an additional 16-ch A/D card be added into the DEWE-3210 mainframe! OWNER’s GUIDE - Conditioners, DAQ | 13-309 Addressing DAQ modules Each DAQ module must have a unique address (just like HSI, PAD, and other modules). The address is stored inside the DAQ module in non-volatile memory. Therefore, if you remove a DAQ module from one system, where it was set to address 31, and plug it into a different Dewetron chassis, it will still report itself on the bus at address 31. This can cause a conflict if you already have a module at this address. In addition, it will be confusing to you when you hook up your signals to what you believe is DAQ module at address 16, but the channels show up on address 31. Therefore, it is vitally important that you set the addresses of any DAQ, PAD, or HSI modules that you plug into your Dewetron system. -- There is no need to set the addresses of MDAQ modules, except when initially installed at the factory. There are essentially two ways to address your modules: FILL RACK PROCEDURE - this addresses all of your modules in sequence. This is what you should do if you have been changing more than one module around, to ensure that every module is at the appropriate and unique address. FILL ONE MODULE PROCEDURE - easier and faster, when you simply want to exchange one module. Let’s look at how to do each one of the above procedures: Fill Rack (all Modules) Procedure Within DS-7, go to the ACQUISITION MODE and select the SETUP screen, where you can see your list of modules. Now click on the top of the AMPLIFIER COLUMN and you will see this menu: Select the FILL RACK option, and the software will prompt you like this: 13-310| OWNER’s GUIDE Follow the instruction to press the TOP black button on the module in the first slot, which is always SLOT 0 in the case of doing a FILL RACK, since you are starting at 0 and going all the way up, filling all modules. When you press this button on the module, the system will beep and prompt you to press the next module’s button, and so on. Continue all the way through until you have done the last module, then press CANCEL to complete and save your changes. If you get to the position where there is an empty module slot, or a non-programmable module from the old days in that slot, press the SKIP button to move past it to the next module. You can do this as many times as needed. When you’re done, the rack should be filled with all of the modules that are physically installed within this system, like this: FILL (or CLEAR) One Module Procedure FILL RACK is a great way to ensure that your modules are all addressed correctly, and we highly recommend it if you make several module exchanges at once. But there are times when you simply want to exchange one module with a different one, or perhaps to just remove a module. This is also quite easy once you know how. Within DEWESoft, go to the ACQUISITION MODE and select the SETUP screen, where you can see your list of modules. This time, instead of clicking on the top of the AMPLIFIER COLUMN, double-click the amplifier column for the one module that you want to add, delete, or exchange. When you do this, the software will give you a similar choice as before: And your choices are: OWNER’s GUIDE - Conditioners, DAQ | 13-311 If you have plugged a new module into this slot, choose FILL, then follow the prompts. If you change you mind and want to do a FILL RACK anyway, starting at slot 0, choose FILL FROM #0, then follow the prompts. If there is a module in this slot that you have removed, but it continues to show up in RED (because the software cannot really find it), choose CLEAR to remove it from the list. If you have clicked this by accident and want to cancel without making any changes, choose CANCEL Module Installation Trouble-shooting There may be times when you have trouble addressing your modules, for a variety of reasons. Here are some good tips for solving these issues: ⇒⇒ Problem: some or all modules are showing up in RED letters. Analysis: a module shown in RED letters on the setup screen tells you that the software cannot find this module. Or, it can mean that there is a conflict with another module, like when you plug two modules with the same address into the system at the same time and don’t do a FILL RACK or FILL (or CLEAR) one of them. A very rare condition might be that a module is defective and cannot communicate properly. -- Solution: the trusty FILL RACK is always a great and easy way to solve nearly all these issues. If the FILL RACK does not solve them, remove any modules shown in RED and add them back in one at a time, using the FILL ONE MODULE procedure. Fill one module at a time until the offending modules’ addresses have been resolved. ⇒⇒ Problem: you plug in a new module into a previously unused slot, but it does not show up. Analysis: more than likely it was already set to an address that you were using, and it has either taken another module’s address, or is conflicting with it. -- Solution: the trusty FILL RACK is always a great and easy way to solve nearly all these issues. If the FILL RACK does not solve them, remove any modules shown in RED and add them back in one at a time, using the FILL ONE MODULE procedure. Fill one module at a time until the offending modules’ addresses have been resolved. ⇒⇒ Problem: you want to use a very old PAD module which does not have the upper black button on it, so you don’t know how to address it Analysis: These modules have been out of production for a long time, but there are still some around, and they are still perfectly good modules. -- Solution: Start with the old PAD module in the slot, but NOT PRESSED IN!! Make sure the connector on the inside is not mated or making contact in any way. Now double click on the amplifier slot where you want to install this module. Select FILL when prompted. Then when the next prompt appears to press the black button 13-312| OWNER’s GUIDE or push in the module... PUSH IN THE MODULE. The green LED on its front panel should light up, and it should show up on the list on your SETUP screen. ⇒⇒ Problem: some modules show up with the SERIAL NUMBERS in the amplifier column, and some do not. Analysis: There is nothing wrong here. With each Dewetron module there is a certain revision before which the serial number was not available for external query, so these modules will not show this information on the setup screen. Solution: N/A OWNER’s GUIDE - Conditioners, DAQ | 13-313 DAQP-HV (and -S3) Isolated High Voltage module (300/700 kHz) Input ranges: Bandwidth: Isolation: Signal connection: 7 ranges (±20 V to ±1400 V) 300 kHz (version DAQP-HV-S3: 700 kHz) 1.8 kVRMS line to line 1.4 kVRMS line to ground Banana sockets (S3 = Screw terminals) V DAQP-HV Specifications Parameter DAQP-HV Input ranges unipolar and bipolar: 20 V, 50 V, 100 V, 200 V, 400 V, 800 V, 1400 V DC accuracy: 20 V and 50 V 100 V to 1400 V ±0.05 % of reading ±40mV ±0.05 % of reading ±0.05 % of range Gain linearity: 0.03% Gain drift range: Typically 20 ppm/°K (max. 50 ppm/°K) Offset drift: 20 V to 100 V 200 V to 1400 V typical 0.5mV/°K typical 5ppm/°K max. 4mV/°K max. 20 ppm of Range/°K Long term stability: 100 ppm/sqrt (1000 hrs) Input resistance: 10 MΩ -3dB Bandwidth: 300 kHz Filter selection: Push button or software Filter (lowpass): 10, 30, 100, 300, 1k, 3k, 10k, 30k, 100k, 300 kHz Filter type: Bessel or Butterworth 40 dB/decade Typical SFDR and SNR: 300 kHz SFDR SNR 98 76 dB 98 84 dB 98 86 dB 50 V: 200 V: 1400 V: Typical CMRR: >80 dB @ 50 Hz 70 dB @ 400 Hz 60 dB @ 1 kHz 48 dB @ 10 kHz Isolation voltage Line to Ground 1.4kVrms Line to Line 1.8kVrms Protection: Surge (1.2/50) Burst(5kHz) CAT III 600 CAT IV 300 ±4000V ±4000V Output voltage: ±5 V Output resistance: <10 Ω Output current: 5 mA Output protection: Short to ground for 10 sec. Power supply: ±9 VDC ± 1% Power consumption: 0.7 W 100 kHz SFDR SNR 101 81 dB 101 89 dB 102 91 dB 1) 10 kHz SFDR 108 108 107 SNR 90 dB 91 dB 92 dB 13-314| OWNER’s GUIDE Parameter DAQP-HV Power On default settings: Software programable RS485 interface for module control: Yes TEDS support: N/A MSI support: N/A 1) The 300 kHz filter setting applies only to the Bessell filter type Signal hook-up DAQP-HV: The insulated banana jacks are the signal connection point. Use only mating cables which have molded insulated/safety type plugs. These plugs should be the kind which prevent you from coming into contact with high voltages or currents. DAQP-HV-S3: The insulated screw terminal panels are the signal connection point. Always make your connections before applying voltage to them. ⇒⇒ Use only insulated cables and the appropriate mating plugs or connectors when using this module! ⇒⇒ Never handle cables when high voltage is applied! Connect your signal points before applying high voltage! ⇒⇒ Failure to observe safety protocols can result in equipment damage, and personal injury or even death! ⇒⇒ Always check that positive and negative lines are connected with the correct polarity on the DAQP-HV and DAQP-HV-S3 module, and at the signal source side. ⇒⇒ Use of red (+) and black (-) color coded cables is highly recommended. ⇒⇒ High voltages can be lethal! Observe all safety protocols at all times. OWNER’s GUIDE - Conditioners, DAQ | 13-315 DAQP-DMM Isolated High Voltage Module (20/30 kHz) Voltage input: Bandwidth: Isolation: Signal input: 6 ranges (±10 V to ±1000 V) 30 kHz maximum 1500 VRMS Insulated banana jacks V DAQP-DMM Specifications Parameter DAQP-DMM Input ranges: ±10, ±40, ±100, ±200, ±400, ±1000 V Range selection: Pushbutton or software command DC accuracy: 0.1 % of reading ±0.1 % of range Gain linearity: Better than ±0.03 % Gain drift range: Typ. 20 ppm/°K, max. 40 ppm/°K Input resistance: 10 MΩ (±0.1 %) Bandwidth (-3 dB ±1.5 dB @ f0) 10 V to 40 V range 100 V to 200 V range 400 V to 1000 V range Typical 20 kHz Typical 25 kHz 30 kHz Filter selection: Pushbutton or software command Filter: 10 Hz, 100 Hz, 1 kHz, 3 kHz (±1.5 dB @ f0) Filter characteristics @ 0.01, 0.1, 1, 3 kHz @ 30 kHz Butterworth 40 dB / decade (12 dB / octave) 100 dB / decade (30 dB / octave) Typ. SNR @ max. bandwidth 10 V range 100 V range 1000 V range 60 dB 76 dB 81 dB Typical CMRR: 73 dB @ 0 Hz 70 dB @ 50 Hz 57 dB @ 400 Hz Isolation voltage: 1.5 kVRMS Output voltage: ±5 V Output resistance: <10 Ω Output current: 5 mA max. Output protection: Continuous short to ground Power supply voltage: ±9 VDC ± 1% Power consumption: 0.65 W typical RS-485 interface for module control: Yes TEDS support: N/A MSI support: N/A 13-316| OWNER’s GUIDE Signal hook-up DAQP-DMM: The insulated banana jacks are the signal connection point. Use only mating cables which have molded insulated/safety type plugs. These plugs should be the kind which prevent you from coming into contact with high voltages or currents. ⇒⇒ Use only insulated cables and the appropriate mating plugs or connectors when using this module! ⇒⇒ Never handle cables when high voltage is applied! Connect your signal points before applying high voltage! ⇒⇒ Failure to observe safety protocols can result in equipment damage, and personal injury or even death! ⇒⇒ Always check that positive and negative lines are connected with the correct polarity on the DAQP-DMM mod- ule, and at the signal source side. ⇒⇒ Use of red (+) and black (-) color coded cables is highly recommended. ⇒⇒ High voltages can be lethal! Observe all safety protocols at all times. OWNER’s GUIDE - Conditioners, DAQ | 13-317 DAQP-LV Isolated Low Voltage Module (300 kHz) Voltage input: 12 ranges (10 mV to 50 V) Current input: ±20 mA using DAQ-SHUNT-1 (option) ±5 A using DAQ-SHUNT-4 or DAQ-SHUNT-5 Bandwidth: 300 kHz Isolation: 350 VDC (1 kVRMS with banana connector) Additional signal input types using MSI interfaces: IEPE Constant current powered sensors (accels,mics); 12 ranges (10 mV to 5 V); requires MSI-V-ACC RTD Resistance Temperature Detector (Pt100 to Pt2000) 9 resistance ranges (8 to 4000 Ω); requires MSI-V-RTD CHARGE Charge up to 50000 pC requires MSI-V-CHA-50 V DAQP-LV Specifications Parameter DAQP-LV Input ranges unipolar and bipolar: 10 mV, 20 mV, 50 mV, 100 mV, 200 mV, 500 mV, 1 V, 2.5 V, 5 V, 10 V, 25 V, 50 V Push button selectable ranges: 10 mV, 50 mV, 200 mV, 1 V, 5 V, 10 V, 50 V DC accuracy: Bipolar: Unipolar: Range 10 mV to 50 mV 100 mV to 50 V 10 mV to 50 mV 100 mV to 50 V Accuracy ±0.02 % of reading ±40 μV ±0.02 % of reading ±0.05 % of range ±0.04 % of reading ±40 μV ±0.04 % of reading ±0.05 % of range Input coupling: DC or AC software selectable (1.5 Hz standard, cust.on request down to 0.01 Hz) Gain linearity: 0.01 % of full scale Gain drift range: Typically 10 ppm/°K (max. 20 ppm/°K) Offset drift: 10 mV to 200 mV: 500 mV to 50 V: Uni- and bipolar 3 μV/°K 10 ppm of Range/°K Long term stability: 100 ppm/sqrt (1000 hrs) Input resistance: 1 MΩ -3dB Bandwidth: 300 kHz Filter selection: Push button or software Filter: 10, 30, 100, 300, 1k, 3k, 10k, 30k, 100k, 300 kHz 1) Filter type: Bessel or Butterworth 40 dB/decade Typical SFDR and SNR: 300kHz bandwidth SFDR SNR 100 dB 72 dB 102 dB 82 dB 102 dB 82 dB 100 kHz bandwidth SFDR SNR 98 dB 76 dB 99 dB 93 dB 99 dB 93 dB Typical CMRR: 10 mV to 1 V range: >100 dB @ 50 Hz >100 dB @ 1 kHz 83 dB @ 10 kHz 2.5 V to 50 V range: 90 dB @ 50 Hz 65 dB @ 1 kHz 55 dB @ 10 kHz Input overvoltage protection: 350 VDC Isolation voltage: 350 VDC (1 kVRMS with banana connector) Sensor supply: ±9 V (±1 %), 12 V (±5 %), 200mA resettable fuse protected 2) Output voltage: ±5 V Output resistance: <10 Ω 20 mV 1V 50 V 10 kHz bandwidth SFDR SNR 97 dB 84 dB 97 dB 96 dB 97 dB 96 dB 13-318| OWNER’s GUIDE Maximum Output current: 5 mA Output protection: Short to ground for 10 sec. Power On default settings Software programable Power supply: ±9 VDC ± 1% Power consumption: 0.8 W without sensor supply RS-485 interface for module control: Yes TEDS support: Yes, compatible with TEDS chips DS2406, DS2430A, DS2432, DS2433, DS24313) MSI support: MSI-V-ACC; MSI-V-RTD; MSI-V-CHA-50 (1) 300 kHz exclusively for Bessel filter characteristic (2) Overall current should not exceed Dewetron mainframe’s maximum power. (3) TEDS is only available on the -D and -L versions DAQP-LV-D pin-outs Standard 9-pin DSUB connector DAQP-LV Signal Hook-up DAQP-V-B model with banana jacks Hot: IN+ Shield: INDAQP-V-BNC model with BNC connector Hot: IN+ Pin Description 1 TEDS 2 IN + 3 Reserved for custom sensor supplies 4 GND (not isolated) 5 +9 V (200 mA max.) 6 +12 V (200 mA max.) 7 IN - 8 Reserved for custom sensor supplies 9 -9 V (200 mA max.) Shield: IN- DAQP-LV-L pin-outs LEMO EGG.1B.307 DAQP-V-D model with DSUB connector See table > DAQP-V-L model with LEMO connector Pin Description 1 IN + 2 IN - 3 +9 V (200 mA max.) 4 -9 V (200 mA max.) 5 GND 6 +12 V (200 mA max.) 7 TEDS ⇒⇒ IMPORTANT: Always observe all safety protocols when handling live voltages! ⇒⇒ Use pins 4, 5 and 9 only as NON-ISOLATED sensor supply voltages ⇒⇒ If signals above 60 V may appear, don’t use the metal housing of SUBD connector OWNER’s GUIDE - Conditioners, DAQ | 13-319 DAQP-LV: Typical sensor connections Sensor with differential output, module powered Current measurement using external shunt Current loop-powered measurement with external shunt Sensor with common ground 13-320| OWNER’s GUIDE DAQP-LV: Shunt Options There are several current shunts that are available for this module, which can handle currents up to 5A. For higher currents, please use a rated CLAMP or FLEX COIL or other current transformer which has a voltage output. Model Input Range Accuracy Description 100 mA 0.1% 50 Ω shunt adapter (1 W) Compatible with all Dewetron voltage modules and break-out boxes with banana jacks 100 mA 0.1% 50 Ω shunt adapter (1 W) (This is the resistor from the DAQ-SHUNT-1 option above - for user mounting/integration) 5A ±0.1% < 10 ppm 100 mΩ Shunt box Current input via 2x safety banana jacks Voltage output via 2x 0.3 meter cable with banana plugs 5A ±0.1% < 10 ppm 100 mΩ Shunt box Current input via 2x safety banana jacks Voltage output via 2x safety banana jacks DAQ-SHUNT-1 DAQ-SHUNT-1R DAQ-SHUNT-4 DAQ-SHUNT-5 OWNER’s GUIDE - Conditioners, DAQ | 13-321 DAQP-V Isolated Low Voltage Module (50 kHz) Input ranges: Bandwidth: Isolation: Signal connectors: 6 ranges from ±10 mV to ±50 V 50 kHz 350 VDC (1 kVRMS with banana connector) -B: Safety banana sockets -BNC: BNC connector -D: 9-pin SUB-D connector -L: 8-pin LEMO connector (option) V DAQP-V Specifications Parameter DAQP-V Input ranges: ±10, ±100 mV, ±1, ±5, ±10, ±50 V Range Selection: Push button or software DC accuracy: 10 mV range 100 mV range 1 V to 50 V ranges 0.05 % of reading ±40 μV 0.05 % of reading ±100 μV 0.05 % of reading ±0.05 % of range Input coupling: DC fixed Gain linearity: Better than ±0.03% Gain drift range: Typically 20 ppm/°K (max. 40 ppm/°K) Input resistance: 1 MΩ (±0.1 %) Bandwidth (-3 dB): 50 kHz (±1.5 dB @ f0) Filters (low-pass): 10 Hz, 100 Hz, 1 kHz, 10 kHz (±1.5 dB @ f0) Filter selection: Pushbutton or software command Filter characteristics: @ 0.01, 0.1, 1, 10 kHz @ 50 kHz Typ. SNR @ max. bandwidth 10 mV range 10 V range 50 V range Butterworth 40 dB / decade (12 dB / octave) 100 dB / decade (30 dB / octave) 61 dB 78 dB 78 dB Typical CMRR: 90 dB @ 0 Hz 78 dB @ 50 Hz 60 dB @ 400 Hz Isolation voltage: 350 VDC (1 kVRMS with banana connector) Sensor supply: ±9 V (±1 %), 12 V (±5 %) Output voltage: ±5 V Output resistance: <10 Ω maximum Output current: 5 mA Output protection: Continuous short to ground Power supply: ±9 VDC ± 1% Power consumption: 0.85 W typical without sensor supply RS-485 interface: Yes TEDS: N/A Supported TEDS chips: N/A Supported MSI N/A 13-322| OWNER’s GUIDE DAQP-V Signal Hook-up DAQP-V-B model with banana jacks DAQP-V-D pin-outs Standard 9-pin DSUB connector DAQP-V-BNC model with BNC connector Hot: IN+ Shield: IN- Pin Description 1 Not connected 2 IN + 3 Not connected 4 GND (not isolated) 5 reserved for +9 V sensor supply 6 +12 V sensor supply (200 mA max.) 7 IN - 8 Not connected 9 reserved for -9 V sensor supply DAQP-V-D model with DSUB connector DAQP-V-L pin-outs LEMO EGG.1B.307 DAQP-V-L model with LEMO connector Pin Description 1 IN + 2 IN - 3 +9 V sensor supply 4 -9 V sensor supply 5 GND 6 +12 V sensor supply 7 not connected ⇒⇒ IMPORTANT: Always observe all safety protocols when handling live voltages! ⇒⇒ Use pins 4, 5 and 9 only as NON-ISOLATED sensor supply voltages ⇒⇒ If signals above 60 V may appear, don’t use the metal housing of SUBD connector -- For sensor hook-up guidance and shunt resistor information, please refer to the DAQP-LV module (except that TEDS is not available on the DAQP-V module) OWNER’s GUIDE - Conditioners, DAQ | 13-323 DAQP-LA and LA-SC Isolated Current Module Input ranges: Bandwidth: Isolation: Signal connection: DAQP-LA-SC: 0.1 A, 0.3 A, 1 A, 3 A, 10 A peak, 30 A peak DAQP-LA-B-S1: 2 mA, 6 mA, 20 mA, 60 mA, 200 mA, 0.6 A 300 kHz 1.4 kVRMS Input to ground -SC: screw terminals -B-S1: insultated banana jacks DAQP-LA Specifications Parameter DAQP-LA-SC DAQP-LA-B-S1 Input resistance (Shunt): 0.1 Ω 5Ω Shunt inductance: <10 nH <10 nH Input ranges: 0.1 A, 0.3 A, 1 A, 3 A, 10 A peak, 30 A peak 2 mA, 6 mA, 20 mA, 60 mA, 200 mA, 0.6 A Continuous current: max. 5 Arms max. 0.6 A Peak current: 30 A max. 10 ms; 10 A max. 100 ms DC accuracy: 100 mA and 300 mA 1 A to 30 A 2 mA and 6 mA 20 mA and 600 mA Offset drift 100 mA and 300 mA 1 A to 30 A 2 mA and 6 mA 20 mA to 600 mA ±0.05 % of reading ±200 μA ±0.05 % of reading ±0.05 % of range ±0.05 % of reading ±4 μA ±0.05 % of reading ±0.05 % of range typ. max. 1220μA/°K 20 40 ppm of Range/°K typ . 0.24 20 Gain linearity: 0.03 % Gain drift range: Typically 20 ppm/°K (max. 50 ppm/°K) Long term stability: 100 ppm/sqrt (1000 hrs) -3dB Bandwidth: 300 kHz Filter selection: Push button or software Filter: 10, 30, 100, 300, 1k, 3k, 10k, 30k, 100k, 300 kHz 1) Filter type: Bessel or Butterworth 40 dB/decade Typical SFDR and SNR: 300kHz bandwidth SFDR SNR 95 dB 64 dB 102 dB 82 dB 104 dB 89 dB 100 mA 1A 30 A 100 kHz bandwidth SFDR SNR 95 dB 67dB 103 dB 85 dB 103 dB 89 dB Protection: CAT III 150 V CAT IV 100 V Isolation voltage: Input to Ground 1.4 kVRMS Output voltage: ±5 V Output resistance: <10 Ω Output current: 5 mA Output protection: Short to ground for 10 sec. max. 0.4 40 10 kHz bandwidth SFDR SNR 95 dB 77 dB 113 dB 90 dB 117 dB 91 dB μA/°K ppm of Range/°K 13-324| OWNER’s GUIDE Power On default settings Software programable Power supply: ±9 VDC ± 1% Power consumption: 0.7 W RS-485 interface: Yes TEDS: N/A Supported TEDS chips: N/A Supported MSI N/A (1) 300 kHz exclusively for Bessel filter DAQP-LA Signal Hook-up DAQP-LA-B-xx model with banana jacks DAQP-LA-SC model with screw terminal connectors Hot: IN+ Shield: IN- ⇒⇒ IMPORTANT: Always observe all safety protocols when handling live voltages! OWNER’s GUIDE - Conditioners, DAQ | 13-325 DAQP-STG Isolated Universal Input Module Strain gauge, bridge sensors: Piezoresistive bridge: Voltage input: RTD: Resistance: Isolation: Signal input connection: ±0.1 to ±1000 mV/V (@ 5 VDC excitation) ±0.5 to ±10000 mV/mA (@ 1 mA excitation) ±500 μV to ±10 V Resistance Temperature Detector (Pt100 to Pt2000) 9 resistance ranges (8 to 4000 Ω) 25 mΩ to 100 kΩ 350 VDC 9-pin SUB-D connector (standard) or LEMO (optional) Additional signal input using MSI interfaces: IEPE Constant current powered sensors (accelerometers, mics); 12 ranges (±2.5 mV to 10 V); requires MSI-V-ACC THERMOCOUPLE Popular T/C types; requires MSI-BR-TH-J, -K, or -T CHARGE Charge sensors up to 50000 pC requires MSI-V-CH-50 VOLTAGE up to ±200 V requires MSI-BR-V-200 V DAQP-STG specifications Parameter DAQP-STG Gain: 0.5 to 10 000 Voltage Input ranges: Sensitivity @ 5 VDC excitation: ±0.5 , ±1, ±2.5, ±5, ±10, ±25, ±50, ±100, ±250, ±500 mV, ±1 V, ±2V, ±5 V,±10 V ±0.1 , ±0.2, ±0.5, ±1, ±2, ±5, ±10, ±20, ±50, ±100, ±200, ±400, ±1000 mV/V Resistance: 25 mΩ to 100 kΩ Input impedance: >100 MΩ (power off: 50 kΩ) Input noise: 3.5 nV * √Hz Voltage Input Accuracy: Excitation voltage: Excitation current: Gain drift Offset drift Linearity Accuracy Drift Current limit Protection Accuracy Drift Compliance voltage Output impedance ±0.05 % of reading ± 0.02 % of range ±10 μV typical 10 ppm/°K max. 20 ppm/°K typical 0.3 μV/°K + 10 ppm of range, max 2 μV/°K + 20 ppm of range typical 0.02 % 0, 0.25, 0.5, 1, 2.5, 5,10 and 12 VDC software programmable (16 Bit DAC) ±0.03 % ±1 mV ±10 ppm/K ±50 μV/K 100 mA Continuous short to ground 0.1, 0.2, 0.5, 1, 2, 5, 10 and 20mA software programmable (16 Bit DAC) 0.05% ±2μA 15ppm/°K 12V >1 MΩ Supported Sensors: 4- or 6-wire full bridge 3- or 5-wire 1⁄2 bridge with internal completion (software programmable) 3- or 4-wire 1⁄4 bridge with internal resistor for 120 and 350 Ω (software programmable)1) 4-wire full bridge with constant current excitation (piezoresistive bridge sensors) Potentiometric Resistance Resistance Temperature Detection: PT100 PT200 PT500 PT1000 Bridge resistance: 80 Ω to 10 kΩ @ ≤ 5 VDC excitation Shunt calibration: Two internal shunt resistors 59.88 kΩ and 175 kΩ Shunt and completion resistor accuracy: 0.05% ±15ppm/°K Automatic bridge balance: Input range 500μV to 1V: 2.5V to 5V: Bandwidth (-3dB): 300 kHz Filters (low pass): 10 Hz, 30 Hz, 100 Hz, 300 Hz, 1 kHz, 3 kHz, 10 kHz, 30 kHz, 100 kHz (±1.5 dB @ f0) Filter characteristics: 10Hz to 100Hz: 300kHz: ±200 % of Range ±40% of Range Butterworth or Bessel 40 dB/dec ( 2nd order) Bessel 60 dB/dec (3rd order) 13-326| OWNER’s GUIDE Parameter DAQP-STG Typical SNR @ 100 kHz [1 kHz] and 5 VDC excitation: 66 dB [84 dB] @ 1 mV/V 82 dB [100 dB] @ 50 mV/V Typical CMRR @ 0.1 mV/V [1 mV/V] and 5 VDC excitation: 160 dB [160 dB] @ DC 115 dB [110 dB] @ 400 Hz 110 dB [105 dB] @ 1 kHz Isolation ±350 VDC continuous (for input, excitation and TEDS interface) Common mode Voltage ±350 VDC input to housing Over voltage protection: ±50 VDC input (+) to input (-) Output voltage: ±5 V Output resistance: <1Ω Output current: Max. 5 mA; short to ground protected for 10 seconds RS-485 interface: Yes TEDS support: Yes, compatible with TEDS chips DS2406, DS2430A, DS2431, DS2432, DS2433 MSI support: MSI-BR-TH-x, MSI-BR-ACC, MSI-BR-V-200 ,MSI-BR-CH-50 Power supply voltage: ±9 VDC (±1 %) Power consumption: Typ. 1.7 W @ 350 Ω, 2.15 W @ 120 Ω (both full bridge @ 5 VDC excitation) Absolute max.: 3 W (maximum excitation @ maximum current) Module Pin-outs ⇒⇒ CAUTION: The sensor shield can be connected to either pin 4 (SUB-D version only) or the housing of the 9-pin SUB-D / 8-pin LEMO connector, depending on your application. OWNER’s GUIDE - Conditioners, DAQ | 13-327 DAQP-STG-D Cables and Shielding To reduce the influence of electromagnetic disturbances, shielded twisted pair cables are recommended. Connect the shield to the isolated GND (Pin4) to get the best result. The twisted pairs for full bridge, half bridge, voltage and resistance mode are: Twisted pair 1 EXC+ PIN1 EXC- PIN8 Twisted pair 2 Sense+ PIN6 Sense- PIN3 Twisted pair 3 IN+ PIN2 IN- PIN7 Twisted pair 4 R+ PIN5 GND(isolated) PIN4 If TEDS is used also the shield could be used as GNDisolated For quarter bridge mode: Twisted pair 1 IN+ PIN2 Sense1 PIN3 Twisted pair 2 R+ PIN5 EXC- PIN8 DAQP-STG Operation Notes Free variable gain and excitation The gain, excitation and offset values of this module are free programmable. So it is possible to normalize any physical sensor input signal to the ±5V output of the module. By using these settings as power on default, standalone solutions could be easily realized. Gain: from 0.5 to 10000. The module input ranges are based on predefined gain values. The module automatically chose the best gain combination of the internal amplifiers to keep the overall noise and drift as low as possible. Output offset: Could be programmed from the positive to the negative full scale range except on the input ranges above 1V. Due to internal structure here the offset could be set from +20 % to – 20 %. Excitation Voltage: The excitation voltage is programmable from 0 to 12 V in 185 μV steps. Setting the excitation to 0 V for example allows you to determine the noise of the sensor cabling. The sense terminals have to be connected to the excitation terminals all the time. Even if the remote sensing is not required. Excitation current: The current could be programmed from 0.1 mA to 20 mA in 0.3 μA steps. The maximum compliance voltage is 12 V. The compliance voltage is automatically balanced around the internal GND. This minimizes the common mode error. Power On Default function You can store the latest settings of the module in the internal EE-Prom memory. Once the module restarts, it comes up automatically with these setting. This is important for stand alone applications and for fail-safe reasons. 13-328| OWNER’s GUIDE Filter The Module has nine selectable low-pass filters from 10 Hz to 100 kHz. The filter characteristic can be set to Butterworth 2nd order or Bessel 2nd order. An additional fixed filter inside this module is a 3rd order Bessel filter with a guaranteed -3 dB bandwidth of 300 kHz. DAQP-STG Amplifier balance The amplifier balance allows eliminating automatically all internal amplifier offsets. It switches the differential amplifier inputs IN+ and IN- to the internal isolated GND reference point. Then the output offset of the module is automatically adjusted to zero for all ranges. This function takes up to 8 seconds. Automatically previous stored sensor offset values are cleared. Sensor Balance Typically every strain gage sensor has a certain offset. That comes from manufacturing tolerances or because of sensor mounting. By performing a bridge balance this sensor offset could be completely removed on the analog side up to 200 % of the actual range. This allows using the full dynamic of the AD-board instead of losing resolution because of digital offset shifting. Output offset and sensor balance may not exceed 200 % of range (20 % for ranges above 1 V). Internal Completion Resistors The DAQP-STG has an internal half bridge completion and two internal quarter bridge completions for 120 Ω and 350 Ω strain gages. The used high precision resistors with low temperature drift allow a long- time stable measurement of almost every strain gage type without using an external completion network. Internal Shunt With two internal shunt resistors (59.88 kΩ and 175 kΩ) and one spare socket for a customised shunt, the DAQP-STG has wide flexibility in case of shunt calibration. A jumper network gives the possibility to connect the internal shunts to either Sense+ Sense – IN+ or IN- to be compatible to existing sensor types and correction calculation methods. This technology is used to correct the complete measurement chain gain error from the sensor input to the digital signal output. It is based on the known ratio between the shunt resistor and the strain gage resistance. Short It switches the differential amplifier inputs IN+ and IN- from the input terminals to the internal isolated GND reference point. With this function the absolute sensor offset could be determined. CAL It applies a high precision internal reference signal with 80% of the full scale value to the module. For ranges above 1V the reference signal level is 20 % of range. Self Test The self test function is a software controlled procedure that checks in the first step the amplifier itself. In the second step a basic sensor check will be performed. This test is only available in DeweSoft if an AD-Card is installed. Part 1: Amplifier Test The amplifier offset is checked by using the Short function The 80% Cal signal is applied to the amplifier. The complete isolation amplifier including the AD-Card is checked by using this test signal. The self test circuit switches the amplifier input to the positive excitation voltage, so also the input amplifier is checked. Warning: if there is a short circuit on the excitation this test will fail. OWNER’s GUIDE - Conditioners, DAQ | 13-329 Part 2: Basic Sensor Test Bridge Sensor: It is checked if the supply current doesn’t exceed the maximum value, and if the excitation voltage is within the predefined value. DAQP-STG Full bridge signal connection 6-wire and 4-wire sensor connection Voltage or Current excitation are allowed. Sense lines MUST be connected to the excitation also when 4-wire connection is used. 6-wire sensor connection: Sense+ is connected to EXC+ at the sensor 4-wire sensor connection: Sense+ is connected to EXC+ at the connector DAQP-STG Half bridge signal connection 5-wire and 3-wire sensor connection, and potentiometric sensors 5-wire sensor connection: Sense+ is connected to EXC+ at the sensor 3-wire sensor connection: Sense+ is connected to EXC+ at the connector Voltage or Current excitation are allowed. 13-330| OWNER’s GUIDE Sense lines MUST be connected to the excitation also when 4-wire connection is used. A potentiometer can be seen similar to a half bridge sensor with ±500 mV/V sensitivity. Therefore potentiometric sensors can be measured with bridge amplifiers. The advantages of using the DAQP-STG for potentiometric measurements is by adjusting the offset and range, you can focus on a certain potentiometer position with higher resolution. The scaling is ±500 mV/V equals ±50 % of potentiometer position. 1) ‘R+’ has to be connected only if shunt calibration is required, otherwise it can be left unconnected. DAQP-STG Quarter bridge signal connection 3-wire sensor connection (Sense+ is connected to EXC+ at the sensor) ⇒⇒ Sense leads (SUB-D: pin 3 and 6 must be connected! -- The 3-wire quarter bridge is only able to compensate symmetrical wire resistance 4-wire sensor connection (Sense+ is connected to EXC+ at the sensor) OWNER’s GUIDE - Conditioners, DAQ | 13-331 In the quarter bridge 4-wire mode the DAQP-STG internally adjusts its excitation so that on the gage the resistor terminates exactly on the half of the excitation voltage. All wire resistances are compensated. DAQP-STG Resistance, RTD 2-wire and 4-wire For resistance and RTD mode, 4-wire connection is recommended (2-wire connection will not compensate wire resistance). DAQP-STG - Other measurement modes and hook-ups Voltage and microvolt measurement signal connection ⇒⇒ CAUTION: If the excitation is not used for sensor supply it has to be deactivated by setting it to 0 V. This will internally connect the IN- to the GNDisolated to improve the common mode rejection. 13-332| OWNER’s GUIDE Sensor with supply, and voltage output In the quarter bridge 4-wire mode the DAQP-STG internally adjusts its excitation so that on the gage the resistor terminates exactly on the half of the excitation voltage. All wire resistances are compensated. Why More Wires are Better... Sensitivity: For sensor wiring typically copper cables are used. For example a 120 Ω full bridge connected with four 0.14 mm2 cables will have an sensitivity error of 2.1 % due to the 1.27 Ω wire resistance. But with 6-wire technology this can be completely compensated! Temperature drift: Intial error Drift after 10°C warm up Offset Sensitivity Offset Sensitivity 2-wire 25183 μm/m -4.97 % 956 μm/m -0.18 % 3-wire 0 μm/m -2.6 % 0 μm/m -0.01 % 4-wire 0 μm/m 0.0 % 0 μm/m 0.00 % OWNER’s GUIDE - Conditioners, DAQ | 13-333 DAQP-BRIDGE-A Isolated Strain Gage Module Protection: Input sensitivity: Ranges and filter: Bridge offset: Bridge completion: Shunt calibration: Custom range: Signal connection: Fully isolated (input and excitation) 0.5 mV/V to 1000 mV/V Button or software selection Automatic bridge offset adjustment (approx. ±200 % of range) Internal completion for 1⁄2 and 1⁄4 bridge (120 and 350 Ω) Two internal shunts or external shunt calibration possible Programmable range for sensitivity, excitation and offset 9-pin SUB-D or 8-pin LEMO connector (optional) DAQP-BRIDGE-A specifications Parameter DAQP-BRIDGE-A Gain: 20 to 1000 Input ranges: @ 5 VDC excitation: ±5, ±10, ±25, ±50, ±100, ±250 mV ±1, ±2, ±5, ±10, ±20, ±50 mV/V Range selection: Push button or software Input impedance: > 100 MΩ DC accuracy: ±0.1 % Gain linearity: ±0.05 % Excitation voltage: Accuracy: Drift: Protection: 0.25, 0.5, 1, 2.5, 5 and 10 VDC software programmable (5 VDC = default setting) 0.05 % ±1 mV typ. 20 ppm (max. 40 ppm) Continuous short to ground Bridge types: Full bridge 1⁄2 bridge with internal completion (software programmable) 1⁄4 bridge with internal resistor for 120 and 350 Ω (software programmable) Bridge resistance: 120 Ω to 10 kΩ (down to 87 Ω on request) Shunt calibration: Two internal shunt resistors or external resistor for shunt calibration (175k & 59k88) Zero adjust: Full automatic, ±200 % of F.S. (via push button or software) Bandwidth (-3dB): 20 kHz (±1.5 dB @ f0) Filters (lowpass): 10 Hz, 100 Hz, 1 kHz, 5 kHz, 20 kHz (±1.5 dB @ f0) Filter selection: Push button or software Filter characteristics: Bessel or Butterworth (software programmable) 40 dB / decade (12 dB / octave) Typ. SNR @ max. bandwidth: 71 dB @ Gain 1000 79 dB @ Gain 20 Typical CMRR: 73 dB @ 0 Hz 71 dB @ 400 Hz 70 dB @ 1 kHz Overvoltage protection: ±10 VDC Isolation: 350 VDC (for input and excitation) Output voltage: ±5 V Output resistance: < 10 Ω Output current: Max. 5 mA Output protection: Continuous short to ground RS-485 interface: Yes TEDS support: No MSI support: Manually support of MSI-BR-TH-x adapter 13-334| OWNER’s GUIDE Parameter DAQP-BRIDGE-A Power supply voltage: ±9 VDC (±1 %) Power consumption: Typ. 1.44 W @ 350 Ω, 1.83 W @ 120 Ω (both full bridge @ 5 VDC excitation) Max: 3 W (depending on sensor) * Module Pin-outs ⇒⇒ CAUTION: The sensor shield can be connected to either pin 4 (SUB-D version only) or the housing of the 9-pin SUB-D / 8-pin LEMO connector, depending on your application. Full bridge signal connection 6-wire sensor connection 4-wire sensor connection ⇒⇒ Sense leads (SUB-D: pin 3 and 6; LEMO: pin 5 and 6) MUST be connected! OWNER’s GUIDE - Conditioners, DAQ | 13-335 Half bridge signal connection 3-wire sensor connection ⇒⇒ Sense leads (SUB-D: pin 3 and 6; LEMO: pin 5 and 6) MUST be connected! Quarter bridge signal connection 3-wire sensor connection ⇒⇒ Sense leads (SUB-D: pin 3 and 6; LEMO: pin 5 and 6) MUST be connected! ⇒⇒ 1) ‘Shunt’ has to be connected only if shunt calibration is required, otherwise it can be left unconnected. Potentiometric and µV measurements The differential amplifier of the DAQP-BRIDGE-B module is designed to measure small voltages (with very low offset drift and high amplification). These are exactly the same requirements than for μV amplifiers. By setting the bridge input type to Voltage you can select input ranges from ±0.5 mV to ±500 mV. The advantages of using bridge amplifiers for μV measurements: only one multifunctional module with high bandwidth, a lot of input and filter ranges and a programmable offset (Auto Zero). The correct hook-up is simply connecting your µV signal to the IN+ and IN- pins of the this module, and be sure to use a shielded cable and connect the drain to the ground pin of the DSUB connector on the DAQ module. 13-336| OWNER’s GUIDE A potentiometer can be seen similar to a half bridge sensor with ±500 mV/V sensitivity. Therefore potentiometric sensors can be measured with bridge amplifiers. The advantages of using bridge amplifiers for potentiometric measurements: only one multifunctional module with high bandwidth and a programmable offset (by adjusting the offset and range, you can focus on a certain potentiometer position with higher resolution). Module configuration DAQP-BRIDGE-A: Excitation: 0.5 V Range: 500 mV/V The following table shows how the mV/V ranges are calculated. The ranges depend on the gain and the excitation voltage (note that commas indicate decimal points in this table): ⇒⇒ Always change the excitation voltage before changing the input range, otherwise you will not get the required 500 mV/V range. Potentiometer sensor connection The left side shows the connections on the signal conditioner, while the right side represents your potentiometric sensor: OWNER’s GUIDE - Conditioners, DAQ | 13-337 DAQP-BRIDGE-B Strain Gage Module Input sensitivity: Bandwidth, filter: Bridge offset: Bridge completion: Shunt calibration: Custom range: TEDS: Signal connection: 0.05 mV/V to 1000 mV/V 200 kHz, 9 selectable lowpass filters (10 Hz to 100 kHz) Automatic offset adjustment (approx. ±200 % of range) Internal completion for 1⁄2 and 1⁄4 bridge (120 and 350 Ω) Supports 3- and 4-wire 1⁄4 bridge connection Two internal shunts or external shunt calibration possible Programmable range for sensitivity, excitation and offset Support for TEDS sensors 9-pin SUB-D or 8-pin LEMO connector (optional) DAQP-BRIDGE-B specifications Parameter DAQP-BRIDGE-B (revision 2) Gain: 10 to 10 000 Input ranges: @ 5 VDC excitation: ±0.5 1), ±1, ±2.5, ±5, ±10, ±25, ±50, ±100, ±250, ±500 mV ±0.1 1), ±0.2, ±0.5, ±1, ±2, ±5, ±10, ±20, ±50, ±100 mV/V Range selection: Push button or software Input impedance: > 100 MΩ Input noise: 3.5 nV * √Hz Accuracy @ 5 VDC excitation: ±0.05 % F.S. Gain drift @ 5 VDC excitation: 10 ppm/K of range ±0.02 μV/V/K Excitation voltage: Accuracy: Drift: Protection: 0.25, 0.5, 1, 2.5, 5 and 10 VDC software programmable (5 VDC = default setting) ±0.05 % ±0.7 mV ±10 ppm/K ±50 μV/K Continuous short to ground Bridge types: 4- or 6-wire full bridge 3- or 5-wire 1⁄2 bridge with internal completion (software programmable) 3- or 4-wire 1⁄4 bridge with internal resistor for 120 and 350 Ω (software programmable) 1) Bridge resistance: 87 Ω to 10 kΩ @ ≤ 5 VDC excitation (120 Ω to 10 kΩ @ 10 VDC excitation) Shunt calibration: Two internal shunt resistors Zero adjust: Full automatic, ±200 % of F.S. (via push button or software) Bandwidth (-3dB): 200 kHz (±1.5 dB @ f0) 1) Filters (lowpass): 10 Hz, 30 Hz, 100 Hz, 300 Hz, 1 kHz, 3 kHz, 10 kHz, 30 kHz, 100 kHz (±1.5 dB @ f0) Filter selection: Push button or software Filter characteristics: Bessel or Butterworth (software programmable) 40 dB / decade (12 dB / octave) Typ. SNR @ 100 kHz [1 kHz] and 5 VDC excitation: 66 dB [84 dB] @ 1 mV/V 82 dB [100 dB] @ 50 mV/V Typ. CMRR @ 0.1 mV/V [1 mV/V] and 5 VDC excitation: 125 dB [120 dB] @ DC 115 dB [110 dB] @ 400 Hz 110 dB [105 dB] @ 1 kHz Max. common mode voltage: ±6 V Overvoltage protection: ±10 VDC Output voltage: ±5 V Output resistance: < 10 Ω Output current: Max. 5 mA Output protection: Continuous short to ground 13-338| OWNER’s GUIDE Parameter DAQP-BRIDGE-B (revision 2) RS-485 interface: Yes TEDS: Supported TEDS chips Hardware support for TEDS (Transducer Electronic Data Sheet) DS2406, DS2430A, DS2432, DS2433 MSI support: Automatic MSI-BR-TH-x support Power supply voltage: ±9 VDC (±1 %) Power consumption: Typ. 1 W @ 350 Ω, 1.3 W @ 120 Ω (both full bridge @ 5 VDC excitation) Max: 2 W (depending on sensor) 1) 4-wire 1⁄4 bridge or ±0.5 mV input range will limit the bandwidth to 30 kHz Module Pin-outs ⇒⇒ CAUTION: The sensor shield can be connected to either pin 4 (SUB-D version only) or the housing of the 9-pin SUB-D / 8-pin LEMO connector, depending on your application. Full bridge signal connection 6-wire sensor connection 4-wire sensor connection ⇒⇒ Sense leads (SUB-D: pin 3 and 6; LEMO: pin 5 and 6) MUST be connected! OWNER’s GUIDE - Conditioners, DAQ | 13-339 Half bridge signal connection 5-wire sensor (sense wired at the sensor) 3-wire sensor (sense wired at the connector) ⇒⇒ Sense leads (SUB-D: pin 3 and 6; LEMO: pin 5 and 6) MUST be connected! Quarter bridge signal connection 4-wire sensor (sense wired at the sensor) 3-wire sensor (sense wired at the connector) ⇒⇒ Sense leads (SUB-D: pin 3 and 6; LEMO: pin 5 and 6) MUST be connected! ⇒⇒ 1) ‘R+’ has to be connected only if shunt calibration is required, otherwise it can be left unconnected. Potentiometric and µV measurements The differential amplifier of the DAQP-BRIDGE-B module is designed to measure small voltages (with very low offset drift and high amplification). These are exactly the same requirements than for μV amplifiers. By setting the bridge input type to Voltage you can select input ranges from ±0.5 mV to ±500 mV. The advantages of using bridge amplifiers for μV measurements: only one multifunctional module with high bandwidth, a lot of input and filter ranges and a programmable offset (Auto Zero). The correct hook-up is simply connecting your µV signal to the IN+ and IN- pins of the this module, and be sure to use a shielded cable and connect the drain to the ground pin of the DSUB connector on the DAQ module. 13-340| OWNER’s GUIDE A potentiometer can be seen similar to a half bridge sensor with ±500 mV/V sensitivity. Therefore potentiometric sensors can be measured with bridge amplifiers. The advantages of using bridge amplifiers for potentiometric measurements: only one multifunctional module with high bandwidth and a programmable offset (by adjusting the offset and range, you can focus on a certain potentiometer position with higher resolution). Module configuration DAQP-BRIDGE-B: Excitation: 1V Range: 500 mV/V The following table shows how the mV/V ranges are calculated. The ranges depend on the gain and the excitation voltage (note that commas indicate decimal points in this table): ⇒⇒ Always change the excitation voltage before changing the input range, otherwise you will not get the required 500 mV/V range. Potentiometer sensor connection The left side shows the connections on the signal conditioner, while the right side represents your potiometric sensor: OWNER’s GUIDE - Conditioners, DAQ | 13-341 DAQP-CFB Carrier Frequency/LVDT module Ideal for these kinds of sensors: Special features: Input ranges: Bandwidth: Isolation: Signal connection: full bridge; half bridge; quarter bridge 120 Ω; quarter bridge 350 Ω inductive full bridge; inductive half bridge (such as most LVTD Sensors) Automatic balancing up to 400% of range Internal completion for 1⁄2 and 1⁄4 bridge Two internal shunts for completion 0.1 mV/V to 1000 mV/V 2.3 kHz N/A 9-pin SUB-D DAQP-CFB specifications Parameter DAQP-CFB Input ranges: 0.1 mV/V to 1000 mV/V Inductive input ranges: 5 mV/V to 1000 mV/V (inductive range is limited from 20 mVRMS to 1000 mVRMS input voltage) Input voltage ranges: 0.2 mVRMS to 1000 mVRMS Bridge resistance: 60 - 1,000 Ω depending on excitation voltage Excitation voltage level: 1, 2, 5 VRMS Excitation voltage frequency: 5 kHz sine wave ±20 Hz Maximum excitation current: 30 mARMS short circuit protected Excitation voltage synchronization: Internal or external Excitation voltage accuracy: 5 VRMS ±5 mVRMS; 2 VRMS ±2.5 mVRMS; 1 VRMS ±2.5 mVRMS Excitation voltage drift: typically 50 ppm/°K Excitation frequency drift: typically 20 ppm/°K Nonlinearity: ±0.02 % FS Accuracy: ±0.2 % of reading ±0.1 % of range Offset drift: ±0.003 μV/V/K ±40 ppm of Range/°K Gain drift: within ±30 ppm/°K Balance adjusting range: ±400 % of Range (±200 % at 1 V excitation) Capacitive imbalance compensation: Approx. 1000 pF Phase adjustment range: ±40° (inductive mode only) Balance adjusment accuracy: within ±0.1 % FS Supported sensors: full bridge; half bridge; quarter bridge 120 Ω; quarter bridge 350 Ω inductive full bridge; inductive half bridge (typically LVTD Sensors) Shunt calibration: internal 50 kΩ and 100 kΩ Shunt Completion and shunt resistor accuracy: ±0.05 % -3 dB Bandwidth: DC - 2.3 kHz Filters (lowpass): 10, 30, 100, 300, 1 kHz Filter characteristics: 2nd order Bessel, 2nd order Butterworth (40 dB/ decade) Typ. SNR @ 1000 Hz [100 Hz] and 2 VRMS excitation: 78 dB [85 dB] @ 1 mV/V 80 dB [87 dB] @ 100 mV/V 13-342| OWNER’s GUIDE Parameter DAQP-CFB Over voltage protection ±10 V Output voltage: ±5V Output current: ±5 mA Output protection: Continuous short to ground Power consumption: max. 1.5 W Supported TEDS chips: DS2406, DS2430, DS2432, DS2433, DS2431 1) Weight: within 250 (±30) g 1) TEDS only supported by revision 2 of this module (or higher) Module Pin-outs -- Pins 6 and 8 can be left unconnected Software controlled functions Amplifier balance Amplifier balance allows elimination of the amplifier offset. The input is shorted and all ranges are balanced by within the module. Any previously stored sensor offset values are cleared. Sensor balance Sensor balance is similar to the amplifier balance. Because the input is not shorted, the sensor offset is automatically adjusted to zero. Short When measuring the absolute strain it is possible to disconnect the sensor via software and short the input. Shunt Two different internal shunts resistors (50 kΩ and 100 kΩ) can be connected for easy function or calibration check. With this technique the whole measurement chain (sensor, amplifier and analog to digital conversa- OWNER’s GUIDE - Conditioners, DAQ | 13-343 tion) are checked. The table below shows the shunt calibration result for typical strain gage resistor values. Strain gage resistor Shunt resistor Result 120 Ω 50 kΩ 0.6 mV/V 120 Ω 100 kΩ 0.3 mV/V 350 Ω 50 kΩ 1.74 mV/V 350 Ω 100 kΩ 0.87 mV/V The shunt resistor check is not possible in inductive bridge operation mode. Cal Independent of the value of the input signal, the CAL function sets the output to 80% of the actual range. The base of this calibration signal is the excitation voltage. Therefore this is an easy check of the excitation voltage. The typical reasons why the excitation is not working are short curcuit of the excitation at the cabling or sensor defects, too high a load for the excitation amplifier (please decrease the excitation level), or wrong settings of the synchronization mode (no master assigned). Synchronizing multiple amplifiers Due the high amplification of strain gage amplifiers it is needed to synchronize the excitation voltage if multiple channels are used. This is done with Pin 8 of the back plane connector. See the detailed DAQ modules manual for details about how to set up the synchronization of multiple DAQP-CFB modules. Sensor connections Inductive half bridge sensors LVDT sensors 13-344| OWNER’s GUIDE Full bridge signal connection 4-wire sensor for standard bridge & inductive bridge (Sense wired at the connector) -- Sense leads (SUB-D: pin 3 and 6) could be connected to be compatible to other modules. Half bridge signal connection 3-wire sensor for standard bridge (Sense wired at the sensor) Quarter bridge signal connection 3-wire sensor for standard bridge (Sense wired at the connector) -- Sense leads (SUB-D: pin 3 and 6) could be connected to be compatible to other DEWE-BRIDGE amplifier. -- 1) ‘R+’ has to be connected only if shunt calibration is required, otherwise it can be left unconnected. OWNER’s GUIDE - Conditioners, DAQ | 13-345 DAQP-ACC-A IEPE Accelerometer module Ideal for these kinds of sensors: Input ranges: Bandwidth: Isolation: Signal connection: Constant current type accelerometers, aka IEPE, ICP, I.C.P.®, or Piezotronic ±5 V, ±1.66 V, ±500 mV, ±166 mV, ±50 mV 300 kHz N/A BNC connector DAQP-ACC-A specifications Parameter DAQP-ACC-A Input ranges: ±5 V, ±1.66 V, ±500 mV, ±166 mV, ±50 mV Gain: 1, 3, 10, 30, 100 Range/gain selection: Pushbutton or software selection Gain error: 0.5 % Sensor types: IEPE (constant current) only Sensor excitation: 4 or 8 mA (software selection), 10 %, up to 28 VDC Input impedance: 5 or 7 MΩ (depending on time constant), in parallel with 1.2 nF Input voltage range: Voltage < 4 V Voltage > 19 V -3 dB Bandwidth: Filters (high-pass) 4 to 19 V ”Shortcut” detection “No sensor” detection From selected highpass filter to 300 kHz (+2 to -5 dB @ fg) 0.5 Hz filter 5 Hz filter 0.5 Hz and 5 Hz (software selection) 0.32 s time constant 0.032 s time constant Filters (low-pass): 1 kHz, 10 kHz, 100 kHz, 300 kHz other filter steps available as an option upon request Filter selection: Pushbutton or software selection Filter characteristics Typ. SNR @ max. bandwidth up to 100 kHz 300 kHz Gain 1 and 3 Gain 10 Gain 30 Gain 100 Butterworth 100 dB / decade (30 dB / octave) 80 dB / decade (24 dB / octave) 94 dB 91 dB 80 dB 73 dB Output voltage: ±5 V Output resistance: <10 Ω Output current: 5 mA maximum Output protection: Continuous short to ground Power supply voltage: ±9 VDC (±10 %) RS-485 interface for module control: Yes TEDS support: N/A Power consumption: Typical 0.8 to 1.0 W (depending on sensor) 13-346| OWNER’s GUIDE Sensor connection Standard IEPE accelerometer or microphone connector and cable. Use a standard BNC plug on the Dewetron module side. The sensor side may be molded into the sensor, or a modular connector with BNC, 10-32, etc. OWNER’s GUIDE - Conditioners, DAQ | 13-347 DAQP-CHARGE-A Charge/IEPE module Handles both of these sensors: Special features: IEPE sensitivity: Charge sensitivity: Bandwidth: Isolation: Signal connection: Charge type accelerometers and microphones, plus IEPE (Piezotron) accelerometers and mics Directly outputs acceleration, velocity or displacement 0, 20, 40 and 60 dB (±5 V, ±500 mV, ±50 mV, ±5 mV) 5, 50, 500, 5000 and 50000 pC 0.1 Hz to 50 kHz N/A BNC (10-32 microdot adapter included) DAQP-CHARGE-A specifications Parameter DAQP-CHARGE-A Input sensitivity: IEPE mode: CHARGE mode: 0, 20, 40, 60 dB (±5 V, ±500 mV, ±50 mV, ±5 mV) 5, 50, 500, 5000, 50000 pC Supported sensor types: Dynamic CHARGE and IEPE (constant current) Sensor type selection: Pushbutton or software selection Gain accuracy: 1% full scale Input range fine tuning: Software selectable Range selection: Pushbutton: fixed ranges Software: every range Integration on-board: Single (velocity) or double (displacement), 0 dB at 15.9 H LED indicators: Range and filter: ICP LED: OVL LED: A, V and D LED: 5 LEDs Active with connected ICP® sensor, inactive for charge input Overload control (output voltage > 5 V) Indicator for acceleration, velocity and displacement output Constant current source: 3.2 to 5.6 mA, > 24 V Filters (high-pass): 0.1 Hz, 1 Hz, 10 Hz (±2 dB @ f0) Filters (low-pass): 100 Hz, 1, 3, 10, 50 kHz (±2 dB @ f0) Filter selection: Push button or software selection Filter characteristics: Butterworth 80 dB / decade (24 dB / octave) -3 dB Bandwidth: 0.1 Hz to 50 kHz (±2 dB @ f0) Typ. SNR @ max. bandwidth 5000 pC 500 pC 50 PC 5 pC 5 pC 90 dB 87 dB 73 dB 54 dB 60 dB @ 10 kHz Output voltage: ±5V Output noise: < 8 mV (all ranges with 50 kHz filter) Power consumption: 0.6 W to 1.2 W (depending on sensor) Power supply voltage: ±9 VDC (±10 %) TEDS support: N/A RS-485 interface for module control Yes 13-348| OWNER’s GUIDE Sensor connection Standard charge or IEPE accelerometer or microphone connector and cable. Use a standard BNC plug on the Dewetron module side. The sensor side may be molded into the sensor, or a modular connector with BNC, 10-32, etc. BNC to Microdot adapter This adapter is included for no additional cost with the DAQP-CHARGE-A module. -- Using an IEPE® sensor with charge input selected (or a Charge sensor with IEPE® input selected) will not destroy the module or the sensor, but the measured values will be incorrect. -- When using the fine tuning option of the input range (3686 steps per decade), the module is no longer in a calibrated state. In this case the input range LED’s are not active! OWNER’s GUIDE - Conditioners, DAQ | 13-349 DAQP-CHARGE-B Isolated Static/Dynamic Charge module Charge sensors, dynamic or static Special capability: Selectable time bases for long settling time sensors Charge drift < 0.03 pC/sec Ideal for these kinds of sensors: Input ranges: Bandwidth: Isolation: Signal connection: ±100 to ±1 000 000 pC 100 kHz 350 VDC BNC connector DAQP-CHARGE-B specifications Parameter DAQP-CHARGE-B Input ranges: ±100, ±500, ±2 000, ±10 000, ±40 000, ±200 000, ±1 000 000 pC Supported sensor types: Dynamic and static CHARGE accelerometers and microphones Gain accuracy: 0.5 % of range (1 % of range for 100 and 500 pC) Gain linearity: ±0.5 % -3 dB Bandwidth: 100 kHz (±1.5 dB @ f0) Range selection: Pushbutton or software selection Filters (low-pass): 10 Hz, 30 Hz, 100 Hz, 300 Hz, 1 kHz, 3 kHz, 10 kHz, 30 kHz, 100 kHz (±2 dB @ f0) Filter selection: Push button or software selection Filter characteristics: Bessel or Butterworth (software selectable) 40 dB / decade (12 dB / octave) Time constant: Long Highpass filter on DC mode 2 to 1000 sec. Drift input current @ 25 °C: < ±0.03 pC/s Offset drift: 50 ppm of Range/°K Amplifier reset: Push button or software Offset after reset: ±2 mV or ±1 pC (greater value is valid) Typ. SNR @ max. bandwidth: Ouput noise: Range 100 pC Range > 2000 pC @ 100 kHz @ 30 kHz 76 dB (82 dB @ 30 kHz / 85 dB @ 10 kHz ) 81 dB (89 dB @ 30 kHz / 93 dB @ 10 kHz ) 0.3 mVRMS + 0.01 pCRMS 0.12 mVRMS + 0.008 pCRMS Output voltage: ±5V Output noise: < 8 mV (all ranges with 50 kHz filter) Cable noise: < 10-5 pCRMS/pF CMR: < 0.02 pC/V (difference between input and output ground) Input overvoltage protection: 1 kV ESD Isolation: 350 VDC Power consumption: 1.5 W to 3.5 W (depending on signal range and frequency) Power supply voltage: ±9 VDC (±1 %) TEDS support: N/A RS-485 interface for module control Yes 13-350| OWNER’s GUIDE Sensor connection Standard charge accelerometer or microphone connector and cable. Use a standard BNC plug on the Dewetron module side. The sensor side may be molded into the sensor, or a modular connector with BNC, 10-32, etc. BNC to Microdot adapter This adapter is available as an option with the DAQP-CHARGE-B module. High pass filter The time constant of the internal highpass filter depends on the used input range. For range 1 (100 pC, 500 pC and 2,000 pC) the time constant is 2 seconds (or 0.07 Hz), for range 2 (10,000 pC and 40,000 pC) the time constant is 40 seconds (or 3.9 mHz). For the highest both ranges (200,000 pC and 1,000,000 pC) the time constant is 1,000 seconds or 0.16 mHz). OWNER’s GUIDE - Conditioners, DAQ | 13-351 DAQP-THERM Isolated Thermocouple module Ideal for these kinds of sensors: Special feature: Cold junction compensation: Linearization: Bandwidth: Isolation: Signal connection: Thermocouple types K, J, T, R, S, N, E, B, L, C, U Freely programmable measuring range! On-board and automatic On-board and automatic 3 kHz 350 VDC Standard mini T/C connector, universal white DAQP-THERM specifications Parameter DAQP-THERM Thermocouple types: K, J, T, R, S, N, E, B, L, C, U Range selection: Min. to max. of the input range is freely programmable within the full thermocouple input span CJC absolute accuracy: ±0.2 °C CJC stability: 0.01 °C/°C ambient temperature change Linearization: DSP based linearization Accuracy: Typical 0.3° for type K including CJC error; details see table below Nonlinearity: > 0.01°C Input resistance: > 1 MΩ -3 dB Bandwidth: 3 kHz Filters: 3 Hz, 10 Hz, 30 Hz, 100 Hz, 300 Hz, 1 kHz Filter characteristics: Butterworth or Bessel, 2nd, 4th, 8th order programmable Isolation: ±1000 VRMS continuous (for input excitation and TEDS interface) Typ. CMRR @ 3kHz: > 160 dB Open thermocouple detection: 100 MΩ pull up; software selectable Output voltage: ±5 V; 0 to 5 V; (±10 V and 0 to 10 V possible only with special DEWE-30) Output resistance: 100 Ω Output protection: Continuous short to ground Power supply voltage: ±9 VDC (±1 %) Power consumption: 1 W typical TEDS support: N/A Connector: Universal mini termocouple connector, white color code Standard MINI thermocouple connector 13-352| OWNER’s GUIDE DAQP-THERM Input ranges and detailed specifications Thermocouple Input range Accuracy Type Standard min [°C] max [°C] -270 to -200 °C [°C] -200 to -100 °C [°C] -100 to 0 °C [°C] 0 to 100 °C [°C] 100 °C to fullscale [% of reading + °C] J DIN EN 60584-1 -270 1372 6.70 0.70 0.35 0.26 0.027 0.26 K DIN EN 60584-1 -210 1200 0.68 0.60 0.32 0.25 0.019 0.25 T DIN EN 60584-1 -270 400 4.37 0.69 0.37 0.26 R DIN EN 60584-1 -50 1760 0.85 0.59 0.009 0.44 S DIN EN 60584-1 -50 1760 0.77 0.58 0.012 0.45 N DIN EN 60584-1 -270 1300 9.14 0.77 0.37 0.28 0.017 0.27 E DIN EN 60584-1 -270 1000 4.25 0.60 0.33 0.24 0.018 0.23 L DIN 43710 0 900 0.25 C ASTM E988-96 0 2310 0.36 U DIN 43710 -200 600 0.64 0.37 DIN EN 60584-1 0 1820 0.33 0.045 0.26 0 to 500°C B 0.23 0.26 0.33 0.24 > 500°C 0.44 All values given in Celcius on these pages. Software programmable module range Regardless which input mode is selected, the module measurement range is completely free programmable. Simply by entering the lower and upper limit the amplifier adjusts its gain and offset factors automatically. The amplifier output is scaled to either ±5 V or 0 to 5 V. Converting a nonlinear temperature signal from a thermocouple to a linear analog output is one of the key features of this amplifier. Open thermocouple detection The open thermocouple detection of the DAQP-THERM consists of an 100 MΩ pull-up resistor. That typically drives a 50 nA current through the sensor which normally does not take effect on the measurement, but is enough to generate an input overflow if the sensor breaks. Despite of this small current, there are sensors available where this current generates a big error. These sensors are typically non-contact infrared thermocouples and fast response thermocouples. In that case the open thermocouple detection can simply be deactivated in the software. Sensors with up to 50 kΩ output impedance can be measured in this way. CJC The DAQP-THERM comes with an integrated cold junction compensation sensor with an absolute accuracy of ±0.2 °C. In order to archieve this accuracy the sensor has to be connected for at least 5 minutes to the thermocouple connector (CJC equilibrium time). OWNER’s GUIDE - Conditioners, DAQ | 13-353 DAQP-MULTI Isolated Multifunction module Thermocouple: Bridge: Voltage input: RTD: Resistance: Bandwidth: Isolation: Signal connection: Freely programmable ranges within full thermocouple input span ±0.5 to ±1000 mV/mA ±5 mV to ±5 V (free programmable within ±5 V) Resistance Temperature Detector (Pt100 to Pt2000), freely programmable ranges within full RTD input span 1 Ω to 1 MΩ (free programmable between 1 Ω and 1 MΩ) 3 kHz 1000 VRMS continuous Standard miniature thermocouple connector, and 9-pin SUB-D connector V DAQP-MULTI Specifications Parameter DAQP-MULTI Input types: Thermocouple (TC); Resistance Temperature Detector (RTD); Voltage; Resistance; Bridge with constant current excitation Thermocouples Sensor types: K, J, T, R, S, N, E, B, L, C, U, others on request Range: Min. to max. of the input range is free programmable within the full thermocouple input span CJC absolute accuracy: ±0.2 °C CJC stability: 0.01 °C/°C ambient temperature change Accuracy: Typical 0.3° for type K including CJC error; details see table below. Linearization: DSP based linearization on-board Non-linearity: > 0.01°C Open thermocouple detection: 100 MΩ pull up; software selectable Connector: Mini thermocouple connector with integrated cold junction compensation sensor RTD Sensor types: Pt100, Pt200, Pt500, Pt1000, Pt2000, others on request Range: Min. and max. of the input range is free programmable within the full RTD input span Constant current: Pt100: 1 mA; Pt200, Pt500: 0.5 mA; Pt1000, Pt2000: 0.2 mA Accuracy: Typical accuracy 0.15 °C for Pt100, details see table below Linearization: DSP based linearization on-board Non-linearity: > 0.01 °C Voltage Input ranges: ±5 mV, ±10 mV, ±20 mV, ±50 mV, ±100 mV, ±200 mV, ±500 mV, ±1 V, ±2 V, ±5 V, free programmable within ±5V Accuracy: 0 to ±100 mV Range: 0.02 % of reading ±0.01 % of Range ±5 μV >±100mV to ±5V Range: 0.02 % of reading ±0.01 % of Range ±100 μV Offset drift: Typical ±0.3 μV/°K ±10 ppm of range/°K Gain drift: Typical 15 ppm/°K Input impedance: > 100 MΩ (power off: 50 kΩ) Input noise: 8 nV * √Hz 13-354| OWNER’s GUIDE Parameter DAQP-MULTI Resistance Ranges: 1, 3, 10, 30, 100, 300, 1k, 3k, 10k, 30k, 100k, 1M, free programmable between 1 Ω and 1 MΩ Accuracy: See table below Drift: Typical 15 ppm/°K Constant current: From 5 μA to 5 mA depending on range Bridge Ranges: 0.5, 1, 2, 5, 10, 20, 50, 100, 200, 500, 1000 mV/mA Accuracy: 0.02 % of reading ±0.01 % of Range ±5 μV Offset drift: typical ±0.3 μV/°K ±10 ppm of range/°K Gain drift: typical 15ppm/°K Input impedance: > 100 MΩ (power off: 50 kΩ) Input noise: 8 nV * √Hz Automatic bridge balance: ±200 % of range Supported sensors: 4 wire full bridges Connector: DSUB 9, standard Dewetron bridge pin-outs Excitation current: 1, 2, 4 mA; software programmable Accuracy: 0 to 200 μA 200 μA to 5 mA 0.02 % ±50 nA 0.02 % ±1 μA Drift: 15 ppm/°K Compliance voltage: 15 V Source resistance: > 150 kΩ General Specifications -3dB Bandwidth: 3 kHz Filters: 3 Hz, 10 Hz, 30 Hz, 100 Hz, 300 Hz, 1 kHz Group delay: 300 μs with highest filter Filter characteristics: Butterworth or Bessel, 2nd, 4th, 8th order programmable Typ. CMRR @ 3kHz >160 dB Isolation: ±1000 VRMS continuous (for input excitation and TEDS interface) Over-voltage protection: ±100 V between inputs (clamping voltage: 5 V @ TC input; 11 V @ Voltage input) Output voltage: ±5 V; 0 to 5V; (±10 V and 0 to 10 V with special DEWE-30) Output resistance: 22 Ω Output current: Max. 5 mA Output protection: Continuous short to ground RS485 interface for module control: Yes Supported TEDS chips: DS2406, DS2430A, DS2431, DS2432, DS2433,DS28EC20 MSI support: No Power supply voltage: ±9 VDC (±1 %) Power consumption: 1 W typical OWNER’s GUIDE - Conditioners, DAQ | 13-355 DAQP-MULTI Input ranges and detailed specifications for THERMOCOUPLES Thermocouple Input range Accuracy min [°C] -270 to -200 °C [°C] Type Standard J DIN EN 60584-1 -270 1372 6.70 K DIN EN 60584-1 -210 1200 0.68 T DIN EN 60584-1 -270 400 4.37 R DIN EN 60584-1 -50 S DIN EN 60584-1 N max [°C] -200 to -100 °C [°C] -100 to 0 °C [°C] 0 to 100 °C [°C] 0.70 0.35 0.26 0.027 0.26 0.60 0.32 0.25 0.019 0.25 0.69 0.37 0.26 1760 0.85 0.59 0.009 0.44 -50 1760 0.77 0.58 0.012 0.45 DIN EN 60584-1 -270 1300 9.14 0.77 0.37 0.28 0.017 0.27 E DIN EN 60584-1 -270 1000 4.25 0.60 0.33 0.24 0.018 0.23 L DIN 43710 0 900 0.25 C ASTM E988-96 0 2310 0.36 U DIN 43710 -200 600 0.64 0.37 DIN EN 60584-1 0 1820 0.23 0.33 0.045 0.26 0 to 500°C B 100 °C to fullscale [% of reading + °C] 0.33 0.24 > 500°C 0.26 0.44 DAQP-MULTI Input ranges and detailed specifications for RTDs RTDs Type Standard Input range Current Accuracy min [°C] [mA] -200 to -100 °C [°C] max [°C] -100 to 0 °C [°C] 100 °C to full-scale [% of reading + °C] Pt100 (385) DIN EN 60751 -200 850 0.2 0.14 0.21 0.07 0.21 Pt200 (385) DIN EN 60751 -200 850 0.1 0.18 0.27 0.10 0.27 Pt500 (385) DIN EN 60751 -200 850 0.2 0.34 0.42 0.09 0.42 Pt1000 (385) DIN EN 60751 -200 850 0.2 0.22 0.29 0.09 0.29 Pt2000 (385) DIN EN 60751 -200 850 0.2 0.25 0.35 0.12 0.36 -200 850 0.2 0.14 0.21 0.07 0.21 Pt100 (3926) DAQP-MULTI Input ranges and detailed DAQP-MULTI detailed specifications 13-356| OWNER’s GUIDE specifications for RESISTANCE for EXCITATION CURRENT Resistance Range Current Accuracy [Ω] [mA] % of reading Excitation % of range 1,000,000 0.005 0.04 1.02 0 to 200 μA 300,000 0.015 0.04 0.35 >0.2 to 5 mA 100,000 0.05 0.04 0.11 30,000 0.1 0.04 0.07 10,000 0.1 0.04 0.08 3,000 0.2 0.04 0.07 1,000 0.5 0.04 0.25 300 1 0.04 0.18 100 1 0.04 0.12 30 2 0.04 0.08 10 4 0.04 0.06 3 5 0.04 0.10 1 5 0.04 0.23 % of reading [µA] 0.02 0.05 0.02 1 Sensor connections 9-pin DSUB connector Mini thermocouple connector OWNER’s GUIDE - Conditioners, DAQ | 13-357 Resistance, RTD 2-wire and 4-wire -- For resistance and RDT mode the 4-wire connection is recommended. The 2-wire connection will not compensate the wire resistance. Voltage Measurement Bridge sensor 13-358| OWNER’s GUIDE Thermocouple sensor OWNER’s GUIDE - Conditioners, DAQ | 13-359 DAQP-FREQ-A Frequency to Voltage module Ideal for these kinds of sensors: Frequency ranges: Special feature: Input ranges: Isolation: Signal connection: Frequency and tachometer sensors, hall effect F/V, optical speed sensors, and more 100 Hz, 1 kHz, 5 kHz, 20 kHz, 100 kHz, 200 kHz Second output from module: TTL clock mirror of input frequency 100 Hz, 1 kHz, 5 kHz, 20 kHz, 100 kHz, 200 kHz 350 VDC 9-pin SUB-D connector DAQP-FREQ-A specifications Parameter DAQP-FREQ-A Input ranges: 100 Hz, 1 kHz, 5 kHz, 20 kHz, 100 kHz, 200 kHz Minimum input frequency: 2 % of selected range Range selection: Pushbutton or software selection Accuracy: ±0.05 % (from 4 % to 100 % of range) Input signal: 10 mV to 300 V Note: the DSUB connector is only specified up to 250 V For signals above 60 V do not use the metal housing of the provided DSUB connector Input resistance: 1 MΩ Input filters: 100 Hz, 1 kHz, 5 kHz, 20 kHz, 100 kHz, 200 kHz Filter selection: Pushbutton or software selection Input coupling: DC or AC (software selectable) Trigger level: 10 mV to 130 V (software programmable) Sensor supply: +12 VDC, ±9 VDC (not isolated) Input isolation: 350 VDC Over-voltage protection: Output filter: Output signals: ±500 V peak / 350 VRMS Filter characteristics Selection Main output Secondary output 3 ranges with 1.5, 30 and 500 ms (10 - 90 %) Butterworth, 60 dB / decade (18 dB / octave) Automatically according to input range Slow (default) or fast output filter selectable within the input range ±5 V according to input frequency Secondary: TTL level trigger output signal Output resistance: < 10 mΩ Output current: 5 mA max. Output protection: Continuous short to ground Power consumption: 1 W max. TEDS support: N/A Power supply voltage: ±9 VDC (±5 %) 13-360| OWNER’s GUIDE Sensor connection ⇒⇒ Sensor supply voltages are not isolated - only the input (pin 2 and 7)! ⇒⇒ For signals above 60 V don’t use the metal housing of SUBD connector! Sensors without power supply Sensors with power supply Open collector sensors (NPN) Open collector sensors (PNP) -- The value of the resistor depends on the sensor supply voltage and the open collector sensor. OWNER’s GUIDE - Conditioners, DAQ | 13-361 DAQN-V-OUT Isolated Voltage Output module Module purpose: 1:1 (unity gain) isolation module, compatible with AD series cards which have analog outputs Input/Output range: ±10 V Bandwidth: 400 Hz Isolation: 1500 VRMS Signal connection: -B: Banana plugs -BNC: BNC connector -D: 9-pin SUB-D connector OUT DAQN-V-OUT specifications Parameter DAQN-V-OUT Input range: ±10 V Input range maximum: ±36 V maximum (damage will occur above ±36 V) Input resistance: 50 MΩ Output voltage range: ±10 V Over range capability: 5 % @ 10 V output Output drive: 50 mA max. Output resistance: 0.5 Ω Output current during fault, maximum: 75 mA Output protection, transient: ANSI/IEEE C37.90.1-1989 CMV, output to input, continuous: 1500 VRMS max. ANSI/IEEE C37.90.1-1989 110 dB Accuracy: ±0.05 % span (0 to 5 mA load) NMR (-3 dB @ 400 Hz): 100 dB per decade above 400 Hz Non-linearity: 0.02 % span Transient CMRR (50 / 60 Hz) Stability: Noise: Offset Span Output ripple, 1 kHz bandwidth ±25 ppm/°C ±20 ppm/°C 2 mVpp -3 dB Bandwidth: 400 Hz Power supply voltage: 9 VDC ±5 % Over voltage protection ±10 V Power supply current: 350 mA full load, 135 mA no load Power supply sensitivity: ±12.5 ppm/% 13-362| OWNER’s GUIDE Output signal connections DAQN-V-OUT-B module Voltage output via banana plug cables DAQN-V-OUT-BNC module Voltage output via BNC cable DAQN-V-OUT-B module Voltage output via DSUB 9-pin cable Pin 9-pin DSUB connector 1 Not connected 2 Not connected 3 Not connected 4 GND (not isolated) 5 +9 V (not isolated) 6 Not connected 7 OUT + (-10 to +10 V, isolated) 8 OUT - (-10 to +10 V, isolated) 9 -9V (not isolated) ⇒⇒ Use pin 4, 5 and 9 only as sensor supply (not isolated)! ⇒⇒ For signals above 60 V don’t use the metal housing of SUB-D connector! OWNER’s GUIDE - Conditioners, PAD | 14-363 14 PAD series Signal Conditioners PAD Series Common Information Calibration information All DEWETRON modules are calibrated at 25°C after a warmup time of 30 minutes and meet their specifications when leaving the factory. The time interval for recalibration depends on environmental conditions. Typically, the calibration should be checked once a year. Calibration certificates are available from DEWETRON as an option. DEWETRON offers several types: NIST traceable DEWETRON calibration certificate (USA CAL LAB only) ISO traceable DEWETRON certificate (European CAL LAB only) Calibration certificate according to ÖKD (equivalent to DKD) This manual contains no calibration information. There is a separate calibration kit available for DAQ series modules manual calibration. The CAL-KIT contains the required cables, software and instructions that you need to add to your own calibration lab. It does not include a calibrator or volt meter. General PAD module specifications Module dimensions: 20 x 65 x 105 mm (0.79 x 2.56 x 4.13 in.) (W x H x D without front cover and connectors) Frontcover: 20 x 87 x 2 mm (0.79 x 3.43 x 0.08 in.) (W x H x D without connector) Environmental: Temp. range storage: Temp. range operating: Rel. humidity (MIL202): RFI susceptibility: -30 °C to +85 °C (-22 °F to 185 °F) -5 °C to +60 °C (23 °F to 140 °F) 0 to 95 % at 60 °C, non-condensing ±0.5 % span error at 400 MHz, 5 W, 3 m All specifications within this manual are valid at 25 °C. All modules are produced according to ISO9001 and ISO14001. 14-364| OWNER’s GUIDE PAD Module Connectors Front Panel Connector Accessible to the user. The connector type and pin assignment varies from module to module. Detailed pin assignment of each module is shown in the appropriate module description. Rear Connector Not user accessible. 9-pin male SUB-D, interface to the Dewetron System. HSI, DAQ, and PAD module rear panel RS-232/485 interface PAD modules can be configured via RS-485 interface, and they require this interface for all data transfers. The DEWE-3210 and DEWE-3211 include an internal RS-232/485 converter and interface. This converter allows communication with all Dewetron signal conditioning modules. To communicate with the modules, the RS-232 interface must be set to the following parameters: baud rate: 9600 data bits: 8 parity: no parity stop bits: 1 handshake: not required OWNER’s GUIDE - Conditioners, PAD | 14-365 PAD Modules Table Module Chs Input type Ranges Voltage ±100 mV to ±50 V Bandwidth (BW) Filters (FILT) Isolation (ISO) Overvoltage protection (OP) Special functions BW: 6 Hz FILT: 1 / 4 / 8 values ISO: 350 VDC OP: 150 VDC Separate 24-bit ADC per channel BW: 6 Hz FILT: 1 / 4 / 8 values ISO: 350 VDC OP: 15 VDC Separate 24-bit ADC per channel ISO: 350 VDC OP: 15 VDC Separate 24-bit ADC per channel Voltage measurement PAD-V8-P V 8 Current ±20 mA Voltage ±15, ±50, ±100, ±150 mV -150 mV to +1.5V Thermocouple Types J, K, T with PAD-CB8 breakout box RTDs Pt100, Pt200, Pt500, Pt1000, Pt2000, Ni120 Temperature and Ωic measurement PAD-TH8-P + PAD-CB8-J/K/T 8 PAD-TH8-P + PAD-CB8-RTD Resistors up to 2 MΩ BW: 6 Hz FILT: 1 / 4 / 8 values Digital output Relay outputs (dry contacts) -- ISO: 300 VDC Max load: 0.5 A @ 60 VAC, 1 A @ 24 VDC Voltage output 0 to 10V Current output 0 to 20 mA, 4 to 20 mA -- ISO: 300 VDC -- 8 Analog and digital outputs PAD-DO7 7 PAD-AO1 1 OUT Please see the following pages for details about each of the available PAD series modules and accessories. -- Note: if you want to also use DAQ or HSI series modules in this expansion rack, then you must also have an analog cable connecting it to the DEWE-3210 or DEWE-3211. In addition, there must be an A/D card inside the DEWE-321x chassis with the appropriate number of ADCs available. Hook-up Notes: -- If using RS232 com port, you must configure the port used for additional PAD modules in the DS-7 settings > hardware setup > analog tab. -- Make sure “PAD modules” are checked 14-366| OWNER’s GUIDE Adding PAD modules to your Dewtetron system: PAD modules can be plugged directly into the DEWE-3210, because it has 8 slots for DAQ/PAD/HSI series plug-in modules. But if you don’t want to give up one of these eight dynamic input slots, you can simply add a DEWE-30 series chassis. This method also allows the DEWE-3211 to utilze PAD series modules, since this model does not have any slots on its chassis. When only PAD modules are installed into it, the DEWE-30 series expansion box connects easily via either RS485 connected to the Dewetron chassis’ EPAD interface, or via RS232C using the Dewetron chassis’ COM port. DEWE-30 chassis are available with 4, 8, 16, 32, 48, or 64 slots. -- Note: if you want to also use DAQ or HSI series modules in this expansion rack, then you must also have an analog cable connecting it to the DEWE-3210 or DEWE-3211. In addition, there must be an A/D card inside the DEWE-321x chassis with the appropriate number of ADCs available. Typical hook-ups PAD modules can plug directly into any DEWE system that has DAQ/PAD/HSI slots, or... PAD modules can plug into a DEWE-30 chassis, and connect to a DEWE system via RS485 (always available on the EPAD connector in any DEWE mainframe) When using PAD modules simply with a computer (not a DEWE computer), you can use the RS232 serial interface on the back of the DEWE-30 chassis to connect to your computer. If your computer does not have RS232, you can obtain and use an RS232 to USB converter that will create a virtual com port on your computer. Do not connect both RS232 (USB) and RS485 interfaces at the same time. If using RS232 com port, you must configure the port used for additional PAD modules in the DS-7 hardware setup, analog tab. Make sure that PAD modules are check-marked in the HARDWARE SETUP SCREEN when using DS-7 software When adding external PAD modules, enter the number of them under “Additional PAD modules” If adding a DEWE-30 via RS232, select the appropriate com port here for the additional PAD modules. OWNER’s GUIDE - Conditioners, PAD | 14-367 Addressing PAD modules Each PAD module must have a unique address (just like DAQ modules). The address is stored inside the PAD module in non-volatile memory. Therefore, if you remove a PAD module from one system, where it was set to address 31, and plug it into a different Dewetron chassis, it will still report itself on the bus at address 31. This can cause a conflict if you already have a module at this address. In addition, it will be confusing to you when you hook up your signals to what you believe is PAD module at address 16, but the channels show up on address 31. Therefore, it is vitally important that you set the addresses of any DAQ, PAD, or HSI modules that you plug into your Dewetron system. -- There is no need to set the addresses of MDAQ modules, except when initially installed at the factory. There are essentially two ways to address your modules: FILL RACK PROCEDURE - this addresses all of your modules in sequence. This is what you should do if you have been changing more than one module around, to ensure that every module is at the appropriate and unique address. FILL ONE MODULE PROCEDURE - easier and faster, when you simply want to exchange one module. Let’s look at how to do each one of the above procedures: Fill Rack (all Modules) Procedure Within DEWESoft, go to the ACQUISITION MODE and select the SETUP screen, where you can see your list of modules. Now click on the top of the AMPLIFIER COLUMN and you will see this menu: Select the FILL RACK option, and the software will prompt you like this: 14-368| OWNER’s GUIDE Follow the instruction to press the TOP black button on the module in the first slot, which is always SLOT 0 in the case of doing a FILL RACK, since you are starting at 0 and going all the way up, filling all modules. When you press this button on the module, the system will beep and prompt you to press the next module’s button, and so on. Continue all the way through until you have done the last module, then press CANCEL to complete and save your changes. If you get to the position where there is an empty module slot, or a non-programmable module from the old days in that slot, press the SKIP button to move past it to the next module. You can do this as many times as needed. When you’re done, the rack should be filled with all of the modules that are physically installed within this system, like this: FILL (or CLEAR) One Module Procedure FILL RACK is a great way to ensure that your modules are all addressed correctly, and we highly recommend it if you make several module exchanges at once. But there are times when you simply want to exchange one module with a different one, or perhaps to just remove a module. This is also quite easy once you know how. Within DEWESoft, go to the ACQUISITION MODE and select the SETUP screen, where you can see your list of modules. This time, instead of clicking on the top of the AMPLIFIER COLUMN, double-click the amplifier column for the one module that you want to add, delete, or exchange. When you do this, the software will give you a similar choice as before: OWNER’s GUIDE - Conditioners, PAD | 14-369 And your choices are: If you have plugged a new module into this slot, choose FILL, then follow the prompts. If you change you mind and want to do a FILL RACK anyway, starting at slot 0, choose FILL FROM #0, then follow the prompts. If there is a module in this slot that you have removed, but it continues to show up in RED (because the software cannot really find it), choose CLEAR to remove it from the list. If you have clicked this by accident and want to cancel without making any changes, choose CANCEL Module Installation Trouble-shooting There may be times when you have trouble addressing your modules, for a variety of reasons. Here are some good tips for solving these issues: ⇒⇒ Problem: Some or all modules are showing up in RED letters. Analysis: a module shown in RED letters on the setup screen tells you that the software cannot find this module. Or, it can mean that there is a conflict with another module, like when you plug two modules with the same address into the system at the same time and don’t do a FILL RACK or FILL (or CLEAR) one of them. A very rare condition might be that a module is defective and cannot communicate properly. -- Solution: the FILL RACK procedure is always a great and easy way to solve nearly all these issues. If the FILL RACK does not solve them, remove any modules shown in RED and add them back in one at a time, using the FILL ONE MODULE procedure. Fill one module at a time until the offending modules’ addresses have been resolved. ⇒⇒ Problem: you plug in a new module into a previously unused slot, but it does not show up. Analysis: more than likely it was already set to an address that you were using, and it has either taken another module’s address, or is conflicting with it. -- Solution: the FILL RACK is always a great and easy way to solve nearly all these issues. If the FILL RACK does not solve them, remove any modules shown in RED and add them back in one at a time, using the FILL ONE MODULE procedure. Fill one module at a time until the offending modules’ addresses have been resolved. ⇒⇒ Problem: you want to use a very old PAD module which does not have the upper black button on it, so you don’t 14-370| OWNER’s GUIDE know how to address it Analysis: These modules have been out of production for a long time, but there are still some around, and they are still perfectly good modules. -- Solution: Start with the old PAD module in the slot, but NOT PRESSED IN!! Make sure the connector on the inside is not mated or making contact in any way. Now double click on the amplifier slot where you want to install this module. Select FILL when prompted. Then when the next prompt appears to press the black button or push in the module... PUSH IN THE MODULE. The green LED on its front panel should light up, and it should show up on the list on your SETUP screen. ⇒⇒ Problem: some modules show up with the SERIAL NUMBERS in the amplifier column, and some do not. Analysis: There is nothing wrong here. With each Dewetron module there is a certain revision before which the serial number was not available for external query, so these modules will not show this information on the setup screen. -- Solution: There is no solution for this. But at the same time there is not really a proble, either. If you must have modules with serial numbers showing in the software, then the only remedy is to replace older hardware with newer hardware. That will eliminate the problem. PAD modules can also be replaced via newer EPAD2 modules if you don’t want to use DAQ slots for them any more. Using EPAD2 modules will free up slots in your DEWETRON chassis for more dynamic channels, via DAQ and HSI series signal conditioners. OWNER’s GUIDE - Conditioners, PAD | 14-371 PAD-V8-P Isolated 8-channel Voltage module Module purpose: Input ranges: Bandwidth: Isolation: Signal connection: Interface boxes: Voltage input module for DC/quasi-static signals Selectable from ±100 mV to ±50V full-scale 6 Hz 350 VDC 25-pin D connector PAD-CB8-BNC: 8 channel connector block, BNC PAD-CB8-B: 8 channel connector block, banana jacks V PAD-V8-P specifications Parameter PAD-V8-P Input channels: 8 differential input channels Input ranges: Voltage Current ±100 mV, ±150 mV, ±500 mV, ±1 V, ±2.5 V, ±5 V, ±10 V, ±50 V, -0.15 to +1.5 V With external shunt resistor Resolution: 10 µV for all ranges Sample rate: 12 Hz for all channels, maximum Read-out speed: Typical 80 channels/s DC accuracy: ±0.02 % of reading ±900 μV -3 dB Bandwidth: 6 Hz (±1.5 dB @ f0) Input isolation: 350 VDC (channel to channel, and input to output) Over-voltage protection 150 VDC Common mode voltage: 350 VDC / 250 VAC @ 50 Hz NMR: 120 dB @ 50/60 Hz CMRR: 140 dB @ DC, 120 dB @ 50 Hz RS485 interface for module control/data: Yes Power supply voltage: 9 VDC ±10 % Power consumption: 0.6 W typical 1) 1) Depending on system and number of channels PAD-CB8-B and PAD-CB8-BNC break-out boxes High quality break-out boxes are available for the PAD-V8-P module. The PAD-CB8-B provides eight banana jacks, while the PAD-CB8-BNC provides eight BNC onnectors. Each one features a 2 meter long cable and connector that plugs into the face of the PAD-V8-P module. There are no electronics inside these break-out boxes. 14-372| OWNER’s GUIDE Connector pin-outs Mating connector Pin Function Pin Function 1 Channel 0 (+) 13 Channel 6 (+) 2 Channel 0 (-) 14 Channel 6 (-) 3 Channel 1 (+) 15 Channel 7 (+) 4 Channel 1 (-) 16 Channel 7(-) 5 Channel 2 (+) 17 Digital input 1* 6 Channel 2 (-) 18 Digital input 2* 7 Channel 3 (+) 19 Digital input 3* 8 Channel 3 (-) 20 +12 VDC 9 Channel 4 (+) 21 Reset / Digital input 4* 10 Channel 4 (-) 22 GND 11 Channel 5 (+) 23 Reserved 12 Channel 5 (-) 24 Reserved 25 Reserved * not supported in Dewesoft software PAD-OPT2 25-pin SUB-D connector with screw terminals (optional) Low cost alternative to the PAD-CB8-B and -BNC breakout boxes, or as a building block to making your own cable without soldering. Metal shell covers are included. OWNER’s GUIDE - Conditioners, PAD | 14-373 PAD-TH8-P Isolated 8-channel Temperature module Module purpose: Bandwidth: Isolation: Signal connection: Interface boxes: Thermocouples and RTD input module for DC/quasi-static signals 6 Hz 350 VDC 25-pin D connector PAD-CB8-TH8-K-M: T/C K mini connectors, 2 meter cable PAD-CB8-TH8-K-P2: T/C J mini connectors, 2 meter cable PAD-CB8-TH8-J-P2: T/C J mini connectors, 2 meter cable PAD-CB8-TH8-T-P2: T/C J mini connectors, 2 meter cable PAD-CB8-RTD: RTD, 9-pin DSUB, 2 meter cable PAD-TH8-P specifications Parameter PAD-TH8-P Input channels: 8 differential input channels Input voltage: ±1.5 V Input resistance: 1.4 MΩ Gain linearity: 0.001% Temperature drift: 30 ppm/°K Typical noise: 2 µV Resolution: 10 µV for all ranges Sample rate: 12 Hz for all channels, maximum Read-out speed: Typical 80 channels/s DC accuracy: Better than ±0.05 % ±200 μV (typ. ±0.03 % F.S. ±20 μV) -3 dB Bandwidth: 6 Hz (±1.5 dB @ f0) Input isolation: 350 VDC (channel to channel, and input to output) Over-voltage protection 15 VDC Common mode voltage: 130 VDC / 250 VAC @ 50 Hz NMR (50/60 Hz): 120 dB CMRR (50/60 Hz): 130 dB RS485 interface for module control/data: Yes Power supply voltage: 9 VDC ±10 % Power consumption: 0.6 W typical 1) 1) Depending on system and number of channels 14-374| OWNER’s GUIDE PAD-CB8-K-xx series break-out boxes Above left: standard size PAD-CB8-K-P2 break-out box | Above center: miniature size PAD-CB8-K-M Above: PAD-CB8-RTD break-out box Parameter PAD-CB8-J (or K or T)-P2 and PAD-CB8-J (or K or T)-M Input channels: 8 thermocouple sensors (J, K, or T) with built-in CJC (cold junction compensation) Accuracy: Thermocouple type J: ±1.0 °C @ -200 to -100 °C ±0.3 °C @ -100 to 150 °C ±0.4 °C @ 150 to 400 °C ±1 °C @ 400 to 1200 °C Typical noise: ±0.1 °C @ 6 Hz sampling; no average Operating temperature: -25 to +80 °C Cable length: 2m (up to 12 m on request) Dimensions: approx. 196 x 57 x 32.2 mm (7.7 x 2.2 x 1.3 in.) Thermocouple type K: ±1.0 °C @ -200 to -25 °C ±0.4 °C @ -25 to 120 °C ±0.6 °C @ 120 to 400 °C ±1 °C @ 400 to 1372 °C Thermocouple type T: ±1.0 °C @ -200 to -150 °C ±0.4 °C @ -150 to 400 °C PAD-CB8-RTD break-out box Parameter PAD-CB8-RTD Input channels: 8 RTD sensors Constant current: 1250 μA (CB8-RTD-S3: 250 μA) Constant current drift: 5 ppm/°K Connection types: 2-, 3-, and 4-wire Standard input ranges: Resistor 0 to 999,99 Ω, Pt100 a = 0.00385; Pt100 a = 0.003916; Pt200; Pt500; Ni120 CB8-RTD-S3: Resistor 0 to 999,99 Ω, Pt100 a = 0.00385; Pt100 a = 0.003916; Pt200; Pt500; Pt1000; Pt2000 Accuracy: Pt100 a = 0.00385 ±0.25 °C @ -200 to 100 °C ±0.4 °C @ 100 to 400 °C ±0.8 °C @ 400 to 800 °C Pt100 a = 0.003916 ±0.25 °C @ -200 to 100 °C ±0.4 °C @ 100 to 400 °C ±0.8 °C @ 400 to 800 °C Pt200 a = 0.00385 ±0.25 °C @ -200 to 100 °C ±0.4 °C @ 100 to 400 °C ±0.5 °C @ 400 to 630 °C Pt500 a = 0.00385 ±0.25 °C @ -200 to 100 °C ±0.4 °C @ 100 to 400 °C Pt1000 a = 0.00385 ±0.25 °C @ -200 to 100 °C ±0.4 °C @ 100 to 400 °C ±0.8 °C @ 400 to 600 °C Pt2000 a = 0.00385 ±0.25 °C @ -200 to 100 °C ±0.4 °C @ 100 to 400 °C ±0.8 °C @ 400 to 600 °C Pt1000 a = 0.00385 ±0.25 °C @ -200 to 100 °C ±0.4 °C @ 100 to 400 °C ±0.8 °C @ 400 to 600 °C Ni120 ±0.3 °C @ -80 to 100 °C ±0.6 °C @ 100 to 260 °C Typical noise: 0.01 °C Operating temperature: -25 to +80 °C Cable length: 2m (up to 12 m on request) Dimensions: approx. 196 x 57 x 32.2 mm (7.7 x 2.2 x 1.3 in.) OWNER’s GUIDE - Conditioners, PAD | 14-375 PAD-DO7 Isolated 7-channel Relay Output module Module purpose: Isolation: Signal connection: Important note: Driving dry contact relays 300 VDC 25-pin D connector This module is not supported by DEWESoft data acquisition software PAD-DO7 specifications Parameter PAD-DO7 Output channels: 7 relay output channels Relay type: Form “A” relay SPST N.O. with dry contacts Max load: 0.5 A (60 VAC) 1 A (24 VDC) Gain linearity: 0.001% Input isolation: 300 VRMS Relay on-time: 5 mS typical Common mode voltage: 130 VDC / 250 VAC @ 50 Hz RS485 interface for module control/data: Yes Power supply voltage: +12 VDC (±10%) Power consumption: 1.0 W typical 14-376| OWNER’s GUIDE Connector pin-outs Mating connector Pin Function Pin Function PAD-OPT2 1 R1 NO 13 R7 NO 2 R1 COM 14 R7 COM 25-pin SUB-D connector with screw terminals (optional) 3 R2 NO 15 Not connected 4 R2 COM 16 Not connected 5 R3 NO 17 Not connected 6 R3 COM 18 Not connected 7 R4 NO 19 Not connected 8 R4 COM 20 +12 VDC 9 R5 NO 21 Init 10 R5 COM 22 GND 11 R6 NO 23 Not connected 12 R6 COM 24 Not connected 25 Not connected * not supported in Dewesoft software Convenient building block to making your own cable without soldering. Metal shell covers included. OWNER’s GUIDE - Conditioners, PAD | 14-377 PAD-AO1 Isolated 1-channel Analog Output module Module purpose: Isolation: Signal connection: Important note: Driving a DC analog output 300 VDC 25-pin D connector This module is not supported by DEWESoft data acquisition software PAD-AO1 specifications Parameter PAD-AO1 Output channel: 1 analog VDC output channel Output signals: Voltage Current 0 to 10 V 0 to 20 mA or 4 to 20 mA Resolution: 12-bits Accuracy: ±0.1 % of FSR Read-back accuracy: ±1 % of FSR Rad-back resolution: ±0.02 % of FSR Zero drift: Voltage output Current output ±30 μV/°C ±0.2 μA/°C Span temp. coefficient: ±25 ppm/°C Programmable output slope: 0.125 to 1024 mA/sec or 0.0625 to 512 V/sec Current load resistor: 500 Ω Isolation: 300 VDC RS485 interface for module control/data: Yes Power supply voltage: +12 VDC (±10%) Power consumption: 1.2 W typical OUT 14-378| OWNER’s GUIDE Connector pin-outs Mating connector Pin Function Pin Function PAD-OPT2 1 Not connected 13 Not connected 2 Not connected 14 Not connected 25-pin SUB-D connector with screw terminals (optional) 3 Not connected 15 Reserved 4 Not connected 16 Reserved 5 Not connected 17 IOUT (+) 6 Not connected 18 IOUT (-) 7 Not connected 19 VOUT (+) 8 Not connected 20 VOUT (-) 9 Not connected 21 Not used 10 Not connected 22 GND 11 Not connected 23 Not connected 12 Not connected 24 Not connected 25 Not connected * not supported in Dewesoft software Convenient building block to making your own cable without soldering. Metal shell covers included. OWNER’s GUIDE - Conditioners, MDAQ | 15-379 15 MDAQ Series Conditioners MDAQ Series Common Information Calibration information All DEWETRON modules are calibrated at 25°C after a warmup time of 30 minutes and meet their specifications when leaving the factory. The time interval for recalibration depends on environmental conditions. Typically, the calibration should be checked once a year. Calibration certificates are available from DEWETRON as an option. DEWETRON offers several types: NIST traceable DEWETRON calibration certificate (USA CAL LAB only) ISO traceable DEWETRON certificate (European CAL LAB only) Calibration certificate according to ÖKD (equivalent to DKD) This manual contains no calibration information. There are separate resources optionally available for MDAQ series modules for automated calibration under Met/CAL®. The CAL-KIT contains the required cables, software and instructions that you need to add to your own calibration lab. It does not include a calibrator or volt meter. General MDAQ module specifications MDAQ modules are factory installed within your Dewetron system. From the outside you see only the input connectors. But inside, there is a BASE card which can hold any two 8-channel MDAQ-SUB modules on one side, and any MDAQ-FILT filter card on the other side. The result is a system which can be configured to suit a wide variety of applications. All specifications within this manual are valid at 25 °C. All modules are produced according to ISO9001 and ISO14001. 15-380| OWNER’s GUIDE MDAQ-BASE-5 Mother Board Every MDAQ assembly consists of a 16-channel MDAQ-BASE mother board and at least one MDAQ-SUB series 8-channel daughter card. Each MDAQ-BASE card can accept any two MDAQ-SUB cards, which are mounted next to each other on one side of the MDAQ-BASE. The other side of the MDAQ-BASE can accept any single Dewetron MDAQ-FILT series 16-channel filter card. MDAQ-BASE-5 Details The MDAQ assembly is factory installed according to your purchase order. Unlike DAQ modules, which can be freely plugged/ unplugged by the system user, MDAQ assemblies are not user-exchangeable. When your system is constructed at Dewetron, the MDAQ assembly will be completely installed and tested. TOP: MDAQ-SUB DAUGHTER cards (2) MIDDLE: MDAQ-BASE mother board BOTTOM: MDAQ-FILT card (optional) MDAQ-SUB module dimensions: Modules with BNC connectors: 175 x 61 x 30 mm (6.9 x 2.4 x 1.2 in.) Modules with DSUB connectors: 175 x 82 x 22 (6.9 x 3.2 x 0.9) MDAQ-SUB output connector (for MDAQ-BASE mother board) 68-pin amplimite series (AMP Nr. 174339-6) OWNER’s GUIDE - Conditioners, MDAQ | 15-381 Module Input type Ranges Strain gage (full, half, and 1/4 bridge, incl. shunt cal and balance) for strain gage applications 14 ranges from ±0.5 to 1000 mV/V (@ 5V excitation) Voltage up to ±10V 15 ranges from ±2.5 V to ±10 V IEPE via MSI-BR-ACC 7 ranges from ±0.25 mV to ±10V Voltage via MSI-BR-V200 6 ranges from ±10 to ±200 V Thermocouples via MSI-BRTH-J, -K, -T Full range of thermocouple type RTD via MSI-BR-RTD -200° to 1000°C, and 0 to 6.5 kΩ Strain gage (full and half bridge) for strain gage sensors 14 ranges from ±0.5 to 1000 mV/V (@ 5V excitation) Voltage up to ±10V 15 ranges from ±2.5 V to ±10 V IEPE via MSI-BR-ACC 7 ranges from ±0.25 mV to ±10V Voltage via MSI-BR-V200 6 ranges from ±10 to ±200 V Thermocouples via MSI-BRTH series Full range of thermocouple type RTD via MSI-BR-RTD -200° to 1000°C, and 0 to 6.5 kΩ Voltage up to ±200V 13 ranges from ±0.125 to ±200 V 2) IEPE via MSI-BR-ACC 7 ranges from ±0.25 mV to ±10V RTD via MSI-BR-RTD -200° to 1000°C, and 0 to 6.5 kΩ 8 Voltage up to ±200V 8 8 Chs MDAQ-SUB-STG-D Connector: DB9 MSI V 8 MSI MSI MDAQ-SUB-BRIDGE-D Connector: DB9 MSI 8 V MSI MSI MDAQ-SUB-V200-D Connector: DB9 8 V MSI TEDS Bandwidth High-pass Filter Excitation √ BW: 30 kHz HF: -EX: 0 to 12 VDC √ BW: 30 kHz HF: 0.16 Hz EX: 0 to 12 VDC EX: ±15 VDC √ BW: 300 kHz EX: 0 to 12 VDC EX: ±15 VDC 13 ranges from ±0.125 to ±200 V -- BW: 300 kHz HF: -EX: -- IEPE or voltage up to ±10V 8 ranges from ±125 mV to ±10 V √ BW: 300 kHz HF: 0.16 Hz EX: 4/8 mA IEPE or voltage up to ±10V 8 ranges from ±125 mV to ±10 V √ BW: 300 kHz HP: 0.16 and 3.4 Hz EX: 4/8 mA MDAQ-SUB-V200-BNC MSI Connector: BNC V MDAQ-SUB-ACC-BNC Connector: BNC MDAQ-SUB-ACC-A-BNC Connector: BNC (same image as above) -- 1) When excitation is chosen on any channel of an MDAQ-SUB module, it is the same for all 8 channels of that module. ⇒⇒ 2) We recommend not exceeding 50Vrms on the DSUB input connector for safety reasons 15-382| OWNER’s GUIDE MDAQ-SUB-STG 8-channel Strain Gage/Bridge module Sensor compatibilty: Special functions: Ranges: Bandwidth: Input configuration: Compatibility: Signal connection: Full bridge sensors, 1/2 bridge sensors, 1/4 bridge sensors, Voltages up to ±10V, Potentiometric/Ωic sensors Built-in bridge completion, built-in shunt resistors, Software selectable auto-balance Excitation programmable in 1 mV steps from 0 to 12VDC Sense lines for the most accurate measurements 15 input ranges from ±2.5mV to ±10V 30 kHz Differential (not isolated) Plugs into any MDAQ-BASE card -D: Banana plugs (standard) -L: 8-pin LEMO connector (optional) V MDAQ-SUB-STG specifications Parameter MDAQ-SUB-STG Gain: 0.5 to 2000 Input ranges @ 5VDC excitation: ±2.5, 5, 10, 20, 25, 50, 100, 200, 250, 500, 1000, 1250, 2500, 5000, 10 000 mV ±0.5, 1, 2, 4, 5, 10, 20, 40, 50, 100, 200, 250, 500, 1000 mV/V Input impedance: >100 MΩ Input noise: 3.5 nV * √Hz Typ. input offset drift: 0.5 μV/K (for ranges < 200 mV) DC Accuracy (High Gain) ±2.5mV;5mV/V;10mV/V;±25mV 20mV 50mV ±100mV to ±200mV (with correction table applied) ±0.03% of reading ±15μV [±3μV/V @5 Vexc] ±0.03% of reading ±0.12% of range ±0.03% of reading ±0.06% of range ±0.03% of reading ±0.03% of range (no correction table applied) ±0.15% of reading ±15μV [±3μV/V @5 Vexc] ±0.03% of reading ±0.12% of range ±0.03% of reading ±0.06% of range ±0.03% of reading ±0.03% of range DC Accuracy ±0.250 to ±1V ±1.25V; ±2.5V ±5; 10V (with correction table applied) ±0.03% of reading 400μV [±80μV/V @5 Vexc] ±0.03% of reading ±1mV ±0.03% of reading ±0.03% of range (no correction table applied) ±0.15% of reading 400μV [±80μV/V @5 Vexc] ±0.15% of reading ±1mV ±0.15% of reading ±0.03% of range (Low Gain) Gain drift @ 5VDC excitation: 10 ppm/K of range ±0.02 μV/V/K Excitation voltage: 0 to 12 VDC, programable in 1 mV steps. (5 VDC default) Excitation accuracy: ±0.05 % ±0.7 mV Excitation drift: ±10 ppm/K ±50 μV/K Excitation protection: Continuous short to ground Excitation current limit: 50 mA/channel Bridge types: 4- or 6-wire full bridge 3- or 5-wire 1⁄2 bridge with internal completion (software selectable) 3- wire Quarter bridge with internal 120 Ω and 350 Ω completion (software selectable) Shunt resistor: Internal 100 k and 50 k Resistor (software selectable) Completion and Shunt resistor accuracy: 0.05% 5ppm/°K Bridge resistance: 120 Ω to 10 k Ω OWNER’s GUIDE - Conditioners, MDAQ | 15-383 Parameter MDAQ-SUB-STG Automatic bridge balance: 2.5mV to 20mV 25mV to 200mV 250mV to 1V 2V to 10V Absolute Voltage mV/V @ 5V EXC ±10mV ±100mV ±0.5V ±5V ±2mV/V ±20mV/V ±100mV/V ±1000mV/V μm/m @ 5VEXC (k=2 quarter bridge) ±4,000μm/m ±40,000μm/m ±200,000μm/m ±2,000,000μm/m -3 dB Bandwidth: 30 kHz Filters (low-pass): See MDAQ-FILT specification (option) Typ. SNR @ 30 kHz [1 kHz] and @ 5 VDC excitation 64 dB [82 dB] @ 1 mV/V 82 dB [96 dB] @ 50 mV/V Typ. CMR @ 0.1 mV/V [1 mV/V] and @ 5 VDC excitation 125 dB [120 dB] @ DC 115 dB [110 dB] @ 400 Hz 110 dB [105 dB] @ 1 kHz Input isolation: N/A (input is differential but not isolated) Common Mode Voltage: 12V maximum Input over-voltage protection: ±25 VDC Output voltage: ±5 V Output resistance: < 10 Ω Output current: 5 mA max. Output protection: Continuous short to ground TEDS compatible 1) Yes, compatible with TEDS chips DS2406, DS2430A, DS2432, DS2433 Power consumption: @ 5 VDC excitation @ 5 VDC excitation @ 10 VDC excitation Standard operating temperature: 350 Ω 16 Channels typ. 8 W 120 Ω 16 Channels typ. 15 W 350 Ω 16 Channels typ. 15 W 0 °C to 70 °C (32 °F to 158 °F) 1) When MSI modules are used, the TEDS interface is used by the MSI, and is not available to any sensor that you may connect Module Pin-outs (all 8 inputs are the same) ⇒⇒ CAUTION: The sensor shield can be connected to ei- ther pin 4 (SUB-D version only) or the housing of the 9-pin SUB-D / 8-pin LEMO connector, depending on your application. ⇒⇒ If signals above 60 V may appear, don’t use the metal housing of SUBD connector. PIN Function 1 EXC+ 2 IN+ 3 Sense - 4 GND 5 +15VDC (50 mA) 6 Sense + 7 IN- 8 EXC- 9 TEDS 15-384| OWNER’s GUIDE Full bridge signal connection 6-wire and 4-wire sensor connection Voltage or Current excitation are allowed. Sense lines MUST be connected to the excitation also when 4-wire connection is used. 6-wire sensor connection: Sense+ is connected to EXC+ at the sensor 4-wire sensor connection: Sense+ is connected to EXC+ at the connector Half bridge signal connection 5-wire and 3-wire sensor connection, and potentiometric sensors 5-wire sensor connection: Sense+ is connected to EXC+ at the sensor 3-wire sensor connection: Sense+ is connected to EXC+ at the connector Voltage or Current excitation are allowed. A potentiometer can be seen similar to a half bridge sensor with ±500 mV/V sensitivity. Therefore potentiometric sensors can be measured with bridge amplifiers. The advantages of using the MDAQ-STG for potentiometric measurements is by adjusting the offset and range, you can focus on a certain potentiometer position with higher resolution. The scaling is ±500 mV/V equals ±50 % of potentiometer position. OWNER’s GUIDE - Conditioners, MDAQ | 15-385 -- 1) ‘R+’ has to be connected only if shunt calibration is required, otherwise it can be left unconnected. Quarter bridge signal connection 3-wire sensor connection (Sense+ is connected to EXC+ at the sensor) ⇒⇒ Sense leads (SUB-D: pin 3 and 6 must be connected! -- ‘R+’ has to be connected only if shunt calibration is required, otherwise it can be left unconnected. -- The 3-wire quarter bridge is only able to compensate symmetrical wire resistance Other measurement modes and hook-ups Voltage and microvolt measurement signal connection 15-386| OWNER’s GUIDE ⇒⇒ CAUTION: If the excitation is not used for sensor supply it has to be deactivated by setting it to 0 V. Sensor with 15VDC supply, and voltage output Why More Wires are Better... Sensitivity: For sensor wiring typically copper cables are used. For example a 120 Ω full bridge connected with four 0.14 mm2 cables will have an sensitivity error of 2.1 % due to the 1.27 Ω wire resistance. But with 6-wire technology this can be completely compensated! Temperature drift: Intial error Drift after 10°C warm up Offset Sensitivity Offset Sensitivity 2-wire 25183 μm/m -4.97 % 956 μm/m -0.18 % 3-wire 0 μm/m -2.6 % 0 μm/m -0.01 % 4-wire 0 μm/m 0.0 % 0 μm/m 0.00 % OWNER’s GUIDE - Conditioners, MDAQ | 15-387 MDAQ-SUB-BRIDGE 8-channel Bridge module Sensor compatibilty: Special functions: Ranges: Bandwidth: Input configuration: Compatibility: Signal connection: Full bridge sensors, 1/2 bridge sensors Voltages up to ±10V, Potentiometric/Ωic sensors Built-in bridge completion for half bridge AC/DC coupling software selectable Software selectable auto-balance Several selectable excitation voltages Sense lines for the most accurate measurements 15 input ranges from ±2.5mV to ±10V 30 kHz Differential (not isolated) Plugs into any MDAQ-BASE card -D: Banana plugs (standard) -L: 8-pin LEMO connector (optional) V MDAQ-SUB-BRIDGE specifications Parameter MDAQ-SUB-BRIDGE Gain: 0.5 to 2000 Input ranges @ 5VDC excitation: ±2.5, 5, 10, 20, 25, 50, 100, 200, 250, 500, 1000, 1250, 2500, 5000, 10 000 mV ±0.5, 1, 2, 4, 5, 10, 20, 40, 50, 100, 200, 250, 500, 1000 mV/V Input impedance: 1 MΩ Input noise: 3.5 nV * √Hz Typ. input offset drift: 0.5 μV/K (for ranges < 200 mV) DC Accuracy (High Gain) ±2.5mV;5mV/V;10mV/V;±25mV 20mV 50mV ±100mV to ±200mV (with correction table applied) ±0.03% of reading ±15μV [±3μV/V @5 Vexc] ±0.03% of reading ±0.12% of range ±0.03% of reading ±0.06% of range ±0.03% of reading ±0.03% of range (no correction table applied) ±0.15% of reading ±15μV [±3μV/V @5 Vexc] ±0.03% of reading ±0.12% of range ±0.03% of reading ±0.06% of range ±0.03% of reading ±0.03% of range DC Accuracy ±0.250 to ±1V ±1.25V; ±2.5V ±5; 10V (with correction table applied) ±0.03% of reading 400μV [±80μV/V @5 Vexc] ±0.03% of reading ±1mV ±0.03% of reading ±0.03% of range (no correction table applied) ±0.15% of reading 400μV [±80μV/V @5 Vexc] ±0.15% of reading ±1mV ±0.15% of reading ±0.03% of range (Low Gain) Gain drift @ 5VDC excitation: 10 ppm/K of range ±0.02 μV/V/K Excitation voltage: 0.25, 0.5, 1, 2.5, 5V (default) and 10 VDC (software selectable) Excitation accuracy: ±0.05 % ±0.7 mV Excitation drift: ±10 ppm/K ±50 μV/K Excitation protection: Continuous short to ground Excitation current limit: 50 mA/channel Bridge types: 4- or 6-wire full bridge 3- or 5-wire 1⁄2 bridge with internal completion (software selectable) Completion and Shunt resistor accuracy: 0.05% 5ppm/°K Bridge resistance: 120 Ω to 10 k Ω Automatic bridge balance: Absolute Voltage mV/V @ 5V EXC ±10mV ±100mV ±0.5V ±5V ±2mV/V ±20mV/V ±100mV/V ±1000mV/V 2.5mV to 20mV 25mV to 200mV 250mV to 1V 2V to 10V μm/m @ 5VEXC (k=2 quarter bridge) ±4,000μm/m ±40,000μm/m ±200,000μm/m ±2,000,000μm/m 15-388| OWNER’s GUIDE Parameter MDAQ-SUB-BRIDGE -3 dB Bandwidth: 30 kHz Filters (low-pass): See MDAQ-FILT specification (option) Typ. SNR @ 30 kHz [1 kHz] and @ 5 VDC excitation 64 dB [82 dB] @ 1 mV/V 82 dB [96 dB] @ 50 mV/V Typ. CMR @ 0.1 mV/V [1 mV/V] and @ 5 VDC excitation 125 dB [120 dB] @ DC 115 dB [110 dB] @ 400 Hz 110 dB [105 dB] @ 1 kHz Input isolation: N/A (input is differential but not isolated) Common Mode Voltage: 12V maximum Input over-voltage protection: ±25 VDC Output voltage: ±5 V Output resistance: < 10 Ω Output current: 5 mA max. Output protection: Continuous short to ground TEDS compatible 1) Yes, compatible with TEDS chips DS2406, DS2430A, DS2432, DS2433 Power consumption for 16 channels: @ 5 VDC excitation @ 5 VDC excitation @ 10 VDC excitation @ 10 VDC excitation 350 Ω @ 10V Exc. typ. 15 W 120 Ω @ 5V typ. 15 W 350 Ω max. @ 15 W max. 120 Ω @ 15 W Standard operating temperature: 0 °C to 70 °C (32 °F to 158 °F) 1) When MSI modules are used, the TEDS interface is used by the MSI, and is not available to any sensor that you may connect Module Pin-outs (all 8 inputs are the same) PIN Function 1 EXC+ 2 IN+ 3 Sense - 4 GND 5 +15VDC (50 mA) 6 Sense + or the housing of the 9-pin SUB-D / 8-pin LEMO connector, depending on your application. 7 IN- 8 EXC- ⇒⇒ If signals above 60 V may appear, don’t use the metal housing of SUBD connector. 9 TEDS ⇒⇒ CAUTION: The sensor shield can be connected to either pin 4 (SUB-D version only) OWNER’s GUIDE - Conditioners, MDAQ | 15-389 Full bridge signal connection 6-wire and 4-wire sensor connection Voltage or Current excitation are allowed. Sense lines MUST be connected to the excitation also when 4-wire connection is used. 6-wire sensor connection: Sense+ is connected to EXC+ at the sensor 4-wire sensor connection: Sense+ is connected to EXC+ at the connector Half bridge signal connection 5-wire and 3-wire sensor connection, and potentiometric sensors 5-wire sensor connection: Sense+ is connected to EXC+ at the sensor 3-wire sensor connection: Sense+ is connected to EXC+ at the connector Voltage or Current excitation are allowed. A potentiometer can be seen similar to a half bridge sensor with ±500 mV/V sensitivity. Therefore potentiometric sensors can be measured with bridge amplifiers. The advantages of using the MDAQ-STG for potentiometric measurements is by adjusting the offset and range, you can focus on a certain potentiometer position with higher resolution. The scaling is ±500 mV/V equals ±50 % of potentiometer position. -- 1) ‘R+’ has to be connected only if shunt calibration is required, otherwise it can be left unconnected. 15-390| OWNER’s GUIDE Other measurement modes and hook-ups Voltage and microvolt measurement signal connection ⇒⇒ CAUTION: If the excitation is not used for sensor supply it has to be deactivated by setting it to 0 V. Sensor with 15VDC supply, and voltage output Why More Wires are Better... Sensitivity: For sensor wiring typically copper cables are used. For example a 120 Ω full bridge connected with four 0.14 mm2 cables will have an sensitivity error of 2.1 % due to the 1.27 Ω wire resistance. But with 6-wire technology this can be completely compensated! Temperature drift: Intial error Drift after 10°C warm up Offset Sensitivity Offset Sensitivity 2-wire 25183 μm/m -4.97 % 956 μm/m -0.18 % 3-wire 0 μm/m -2.6 % 0 μm/m -0.01 % 4-wire 0 μm/m 0.0 % 0 μm/m 0.00 % OWNER’s GUIDE - Conditioners, MDAQ | 15-391 MDAQ-SUB-V200 Differential Voltage Input module Sensor compatibilty: Special features: Measuring ranges: Bandwidth: Input configuration: Compatibility: Signal connection: Voltages, and low currents with appropriate shunt The DSUB version has sensor power on board, and is TEDS compatible Low and high ranges from ±0.125 V to ±200 V 300 kHz Differential (not isolated) Plugs into any MDAQ-BASE card -BNC: BNC jacks (standard) -D: 9-pin DSUB connector V MDAQ-SUB-V200 Specifications Parameter MDAQ-SUB-V200 Input ranges: Divider OFF (higher voltage ranges) Divider ON lower voltage ranges) ±0.125 V, 0.25 V, 0.5 V, 1 V, 1.25 V, 2.5 V, 5 V, 10 V (12 V max CMV) ±2.5 V, 5 V, 10 V, 20 V, 25 V, 50 V, 100 V, 200 V (250 V max CMV) Input impedance: 1 MΩ to GND, 2 MΩ differential DC accuracy: ±0.125 to ±1V ±1.25V; ±2.5V ±5; ±10V (Divider OFF) (with correction table applied) ±0.03% of reading ±400 μV ±0.03% of reading ±1 mV ±0.02% of reading ±0.03% of range (without correction table applied) ±0.15% of reading 400 µV ±0.15% of reading 1 mV ±0.15% of reading ±0.03% of range DC accuracy: ±2.5 to ±20V ±25V; ±50V ±100; ±200V (Divider ON) (with correction table applied) ±0.06% of reading ±8 mV ±0.03% of reading ±20 mV ±0.02% of reading ±0.03% of range (without correction table applied) ±0.25% of reading 8 mV ±0.25% of reading 20 mV ±0.25% of reading ±0.03% of range Gain drift: Input offset drift: 125 mV to 10 V 2.5 V to 200 V typ. 15 ppm/K (max. 40 ppm/K) (Divider OFF) (Divider ON) Over voltage protection: -3 dB Bandwidth: typ. 10 μV/K (max. 20 μV/K) typ. 100 μV/K (max. 200 μV/K) ±250 VDC (Divider OFF) (Divider ON) Channel separation @ 10 kHz: 300 kHz (200 kHz at range 0.125 V and 1.25 V) 300 kHz (200 kHz at range 2.5 V and 25 V) > 80 dB CMRR @ 50 Hz (@ 1 kHz) (Divider OFF) (Divider ON) Typ. SNR @ 50 kHz BW ±0.125 V and ±0.25 V ±0.5 V to ±10 V (Divider OFF) ±2.5 V and ±10 V ±10 V to ±25 V ±25 V to ±200 V (Divider ON) > 94 dB (> 80 dB) > 70 dB (> 56 dB) > 87 dB > 96 dB > 84 dB > 88 dB < 93 dB Programmable sensor supply (1) Sensor supply accuracy(1) Fixed sensor supply (1) 0 to 12 V short circuit protected; 50mA current limmitation ±0.05 % ±2 mV ±15 V (50 mA) Output voltage: ±5 V Output impedance: 5Ω Output current: ±20 mA RS485 interface for module control: Yes 15-392| OWNER’s GUIDE Parameter MDAQ-SUB-V200 Power supply: ±15 VDC Power consumption: typ. 4.5 W / 10 W Sensor connection: -BNC: -D: TEDS support: Yes (-D model only!), compatible with chips DS2406, DS2430A, DS2432, DS2433 Standard operating temperature: 0 °C to 70 °C (32 °F to 158 °F) BNC connector, female 9-pin DSUB connector, female 1) Applies to the MDAQ-SUB-V-200-D model only (DSUB connector) Module Pin-outs (all 8 inputs are the same) MDAQ-SUB-V-200-BNC version Hot: IN+ Shield: IN- MDAQ-SUB-V-200-D version See table > ⇒⇒ If signals above 60 V may appear, don’t use the metal housing of SUBD connector. ⇒⇒ Note - for safety reasons, refer to your local/government regulations about the maximum voltage that may be applied to BNC or DSUB connectors! PIN DSUB-9 connector MDAQ-SUB-V-200-D module (typ x 8) 1 TEDS 2 IN+ 3 Reserved 4 GND 5 +15V sensor supply 6 0 - 12VDC sensor supply (software programmable) 7 IN- 8 Reserved 9 -15V sensor supply OWNER’s GUIDE - Conditioners, MDAQ | 15-393 MDAQ-SUB-V200 sensor connections Sensor with differential output, module powered Sensor with common ground Loop-powered sensor, ext. shunt Single-ended connection Current measurement, external shunt Potentiometric connection 15-394| OWNER’s GUIDE Avoiding Common Mode Issues In contrast to isolated amplifiers the input common voltage range is limited at differential amplifiers. The measurement configuration below shows the possibilities to measure the current of a 24 V supplied system. The optimum input range in that case is 500 mV. That will work fine for CH1 in the picture, but not for the CH0. This channel will exceed the maximum common mode voltage and go into overflow. With the MDAQ-SUB-V-200 module, there are several ranges which overlap between the 12V and 250V max CMV ranges. This is intentionally done to provide you with more options when it comes to choosing the best possible fit of range/resolution/common mode. The max. CMV is shown here within the software (analog channel setup dialog): Notice that in the screen shot above left, the CMV is shown to be 12V max, whereas it is 250V max in the screen shot above right. ⇒⇒ Always pay attention to the max CMV which is listed on the channel setup screen, when you select a given range within the software. OWNER’s GUIDE - Conditioners, MDAQ | 15-395 MDAQ-SUB-ACC IEPE Accelerometer module Sensor compatibilty: Special features: Modes: Bandwidth: Isolation: Compatibility: Signal connection: IEPE constant current accelerometers and microphones, and ±10V max. signals Single ended or differential input mode AC/DC coupling 300 kHz N/A Plugs into any MDAQ-BASE card BNC connector V MDAQ-SUB-ACC specifications Parameter MDAQ-SUB-ACC Input voltage ranges: ±0.125 V, 0.25 V, 0.5 V, 1 V, 1.25 V, 2.5 V, 5 V, 10 V Gain: 0.5, 1, 2, 4, 5, 10, 20, 40 Input modes: Voltage modes Input impedance: DC Accuracy: IEPE or low voltage Single-ended or differential AC or DC coupling 1 MΩ ±0.125 to ±1V ±1.25V; ±2.5V ±5;10V (with correction table applied) ±0.03% of reading ±400 μV ±0.03% of reading ±1 mV ±0.02% of reading ±0.03% of range (without correction table applied) ±0.15% of reading 400 µV ±0.15% of reading 1 mV ±0.15% of reading ±0.03% of range Gain drift: typ. 10 ppm/K (max. 20 ppm/K) Input offset drift: typ. 3 μV/K (max. 12 μV/K) Over voltage protection: IN+ differential ±40 V IN- differential: max ±40 V IN- Single ended: max 300 mA Max common mode voltage: 12 V (differential mode) -3 dB Bandwidth: 300 kHz (200 kHz at range 1.25 V and 0.125 V) Channel separation @ 10 kHz: > 96 dB CMR @ 50 Hz (@ 1 kHz): > 94 dB (> 80 dB) Typ. SNR @ 50 kHz bandwidth: Range ±0.125 V Range ±0.25 V Range ±0.5 V to ±1.25 V Range ±2.5 V to ±10 V > 87 dB > 93 dB > 96 dB > 100 dB Sensor excitation: 4 or 8 mA, 5 % up to 24 VDC Current noise: 150 nA * sqrt (Hz) RS485 interface for module control: Yes Power supply voltage: ±15 VDC Output voltage: ±5 V Output impedance: 5Ω Power consumption: typ. 10 W (max 12 W @ 8 mA sensor excitation) TEDS support: Yes, compatible with TEDS chips DS 2406, DS 2430A, DS 2432, DS2433 Standard operating temperature: 0 °C to 70 °C (32 °F to 158 °F) 15-396| OWNER’s GUIDE Module Pin-outs (all 8 inputs are the same) MDAQ-SUB-ACC-BNC version Typical Sensor Hook-ups HOT: SHIELD: Above left: IEPE sensor mode IN+ IN- Above right: Voltage input mode For constant current powered sensors (IEPE) the current source is switched on and the minus input of the BNC is connected to GND. The input coupling is switched to AC. In this mode the TEDS interface circuit is activated so that it can read the sensor information from IEEE 1451.4 compliant sensors (the TEDS interface is disabled in the voltage mode). In all voltage measurement modes the current source is disconnected from the input signal. The position of the GND switch defines if the amplifier is used for differential or singled-ended input configuration. The allowed input voltage range (common mode voltage) is limited to 12 V. -- NOTE: If floating input sources (like batteries) are connected to the MDAQ-SUB-ACC the amplifier has to be used in single ended configuration (GND-switch ON)! Otherwise the input may be out of the maximum input voltage range! -- In differential mode as well as in single ended mode AC or DC coupling is possible. The standard high pass filter frequency is 3 Hz in AC-mode. Please contact DEWETRON for other frequencies. ⇒⇒ The constant current supply (4 or 8 mA) that you set on one channel, will apply to all 8 channels of this MDAQ- SUB module. However, other MDAQ-SUB modules may be set to different constant current levels. OWNER’s GUIDE - Conditioners, MDAQ | 15-397 MDAQ-SUB-ACC-A IEPE Accelerometer module Sensor compatibilty: Special features: Modes: Bandwidth: Isolation: Compatibility: Signal connection: IEPE constant current accelerometers and microphones, and ±10V max voltages Two selectable high-pass filters Single ended, AC/DC coupling 300 kHz N/A Plugs into any MDAQ-BASE card -BNC: BNC connector V MDAQ-SUB-ACC-A specifications Parameter MDAQ-SUB-ACC-A Input voltage ranges: ±0.125 V, 0.25 V, 0.5 V, 1 V, 1.25 V, 2.5 V, 5 V, 10 V Gain: 0.5, 1, 2, 4, 5, 10, 20, 40 Input modes: Voltage modes Input impedance: DC Accuracy: IEPE or low voltage Single-ended only AC or DC coupling 1 MΩ ±0.125 to ±1V ±1.25V; ±2.5V ±5;10V (with correction table applied) ±0.03% of reading ±400 μV ±0.03% of reading ±1 mV ±0.02% of reading ±0.03% of range (without correction table applied) ±0.15% of reading 400 µV ±0.15% of reading 1 mV ±0.15% of reading ±0.03% of range Gain drift: typ. 10 ppm/K (max. 20 ppm/K) Input offset drift: typ. 3 μV/K (max. 12 μV/K) Over voltage protection: IN+ ±40 V IN- Single ended: max 300 mA Max common mode voltage: ±12 V (differential mode) -3 dB Bandwidth: 300 kHz (200 kHz at range 1.25 V and 0.125 V) Channel separation @ 10 kHz: > 96 dB CMR @ 50 Hz (@ 1 kHz): > 94 dB (> 80 dB) Typ. SNR @ 50 kHz bandwidth: Range ±0.125 V Range ±0.25 V Range ±0.5 V to ±1.25 V Range ±2.5 V to ±10 V > 87 dB > 93 dB > 96 dB > 100 dB Sensor excitation: 4 or 8 mA, 5 % up to 24 VDC Current noise: 150 nA * sqrt (Hz) RS485 interface for module control: Yes Power supply voltage: ±15 VDC Output voltage: ±5 V Output impedance: 5Ω Power consumption: typ. 10 W (max 12 W @ 8 mA sensor excitation) TEDS support: Yes, compatible with TEDS chips DS 2406, DS 2430A, DS 2432, DS2433 Standard operating temperature: 0 °C to 70 °C (32 °F to 158 °F) 15-398| OWNER’s GUIDE Module Pin-outs (all 8 inputs are the same) MDAQ-SUB-ACC-A-BNC version Typical Sensor Hook-ups Above left: IEPE sensor mode Above right: Voltage input mode For constant current powered sensors (IEPE) the current source is switched on and the minus input of the BNC is connected to GND. In this mode the TEDS interface circuit is activated so that it can read the sensor information from IEEE 1451.4 compliant sensors (the TEDS interface is disabled in the voltage mode). In all voltage measurement modes the current source is disconnected from the input signal. The position of the GND switch defines if the amplifier is used for differential or singled-ended input configuration. The allowed input voltage range (common mode voltage) is limited to 12 V. ⇒⇒ The constant current supply (4 or 8 mA) that you set on one channel, will apply to all 8 channels of this MDAQ- SUB module. However, other MDAQ-SUB modules may be set to different constant current levels. OWNER’s GUIDE - Conditioners, MDAQ | 15-399 MDAQ-FILT-5-Bx Filter card MDAQ-FILT-5-BE: Bessel characteristics MDAQ-FILT-5-BU: Butterworth characteristics 16 Channel 2nd order low pass filter 5 selectable filters including bypass function 5 different cut off frequencies Discrete low noise filter design Independent filter settings for each channel Direct control from MDAQ-xx Amplifier series MDAQ-FILT-5-Bx specifications Parameter MDAQ-FILT-5-Bx Filter range (-3 dB): Version MDAQ-FILT-5-BU Version MDAQ-FILT-5-BE Version MDAQ-FILT-5-BU-S1 Bypass bandwidth: Filter characteristics: 30 Hz, 100 Hz, 300 Hz, 1 kHz, 10 kHz, bypass 30 Hz, 100 Hz, 300 Hz, 1 kHz, 10 kHz, bypass 100 Hz, 1 kHz, 10 kHz, 30 kHz, 100 kHz, bypass other frequencies optionally available > 700 kHz -BE model -BU model 2-Pole Bessel 2-Pole Butterworth Attenuation slope: 40 dB/decade (12 dB/octave) Filter Accuracy: ±1.5 dB @ fc DC gain: 1 (0 dB) Offset error: Max. 1 mV (typ <0.2 mV) Max. 0.02% of range with MDAQ-BASE-5 Input voltage range: ±10 VPP Channel separation @ 50 kHz: > 96 dB CMR @ 50 Hz (@ 1 kHz): > 94 dB (> 80 dB) Input configuration: Designed to work with MDAQ-BASE-5 mother board Output configuration: Single-ended S/NR @ bandwidth: > 100 dB Output impedance: 5Ω Output current: 20 mA max. Output connector: 68-pin Amplimite series (AMP Nr. 174339-6), SCSI II Type Power supply: ±7.5 V to ±15 V direct via MDAQ-BASE Power consumption: typ. 3 W Dimensions: 175 x 61 x 14 mm (6.9 x 2.4 x 0.9 in.) 15-400| OWNER’s GUIDE MDAQ-AAF4-5-Bx Filter card MDAQ-AAF4-5-BE: Bessel characteristics MDAQ-AAF4-5-BU: Butterworth characteristics 16 Channel 4th order low pass filter 5 selectable filters including bypass function 5 different cut off frequencies Discrete low noise filter design Independent filter settings for each channel Direct control from MDAQ-xx Amplifier series MDAQ-AAF4-5-Bx specifications Parameter MDAQ-AAF4-5-Bx Filter range (-3 dB): version MDAQ-AAF4-5-BU version MDAQ-AAF4-5-BU-S1 version MDAQ-AAF4-5-BU-S2 version MDAQ-AAF4-5-BE-S1 Bypass bandwidth: Filter characteristics: 100 Hz, 1 kHz, 10 kHz, 30 kHz, 100 kHz, bypass 163 Hz, 500 Hz, 2.5 kHz, 10 kHz, bypass, bypass 10 Hz, 100 Hz, 1 kHz, 10 kHz, 20 kHz, bypass 100 Hz, 1 kHz, 10 kHz, 20 kHz, 30 kHz, bypass other frequencies optionally available > 700 kHz -BE model -BU model 4-Pole Bessel 4-Pole Butterworth Attenuation slope: 80 dB/decade (24 dB/octave) Filter Accuracy: ±1.5 dB @ fc DC gain: 1 (0 dB) Offset error: Max. 1 mV (typ <0.2 mV) Max. 0.02% of range with MDAQ-BASE-5 Input voltage range: ±10 VPP Channel separation @ 50 kHz: > 96 dB CMR @ 50 Hz (@ 1 kHz): > 94 dB (> 80 dB) Input configuration: Designed to work with MDAQ-BASE-5 mother board Output configuration: Single-ended S/NR @ bandwidth: > 100 dB Output impedance: 5Ω Output current: 20 mA max. Output connector: 68-pin Amplimite series (AMP Nr. 174339-6), SCSI II Type Power supply: ±7.5 V to ±15 V direct via MDAQ-BASE Power consumption: typ. 3 W Dimensions: 175 x 61 x 14 mm (6.9 x 2.4 x 0.9 in.) OWNER’s GUIDE - Conditioners, EPAD2/CPAD2 | 16-401 16 EPAD2 and CPAD2 Series EPAD2 and CPAD2 overview EPAD2 modules are external signal conditioning modules which connect to virtually any Dewetron system via the RS485 interface, normally marked EPAD on your Dewetron system. It is marked this way on both the DEWE-3210 and DEWE-3211 mainframes. However, EPAD2 series modules may also be connected to any computer using a small interface box called the EPAD-BASE2, which allows you to connect one or more EPAD2 modules to your computer’s RS232 or USB 2.0 interface. CPAD2 modules are external modules which connect to any Dewetron system which has at least one CAN BUS interface. Unlike EPAD2 series modules which employ the RS485 bus for communication and data transfer, CPAD2 modules employ the CAN BUS for these functions. Both EPAD2 and CPAD2 modules are 100% compatible with Dewetron software. The following pages will show you how to connect and control these modules from within your system, as well as provide detailed specifications about these modules. EPAD2 and CPAD2 modules are available for measuring voltage, current, and temperature. Each module provides 8 inputs. They have a separate 24-bit ADC for each input channels, and provide galvanic isolation to avoid ground loops and common mode problems. They can be daisy-chained to add more and more channels to a single interface (CPAD2 and EPAD2 modules cannot be chained together). EPAD2 and CPAD2 modules are not meant for dynamic/AC signals, but are intended for slowly changing (quasi-static) and DC signals. They are the ideal way to add a moderate or even large number of slow channels to your Dewetron system in an affordable and convenient way. Further technical details can be found within the xPAD technical reference manual, a separate document. All specifications within this manual are valid at 25 °C. All modules are produced according to ISO9001 and ISO14001. 16-402| OWNER’s GUIDE General EPAD2/CPAD2 Module Specifications Environmental: Temp. range storage: Temp. range operating: Enhanced temperature range: Rel. humidity (MIL202): RFI susceptibility: -30 °C to +85 °C (-22 °F to 185 °F) -5 °C to +60 °C (23 °F to 140 °F) Upon request and special order 0 to 95 % at 60 °C, non-condensing ±0.5 % span error at 400 MHz, 5 W, 3 m All specifications within this manual are valid at 25 °C. All modules are produced according to ISO9001 and ISO14001. EPAD2/CPAD2 Series Common Information Calibration information All DEWETRON modules are calibrated at 25°C after a warmup time of 30 minutes and meet their specifications when leaving the factory. The time interval for recalibration depends on environmental conditions. Typically, the calibration should be checked once a year. Calibration certificates are available from DEWETRON as an option. DEWETRON offers several types: NIST traceable DEWETRON calibration certificate (USA CAL LAB only) ISO traceable DEWETRON certificate (European CAL LAB only) Calibration certificate according to ÖKD (equivalent to DKD) EPAD2 RS-232/485 interface EPAD2 series modules are controlled via RS-485 interface, and they require this interface for all data transfers The DEWE-3210 and DEWE-3211 include an internal RS-232/485 converter and interface. This converter allows communication with all Dewetron signal conditioning modules. To communicate with the modules, the RS-232 interface must be set to the following parameters: baud rate: 9600 data bits: 8 parity: no parity stop bits: 1 handshake: not required CPAD2 CAN BUS interface CPAD2 series modules are controlled via the industry standard CAN BUS over CAN 2.0b protocol, and they require this interface for all data transfers. CAN BUS is an option for both the DEWE-3210 and DEWE-3211 instruments, and must be installed at the factory in order for this interface to be available for CPAD2 connection. OWNER’s GUIDE - Conditioners, EPAD2/CPAD2 | 16-403 Cross-reference of EPAD2 / CPAD2 modules Module Input type Input ranges Isolation 8 thermocouple connectors Type J: xPAD2-TH8-P-J Type K: xPAD2-TH8-P-K Type T: xPAD2-TH8-P-T Type U: UNIVERSAL Type J: -210 to 1200 °C Type K: -270 to 1372 °C Type T: -270 to 400 °C Type U: includes types K, J, T, E, R, S, B, N, C, and U EPAD2-V8 CPAD2-V8 8 isolated voltage input channels Physical input range: ±50 V Software selectable: ±100 mV, ±500 mV, ±1 V, ±2.5 V, ±5 V, ±10 V 350 VDC (channel to channel and channel to BUS, power and chassis) EPAD2-RTD8 CPAD2-RTD8 8 isolated Resistance Temperature Detector (RTD) channels Resistor: 0 to 999.99 Ω RTD: PT100(385), PT200 (385), PT500(385), PT1000 (385), PT2000(385), PT100 (3961) 350 VDC (channel to channel and channel to BUS, power and chassis) EPAD2-TH8-P CPAD2-TH8-P 8 isolated voltage inputs Supported breakout boxes: PAD-CB8-x-P2 PAD-CB8x-M PAD-CB8-RTD ±1.5 V fixed 350 VDC (channel to channel and channel to BUS, power and chassis) EPAD2-LA8 CPAD2-LA8 8 isolated current inputs 0 to 20 mA, ±20 mA, ±30 mA 350 VDC (channel to channel and channel to BUS, power and chassis) EPAD2-TH8-x CPAD2-TH8-x (where x = J, K, T, U) 350 VDC (channel to channel and channel to BUS, power and chassis) COMMENTS Overvoltage protection: 15 VDC Types J, K, T have typical accuracy of ±0.4°C Type U (universal) has typical accuracy of ±1.4°C Overvoltage protection: 350 VDC DSUB25 connector - please order PAD-CB8-B or -BNC breakout boxes to complete this module Overvoltage protection: 15 VDC LEMO connectors Overvoltage protection: 15 VDC DSUB25 connector - please order PAD-CB8-J, K, T or -RTD breakout boxes to complete this module Overcurrent protection: 70 mA cont. LEMO connectors Installing CPAD2 modules After connecting a CPAD2 module to an unused CAN BUS interface on your Dewetron system, run DEWESoft and go to the HARDWARE SETTINGS screen, accessed under the SETTINGS button. Then click on the CAN button. Select the CAN interface that you connected the CPAD2 module to on that screen and set it to work with CPAD2 modules, as shown in the screen shot here. If your software does not have this selection on the CAN screen, please obtain the CPAD2 plugin from Dewetron. This is a software addon that is free of charge with your CPAD modules. It was included on a DVD/CD disk when you purchased your CPAD2 module(s). Or it can be downloaded from our FTP site. Additional CPAD2 series modules can be daisy-chained to the first module. The last CPAD2 module must have the terminator plugged into the last open connector to ensure stable bus communications. Terminator 16-404| OWNER’s GUIDE Installing EPAD2 modules When you purchase an EPAD2 module for an existing Dewetron system, you need to make a small change to the hardware setup of your system so that the EPAD2 is recognized by the software. First, connect the EPAD2 to the EPAD connector on your system. If you plan to connect multiple EPAD2 modules, start with one first and then add the others one at a time. When connected properly, the EPAD2 LED should light up, indicating that it is powered. If this does not happen, check your cabling and verify it with Dewetron if necessary. Now run DS-7. Click the SETTINGS button near the top right of the screen and then click HARDWARE SETUP. Make sure you are looking at the ANALOG page of this dialog box. It looks like this: Notice the area that we have drawn a red rectangle around in the screen shot above: this is where you need to input the number of EPAD2 modules that you want to add. Enter that number here. Then click OK to close this dialog box. Click Ch Setup to see the list of ANALOG channels in DS-7. Scroll to the very bottom of this list and you will see that four empty channels have been added. Assuming that one EPAD2 module is connected already to the bus, double-click the first empty EPAD2 channel in the list within the AMPLIFIER column: Double-click here The new empty channels are outlined in red above. Now DOUBLE-CLICK on the first amplifier button, that we have outlined in blue above. That will cause DS-7 to pop up the question “what should be done with the module?”, at which point you should click the FILL button. OWNER’s GUIDE - Conditioners, EPAD2/CPAD2 | 16-405 When you click FILL, DS-7 will prompt you to press the black button on the EPAD2 module. Use a paperclip or thin pencil lead to do that, and the module will be addressed to this slot number, and it will show up here on the Setup screen. Use the SET CH. button on the far right to configure the eight channels of this module. Now connect the next EPAD2 module and repeat these steps, moving down to the next empty amplifier button, and so on, until all EPAD2 modules have been installed. Be sure to plug the terminator into the last EPAD2 module (even if there is only one EPAD2 module). xPAD2 Series Calibration Information All DEWETRON modules are calibrated at 25°C after a warmup time of 30 minutes and meet their specifications when leaving the factory. The time interval for recalibration depends on environmental conditions. Typically, the calibration should be checked once a year. Calibration certificates are available from DEWETRON as an option. DEWETRON offers several types: NIST traceable DEWETRON calibration certificate (USA CAL LAB only) ISO traceable DEWETRON certificate (European CAL LAB only) Calibration certificate according to ÖKD (equivalent to DKD) This manual contains no calibration information. There are separate resources optionally available for MDAQ series modules for automated calibration under Met/CAL®. The CAL-KIT contains the required cables, software and instructions that you need to add to your own calibration lab. It does not include a calibrator or volt meter. 16-406| OWNER’s GUIDE EPAD2-TH8-X and CPAD2-TH8-X Intelligent amplifier with integrated 24-bit A/D conversion 8 input channels for thermocouple types J, K, T, and U (universal) Inputs isolated to 350 VDC Modules daisy-chain together to add more and more channels EPAD2 series uses RS485 interface CPAD2 series uses CAN 2.0B interface Specifications Parameter EPAD2-TH8-x and CPAD2-TH8-x Input channels: 8 isolated thermocouple channels Input signals: thermocouple types depending on module J: -210 °C to 1200 °C K: -270 °C to 1372 °C T: -270 °C to 400 °C U: Supports types K, J, T, E, R, S, B, N, C, and U Sample rate: 12.5 S/s/ch maximum -3 dB bandwidth: 6 Hz ADC type: Sigma delta ADC per channel, 24-bit (Note: CPAD2 outputs CAN data at 16-bits) Input connector: Standard “mini” thermocouple connector, polarized, color coded Type K: yellow Type J: black Type T: blue Type U: white Resolution: 0.01 °C for all types Input impedance: typically 1.4 MΩ Bias current: typically 10 nA Open thermocouple detection: module indicates fullscale if input is open Accuracy: Thermocouple type J Thermocouple type K Thermocouple type T Thermocouple type U ±1.0 °C @ -210 to -100 °C ±0.3 °C @ -100 to 760 °C ±0.4 °C @ 760 to 1200 °C ±1.0 °C @ -200 to -25 °C ±0.4 °C @ -25 to 1000 °C ±0.5 °C @ 1000 to 1372 °C ±1.0 °C @ -250 to -150 °C ±0.4 °C @ -150 to 400 °C Varies according to the T/C type and range, but accuracy ±1.4 °C, typ. ±0.7 °C Temperature drift: typically 20 ppm/°C Isolation voltage: 350 VDC (channel to channel and channel to Bus, Power and Chassis) Over-voltage protection: 15 VDC CMRR @ 50/60 Hz: 130 dB Interface: EPAD2 series: RS485 CPAD2 series: CAN BUS 2.0B protocol Read-out speed: EPAD2 series: typ. 80 ch/sec. CPAD2 series: 12.5Hz, 10Hz, 5Hz, 2Hz, 1Hz, 0.5Hz, 0.2Hz or 0.1 Hz programmable Bus power connector: LEMO EGG.1B.304 Power supply voltage: 7 to 40V Power consumption: 0.5 W maximum Dimensions: Weight: Base module (W x D x H) Mounting holes distance: 129 x 72 x 34.2 mm (5.1 x 2.8 x 1.3 in.) incl. mounting holes 119 x 7 mm (4.7 x 0.3 in.), 4.2 mm (0.165 in.) diameter 360 g typical OWNER’s GUIDE - Conditioners, EPAD2/CPAD2 | 16-407 xPAD2 interface connector Use the correct type There are two identical interface connectors for power and control. One is used to interface with either the Dewetron system, or another xPAD2 module in a series. The other can be used to extend the daisychain another xPAD2 module from this one. The two connectors are interchangeable. Thermocouples are color coded according to international conventions. PIN EPAD2 CPAD2 1 RS485 (A) CAN high 2 RS485 (B) CAN low 3 +15V supply +15V supply 4 GND GND -- Note: Our “universal” thermocouple input is cow- white, to indicate that it is compatible with multiple thermocouple types. Connecting sensors Use thermocouple sensors with standardized “mini” thermocouple connectors. This is a polarized connector with two flat blades, and one blade is wider than the other. Insert the plug correctly, and do not force the plug in the wrong way. -- Connecting the thermocouple backwards will result in wrong readings. Above: typical thermocouple mini connectors, image courtesy of Omega.com LEMO EGG.1B.304 xPAD2-TH8-X Dimensions 16-408| OWNER’s GUIDE EPAD2-V8-X and CPAD2-V8-X Intelligent amplifier with integrated 24-bit A/D conversion 8 input channels for voltages Inputs isolated to 350 VDC Modules daisy-chain together to add more and more channels EPAD2 series uses RS485 interface CPAD2 series uses CAN 2.0B interface Specifications Parameter EPAD2-V8-x and CPAD2-V8-x Input channels: 8 isolated voltage channels Input ranges: Physical input range: ±50 V Software selectable: ±100 mV, ±500 mV, ±1 V, ±2.5 V, ±5 V, ±10 V Sample rate: 12.5 S/s/ch maximum -3 dB bandwidth: 6 Hz ADC type: Sigma delta ADC per channel, 24-bit (Note: CPAD2 outputs CAN data at 16-bits) Input connector: Standard “mini” thermocouple connector, polarized, color coded Type K: yellow Type J: black Type T: blue Type U: white Resolution: 1µV for all ranges Input impedance: typically 1.4 MΩ Bias current: typically 10 nA Linearity: 0.001 % DC accuracy: ±0.02 % of reading ±900 μV Temperature drift: typically 25 ppm/°C Isolation voltage: 350 VDC (channel to channel and channel to Bus, Power and Chassis) Over-voltage protection: 15 VDC CMRR @ 50/60 Hz: 130 dB Interface: EPAD2 series: RS485 CPAD2 series: CAN BUS 2.0B protocol Read-out speed: EPAD2 series: typ. 80 ch/sec. CPAD2 series: 12.5Hz, 10Hz, 5Hz, 2Hz, 1Hz, 0.5Hz, 0.2Hz or 0.1 Hz programmable Bus power connector: LEMO EGG.1B.304 Power supply voltage: 7 to 40V Power consumption: 0.5 W maximum Dimensions: Weight: Base module (W x D x H) Mounting holes distance: 129 x 72 x 34.2 mm (5.1 x 2.8 x 1.3 in.) incl. mounting holes 119 x 7 mm (4.7 x 0.3 in.), 4.2 mm (0.165 in.) diameter 310 g typical OWNER’s GUIDE - Conditioners, EPAD2/CPAD2 | 16-409 xPAD2-V8-X Dimensions Connector pin-outs Pin Function Pin Function 1 Channel 0 (+) 13 Channel 6 (+) 2 Channel 0 (-) 14 Channel 6 (-) 3 Channel 1 (+) 15 Channel 7 (+) 4 Channel 1 (-) 16 Channel 7(-) 5 Channel 2 (+) 17 Digital input 1* 6 Channel 2 (-) 18 Digital input 2* 7 Channel 3 (+) 19 Digital input 3* 8 Channel 3 (-) 20 +12 VDC 9 Channel 4 (+) 21 Reset / Digital input 4* 10 Channel 4 (-) 22 GND 11 Channel 5 (+) 23 Reserved 12 Channel 5 (-) 24 Reserved 25 Reserved * not supported in Dewesoft software xPAD2 interface connector There are two identical interface connectors for power and control. One is used to interface with either the Dewetron system, or another xPAD2 module in a series. The other can be used to extend the daisychain another xPAD2 module from this one. The two connectors are interchangeable. PIN EPAD2 CPAD2 1 RS485 (A) CAN high 2 RS485 (B) CAN low 3 +15V supply +15V supply 4 GND GND Mating connector PAD-OPT2 25-pin SUB-D connector with screw terminals (optional) LEMO EGG.1B.304 xPAD2-V8 signal interface connector Normally this is where you plug in a break-out box, such as the PAD-CB8-B (banana jacks) or PADCB8-BNC (BNC connectors). But in the event that you want to make your own cable, the pin-outs are here, and there is a convenient mating connector with screw terminals available for purchase. Low cost alternative to the PAD-CB8-B and -BNC breakout boxes, or as a building block to making your own cable without soldering. Metal shell covers included. 16-410| OWNER’s GUIDE EPAD2-RTD8 and CPAD2-RTD8 Intelligent amplifier with integrated 24-bit A/D conversion 8 input channels for RTD sensors Supports 2-wire and 4-wire hook-ups Inputs isolated to 350 VDC Modules daisy-chain together to add more and more channels EPAD2 series uses RS485 interface CPAD2 series uses CAN 2.0B interface Specifications Parameter EPAD2-RTD8 and CPAD2-RTD8 Input channels: 8 isolated RTD channels Input ranges: Resistor: 0 to 999.99 Ω RTD: PT100(385); PT200(385); PT500(385); PT1000(385); PT2000(385); PT100(3961) Sample rate: 12.5 S/s/ch maximum -3 dB bandwidth: 6 Hz ADC type: Sigma delta ADC per channel, 24-bit (Note: CPAD2 outputs CAN data at 16-bits) Input connector: ERA.1S.304 Resolution: 0.01 °C for all types Input impedance: typically >100 MΩ Bias current: typically 10 nA Connection type: 2-wire, 4-wire (see diagrams on opposite page) Accuracy: Pt100 a = 0.00385 ±0.25 °C @ -200 to 100 °C ±0.4 °C @ 100 to 400 °C ±0.8 °C @ 400 to 800 °C Pt100 a = 0.003916 ±0.25 °C @ -200 to 100 °C ±0.4 °C @ 100 to 400 °C ±0.8 °C @ 400 to 800 °C Pt200 a = 0.00385 ±0.25 °C @ -200 to 100 °C ±0.4 °C @ 100 to 400 °C ±0.8 °C @ 400 to 800 °C Pt500 a = 0.00385 ±0.25 °C @ -200 to 100 °C ±0.4 °C @ 100 to 250 °C Pt1000 a = 0.00385 ±0.25 °C @ -200 to 100 °C ±0.4 °C @ 100 to 400 °C ±0.8 °C @ 400 to 600 °C Pt2000 a = 0.00385 ±0.25 °C @ -200 to 100 °C ±0.4 °C @ 100 to 400 °C ±0.8 °C @ 400 to 600 °C Temperature drift: typically 25 ppm/°C Isolation voltage: 350 VDC (channel to channel and channel to Bus, Power and Chassis) Over-voltage protection: 15 VDC CMRR @ 50/60 Hz: 130 dB Interface: EPAD2 series: RS485 CPAD2 series: CAN BUS 2.0B protocol Read-out speed: EPAD2 series: typ. 80 ch/sec. CPAD2 series: 12.5Hz, 10Hz, 5Hz, 2Hz, 1Hz, 0.5Hz, 0.2Hz or 0.1 Hz programmable Bus power connector: LEMO EGG.1B.304 Power supply voltage: 7 to 40V Power consumption: 0.5 W maximum Dimensions: Weight: Base module (W x D x H) Mounting holes distance: 129 x 72 x 34.2 mm (5.1 x 2.8 x 1.3 in.) incl. mounting holes 119 x 7 mm (4.7 x 0.3 in.), 4.2 mm (0.165 in.) diameter 310 g typical OWNER’s GUIDE - Conditioners, EPAD2/CPAD2 | 16-411 xPAD2-RTD8 Dimensions * Shield is on the housing RTD connections 2-wire hook-up ERA.1S.304.CLL xPAD2 interface connector There are two identical interface connectors for power and control. One is used to interface with either the Dewetron system, or another xPAD2 module in a series. The other can be used to extend the daisychain another xPAD2 module from this one. The two connectors are interchangeable. PIN EPAD2 CPAD2 1 RS485 (A) CAN high 2 RS485 (B) CAN low 3 +15V supply +15V supply 4 GND GND LEMO EGG.1B.304 xPAD2-RTD8 signal interface connector Pin Function 1 Excitation + 2 Sense + 3 Sense - 4 Excitation - 4-wire hook-up 16-412| OWNER’s GUIDE EPAD2-TH8 and CPAD2-TH8 Intelligent amplifier with integrated 24-bit A/D conversion 8 input channels for thermocouples or RTDs via PAD-CB8 series break-out boxes Inputs isolated to 350 VDC Modules daisy-chain together to add more and more channels EPAD2 series uses RS485 interface CPAD2 series uses CAN 2.0B interface Specifications Parameter EPAD2-TH8 and CPAD2-TH8 Input channels: 8 isolated voltage channels (prepared for thermocouple or RTD interface boxes) Input range: ±1.5 V (fixed) Sample rate: 12.5 S/s/ch maximum -3 dB bandwidth: 6 Hz ADC type: Sigma delta ADC per channel, 24-bit (Note: CPAD2 outputs CAN data at 16-bits) Input connector: SUBD 25-pin connector - please order your choice of PAD-CB8-TH or RTD series break-out boxes Resolution: 1µV Input impedance: typically 1.4 MΩ Supported break-out boxes: PAD-CB8-x-P2 standard thermocouple breakout box (where x = J, K, or T) PAD-CB8-x-M miniature size thermocouple breakout box (where x = J, K, or T) PAD-CB8-RTD RTD breakout box Temperature drift: typically 20 ppm/°C Isolation voltage: 350 VDC (channel to channel and channel to Bus, Power and Chassis) Over-voltage protection: 15 VDC CMRR @ 50/60 Hz: 130 dB Interface: EPAD2 series: RS485 CPAD2 series: CAN BUS 2.0B protocol Read-out speed: EPAD2 series: typ. 80 ch/sec. CPAD2 series: 12.5Hz, 10Hz, 5Hz, 2Hz, 1Hz, 0.5Hz, 0.2Hz or 0.1 Hz programmable Bus power connector: LEMO EGG.1B.304 Power supply voltage: 7 to 40V Power consumption: 0.5 W maximum Dimensions: Weight: Base module (W x D x H) Mounting holes distance: 129 x 72 x 34.2 mm (5.1 x 2.8 x 1.3 in.) incl. mounting holes 119 x 7 mm (4.7 x 0.3 in.), 4.2 mm (0.165 in.) diameter 310 g typical OWNER’s GUIDE - Conditioners, EPAD2/CPAD2 | 16-413 xPAD2-TH8 Dimensions Connector pin-outs Pin xPAD2 interface connector PIN EPAD2 CPAD2 RS485 (A) CAN high 2 RS485 (B) CAN low 3 +15V supply +15V supply 4 GND GND Pin Function 1 Channel 0 (+) 13 Channel 6 (+) 2 Channel 0 (-) 14 Channel 6 (-) 3 Channel 1 (+) 15 Channel 7 (+) 4 Channel 1 (-) 16 Channel 7(-) 5 Channel 2 (+) 17 Reserved 6 Channel 2 (-) 18 Reserved 7 Channel 3 (+) 19 Reserved 8 Channel 3 (-) 20 +12 VDC 9 Channel 4 (+) 21 Reserved 10 Channel 4 (-) 22 GND 11 Channel 5 (+) 23 Reserved / CJC 12 Channel 5 (-) 24 Reserved / CJC 25 Reserved / CJC Mating connector There are two identical interface connectors for power and control. One is used to interface with either the Dewetron system, or another xPAD2 module in a series. The other can be used to extend the daisychain another xPAD2 module from this one. The two connectors are interchangeable. 1 Function PAD-OPT1 25-pin SUB-D connector with screw terminals (optional) LEMO EGG.1B.304 xPAD2-V8 signal interface connector Normally this is where you plug in a break-out box, such as the PAD-CB8-B (banana jacks) or PADCB8-BNC (BNC connectors). But in the event that you want to make your own cable, the pin-outs are here, and there is a convenient mating connector with screw terminals available for purchase. Low cost alternative to the PAD-CB8-B and -BNC breakout boxes, or as a building block to making your own cable without soldering. CJC chip and metal shell covers included. CJC chip will be preinstalled for you on pins 23-24-25 (not shown in image above). 16-414| OWNER’s GUIDE EPAD2-LA8 and CPAD2-LA8 Intelligent amplifier with integrated 24-bit A/D conversion 8 input channels for current measurements Supports 0 to 20 mA, ±20 mA, and ±30 mA Inputs isolated to 350 VDC Modules daisy-chain together to add more and more channels EPAD2 series uses RS485 interface CPAD2 series uses CAN 2.0B interface Specifications Parameter EPAD2-LA8 and CPAD2-LA8 Input channels: 8 isolated current input channels Input ranges: 0 to 20 mA, ±20 mA; and ±30 mA Sample rate: 12.5 S/s/ch maximum -3 dB bandwidth: 6 Hz ADC type: Sigma delta ADC per channel, 24-bit (Note: CPAD2 outputs CAN data at 16-bits) Input connector: LEMO EGB.1B.304 Resolution: 0.3 μA Input impedance: 50 Ω 0.1 % Connection type: 2-wire, 4-wire (see diagrams on opposite page) Temperature drift: typically 20 ppm/°C Isolation voltage: 350 VDC (channel to channel and channel to Bus, Power and Chassis) Over-current protection: 70 mA continuous CMRR @ 50/60 Hz: 130 dB Interface: EPAD2 series: RS485 CPAD2 series: CAN BUS 2.0B protocol Read-out speed: EPAD2 series: typ. 80 ch/sec. CPAD2 series: 12.5Hz, 10Hz, 5Hz, 2Hz, 1Hz, 0.5Hz, 0.2Hz or 0.1 Hz programmable Bus power connector: LEMO EGG.1B.304 Power supply voltage: 7 to 40V Power consumption: 0.5 W maximum Dimensions: Weight: Base module (W x D x H) Mounting holes distance: 129 x 72 x 34.2 mm (5.1 x 2.8 x 1.3 in.) incl. mounting holes 119 x 7 mm (4.7 x 0.3 in.), 4.2 mm (0.165 in.) diameter 360 g typical OWNER’s GUIDE - Conditioners, EPAD2/CPAD2 | 16-415 xPAD2-LA8 Dimensions xPAD2-LA8 signal interface connector Pin Function 1 Power supply + 2 Current + 3 Current - 4 Power supply - EGB.1B.304 * Shield is on the housing xPAD2 interface connector There are two identical interface connectors for power and control. One is used to interface with either the Dewetron system, or another xPAD2 module in a series. The other can be used to extend the daisychain another xPAD2 module from this one. The two connectors are interchangeable. PIN EPAD2 CPAD2 1 RS485 (A) CAN high 2 RS485 (B) CAN low 3 +15V supply +15V supply 4 GND GND LEMO EGG.1B.304 16-416| OWNER’s GUIDE OWNER’s GUIDE - ORION A/D Cards | 17-417 17 ORION Series A/D Cards There are several A/D cards which may be installed into your Dewetron system, depending on how it was ordered from the factory. In the models covered by this manual, the ORION-1616-100 is installed as a standard. However, as mentioned, your card might have been upgraded in terms of its options (the last digit might be changed), or upgraded to a completely different card, with a different model name. The ORION series are simultaneous sampling, high-end performance, including synchronous counter/encoder inputs on board, and offering options such as CAN BUS interfaces, isolated counters and digital input lines, and more. ORION series cards represent the state of the art within the Dewetron family. They were designed from the ground up to allow 100% synchronization, not just within one system but across multiple systems, whether they are physically connected, or separated by thousands of miles. This section will present the basic specifications for all commonly installed ORION series A/D cards. Additional information is available in Dewetron manuals specific to these cards, available as separate documents. ORION series Cross-Reference Series Voltage ranges Bits Max SR ADC type Dig. Ins Dig. I/ Os Ctr/Enc CAN ORION-0824-200 8 ±0.1 V, ±0.5 V, ±2 V, ±10 V IEPE®: 4 mA / 8 mA excitation 24-bit 204.8 D/Sigma 8 to 40 8 2 to 10 (ADV) 0 or 2 ORION-1624-200 16 ±10 V 24-bit 204.8 D/Sigma 8 to 40 8 2 to 10 (ADV) 0 or 2 ORION-1622-100 16 ±10 V 22-bit 100 D/Sigma 8 to 40 8 2 to 10 (ADV) 0 or 2 ORION-3222-100 32 ±10 V 22-bit 100 D/Sigma 8 to 24 8 2 to 10 (ADV) 0 or 2 ORION-0816-1000 8 ±1.25 V, ±2.5 V, ±5 V, ±10 V 16-bit 1000 SAR 8 to 40 8 2 to 10 0 or 2 ORION-1616-100 16 ±1.25 V, ±2.5 V, ±5 V, ±10 V 16-bit 100 SAR 8 to 40 8 2 to 10 0 or 2 ORION-3216-100 32 ±1.25 V, ±2.5 V, ±5 V, ±10 V 16-bit 100 SAR 8 to 24 8 2 to 10 0 or 2 Key Features Simultaneous sampling Separate A/D converter channel Dozens of different models Synchronized analog, digital, counter and CAN inputs Clock output for synchronizing external devices, e.g. video cameras Sync option for synchronizing multiple systems or synchronize to IRIG or GPS 17-418| OWNER’s GUIDE ORION Overview To create instruments with dozens or even hundreds of dynamic channels, multiple ORION cards can be installed within a single unit. All cards are synchronized via the internal sync-bus to ensure absolute simultaneous sampling of all channels. Key Features Simultaneous sampling Separate A/D converter channel Dozens of different models Synchronized analog, digital, counter and CAN inputs Clock output for synchronizing external devices, e.g. video cameras Sync option for synchronizing multiple systems or synchronize to IRIG or GPS Multiple Dewetron instruments can be hardwaresynchronized using the ORION-SYNC option. Depending on distance and local preconditions there are several choices how to use this option. You can connect your instruments via standard CAT6 cables, over short distances. The maximum length depends on the sampling rate and the A/D technology, and ranges between 30 m to 200 m. This requires that the ORION-SYNC option was factory installed when each system was made. For large distances which do not allow physical connection be This -- One card must of bethe set instruments, as the master,synchronization and the others ascan slaves. achieved using GPS or IRIG time codes. Thisisrequires the Dewetron systems have either the IRIGdone at that the driver level. CLOCK or GPS-CLOCK option installed internally, or connected externally (order IRIG-CLOCK-INT or GPS-CLOCK-INT for factory-installed internal interfaces, or the IRIG-CLOCK-EXT or GPS-CLOCK-EXT for field-installed external interfaces). The driver design enables total continuous gap-free disk storing rates of more than 100 MB/s. Today standard computers with a single hard disk reach continuous gap-free storing rates between 50 MB/s and 80 MB/s. A/D Technologies within the ORION series Delta-Sigma Converter This technique is used in the ORION cards with 22 and 24-bit A/D converters. Of course, 24-bit converters offer highest dynamic range (up to 120 dB). Whenever you choose a sampling rate, the used internal sampling rate is up to 512 times higher. Using this over-sampling technique full anti-aliasing protection is guaranteed. These boards can not be external clocked, but synchronized from board to board and also synchronized to GPS clock using the DEWE-GPSCLOCK or to IRIG time using DEWE- IRIG-CLOCK. OWNER’s GUIDE - ORION A/D Cards | 17-419 Flash Converter This technique is used in all ORION cards with 16-bit A/D converters, as well as MI and AD series boards. Flash converters offer the fastest sampling rates (up to 1 MS/s/ch) as well as the possibility for external clocking. This is required for external clocked applications like distance related A/D conversion, combustion analysis as well as order tracking applications (using hardware order tracking clocked by an encoder). Combining ORION cards ORION cards with different bit resolutions, or different max sample rates, cannot be mixed within the same system. In other words, you cannot install an ORION-0816-1000 and an ORION-1616-100 in the same system, because they have different max sample rates. Nor can you mix ORION-1616-100 with ORION-1622-100. However, there is no problem to mix the ORION-3216-100 with ORION-1616-100 cards, because they have the same bit resolution and the same max sample rate. (The ORION-3216-100 is an ORION-1616-100 card with an add-on of 16 more channels, so they are essentially the same card anyway). Also there is no problem to mix multiples of the same card, but which have different last digits. Therefore you may install an ORION-1624-200, ORION-1624-202, and ORION-1624-205 in the same system. Synching ORION cards If multiple compatible ORION cards are installed in the same system, they must be interconnected with a sync cable. A standard 10-pin connector with 1.27 mm flat ribbon cable is available for easy connection between the boards. Synching Multiple systems If multiple systems or PCI expansion systems are used, a sync bus option must be installed. This option decouples the internal sync bus with the external sync I/O connector. By changing the internal TTL sync bus levels from TTL to RS-422 level, the distance between two systems can be increased by up to 50 meters using by using standard CAT5/ CAT6 Ethernet cables (greater distances are possible - please contact Dewetron to discuss). 17-420| OWNER’s GUIDE The ORION-DAQ-SYNC option is required for Dewetron 16-bit ORION cards. The ORION-DSA-SYNC option is required for Dewetron 22- and 24-bit ORION cards. The SYNC option also includes the security circuit if two master systems have to be connected together over the sync bus connection. As soon as the system is configured to a master system the external sync is ignored by disabling the SYNC-IN amplifier. The LED labeled MI (master internal) indicates if the system is configured to a master system. ME (master external) will light up if a valid sync signal is being received on the SYNC-IN connector. Above: schematic of ORION-XXX-SYNC option -- Note - if you plan on adding more compatible Dewetrons and hardware synchronizing them like this, it is highly recommended to have the sync option installed at the factory. It is difficult to add later. Opto-coupler emitter Opto-collector System on Power +5V Power GND SYNC IN ME/MI LEDs (2) To ORION card sync bus interface SYNC OUT In addition to the synchronization function the ORION-xxx-SYNC allows also the remote power-on of any connected slave system. When the master is powered on, an opto coupler output (PC817) is activated to switch on the power supply of the slave system. The remote power on also can be controlled with an external control voltage (+5 V@Sys-On). Systems with this option typically have a three way power switch labeled ON, OFF, and SLAVE ON. In this third mode, the system can be powered on remotely if connected to a master. This is very convenient for powering on everything at once, and in the correct order. On-board RS-485 interface ORION cards are equipped with an RS-485 interfaced as standard. The baud-rate is fixed to 9600, 8 data, 1 stop bit and no parity. This interface is used for configuration of DAQ, MDAQ, and HSI signal conditioning modules. In addition, PAD and EPAD2 series modulescan also be handled. Therefore there is no need for an additional serial interface for module control when ORION cards are used within your system. OWNER’s GUIDE - ORION A/D Cards | 17-421 In DS-7 you need to access the HARDWARE SETUP screen, and make sure that “ORION onboard” is selected as the module control interface, as shown in the screen shot at right. ORION card Windows driver Every PCI card requires a driver so that Windows knows how to implement it. 99% of the time, ORION cards are factory installed, and thus we install the drivers for you. If you are adding a second compatible ORION card to your system, then the drivers are already installed. However, if you are installing one or more ORION cards into a new computer, please contact Dewetron for the latest Windows driver. Installing ORION cards Please see the manual provided with your new ORION card for complete installation instructions. It is beyond the scope of this manual to describe that for all of the different ORION cards that we offer. 17-422| OWNER’s GUIDE ORION-0424-200 4 simultaneous sampled channels, BNC connection Voltage or IEPE® mode (4 mA or 8 mA source) 4 input ranges (from ±0.1 V to ±10 V) Input coupling DC or AC (0.15 Hz or 3.4 Hz) 204.8 kS/s per channel 24 bit resolution, anti-aliasing filter TEDS (IEEE 1451) sensor support Model Overview Model Analog chs Max kS/s/ ch Digital input chs Digital I/O Ext clock Ext. trigger Counter/ encoder TTL Counter/ Encoder ADJ CAN BUS ORION-0424-200 4 204.8 -- -- -- 1 -- 1 -- Top Level Specifications Parameter Specification Number of analog input channels: 4, simultaneously sampled Input configuration: Symmetric, differential or single ended Resolution: 24 bit, nominal Type of ADC: Delta-sigma Sample rate: 204.8 kS/s/ch maximum Input signal range: ±10V, ±2V, ±0.5V, ±0.1V peak Input impedance (ground ref.): Positive to negative input 1 MΩ each with 60 pF to GND Over-voltage protection: ±30V on both positive and negative inputs Alias-free bandwidth (passband): 1 kS/s ≤ fs ≤ 51.2 kS/s DC (0 Hz) to 0.42 fs 51.2 kS/s < fs ≤ 102.4 kS/s DC (0 Hz) to 0.32 fs 102.4 kS/s < fs ≤ 200 kS/s DC (0 Hz) to 0.22 fs Dimensions: 17.5 x 10.7 cm (6.9 x 4.2 in.) (not including connectors) Form factor: Half length PCI card Analog input connector: BNC Counter input connector: DSUB 9-pin connector, male Environmental: T.OP: 0 to 50°C, T.STORE: -20 to 70°C; RH: 10 to 90 %, non-condensing For complete details, please see the detailed manual for this card, available as a separate document. OWNER’s GUIDE - ORION A/D Cards | 17-423 ORION-0824-200 8 simultaneous sampled channels Voltage or IEPE® mode (4 mA or 8 mA source) Synchronous digital inputs 204.8 kS/s per channel 24 bit resolution, anti-aliasing filter 6 models available with many options Model Overview Model Analog chs Max kS/s/ch Digital input chs Digital I/O Ext clock Ext. trigger Counter/ encoder TTL Counter/ Encoder ADJ CAN BUS ORION-0824-200 8 204.8 2 (8*) 8 -- 1 -- 2 -- ORION-0824-201 8 204.8 2 (8*) 8 -- 1 -- 2 2 ORION-0824-202 8 204.8 10 (40*) 8 -- 1 8 2 -- ORION-0824-203 8 204.8 10 (40*) 8 -- 1 8 2 2 ORION-0824-204 8 204.8 10 (40*) 8 -- 1 -- 2+8 -- ORION-0824-205 8 204.8 10 (40*) 8 -- 1 -- 2+8 2 Top Level Specifications Parameter Specification Number of analog input channels: 8, simultaneously sampled Input / Resolution / ADC type: Symmetric, differential or single ended / 24 bit, nominal / Sigma-delta Sample rate: 204.8 kS/s/ch maximum Input signal range: ±10V, ±2V, ±0.5V, ±0.1V peak Input impedance (ground ref.): 1 MΩ each with 60 pF to GND (Positive to negative input) Over-voltage protection: ±30V on both positive and negative inputs Alias-free bandwidth (passband): 1 kS/s ≤ fs ≤ 51.2 kS/s DC (0 Hz) to 0.42 fs 51.2 kS/s < fs ≤ 102.4 kS/s DC (0 Hz) to 0.32 fs 102.4 kS/s < fs ≤ 200 kS/s DC (0 Hz) to 0.22 fs Form factor: Half length PCI card Analog input connector: 68-pin SCSI male (AMP 174341-5) Environmental: T.OP: 0 to 50°C, T.STORE: -20 to 70°C; RH: 10 to 90 %, non-condensing For complete details, please see the detailed manual for this card, available as a separate document. 17-424| OWNER’s GUIDE ORION-1624-200 16 simultaneous sampled channels ±10V input range Synchronous digital inputs 204.8 kS/s per channel 24 bit resolution, anti-aliasing filter 6 models available with many options Model Overview Model Analog chs Max kS/s/ch Digital input chs Digital I/O Ext clock Ext. trigger Counter/ encoder TTL Counter/ Encoder ADJ CAN BUS ORION-1624-200 16 204.8 2 (8*) 8 -- 1 2 -- -- ORION-1624-201 16 204.8 2 (8*) 8 -- 1 2 -- 2 ORION-1624-202 16 204.8 10 (40*) 8 -- 1 2+8 -- -- ORION-1624-203 16 204.8 10 (40*) 8 -- 1 2+8 -- 2 ORION-1624-204 16 204.8 10 (40*) 8 -- 1 2 8 -- ORION-1624-205 16 204.8 10 (40*) 8 -- 1 2 8 2 Top Level Specifications Parameter Specification Number of analog input channels: 16, simultaneously sampled Input / Resolution / ADC type: Symmetric, differential / 24 bit, nominal / Sigma-delta Sample rate: 204.8 kS/s/ch maximum Input signal range: ±10 V Input impedance: 10 MΩ in parallel with 60 pF (both positive and negative inputs) Over-voltage protection: ±30V on both positive and negative inputs Alias-free bandwidth (passband): 1 kS/s ≤ fs ≤ 51.2 kS/s DC (0 Hz) to 0.42 fs 51.2 kS/s < fs ≤ 102.4 kS/s DC (0 Hz) to 0.32 fs 102.4 kS/s < fs ≤ 200 kS/s DC (0 Hz) to 0.22 fs Form factor: Half length PCI card Analog input connector: 68-pin SCSI male (AMP 174341-5) Environmental: T.OP: 0 to 50°C, T.STORE: -20 to 70°C; RH: 10 to 90 %, non-condensing For complete details, please see the detailed manual for this card, available as a separate document. OWNER’s GUIDE - ORION A/D Cards | 17-425 ORION-1622-100 and ORION-3222-100 16 or 32 simultaneous sampled channels ±10 V inputs Synchronous digital inputs 100 kS/s per channel 22 bit resolution, anti-aliasing filter 8 models available with many options Model Overview Model Analog chs Max kS/s/ch Digital input chs Digital I/O Ext clock Ext. trigger Counter/ encoder TTL Counter/ Encoder ADJ CAN BUS ORION-1622-100 16 102.4 2 (8*) 8 -- 1 2 -- -- ORION-1622-101 16 102.4 2 (8*) 8 -- 1 2 -- 2 ORION-1622-102 16 102.4 10 (40*) 8 -- 1 2+8 -- -- ORION-1622-103 16 102.4 10 (40*) 8 -- 1 2+8 -- 2 ORION-1622-104 16 102.4 10 (40*) 8 -- 1 2 8 -- ORION-1622-105 16 102.4 10 (40*) 8 -- 1 2 8 2 ORION-3222-100 32 102.4 18 (24*) 8 1 1 2 -- -- ORION-3222-101 32 102.4 18 (24*) 8 1 1 2 -- 2 Top Level Specifications Parameter Specification Number of analog input channels: 16 or 32, simultaneously sampled Input / Resolution / ADC type: Symmetric, single ended w/remote sense / 22 bit nominal / Sigma-delta Sample rate: 102.4 kS/s/ch maximum Input signal range: ±10 V Input impedance (ground ref.): 1 MΩ each with 60 pF to GND Over-voltage protection: ±30V Alias-free bandwidth (passband): 1 kS/s ≤ fs ≤ 51.2 kS/s DC (0 Hz) to 0.42 fs 51.2 kS/s < fs ≤ 102.4 kS/s DC (0 Hz) to 0.32 fs Form factor: Half length PCI card Analog input connector: 68-pin SCSI male (AMP 174341-5) Environmental: T.OP: 0 to 50°C, T.STORE: -20 to 70°C; RH: 10 to 90 %, non-condensing For complete details, please see the detailed manual for this card, available as a separate document. 17-426| OWNER’s GUIDE OWNER’s GUIDE - Interface cards | 18-427 18 DEWETRON Interfaces There are several key interface cards that are available for your Dewetron instrument. These include time code interfaces based on IRIG or GPS, as well as BUS interface cards for popular data busses such as ARINC 429, MIL-STD-1553, NTSC/PAL video input, and more. Please see the next pages for basic information about these interface cards. Additional details can be found in the manuals specific to each card, as provided with your system. DEWE-CLOCK time code interface card Device Overview The DEWE-CLOCK is a synchronized time base generator capable of using either GPS or IRIG as time source. This allows completely synchronized data acquisition of multiple systems whether they are mobile or stationary. Additionally the DEWE-CLOCK can also be used as an IRIG time code generator (output IRIG B/ DC) synchronized to the GPS time. The time synchronization is supported for the whole DEWE-ORION series as well as for many 3rd party A/Dboards. The diagram below outlines the basic functionality of the DEWE-CLOCK: 18-428| OWNER’s GUIDE GPS Measurement Mode The base of any GPS receiver is precise time measurement. In addition to the position information a precise PPS (pulse per second) is generated by the GPS engine. This pulse is used to synchronize a 40 MHz oscillator with software PLL (phase locked loop). The result is an ultra-stable 40 MHz clock source which is completely free of drift over time. Out of this 40 MHz base clock, the programmable clock divider generates the clock frequency for the standard data acquisition system which is being output on the 9-pin DSUB connector. For A/D-boards with over-clocked delta sigma converters (e.g. DEWE-ORION-DSA series), a special output clock is required for synchronized sampling. This is available on a RJ45 connector. The communication to the host is provided over USB interface. IRIG Based Operation The IRIG signal contains the binary-coded time (year, day of year, hours, minutes, seconds, fractions of a second) modulated on a sine wave carrier. This signal is decoded to the PPS and the drift-free 40 MHz clock. The following IRIG time codes are supported: IRIG-A (10 Hz) IRIG-B (1 Hz) Functionality of the LEDs Power Green The power LED is solid green when the DEWE-CLOCK is in normal operation. Status (red) Indicates current status of device. At normal operation - when DEWE-CLOCK is locked to the selected time source - it shortly blinks once a second. When the time source signal is missing (neither GPS or IRIG time code signal), the device automatically goes to flying-wheel operation. This is indicated by inverted blinking. OWNER’s GUIDE - Interface cards | 18-429 Mounting the Aerial The aerial supplied with the DEWE-CLOCK is designed to be mounted with the included mounting kit. The positioning of the aerial is critical to the correct operation of the DEWE-CLOCK. The aerial picks up the signals from up to 12 satellites which are all in different places in the sky. These satellites are not necessarily directly overhead, and can often be close to the horizon. Therefore it is best to mount the aerial in a way, that the least amount of metal obscures the view of the sky. On a domed roof, place the aerial on the top of the dome. On an open car with a roll-over bar, place the aerial horizontally on the highest point of the roll-over hoop and tape the wire securely to the frame. Although the DEWE-CLOCK can work with at least three satellites, it’s precision increases the more satellites it finds. If one satellite disappears over the horizon, or behind an object, there are other satellites still in view. In order to fix your antenna on a tube, use the provided universal mounting adaptor. The image here shows you how to affix the tube with the screws - see call-outs (1) (2). -- Important note: The maximum diameter is limited to 43 mm (1.7 Inch). Otherwise the universal mounting adapter will not fit on the tube. The DEWE-CLOCK is shipped with a 6 m antenna cable (standard). 15 m or 25 m antenna cables are available optionally. PC-GPS-CBL15 - 15 m PC-GPS-CBL15 - 25 m This is an industry standard BNC connector, female. A mating BNC cable is not included with the IRIG-CLOCK option. Warm-Up time When the DEWE-CLOCK is used as GPS based time code generator for the first time, has been moved more than 200 km or not used for 10 hours (since last usage), it is recommended to perform a ‘cold start’. To get the best performance from your GPS in the future, perform this cold start in an open place with a good all round view to the sky. Allow the GPS to map the satellites for at least 20 to 30 minutes. The GPS builds up the ‘Ephemeris’ data on each satellite which is stored in a non-volatile 18-430| OWNER’s GUIDE memory, and means future satellite tracking is swift and stable. Once the GPS has carried out a successful cold start, future satellite lock from power up will take between 15 seconds and 1 minute. Before going to test in a shady environment with tall objects or near to trees, allow the GPS to settle in an open space for 5 to 10 minutes. Scope of Supply OWNER’s GUIDE - Interface cards | 18-431 Connection Connector overview: Aerial connector Connect the GPS antenna to the SMA connector. IRIG connector Connect the IRIG signal to the BNC connector. Multi I/O connector The 9-pin DSUB 9 (male) connector is configured as output connector for following signals: 18-432| OWNER’s GUIDE Mini USB connector The mini-USB interface connectors meets standard USB pin assignment. ORION-DSA-SYNC connector This connector is used for synchronizing any ORION-DSA data acquisition card to the DEWE-CLOCK. For this purpose the DEWE-CLOCK is equipped with a RJ45 connector for connection to the DEWETRON data acquisition system. A standard CAT5e or CAT6 Ethernet cable with up to 30 m can be used for connection. OWNER’s GUIDE - Interface cards | 18-433 Multi I/O connector cable Type of cable: 2x2x0.25 shielded 18-434| OWNER’s GUIDE Connecting the DEWE-CLOCK hardware to the DAQ-System Synchronization to DEWE-ORION-DAQ series or 3rd party A/D boards To synchronize standard data acquisition systems a start trigger and the possibility of external clocking is required. Usually DEWETRON data acquisition systems are equipped with a 37-pin DSUB connector. This digital multifunction connector contains the required clock and trigger input for easy connection to the clocking unit. DEWE-CLOCK with GPS source DEWE-CLOCK with IRIG source Synchronization to DEWE-ORION-DSA series One of the unique features of the DEWE-CLOCK is the possibility to synchronize also data acquisition systems using delta sigma ADC technology like DEWE-ORION-DSA. The main challenge is to produce the OWNER’s GUIDE - Interface cards | 18-435 up to 256 times over sample clock used for these types of analog to digital converters. For this purpose the DEWE-CLOCK is equipped with a RJ45 connector for connection to the DEWETRON data acquisition system. A standard CAT5e or CAT6 Ethernet cable with up to 30 m can be used for connection. ⇒⇒ Please note: also the data acquisition has to be provided ORION-DSA-SYNC option for having access to the synch bus of the board. Configure of DS-7 Software To unlock the GPS functionality in DS-7 software, the GPS has to be configured in the Hardware Setup screen (Settings > Hardware Settings > GPS): Select “DEWESoft USB” from the GPS device dropdown menu. DS-7 will automatically start searching for a connected device. There are only a few settings on this screen, as follows: Update rate The update rate is fixed at 1 Hz. 18-436| OWNER’s GUIDE Maps directories Select the directories, where you stored your maps. You can copy your maps into this directory, add individual directories or remove unused directories from the box. Convert the maps to .jpg or .bmp format before selecting them. Timing settings When you want to use the DEWE-CLOCK as high precision timing device for synchronized data acquisition, you need to enable this in the Timing section (Settings > Hardware Settings > Timing). Select “DEWESoft USB” from the Timing device dropdown menu. DS-7 will automatically start searching for a connected device. Input settings Time source Here you can select which input signal (GPS or IRIG) is used for the time source. Code type If IRIG mode is selected as time source, this dropdown menu defines the used code type (IRIG-A, IRIG-B or IRIG-G). Modulation This selects the modulation type (AC or DC) of the IRIG input signal Output settings The checkbox “IRIG Out” enables the output of the internally generated IRIG signal on the BNC connector of the DEWE-CLOCK. Please note that only IRIG-B with DC modulation is supported as output signal. Set to default OWNER’s GUIDE - Interface cards | 18-437 This button defines the current input and output settings as power on default settings. This way the DEWECLOCK will always start up with the predefined settings. What Happens If the Timinig Source is Lost? For synchronizing the internal oscillator with the PPS signal at least 4 satellites are required. If the GPS or IRIG signal is lost during acquisition the DEWE-CLOCK continues sourcing the data acquisition system with a precision clock source. Without synchronising to the GPS or IRIG signal, the oscillator may drift. Therefore the absolute time synchronisation cannot be guaranteed anymore. However, as soon the GPS or IRIG signal is available again, the DEWE-CLOCK recognizes a possible drift and tries to correct this inaccuracy. If the drift during the free-run time is higher than 200 ms, a new data file is automatically generated with exact time stamping. The graph below gives an idea how the DEWE-CLOCK behaves when the GPS or IRIG signal is lost during data acquisition. In this example the drift of the oscillator is smaller than the allowed 2 ms (fixed). A) This state shows the normal operation. The internal clock is synchronized to the GPS/IRIG once per second. B) At this point the time source signal is lost. C) In the free-run operation the oscillator drift is obvious. D) After the time source signal is received again, the error during the free run cycle is calculated. E1) Because the oscillator drift is smaller than 200 ms, the DEWE-CLOCK automatically corrects the drift for getting again time synchronized data. So the data acquisition is not interrupted although the time source signal was lost. The correction is done with the maximum rate of 5 μs/sec. However if the time source signal is lost for too long, the oscillator drift may be higher than 200 ms. In this case automatically the existing data file is closed and a new file is generated with adding “Lost” of the current filename: “DataFilennameLostX” where X is a running number for each time source signal loss. 18-438| OWNER’s GUIDE As soon the timing device is selected, DS-7 automatically sets the data acquisition hardware to external clocking for receiving the sample frequency out of the DEWE-CLOCK. In addition, each measurement starts synchronized with the PPS signal. The time information of the data file is taken out of the GPS-time or IRIGtime and not from the local PC time anymore. OWNER’s GUIDE - Interface cards | 18-439 Channel setup The DS-7 screenshot below shows the channel setup screen of the DEWE-CLOCK when it was selected as GPS device. In the column ON/OFF you can select the channels for storing during the measurement. The default channel names are displayed in the column NAME. You can change them with a double click on it. Beside the channel names the actual value is displayed. X absolute: Longitude component of position in degrees, minutes and fraction of minutes Y absolute: Latitude component of position in degrees, minutes and fraction of minutes Z: Altitude in meters above sea level Velocity: Speed over ground (vector of all 3 dimensions) Direction: True track over ground Used sat.: Numbers of satellites used for calculation of position and speed Current sec: Seconds since midnight (UTC + 15 seconds) NMEA log: The raw NMEA string from the GPS receiver The circle on the right side of the screen image (above) gives an overview of the satellites in view of the GPS receiver and which of them are used from the receiver. The color of the shown satellites indicates the signal strength of them. From grey to dark green which is the strongest signal. Satellites shown in the centre of the circle are directly above the GPS aerial. Satellites shown at the border of the circle are near the horizon. The field <PPS sync> and <Not fixed> change their color from grey to green depending if the appropriate feature is available at the moment (green means available). The PPS sync is used for hardware synchronization to analog channels. This will eliminate the time shift caused due the calculation time of the GPS receiver and of the data transfer time of the USB interface. 18-440| OWNER’s GUIDE The button “NMEA log” shows/hides the raw NMEA data stream from the GPS receiver. Measurement setup When the DEWE-CLOCK is used as timing device and you switch to the measurement screen you will see the actual time from the DEWE-CLOCK shown in the top right corner of the screen. A green dot next to this time indicates that the DEWE-CLOCK is locked to the GPS or IRIG time whereas a red dot indicates that the DEWE-CLOCK is in free-run mode. As default the local time is stored inside the data file. But if the measurement results from multiple systems located in different time zones should be analyzed it is recommended to set to UTC or GPS time. This can be done in the Global settings of DEWESoft (Settings Global settings Displays). Doing so, the data from all data acquisition systems are containing the same absolute time stamp. OWNER’s GUIDE - Interface cards | 18-441 DEWE-CLOCK Specifications DEWE-CLOCK Specification IRIG Input Specifications Supported codes IRIG code A or B;; AM or DC Compatibility (AM code) 0.5 Vp-p to 10 Vp-p Ratio (AM) 3:1 ±10 % Compatibility (DC code) DC Level Shift TTL / CMOS compatible Impedance 20 kΩ Isolation 150 VDC Trigger accuracy 1 µs IRIG Input Specifications Supported codes IRIG code B, DC Isolation None Accuracy < 1 µs latency from GPS PPS signal GPS Specifications General 12 channel, L1 frequency receiver PPS accuracy 100 ns Refresh rate 1 Hz Position accuracy Trigger accuracy Autonomous Differential Horizontal CEP 3.0 m 1.0 m 1 µs System Specifications Clock accuracy locked Without drift Clock accuracy unlocked < 10 ppm 18-442| OWNER’s GUIDE DEWE-CLOCK Specification Input SMA for GPS antenna, BNC for IRIG I/O Output: Clock and Trigger for DAQ-systems on DB9 connector Trigger: PPS (pulse per second), rising edge on time, 75 msec high time, TTL level compatible Scan clock: 10 Hz to 10 MHz, rising edge synchronized, 50 % duty cycle, TTL level compatible ORION-DSA-SYNC: LVDS compatible on RJ45 Power supply USB powered, max. current 500 mA Temperature Operating: -5 °C to +70 °C Humidity 10 % to 80 %; non condensing Dimensions 133 x 104 x 43 mm (5.23 x 4.1 x 1.7 in.) Weight Approximately 330 g (0.72 lbs.) Vibration test Shape Frequency Power spectral density Duration: EN 600068-2-6 Sine 10 Hz to 150 Hz 1 m/s2 / Hz from 10 – 200 Hz 30 Minutes per axis Vibration test Shape Frequency range Power spectral density Duration EN 60721-3-2 Class 2M2 Random 10 - 200 Hz 1 m/s2 / Hz from 10 – 200 Hz 30 Minutes per axis Shock Shape Acceleration amplitude Duration EN 60068-2-27 Half-sine 15 g 11 ms Shock test type Test in 3 axis, 3 shocks in each axis and direction Non-operating (storage): -20 °C to +85 °C OWNER’s GUIDE - Interface cards | 18-443 VIDEO-FG-4 interface card This is a PCI card with four NTSC/PAL video inputs on it, presented on standard BNC connectors on the side of your Dewetron system. With this option and DEWESoft-PROF level software, you can acquire and display up to four video streams simultaneously in sync with your data. It accepts standard composite colors (PAL, NTSC) or monochrome video formats (CCIR, EIA). The supported resolution is programmable and includes square-pixel (640 x 480 or 768 x 576) and broadcast resolution. Before captured images are transferred to the PC’s memory, images can be scaled down using available selectable ratios. Image Acquisition Frame Rate: 30 full-frame images acquired per second for each channel. Color Image: Color video format is compatible with the following composite video input formats: NTSC-M, NTSC-Japan, PCL-B, PALD, PAL-G, PAL-H, PAL-I, PAM-M, PAL-N and SECAM Monochrome Image: The monochrome video acquisition is compatible with CCIR and EIA (RS-170). Optional Scaling: The acquire images or portions of images can be optionally scaled: Acquisition of a programmable area of interest Scaling of the image (down to 1:16) Adjustment of hue (for NTSC signals), contrast (0 to 200%), brightness and saturation (0 to 200% for U and V signals) Automatic chrominance gain control It is necessary to install the driver for this card under Windows before it can be used within DEWESoft. Additionally, each of the inputs must be configured as a DirectShow video channel. This must be done for each of the four video inputs by following the instructions in the manual for this product. The OEM source for this card is Adlink, part number PCI-RTV24. Please refer to that technical information for details. 18-444| OWNER’s GUIDE Video interface setup Once the card is installed and configured for DirectShow under Windows, run DEWESoft and then go to hardware setup under the SETTINGS button. Click the VIDEO button to see the setup for your cameras and video inputs: You need to enable DIRECTX video via the checkbox. When you do, the VIDEO-FG4 card should show up automatucally, and four video channels should appear in the list. If this does not happen, then the card is not set up properly under Windows, because DEWESoft will always see any properly configured DirectX video sources that are available under Windows. Be sure that the ENABLED column is set to YES for each of the video streams that you want to be able to display and record. In the bottom section you can choose the type of video files that will be created, and the compression format. Once this is done, and you return to the SETUP screens, you will have a new button called VIDEO in the toolbar. Click it to access the video streams, preview them, and activate them for display and recording. OWNER’s GUIDE - Interface cards | 18-445 As always, be sure to press in as USED any of the video streams or cameras that you want to be able to display and record with your data files. Displaying video channels Video streams are displayed almost like any other channel, except that there is a special video display widget that is used. Enter the design mode and find the icon that looks like a roll of film, and click it to add one video display widget to your screen: The video widget is shown highlighted in yellow, above. After you click it to add a video window, you can select any USED video streams from the channel list to put them onto your screen. The video widget can be scaled and moved freely into an attractive arrangement on your display: 18-446| OWNER’s GUIDE -- Note: video streams also create a channel which contains the frame count. You can display this count in a digital meter as a convenience. OWNER’s GUIDE - Interface cards | 18-447 ARINC-429 and MIL-STD-1553 interfaces ARINC 429 and 1553 bus interfaces are available for your Dewetron system, in both PCI card and external USB box format. The OEM supplier of these interfaces is Ballard Technologies. Dewetron systems support the Omnibus line of cards and rack-mounting boxes, as well as the so-called “fifth generation” of lower cost Ballard PCI cards. The software interface into DEWESoft is in the form of a software plugin, which is an option called DEWESoft-OPT-ARINC/1553. -- With the Omnibus series you can have a single card with both ARINC 429 and 1553 interfaces on it. In the USB and 5th generation PCI series, there is one bus type maximum per interface. The plugin will be installed and configured at the factory, however, if you need to reinstall the plugin, please copy Ballard.dll to the Addons folder of DEWESoft. If you are running Windows 7, plugins need to be registered, and there is a button for that on the plugins page of the DEWESoft hardware setup screen. When this is done, the Ballard plugin will appear in Hardware setup plugin list. Refer to Ballard manual for installation of Ballard drivers and connecting Ballard devices. First checkmark the Ballard plugin to enable it. If any devices will be found they will be shown at Devices panel. If hardware configuration changes, just press the Search button and system will be rescanned. If you want to use previous recorded data or/and don’t have hardware, you can use a replay mode. Checkmark it and select any csv file with device definition and bus data. At the top you have save messages check box for saving replay files. Just check it and one csv file for each device (core) will be created along with DEWESoft data file when recording (on the same folder with the same name). Under it is one button for each bus. Short name on the button is composed of device number, channel num- 18-448| OWNER’s GUIDE ber and channel type. MIL-STD-1553 buses have two tabs, one for receive and one for transmit. ARINC 429 receive setup In addition to standard buttons for adding and deleting messages or channels and display options there is a scan check box. If it is checked every unhandled message coming through the bus will be added automatically to the list. On start every message already had standard channels (SDI, SSM and Parity). They can be deleted if you do not need them. Bus speed and Parity check are there for ARINC 429 bus control. Messages that do not have proper parity will be ignored. In the table you can see all messages and channels and live data. Labels are always in octal notation, and for the message value you can choose between hex and binary (right click on the VALUES column). Messages are always ordered by their labels. Some properties like color and name can be changed directly on the table and for others you must open SETUP. In the SETUP dialog you can add channels and manage their properties. There is no problem to have more messages with the same label (and SDI filter) and/or more channels using same bits. When the message will come through the bus all that messages and channels will catch its data. ARINC 429 transmit setup Here you have buttons for adding and deleting messages and for sorting them. Bus speed is for ARINC 429 bus setup. OWNER’s GUIDE - Interface cards | 18-449 Two types of messages can be created. Button and Schedule. Schedule messages will be send automatically in intervals which are defined with MIN INT and MAX INT values. The schedule is created and scheduled messages start to transmit after you leave the tab by entering some other tab or entering the measure mode. Button messages are never sent automatically. You get a button to send them manually. In setup mode the button for each Button message is on the table, and in Measure mode you get the special window with buttons for all that messages. MIL-STD-1553 receive setup As in the ARINC 429 setup there are standard buttons for adding and deleting messages or channels and display options. There is also a scan check box. If SCAN is checkmarked, every unhandled message coming through the bus will be added automatically to the list. 18-450| OWNER’s GUIDE In the table you can see all messages, channels and live data. Messages are always ordered by their addresses. Some properties like color and name can be change directly on the table and for others you must open SETUP. In the SETUP dialog you can add channels and manage their properties. There is no problem to have more messages with the same address and/or more channels using same word/bits. When the message will come through the bus all that messages and channels will catch its data. MIL-STD-1553 transmit setup Here you have buttons for adding and deleting messages and for sorting them. OWNER’s GUIDE - Interface cards | 18-451 Every message has the Edit button which opens Transmit message setup form where all message properties and data can be set. Two types of messages can be created. Button and Schedule. Schedule messages will be send automatically in the same order they have in the list. After each message there can be wait time which can be defined in Wait time column. After last message is sent the schedule starts will the first message again. The schedule is created and scheduled messages start to transmit after you leave the tab by entering some other tab or entering the measure mode. Button messages are never sent automatically. You get a button to send them manually. In setup mode the button for each Button message is on the table, and in Measure mode you get the special window with buttons for all that messages. Storing ARINC/1553 data ARINC and 1553 channels pressed in as USED on the setup screen will be stored into the data file when you store data. It does not matter if the channels are shown on a display screen or not. Processing ARINC/1553 data in MATH ARINC and 1553 channels can be used within your MATH channels just like any other channel. 18-452| OWNER’s GUIDE CAN BUS interfaces In terms of hardware, Dewetron systems are available with several different CAN BUS interfaces. However, 90% of the systems delivered have the 2 CAN BUS interfaces that are provided as options from a Dewetron ORION series A/D card. If you look at the model numbering of our ORION cards, you will see that the last digit changes according to which options are installed on the card, like this: model name last digit description ORION-1616-100 0 (even) the standard card ORION-1616-101 1 (odd) Adds 2 x CAN BUS interfaces ORION-1616-102 2 (even) The standard card plus more counters + digital inputs ORION-1616-103 3 (odd) The standard card plus more counters + digital inputs + 2 x CAN BUS interfaces ORION-1616-104 4 (even) The standard card plus ADVANCED counters + digital inputs ORION-1616-105 5 (odd) The standard card plus ADVANCED counters + digital inputs + 2 x CAN BUS interfaces You can see from the table above that basically any ORION card whose model name ends in an odd number has the CAN interfaces on it. In addition to the hardware option, you must have the software option called DEWESoft-OPT-CAN installed. The actual CAN bus interface connectors installed on your unit are shown in SECTION 4, SIGNAL INPUT CONNECTORS in this document. That page also shows you how to connect to the CAN BUS, including using termination resistors if needed. If you want to use either one of the CAN bus interfaces to connect a Dewetron CPAD2 series module, please see SECTION 10, CONDITIONERS, CPAD2 within this document. Your CAN interfaces should be set up already at the factory, however, if you need to check or reconfigure the settings, please check the HARDWARE SETUP under the SETTINGS menu. Then click the CAN button to see the CAN hardware interface setup: Use the selector to choose the CAN device that is installed within your system. Here is a basic description of what each entry refers to: Test CAN (replay mode) - for demonstration and training purposes, you may select this even if you do not have the CAN software option, and point the software to a CAN bus data file (CSV), which it will replay through the system for you. OWNER’s GUIDE - Interface cards | 18-453 National Instruments - select this if your system has a National Instruments brand PCI-CAN/2 interface card. Softing - select this if you are using a compatible Softing brand CAN BUS interface card Vector - select this if you are using a compatible Vector brand CAN BUS interface card Dewetron DAQ - select this option if your system has any 16-bit ORION card with the CAN option Dewetron DSA - select this option if your system has any 22- or 24-bit ORION card with the CAN option ⇒⇒ Note - if your DEWESoft license does not include the CAN option, you will not be able to proceed with hardware setup after selecting a real CAN interface card. Please contact Dewetron for a license upgrade. After doing the hardware setup, please visit the CH SETUP screens and click on the CAN icon, which will appear there in the toolbar. At first you will have no channels or messages being shown. This is normal. Notice that there are buttons for CAN0 and CAN1. That is because there are two CAN interfaces in nearly every system. Your system could even have more -- in which case you will have additional buttons for CAN2, CAN3, etc. The maximum is 8 interfaces in one Dewetron system. It is essential to select the correct SPEED of the bus, in kBaud. Dewetron CAN hardware supports speeds up to 1 Mb (1,000,000 bits per second). 500 kb is the default. ⇒⇒ Selecting a wrong SPEED of the CAN bus can actually interfere with certain systems, so please take care to select the correct one. Setting up your channels It is important to know that the CAN data stream does not contain any information about the channels that are being conveyed within the 64-bit messages. Therefore you need to know the configuration. Most car companies are very secretive about the CAN message layout, and do not release this information. Dewetron 18-454| OWNER’s GUIDE does not have any information about the CAN message layout from any car maker. However, there are third party programs such as CANALYZER which you could use to help in this area. This product is not affiliated with Dewetron in any way. A great invention of Vector corporation is the DBC file. This is essentially a standardized flat file which contains the information about a given CAN messaging layout. If you have a DBC file, you may import it right here and set up all of your channels instantly. Click the IMPORT button under the label DBC library, and then select the DBC file that you would like to apply. Scan for messages Another approach is to checkmark the SCAN button. When you do this, DEWESoft will “listen” on this bus and identify all of the CAN messages that are coming across, and create messages for them here. DEWESoft will show you how many messages it has found above the SCAN button. -- SCAN can only find messages that appear during the time the system is scanning. Not all CAN messages are coming across the bus all the time! Some messages only report errors, for example, so you might have to scan for days or weeks to see them all this way. Yet other messages will only appear based on a specific query, and will thus never appear unless you cause them to report on the bus. -- SCAN can only find messages; it cannot identify the channels within the messages Of course, since each message might contain any number of channels, starting at various bits and running any bit length, and with any scaling factors, it is still impossible to know just from the messages, what the bits represent, but it gives you a starting point. As mentioned, the easiest way is by importing a DBC file, which contains everything already. But if you need to configure channels manually, the procedure is quite simple. Configuring message and channels manually You can add messages manually by clicking the Message + button (or using SCAN as mentioned above). To configure the channels contained within a message, click the SETUP button for a message, and the CAN CHANNEL SETUP box will open: OWNER’s GUIDE - Interface cards | 18-455 In the top half of this dialog you set up the message itself, where in the bottom half you can configure the channels contained within this message. Message setup Looking at the top half, message configuration, here are the key things to know about: Name The name of the message Arb ID# ID number of your message on the CAN bus Type Select between CAN standard and CAN extended from drop down list. Those two differs in identifier length. The standard length is 11 bits, and extended is 29 bits. DLC DLC is the length of the message. It ranges from 1 to 8. As a standard, the DLC is set to 8. Delay We can also enter the message delay in millisecond which shifts the time stamp of the message back in time. This can be used to perfectly synchronize the analog data with CAN data with compensating the delays in digital data transmission. Channel setup Now we need to add the channel(s) contained within this message. Click the ADD button and DEWESoft will create a default channel and color code the first 16 bits of the CAN message. Please enter the name and units of this channel, and the scale factor (multiplier and offset). Also, make sure that the start bit and length (in bits) are correct. Then click OK. You can see that in the screen shot below, four channels have been set up within this one message. Two of the channels are just one bit long, whereas the other ones are 18-456| OWNER’s GUIDE Or, if this message contains multiple channels, repeat the procedure starting with the ADD button mentioned above, and create more channels. Within a message, there can be numerous channels, and each one can be absolutely unique in terms of its bit length, scaling, name, units... CAN is really quite flexible. Arbitration IDs and CAN message rates CAN messages are identified via hex IDs known as “Arbitration IDs.” This is what DEWESoft shows on the message list, in the ARB column: Below the Arbitration ID, the rate at which this message is coming across the bus is also shown in Hz. You will notice that each message can come across at a different rate. J1939 support J1939 is used to enable special decoding of arbitration ID which includes the sender, receiver and the message ID itself. Arb ID is always extended in this case. This is most widely used on trucks, busses and certain military vehicles. Please make sure that the bus type is really J1939 before enabling this option. OBD II support DEWESoft additionally supports the protocol for reading in data from the OBD II port, required on all US cars. In this case, the messages are standardized, and a DBC file is not needed. This feature requires that an optional plugin be purchased and installed into DEWESoft. Select messages / channels for storage Notice the buttons near the top of the CAN setup window labeled VIEW: OWNER’s GUIDE - Interface cards | 18-457 It is important to go to the CHANNELS view, and then press USED for the channels that you want to really record and display next time you store data. ⇒⇒ If you press USED only on the MESSAGES view, the actual message ID itself will be stored, but not the channel(s) that it contains!!! Always go to CHANNELS view and press in USED for all channels that you want to display and store. After clicking CHANNELS, you will see a list of all of the channels contained within the various CAN messages that you have set up: Make sure to press USED in on the channels that you want to store and display. We cannot emphasize that enough. OK, your CAN interface is set up. When you save this Dewesoft SETUP, all of the CAN parameters are saved into the setup file, of course. But sometimes it is useful to be able to save this CAN setup as a DBC file. This is possible, as described in the next section. Saving DBC files Saving your CAN setup to a stand-alone DBC file requires a software option called DEWESoft-OPT-CANOUT. This option is needed because the DBC file format is proprietary to Vector, a company not affiliated with Dewetron. With this software option, we include a license from Vector, which we purchase from them and transfer to you, so that you gain the ability to export your CAN setup to a standard Vector DBC file. This DEWEsoft-CAN-OUT option also includes the ability to transmit CAN messages onto the bus. Please see 18-458| OWNER’s GUIDE the separate documentation about these capabilities for further details. Displaying CAN channels Whichever CAN channels are pressed in as USED on the CAN setup screen, will be displayed on the measure screens, as shown below. We made a simple screen which populates the CAN channels into digital meters. Below that, each of the four wheel speed channels are shown in a recorder graph. Notice that the CAN channels are shown on the right side of the screen in the CHANNEL LIST. A nice feature is that the channels contained within each message are collapsed into a group whose name is the same as the message name: OWNER’s GUIDE - Interface cards | 18-459 So you can see that the message called SteeingWheel has four channels within it. The CAN messages and channels will disappear from this list if you click on a display type which is incompatible. For example, CAN is too slow to show in a SCOPE or FFT graph. So if you click on a SCOPE or FFT graph, the CAN channels will disappear from the channel list. This is the same with other very slow data, like from PAD, EPAD2 or CPAD2 modules, for example. Storing CAN data Any CAN channels pressed in as USED on the CAN setup screen will be stored into the data file when you store data. It does not matter if the channels are shown on a display screen or not. Processing CAN data in MATH CAN channels can be used within your MATH channels just like any other channel. 18-460| OWNER’s GUIDE OWNER’s GUIDE - Dewetron Sensors | 19-461 19 DEWETRON Sensors Dewetron offers a handful of specialty sensors for our systems, primarily DEWE-CAM series CAMERAS that are made to work with our hardware and software. This section will show the sensors that we make and provide the details that you require about their specifications, capabilities, and applications. We also offer GPS speed / distance and position sensors, with extremely high performance. We also offer intertial sensors for movement applications. 19-462| OWNER’s GUIDE DEWE-CAMS DEWE-CAM-USB This camera is a USB 2.0 compatible DirectX camera that is compatible with all DEWETRON systems. For use within the software, the Windows driver must be installed. In addition, the camera must be attached to the DEWETRON system before the software is started. Further operational guidelines are presented at the end of this section. The DEWE-CAM-USB has an integral USB 2.0 cable which connects to your DEWETRON system. The camera is also powered via the 500 mA available on the USB port, and there is no separate power input possible on the camera. As a result, you should always connect the camera to a USB port on the DEWETRON system - and never via a USB hub or other in between device (such as the MOBDISP-17, as one example). Outline Drawing Operating System Drivers Windows 32-bit: SFT-04040, driver and stand-alone video viewer Windows 64-bit SFT-10028, driver only (please download SFT-04040 for a viewer) Please see the DEWE-CAM-USB web page at www.dewamerica.com to download the latest drivers. OWNER’s GUIDE - Dewetron Sensors | 19-463 DEWE-CAM-USB Specifications DEWE-CAM-USB Specs Image sensor 1/4” IL CCD Active pixels 768 x 494 (NTSC) / 752 x 582 (PAL) Viewer display (USB 2.0, 30fps) / 720 x 480 pixels max (NTSC / 720 x 576 pixels max (PAL) Sensitivity < 0.5 Lux Signal To Noise Ratio > 48 dB (AGC off) Gamma 0.45 default (1.0 via Software) Gain control Automatic 36 dB (AGC default) or Fixed options via software Scan mode Interlaced / Non Interlaced (selectable via Software) Synchronization Internal Back Light Compensation On by default White Balance Mode AWB auto white mode, Fixed modes selectable via software Contour enhancement On by default Iris control CCD Iris default Shutter speed Automatic Video output USB 2.0 Power supply 5 VDC via USB bus Power consumption < 1.3 W Environmental Operating temperature -15°C to + 55°C (5°F to + 131°F) Storage temperature -25°C to + 70°C (-13°F to + 158°F) Operating humidity 20% up to 93% RH Storage humidity Up to 98% RH Lifetime MTBF > 150000 Mechanical Dimensions 50mm x 50mm x 49.6mm (without lens mount) (1.97” x 1.97” x 1.95”) Weight 154g (0.34 lb) Cable Integrated 8.2 ft. USB cable 19-464| OWNER’s GUIDE Using the DEWE-CAM-USB within DS-7 software As mentioned earlier, the drivers must be installed within the Windows operating system. Step 1 Connect the camera to your DEWE system. Step 2 Start the DS-7 software. First Time Setup Steps You need to turn on DirectX VIDEO support within DS-7. To do this, select SETTINGS then HARDWARE SETUP. This will open the hardware settings dialog box. Click on the VIDEO tab and then place a checkmark on the DirectX box. If the WIndows driver has been properly installed, the camera will show up in the list. The name in the screen capture shown above is figurative - yours will be different. Make sure that your camera is enabled. Adjusting for Camera Delay Since USB camera video frames have to be processed by the CPU, there is always a small latency or delay, between when the camera “sees” the image and when the frame is processed. This latency can be offset automatically at the time of recording. But in order to know how many milliseconds the delay is, we need to measure it first. Here are the steps: First, connect a sensor by which you can create a sharp spike which can be seen within the camera image. A perfect example would be tapping on an accelerometer, or microphone. In the same way that film crews use a “slate” clapper in order to later align the video with the audio: the precise moment that the clapper comes together creates an audio spike which makes it easy to align the two media. Do a short recording using your video camera and sensor. Click ANALYSIS to replay the data. Use the cursors on the recorder graph to measure the number of ms that the video lags behind the data. Now go back to the Hardware Settings screen, video tab, and enter that number into the DELAY field. In future recordings, the video will be aligned better with the data. OWNER’s GUIDE - Dewetron Sensors | 19-465 Recording with your DEWE-CAM-USB In the previous steps we turned on the camera in general within the software. This is analogous to turning on your A/D card at the hardware setup level. But in order to record video from the camera we need to configure it on the Channel Setup screen (just like we do analog and digital channels). On the Channel Setup screen, click the VIDEO icon. -- Note - if you don’t see a VIDEO icon here, then either DirectX video is not enabled or your camera is not enabled on the HARDWARE SETTINGS screen, or the camera was not plugged in when the software was launched. Check those settings and then come back to this point when you have gotten a VIDEO icon here. In the CAMERA OPTIONS area you will see your camera. Enable the USED button. This will activate the camera and allow it to be viewed and recorded. You can click the SETUP button to configure the detailed settings of the camera. Now go to the MEASURE screens and add your camera to any screen of your choosing. When you STORE data, video will be recorded automatically. 19-466| OWNER’s GUIDE DEWE-CAM-FW-70 This camera has a HARD SYNC to the ORION A/D card within your DEWETRON system, allowing the video frames to be precisely time synchronized with the analog and digital data (and CAN data, if this option is installed). The data and control interface is Firewire. It is required that a PCI or PCIe Firewire (IEEE1394) interface be added to your DEWETRON system, otherwise the specified maximum frame rates cannot be guaranteed. (The Firewire interfaces built into the mainboards on certain DEWETRON models are not as fast as a separate PCI / PCIe card.) In addition, the SYNC cable must be connected to the Digital I/O (Accessory) connector on your DEWETRON system, and properly configured to be controlled by the ORION card within your system. Main Features VGA 640 x 480 progressive CCD Up to 70 fps @ full resolution Super compact size Ready for C-Mount lenses Wide-range manual / auto gain Manual / auto exposure (shutter) Gamma on / off Real time shading correction External trigger input for synchronization including frame index Lockable IEEE1394 connector OWNER’s GUIDE - Dewetron Sensors | 19-467 Specifications DEWE-CAM-FW-70 Specifications Image device type 1/2” (diag. 8 mm) progressive scan, SONY Picture size 640 x 480 px Cell size 9.9 μm x 9.9 μm Resolution depth 12 bit (ADC) Lens mount C-Mount Digital interface IEEE 1394 IIDC v. 1.3 Transfer rates 100 Mbit/s, 200 Mbit/s and 400 Mbit/s Frame rates Up to 74 Hz in full resolution, higher rates with AOI Gain control Manual: 0 to 24 dB (0.035 dB/step); Auto gain (selectable AOI) Shutter speed 20 to 67.108.864 μs (67 s); auto shutter (selectable AOI) External trigger Yes Shutter trigger Yes Smart features Real time shading correction; built-in FIFO memory up to 17 frames Power requirements 8 to 36 VDC via IEEE 1394 cable or 12-pin HIROSE Power consumption Less than 3 W (@ 12 VDC) Dimensions (L x W x H) 72 x 44 x 29 mm (2.8 x 1.7x 1.1 in.) w/o tripod and lense Weight <120 g (without lens) Temperature Operating: +5 to +45 °C; Storage: -10 to +60 °C Regulations EN 55022, EN 61000, EN 55024, FCC Class B; DIN ISO 9022 Package information Each DEWE-CAM-FW-70 package consists of 1 x DEWE-CAM-FW-70 camera 1 x IEEE 1394 cable (4.5 m) 1 x Trigger calbe (4.5 m) 1 x Mounting plate (for tripod or suction cup mounting) 1 x Suction cup 1 x Protection bag Options C-MOUNT lens 6 mm, F 1.2, Iris 1.2 to 16, screw fixing for focus and iris, 42 x 46 mm / 125 g 19-468| OWNER’s GUIDE DEWE-CAM-GIG-E-120 OWNER’s GUIDE - Dewetron Sensors | 19-469 19-470| OWNER’s GUIDE OWNER’s GUIDE - Dewetron Sensors | 19-471 GPS Sensors DEWE-VGPS-200C 19-472| OWNER’s GUIDE DEWE-VGPS-HS High Speed GPS Sensor OWNER’s GUIDE - iPAD Wireless Display | 20-473 20 Using the iPad as a Wireless Display There are a few important things that you need to do in order to use remote desktop applications, such as the iTap RDP on the new iPad, to control your Dewetron system. In a nutshell, you must have these things set properly: Create a passworded USER account on the DEWE computer Allow Remote Desktop in Windows Connect your USER account(s) to remote desktop Set the DEWE Computer’s WIFI adapter to a fixed IP address Allow Remote Desktop through the DEWE Computer firewall Create a private WIFI network with your Wirless Router Connect the computer to your private WIFI network Connect the new iPad to your private WIFI network The new iPad should be running iTap RDP app, and pointed to the fixed IP of the Dewetron, and to the passworded login that you created on the computer. System Requirements A Dewetron computer system with a wireless adapter installed and working A wireless router compatible with your Dewetron adapter and the new iPad WIFI The new iPad from Apple Computer The RDP app from the company called iTap (downloadable on the app store; moderately priced) Now, please follow these steps... 20-474| OWNER’s GUIDE 1. Create a Passworded USER account To be able to connect to your Computer using Remote Desktop you have to have a password set for your User account. If you do not have a password set you have to create one. This also applies for any user who should be able to connect to your computer via Remote Desktop. Open Control Panel Click on the Windows start button. Select “Control Panel”. Open User Accounts Click on the User Accounts and Family Safety. Select Change password Click on the Change your Windows password. OWNER’s GUIDE - iPAD Wireless Display | 20-475 Create a password for your account. Select Create a password for your account. Enter your password and confirm. Type in your password. Type a password hint to recall if you forgot it. Click on Create password. 20-476| OWNER’s GUIDE 2. Allow Remote Desktop in Windows Navigate to system settings Click on the Windows start button. Click with the right mouse button on the “Computer” button. Select “Properties”. Select Remote settings On the left pane click on Remote settings. OWNER’s GUIDE - iPAD Wireless Display | 20-477 Allow Remote Desktop connections From the top five tabs select the Remote tab. In the lower “Remote Desktop” section select the middle one. (“Allow connections from computers run- ning any version of Remote Desktop [..]”). Click on Select Users. 20-478| OWNER’s GUIDE 3. Connect your USER account to RDP Continuing from the previous step, please select Users Add any User you want to be able to access your Computer. Click OK to finalize this step. -- Note - the USER ACCOUNT that you created in STEP 1 must be showing in the screen above! Make sure that this user account is listed or granted access to remote desktop. 4. Set the DEWE Computer’s WIFI adapter to a fixed IP Address We set the computer’s WIFI interface to a fixed, non-routable IP address of: 192.168.1.100 subnet mask: 255.255.255.0 This is done here: OWNER’s GUIDE - iPAD Wireless Display | 20-479 Then click on CHANGE ADAPTER SETTINGS in the left toolbar: Then RIGHT CLICK on the wireless network connection that you want to use to connect to the private WIFI network we will create in the next step, then select PROPERTIES from the context menu that will appear: 20-480| OWNER’s GUIDE Uncheck Internet Protocol Version 6 (TCP/IPv6) Make sure that Internet Protocol Version 4 is checked, and selected, as shown above. Click PROPERTIES to configure your fixed IP address: OWNER’s GUIDE - iPAD Wireless Display | 20-481 Click the radio button called “Use the following IP address:” Then enter the fixed IP and subnet mask as shown above. -- Note - if you are configuring MULTIPLE Dewetron instruments, please change the last IP number set of each one to something unique. For example, if you want to control four different Dewetrons from one iPad, you would set these Dewetron IPs to something like this: Dewetron instrument #1: 192.168.1.101 Dewetron instrument #2: 192.168.1.102 Dewetron instrument #3: 192.168.1.103 Dewetron instrument #4: 192.168.1.104 … Dewetron instrument #10: 192.168.1.110 Now click OK on any open dialogs to set these changes and put them into effect. If your Dewetron computer asks to you restart, please do so. Shut down the instrument (computer), and then restart it in the normal way. 20-482| OWNER’s GUIDE 5. Allowing Remote Desktop through the DEWE Computer’s Firewall In certain circumstances you might need to manually create the exception in the firewall to allow Remote Desktop to be used. Please be aware that a 3rd party firewall (e.g., Symantec, Kaspersky) might also affect Remote Desktop. Check those settings to be sure that Remote Desktop is allowed! Open Control Panel Click on the Windows start button. Select “Control Panel”. Go to System and Security Click on System and Security. OWNER’s GUIDE - iPAD Wireless Display | 20-483 Open Firewall settings Click on “Allow a program through Windows Firewall”. Allow Remote Desktop exception Click on the Change settings button. Scroll down to “Remote Desktop”. Check Remote Desktop, Home/Work and Public. Click OK. 20-484| OWNER’s GUIDE 6. Create a Private WIFI network with your Wireless Router Most of our customers purchase a simple wireless router and simply connect it to power. They do NOT connect it to the internet or to their company network. Run the configuration program that comes with the wireless router (most of them have a web browser based interface) and set up the name (SSID) of the wireless LAN, and set the security method that you prefer to use (WEP, WPA...) and the password. These settings are completely up to you, according to your company’s requirements. In our example, we will set the SSID to DEWE-INSTRUMENTS and set up WEP security and a password. We set the base IP address of the wireless router to 192.168.1.1 with a subnet mask of 255.255.255.0. By not connecting the router to the company network or the internet, only a local computer with WIFI can access it. This is what we want in our example: to create a local private network. Notice that the IP address is routable from our DEWE computer, which was set to 192.168.1.100 (the last three digits might be different according to your configuration). Just be sure NOT to use the same last three digits on your router that you have used on the DEWE computers! It must be unique. OWNER’s GUIDE - iPAD Wireless Display | 20-485 7. Connect the DEWE computer to your private network Make sure that the DEWE computer is within range of your WIFI network and that the wireless router is turned on and working. In the tray, find your WIRELESS CONNECTION icon and click it to pop up the list of available networks. Select the DEWE-INSTRUMENTS network and CONNECT to it. Click CONNECT to join this network 20-486| OWNER’s GUIDE 8. Connect the new iPad to your private network Make sure that the DEWE computer is within range of your WIFI network and that the wireless router is turned on and working. Click the SETUP icon on the iPad and then make sure that WIFI is turned on. When the network that you created appears in the list, CLICK IT to select it. If you have set up a password, you will need to enter it on the iPad. Follow the normal iPad procedures to put your iPad onto this network. You can check the settings by clicking the blue forward arrow on this connection. It should look something like this: OWNER’s GUIDE - iPAD Wireless Display | 20-487 Notice how the IP address is set to 100, and the Router has the “1” as the last three digits. Everything looks correct. Now we can run the iTap RDP application and configure it to remotely control any DEWE instrument that is on this network. 20-488| OWNER’s GUIDE Open the iTap app and then create a configuration that points to your DEWE computer instrument. Here is what the screen looks like: Use the (>) control within the list of bookmarks to edit the settings. Input the user name and password as well as the IP address of the DEWE instrument that you want to remotely control. OWNER’s GUIDE - iPAD Wireless Display | 20-489 Then touch once on the name from the bookmarks, then click CONNECT in the middle of the screen to start. If you have a local screen plugged into the DEWE computer, it will go back to the login screen as long as the iPad RDP is logged in and operating the computer. At this moment, the iPad will serve as the screen and virtual keyboard of the system. The iTap app has numerous controls and gestures for operating the computer, opening the on-screen keyboard, pinching and zooming, and more. Please see the iTap documentation for a complete list. There is an index presented at the end of this document with the main gestures, as a convenience to you. Note - if you possess a bluetooth keyboard for your iPad, you can use it as a real keyboard with your DEWE computer, as long as the iTap RDP application is serving as the display of this system. Sometimes a real keyboard is more convenient than the on-screen version. You have the option of using it or not - it makes no difference to the iTap application that we have seen. Note also that you can create multiple bookmarks for various DEWE computer instruments, and log into any of them from a single iPad. You can also store your login credentials within the app, and link them to each DEWE computer, so that you don’t need to enter the password each time. -- Important note - you need to configure the DEWE computer so that the WIFI adapter is ON and set to automati- cally connect to the DEWE-INSTRUMENTS wireless router. If you don’t do that, then you will need to connect a monitor to the DEWE computer and make those settings manually before you will be able to connect wirelessly. These are standard Windows settings that are easily made within the configuration of your wireless adapter. 20-490| OWNER’s GUIDE 9. Gestures iTap mobile RDP uses gestures to control all input actions except keyboard input. This frees up your screen, because it doesn’t need to display any buttons. This is a quick reference - please see the HELP built into the iTap app itself for more details, or visit the company on the internet from your computer. -- Note: 3 finger gestures will not work if you have Apple’s “Zoom” accessibility feature enabled! In that case you might use the corresponding buttons within the iTap Utility Bar instead. Make sure that the “Utility Bar” is set to “Initally On” in your bookmark’s advanced settings. You can use the following gestures: Basic Gestures Tap three fingers to show or hide the utility bar. Swipe three fingers from left to right to disconnect and return to the main menu. Swipe three fingers from top to bottom to show/hide the keyboard. Scope Mode and Pointer Mode Gestures A single tap will produce a mouse click on the location where you tapped. Zoom in if you need very precise control over the click location. OWNER’s GUIDE - iPAD Wireless Display | 20-491 A simple drag will pan the display. This is a clientside operation, no mouse movement is generated on the server. Perform a pinch gesture with two fingers to zoom in or out. Like panning this does not produce any mouse input on the server. Drag two fingers up or down the display to emulate a mousewheel. Tap with two fingers to produce a right click. Tapping with one finger two times in quick succession will produce a doubleclick. Tap three times for a tripple click, and so on. The same can be done with two fingers to do a right mouse button doubleclick. Tap with a single finger and then quickly touch the screen again but do not release the finger to initiate a mouse drag. the mouse will be released once you remove the finger from the display. The same can be done with two fingers for a right mouse button drag. 20-492| OWNER’s GUIDE Scope Mode Gestures Touch the screen and hold the finger for a short while to begin scope mode. Scope mode is in effect as long as the scope is visible. Move the finger to move the scope. As you approach the screen borders the screen will scroll in that direction. The closer you are to the border, the faster is scrolls. Touch the screen with a single additional finger to press the left mouse button, release the additional finger to release the left mouse button. Repeat for double- or multi-clicks. Touch the screen with two additional finger simultaneously to press the right mouse button, release the additional fingers to release the left mouse button. Repeat for double- or multi-clicks. You can move the original finger to perform mouse drags while holding down an additional finger to drag the left mouse button. The additional finger does not have to move. You can move the original finger to perform mouse drags while holding down two additional fingers to drag the right mouse button. The additional fingers do not have to move. Draw Mode Gestures A single tap will produce a mouse click on the location where you tapped. Zoom in if you need very precise control over the click location. OWNER’s GUIDE - iPAD Wireless Display | 20-493 Drag a single finger to drag the left mouse button (paint). A drag with two fingers will pan the display. This is a clientside operation, no mouse movement is generated on the server. Perform a pinch gesture with two fingers to zoom in or out. Like panning this does not produce any mouse input on the server. 20-494| OWNER’s GUIDE OWNER’s GUIDE - Appendix | A-495 Appendix Index Symbols 0.5U-AMFLEX-POWER-4 6-110, 7-134 0.5U-AMFLEX-POWER-8 6-111, 7-135 0.5U-CLAMP-DC-POWER-4 6-111, 7-135 0.5U-CLAMP-DC-POWER-8 6-111, 7-135 0.5U-DA2-BNC 6-110, 7-134 0.5U-DA4-BNC 6-110, 7-134 0.5U-DA8-BNC 6-110, 7-134 1.5U-ORION-DIO-PANEL-1 6-111, 7-135 1.5U-TC-PANEL-32 6-111, 7-135 1U-DA8-BNC 6-111, 7-135 1U-DA16-BNC 6-111, 7-135 2D array 9-172 2-point scaling method 9-183 3D array 9-172 22-bit A/D converter 5-102, 9-193, 274, 13-297, 13-344, 13-345, 14-353, 14-362, 14-366, 14368, 15-370, 16-392, 16-399, 16-403, 17-407, 17-408, 17412, 17-413, 17-414, 17-415 310-UPS 3-19, 3-21, 3-24, 3-25, 3-45, 3-47, 10-243, 10-247 1553 5-101, 9-174, 18-417, 18-437, 18-438, 18-439, 18-440 A Accessory connector 3-38, 4-70, 5-94, 6-120, 7-144 Accuracy 8-162 AC power cord 3-45, 5-95 Acquisition Mode 5-103, 9-173 Acquisition Screens 9-194 Activate the Channels 9-178 ADAP-BAN-BNC 11-264 ADAP-BNC-MICRODOT 11263 ADAP-BR-1/4-120, using it 11265, 11-271 ADAP-BR-1/4-350 11-265 ADAP-CAN-OPT-ISO 11-263 ADAP-DAQ-BNC 11-264 ADAP-MDAQ-BNC 11-264 ADAP-MIC-BNC-CBL 11-265 ADC 8-150 address, Dewetron Inc. ii, 3-37, 5-93, 276, 278, 13-299, 13-301, 14-357, 14-359, 14-360 addressing module 278, 13-301 Adlink 18-433 AD series 5-99, 5-100, 13-351, 17-409 amplifier column 277, 279, 13-300, 13-302, 14-358, 14-360 ANALOG INPUT connector 3-37, 5-93 Analog input connectors 3-36, 4-68, 5-91, 6-119, 7-143 Analog output 13-296 Analog Output module 14-367 ANALOG setup screen 9-176, 9-193 Analysis Mode 9-173, 9-175, 9-201, 9-207 anti-aliasing 17-408, 17-412, 17413, 17-414, 17-415 antivirus/security software 2-15 Arbitration ID 18-446 ARINC 3-23, 3-48, 4-55, 4-75, 5-81, 5-101, 6-107, 6-113, 6-127, 7-137, 7-147, 9-171, 9-174, 18-417, 18-437, 18438, 18-439, 18-441 ARINC 429 9-174 ARINC 429 receive setup 18-438 ARINC 429 transmit setup 18-438 Audio 3-29, 3-35, 4-61, 4-67, 5-84, 5-89, 5-102, 6-118, 7-142, 11-265 Automatic File Numbering 9-190 Automatic file SWITCHING function 9-192 Automatic Recording STOP function 9-190 B Background image 9-172 Ballard 18-437 BAT-CHARGER-1 5-96, 6-123, 10-247, 10-251, 10-252, 10- A-496| Appendix 253, 10-254 BATT-95WH 3-45, 5-96, 10-247 Battery appears damaged 3-45, 5-95, 6-122 battery door 5-95, 6-122 Battery handling 3-45, 5-95, 6-122 BATTERY STATUS LCD 5-95, 6-122 BIOS 2-14, 3-46, 5-97, 6-124 break-out box 14-364 BUS interfaces 3-37, 4-69, 5-92, 6-119, 7-143, 9-174, 9-194 C calibration 1-12, 5-101 Calibration 1-12 CANALYZER 18-444 CAN bus interfaces 5-100 CAN channels, displaying 18-448 CAN data, performing MATH 18-449 CAN data, storing 18-449 CAN message rates 18-446 CAN output 5-100, 9-174 Carrying bag 5-101 CAT5e 3-32, 4-64, 5-87, 6-116, 7-140 CAT6 3-32, 4-64, 5-87, 6-116, 7-140, 17-408 CD 5-98 certificate of compliance 1-12 channel name, units, color 9-181, 9-185 Channel Setup 9-179 channel setup dialog 9-178 coefficients 5-103 CONN-DSUB-9 11-264 Connectors 3-30, 3-32, 3-35, 3-36, 3-37, 4-61, 4-62, 4-64, 4-67, 4-68, 4-69, 5-85, 5-87, 5-89, 5-91, 5-92, 6-116, 6-118, 6-119, 7-140, 7-142, 7-143 Copying Channel Settings 9-187 Copy/Paste menu 9-187 Core2Duo® 5-102, 5-103 Counter 3-36, 4-69, 5-91, 5-100, 5-103, 6-119, 6-126, 7-143, 7-146, 8-151, 8-154, 8-155, 8-156, 8-157, 8-162 Counter/Encoder 6-126, 7-146 Counter Filters 8-164 CPAD2 5-99, 16-391 CPAD2 modules, adding new modules 16-393 CPAD2-RTD8 16-393, 16-396 CPAD2-TH8 16-393, 16-396 CPAD2-TH8-x 16-393, 16-396 CPAD2-V8 16-393, 16-396 CPU 5-102, 5-103 Current sensors, using 11-269 Cursor 9-173 cursors 9-173, 9-201, 9-203, 9-204 D D3PC-8 4-51, 4-53, 4-56, 4-57, 4-58, 4-59, 4-71, 4-74 D310 i, 1-12, 3-17, 3-18, 3-19, 3-20, 3-21, 3-22, 3-23, 3-24, 3-25, 3-26, 3-27, 3-28, 3-33, 3-37, 3-38, 3-40, 3-41, 3-42, 3-43, 3-44, 3-45, 3-46, 3-47, 3-48, 4-55, 4-60, 4-65, 4-75, 10243, 10-247, 10-251 DAQ Module Connectors 13-293 DAQ modules, Addressing 276, 13-299 DAQN-V-OUT 13-296 DAQP-ACC-A 13-295 DAQP-BRIDGE-A 13-295, 13323 DAQP-BRIDGE-B 13-331, 13335, 13-337, 13-339, 13-341, 13-343, 13-349, 13-351, 14-361, 14-363, 14-364, 14365, 14-367, 15-372, 15-377, 15-381, 15-385, 15-387, 15389, 15-390, 16-396, 16-398, 16-400, 16-402, 16-404 DAQP-CFB 13-295 DAQP-CHARGE-A 13-295 DAQP-CHARGE-B 13-295 DAQP-DMM 13-294, 13-305 DAQP-FREQ-A 13-296 DAQP-HV 13-294, 13-303 DAQP-HV-S3 13-294, 13-303 DAQP-LA-B 13-294, 13-313 DAQP-LA-SC 13-294, 13-313 DAQP-LV 9-180, 13-294, 13-307 DAQP-MULTI 13-296 DAQP-STG 13-295, 13-315 DAQP-THERM 13-296 DAQP-V 13-294, 13-311 DAQ-SHUNT-1 11-264, 282, 285, 13-307, 13-310 DAQ-SHUNT-1 adapter, using it 11-266 DAQ-SHUNT-1-BNC 11-264 DAQ-SHUNT-3 11-264, 282, 285, 13-307, 13-310 DAQ-SHUNT-4 11-264, 282, 285, 13-307, 13-310 DAQ-SHUNT-5 11-264, 282, 285, 13-307, 13-310 Data export 9-173 Data file format 9-172 Data replay 9-173 Data throughput 3-47, 4-74, 6-126, 7-146 DBC file 18-444, 18-447 DBC files, saving 18-447 DC power cord 3-45, 5-95 DC power input 3-45, 4-60, 5-83, 5-95, 6-114, 7-138 Default Display Range 9-185 Delay 18-445 Design mode 9-207 DEWE-30-8 expansion rack 275, 13-298 DEWE-30-16 rack 275, 13-298 DEWE-3040-RM i, 1-12, 7-129, 7-131, 7-132, 7-133, 7-136, 7-137, 7-140, 7-145, 7-146, 10-243 DEWE-3050 i, 1-12, 3-48, 4-75, 6-105, 6-107, 6-108, 6-109, 6-110, 6-112, 6-113, 6-117, 6-119, 6-122, 6-123, 6-124, OWNER’s GUIDE - APPENDIX | A-497 6-125, 6-126, 6-127, 7-134, 7-141, 7-143, 7-147, 10-243, 10-247, 10-251 DEWE-3210 3-36, 3-37, 4-68, 5-77, 5-91, 5-93, 5-101, 6-105, 6-119, 7-129, 7-143, 14-354, 16-392 DEWE-3211 1-12, 3-22, 3-36, 4-51, 4-68, 5-77, 5-80, 5-91, 5-101, 6-105, 7-129, 14-354, 16-392 DEWE-CAM-FW 3-23, 3-31, 3-47, 4-55, 4-63, 4-74, 5-81, 6-107, 6-113, 6-126, 7-131, 7-137, 7-146, 19-456 DEWE-CAM-GIG-E 3-23, 4-55, 5-81, 6-107, 6-113, 7-131, 7-137, 9-174, 19-458 DEWE-CAM-USB 3-23, 4-55, 5-81, 6-107, 6-113, 7-131, 7-137, 19-452, 19-453, 19454, 19-455 DEWE-DCDC-24-300-ISO 10255, 11-271 DEWESoft 7 5-103, 9-167, 9-211, 9-236 DEWESoft-OPT-ARINC/1553 18-437 Dewetron ii, 1-11, 1-12, 2-13, 2-15, 3-31, 3-34, 3-45, 4-63, 4-66, 5-86, 5-89, 5-96, 5-101, 6-118, 6-123, 7-142, 8-149, 9-174, 9-175, 9-182, 9-194, 9-199, 10-243, 10-247, 11-265, 273, 276, 279, 285, 13-293, 13-299, 13-302, 13308, 13-310, 13-336, 13-338, 13-340, 13-344, 14-354, 14-356, 14-357, 14-360, 15369, 15-370, 16-391, 16-392, 16-393, 16-397, 16-399, 16401, 16-403, 16-405, 17-407, A-493 DEWE-VGPS-200C 9-174 digital filter 8-164 Digital inputs 9-174 Digital I/O connector 3-38, 5-94, 6-120, 7-144 DirectShow 9-174, 18-433, 18-434 DIRECTX 18-434 Display Range 9-185 Display Range, Setting the Default 9-185 Display Scale 9-184 DLC 18-445 DPS-2410 3-45, 3-46, 5-83, 5-95, 5-96, 5-97, 5-101, 5-102, 6-122, 6-123, 6-124, 7-145, 10-243 DS-7 3-47, 4-74, 4-75, 6-126, 7-146, 9-167, 9-171, 9-172, 9-175, 11-261, 11-263, 11265, 276, 13-299, 14-356, 16394, 16-395, 17-411, 19-454 DSUB 37-pin connector, 3-39, 4-70, 5-94, 6-121, 7-144 DVD 5-98, 5-101 DVD / CD drive 5-98 Dynamic acquisition rate 9-193 E Encoder 8-150, 8-151, 8-158, 8-159, 8-160, 8-161 encoders 8-158, 9-174, 9-194 End-of-Life Handling 2-15 EPAD2 5-99, 5-101, 16-391 EPAD2 modules, installing new ones 16-394 EPAD2-RTD8 16-393, 16-396 EPAD2-TH8 16-393, 16-396 EPAD2-TH8-x 16-393, 16-396 EPAD2-V8 16-393, 16-396 Ethernet 3-29, 3-32, 4-61, 4-64, 5-84, 5-86, 5-87, 6-116, 7-138, 7-140 Event Counting 8-151, 8-153 EVENTS 9-199 Export file formats 9-173 Export Your Data 9-207 F FFT 9-172, 9-173, 9-194, 9-196 FFT graph, 9-172 file conversion 9-207 File export button 9-207 File Name 9-190 File Numbering, automatic 9-190 FILL ONE MODULE PROCEDURE 276, 13-299, 14-357 FILL (or CLEAR) One Module Procedure 277, 13-300, 14-358 Fill Rack (all Modules) Procedure 276, 13-299, 14-357 FILL RACK PROCEDURE 276, 13-299, 14-357 firewire 3-29, 3-31, 4-61, 4-63, 5-84, 5-86 Flexpro 9-173, 9-207 Fluke 1-12 Frequency Measurement 8-151, 8-162 Frequency to voltage 13-296 function scaling method 9-183 Fuse 4-60, 5-83, 6-114, 7-138 G Gated Event Counting 8-151, 8-153 GPS 9-172, 9-174 GPS-CLOCK 17-408 GPS track 9-172 graph 9-172, 9-173, 9-180, 9-183, 9-184, 9-185, 9-186, 9-187, 9-197, 9-198, 9-199, 9-202, 9-203, 9-204 Ground (earth) Connector 4-60, 5-83, 6-114, 7-138 H hard drive 3-46, 4-73, 5-97, 6-124, 7-145, 9-176 Hazardous Substances 2-15 HDD 4-72, 5-97, 5-98, 5-103, 6-124 hot-swappable batteries 3-45, 5-95, 6-122 A-498| Appendix HSI 5-99 HSI-HV Isolated High Voltage module 280 HSI-HV Specifications 280 HSI-LV Isolated Low Voltage Module 282 HSI-LV Shunt Options 285 HSI-LV Specifications 282 HSI Series Signal Conditioners 273 HSI-STG Isolated Universal Input Module 286 HSI-STG Pin-outs 287 HSI-STG specifications 286 humidity 2-13, 5-102 I i7 6-126, 7-146 IEEE-1394 3-29, 3-31, 4-61, 4-63, 5-84, 5-86, 5-102 IEPE 9-174, 282, 286, 13-294, 13295, 13-307, 13-315, 13-335, 13-337, 13-339 Inductive 13-295 Inertial sensors 9-174 Input scaling 5-103 Installing the Smart Batteries 3-44, 4-72, 5-95, 6-122 Intel 3-47, 4-74, 6-126, 7-146 iPad 20-476 IRIG-CLOCK 17-408, 18-419 Isolation 5-100 J J1939 5-100, 9-174, 18-446 K Keyboard 5-102 L LabVIEW 3-47, 4-74, 6-126, 7-146, 9-167, 9-168, 9-169, 9-170 LCD 5-95, 5-97, 5-102, 6-122, 6-124, 10-247 LCD screen, battery indicator 5-95, 6-122 LEMO 3-28, 3-36, 4-60, 4-69, 5-83, 5-91, 6-119, 7-143 LVDT 13-295 M Math channel 9-173 Matlab ii, 9-172, 9-173 Max value 9-181, 9-185 MDAQ 5-99, 9-180 MDAQ-AAF4-5-BE-S1 15-390 MDAQ-AAF4-5-BU 15-390 MDAQ-AAF4-5-BU-S1 15-390 MDAQ-AAF4-5-BU-S2 15-390 MDAQ-BASE-5 5-99, 15-370 MDAQ-FILT-5-BE 15-389, 16396, 16-398, 16-400, 16-402, 16-404 MDAQ-FILT-5-BU 15-389 MDAQ-FILT-5-BU-S1 15-389 MDAQ-SUB-ACC 15-385, 15387, 15-389, 15-390, 16-396, 16-398, 16-400, 16-402, 16-404 MDAQ-SUB-BRIDGE 15-377 MDAQ-SUB-STG 15-372, 15-377 MDAQ-SUB-V200 15-381 Met/CAL® 1-12, 5-101 MIL-STD-1553 5-101, 9-174, 18417, 18-437, 18-438, 18-439, 18-440 MIL-STD-1553 receive setup 18439 MIL-STD-1553 transmit setup 18-440 Min value 9-181, 9-185 MOB-DISP-17 3-43, 4-58, 10-256, 10-257, 10-259, 10-260, 19-452 Module Installation Trouble-shooting 278, 13-301, 14-359 modules are showing up in RED letters 278, 13-301, 14-359 MSI-V-ACC 11-262, 283, 286, 13294, 13-307, 13-308, 13-315 MSI-V-CH-50 11-262, 283, 286, 13-294, 13-307, 13-308, 13-315 MSI-V-RTD 11-262, 283, 286, 13294, 13-307, 13-308, 13-315 Multifile 9-190, 9-191 N National Instruments 18-443 nCode ii network stacks 2-15 Neutrino-4 5-96, 10-247, 10-255 NIST ii NIST traceable 1-12, 5-101 Notice event 9-199 NTSC/PAL video inputs 18-433 O OBDII 5-100 OBD II support 18-446 On-board RS-485 interface 17-410 operating system 3-46, 4-73, 5-97, 5-98, 6-124 optical drive 5-98 Optical read/write drive 5-98 ORION 3-39, 4-70, 5-94, 5-99, 5-100, 6-121, 7-144, 8-165, 17-407 ORION-0424-200 17-412 ORION-0816-1000 17-407, 17-413 ORION-0816-1001 17-407, 17-413 ORION-0816-1002 17-407, 17-413 ORION-0816-1003 17-407, 17-413 ORION-0816-1004 17-407, 17-413 ORION-0816-1005 17-407, 17-413 ORION-0824-200 17-407, 17-413 ORION-0824-201 17-407, 17-413 ORION-0824-202 17-407, 17-413 ORION-0824-203 17-407, 17-413 ORION-0824-204 17-407, 17-413 ORION-0824-205 17-407, 17-413 ORION-1616-100 17-407, 17-413 ORION-1616-101 17-407, 17-413 ORION-1616-102 17-407, 17-413 ORION-1616-103 17-407, 17-413 ORION-1616-104 17-407, 17-413 OWNER’s GUIDE - APPENDIX | A-499 ORION-1616-105 17-407, 17-413 ORION-1622-100 17-407, 17-413 ORION-1622-101 17-407, 17-413 ORION-1622-102 17-407, 17-413 ORION-1622-103 17-407, 17-413 ORION-1622-104 17-407, 17-413 ORION-1622-105 17-407, 17-413 ORION-3216-100 17-407, 17-413 ORION-3216-101 17-407, 17-413 ORION-3222-100 17-407, 17-413 ORION-3222-101 17-407, 17-413 ORION cards, Combining various 17-409 ORION cards installation 17-411 ORION cards, synchronizing them 17-409 ORION card Windows driver 17411 ORION-DAQ-SYNC 17-410 ORION-DSA-SYNC 17-410 ORION series 17-407 ORION-SYNC 17-408 Outline Drawings 3-18, 4-52, 5-78, 6-106, 7-130 Overview 1-12, 9-172, 9-194, 9-195 P PAD-AO1 14-355, 14-367 PAD-CB8-B 14-361, 16-399, 16-403 PAD-CB8-BNC 14-361 PAD-CB8-RTD 14-355, 14-363, 14-364 PAD-DO7 14-355, 14-365 PAD module, old type without buttons 278, 13-301, 14-359, 14-360 PAD modules, adding new ones 14-356 PAD Modules Table 14-355 PAD-TH8-P 14-355, 14-363 PAD-V8-P 14-355, 14-361 Paste special 9-188 Paste special… 9-188 Paste to all 9-188 PCM data 9-174 Period Time Measurement 8-151, 8-155 polynomial 5-103 Pot/Ohmic sensors 13-295 Power 5-102, 9-172, 10-243 power cord 2-13, 3-45, 5-95 Project 9-211, 9-212, 9-215, 9-216, 9-217, 9-218, 9-220, 9-233, 9-234 PROPERTIES BAR 9-196 PS/2 3-29, 3-30, 3-31, 4-61, 4-62, 4-63, 5-84, 5-85, 5-86 Pulse Width Measurement 8-151, 8-156 Q Quadrature Encoder 8-151, 8-158, 8-159, 8-160 Quick start guide 1-12, 9-167 R RAM 5-102, 5-103, 9-198 Recorder 9-172, 9-173, 9-194, 9-196, 9-197 recorder graph 9-173, 9-198, 9-199, 9-202, 9-203, 9-204 Recording modes 5-103 Recording setup 5-103 Recycling 2-15 Reference Check 9-183 Relay Output module 14-365 Reloading your Data Files 9-199 remote power-on 17-410 removable 3-46, 3-47, 4-73, 4-74, 5-97, 5-98, 5-102, 6-105, 6-107, 6-108, 6-124, 6-126, 7-145, 7-146 removable hard disk drive 3-46, 4-73, 5-97, 6-124, 7-145 Replay speed 9-173 Resistance 282, 286, 13-295, 13-296, 13-307, 13-315 RIBBON 9-196 RS-232/485 interface 14-354 RS232C 3-29, 3-30, 4-61, 4-62, 5-84, 5-85, 5-102, 6-116, 7-138 S safety 2-13, 2-14 Safety precautions 1-12, 2-13 Sample rate 9-181 Sample Rate 9-193 Sample rate divider 9-181 Sample Rate, setting it 9-193 Save Your Setup 9-194 SBS 10-254 Scale/CAL 9-182 Scope 9-172, 9-173, 9-194, 9-196 Screen design 9-172 sensors 1-12, 2-13, 3-34, 3-37, 4-66, 4-69, 5-89, 5-92, 5-103, 6-118, 6-119, 7-142, 7-143, 9-174 Setup files 9-172 Setup file, saving 9-194 Set Up Your Channels 9-178 Shock and vibration 5-102 Shunt resistors, using custom 11-268 SideHAND ii Sigma-delta 17-413, 17-414, 17-415 signal conditioner hardware control 9-180 Signal Input Connectors 3-35, 4-68, 5-91, 6-119, 7-143 Simultaneous sampling 17-407, 17-408 slope 9-182, 14-367, 15-389, 15-390 smart batteries 3-45, 5-96, 5-102, 6-123 SMBus 10-253, 10-254 Softing 18-443 Software 3-47, 4-74, 5-103, 6-126, 7-146, 8-152, 8-153, 8-154, 8-155, 8-156, 8-157, 8-160, 8-161, 8-163, 9-167, 9-172, 9-173, 281, 283, 13-304, 13-308, 13-314, 13-332, 13337, 13-342, 15-372, 15-377, 16-393, 16-398, 19-453 Software licensing 9-173 A-500| Appendix Sound sensors 9-174 Specifications 5-103 Specifications, Analog Input 3-18, 3-28, 4-52, 5-78, 5-83, 6-106, 6-114, 7-130, 7-138 STOP, Automatically 9-190 Stop storing. 9-199 Stop storing after 9-190, 9-192 STORE and STOP buttons 9-208 STORING data 9-198 Strain gage 9-173 Support 1-11, 1-12 SYNC 5-93 Synching Multiple systems 17-409 synchronizing external devices 17407, 17-408 synchronizing multiple systems 17407, 17-408 System restore DVD 5-101 System Startup 3-44, 4-72, 5-95, 6-122, 7-145 T TEDS 5-103 Temperature 5-102, 282, 286, 13295, 13-307, 13-315, 13-343, 14-355, 14-363 Text event 9-199 Thermocouple 13-295, 13-296 time constant 13-295 TOOLBAR 9-196 touchpad 5-102 training 1-11, 2-14 turn on (or off ) all channels at once 9-178 Two Pulse Edge Separation 8-151, 8-157 U Unused (channels) 9-178 unzoom, how to 9-202 Up/Down Counter 8-151, 8-154 USB 3-29, 3-30, 3-34, 4-61, 4-62, 4-66, 5-84, 5-85, 5-88, 5-89, 5-102, 6-117, 6-118, 7-141, 7-142, 9-174 Used (channels) 9-178 V Vector 18-443 VGA 3-33, 4-65, 5-87, 5-88, 5-102 video 3-29, 3-31, 3-33, 3-34, 4-61, 4-63, 4-65, 4-66, 5-84, 5-86, 5-87, 5-88, 5-89, 5-102, 6-117, 6-118, 7-141, 7-142, 9-174, 9-194 video channels, displaying 18-435 VIDEO-FG-4 9-174 Voice event 9-199 Voltage/current input configurations 8-149 W Weight 5-102 Windows 7 ii, 5-98, 5-102 Windows updates 2-15 Windows XP ii Wireless Display 4-59, 20-463 X XLR 11-265 X-Y graph 9-172 X-YYY 9-172 Y y = mx + b 9-182 y/t 9-172 Z zoom 9-173, 9-194, 9-201, 9-202, 9-203, 9-207 Zooming in 9-200 zooming out 9-200 zoom in/out 9-173 OWNER’s GUIDE - APPENDIX | A-501 Dewetron, Inc. 10 High Street, Ste K, Wakefield, RI 02879 USA ¤ Tel: +1 401-284-3750 ¤ Fax: +1 401-284-3755 ¤ www.dewamerica.com