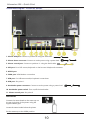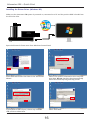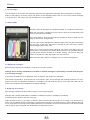
1
WARNING To avoid electrical shock hazards, uni t covers should only be removed by authorised personnel. © COPYRIGHT This document is the property of Copytrax Technologies UK Ltd and it may not be reproduced, copied or exhibited to a third party without permission from Copytrax. ENVIRONMENTAL PROTECTION Waste electrical products should not be thrown away with household waste. Please recycle where facilities exist. Check with your local authority or retailer for recycling advice. Copytrax reserve the right to amend or modify the specifications and design criteria applying to these products. Artmaster 600 CONTENTS Box Contents and Unpacking . . . . . . . . . . . . . . . . . . . . . . . . . . . . . 7 Quick Start . . . . . . . . . . . . . . . . . . . . . . . . . . . . . . . . . . . . . . . . . . . . 8 Autoloader and Printer Setup . . . . . . . . . . . . . . . . . . . . . . . . . . . . . . . 8 Connections Diagram - Standard Version . . . . . . . . . . . . . . . . . . . . . 9 Connections Diagram - In-Built PC Version . . . . . . . . . . . . . . . . . . . 10 Keypad Functions . . . . . . . . . . . . . . . . . . . . . . . . . . . . . . . . . . . . . . . 11 Print Head and CISS Installation . . . . . . . . . . . . . . . . . . . . . . . . . . . 12 Installing the Software . . . . . . . . . . . . . . . . . . . . . . . . . . . . . . . . . . . .15 Installing the Printer Driver (Windows XP) . . . . . . . . . . . . . . . . . . . . .16 Installing the Printer Driver (Windows Vista and Windows 7) . . . . . .18 Printer and Autoloader Alignment . . . . . . . . . . . . . . . . . . . . . . . . . . . .21 Setting the Default Printing Preferences . . . . . . . . . . . . . . . . . . . . . . 22 Printer Service Terminal. . . . . . . . .. . . . . . . . . . . . . . . . . . . . . . . . . . 23 Print Offset . . . . . . . . . . . . . . . . . . . . . . . . . . . . . . . . . . . . . . . . . . . . 24 Aligning the Print Heads . . . . . . . . . . . . . . . . . . . . . . . . . . . . . . . . . . 25 Registering Your Copy of Disc Manager . . . . . . . . . . . . . . . . . . . . . . 27 Setting up Disc Manager . . . . . . . . . . . . . . . . . . . . . . . . . . . . . . . . . .28 Setting up Label Designer . . . . . . . . . . . . . . . . . . . . . . . . . . . . . . . . .28 Creating a Print Image . . . . . . . . . . . . . . . . . . . . . .. . . . . . . . . . . . .29 How to Print Your Image . . . . . . . . . . .31 Advanced Disc Manager . . . . . . . . . . . . . . . . . . . . . . . . . . . . . . . .33 1. Licence Agreement . . . . . . . . . . . . . . . . . . . . . . . . . . . . . . . . . . 34 1.1 Copyright . . . . . . . . . . . . . . . . . . . . . . . . . . . . . . . . . . . . . . . . . . 34 1.2 Licence . . . . . . . . . . . . . . . . . . . . . . . . . . . . . . . . . . . . . . . . . . . 34 1.3 Copy Restrictions . . . . . . . . . . . . . . . . . . . . . . . . . . . . . . . . . . . 34 1.4 Term . . . . . . . . . . . . . . . . . . . . . . . . . . . . . . . . . . . . . . . . . . . . . 34 1.5 Limited Warranty . . . . . . . . . . . . . . . . . . . . . . . . . . . . . . . . . . . .34 1.6 No Liability For Consequential Damages . . . . . . . . . . . . . . . . . 34 1.7 Miscellaneous . . . . . . . . . . . . . . . . . . . . . . . . . . . . . . . . . . . . . . 34 2. Installations . . . . . . . . . . . . . . . . . . . . . . . . . . . . . . . . . . . . . . . . . 35 2.1 Minimum System Requirements . . . . . . . . . . . . . . . . . . . . . . . . 35 2.2 Software . . . . . . . . . . . . . . . . . . . . . . . . . . . . . . . . . . . . . . . . . . . 35 2.3 Installation . . . . . . . . . . . . . . . . . . . . . . . . . . . . . . . . . . . . . . . . . 35 2.4 Disc Manager Installation . . . . . . . . . . . . . . . . . . . . . . . . . . . . . . 36 2.5 Uninstall . . . . . . . . . . . . . . . . . . . . . . . . . . . . . . . . . . . . . . . . . . . 38 2.6 Disc Manager start . . . . . . . . . . . . . . . . . . . . . . . . . . . . . . . . . . . 39 3. MENU . . . . . . . . . . . . . . . . . . . . . . . . . . . . . . . . . . . . . . . . . . . . . . 39 3.1 Menu Structure . . . . . . . . . . . . . . . . . . . . . . . . . . . . . . . . . . . . . 40 3.2 Toolbar . . . . . . . . . . . . . . . . . . . . . . . . . . . . . . . . . . . . . . . . . . . . 41 4. File . . . . . . . . . . . . . . . . . . . . . . . . . . . . . . . . . . . . . . . . . . . . . . . 41 4.1. Job Scheduler . . . . . . . . . . . . . . . . . . . . . . . . . . . . . . . . . . . . . . 41 4.2 Job Editor . . . . . . . . . . . . . . . . . . . . . . . . . . . . . . . . . . . . . . . . . 43 4.2.1 Create New . . . . . . . . . . . . .44 4.3 Device Status . . . . . . . . . . . . . . . . . . . . . . . . . . . . . . . . . . . . . . . 46 4.4 Read Image . . . . . . . . . . . . . . . . . . . . . . . . . . . . . . . . . . . . . . . . 47 4.5 Disc Xpress . . . . . . . . . . . . . . . . . . . . . . . . . . . . . . . . . . . . . . . . 48 4.6 Label Designer . . . . . . . . . . . . . . . . . . . . . . . . . . . . . . . . . . . . . . 48 4.7 Exit . . . . . . . . . . . . . . . . . . . . . . . . . . . . . . . . . . . . . . . . . . . . . . . 48 Artmaster 600 5. Job Scheduler . . . . . . . . . . . . . . . . . . . . . . . . . . . . . . . . . . . . . . 48 5.1 Duplication Mode . . . . . . . . . . . . . . . . . . . . . . . . . . . . . . . . . . . . 48 5.1.1 Job Scheduler buttons . . . . . . . . . . . . . . . . . . . . . . . . . . . . . . . 49 5.2 Read Disc Mode . . . . . . . . . . . . . . . . . . . . . . . . . . . . . . . . . . . . . 49 5.2.1 Jobs and Attributes . . . . . . . . . . . . . . . . . . . . . . . . . . . . . . . . . 50 5.2.2 Save Files and Images . . . . . . . . . . . . . . . . . . . . . . . . . . . . . . 51 5.2.3 Log Files . . . . . . . . . . . . . . . . . . . . . . . . . . . . . . . . . . . . . . . . . 51 5.3 Add a new Job . . . . . . . . . . . . . . . . . . . . . . . . . . . . . . . . . . . . . . 51 5.4 Delete Job . . . . . . . . . . . . . . . . . . . . . . . . . . . . . . . . . . . . . . . . . 52 5.5 Edit Job . . . . . . . . . . . . . . . . . . . . . . . . . . . . . . . . . . . . . . . . . . . 52 5.6 Copy Job . . . . . . . . . . . . . . . . . . . . . . . . . . . . . . . . . . . . . . . . . . 53 5.7 Increase Priority . . . . . . . . . . . . . . . . . . . . . . . . . . . . . . . . . . . . 53 5.8 Decrease Priority . . . . . . . . . . . . . . . . . . . . . . . . . . . . . . . . . . . . 54 5.9 Load Scheduled Jobs . . . . . . . . . . . . . . . . . . . . . . . . . . . . . . . . 54 6. Start . . . . . . . . . . . . . . . . . . . . . . . . . . . . . . . . . . . . . . . . . . . . . . 55 6.1 Start . . . . . . . . . . . . . . . . . . . . . . . . . . . . . . . . . . . . . . . . . . . . . . 55 6.2 Stop . . . . . . . . . . . . . . . . . . . . . . . . . . . . . . . . . . . . . . . . . . . . . . 55 6.3 Abort . . . . . . . . . . . . . . . . . . . . . . . . . . . . . . . . . . . . . . . . . . . . . 55 6.4 Reset Autoloader . . . . . . . . . . . . . . . . . . . . . . . . . . . . . . . . . . . . 55 6.5 Reset Bin Position . . . . . . . . . . . . . . . . . . . . . . . . . . . . . . . . . . . 55 7. Setup . . . . . . . . . . . . . . . . . . . . . . . . . . . . . . . . . . . . . . . . . . . . . 56 7.1 Hardware Settings . . . . . . . . . . . . . . . . . . . . . . . . . . . . . . . . . . . 56 7.2 Software Options . . . . . . . . . . . . . . . . . . . . . . . . . . . . . . . . . . . . 57 7.2.1 Temporary Space . . . . . . . . . . . . . . . . . . . . . . . . . . . . . . . . . . 58 7.2.2 Printing Options . . . . . . . . . . . . . . . . . . . . . . . . . . . . . . . . . . . . 59 7.2.3 Autoloader Options . . . . . . . . . . . . . . . . . . . . . . . . . . . . . . . . . 59 7.3 ARC . . . . . . . . . . . . . . . . . . . . . . . . . . . . . . . . . . . . . . . . . . . . . . 60 7.4 Registration . . . . . . . . . . . . . . . . . . . . . . . . . . . . . . . . . . . . . . . . 61 8. Information . . . . . . . . . . . . . . . . . . . . . . . . . . . . . . . . . . . . . . . . . 62 8.1 Settings . . . . . . . . . . . . . . . . . . . . . . . . . . . . . . . . . . . . . . . . . . . . 63 8.2 E-mail notification . . . . . . . . . . . . . . . . . . . . . . . . . . . . . . . . . . . . 63 8.3 Send Service Info . . . . . . . . . . . . . . . . . . . . . . . . . . . . . . . . . . . . 63 8.4 Export service info . . . . . . . . . . . . . . . . . . . . . . . . . . . . . . . . . . . 64 9. Language . . . . . . . . . . . . . . . . . . . . . . . . . . . . . . . . . . . . . . . . . . 64 10. View . . . . . . . . . . . . . . . . . . . . . . . . . . . . . . . . . . . . . . . . . . . . . . 64 10.1 Toolbar . . . . . . . . . . . . . . . . . . . . . . . . . . . . . . . . . . . . . . . . . . . 65 10.2 Status bar . . . . . . . . . . . . . . . . . . . . . . . . . . . . . . . . . . . . . . . . . 65 10.3 Title screen . . . . . . . . . . . . . . . . . . . . . . . . . . . . . . . . . . . . . . . 65 11. Window . . . . . . . . . . . . . . . . . . . . . . . . . . . . . . . . . . . . . . . . . . . 65 11.1 Cascade . . . . . . . . . . . . . . . . . . . . . . . . . . . . . . . . . . . . . . . . . . 65 11.2 Tile horizontally . . . . . . . . . . . . . . . . . . . . . . . . . . . . . . . . . . . . . 65 11.3 Arrange ions . . . . . . . . . . . . . . . . . . . . . . . . . . . . . . . . . . . . . . . 66 12. Help . . . . . . . . . . . . . . . . . . . . . . . . . . . . . . . . . . . . . . . . . . . . . . 66 12.1 Help topics . . . . . . . . . . . . . . . . . . . . . . . . . . . . . . . . . . . . . . . . 66 12.2 DM Home Page . . . . . . . . . . . . . . . . . . . . . . . . . . . . . . . . . . . . 66 12.3 About . . . . . . . . . . . . . . . . . . . . . . . . . . . . . . . . . . . . . . . . . . . . 66 Disc Manager How To. . . . . . . . . . . . . . . . . . . . . . . . . . . . . . . . . . . .67 Disc Manager Appendix . . . . . . . . . . . . . . . . . . . . . . . . . . . . . . . . . .71 Artmaster 600 Advanced Printer . . . . . . . . . . . . . . . . . . . . . . . . . . . . . . . . . . . . . . . 76 1. General. . . . . . . . . . . . . . . . . . . . . . . . . . . . . . . . . . . . . . . . . . . . . 76 1.1 Printer Artmaster 600 . . . . . . . . . . . . . . . . . . . . . . . . .. . . . . . . . . . 76 1.2 Description of the Control Panel. . . . . . . .. . . . . . . . . . . . . . . . . . . 77 2. Printer Properties. . . . . . . . . . . . . . . . . . . . . . . . . . . . . . . . . . . . . .78 2.1 Paper / Quality . . . . . . . . . . . . . . . . . . . . . . . . . . . . . . . . . . . . . .78 2.2 Color and Mask Settings . . . . . . . . . . . . . . . . . . . . . . . . . . . . . . .78 2.3 Maintenance Tab . . . . . . . . . . . . . . . . . . . . . . . . . . . . . . . . . . . . . .79 2.4 Printer Service Terminal . . . . . . . . . . . . . . . . . . . . . . . . . . . . . . . .79 3. Ink Cartridge . . . . . . . . . . . . . . . . . . . . . . . . . . . . . . . . . . . . . . . .83 3.1 Status LEDs . . . . . . . . . . . . . . . . . . . . . . . . . . . . . . . . . . . . . . . .83 3.2 Replacing Cartridges . . . . . . . . . . . . . . . . . . . . . . . . . . . . . . . . . . 83 4. Replacing Print Heads . . . . . . . . . . . . . . . . . . . . . . . . . . . . . . . . . 83 Continuous Ink System. . . . . . . . . . . . . . . . . . . . . . . . . . . . . . . . . . 84 1. Installation. . . . . . . . . . . . . . . . . . . . . . . . . . . . . . . . . . . . . . . . . . 84 1.1 Identify Parts . . . . . . . . . . . . . . . . . . . . . . . . . . . . . . .. . . . . . . . . .84 1.2 Start . . . . . . . . . . . . . . . . . . . . . . . . . . . . .. . . . . . . . . . . . . . . . . . 85 2. Cartridge Installation . . . . . . . . . . . . . . . . . . . . . . . . . . . . . . . . . . . 87 3. Waste Ink . . . . . . . . . . . . . . . . . . . . . . . . . . . . . . . . . . . . . . . . . . 88 3.1 Empty the Service Station . . . . . . . . . . . . . . . . . . . . . . . . . . . . . 88 3.2 Disposal of the Waste Ink . . . . . . . . . . . . . . . . . . . . . . . . . . . . . .88 Troubleshooting . . . . . . . . . . . . . . . . . . . . . . . . . . . . . . . . . . . . . . . .89 Technical Data. . . . . . . . . . . . . . . . . . . . . . . . . . . . . . . . . . . . . . . . . 91 Warranty and Support . . . . . . . . . . . . . . . . . . . . . . . . . . . . . . . . . . .92 Artmaster 600 7 Artmaster 600 – Quick Start 8 Artmaster 600 – Quick Start 9 Artmaster 600 – Quick Start 10 Artmaster 600 – Quick Start 11 Artmaster 600 – Quick Start 12 Artmaster 600 – Quick Start 13 Artmaster 600 – Quick Start 14 Artmaster 600 – Quick Start 15 Artmaster 600 – Quick Start 16 Artmaster 600 – Quick Start 17 Artmaster 600 – Quick Start 18 Artmaster 600 – Quick Start 19 Artmaster 600 – Quick Start 20 Artmaster 600 – Quick Start 21 Artmaster 600 – Quick Start 22 Artmaster 600 – Quick Start 23 Artmaster 600 – Quick Start 24 Artmaster 600 – Quick Start 25 Artmaster 600 – Quick Start 26 Artmaster 600 – Quick Start 27 Artmaster 600 – Quick Start 28 Artmaster 600 – Quick Start 29 Artmaster 600 – Quick Start 30 Artmaster 600 – Quick Start 31 Artmaster 600 – Quick Start 32 Disc Manager Disc Manager PREFACE This manual details how to set up and begin using the software for your CD/DVD printer. It also provides information on configuration your software and basic operations. If you are a new user of Disc Manager software read the User´s Manual carefully and for step-by-step instructions on setting up your software. Disc Manager software contains: Disc Manager Disc Xpress Label Designer Ahead Nero - software for automatic duplication CD and DVD - software for create data CD and DVD (not used with Artmaster 600) - software for create CD and DVD Labels - part Nero API - for recording control (not used with Artmaster 600) A license key is required to run Disc Manager software. Starting without a license key enables you to use the Disc Manager software for 30 days. Contact Copytrax for your license key. Disc Manager includes functions for burning CD and DVD which are not relevant to the Artmaster 600 printer. 33 Disc Manager Disc Manager 1. Licence Agreement This document is a legal agreement between you and Copytrax . Please read this agreement carefully before install the Disc Manager. If you do not agree to the term of this agreement, promptly return the disc pack including written materials and binders or other containers to the place of purchase for a full refund. 1.1 Copyright The Disc Manager and Label Designer software programs (the "Software") is owned by Copytrax . 1.2 Licence Copytrax grants you rights to use the software on a single user computer, or a single terminal or workstation of a multi-user computer or local area network. A separate licence must be obtained from Copytrax computer systems for every other terminal or workstation on a multi-user computer or local area network. 1.3 Copy Restrictions This software and the accompanying written materials are copyright and property of Copytrax . You may make one copy of the software for back up or archival purpose. All the other copies are strictly forbidden. You may not decompile, reverse engineer, copy, transfer, or otherwise use the software except as expressly stated in this agreement. 1.4 Term This licence is effective until terminated. You may terminate this licence at any time by destroying all copies of the software. This licence will terminate automatically, without notice from Copytrax , if you fail to comply with this agreement. Upon such termination, you shall destroy all copies of the software. 1.5 Limited Warranty Copytrax warrants that the origin disc are free from defects in material and workmanship, assuming normal use, for a period of ninety (90) days from the date of purchase. If a defect occurs during this time, you may return your faulty disc to Copytrax , along with a dated proof of purchase, and it will be replaced free of charge. 1.6 No Liability For Consequential Damages In no event shall Copytrax be liable for any damages, including any loss of profit, or other incidental, or consequential damages. Arising out of your use or inability to use the software or written materials, even if Copytrax had have been advised exclusion or limitation of liability for limitation may not apply to you. 1.7 Miscellaneous This software and documents are protected by Czech and international copyright laws. If any provision of this agreement shall be unlawful, void or for any reason unenforcable, then that provision shall be deemed severed from this agreement and shall not affect the validity or enforceability of the remaining provisions of this agreement. This agreement is the complete statement of the agreement and supersedes any proposal or prior communications between us relating to the subject matter of this agreement. If you have any question regarding this agreement, you may contact us. 34 Disc Manager Disc Manager 2. Installations 2.1 Minimum System Requirements Please make sure that the computer on which you plan to install Disc Manager meets the minimum system requirements for the program to run: For two recorders: For four recorders: • • • • • • • • • • • • • • • Microsoft Windows 2000, XP CPU 1,6 GHz or high 1GB RAM or more FireWire (for Gamma duplicator) One COM port Monitor (1024x768 recommended) 300 MB free disk space Microsoft Windows 2000, XP CPU 1.8 GHz or high 2 GB RAM or more Raid 0 disc (HDD Raptor 10000 rpm) 2 FireWire controllers (for Gamma duplic.) One COM port Monitor (1024x768 recommended) 300 MB free disk space 2.2 Software At present the CD Disc Manager is available for the automatic duplicators. It consists of several modules. • CD Disc Manager • CD Xpress • Label Designer - controls the automatic duplicators - CD / DVD mastering (not used with the Artmaster 600) - Graphics software to design the CD / DVD label 2.3 Installation This chapter describes how to install the Disc Manager software onto your computer. You can find the Disc Manager software on the supplied CD disc. To install from the Disc Manager CD, simply insert the CD disc into the drive. If setup does not begin automatically, you will need to run autorun.exe from the CD’s root directory. (To install the download version, unzip the downloaded file. Then start the SetupDM.exe. You must have administrator privileges on your PC) After run the CD you can see information for installation in the main installation window: Content - for read short informations about installation the Disc Manager Software click by mouse on this button. About DM - for read informations about the Disc Manager Software click by mouse on this button. DM for Win XP / Vista - install the Disc Manager software. After click by mouse on this button starts the installation. DM for Windows 7 - install the Disc Manager software. After click by mouse on this button starts the installation. Web Pages - for visit web pages of Copytrax computer systems click by mouse on this button. 35 Disc Manager Disc Manager When you install the Disc Manager software from CD for another duplicator (e.g. Alpha, Delta, Omega,..) you can see different information window: Main window for Delta duplicator Main window for Omega duplicator Main window for Alpha duplicator 2.4 Disc Manager Installation To run install the Disc Manager software click by mouse on the Disc Manager button in main window or run SetupDM.exe file which you download from internet. After executing, you will find a starting dialog on the screen: Select language - available are Czech, English and German After select the install language click by mouse to OK button to continue or click to Cancel button to cancel this installation. Setup program copy the Disc Manager files onto your hard disc: 36 Disc Manager Disc Manager If will you know more about Disc Manager software click by mouse to View README.TXT button. You obtain more information about: • What is possible in Disc Manager • Program features • Supported formats • Minimal System Requirements • History To continue install the Disc Manager software click by mouse to the Next button or click to Cancel button to cancel this installation. Please read the software licence agreement before install. If you agree click by mouse to YES button or click to Cancel button to stop this installation. This window show information which software was installed and which software can be install now. Please confirm the directory or choose where you want to install Disc Manager. Install - select programs for installation and click by mouse to Installbutton Update - select programs to update on latter version and click by mouse to Updatebutton After executing, you will find a starting dialog on the next window. 37 Disc Manager Disc Manager During the install, you will see this message: This message will show when you make upgrade the Disc Manager to the latter version. Click by mouse to Yes button to continue or Noto cancel. This message will show when you make upgrade the Disc Manager to the latter version. Allow you to create backup of existing version software. Click by mouse to Yes button to continue or Noto cancel. This message will show when you make upgrade or install the Disc Manager. The Disc Manager require the Nero software. Please, pay attention to right version of the Nero and Disc Manager software. Installation continues: Setup program copy all the necessary files of the Disc Manager onto your hard disc. When all files was copy click by mouse to the Finishbutton. The Disc Manger is installed and ready for use. You can see three icons on the desktop: Disc Manager icon Disc Xpress icon Label Designer icon After installation has completed you will be required to restart your machine. If you do not wish to restart immediately, choose restart later. But before then start Disc Manager. 2.5 Uninstall In order to uninstall the Disc Manager, the personal computer must be restarted first of all. This is necessary so that all files which are used by the Disc Manager are not blocked by other applications or the operating system. Blocked files cannot be removed during the uninstallation. This may cause problems in the case of a later reinstallation. All programs must be closed before the uninstallation of the Disc Manager software. 38 Disc Manager Disc Manager Please open the uninstall dialog - click by mouse to: Start --> Programs --> Disc Manager --> Uninstall After executing, you will find an uninstall dialog on the screen - see right up picture.Click by mouse to Uninstall button to continue or Cancel button to stop the uninstallation. For finish the uninstallation the Disc Manager click by mouse to Finish button - see right up picture. The Disc Manager was uninstall. 2.6 Disc Manager start You can start the Disc Manager software after installation is complete. Starts the Disc Manager by clicking Disc Manager icon twice in the desktop or on the Windows Start menu point to: Start --> Programs --> Disc Manager --> Disc Manager When you start the Disc Manager software fill in the registration windows, please. Fill in User name, Company name and Licence key. The registration code is on a wrap of CD. Next click by mouse to OK button for open the Disc Manager. When you start the Disc Manager software as a trial version you have a 30 days for trying, but you can use only four recorders and you are prompted with trial version message. You receive the licence key after sending the activation key, see chapter 7.4 Registration. Registration window after first start Filled in the registration windows (example) 3. MENU This chapter describes all menu items of the Disc Manager software, look at next page. 39 Disc Manager Disc Manager 3.1 Menu Structure File Job Scheduler Job Editor Device Status Read Image Disc Xpress Label Designer Exit Job Scheduler Duplication Mode Read Discs Mode Add New Job Delete Job Edit Job Copy Job Increase Priority Decrease Priority Load Scheduled Jobs - Shows Job Scheduler window for controlling the recording process on a PC Shows Job Editor window for creating, deleting and editing duplication jobs Shows window with status of connected devices Displays dialog for reading image of the whole CD or DVD disc Runs program Disc Xpress for creation of CD or DVD images Runs Label Designer. This software is for designing CD and DVD print labels Quits Disc Manager - Disc Manager can duplicate discs - Disc Manager can only read discs - Add new job into Job Scheduler - Delete selected job from the Job Scheduler - Changes number of copies of the selected job - Does the copy of selected job - Moves job higher in Job Scheduler to increase its priority - Moves job lower to decrease its priority - Loads state of Job Scheduler stored on hard disc Run Start Stop Abort Reset Autoloader Reset Bin Positions - Runs duplication process - Stops duplication process after finishing already started discs - Stops process as soon as possible. If disc is recording it will destroy this disc - This is for calibration loader for its default position - Loader will forget levels in each of bins and set these levels to default values Setup Hardware Settings Software Options ARC Registration - Settings of your autoloader, recorders and printer - Variable adjustments - Advanced Recording control – tool for automatic duplication from directory - Shows registration dialog for insertion the licence key and owners data Reporting Settings E-mail Notification Send Service Info Export Service Info - Language English Česky Deutch - All texts in Menu are English - All texts in Menu are Czech - All texts in Menu are German Setting for sending notification through e-mail Enable or disable E-mail notification Sends service logs of Disc Manager to software support Creates c\service.zip file with all service logs View View Toolbar View Status bar View Title Screen Window Cascade Tile Horizontally Arrange Icons List of Window - Shows / Hides Toolbar - Shows / Hides Status bar - Shows / Hides Title screen when Disc Manager starts - Cascade mode view - Tiling mode view - Arrange closed window in lower section Disc Manager window - Shows the actual on or off window Help Help Topics DM Home Page About - Shows help - Opens the home page of the Disc Manager - Shows basic info about Disc Manager 40 Disc Manager Disc Manager 3.2 Toolbar Job Scheduler - shows Job Scheduler window for controlling the recording process on a PC Job Editor - shows Job Editor window for creating, deleting and editing duplication jobs Device Status - shows windows with status of connected devices Start - runs duplication process. It starts all scheduled jobs from Job Scheduler window Stop - stops duplication process after finishing already started discs. Recording of already begun disc will not be interrupted Abort - stops duplication process as soon as possible. If disc is recording it will destroy this disc. Read Image - displays dialog for reading image of the whole CD or DVD disc Disc Xpress - runs program Disc Xpress for creation of CD or DVD images Label Designer - runs Label Designer. This software is for designing CD and DVD print labels. Help - shows this help About - shows dialog about Disc Manager application Menu Control For Menu control use the mouse or keyboard. When use the mouse press the left button to select a menu item or to manipulate text designated by the pointer. Press the right button in Job Scheduler and Job Editorto manipulate with jobs. For the keyboard - some operations require you to simultaneously use two or more keys. We identify such operations by the key top symbols separated by a plus sign (+). When you press Alt you can see underlined letters in Menu. For example: Alt+B+A means you must hold down Alt and at the next time press B and next time release B and press A. Alt+B+A it means Add New Job. 4. File Job Scheduler - Expand Job Scheduler window if minimised or move to front Job Editor - Expand Job Editor window if minimised or move to front Device Status - Expand Device statuswindow if minimised or move to front Read Image - Show Read Imagedialog for reading images from CD and DVD Disc Xpress - Run Disc Xpressfor create master data disc Label Designer - Run Label Designerfor create labels for CD and DVD Exit - Stop the Disc Manager and close the Disc Manager window 4.1. Job Scheduler Job Scheduler is main window of the Disc Manager. It shows scheduled jobs. On the right side of the window there are a few buttons for control inserted jobs. You can Add predefined job, Deleteselected job or Edit number of copies of the selected job. With Copy button you can do the copy of selected job. Two buttons at the bottom ( ) are for control order of scheduled jobs increase or decrease priority. You can move selected job up or down and say which one will be executed first. Jobs are process from top to bottom. After click Start button from the toolbar or after choose menu item Run->Start, the Disc Manager will control automatic loader to perform producing 41 Disc Manager Disc Manager scheduled discs according to the given jobs until all jobs have been done or the user stops the process. A job is done when all discs have been produced. The Job Scheduler window doesn´t close only minimalize click by mouse to button and reopen click by mouse to button in upper right corner the Job Scheduler window. Tip: When you pointed by mouse to a Job you can see Tooltip about this job. Tooltip shows detailed informations about Job. You can see Name of job, Note about job, recording Image include path, printing Label include path, recording Speed, sorting input and output Bins and Rotation angle if rotation head is used. See picture: Description of Job Scheduler buttons: Duplication Mode Read Disc Mode Add Delete Edit Copy Arrow Up Arrow down - Disc Manager can duplicate discs - Batch mode, Disc Manager can only read discs - Insert predefined job - Delete inserted job - Edit inserted job - Copy of selected job - Moves job higher in Job Scheduler to increase its priority - Moves job lower to decrease its priority After click by mouse to Start button on the toolbar or after choose menu item Run / Start orAlt+U+S , the Disc Manager starts the duplication until all jobs have been done or the user stops the process. A job is done when all discs have been produced. There are several sections in the Job Scheduler window. Job No. section is for identification job, this number is created automatically by Disc Manager. In Job Name section you can see name of the inserted job. In Attributes section there are a few letters described below. Copies shows total quantity of discs for duplication. Complete shows quantity and percentage amount of finished discs and Bad shows number of bad discs. Job No. Job Name Attributes Attribute Attribute Attribute Attribute Attribute Attribute Attribute Attribute Copies Complete Bad - Identify the job - Name of the inserted job - There you can see following parameters: E - Erase rewritable media R - Recording Rs - Recording simulation V - Verification P - Printing Ps - Printing simulation B - Print Before recording W - Wait for previous job - Quantity of discs for duplication - Quantity and percentage amount of finished discs - Number of bad discs Tip: During the duplication process the Disc Manager automatically saves state of Job Scheduler. So if there is some problem with Disc Manager or with computer or hardware there is possibility to load scheduled jobs after new start of Disc Manager from menu Job Scheduler/Load Scheduled Jobs. 42 Disc Manager Disc Manager 4.2 Job Editor Job is an order for Disc Manager to record a number of identical discs. You can define all specifications needed to do the job in Job Editor. In Job Editor you can see list of defined jobs. At the bottom of this window there are four buttons. For add new job to the list of jobs, for delete selected job from the list and for edit job properties. Last button is for closing of Job Editor window. Tip: When you have a great numbers of Jobs you can pointed by mouse to any Job and press first letter what you find. The list of Jobs shows all jobs which began at required letter. Next use arrow down on the keyboard to find job. Description of Sections in the Job Editor window: Job Name Image Label Attributes: Attribute Attribute Attribute Attribute Attribute Attribute Attribute Attribute - Name of the inserted job - Show image name used for duplication - Show label name used for printing - there you can see following parameters: E - Erase rewritable media R - Recording Rs - Recording simulation V - Verification P - Printing Ps - Printing simulation B - Print Before recording W - Wait for previous job Description of Job Editor buttons: Create Delete Edit Close - Create a new Job Delete selected Job Edit selected Job Close Job Editor window 43 Disc Manager Disc Manager 4.2.1 Create New • Job Name If you choose Create Newbutton for create a new job then you can see following dialog window. Here you can set, if the job consists of the recording, of the printing and of the erasing. Job Name - bookmark here you can write name of the job. Use letters and sign recommended for use in the Windows. Description - bookmark here you can describe in detail. For example: used media - printable / brand, inner diameter for printable media (18 up to 38 mm). • Recording Recording bookmark is for enable or disable recording. Select type of the disc and more. Additional parameters for recording are activation of Burn Proof and speed of burning. If you check Erase rewritable discs, the discs will be erased before recording. You can also define jobs only for erasing the discs. Enable Recording - enable or disable recording on the CD or DVD disc. Record Image File - You can use image created by Nero software - this image has extension: *.nrg or ISO image created by another software - this image has extension: *.iso Click by mouse to and browse the image file. Record content of selected directory - You can record data CD, DVD or BD from selected directory. Click by mouse to and browse the directory. Select type of Disc - When you use the Nero image then Disc Manager recognise type of disc automatically. When you use the ISO image then you have to select type of the disc manually. Simulate Recording - When you choose this menu item then the duplicator looks like producing CD/DVD/BD, but it does not really record. The laser itself is not activated. This mode lets you test your system configuration without really recording CD/DVD/BD discs. Overburn - Normally a CD-R has got a fixed maximum size of capacity. The manufacturer of the CD-R has been a bit overcautious with the data he has provided and that there really is still room at the end of the CD-R. So, you can create a CD which does not satisfy a standard CD. But there is no guarantee for this! Erase Rewritable Disc - When is enable then rewritable disc will be deleted before recording. Activate Burn-Proof - For enable you must know that your recorder BURN-Proof support. Recording speed - set recording speed 44 Disc Manager Disc Manager • Printing The Printing bookmark enable printing on CD/DVD surface (printable CD/DVD media). You can choose the print file in *.prn or *.dml format. PRN file is make by printer driver from any graphics software (Corel, Photoshop, Illustrator, ...) and DML file is graphic format from Label Designer which is part of Disc Manager software. If you choose printing job, you can set order of doing job. Enable Printing - enable printing in job. Label print file - Click by mouse to icon and browse the print file. Then click to Open. Simulate printing - At simulation the printer looks like producing CD or DVD, but it does not really printing. The printable CD or DVD will be placed in the printer but not printed too. It will be taken again from the printer unprinted. Print before recording - Choose printing order, you can set also classic order of doing job (record and then print) or print before recording method. Warning: if you use the Merge Field, Serialisation or Bar Code (from Label Designer) with the automatic duplicator (e.g. Alpha, Gamma, Delta, Omega), then make sure that you have setup Print after Recording. • Bin Setup The Bin Setup bookmark allow you to set which hopper is for your job input and which is output. This option will be enabled only if you have your autoloader configured with individual control of its bin. Input Bin - set the input bin for created job Output Bin - set the output bin for created job Ordering disc for Alpha duplicators: Note: this menu item doesn´t use for duplicators which has one input and one output bin, e.g. Omega, Gamma 2 and Gamma Office One with single bins. You have to use double bins (DB) for Gamma. Summary of bins in duplicators: Gamma 2,4 and 7 (DB) Alpha, Alpha Rack Omega - cannot be used Delta 3, 5 and 7 Identification Bins:1 - Rear Left, 2 - Front Left, 3 - Front Right, 4 - Rear Right, 5 - Reject Bin 45 Disc Manager Disc Manager • Disc Rotation Disc Rotation - The rotation head is used to rotate pre-printed discs to a proper orientation. The following print will be aligned to the pre-printed surface. You have to use discs with a special rotation mark and duplicator must has a special rotation head installed and it must be also configured in configuration dialog. If you have this you can select offset of rotation for all discs in your job. So, you can reprint into specify place on the printable CD. Disc Rotation - select offset of rotation for all discs in your job. Range of rotation - 0 up to 360 degree. OK - Click by mouse to OK button to save the offset Cancel - Click by mouse to Cancel button to continue without save new position. Short description: A - Rotation Mark B - Restricted area for print (white ring) C - Area for print (gray fill) 4.3 Device Status This window displays status of the connected devices. It shows status of the autoloader and its version and firmware, status and progress of the each recorders and status of the connected printer. At the bottom of this window you can see quantity of good and bad discs done from the start of Disc Manager. For show this window you can click at the Device Status button on the toolbar or you can see it by clicking on the menu File -->Device Status. 46 Disc Manager Disc Manager Tips: • Click by mouse to abort process button (square and cross button) on the right position in the Device Status window you can stop process in selected recorder. • If you have ODP100, ODP200 or ODP500 printer and if you move mouse cursor over the Printer label in the Device Status window , you can see ink-level for black, photo and colour cartridges. 4.4 Read Image This function reads media and store its image on HDD according to your path. The easiest way how to get this image is through the function Read Image. For open following window you can click by mouse to the menu File->Read Image or button Read Imagefrom the toolbar. Image File - This dialog there is necessary to choose name of the image file with path to store it onto hard disc. Look at picture below. Choose Recorder - you can choose some drive configured with autoloader (this recorder will be used for loading and unloading disc). Another Rec - you can choose any other CD/DVD drive that is installed in your computer (and you will be ask to insert disc manually). Reading Speed - reading speed which you want use. If you have set all these things you can click by mouse to Start button to begin reading process. For better performance don’t use the system HDD (C:) as a target HDD (not save image on system HDD disc). Insert Image File - Click by mouse to icon . Click by mouse to Save in:section and choose path. Next type the name for new image and click by mouse to Save button. You will be return to previous dialog. 47 Disc Manager Disc Manager 4.5 Disc Xpress Disc Xpress is a program for creation data CD and DVD. You can start this program from desktop or from the Disc Manager toolbar. Disc Xpress in not used with the Artmaster 600 printer only version. 4.6 Label Designer Label Designer is a program for creation and edit Label for CD and DVD. You can start this program from desktop or from the Disc Manager toolbar. For more or detailed information read the Label Designer separate User´s Manual. 4.7 Exit Close Disc Manager program. Be sure to stop or end all inserted jobs in the Job Scheduler. You can close this program from the Disc Manager menu click by mouse to File ->Exit or press Alt+F4 from keyboard or click by mouse to icon in right upper corner Disc Manager window. 5. Job Scheduler Duplication Mode Read Discs Mode - Disc Manager can duplicate discs - Disc Manager can only read discs Add New Job Delete Job Edit Job Copy Job Increase Priority Decrease Priority - Add new job into Job Scheduler - Delete selected job from the Job Scheduler - Changes number of copies of the selected job - Does the copy of selected job - Moves job higher in Job Scheduler to increase its priority - Moves job lower to decrease its priority Load Scheduled Jobs - Loads state of Job Scheduler stored on hard disc Job Scheduler is main window of the Disc Manager. It shows scheduled jobs. On the right side of the window there are buttons for scheduling. These buttons, in the upper part, can be modificate according license key. So, you can run duplicator in Duplication Mode or Reading Disc Mode. 5.1 Duplication Mode When is enable this mode you can see check mark ahead of Duplication Modein menu Job Scheduler.It comes to this, that Disc Manager can read and record jobs include print labels. This is default settings for Disc Manager. 48 Disc Manager Disc Manager 5.1.1 Job Scheduler buttons Read Disc - Click by mouse to this button and Disc Manager switches into Read Disc Mode. In this mode Disc Manager can only read discs and store them onto internal hard disk. Add - Insert predefined job. Insert Job created in Job Editor. Delete - Delete inserted job in the Job Scheduler window. This procedure delete only Job. Image and print file aren´t delete. Edit - Edit inserted job. You can change number of copies of the selected job. Copy - Copy of selected job. You can make copy selected Job include finished Job. Arrow Up - Moves job higher in Job Scheduler to increase its priority. You can move selected job up and say which one will be executed first. Arrow down - Moves job lower to decrease its priority. You can move selected job down and say which one will be executed later. 5.2 Read Disc Mode With this function you can easily read your data CD or DVD discs and store them onto your hard disc. Content of each disc is stored into individual subdirectory of directory you will define for storing read discs. This function must be allowed by license key that releases you switching between Duplication Mode and Read Discs Mode in Job Scheduler window. By clicking Read Disc button Alt+B+R from keyboard, the Job switches into mode for reading following setting dialog for this is see left picture. or press Scheduler discs and displayed, Directory - Here you have to set the directory, where read discs will be stored. It is recommended to store the files on the other disc as System disc ( C:\ ). Method - You can set if there will be stored disc as files, *.ISO or *.NRG image. Reading Timeout - This feature automatically interrupt reading disc to the computer’s HDD when there is disc (CD/DVD) no read for a specified time. Counter Start - disc counter - starter position number. Created Names - Every read disc is save into specify directory. Name of this directory has a unique name. Format of this name: Log File - You can set if there will be logged copied and also not-copied files in the log file. This log file is stored in the directory that you have defined for storing the discs. Now, if you click OK button the conditions will be save and if you click Start button or click the menu Run/Start, reading process will start. Whole process runs as long as there are discs in input bin. If it gets empty, reading process will finish. 49 Disc Manager Disc Manager 5.2.1 Jobs and Attributes After click by mouse to Start button on the toolbar or after choose menu item Run / Start orAlt+U+S , the Disc Manager starts the read disc until all discs have been done or the user stops the process. A job is done when all discs have been saved. Process of the Job is indicated by colour. Black colour - jobs are ready. Red colour - jobs are running. Gray colour - jobs are finished. Finished, running and ready Jobs All Jobs are finished There are several sections in the Job Scheduler window. Description of Job Scheduler sections: Job No. Job Name Attributes Copies Complete Bad - Section for identification jobs, this number is created automatically by Disc Manager - In Job Name section you can see name of the reading job - Attributes for reading file(s) - Copies shows total quantity of discs for reading - Complete shows quantity and percentage amount of finished discs - Bad shows number of bad discs Used colour into Job Scheduler Black Colour Red Colour Gray Colour - Jobs are ready - Jobs are running - Jobs are finished 50 Disc Manager Disc Manager 5.2.2 Save Files and Images Disc Manager in Read Disc mode saves the files or images into specify directory. Name of this directory has a unique name. It consists of Date &Time, Counter and Volume. You can choose six combination of these. When reading disc hasn´t a volume then Disc Manager fills in type of disc, e.g. Audio CD. Maximal length name of the directory is 30 characters. When you want save disc as files then Disc Manager create subdirectory for every disc. 5.2.3 Log Files Disc Manager in Read Disc mode saves the log files into the same directory where is saved files or images. Disc Manager saves two log files. In the first log file saves list of all reading discs. Its name is _readme.log. In the second log file saves list of all reading files. The name of second file is same as name of directory or image. For example: 051013_144225_Audio CD.log Both logs file are in text format. You can see example log files in Appendix. 5.3 Add a new Job For insert job into Job Scheduler window click by mouse to Add button onto right side Job Scheduler window. After click by mouse to Add button you can see new dialog window: All created Jobs are showed In Job Name window. Click by mouse to select one of them. It will show detailed information about selected job into Description window. You can change number of copy and recording speed. Job Name - This window show all created Jobs Description - This windows show detailed information about selected job. No. of copies - Number of copy discs which you want produce. Speed - Select recording speed here OK - Click by mouse to this button insert selected job into Job Scheduler window. Cancel - Click by mouse to this button and Add job will be cancelled. 51 Disc Manager Disc Manager 5.4 Delete Job Click by mouse into Job Scheduler window to select Job which you want to delete. Next click by mouse to Delete button for delete this Job. Please confirm to delete. 5.5 Edit Job Click by mouse into Job Scheduler window to select Job which you want to edit. Next click by mouse to Editbutton onto right side Job Scheduler window. You can change number of copy and recording speed. All created Jobs are showed In Job Name window. Click by mouse to select one of them. It will show detailed information about selected job into Description window. You can change number of copy and recording speed. No. of copies - Number of copy discs which you want produce Speed - Select recording speed here OK - Click by mouse to insert selected job into Job Scheduler window. Cancel - Click by mouse to Add job will be cancelled. 52 Disc Manager Disc Manager 5.6 Copy Job Copy Jobdoes the copy of selected job. You need produce a few disc after the Job is finished. Exist two possibilities. At first - click by mouse to Add button, next browse in the list of jobs, and next select job and then edit job to set copy of disc. At second - click by mouse to job witch you need copy, next click to Copy button and then edit job to set copy of disc. See pictures below: Select job for a copy Added job No.0009 5.7 Increase Priority After add jobs into Job Schedulerand press Start button the Disc Manager begins do jobs one by one so, how are sequenced in Job Scheduler window. As the first begins duplicate part in first line, then the second line, further third line, ... etc. If you need do job early - you need heighten its priority, then clicks by mouse to required job. Now click by mouse to Arrow up button to shift job one row height into list of jobs. You can repeated click and job will move up. 53 Disc Manager Disc Manager 5.8 Decrease Priority After add jobs into Job Schedulerand press Start button the Disc Manager begins do jobs one by one so, how are sequenced in Job Scheduler window. As the first begins duplicate part in first line, then the second line, further third line, ... etc. If you need do job later - you need reduce its priority, then clicks by mouse to required job. Now click by mouse to Arrow down button to shift job one row below into list of jobs. You can repeated click and job will move down. See pictures below: Decrease priority - job No:006 5.9 Load Scheduled Jobs During duplication the Disc Manager saves actual state of jobs into Job Scheduler. These files are in subdirectory Saves. Full path: C:\Program Files\Disc Manager\disc manager\data\saves\*.dat. So, you can load earlier scheduled jobs. For load schedule jobs into Job Scheduler window click by mouse to: Job Scheduler->Load Scheduled Jobs. Into open dialog window select last or earlier file. Click to open and Job Scheduler will load this file. You can see loaded job into Job Scheduler window. The Disc Manager keep last fifty files into C:\Program Files\Disc Manager\disc manager\data\saves\*.dat directory. 54 Disc Manager Disc Manager 6. Start Start - Runs duplication process Stop - Stops duplication process after finishing already started discs Abort - Stops process as soon as possible. If disc is recording it will destroy this disc Reset Autoloader Reset Bin Positions - This is for calibration loader for its default position - Loader will forget levels in each of bins and set these levels to default values 6.1 Start Insert empty CD or DVD discs (blank or printable discs) into input bins. Add job into Job Scheduler- see chapter 5.3 Add a new Job and click by mouse to Start button on the toolbar or from menu Run->Start or from keyboard Alt+U+S. The Disc Manager starts the duplication until all jobs have been done or the user stops the process. Jobs are process from top to bottom. A job is done when all discs have been produced. 6.2 Stop You can stop job when is running. Click by mouse to Stop button or from menu Run->Stop is for interrupt production process. This function does not destroy any disc, because duplication process is stopped after already begun CD or DVD. 6.3 Abort You can Abort job when is running. Click by mouse to Abort button or from menu Run->Abort to stops duplication process as soon as possible. If there are discs in the recorders and burning is proceeded, then these discs are destroyed and puts into reject bin. This function stops the production process immediately. If there is disc in a printer and printing is proceeded, then this disc will stop after print is finish. 6.4 Reset Autoloader It makes software reset of the loader for set its default position. Click by mouse to menu: Run -> Reset Autoloader. Lifter will move to the left side and next to the right side and stops in its default position. 6.5 Reset Bin Position You can set default head position for all bins. Click by mouse to menu: Run -> Reset Bin Position head will forget levels in each of bins and set these levels to default values. Tip: Don't manipulate with CD or DVD in input and output bins during the duplication process. Disc Manager remembers number of discs and positions where it picks last disc. And if you take some disc from the output bin during work the autoloader cannot find out new proper position. So, if you take some disc from the output bin the autoloader will putting them from high. 55 Disc Manager Disc Manager 7. Setup This menu makes it possible to settings automatic duplicator when is connected. Hardware Settings - Settings of your autoloader, recorders and printer Software Options - Variable adjustments ARC - Tool for automatic duplication from directory Registration - Shows registration dialog for insertion the license key and owners data 7.1 Hardware Settings First the most important thing you have to do you must configure your hardware. Click by mouse to menu: Setup -> Hardware Settings to open hardware configuration window. There are three types of devices which you must configure. Your autoloader, your recorders which you have connected and printer. Enable autoloader - Click by mouse to a little window you enable autoloader. If is disable (without check mark) then you can use the Disc Manager in manual mode. In manual mode is disabled printer and you have allowed jobs only with recording and without printing. Autoloader COM port - serial port for control automatic duplicator. You must set No. of serial port which is used for communication with your loader. Autoloader Type - you must select type of your autoloader. At this moment is supported Gamma, Samurai, Alpha, Omega, Delta, Shuttle and Printer autoloader. For more info contact Copytrax . Autoloader Bin Mode - here are exist three possibilities: Standard input and output bin - for duplicators with one input an one output bin. E.g.: Alpha, Omega, Gamma 2 Sequential control of bins - for duplicators with double input and output bins. At the beginning the you fill bins (1), (2), and (3) by CD/DVD disks. See pictures on the next page. Autoloader loads from bin 1 and unloads to binWhen 4. the bin 1 is empty loader goes to bin 2 and loads from it and unloads to emptied bin 1. When bin 2 is empty loading is from bin 3 and unloading to bin 2. Loader reports error after the last input bin 3 is empty. Individual mode control - for duplicators with double input and output bins only. Two independent input bins and two independent output bins. This is special mode which must be supported by the control system. Input bins are on the left (1), (2) and output bins (3), (4) are on the right side. 56 Disc Manager Disc Manager Sample bins: Gamma Bins Alpha Bins Delta Bins Use Rotation Head -There is item for rotation discs to index mark by use a special rotation head. For more information read chapter 4.2.1 Create New section Disc Rotation. Enable Recorders - In this section you can select how many recorders you will use and which of this will you use. At the right side of each recorder is Check button. This button is for checking if selected recorder is really recorder with right position in duplicator tower. After click this button the Disc Manager ejects and close tray of selected recorder. You have to check if it was recorder in right position. When you have connected autoloader through the Fire-Wire you pay attention to right right recorders positions. Note: Number of used recorders is enable by license key. You can´t use recorders more then is enable. Enable Printer - Click by mouse to a little window you enable the printer. Printer - you have to select type of your printer and correspondent printer drive that you have installed in Windows. The most often used printer are ODP100, ODP200,ODP500 and P55. Construction - Construction of some printers don't allow you to print during autoloader movement, because their tray goes out of printer during printing. For these type of printer is necessary to set Load recorders is not possible during printing,e.g. Signature printers. Other printers are printing inside the printer so the loader needn't wait for printer tray, e.g. ODP100, ODP200, ODP500, ... Load recorders is not possible during printing - for printers whose tray goes out during printing Load recorders during printing - for printers which are printing inside the printer Monitoring - If you have ODP100 or ODP200 printer then you can check monitoring ink levels in cartridges. Then Disc Manager is checking this level and if there is no ink, warning message will displayed. Important note: If this will not be configured correctly, Disc Manager will not work properly! 7.2 Software Options When Disc Manager is installed then you must set the environment variable. After Disc Manager starts click by mouse to menu Setup -> Software Options. In opened Software Optionwindow you can see three bookmarks: • Temporary Space - set-up all necessary parameters for good function the Disc Manger software • Printing Options - set-up important parameters for good function printer and set-up parameters for printing PDF file • Autoloader Options - set-up important parameters for accurate function connected Autoloader. 57 Disc Manager Disc Manager 7.2.1 Temporary Space In Temporary Working Areayou can setup working Data Directory , Space Limitand Duration limitfor delete all temporary files. Data Directory - you have to create directory for temporary files. Click by mouse to “...”. In the new window select disc and create directory. Disc Manager loads files and images into this directory. It should be fastest disc into your computer, but should not be disc with Windows. If it is the operating system on a disc C:\, then you select Data Directory on the another physical disc, e.g. E:\Temp. Space Limit for erasing old data - this function watches available free space on the selected disc. When available free space is less than limit (20GB on the picture) then Disc Manager shows request for release the space on the disc and job will not running. Duration Limit for erasing old data - this function set-up the period in days. For the duration of period are keeping all files in the temporary directory. If period is finishes then Disc Manager will delete all expire files. Delete Temporary images - Click by mouse to a little window you enable Delete temporary imagesafter job is finishing. Tips: • If you will create the Data Directory on the same disc where you saved images (e.g. E:\Images) then Disc Manager will not copy this image into Data Directory. Disc Manager uses this image from current position and this image will not delete. • For CD you need 1 GB available free space on the HDD. For DVD +/-R you need 5 GB available free space on the HDD and for DVD-DL you need 10 GB free space on the HDD. • You NOT save images (*.nrg, *.iso) into Data Directory because when duplication finishes the images will be DELETED !!! 58 Disc Manager Disc Manager 7.2.2 Printing Options In Printing Options you can set-up working environment for external software Bartend.exe and you can on/off optimalisation for Teac P55 Printer. Printing BarTender BTW files: • Application - Your choice of an external program, e.g. bartend.exe • Parameters - Parameters of an external program, look at the User Manual of used external software. Printing Acrobat PDF files: • Application - Your choice of a external printing program, e.g. pdfp.exe • Parameters - Parameters of a external program, look at the User Manual of used external software. Teac P55 Printer - on/off optimalisation 7.2.3 Autoloader Options In Autoloader Options you can set-up working environment for connected autoloader. Discs Sorting, one of two possibilities: • Finished disc ... - When disc is finished then disc is immediately puts into output bin. • Discs in output ... - When disc is finished then disc is puts into output bin according as Job was scheduled. Jobs Processing, one of two possibilities: • New job ... - When you insert a new Job then new Job starts immediately if one or more of recorders are free. • Wait with ... - When you insert a new Job then new Job will wait until previous Job is finished. Reset Bin Position, one of three possibilities: • Automatically ... - Every Job starts (pick CD/DVD) from input bin one. • Everytime the ... - Inserted Job starts immediately. • Never ... - New Job starts (pick CD/DVD) from bin where stops last Job. 59 Disc Manager Disc Manager 7.3 ARC This function must be allowed by license key. ARC - Advance Recording Control is easy and powerful tool for automation of the recording and backup processes in network environments. ARC makes you possibility to record CD or DVD from various computers in the local network without installing any special software. The principle is very easy. There is some directory (shared network directory) defined by user which is permanently monitored by ARC function. When there are some data and these data are not changed during monitoring, the ARC interprets these data as prepared for recording. Then the job is created and inserted into Job Scheduler. For open ARC dialog window you have to click the menu Setup/ARC - Advanced Recording Control. By clicking it the following window is shown. General Parameters - This bookmark is for setting main parameters of ARC function. ARC directory - Is directory which is monitored by this function. It is usually some shared local or network directory. Click by mouse to icon and browse the ARC directory. Then click to Open. ARC method: In ARC Method section you can select from three various methods: • Image Based: If some image is detected by ARC in monitored directory, this image will be recorded by Disc Manager. • File Based: the ARC directory is monitored as a whole and if data inside is not changed, image from this data is created and then recorded by Disc Manager. • Directory Based: in the ARC directory there is collection of several subdirectory and each is monitored separately. • DMS - Disc Manager Script: DMS files are insert into the ARC directory and it´s monitoring by ARC. When conditions occurs then Disc Manager executes the DMS file. You can use the DMS file (*.dms) and Rimage script file NWP (*.nwp). If you know more look at 19.11 How create DMS file chapter. Latency time - Latency time defines time interval between monitoring ARC directory. Action is starts when all conditions are without changes for a two latency period. Additional Conditions - This bookmark specify other conditions for creating job. There is condition for file which has to exist, for minimum size of data in ARC directory and time conditions: File Has To Exist - This is condition for file which has to exist. When this condition occurs then ARC will test other conditions and next create image and record CD or DVD. Minimum Size - This is condition for minimum size of all files inserted in the ARC directory. When this condition occurs then ARC will test other conditions and next create image and record CD or DVD. Limit size - This is condition for limit size of all files inserted in the ARC directory. When new arriving file is over the limit then ARC doesn´t record this file on CD or DVD. This file (files) stays in the ARC directory and will be use later. Time Conditions - This condition says how often ARC tests the switch-on conditions - a hour, a day, a week. 60 Disc Manager Disc Manager Printing - This bookmark is for printing label onto the recorded disc. You can use this printing file also as a condition File has to exist for job start. For this option you have to use the printable disc (for ink-jet printer). You can enter *.prn file from driver or *.dml file from the Label Designer. If it is use *.dml file then it can be use serialisation, merge field or insert actual date and time. If you know more look at Label Designer´s User Manual. Job settings - Last bookmark Job Settingsis for definition job parameters. Disc Name - specifies the disc volume name. File System - specifies the uses file system. It can be set: ISO9660, ISO9660+Joliet and UDF Verification - This function allows comparison of copy and master image, to make sure there are no detectable differences. Erase Rewritable Disc - Use this menu option to start erase the data on the CD/DVD-RW disc. Recording Speed - Maximal recording speed for data CD and DVD isn't restricted. But Copytrax recommends to all their customers not use the maximal speed. Please setup recording speed according used media but you use recording speed lower than maximum. Number of Copies - You can enter a number of copy. Default is 1. Enable - If you have all ARC parameters defined you can run ARC function by clicking Enable button. Then indicator in the right top corner gets green and it indicates that ARC is running. Also in status bar in main window of the Disc Manager shows that ARC is running. Disable - If ARC is running you can stop ARC function clicking by mouse to Disable button. Close - close ARC setting window. 7.4 Registration If you start the Disc Managerfor the first time, the Registration window is displayed. If you click on a Trialbutton, the Disc Manager will work in a trial mode. Functionality of trial mode is 30-days with 4 writers and 1 printer. Functions Network, Serialisation, Read discs and ARC are in trial mode not allowed. After you buy license key (by your dealer or on the www.copytrax.com) with functions you need, fill in the registration window with your name, company and license key. 61 Disc Manager Disc Manager Registration window after first start: User - Name of the user. Company - Company name - type the company which bought the Disc Manager software. Number for activation - This number you have to send to Copytrax [email protected] tpgether with the Autoloader serial number. A license key will be provided by e-mail at our earliest opportunity. License Key - Insert a valid registration key. The license key will activate your purchased features in Label Designer and Disc Manager. You receive the license key after sending the activation key. OK - Press OK button to confirm Trial - Press Trial button and the Disc Manager will work in Demo mode for 30-days. Exit - Press Exit button to cancel the Disc Manager program. Disc Manager features which can activate thorough the registration key: • NET • Manual mode • ARC • Autoloader • Reading discs • DMS • Label Designer - serialisation • Label Designer - Bar Code • Label Designer - Merge Field 8. Information Use this menu when you want be informed by mail to complete jobs that were running on Disc Manager. For setting up this item you will have to ask your network administrator. You will need host address, port number and create addresses (accounts) for the duplicator. Settings E-mail Notification - Setting up this function - Enable or disable this function Send Service Info Export Service Info - It will sent Disc Manager service logs - Pack the service logs (ZIP) 62 Disc Manager Disc Manager 8.1 Settings In this section, set the environment and conditions for information on a completed jobs and error conditions in the disc duplication and printing. Click by mouse in the Reporting -> Settingsto open the following dialog box: Local E-mail account: Enter the address of the hostile obtained from your network administrator. Local Port: Enter the port number obtained from your network administrator. Your address: Enter the E-mail address duplicator obtained from your network administrator. Type of notification: You can select what information will be sent Disc Manager. The choice you make by checking the box prior to the information you want to send you. The e-mail: Enter the E-mail address where to send information about jobs. Subject: Enter a sentence which will be subject of e-mail. Test: Click this button to send a test mail. You'll see the correctness of the set conditions for sending mail. Click OK to confirm the settings, click Cancel to exit from dialog without changing any settings. Samples of sending informations: Disc Manager - email test Job finished: Delta_cz_zapis (0100) Message after click on the Test button. Message when duplication was finish (100 pcs discs) All jobs are finished Autoloader error: Status 2 - No disc at the position Message when all jobs was finish Message when autoloader error 8.2 E-mail notification Click by mouse on the menu item Reporting -> E-mail Notificationto activate this function. In the menu is a check mark appears before this function. Now mails will be sent to the address after completing the set conditions. To stop receiving mail, click on the menu item Reporting -> E-mail Notification by E-mail and function is deactivated, removed the check mark from this feature. 8.3 Send Service Info Through this function, you can send service information to a technical support centre. These logs will be sent from the program and your Disc Manager description of the problem. Log files contain all the necessary service information that is useful in finding the cause of the problem. After clicking the mouse in the Reporting-> Send Service Information window appears as follows: 63 Disc Manager Disc Manager Click to Send button you will send the log files, click to Close button you will exit from dialog without sending mail. This feature it needs access to an Internet. 8.4 Export service info Through this function, you can create a file service.zip. This file will contain all the service information (log files), useful in finding the cause of the problem. The information contained in this file are the same as in the previous case (Section 9.3). The difference is only in the manual dispatch of this file. This file can be sent to technical support [email protected] After created a message, you will inform on the monitor, see following picture You can see the file's location: Click to OK close the dialog window. 9. Language Switch between supported languages. In the present time are support: • English • Czech • Germany Click by mouse into Menu Language->[eng /en /de] activates the menu selected in the national language. The menu is a check mark appears before the chosen language. 10. View View Toolbar View Status bar View Title Screen - Display or hide the Toolbar - Display or hide the Status bar - Enable or disable view the start screen with logo. 64 Disc Manager Disc Manager 10.1 Toolbar Click by mouse to View->Toolbar show or close the Toolbar. When item is enabled then menu is a check mark appears before the View Toolbar item. 10.2 Status bar Click by mouse to View->Status bar show or close the Status bar.Status bar is situated in bottom parts of the Disc Manager window. Status bar shows following informations: Autoloader type: it shows type of the autoloader which is connected (e.g.: Alpha, Delta, Gamma, Omega, Shuttle, Samurai, DiscJet) Firmware version: version of the firmware installed in the autoloader. NET: when is enabled shows NETwork ARC: when is enabled shows ARC Number of clients: shows number of connected clients and data connecting. 10.3 Title screen Click by mouse to View->View Title Screen to enable or disable the welcome screen when you start Disc Manager. When you enable this feature on the menu item check mark before the title screen. When you disable the checkbox is not there. 11. Window Cascade - Displays opened windows in cascade Tile Horizontally - Displays open windows horizontally Arrange Icons - Order the minimised windows - The Job Scheduler window is open and active - The Job Editor window is open - The Device Status window is open 11.1 Cascade Click by mouse to Window->Cascade to arrange opened windows on your desktop. All Disc Manager windows are arrange ascending in a row, from left to right and from bottom to up. 11.2 Tile horizontally Click by mouse to Window->Tile Horizontallyto arrange opened windows on your desktop. All Disc Manager windows will be arrange over each other. 65 Disc Manager Disc Manager 11.3 Arrange ions Click by mouse to Window->Arrange Iconsto arrange closed (minimised) windows on the Disc manager window. minimised windows will move to the left down corner of the Disc manager window. See the following pictures: Closed windows Arranged windows 12. Help Help Topics - Displays Help DM Home Page - Open the Disc Manager Home page on www.copytrax.com About - Displays about the Disc Manager 12.1 Help topics The Disc Manager software contains independent Help system that provides comprehensive documentation for the Disc Manager software and more details. You can view Help in one of the following ways: • Click the Help Topics in Help menu • Press F1 when Disc Manager window is active 12.2 DM Home Page Click by mouse to Help->DM Home PageThis feature needs computer connectivity for the internet. 12.3 About Click by mouse to Help-> About window appears in which you inform about producer (author) of the Disc Manager software. The sales and service business abroad and the user and the license key. Press ESC or click on a cross in the upper right corner About this exit. 66 Disc Manager Disc Manager - How To 19. How to do . . . The following chapters describes how to do, for example: how to insert a Job, how to delete a Job, how to modify the Job, how to create a Job, how to create a Job for write, how to create a Job for printing, how to load the image, how to create an image from the files, ..., and more. 19.1 How to read CD or DVD disc 1. Start the Disc Manager software 2. Check the Hardware settings, see chapter 8.1, next click to OK 3. Insert master disc into Input Bin1 4. Click by mouse to the menu File --> Read Image or Read Image button from the Toolbar 5. In opened dialogue box type the name for master disc and path to store it onto HDD. Next press OK 6. Select the recorder for reading the master disc 7. Choose reading speed 32X for data disc or 24X for audio disc 8. Click to the Start button. Duplicator will take disc from input Bin1 and insert it to the recorder. 9. After loading the image, click to Close button. Now the computer has recorded an image. A disk image is in the same format as the source disc. 19.2. How to compile the image from files 1. Click on the icon you start Disc Manager 2. Check your hardware and click OK , see section 8.1 3. On the toolbar, click on the Disc Xpress button 4. In the opened window, choose the type of compilation CD or DVD 5. Type the name (volume) for disc 6. Select the file system (for long names with graphic accents select the ISO9660 + Joliet) 7. Enter the name and location of the image to load 8. Check your settings if according to your requirements click OK. 9. In the new opened window (see up picture on the page 40) assemble your image 10. In the right window, choose the files and folders and mark them by clicking the mouse. See page 40, Compilation section 11. Drag and drop files and folders from the the right window to the left window 12. Follow the green bar at the bottom, which shows the size of the assembled compilation 13. Now you can add or remove files and folders into or from the compilation 14. Click on the menu at Compile --> Create Image to start creating the image of the compilation 15. After creating an image is displayed a message including the path where the image was saved 16. Click OK to finish 17. Click in the menu at Compile --> Exit to close the Disc Xpress 19.3. How to create Job for record only To create a Job for recording you have to prepare image first, see chapter 19.1 or 19.2 1. Click on the icon you start Disc Manager 2. Check your hardware and click OK, see chapter 8.1 3. On the toolbar, click on the Job Editor icon 4. Click on the Add for create a new Job, see at the chapter 4.2.1. 5. Enter name of Job 6. Click to Recording bookmark 7. Enable recording (Make tick in small box before enable recording) 8. Browse in the HDD and select the recording image (with extension *.NRG or *.ISO) 9. Enable verification file (Make tick in small box before Verify after recording) 10. Enable Burn Proof (Make tick in small box before Activate Burn Proof) 11. Choose the recording speed, we recommend the 32X for data and 24X for Audio. For DVD please setup recording speed according to used media but you use recording speed lower than maximum 12. Click on the OK you create a Job for recording only 67 Disc Manager - How To Disc Manager 19.4. How to create Job for print only To create a Job for printing must be prepared in advance of printing the print file (with extension *. PRN). The print file is created in a graphics program which you use. If you are using a graphics program Label Designer then to obtain a print file follow the instructions in the Label Designer user manual. To create a print job, you can use graphics files directly from the Designer Labeland do not create a print file. This file has the extension *. DML. 1. 2. 3. 4. 5. 6. 7. 8. 9. Click on the icon you start Disc Manager Check your hardware and click OK, see chapter 8.1 On the toolbar, click on the Job Editor icon Click on the Add for create a new Job, see at the chapter 4.2.1. Enter name of Job Click to Printing bookmark Enable printing (Make tick in small box before Enable Printing) Browse in the HDD and select the printing image (with extension *.PRN or *.DML) Click on the OK you create a Job for printing only 19.5 How to create Job for printing and recording To create this Job must have a pre-prepared image in accordance with Chapter 19.3 and 19.4 and the previously created print file has the extension *. prn. The print file is created in a graphics program you use. If you are using a graphics program Label Designer then to obtain a print file follow the instructions in the Label Designer user manual. To create a print job, you can use graphics files directly from the Designer Labeland do not create a print file. This file has the extension *. DML. 1. Click on the icon you start Disc Manager 2. Check your hardware and click OK, see section 8.1 3. Click on the icon Job Editortoolbar, you run the program 4. Click the Add button to create new Job, see. Chapter 4.2.1 5. Enter the name of the Job 6. Click the Recordingbookmark 7. Enable recording (Make tick in small box before enable recording) 8. Browse in the HDD and select the recording image (with extension *.NRG or *.ISO) 9. Enable verification file (Make tick in small box before Verify after recording) 10. Enable Burn Proof (Make tick in small box before Activate Burn Proof) 11. Choose the recording speed, we recommend the 32X for data and 24X for Audio. For DVD please setup recording speed according to used media but you use recording speed lower than maximum 12. Click to Printing bookmark 13. Enable printing (Make tick in small box before Enable Printing) 14. Browse in the HDD and select the printing image (with extension *.PRN or *.DML) 15. Click on the OK you create a Job for recording and printing 19.6 How to insert a Job To insert a Job into the Job Scheduleryou must have pre-prepared Job in accordance with Chapter 21.3 to 21.5. 1. 2. 3. 4. Click the Add button in the right part of the Job Scheduler window Browse the required Job and click to select Enter the number of copy Choose the recording speed, we recommend the 32X for data and 24X for Audio. For DVD please setup recording speed according to used media but you use recording speed lower than maximum 5. Click OK to insert the job into the Job Scheduler 68 Disc Manager Disc Manager - How To 19.7 How to run a Job 1. To run the Job must be inserted at least one Job in the Job Scheduler window 2. When inserting more of Jobs - you will increase its priority 3. Click the mouse to select the Job you want to run first 4. Click by mouse to Arrow Upbutton to increase the priority (preference) or the Arrow Downbutton to decrease the priority (delay) in the Job Scheduler window 5. Click the Start button on the Toolbar to start all inserted Jobs. Next Job will be executed after the first Job finish. TIP: After running, the Jobs are running from top to bottom as they are listed. If you need to increase or decrease priority for one Job (or more Jobs), you can change its priority by clicking the Arrow Upbutton to increase the priority (preference) or the Arrow Downbutton to decrease the priority (delay), right in the Job Scheduler window. TIP: When you start the Job you will info about Jobs in the Job Schedulerwindow - the number of copy, the process and finish the job. When you insert the Job is displayed in black. When Job is running then will change colour to red. When finished, it will change colour to gray. TIP: Keep CD or DVD discs in the input and output bins while process. Duplicator continuously remembers the number of disks in these bins. If you remove any discs during running a Job the some problem became. The duplicator does not recognise the level of filling bins. So it may happen that the duplicator will drop discs into the output bin from height. To reset the position of all bins to the default values, do it in the Run --> Reset bin positions when the Disc Manageris idle. 19.8 How to delete a Job To better the summary of inserted Jobs you can delete the Job in Job Scheduler window. You can not delete a task that is running. 1. Click on the Job that you want to delete to highlight it 2. Click the Delete button in the right part of the Job Scheduler window, deleting it 19.9 How to edit a Job You can edit the number of copy and recording speed with the inserted Jobs in the Job Scheduler window. In the running Jobs can be change the number of disks but partially only. Unable to set a smaller number than has been done. 1. 2. 3. 4. Browse the Job and click to select Click the Edit button in the right part of the Job Scheduler Enter the number of copy Choose the recording speed, we recommend the 32X for data and 24X for Audio. For DVD please setup recording speed according to used media but you use recording speed lower than maximum 5. Click OK to insert the modified Job back to the Job Scheduler 19.10 How to copy a Job If you need to run a Job again, which is already finished, and is still in the list of Job Scheduler, you can simply copy, modify and run again. 1. Click to highlight the finished Job 2. Click the Copy button on the right in the Job Scheduler window 3. In the Job Scheduler window appears copy of the Job Now, you can click the Start button on the toolbar to run the inserted Job, or click on the Edit button on the right side of the Job Scheduler window modify this job. You can specify the number of copy or change the recording speed. 69 Disc Manager - How To Disc Manager 19.11 How to create DMS file To use scripts to control Disc Manager it is necessary to create a script file DMS or NWP. A description and a sample script file DMS (Disc Manager Script *. DMS) for the Disc Manager. Script file is a plain text file created in a simple text editor and saved as a text document, and is usually has the size of 150-200 bytes, and it has a extension *. DMS (e.g. RECPRN.DMS). Recording image and printing the PRN file (e.g. recprn.dms) [GENERAL] NAME=recording+printing COPIES=15 STATUS=0 ERROR= [RECORDING] IMAGE=test.nrg SPEED=40 ERASE=0 VERIFY=1 [PRINTING] LABEL=test.prn For more information see at the Appendix A.4 Chapter. 70 Disc Manager Disc Manager - Appendix A.1 Sample: Log file - Create Image Cutaway LOG file: DATE: 14.10.2011 08:29:02 DISC NAME: European Law DESCRIPTION: Backup files 01.10.2011 01:00:02 DIRECTORY: 111014_082900_European Law 245 FILES WERE COPIED SUCCESSFULLY i:\_cti_me.txt i:\autorun.inf i:\files\000text.html i:\files\001text.html i:\files\002text.html i:\files\003text.html i:\files\082otazka.html i:\files\083otazka.html i:\files\084otazka.html i:\files\085otazka.html i:\files\086otazka.html i:\files\087otazka.html i:\files\187otazka.html i:\files\188otazka.html “ “ “ “ i:\files\189otazka.html i:\files\190otazka.html i:\files\grafika.html i:\files\html1.png i:\files\html2.png i:\files\jakhtml.html i:\files\jakhtml.png i:\files\priklady.html i:\files\styl.css i:\files\texty.html i:\files\title1.png i:\files\title2.png i:\files\title3.png i:\files\title4.png i:\files\title5.png i:\files\top1.png i:\files\top2.gif i:\files\zakony.html i:\index.html 0 FILES WERE NOT COPIED (because of problems with reading) ******************************************************************************* 71 Disc Manager - Appendix Disc Manager A.2 Sample: Log file - Job Cutaway LOG file. You can see info about duplicator and every copy of disc. 06:28:13 06:28:13 06:28:13 06:28:13 06:28:13 06:28:13 06:28:13 06:28:13 06:28:13 06:28:13 06:28:13 06:28:13 06:28:13 06:28:13 06:28:14 06:28:14 06:28:26 06:28:26 06:28:26 06:28:26 06:28:26 06:28:26 06:28:26 06:28:26 06:28:26 06:28:26 06:28:26 06:28:26 06:28:26 06:28:27 06:28:28 06:28:28 08:38:29 08:38:29 08:38:29 08:38:29 08:38:29 08:38:29 08:38:29 “ “ “ 09:51:58 09:52:42 09:52:42 09:52:42 09:52:42 09:52:42 09:52:42 09:52:42 ************************************************************************* This logfile was created 27.10.05, at 06:28:13 Disc Manager version 5.1.11.29 License conditions: Disc Manager is registered License key: DM50-12345-12345-12345-12345-12345-12345 Possible autoloader: 00000000 Maximum count of recorders: 8 Maximum count of printers: 1 Autoloader mode is supported Manual mode is supported NET Server mode is enabled serialisation is enabled ************************************************************************* Nero API version 6.6.0.12 ************************************************************************* Autoloader type: Gamma 8 v.2.11 b4 Serial number of the autoloader: 55638429 Recorder 1: I: (5,2) PIONEER DVD-RW DVR-106D Recorder 2: H: (5,3) PIONEER DVD-RW DVR-106D Recorder 3: G: (5,0) PIONEER DVD-RW DVR-106D Recorder 4: F: (5,1) PIONEER DVD-RW DVR-106D Printer: IGA ODP 200 (HP type) Memory free: 342 MB Memory needed: 128 MB HDD space for data (C:\Program Files\Disc Manager\disc manager\data\): 20 GB Max. age for data (C:\Program Files\Disc Manager\disc manager\data\): 5 days Now is used: 0 GB Free space on drive C: 5 GB ************************************************************************* Start button pressed ************************************************************************* Job "Univerzita_CD4_Dys" (No. 0001) Copy 1 of 100 finished No record Print label D:\ODP200_PrintFiles\Univerzita_CD4_Dys.prn Simulation disabled Record then print ************************************************************************* “ “ “ ************************************************************************* Job "Univerzita_CD4_Dys" (No. 0001) Copy 90 of 100 finished No record Print label D:\ODP200_PrintFiles\Univerzita_CD4_Dys.prn Simulation disabled Record then print ************************************************************************* “ “ etc. (in turn one by one, up to last copy) 72 Disc Manager Disc Manager - Appendix A.3 Error messages List of error messages for duplicators: Alpha, Delta, Gamma, Omega, Samurai, DiscJet and Shuttle Status 0 1 2 3 4 5 6 7 8 9 A B C D E F G H I J K L M N S T U V W Description low ink-level in printer invalid command parameter no disc at the position wrong position parameter the source or destination position doesn’t exist right margin reached left margin reached lifter blocked - can’t go top lifter blocked - can’t go down init error - cannot initialise the loader can’t pick disc moving error timeout error ERR_UNLOAD (not for Gamma duplicators) ERR_END_BIN (not for Gamma duplicators) power up initialization error disc lost ERR_POSITION (not for Gamma duplicators) rotate CD error (rotation head is not yet implemented) reject bin is full drive error (can’t open or close) printer error (can’t open or close) reserved disc not put (some problem with gripper) door open (ne pro duplikátory Gamma) rotator head not present (while trying to use rotation) rotator bus is blocked communication with rotator failed communication with rotator lost (during transfer) rotator is not responding 73 Disc Manager Disc Manager - Appendix A.4 DMS structure [GENERAL] NAME COPIES INPUTBIN OUTPUTBIN STATUS ERROR - main body - name of the Job - number of copy - 1-4 .. No. of the input bin (default is 1 - the first input bin) - 1-4 .. No. of the output bin (default is 1 - the first output bin) - status of a Job - description of error which occurred during the running the Job [RECORDING] - parameters for recording IMAGE - image name (if is inserted without the path then must be in the same folder as the DMS file) DIRECTORY - folder for recording (you can use IMAGE or DIRECTORY, they don´t be use together) VOLUME - name of the disc when the DIRECTORY is use SPEED - recording speed (default = max.) ERASE - 0/1 .. erase disc before recording? (default = 0) VERIFY - 0/1 .. check the data after recording? (default = 0) SIMULATION - 0/1 .. recording simulation? (default = 0) [PRINTING] LABEL MERGE BEFOREREC SIMULATION - parameters for printing - name of printing file (if is inserted without the path then must be in the same folder as the DMS file) - specify file contains an external texts for DML or BTW - 0/1 .. printing before recording? (default = 0) - 0/1 .. printing simulation? (default = 0) Job status and error: [GENERAL] STATUS ERROR - main body - status of the DMS script - description of the error code STATUS: 0 .. wait on a new file for Disc Manager 1 .. Disc Manager found DMS file 2 .. Job was add into Job Scheduler 3 .. Job is running (recording and printing) 4 .. Job finished 10001 and more.. error codes STATUS=10001 STATUS=10002 - error = missing image for recording - error = missing image for printing Input and output bins: [GENERAL] INPUTBIN OUTPUTBIN - main body - 1-4 .. No. of the input bin - 1-4 .. No. of the output bin In this case is necessary set bins into Individual Bin Mode, see at the zásobníků, viz kapitola 4.2.1 part Setup Numbering of input bins Numbering of output bins 74 Disc Manager Disc Manager - Appendix Example: 1.) Recording image an printing prn file(e.g.. recprn.dms) [GENERAL] NAME=recording+printing COPIES=15 STATUS=0 ERROR= [RECORDING] IMAGE=test.nrg SPEED=40 ERASE=0 VERIFY=1 [PRINTING] LABEL=test.prn 2.) Folder recording(e.g.. recdir.dms) [GENERAL] NAME=recording directory COPIES=8 STATUS=0 ERROR= [RECORDING] DIRECTORY=e:\temp VOLUME=test SPEED=16 ERASE=0 VERIFY=0 NWP – Rimage Network Publisher Multi-Platform(skripts for Rimage duplicators) Mechanism: - NWP file is running through DMS - DMS is ARC method, DM monitoring the ARC folder to insert DMS (*.dms) and NWP (*.nwp) files - Procedure: 1) Found NWP file 2) Rename NWP to INP (during running only) 3) Execution script 4) Rename INP to: - DON (done) if successfully - ERR (error) and create LOG file which contains description of error It is necessary provide shared access for reading to another applications. Other application mustn't it lock this file otherwise problems occur. Commands: order_id filetype=IMAGE filetype=PARENT file volume label merge copies - Job name in the Job Scheduler - image will be record (parameter contains the image) - folder will be record (parameter contains the folder) - path to the image for record (NRG, ISO) or folder - name of the disc (volume) if not found files in the PARENT - path to the printing file - PRN, DML, BTW, PDF - path to the specify file contains an external texts for DML or BTW - number of copy 75 Printer 1. General The Artmaster 600 CD/DVD ink jet printer, based on the HP DeskJet paper printer from Hewlett Packard. The form feed is replaced by a compact disc drawer (Tray). The printer processes printable CDs or DVDs coated for ink jet color print. An additional electronic is integrated to access the additional sensors for the drawer. The driver will install as ODP500 Series printer. System Requirements: The PC that runs the Artmaster 600 needs one USB port. Full speed (USB 1.1) or High speed (USB 2.0) The Artmaster 600 operates with Windows only. 1.1 Printer Artmaster 600 Description: 1. Service cover for exchange printers head 2. Status LED, (see below) 3. Ink cartridges 4. Opening for tray 5. Control panel and LEDs (see below) Control panel: 1. Switch ON / OFF and LED 2. Open / Close tray 3. Cancel 4. Resume button and LED 5. Yellow LEDs, status of the heads Ink-Jet cartridge LEDs C. Status LED M. Status LED Y. Status LED K. Status LED 76 C yan ink-jet cartridge M agenta ink-jet cartridge Yellow ink-jet cartridge blacK ink-jet cartridge Printer Rear side On the rear side of the printer (on the left side) are the connectors for the power cord and the USB cable. Rear side - left corner On the rear side of the printer (on the right side) is a 6 pin Mini DIN connector (PS/2) to connect the printer to the autoloader. Rear side - right corner 1.2 Description of the control panel Power switch and LED With the Power Button you can switch the printer on and off. After pressing the power button, you have to wait up to 2 minutes, until the printer has finished his initialisation. The Power LED blinks when printer is busy and printing data is being processed. Open / Close tray When you press this button you can open and close the printer tray. Cancel When you press Cancel button you can cancel the actual print jobs. Resume The Resume LED is blinking, when there is a print job, but no media in the tray. The print job has to be cancelled with the Cancel button (X). Put a disc into the tray and send the printing data again. This LED is blinking also in the case of an error. Together with green power LED it will show an error code. Please refer to section Appendix in this manual. Head Status LEDs When this LED is blinking, the printer is not able to print. He cannot react to commands from outside. Moving the tray is not possible and also the Tool „Printer Service Terminal“ is no longer working. You have to bring the printer out of this error state first, before you can continue. 77 Printer 2. Printer Properties The printer software, which is called printer driver sends the printing requests from the different applications to the printer. Many options are possible to modify the printing data which will be sent to the printer. To achieve best results, it is necessary to make some tests with different options. The printing driver software consists off well known MS Windows functions and some special functions in the Maintenance dialog. Please open the Properties of the printer. Click to Start -> Settings -> Printer and Faxesand now click by right button on the ODP-500and next click by left button to Properties. The following Message Box comes up on the screen, see next chapter. 2.1 Paper/Quality Print Task Quick Sets: The current settings will be saved with the option Advanced Features: The „Advanced Features“ allow you to set the ink volume and the dry time. These settings are depending very much on the chosen print quality and print mode. Size is: The SULQWHU supports the CD/DVD format 120 x 120 mm. The page size of the printer is: 126 x 126 mm, That means there is a 3mm border. The printing has to be centered. Smaller media is possible with proper templates and settings. Type is: The possible print modes are: Draft, Text, Graphic a Photo. We recommend the Photo. Note: The print mode „Photo“ will not use the black ink. In that case, grey color is mixed by the three colors CMY. Print preview:when printer is used with the autoloader then this possibility must be OFF!!! Print quality: The possible print modes are: Fast, Normal, Best a Maximum dpi. We recommend the Best. Real Life Digital Photography:this button enables the possibility to optimise the photo printing. 2.2 Color and Mask Settings The Colour dialog is the main dialog to modify the colour settings. The dialog “Mask Settings” allows you to fit the print image onto the different possible media sizes. 78 Printer 2.3 Maintenance The dialog Maintenance helps you to set and check the physical options of the printer via the Printer Service Terminal Click to Terminal Printer Service button for open the terminal. 2.4 Printer service terminal Printer selection - The proper printer will be selected automatically, while starting the tool, if the printer is switched on and connected. With the button Select File you can select print files (*.prn) to print them via the Print File button. See pictures on the next page. 79 Printer The small line next to the Text Connected shows if the printer is accessible. If yes, the line will rotate slowly. Specific control - The button „Open Tray“ will open the tray, the button „Close Tray“ will close the tray of the printer. If the printer is busy, or in an error condition, these button are out of function. Position Calibration This group of functions gives you the possibility to centre and calibrate the print out. Pressing the button „Print Calibration Test File“ will print a specific file which enables you to centre the print out via the Margin settings. Look at the printed image and figure out the offset to the actual margin settings. A distance of 1mm is equivalent to 100 steps. Add the offset you need to the actual margins and save the values via the corresponding button. The „Eject Position“ is the position where the tray stays when the tray is open. Printing image - shows the values that say how and by how much and which direction is shifted from the print media. Or if it is exactly in the middle. A value of 1 mm corresponds to a value of 100 steps. They add the value, or subtract the values listed in the windows dialog Position Calibration. Printer calibration - the printer properties in the Maintenance tab, run the Printer Service Terminal. After reading the values, click Open Tray. When tray is out insert Printable media. Click on the Close Tray. Tray will drive inside the printer. Now click Print Calibration Test File. The inserted media to print the cross hairs, see image on the left. Read the value of media in the direction which has to move the print media to the print. was in the middle. The lower this value or increase values in the Left Margin field or Right Margin. After entering values, click the Save button for Left Margin or Top Margin to save entered values. Repeatedly press the cross hairs Calibration Test Print File precisely calibrates the printer. Note: Remember that now you have to customize and print the graphics program you use. Calibrate a template in a graphics program which you use, such as label in the Label Designer, template in Corel, etc. .. 80 Printer Cleaning - The buttons Print KY Test and Print CM Test will print some test patterns which shows the quality of the print heads. If some lines are missing in the print out, the corresponding nozzle in the print head has a problem. But the print head is still OK, when only a few nozzles have a problem. Only if there are more nozzles missing, you will see it in the print out as missing lines. Normally it is possible to reactivate a problematic print head with the cleaning functions below. Pressing the Clean …buttons will clean the print heads. You have to start with Clean lightto enable the other cleaning functions. This is to avoid damaging the print heads while cleaning. With the button Print Testfileyou can start the print of a test image to check the result. We recommend to print this file once after a cleaning process. Printed test for the head KY (blacK , Yellow) Printed test for the head CM (Cyan, Magenta) Alignment - This button will start the print head alignment process. Note: When you start the alignment process, you have to finish it after a certain point. Otherwise the actual values will be overwritten without proper new values. Therefore the first dialog after starting the alignment gives you the chance to quit the alignment process before the actual values are overwritten. Prepare two printable CD, one insert into the printer and click to the Alignment button. Next click to 20ips button and next click to CD1 button. When printer stops exchange the CD in the printer and click to CD2 button. Remove the second CD from the tray. Quality print option Run print alignment 81 Printer Printed Alignment for A - D (CD1) groups Printed Alignment for E - H (CD2) groups Have a look at the printed CD and set (tick) individual frame (A, B, ....., H) Tick according the lines in group are straightest across. For example - have a good line to register the position of A8 in the box corresponding to the number of A8 dialog box, click the mouse. In the field point is displayed. Areas with a high content of ink (the perimeter of the disk, or print labels before), is used to clean the ink nozzles. Printing Thin lines are then very clear. Check repeat? Individual frame Click on Submit finish entering values. Now, in the next dialog box, click the Yes button, you can reprint two CDs with test patterns. Use of two additional Printable media. In this case should be printed groups (with the best straightest across) in the middle of the CD. Click to NO to complete the heads printer alignment without re-printing. Click to Cancel is not recommended because the printer memory will hold zero (memory for printhead alignment will reset). You will need to run the printhead alignment again and complete it correctly. To print to align the print heads are identical to 20ipsand 40ips. Printable media consumption is 2 + 2 to 20ipsand 2 + 2 for 40ips . 82 Printer 3. Ink Cartridges The cartridges for the printer are especially optimised and registered cartridges, which guaranties a maximum quality of the printing. To ensure such a high quality of the cartridges and the ink, you can not buy these cartridges in a regular store. You have to buy the cartridges from your distributor. 3.1 Status LEDs Normally, when all cartridges are installed and filled, the LEDs are switched off. When the ink inside a cartridge is les than 20% to 25% the corresponding LED went on and illuminates steadily. The LED is blinking, when the ink inside the cartridge is empty, or when the cartridge is defective or wrong placed. If one or more wrong cartridges are installed, these LEDs may light up while the tray is moving. In this case, the printer is not able to print. You have to replace the Cartridge(s) with proper ones. When one or more of these LED are blinking, the printer is not able to print. He cannot react to commands from outside. Moving the tray is not possible and also the Tool Printer Service Terminal is no longer working. You have to bring the printer out of this error state first, before you can continue. More about the status LED ink cartridges you can read in the Appendix. 3.2 Replacing cartridges… Before buying replacement cartridges, verify the correct part numbers. Damage that is directly attributable to modified or refilled cartridges is specifically excluded from the printer’s warranty coverage. If the printer is switched off, no additional action is required, just replace the cartridges. If the printer is powered on, open the service cover and let it open. The Power light and the Resume light are on now, and the ink pump is deactivated. Replace the cartridges now and close the service cover after that. Wait until the printer has recognized and initialised the changed cartridges. 4. Replacing Print heads… Before buying replacement print heads, verify the correct part numbers. Damage that is directly attributable to modified or refilled print head or cartridge is specifically excluded from the printer’s warranty coverage. Open the service cover (1), see page 1, and let it open. Press the Resume button (4), see page 1, for at least 3 seconds. The print heads will move now slowly to the left service position. The Power light (1) and the Resume light (4) are on now, and the ink pump is deactivated. Replace the print heads now and close the service cover after that. Wait until the printer has recognized and initialised the changed print heads. 83 Continuous Ink System 84 Continuous Ink System 85 Continuous Ink System 86 Continuous Ink System 87 Continuous Ink System 88 Troubleshooting The Power light is on and the Resume light blink The printer is out of media • Delete the print job with the Cancel button X, put a disc into the tray and send the print job again.. The Power light and the Resume light are on The service cover is open or not closed correctly • Close the Service cover. The Power light is on, and one or more of the print head lights blinks One or more print heads are missing • Install the print head indicated, and print again. The Power light, and one or more of the print head lights blinks One or more print heads are faulty or need attention • Ensure the print head indicated is properly installed, then try to print again. • If the error persists, replace the print head indicated. The Power light is on, and one or more of the cartridge lights blinks One or more cartridges are missing, or empty • Install the cartridge indicated, and print again. • If the error persists, replace the cartridge indicated. The Power light blinks, and one or more of the cartridge lights blinks One or more cartridges are faulty or need attention • Ensure the cartridge indicated is properly installed, then try to print again. • If the error persists, replace the cartridge indicated. The Power light blinks, and one or more of the cartridge lights are on • One or more cartridges are low on ink (less than 20 to 25 %) • No action required. The Power light on, and one or more of the cartridge lights are on • One or more cartridges are low on ink (less than 20 to 25 %) • No action required. All lights are on A non-recoverable error has occurred • Disconnect all cables (such as power cord, network and USB cable). Wait about 20 seconds and reconnect the cable. • If the problem persists, contact your service provider. 89 Troubleshooting The Power light and the Resume light blink Sensor error • Delete the print job, switch off the printer, open the top cover and clean the encoder. If problems persist, replace the encoder. The Power light and the Resume light blink, and one or more of the cartridge lights are on The cartridge chips require resetting • Press the following button sequence to continue printing: -Press (and hold) the Power button -Press the Resume button three (3) times -Release Power button. The product DVD lists our available lines of support should you need to ask a question not overed by this section. 90 Technical Data Print Media: CD and DVD discs. Outer diameter 120 mm and inner diameter 15 mm (hole) with printable surface. Printable layer is typically from the inner diameter of 18 mm to 119 mm outside diameter. The smallest and largest size Printable layer is given by the manufacturer of the CD or DVD media. Printing Method: CMYK, uses four separate, replaceable ink cartridge Size of print: Print maximum dimension is 125 x 125 mm Ink cartridges: Cyan #040 1000 001, Magenta #4000 3522, Yellow #4000 3521, Black #4000 3520 Printing Head: Black / Yellow #4000 3510, Magenta / Cyan #4000 3511 Diameter Width: 495 mm High: 200 mm Depth: 445 mm Weight With standard ink: 16,3 kg With external ink: 21,5 kg, including 4 litre ink - CMYK Power supply system: 230V, 50Hz Consumption: 80 W Operating conditions Temperature: 18 up to 38 oC storage temperature: 5 up to 50 oC Working conditions: The printer is designed for use in office type spaces All right for any manual modifications are reserved. 91 Warranty Support. Warranty&and Support COPYRIGHT © Copytrax Technologies UK Ltd. 2008. All rights reserved. This manual and the software described in it are copyrighted with all rights reserved. No part of this publication may be reproduced, transmitted, transcribed, stored in a retrieval system or translated into any language in any form by any means without the written permission of Copytrax Technologies UK Ltd. ENVIRONMENTAL Waste electrical products should not be thrown away with household waste. Please recycle where facilities exist or call us and we can arrange collection (UK only) and disposal. TRADEMARKS Copytrax is the registered trademark of Copytrax Technologies UK Ltd. Brand names and product names are trademarks or registered trademarks of their respective companies. LIMITED LIABILITYPRODUCT WARRANTY The warranty period is 12 months from the date of purchase from Copytrax. Any print heads & ink systems are limited to 3 months warranty. All warranties are limited to manufacturing defects only. Fair wear & tear or misuse of the unit or its components are not covered by the warranty. Warranty on products purchased from an authorised Copytrax distributer are covered by the distributor & not by Copytrax direct. Copytrax will work with the distributor to resolve any issues quickly. Copytrax warranty is a return to base(Cambridge, UK). All returns must be assigned an RMA number before returning to Copytrax. No on-site service is provided by Copytrax. You must return the product to Copytrax or an authorised Copytrax dealer within the warranty period accompanied by proof of purchase. Copytrax DISCLAIMS ALL IMPLIED WARRANTIES ON THE PRODUCT, INCLUDING WITHOUT LIMITATION WARRANTIES OF MERCHANTABILITY, PERFORMANCE AND FITNESS FOR A PARTICULAR PURPOSE. Copytrax WILL NOT BE LIABLE FOR ANY BUG, ERROR, OMISSION, DEFECT, DEFICIENCY, OR NONCONFORMITY IN ITS HARDWARE. AS A RESULT THE HARDWARE IS SOLD “AS IS” AND THE PURCHASER ASSUMES THE ENTIRE RISK AS TO ITS QUALITY AND PERFORMANCE. Copytrax SHALL IN NO EVENT BE LIABLE FOR DIRECT, INDIRECT, SPECIAL, INCIDENTAL, CONTINGENT OR CONSEQUENTIAL DAMAGES RESULTING FROM ANY DEFECT IN THE HARDWARE OR ITS DOCUMENTATION INCLUDING DAMAGES FROM LOSS OF DATA, EVEN IF Copytrax OR AN AUTHORIZED Copytrax DEALER HAS BEEN ADVISED OF THE POSSIBILITY OF SUCH DAMAGES YOU AGREE THAT Copytrax’s LIABILITY ARISING OUT OF CONTRACT, NEGLIGENCE, STRICT LIABILITY OR TORT OR WARRANTY SHALL NOT EXCEED ANY AMOUNTS PAID BY YOU FOR THIS PRODUCT. any written or oral information or advice given by Copytrax dealers, distributers, agents or employees will in no way increase the scope of this warranty. Nor may you rely on such oral or written communication. Some states do not allow the exclusion or limitation of implied warranties or liability for incidental or consequential damages, so the above limitation or exclusion may not apply to you. This warranty gives you specific legal rights, and you may also have other rights which vary from state to state. For support tel. UK: 0844 815 6225 Intl: +44 1954 212200 e-mail: [email protected] Copytrax Technologies UK Ltd. 35 Dry Drayton Industries Scotland Road Dry Drayton Cambridge Cambridgeshire. CB23 8AT United Kingdom. Telephone UK: 0844 815 6225 International: +44 1954 212200 Fax UK: 01954 211950 International: +44 1954 211950 Web www.copytrax.com e-mail [email protected] Registered No. 6691594 VAT No. GB938 6097 79 92