1
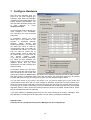
www.terra.cz
[email protected]
Disc Manager
Software for handling of duplicators
User Manual
Content
Content ....................................................................................................................................... 1
1
Installation .......................................................................................................................... 2
1.1
Starting ....................................................................................................................... 2
1.2
Removing Disc Manager............................................................................................ 2
1.3
Minimal System Requirements .................................................................................. 2
2
Software License Agreement ............................................................................................. 3
2.1
Copyright.................................................................................................................... 3
2.2
License ....................................................................................................................... 3
2.3
Copy Restrictions ....................................................................................................... 3
2.4
Term ........................................................................................................................... 3
2.5
Limited Warranty ....................................................................................................... 3
2.6
No Liability for Consequential Damages................................................................... 4
2.7
Miscellaneous............................................................................................................. 4
3
Menu................................................................................................................................... 5
3.1
Menu Structure........................................................................................................... 5
3.2
Toolbar ....................................................................................................................... 7
4
Menu File ........................................................................................................................... 8
4.1
Job Scheduler ............................................................................................................. 8
4.2
Job Editor ................................................................................................................. 10
4.3
Device Status............................................................................................................ 13
4.4
Read Image............................................................................................................... 14
5
Create a Job ...................................................................................................................... 15
6
Control the Duplication Process....................................................................................... 18
7
Configure Hardware......................................................................................................... 19
8
Advanced functions.......................................................................................................... 20
8.1
Network.................................................................................................................... 20
8.2
Error Reporting ........................................................................................................ 20
8.3
Serialization Printing................................................................................................ 21
8.4
ARC - Advanced Recording Control ....................................................................... 22
8.5
Read Discs................................................................................................................ 24
9
Disc Xpress ...................................................................................................................... 25
Appendix .................................................................................................................................. 27
1
1 Installation
Put the Gamma Disc into your CD/DVD drive. In the directory "Software" start installation
program "setup.exe". This installation program installs whole Disc Manager package.
1.1 Starting
To start the program choose please Start/Programs/Disc Manager/Disc Manager. You may
also click to Disc Manager icon on the desktop. After start you have to register the Disc
Manager. Type your name, company and licence key. You can also start Disc Manager as trial
version, but in this demo mode the Disc Manager has some restrictions - only for 2 recorders,
without printer and runs only 30 days.
Now after start you have to configure your hardware (see chapter Configure Hardware).
Important caution
It is important to be sure, that after installation the Autorun function is switched off to prevent
possible start of programs from discs inserting during duplication process in the recorders.
Use register editor regedit.exe and find the key
HKEY_LOCAL_MACHINE SYSTEM/Current control set/Services/Cdrom
Check and event. change the value of Autorun to 0.For this you have to have admin rights.
Than restart the computer that the changes are accepted from operating system.
1.2 Removing Disc Manager
Uninstall program removes installed Disc Manager application and all its components from
hard disc. To remove the Disc Manager software from your computer choose
Start/Programs/Disc Manager/Uninstall
1.3 Minimal System Requirements
For 2 recorders:
- Microsoft Window 2000, NT 4.0 or XP
- Pentium 1GHz or higher
- 256MB RAM or more
- FireWire controller
- COM port
- High colour monitor (min. 1024x768 pixels)
- Full installation needs 50MB HD space
2
For 4 recorders:
- Microsoft Window 2000, NT 4.0 or XP
- Pentium 1.6GHz or higher
- 512MB RAM or more
- Raid0 disc array controller
- 2 FireWire controllers
- COM port
- High colour monitor (min. 1024x768 pixels)
- Full installation needs 50MB HD space
2 Software License Agreement
This document is a legal agreement between you and TERRA computer systems. Please read
this agreement carefully before opening the sealed disc pack. By opening this sealed disc
pack, you accept the term of this agreement. If you do not agree to the term of this agreement,
promptly return the unopened sealed disc pack including written materials and binders or
other containers to the place of purchase for a full refund.
2.1 Copyright
The software program (the "Software") is owned by TERRA computer systems
2.2 License
TERRA computer systems grants you rights to use the software on a single user computer, or
a single terminal or workstation of a multi-user computer or local area network. A separate
license must be obtained from TERRA computer systems for every other terminal or
workstation on a multi-user computer or local area network.
2.3 Copy Restrictions
This software and the accompanying written materials are copyright and property of TERRA
computer systems. You may make one copy of the software for back up or archival purpose.
All the other copies are strictly are strictly forbidden.
You may not de-compile, reverse engineer, copy, transfer, or otherwise use the software
except as expressly stated in this agreement.
2.4 Term
This license is effective until terminated. You may terminate this license at any time by
destroying all copies of the software. This license will terminate automatically, without notice
from TERRA computer systems, if you fail to comply with this agreement. Upon such
termination, you shall destroy all copies of the software.
2.5 Limited Warranty
TERRA computer systems warrants that the origin disc are free from defects in material and
workmanship, assuming normal use, for a period of ninety (90) days from the date of
purchase. If a defect occurs during this time, you may return your faulty disc to TERRA
computer systems, along with a dated proof of purchase, and it will be replaced free of charge.
3
2.6 No Liability for Consequential Damages
In no event shall TERRA computer systems be liable for any damages, including any loss of
profit, or other incidental, or consequential damages. Arising out of your use or inability to
use the software or written materials, even if TERRA computer systems had have been
advised exclusion or limitation of liability for limitation may not apply to you.
2.7 Miscellaneous
This agreement is governed by the laws of the Czech Republic.
If any provision of this agreement shall be unlawful, void or for any reason unenforceable,
then that provision shall be deemed severed from this agreement and shall not affect the
validity or enforceability of the remaining provisions of this agreement. This agreement is the
complete statement of the agreement and supersedes any proposal or prior communications
between us relating to the subject matter of this agreement.
If you have any question regarding this agreement, you may contact as below:
TERRA computer systems Ltd.
Olomoucka 81
627 00 Brno
Czech Republic
Europe
Phone: +420.548.423.811
Fax: +420.548.423.810
http://www.terra.cz
[email protected]
4
3 Menu
3.1 Menu Structure
File
Job Scheduler - shows Job Scheduler window for controlling the recording process on a
PC
Job Editor - shows Job Editor window for creating, deleting and editing duplication jobs
Device Status - shows window with status of connected devices
Read Image - displays dialog for reading image of the whole CD or DVD disc
Disc Xpress - runs program Disc Xpress for creation of CD or DVD images
Label Designer - runs Label Designer. This software is for designing CD and DVD print
labels
Exit - quits Disc Manager
Job Scheduler
Duplication Mode - Disc Manager can duplicate
Read Discs Mode - Disc Manager can only read
Add New Job - add new job into Job Scheduler
Delete Job - delete selected job from the Job Scheduler
Edit Job - changes number of copies of the selected job
Copy Job - does the copy of selected job
Increase Priority - moves job higher in Job Scheduler to increase its priority
Decrease Priority - moves job lower to decrease its priority
Load Scheduled Jobs - load state of Job Scheduler stored on hard disc
Run
Start - runs duplication process. It starts all scheduled jobs from Job Scheduler window
Stop - stops duplication process after finishing already started discs. Recording of already
begun disc will be not interrupted
Abort - stops duplication process as soon as possible. If disc is recording it will destroy
this disc.
Reset Autoloader - this is for calibration loader for its default position
Reset Bin Positions - loader will forget levels in each of bins and set these levels to
default values.
Network
Enable Server - enables server for controlling Disc Manager via network
Clients List - shows connected clients
Setup
Hardware settings - settings of your autoloader, recorders and printer
Ordering discs in output bins - according to the finished jobs
ARC - Advanced Recording control – tool for automatic duplication from directory
Registration - shows registration dialog for insertion the licence key and owners data
5
Analyse
CD Test - this runs PlexTools application if you have it installed in your computer
CD Analyse - this is for analysis of your CD
DVD Analyse - this is for analysis of your CD
Reporting
Settings - setting for sending notification through emails
Email Notification - enable or disable email notification
Send Service Info - sends service logs of Disc Manager to software support
Export Service Info - creates c\service.zip file with all service logs
Language
This menu is for switching between several languages
View
View Toolbar - this shows/hides toolbar
View Statusbar - this shows/hides status bar
View Title Screen - this enables/disables displaying of title splash screen
Window
This menu is for switching between windows in Disc Manager
Help
Help Topics - shows this help
TERRA Home Page - opens website of the company TERRA computer systems
About - shows dialog about Disc Manager application
6
3.2 Toolbar
Job Scheduler - shows Job Scheduler window for controlling the recording process on a PC
Job Editor - shows Job Editor window for creating, deleting and editing duplication jobs
Device Status - shows windows with status of connected devices
Start - runs duplication process. It starts all scheduled jobs from Job Scheduler window
Stop - stops duplication process after finishing already started discs. Recording of already
begun disc will not be interrupted
Abort - stops duplication process as soon as possible. If disc is recording it will destroy this
disc.
Read Image - displays dialog for reading image of the whole CD or DVD disc
7
Disc Xpress - runs program Disc Xpress for creation of CD or DVD images
Label Designer - runs Label Designer. This software is for designing CD and DVD print
labels. This software is for designing CD and DVD print labels. Description you will find in
the Label Designer User Manual.
Help - shows this help
About - shows dialog about Disc Manager application
4 Menu File
4.1 Job Scheduler
Job Scheduler is main window of the Disc Manager. It shows scheduled jobs. On the right side of the
window there are buttons for scheduling.
Read Discs
You can add predefined job (Add button), delete selected job (Delete button) or edit number of copies
of the selected job (Edit button). With Copy button you can do the copy of selected job. Two buttons
at the bottom are for control order of scheduled jobs. You can move selected job up or down and say
which one will be executed first.
After click Start button from the toolbar or after choose menu item Run/Start, the Disc Manager will
control automatic loader to perform producing scheduled discs according to the given jobs until all jobs
have been done or the user stops the process. A job is done when all discs have been produced.
8
There are several sections in the Job Scheduler. Job No. section is for identification job, this number
is created automatically by Disc Manager. In Job Name section you can see name of the job. Copies
shows total quantity of discs for duplication, Complete shows quantity and percentage amount of
finished discs and Bad shows number of bad discs.
In Attributes section there you can see following parameters:
E
R
Rs
V
P
Ps
B
W
erase rewriteable media
recording
simulation recording
verification
printing
simulation printing
print before recording
wait for previous job
Tip:
If you move cursor over some job then tool tip with description of job will be shown.
The following dialog window will be displayed if you click Add or Edit button. Here you can select one
of the predefined jobs and then set recording speed and number of copies you want to produce.
Tip:
During the duplication process the Disc Manager automatically saves state of Job Scheduler. So if
there is some problem with Disc Manager or with computer or hardware there is possibility to load
scheduled jobs after new start of Disc Manager from menu Job Scheduler/Load Scheduled Jobs.
9
4.2 Job Editor
What is a Job. An order for Disc Manager to record a number of identical discs is called a job. You can
define all specifications needed to do the job in Job Editor. In Job Editor you can see list of defined
jobs. At the bottom of this window there are four buttons.
For add new job to the list of jobs, for delete selected job from the list and for edit job properties. Last
button is for close Job Editor window.
In Attributes section there you can see following parameters:
E
erase rewriteable media
R
recording
Rs simulation recording
V
verification
P
printing
Ps
simulation printing
B
print before recording
W
wait for previous job
If you choose Add button for create new job or Edit button for editing the existing job then you can
see following dialog window. Here you can set, if the job consists of the recording, of the printing and
of the erasing. In Job Name bookmark there you can set name of the job, its description and also you
can check parameter if the job will wait for finishing previous job.
10
The Recording bookmark is for enable or disable recording. Additional parameters for recording are
activation of Burn Proof mechanism and speed of burning. If you check "Erase recordable discs", the
discs will be erased before recording. You can also define jobs only for erasing the discs.
If you choose printing and recording job, you can set also classic order of doing job (record and then
print) or print before recording method.
11
The following option Bin Setup will be enabled only if you have your autoloader configured with
individual control of its bin. Then you can set which hopper is for your job input and which is output.
For rotation discs to the index mark you need special rotation head on your autoloader and it must be
also configured in configuration dialog. If you have this you can select offset of rotation for all discs in
your job.
12
Note:
Maximal recording speed isn’t restricted. But TERRA computer systems company recommends to all
their customers maximal speed 32x for data and 16x for audio. This is because of many incidents of
destroy CD during the full speed recording on fast drives (48x and 52x) and because of quality of
recorded discs.
If you set some speed and CD or DVD is recorded by lower speed, it can be caused by insensitivity of
your media and your recorder.
4.3 Device Status
This window displays status of the connected devices. It shows status of the autoloader and its
version, status and progress of the each recorders and status of the connected printer. At the bottom
of this window you can see quantity of good and bad discs done from the start of Disc Manager and
total quantity of good and bad discs during whole being of the Disc Manager.
For show this window you can click at the Device Status button on the toolbar or you can see it by
clicking on the menu File/Device Status.
13
Tip:
If you have ODP100 or ODP200 printer and if you move mouse cursor over the Printer label, you can
see ink-level for black/photo and for colour cartridge.
4.4 Read Image
For creating new job with recording, you will need image file of original disc for duplication. The easiest
way how to get this image is through the function Read Image. For open following window you can
click the menu File/Read Image or button Read Image from the toolbar.
In this dialog there is necessary to choose name of the image file with path to store it onto hard disc.
Then you have to choose drive in which is original CD or DVD inserted. There are two possibilities.
14
Either you can choose some drive configured with autoloader (and then the loader will be used for
loading and unloading disc) or you can choose some other CD/DVD drive that is installed in your
computer (and you will be ask to insert disc manually). Additional parameter is speed of reading. If you
have set all these things you can click Start button to begin reading process.
5 Create a Job
If you want create new job you have to prepare needed images. For recording you will need ISO or
NRG image and for printing you will need PRN image file.
The easiest way how to create NRG image is with function Read Image from the toolbar Second
possibility how to create ISO or NRG image for recording discs is The PRN file you can create in Label
Designer. Open this application by clicking on the menu File/Label Designer or by clicking on the
Label Designer button from the toolbar. The way how to create PRN file in this application is
following. Design your label, then select File/Print and then select "Print to file" in print dialog. After
clicking OK button the program ask you for name of PRN printer file. For further information see the
Label Designer help file.
Now you have the needed images prepared, so you can open Job Editor by clicking on the menu
File/Job Editor or by clicking on the Job Editor button from the toolbar. Then there appears Job
Editor window
So, click Add button for creating a new job. You will see following dialog. Here you set name of the
job, its description and choose type of your job - recording, printing, recording and printing, print before
recording and optionally erasing the rewriteable discs and other properties. In this case you will need
previously created images.
15
16
17
6 Control the Duplication Process
The production process is controlled by the Start, Stop and Abort buttons from the toolbar or from
menu Run/Start, Run/Stop and Run/Abort
Start button or menu Run/Start starts production discs according to jobs scheduled in Job Scheduler
window. It runs until all jobs have been done or the user stops this process.
Note:
Don’t manipulate with CD or DVD in input and output bins during the duplication process. Autoloader
remembers number of discs and positions where it picks last disc. And if you take some disc from the
output bin during work the autoloader cannot find out new proper position.
If you want to reset these bin positions, go in menu Run/Reset Bin Positions.
Stop button or menu Run/Stop is for interrupt production process. This function does not destroy any
disc, because duplication process is stopped after already begun CD or DVD.
Abort button or menu Run/Abort stops duplication process as soon as possible. If there are discs in
the recorders and burning is proceeded, then these discs are destroyed and put into reject bin. This
function stops the production process immediately.
18
7 Configure Hardware
First the most important thing you
have to do you must configure your
hardware. After start Disc Manager
is displayed configuration dialog (see
below) window automatically. You
can also open this dialog during work
in
Disc
Manager
in
menu
Setup/Preferences.
There are three types of devices you
must configure. Your autoloader,
your recorders you have connected
and printer.
In autoloader section you must
select type of your loader. At this
moment is supported Gamma,
Samurai,
Delta,
Shuttle
and
Producer autoloader. You must also
set serial port which is used for
communication with your loader. By
"Autoloader Bin Mode" you choice
how you want to control use of
loader hoppers. There is also item
for rotation discs to index mark by
use
special
rotation
head.
If you uncheck "Enable autoloader"
you switch the Disc Manager into
manual mode. In manual mode is
disabled printer and you have
allowed jobs only with recording and
without printing.
In recorders section you can select
how many recorders you will use and
which of this will you use. At the right
side of each recorder is Check button. This button is for checking if selected recorder is really recorder
with right position in duplicator tower. After click this button the application ejects tray of selected
recorder and closes this tray and user have to check if it was recorder in right position.
You can also choose if you want to use printer. If so, you have to select type of your printer and
correspondent printer drive that you have installed in Windows. Construction of some printers don’t
allow you to print during autoloader movement, because their tray goes out of printer during printing.
For these type of printer is necessary to set "The autoloader has to wait for printer tray" (for example
Signature printers). Other printers are printing inside the printer so the loader needn’t wait for printer
tray (for example ODP100 and ODP200).
If you have ODP100 or ODP200 printer then you can check monitoring ink levels in cartridges. Then
Disc Manager is checking this level and if there is no ink, warning message will displayed.
Important note:
If this will not be configured correctly, Disc Manager will not work properly!
19
8 Advanced functions
8.1 Network
Disc Manager can be controlled externally (for example Disc Manager NET Client and other special
applications) via TCP/IP network protocol. This function must be allowed by licence key that releases
using of network for remote controlling (if you have allowed it you can see the name of application
Disc Manager NET Server).
The menu Network/Enable Server is for enable or disable communication through the network. If you
have enabled server then this menu is checked and Start button on toolbar is with NET label:
Then you can connect to Disc Manager from remote computer by application that is able to
communicate with Disc Manager NET Server. If you have no job in Job Scheduler and click Start
button, then Job Scheduler will go into „waiting mode" - Disc Manager is waiting for jobs and if some
job comes then it is started immediately. After finishing all jobs the Job Scheduler will stay in „waiting
mode". If you need to leave „waiting mode" you have to click Stop button.
If you have server disabled then Start button is without NET label:
Now Disc Manager isn’t able to communicate via network. And if you click Start button all scheduled
jobs from Job Scheduler is performed and then for new duplication cycle Disc Manager waits again for
click on Start button.
8.2 Error Reporting
This function is useful if you
don’t want to watch Disc
Manager during all duplication
process. You can set email
notification and then if Disc
Manager has some problem,
email or SMS with this
problem is sent to you. The
following dialog with setting
can be displayed by clicking
on
the
menu
Reporting/Settings.
20
There is necessary to fill in Local Email Setting. These values is for connecting on your email server
account (this values are the same as for example in Outlook Express). Then you can select what kind
of notification should Disc Manager reports. And finally address and subject where the emails will be
sent. With Check button you can check if you set all correctly (it tries to send example email). If so,
you have to confirm it by clicking Ok button.
If you have set all parameters then you can enable email notification by clicking the menu
Reporting/Email Notification.
Note:
In some countries and with some mobile operators there is possibility to fill in right parameters for
sending notifications as SMS to your mobile phone.
8.3 Serialization Printing
Disc Manager allows you to print two types of file. Either PRN file or DML file. Second one is file
created by Label Designer (DML = Disc Manager Label) and in this application there is possibility to
define serialization printing for serial numbers, barcodes and merge fields (auto incremental values for
each copy of the disc).
For this you need appropriate licence key (like for network communication) which allow you to use
serialization in Disc Manager and Label Designer.
So, if you define the serialization in Label Designer for some serial code or barcode or merge field,
then if you create job with printing of this DML file, you will produce discs with unique label for each
disc.
Note:
This function works in jobs that are defined as „printing jobs" or „record and print jobs". It doesn’t work
in jobs defined as „print before recording jobs".
21
8.4 ARC - Advanced Recording Control
Advance Recording Control is easy and powerful tool for automation of the recording and backup
processes in network environments. ARC makes you possibility to record CD or DVD from various
computers in the local network without installing any special software.
The principle is very easy. There is some directory (shared network directory) defined by user which is
permanently monitored by ARC function. When there are some data and these data are not changed
during monitoring, the ARC interprets these data as prepared for recording. Then the job is created
and inserted into Job Scheduler.
For open ARC dialog window you have to click the menu Setup/ARC - Advanced Recording
Control. By clicking it the following window is shown.
The General Parameters bookmark is for setting main parameters of ARC function. ARC Directory is
directory which is monitored by this function. It is usually some shared network directory. In ARC
Method section you can select from 3 various methods:
- Image Based: if some image is detected by ARC in monitored directory, this image will be
recorded by Disc Manager
- File Based: the ARC directory is monitored as a whole and if data inside is not changed,
image from this data is created and then recorded
- Directory Based: in the ARC directory there is collection of several subdirectories and each is
monitored separately
Latency time defines time interval between monitoring ARC directory.
22
Next bookmark Additional Conditions specifies other conditions for creating job. There is condition
for file which has to exist, for minimum size of data in ARC directory and time conditions:
Last bookmark Job Settings is for definition job parameters.
If you have all ARC parameters defined you can run ARC function by clicking Enable button. Then
indicator in the right top corner gets green and it indicates that ARC is running. Also in status bar in
main window of the Disc Manager there is indicator that ARC is running. Disable button is for stopping
ARC function.
23
8.5 Read Discs
With this function you can easily read your data CD or DVD discs and store them onto your hard disc.
Content of each disc is stored into individual subdirectory of directory you will define for storing read
discs. This function must be allowed by licence key that releases you switching between duplication
and read discs mode in Job Scheduler.
By clicking Read Discs button, the Job Schedulers switches into mode for reading discs and following
setting dialog for this is displayed.
Here you have to set the directory, where read discs will be stored. And you can set if there will be
logged copied and also not-copied files in the log file. This log file is stored in the directory that you
have defined for storing the discs. You have open this setting dialog by clicking Settings button in Job
Scheduler.
Now, if you click Start button or click the menu Run/Start, reading process will start.
Whole process runs as long as there are discs in input bin. If it gets empty, reading process will finish.
24
9 Disc Xpress
Disc Xpress is program for creation data CD and DVD. You can start this program from desktop or
from the Disc Manager tool bar. After start appears dialog window in which you can choose type of
compilation, disc name, file system and set the output image file.
Click on OK confirms the settings.
Now opens the main Disc Xpress window.
25
On the right side is the structure as the tree in Windows and also the work with folders and files is the
same. You can choose the folders and files with mouse or buttons Shift and Ctrl.
The chosen files you drag and drop to the left side of window.
On the bottom of window you will see the amount of data on the disc.
26
Appendix
Error States
Examples of some errors
There are no discs in input bin, so
autoloader reports it can’t find CD at
this position. You have now 2
possibilities. Refill input bin with
empty discs and try it again or you
can also put disc in appropriate
recorder manually. If you check
„Abort the duplication process", it
will work like if you click Stop button
from toolbar after solving this error.
There is some hardware problem
with the printer. Printer doesn’t
communicate with autoloader. It’s
very difficult to decide what
happened so there is only one
possibility – to do it manually.
Printer reports low ink-level. In this
case you can change appropriate
cartridge or you can try to print some
next copies with the current
cartridge (without ink level warning).
Usually there is some extra ink
although printer reports that there is
no ink. So you have possibility to
print 1, 2, 5 or 10 next copies with
this cartridge.
27
List of all errors
For Gamma, Delta, Samurai, DiscJet and Shuttle autoloaders:
status
0
1
2
3
4
5
6
7
8
9
A
B
C
D
E
F
G
H
I
J
K
L
M
N
S
T
U
V
W
description
low ink-level in printer
invalid command parameter
no disc at the position
wrong position parameter - the source or destination position doesn’t exist
right margin reached
left margin reached
lifter blocked - can’t go top
lifter blocked - can’t go down
init error - cannot initialise the loader
can’t pick disc
moving error
timeout error
ERR_UNLOAD (not in Gamma series)
ERR_END_BIN (not in Gamma series)
power up initialisation error
disc lost
ERR_POSITION (not in Gamma series)
rotate CD error (rotation head is not yet implemented)
reject bin is full
drive error (can’t open or close)
printer error (can’t open or close)
reserved
disc not put (some problem with gripper)
door open (not in Gamma series)
rotator head not present (while trying to use rotation)
rotator bus is blocked
communication with rotator failed (can’t establish connection)
communication with rotator lost (during transfer)
rotator is not responding
For Producer autoloader:
status
0
1
2
4
9
A
B
C
D
F
description
low ink-level in printer
loader jammed
input hopper empty
command sequence error
disk stuck
output hopper full
door open
hopper not correctly inserted
reject hopper full
unknown error
28