1
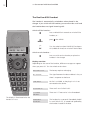
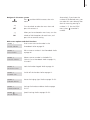
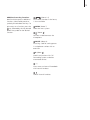
BeoCom 6000
Guide
Before you start…
This Guide contains instructions in how to use the BeoCom 6000
handset with either a BeoLine ISDN, a BeoLine PSTN or a
BeoCom 6000 base.
ISDN or PSTN?
ISDN and PSTN are two different telephone line networks. PSTN (Public
Switched Telephone Network) is the most comon network. ISDN
(Integrated Services Digital Network) is a network which, for example,
allows you to send and receive data digitally over the telephone line from
an Internet service provider during a telephone call on the same line.
BeoCom 6000 is compatible with both PSTN and ISDN.
How to use this Guide
Use this Key to identify what a button or status display looks like in an
instruction sequence.
Keys on the handset:
The wheel
OK
The key in the middle of the wheel
The phone key, which starts or ends a call
0–9
The digit keys
The standby key, which gives access to additional
functions
The handset display:
00:SET CLOCK?
00:00 1.JAN
3
4
Contents
Get started with BeoCom 6000, 6
Find out how to register BeoCom 6000 to a base, name the
handset, set the time and date, charge the handset battery,
interpret the indicator lights on the handset and base, use the
handset keys and navigate using the menu system and the handset
display. The chapter also contains information about maintenance
of BeoCom 6000 and accessories available from your Bang &
Olufsen retailer.
Daily use, 18
Find out how to make and answer calls, adjust the handset volume,
make calls from the Phonebook, Caller ID and Redial lists, store a
number in the Phonebook after a call, lock the handset keypad,
and use Call Waiting.
Advanced operations, 25
Find out how to enter, edit and delete names and numbers in the
Phonebook, store numbers from the Redial and Caller ID lists, call
and store extension numbers, and adjust the volume level of some
Bang & Olufsen audio or video products.
System use with several handsets, 32
Find out how to make a handset personal or common, call another
handset, forward external calls and make a three-party call.
If you have a BeoLine ISDN base…, 37
Find out about ISDN services and functions specific to the
BeoLine ISDN base: Multiple Subscriber Numbers (MSN), Call
Forwarding (CFU), Withheld Number (CLIR and COLR), Call Waiting,
Terminal Portability (TP) and Three-party call.
5
Preference settings, 48
Find out how to register a handset to a base manually, choose a
base, change the PIN code for the base, and cancel the registration
of a handset to a base. The chapter also includes an overview of
the Handset/Base, Ringer and Setup menus.
For your information…, 54
This chapter contains technical data for the BeoCom 6000, an
overview of display messages, a troubleshooting section, special
information about your BeoCom 6000 and a description of the
conditions under which the product guarantee applies.
Index, 61
Find the specific subject you want to know more about.
Get started with BeoCom 6000
6
Base indicator light
Button
The BeoCom 6000 base. The PARK
number identifying the base is
visible on the bottom. Check this
number against the number in the
handset display.
First-time registration of the handset to a base
In order for the base and the handset to communicate, the handset
must be registered to the base. Up to 6 handsets can be registered
to one base, and each handset can be registered to up to 4 bases.
To register a handset, follow the procedure corresponding to the
type of base you have:
If you have a BeoCom 6000 base…
Press and hold the button on the base for two
seconds. The indicator light flashes red, and the
base is ready for registration for five minutes
Press to switch on the handset
REGISTER BASE?
OK
BASE 01/01
36-000077123456
Press to be able to register the handset.
REGISTER BASE? is shown in the display
Press to continue. The handset searches for an
open base
When a base is located, the PARK number
identifying the base is shown. Check the number
against the number on the bottom of the base
If the numbers do not match, turn the wheel to
view the available bases. If the desired base is
not shown, open the base for registration once
more and repeat the procedure. Otherwise…
OK
0–9
OK
Press to register the handset to the base
If the base prompts you for a PIN code, enter the
PIN code and press OK. The display tells you
when registration is complete
7
If you have a BeoLine PSTN base…
> Ensure that the base and the charger are connected to the mains.
> Press and hold the button on the back of the base for at least four
seconds. The base is now open for registration for five minutes.
> If you are registering your first handset to this base, place the handset
in the charger. Registration occurs automatically, and you can then
name the handset, as described on page 9.
If you have previously registered handsets to this base…
Press to switch on the handset
REGISTER BASE?
OK
BASE 01/01
36-000077123456
Press to be able to register the handset.
REGISTER BASE? is shown in the display
Press to continue. The handset searches for an
open base
When a base is located, the PARK number
identifying the base is shown. Check the number
against the number on the back of the base
If the numbers do not match, turn the wheel to
view the available bases. If the desired base is
not shown, open the base for registration once
more and repeat the procedure. Otherwise…
OK
0–9
OK
Press to register the handset to the base
If the base prompts you for a PIN code, enter the
PIN code and press OK. The display tells you
when registration is complete
Button
The BeoLine PSTN base. The PARK
number identifying the base is
visible on the back. Check this
number against the number in the
handset display.
If you have registered a handset to
more than one base, you must
select which base you want to use.
Refer to page 48 for further
information.
You can not edit in common
Phonebook, Caller ID or Redial lists
if you register a common handset
to more than one base. Set your
handset to ‘personal’ if you intend
to register it to more than one
base. Refer to page 34 for further
information.
>> Get started with BeoCom 6000
8
If you have a BeoLine ISDN base…
> If you are registering your first handset to this base, ensure that the
base and the charger are connected to the mains.
> Place your handset in the charger. Registration occurs automatically,
and you can then name the handset, as described on page 9.
Indicator light
The BeoLine ISDN base. The PARK
number identifying the base is
visible on the back. Check this
number against the number in the
handset display.
If you have registered a handset to
more than one base, you must
select which base you want to use.
Refer to page 48 for further
information.
You can not edit in common
Phonebook, Caller ID or Redial lists
if you register a common handset
to more than one base. Set your
handset to ‘personal’ if you want
to be able to register it to more
than one base. Refer to page 34
for further information
If you have previously registered handsets to this base…
Disconnect the base from the mains for two
seconds and then reconnect it. The indicator
light flashes, and the base is open for registration
for five minutes
Press to switch on the handset
REGISTER BASE?
OK
BASE 01/01
36-000077123456
Press to be able to register the handset.
REGISTER BASE? is shown in the display
Press to continue. The handset searches for an
open base
When a base is located, the PARK number
identifying the base is shown. Check the number
against the number on the base
If the numbers do not match, turn the wheel to
view the available bases. If the desired base is
not shown, open the base for registration once
more and repeat the procedure. Otherwise…
OK
0–9
OK
Press to register the handset to the base
If the base prompts you for a PIN code, enter the
PIN code and press OK. The display tells you
when registration is complete
9
Name the handset
When registration is complete, the display prompts you to name
the handset and set the clock. You can enter these settings at a
later date, if you wish.
You can name the handset after the room in which it is placed, or after
the person using it. If you do not wish to name the handset, press C.
You can then set the clock, as described on the following page.
ENTER NAME
OK
ENTER NAME is shown
Press to be able to enter a name
<&-./ ABCDEFGH>
ENTER NAME:_
Turn the wheel to select characters
OK
Press to store the selected character
Finish ‘typing’ the name…
STORE NAME
OK
LIVING ROOM
STORED
Turn the wheel to move the cursor under the
symbol. STORE NAME? appears in the display
Press to store the name
The naming function is also
accessible via the HANDSET/BASE
menu, and the clock function is
accessible via the SETUP menu.
Please refer to pages 52–53 for
further information.
>> Get started with BeoCom 6000
10
Set the time and date
Some telephone companies provide
a service that sets the clock
automatically the first time you
make and complete a call. The
service also ensures that the clock
is always updated. If your
telephone company does not offer
this service, you can set the clock
as described on pages 52–53.
The handset controls battery
charging, so you can always place
the handset in the charger after
use, even if the battery does not
need recharging. Leaving the
handset in the charger does not
reduce the lifetime of the battery.
The handset display and a beep
signal will inform you when the
batteries require charging. Please
refer to page 17 for further
information.
After you name the handset, the display prompts you to set the
time and date. The time is shown when the phone is not in use and
when there is no new information in the display. Time and date are
also shown with Caller ID and Redial information.
SET CLOCK?
SET CLOCK? is shown
00:00 1.JAN
OK
Press to be able to set the clock
Turn the wheel to set the hour
OK
Press to store and move to the next space
Complete the setting of the clock…
OK
Press to store the time and date
OK
Turn the wheel to set the year and press OK to
store the year
Charging the handset battery
When the handset is placed in the charger, the battery is charged if
necessary. For safety reasons, the battery is not charged when
packed, so you must charge the battery for at least 20 minutes
before using the phone.
About charging…
– The charger must be connected to the mains.
– It takes four hours to fully charge the battery.
– Talk-time per charge is approximately eight hours.
– Standby time per charge is approximately 80 hours.
11
Phone feedback – indicator lights
Indicator light
Indicator light on the BeoCom 6000 base
The two-colour indicator light on the base lights up in:
Green… The base is on and the handset is placed correctly for charging.
Red… Charging impossible. Place the handset correctly in the charger.
Red flashes… The base is open for registration of handsets.
Indicator light on the BeoLine ISDN base
The light is located at the back and lights up in:
Red… The base works normally.
Slow flashes… The base is ready for registration of handsets.
Quick flashes… The connection is faulty.
Indicator light on the handset
The indicator light flashes red when…
– The phone rings
– Unanswered Caller IDs are registered
– No line is available
– The base is not connected to the power supply and the signal between
the handset and the base is lost
– The handset is out of range of the base
Find out why the handset indicator light is flashing…
Press to open the display
OK
Turn the wheel to see the relevant causes one by
one
Indicator light
Indicator
light
You can turn off the handset
indicator light, or alert signal. Refer
to pages 52–53 for further
information.
>> Get started with BeoCom 6000
12
The BeoCom 6000 handset
The handset is automatically switched on when placed in the
charger. If you switch off the handset, you cannot make a call and
the handset does not signal incoming calls.
Switch off the handset…
Press and hold for 4 seconds to switch off the
handset, or…
press
then MENU
MENU
SET CLOCK
08:23 26. OCT
CALLER ID
REDIAL
PHONEBOOK
OK
Turn the wheel to select POWER OFF and press
OK (middle of wheel) to switch off the handset
Switch on the handset…
Press to switch on the handset, or place the
handset in the charger
C
A
Display overview
Depending on the state of the handset, different messages can appear
when you press OK. Turn the wheel to view them.
V
1
2
4
5
MENU
7
3
The battery requires recharging.
NO SIGNAL
The signal between handset and base is lost, or
there is no power to the base.
LINE BUSY
No line is available, or the plug-in unit is not
connected to the socket.
5 CALLER ID
There are 5 new Caller ID calls.
117 FREE
There are 117 free entries in the Phonebook.
6
PAUSE
8
BATTERY FLAT
9
R
0
ENTRIES
The display is illuminated when the
handset is in use.
PERSONAL
HANDSET
The handset has a personal Phonebook, Redial
list and Caller ID list, all stored and updated by
the handset instead of the base.
13
Navigate in the menu system
Press and then MENU to access the main
MENU
menu
OK
OK
Turn the wheel to select the menu item and
press OK to access it
When you have selected a menu item, turn the
wheel to find the options for each item, and
press OK to store the setting
Main menu options and their functions
MENU 1
Enter a new name and number in the
STORE ENTRY
Phonebook. Refer to page 25.
MENU 2
EDIT ENTRY
Edit a name or number in the Phonebook. Refer
to page 26.
DELETE ENTRY
Delete name or number in the Redial list,
Caller ID list or Phonebook. Refer to pages 22,
23 and 27.
MENU 4
Lock the handset keypad. Refer to page 19.
MENU 3
KEYPAD LOCK
MENU 5
Switch off the handset. Refer to page 12.
POWER OFF
MENU 6
Preset the ringing signal. Refer to pages 52–53.
RINGER MENU
HANDSET/BASE
Settings for handset and base. Refer to pages
52–53.
MENU
Special settings. Refer to pages 52–53.
MENU 7
SETUP MENU
Alternatively, if you know the
number of the desired menu, you
can select this menu directly from
the main menu by pressing its
number (1–7). For the SETUP
menu, press
instead of a
number.
>> Get started with BeoCom 6000
14
Handset keys
CALLER ID
Access the Caller ID list
REDIAL
Access the Redial list
SET CLOCK
08:23 26. OCT
CALLER ID
REDIAL
PHONEBOOK
C
A
V
1
2
4
5
MENU
7
PHONEBOOK
Access the Phonebook. Also used
for storing names and numbers in
the Phonebook
3
6
PAUSE
8
9
Turn the wheel to search in
Phonebook, Redial, Caller ID and
the phone’s menu system. During a
call, turn the wheel to adjust the
volume
OK (wheel middle)
Accept and store entries or choices
in the display
C
Deletes the most recent entry.
Press and hold to exit a function
R
0
Starts and ends a call
A
Adjusts the volume of Bang &
Olufsen audio systems
V
Adjusts the volume of Bang &
Olufsen video systems
Access key to the functions
illustrated above the keys. Also
used to switch the handset on or
off, as well as to lock or unlock the
keypad
0–9
Digit keys for entering telephone
numbers and selecting menus
Used in telephone numbers, for
Call Forwarding and other
automated services
15
Additional two-key functions
BeoCom 6000 contains additional
functions, identified by words or
symbols printed above the keys. To
gain access to a function, press the
key, followed by the key located
below the symbol for the desired
function:
(above 1-6)
Call another handset in the house,
1–6 are available
MENU (above 7)
Select the menu system
(above )
Connects and disconnects the
microphone
PAUSE (above 9)
Pause key, used for storing pauses
in a telephone number with an
extension
R (above )
Used in conjunction with Call
Forwarding systems and other
automated services
Gives access to internal Phonebook
with internal handsets
Calls all internal handsets
>> Get started with BeoCom 6000
16
Placement and surroundings
The phone must not be placed in damp, dusty or polluted
surroundings and should not be exposed to direct sunlight or
liquids. Avoid the handset charging contacts touching metal or
greasy parts.
Cleaning
Clean your BeoCom 6000 with a soft, damp cloth with a few drops
of mild detergent added. Clean the charging contacts of charger
and handset carefully with a cotton bud and spirit.
The following accessories are
available from your Bang & Olufsen
retailer: Extra handset, Clip, Table
charger, Wall charger.
Attaching the clip
With the clip you can attach the handset to your pocket. Attach the
clip on the back of the handset:
2
1
CLIC
B
K
CLIC
K
Attach the clip…
> Slide the two flaps down along the two grooves on the sides of the
handset.
> When the clip is positioned correctly, approx. 4.5 cm from the top of
the handset, it will click into place. Make sure the clip is firmly attached
on both sides of the handset.
Remove the clip:
> Pull the left flap (B) out to the left with a flat object.
> When the left flap is clear of the groove, pull the clip back – be careful
not to scratch the handset with the clip.
17
Battery status
The battery indicator in the display shows the capacity or talk time
left in the handset. 6 symbols are available for the battery
indicator:
You can display the battery charging status in the handset at any time by
pressing OK. If the batteries require charging, this appears automatically
in the display and the handset warns you with an audible signal.
117 FREE ENTRIES
CALLER ID
REDIAL
80% charged
60% charged
40% charged
20% charged
0% charged
Replacing the battery
Removing the battery…
> Remove the battery cover; press the cover lightly and slide it off.
> Remove the battery and pull out the battery plug.
Inserting batteries…
> Insert the battery plug (A) and place the battery and the cords as
shown.
> Replace the battery cover, make sure that the tabs and the slots snap
into place correctly at the top and bottom of the cover.
If the battery in the handset is replaced with a new battery, please follow
the instructions accompanying the new battery.
PHONEBOOK
100% charged
A
Daily use
18
Make and answer calls
To get a dial tone before entering
the number, press .
You can also make a call directly
from the Phonebook. Refer to page
21 for further information.
You can also set the phone to auto
off hook, which means that you
simply lift the handset from the
charger to answer a call. Refer to
page 52–53 for further
information.
The button on the BeoCom 6000 is used to start and end a call.
During the call, the phone displays the duration of the call and the
number or name of the person called. If you do not wish to answer
a call, you can mute the ringing signal.
Make and end calls…
0–9
Enter the telephone number
C
If you make a mistake, turn the wheel to move
the cursor to the digit in question and press C to
delete it. Otherwise…
Press to make the call. The call time is shown,
and if the name is stored in the Phonebook, this
is shown as well
Press to end the call, or place the handset in the
charger
Answer a call…
Press, wait for a beep and then answer the call
Press to end a call or place the handset in the
charger
Mute a handset’s ringing…
Press to mute the ringing signal. The indicator
light on the handset flashes until the caller hangs
up the phone
19
Lock the handset keypad
You can lock the handset keypad to avoid inadvertent key
activation when, for example, you carry the handset in a pocket.
If you lock the handset keypad, you can still answer calls, but you
have to unlock the keypad to make a call.
Alternatively, you can lock the
handset by from the SETUP menu.
Refer to pages 52–53 for further
information.
Lock the handset keypad…
Press and hold for 2 seconds to lock the keypad.
The handset beeps when locked
When you adjust the volume, you
will hear a beep from the handset
when the maximum volume level is
reached. A selected volume setting
– with the exception of maximum
volume – applies to all subsequent
calls until the next time you adjust
the volume.
Unlock the keypad…
Press to unlock. The handset beeps again
OK
Press to confirm
Volume and the microphone
During a call, you can adjust the volume level using the wheel.
You can also switch off the microphone if you do not wish the
person on the phone to overhear a conversation you are having
with a person in the room.
Turn the handset volume up or down…
Turn the wheel to adjust the handset volume
Turn the microphone on or off…
Press then
to turn off the microphone.
While the microphone is off, the handset beeps
Press
again
then
to turn on the microphone
>> Daily use
20
Store a number after a call
You can make Phonebook entries
easier to find:
MARY & ROBERT
After a call, you will be asked whether you want to store the
number in the Phonebook, if it is not already there. You can also
enter a name with the number.
B&O MICHAEL
L_JANE
After a call…
CALL TIME 00:29
– When entering couples’ names,
put first names in alphabetical
order;
– When entering names of
colleagues, put the company
name first;
– When entering the names of
childrens’ friends, start with the
child’s first initial.
STORE ENTRY?
OK
The display shows the call duration and prompts
you to store the number
Press OK to store the number and enter a name
<&-./ ABCDEFGH>
ENTER NAME:_
Turn the wheel to select the letters for the name
OK
Press OK to store the selected letter
Finish ‘typing’ the name
0–9
PHONEBOOK
STORE NAME?
OK
To include digits in an entry, press the number
keys
Press to store the name and number, or…
…turn the wheel to move the cursor under the
symbol. STORE NAME? appears
Press OK to store the name and number
21
Search the Phonebook and make a call
When the phone is not in use, you can turn the wheel to search
directly from the entire list of names in the Phonebook.
When the phone is not in use…
Turn the wheel to search through the entire
Phonebook
Press to make a call, or…
PHONEBOOK
Press to access the Phonebook
<ABCDEFGHIJKLMN
<OPQRSTUVWXYZ>
Turn the wheel to select the first letter
OK
Press to search through names beginning with
the letter you selected
Turn the wheel to search through the names
Press to make a call
To change a number before dialling…
OK
Press to be able to change a number
Turn the wheel to select a digit
C
0–9
Press to delete a digit
Enter a new digit
Press to make a call
If you change a number before you
dial, as described below, the
Phonebook entry containing the
name and number is not changed.
>> Daily use
22
Use Redial
You can store telephone numbers
from the Redial list directly in the
Phonebook. Refer to page 28.
The Redial list is common only to
handsets set up to be ‘common’.
Refer to page 34 for further
information.
To safeguard the use of service
functions, characters entered after
and
are not registered in the
Redial list.
The Redial function stores the last 24 telephone numbers you
called. In addition to the number called, you can also view the time
and date of the call. If you have entered a name in the Phonebook,
this is displayed instead of the number. Internal calls are not
registered in the Redial list.
Call from the Redial list…
REDIAL
Press to access the list
REDIAL
Press again to see the call duration, or…
…turn the wheel to select a name or number
Press to call
Delete a specific Redial number…
REDIAL
Press to access the list
Turn the wheel to select the name or number
Press
then MENU to access the main menu
MENU
OK
OK
Turn the wheel to select the DELETE ENTRY
menu and press OK to be able to delete the
selected entry
Press to delete the entry. Repeat the procedure
for each entry you wish to delete
23
Use Caller ID
The last 24 numbers you have received calls from are stored in the
Caller ID list. If the number is in the Phonebook, the name is also
shown. Identical numbers are only stored once in the list, i.e. the
most recent call. The Caller ID list shows information on who called,
the number of calls and the time the calls were received. New calls
are indicated by .
Call from the Caller ID list…
CALLER ID
Press to access the list
CALLER ID
Press again to see the number of new calls
registered, or….
…turn the wheel to select a name or number
Press to call
Delete a specific Caller ID call…
CALLER ID
Press to access the list
Turn the wheel to select the name or number
Press
then MENU to access the main menu
MENU
OK
OK
Turn the wheel to select the DELETE ENTRY
menu and press OK to be able to delete the
selected entry
Press to delete the entry. Repeat the procedure
for each entry you wish to delete
This function requires a Caller ID
subscription with your telephone
company.
You can store telephone numbers
from the Caller ID list directly in the
Phonebook. Refer to page 28 for
further information.
The Caller ID list is shared only by
handsets set up to be ‘common’.
Refer to page 34.
If Caller ID information is
unavailable, the display shows
ANONYMOUS for calls from
unlisted or withheld numbers, and
NOT POSSIBLE for calls where
Caller ID is unavailable for technical
reasons.
>> Daily use
24
Switch between two calls – Call Waiting
In order to use this function, you
need to subscribe to the Call
Waiting service.
If you receive an incoming call while you are already speaking on
the phone, a beep sounds in the handset, and the display shows
the telephone number of the caller. If the caller’s name is stored in
the Phonebook, this is shown as well. You can now place the first
call on hold and answer the new call.
Answer an incoming call during a call…
Turn the wheel until EXT HOLD & SHIFT is shown
OK
and press OK to answer the incoming call
Change between the two calls…
OK
Press to be able to change between calls
OK
Turn the wheel until EXT HOLD & SHIFT is shown
and press OK to change calls, or…
…press
then R to select the second call
R
Press
R
then R to return to the first call
Advanced operations
25
Enter a new name and number in the Phonebook
At any time, you can store a name and number in the Phonebook.
Numbers are stored once. A number can contain up to 48 digits,
and a name up to 16 characters. You can store up to 200 entries,
but the maximum number of entries in the Phonebook depends on
the length of the names and numbers you enter.
Enter a number…
Press
then MENU to access the main menu
MENU
OK
0–9
Turn the wheel to select the STORE ENTRY menu
and press OK to access the menu
Enter the telephone number
OK
Press to store the number
OK
Press to be able to enter a name
<&-./ ABCDEFGH>
ENTER NAME:_
Enter a name…
Turn the wheel to select the characters for the
name
OK
Press to store the selected character
Finish ‘typing’ the name…
PHONEBOOK
Press to store the name, or…
…turn the wheel to move the cursor under the
symbol. STORE NAME? appears
OK
Press to store the name
You can make a call directly from
the Phonebook. Refer to page 21
for further information.
You can edit and delete in the
Phonebook, but the common
Phonebook is stored in the base.
Therefore, you cannot store, delete
or edit entries if the handset is out
of range of base number 01, or not
registered to base number 01.
If you want to use another
telephone company, you have to
insert the operator code (prefix) in
front of the telephone number.
Names and numbers are common
only to all handsets set up to be
‘common’. Refer to page 34 for
further information.
>> Advanced operations
26
Edit a name or number in the Phonebook
When you have displayed a
number from the Phonebook, you
can edit it by pressing OK. Press OK
again to enter a new name for the
edited number. This entry is then
stored as a new entry in the
Phonebook.
You can edit numbers or names in the Phonebook at any time.
Delete characters or digits in reverse order, or place the cursor
under a character or digit first.
PHONEBOOK
If the handset is in use, press PHONEBOOK. If the
handset is in standby, go to the next step
Turn the wheel to select an entry
Press
then MENU to access the main menu
MENU
OK
Turn the wheel to select the EDIT ENTRY menu
and press OK
Edit a telephone name and number…
Turn the wheel to select a digit in the number
C
0–9
OK
Press to delete a digit
Enter new digits in the number
Press to store the number. You can then edit the
name
Turn the wheel to select the letters for the name
OK
C
Press to store the selected letter, or…
press to delete letters
Store the changed name…
PHONEBOOK
Press to store the name, or…
Turn the wheel to move the cursor under the
symbol. STORE NAME? appears
OK
Press to store the name
27
Delete names and numbers in the Phonebook
You can delete names and numbers stored in the Phonebook.
PHONEBOOK
If the handset is in use, press PHONEBOOK. If the
handset is in standby, go to the next step
Turn the wheel to select an entry
Press
then MENU to access the main menu
MENU
OK
JOHN BROWN
Turn the wheel to select the DELETE ENTRY
menu and press OK to be able to delete the
entry
DELETE?
OK
JOHN BROWN
DELETED
Press to delete the entry
>> Advanced operations
28
Store Redial and Caller ID numbers
Numbers which appear in the
Redial and Caller ID lists as names
or with names are already stored in
the Phonebook.
Telephone numbers from the Redial and Caller ID lists can be stored
and named in the Phonebook.
REDIAL
CALLER ID
Press REDIAL or CALLER ID. The last number in
the list is shown in the display
OK
Turn the wheel to select the desired number and
press OK to store the number in the Phonebook
OK
Press to be able to enter a name
<&-./ ABCDEFGH>
ENTER NAME:_
Turn the wheel to select characters for the name
OK
Press to store the selected character
Finish ‘typing’ the name
PHONEBOOK
Press to store the name, or…
turn the wheel to move the cursor under the
symbol. STORE NAME? appears
OK
Press to store the name
29
Adjust volume level on audio/video products
You can adjust the volume of your Bang & Olufsen audio and video
products directly from your handset. First select which sound
source, audio or video, you wish to adjust. If you have a Bang &
Olufsen BeoLink® system installed, you can also adjust the volume
in a link room.
Adjust the volume of an Audio or Video system…
A
Press A to be able to adjust audio volume level,
V
or V for video volume
Turn the wheel to turn the volume up or down
Adjust the volume of a link product…
Press
A
V
Press A or V to be able to adjust audio or video
volume level on your link room product
Turn the wheel to turn the volume up or down
VOLUME +/LINK
30
>> Advanced operations
Call and store extension numbers in the Phonebook
If you want to make a call to an extension number, a pause must be
inserted before the extension number. Store the main number, the
pause and the extension number in the Phonebook, and give the
number a name. You can then call the number from the
Phonebook.
Call an extension number directly…
0–9
Enter the main telephone number
Press to make the call
Wait for a connection…
0–9
Enter the extension number
Press to end the call
Store an extension number in the Phonebook…
0–9
Enter the main telephone number
Press
then PAUSE to insert a pause
PAUSE
0–9
OK
Enter the extension number
Press to store the entry in the Phonebook
Call an extension number from the Phonebook…
Turn the wheel to search through the entire
Phonebook
Press to make a call
WAIT FOR ENTRY
OK
Press to call the extension number
31
32
System use with several handsets
With several handsets registered to one base, you can make your
own phone system. The handsets can all receive external calls, also
during internal calls between handsets. Handsets in the system are
numbered 1–6 and can be named as well.
Each handset is initially set up as ‘common’. This means that the
Phonebook, Caller ID list and Redial list are all updated by the base
and shared with other handsets in the system. If you want an
independent Phonebook, Caller ID list and Redial list in an
individual handset, make the handset ‘personal’ instead.
For further information about the possibilities a system setup
offers, please refer to the following pages.
33
Call another handset
You can call one handset or call all handsets simultaneously. If you
call all handsets, the handset that responds first receives the call.
If you call one handset, the display shows which handset has been
called.
Call a handset…
Press to make an internal call
1–6
1: LIVING ROOM
The phone system allows up to two
internal calls and 1 external call to
take place at the same time.
There are three different ringing
signals to identify external calls,
internal calls, and internal calls to
all handsets.
Press the number of the handset, or…
Turn the wheel to search through the internal
listing of handsets. The handset number is
shown, along with any stored name
Press to call the handset
Call all handsets…
Press to make an internal call
Press to call all handsets
End a call…
Press to end a call
If you misplace a handset, you may
be able to locate it by making a call
to that handset.
34
Make a handset ‘personal’ or ‘common
If you change your handset from
‘personal’ back to ‘common’, the
personal Phonebook, Caller ID list
and Redial list are deleted, as well
as any name you have given your
handset. If you have other handsets
which have common lists, these
lists replace the personal lists that
have been deleted. Updating the
common Phonebook, Caller ID and
Redial lists takes up to five minutes.
You can set your handset to be ‘personal’ instead of ‘common’.
The Phonebook, Redial list and Caller ID list of a personal handset
are located in the handset and not the base.
Press
then MENU to access the main menu
MENU
OK
COMMON
Turn the wheel to select the HANDSET/BASE
menu and press OK to access the menu
Turn the wheel to select PERSONAL or COMMON
and press OK to store the setting
OK
COMMON
SURE?
C
OK
The display prompts you to confirm. If you
change your mind, press C to reverse the setting.
Otherwise…
Press to confirm the setting
35
Forward external calls
You can forward an external call to one handset or to all handsets.
You can speak with the person answering the internal handset, or
you can forward the external call directly. When you forward an
external call to all handsets, the call goes to the handset which
answers first.
Forward an external call…
Press to be able to make an internal call.
The external call is now on hold
Turn the wheel to select a handset
Press to call the selected handset
When the internal call is answered, press to hang
up and forward the external call to the selected
handset
Retrieve the external call if the internal call is not answered…
OK
Press again to retrieve the external call
>> System use with several handsets
36
Make a three-party call
If you have a BeoLine ISDN, a
three-party call is also possible
between one internal handset and
two external calls. Refer to page 47
for further information.
During an external call, you can call another party on an internal
handset to establish the three-party call. If one party hangs up, the
call continues with you and the remaining party. If you hang up,
the three-party call is ended.
Start a three-party call with one internal and one external party…
Press to make an internal call during an external
call
Turn the wheel to select a handset
Press to call the handset. The external call is now
on hold
OK
THREE PARTY?
Press when the internal call is answered
Turn the wheel to select THREE PARTY? and
press OK to start the three-party call
OK
Press to end the three-party call
Retrieve the external call if the internal call is not answered…
OK
Press to change to the external call on hold
If you have a BeoLine ISDN base…
37
Set up handsets for ISDN services
To set up your phone to meet your needs, consider how you want
to make use of the individual handsets, and subscribe to the
supplementary services you find most useful.
– BeoLine ISDN supports the most common ISDN Digital Select Services.
To use these services, you must first subscribe to the Multiple
Subscriber Numbering (MSN) service. MSN allows you to give your
handsets their own telephone numbers. Refer to page 38–39 for
further information.
– If you activate Call Waiting, you can receive a new call on the same
telephone number during a conversation. Refer to pages 40–41.
– If you want your handset to have its own Phonebook, Redial and Caller
ID lists, set the handset to be ‘personal’ instead of ‘common’. Refer to
page 34.
– If you want to conceal your telephone number during a call, you must
have a subscription to Withheld Number. Refer to page 45.
– If you have a subscription to Call Forwarding, you can forward external
calls to another telephone number. Refer to page 46.
If you already have a BeoCom 6000
phone system and you want to
transfer your common Phonebook
to the BeoLine 6000 ISDN base,
please contact your Bang & Olufsen
retailer for assistance.
>> If you have a BeoLine ISDN base…
38
A telephone number for each handset – MSN
MSN stands for ‘Multiple Subscriber
Numbering’.
If you have a call on a code 0
handset and have not activated
Call Waiting (see page 40), the
other handsets cannot receive calls,
and callers will hear a busy signal.
You may find this useful, as the
handsets will not ring while you are
on the phone. If you have activated
Call Waiting, the other handsets
can receive calls.
Up to four handsets can be given
one MSN number.
The MSN service allows you to give each of your handsets their own
telephone number. This can be practical if you want to know for
whom a call is meant, or if you want separate itemised bills.
When you subscribe to MSN, you must give each handset its own code:
Code 0: The handset rings regardless of which MSN number is being
called.
Code 1: The handset only rings if its own MSN number is called.
However, the handset will also ring if other handsets do not answer
their calls by the third ringing signal.
Code 2: The handset only rings if its own MSN number is called. You can
retrieve calls from other handsets by pressing and .
MSN numbers are shown in the display as Caller ID at the other end of
the line. To be able to call anonymously, refer to page 43, also if you have
a Withheld Number subscription with your telephone company.
Give a handset its own telephone number…
441
Press to activate the MSN service
0–9
Enter the relevant MSN number
Press to continue
0–2
Press 0, 1 or 2 to give a handset a code
Press to continue
Press and await a dial tone
Press again to store the setting
39
An everyday situation
A handset in the kitchen…
Set up the handset to have the main number. If you choose code 0, the
handset will always ring, no matter who the call is for.
A handset in the living room…
Set up the handset to have the main number with code 1. The living
room will only receive the calls meant for the main number. If none of
the other handsets have responded by the third ringing signal, the calls
will be transferred to the living room.
A handset in your daughter’s room…
Set up the handset to have a new MSN number and choose code 2.
That way your daughter will only receive the calls that are meant for
her. However, if one of the other handsets rings, she can answer this
call by pressing and .
The handset in the home office…
Set up the handset to have a new MSN number. Choose code 2 if you
do not want to be disturbed by private calls while you are working.
Choose code 1 if you want to answer calls not answered by the other
handsets. If you choose code 0, the handset will ring independently of
which MSN number that has been dialled.
>> If you have a BeoLine ISDN base…
40
Two calls at the same time – Call Waiting
If you do not want to be disturbed
by ringing signals from other
handsets or by a Call Waiting beep
in your handset, do not activate Call
Waiting. In this situation, a person
calling you will hear a busy tone.
To be able to receive a second call on the same telephone number
during a call, you must first activate Call Waiting. If a second party
calls during a conversation, you hear a beep in your handset, and
handsets set up to react on the specific number ring. The number
of the incoming call is shown in the display. If the name is stored in
the Phonebook, the name is shown as well.
Your choices upon receiving a call:
EXT HOLD&SHIFT… Set the active call on hold and change to the new call
EXT IGNORE… Ignore the new call and continue the active call
EXT END&SHIFT… End the active call and change to the call on hold
Your choices while a call is on hold:
EXT HOLD&SHIFT… Change between two calls
EXT END&SHIFT… End the active call and change to the call on hold
EXT CONFERENCE… Start a three-party call with the active call and the
call on hold
BeoLine ISDN is preset at the factory with Call Waiting deactivated. If you
choose to keep this setting, the other handsets can still ring during a
conversation. This happens if you have an MSN subscription and the
following two conditions apply:
– You are using a handset set to code 1 or 2, and…
– An incoming call is directed to an MSN number other than the one your
handset has.
41
Activate Call Waiting in all handsets…
Press to activate Call Waiting
351 1
Press and await a dial tone
Press to store the setting
Handle an incoming call during a call…
Turn the wheel to choose between the three
OK
possibilities described on the previous page and
press OK to enter your choice
Handle a call on hold…
Press to open the display
OK
OK
Turn the wheel to choose between the three
possibilities described on the previous page and
press OK to enter your choice
Start a three-party call…
Press to open the display
OK
OK
Turn the wheel to select EXT CONFERENCE and
press OK to start the three-party call
Deactivate Call Waiting in all handsets…
351 0
Press to deactivate Call Waiting
Press and await a dial tone
Press to store the setting
Both telephone lines are in use
during a three-party call and when
you have set a call on hold.
42
>> If you have a BeoLine ISDN base…
Suspend an active call – Terminal Portability
If you subscribe to this service, you can suspend an active call if, for
example, you wish to use another ISDN handset in another room.
You can give the call a code by which it can be identified when the
call is retrieved.
Activate Terminal Portability…
792
Press to activate Terminal Portability
0–9
Enter the identification code
Press to continue
Press and await a dial tone
Press to store the setting
Suspend a call…
Press to suspend the call with the telephone
exchange
Retrieve a suspended call…
Press to retrieve the call. The active handset
sends the preset identification code to the
exchange, and can therefore retrieve the call
Deactivate the service…
792
Press to deactivate Terminal Portability
Press to continue
Press and await a dial tone
Press to store the setting
43
Avoid interruptions – exclude a handset
If, for example, you have a handset in your home office and do not
wish to be disturbed by calls to other handsets in your phone
system, you can prevent the handset from ringing by selecting up
to two MSN numbers to be ignored by that handset. Of course,
handsets set to receive calls to these MSN numbers will still ring.
Exclude incoming calls to an MSN number…
451
Press to be able to exclude calls to an MSN
number. To exclude calls to a second MSN
number, enter code 452 instead of 451
0–9
Enter the MSN number to be excluded
Press to continue
Press and await a dial tone
Press again to store the setting
44
Withheld Number – CLIR and COLR
CLIR stands for ‘Calling Line
Identification Restriction’,
COLR for ‘Connected Line
Identification Restriction’.
If you have several handsets, you
must set up each handset to be
anonymous, even though you
already have a Withheld Number
subscription with your telephone
company.
If you do not want to reveal your telephone number during a call,
you can choose to be anonymous. CLIR gives anonymity to calls
originating from your main number, while COLR gives the same
anonymity to calls originating from any number you use for Call
Forwarding.
Activate Withheld Number in each handset…
PPress to activate the Withheld Number service
444 1
Press and await a dial tone
Press to store the setting
Deactivate Withheld Number in each handset…
Press to deactivate the Withheld Number service
444 0
Press and await a dial tone
Press to store the setting
>> If you have a BeoLine ISDN base…
Call Forwarding
This service forwards calls coming in to a specific MSN number
onward to a designated number. If you subscribe to several extra
MSN numbers and wish to use this service, you must activate Call
Forwarding on each handset that has its own MSN number.
Activate Call Forwarding…
811
Press to activate Call Forwarding. In this example,
Call Forwarding Unconditional (service code 811)
is activated
0–9
Enter the telephone number to which you want
to forward your calls
Press to continue
Press and await a dial tone
Press to store the setting
Deactivate Call Forwarding…
Press to deactivate Call Forwarding. In this
811
example, Call Forwarding Unconditional (service
code 811) is deactivated
Press and await a dial tone
Press to store the setting
The following subscription types are
available:
– ‘Call Forwarding Unconditional’
(CFU) forwards all incoming calls
to a designated number. CFU has
service code 811.
– ‘Call Forwarding Busy’ (CFB)
forwards incoming calls to a
designated number if the MSN
number is busy. CFB has service
code 812.
– ‘Call Forwarding No Reply’ (CFNR)
forwards incoming calls to a
designated number if there is no
reply on the MSN number. CFNR
has service code 813.
45
46
Make a three-party call
Refer to page 33 for further
information about how to make a
three-party call between 2 internal
handsets and 1 external call.
Both telephone lines are in use
during a three-party call and when
you set a call on hold.
A three-party call is possible between 1 internal handset and 2
external callers, or between 2 internal handsets and 1 external
caller. During an external call, you can call another party to
establish the three-party call. If one of the parties hangs up, the call
continues with you and the remaining party. If you hang up, the
three-party call ends.
Start an external three-party call…
Press during an external call to get a dial tone
R
2
0–9
R
3
Enter the telephone number
Press when the external call is answered to start
the three-party call
Press to end the three-party call
Retrieve the first external call if the new external call is not
answered…
Press to retrieve the external call on hold
R
47
Preference settings
48
Choose a base to use with a handset
Alternatively, you can choose AUTO
SELECT. The handset then searches
for another base if the signal to the
current base is lost.
‘Common’ Phonebook, Redial and
Caller ID lists are only accessible
when the handset is set for use
with base number 01.
If a handset is registered to several bases, you can choose which
base to use via the SELECT BASE menu. An available base is
identified in the display by its PARK number, which you also can
find on the bottom or back of the base. Any outgoing calls in
progress are lost when you change the setting and switch to a
different base!
Press
then MENU to access the main menu
MENU
OK
Turn the wheel to select the HANDSET/BASE
menu and press OK to access the menu
OK
Turn the wheel until SELECT BASE is shown and
press OK to select a base
Turn the wheel to view the available bases
BASE 01/01
36-000077123456
OK
Press OK to select a base
If you have more than one base in your home or office and receive an
incoming call, the base receiving the call determines which handsets will
ring. A call received by only one base is sent onward only to handsets
preset for use with that base.
49
Change the base PIN code
The PIN code is a 4-digit access code. Enter your own PIN code to
prevent others from registering their handset to the base.
Press
then MENU to access the main menu
MENU
OK
Turn the wheel to select the HANDSET/BASE
menu and press OK to access the menu
OK
Turn the wheel until PIN CODE is shown and
press OK to be able to change the code
0–9
OK
Enter the old code. The PIN code is preset to
‘0000’
Press to continue
Enter the new code…
0–9
Enter a new 4-digit code
OK
Press to store the code
If you have problems changing
the code, please contact your
Bang & Olufsen retailer.
>> Preference settings
50
Cancel registration of a handset to a base
If your handset is registered to
several bases, and you remove
BASE 01, the handset becomes
‘personal’ instead of ‘common’.
The Phonebook is then only present
in the handset itself.
It is possible to remove one or more handsets from a specific base.
If the base is out of reach, you can remove the base from the
handset instead.
Remove a handset from a base…
Press then MENU to access the main menu
MENU
Turn the wheel to select the HANDSET/BASE
menu and press OK to access the menu
OK
OK
1: WORKSHOP
Turn the wheel until REMOVE HANDSET is shown
and press OK to access the menu. The first
available handset is shown in the display
Turn the wheel to select a handset and press OK
to remove the handset
OK
Remove a base from a handset…
Press then MENU to access the main menu
MENU
Turn the wheel to select the HANDSET/BASE
menu and press OK to access the menu
OK
OK
BASE
02/03
36-000077123456
Turn the wheel until REMOVE BASE is shown and
press OK to access the menu. The display shows
how many bases are available, as well as the
PARK number of the selected base
OK
Turn the wheel to select a base to remove and
press OK to remove the base
OK
Press again to confirm
51
Register a handset to a base manually
If you already have a BeoCom 6000 phone system and wish to
register one or more of these handsets with a new base, follow the
procedure described below.
Open the new base for registration as described
on pages 6–7.
Press
then MENU to access the main menu
MENU
OK
Turn the wheel to select the HANDSET/BASE
menu and press OK to access the menu
OK
Turn the wheel until REGISTER BASE is shown
and press OK to search for a base
When the handset has located the base…
BASE 01/01
The display informs you that the base has been
36-000077123456
located
Turn the wheel to view the available bases.
Compare the PARK number in the display with
the number on the base
OK
When the numbers match, press OK.
Registration begins automatically
If ENTER PIN is displayed…
0–9
Enter the PIN code and press OK
OK
REGISTER BASE
COMPLETED
To be able to register handsets
automatically to the new base, you
must first cancel the registration to
the current base, as described on
page 48. Refer to pages 6–8 for
information about automatic
registration of a handset to a base.
52
>> Preference settings
The Ringer, Handset/Base, and Setup menus
These menus contain several options which allow you to connect,
disconnect or adjust BeoCom 6000 functions. The options and the
functions they affect are described below.
Choose settings in the menus…
Press then MENU to access the main menu
MENU
SETUP MENU
OK
Turn the wheel to display SETUP MENU, RINGER
MENU, or HANDSET/BASE
Press to access the menu
Turn the wheel until the desired option is
displayed, such as CLOCK
CLOCK
OK
Press to access the menu
Turn the wheel to select a menu option
OK
Press to store the setting
The Ringer menu options
RINGER ON/OFF… Options are ON, OFF, and TEMPORARY OFF. If you set
the ringing signal to TEMPORARY OFF, it is switched off until you
press or switch on the handset. If you set the ringing signal to OFF or
TEMPORARY OFF, a call from one handset to another still goes through.
RINGER LEVEL… Options for ringer volume level are INCREASING,
EXTRA LOW, LOW, MEDIUM and LOUD.
RINGER MELODY… 4 different ringing signal melodies are available.
They can each play at low or high speeds.
53
The Handset/Base menu options
HANDSET NAME… Name a handset. Refer to page 9.
SELECT BASE… Choose a base for the handset. Refer to page 48.
REGISTER BASE… Register a base to a handset. Refer to page 51.
REMOVE BASE… Remove a base from a handset. Refer to page 50.
REMOVE HANDSET… Remove a handset from the base. Refer to page 50.
COMMON… Set up the handset with a common Phonebook and
common lists. Refer to page 34.
PERSONAL… Set up the handset with a personal Phonebook and personal
lists. Refer to page 34.
AUTO REGISTER… Disconnect or connect automatic registration of the
first handset. Refer to pages 6–8.
PIN CODE… Enter a PIN code when registering a handset with a base.
Refer to page 49.
The Setup menu options
CLOCK… Set the clock, the date and the year.
QUIET PERIOD… Set a period of time in which the battery alarm is
deactivated.
ALERT SIGNAL… Set the flashing of the handset’s indicator light.
Options are YES and NO.
KEYPAD LOCK… Set the keypad lock. Options are ON (keypad locked),
OFF (keypad unlocked) and AUTO ON (keypad locks automatically after
a call).
AUTO OFF HOOK… Set the handset to answer an incoming call
automatically when the handset is lifted off the charger. Options are
YES and NO.
SWITCHBOARD… Set BeoCom 6000 for use with a switchboard. Options
are YES and NO. If you choose YES, use the number keys to enter a
prefix code and turn the wheel to select a pause length. You can select
a pause length between 0 and 12 seconds, or select ‘Wait’.
Display messages
54
Display
PHONEBOOK
**** EMPTY *****
PHONEBOOK
***** FULL *****
PHONEBOOK
*** UPDATING ***
PHONEBOOK
** NOT BASE 1 **
PHONEBOOK
*** NO SIGNAL ***
CALLER ID
**** EMPTY *****
Cause
You have not stored any numbers in the
Phonebook.
Action
Store entries in the Phonebook. Refer to
page 25.
New entries cannot be stored. The
Phonebook is full.
Delete entries in the Phonebook. Refer to
page 27.
The Phonebook is updating entries and is
temporarily inaccessible.
Wait. Updating the Phonebook can take
up to 5 minutes.
The Phonebook is stored in base 1, but
base 1 is inaccessible.
Move within range of base 1 or select
base 1. Refer to page 48.
The handset is not receiving a signal from
base number 1.
The CALLER ID list is empty. Either you do
not subscribe to Caller ID, or you have
not received calls.
**** EMPTY *****
The Redial list is empty. You have not
made calls that can be redialled.
INTERNAL NO
There is only one handset.
REDIAL
** NO INTERNAL **
3:
NOT FOUND
You have called handset 3, which is not
registered to the base.
55
Display
***** FULL *****
Cause
6 handsets are already registered to this
base.
Action
Remove a handset from a base (page 50)
or register the handset to another base
(page 51).
NOT REGISTERED
The handset is not registered to any base.
Register the handset. Refer to page 51.
The radio signal between base and
handset is lost.
Move within signal range.
**** ERROR ****
Handset registration has been interrupted
prior to completion.
Register the handset again. Refer to
page 51.
LOCKED-1:
The keypad on handset 1 is locked.
Unlock the keypad. Refer to page 19.
The clock is not transferred to the base
because the handset is out of range.
Set the clock when the base is within
range. Refer to page 10.
REGISTER BASE
12:47
07.JUN
NO SIGNAL
12:47
07.JUN
REGISTERING
12:47
07.JUN
CLOCK STORED
* ONLY HANDSET *
Troubleshooting
56
Problem
The handset is not working.
Cause
The handset batteries are flat.
Action
Charge the battery (page 10) or
check that the battery is inserted
correctly (page 17).
The phone does not ring.
– The ringing signal is switched off;
– The Multiple Subscriber
Numbering (MSN) system has
been set up incorrectly (Applies
only to BeoLine ISDN).
– Activate the ringing signal. Refer
to pages 52–53.
– Set up the MSN system correctly.
Refer to pages 38–39.
Redial is not working.
– Pause between the first part of a
number and the second part of a
number has not been entered;
– The Redial number has not been
registered correctly;
– You are using a common handset
on a base other than base
number 1. The Redial list is only
registered in base number 1.
– Telephone numbers with fewer
than three digits are not stored in
the Redial list.
Check that numbers are entered
correctly.
The indicator light on the BeoCom
6000 base does not shine green.
The charging contacts on the
handset and/or charger are dirty
Clean the charging contacts with a
cotton bud and spirit.
Registration is not working.
The handset is already registered to
another base, or the base is already
registered to another handset.
Register the handset. Refer to
page 51.
The connection between the
handset and the base is often lost.
The base placement might not be
optimal.
Place the base high and freestanding for a reliable connection.
The display indicates that the
Phonebook is full, even though
there are fewer than 200 entries.
The numbers entered exceed 12
characters in length and thus
occupy more than one space in the
Phonebook.
57
Problem
The Phonebook, Redial and Caller
ID lists are not updated.
Cause
You are using a common handset
not registered to base number 1,
where the Phonebook and the
other lists are contained.
Action
Set the handset as personal (page
34) or register the handset to base
number 1 (page 51).
The display shows that the
batteries are flat, even after the
batteries have been charged or
replaced.
Place the handset in the charger.
The battery life indicator is then
updated.
Disarray in a system with several
handsets and bases – incorrect
messages are displayed during
registration of handsets.
Remove the handsets from the
base (page 50) and register them
again one by one (page 51).
The clock shows the wrong time.
The handset or the handset
indicator light does not react as
expected.
The base and all the handsets have
been switched off at the same
time.
Set the clock. Refer to page 10.
Switch the handset off and on
again (page 12). The handset
updates your settings automatically.
58
Technical data
Number of handsets per base
Talk time per charging
Standby time per charging
Charging time
Range
System
Power supply, Base
Power supply, Charger
Power supply, Handset
Power output
Temperature and humidity
Display
Indicator lights:
BeoCom 6000 Base
BeoLine ISDN Base
Handset
6
8 hours
80 hours
4 hours
The phone has a range indoors of
up to 50 metres, and outdoors of
up to 300 metres. However, both
figures are dependent on
conditions
DECT/GAP
230V AC / 7,5V DC mains
adaptor
230V AC / 7,5V DC mains
adaptor
NiMH batteries, 655 mAh
(EIRP) 250 mW/10 mW
The phone should be placed in
surroundings with an ambient
temperature of 0 – 45° C and a
relative humidity of 15 – 95%
Alpha numeric display with 2
lines of 16 characters each. The
light in the display is activated by
action and incoming calls – and is
switched off after 20 seconds
Red/Green
Red
Red
Important information about BeoCom 6000
BeoCom 6000 is intended for use on public analogue or ISDN networks.
The phone supports Caller ID, as long as this automated service is offered
by your telephone company. BeoCom 6000 supports a large number of
ISDN services, some of which require you to take out special subscriptions
with the telephone company. Not all supplementary services offered by
the different service providers are available in all countries.
The phone can only be expected to function in the country for which it
was manufactured, as transmission systems, legal requirements and
automated services may vary from country to country. The packaging will
state for which country your BeoCom 6000 is manufactured. The national
identity letters can be found above the lowest bar code on the label.
If you are in any doubt about the use of your BeoCom 6000, please
contact your retailer for further information.
Bang & Olufsen hereby declare that BeoCom 6000 is in accordance with
the fundamental requirements and other relevant regulations in Directive
1999/5/EC.
Further information is available on the Internet at:
www.telecom.bang-olufsen.com
Contact Bang & Olufsen Telecom:
e-mail:
[email protected]
Visit our website on the Internet:
www.bang-olufsen.com
59
60
Conditions of the guarantee
Each Bang & Olufsen product purchased from an authorised Bang &
Olufsen retailer carries a guarantee against defects in workmanship and
materials. The guarantor is the authorised Bang & Olufsen retailer or
subsequently the national Bang & Olufsen representative. The guarantee
period is 24 months.
The guarantee covers the repair costs (i.e. spare parts and labour costs)
for the product. The guarantee also covers accessories.
As Bang & Olufsen phone products only function in the country for which
they were produced, the guarantee only applies in that country. This is
due to the variations in transmission systems and legal requirements from
country to country.
The guarantee does not cover damage due to accidents, including
damage by lightning, fire, water and transport damage, misuse or
negligence. Bang & Olufsen is not responsible for any indirect loss,
including any consequential loss.
The guarantee does not cover transport costs or the replacement of
batteries.
The guarantee is annulled if the product is repaired or modified other
than by a person authorised by Bang & Olufsen or if the serial number has
been removed from the product.
For the guarantee to be valid, a document is required stating the
following:
– Product name and type number
– Serial number
– Date of purchase/delivery
– Guarantee period
– Stamp and signature of an authorised Bang & Olufsen retailer
Index
61
Accessories
Calls
Accessories, 16
Attaching the clip, 16
Call another handset, 33
Call and store extension numbers in the
Phonebook, 30
Call from the Caller ID list, 23
Call from the Redial list, 22
Change a number before dialling, 18
Forward external calls, 35
Make and answer calls, 18
Three-party call, 36
Three-party call (ISDN Service), 46
Search the Phonebook and make a call, 21
Store a number after a call, 20
Base
Automatic registration of a handset, 6–8
Cancel registration of a handset, 50
Change the base PIN code, 49
Choose a base, 48
First-time registration of the handset to a base,
6–8
Handset/Base menu options, 53
Manual registration of a handset, 51
Open a base for registration, 6–8
PARK numbers, 6–8
Call Waiting
Call Waiting (ISDN Service), 40
Call Waiting – Switch between two calls, 24
Battery
Battery status, 17
Charging the handset battery, 10
Replacing the battery, 17
Charging
Battery status, 17
Charging the handset battery, 10
BeoLine
CLIR and COLR
ISDN base…, 8
PSTN base…, 7
What are ISDN and PSTN?, 3
Withheld Number, 44
Conference calls
BeoLink
Adjust volume level on audio/video products, 29
Three-party call, 36
Three-party call (ISDN Service), 46
Caller ID
Contact
Store Redial and Caller ID numbers, 28
Use Caller ID, 23
Contact Bang & Olufsen Telecom, 59
>> Index
62
Delete
Handset
Caller ID call, 23
Redial number, 22
Name or number in the Phonebook, 27
Call another handset, 33
‘Common’ handset, 34
Handset/Base menu options, 53
Handset keys, 14
Indicator light, 11
Lock the keypad, 19
Mute the ringing signal, 18
Name the handset, 9
‘Personal’ handset, 34
Switch on or off, 12
Volume and the microphone, 19
Displays and menus
Display overview, 12
Display messages – Troubleshooting, 54
Main menu options, 13
Navigate in the menu system, 13
Ringer, Handset/Base, and Setup menus, 52–54
Indicator lights
Edit
Phone feedback – indicator lights, 11
Edit the Phonebook, 26
ISDN
Extension numbers
What are ISDN and PSTN?, 3
Call and store extension numbers in the
Phonebook, 30
ISDN Services
Forward calls
Forward external calls, 35
A telephone number for each handset – MSN, 38
Avoid interruptions – exclude a handset, 43
Call Forwarding, 45
Make a three-party call, 46
Suspend an active call – Terminal Portability, 42
Two calls at the same time – Call Waiting, 40
Withheld Number – CLIR and COLR, 44
Keypad
Handset keys, 14
Lock the handset keypad, 19
63
Maintenance
Redial
Cleaning, 16
Replacing the battery, 17
Technical data, 58
Store Redial and Caller ID numbers, 28
Use Redial, 22
Registration
Microphone
MSN
Automatic registration of a handset, 6–8
Cancel registration of a handset, 50
First-time registration of the handset, 6–8
Manual registration, 51
PARK numbers, 6–8
A telephone number for each handset, 38
Avoid interruptions – exclude a handset, 43
Ringing signal
Phonebook
Mute the ringing signal, 18
Ringer menu options, 52
Switch the microphone on or off, 19
Call and store extension numbers, 30
Delete a name or number, 27
Edit a name or number, 26
Enter a new name and number, 25
Search the Phonebook and make a call, 21
Store a number after a call, 20
Store Redial and Caller ID numbers, 28
Services
Caller ID, 23
Two calls at the same time – Call Waiting, 24
Settings
PIN code
Change the base PIN code, 49
Placement
Placement and surroundings, 16
PSTN
What are ISDN and PSTN?, 3
Adjust volume on audio/video products, 29
Cancel registration of a handset, 50
Change the base PIN code, 49
Choose a base, 48
Name the handset, 9
Ringer, Handset/Base, and Setup menus, 52
Time and date, 10
Volume and the microphone, 19
>> Index
64
Switchboard
Call and store extension numbers in the
Phonebook, 30
Technical data
BeoCom 6000 specifications, 56
Terminal Portability
Suspend an active call, 40
Troubleshooting
Display messages, 52
Troubleshooting, 54
Volume
Volume and the microphone, 19
Adjust volume level on audio/video products, 29
3507261
0204
Printed in Denmark by Bogtrykkergården a-s, Struer